Zotac Zone review: want a faster Steam Deck OLED? It’ll cost ya
The priciest Deck rival yet, albeit one with loads of hardware tricks
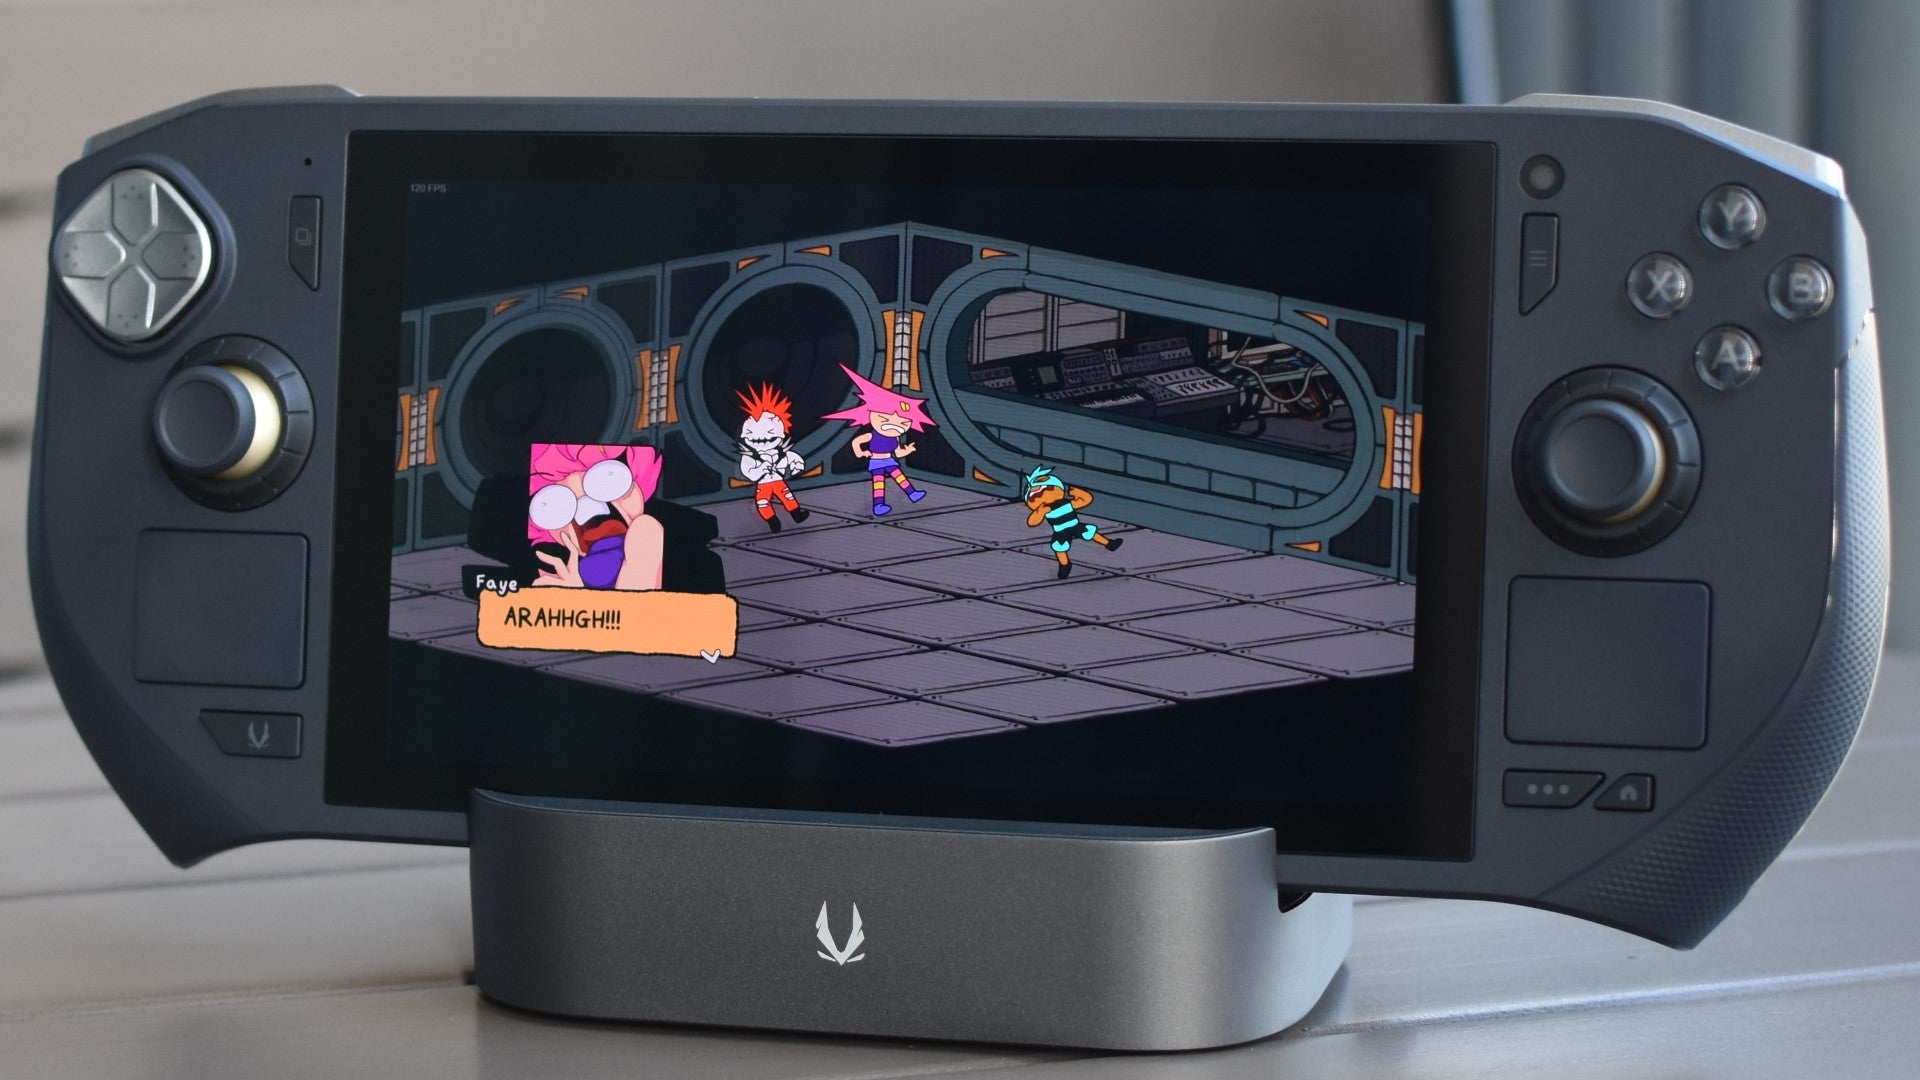
Image credit:Rock Paper Shotgun

Zotac are one of the better graphics card makers of the post-EVGA era, so even as the early pangs of handheld gaming PC fatigue start to creep in, I’ve been keeping a hopeful eye on the Zotac Zone . This is their take on a Steam Deck rival, or more specifically, the Steam Deck OLED , as this is the first real competitor to go for a similarly star-bright, colour-erupting AMOLED display. Cor, phwoar, and indeed, wowzers.
Much like a Zotac GPU, the Zone is chunkier than you might like but ultimately well-crafted. It successfully combines that rich screen with oodles of input features and Deck-thrashing performance, though between its high price and a downright vampiric thirst for battery juice, it’s definitely more of a specialist tool than a crowd-pleasing portable.
Zotac Zone specs: CPU/GPU: AMD Ryzen 7 8840U/AMD Radeon 780M RAM: 16GB LPDDR5X Storage: 512B NVMe SSD Display: 7in, 1920x1080, 120Hz AMOLED Ports: 2x USB-C, 1x 3.5mm, 1x microSD Dimensions: 285x115x35mm Weight: 714g Price: £850 / $TBA
This is, at least, by design. Take the controls: the pleasantly concave, Hall effect thumbsticks, mechanically clicky D-pad, and adjustable triggers could all have been lifted from a fancy top-end ‘pro’ gamepad like the Xbox Elite Wireless Controller or Razer Wolverine V3 Pro . These alone give the Zone a calibre of input quality and flexibility that’s currently unique among handheld PCs, and then it goes even further by adding dual trackpads. Indeed, just like on the Steam Deck, except these have real right/left-click mechanisms, instead of faking them with haptics as Valve do. More importantly, rubbing them in tandem makes it far easier to navigate Windows 11 on the Zone than on the thumbstick-only Asus ROG Ally and ROG Ally X , or even the single-padded Lenovo Legion Go .
Another clever little detail is the radial dials around each stick, which can be set to quickly adjust screen brightness, speaker volume, or the brightness of the RGB strip on the rear. All of these can be adjusted by other means, including with the actual volume buttons on the top, though being able to make these changes without moving either hand from their normal gripping positions is genuinely quite handy. My only complaint it that I wish these dials could control more, like thumbstick and trackpad sensitivity.

Image credit:Rock Paper Shotgun
Granted, not all of the Zone’s features are as reliably useful. I’m not sure why there’s a webcam here, nestled up by the face buttons, unless you fancied running some kind of low-quality livestream with an unflatteringly angled facecam. And the hidden cost of stuffing in all these extra bells, whistles, and full-on tubas is that the Zone is noticeably heavier than the 640g Steam Deck OLED – my scales put it at a dense 714g, even more than the 692g figure given in the official specs. It’s thicker than the Deck as well, though not quite as wide.
Still, this substantial feel extends to the build quality, and I suppose some extra millimetres to the depth will allow the main chip – a laptop-style AMD Ryzen 7 8840U – more room to breathe. While not as whispery as the Deck OLED, the Zone’s mid-game fan noise is easily drowned out by the speakers, and the hand grips never become particularly warm to the touch.
Building a handheld around a laptop processor like this, as opposed to a purpose-built mobile APU, can be a tricky business. MSI tried it with the Claw , and despite an excellent product name ( the Clawwwww), its Intel CPU proved so mismatched for the task that they stopped sending around review kits and quickly announced a reworked successor . Where games performance is concerned, however, the Zone appears to have got it right, its integrated Radeon 780M graphics pulling the best benchmark results in its class.

Image credit:Rock Paper Shotgun
Even comparing the Zone’s 1080p results to those of the 800p Steam Deck, it either outpaces or practically matches the latter, and at a lowered 720p, Zotac simply has the fastest handheld of the whole bunch. Even the ROG Ally X, with its jacked-up 24GB memory supply, can’t keep up.
This extra power also enables games that can only just keep above 30fps on the Steam Deck to either run smoother on the Zone, or to remain playable with higher quality settings. Metaphor: ReFantazio , to name one, needs almost every setting on its lowest for the Deck to handle 30fps at 800fps; on the Zone, it typically stays above 35fps on Intermediate quality, despite the added strain of 1080p. This resolution is a bit too much for the demands of Horizon Forbidden West , but at 720p, it can still keep above 30fps with a mix of Low quality and FSR 3.1 on Performance mode – or 45-60fps with frame generation enabled on top. The Steam Deck OLED needs FSR on its considerably uglier Ultra Performance setting to even have a hope of 30fps.
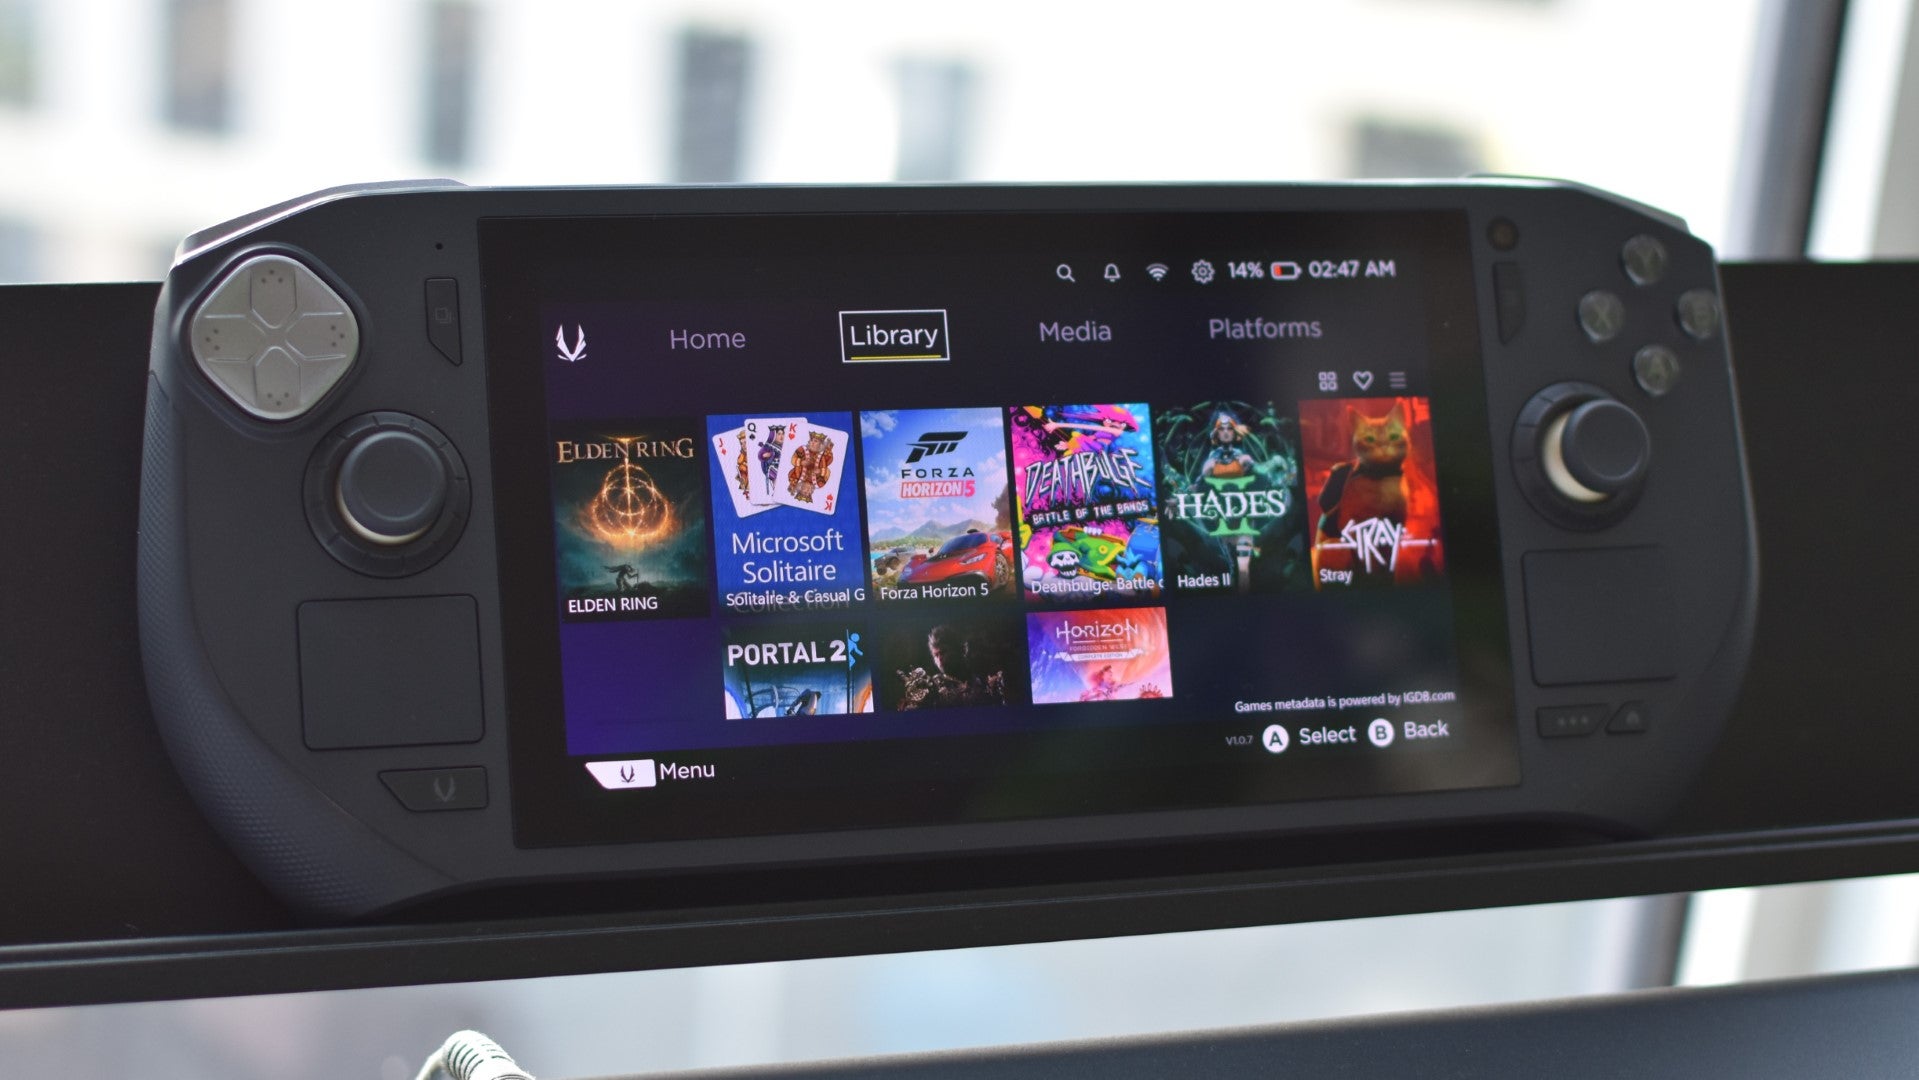
Image credit:Rock Paper Shotgun
Sadly, the Zone isn’t so much of a performance upgrade that it will run absolutely anything. PC-brutalisers like Warhammer 40,000: Space Marine 2 and the Silent Hill 2 remake won’t reliably meet the 30fps minimum at 720p, regardless of how much fuzzy upscaling you throw at them. Perhaps games like these are the next frontier for handhelds; the mountains that Valve are waiting for a “generational leap” to clear. In the meantime, though, there is value in simply being able to run light and middleweight games are tangibly quicker speeds, especially when the Zone’s 120Hz refresh rates makes it easier to appreciate the enhanced slickness.
Speaking of screens, the Zone’s display isn’t just sharper and faster than the Deck OLED’s, but bolder too. If only marginally: I recorded it covering 100% of the sRGB gamut, basically meaning it can show more colours than with the 93.8% coverage of Valve’s handheld. Balancing this out is the Deck OLED’s slightly higher peak brightness, of 984cd/m2 to the Zone’s 916cd/m2, while both get the Infinity:1 contrast ratio inherent to OLED displays.
The Zone still claims an overall specs win, by virtue of its higher resolution and refresh rate, but it’s a close-run contest on general usability. Firstly, the Steam Deck OLED’s screen has a much more effective anti-glare coating, making it more comfortable to peer at in direct light. Second, the Deck handles HDR an awful lot better, auto-enabling it when launching a compatible game but leaving it off otherwise. Since the Zone is a Windows machine, playing HDR games first requires that you manually dig into the display settings to switch on Windows HD Colour. Which – because Microsoft have never figured out otherwise – butchers the appearance of all non-HDR content until you disable it again. Even sillier than that, though, is how the Zone only allows for HDR in the first instance when it’s plugged in and charging – so this feature is off the table entirely on battery power. Which, for an expressly portable device, is kind of defeating the point.
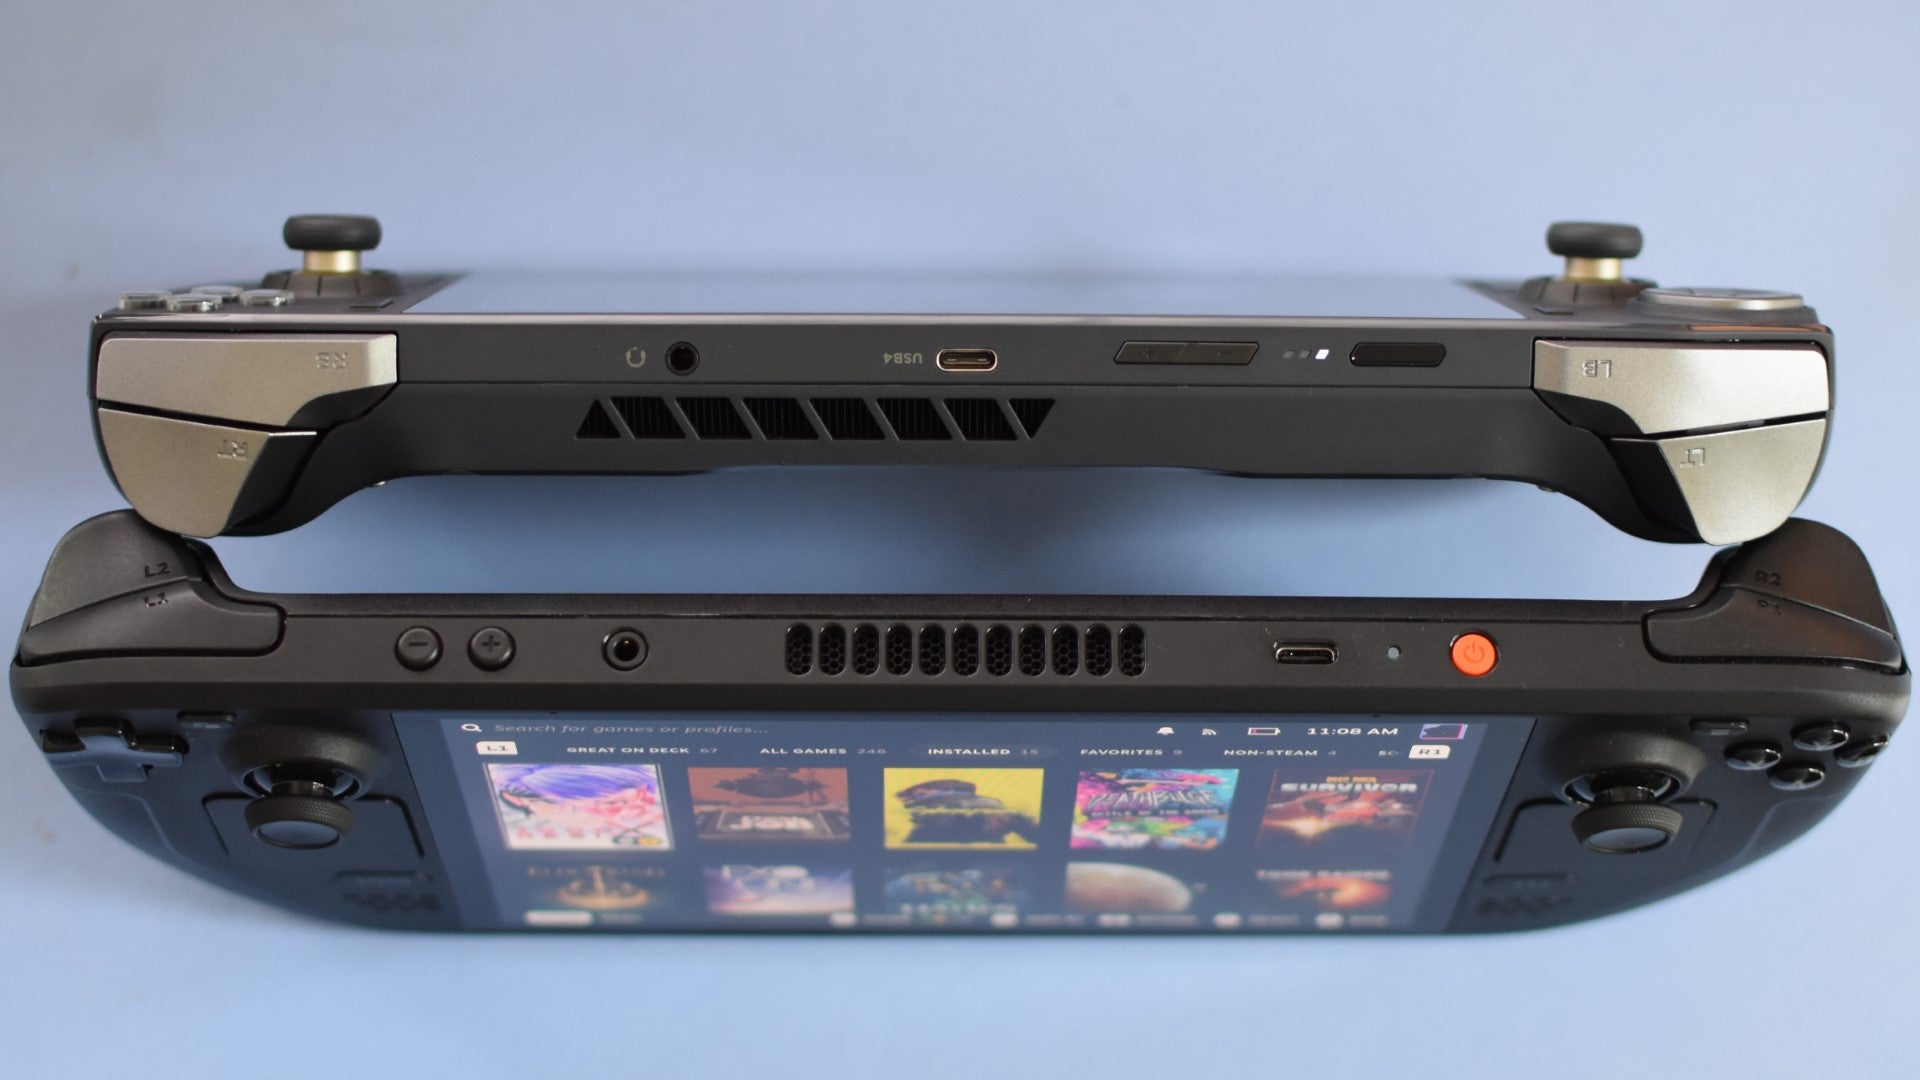
Image credit:Rock Paper Shotgun
The Deck OLED does software better in general, really. That’s not to discount how Windows will natively work with all game launchers and anti-cheat systems, a minority of which the Deck family still has trouble with, but the overall SteamOS experience remains more pleasant and painless than using Windows on a handheld. Yes, even with the extra trackpads. Those do help with clicking and scrolling, but you’re still ultimately trying to wrestle an OS built for desktop monitors into a dinky 7in device, and that’s never going to be feel as intuitive or even responsive as the totally bespoke, gamepad-tuned SteamOS.
The Zone gets a little help from Zotac’s ONE utility, which – similarly to Armory Crate on the ROG Ally – pulls in both a combined launcher for games and game platforms, and a Zone-specific set of tools, settings, and overlays. Some of it is useful, such as the easy-to-use input rebind menu, but it also offers nothing that SteamOS (or indeed, Armory Crate) does. Quite a bit less, in fact. Hit the overlay button while playing a game, and the sparseness of switches and toggles will make the SteamOS equivalent look like the Large Hadron Collider’s control room.
What’s worse are the bugs. The Zone isn’t as much of a misbehaving software safari as the ROG Ally X was at launch, but I did suffer a recurring problem where the display would simply neglect to.. display certain games. This started from launch with Horizon Zero Dawn , and in Silent Hill 2, everything worked fine until I tried swapping the resolution to 720p – for which I was punished with an unbudging black screen and some mocking menu music that confirmed the game was otherwise still running. Hopefully this can be fixed on Zotac’s end, as restarting and reinstalling graphics drivers didn’t help a jot.
Image credit:Rock Paper Shotgun
This has become a common theme with Steam Deck alternatives: they’re usually faster, and come packing a wider range of hardware features, and yet they rarely end up feeling as practical to use. That goes for battery life too, unfortunately. Unlike both the original and OLED Steam Decks, the Zone evidently doesn’t know to stretch its lifespan when running less demanding games: with the speakers and screen brightness both on 50%, I got 1h 44m out of Forza Horizon 5 , 1h 49m out of Elden Ring , and 1h 47m out of Portal 2. Points for consistency, but I’d much rather take a Steam Deck OLED on a long flight, as that managed 5h 48m in Portal 2 , as well as 2h 14m in the hungrier Elden Ring. The ROG Ally X can handily outlast the Zone too, scoring 2h 55m in Forza.
I don’t wish to sound like I’m boiling a handheld’s entire appeal down to solely its battery life, but these are meant to be portable machines, so we can’t really understate the importance of endurance either. And the Zone isn’t even especially good for wired use, as the bundled USB-C charging cable is so short that the only way you could play it while topping up is if your chair is right next to a power outlet. Which makes HDR an even less likely proposition, too.
You also don’t get a case , which for a package costing £850 a pop – £50 more than the ROG Ally X, and nearly £400 more than a base Steam Deck OLED – is just mean. The Zone’s chart-topping game performance and premium inputs do mean it will beat any allegations of daylight robbery, but also, uh, oof? £850 is crème de la crème money, and on software and battery life, the Zone is more like a semi-skimmed Cravendale.
Its performance and controls, on the other hand, really are top-notch, and despite some HDR woes the AMOLED panel still makes a superb screen for general purpose play. So what to make of it?
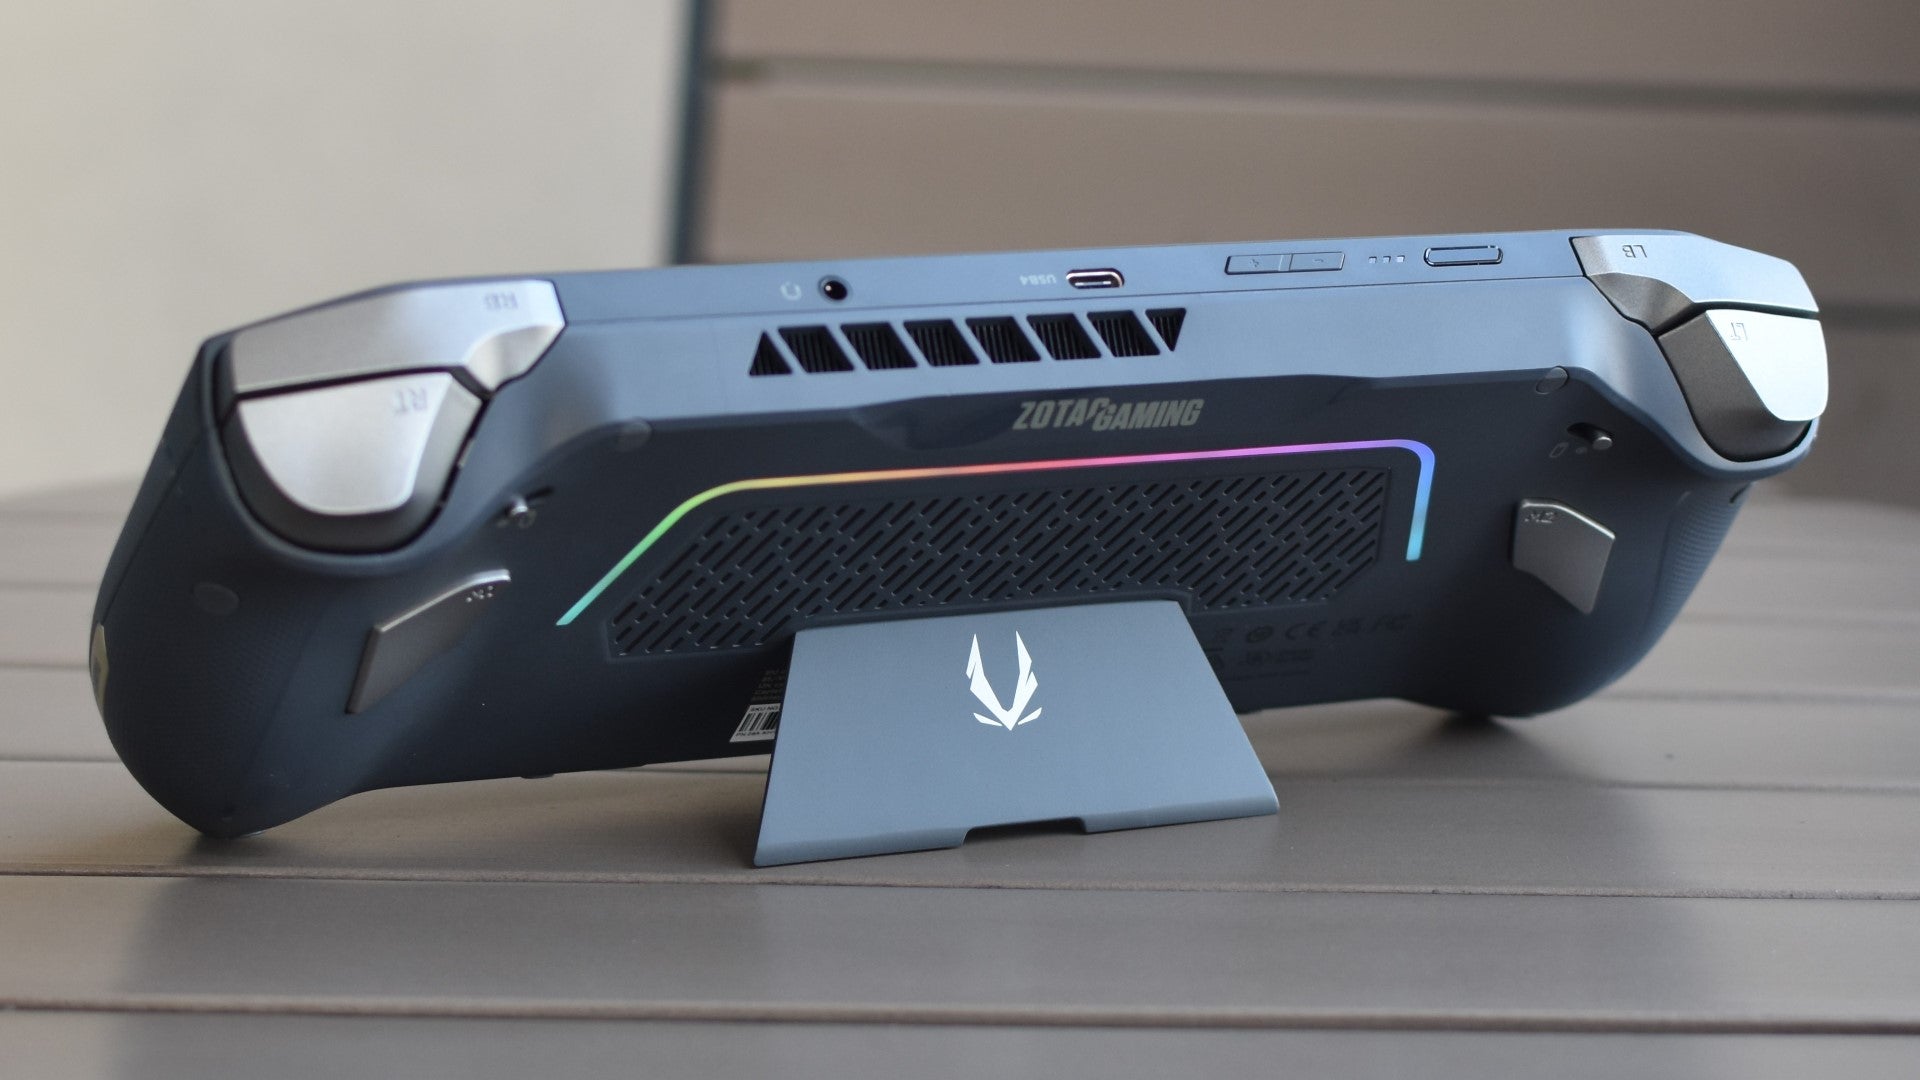
Image credit:Rock Paper Shotgun
Ultimately, that comes down to how you weigh each side of the framesrate-versus-practicality tradeoff. There are, I’m sure, people out there who’ve been left cold by the brawniness of portable PCs thus far – so the Zone, being as capable of outmuscling the Steam Deck and ROG Ally X as it is, could be the one they’ve been waiting for. Even if the handheld that burns twice as bright burns half as long.
The Steam Deck OLED, meanwhile, is the more balanced option. It’s not that fast, no, but it is close to half the price of the Zone while being easier to use, and for far longer periods. And while that’s probably the most tepid conclusion I’ve ever written for anything, this is like the fourth “pricier than a Steam Deck but faster and fancier” handheld PC review I’ve done, and there are only so many different ways of saying that. Maybe that’s where the fatigue comes from?
Find out how we conduct our reviews by reading our review policy .
Rock Paper Shotgun is better when you sign in
Sign in and join us on our journey to discover strange and compelling PC games.

All 75 Arc Raiders Blueprints and where to get them
These areas have the highest chance of giving you Blueprints

Image credit:Rock Paper Shotgun/Embark Studios

Looking for more Arc Raiders Blueprints? It’s a special day when you find a Blueprint, as they’re among the most valuable items in Arc Raiders. If you find a Blueprint that you haven’t already found, then you must make sure you hold onto it at all costs, because Blueprints are the key to one of the most important and powerful systems of meta-progression in the game.
This guide aims to be the very best guide on Blueprints you can find, starting with a primer on what exactly they are and how they work in Arc Raiders, before delving into exactly where to get Blueprints and the very best farming spots for you to take in your search.
We’ll also go over how to get Blueprints from other unlikely activities, such as destroying Surveyors and completing specific quests. And you’ll also find the full list of all 75 Blueprints in Arc Raiders on this page (including the newest Blueprints added with the Cold Snap update , such as the Deadline Blueprint and Firework Box Blueprint), giving you all the information you need to expand your own crafting repertoire.
In this guide:
- What are Blueprints in Arc Raiders?
- Full Blueprint list: All crafting recipes
- Where to find Blueprints in Arc Raiders Blueprints obtained from quests Blueprints obtained from Trials Best Blueprint farming locations

What are Blueprints in Arc Raiders?
Blueprints in Arc Raiders are special items which, if you manage to extract with them, you can expend to permanently unlock a new crafting recipe in your Workshop. If you manage to extract from a raid with an Anvil Blueprint, for example, you can unlock the ability to craft your very own Anvil Pistol, as many times as you like (as long as you have the crafting materials).
To use a Blueprint, simply open your Inventory while in the lobby, then right-click on the Blueprint and click “Learn And Consume” . This will permanently unlock the recipe for that item in your Workshop. As of the Stella Montis update, there are allegedly 75 different Blueprints to unlock - although only 68 are confirmed to be in the game so far. You can see all the Blueprints you’ve found and unlocked by going to the Workshop menu, and hitting “R” to bring up the Blueprint screen.
It’s possible to find duplicates of past Blueprints you’ve already unlocked. If you find these, then you can either sell them, or - if you like to play with friends - you can take it into a match and gift it to your friend so they can unlock that recipe for themselves. Another option is to keep hold of them until the time comes to donate them to the Expedition.
Full Blueprint list: All crafting recipes
Below is the full list of all the Blueprints that are currently available to find in Arc Raiders, and the crafting recipe required for each item:
| Blueprint | Type | Recipe | Crafted At |
|---|---|---|---|
| Bettina | Weapon | 3x Advanced Mechanical Components 3x Heavy Gun Parts 3x Canister | Gunsmith 3 |
| Blue Light Stick | Quick Use | 3x Chemicals | Utility Station 1 |
| Aphelion | Weapon | 3x Magnetic Accelerator 3x Complex Gun Parts 1x Matriarch Reactor | Gunsmith 3 |
| Combat Mk. 3 (Flanking) | Augment | 2x Advanced Electrical Components 3x Processor | Gear Bench 3 |
| Combat Mk. 3 (Aggressive) | Augment | 2x Advanced Electrical Components 3x Processor | Gear Bench 3 |
| Complex Gun Parts | Material | 2x Light Gun Parts 2x Medium Gun Parts 2x Heavy Gun Parts | Refiner 3 |
| Fireworks Box | Quick Use | 1x Explosive Compound 3x Pop Trigger | Explosives Station 2 |
| Gas Mine | Mine | 4x Chemicals 2x Rubber Parts | Explosives Station 1 |
| Green Light Stick | Quick Use | 3x Chemicals | Utility Station 1 |
| Pulse Mine | Mine | 1x Crude Explosives 1x Wires | Explosives Station 1 |
| Seeker Grenade | Grenade | 1x Crude Explosives 2x ARC Alloy | Explosives Station 1 |
| Looting Mk. 3 (Survivor) | Augment | 2x Advanced Electrical Components 3x Processor | Gear Bench 3 |
| Angled Grip II | Mod | 2x Mechanical Components 3x Duct Tape | Gunsmith 2 |
| Angled Grip III | Mod | 2x Mod Components 5x Duct Tape | Gunsmith 3 |
| Hullcracker | Weapon | 1x Magnetic Accelerator 3x Heavy Gun Parts 1x Exodus Modules | Gunsmith 3 |
| Launcher Ammo | Ammo | 5x Metal Parts 1x Crude Explosives | Workbench 1 |
| Anvil | Weapon | 5x Mechanical Components 5x Simple Gun Parts | Gunsmith 2 |
| Anvil Splitter | Mod | 2x Mod Components 3x Processor | Gunsmith 3 |
| ??? | ??? | ??? | ??? |
| Barricade Kit | Quick Use | 1x Mechanical Components | Utility Station 2 |
| Blaze Grenade | Grenade | 1x Explosive Compound 2x Oil | Explosives Station 3 |
| Bobcat | Weapon | 3x Advanced Mechanical Components 3x Light Gun Parts | Gunsmith 3 |
| Osprey | Weapon | 2x Advanced Mechanical Components 3x Medium Gun Parts 7x Wires | Gunsmith 3 |
| Burletta | Weapon | 3x Mechanical Components 3x Simple Gun Parts | Gunsmith 1 |
| Compensator II | Mod | 2x Mechanical Components 4x Wires | Gunsmith 2 |
| Compensator III | Mod | 2x Mod Components 8x Wires | Gunsmith 3 |
| Defibrillator | Quick Use | 9x Plastic Parts 1x Moss | Medical Lab 2 |
| ??? | ??? | ??? | ??? |
| Equalizer | Weapon | 3x Magnetic Accelerator 3x Complex Gun Parts 1x Queen Reactor | Gunsmith 3 |
| Extended Barrel | Mod | 2x Mod Components 8x Wires | Gunsmith 3 |
| Extended Light Mag II | Mod | 2x Mechanical Components 3x Steel Spring | Gunsmith 2 |
| Extended Light Mag III | Mod | 2x Mod Components 5x Steel Spring | Gunsmith 3 |
| Extended Medium Mag II | Mod | 2x Mechanical Components 3x Steel Spring | Gunsmith 2 |
| Extended Medium Mag III | Mod | 2x Mod Components 5x Steel Spring | Gunsmith 3 |
| Extended Shotgun Mag II | Mod | 2x Mechanical Components 3x Steel Spring | Gunsmith 2 |
| Extended Shotgun Mag III | Mod | 2x Mod Components 5x Steel Spring | Gunsmith 3 |
| Remote Raider Flare | Quick Use | 2x Chemicals 4x Rubber Parts | Utility Station 1 |
| Heavy Gun Parts | Material | 4x Simple Gun Parts | Refiner 2 |
| Venator | Weapon | 2x Advanced Mechanical Components 3x Medium Gun Parts 5x Magnet | Gunsmith 3 |
| Il Toro | Weapon | 5x Mechanical Components 6x Simple Gun Parts | Gunsmith 1 |
| Jolt Mine | Mine | 1x Electrical Components 1x Battery | Explosives Station 2 |
| Explosive Mine | Mine | 1x Explosive Compound 1x Sensors | Explosives Station 3 |
| Jupiter | Weapon | 3x Magnetic Accelerator 3x Complex Gun Parts 1x Queen Reactor | Gunsmith 3 |
| Light Gun Parts | Material | 4x Simple Gun Parts | Refiner 2 |
| Lightweight Stock | Mod | 2x Mod Components 5x Duct Tape | Gunsmith 3 |
| Lure Grenade | Grenade | 1x Speaker Component 1x Electrical Components | Utility Station 2 |
| Medium Gun Parts | Material | 4x Simple Gun Parts | Refiner 2 |
| Torrente | Weapon | 2x Advanced Mechanical Components 3x Medium Gun Parts 6x Steel Spring | Gunsmith 3 |
| Muzzle Brake II | Mod | 2x Mechanical Components 4x Wires | Gunsmith 2 |
| Muzzle Brake III | Mod | 2x Mod Components 8x Wires | Gunsmith 3 |
| Padded Stock | Mod | 2x Mod Components 5x Duct Tape | Gunsmith 3 |
| Shotgun Choke II | Mod | 2x Mechanical Components 4x Wires | Gunsmith 2 |
| Shotgun Choke III | Mod | 2x Mod Components 8x Wires | Gunsmith 3 |
| Shotgun Silencer | Mod | 2x Mod Components 8x Wires | Gunsmith 3 |
| Showstopper | Grenade | 1x Advanced Electrical Components 1x Voltage Converter | Explosives Station 3 |
| Silencer I | Mod | 2x Mechanical Components 4x Wires | Gunsmith 2 |
| Silencer II | Mod | 2x Mod Components 8x Wires | Gunsmith 3 |
| Snap Hook | Quick Use | 2x Power Rod 3x Rope 1x Exodus Modules | Utility Station 3 |
| Stable Stock II | Mod | 2x Mechanical Components 3x Duct Tape | Gunsmith 2 |
| Stable Stock III | Mod | 2x Mod Components 5x Duct Tape | Gunsmith 3 |
| Tagging Grenade | Grenade | 1x Electrical Components 1x Sensors | Utility Station 3 |
| Tempest | Weapon | 3x Advanced Mechanical Components 3x Medium Gun Parts 3x Canister | Gunsmith 3 |
| Trigger Nade | Grenade | 2x Crude Explosives 1x Processor | Explosives Station 2 |
| Vertical Grip II | Mod | 2x Mechanical Components 3x Duct Tape | Gunsmith 2 |
| Vertical Grip III | Mod | 2x Mod Components 5x Duct Tape | Gunsmith 3 |
| Vita Shot | Quick Use | 2x Antiseptic 1x Syringe | Medical Lab 3 |
| Vita Spray | Quick Use | 3x Antiseptic 1x Canister | Medical Lab 3 |
| Vulcano | Weapon | 1x Magnetic Accelerator 3x Heavy Gun Parts 1x Exodus Modules | Gunsmith 3 |
| Wolfpack | Grenade | 2x Explosive Compound 2x Sensors | Explosives Station 3 |
| Red Light Stick | Quick Use | 3x Chemicals | Utility Station 1 |
| Smoke Grenade | Grenade | 14x Chemicals 1x Canister | Utility Station 2 |
| Deadline | Mine | 3x Explosive Compound 2x ARC Circuitry | Explosives Station 3 |
| Trailblazer | Grenade | 1x Explosive Compound 1x Synthesized Fuel | Explosives Station 3 |
| Tactical Mk. 3 (Defensive) | Augment | 2x Advanced Electrical Components 3x Processor | Gear Bench 3 |
| Tactical Mk. 3 (Healing) | Augment | 2x Advanced Electrical Components 3x Processor | Gear Bench 3 |
| Yellow Light Stick | Quick Use | 3x Chemicals | Utility Station 1 |
Note: The missing Blueprints in this list likely have not actually been added to the game at the time of writing, because none of the playerbase has managed to find any of them. As they are added to the game, I will update this page with the most relevant information so you know exactly how to get all 75 Arc Raiders Blueprints.
Where to find Blueprints in Arc Raiders
Below is a list of all containers, modifiers, and events which maximise your chances of finding Blueprints:
- Certain quests reward you with specific Blueprints .
- Completing Trials has a high chance of offering Blueprints as rewards.
- Surveyors have a decent chance of dropping Blueprints on death.
- High loot value areas tend to have a greater chance of spawning Blueprints.
- Night Raids and Storms may increase rare Blueprint spawn chances in containers.
- Containers with higher numbers of items may have a higher tendency to spawn Blueprints. As a result, Blue Gate (which has many “large” containers containing multiple items) may give you a higher chance of spawning Blueprints.
- Raider containers (Raider Caches, Weapon Boxes, Medical Bags, Grenade Tubes) have increased Blueprint drop rates. As a result, the Uncovered Caches event gives you a high chance of finding Blueprints.
- Security Lockers have a higher than average chance of containing Blueprints.
- Certain Blueprints only seem to spawn under specific circumstances: Tempest Blueprint only spawns during Night Raid events. Vulcano Blueprint only spawns during Hidden Bunker events. Jupiter and Equaliser Blueprints only spawn during Harvester events.

Raider Caches, Weapon Boxes, and other raider-oriented container types have a good chance of offering Blueprints. |Image credit:Rock Paper Shotgun/Embark Studios
Blueprints have a very low chance of spawning in any container in Arc Raiders, around 1-2% on average. However, there is a higher chance of finding Blueprints in particular container types. Specifically, you can find more Blueprints in Raider containers and security lockers.
Beyond this, if you’re looking for Blueprints you should focus on regions of the map which are marked as having particularly high-value loot. Areas such as the Control Tower in Dam Battlegrounds, the Arrival and Departure Buildings in Spaceport, and Pilgrim’s Peak in Blue Gate all have a better-than-average chance of spawning Blueprints somewhere amongst all their containers. Night Raids and Electromagnetic Storm events also increase the drop chances of certain Blueprints .
In addition to these containers, you can often loot Blueprints from destroyed Surveyors - the largest of the rolling ball ARC. Surveyors are more commonly found on the later maps - Spaceport and Blue Gate - and if one spawns in your match, you’ll likely see it by the blue laser beam that it casts into the sky while “surveying”.
Surveyors are quite well-armoured and will very speedily run away from you once it notices you, but if you can take one down then make sure you loot all its parts for a chance of obtaining certain unusual Blueprints.
Blueprints obtained from quests
One way in which you can get Blueprints is by completing certain quests for the vendors in Speranza. Some quests will reward you with a specific item Blueprint upon completion, so as long as you work through all the quests in Arc Raiders, you are guaranteed those Blueprints.
Here is the full list of all Blueprints you can get from quest rewards:
- Trigger Nade Blueprint: Rewarded after completing “Sparks Fly”.
- Lure Grenade Blueprint: Rewarded after completing “Greasing Her Palms”.
- Burletta Blueprint: Rewarded after completing “Industrial Espionage”.
- Hullcracker Blueprint (and Launcher Ammo Blueprint): Rewarded after completing “The Major’s Footlocker”.
Alas, that’s only 4 Blueprints out of a total of 75 to unlock, so for the vast majority you will need to find them yourself during a raid. If you’re intent on farming Blueprints, then it’s best to equip yourself with cheap gear in case you lose it, but don’t use a free loadout because then you won’t get a safe pocket to stash any new Blueprint you find. No pain in Arc Raiders is sharper than failing to extract with a new Blueprint you’ve been after for a dozen hours already.

One of the best ways to get Blueprints is by hitting three stars on all five Trials every week. |Image credit:Rock Paper Shotgun/Embark Studios
Blueprints obtained from Trials
One of the very best ways to get Blueprints is as rewards for completing Trials in Arc Raiders. Trials are unlocked from Level 15 onwards, and allow you to earn rewards by focusing on certain tasks over the course of several raids. For example, one Trial might task you with dealing damage to Hornets, while another might challenge you to loot Supply Drops.
Trials refresh on a weekly basis, with a new week bringing five new Trials. Each Trial can offer up to three rewards after passing certain score milestones, and it’s possible to receive very high level loot from these reward crates - including Blueprints. So if you want to unlock as many Blueprints as possible, you should make a point of completing as many Trials as possible each week.
Best Blueprint farming locations
The very best way to get Blueprints is to frequent specific areas of the maps which combine high-tier loot pools with the right types of containers to search. Here are my recommendations for where to find Blueprints on every map, so you can always keep the search going for new crafting recipes to unlock.

Image credit:Rock Paper Shotgun/Embark Studios
Dam Battlegrounds
The best places to farm Blueprints on Dam Battlegrounds are the Control Tower, Power Generation Complex, Ruby Residence, and Pale Apartments . The first two regions, despite only being marked on the map as mid-tier loot, contain a phenomenal number of containers to loot. The Control Tower can also contain a couple of high-tier Security Lockers - though of course, you’ll need to have unlocked the Security Breach skill at the end of the Survival tree.
There’s also a lot of reporting amongst the playerbase that the Residential areas in the top-left of the map - Pale Apartments and Ruby Residence - give you a comparatively strong chance of finding Blueprints. Considering their size, there’s a high density of containers to loot in both locations, and they also have the benefit of being fairly out of the way. So you’re more likely to have all the containers to yourself.
Buried City
The best Blueprint farming locations on Buried City are the Santa Maria Houses, Grandioso Apartments, Town Hall, and the various buildings of the New District . Grandioso Apartments has a lower number of containers than the rest, but a high chance of spawning weapon cases - which have good Blueprint drop rates. The others are high-tier loot areas, with plenty of lootable containers - including Security Lockers.
Spaceport
The best places to find Blueprints on Spaceport are the Arrival and Departure Buildings, as well as Control Tower A6 and the Launch Towers . All these areas are labelled as high-value loot regions, and many of them are also very handily connected to one another by the Spaceport wall, which you can use to quickly run from one area to the next. At the tops of most of these buildings you’ll find at least one Security Locker, so this is an excellent farming route for players looking to find Blueprints.
The downside to looting Blueprints on Spaceport is that all these areas are hotly contested, particularly in Duos and Squads. You’ll need to be very focused and fast in order to complete the full farming route.

Image credit:Rock Paper Shotgun/Embark Studios
Blue Gate
Blue Gate tends to have a good chance of dropping Blueprints, potentially because it generally has a high number of containers which can hold lots of items; so there’s a higher chance of a Blueprint spawning in each container. In my experience, the best Blueprint farming spots on Blue Gate are Pilgrim’s Peak, Raider’s Refuge, the Ancient Fort, and the Underground Complex beneath the Warehouse .
All of these areas contain a wealth of containers to loot. Raider’s Refuge has less to loot, but the majority of the containers in and around the Refuge are raider containers, which have a high chance of containing Blueprints - particularly during major events.
Stella Montis
On the whole, Stella Montis seems to have a very low drop rate for Blueprints (though a high chance of dropping other high-tier loot). If you do want to try farming Blueprints on this map, the best places to find Blueprints in Stella Montis are Medical Research, Assembly Workshop, and the Business Center . These areas have the highest density of containers to loot on the map.
In addition to this, the Western Tunnel has a few different Security Lockers to loot, so while there’s very little to loot elsewhere in this area of the map, it’s worth hitting those Security Lockers if you spawn there at the start of a match.
That wraps up this primer on how to get all the Blueprints in Arc Raiders as quickly as possible. With the Expedition system constantly resetting a large number of players’ Blueprints, it’s more important than ever to have the most up-to-date information on where to find all these Blueprints.
While you’re here, be sure to check out our Arc Raiders best guns tier list , as well as our primers on the best skills to unlock and all the different Field Depot locations on every map.

ARC Raiders
PS5 , Xbox Series X/S , PC
Rock Paper Shotgun is better when you sign in
Sign in and join us on our journey to discover strange and compelling PC games.
