Wild Bastards review: a messy roguelike shooter that’s nonetheless full o’ beans
Some people call me the space cowboy

Image credit:Rock Paper Shotgun / Maximum Entertainment

- Developer: Blue Manchu
- Publisher: Maximum Entertainment
- Release: Sept 12th
- On: Windows
- From: Epic Games , Steam
- Price: £28/$40/€40
- Reviewed on: Intel Core-i7-11700F, 16GB RAM, Nvidia GeForce RTX 3060, Windows 10
There are cold opens and there are freezing ones. Sci-fi roguelike shooter Wild Bastards doesn’t start on its strongest cowboy boot. You are dumped into the middle of an interstellar chase and summarily shown the ropes. The guns feel simplistic, the arenas bare, the loot vanilla, and the entire loop of beaming down to a planet and getting into small-scale “showdowns” threatens to become stale within the first hour or so. But then you find an outlaw buddy who offers a new way to shoot human dirtbags. Then another fellow bandit. And another. By the time your spaceship is half-filled with scoundrels and weirdoes shouting at each other, the game has warmed up enough to reveal its central idea. This ain’t no grand FPS campaign, nor is it quick as roguelikes go. It’s a snacky shootout sim with tumbleweed towns that feels best when you savour the pre-fight suspense.

It’s rogueishly recognisable in a lot of ways. There’s a branching map of planets to visit, each with a planetary surface map filled with nodes and spidery routes to your goal: a special beacon. Getting in your way are blockades of enemies that trigger first-person showdowns. These are relatively short gun fights in randomly generated towns, swamps or mining quarries. Although there are important decisions to make on the planet map, it’s the grounded showdowns where all those decisions come to fruition.
As encounters, they have a strong “ghost town” atmosphere. A criminal family of prejudiced humans is desperate to put your gang of mutants ’n’ robots in the ground. These enemies (and their pet critters) hide among the shacks, boulders, rooftops, and outhouses, often waiting for you to come close. But they’ll routinely give their positions away by yammerin’ to each other, a helpful splash of comic book noise visually blinking from the spot they yell from.
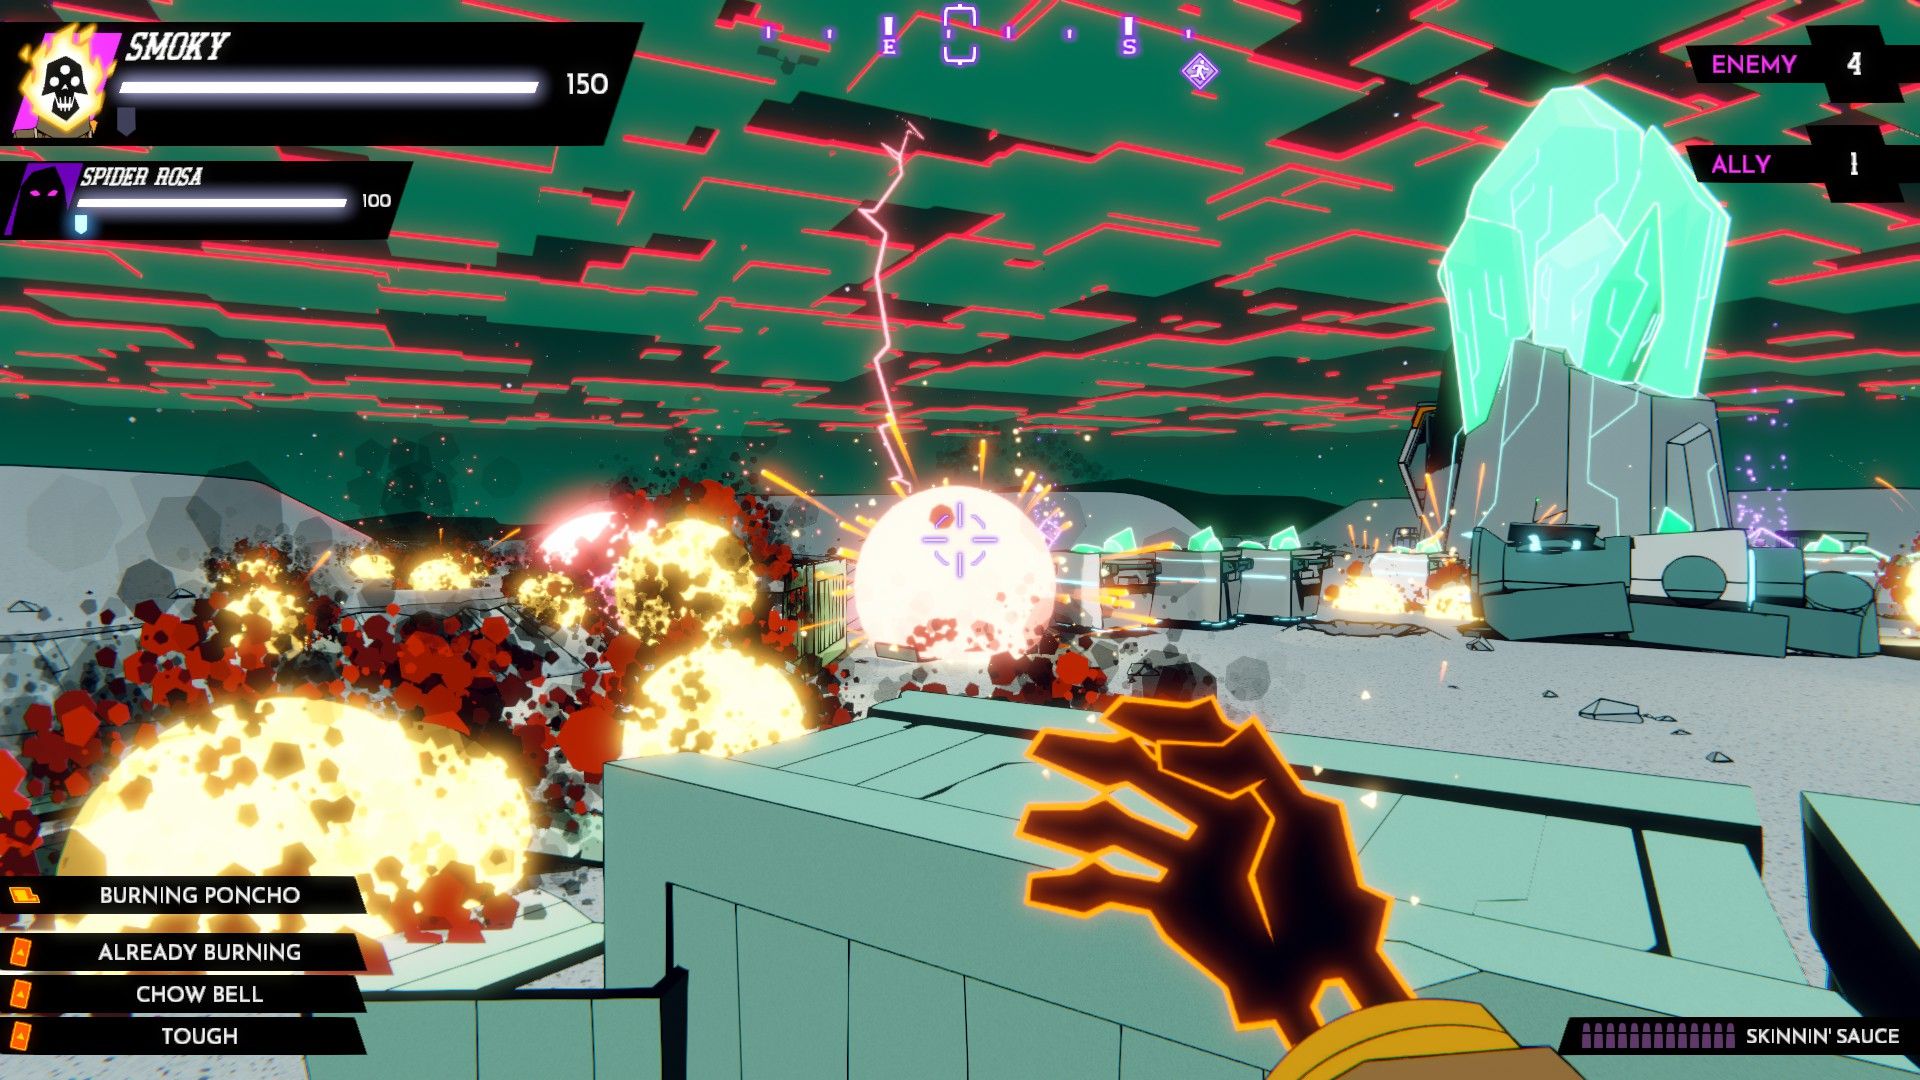
Image credit:Rock Paper Shotgun / Maximum Entertainment
It took a minute to click, but once I understood the game’s pace, it worked. The visual hollering is a thematic substitute for the ubiquitous “see through walls” ability that many games use to keep the player informed about enemy whereabouts. It encourages you to stop and listen, to take your time and creep along, without the need to obscure everything else on the screen with a cool blue filter.
It’s not the only twist on shootin’ doods. For example, your heroes take to the battlefield in pairs, but not side-by-side. Instead, you swap between your two characters at any time. This is basically changing weapons, but said weapon has distinct abilities and its own health bar. Surviving a planet means preserving that health as much as possible between showdowns. You soon learn this is not a frenetic, balls-to-the-wall shooter about sliding around corners or racing from execution animation to execution animation. It’s more cautious than that.
There can be frantic showdowns, sure, like the time I was faced with a handful of rocket-launching grizzlies hiding in swamp reeds, while a heap of rooftop bombers rained endless cluster bombs down on me. But more often it’s a slower-paced affair. Tense, even. You creep around corners listening out for the tell-tale gurgle of dangerous “porcupines”. You walk gingerly into a warren of ruined huts knowing that a trio of shotgun-toting bushwhackers are in there, and they won’t come out.
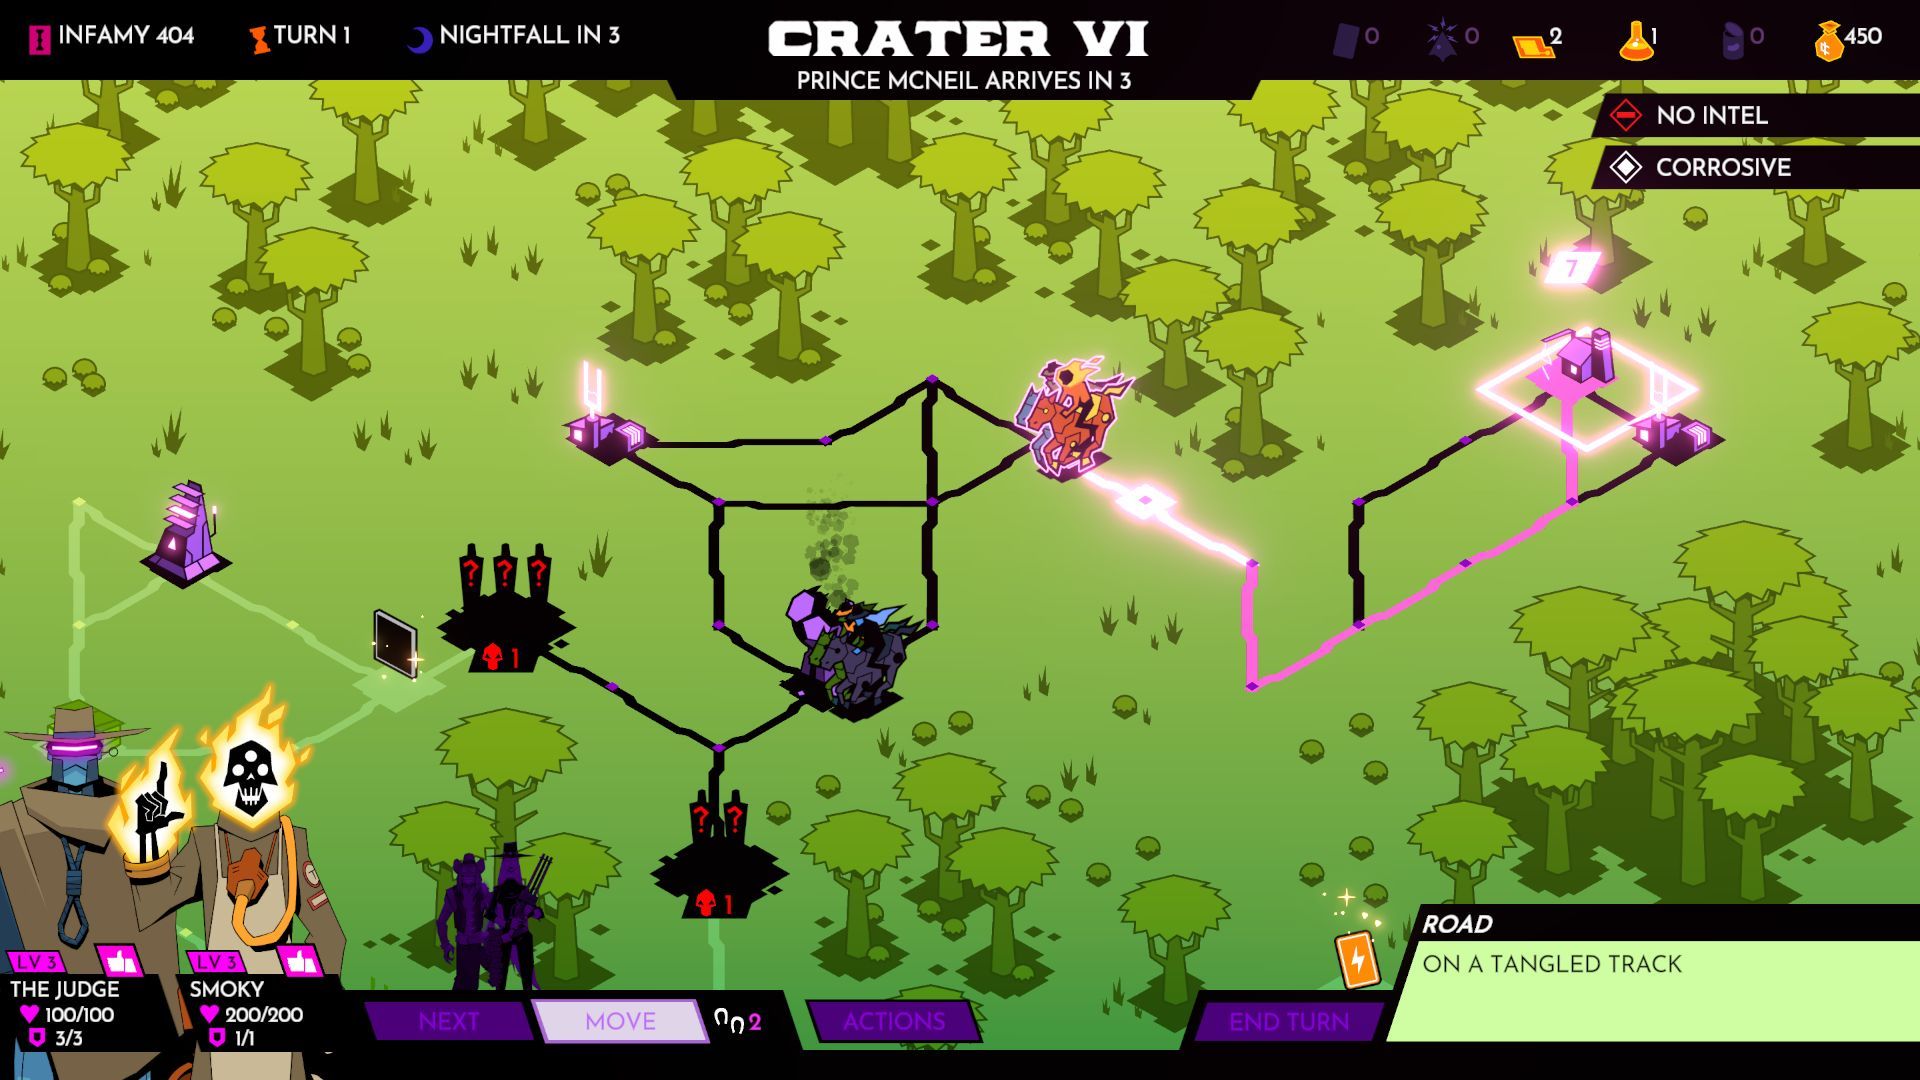
Image credit:Rock Paper Shotgun / Maximum Entertainment
This is Wild Bastards at its most atmospheric, fully embracing the quiet cowboy standoff fantasy. Environmental hazards up the challenge. A swamp planet has toxic pools to avoid, a frozen planet is covered in banks of snow that slow you right down if you trudge through them. On a stormy planet, lightning bolts chase you around, forcing both you and your enemy to take shelter in bubble domes, or brave the open plains with constant movement. You’ll often see nightfall arrive, greatly reducing vision for every gunslinger involved.
Back in map world, the planet has shops selling helpful mods. We’re talkin’ boots that increase your jump height, gun parts that quicken your reload, a poncho that makes you 50% immune to fire. Most are ordinary. But you’ll lose all these mods between star systems (every few planets). As a roguelike player, you might hate this. It goes against the expectation set by some roguelikes that the player should accrue goodies until death. I got used to it, but here’s a litmus test: if the decaying weapons in Zelda: Breath Of The Wild annoyed you, this probably will too.
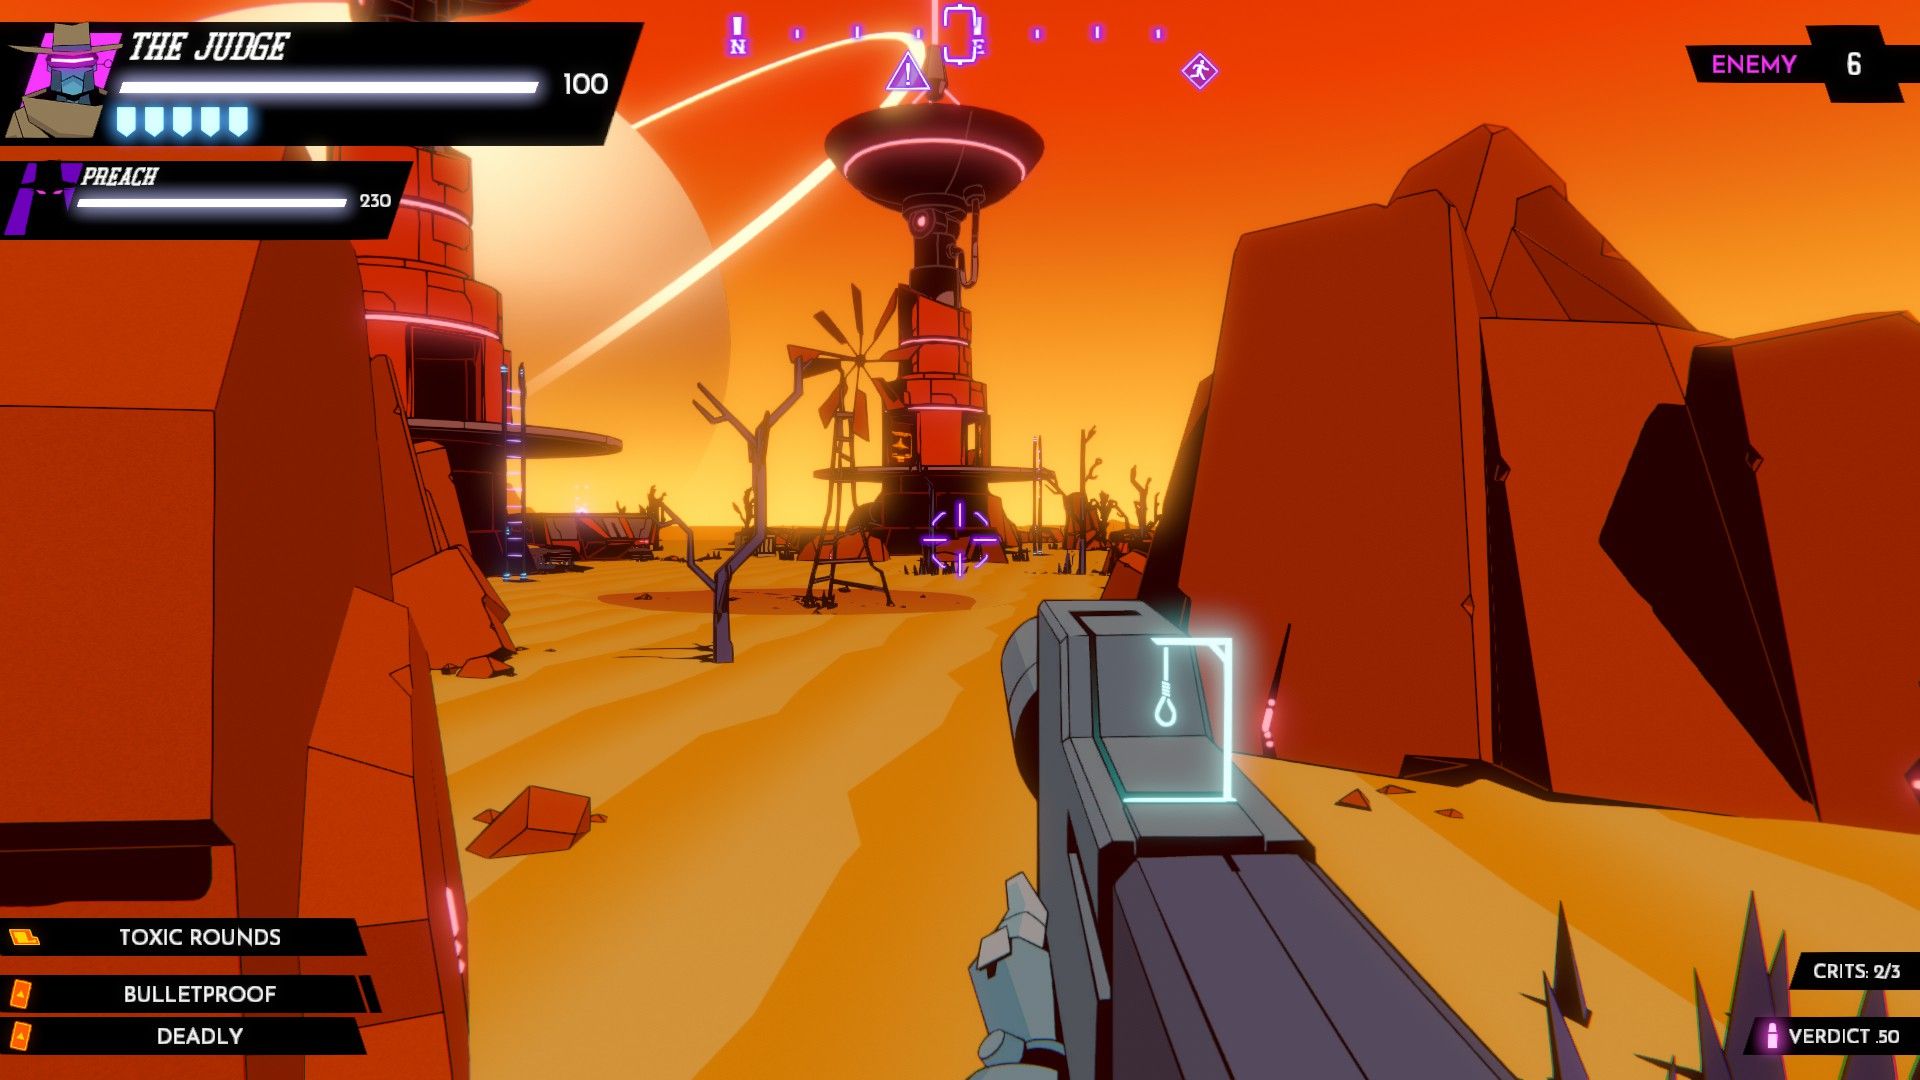
Image credit:Rock Paper Shotgun / Maximum Entertainment
The real goal isn’t the accumulation of mods though. It’s reaching the end of a star system and finding a coffin containing a new friendly outlaw, like some cadaverous loot box. The starter heroes, pistol wielding Spider Rosa and the shotgun toting Casino, are plain as basic yogurt. But new, permanently unlockable heroes include long-range sniper, The Judge, whose aiming reticule is a steadily doodled game of holographic hangman that adds a line every time you hit a foe (when the hangman is completed, the next shot is an insta-kill). Or the minigun toting Preach, whose ultimate ability heals her while she unloads bullets into bods. The ghostly Kaboom can become temporarily invisible while tossing sticks of dynamite. Smoky shoots fire from his hand, and reloads by counting his own fingers.
Many of the voice actors relish their cowboy roles, fully embracing the “if’ns” and the “guldems” of the western. There are some cracker lines playing on the mash-up of spitoon sci-fi. When an enemy uses his laser eyes to kill The Judge, one outlaw remarks: “It ain’t right, zappin’ a feller eye-wise.” When the irritated Judge is resurrected, he is told to calm down, to stop being so shook up. “I ain’t shook up over jack OR shit!” he yells.
It ain’t just flavourful language neither. Why, them ne’er-do-wells get into honest-to-god feuds, and downright refuse to work together during showdowns, like what decent folk does. Meaning you gotta resituate yer team compositions and what-have-you. (Hoo-wee, is it hard work keepin’ up this here vernacular. God damn.) But that’s fine. ‘Cause you can find cans o’ beans!
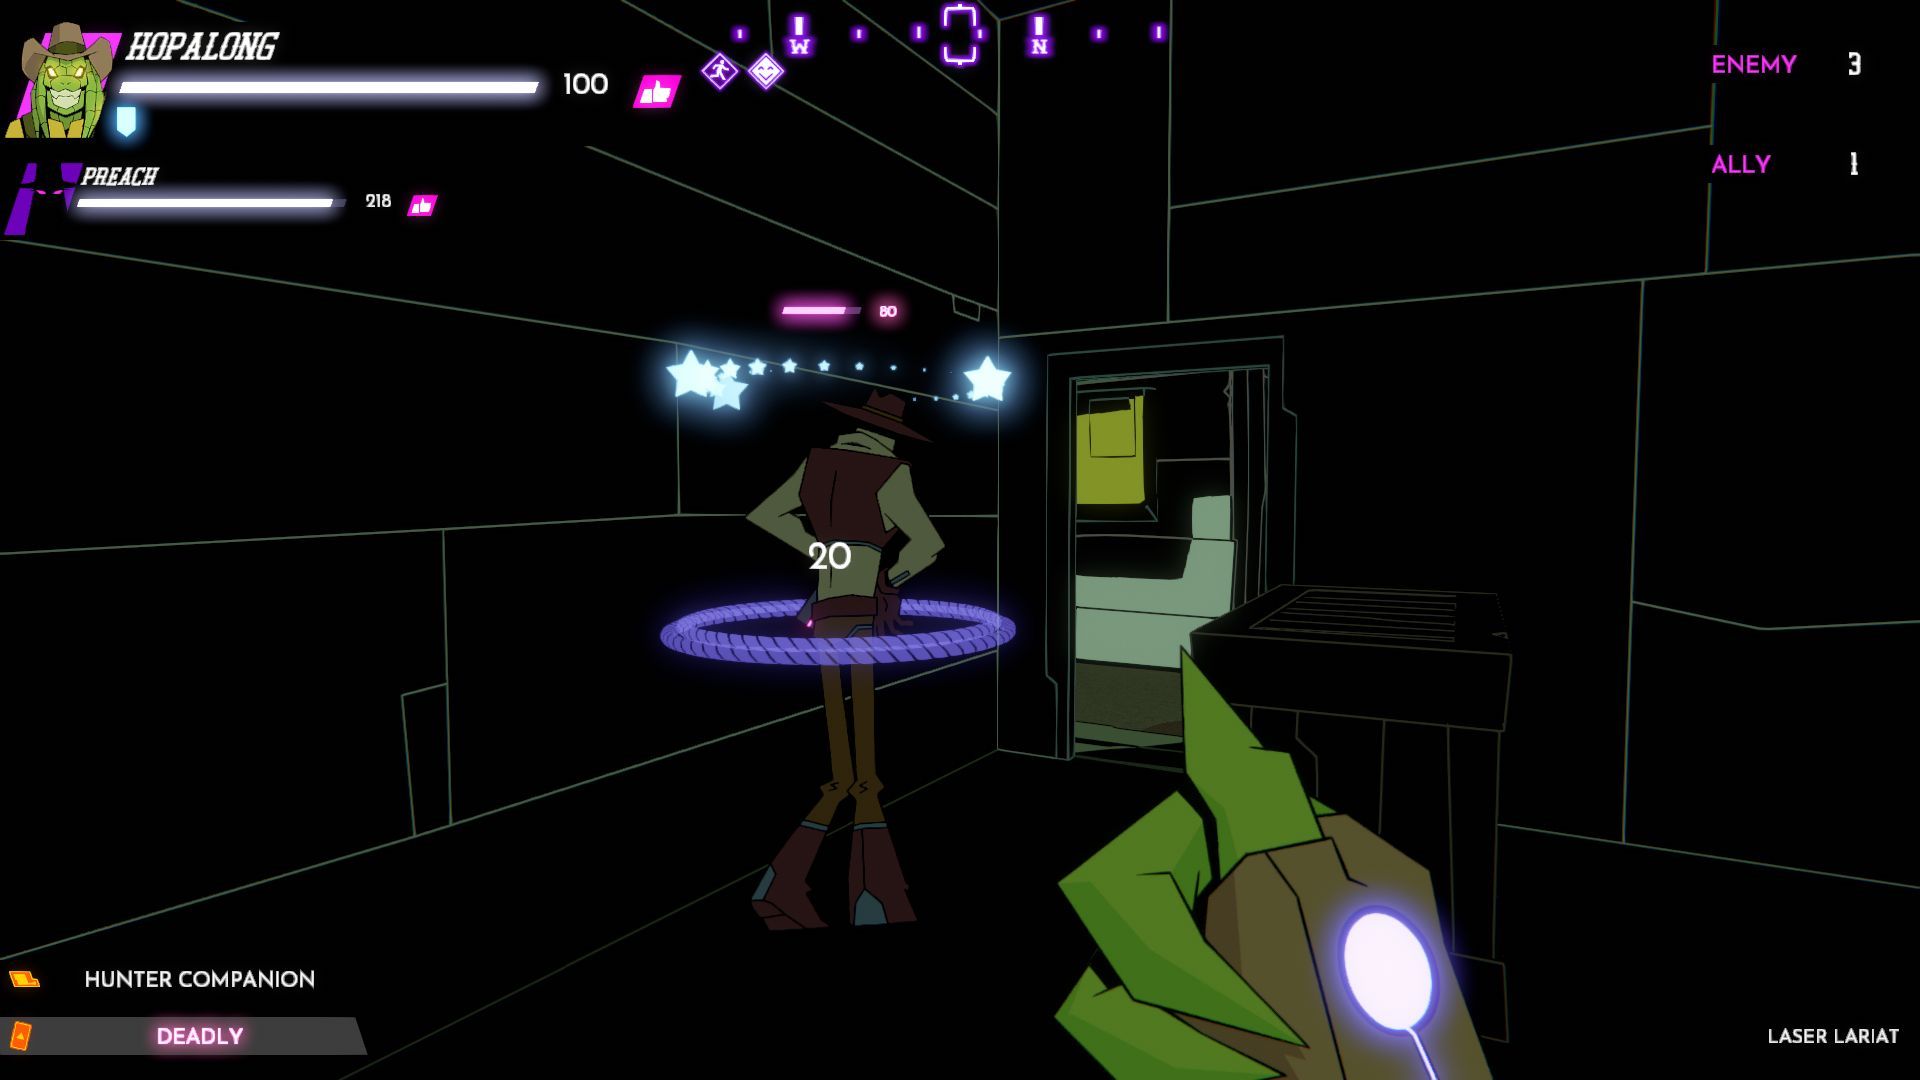
Image credit:Rock Paper Shotgun / Maximum Entertainment
See, you gots to use these here baked beans to dee-fuse any untoward tensions in the gang. Use ’em beans, and them two sumbitches is friends again. (All right. Enough of these gosh-darned linguistic free-volities. I’m tuckered out.)
All this is to say, there are times when you revive an outlaw and, instead of thanking you, he reveals a toxic personality that triggers a horrendous criss-crossing network of feuds. I fell into a fit of laughter just watching all the jagged lines of dislike popping onto the personality graph when this happened to me. Many outlaws would now refuse to beam down together. I didn’t care, because it was funny.
Despite the comic companionship, some characters do feel functionally weak. For example, lizard dude Hopalong can incapacitate enemies by holding down his lasso over them, but is slowed to a crawl while doing this. Which means taking on one enemy at a time, or risk being shot while lassoing. Other characters, like the rapid fire plasma-blasting Roswell, feel adaptable and reliable in nearly every encounter. Which means players focused on winning every encounter will lean heavily toward, arguably, the most boring fighters.
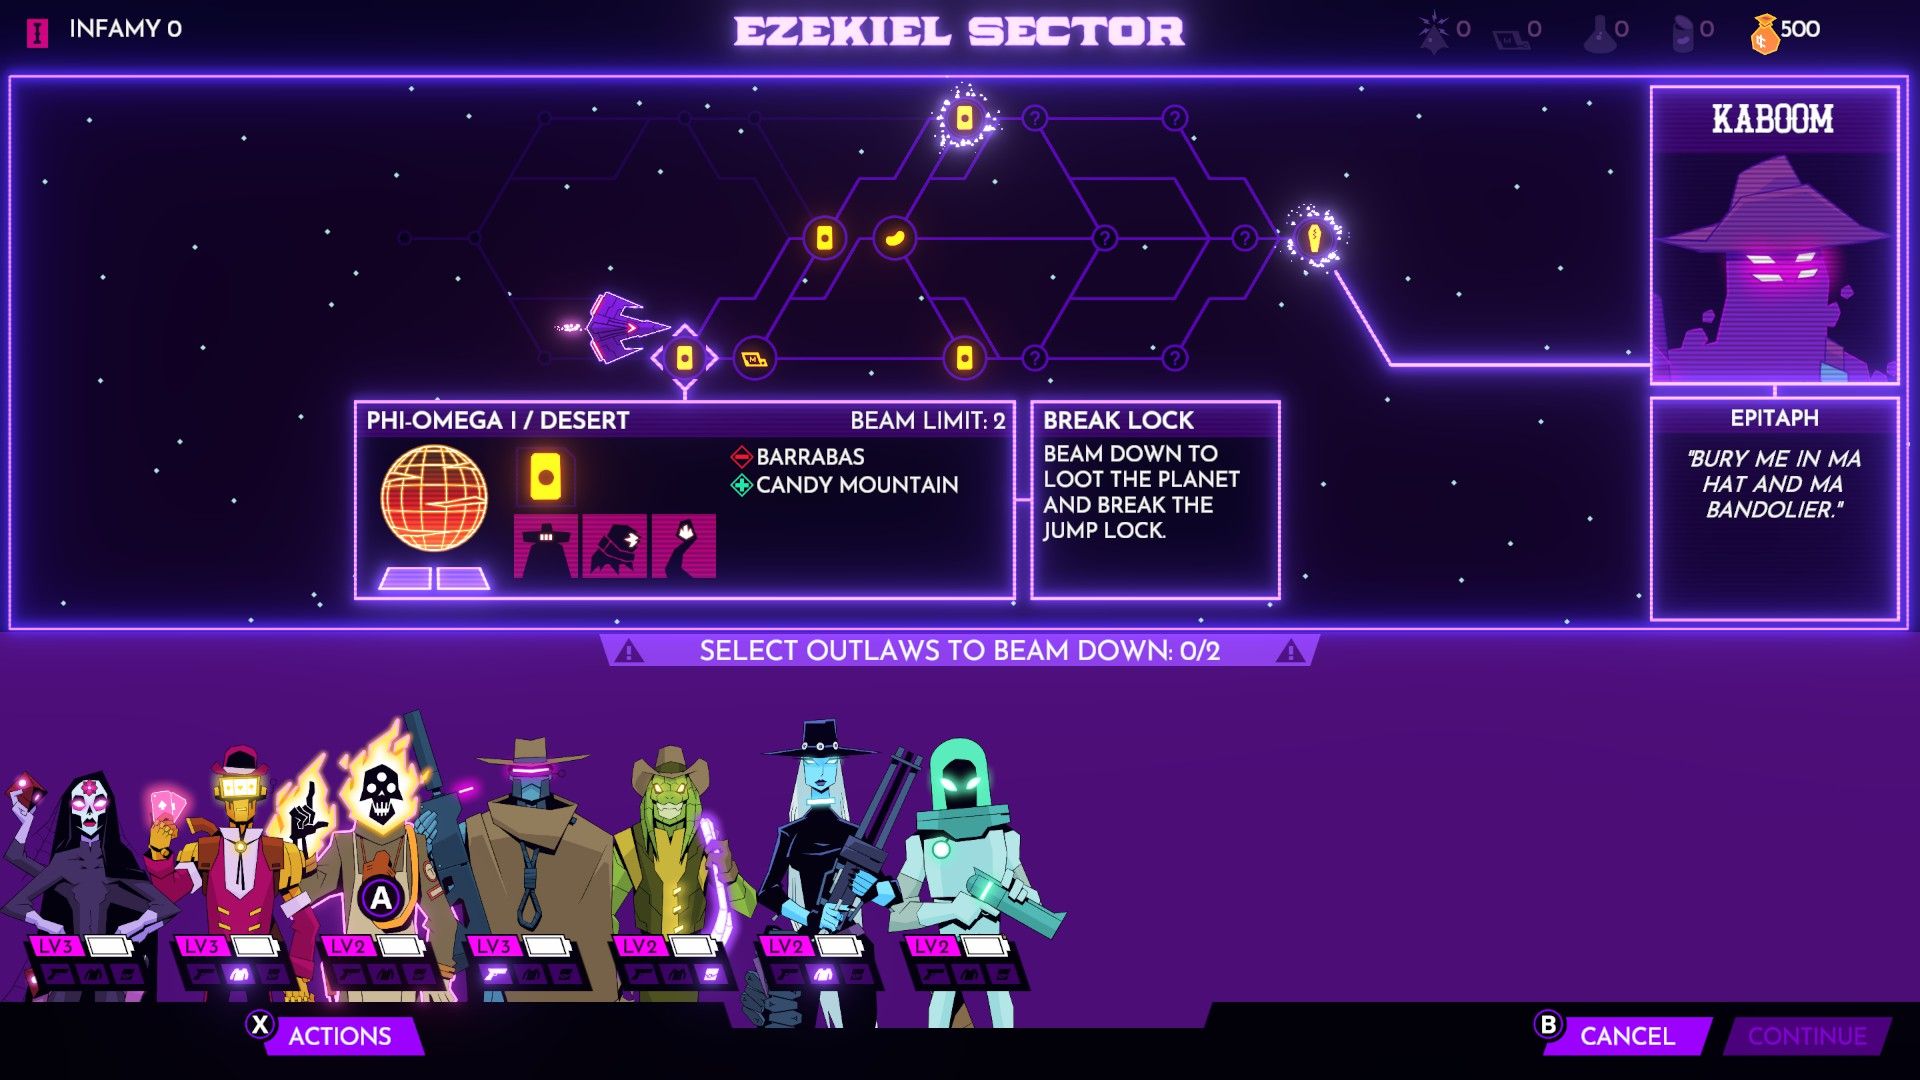
Image credit:Rock Paper Shotgun / Maximum Entertainment
On top of this, some of the ultimate abilities - like Smoky’s “Cookout” or Casino’s “Roulette” - will simply kill enemies from anywhere on the battlefield, even if you can’t see them and don’t know where they are. That’s useful. But I don’t find it satisfying or engaging in a shooter to have a “kill things I can’t see” button. It feels like a cop-out that stops you from playing the actual game - run and gun, hide and seek.
Altogether, Wild Bastards pushes some orthodoxies out the window, even while it comfortably settles down with others by the fire. Sometimes it takes an interesting slant - slower gunfights, swappable heroes, equipment decaying at every new star system. Sometimes, though, it’s awkward. Default controller settings are deeply stiff and unreliable (I mostly fixed this by turning off “acceleration” and whacking down the “look deadzone”). The user interface often feels bare, clumsy or unusual (why are “new game” and “continue” tucked away in the bottom right corner of the main menu?). And there are strange occurrences I have to assume are bugs: twice I arrived at a fight only to have it auto-resolve as soon as the intro countdown ended.
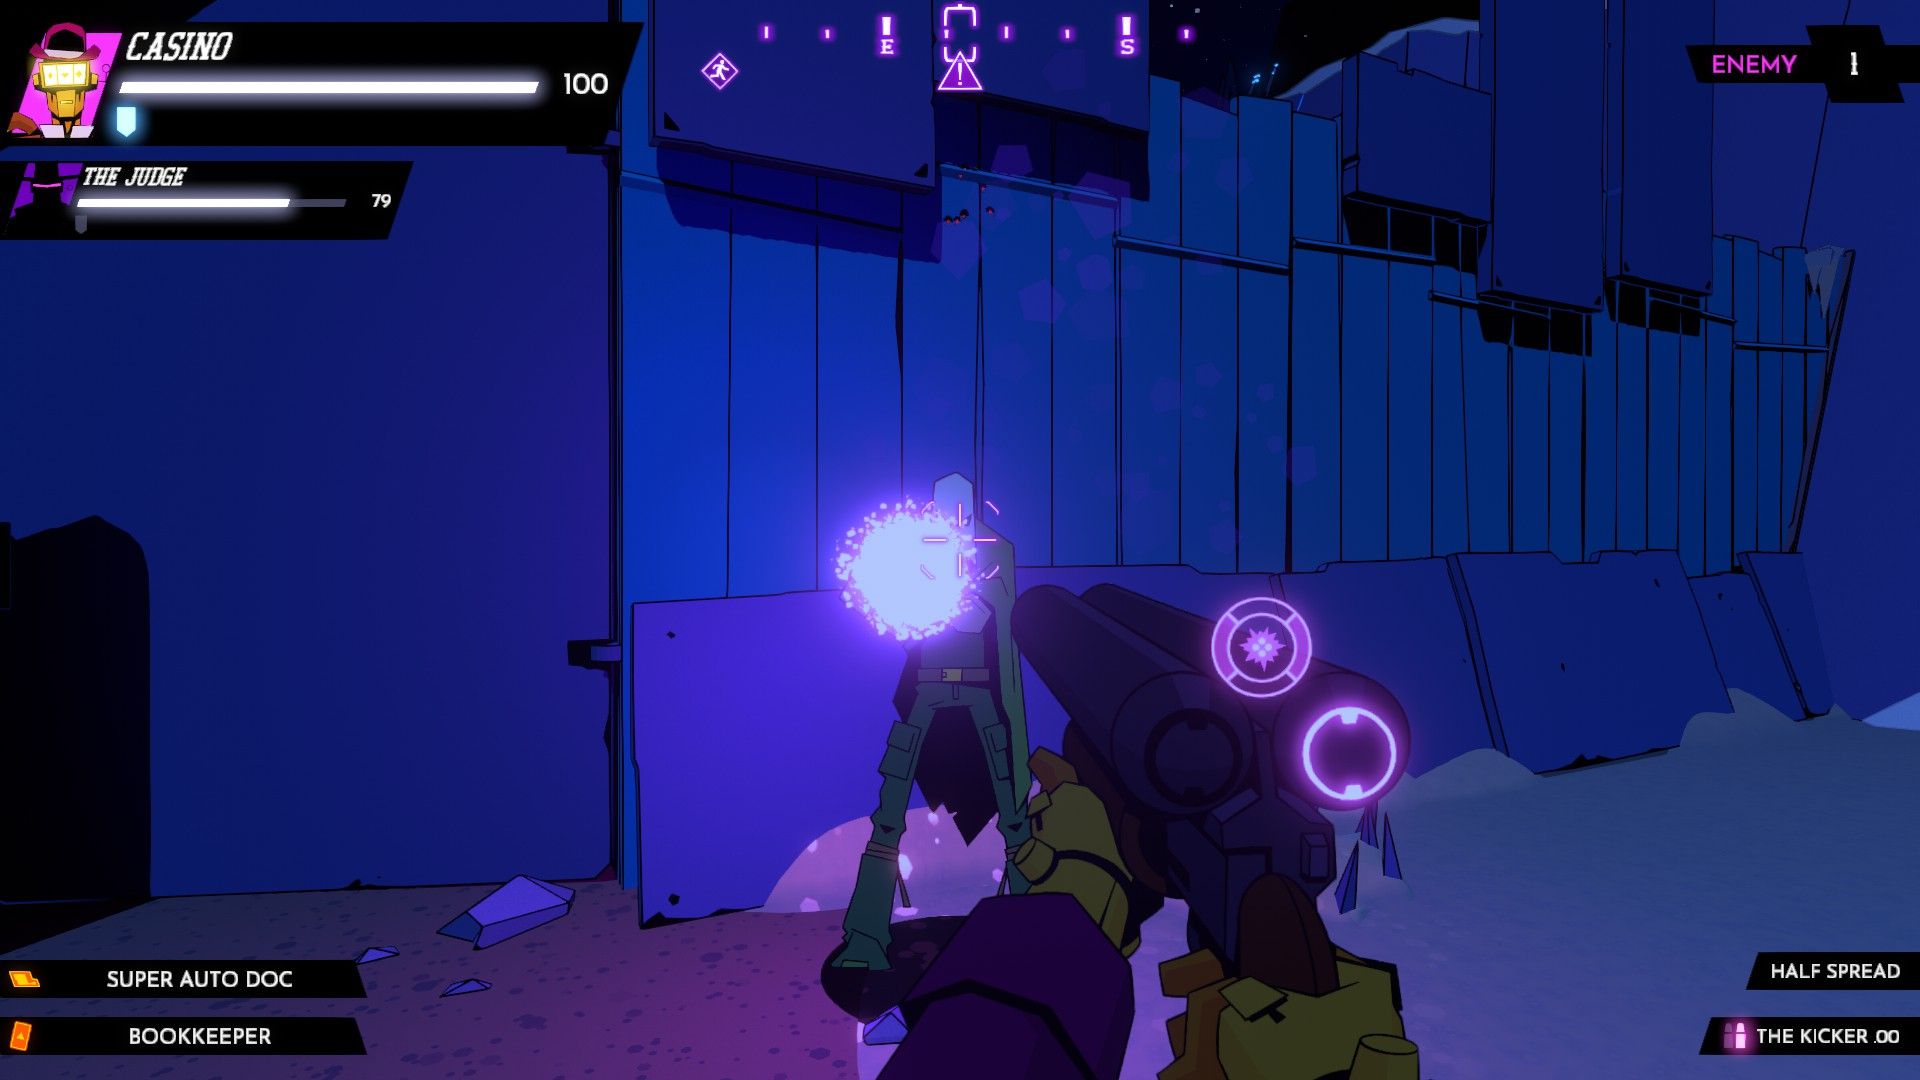
Image credit:Rock Paper Shotgun / Maximum Entertainment
There’s a lot more going on. Outlaws can get “scattered” to the wrong location when beamed to planet’s surface. Characters can become close pals. You can release a stampede of cows to run around the planet map, battering bad guys. At times, it feels like a messily greedy game, throwing a lot of ideas into its swag bag and running off into the sunset, without necessarily considering whether those ideas ought to exist in the same satchel together.
But my overwhelming impression is of a game that wants to set its own pace, its own “high noon” rhythm. And I quite liked that. As a roguelike its quirks will either endear you to it or make you grimace in mild frustration. Its up-and-down pacing, both on and off the battlefield, makes it hard to recommend to people who like their roguelikes snappy. And while I thoroughly enjoyed the cowboy chatter, it might grate on anyone who wants to hurry up and hit the next showdown. It’s a slow burn and the opening hour doesn’t communicate the intention particularly well. But as anyone who has really tried cooking beans over a fire can testify, once they’re warm, they’re just fine.
Find out how we conduct our reviews by reading our review policy .
Wild Bastards
PC
Rock Paper Shotgun is better when you sign in
Sign in and join us on our journey to discover strange and compelling PC games.

All 75 Arc Raiders Blueprints and where to get them
These areas have the highest chance of giving you Blueprints

Image credit:Rock Paper Shotgun/Embark Studios

Looking for more Arc Raiders Blueprints? It’s a special day when you find a Blueprint, as they’re among the most valuable items in Arc Raiders. If you find a Blueprint that you haven’t already found, then you must make sure you hold onto it at all costs, because Blueprints are the key to one of the most important and powerful systems of meta-progression in the game.
This guide aims to be the very best guide on Blueprints you can find, starting with a primer on what exactly they are and how they work in Arc Raiders, before delving into exactly where to get Blueprints and the very best farming spots for you to take in your search.
We’ll also go over how to get Blueprints from other unlikely activities, such as destroying Surveyors and completing specific quests. And you’ll also find the full list of all 75 Blueprints in Arc Raiders on this page (including the newest Blueprints added with the Cold Snap update , such as the Deadline Blueprint and Firework Box Blueprint), giving you all the information you need to expand your own crafting repertoire.
In this guide:
- What are Blueprints in Arc Raiders?
- Full Blueprint list: All crafting recipes
- Where to find Blueprints in Arc Raiders Blueprints obtained from quests Blueprints obtained from Trials Best Blueprint farming locations

What are Blueprints in Arc Raiders?
Blueprints in Arc Raiders are special items which, if you manage to extract with them, you can expend to permanently unlock a new crafting recipe in your Workshop. If you manage to extract from a raid with an Anvil Blueprint, for example, you can unlock the ability to craft your very own Anvil Pistol, as many times as you like (as long as you have the crafting materials).
To use a Blueprint, simply open your Inventory while in the lobby, then right-click on the Blueprint and click “Learn And Consume” . This will permanently unlock the recipe for that item in your Workshop. As of the Stella Montis update, there are allegedly 75 different Blueprints to unlock - although only 68 are confirmed to be in the game so far. You can see all the Blueprints you’ve found and unlocked by going to the Workshop menu, and hitting “R” to bring up the Blueprint screen.
It’s possible to find duplicates of past Blueprints you’ve already unlocked. If you find these, then you can either sell them, or - if you like to play with friends - you can take it into a match and gift it to your friend so they can unlock that recipe for themselves. Another option is to keep hold of them until the time comes to donate them to the Expedition.
Full Blueprint list: All crafting recipes
Below is the full list of all the Blueprints that are currently available to find in Arc Raiders, and the crafting recipe required for each item:
| Blueprint | Type | Recipe | Crafted At |
|---|---|---|---|
| Bettina | Weapon | 3x Advanced Mechanical Components 3x Heavy Gun Parts 3x Canister | Gunsmith 3 |
| Blue Light Stick | Quick Use | 3x Chemicals | Utility Station 1 |
| Aphelion | Weapon | 3x Magnetic Accelerator 3x Complex Gun Parts 1x Matriarch Reactor | Gunsmith 3 |
| Combat Mk. 3 (Flanking) | Augment | 2x Advanced Electrical Components 3x Processor | Gear Bench 3 |
| Combat Mk. 3 (Aggressive) | Augment | 2x Advanced Electrical Components 3x Processor | Gear Bench 3 |
| Complex Gun Parts | Material | 2x Light Gun Parts 2x Medium Gun Parts 2x Heavy Gun Parts | Refiner 3 |
| Fireworks Box | Quick Use | 1x Explosive Compound 3x Pop Trigger | Explosives Station 2 |
| Gas Mine | Mine | 4x Chemicals 2x Rubber Parts | Explosives Station 1 |
| Green Light Stick | Quick Use | 3x Chemicals | Utility Station 1 |
| Pulse Mine | Mine | 1x Crude Explosives 1x Wires | Explosives Station 1 |
| Seeker Grenade | Grenade | 1x Crude Explosives 2x ARC Alloy | Explosives Station 1 |
| Looting Mk. 3 (Survivor) | Augment | 2x Advanced Electrical Components 3x Processor | Gear Bench 3 |
| Angled Grip II | Mod | 2x Mechanical Components 3x Duct Tape | Gunsmith 2 |
| Angled Grip III | Mod | 2x Mod Components 5x Duct Tape | Gunsmith 3 |
| Hullcracker | Weapon | 1x Magnetic Accelerator 3x Heavy Gun Parts 1x Exodus Modules | Gunsmith 3 |
| Launcher Ammo | Ammo | 5x Metal Parts 1x Crude Explosives | Workbench 1 |
| Anvil | Weapon | 5x Mechanical Components 5x Simple Gun Parts | Gunsmith 2 |
| Anvil Splitter | Mod | 2x Mod Components 3x Processor | Gunsmith 3 |
| ??? | ??? | ??? | ??? |
| Barricade Kit | Quick Use | 1x Mechanical Components | Utility Station 2 |
| Blaze Grenade | Grenade | 1x Explosive Compound 2x Oil | Explosives Station 3 |
| Bobcat | Weapon | 3x Advanced Mechanical Components 3x Light Gun Parts | Gunsmith 3 |
| Osprey | Weapon | 2x Advanced Mechanical Components 3x Medium Gun Parts 7x Wires | Gunsmith 3 |
| Burletta | Weapon | 3x Mechanical Components 3x Simple Gun Parts | Gunsmith 1 |
| Compensator II | Mod | 2x Mechanical Components 4x Wires | Gunsmith 2 |
| Compensator III | Mod | 2x Mod Components 8x Wires | Gunsmith 3 |
| Defibrillator | Quick Use | 9x Plastic Parts 1x Moss | Medical Lab 2 |
| ??? | ??? | ??? | ??? |
| Equalizer | Weapon | 3x Magnetic Accelerator 3x Complex Gun Parts 1x Queen Reactor | Gunsmith 3 |
| Extended Barrel | Mod | 2x Mod Components 8x Wires | Gunsmith 3 |
| Extended Light Mag II | Mod | 2x Mechanical Components 3x Steel Spring | Gunsmith 2 |
| Extended Light Mag III | Mod | 2x Mod Components 5x Steel Spring | Gunsmith 3 |
| Extended Medium Mag II | Mod | 2x Mechanical Components 3x Steel Spring | Gunsmith 2 |
| Extended Medium Mag III | Mod | 2x Mod Components 5x Steel Spring | Gunsmith 3 |
| Extended Shotgun Mag II | Mod | 2x Mechanical Components 3x Steel Spring | Gunsmith 2 |
| Extended Shotgun Mag III | Mod | 2x Mod Components 5x Steel Spring | Gunsmith 3 |
| Remote Raider Flare | Quick Use | 2x Chemicals 4x Rubber Parts | Utility Station 1 |
| Heavy Gun Parts | Material | 4x Simple Gun Parts | Refiner 2 |
| Venator | Weapon | 2x Advanced Mechanical Components 3x Medium Gun Parts 5x Magnet | Gunsmith 3 |
| Il Toro | Weapon | 5x Mechanical Components 6x Simple Gun Parts | Gunsmith 1 |
| Jolt Mine | Mine | 1x Electrical Components 1x Battery | Explosives Station 2 |
| Explosive Mine | Mine | 1x Explosive Compound 1x Sensors | Explosives Station 3 |
| Jupiter | Weapon | 3x Magnetic Accelerator 3x Complex Gun Parts 1x Queen Reactor | Gunsmith 3 |
| Light Gun Parts | Material | 4x Simple Gun Parts | Refiner 2 |
| Lightweight Stock | Mod | 2x Mod Components 5x Duct Tape | Gunsmith 3 |
| Lure Grenade | Grenade | 1x Speaker Component 1x Electrical Components | Utility Station 2 |
| Medium Gun Parts | Material | 4x Simple Gun Parts | Refiner 2 |
| Torrente | Weapon | 2x Advanced Mechanical Components 3x Medium Gun Parts 6x Steel Spring | Gunsmith 3 |
| Muzzle Brake II | Mod | 2x Mechanical Components 4x Wires | Gunsmith 2 |
| Muzzle Brake III | Mod | 2x Mod Components 8x Wires | Gunsmith 3 |
| Padded Stock | Mod | 2x Mod Components 5x Duct Tape | Gunsmith 3 |
| Shotgun Choke II | Mod | 2x Mechanical Components 4x Wires | Gunsmith 2 |
| Shotgun Choke III | Mod | 2x Mod Components 8x Wires | Gunsmith 3 |
| Shotgun Silencer | Mod | 2x Mod Components 8x Wires | Gunsmith 3 |
| Showstopper | Grenade | 1x Advanced Electrical Components 1x Voltage Converter | Explosives Station 3 |
| Silencer I | Mod | 2x Mechanical Components 4x Wires | Gunsmith 2 |
| Silencer II | Mod | 2x Mod Components 8x Wires | Gunsmith 3 |
| Snap Hook | Quick Use | 2x Power Rod 3x Rope 1x Exodus Modules | Utility Station 3 |
| Stable Stock II | Mod | 2x Mechanical Components 3x Duct Tape | Gunsmith 2 |
| Stable Stock III | Mod | 2x Mod Components 5x Duct Tape | Gunsmith 3 |
| Tagging Grenade | Grenade | 1x Electrical Components 1x Sensors | Utility Station 3 |
| Tempest | Weapon | 3x Advanced Mechanical Components 3x Medium Gun Parts 3x Canister | Gunsmith 3 |
| Trigger Nade | Grenade | 2x Crude Explosives 1x Processor | Explosives Station 2 |
| Vertical Grip II | Mod | 2x Mechanical Components 3x Duct Tape | Gunsmith 2 |
| Vertical Grip III | Mod | 2x Mod Components 5x Duct Tape | Gunsmith 3 |
| Vita Shot | Quick Use | 2x Antiseptic 1x Syringe | Medical Lab 3 |
| Vita Spray | Quick Use | 3x Antiseptic 1x Canister | Medical Lab 3 |
| Vulcano | Weapon | 1x Magnetic Accelerator 3x Heavy Gun Parts 1x Exodus Modules | Gunsmith 3 |
| Wolfpack | Grenade | 2x Explosive Compound 2x Sensors | Explosives Station 3 |
| Red Light Stick | Quick Use | 3x Chemicals | Utility Station 1 |
| Smoke Grenade | Grenade | 14x Chemicals 1x Canister | Utility Station 2 |
| Deadline | Mine | 3x Explosive Compound 2x ARC Circuitry | Explosives Station 3 |
| Trailblazer | Grenade | 1x Explosive Compound 1x Synthesized Fuel | Explosives Station 3 |
| Tactical Mk. 3 (Defensive) | Augment | 2x Advanced Electrical Components 3x Processor | Gear Bench 3 |
| Tactical Mk. 3 (Healing) | Augment | 2x Advanced Electrical Components 3x Processor | Gear Bench 3 |
| Yellow Light Stick | Quick Use | 3x Chemicals | Utility Station 1 |
Note: The missing Blueprints in this list likely have not actually been added to the game at the time of writing, because none of the playerbase has managed to find any of them. As they are added to the game, I will update this page with the most relevant information so you know exactly how to get all 75 Arc Raiders Blueprints.
Where to find Blueprints in Arc Raiders
Below is a list of all containers, modifiers, and events which maximise your chances of finding Blueprints:
- Certain quests reward you with specific Blueprints .
- Completing Trials has a high chance of offering Blueprints as rewards.
- Surveyors have a decent chance of dropping Blueprints on death.
- High loot value areas tend to have a greater chance of spawning Blueprints.
- Night Raids and Storms may increase rare Blueprint spawn chances in containers.
- Containers with higher numbers of items may have a higher tendency to spawn Blueprints. As a result, Blue Gate (which has many “large” containers containing multiple items) may give you a higher chance of spawning Blueprints.
- Raider containers (Raider Caches, Weapon Boxes, Medical Bags, Grenade Tubes) have increased Blueprint drop rates. As a result, the Uncovered Caches event gives you a high chance of finding Blueprints.
- Security Lockers have a higher than average chance of containing Blueprints.
- Certain Blueprints only seem to spawn under specific circumstances: Tempest Blueprint only spawns during Night Raid events. Vulcano Blueprint only spawns during Hidden Bunker events. Jupiter and Equaliser Blueprints only spawn during Harvester events.

Raider Caches, Weapon Boxes, and other raider-oriented container types have a good chance of offering Blueprints. |Image credit:Rock Paper Shotgun/Embark Studios
Blueprints have a very low chance of spawning in any container in Arc Raiders, around 1-2% on average. However, there is a higher chance of finding Blueprints in particular container types. Specifically, you can find more Blueprints in Raider containers and security lockers.
Beyond this, if you’re looking for Blueprints you should focus on regions of the map which are marked as having particularly high-value loot. Areas such as the Control Tower in Dam Battlegrounds, the Arrival and Departure Buildings in Spaceport, and Pilgrim’s Peak in Blue Gate all have a better-than-average chance of spawning Blueprints somewhere amongst all their containers. Night Raids and Electromagnetic Storm events also increase the drop chances of certain Blueprints .
In addition to these containers, you can often loot Blueprints from destroyed Surveyors - the largest of the rolling ball ARC. Surveyors are more commonly found on the later maps - Spaceport and Blue Gate - and if one spawns in your match, you’ll likely see it by the blue laser beam that it casts into the sky while “surveying”.
Surveyors are quite well-armoured and will very speedily run away from you once it notices you, but if you can take one down then make sure you loot all its parts for a chance of obtaining certain unusual Blueprints.
Blueprints obtained from quests
One way in which you can get Blueprints is by completing certain quests for the vendors in Speranza. Some quests will reward you with a specific item Blueprint upon completion, so as long as you work through all the quests in Arc Raiders, you are guaranteed those Blueprints.
Here is the full list of all Blueprints you can get from quest rewards:
- Trigger Nade Blueprint: Rewarded after completing “Sparks Fly”.
- Lure Grenade Blueprint: Rewarded after completing “Greasing Her Palms”.
- Burletta Blueprint: Rewarded after completing “Industrial Espionage”.
- Hullcracker Blueprint (and Launcher Ammo Blueprint): Rewarded after completing “The Major’s Footlocker”.
Alas, that’s only 4 Blueprints out of a total of 75 to unlock, so for the vast majority you will need to find them yourself during a raid. If you’re intent on farming Blueprints, then it’s best to equip yourself with cheap gear in case you lose it, but don’t use a free loadout because then you won’t get a safe pocket to stash any new Blueprint you find. No pain in Arc Raiders is sharper than failing to extract with a new Blueprint you’ve been after for a dozen hours already.

One of the best ways to get Blueprints is by hitting three stars on all five Trials every week. |Image credit:Rock Paper Shotgun/Embark Studios
Blueprints obtained from Trials
One of the very best ways to get Blueprints is as rewards for completing Trials in Arc Raiders. Trials are unlocked from Level 15 onwards, and allow you to earn rewards by focusing on certain tasks over the course of several raids. For example, one Trial might task you with dealing damage to Hornets, while another might challenge you to loot Supply Drops.
Trials refresh on a weekly basis, with a new week bringing five new Trials. Each Trial can offer up to three rewards after passing certain score milestones, and it’s possible to receive very high level loot from these reward crates - including Blueprints. So if you want to unlock as many Blueprints as possible, you should make a point of completing as many Trials as possible each week.
Best Blueprint farming locations
The very best way to get Blueprints is to frequent specific areas of the maps which combine high-tier loot pools with the right types of containers to search. Here are my recommendations for where to find Blueprints on every map, so you can always keep the search going for new crafting recipes to unlock.

Image credit:Rock Paper Shotgun/Embark Studios
Dam Battlegrounds
The best places to farm Blueprints on Dam Battlegrounds are the Control Tower, Power Generation Complex, Ruby Residence, and Pale Apartments . The first two regions, despite only being marked on the map as mid-tier loot, contain a phenomenal number of containers to loot. The Control Tower can also contain a couple of high-tier Security Lockers - though of course, you’ll need to have unlocked the Security Breach skill at the end of the Survival tree.
There’s also a lot of reporting amongst the playerbase that the Residential areas in the top-left of the map - Pale Apartments and Ruby Residence - give you a comparatively strong chance of finding Blueprints. Considering their size, there’s a high density of containers to loot in both locations, and they also have the benefit of being fairly out of the way. So you’re more likely to have all the containers to yourself.
Buried City
The best Blueprint farming locations on Buried City are the Santa Maria Houses, Grandioso Apartments, Town Hall, and the various buildings of the New District . Grandioso Apartments has a lower number of containers than the rest, but a high chance of spawning weapon cases - which have good Blueprint drop rates. The others are high-tier loot areas, with plenty of lootable containers - including Security Lockers.
Spaceport
The best places to find Blueprints on Spaceport are the Arrival and Departure Buildings, as well as Control Tower A6 and the Launch Towers . All these areas are labelled as high-value loot regions, and many of them are also very handily connected to one another by the Spaceport wall, which you can use to quickly run from one area to the next. At the tops of most of these buildings you’ll find at least one Security Locker, so this is an excellent farming route for players looking to find Blueprints.
The downside to looting Blueprints on Spaceport is that all these areas are hotly contested, particularly in Duos and Squads. You’ll need to be very focused and fast in order to complete the full farming route.

Image credit:Rock Paper Shotgun/Embark Studios
Blue Gate
Blue Gate tends to have a good chance of dropping Blueprints, potentially because it generally has a high number of containers which can hold lots of items; so there’s a higher chance of a Blueprint spawning in each container. In my experience, the best Blueprint farming spots on Blue Gate are Pilgrim’s Peak, Raider’s Refuge, the Ancient Fort, and the Underground Complex beneath the Warehouse .
All of these areas contain a wealth of containers to loot. Raider’s Refuge has less to loot, but the majority of the containers in and around the Refuge are raider containers, which have a high chance of containing Blueprints - particularly during major events.
Stella Montis
On the whole, Stella Montis seems to have a very low drop rate for Blueprints (though a high chance of dropping other high-tier loot). If you do want to try farming Blueprints on this map, the best places to find Blueprints in Stella Montis are Medical Research, Assembly Workshop, and the Business Center . These areas have the highest density of containers to loot on the map.
In addition to this, the Western Tunnel has a few different Security Lockers to loot, so while there’s very little to loot elsewhere in this area of the map, it’s worth hitting those Security Lockers if you spawn there at the start of a match.
That wraps up this primer on how to get all the Blueprints in Arc Raiders as quickly as possible. With the Expedition system constantly resetting a large number of players’ Blueprints, it’s more important than ever to have the most up-to-date information on where to find all these Blueprints.
While you’re here, be sure to check out our Arc Raiders best guns tier list , as well as our primers on the best skills to unlock and all the different Field Depot locations on every map.

ARC Raiders
PS5 , Xbox Series X/S , PC
Rock Paper Shotgun is better when you sign in
Sign in and join us on our journey to discover strange and compelling PC games.
