Warhammer 40,000: Rogue Trader review: engrossing, obscure and absolutely exhausting
In the grim darkness of the far future, there is only More
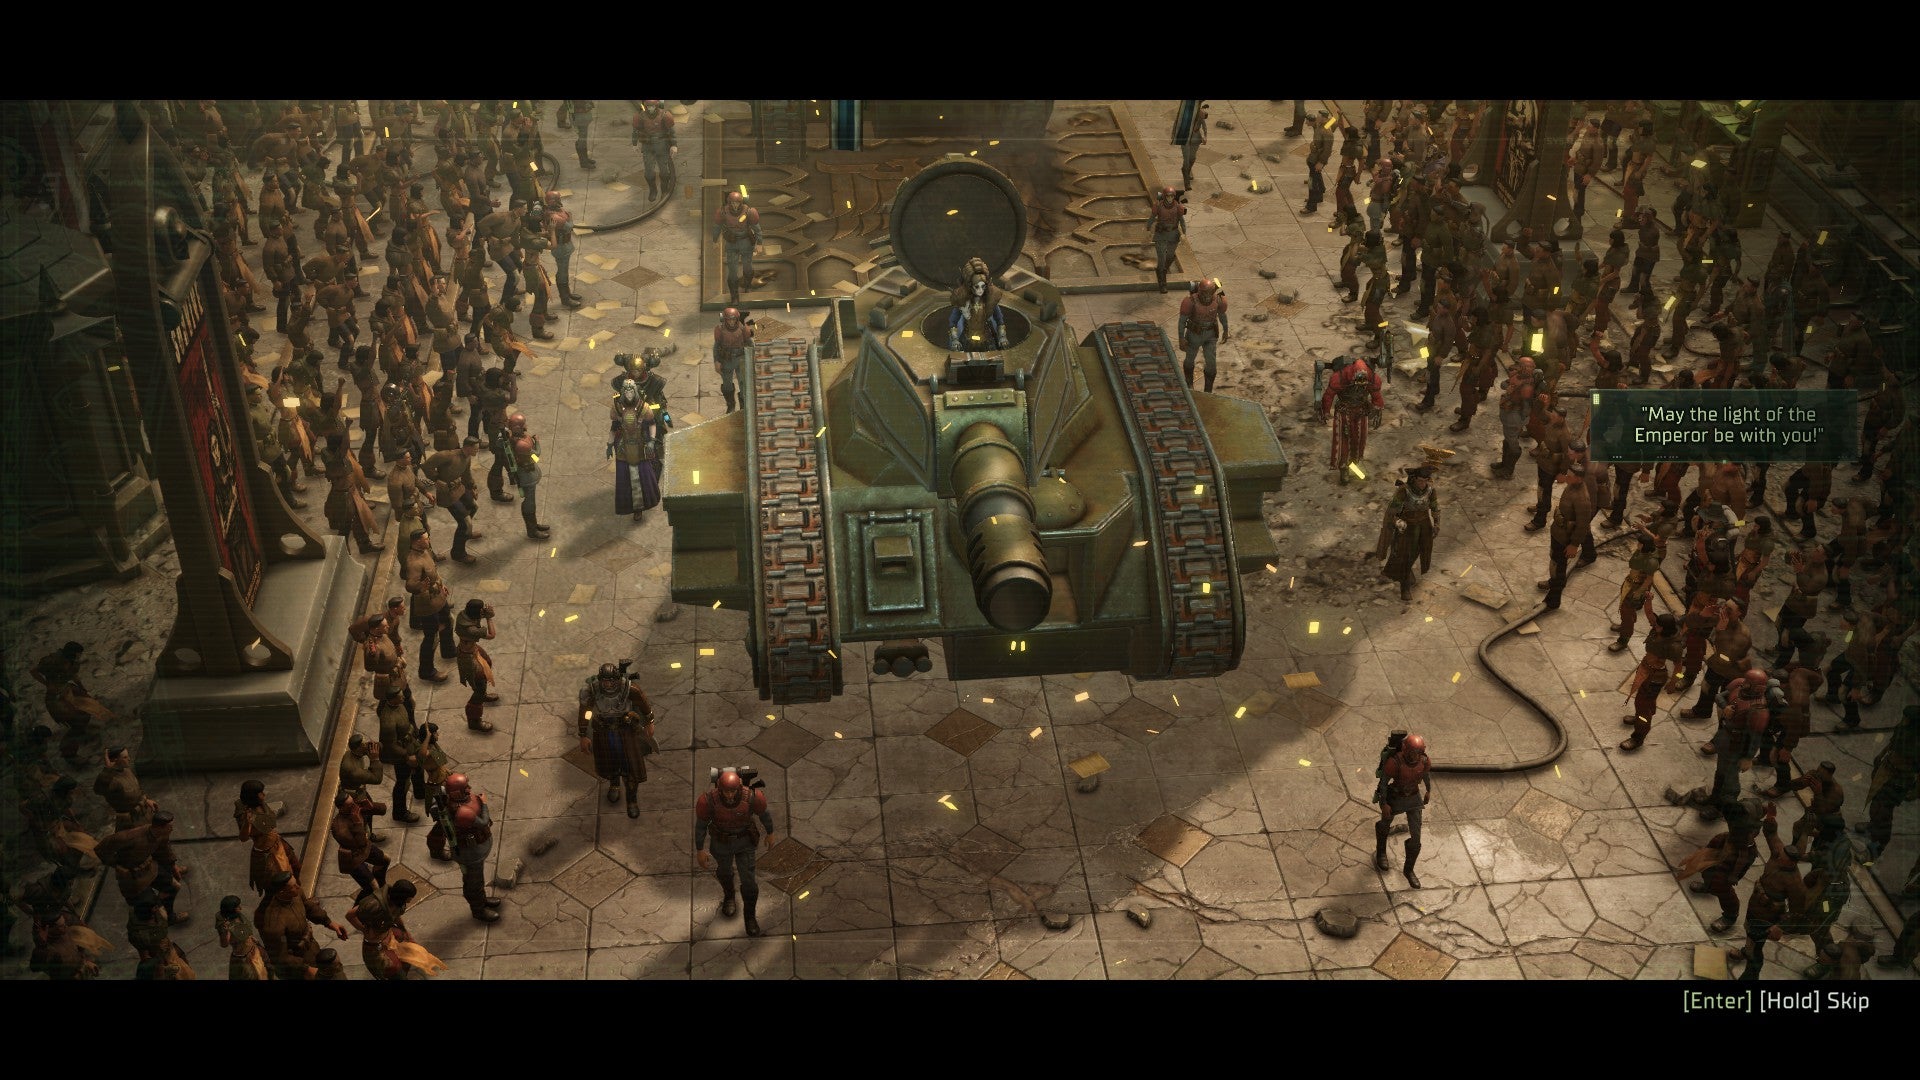
Image credit:Owlcat Games/RockPaperShotgun

- Developer: Owlcat Games
- Publisher: Owlcat Games
- Release: December 7th 2023
- On: Windows
- From: Steam , Epic Games Store , GOG
- Price: £42.99/€50/$54.68
- Reviewed on: Intel Core-i7 12700F, 16GB RAM, Nvidia RTX 3060, Windows 11
In the festively grim universe of Warhammer 40,000, space is sometimes racked by Warp storms – terrible cyclones of Chaos energy that have a catastrophic effect on imperial communications. One such storm hits the Koronus Expanse during the events of Warhammer 40,000: Rogue Trader , erasing starcharts and obliging your character - a newly minted Rogue Trader, aka High Gothic Commander Shepard - to re-discover the systems and planets that make up your predecessor Theodora’s dominions, while gathering an entourage of indecently customisable warriors, and hunting down a series of badniks that include a mysterious Chaos cult.
Warp storms sometimes have relativistic consequences. Voidship crews may be stranded for decades in transit: you will meet characters in this vast, brooding RPG who arrived at their destinations to find the battles they were sent to fight already passed into legend, the people they were sent to meet long since dead or departed. Something similar has happened to this review, which was supposed to be published in early December. Did I dramatically underestimate the amount of playtime involved, despite being told months in advance by developers Owlcat that Rogue Trader is well over 100 hours long ? Nonsense. It’s all because of those pesky Chaos disruptions, you see. It’s Chaos that’s to blame.
The Koronus Expanse is a fickle environment even without the Warp storms. Located on the grey fringes of the Imperium of Man, it’s a colonial melting pot of shifting allegiances and useful cynicism, where humans, xenos, mutants, heretics and true believers rub shoulders in the marketplace, and where noble dynasties plot with or against each other while their serfs prepare for revolution (often, but not always, with the discreet assistance of Chaos agents). Ranging from haunted space hulks through lush jungle planets to the crackling Tesla monasteries of the Adeptus Mechanicus, it’s a suppurating, amoral waterhole of a setting where you can strike deals with known pirates, hire Eldar rangers and openly describe yourself as a Chaos god’s anointed, without being struck down by a devouter party member – or at least, not for a good few hours of playtime.
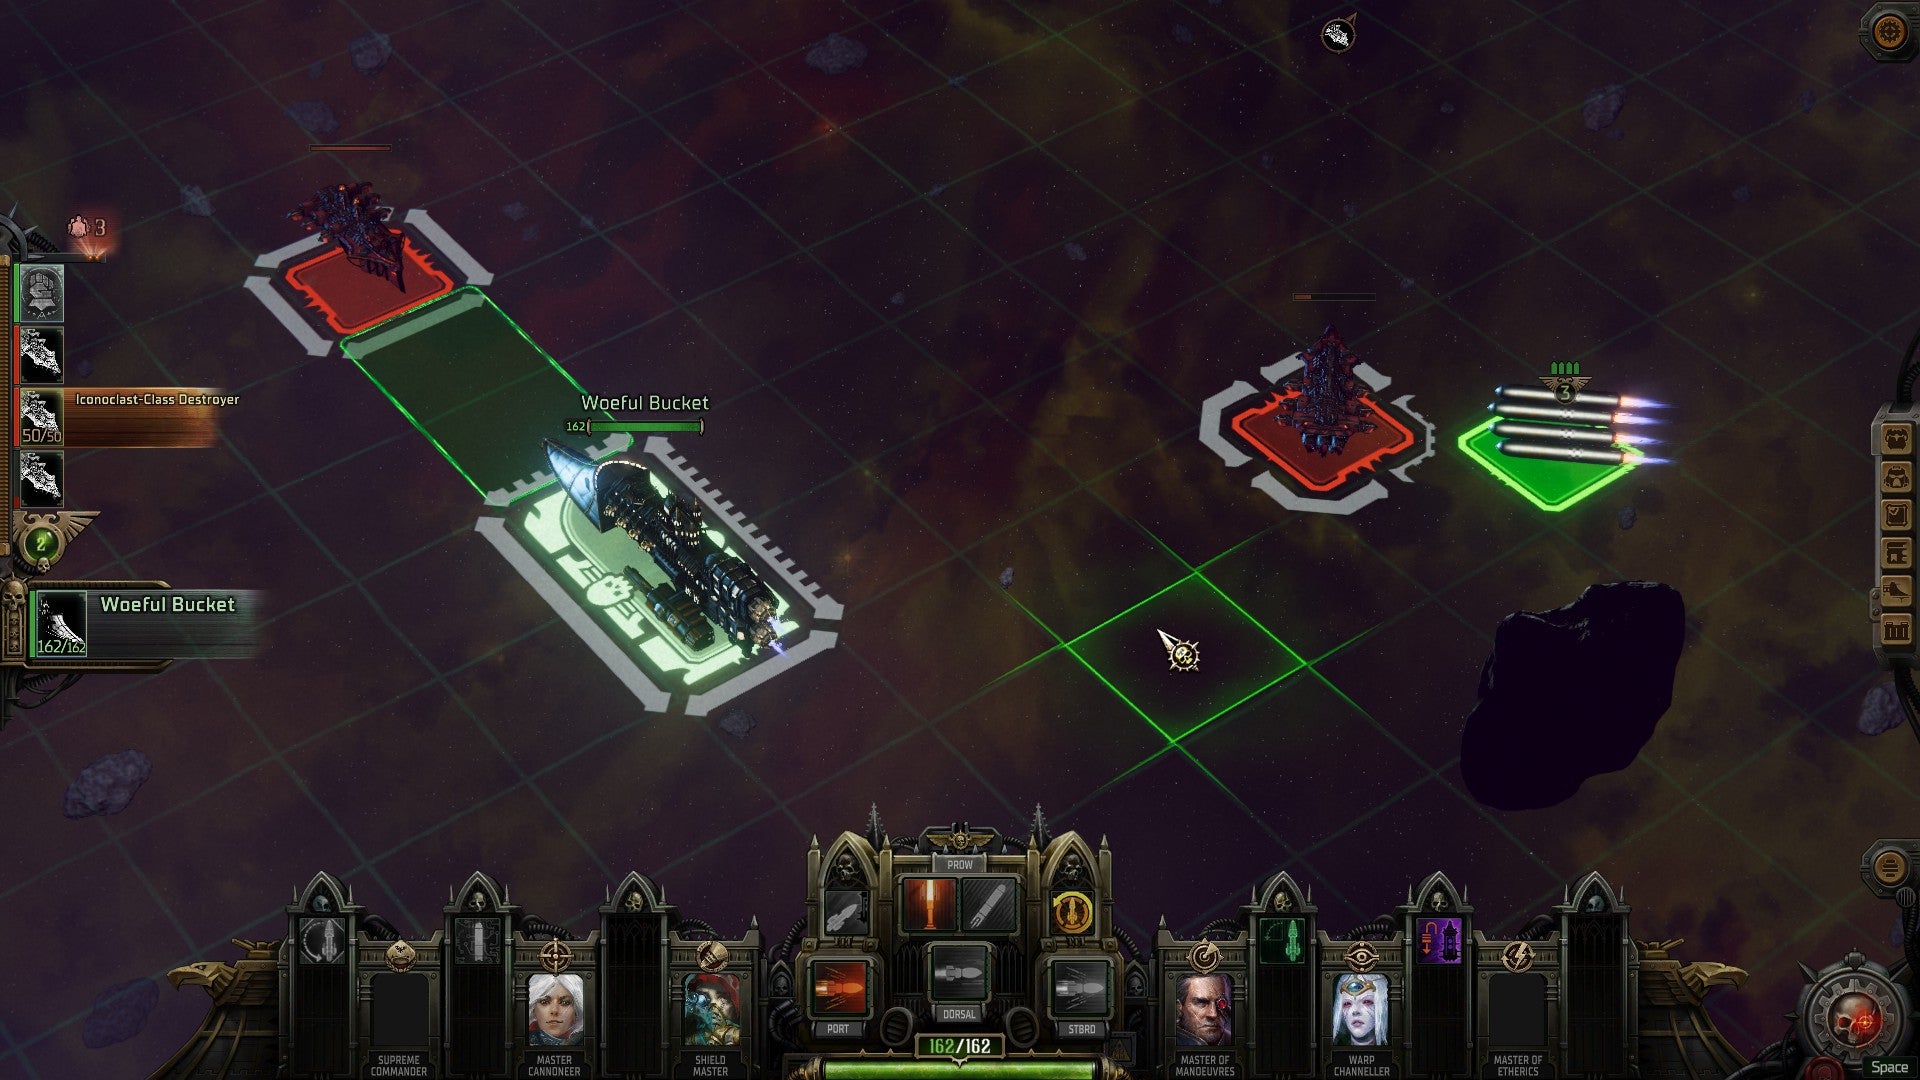
Image credit:Owlcat Games/RockPaperShotgun
Come to it fresh from one of the less… talkative Warhammer videogames, and you may be surprised by the, whisper it, tolerance on show. Playing as a closet Chaos worshipper with a streak of Iconoclasm (the least murderous of the game’s three philosophical alignments, defined by sympathy towards underdogs and a dislike of needless suffering), it took me a while to grasp that I could get away with pretty much anything. 20 hours in, I fell into conversation with a fire-and-brimstone cleric who pressed me about my real sympathies. I decided to go for broke and declare that, yep, I’m Team Chaos, thanks. Instead of demanding my execution, the other character burst out laughing. “Well, at least you’re honest about it.” In fairness, Rogue Traders aren’t like regular folk: they have Emperor-given license to bend the rules, providing the overall result is to bring more worlds into the Imperium’s clutches. The appeal of playing one, then, is being able to simultaneously lord over and lose yourself within a setting that is typically only depicted in videogames from the perspectives of soldiers and generals.
The Koronus Expanse is an intriguing cross-section of Warhammer 40,000’s many silly extremist ideologies. The same is true of your entourage, who make the crew of the good ship Normandy look like a bunch of mild-mannered bureaucrats. Everybody in your gallant band is some kind of weirdo bigot with suppressed violent intentions towards one or more of the rest. Every character has an absurdly convoluted origin story that stretches back centuries, including a few loyalty-quest-defining terrible secrets that soon bubble to the surface. Everybody is a mixture of friend and enemy and ticking timebomb. If you thought Ashley vs Kaiden in Mass Effect was too much stress, just wait till you meet Idira, a Psyker who is doomed to gradually succumb to demonic possession, and Argenta, a zealous Sister of Battle – both are convinced from the outset that the other one is a traitor. Deeper in, there are murdery Dark Elves, slightly less murdery non-Dark Elves and genetically engineered werewolf Space Marines with an unbridled passion for song.
Oscillating between all these viciously opposed worldviews, including an overlapping social dynamic of rich vs poor, is the most enjoyable aspect of Rogue Trader’s story. It’s less enjoyable when you fixate on the main, chapter-based plot, which is incredibly long-winded, and follows a steady rhythm of landing on a planet, talking to a few people to unlock quest areas, then traipsing across a fundamentally linear map to a movie-of-the-week villain.
Individual scenarios can be gripping – all have multiple outcomes linked to your alignment, and some have a puzzle element, such as (to pick a very early example) identifying and tracking down the right ingredients for an alchemical spawning vat. The writing is as dense and exhausting as you’d expect from a Warhammer game, but it generally keeps things lively. In particular, I always loved bringing Idira and my three-eyed Navigator, Cassia, along to chinwags, because Idira can hear disembodied spirits while Cassia sees people as colours, which leads to occasional interjections like “this man’s soul is the colour of a sewage leak on a lazy Sunday afternoon in April, and by the way, the voices say he’s got a Melta launcher down his trousers”.

Image credit:Owlcat Games/RockPaperShotgun
There’s lots to digest, moment to moment. But where obvious rival Baldur’s Gate 3 is an outright sandbox that almost handles like an immersive sim, Rogue Trader is fundamentally a march on the waypoint, for all its opulent wording and framing. While extravagantly built, to the point that you sometimes struggle to see your characters, the tabletop-style maps harbour few exciting secrets beyond caches of loot, traps and incidental lore pop-ups. You’ll want to make a point of gathering the loot regardless, because gifting it to other factions is how you’ll raise your overall Profit Factor as Rogue Trader and gain access to juicier options from merchants.
One reason Rogue Trader is so long is that you’ll spend a lot of time playing another game within it, a game I like to call “Find The Buff”. The character customisation sees you choosing a social background, world of origin, core stats, and guiding myths and nightmares together with an “archetype” or class – a big fat Wheel O’ Unlocks with Warhammer-brand pointy bits. You gain access to one of three secondary archetypes at level 17, with a final “exemplar” archetype unlocked past level 36. In the course of filling out these archetypes, you will pile on dozens upon dozens of active and passive abilities and modifiers, a feast of options that propels Rogue Trader well beyond the XCOM reskin initially suggested by grid-based layouts of full or half-shield cover.
The range of things that can happen based on any single character action can be absolutely wild. My Eldar ranger Yrliet, for example, has unlocked an ability that causes her next shot to drive the target a few squares out of cover while inflicting reduced damage. This might shunt the target into the gaze of my Navigator, who has a passive that reduces the dodge and hit chance of any enemy she can see, making her a great partner to Yrliet.

Image credit:Owlcat Games/RockPaperShotgun
It might also trigger a reaction attack from Idira, who I’ve transformed from a backline support into a kind of magic assassin. If the reaction attack kills the target, and one of my strutting noble characters has decreed that Idira is their Servant for this battle, it might power that noble character up in various ways. But given that Idira is wielding a cursed sword, the reaction attack might also destabilise the veil between mortal and Chaos realms, summoning a demon such as a Bloodletter, just when I thought I had the enemy on the ropes. All this, because my stupid sniper couldn’t be arsed to shoot through cover.
If you love optimising the hell out of a party and chaining their capabilities to moderately break the base systems and stat balancing, Rogue Trader is practically a class-A narcotic. One thing I especially love doing is stacking abilities that confer extra turns, movement points and action points, so as to turn one party member into a sadistic timegod, “stunlocking” the enemy team behind an infinite cascade of moves within moves within moves. Very infrequently, you can have an appropriately overclocked party member clear out a whole room before the slowest of their allies takes a single turn.
I also love the Grand Strategist archetype, who applies different buffs to certain areas and mods terrain – there’s a GS ability that gives characters a free move toward a specific patch of ground, for bonus blitzkrieg. More immediately, I get a real kick out of alternating attack types as the Arch-Militant so as to earn “versatility” and increase their Weapon and Ballistic stats.
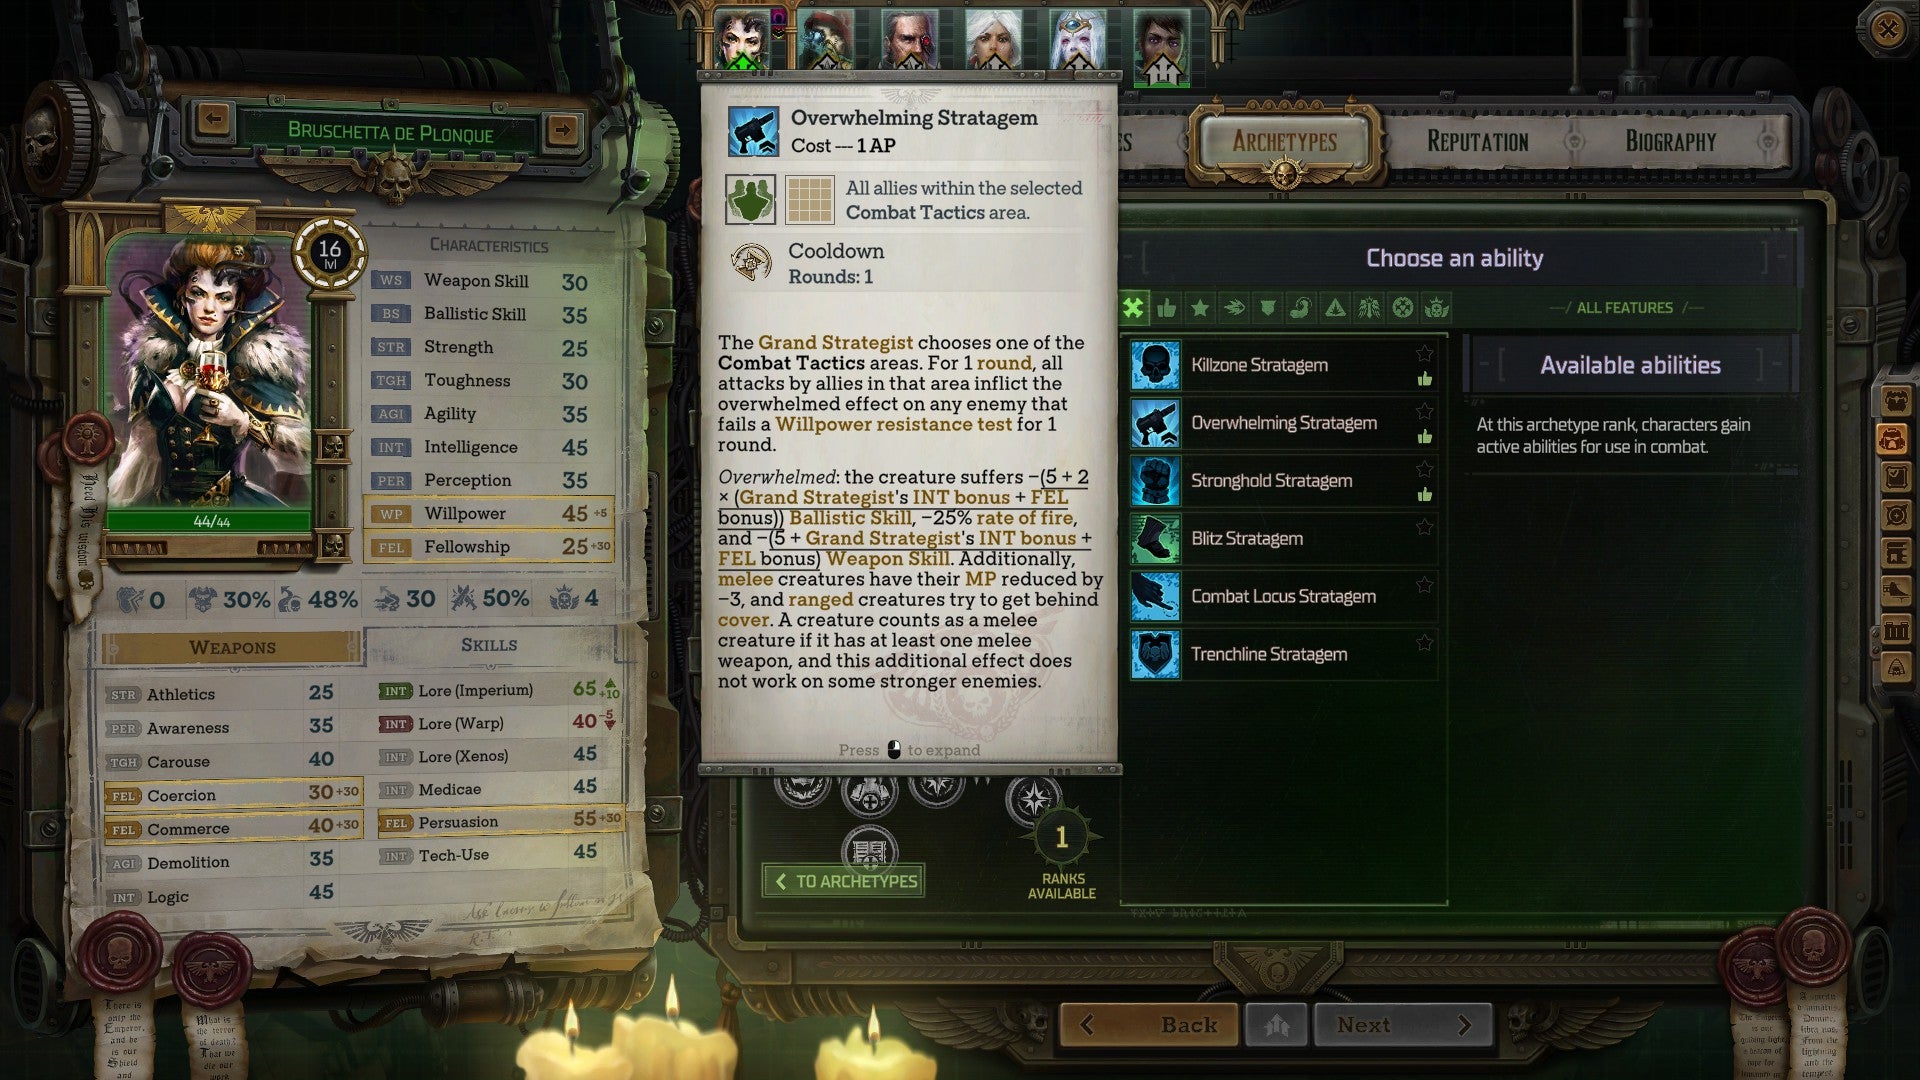
Image credit:Owlcat Games/RockPaperShotgun
Each battle and every turn in Rogue Trader is, in short, a frightfully complex energy transaction between characters, enemies, the terrain and the systems - a work of calculation that can be immensely gratifying but also, a real headache to follow. That’s partly inevitable when you have this many variables in play, but the presentation also obscures many of the moving parts – hence, “Find The Buff”.
Status effects are shown on a vertigo-inducing right-click character sheet, with mouse-over pop-ups that don’t quite explain enough. These pop-ups only display the initial, non-upgraded form of each unlockable trait, for example, so if you want to properly assess all the modifications you’ve made before committing to an action, you’ll need to retrace your steps through the archetype screens. The combat log, similarly, can be frustratingly recalcitrant on why, for instance, a character has just earned an extra turn or suffered Warp damage out of nowhere. I feel bad about criticising Rogue Trader’s UI designers, given how much Videogame they have to distil and express, but I would point to Darkest Dungeon 2 ’s system of status tokens as evidence that readability doesn’t have to be at odds with indecent tactical depth.
Rogue Trader expects you to put the work in to understand these things. It also expects you to be good at visualising scenarios based on arcane maths equations. Each unlock slot on the archetype wheel corresponds to several tabbed lists of generic and specialised abilities or traits, together with weapon or equipment proficiencies and basic stat buffs.

Image credit:Owlcat Games/RockPaperShotgun
As I noted in my write-up for embargo , picturing them in action takes a lot of effort. You’ll peer at the descriptive text like a novice monk practising their Latin, and gradually realise that ah, what this basically does is punish an enemy for moving or being moved. It can be a fun challenge, but again, a touch more transparency would have made a big difference: in particular, presenting all the level-up options as tabbed lists makes them feel interchangeable, with too little visual variation between icons. As it is, while I did enjoy wrestling with the intricacies, I’ve never played an RPG in which the sight of a level-up notification made me quit more often than Rogue Trader. I’ve also played few RPGs that are as hard to pick up after an extended absence: you have to spend at least a session remembering what all your characters do.
The difficulty memorising the specifics is exacerbated by the fact that many of the game’s battles are filler, particularly on Normal difficulty – there are lots of granular difficulty options to fiddle with, but to understand how they affect the game, you’ll need to play a couple dozen hours on a default setting. Boss fights against demons and the like with very specialised quirks and super-moves are a delight to figure out. Scraps with Cutthroat Rebel and his many, many associates are just there to slow you down. This is a charge I would sadly level against much of Rogue Trader, including the space battles featuring your private voidship, which are simplified turn-based skirmishes with the additional problem of inertia and turning circles.
Had I tried to write up Rogue Trader for embargo, I suspect I would have disliked it a lot more. Much as I try to distance myself from pressures cultivated by review conditions, having a game this gigantic lobbed at your calendar inevitably leads to burnout and impatience. Rogue Trader is a lot more entertaining when you can dip in as you please, providing you keep copious notes, but even then, there will be moments when you feel overwhelmed. The game’s appetite for the pomp and pageantry of Warhammer 40,000 is at once its best and worst quality. Sometimes, it’s a gorgeously Gothic gateau noir that teems with strange and different flavours, such that you can spend hours guessing at the ingredients. But sometimes the flavours obliterate each other, and you just feel like you’re trying to swallow a cathedral.
Find out how we conduct our reviews by reading our review policy .
Warhammer 40,000: Rogue Trader
PS5 , Xbox Series X/S , PC , Mac
Rock Paper Shotgun is better when you sign in
Sign in and join us on our journey to discover strange and compelling PC games.

All 75 Arc Raiders Blueprints and where to get them
These areas have the highest chance of giving you Blueprints

Image credit:Rock Paper Shotgun/Embark Studios

Looking for more Arc Raiders Blueprints? It’s a special day when you find a Blueprint, as they’re among the most valuable items in Arc Raiders. If you find a Blueprint that you haven’t already found, then you must make sure you hold onto it at all costs, because Blueprints are the key to one of the most important and powerful systems of meta-progression in the game.
This guide aims to be the very best guide on Blueprints you can find, starting with a primer on what exactly they are and how they work in Arc Raiders, before delving into exactly where to get Blueprints and the very best farming spots for you to take in your search.
We’ll also go over how to get Blueprints from other unlikely activities, such as destroying Surveyors and completing specific quests. And you’ll also find the full list of all 75 Blueprints in Arc Raiders on this page (including the newest Blueprints added with the Cold Snap update , such as the Deadline Blueprint and Firework Box Blueprint), giving you all the information you need to expand your own crafting repertoire.
In this guide:
- What are Blueprints in Arc Raiders?
- Full Blueprint list: All crafting recipes
- Where to find Blueprints in Arc Raiders Blueprints obtained from quests Blueprints obtained from Trials Best Blueprint farming locations

What are Blueprints in Arc Raiders?
Blueprints in Arc Raiders are special items which, if you manage to extract with them, you can expend to permanently unlock a new crafting recipe in your Workshop. If you manage to extract from a raid with an Anvil Blueprint, for example, you can unlock the ability to craft your very own Anvil Pistol, as many times as you like (as long as you have the crafting materials).
To use a Blueprint, simply open your Inventory while in the lobby, then right-click on the Blueprint and click “Learn And Consume” . This will permanently unlock the recipe for that item in your Workshop. As of the Stella Montis update, there are allegedly 75 different Blueprints to unlock - although only 68 are confirmed to be in the game so far. You can see all the Blueprints you’ve found and unlocked by going to the Workshop menu, and hitting “R” to bring up the Blueprint screen.
It’s possible to find duplicates of past Blueprints you’ve already unlocked. If you find these, then you can either sell them, or - if you like to play with friends - you can take it into a match and gift it to your friend so they can unlock that recipe for themselves. Another option is to keep hold of them until the time comes to donate them to the Expedition.
Full Blueprint list: All crafting recipes
Below is the full list of all the Blueprints that are currently available to find in Arc Raiders, and the crafting recipe required for each item:
| Blueprint | Type | Recipe | Crafted At |
|---|---|---|---|
| Bettina | Weapon | 3x Advanced Mechanical Components 3x Heavy Gun Parts 3x Canister | Gunsmith 3 |
| Blue Light Stick | Quick Use | 3x Chemicals | Utility Station 1 |
| Aphelion | Weapon | 3x Magnetic Accelerator 3x Complex Gun Parts 1x Matriarch Reactor | Gunsmith 3 |
| Combat Mk. 3 (Flanking) | Augment | 2x Advanced Electrical Components 3x Processor | Gear Bench 3 |
| Combat Mk. 3 (Aggressive) | Augment | 2x Advanced Electrical Components 3x Processor | Gear Bench 3 |
| Complex Gun Parts | Material | 2x Light Gun Parts 2x Medium Gun Parts 2x Heavy Gun Parts | Refiner 3 |
| Fireworks Box | Quick Use | 1x Explosive Compound 3x Pop Trigger | Explosives Station 2 |
| Gas Mine | Mine | 4x Chemicals 2x Rubber Parts | Explosives Station 1 |
| Green Light Stick | Quick Use | 3x Chemicals | Utility Station 1 |
| Pulse Mine | Mine | 1x Crude Explosives 1x Wires | Explosives Station 1 |
| Seeker Grenade | Grenade | 1x Crude Explosives 2x ARC Alloy | Explosives Station 1 |
| Looting Mk. 3 (Survivor) | Augment | 2x Advanced Electrical Components 3x Processor | Gear Bench 3 |
| Angled Grip II | Mod | 2x Mechanical Components 3x Duct Tape | Gunsmith 2 |
| Angled Grip III | Mod | 2x Mod Components 5x Duct Tape | Gunsmith 3 |
| Hullcracker | Weapon | 1x Magnetic Accelerator 3x Heavy Gun Parts 1x Exodus Modules | Gunsmith 3 |
| Launcher Ammo | Ammo | 5x Metal Parts 1x Crude Explosives | Workbench 1 |
| Anvil | Weapon | 5x Mechanical Components 5x Simple Gun Parts | Gunsmith 2 |
| Anvil Splitter | Mod | 2x Mod Components 3x Processor | Gunsmith 3 |
| ??? | ??? | ??? | ??? |
| Barricade Kit | Quick Use | 1x Mechanical Components | Utility Station 2 |
| Blaze Grenade | Grenade | 1x Explosive Compound 2x Oil | Explosives Station 3 |
| Bobcat | Weapon | 3x Advanced Mechanical Components 3x Light Gun Parts | Gunsmith 3 |
| Osprey | Weapon | 2x Advanced Mechanical Components 3x Medium Gun Parts 7x Wires | Gunsmith 3 |
| Burletta | Weapon | 3x Mechanical Components 3x Simple Gun Parts | Gunsmith 1 |
| Compensator II | Mod | 2x Mechanical Components 4x Wires | Gunsmith 2 |
| Compensator III | Mod | 2x Mod Components 8x Wires | Gunsmith 3 |
| Defibrillator | Quick Use | 9x Plastic Parts 1x Moss | Medical Lab 2 |
| ??? | ??? | ??? | ??? |
| Equalizer | Weapon | 3x Magnetic Accelerator 3x Complex Gun Parts 1x Queen Reactor | Gunsmith 3 |
| Extended Barrel | Mod | 2x Mod Components 8x Wires | Gunsmith 3 |
| Extended Light Mag II | Mod | 2x Mechanical Components 3x Steel Spring | Gunsmith 2 |
| Extended Light Mag III | Mod | 2x Mod Components 5x Steel Spring | Gunsmith 3 |
| Extended Medium Mag II | Mod | 2x Mechanical Components 3x Steel Spring | Gunsmith 2 |
| Extended Medium Mag III | Mod | 2x Mod Components 5x Steel Spring | Gunsmith 3 |
| Extended Shotgun Mag II | Mod | 2x Mechanical Components 3x Steel Spring | Gunsmith 2 |
| Extended Shotgun Mag III | Mod | 2x Mod Components 5x Steel Spring | Gunsmith 3 |
| Remote Raider Flare | Quick Use | 2x Chemicals 4x Rubber Parts | Utility Station 1 |
| Heavy Gun Parts | Material | 4x Simple Gun Parts | Refiner 2 |
| Venator | Weapon | 2x Advanced Mechanical Components 3x Medium Gun Parts 5x Magnet | Gunsmith 3 |
| Il Toro | Weapon | 5x Mechanical Components 6x Simple Gun Parts | Gunsmith 1 |
| Jolt Mine | Mine | 1x Electrical Components 1x Battery | Explosives Station 2 |
| Explosive Mine | Mine | 1x Explosive Compound 1x Sensors | Explosives Station 3 |
| Jupiter | Weapon | 3x Magnetic Accelerator 3x Complex Gun Parts 1x Queen Reactor | Gunsmith 3 |
| Light Gun Parts | Material | 4x Simple Gun Parts | Refiner 2 |
| Lightweight Stock | Mod | 2x Mod Components 5x Duct Tape | Gunsmith 3 |
| Lure Grenade | Grenade | 1x Speaker Component 1x Electrical Components | Utility Station 2 |
| Medium Gun Parts | Material | 4x Simple Gun Parts | Refiner 2 |
| Torrente | Weapon | 2x Advanced Mechanical Components 3x Medium Gun Parts 6x Steel Spring | Gunsmith 3 |
| Muzzle Brake II | Mod | 2x Mechanical Components 4x Wires | Gunsmith 2 |
| Muzzle Brake III | Mod | 2x Mod Components 8x Wires | Gunsmith 3 |
| Padded Stock | Mod | 2x Mod Components 5x Duct Tape | Gunsmith 3 |
| Shotgun Choke II | Mod | 2x Mechanical Components 4x Wires | Gunsmith 2 |
| Shotgun Choke III | Mod | 2x Mod Components 8x Wires | Gunsmith 3 |
| Shotgun Silencer | Mod | 2x Mod Components 8x Wires | Gunsmith 3 |
| Showstopper | Grenade | 1x Advanced Electrical Components 1x Voltage Converter | Explosives Station 3 |
| Silencer I | Mod | 2x Mechanical Components 4x Wires | Gunsmith 2 |
| Silencer II | Mod | 2x Mod Components 8x Wires | Gunsmith 3 |
| Snap Hook | Quick Use | 2x Power Rod 3x Rope 1x Exodus Modules | Utility Station 3 |
| Stable Stock II | Mod | 2x Mechanical Components 3x Duct Tape | Gunsmith 2 |
| Stable Stock III | Mod | 2x Mod Components 5x Duct Tape | Gunsmith 3 |
| Tagging Grenade | Grenade | 1x Electrical Components 1x Sensors | Utility Station 3 |
| Tempest | Weapon | 3x Advanced Mechanical Components 3x Medium Gun Parts 3x Canister | Gunsmith 3 |
| Trigger Nade | Grenade | 2x Crude Explosives 1x Processor | Explosives Station 2 |
| Vertical Grip II | Mod | 2x Mechanical Components 3x Duct Tape | Gunsmith 2 |
| Vertical Grip III | Mod | 2x Mod Components 5x Duct Tape | Gunsmith 3 |
| Vita Shot | Quick Use | 2x Antiseptic 1x Syringe | Medical Lab 3 |
| Vita Spray | Quick Use | 3x Antiseptic 1x Canister | Medical Lab 3 |
| Vulcano | Weapon | 1x Magnetic Accelerator 3x Heavy Gun Parts 1x Exodus Modules | Gunsmith 3 |
| Wolfpack | Grenade | 2x Explosive Compound 2x Sensors | Explosives Station 3 |
| Red Light Stick | Quick Use | 3x Chemicals | Utility Station 1 |
| Smoke Grenade | Grenade | 14x Chemicals 1x Canister | Utility Station 2 |
| Deadline | Mine | 3x Explosive Compound 2x ARC Circuitry | Explosives Station 3 |
| Trailblazer | Grenade | 1x Explosive Compound 1x Synthesized Fuel | Explosives Station 3 |
| Tactical Mk. 3 (Defensive) | Augment | 2x Advanced Electrical Components 3x Processor | Gear Bench 3 |
| Tactical Mk. 3 (Healing) | Augment | 2x Advanced Electrical Components 3x Processor | Gear Bench 3 |
| Yellow Light Stick | Quick Use | 3x Chemicals | Utility Station 1 |
Note: The missing Blueprints in this list likely have not actually been added to the game at the time of writing, because none of the playerbase has managed to find any of them. As they are added to the game, I will update this page with the most relevant information so you know exactly how to get all 75 Arc Raiders Blueprints.
Where to find Blueprints in Arc Raiders
Below is a list of all containers, modifiers, and events which maximise your chances of finding Blueprints:
- Certain quests reward you with specific Blueprints .
- Completing Trials has a high chance of offering Blueprints as rewards.
- Surveyors have a decent chance of dropping Blueprints on death.
- High loot value areas tend to have a greater chance of spawning Blueprints.
- Night Raids and Storms may increase rare Blueprint spawn chances in containers.
- Containers with higher numbers of items may have a higher tendency to spawn Blueprints. As a result, Blue Gate (which has many “large” containers containing multiple items) may give you a higher chance of spawning Blueprints.
- Raider containers (Raider Caches, Weapon Boxes, Medical Bags, Grenade Tubes) have increased Blueprint drop rates. As a result, the Uncovered Caches event gives you a high chance of finding Blueprints.
- Security Lockers have a higher than average chance of containing Blueprints.
- Certain Blueprints only seem to spawn under specific circumstances: Tempest Blueprint only spawns during Night Raid events. Vulcano Blueprint only spawns during Hidden Bunker events. Jupiter and Equaliser Blueprints only spawn during Harvester events.

Raider Caches, Weapon Boxes, and other raider-oriented container types have a good chance of offering Blueprints. |Image credit:Rock Paper Shotgun/Embark Studios
Blueprints have a very low chance of spawning in any container in Arc Raiders, around 1-2% on average. However, there is a higher chance of finding Blueprints in particular container types. Specifically, you can find more Blueprints in Raider containers and security lockers.
Beyond this, if you’re looking for Blueprints you should focus on regions of the map which are marked as having particularly high-value loot. Areas such as the Control Tower in Dam Battlegrounds, the Arrival and Departure Buildings in Spaceport, and Pilgrim’s Peak in Blue Gate all have a better-than-average chance of spawning Blueprints somewhere amongst all their containers. Night Raids and Electromagnetic Storm events also increase the drop chances of certain Blueprints .
In addition to these containers, you can often loot Blueprints from destroyed Surveyors - the largest of the rolling ball ARC. Surveyors are more commonly found on the later maps - Spaceport and Blue Gate - and if one spawns in your match, you’ll likely see it by the blue laser beam that it casts into the sky while “surveying”.
Surveyors are quite well-armoured and will very speedily run away from you once it notices you, but if you can take one down then make sure you loot all its parts for a chance of obtaining certain unusual Blueprints.
Blueprints obtained from quests
One way in which you can get Blueprints is by completing certain quests for the vendors in Speranza. Some quests will reward you with a specific item Blueprint upon completion, so as long as you work through all the quests in Arc Raiders, you are guaranteed those Blueprints.
Here is the full list of all Blueprints you can get from quest rewards:
- Trigger Nade Blueprint: Rewarded after completing “Sparks Fly”.
- Lure Grenade Blueprint: Rewarded after completing “Greasing Her Palms”.
- Burletta Blueprint: Rewarded after completing “Industrial Espionage”.
- Hullcracker Blueprint (and Launcher Ammo Blueprint): Rewarded after completing “The Major’s Footlocker”.
Alas, that’s only 4 Blueprints out of a total of 75 to unlock, so for the vast majority you will need to find them yourself during a raid. If you’re intent on farming Blueprints, then it’s best to equip yourself with cheap gear in case you lose it, but don’t use a free loadout because then you won’t get a safe pocket to stash any new Blueprint you find. No pain in Arc Raiders is sharper than failing to extract with a new Blueprint you’ve been after for a dozen hours already.

One of the best ways to get Blueprints is by hitting three stars on all five Trials every week. |Image credit:Rock Paper Shotgun/Embark Studios
Blueprints obtained from Trials
One of the very best ways to get Blueprints is as rewards for completing Trials in Arc Raiders. Trials are unlocked from Level 15 onwards, and allow you to earn rewards by focusing on certain tasks over the course of several raids. For example, one Trial might task you with dealing damage to Hornets, while another might challenge you to loot Supply Drops.
Trials refresh on a weekly basis, with a new week bringing five new Trials. Each Trial can offer up to three rewards after passing certain score milestones, and it’s possible to receive very high level loot from these reward crates - including Blueprints. So if you want to unlock as many Blueprints as possible, you should make a point of completing as many Trials as possible each week.
Best Blueprint farming locations
The very best way to get Blueprints is to frequent specific areas of the maps which combine high-tier loot pools with the right types of containers to search. Here are my recommendations for where to find Blueprints on every map, so you can always keep the search going for new crafting recipes to unlock.

Image credit:Rock Paper Shotgun/Embark Studios
Dam Battlegrounds
The best places to farm Blueprints on Dam Battlegrounds are the Control Tower, Power Generation Complex, Ruby Residence, and Pale Apartments . The first two regions, despite only being marked on the map as mid-tier loot, contain a phenomenal number of containers to loot. The Control Tower can also contain a couple of high-tier Security Lockers - though of course, you’ll need to have unlocked the Security Breach skill at the end of the Survival tree.
There’s also a lot of reporting amongst the playerbase that the Residential areas in the top-left of the map - Pale Apartments and Ruby Residence - give you a comparatively strong chance of finding Blueprints. Considering their size, there’s a high density of containers to loot in both locations, and they also have the benefit of being fairly out of the way. So you’re more likely to have all the containers to yourself.
Buried City
The best Blueprint farming locations on Buried City are the Santa Maria Houses, Grandioso Apartments, Town Hall, and the various buildings of the New District . Grandioso Apartments has a lower number of containers than the rest, but a high chance of spawning weapon cases - which have good Blueprint drop rates. The others are high-tier loot areas, with plenty of lootable containers - including Security Lockers.
Spaceport
The best places to find Blueprints on Spaceport are the Arrival and Departure Buildings, as well as Control Tower A6 and the Launch Towers . All these areas are labelled as high-value loot regions, and many of them are also very handily connected to one another by the Spaceport wall, which you can use to quickly run from one area to the next. At the tops of most of these buildings you’ll find at least one Security Locker, so this is an excellent farming route for players looking to find Blueprints.
The downside to looting Blueprints on Spaceport is that all these areas are hotly contested, particularly in Duos and Squads. You’ll need to be very focused and fast in order to complete the full farming route.

Image credit:Rock Paper Shotgun/Embark Studios
Blue Gate
Blue Gate tends to have a good chance of dropping Blueprints, potentially because it generally has a high number of containers which can hold lots of items; so there’s a higher chance of a Blueprint spawning in each container. In my experience, the best Blueprint farming spots on Blue Gate are Pilgrim’s Peak, Raider’s Refuge, the Ancient Fort, and the Underground Complex beneath the Warehouse .
All of these areas contain a wealth of containers to loot. Raider’s Refuge has less to loot, but the majority of the containers in and around the Refuge are raider containers, which have a high chance of containing Blueprints - particularly during major events.
Stella Montis
On the whole, Stella Montis seems to have a very low drop rate for Blueprints (though a high chance of dropping other high-tier loot). If you do want to try farming Blueprints on this map, the best places to find Blueprints in Stella Montis are Medical Research, Assembly Workshop, and the Business Center . These areas have the highest density of containers to loot on the map.
In addition to this, the Western Tunnel has a few different Security Lockers to loot, so while there’s very little to loot elsewhere in this area of the map, it’s worth hitting those Security Lockers if you spawn there at the start of a match.
That wraps up this primer on how to get all the Blueprints in Arc Raiders as quickly as possible. With the Expedition system constantly resetting a large number of players’ Blueprints, it’s more important than ever to have the most up-to-date information on where to find all these Blueprints.
While you’re here, be sure to check out our Arc Raiders best guns tier list , as well as our primers on the best skills to unlock and all the different Field Depot locations on every map.

ARC Raiders
PS5 , Xbox Series X/S , PC
Rock Paper Shotgun is better when you sign in
Sign in and join us on our journey to discover strange and compelling PC games.
