Thiollier questline guide - Elden Ring DLC
A full walkthrough of Thiollier’s questline in Shadow of the Erdtree

Image credit:Rock Paper Shotgun/Bandai Namco

How do you complete Thiollier’s questline in Elden Ring: Shadow Of The Erdtree? The mild-mannered poisioner Thiollier is a major NPC character in the Shadow Of The Erdtree DLC, and his questline, which revolves around his devotion to St. Trina, is one of the most intriguing in Elden Ring .
Thiollier’s questline runs parallel to the DLC’s main quest in the Lands of Shadow, and if you can make it to the very end, you’ll receive several excellent rewards after beating Shadow of the Erdtree’s final boss. In this guide, we’ll walk you through everything you need to know about Thiollier’s questline in Elden Ring: Shadow Of The Erdtree.
Thiollier questline steps
Here is a quick summary of all the steps to complete the Thiollier questline in the Elden Ring DLC. You can click on each step to be taken to the relevant section in our full walkthrough below:
- Speak to Thiollier at the Pillar Path Cross in the Gravesite Plain.
- Speak to Moore at the Main Gate Cross outside Belurat.
- Talk to Moore again to receive the Black Syrup item.
- Bring the Black Syrup to Thiollier.
- Ask Thiollier about the Black Syrup.
- Tell Thiollier “I’m weary of life” to receive Thiollier’s Concoction.
- Journey into the Rauh Base or past Bonny Village to break Miquella’s charm.
- (Optional) Speak to Leda and “Suggest Thiollier”.
- Speak to Thiollier at the Pillar Path Cross.
- Reload the area and speak to Thiollier again to hear he’s heading south.
- Descend into the Fissure at the bottom of the Cerulean Coast.
- Proceed through the Stone Coffin Fissure region.
- Defeat the Putrescent Knight.
- Speak to Thiollier in the Garden of Deep Purple.
- Reload the area and speak to Thiollier again.
- Imbibe St. Trina’s Nectar four times.
- Pass on St. Trina’s words to Thiollier.
- Try to pass on St. Trina’s words to Thiollier again.
- Reload the area and survive Thiollier’s invasion.
- Speak to Thiollier again.
- Imbibe St. Trina’s Nectar twice more.
- Pass on St. Trina’s most recent words to Thiollier.
- (Optional) Summon Thiollier for the NPC fight in Enir-Ilim.
- (Optional) Ask Ansbach about Thiollier.
- Summon Thiollier for the final boss fight.
- Loot Thiollier’s Hidden Needle from the final boss arena.
- Return to St. Trina after defeating the final boss.
Now let’s explain these steps in greater detail for those who aren’t sure what to do next in Thiollier’s quest.
Important: Complete Thiollier’s quest before Enir-Ilim It’s possible to accidentally lock yourself out of finishing Thiollier’s questline by progressing too far in the main story before completing all of the above steps. Once you reach Enir-Ilim and go beyond the Cleansing Chamber Anteroom Site Of Grace , Thiollier will disappear from the map. If you completed his questline before this point, you will be able to summon him for the NPC fight in Enir-Ilim. If you haven’t completed his quest by this point, then he will simply disappear forever, and you won’t be able to experience his full story.
How to start Thiollier’s quest
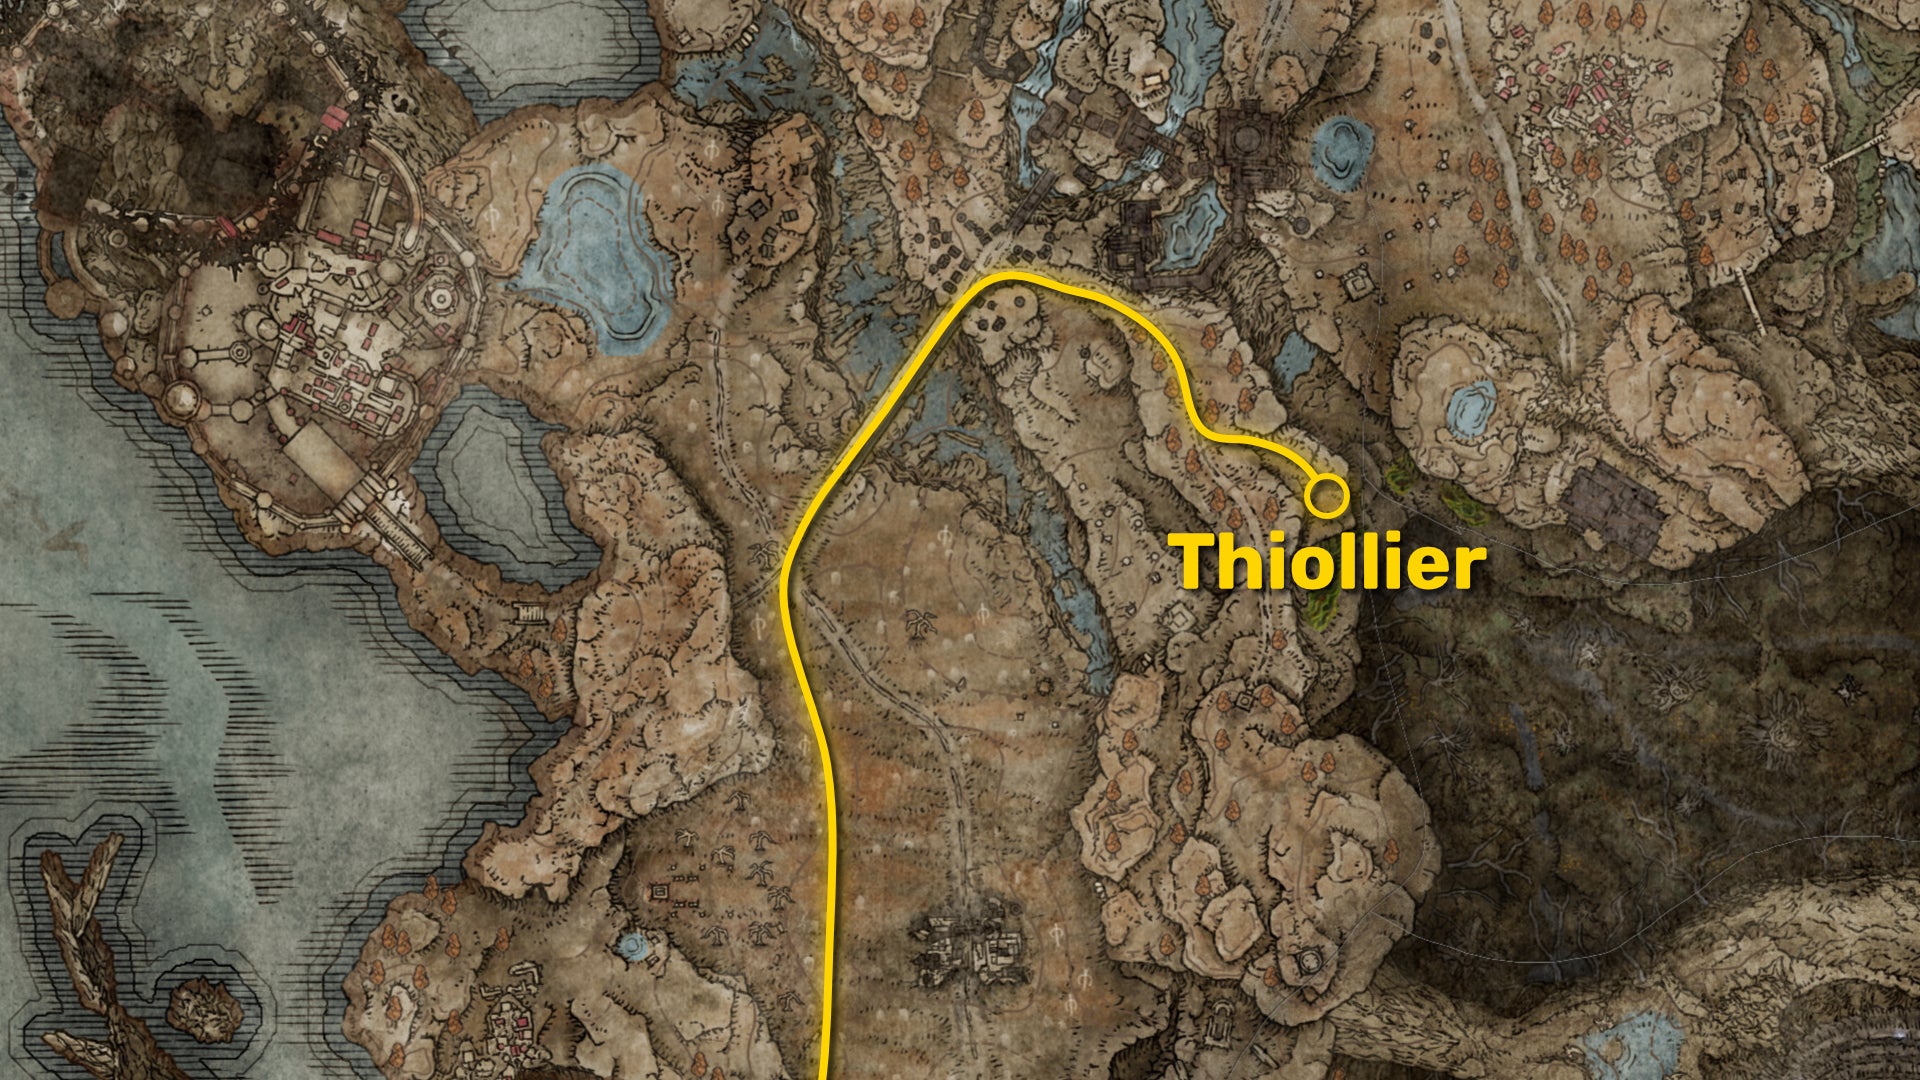
Follow this path from the start of the DLC to reach Thiollier and begin his questline. |Image credit:Rock Paper Shotgun/Bandai Namco
Where to find Thiollier
You will first find Thiollier sitting next to the Pillar Path Cross in the Gravesite Plain - the first region of the DLC map. To get there, cross the Ensis Greatbridge in the north of the region and then turn right at the Castle Front Site of Grace . Follow the road southeast and then turn left when the path splits just past the encampment. You should see a Miquella’s Cross at the end of the path; next to it is Thiollier.

Thiollier can be found sitting down next to the Pillar Path Cross. |Image credit:Rock Paper Shotgun/Bandai Namco
Speak to Thiollier and he’ll tell you a little about himself; namely that he’s weak and his only proficiency is in poison. Feel free to peruse his shop of poisonous goodies, and note that you can purchase the Deadly Poison Perfume Bottle from him.
Hoiw to begin Thiollier’s quest
Once you’ve spoken to Thiollier, head to the Main Gate Cross just outside the Belurat, Tower Settlement legacy dungeon. This can be found by following the road a short distance west from the Three-Path Cross Site Of Grace in the centre of the Gravesite Plains. There, speak to Moore if you haven’t already.

Speak to Moore and have him give you the Black Syrup to deliver to Thiollier. |Image credit:Rock Paper Shotgun/Bandai Namco
Specifically, select the option to " Talk to Moore “, and he’ll tell you that he’s been holding an item for Thiollier. He’ll give the item - Black Syrup - to you, and ask you to pass it on to Thiollier. Though it may seem like Moore’s questline more than anyone else’s, this also marks the beginning of Thiollier’s quest.
How to get Thiollier’s Concoction

Tell Thiollier you’re weary of life to receive Thiollier’s Concoction. |Image credit:Rock Paper Shotgun/Bandai Namco
Speak to Thiollier at the Pillar Path Cross again, and select the following dialogue options:
- “Give black syrup”.
- “Ask about black syrup”.
- “I’m weary of life”.
When you first give him the Black Syrup, he’ll wax lyrical about it for a while. Then when you ask him about it, he’ll tell you that if you ever feel weary of life, he can provide something for you. Go straight ahead and tell him " I’m weary of life ,” and he’ll give you Thiollier’s Concoction for free.
Be warned: you’ll die if you consume Thiollier’s Concoction. If you do drink the fatal brew, you can purchase more Thiollier’s Concoction from Thiollier’s shop for 30,000 Runes apiece. See our guide on where to use Thiollier’s Concoction for more on this item, which leads into the Dragon Communion Priestess questline .
Breaking Miquella’s Charm
<img loading=“lazy” src=“https://assetsio.gnwcdn.com/elden-ring-somewhere-a-great-rune-has-broken.jpg?width=2048&height=2048&fit=bounds&quality=85&format=jpg&auto=webp" onerror=“this.onerror=null;this.src=‘https://blogger.googleusercontent.com/img/a/AVvXsEhe7F7TRXHtjiKvHb5vS7DmnxvpHiDyoYyYvm1nHB3Qp2_w3BnM6A2eq4v7FYxCC9bfZt3a9vIMtAYEKUiaDQbHMg-ViyGmRIj39MLp0bGFfgfYw1Dc9q_H-T0wiTm3l0Uq42dETrN9eC8aGJ9_IORZsxST1AcLR7np1koOfcc7tnHa4S8Mwz_xD9d0=s16000';" alt=“The player in Elden Ring: Shadow Of The Erdtree races on horseback through a field of tall grass. A notification pops up saying: “Somewhere, a great rune has broken…”. - 7”>
You’ll need to progress beyond Scadu Altus in order to break Miquella’s charm over Leda’s band of followers. |Image credit:Rock Paper Shotgun/Bandai Namco
The next stage of Thiollier’s questline requires you to first reach either Rauh Base or the eastern section of Scadu Altus beyond Bonny Village. Progress along either of these paths far enough, and you’ll hear a great shattering sound. Moments later you’ll receive a notification:
Somewhere, a great rune has broken … And so too has a powerful charm.
Once this happens, speak to Thiollier again at the Pillar Path Cross, and he’ll tell you that, with Miquella’s charm no longer affecting him, he’s feeling haunted by memories of St. Trina - Miquella’s sleep-giving alternate self.
(Optional) Speak to Leda about Thiollier
You can also, either before or after speaking to Thiollier, head to the Highroad Cross Site Of Grace where Leda is located, and talk to her after the lifting of Miquella’s charm. She’ll resolve to start weeding out the unworthy from the group. While this is delving more into Leda’s quest than Thiollier’s, you can get a little bit of extra dialogue about Thiollier from her by selecting the option, " Suggest Thiollier “.
Don’t worry, this won’t do anything drastic. Leda will tell you that, given Thiollier’s love of St. Trina, she can’t see him as anything other than an ally to Miquella, and so she won’t make any moves against him. It also won’t stop you from then picking one of the other dialogue options while speaking to Leda, so you’ll be free to continue her quest as normal too.
Speak to Thiollier to hear he’s heading south
After speaking to Thiollier the first time following the breaking of Miquella’s charm, reload the area and speak to Thiollier again, for the final time in this location at the Pillar Path Cross. He’ll tell you that he’s heading south, in search of deep-purple water lilies that he heard Moore once speak about. Apparently they bloom on the southern shore, so he’s heading there to track down St. Trina.
What if you found St. Trina before Thiollier? If you managed to break Miquella’s charm and reach the end of the Stone Coffin Fissure region before even meeting Thiollier, then when you first meet Thiollier at the Pillar Path Cross, you have the option to tell Thiollier where he can find St. Trina. He will then be at the Garden Of Deep Purple the next time you reload the area.
Head to the Fissure
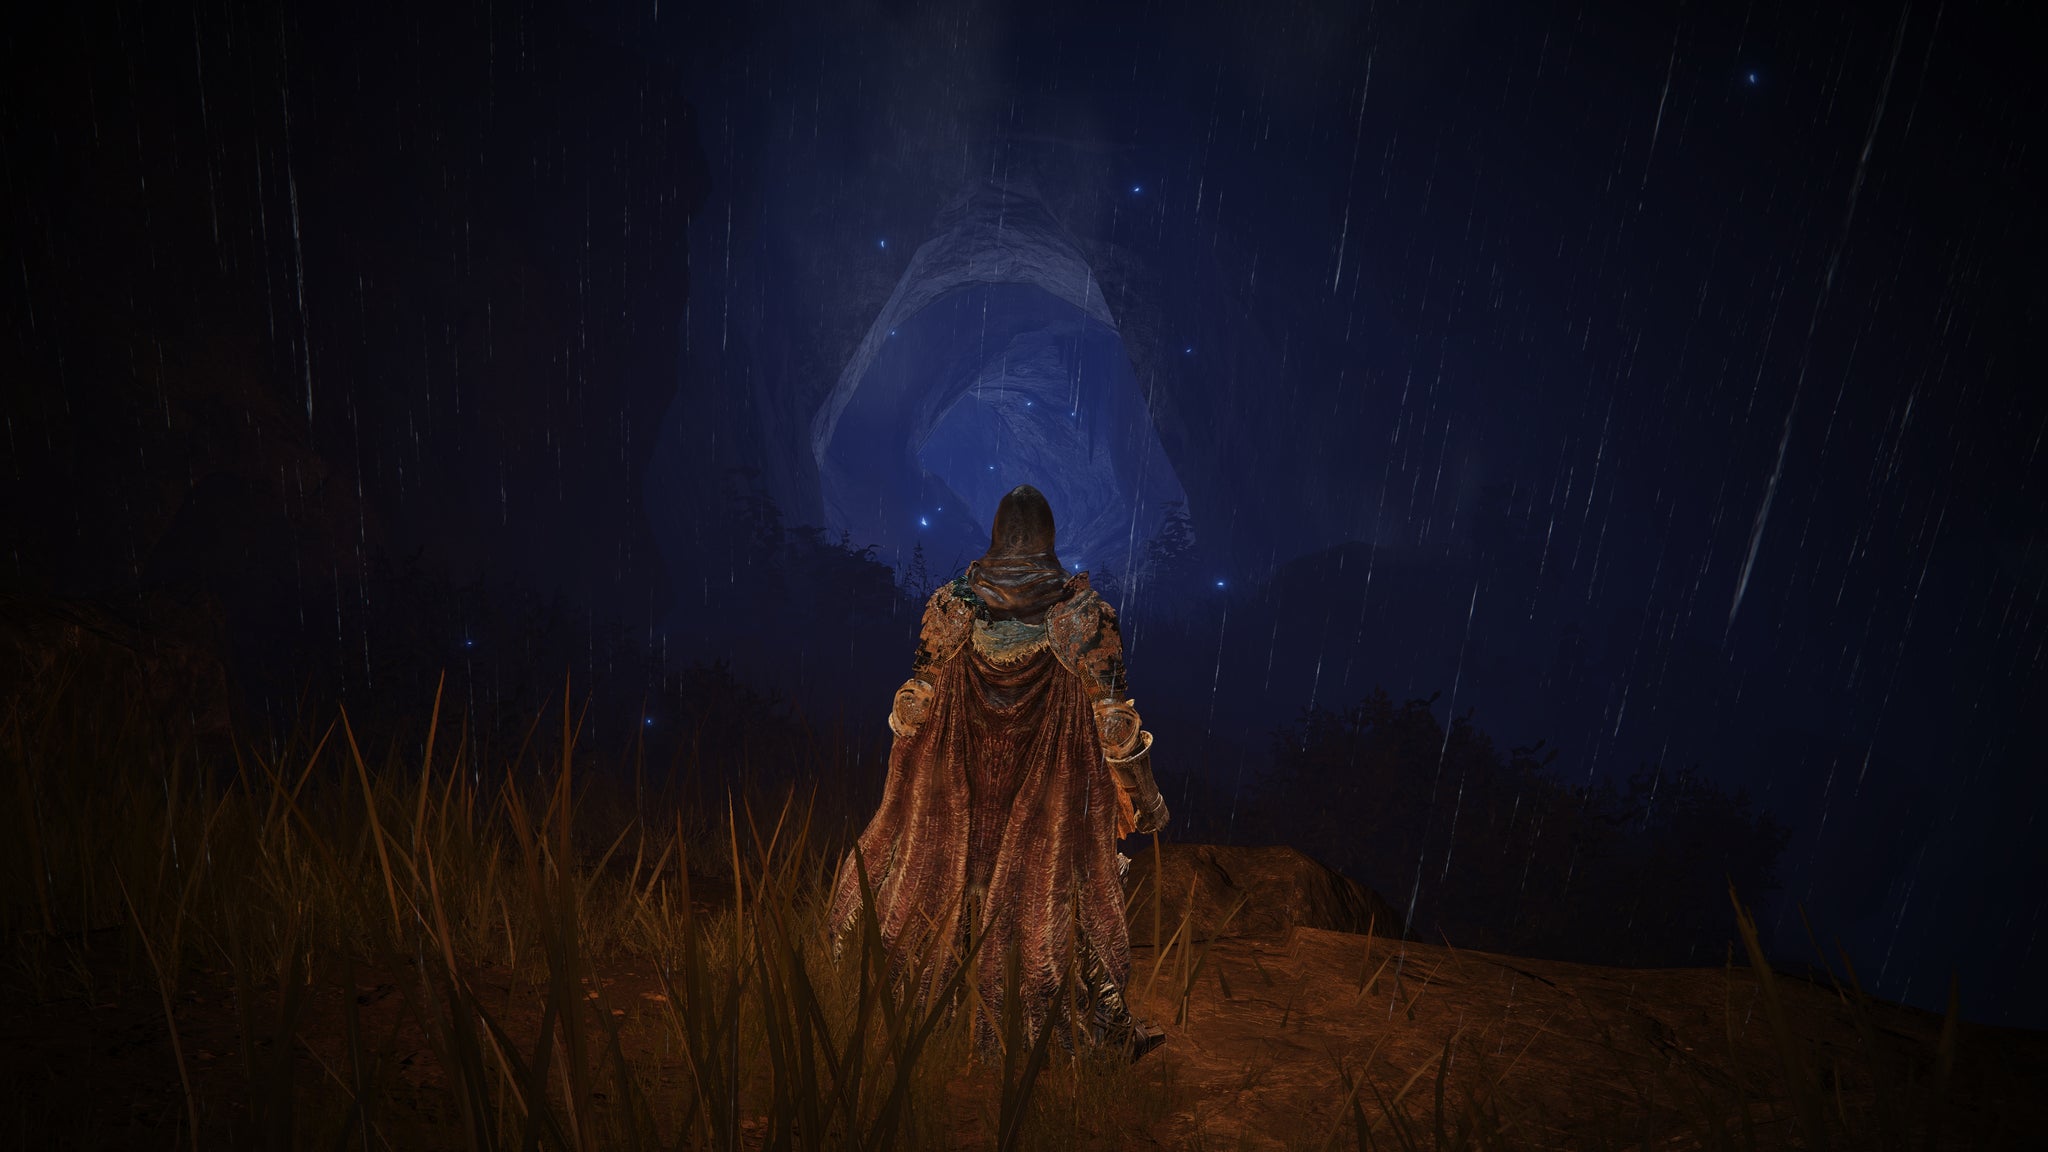
The Fissure entrance is sealed until Miquella’s charm is lifted. |Image credit:Rock Paper Shotgun/Bandai Namco
The next stage of Thiollier’s quest involves quite a lot of travel. First you need to reach the Cerulean Coast , then the Fissure entrance on the south coast, and then you need to conquer the entire underground Fissure sub-region as well. So let’s dive into… all of that.
Reaching the Cerulean Coast
We have a guide on how to reach the Cerulean Coast , because the path is quite obscure. But simply put, you need to follow the Ellac River down south below the Gravesite Plain. Start at the Castle Front Site Of Grace outside Castle Ensis, then take the lower path southeast, to the right of the path that led you to Thiollier’s previous location. Turn left just before where the Bloodfiends are fighting Messmer’s soldiers, and follow the path left into a poisonous swamp area.
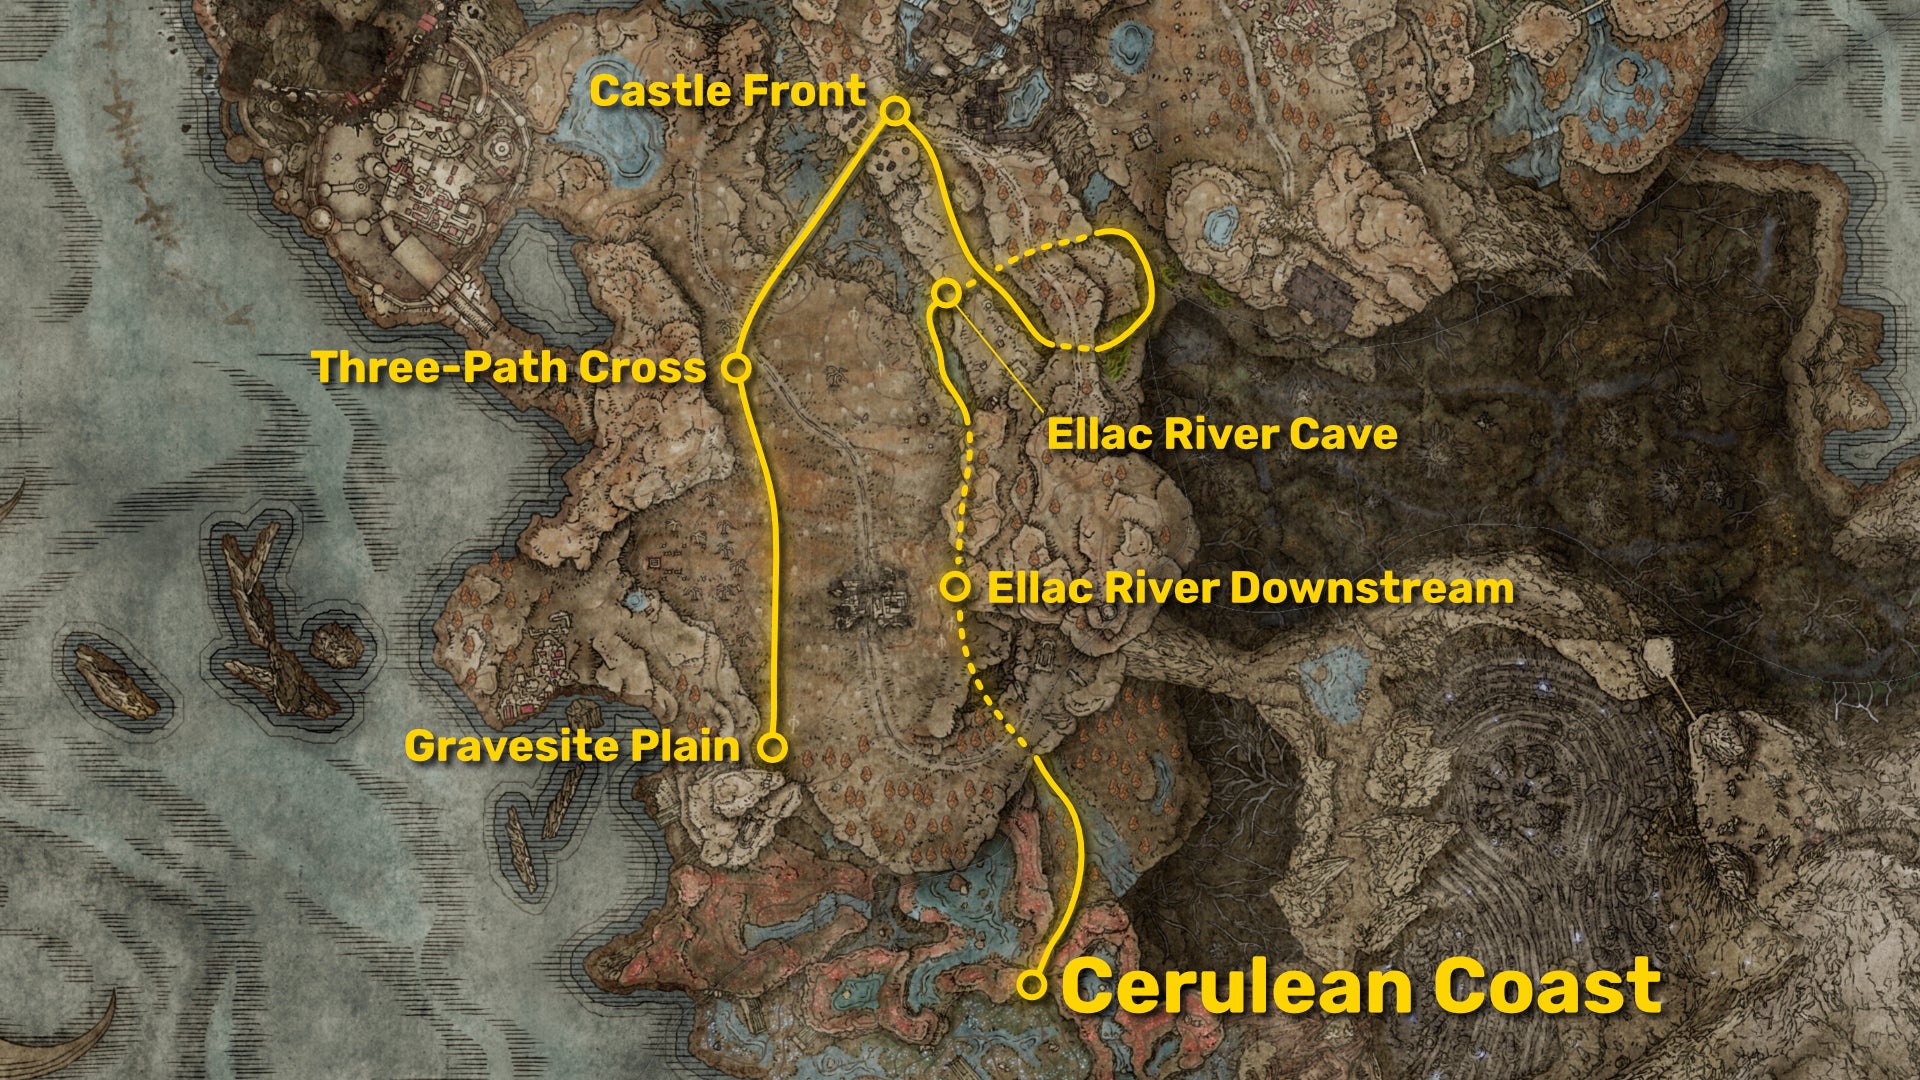
Follow this exact path to reach the Cerulean Coast from the Gravesite Plain starting region. |Image credit:Rock Paper Shotgun/Bandai Namco
From here, follow the curving path to the left, and once you reach the river past the Vulgar Militia, head into the cave behind the giant Miranda Flower . Take the left path when it splits, and follow it until you reach the Ellac River Site Of Grace.
After that, it’s just a long trek south down the river to reach the Cerulean Coast. Use the large rocks as platforms until you reach the ground, then just keep charging south. When the path opens up into a clearing, you’ll see a Furnace Golem which you can either kill or bypass for now; and just beyond that, you’ll find the Cerulean Coast Site Of Grace.
Reaching the Fissure entrance
From the Cerulean Coast Site Of Grace, this middle phase of the journey is much easier. Just head directly south, killing or avoiding enemy threats as you see them. If you haven’t yet found the Map Fragment for the Cerulean Coast, then head to its marker in the fog of war of the map, because it’ll take you fairly close to where you need to go anyway.

Follow this path to the very southern point of the Cerulean Coast, and you’ll find the entrance to the Fissure. |Image credit:Rock Paper Shotgun/Bandai Namco
If you’ve revealed this part of the map, your goal is to reach the peninsula sticking out of the southern edge of the Cerulean Coast. Follow the road past the Spirit Worms and the ruin, and you’ll soon come across a gigantic hole in the ground. This is the entrance to the Fissure, a sub-region below the Cerulean Coast. Carefully parkour down all the way to the bottom, where you’ll find the Stone Coffin Fissure Site Of Grace. For a more detailed explanation on traversing underground, check out our guide on how to get to the Stone Coffin Fissure .
If you came here before Miquella’s charm was broken, then the entrance to the sub-region is sealed off by a glowing barrier decorated with Miquella’s emblem. With Miquella’s charm broken, however, you are free to enter the Fissure itself.
Heading through the Fissure

The Stone Coffin Fissure will take you perhaps 30 minutes to traverse. |Image credit:Rock Paper Shotgun/Bandai Namco
The Fissure
The Fissure sub-region in Shadow Of The Erdtree is lengthy but fairly linear. Your main enemies in this region are Bloodfiends, Skeletons, and Abnormal Stone Clusters (the wierd stone worm things you see outside Evergaols in base Elden Ring). Stay patient and tackle everything carefully, and this region won’t pose too much of an issue for you.
Once you reach the Fissure Depths Site Of Grace, head up the stairs and jump off the top of the giant stone statue’s head in front of you. You will fall a very great distance, but don’t worry, you won’t take any fall damage. When you finally reach the bottom, you’ll find yourself in a beautiful boss arena: the Garden of Deep Purple.
The Garden of Deep Purple
Take a few steps into the Garden of Deep Purple and you’ll be assailed by a terrifying boss: the Putrescent Knight . This guy is no joke, and it may take you a few attempts to get used to his aggressive combos - particularly when he jumps off his mount, and both Knight and mount start attacking you together.

This boss is no joke. Good luck! |Image credit:Rock Paper Shotgun/Bandai Namco
You can make the fight slightly easier by summoning Thiollier to help you using the gold summon sign on the ground near where you land. I didn’t bother with this; my key breakthrough with the Putrescent Knight was learning that you have more time between his attacks than you think - he just makes it look like he’s about to attack when he actually is giving you enough time to pop a heal or recover your stamina. Be patient, don’t get greedy, and you’ll finish him off.
Finding Thiollier again
Once you beat the Putrescent Knight and optionally rest at the Garden of Deep Purple Site Of Grace, head down the path in front of the Grace and you’ll finally see Thiollier again, slumped in a pool of purple nectar next to the godly St. Trina herself. Speak to Thiollier, and he’ll explain that he’s drifting off in St. Trina’s poison, and to let him be. He also warns you against taking the nectar yourself, because it will kill you.
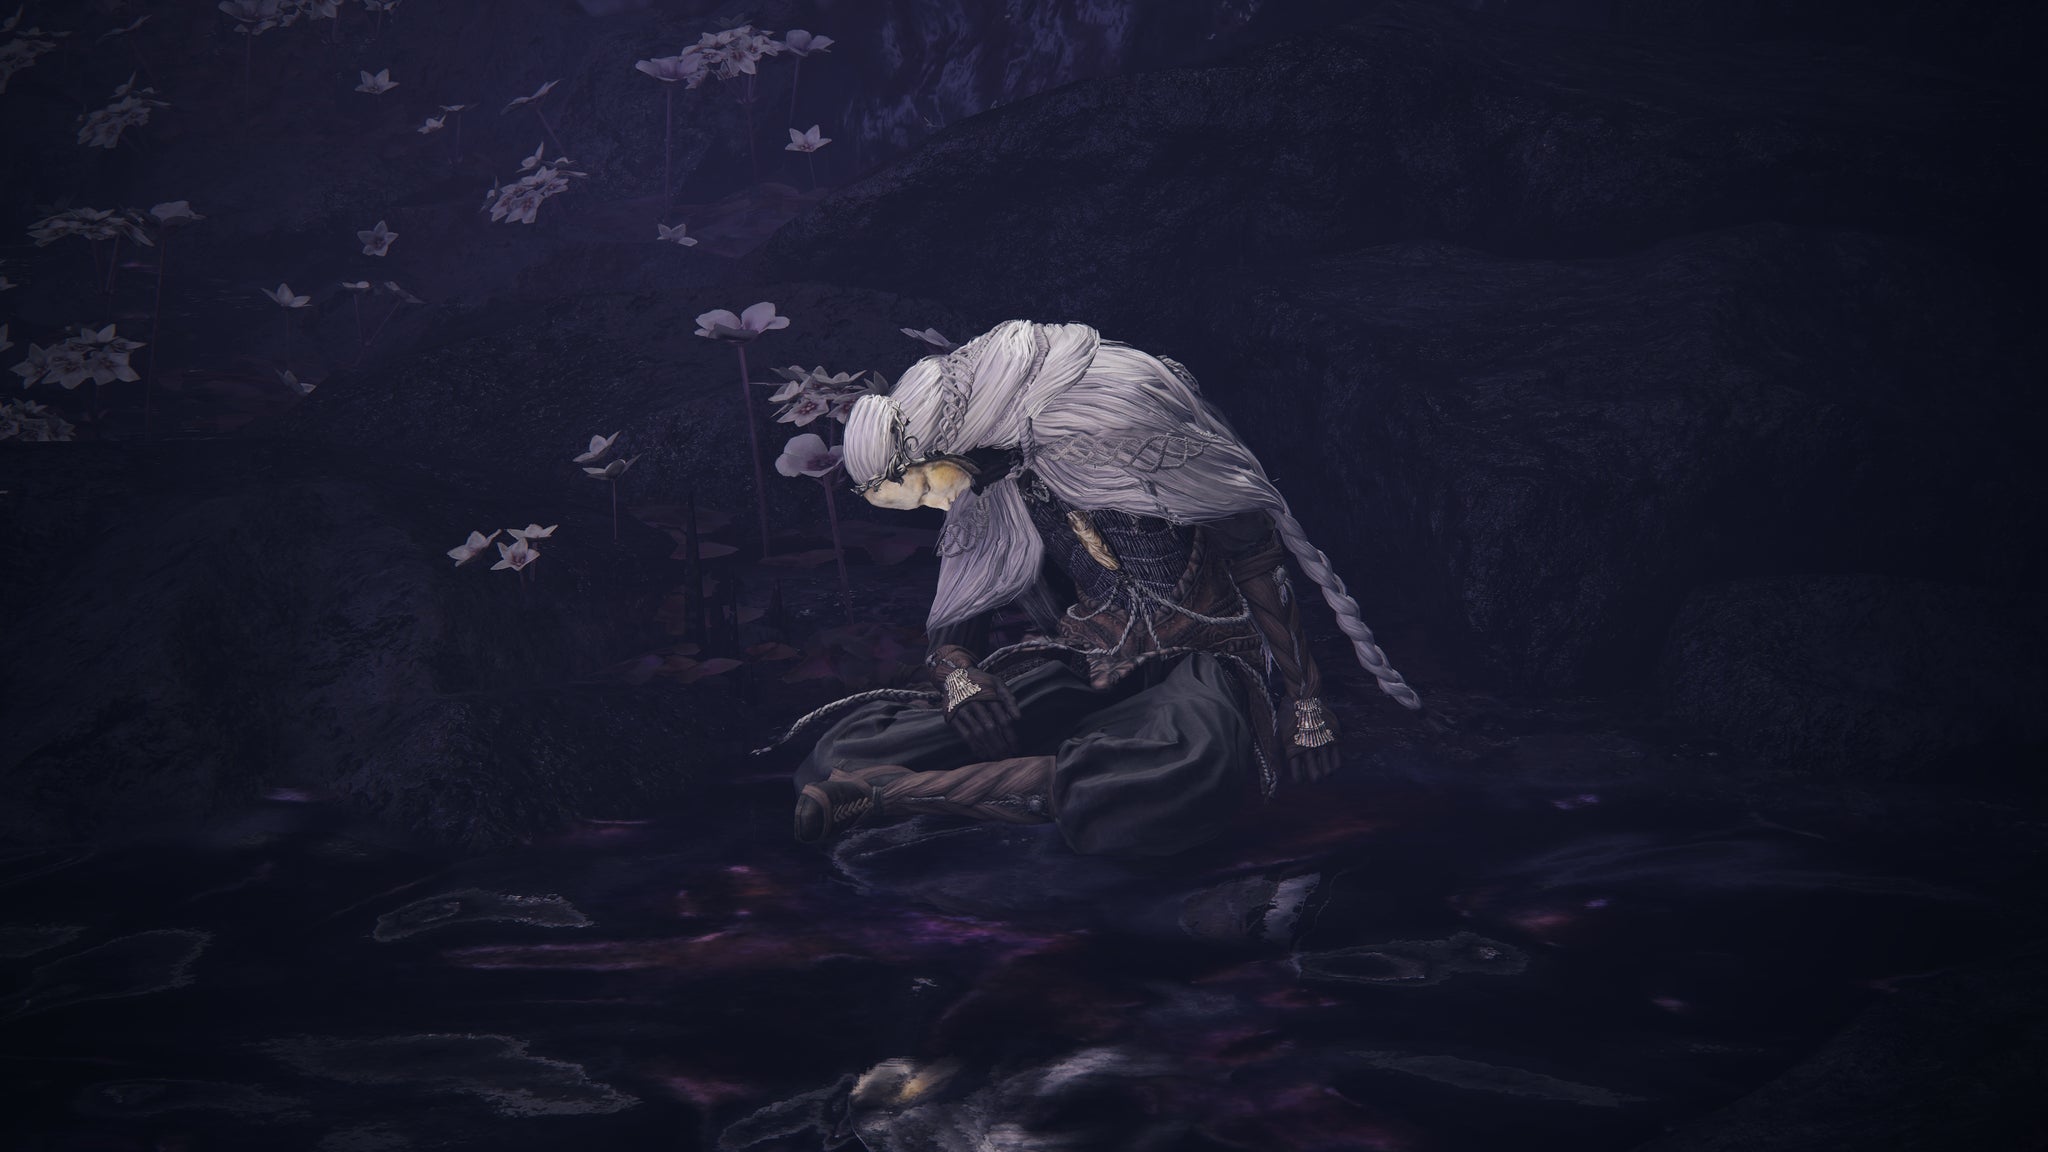
You’ll find Thiollier nearly asleep in front of St. Trina just beyond the boss arena room. |Image credit:Rock Paper Shotgun/Bandai Namco
After this point, you can reload the area and speak to Thiollier again, and he’ll beseech St. Trina to grant him more of her poison. He’ll also tell you once again to leave him be.

St. Trina herself stands slumbering at the end of the Garden of Deep Purple. |Image credit:Rock Paper Shotgun/Bandai Namco
Imbibing St. Trina’s Nectar
Imbibe the Nectar four times in a row
Despite Thiollier’s words of warning, to progress this quest you must now imbibe St. Trina’s nectar . To do this, go up to St. Trina and interact with her, then select " Imbibe nectar “. Doing so will kill you, which is intended. When you respawn, pick up your runes and then imbibe the nectar once again.
Keep imbibing the nectar and killing yourself, and the fourth time round, after you die you will hear St. Trina speak to you:
“Make Miquella stop… Don’t turn the poor thing into a god…”
When you respawn, speak to Thiollier and pass on St. Trina’s words. He’ll become angry with you, thinking that you’re lying to him, and he’ll warn you not to speak those words again.
Pay him no heed! Immediately try to pass on St. Trina’s words to him again. He’ll tell you that he’ll never forgive you.
Defeat Thiollier
Rest at the Garden of Deep Purple Site of Grace to reload the area. When you attempt to head towards St. Trina’s cave, you’ll find the way blocked. Thiollier invades you at this point, and will fight you using his poison-spewing Perfume Bottles.
He’s pretty easy to defeat, just pay the poison no mind, get up close and personal, and finish him off. As he’s told you, he’s weak as a kitten really.
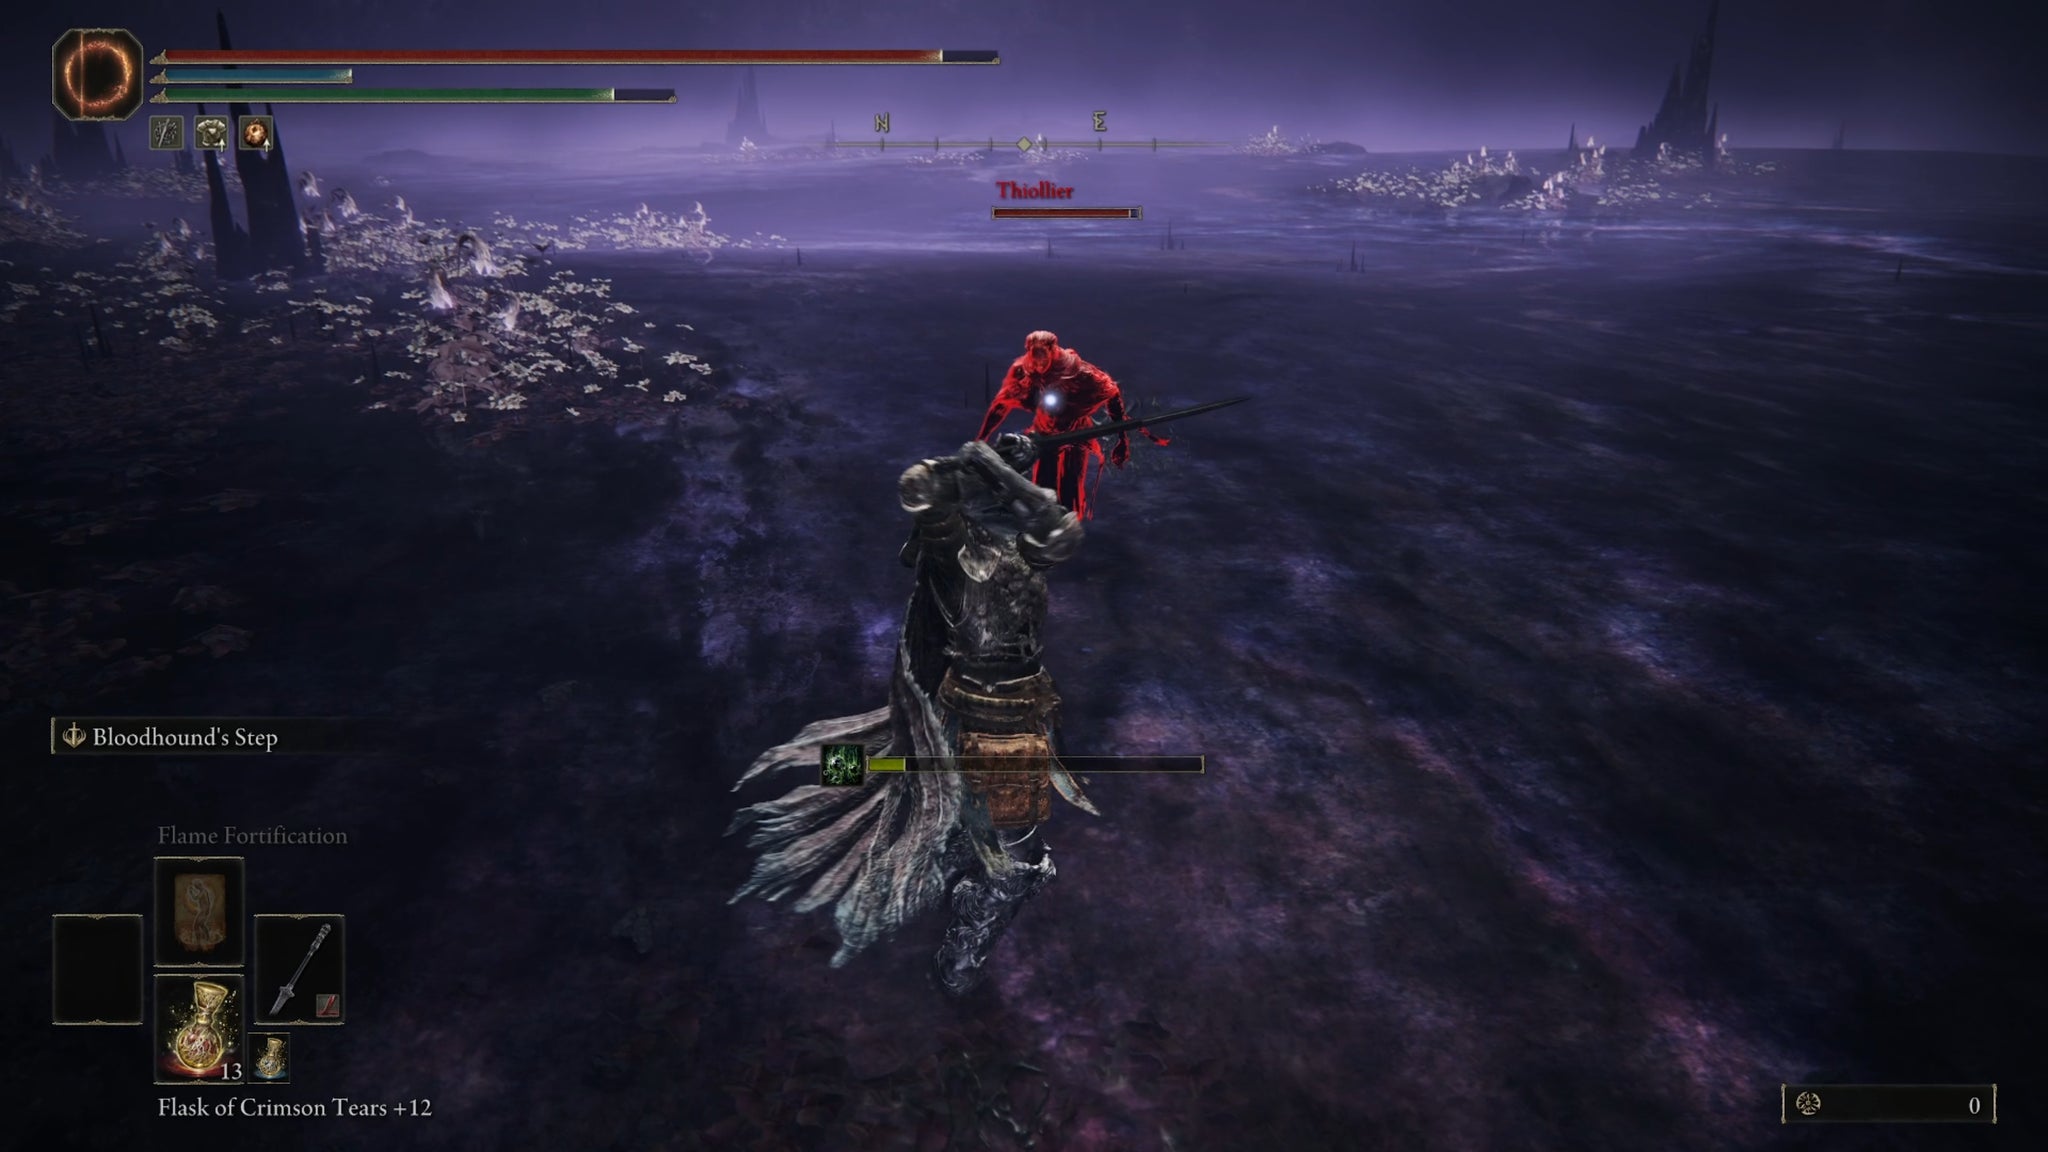
Ignore Thiollier’s poison and you’ll quickly defeat him when he invades. |Image credit:Rock Paper Shotgun/Bandai Namco
Pass on St. Trina’s words
Once you’ve survived the invasion, go into the cave and speak to Thiollier again. He’ll lament his weakness, and ask you to tell him what St. Trina said.
You won’t be able to respond at this point, so leave him be and go to St. Trina. Imbibe her nectar two more times to hear the following dialogue from her:
“Godhood would be Miquella’s prison. A caged divinity… is beyond saving.”
“You must kill Miquella… Grant him forgiveness.”
After this final dialogue, speak to Thiollier again and pass on St. Trina’s last words to you. He’ll once again consider it a lie, but will question himself in his final moments, and implore St. Trina to visit him in his eternal sleep.
After this point, you can reload the area and interact with Thiollier again, but he’ll only breathe loudly at you (“A-Ah”). You can also continue to imbibe St. Trina’s nectar, but she will simply repeat her final instruction to you.
Summon Thiollier for the Enir-Ilim NPC fight
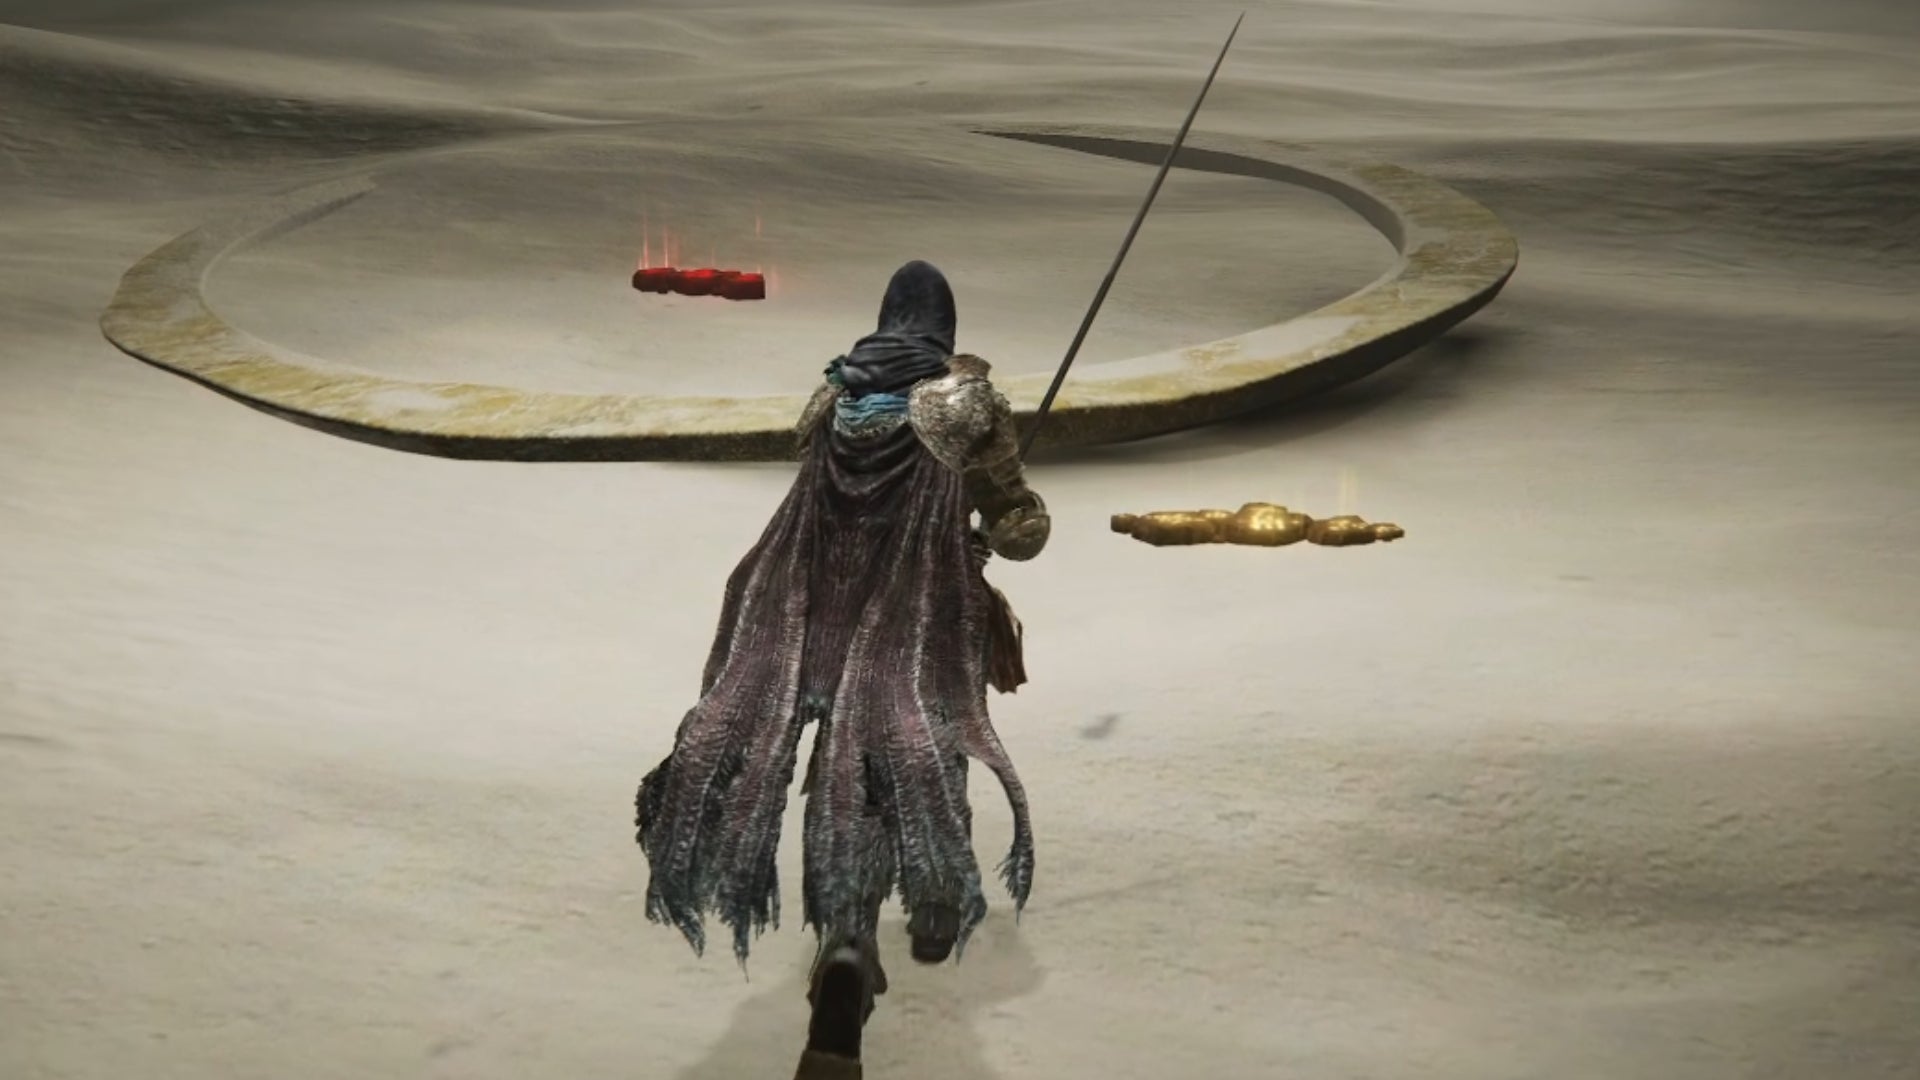
If you complete Thiollier’s quest fully and don’t side with either the Hornsent or Ansbach in their quests, then you can summon Thiollier for the NPC fight in Enir-Ilim. |Image credit:Rock Paper Shotgun/Bandai Namco
If you have completed all the previous steps in Thiollier’s quest before you reach the Cleansing Room Antechamber Site Of Grace in Enir-Ilim, then you will be able to summon Thiollier for the next fight against Leda and her allies.
This fight potentially allows you to summon multiple allies if you have completed their quests; obviously Thiollier is one, but you can also summon Ansbach and the Hornsent if you sided with them both during their quests. We have a list of all NPC allies and enemies in the Leda fight , as well as the conditions needed to summon them.
If you did not gain any of these characters as allies, you’ll still be able to summon Sanguine Noble Nataan as a backup helper during the fight against Leda, Dane, and the rest. However, if you see Sanguine Noble Nataan, it means you didn’t fully complete all the previous steps before getting to this fight in Enir-Ilim, which means you can’t get Thiollier’s final quest reward (explained in the next step).
Summon Thiollier for the final boss fight

Return to St. Trina after completing the final boss fight to round off this questline. |Image credit:Rock Paper Shotgun/Bandai Namco
If you completed all the previous steps in Thiollier’s questline perfectly and in time before reaching the point of no return at the Cleansing Room Antechamber, then when you reach the final boss fight of the DLC you’ll be able to summon Thiollier to fight with you. His summon sign will appear on the left just outside the fog wall of the final boss arena.
Optionally, you can also speak to Ansbach just before the final boss fight, if you managed to complete his questline as well and summoned him in addition to Thiollier in the previous fight against Leda and her allies. This isn’t mandatory, but you are able to ask Ansbach specifically about Thiollier in the previous fight, in which case he’ll remark the following:
“I am afraid I underestimated the lad. Appearing frail in both body and mind, I presumed he’d be like to stumble upon the field of battle… What a fool I was. He serves another master, but Sir Thiollier performed magnificently. Perhaps he too quivers with anticipation. As do we.”
Now for the final step in Thiollier’s questline. Make sure you summon Thiollier for the final boss, and once you defeat them (this may take some time), you will be able to loot Thiollier’s final quest rewards from his body in the boss arena: Thiollier’s Hidden Needle and Thiollier’s Armor Set .
Thiollier himself will be dead (as will Ansbach if you summoned him as well), so it’s a bittersweet end to his story. But hey, at least he fulfilled his master St. Trina’s wishes at the last.
Return to St. Trina after the final boss
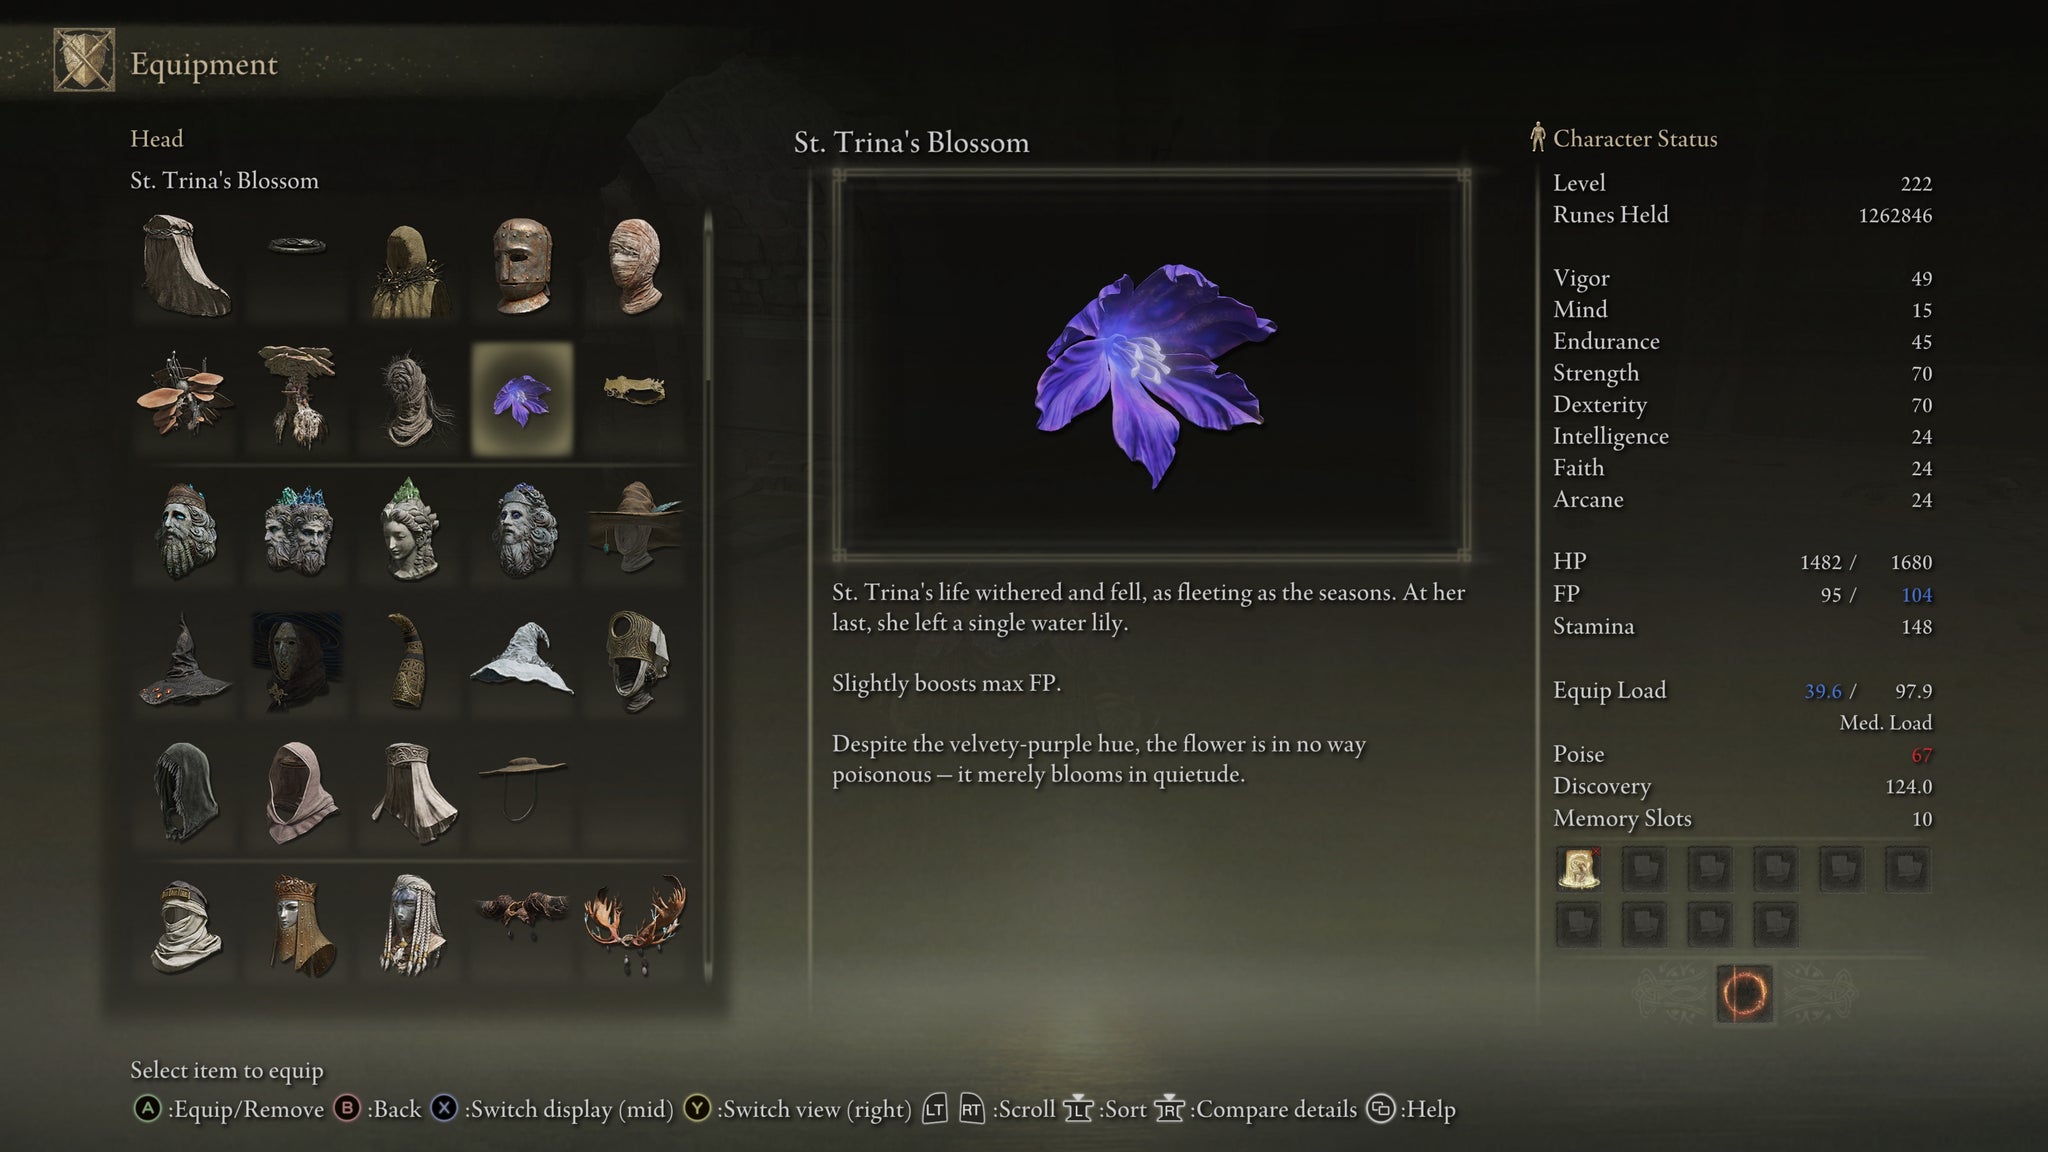
Return to St. Trina after the final boss fight and you’ll get one final reward: St. Trina’s Blossom. |Image credit:Rock Paper Shotgun/Bandai Namco
While this is technically the end of Thiollier’s quest, I’ll just take this moment to finish explaining St. Trina’s quest as well, since the two are inextricably linked.
To finish the quest entirely, you must proceed through Enir-Ilim and defeat the final boss of Shadow Of The Erdtree. After that’s done, return to the Garden Of Deep Purple and proceed into St. Trina’s cave.
St. Trina will have fallen to the ground, presumably dead along with her other half, Miquella. In front of her, you can loot St. Trina’s Blossom , a flower you can put in your hair which technically acts as a Helm:
“St. Trina’s life withered and fell, as fleeting as the seasons. At her last, she left a single water lily. Slightly boosts max FP. Despite the velvety-purple hue, the flower is in no way poisonous - it merely blooms in quietude.”
Thiollier questline rewards
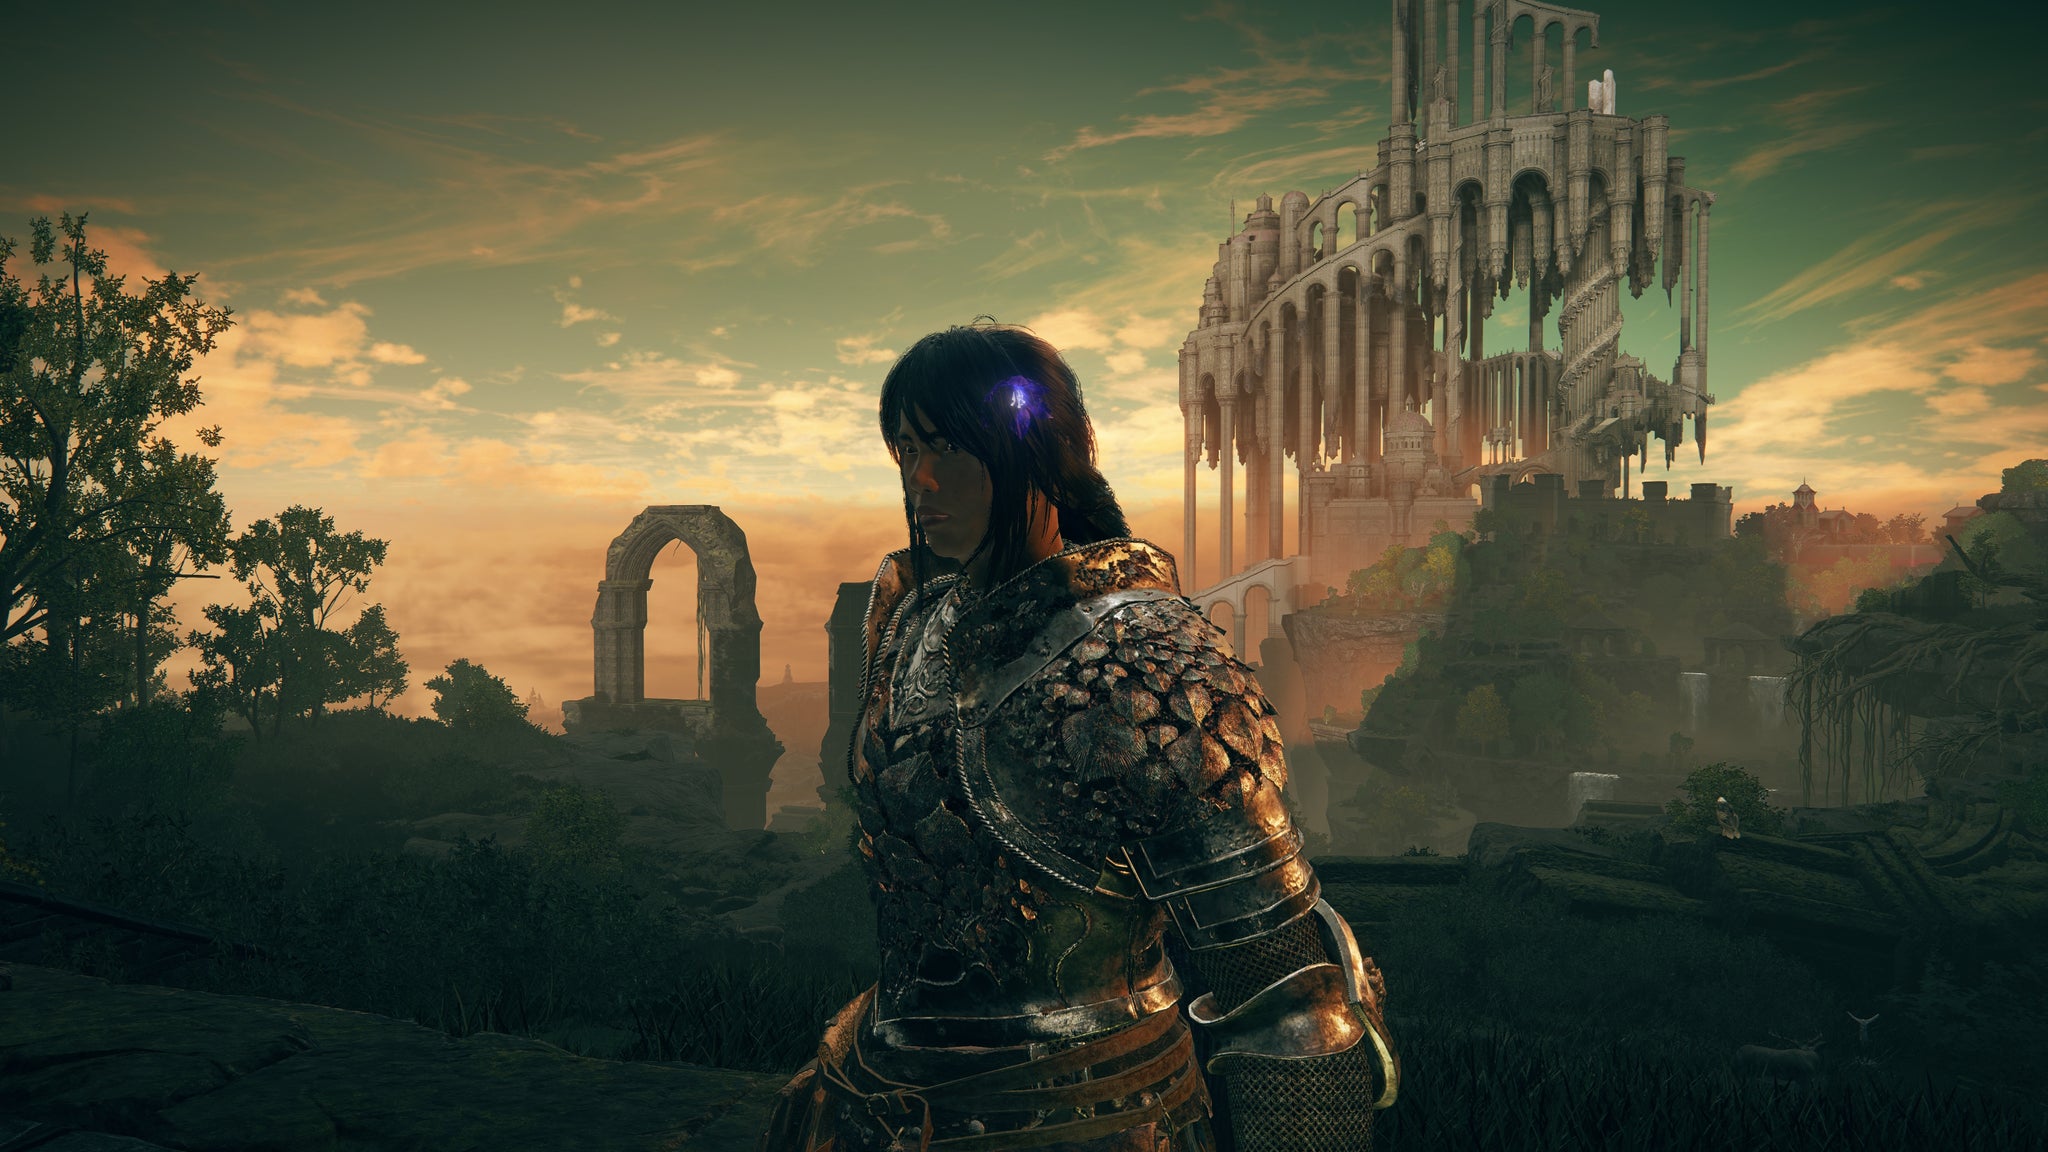
Your final reward for Thiollier’s questline is St. Trina’s Blossom, a flower which boosts your max FP when placed in your Helm slot. |Image credit:Rock Paper Shotgun/Bandai Namco
Complete every step of Thiollier’s questline perfectly, and you’ll end up with the following rewards:
- St. Trina’s Smile : Talisman.
- Thiollier’s Hidden Needle : Fist.
- Thiollier’s Mask : Helm.
- Thiollier’s Garb : Chest armor.
- Thiollier’s Trousers : Leg armor.
- Thiollier’s Gloves : Gauntlet.
- St. Trina’s Blossom : Helm.
This is in addition to the incidental rewards from the required fights against the Putrescent Knight, Leda and her allies, and the final boss of the DLC.
That wraps up this comprehensive guide to completing Thiollier’s questline in Elden Ring: Shadow Of The Erdtree. It’s a tricky and sometimes confusing quest that involves a lot of travel through dangerous areas of the Land of Shadow. For more walkthroughs related to Shadow Of The Erdtree’s NPCs, take a look at our guides for Dryleaf Dane’s questline , Leda’s questline , Ymir’s questline , and Freyja’s questline . If you’re more interested in combat strategies, refer to our Shadow Of The Erdtree main boss order guide for the best way to tackle the enemies of the Shadow Realm.


Elden Ring
PS4 , PS5 , Xbox One , Xbox Series X/S , PC
Rock Paper Shotgun is better when you sign in
Sign in and join us on our journey to discover strange and compelling PC games.

All 75 Arc Raiders Blueprints and where to get them
These areas have the highest chance of giving you Blueprints

Image credit:Rock Paper Shotgun/Embark Studios

Looking for more Arc Raiders Blueprints? It’s a special day when you find a Blueprint, as they’re among the most valuable items in Arc Raiders. If you find a Blueprint that you haven’t already found, then you must make sure you hold onto it at all costs, because Blueprints are the key to one of the most important and powerful systems of meta-progression in the game.
This guide aims to be the very best guide on Blueprints you can find, starting with a primer on what exactly they are and how they work in Arc Raiders, before delving into exactly where to get Blueprints and the very best farming spots for you to take in your search.
We’ll also go over how to get Blueprints from other unlikely activities, such as destroying Surveyors and completing specific quests. And you’ll also find the full list of all 75 Blueprints in Arc Raiders on this page (including the newest Blueprints added with the Cold Snap update , such as the Deadline Blueprint and Firework Box Blueprint), giving you all the information you need to expand your own crafting repertoire.
In this guide:
- What are Blueprints in Arc Raiders?
- Full Blueprint list: All crafting recipes
- Where to find Blueprints in Arc Raiders Blueprints obtained from quests Blueprints obtained from Trials Best Blueprint farming locations

What are Blueprints in Arc Raiders?
Blueprints in Arc Raiders are special items which, if you manage to extract with them, you can expend to permanently unlock a new crafting recipe in your Workshop. If you manage to extract from a raid with an Anvil Blueprint, for example, you can unlock the ability to craft your very own Anvil Pistol, as many times as you like (as long as you have the crafting materials).
To use a Blueprint, simply open your Inventory while in the lobby, then right-click on the Blueprint and click “Learn And Consume” . This will permanently unlock the recipe for that item in your Workshop. As of the Stella Montis update, there are allegedly 75 different Blueprints to unlock - although only 68 are confirmed to be in the game so far. You can see all the Blueprints you’ve found and unlocked by going to the Workshop menu, and hitting “R” to bring up the Blueprint screen.
It’s possible to find duplicates of past Blueprints you’ve already unlocked. If you find these, then you can either sell them, or - if you like to play with friends - you can take it into a match and gift it to your friend so they can unlock that recipe for themselves. Another option is to keep hold of them until the time comes to donate them to the Expedition.
Full Blueprint list: All crafting recipes
Below is the full list of all the Blueprints that are currently available to find in Arc Raiders, and the crafting recipe required for each item:
| Blueprint | Type | Recipe | Crafted At |
|---|---|---|---|
| Bettina | Weapon | 3x Advanced Mechanical Components 3x Heavy Gun Parts 3x Canister | Gunsmith 3 |
| Blue Light Stick | Quick Use | 3x Chemicals | Utility Station 1 |
| Aphelion | Weapon | 3x Magnetic Accelerator 3x Complex Gun Parts 1x Matriarch Reactor | Gunsmith 3 |
| Combat Mk. 3 (Flanking) | Augment | 2x Advanced Electrical Components 3x Processor | Gear Bench 3 |
| Combat Mk. 3 (Aggressive) | Augment | 2x Advanced Electrical Components 3x Processor | Gear Bench 3 |
| Complex Gun Parts | Material | 2x Light Gun Parts 2x Medium Gun Parts 2x Heavy Gun Parts | Refiner 3 |
| Fireworks Box | Quick Use | 1x Explosive Compound 3x Pop Trigger | Explosives Station 2 |
| Gas Mine | Mine | 4x Chemicals 2x Rubber Parts | Explosives Station 1 |
| Green Light Stick | Quick Use | 3x Chemicals | Utility Station 1 |
| Pulse Mine | Mine | 1x Crude Explosives 1x Wires | Explosives Station 1 |
| Seeker Grenade | Grenade | 1x Crude Explosives 2x ARC Alloy | Explosives Station 1 |
| Looting Mk. 3 (Survivor) | Augment | 2x Advanced Electrical Components 3x Processor | Gear Bench 3 |
| Angled Grip II | Mod | 2x Mechanical Components 3x Duct Tape | Gunsmith 2 |
| Angled Grip III | Mod | 2x Mod Components 5x Duct Tape | Gunsmith 3 |
| Hullcracker | Weapon | 1x Magnetic Accelerator 3x Heavy Gun Parts 1x Exodus Modules | Gunsmith 3 |
| Launcher Ammo | Ammo | 5x Metal Parts 1x Crude Explosives | Workbench 1 |
| Anvil | Weapon | 5x Mechanical Components 5x Simple Gun Parts | Gunsmith 2 |
| Anvil Splitter | Mod | 2x Mod Components 3x Processor | Gunsmith 3 |
| ??? | ??? | ??? | ??? |
| Barricade Kit | Quick Use | 1x Mechanical Components | Utility Station 2 |
| Blaze Grenade | Grenade | 1x Explosive Compound 2x Oil | Explosives Station 3 |
| Bobcat | Weapon | 3x Advanced Mechanical Components 3x Light Gun Parts | Gunsmith 3 |
| Osprey | Weapon | 2x Advanced Mechanical Components 3x Medium Gun Parts 7x Wires | Gunsmith 3 |
| Burletta | Weapon | 3x Mechanical Components 3x Simple Gun Parts | Gunsmith 1 |
| Compensator II | Mod | 2x Mechanical Components 4x Wires | Gunsmith 2 |
| Compensator III | Mod | 2x Mod Components 8x Wires | Gunsmith 3 |
| Defibrillator | Quick Use | 9x Plastic Parts 1x Moss | Medical Lab 2 |
| ??? | ??? | ??? | ??? |
| Equalizer | Weapon | 3x Magnetic Accelerator 3x Complex Gun Parts 1x Queen Reactor | Gunsmith 3 |
| Extended Barrel | Mod | 2x Mod Components 8x Wires | Gunsmith 3 |
| Extended Light Mag II | Mod | 2x Mechanical Components 3x Steel Spring | Gunsmith 2 |
| Extended Light Mag III | Mod | 2x Mod Components 5x Steel Spring | Gunsmith 3 |
| Extended Medium Mag II | Mod | 2x Mechanical Components 3x Steel Spring | Gunsmith 2 |
| Extended Medium Mag III | Mod | 2x Mod Components 5x Steel Spring | Gunsmith 3 |
| Extended Shotgun Mag II | Mod | 2x Mechanical Components 3x Steel Spring | Gunsmith 2 |
| Extended Shotgun Mag III | Mod | 2x Mod Components 5x Steel Spring | Gunsmith 3 |
| Remote Raider Flare | Quick Use | 2x Chemicals 4x Rubber Parts | Utility Station 1 |
| Heavy Gun Parts | Material | 4x Simple Gun Parts | Refiner 2 |
| Venator | Weapon | 2x Advanced Mechanical Components 3x Medium Gun Parts 5x Magnet | Gunsmith 3 |
| Il Toro | Weapon | 5x Mechanical Components 6x Simple Gun Parts | Gunsmith 1 |
| Jolt Mine | Mine | 1x Electrical Components 1x Battery | Explosives Station 2 |
| Explosive Mine | Mine | 1x Explosive Compound 1x Sensors | Explosives Station 3 |
| Jupiter | Weapon | 3x Magnetic Accelerator 3x Complex Gun Parts 1x Queen Reactor | Gunsmith 3 |
| Light Gun Parts | Material | 4x Simple Gun Parts | Refiner 2 |
| Lightweight Stock | Mod | 2x Mod Components 5x Duct Tape | Gunsmith 3 |
| Lure Grenade | Grenade | 1x Speaker Component 1x Electrical Components | Utility Station 2 |
| Medium Gun Parts | Material | 4x Simple Gun Parts | Refiner 2 |
| Torrente | Weapon | 2x Advanced Mechanical Components 3x Medium Gun Parts 6x Steel Spring | Gunsmith 3 |
| Muzzle Brake II | Mod | 2x Mechanical Components 4x Wires | Gunsmith 2 |
| Muzzle Brake III | Mod | 2x Mod Components 8x Wires | Gunsmith 3 |
| Padded Stock | Mod | 2x Mod Components 5x Duct Tape | Gunsmith 3 |
| Shotgun Choke II | Mod | 2x Mechanical Components 4x Wires | Gunsmith 2 |
| Shotgun Choke III | Mod | 2x Mod Components 8x Wires | Gunsmith 3 |
| Shotgun Silencer | Mod | 2x Mod Components 8x Wires | Gunsmith 3 |
| Showstopper | Grenade | 1x Advanced Electrical Components 1x Voltage Converter | Explosives Station 3 |
| Silencer I | Mod | 2x Mechanical Components 4x Wires | Gunsmith 2 |
| Silencer II | Mod | 2x Mod Components 8x Wires | Gunsmith 3 |
| Snap Hook | Quick Use | 2x Power Rod 3x Rope 1x Exodus Modules | Utility Station 3 |
| Stable Stock II | Mod | 2x Mechanical Components 3x Duct Tape | Gunsmith 2 |
| Stable Stock III | Mod | 2x Mod Components 5x Duct Tape | Gunsmith 3 |
| Tagging Grenade | Grenade | 1x Electrical Components 1x Sensors | Utility Station 3 |
| Tempest | Weapon | 3x Advanced Mechanical Components 3x Medium Gun Parts 3x Canister | Gunsmith 3 |
| Trigger Nade | Grenade | 2x Crude Explosives 1x Processor | Explosives Station 2 |
| Vertical Grip II | Mod | 2x Mechanical Components 3x Duct Tape | Gunsmith 2 |
| Vertical Grip III | Mod | 2x Mod Components 5x Duct Tape | Gunsmith 3 |
| Vita Shot | Quick Use | 2x Antiseptic 1x Syringe | Medical Lab 3 |
| Vita Spray | Quick Use | 3x Antiseptic 1x Canister | Medical Lab 3 |
| Vulcano | Weapon | 1x Magnetic Accelerator 3x Heavy Gun Parts 1x Exodus Modules | Gunsmith 3 |
| Wolfpack | Grenade | 2x Explosive Compound 2x Sensors | Explosives Station 3 |
| Red Light Stick | Quick Use | 3x Chemicals | Utility Station 1 |
| Smoke Grenade | Grenade | 14x Chemicals 1x Canister | Utility Station 2 |
| Deadline | Mine | 3x Explosive Compound 2x ARC Circuitry | Explosives Station 3 |
| Trailblazer | Grenade | 1x Explosive Compound 1x Synthesized Fuel | Explosives Station 3 |
| Tactical Mk. 3 (Defensive) | Augment | 2x Advanced Electrical Components 3x Processor | Gear Bench 3 |
| Tactical Mk. 3 (Healing) | Augment | 2x Advanced Electrical Components 3x Processor | Gear Bench 3 |
| Yellow Light Stick | Quick Use | 3x Chemicals | Utility Station 1 |
Note: The missing Blueprints in this list likely have not actually been added to the game at the time of writing, because none of the playerbase has managed to find any of them. As they are added to the game, I will update this page with the most relevant information so you know exactly how to get all 75 Arc Raiders Blueprints.
Where to find Blueprints in Arc Raiders
Below is a list of all containers, modifiers, and events which maximise your chances of finding Blueprints:
- Certain quests reward you with specific Blueprints .
- Completing Trials has a high chance of offering Blueprints as rewards.
- Surveyors have a decent chance of dropping Blueprints on death.
- High loot value areas tend to have a greater chance of spawning Blueprints.
- Night Raids and Storms may increase rare Blueprint spawn chances in containers.
- Containers with higher numbers of items may have a higher tendency to spawn Blueprints. As a result, Blue Gate (which has many “large” containers containing multiple items) may give you a higher chance of spawning Blueprints.
- Raider containers (Raider Caches, Weapon Boxes, Medical Bags, Grenade Tubes) have increased Blueprint drop rates. As a result, the Uncovered Caches event gives you a high chance of finding Blueprints.
- Security Lockers have a higher than average chance of containing Blueprints.
- Certain Blueprints only seem to spawn under specific circumstances: Tempest Blueprint only spawns during Night Raid events. Vulcano Blueprint only spawns during Hidden Bunker events. Jupiter and Equaliser Blueprints only spawn during Harvester events.

Raider Caches, Weapon Boxes, and other raider-oriented container types have a good chance of offering Blueprints. |Image credit:Rock Paper Shotgun/Embark Studios
Blueprints have a very low chance of spawning in any container in Arc Raiders, around 1-2% on average. However, there is a higher chance of finding Blueprints in particular container types. Specifically, you can find more Blueprints in Raider containers and security lockers.
Beyond this, if you’re looking for Blueprints you should focus on regions of the map which are marked as having particularly high-value loot. Areas such as the Control Tower in Dam Battlegrounds, the Arrival and Departure Buildings in Spaceport, and Pilgrim’s Peak in Blue Gate all have a better-than-average chance of spawning Blueprints somewhere amongst all their containers. Night Raids and Electromagnetic Storm events also increase the drop chances of certain Blueprints .
In addition to these containers, you can often loot Blueprints from destroyed Surveyors - the largest of the rolling ball ARC. Surveyors are more commonly found on the later maps - Spaceport and Blue Gate - and if one spawns in your match, you’ll likely see it by the blue laser beam that it casts into the sky while “surveying”.
Surveyors are quite well-armoured and will very speedily run away from you once it notices you, but if you can take one down then make sure you loot all its parts for a chance of obtaining certain unusual Blueprints.
Blueprints obtained from quests
One way in which you can get Blueprints is by completing certain quests for the vendors in Speranza. Some quests will reward you with a specific item Blueprint upon completion, so as long as you work through all the quests in Arc Raiders, you are guaranteed those Blueprints.
Here is the full list of all Blueprints you can get from quest rewards:
- Trigger Nade Blueprint: Rewarded after completing “Sparks Fly”.
- Lure Grenade Blueprint: Rewarded after completing “Greasing Her Palms”.
- Burletta Blueprint: Rewarded after completing “Industrial Espionage”.
- Hullcracker Blueprint (and Launcher Ammo Blueprint): Rewarded after completing “The Major’s Footlocker”.
Alas, that’s only 4 Blueprints out of a total of 75 to unlock, so for the vast majority you will need to find them yourself during a raid. If you’re intent on farming Blueprints, then it’s best to equip yourself with cheap gear in case you lose it, but don’t use a free loadout because then you won’t get a safe pocket to stash any new Blueprint you find. No pain in Arc Raiders is sharper than failing to extract with a new Blueprint you’ve been after for a dozen hours already.

One of the best ways to get Blueprints is by hitting three stars on all five Trials every week. |Image credit:Rock Paper Shotgun/Embark Studios
Blueprints obtained from Trials
One of the very best ways to get Blueprints is as rewards for completing Trials in Arc Raiders. Trials are unlocked from Level 15 onwards, and allow you to earn rewards by focusing on certain tasks over the course of several raids. For example, one Trial might task you with dealing damage to Hornets, while another might challenge you to loot Supply Drops.
Trials refresh on a weekly basis, with a new week bringing five new Trials. Each Trial can offer up to three rewards after passing certain score milestones, and it’s possible to receive very high level loot from these reward crates - including Blueprints. So if you want to unlock as many Blueprints as possible, you should make a point of completing as many Trials as possible each week.
Best Blueprint farming locations
The very best way to get Blueprints is to frequent specific areas of the maps which combine high-tier loot pools with the right types of containers to search. Here are my recommendations for where to find Blueprints on every map, so you can always keep the search going for new crafting recipes to unlock.

Image credit:Rock Paper Shotgun/Embark Studios
Dam Battlegrounds
The best places to farm Blueprints on Dam Battlegrounds are the Control Tower, Power Generation Complex, Ruby Residence, and Pale Apartments . The first two regions, despite only being marked on the map as mid-tier loot, contain a phenomenal number of containers to loot. The Control Tower can also contain a couple of high-tier Security Lockers - though of course, you’ll need to have unlocked the Security Breach skill at the end of the Survival tree.
There’s also a lot of reporting amongst the playerbase that the Residential areas in the top-left of the map - Pale Apartments and Ruby Residence - give you a comparatively strong chance of finding Blueprints. Considering their size, there’s a high density of containers to loot in both locations, and they also have the benefit of being fairly out of the way. So you’re more likely to have all the containers to yourself.
Buried City
The best Blueprint farming locations on Buried City are the Santa Maria Houses, Grandioso Apartments, Town Hall, and the various buildings of the New District . Grandioso Apartments has a lower number of containers than the rest, but a high chance of spawning weapon cases - which have good Blueprint drop rates. The others are high-tier loot areas, with plenty of lootable containers - including Security Lockers.
Spaceport
The best places to find Blueprints on Spaceport are the Arrival and Departure Buildings, as well as Control Tower A6 and the Launch Towers . All these areas are labelled as high-value loot regions, and many of them are also very handily connected to one another by the Spaceport wall, which you can use to quickly run from one area to the next. At the tops of most of these buildings you’ll find at least one Security Locker, so this is an excellent farming route for players looking to find Blueprints.
The downside to looting Blueprints on Spaceport is that all these areas are hotly contested, particularly in Duos and Squads. You’ll need to be very focused and fast in order to complete the full farming route.

Image credit:Rock Paper Shotgun/Embark Studios
Blue Gate
Blue Gate tends to have a good chance of dropping Blueprints, potentially because it generally has a high number of containers which can hold lots of items; so there’s a higher chance of a Blueprint spawning in each container. In my experience, the best Blueprint farming spots on Blue Gate are Pilgrim’s Peak, Raider’s Refuge, the Ancient Fort, and the Underground Complex beneath the Warehouse .
All of these areas contain a wealth of containers to loot. Raider’s Refuge has less to loot, but the majority of the containers in and around the Refuge are raider containers, which have a high chance of containing Blueprints - particularly during major events.
Stella Montis
On the whole, Stella Montis seems to have a very low drop rate for Blueprints (though a high chance of dropping other high-tier loot). If you do want to try farming Blueprints on this map, the best places to find Blueprints in Stella Montis are Medical Research, Assembly Workshop, and the Business Center . These areas have the highest density of containers to loot on the map.
In addition to this, the Western Tunnel has a few different Security Lockers to loot, so while there’s very little to loot elsewhere in this area of the map, it’s worth hitting those Security Lockers if you spawn there at the start of a match.
That wraps up this primer on how to get all the Blueprints in Arc Raiders as quickly as possible. With the Expedition system constantly resetting a large number of players’ Blueprints, it’s more important than ever to have the most up-to-date information on where to find all these Blueprints.
While you’re here, be sure to check out our Arc Raiders best guns tier list , as well as our primers on the best skills to unlock and all the different Field Depot locations on every map.


ARC Raiders
PS5 , Xbox Series X/S , PC
Rock Paper Shotgun is better when you sign in
Sign in and join us on our journey to discover strange and compelling PC games.
