SteamWorld Heist 2 review: a tactical trick shot across the bow of lesser strategy games
Heist, heist, baby
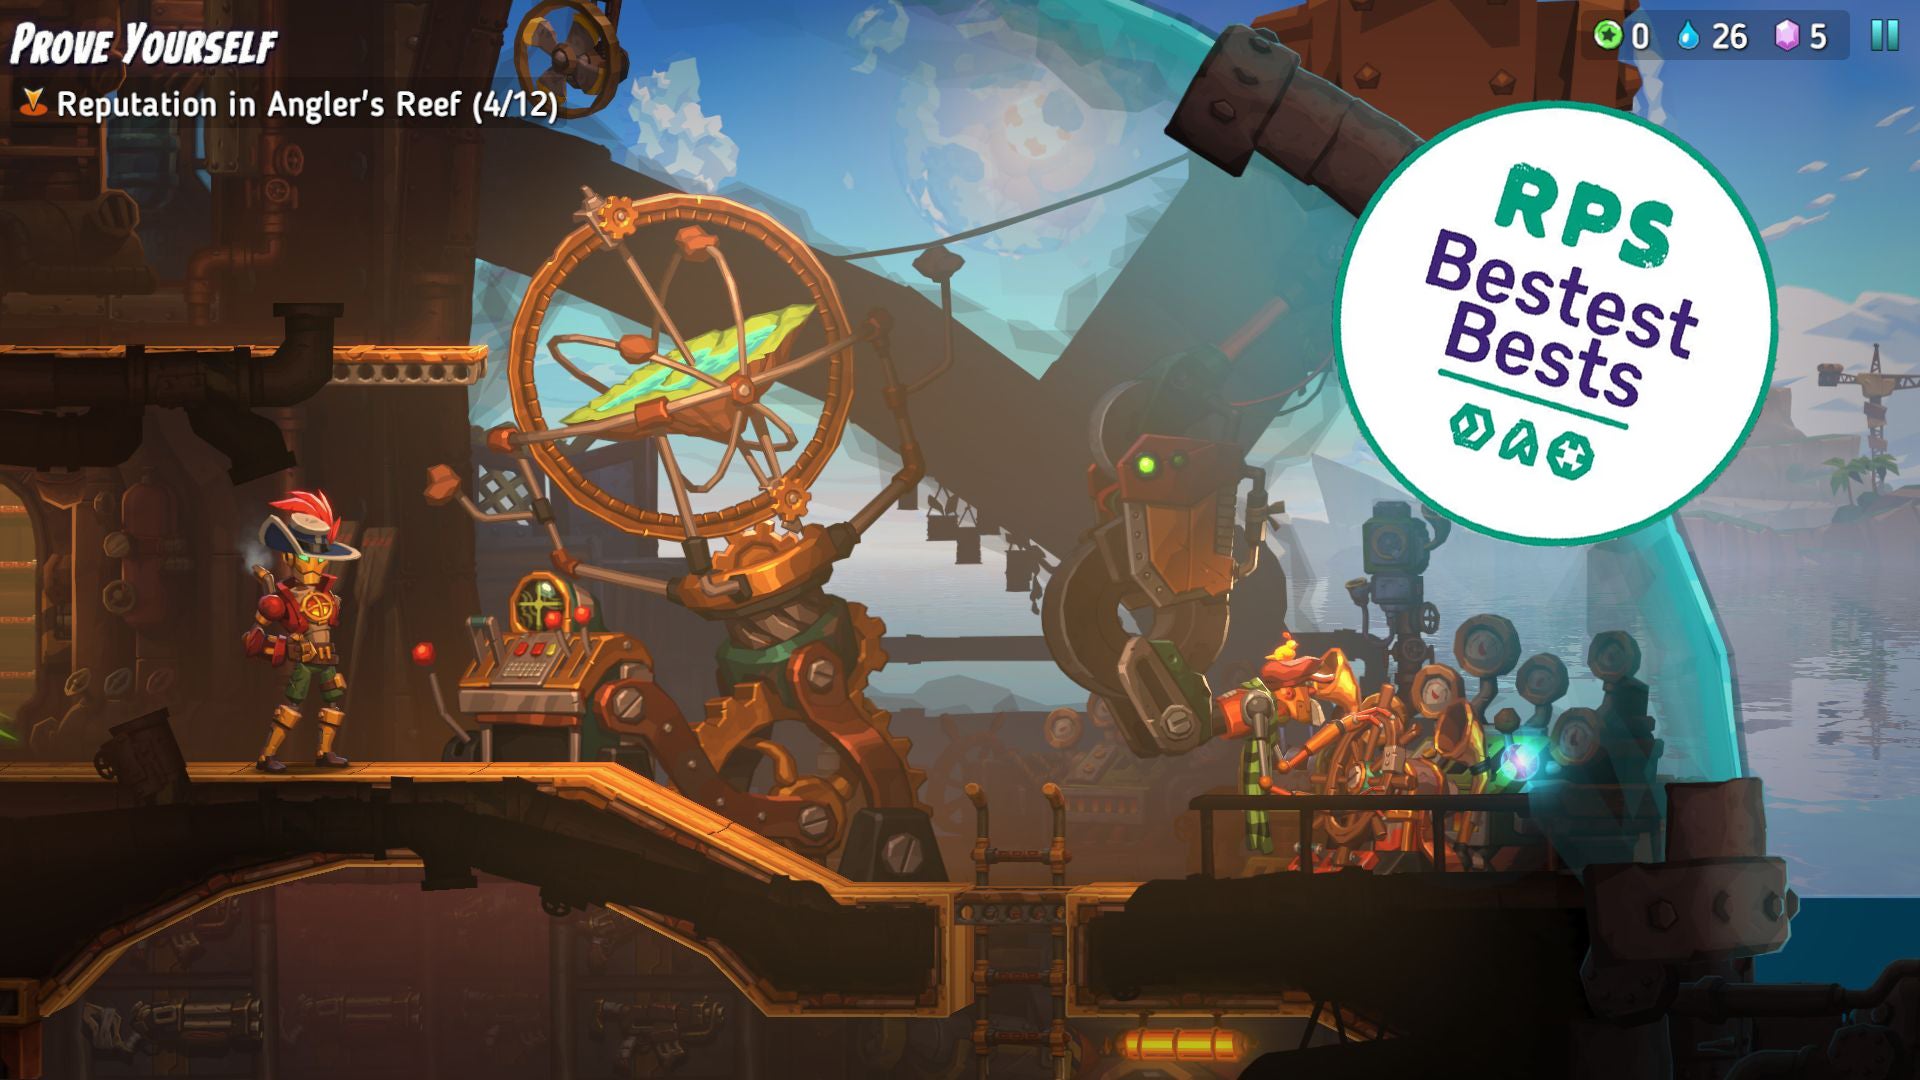
Image credit:Rock Paper Shotgun / Thunderful

- Developer: Thunderful
- Publisher: Thunderful
- Release: Out now
- On: Windows
- From: Epic Games , Steam
- Price: £25/$30/€30
- Reviewed on: Intel Core-i7-11700F, 16GB RAM, Nvidia GeForce RTX 3060, Windows 10
I’ve yet to discover a SteamWorld game I don’t like. Whether plundering the earth in SteamWorld Dig 2 or mucking about with magic in SteamWorld Quest , these are solid and approachable adventures that enthusiastically embrace whatever theme the developers have decided upon. Cowboys? Sure. Wizards? Why not. It barely matters, as long as it results in some good puns. As a studio, Thunderful have a reputation for hopping from one style of game to the next, boiling entire genres down to their essence, and reconstituting them with competence and style to exist within a now-familiar steampunk world of colourful pals and Saturday morning cartoon jokes. The studio is a perpetual notion machine. Yes, with SteamWorld Heist 2 , they’re revisiting the sci-fi bullet-bouncing of their 2016 tactics game SteamWorld Heist , but they’re also introducing significant changes to create a compulsive XCOM-like full of sea-faring submariners that may be their best work yet, even against a back catalogue of blinders.
As with other SteamWorld games, it’s framed in a light, family-friendly story featuring dastardly dieselbots and mildly troubled heroes. You are Captain Leeway, commander of a pirate submarine bobbing within a “sea” which is really a planet-sized bowl of water floating in space. Unfortunately, the water is going bad, making the clean H2O required for steambot engines scarce. Our heroes are out to discover what’s behind this water crisis.

The characters are simple but genial. The one-armed Captain is living in the shadow of his notorious mother. Stiff-upper-lipped grenadier Wesley seeks an honourable death, while sniper Daisy is just happy to be in the belly of a submarine infamous for bothering the enemy Navy. You unlock more crew members as you stop in bars, each chattering away with optional dialogue as the tale goes on. My favourite is the mercenary “Crowbar” who squawks with every line of dialogue and who seemingly values a paycheck above all else. Plenty of fun Naval antagonists show up too, indulging in upper class chit-chat and sporting pseudo-British names like Babblesthrop and Krinkleswiffer.
Structurally, it’s a little different to the first game, which saw you navigating a simple network of stellar stopovers, using a spacey map similar to something you might find in FTL . Here you control the submarine directly instead, sailing around a lush world map of tropical waters, the clouds parting and revealing more of the map as you explore. Eventually, you’ll be avoiding submerged mines, diving below the surface, and rising to fire broadsides at Navy vessels. It’s a bit like playing an arcadey twin stick shooter between the meatier tactical missions. Except the ship will do the shooting for you automatically - you just need to point it in the right direction.
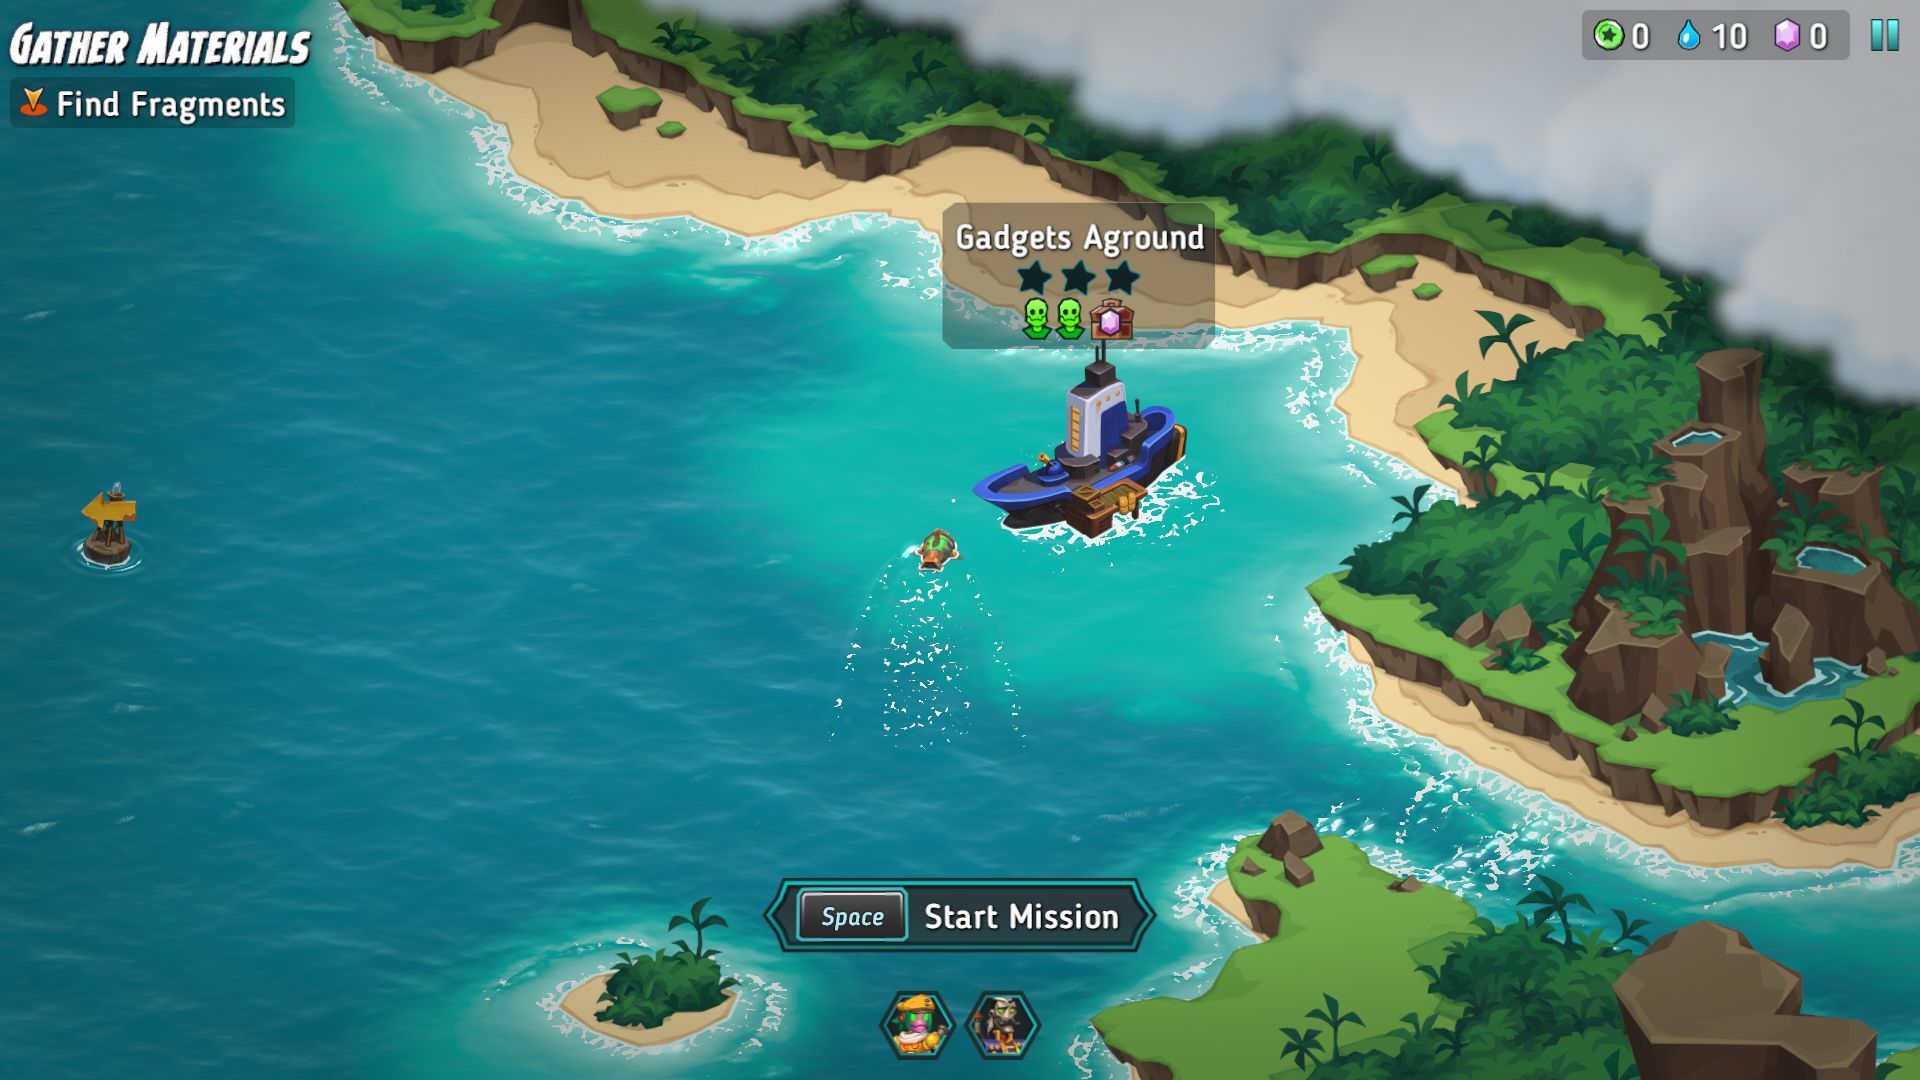
Image credit:Rock Paper Shotgun / Thunderful
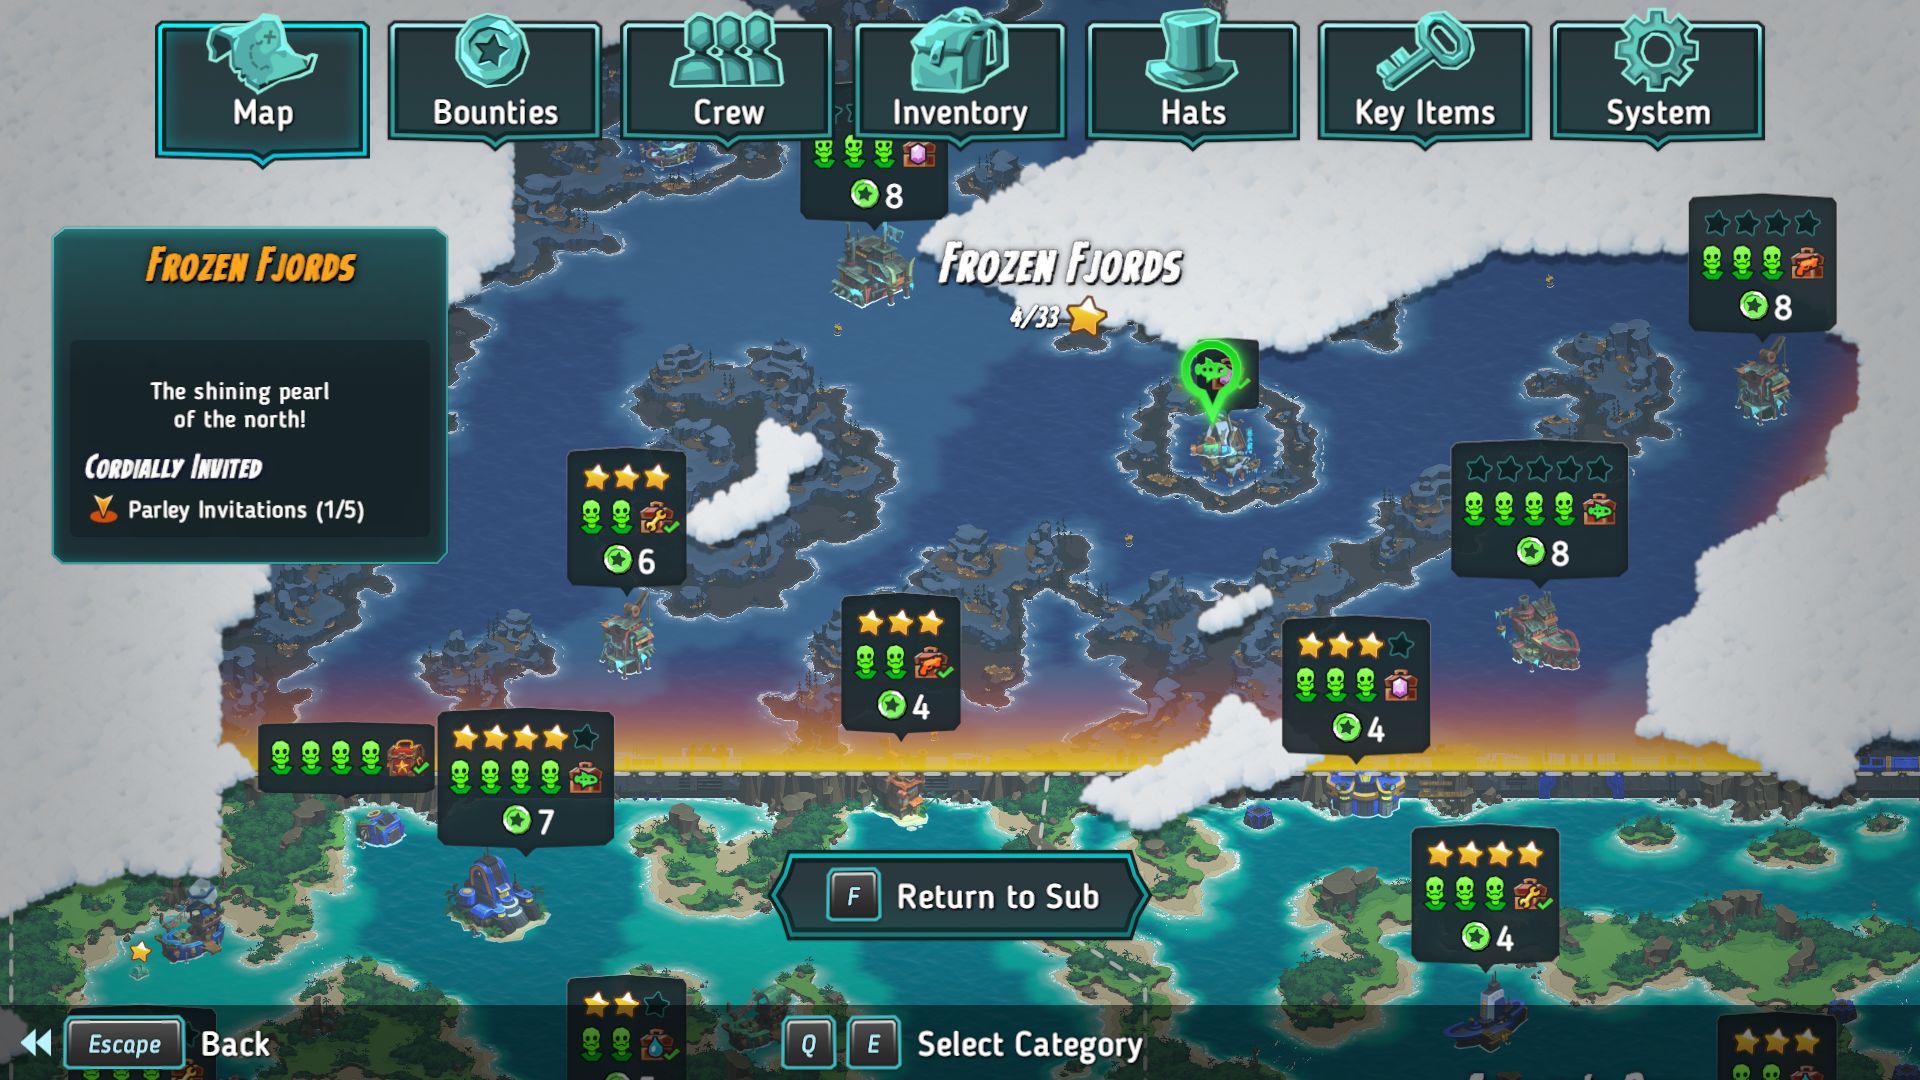
The early blue waters offer a limited smattering of missions (little outposts promising a “star” rating on completion) plus secret locations that require you to boost your way upstream into hidden lagoons, where you might find some flotsam containing a new weapon or a few Gallons (the game’s primary currency). But these are mere paddling pools to the later seas, such as the maze of arctic waters that let you sail wilier waters before you commit to the heavier and harder jobs.
It is in such missions where the really compulsive tactical stuff shines. These are battles full of bouncing bullets, XCOM-like movement, and moreish decision-making. The arms of your bots are unsteady, swaying gently as they aim. Some weapons, like the Sniper rifle, come equipped with a helpful aiming laser, but others, like the SMG, don’t have such a guide, meaning that shots aren’t always a sure thing. And that’s especially true when those pot shots try to take advantage of the ricocheting qualities of the game’s billiard-like gunplay. You sometimes take a gamble by pulling the trigger not knowing exactly how things will go, which delivers a tiny thrill that happens at least once every fight.
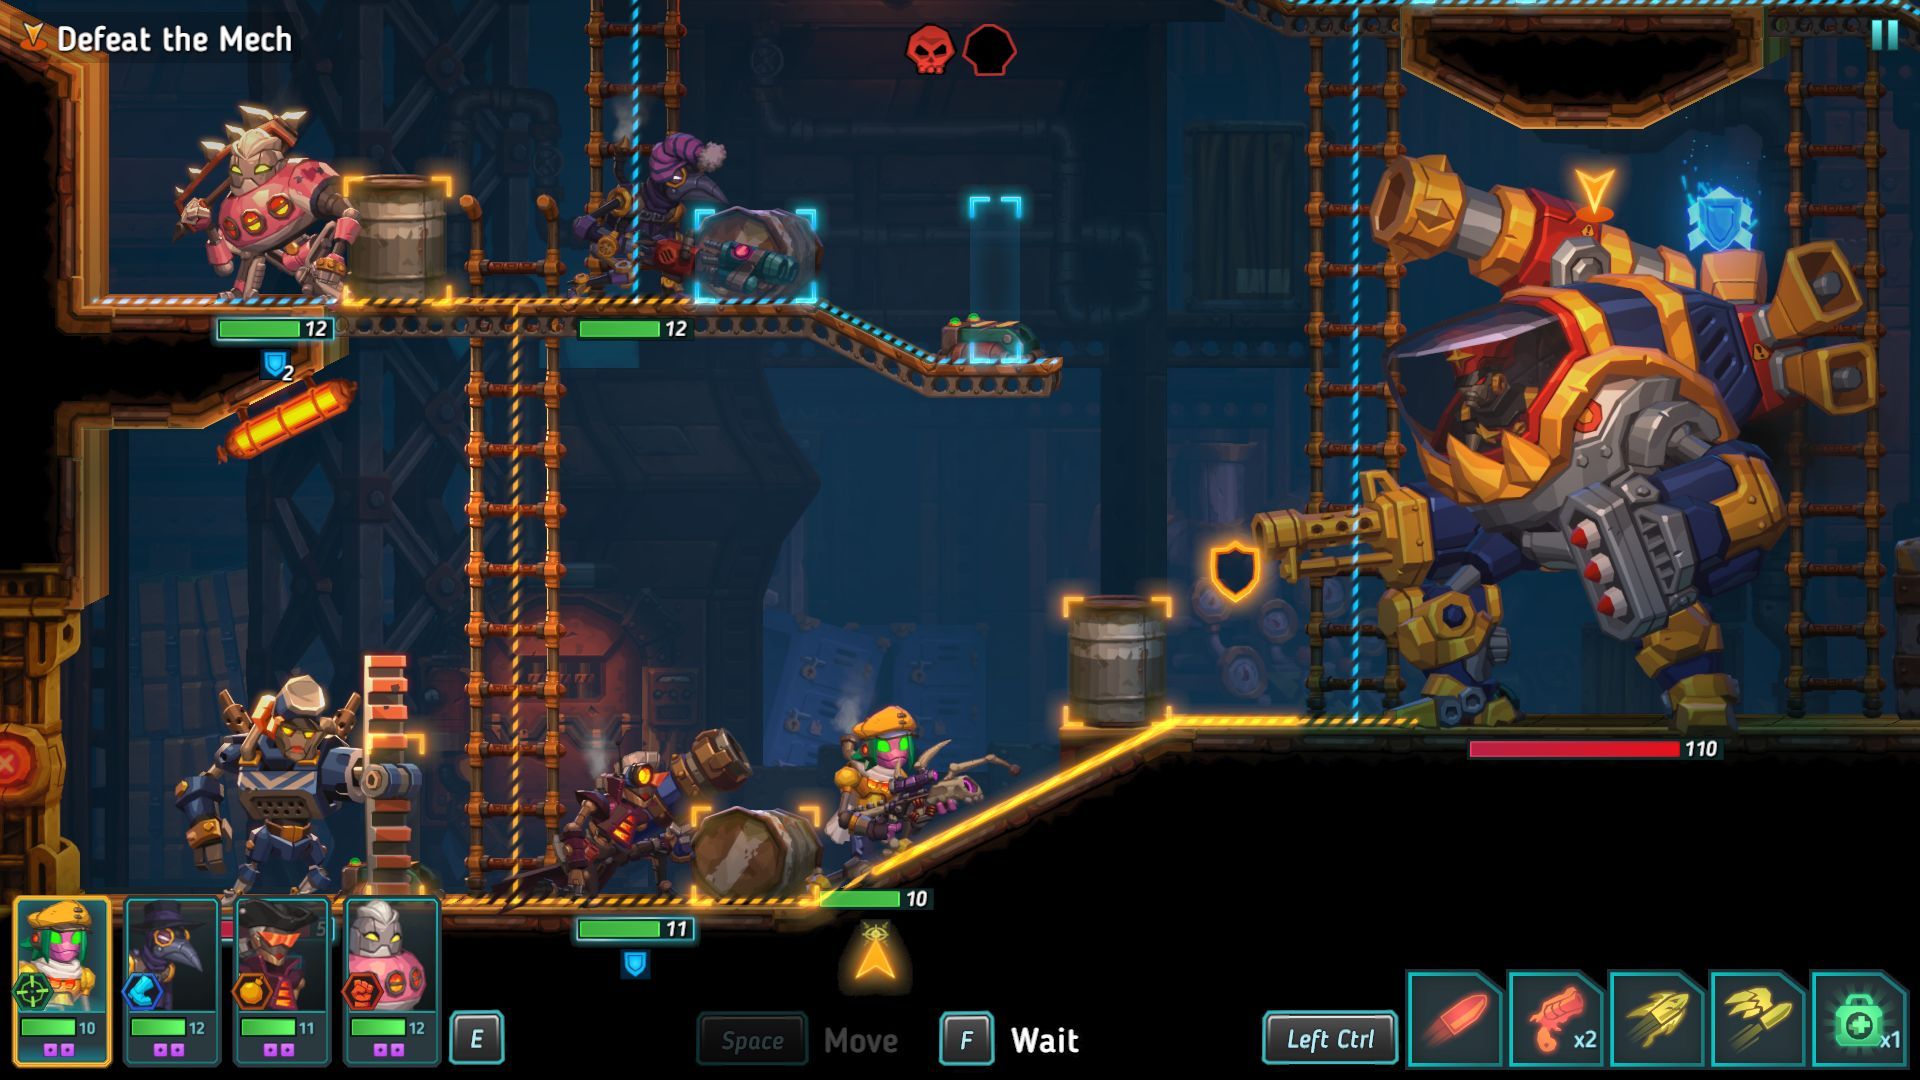
Image credit:Rock Paper Shotgun / Thunderful
Some characters, like the Sniper, can unlock skills that steady the sway and extend the reach of their laser pointers. Other classes, like the machine-gunning Reaper, will get an extra turn after landing a killing blow. The Flanker can take an action after sprinting (normally not allowed) which will remind any XCOM player of all the shotgun-wielding Assault troopers who saved many a day (or got vaporised for charging into the wrong place).
At this point Heist 2 could have left the classes alone, like any other turn-based strategy game . Instead, it pushes things a little further. Here, you can use a limited resource called “cogs” to mix and match the skills of each class (up to a point). An Engineer, who can create a piece of cover at will, might spend a cog to get the “sidestep” ability of a Flanker, allowing them to escape in moments when they are trapped on either side by clobbering enemies. A born Reaper might covet the Sniper’s ability to throw down a smoke bomb that makes him invisible for a turn. Ah, death from the shadows. Delicious.
There is a catch, of course. If you want a character to unlock these skills, they have to train with that class’ weapon and level up the hard way. At first it feels like this is a slow way of creating multiclass characters. But really it is a means of eliminating class altogether (#KarlMarx), since any character can use any weapon and become, in theory, a superpowered generalist. Each character also comes with their own innate abilities: Wesley can lob grenades as a free action, for example, while veteran buccaneer Judy can shame her enemies from across the map, giving them a tonguelashing so fierce it completely ignores armour.


It can be a little cumbersome when it comes to choosing ingredients for each bot’s stew of skills, perhaps a result of the simplified loadout screens. But I’d rather have a clean set of boxes that required some extra clicks than a mess of menus. I did also find myself investing far more in some classes than others. The explosives-obsessed Boomer has health increases that are universally useful, for example, while the Reaper’s concentration on critical hits, while intriguing, just didn’t feel as adaptable or necessary. In fact, outside of the first character who fulfills the role of Reaper, I basically abandoned that class. Though I’m certain there is some brutal build you could make by combining those skills with that of the Flanker, who’s nippy movement could result in robotic massacres.
Not that I sympathise with the enemies too much. Navy commanders can issue “edicts”, buffs that boost the armour and firepower of their fellow tin can men. The Rattlers, meanwhile, are old bots who have “replaced all their metal with bones” as part of a high seas cult. This allows you to fire rounds right through them, which is a blessing in levels where the scamps form a neat line to be blasted. And a curse in later levels where an ice block may stand behind your target, containing yet another enemy, frozen solid until a stray bullet wakes them up and adds to your troubles.
There are some entertaining boss battles too, such as an admiral who shows off with improbable trick shots, his glowing bullet boinging around the level for a comedic amount of time, as you try to figure out who he is even aiming at. It always looks like he has fluffed his shot, until that last bounce sends it directly at your Brawler’s noggin. Then there is Big Steve. Ah, Big Steve.
<img loading=“lazy” src=“https://assetsio.gnwcdn.com/steamworld-heist-2-review-5.jpg?width=2048&height=2048&fit=bounds&quality=85&format=jpg&auto=webp" onerror=“this.onerror=null;this.src=‘https://blogger.googleusercontent.com/img/a/AVvXsEhe7F7TRXHtjiKvHb5vS7DmnxvpHiDyoYyYvm1nHB3Qp2_w3BnM6A2eq4v7FYxCC9bfZt3a9vIMtAYEKUiaDQbHMg-ViyGmRIj39MLp0bGFfgfYw1Dc9q_H-T0wiTm3l0Uq42dETrN9eC8aGJ9_IORZsxST1AcLR7np1koOfcc7tnHa4S8Mwz_xD9d0=s16000';" alt=“A dieselbot with a silly hat shouts his own name: “BIG STEVE!” - 11”>
Image credit:Rock Paper Shotgun / Thunderful
There is sometimes the traditional XCOM problem of running into a room and activating a whole other group of enemies. Which can make opening some doors feel like an instant difficulty multiplier, a sometimes-irrecoverable misstep. On the plus side, there are no consequences for failing a mission at all. Even a total team wipe results in nothing but some lost time. Aborting a mission partway through is likewise no big deal. The spirit of forgiveness runs so deep that you are prompted with the option to change the game’s difficulty mode before every single mission, allowing you to tailor the challenge as you go along.
Still, each bot in your party can only stomach one mission per day before they need a rest, at which point you can dock at the nearest bar to end the day and cash in some “bounty” chips for extra goodies. Aside from being hubs where you can buy items and recruit new members to your squad of clanky misfits, these floating pubs host some of the game’s shanty-adjacent musical numbers. I’m a fan of diegetic songs in video game hubzones (shout out to the band in Endless Dungeon ’s saloon), so I find these upbeat sea-songs give the lopsided bars a sense of breezy homeliness. Though I could see some people immediately turning the music off in the options. My friends, why do you not welcome the earworm’s embrace? There is peace here, in listening to crooning sailors as you try to sleep.
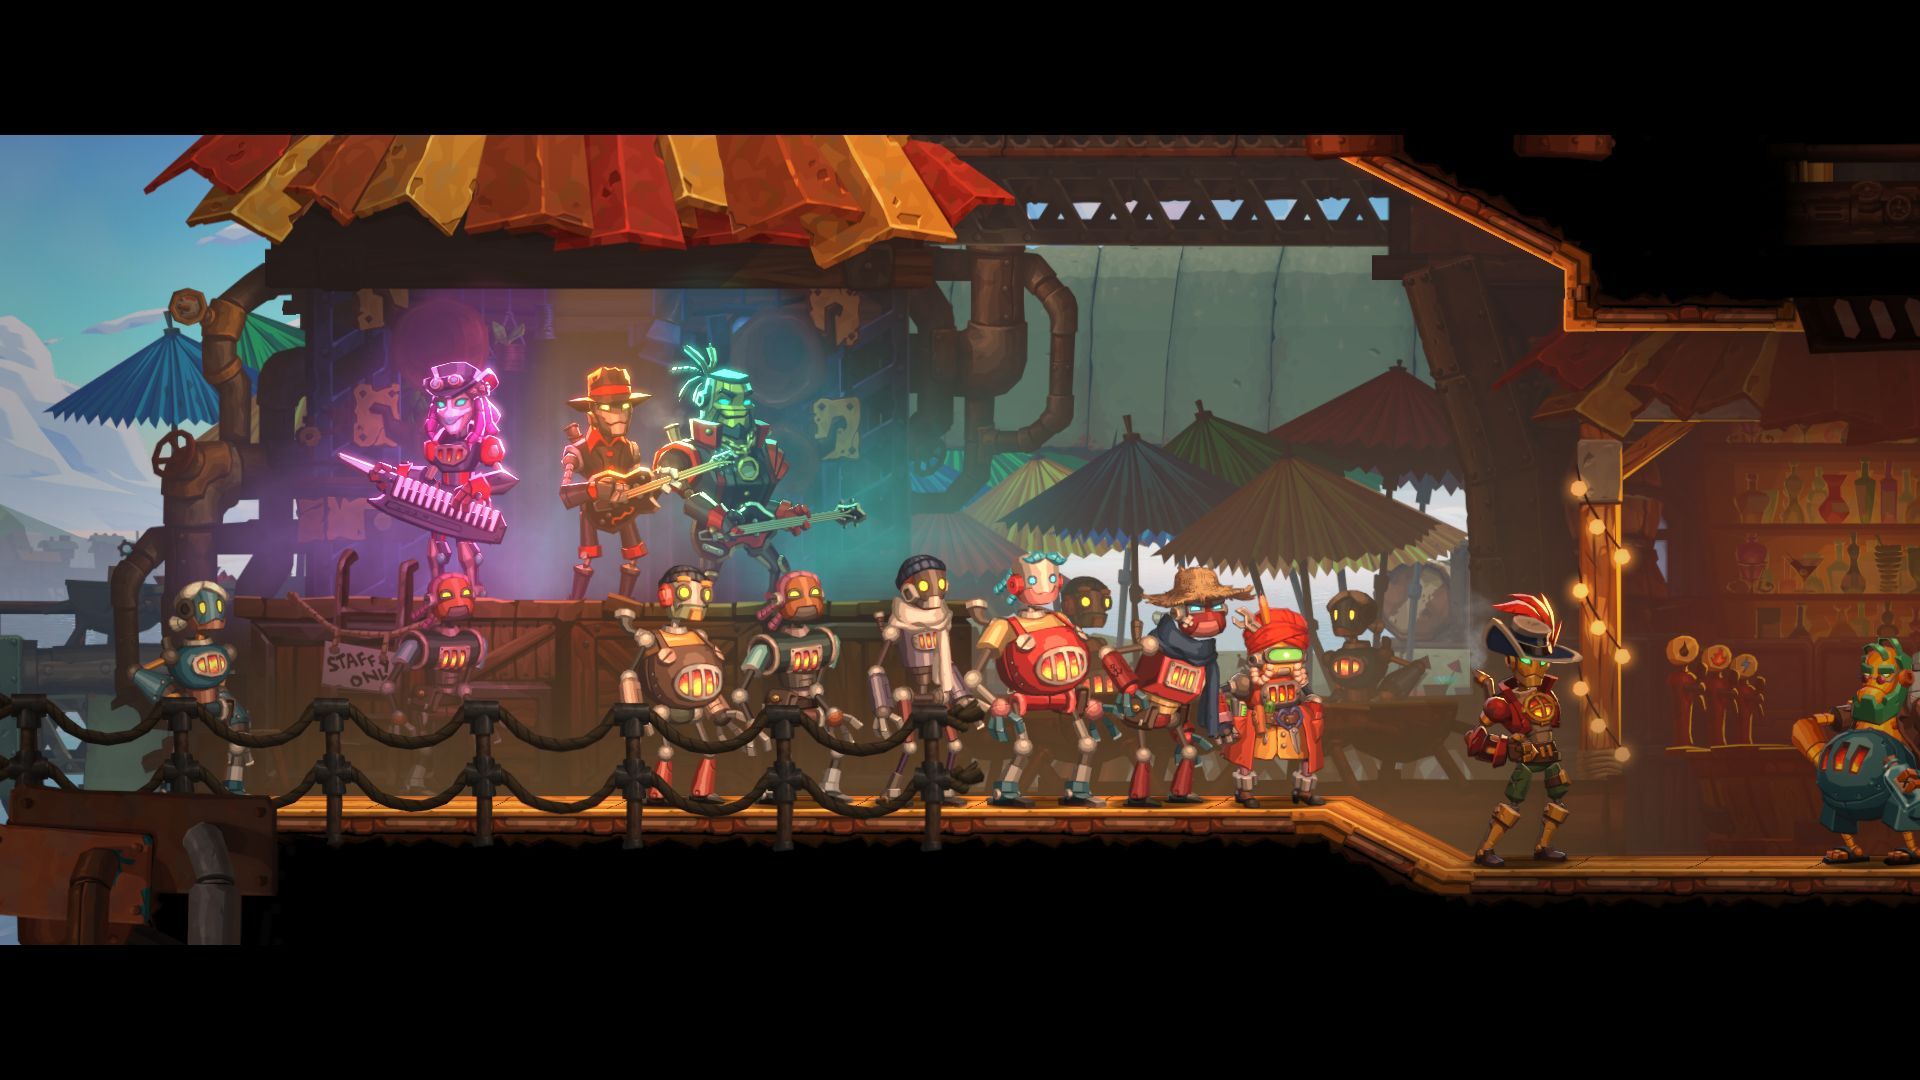
Image credit:Rock Paper Shotgun / Thunderful
I’ve spent a lot of time here describing the actions and cogwheels of the game, and not so much the feelings it elicits. But that’s maybe because the particular joy of SteamWorld games is so simple and pure. From a designer’s standpoint, they are little metal marvels, proof of a long-practised craft. But from a player’s perspective they are games where the pleasure is so plain to feel that I barely want to even discuss it. I don’t have to explain why I like the feeling of a cat’s fur, or the taste of chocolate. I don’t feel a compulsion to examine why Lego feels satisfying to click together, or to discuss what is good about a sunny day. These things are simple totems of happiness. SteamWorld feels this way for me. The worst you can say of them is that they play safe. And yet a safe harbour is something every player of games can use.
Once again, I’ve yet to play a SteamWorld game I didn’t like. SteamWorld Heist 2 is not bucking that trend. After 15 hours I still haven’t finished it, but my endgame sense is tingling and I’m eager to see it through. If I was asked to name the most reliably entertaining franchise in video games today, I would perhaps point to Thunderful’s toybox and say simply: “Them ‘uns”. These games know what they’re doing, they communicate it succinctly, and most importantly, they let the player happily move on when the game is finished. These are not games of “endless replayability”, they are toys of endful playability, of conclusiveness, closure and clemency. If switching off after reaching an “ending” in a piece of Destiny 2 DLC is like finishing a McDonalds yet feeling hungry again two hours later, then watching the credits roll on a SteamWorld game is like finishing a decent home cooked meal and walking away full of unthinking contentment. I’m keen to keep sailing north, find a homey pub on the horizon, and eat that final dish.
Find out how we conduct our reviews by reading our review policy .
SteamWorld Heist 2
Nintendo Switch
Rock Paper Shotgun is better when you sign in
Sign in and join us on our journey to discover strange and compelling PC games.

All 75 Arc Raiders Blueprints and where to get them
These areas have the highest chance of giving you Blueprints

Image credit:Rock Paper Shotgun/Embark Studios

Looking for more Arc Raiders Blueprints? It’s a special day when you find a Blueprint, as they’re among the most valuable items in Arc Raiders. If you find a Blueprint that you haven’t already found, then you must make sure you hold onto it at all costs, because Blueprints are the key to one of the most important and powerful systems of meta-progression in the game.
This guide aims to be the very best guide on Blueprints you can find, starting with a primer on what exactly they are and how they work in Arc Raiders, before delving into exactly where to get Blueprints and the very best farming spots for you to take in your search.
We’ll also go over how to get Blueprints from other unlikely activities, such as destroying Surveyors and completing specific quests. And you’ll also find the full list of all 75 Blueprints in Arc Raiders on this page (including the newest Blueprints added with the Cold Snap update , such as the Deadline Blueprint and Firework Box Blueprint), giving you all the information you need to expand your own crafting repertoire.
In this guide:
- What are Blueprints in Arc Raiders?
- Full Blueprint list: All crafting recipes
- Where to find Blueprints in Arc Raiders Blueprints obtained from quests Blueprints obtained from Trials Best Blueprint farming locations

What are Blueprints in Arc Raiders?
Blueprints in Arc Raiders are special items which, if you manage to extract with them, you can expend to permanently unlock a new crafting recipe in your Workshop. If you manage to extract from a raid with an Anvil Blueprint, for example, you can unlock the ability to craft your very own Anvil Pistol, as many times as you like (as long as you have the crafting materials).
To use a Blueprint, simply open your Inventory while in the lobby, then right-click on the Blueprint and click “Learn And Consume” . This will permanently unlock the recipe for that item in your Workshop. As of the Stella Montis update, there are allegedly 75 different Blueprints to unlock - although only 68 are confirmed to be in the game so far. You can see all the Blueprints you’ve found and unlocked by going to the Workshop menu, and hitting “R” to bring up the Blueprint screen.
It’s possible to find duplicates of past Blueprints you’ve already unlocked. If you find these, then you can either sell them, or - if you like to play with friends - you can take it into a match and gift it to your friend so they can unlock that recipe for themselves. Another option is to keep hold of them until the time comes to donate them to the Expedition.
Full Blueprint list: All crafting recipes
Below is the full list of all the Blueprints that are currently available to find in Arc Raiders, and the crafting recipe required for each item:
| Blueprint | Type | Recipe | Crafted At |
|---|---|---|---|
| Bettina | Weapon | 3x Advanced Mechanical Components 3x Heavy Gun Parts 3x Canister | Gunsmith 3 |
| Blue Light Stick | Quick Use | 3x Chemicals | Utility Station 1 |
| Aphelion | Weapon | 3x Magnetic Accelerator 3x Complex Gun Parts 1x Matriarch Reactor | Gunsmith 3 |
| Combat Mk. 3 (Flanking) | Augment | 2x Advanced Electrical Components 3x Processor | Gear Bench 3 |
| Combat Mk. 3 (Aggressive) | Augment | 2x Advanced Electrical Components 3x Processor | Gear Bench 3 |
| Complex Gun Parts | Material | 2x Light Gun Parts 2x Medium Gun Parts 2x Heavy Gun Parts | Refiner 3 |
| Fireworks Box | Quick Use | 1x Explosive Compound 3x Pop Trigger | Explosives Station 2 |
| Gas Mine | Mine | 4x Chemicals 2x Rubber Parts | Explosives Station 1 |
| Green Light Stick | Quick Use | 3x Chemicals | Utility Station 1 |
| Pulse Mine | Mine | 1x Crude Explosives 1x Wires | Explosives Station 1 |
| Seeker Grenade | Grenade | 1x Crude Explosives 2x ARC Alloy | Explosives Station 1 |
| Looting Mk. 3 (Survivor) | Augment | 2x Advanced Electrical Components 3x Processor | Gear Bench 3 |
| Angled Grip II | Mod | 2x Mechanical Components 3x Duct Tape | Gunsmith 2 |
| Angled Grip III | Mod | 2x Mod Components 5x Duct Tape | Gunsmith 3 |
| Hullcracker | Weapon | 1x Magnetic Accelerator 3x Heavy Gun Parts 1x Exodus Modules | Gunsmith 3 |
| Launcher Ammo | Ammo | 5x Metal Parts 1x Crude Explosives | Workbench 1 |
| Anvil | Weapon | 5x Mechanical Components 5x Simple Gun Parts | Gunsmith 2 |
| Anvil Splitter | Mod | 2x Mod Components 3x Processor | Gunsmith 3 |
| ??? | ??? | ??? | ??? |
| Barricade Kit | Quick Use | 1x Mechanical Components | Utility Station 2 |
| Blaze Grenade | Grenade | 1x Explosive Compound 2x Oil | Explosives Station 3 |
| Bobcat | Weapon | 3x Advanced Mechanical Components 3x Light Gun Parts | Gunsmith 3 |
| Osprey | Weapon | 2x Advanced Mechanical Components 3x Medium Gun Parts 7x Wires | Gunsmith 3 |
| Burletta | Weapon | 3x Mechanical Components 3x Simple Gun Parts | Gunsmith 1 |
| Compensator II | Mod | 2x Mechanical Components 4x Wires | Gunsmith 2 |
| Compensator III | Mod | 2x Mod Components 8x Wires | Gunsmith 3 |
| Defibrillator | Quick Use | 9x Plastic Parts 1x Moss | Medical Lab 2 |
| ??? | ??? | ??? | ??? |
| Equalizer | Weapon | 3x Magnetic Accelerator 3x Complex Gun Parts 1x Queen Reactor | Gunsmith 3 |
| Extended Barrel | Mod | 2x Mod Components 8x Wires | Gunsmith 3 |
| Extended Light Mag II | Mod | 2x Mechanical Components 3x Steel Spring | Gunsmith 2 |
| Extended Light Mag III | Mod | 2x Mod Components 5x Steel Spring | Gunsmith 3 |
| Extended Medium Mag II | Mod | 2x Mechanical Components 3x Steel Spring | Gunsmith 2 |
| Extended Medium Mag III | Mod | 2x Mod Components 5x Steel Spring | Gunsmith 3 |
| Extended Shotgun Mag II | Mod | 2x Mechanical Components 3x Steel Spring | Gunsmith 2 |
| Extended Shotgun Mag III | Mod | 2x Mod Components 5x Steel Spring | Gunsmith 3 |
| Remote Raider Flare | Quick Use | 2x Chemicals 4x Rubber Parts | Utility Station 1 |
| Heavy Gun Parts | Material | 4x Simple Gun Parts | Refiner 2 |
| Venator | Weapon | 2x Advanced Mechanical Components 3x Medium Gun Parts 5x Magnet | Gunsmith 3 |
| Il Toro | Weapon | 5x Mechanical Components 6x Simple Gun Parts | Gunsmith 1 |
| Jolt Mine | Mine | 1x Electrical Components 1x Battery | Explosives Station 2 |
| Explosive Mine | Mine | 1x Explosive Compound 1x Sensors | Explosives Station 3 |
| Jupiter | Weapon | 3x Magnetic Accelerator 3x Complex Gun Parts 1x Queen Reactor | Gunsmith 3 |
| Light Gun Parts | Material | 4x Simple Gun Parts | Refiner 2 |
| Lightweight Stock | Mod | 2x Mod Components 5x Duct Tape | Gunsmith 3 |
| Lure Grenade | Grenade | 1x Speaker Component 1x Electrical Components | Utility Station 2 |
| Medium Gun Parts | Material | 4x Simple Gun Parts | Refiner 2 |
| Torrente | Weapon | 2x Advanced Mechanical Components 3x Medium Gun Parts 6x Steel Spring | Gunsmith 3 |
| Muzzle Brake II | Mod | 2x Mechanical Components 4x Wires | Gunsmith 2 |
| Muzzle Brake III | Mod | 2x Mod Components 8x Wires | Gunsmith 3 |
| Padded Stock | Mod | 2x Mod Components 5x Duct Tape | Gunsmith 3 |
| Shotgun Choke II | Mod | 2x Mechanical Components 4x Wires | Gunsmith 2 |
| Shotgun Choke III | Mod | 2x Mod Components 8x Wires | Gunsmith 3 |
| Shotgun Silencer | Mod | 2x Mod Components 8x Wires | Gunsmith 3 |
| Showstopper | Grenade | 1x Advanced Electrical Components 1x Voltage Converter | Explosives Station 3 |
| Silencer I | Mod | 2x Mechanical Components 4x Wires | Gunsmith 2 |
| Silencer II | Mod | 2x Mod Components 8x Wires | Gunsmith 3 |
| Snap Hook | Quick Use | 2x Power Rod 3x Rope 1x Exodus Modules | Utility Station 3 |
| Stable Stock II | Mod | 2x Mechanical Components 3x Duct Tape | Gunsmith 2 |
| Stable Stock III | Mod | 2x Mod Components 5x Duct Tape | Gunsmith 3 |
| Tagging Grenade | Grenade | 1x Electrical Components 1x Sensors | Utility Station 3 |
| Tempest | Weapon | 3x Advanced Mechanical Components 3x Medium Gun Parts 3x Canister | Gunsmith 3 |
| Trigger Nade | Grenade | 2x Crude Explosives 1x Processor | Explosives Station 2 |
| Vertical Grip II | Mod | 2x Mechanical Components 3x Duct Tape | Gunsmith 2 |
| Vertical Grip III | Mod | 2x Mod Components 5x Duct Tape | Gunsmith 3 |
| Vita Shot | Quick Use | 2x Antiseptic 1x Syringe | Medical Lab 3 |
| Vita Spray | Quick Use | 3x Antiseptic 1x Canister | Medical Lab 3 |
| Vulcano | Weapon | 1x Magnetic Accelerator 3x Heavy Gun Parts 1x Exodus Modules | Gunsmith 3 |
| Wolfpack | Grenade | 2x Explosive Compound 2x Sensors | Explosives Station 3 |
| Red Light Stick | Quick Use | 3x Chemicals | Utility Station 1 |
| Smoke Grenade | Grenade | 14x Chemicals 1x Canister | Utility Station 2 |
| Deadline | Mine | 3x Explosive Compound 2x ARC Circuitry | Explosives Station 3 |
| Trailblazer | Grenade | 1x Explosive Compound 1x Synthesized Fuel | Explosives Station 3 |
| Tactical Mk. 3 (Defensive) | Augment | 2x Advanced Electrical Components 3x Processor | Gear Bench 3 |
| Tactical Mk. 3 (Healing) | Augment | 2x Advanced Electrical Components 3x Processor | Gear Bench 3 |
| Yellow Light Stick | Quick Use | 3x Chemicals | Utility Station 1 |
Note: The missing Blueprints in this list likely have not actually been added to the game at the time of writing, because none of the playerbase has managed to find any of them. As they are added to the game, I will update this page with the most relevant information so you know exactly how to get all 75 Arc Raiders Blueprints.
Where to find Blueprints in Arc Raiders
Below is a list of all containers, modifiers, and events which maximise your chances of finding Blueprints:
- Certain quests reward you with specific Blueprints .
- Completing Trials has a high chance of offering Blueprints as rewards.
- Surveyors have a decent chance of dropping Blueprints on death.
- High loot value areas tend to have a greater chance of spawning Blueprints.
- Night Raids and Storms may increase rare Blueprint spawn chances in containers.
- Containers with higher numbers of items may have a higher tendency to spawn Blueprints. As a result, Blue Gate (which has many “large” containers containing multiple items) may give you a higher chance of spawning Blueprints.
- Raider containers (Raider Caches, Weapon Boxes, Medical Bags, Grenade Tubes) have increased Blueprint drop rates. As a result, the Uncovered Caches event gives you a high chance of finding Blueprints.
- Security Lockers have a higher than average chance of containing Blueprints.
- Certain Blueprints only seem to spawn under specific circumstances: Tempest Blueprint only spawns during Night Raid events. Vulcano Blueprint only spawns during Hidden Bunker events. Jupiter and Equaliser Blueprints only spawn during Harvester events.

Raider Caches, Weapon Boxes, and other raider-oriented container types have a good chance of offering Blueprints. |Image credit:Rock Paper Shotgun/Embark Studios
Blueprints have a very low chance of spawning in any container in Arc Raiders, around 1-2% on average. However, there is a higher chance of finding Blueprints in particular container types. Specifically, you can find more Blueprints in Raider containers and security lockers.
Beyond this, if you’re looking for Blueprints you should focus on regions of the map which are marked as having particularly high-value loot. Areas such as the Control Tower in Dam Battlegrounds, the Arrival and Departure Buildings in Spaceport, and Pilgrim’s Peak in Blue Gate all have a better-than-average chance of spawning Blueprints somewhere amongst all their containers. Night Raids and Electromagnetic Storm events also increase the drop chances of certain Blueprints .
In addition to these containers, you can often loot Blueprints from destroyed Surveyors - the largest of the rolling ball ARC. Surveyors are more commonly found on the later maps - Spaceport and Blue Gate - and if one spawns in your match, you’ll likely see it by the blue laser beam that it casts into the sky while “surveying”.
Surveyors are quite well-armoured and will very speedily run away from you once it notices you, but if you can take one down then make sure you loot all its parts for a chance of obtaining certain unusual Blueprints.
Blueprints obtained from quests
One way in which you can get Blueprints is by completing certain quests for the vendors in Speranza. Some quests will reward you with a specific item Blueprint upon completion, so as long as you work through all the quests in Arc Raiders, you are guaranteed those Blueprints.
Here is the full list of all Blueprints you can get from quest rewards:
- Trigger Nade Blueprint: Rewarded after completing “Sparks Fly”.
- Lure Grenade Blueprint: Rewarded after completing “Greasing Her Palms”.
- Burletta Blueprint: Rewarded after completing “Industrial Espionage”.
- Hullcracker Blueprint (and Launcher Ammo Blueprint): Rewarded after completing “The Major’s Footlocker”.
Alas, that’s only 4 Blueprints out of a total of 75 to unlock, so for the vast majority you will need to find them yourself during a raid. If you’re intent on farming Blueprints, then it’s best to equip yourself with cheap gear in case you lose it, but don’t use a free loadout because then you won’t get a safe pocket to stash any new Blueprint you find. No pain in Arc Raiders is sharper than failing to extract with a new Blueprint you’ve been after for a dozen hours already.

One of the best ways to get Blueprints is by hitting three stars on all five Trials every week. |Image credit:Rock Paper Shotgun/Embark Studios
Blueprints obtained from Trials
One of the very best ways to get Blueprints is as rewards for completing Trials in Arc Raiders. Trials are unlocked from Level 15 onwards, and allow you to earn rewards by focusing on certain tasks over the course of several raids. For example, one Trial might task you with dealing damage to Hornets, while another might challenge you to loot Supply Drops.
Trials refresh on a weekly basis, with a new week bringing five new Trials. Each Trial can offer up to three rewards after passing certain score milestones, and it’s possible to receive very high level loot from these reward crates - including Blueprints. So if you want to unlock as many Blueprints as possible, you should make a point of completing as many Trials as possible each week.
Best Blueprint farming locations
The very best way to get Blueprints is to frequent specific areas of the maps which combine high-tier loot pools with the right types of containers to search. Here are my recommendations for where to find Blueprints on every map, so you can always keep the search going for new crafting recipes to unlock.

Image credit:Rock Paper Shotgun/Embark Studios
Dam Battlegrounds
The best places to farm Blueprints on Dam Battlegrounds are the Control Tower, Power Generation Complex, Ruby Residence, and Pale Apartments . The first two regions, despite only being marked on the map as mid-tier loot, contain a phenomenal number of containers to loot. The Control Tower can also contain a couple of high-tier Security Lockers - though of course, you’ll need to have unlocked the Security Breach skill at the end of the Survival tree.
There’s also a lot of reporting amongst the playerbase that the Residential areas in the top-left of the map - Pale Apartments and Ruby Residence - give you a comparatively strong chance of finding Blueprints. Considering their size, there’s a high density of containers to loot in both locations, and they also have the benefit of being fairly out of the way. So you’re more likely to have all the containers to yourself.
Buried City
The best Blueprint farming locations on Buried City are the Santa Maria Houses, Grandioso Apartments, Town Hall, and the various buildings of the New District . Grandioso Apartments has a lower number of containers than the rest, but a high chance of spawning weapon cases - which have good Blueprint drop rates. The others are high-tier loot areas, with plenty of lootable containers - including Security Lockers.
Spaceport
The best places to find Blueprints on Spaceport are the Arrival and Departure Buildings, as well as Control Tower A6 and the Launch Towers . All these areas are labelled as high-value loot regions, and many of them are also very handily connected to one another by the Spaceport wall, which you can use to quickly run from one area to the next. At the tops of most of these buildings you’ll find at least one Security Locker, so this is an excellent farming route for players looking to find Blueprints.
The downside to looting Blueprints on Spaceport is that all these areas are hotly contested, particularly in Duos and Squads. You’ll need to be very focused and fast in order to complete the full farming route.

Image credit:Rock Paper Shotgun/Embark Studios
Blue Gate
Blue Gate tends to have a good chance of dropping Blueprints, potentially because it generally has a high number of containers which can hold lots of items; so there’s a higher chance of a Blueprint spawning in each container. In my experience, the best Blueprint farming spots on Blue Gate are Pilgrim’s Peak, Raider’s Refuge, the Ancient Fort, and the Underground Complex beneath the Warehouse .
All of these areas contain a wealth of containers to loot. Raider’s Refuge has less to loot, but the majority of the containers in and around the Refuge are raider containers, which have a high chance of containing Blueprints - particularly during major events.
Stella Montis
On the whole, Stella Montis seems to have a very low drop rate for Blueprints (though a high chance of dropping other high-tier loot). If you do want to try farming Blueprints on this map, the best places to find Blueprints in Stella Montis are Medical Research, Assembly Workshop, and the Business Center . These areas have the highest density of containers to loot on the map.
In addition to this, the Western Tunnel has a few different Security Lockers to loot, so while there’s very little to loot elsewhere in this area of the map, it’s worth hitting those Security Lockers if you spawn there at the start of a match.
That wraps up this primer on how to get all the Blueprints in Arc Raiders as quickly as possible. With the Expedition system constantly resetting a large number of players’ Blueprints, it’s more important than ever to have the most up-to-date information on where to find all these Blueprints.
While you’re here, be sure to check out our Arc Raiders best guns tier list , as well as our primers on the best skills to unlock and all the different Field Depot locations on every map.

ARC Raiders
PS5 , Xbox Series X/S , PC
Rock Paper Shotgun is better when you sign in
Sign in and join us on our journey to discover strange and compelling PC games.
