Palworld tier list and the best Pals to choose
Here’s a tier list of the best Pals in Palworld ranked
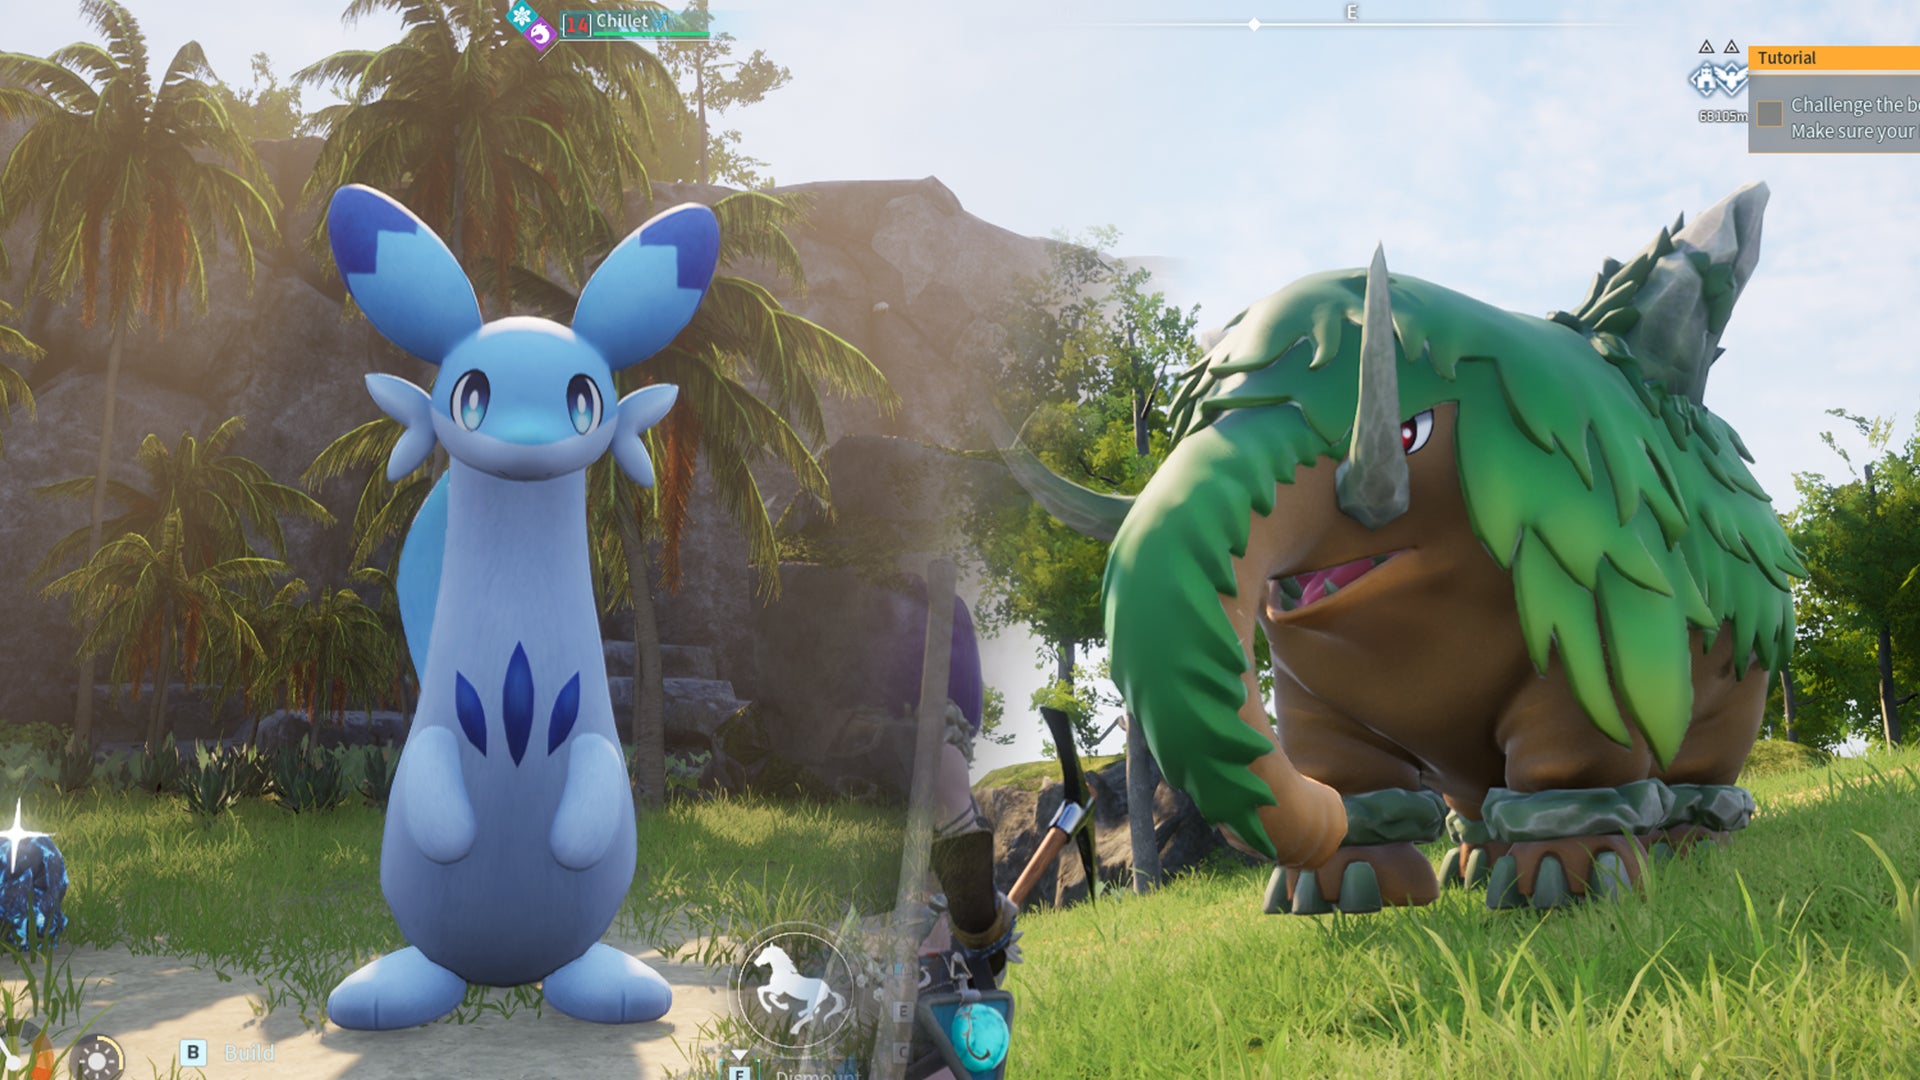
Image credit:Rock Paper Shotgun/Pocketpair

Looking for a Pal tier list to rank the best Pals in Palworld? As you journey through Palworld , you’ll come across Pals of different elements with varying Partner Skills which determine how strong they are in combat.
With so many to choose from, a Pal list that is ever-expanding, and only a limited amount of space on your team, it can be hard prioritising which to recruit. Luckily, we’ve organised all Pals into a tier list below and then went through our top ten essential picks. Featured are the best Pals for combat, the best base Pals , mounts and more.

Palworld tier list
The following Pal tier list contains all Pals currently available in Palworld . As of writing, there are a total of 138 Pals including species variations. Below we’ve ranked them according to the strongest Pals in combat, the fastest mounts and how useful they are at your base when performing tasks like Planting , Handiwork and more.
Be sure to check below this tier list for a breakdown of our top ten Pals and a rundown of why each Pal should be a vital member of your team.
| Tier | Pals |
|---|---|
| S Tier | Anubis, Astegon, Blazamut, Frostallion, Frostallion Noct, Grizzbolt, Jetragon, Jormuntide, Jormuntide Ignis, Lovander, Lyleen, Lyleen Noct, Necromus, Orserk, Paladius, Shadowbeak, Sibelyx, Verdash, Warsect |
| A Tier | Astegon, Azurobe, Beakon, Bushi, Digtoise, Elizabee, Faleris, Felbat, Felbat Noct, Galeclaw, Helzephyr, Ice Reptyro, Incineram, Incineram Noct, Mammorest, Mammorest Cryst, Menasting, Mossanda, Mossanda Lux, Petallia, Pyrin, Quivern, Ragnahawk, Reptyro, Robinquill, Robinquill Terra, Suzaku, Suzaku Aqua, Tocotoco, Vaelet, Wumpo, Wumpo Botan |
| B Tier | Arsox, Beegarde, Blazehowl, Blazehowl Noct, Bristla, Chillet, Cinnamoth, Cryolinx, Dazzi, Dumud, Elphidran, Elphidran Aqua, Fenglope, Flopie, Flambelle, Foxparks, Gorirat, Ice Kingpaca, Jolthog, Jolthog Cryst, Katress, Kingpaca, Kitsun, Lifmunk, Loupmoon, Mau, Mau Cryst, Penking, Pengullet, Rayhound, Reindrix, Swee, Sweepa, Tanzee, Tombat, Vanwyrm, Vanwyrm Cryst, Vixy |
| C Tier | Cawgnito, Daedream, Dinossom, Dinossom Lux, Direhowl, Eikthyrdeer, Eikthyrdeer Terra, Foxcicle, Fuddler, Fuack, Gobfin, Gobfin Ignis, Grintale, Hoocrates, Kelpsea, Kelpsea Ignis, Leezpunk, Leezpunk Ignis, Lunaris, Maraith, Nitewing, Nox, Pyrin, Pyrin Noct, Relaxaurus, Relaxaurus Lux, Ribunny, Rooby, Rushoar, Sparkit, Univolt, Wixen |
| D Tier | Broncherry, Broncherry Aqua, Caprity, Cattiva, Celaray, Chikipi, Cremis, Depresso, Gumoss, Hangyu, Hangyu Cryst, Killamari, Lamball, Melpaca, Mozzarina, Surfent, Surfent Terra, Teafant, Woolipop |
Now you should have a good idea which are the best Pals in Palworld. Below, we’ve listed the top ten Pals you need to recruit, where to find them and what makes them a worthwhile addition to your team.
10. Lyleen
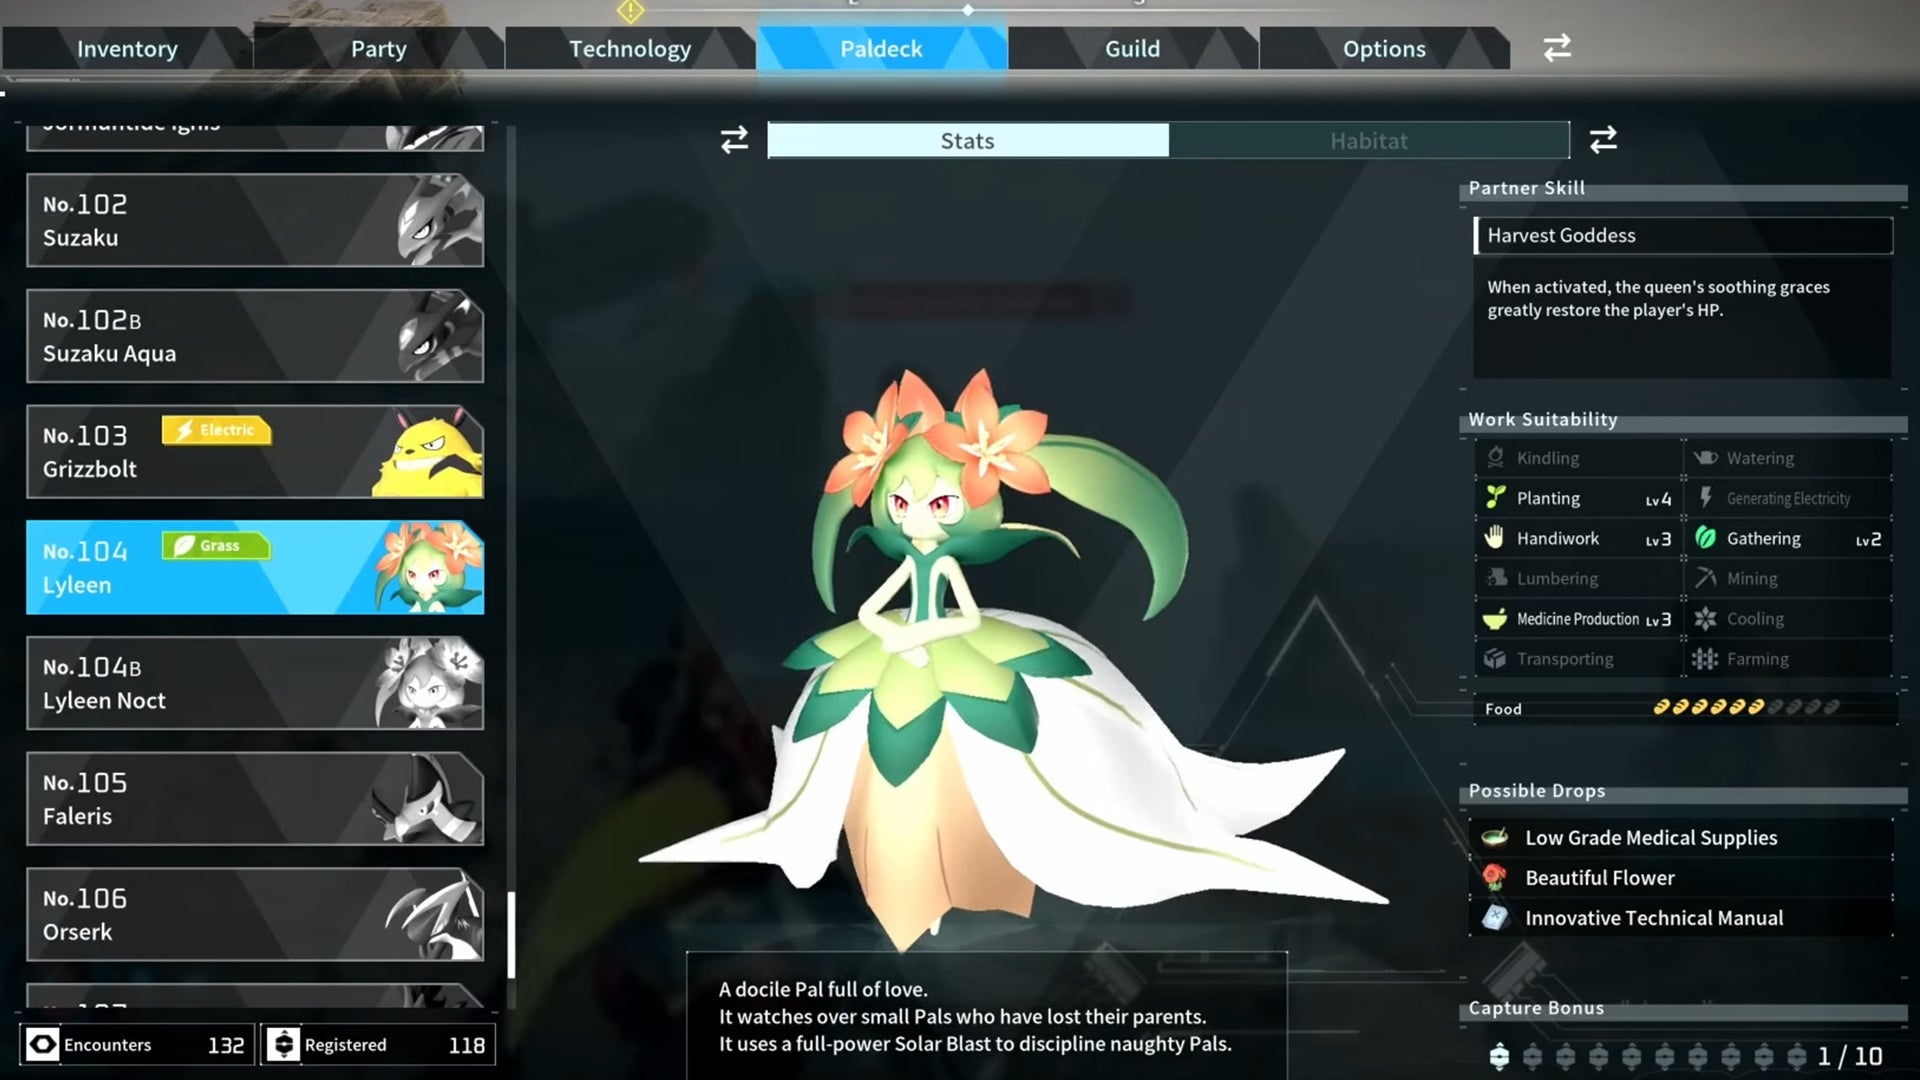
Image credit:Rock Paper Shotgun/Pocketpair
- Paldeck number: 104
- Element: Grass
- Skill Proficiencies: Planting Level 4, Handiwork Level 3, Gathering Level 2, Medicine Productions Level 3
- Partner Skill: Harvest Goddess
- Drops: Low Grade Medical Supplies, Beautiful Flower, Innovative Technical Manual
- Location: No.3 Wildlife Sanctuary
Whilst there are perhaps more fearsome-looking Pals on this list, the Lyleen provides some powerful buffs both to combat and to base management.
The Lyleen resides in a top spot for both our best Planting Pals and best Medicine Production Pals lists. Whilst these skills are reason enough to recruit a Lyleen to your Palbox, their Partner Skill, Harvest Goddess can restore a player’s HP in combat. This is one of few Pals with restorative powers and is infinitely useful when taking on powerful foes.
Whilst the Lyleen predominantly has Grass-type powers, they also do have access to a Water-based power, Aqua Burst , at level 22.
9. Verdash
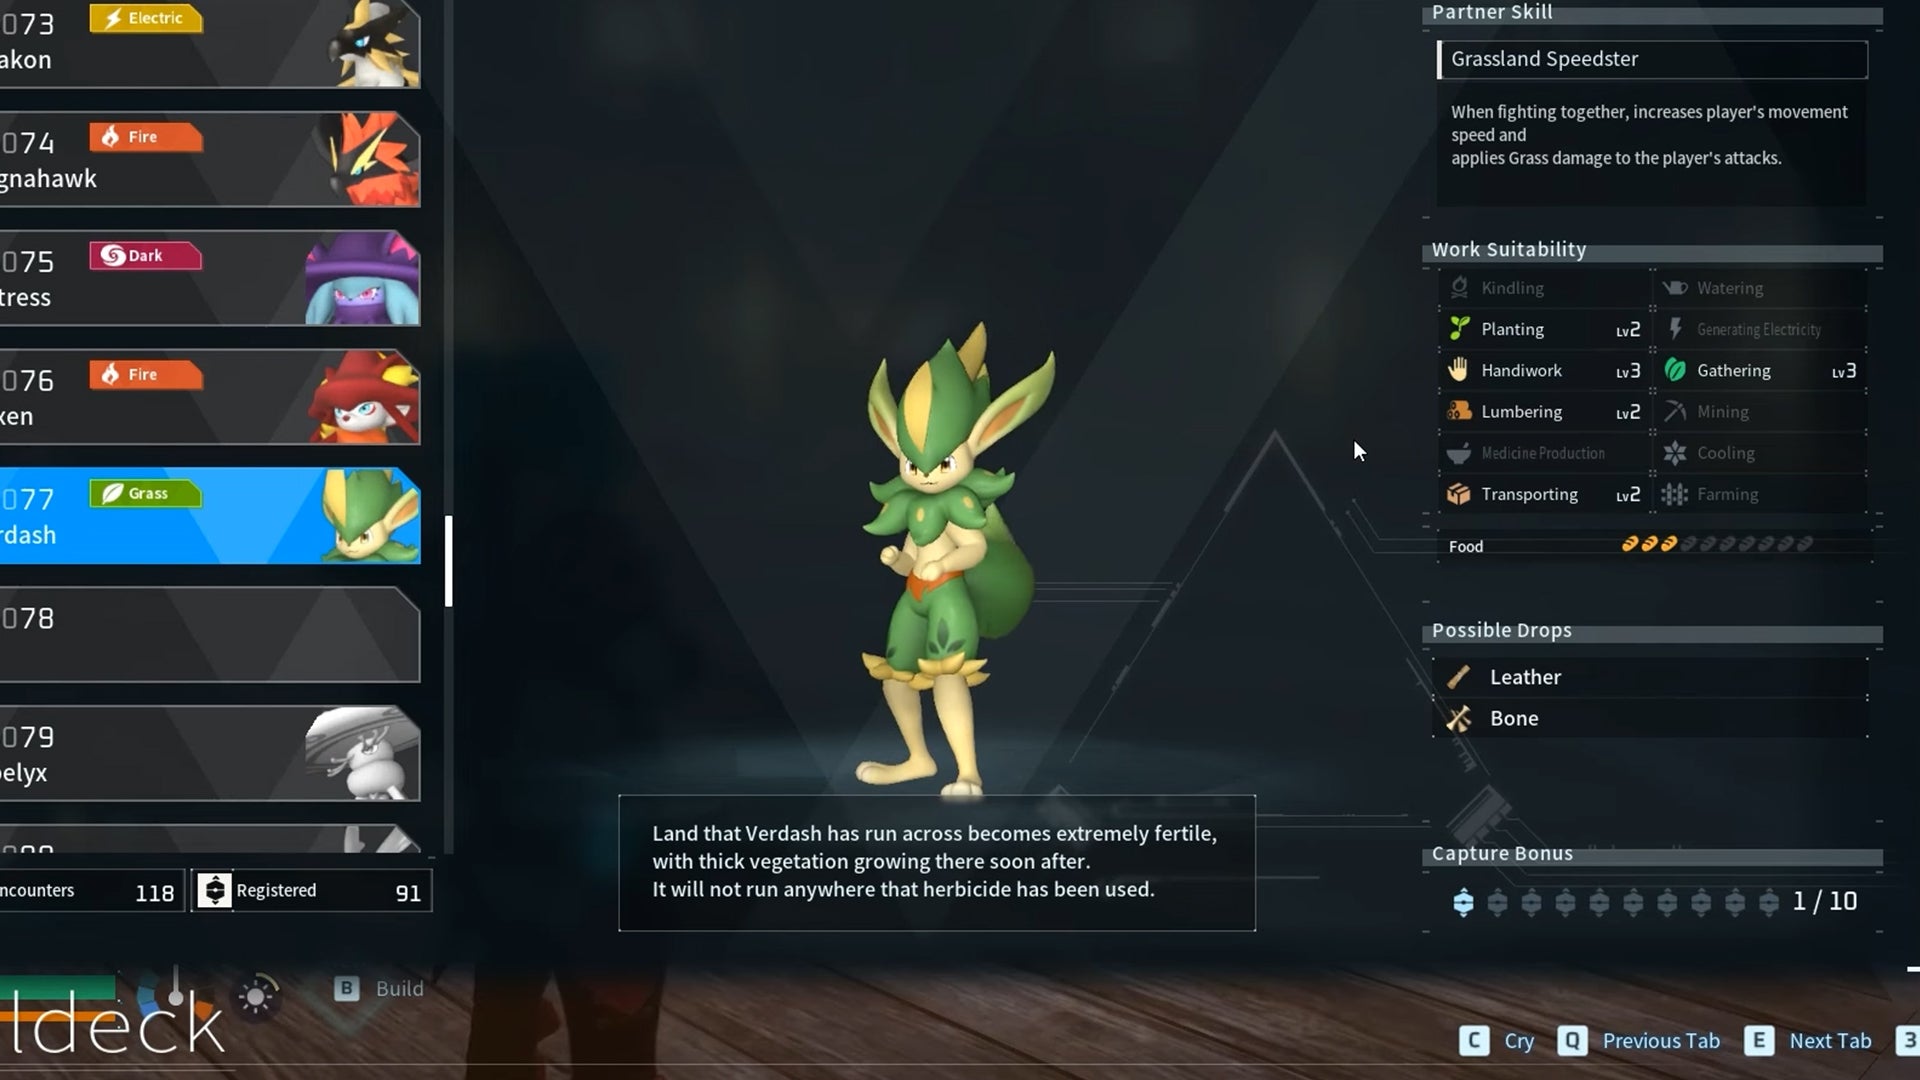
Image credit:Rock Paper Shotgun/Pocketpair
- Paldeck number: 077
- Element: Grass
- Skill Proficiencies: Planting Level 2, Handiwork Level 3, Lumbering Level 2, Transporting Level 2, Gathering Level 3
- Partner Skill: Grassland Speedster
- Drops: Leather, Bone
- Location: No.2 Wildlife Sanctuary
The Verdash has a range of valuable skills which make it a worthy recruit for your base and one of the best base Pals and best Gathering Pals .
Additionally, the Verdash can increase the player’s movement speed in combat and apply Grass damage to all of the player’s attacks, making it especially useful when fighting Ground-type foes.
Verdash Pals also have access to strong Ground damage attacks like the Stone Cannon which has an attack power of 70 despite the fact it can be unlocked at just level 7.
8. Warsect
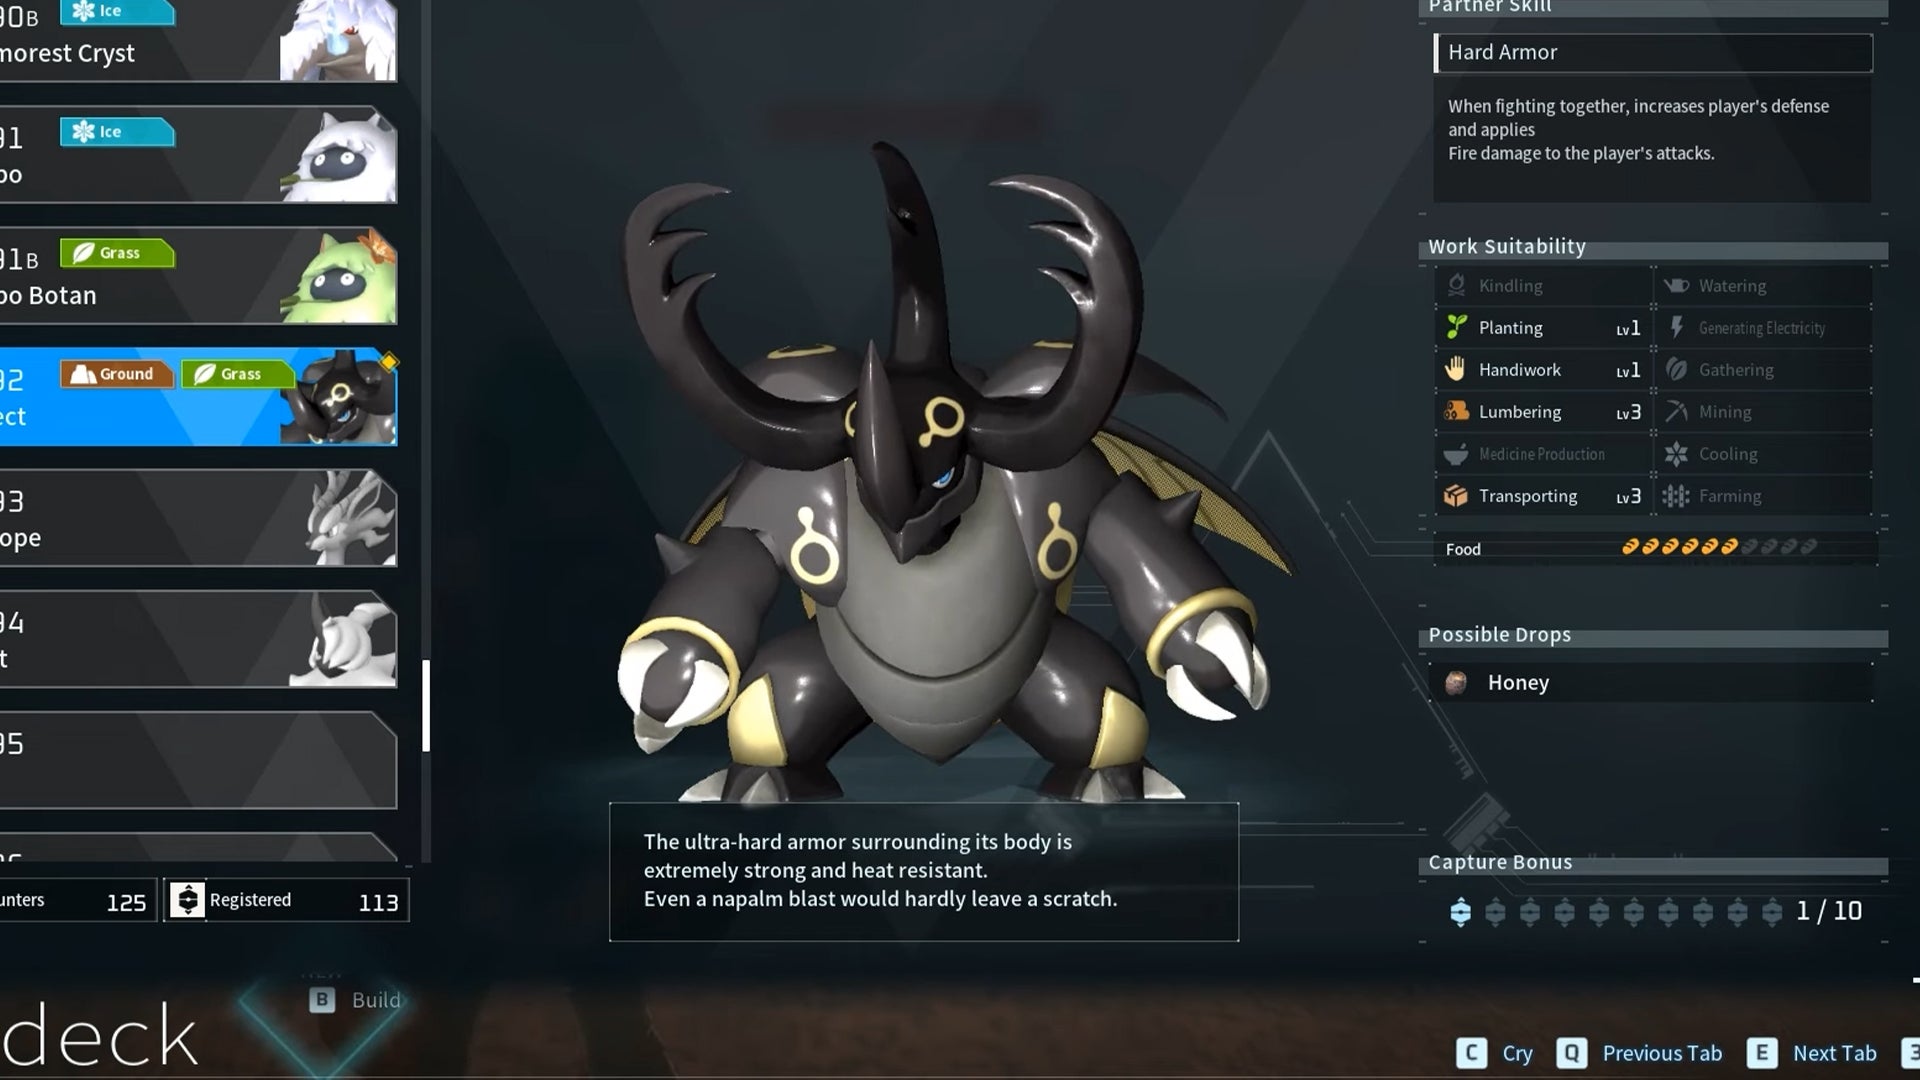
Image credit:Rock Paper Shotgun/Pocketpair
- Paldeck number: 092
- Element: Ground, Grass
- Skill Proficiencies: Planting Level 1, Handiwork Level 1, Lumbering Level 3, Transporting Level 3
- Partner Skill: Hard Armor
- Drops: Honey
- Location: No.2 Wildlife Sanctuary
The Warsect is proficient in both Grass and Ground attacks and is both the best Grass Pal and best Lumbering Pal to recruit in Palworld due to its skill proficiencies.
If you want a Pal that can cover as many elements as possible, Warsect Pals can apply Fire damage to all of the player’s attacks when recruited in your team. It can also strengthen the player’s defence making it a jack of all trades and immeasurably useful against a range of Pal types.
7. Orserk
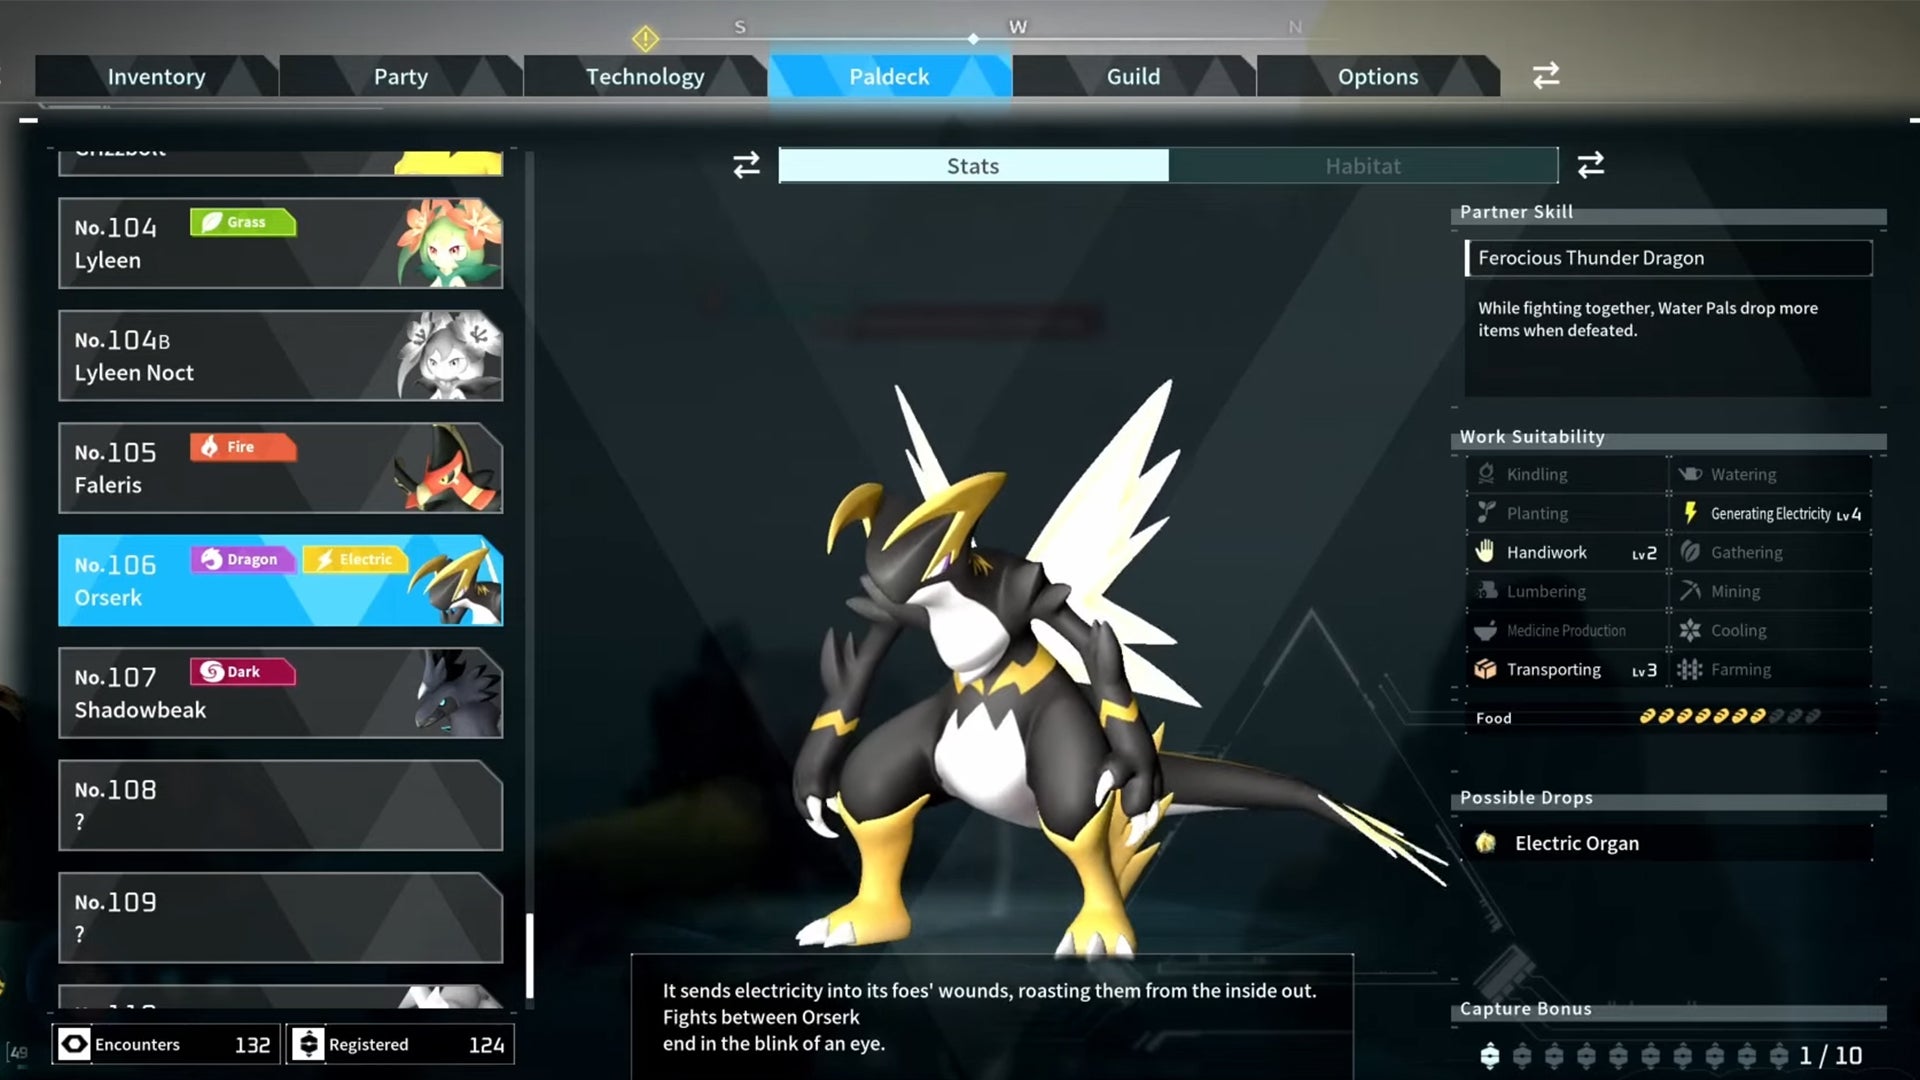
Image credit:Rock Paper Shotgun/Pocketpair
- Paldeck number: 106
- Element: Dragon, Electric
- Skill Proficiencies: Generating Electricity Level 4, Handiwork Level 2, Transporting Level 4
- Partner Skill: Ferocious Thunder Dragon
- Drops: Electric Organ
- Location: No.3 Wildlife Sanctuary
If you have many Production Assembly Lines, you’ll need an Electric Pal to help you maintain power and keep your base at maximum production efficiency. The Orserk is the best pal for Generating Electricity in the game and has a level 4 in this skill proficiency.
Simultaneously, it’s the best Electric Pal due to its impressive Kerauno skill, worth 100 power. Astonishingly, this power can be unlocked from level 1 and essentially equips the Orserk with a throwable blade made of lightning.
The Orserk can additionally perform a Lightning Strike at level 7, which deals out 120 power. These are figures that most Pals have to wait until levels 40 plus to unlock.
6. Necromus
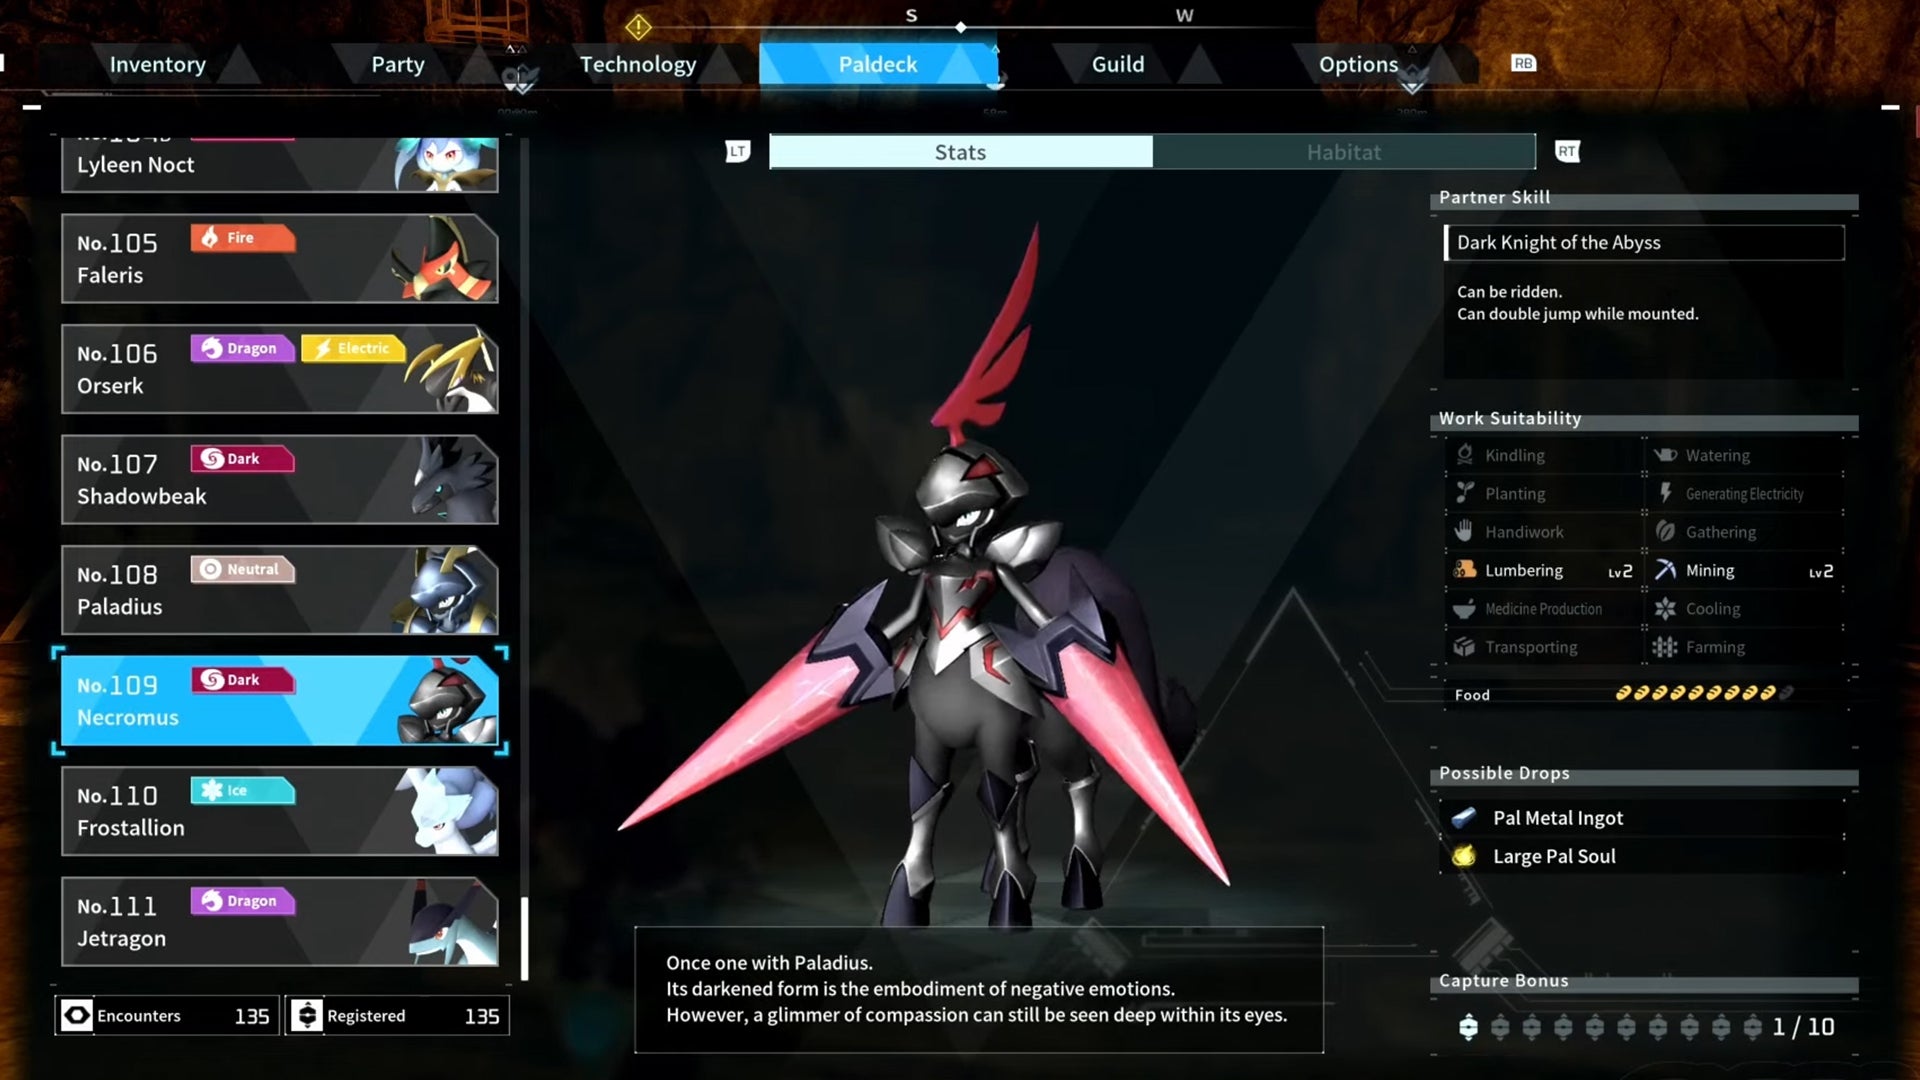
Image credit:Rock Paper Shotgun/Pocketpair
- Paldeck number: 109
- Element: Dark
- Skill Proficiencies: Lumbering Level 2, Mining Level 2
- Partner Skill: Dark Knight of the Abyss
- Drops: Pal Metal Ingot, Large Pal Soul
- Location: North of the Deep Sand Dunes
The Necromus is arguably the best Dark Pal in Palworld due to its hard-hitting Nightmare Ball, Twin Spears and Dark Laser attacks. It additionally has access to both Fire and Ground attacks .
Its Partner Skill allows the Necromus to be ridden as a mount and it can perform a double jump when doing so. The Necromus is classed as a Legendary Pal and there is only one in the game, as of writing.
5. Paladius
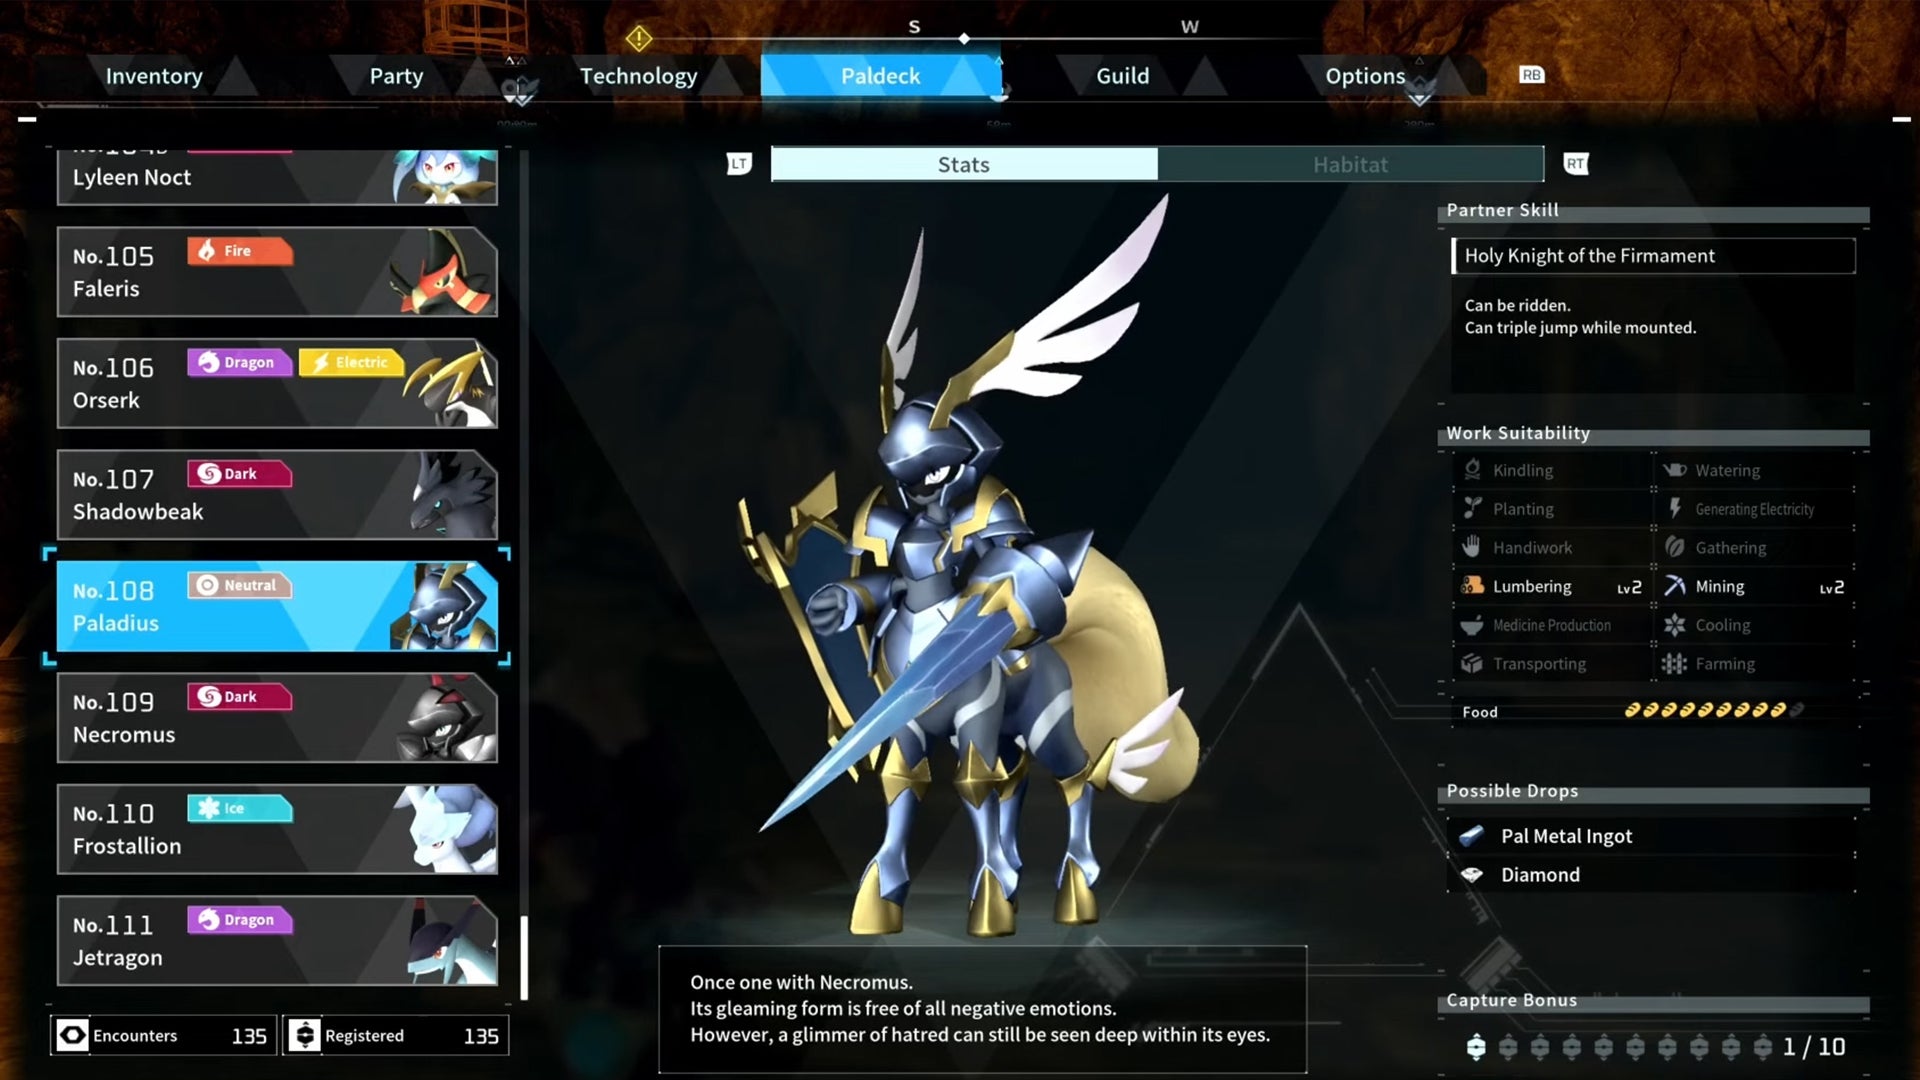
Image credit:Rock Paper Shotgun/Pocketpair
- Paldeck number: 108
- Element: Neutral
- Skill Proficiencies: Lumbering Level 2, Mining Level 2
- Partner Skill: Holy Winged Knight
- Drops: Pal Metal Ingotm, Diamond
- Location: North of the Deep Sand Dunes
Like its companion the Necromus, the Paladius can be used as a mount. Arguably the Paladius is the best mount in Palworld due to its triple jump ability, making traversal much easier across the game’s expansive map .
The Paladius is also one of a kind and can perform both Ice and Neutral attacks. If you’re looking to collect both rare and powerful Pals, the Paladius should be on your list.
4. Anubis
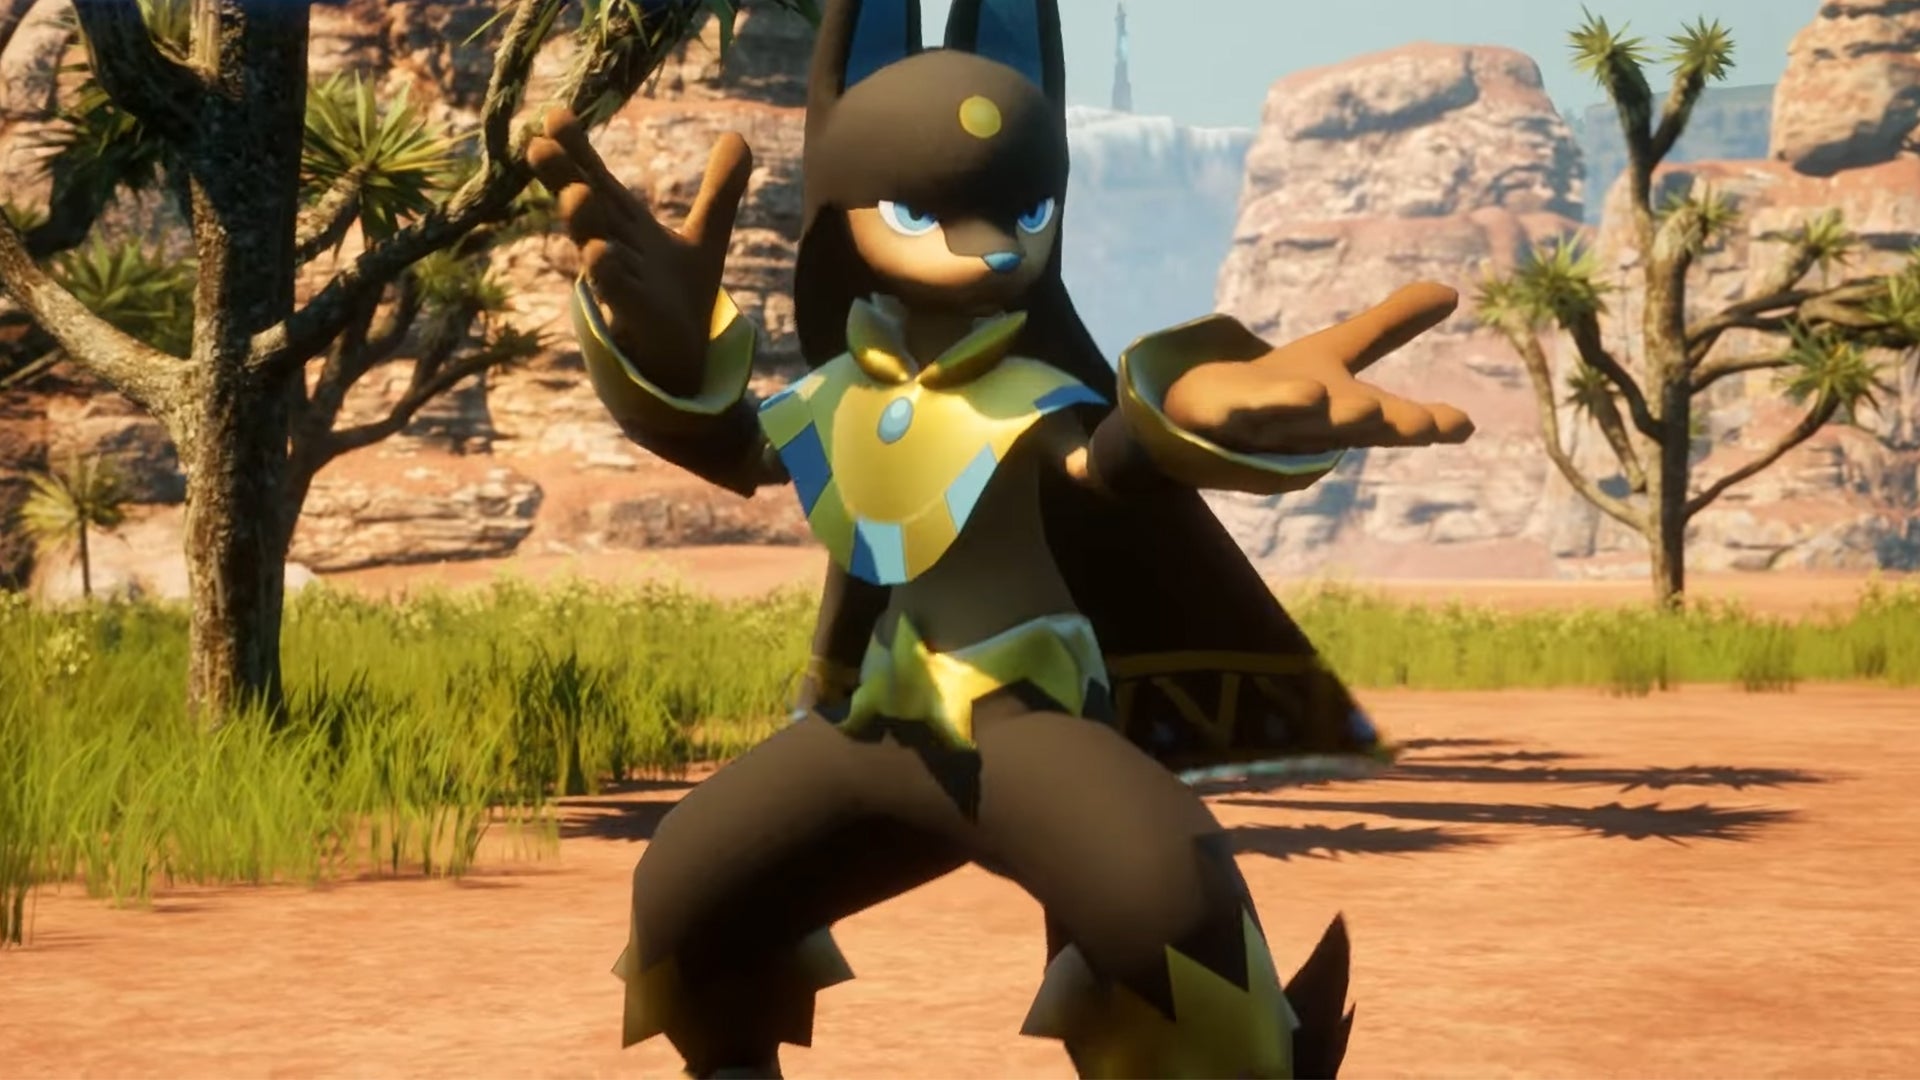
Image credit:Pocketpair
- Paldeck number: 100
- Element: Ground
- Skill Proficiencies: Handiwork Level 4, Transporting Level 2, Mining Level 3
- Partner Skill: Guardian of the Desert
- Drops: Bone, Large Pal Soul, Innovative Technical Manual
- Location: Northeast of Sealed Realm of the Winged Tyrant
The Anubis is the best Handiwork Pal in the game with a level 4 proficiency in the skill. This means it’s a useful Pal to recruit at your base when you expect to do a lot of building and wish to expedite the process.
Perhaps more importantly, it’s also the best Ground Pal in Paworld with access to unique attacks like the Spinning Roundhouse spin kick, Ground Smash AOE attack and Forceful Charge punch attack.
Additionally, the Anubis can move faster than most Pals and perform a side dodge whilst also applying Ground damage to all of the player’s attacks. This makes it versatile and fluid in combat while delivering some seriously strong Ground damage.
3. Jormuntide
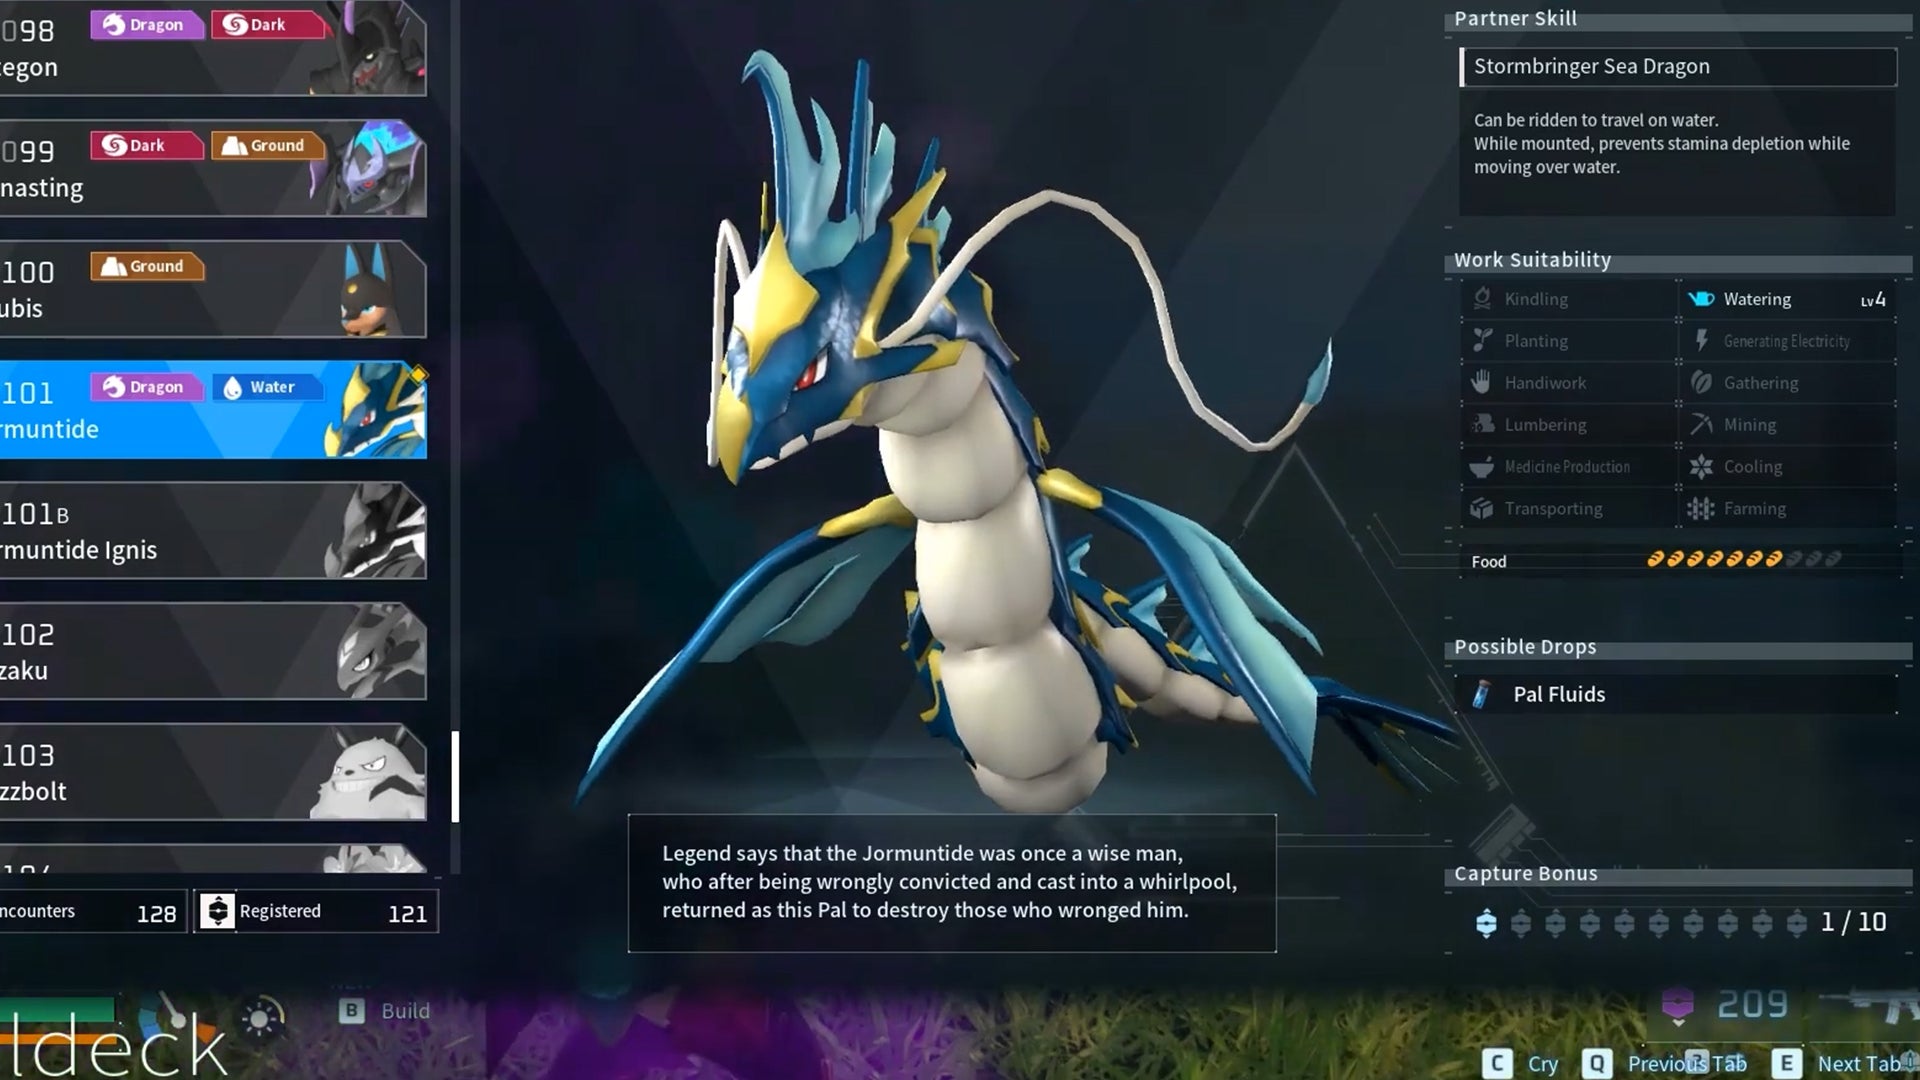
Image credit:Rock Paper Shotgun/Pocketpair
- Paldeck number: 101
- Element: Dragon, Water
- Skill Proficiencies: Watering Level 4
- Partner Skill: Stormbringer Sea Dragon
- Drops: Pal Fluids
- Location: South of Investigator’s Fork
The Jormuntide deserves a high place in this list due to the fact it is both the best Water Pal in Palworld, has the best Watering skill in the game and is also one of the fastest mounts you can get, capable of carrying players across bodies of water without depleting stamina.
The multi-purpose nature of the Jormuntide does not subtract from its ferociousness in combat. Capable of Water, Electric and Dragon attacks , it can summon an Aqua Burst (a ball of water to launch at enemies) at level 22. This attack is worth 100 power and is a precursor to even more powerful attacks as the Jormuntide levels up.
Few can outmatch the Jormuntide, except its variant species the Jormuntide Ignis, detailed below.
2. Jormuntide Ignis
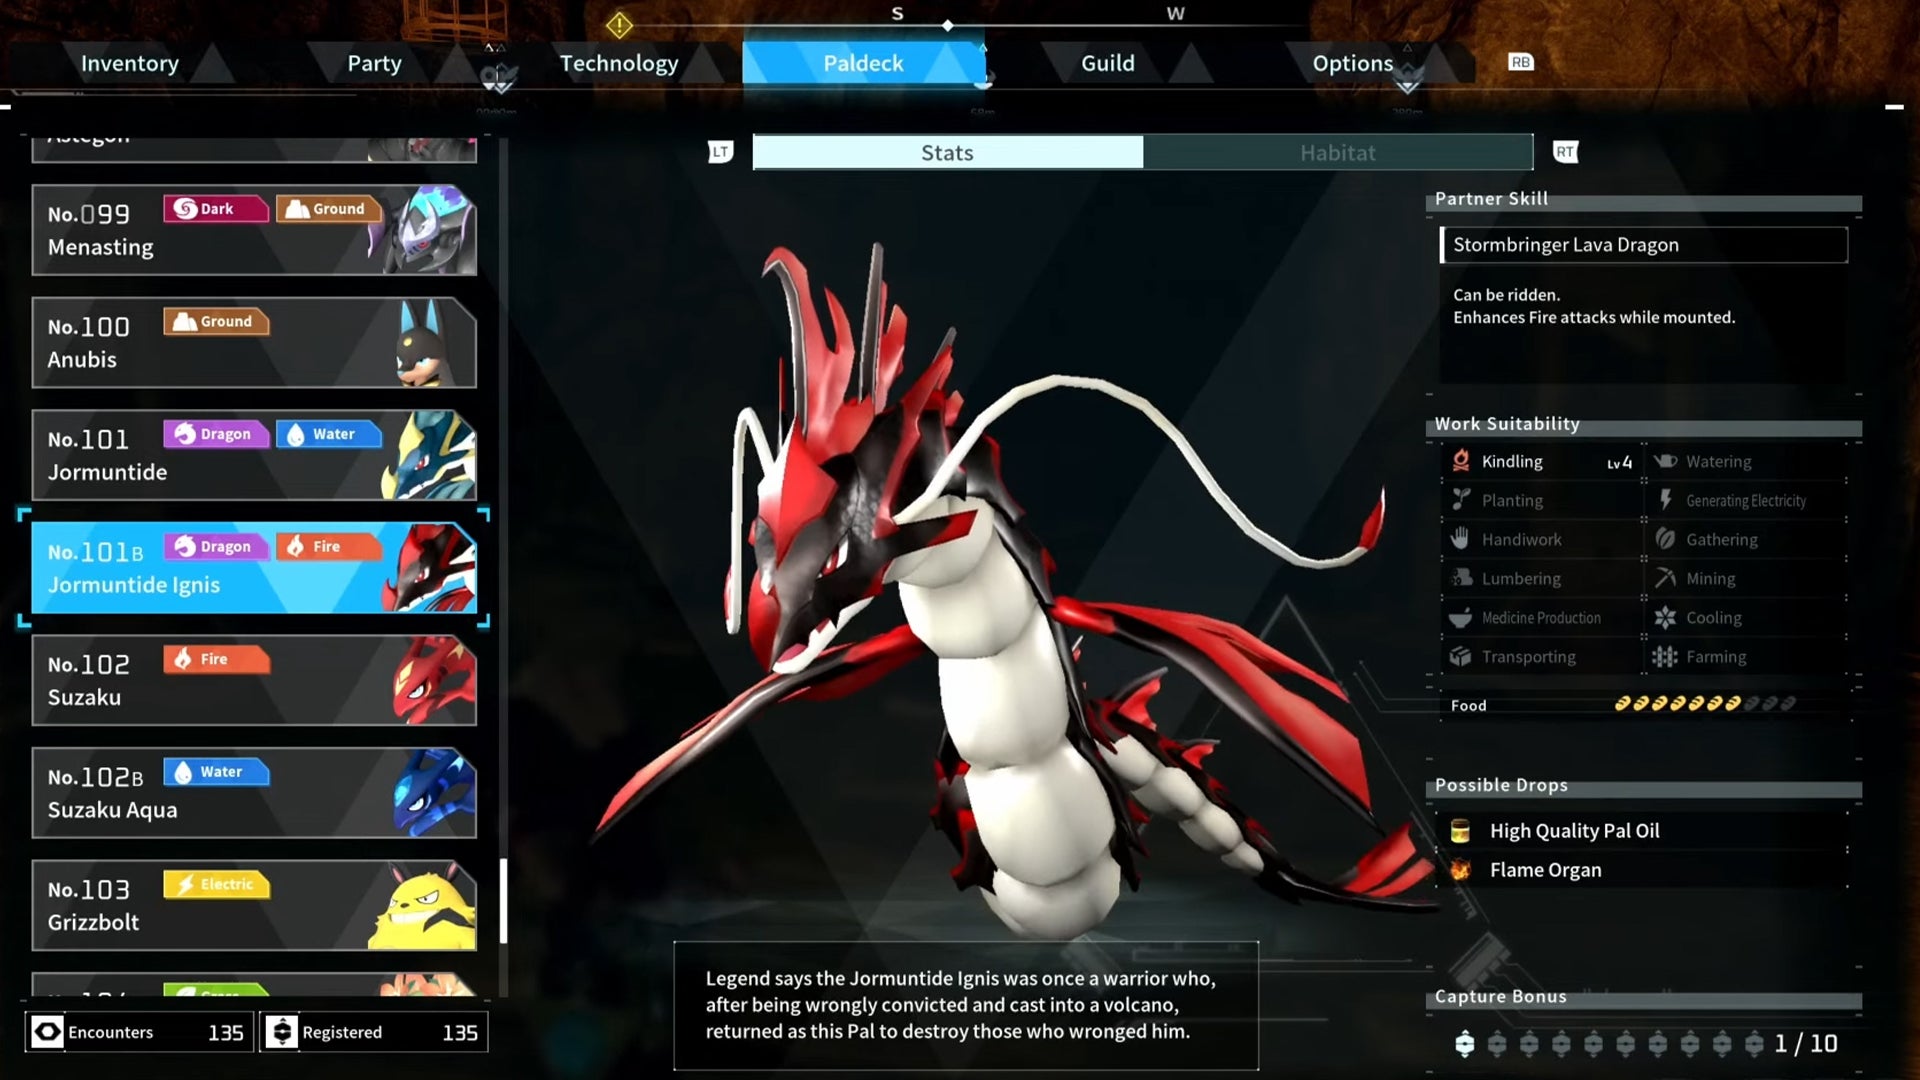
Image credit:Rock Paper Shotgun/Pocketpair
- Paldeck number: 101b
- Element: Dragon, Fire
- Skill Proficiencies: Kindling Level 4
- Partner Skill: Stormbringer Lava Dragon
- Drops: High Quality Pal Oil, Flame Organ
- Location: No.2 Wildlife Sanctuary
Like its blue cousin, the Jormuntide Ignis is a master of both combat and utility. With a level 4 proficiency, it’s the best Kindling Pal in the game, useful for producing Ingots at your base or cooking meals.
It’s also the best Fire Pal in Palworld, with the ability to enhance all Fire attacks of Pals in your team when ridden as a mount .
With access to Fire, Dragon and Electric attacks , its sure to help you in most combat situations. Its most powerful Fire attack can be accessed at level 40 (unlike other Pals that have to wait until level 50) and is worth 150 power. This attack, Fire Ball , does what it says on the tin and summons a large ball of fire to haul at foes.
1. Jetragon

Image credit:Rock Paper Shotgun/Pocketpair
- Paldeck number: 111
- Element: Dragon
- Skill Proficiencies: Gathering Level 3
- Partner Skill: Aerial Missile
- Drops: Pure Quartz, Polymer, Carbon Fiber, Diamond
- Location: Volcanic Cavern
Not only is the Jetragon the fastest flying mount in the game, but whilst in the air, you can fire missiles from its back. This is a legendary Pal, super rare and has access to Fire, Dragon and Dark attacks , making it a formidable predator both in the skies and on land.
The Jetragon takes our top pick for the best Dragon Pal in Palworld due to its powerful repertoire of attacks and grenade launcher Partner Skill. As of writing, there is only one Jetragon in the game and will pose a challenge to capture. If you manage to catch one, however, you’ll be able to defeat any Pals foolish enough to get in your way.
That rounds off our guide to the best Pals in Palworld including a full Pal tier list and a top ten roundup. With these fearsome critters, you should be kitted out with everything you need to explore the map and expand your base. If you have just begun your Palworld journey, try our guide to the best starter Pals or see our Pal locations guide for a thorough rundown of where you can find each of the entries on our list.


Palworld
PS4 , PS5 , Xbox One , Xbox Series X/S , PC
Rock Paper Shotgun is better when you sign in
Sign in and join us on our journey to discover strange and compelling PC games.

All 75 Arc Raiders Blueprints and where to get them
These areas have the highest chance of giving you Blueprints

Image credit:Rock Paper Shotgun/Embark Studios

Looking for more Arc Raiders Blueprints? It’s a special day when you find a Blueprint, as they’re among the most valuable items in Arc Raiders. If you find a Blueprint that you haven’t already found, then you must make sure you hold onto it at all costs, because Blueprints are the key to one of the most important and powerful systems of meta-progression in the game.
This guide aims to be the very best guide on Blueprints you can find, starting with a primer on what exactly they are and how they work in Arc Raiders, before delving into exactly where to get Blueprints and the very best farming spots for you to take in your search.
We’ll also go over how to get Blueprints from other unlikely activities, such as destroying Surveyors and completing specific quests. And you’ll also find the full list of all 75 Blueprints in Arc Raiders on this page (including the newest Blueprints added with the Cold Snap update , such as the Deadline Blueprint and Firework Box Blueprint), giving you all the information you need to expand your own crafting repertoire.
In this guide:
- What are Blueprints in Arc Raiders?
- Full Blueprint list: All crafting recipes
- Where to find Blueprints in Arc Raiders Blueprints obtained from quests Blueprints obtained from Trials Best Blueprint farming locations

What are Blueprints in Arc Raiders?
Blueprints in Arc Raiders are special items which, if you manage to extract with them, you can expend to permanently unlock a new crafting recipe in your Workshop. If you manage to extract from a raid with an Anvil Blueprint, for example, you can unlock the ability to craft your very own Anvil Pistol, as many times as you like (as long as you have the crafting materials).
To use a Blueprint, simply open your Inventory while in the lobby, then right-click on the Blueprint and click “Learn And Consume” . This will permanently unlock the recipe for that item in your Workshop. As of the Stella Montis update, there are allegedly 75 different Blueprints to unlock - although only 68 are confirmed to be in the game so far. You can see all the Blueprints you’ve found and unlocked by going to the Workshop menu, and hitting “R” to bring up the Blueprint screen.
It’s possible to find duplicates of past Blueprints you’ve already unlocked. If you find these, then you can either sell them, or - if you like to play with friends - you can take it into a match and gift it to your friend so they can unlock that recipe for themselves. Another option is to keep hold of them until the time comes to donate them to the Expedition.
Full Blueprint list: All crafting recipes
Below is the full list of all the Blueprints that are currently available to find in Arc Raiders, and the crafting recipe required for each item:
| Blueprint | Type | Recipe | Crafted At |
|---|---|---|---|
| Bettina | Weapon | 3x Advanced Mechanical Components 3x Heavy Gun Parts 3x Canister | Gunsmith 3 |
| Blue Light Stick | Quick Use | 3x Chemicals | Utility Station 1 |
| Aphelion | Weapon | 3x Magnetic Accelerator 3x Complex Gun Parts 1x Matriarch Reactor | Gunsmith 3 |
| Combat Mk. 3 (Flanking) | Augment | 2x Advanced Electrical Components 3x Processor | Gear Bench 3 |
| Combat Mk. 3 (Aggressive) | Augment | 2x Advanced Electrical Components 3x Processor | Gear Bench 3 |
| Complex Gun Parts | Material | 2x Light Gun Parts 2x Medium Gun Parts 2x Heavy Gun Parts | Refiner 3 |
| Fireworks Box | Quick Use | 1x Explosive Compound 3x Pop Trigger | Explosives Station 2 |
| Gas Mine | Mine | 4x Chemicals 2x Rubber Parts | Explosives Station 1 |
| Green Light Stick | Quick Use | 3x Chemicals | Utility Station 1 |
| Pulse Mine | Mine | 1x Crude Explosives 1x Wires | Explosives Station 1 |
| Seeker Grenade | Grenade | 1x Crude Explosives 2x ARC Alloy | Explosives Station 1 |
| Looting Mk. 3 (Survivor) | Augment | 2x Advanced Electrical Components 3x Processor | Gear Bench 3 |
| Angled Grip II | Mod | 2x Mechanical Components 3x Duct Tape | Gunsmith 2 |
| Angled Grip III | Mod | 2x Mod Components 5x Duct Tape | Gunsmith 3 |
| Hullcracker | Weapon | 1x Magnetic Accelerator 3x Heavy Gun Parts 1x Exodus Modules | Gunsmith 3 |
| Launcher Ammo | Ammo | 5x Metal Parts 1x Crude Explosives | Workbench 1 |
| Anvil | Weapon | 5x Mechanical Components 5x Simple Gun Parts | Gunsmith 2 |
| Anvil Splitter | Mod | 2x Mod Components 3x Processor | Gunsmith 3 |
| ??? | ??? | ??? | ??? |
| Barricade Kit | Quick Use | 1x Mechanical Components | Utility Station 2 |
| Blaze Grenade | Grenade | 1x Explosive Compound 2x Oil | Explosives Station 3 |
| Bobcat | Weapon | 3x Advanced Mechanical Components 3x Light Gun Parts | Gunsmith 3 |
| Osprey | Weapon | 2x Advanced Mechanical Components 3x Medium Gun Parts 7x Wires | Gunsmith 3 |
| Burletta | Weapon | 3x Mechanical Components 3x Simple Gun Parts | Gunsmith 1 |
| Compensator II | Mod | 2x Mechanical Components 4x Wires | Gunsmith 2 |
| Compensator III | Mod | 2x Mod Components 8x Wires | Gunsmith 3 |
| Defibrillator | Quick Use | 9x Plastic Parts 1x Moss | Medical Lab 2 |
| ??? | ??? | ??? | ??? |
| Equalizer | Weapon | 3x Magnetic Accelerator 3x Complex Gun Parts 1x Queen Reactor | Gunsmith 3 |
| Extended Barrel | Mod | 2x Mod Components 8x Wires | Gunsmith 3 |
| Extended Light Mag II | Mod | 2x Mechanical Components 3x Steel Spring | Gunsmith 2 |
| Extended Light Mag III | Mod | 2x Mod Components 5x Steel Spring | Gunsmith 3 |
| Extended Medium Mag II | Mod | 2x Mechanical Components 3x Steel Spring | Gunsmith 2 |
| Extended Medium Mag III | Mod | 2x Mod Components 5x Steel Spring | Gunsmith 3 |
| Extended Shotgun Mag II | Mod | 2x Mechanical Components 3x Steel Spring | Gunsmith 2 |
| Extended Shotgun Mag III | Mod | 2x Mod Components 5x Steel Spring | Gunsmith 3 |
| Remote Raider Flare | Quick Use | 2x Chemicals 4x Rubber Parts | Utility Station 1 |
| Heavy Gun Parts | Material | 4x Simple Gun Parts | Refiner 2 |
| Venator | Weapon | 2x Advanced Mechanical Components 3x Medium Gun Parts 5x Magnet | Gunsmith 3 |
| Il Toro | Weapon | 5x Mechanical Components 6x Simple Gun Parts | Gunsmith 1 |
| Jolt Mine | Mine | 1x Electrical Components 1x Battery | Explosives Station 2 |
| Explosive Mine | Mine | 1x Explosive Compound 1x Sensors | Explosives Station 3 |
| Jupiter | Weapon | 3x Magnetic Accelerator 3x Complex Gun Parts 1x Queen Reactor | Gunsmith 3 |
| Light Gun Parts | Material | 4x Simple Gun Parts | Refiner 2 |
| Lightweight Stock | Mod | 2x Mod Components 5x Duct Tape | Gunsmith 3 |
| Lure Grenade | Grenade | 1x Speaker Component 1x Electrical Components | Utility Station 2 |
| Medium Gun Parts | Material | 4x Simple Gun Parts | Refiner 2 |
| Torrente | Weapon | 2x Advanced Mechanical Components 3x Medium Gun Parts 6x Steel Spring | Gunsmith 3 |
| Muzzle Brake II | Mod | 2x Mechanical Components 4x Wires | Gunsmith 2 |
| Muzzle Brake III | Mod | 2x Mod Components 8x Wires | Gunsmith 3 |
| Padded Stock | Mod | 2x Mod Components 5x Duct Tape | Gunsmith 3 |
| Shotgun Choke II | Mod | 2x Mechanical Components 4x Wires | Gunsmith 2 |
| Shotgun Choke III | Mod | 2x Mod Components 8x Wires | Gunsmith 3 |
| Shotgun Silencer | Mod | 2x Mod Components 8x Wires | Gunsmith 3 |
| Showstopper | Grenade | 1x Advanced Electrical Components 1x Voltage Converter | Explosives Station 3 |
| Silencer I | Mod | 2x Mechanical Components 4x Wires | Gunsmith 2 |
| Silencer II | Mod | 2x Mod Components 8x Wires | Gunsmith 3 |
| Snap Hook | Quick Use | 2x Power Rod 3x Rope 1x Exodus Modules | Utility Station 3 |
| Stable Stock II | Mod | 2x Mechanical Components 3x Duct Tape | Gunsmith 2 |
| Stable Stock III | Mod | 2x Mod Components 5x Duct Tape | Gunsmith 3 |
| Tagging Grenade | Grenade | 1x Electrical Components 1x Sensors | Utility Station 3 |
| Tempest | Weapon | 3x Advanced Mechanical Components 3x Medium Gun Parts 3x Canister | Gunsmith 3 |
| Trigger Nade | Grenade | 2x Crude Explosives 1x Processor | Explosives Station 2 |
| Vertical Grip II | Mod | 2x Mechanical Components 3x Duct Tape | Gunsmith 2 |
| Vertical Grip III | Mod | 2x Mod Components 5x Duct Tape | Gunsmith 3 |
| Vita Shot | Quick Use | 2x Antiseptic 1x Syringe | Medical Lab 3 |
| Vita Spray | Quick Use | 3x Antiseptic 1x Canister | Medical Lab 3 |
| Vulcano | Weapon | 1x Magnetic Accelerator 3x Heavy Gun Parts 1x Exodus Modules | Gunsmith 3 |
| Wolfpack | Grenade | 2x Explosive Compound 2x Sensors | Explosives Station 3 |
| Red Light Stick | Quick Use | 3x Chemicals | Utility Station 1 |
| Smoke Grenade | Grenade | 14x Chemicals 1x Canister | Utility Station 2 |
| Deadline | Mine | 3x Explosive Compound 2x ARC Circuitry | Explosives Station 3 |
| Trailblazer | Grenade | 1x Explosive Compound 1x Synthesized Fuel | Explosives Station 3 |
| Tactical Mk. 3 (Defensive) | Augment | 2x Advanced Electrical Components 3x Processor | Gear Bench 3 |
| Tactical Mk. 3 (Healing) | Augment | 2x Advanced Electrical Components 3x Processor | Gear Bench 3 |
| Yellow Light Stick | Quick Use | 3x Chemicals | Utility Station 1 |
Note: The missing Blueprints in this list likely have not actually been added to the game at the time of writing, because none of the playerbase has managed to find any of them. As they are added to the game, I will update this page with the most relevant information so you know exactly how to get all 75 Arc Raiders Blueprints.
Where to find Blueprints in Arc Raiders
Below is a list of all containers, modifiers, and events which maximise your chances of finding Blueprints:
- Certain quests reward you with specific Blueprints .
- Completing Trials has a high chance of offering Blueprints as rewards.
- Surveyors have a decent chance of dropping Blueprints on death.
- High loot value areas tend to have a greater chance of spawning Blueprints.
- Night Raids and Storms may increase rare Blueprint spawn chances in containers.
- Containers with higher numbers of items may have a higher tendency to spawn Blueprints. As a result, Blue Gate (which has many “large” containers containing multiple items) may give you a higher chance of spawning Blueprints.
- Raider containers (Raider Caches, Weapon Boxes, Medical Bags, Grenade Tubes) have increased Blueprint drop rates. As a result, the Uncovered Caches event gives you a high chance of finding Blueprints.
- Security Lockers have a higher than average chance of containing Blueprints.
- Certain Blueprints only seem to spawn under specific circumstances: Tempest Blueprint only spawns during Night Raid events. Vulcano Blueprint only spawns during Hidden Bunker events. Jupiter and Equaliser Blueprints only spawn during Harvester events.

Raider Caches, Weapon Boxes, and other raider-oriented container types have a good chance of offering Blueprints. |Image credit:Rock Paper Shotgun/Embark Studios
Blueprints have a very low chance of spawning in any container in Arc Raiders, around 1-2% on average. However, there is a higher chance of finding Blueprints in particular container types. Specifically, you can find more Blueprints in Raider containers and security lockers.
Beyond this, if you’re looking for Blueprints you should focus on regions of the map which are marked as having particularly high-value loot. Areas such as the Control Tower in Dam Battlegrounds, the Arrival and Departure Buildings in Spaceport, and Pilgrim’s Peak in Blue Gate all have a better-than-average chance of spawning Blueprints somewhere amongst all their containers. Night Raids and Electromagnetic Storm events also increase the drop chances of certain Blueprints .
In addition to these containers, you can often loot Blueprints from destroyed Surveyors - the largest of the rolling ball ARC. Surveyors are more commonly found on the later maps - Spaceport and Blue Gate - and if one spawns in your match, you’ll likely see it by the blue laser beam that it casts into the sky while “surveying”.
Surveyors are quite well-armoured and will very speedily run away from you once it notices you, but if you can take one down then make sure you loot all its parts for a chance of obtaining certain unusual Blueprints.
Blueprints obtained from quests
One way in which you can get Blueprints is by completing certain quests for the vendors in Speranza. Some quests will reward you with a specific item Blueprint upon completion, so as long as you work through all the quests in Arc Raiders, you are guaranteed those Blueprints.
Here is the full list of all Blueprints you can get from quest rewards:
- Trigger Nade Blueprint: Rewarded after completing “Sparks Fly”.
- Lure Grenade Blueprint: Rewarded after completing “Greasing Her Palms”.
- Burletta Blueprint: Rewarded after completing “Industrial Espionage”.
- Hullcracker Blueprint (and Launcher Ammo Blueprint): Rewarded after completing “The Major’s Footlocker”.
Alas, that’s only 4 Blueprints out of a total of 75 to unlock, so for the vast majority you will need to find them yourself during a raid. If you’re intent on farming Blueprints, then it’s best to equip yourself with cheap gear in case you lose it, but don’t use a free loadout because then you won’t get a safe pocket to stash any new Blueprint you find. No pain in Arc Raiders is sharper than failing to extract with a new Blueprint you’ve been after for a dozen hours already.

One of the best ways to get Blueprints is by hitting three stars on all five Trials every week. |Image credit:Rock Paper Shotgun/Embark Studios
Blueprints obtained from Trials
One of the very best ways to get Blueprints is as rewards for completing Trials in Arc Raiders. Trials are unlocked from Level 15 onwards, and allow you to earn rewards by focusing on certain tasks over the course of several raids. For example, one Trial might task you with dealing damage to Hornets, while another might challenge you to loot Supply Drops.
Trials refresh on a weekly basis, with a new week bringing five new Trials. Each Trial can offer up to three rewards after passing certain score milestones, and it’s possible to receive very high level loot from these reward crates - including Blueprints. So if you want to unlock as many Blueprints as possible, you should make a point of completing as many Trials as possible each week.
Best Blueprint farming locations
The very best way to get Blueprints is to frequent specific areas of the maps which combine high-tier loot pools with the right types of containers to search. Here are my recommendations for where to find Blueprints on every map, so you can always keep the search going for new crafting recipes to unlock.

Image credit:Rock Paper Shotgun/Embark Studios
Dam Battlegrounds
The best places to farm Blueprints on Dam Battlegrounds are the Control Tower, Power Generation Complex, Ruby Residence, and Pale Apartments . The first two regions, despite only being marked on the map as mid-tier loot, contain a phenomenal number of containers to loot. The Control Tower can also contain a couple of high-tier Security Lockers - though of course, you’ll need to have unlocked the Security Breach skill at the end of the Survival tree.
There’s also a lot of reporting amongst the playerbase that the Residential areas in the top-left of the map - Pale Apartments and Ruby Residence - give you a comparatively strong chance of finding Blueprints. Considering their size, there’s a high density of containers to loot in both locations, and they also have the benefit of being fairly out of the way. So you’re more likely to have all the containers to yourself.
Buried City
The best Blueprint farming locations on Buried City are the Santa Maria Houses, Grandioso Apartments, Town Hall, and the various buildings of the New District . Grandioso Apartments has a lower number of containers than the rest, but a high chance of spawning weapon cases - which have good Blueprint drop rates. The others are high-tier loot areas, with plenty of lootable containers - including Security Lockers.
Spaceport
The best places to find Blueprints on Spaceport are the Arrival and Departure Buildings, as well as Control Tower A6 and the Launch Towers . All these areas are labelled as high-value loot regions, and many of them are also very handily connected to one another by the Spaceport wall, which you can use to quickly run from one area to the next. At the tops of most of these buildings you’ll find at least one Security Locker, so this is an excellent farming route for players looking to find Blueprints.
The downside to looting Blueprints on Spaceport is that all these areas are hotly contested, particularly in Duos and Squads. You’ll need to be very focused and fast in order to complete the full farming route.

Image credit:Rock Paper Shotgun/Embark Studios
Blue Gate
Blue Gate tends to have a good chance of dropping Blueprints, potentially because it generally has a high number of containers which can hold lots of items; so there’s a higher chance of a Blueprint spawning in each container. In my experience, the best Blueprint farming spots on Blue Gate are Pilgrim’s Peak, Raider’s Refuge, the Ancient Fort, and the Underground Complex beneath the Warehouse .
All of these areas contain a wealth of containers to loot. Raider’s Refuge has less to loot, but the majority of the containers in and around the Refuge are raider containers, which have a high chance of containing Blueprints - particularly during major events.
Stella Montis
On the whole, Stella Montis seems to have a very low drop rate for Blueprints (though a high chance of dropping other high-tier loot). If you do want to try farming Blueprints on this map, the best places to find Blueprints in Stella Montis are Medical Research, Assembly Workshop, and the Business Center . These areas have the highest density of containers to loot on the map.
In addition to this, the Western Tunnel has a few different Security Lockers to loot, so while there’s very little to loot elsewhere in this area of the map, it’s worth hitting those Security Lockers if you spawn there at the start of a match.
That wraps up this primer on how to get all the Blueprints in Arc Raiders as quickly as possible. With the Expedition system constantly resetting a large number of players’ Blueprints, it’s more important than ever to have the most up-to-date information on where to find all these Blueprints.
While you’re here, be sure to check out our Arc Raiders best guns tier list , as well as our primers on the best skills to unlock and all the different Field Depot locations on every map.


ARC Raiders
PS5 , Xbox Series X/S , PC
Rock Paper Shotgun is better when you sign in
Sign in and join us on our journey to discover strange and compelling PC games.
