Outcast: A New Beginning review: an open world dead end
Cutter down

Image credit:Rock Paper Shotgun/THQ Nordic

- Developer: Appeal Studios
- Publisher: THQ Nordic
- Release: March 15th 2024
- On: Windows
- From: Steam
- Price: £50/€60/$60
- Reviewed on: Intel Core i9-11900K, 16GB RAM, Nvidia RTX 3080, Windows 10
Cast your eye over the original Outcast from 1999 today, and you’ll find a world that’s more abstract than alien. Hazy, almost block colour textures are stretched to breaking point over terrain that looks like it’s been pulled and poked by a child sculpting in putty slime, while its cast of beige, three-fingered Talans are so rigid that they’d all be reigning champions at the local robot dance-off. Understandable, given the era in which is was made, but even so - what a difference 25 years make. Even after 2017’s remake glow-up with Outcast: Second Contact, A New Beginning ’s version of Adelpha is a lush and verdant paradise, with treetops soaring over your head, and mountains requiring several triple or quadruple jetpack jumps to traverse. It’s no Avatar: Frontiers Of Pandora , admittedly, but it leans in very much the same direction, punching your eyeballs with such bright, primary colours that you’ll feel enticed to explore every inch of it.
A shame, then, that all its visual splendour amounts to is little more than an empty husk filled with open world busy work that already felt tired and done ten years ago. Its non-linear approach to storytelling remains intact, letting you tackle the quests and problems of its numerous village settlements in any order you wish, but even this has been boiled down to tedious checklists of fetch quests, escort missions and shooting up the same identikit facility one after another. Topping off this fatal combo is returning protagonist Cutter Slade, whose macho army dude dial is still set firmly to cringey wise-cracking and patronising stereotypes. A new beginning this ain’t.

Image credit:Rock Paper Shotgun/THQ Nordic

Slade is quite slippery to control a lot of the time - his run feels like it’s constantly catching on furniture, and zooming around on his jetpack turns him into a rocket-fuelled human eel. |Image credit:Rock Paper Shotgun/THQ Nordic
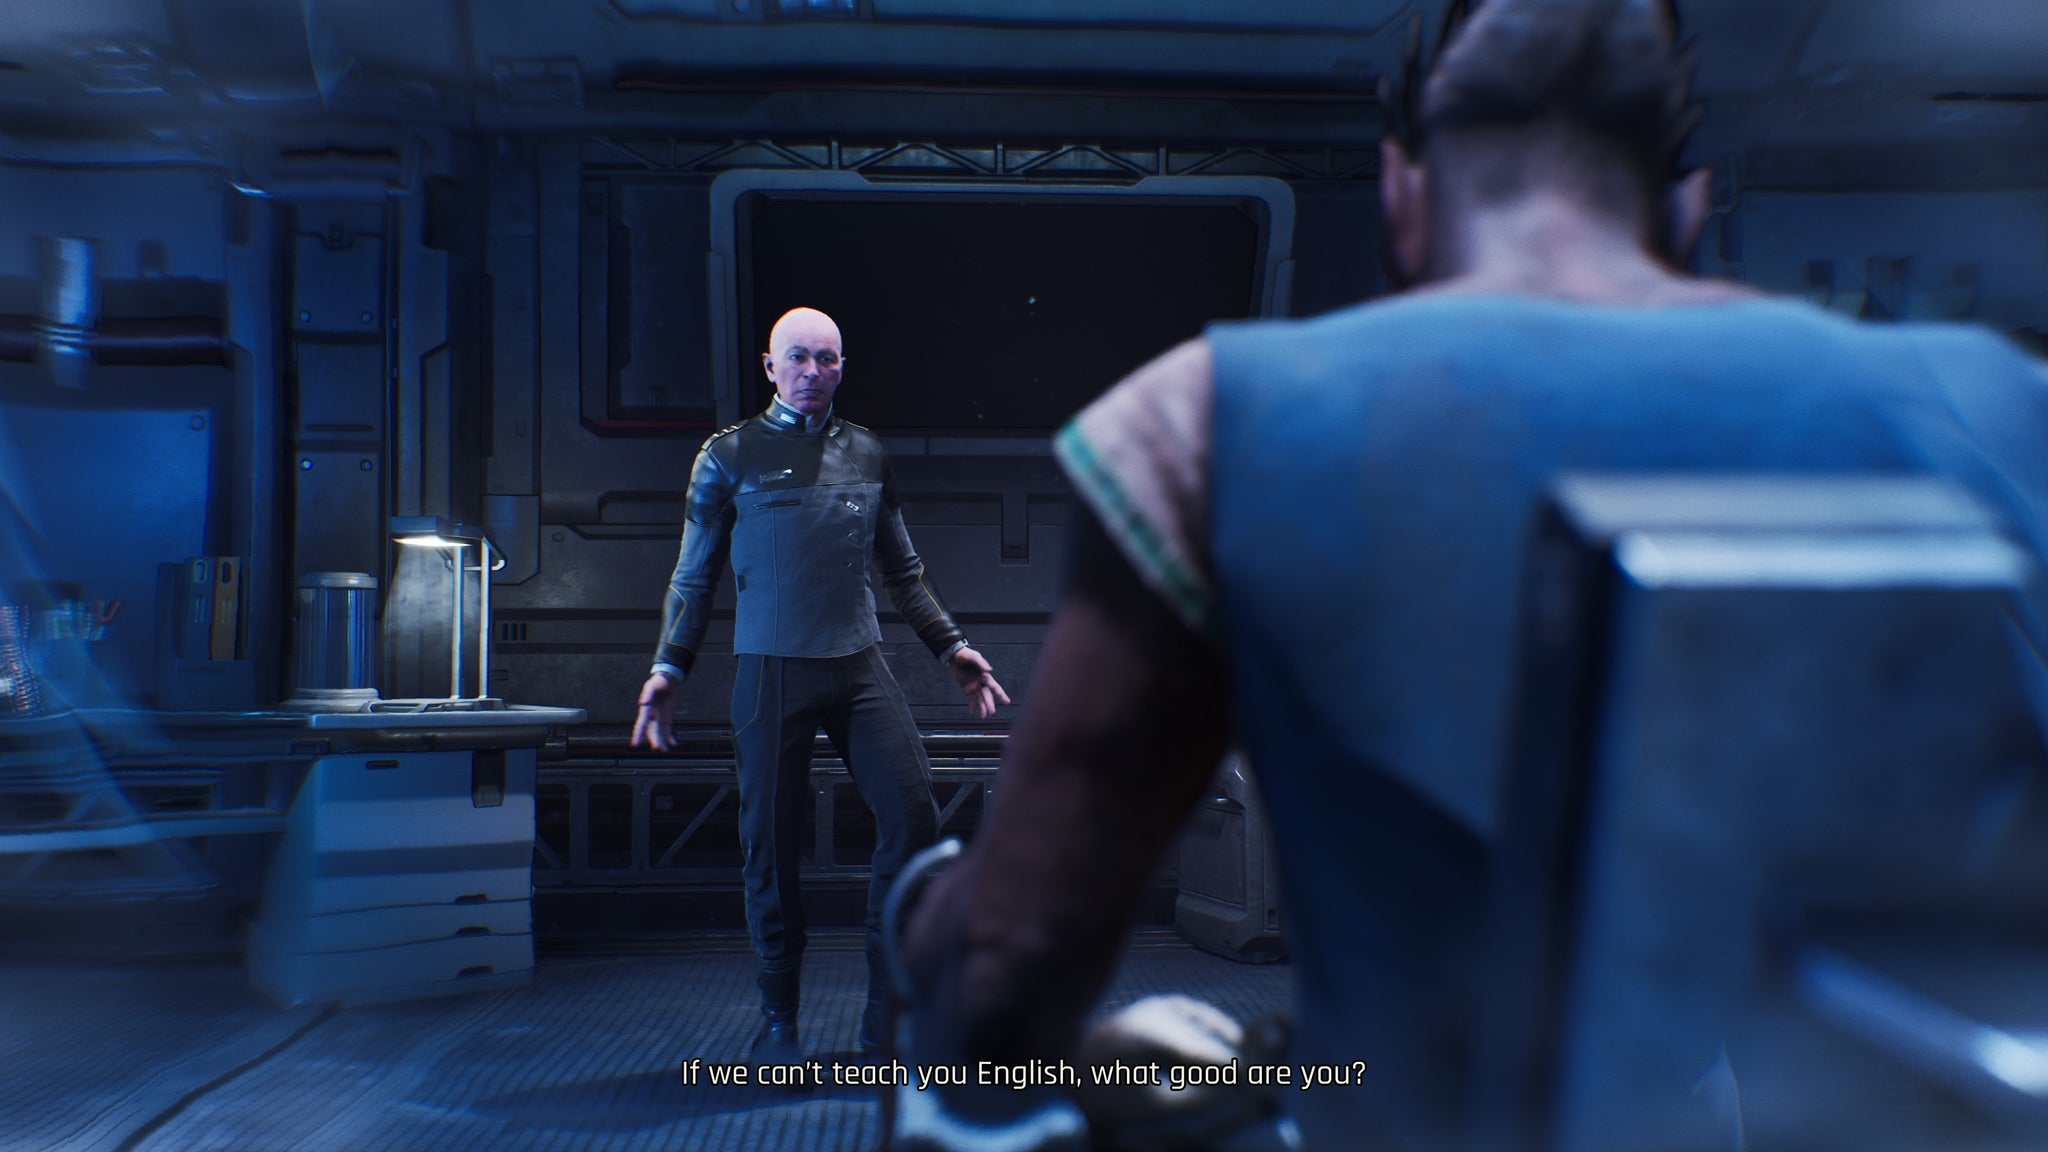
Despite dropping the 2 from its name in an attempt to draw in newcomers, this is still very much a direct sequel to the original, with the plot immediately assuming you know what a Talan is and why Cutter Slade thinks he’s a big deal around these parts. The result is off-putting and abrasive, though in all honesty, everyone is such a bad hang in this game that it’s hard to care about what anyone’s got going on here, let alone Slade or the Talan he’s trying to save from extinction. As it turns out, humans are the ones oppressing the aliens this time (that old chestnut), and shock horror, they’re mostly all terrible. You don’t ever feel too bad about turning their largely robot army into piles of scrap metal, though, as the main villain of the piece - a bald and pasty army general who at one point utters the exact line, “If we can’t teach you English, what good are you?” to a captured Talan - is such a broad and cartoonish caricature of an ignorant colonial boomer that you actively want to wipe every last smug wrinkle off his face with the business end of your laser rifle.
He’s such a colossal turd, in fact, that it makes one of the two primary objectives you’re working toward here feel utterly redundant, as your main goals are to both set the stage for a once-in-a-lifetime sex orgy for the Talans (so they can secure the lineage of their race and not get instantly wiped out the moment you stop paying attention to them), while also strengthening the defences of their main village stronghold. The latter I understand, but mates, this is not the time for peace and love and babies. There are more important matters at hand, like bursting boomer boy’s spaceship like a balloon.
I really wasn’t kidding, folks. |Image credit:Rock Paper Shotgun/THQ Nordic
Like Avatar, many of the tasks required to complete this pair of overarching objectives feels very much like white saviour hand-wringing, with Slade becoming an unstoppable one-man army hell-bent on stepping in to fix every last problem he comes across, usually by shooting everything within a ten-mile radius. Occasionally he’ll indulge in some light-hearted, if mildly janky yak herding, escorting animals from one village to another (though not without murdering incoming predators looking to get a fresh slice of dinobird drumstick), and gathering special feathers/flowers/other miscellaneous items (while also often murdering anything standing in his way), but the more villages you begin to help, the more these tedious variations on a theme start to repeat themselves. Instead of delivering animals, you’re tempting giant insects down from the mountains; instead of herding yaks, you’re stunning sea creatures by chasing after and then jetpacking over them.
They’re all familiar reskins of quests you’ve completed a million times before, though the way your quest log funnels them all into one another does at least give the impression that they do all serve some wider purpose. It also does a reasonably good job of always putting more villages in your way to keep your quest log well-fed, and there were brief moments of satisfaction to be gained from seeing how some of them loop back into one another further down the line.

Turns out the road to saving this alien species from extinction is to herd birds and collect fruit. |Image credit:Rock Paper Shotgun/THQ Nordic
Thing is, while its menus have a whiff of management game about them, the whole system is so beholden to ticking boxes in a specific order that it becomes nothing more than a big, inter-connected checklist of tasks to complete. This is not a game about spinning multiple different plates in multiple different villages, and even quests that ask you to stockpile certain resources seemingly never need topping up once they’ve been deposited. Once each quest was complete, I didn’t have to think about it ever again, and it’s wholly lacking that sense of permanence and evolution that makes other RPG sprawls feel so alive with opportunity.
It doesnt help that its moment-to-moment box-ticking is made infinitely worse by the laboriously overstuffed conversations you have to endure with each respective quest-giver, and you’ll be mashing that skip button as soon as you clap eyes on it. The dialogue is merely a means to an end in A New Beginning , as it has no bearing on your relationship with the Talan, nor does it convey any meaningful information (flavour or otherwise) beyond what gets parped out at the end of it in your quest objective.
This might have been different had Appeal Studios not seemingly binned the much-touted language system they talked about during the run-up to the game’s launch. As I understood it, this would have seen Slade gradually learn the Talan’s native language as he spent more time with them, strengthening his bond to individual communities along the way. In reality, however, Slade is hit with a mind-opening light beam within the first hour, after which he can converse fluently with everyone for the rest of the game. It’s disappointing, to say the least, though given how much of the dialogue made me wince, it’s probably for the best that we didn’t end up excavating it word by word.

Image credit:Rock Paper Shotgun/THQ Nordic

The humour isn’t quite as cringe as Jagged Alliance 3, but there was certainly a lot of eye-rolling going on. |Image credit:Rock Paper Shotgun/THQ Nordic
Combat, too, feels trivially easy, making even Outcast’s more action-packed encounters and facility takedowns feel leaden and tepid - and that’s before you realise they’re all constructed from the same clutch of identical corridor templates in slightly remixed configurations. The third-person shooting is serviceable, but Slade’s choice of laser pistol and rifle both lack any sense of heft or impact when pulling the trigger, and your enemies are all such dullards that you can pick them all off from a distance without barely stepping foot in the place. Indeed, if you find yourself engaging with its also quite lacklustre melee punch-ups, something’s gone wrong, especially when the game’s idea of upping the difficulty is to simply throw more of everything at you at once.
Alas, managing its growing crowds is equally monotonous. Slade only know how to go on the offensive in A New Beginning, which means battles simply descend into drawn-out stand-offs where you’re taking potshots while darting in and out of doorways to stay just outside your prey’s patrol zone. There are upgrades and modules and extra gubbins to collect to make your guns more powerful, but I rarely felt the need to actually make use of them. These robots are that much of a pushover.

The auto-aim assist is so generous in this game that it’s practically unfair to the poor robots. |Image credit:Rock Paper Shotgun/THQ Nordic
Really, though, it’s Outcast’s vision of what a modern day, non-linear open world Adelpha could look like that’s so disappointing here. While the original was one of the more experimental and revolutionary games of its day, A New Beginning feels like the leftovers from Ubisoft’s cutting room floor. If you’re not activating fast-travel points, you’re bombarded by glowing orbs leading you to special upgrade-point-puking plants, parkour challenges in temples to boost your health bar, and destroying ominous red spore outbreaks to extend the time of your entirely useless slow-mo power. And, of course, there are those numerous aforementioned outposts, convoys and drones to take down.
Sure, it manages to eschew the old waypoint towers, but as you push back the fog of war by simply traipsing from one end of the island to the other, the end result is still the same barrage of icons to clear out. Everything else is barren in between, giving little impetus to stray from the beaten path. You can jetpack past the more vicious local wildlife (who serve no benefit other than to savage your health bar between fetch quests), and while you may occasionally want to stop to top up your ammo by punching the corresponding coloured-rock, or scavenge a healing plant (assuming the game recognises the button prompt, which it rarely did while I was in motion), there’s rarely any need to do so when the robots you’re blowing up are so generous with their item drops.
Ultimately, it just makes Outcast: A New Beginning feel very tired and generic - an open world that might have impressed a decade ago, but now comes across as a game both out of time and out of favour. A small word on the game’s performance, too, before I close, which (politely) runs like arse. Aside from frequent stutters when moving to new areas at speed, there were also moments where the frame rate had a full-on meltdown, descending into a farcical slideshow. Publishers THQ Nordic have assured me that optimisation patches are incoming for launch day, but oof, the review build was not a pretty sight at times, lemme tell ya. Even without these performance issues, though, Outcast: A New Beginning has bigger, more fundamental problems lying at its heart. It may finally look like the Adelpha you dreamed about 25 years ago, but this weary sequel has never felt more alienating.
This review was based on a review build of the game provided by publishers THQ Nordic.
Find out how we conduct our reviews by reading our review policy .
Outcast 2: A New Beginning
PS5 , Xbox Series X/S , PC
Rock Paper Shotgun is better when you sign in
Sign in and join us on our journey to discover strange and compelling PC games.

All 75 Arc Raiders Blueprints and where to get them
These areas have the highest chance of giving you Blueprints

Image credit:Rock Paper Shotgun/Embark Studios

Looking for more Arc Raiders Blueprints? It’s a special day when you find a Blueprint, as they’re among the most valuable items in Arc Raiders. If you find a Blueprint that you haven’t already found, then you must make sure you hold onto it at all costs, because Blueprints are the key to one of the most important and powerful systems of meta-progression in the game.
This guide aims to be the very best guide on Blueprints you can find, starting with a primer on what exactly they are and how they work in Arc Raiders, before delving into exactly where to get Blueprints and the very best farming spots for you to take in your search.
We’ll also go over how to get Blueprints from other unlikely activities, such as destroying Surveyors and completing specific quests. And you’ll also find the full list of all 75 Blueprints in Arc Raiders on this page (including the newest Blueprints added with the Cold Snap update , such as the Deadline Blueprint and Firework Box Blueprint), giving you all the information you need to expand your own crafting repertoire.
In this guide:
- What are Blueprints in Arc Raiders?
- Full Blueprint list: All crafting recipes
- Where to find Blueprints in Arc Raiders Blueprints obtained from quests Blueprints obtained from Trials Best Blueprint farming locations

What are Blueprints in Arc Raiders?
Blueprints in Arc Raiders are special items which, if you manage to extract with them, you can expend to permanently unlock a new crafting recipe in your Workshop. If you manage to extract from a raid with an Anvil Blueprint, for example, you can unlock the ability to craft your very own Anvil Pistol, as many times as you like (as long as you have the crafting materials).
To use a Blueprint, simply open your Inventory while in the lobby, then right-click on the Blueprint and click “Learn And Consume” . This will permanently unlock the recipe for that item in your Workshop. As of the Stella Montis update, there are allegedly 75 different Blueprints to unlock - although only 68 are confirmed to be in the game so far. You can see all the Blueprints you’ve found and unlocked by going to the Workshop menu, and hitting “R” to bring up the Blueprint screen.
It’s possible to find duplicates of past Blueprints you’ve already unlocked. If you find these, then you can either sell them, or - if you like to play with friends - you can take it into a match and gift it to your friend so they can unlock that recipe for themselves. Another option is to keep hold of them until the time comes to donate them to the Expedition.
Full Blueprint list: All crafting recipes
Below is the full list of all the Blueprints that are currently available to find in Arc Raiders, and the crafting recipe required for each item:
| Blueprint | Type | Recipe | Crafted At |
|---|---|---|---|
| Bettina | Weapon | 3x Advanced Mechanical Components 3x Heavy Gun Parts 3x Canister | Gunsmith 3 |
| Blue Light Stick | Quick Use | 3x Chemicals | Utility Station 1 |
| Aphelion | Weapon | 3x Magnetic Accelerator 3x Complex Gun Parts 1x Matriarch Reactor | Gunsmith 3 |
| Combat Mk. 3 (Flanking) | Augment | 2x Advanced Electrical Components 3x Processor | Gear Bench 3 |
| Combat Mk. 3 (Aggressive) | Augment | 2x Advanced Electrical Components 3x Processor | Gear Bench 3 |
| Complex Gun Parts | Material | 2x Light Gun Parts 2x Medium Gun Parts 2x Heavy Gun Parts | Refiner 3 |
| Fireworks Box | Quick Use | 1x Explosive Compound 3x Pop Trigger | Explosives Station 2 |
| Gas Mine | Mine | 4x Chemicals 2x Rubber Parts | Explosives Station 1 |
| Green Light Stick | Quick Use | 3x Chemicals | Utility Station 1 |
| Pulse Mine | Mine | 1x Crude Explosives 1x Wires | Explosives Station 1 |
| Seeker Grenade | Grenade | 1x Crude Explosives 2x ARC Alloy | Explosives Station 1 |
| Looting Mk. 3 (Survivor) | Augment | 2x Advanced Electrical Components 3x Processor | Gear Bench 3 |
| Angled Grip II | Mod | 2x Mechanical Components 3x Duct Tape | Gunsmith 2 |
| Angled Grip III | Mod | 2x Mod Components 5x Duct Tape | Gunsmith 3 |
| Hullcracker | Weapon | 1x Magnetic Accelerator 3x Heavy Gun Parts 1x Exodus Modules | Gunsmith 3 |
| Launcher Ammo | Ammo | 5x Metal Parts 1x Crude Explosives | Workbench 1 |
| Anvil | Weapon | 5x Mechanical Components 5x Simple Gun Parts | Gunsmith 2 |
| Anvil Splitter | Mod | 2x Mod Components 3x Processor | Gunsmith 3 |
| ??? | ??? | ??? | ??? |
| Barricade Kit | Quick Use | 1x Mechanical Components | Utility Station 2 |
| Blaze Grenade | Grenade | 1x Explosive Compound 2x Oil | Explosives Station 3 |
| Bobcat | Weapon | 3x Advanced Mechanical Components 3x Light Gun Parts | Gunsmith 3 |
| Osprey | Weapon | 2x Advanced Mechanical Components 3x Medium Gun Parts 7x Wires | Gunsmith 3 |
| Burletta | Weapon | 3x Mechanical Components 3x Simple Gun Parts | Gunsmith 1 |
| Compensator II | Mod | 2x Mechanical Components 4x Wires | Gunsmith 2 |
| Compensator III | Mod | 2x Mod Components 8x Wires | Gunsmith 3 |
| Defibrillator | Quick Use | 9x Plastic Parts 1x Moss | Medical Lab 2 |
| ??? | ??? | ??? | ??? |
| Equalizer | Weapon | 3x Magnetic Accelerator 3x Complex Gun Parts 1x Queen Reactor | Gunsmith 3 |
| Extended Barrel | Mod | 2x Mod Components 8x Wires | Gunsmith 3 |
| Extended Light Mag II | Mod | 2x Mechanical Components 3x Steel Spring | Gunsmith 2 |
| Extended Light Mag III | Mod | 2x Mod Components 5x Steel Spring | Gunsmith 3 |
| Extended Medium Mag II | Mod | 2x Mechanical Components 3x Steel Spring | Gunsmith 2 |
| Extended Medium Mag III | Mod | 2x Mod Components 5x Steel Spring | Gunsmith 3 |
| Extended Shotgun Mag II | Mod | 2x Mechanical Components 3x Steel Spring | Gunsmith 2 |
| Extended Shotgun Mag III | Mod | 2x Mod Components 5x Steel Spring | Gunsmith 3 |
| Remote Raider Flare | Quick Use | 2x Chemicals 4x Rubber Parts | Utility Station 1 |
| Heavy Gun Parts | Material | 4x Simple Gun Parts | Refiner 2 |
| Venator | Weapon | 2x Advanced Mechanical Components 3x Medium Gun Parts 5x Magnet | Gunsmith 3 |
| Il Toro | Weapon | 5x Mechanical Components 6x Simple Gun Parts | Gunsmith 1 |
| Jolt Mine | Mine | 1x Electrical Components 1x Battery | Explosives Station 2 |
| Explosive Mine | Mine | 1x Explosive Compound 1x Sensors | Explosives Station 3 |
| Jupiter | Weapon | 3x Magnetic Accelerator 3x Complex Gun Parts 1x Queen Reactor | Gunsmith 3 |
| Light Gun Parts | Material | 4x Simple Gun Parts | Refiner 2 |
| Lightweight Stock | Mod | 2x Mod Components 5x Duct Tape | Gunsmith 3 |
| Lure Grenade | Grenade | 1x Speaker Component 1x Electrical Components | Utility Station 2 |
| Medium Gun Parts | Material | 4x Simple Gun Parts | Refiner 2 |
| Torrente | Weapon | 2x Advanced Mechanical Components 3x Medium Gun Parts 6x Steel Spring | Gunsmith 3 |
| Muzzle Brake II | Mod | 2x Mechanical Components 4x Wires | Gunsmith 2 |
| Muzzle Brake III | Mod | 2x Mod Components 8x Wires | Gunsmith 3 |
| Padded Stock | Mod | 2x Mod Components 5x Duct Tape | Gunsmith 3 |
| Shotgun Choke II | Mod | 2x Mechanical Components 4x Wires | Gunsmith 2 |
| Shotgun Choke III | Mod | 2x Mod Components 8x Wires | Gunsmith 3 |
| Shotgun Silencer | Mod | 2x Mod Components 8x Wires | Gunsmith 3 |
| Showstopper | Grenade | 1x Advanced Electrical Components 1x Voltage Converter | Explosives Station 3 |
| Silencer I | Mod | 2x Mechanical Components 4x Wires | Gunsmith 2 |
| Silencer II | Mod | 2x Mod Components 8x Wires | Gunsmith 3 |
| Snap Hook | Quick Use | 2x Power Rod 3x Rope 1x Exodus Modules | Utility Station 3 |
| Stable Stock II | Mod | 2x Mechanical Components 3x Duct Tape | Gunsmith 2 |
| Stable Stock III | Mod | 2x Mod Components 5x Duct Tape | Gunsmith 3 |
| Tagging Grenade | Grenade | 1x Electrical Components 1x Sensors | Utility Station 3 |
| Tempest | Weapon | 3x Advanced Mechanical Components 3x Medium Gun Parts 3x Canister | Gunsmith 3 |
| Trigger Nade | Grenade | 2x Crude Explosives 1x Processor | Explosives Station 2 |
| Vertical Grip II | Mod | 2x Mechanical Components 3x Duct Tape | Gunsmith 2 |
| Vertical Grip III | Mod | 2x Mod Components 5x Duct Tape | Gunsmith 3 |
| Vita Shot | Quick Use | 2x Antiseptic 1x Syringe | Medical Lab 3 |
| Vita Spray | Quick Use | 3x Antiseptic 1x Canister | Medical Lab 3 |
| Vulcano | Weapon | 1x Magnetic Accelerator 3x Heavy Gun Parts 1x Exodus Modules | Gunsmith 3 |
| Wolfpack | Grenade | 2x Explosive Compound 2x Sensors | Explosives Station 3 |
| Red Light Stick | Quick Use | 3x Chemicals | Utility Station 1 |
| Smoke Grenade | Grenade | 14x Chemicals 1x Canister | Utility Station 2 |
| Deadline | Mine | 3x Explosive Compound 2x ARC Circuitry | Explosives Station 3 |
| Trailblazer | Grenade | 1x Explosive Compound 1x Synthesized Fuel | Explosives Station 3 |
| Tactical Mk. 3 (Defensive) | Augment | 2x Advanced Electrical Components 3x Processor | Gear Bench 3 |
| Tactical Mk. 3 (Healing) | Augment | 2x Advanced Electrical Components 3x Processor | Gear Bench 3 |
| Yellow Light Stick | Quick Use | 3x Chemicals | Utility Station 1 |
Note: The missing Blueprints in this list likely have not actually been added to the game at the time of writing, because none of the playerbase has managed to find any of them. As they are added to the game, I will update this page with the most relevant information so you know exactly how to get all 75 Arc Raiders Blueprints.
Where to find Blueprints in Arc Raiders
Below is a list of all containers, modifiers, and events which maximise your chances of finding Blueprints:
- Certain quests reward you with specific Blueprints .
- Completing Trials has a high chance of offering Blueprints as rewards.
- Surveyors have a decent chance of dropping Blueprints on death.
- High loot value areas tend to have a greater chance of spawning Blueprints.
- Night Raids and Storms may increase rare Blueprint spawn chances in containers.
- Containers with higher numbers of items may have a higher tendency to spawn Blueprints. As a result, Blue Gate (which has many “large” containers containing multiple items) may give you a higher chance of spawning Blueprints.
- Raider containers (Raider Caches, Weapon Boxes, Medical Bags, Grenade Tubes) have increased Blueprint drop rates. As a result, the Uncovered Caches event gives you a high chance of finding Blueprints.
- Security Lockers have a higher than average chance of containing Blueprints.
- Certain Blueprints only seem to spawn under specific circumstances: Tempest Blueprint only spawns during Night Raid events. Vulcano Blueprint only spawns during Hidden Bunker events. Jupiter and Equaliser Blueprints only spawn during Harvester events.

Raider Caches, Weapon Boxes, and other raider-oriented container types have a good chance of offering Blueprints. |Image credit:Rock Paper Shotgun/Embark Studios
Blueprints have a very low chance of spawning in any container in Arc Raiders, around 1-2% on average. However, there is a higher chance of finding Blueprints in particular container types. Specifically, you can find more Blueprints in Raider containers and security lockers.
Beyond this, if you’re looking for Blueprints you should focus on regions of the map which are marked as having particularly high-value loot. Areas such as the Control Tower in Dam Battlegrounds, the Arrival and Departure Buildings in Spaceport, and Pilgrim’s Peak in Blue Gate all have a better-than-average chance of spawning Blueprints somewhere amongst all their containers. Night Raids and Electromagnetic Storm events also increase the drop chances of certain Blueprints .
In addition to these containers, you can often loot Blueprints from destroyed Surveyors - the largest of the rolling ball ARC. Surveyors are more commonly found on the later maps - Spaceport and Blue Gate - and if one spawns in your match, you’ll likely see it by the blue laser beam that it casts into the sky while “surveying”.
Surveyors are quite well-armoured and will very speedily run away from you once it notices you, but if you can take one down then make sure you loot all its parts for a chance of obtaining certain unusual Blueprints.
Blueprints obtained from quests
One way in which you can get Blueprints is by completing certain quests for the vendors in Speranza. Some quests will reward you with a specific item Blueprint upon completion, so as long as you work through all the quests in Arc Raiders, you are guaranteed those Blueprints.
Here is the full list of all Blueprints you can get from quest rewards:
- Trigger Nade Blueprint: Rewarded after completing “Sparks Fly”.
- Lure Grenade Blueprint: Rewarded after completing “Greasing Her Palms”.
- Burletta Blueprint: Rewarded after completing “Industrial Espionage”.
- Hullcracker Blueprint (and Launcher Ammo Blueprint): Rewarded after completing “The Major’s Footlocker”.
Alas, that’s only 4 Blueprints out of a total of 75 to unlock, so for the vast majority you will need to find them yourself during a raid. If you’re intent on farming Blueprints, then it’s best to equip yourself with cheap gear in case you lose it, but don’t use a free loadout because then you won’t get a safe pocket to stash any new Blueprint you find. No pain in Arc Raiders is sharper than failing to extract with a new Blueprint you’ve been after for a dozen hours already.

One of the best ways to get Blueprints is by hitting three stars on all five Trials every week. |Image credit:Rock Paper Shotgun/Embark Studios
Blueprints obtained from Trials
One of the very best ways to get Blueprints is as rewards for completing Trials in Arc Raiders. Trials are unlocked from Level 15 onwards, and allow you to earn rewards by focusing on certain tasks over the course of several raids. For example, one Trial might task you with dealing damage to Hornets, while another might challenge you to loot Supply Drops.
Trials refresh on a weekly basis, with a new week bringing five new Trials. Each Trial can offer up to three rewards after passing certain score milestones, and it’s possible to receive very high level loot from these reward crates - including Blueprints. So if you want to unlock as many Blueprints as possible, you should make a point of completing as many Trials as possible each week.
Best Blueprint farming locations
The very best way to get Blueprints is to frequent specific areas of the maps which combine high-tier loot pools with the right types of containers to search. Here are my recommendations for where to find Blueprints on every map, so you can always keep the search going for new crafting recipes to unlock.

Image credit:Rock Paper Shotgun/Embark Studios
Dam Battlegrounds
The best places to farm Blueprints on Dam Battlegrounds are the Control Tower, Power Generation Complex, Ruby Residence, and Pale Apartments . The first two regions, despite only being marked on the map as mid-tier loot, contain a phenomenal number of containers to loot. The Control Tower can also contain a couple of high-tier Security Lockers - though of course, you’ll need to have unlocked the Security Breach skill at the end of the Survival tree.
There’s also a lot of reporting amongst the playerbase that the Residential areas in the top-left of the map - Pale Apartments and Ruby Residence - give you a comparatively strong chance of finding Blueprints. Considering their size, there’s a high density of containers to loot in both locations, and they also have the benefit of being fairly out of the way. So you’re more likely to have all the containers to yourself.
Buried City
The best Blueprint farming locations on Buried City are the Santa Maria Houses, Grandioso Apartments, Town Hall, and the various buildings of the New District . Grandioso Apartments has a lower number of containers than the rest, but a high chance of spawning weapon cases - which have good Blueprint drop rates. The others are high-tier loot areas, with plenty of lootable containers - including Security Lockers.
Spaceport
The best places to find Blueprints on Spaceport are the Arrival and Departure Buildings, as well as Control Tower A6 and the Launch Towers . All these areas are labelled as high-value loot regions, and many of them are also very handily connected to one another by the Spaceport wall, which you can use to quickly run from one area to the next. At the tops of most of these buildings you’ll find at least one Security Locker, so this is an excellent farming route for players looking to find Blueprints.
The downside to looting Blueprints on Spaceport is that all these areas are hotly contested, particularly in Duos and Squads. You’ll need to be very focused and fast in order to complete the full farming route.

Image credit:Rock Paper Shotgun/Embark Studios
Blue Gate
Blue Gate tends to have a good chance of dropping Blueprints, potentially because it generally has a high number of containers which can hold lots of items; so there’s a higher chance of a Blueprint spawning in each container. In my experience, the best Blueprint farming spots on Blue Gate are Pilgrim’s Peak, Raider’s Refuge, the Ancient Fort, and the Underground Complex beneath the Warehouse .
All of these areas contain a wealth of containers to loot. Raider’s Refuge has less to loot, but the majority of the containers in and around the Refuge are raider containers, which have a high chance of containing Blueprints - particularly during major events.
Stella Montis
On the whole, Stella Montis seems to have a very low drop rate for Blueprints (though a high chance of dropping other high-tier loot). If you do want to try farming Blueprints on this map, the best places to find Blueprints in Stella Montis are Medical Research, Assembly Workshop, and the Business Center . These areas have the highest density of containers to loot on the map.
In addition to this, the Western Tunnel has a few different Security Lockers to loot, so while there’s very little to loot elsewhere in this area of the map, it’s worth hitting those Security Lockers if you spawn there at the start of a match.
That wraps up this primer on how to get all the Blueprints in Arc Raiders as quickly as possible. With the Expedition system constantly resetting a large number of players’ Blueprints, it’s more important than ever to have the most up-to-date information on where to find all these Blueprints.
While you’re here, be sure to check out our Arc Raiders best guns tier list , as well as our primers on the best skills to unlock and all the different Field Depot locations on every map.

ARC Raiders
PS5 , Xbox Series X/S , PC
Rock Paper Shotgun is better when you sign in
Sign in and join us on our journey to discover strange and compelling PC games.
