Nvidia GeForce RTX 5090 review: the ultimate DLSS 4 billboard
Good for bragging rights, but its most exciting features are coming to cheaper graphics cards as well
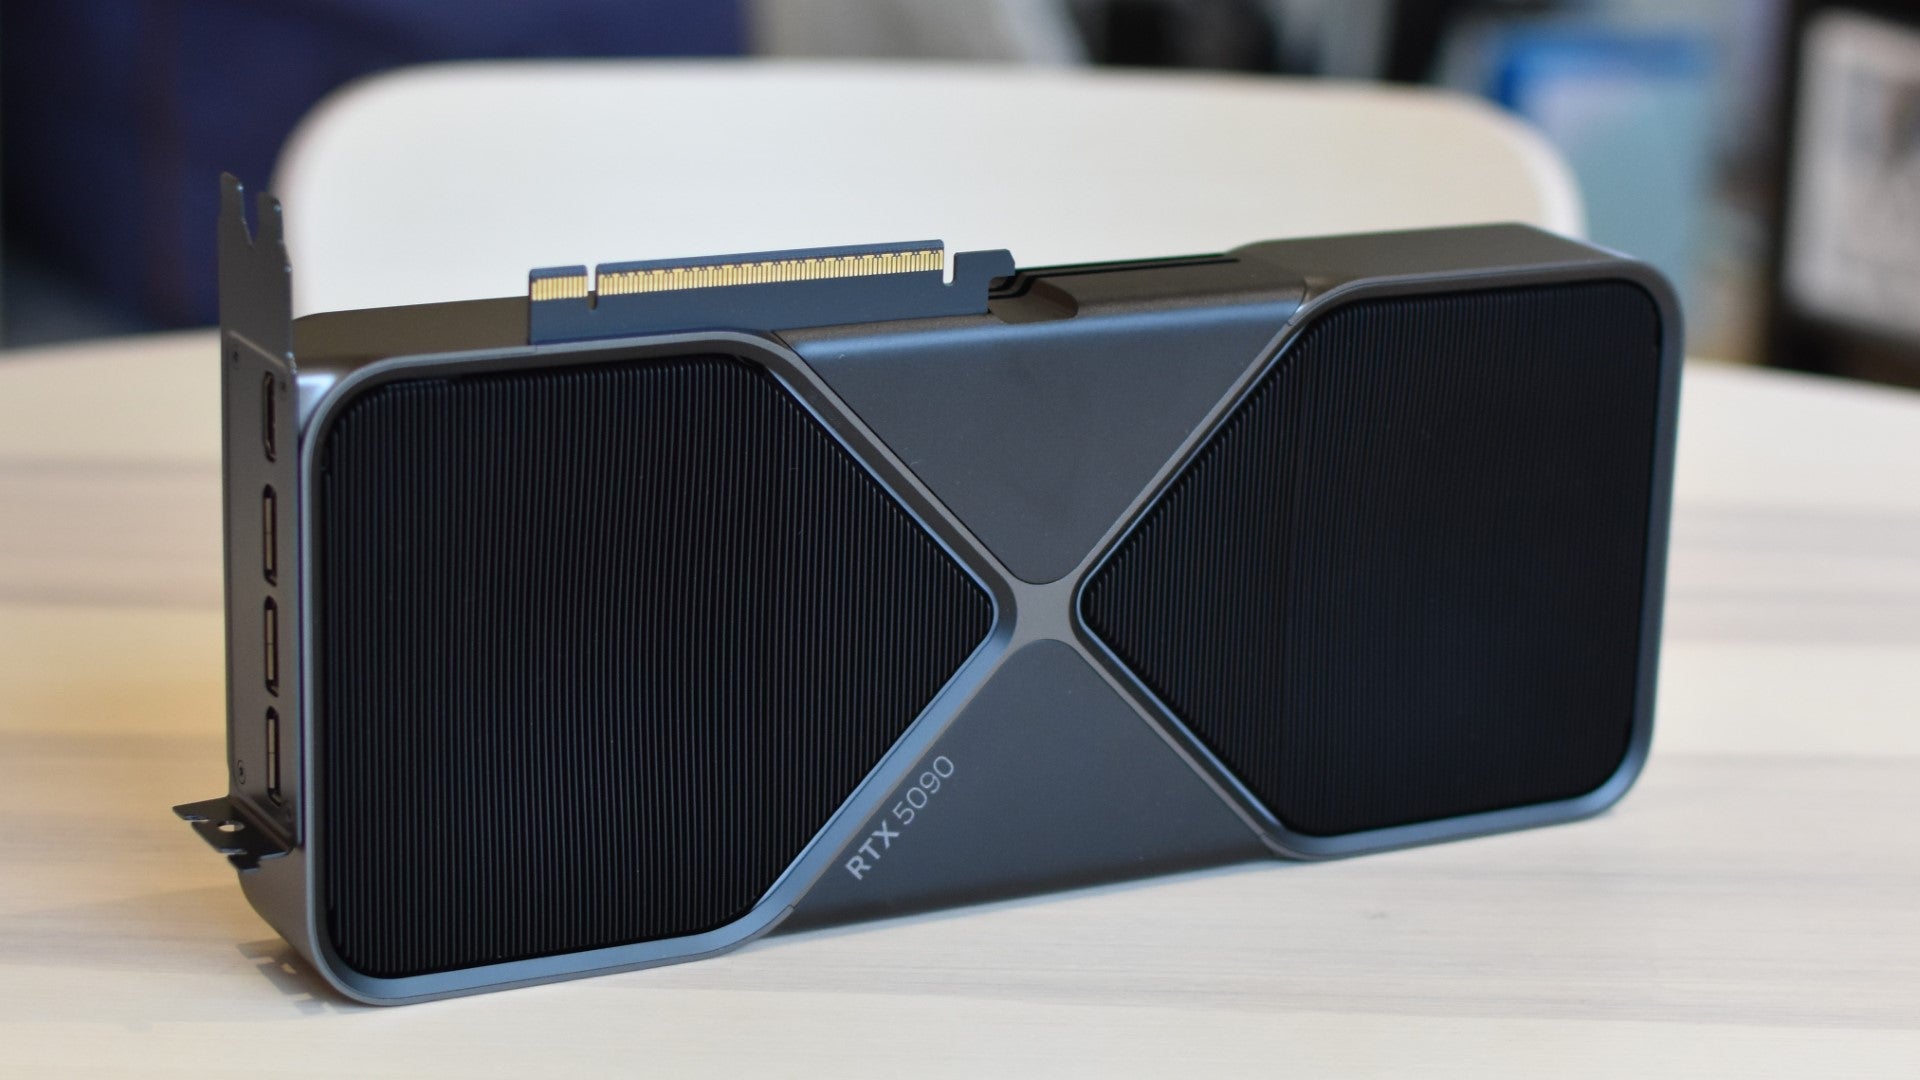
Image credit:Rock Paper Shotgun

Nvidia GeForce RTX 5090 Founders Edition specs: CUDA Cores: 21,760 Base Clock Speed: 2.01GHz Boost Clock Speed: 2.14GHz VRAM: 32GB GDDR7 Power: 575W Recommended System Power: 1000W Price: £1939 / $1999
Readers, I have spent two full days in the benchmark pits to tell you what you’ve already guessed: the GeForce RTX 5090 is very fast, too expensive, and laden with more AI tech than Philip K. Dick’s cheese dreams. At least two of those points will, I’m sure, send the average graphics card shopper running, especially at a time when even game developers are growing suspicious of generative AI and its many-thumbed, robot-voiced nostrums.
Yet while there’s not much to be done about the RTX 5090 costing at minimum £1939 / $1999, hundreds more than the infamously spenny RTX 4090 , its suite of more purely performance-focused artificial intelligence tools is – dare I say it – quite neat. These range from Multi Frame Generation (MFG), which is basically DLSS 3 frame gen but up to twice as fast, to DLSS 4’s general upscaling enhancements and even the ability to apply newer DLSS versions to older games. All this will come to the rest of the RTX 50 series as well, with some trickling down to the enter RTX range, so maybe the RTX 5090 is best understood not as a practical GPU purchase in itself but as a Picadilly Square-filling advert for its more affordable siblings can do.
There’s definitely a sense of Nvidia going “Sod it” with this one, cutting the sensibility brakes to produce something that even hyperenthusiasts might find a bit too mad. Besides the price, this is by far the biggest PSU-muncher to ever wear a GeForce badge: the Founders Edition I tested demands a thundering 1000W power supply and is rated to hoover up to 575W at once, a threat that it made good on by pulling 578W in Cyberpunk 2077 . In comparison, the 450W-rated RTX 4090 looks like it can be powered by potatoes. Credit to the redesigned dual-fan cooler for keeping a lid on temperatures, which I nonetheless measured peaking at a very manageable 74°c.
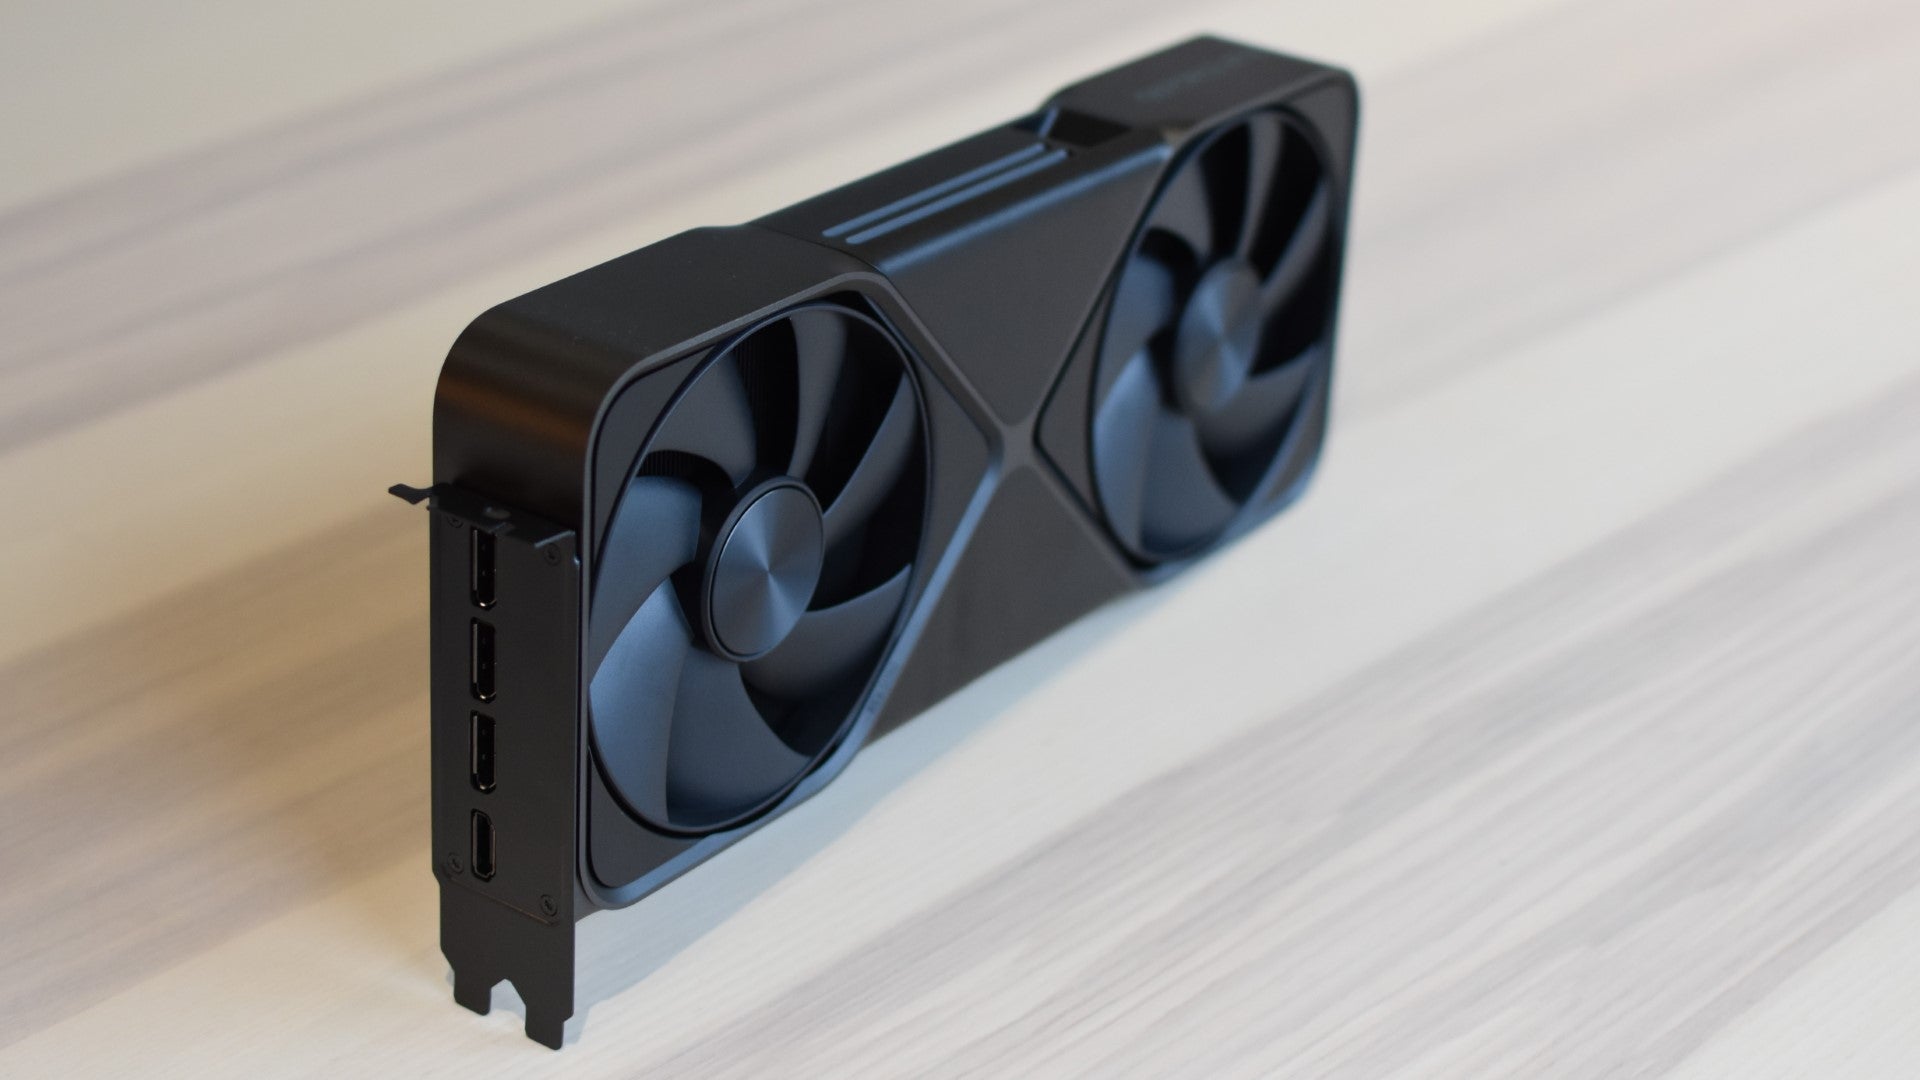
Image credit:Rock Paper Shotgun
On that note, if there’s something the RTX 5090 does brilliantly without any AI caveats, it’s the industrial design. This might actually be – granted that it’s not a high bar – the best-looking graphics card I’ve seen in my life, a modern yet mature slice of precision-cut aluminium. Also, unlike the RTX 4090 FE, it isn’t so big that it could feasibly have come from the age when computers needed their own cupboards. It’s a solid 2cm thinner, to be exact, finally arresting and reversing the trend of ever-fattening premium GPUs.
Nvidia GeForce RTX 5090 review: 4K benchmarks
Ultra HD is the RTX 5090’s spiritual home, just as with the RTX 4090 and RTX 3090 before it. Since I had all three to hand, I introduced them to the new test rig I’d piloted with the Intel Arc B580 , which combines 16GB of DDR5 RAM with an Intel Core i9-13900K.
In terms of unaltered, native-rez games performance, let alone any frame gen gubbins, the RTX 5090 is inarguably the new quickest card of them all. It’s the first ever to smash through 100fps in Cyberpunk 2077 with these settings, and provided you’ve got at least a 144Hz monitor (comparatively not a big ask, if you can afford £2K’s worth of graphics card) then you could see a visible improvement over the RTX 4090 in other tough games like Total War: Warhammer III and F1 24.
Image credit:Rock Paper Shotgun
Nevertheless, it’s hard to ignore how the jump from the RTX 4090 to the RTX 5090 isn’t nearly as big or as consistent as the former’s improvement over the RTX 3090. Nvidia’s top two GPUs are almost level in Horizon Forbidden West and Assassin’s Creed Mirage , and the differences remain minor once you start adding upscaling. Quality-level DLSS in Forbidden West, for example, got it up to 137fps on the RTX 5090 and 125fps on the RTX 4090: hardly a grand leap forward.
The RPS test PC: CPU: Intel Core i9-13900K RAM: 16GB Crucial DDR5 Pro Motherboard: Asus ROG Maximus Z790 Dark Hero PSU: NZXT C1000 Gold
On the other hand, the RTX 5090’s Blackwell architecture does appear a little better at handling the performance hit from ray tracing – and this was already one of Nvidia’s strong suits. After enabling Ultra-quality RT effects, Metro Exodus dropped from 163fps to 117fps on the RTX 5090 and from 135fps to 87fps on the RTX 4090: that makes for reductions of 28% and 36% respectively.
Then there’s DLSS 4, and its most numbermaking component, Multi Frame Generation. This works similarly to the frame generation that DLSS 3 introduced for the 40 series: the card takes data from the frames that the GPU is rendering and uses AI to generate lookalike frames that can be slipped in-between the rendered ones, boosting overall framerates in exchange for a touch of added input lag. However, whereas the DLSS 3 version creates up to one AI frame for every rendered frame, MSG can generate three or four, resulting in scenes like this:
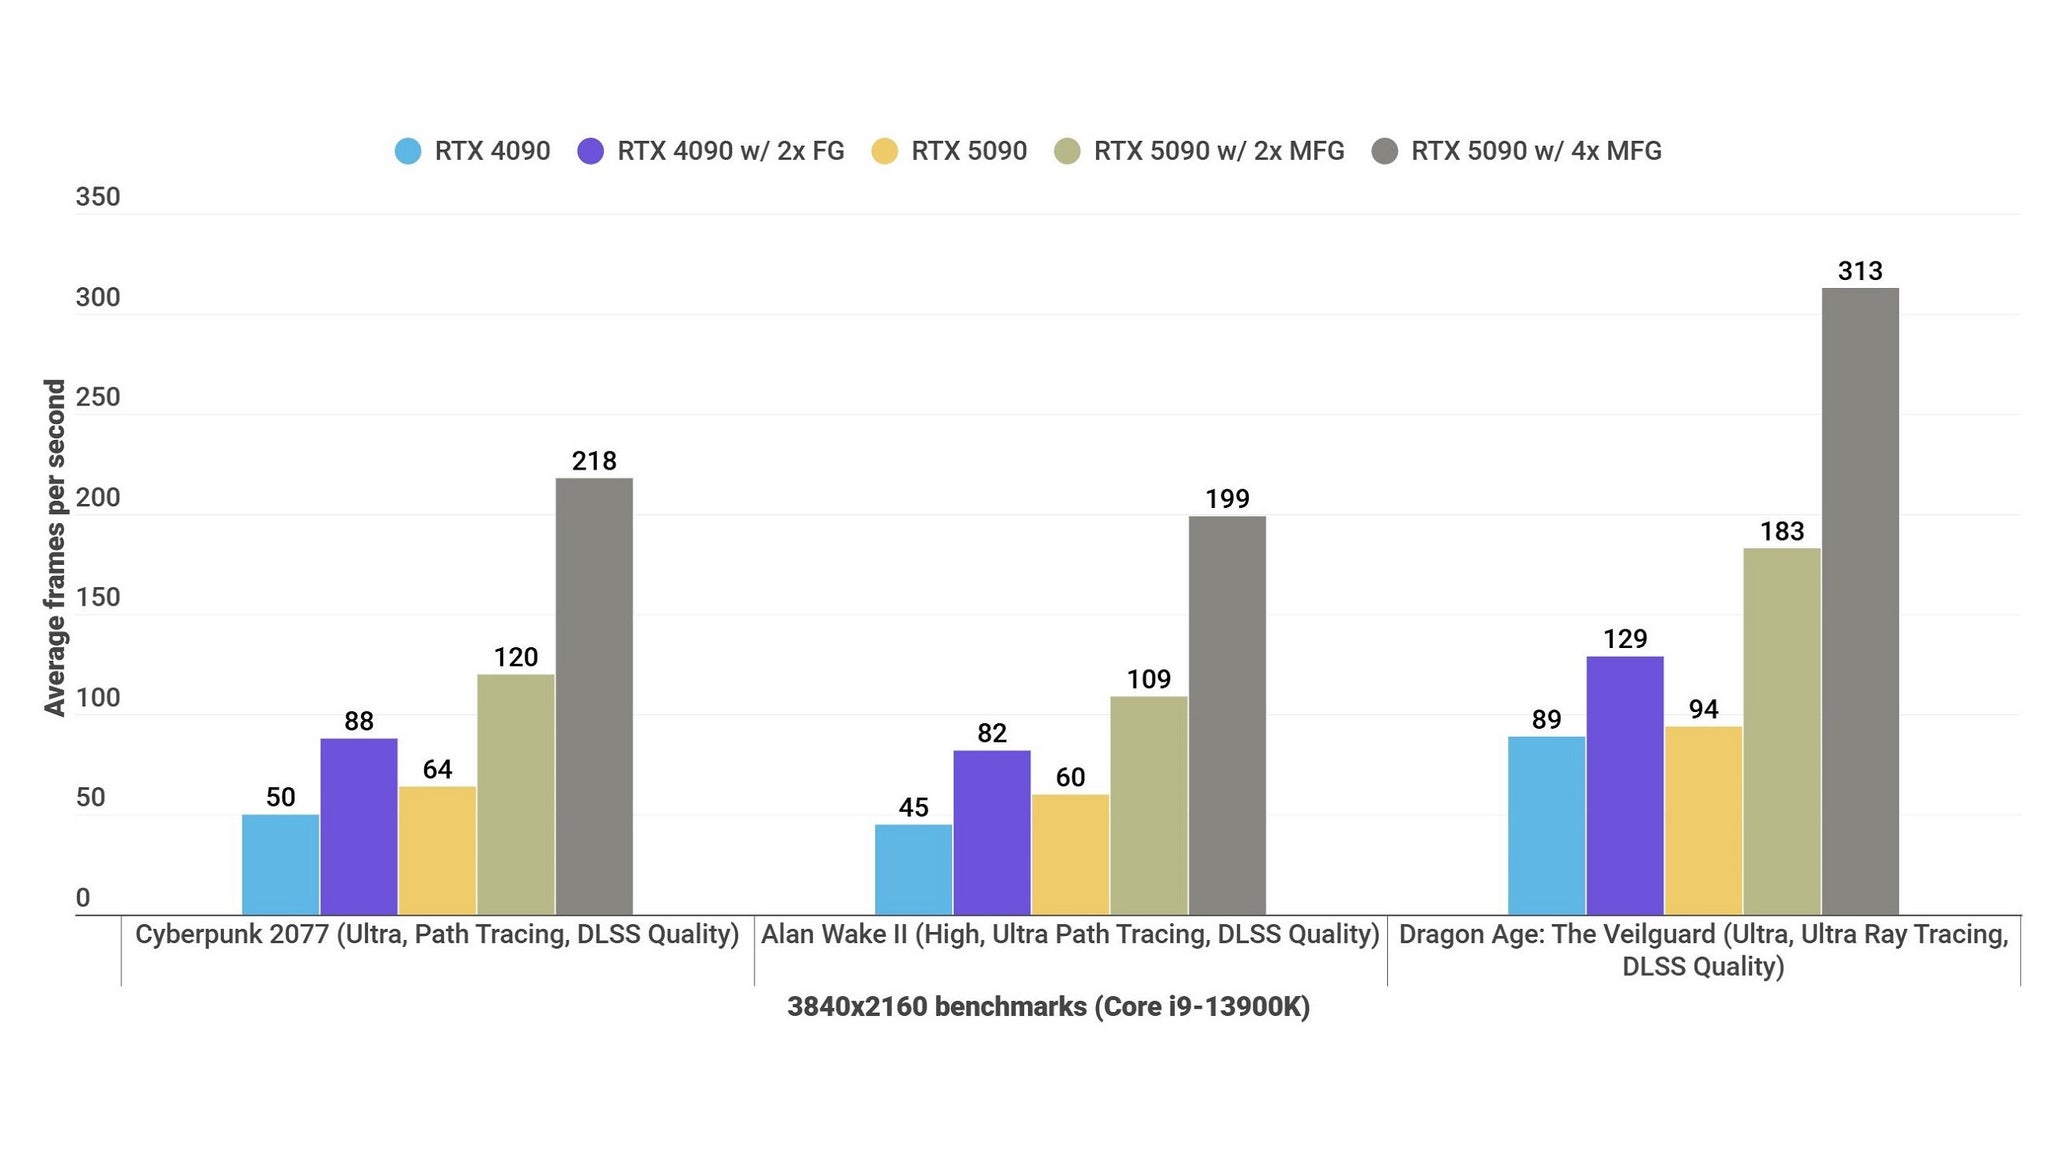
Image credit:Rock Paper Shotgun
That is indeed the RTX 5090 running fully pathed-traced Cyberpunk 2077 and Alan Wake II , at 4K, at – as far as your eyes are concerned – 200fps. And crucially, 4x MFG doesn’t significantly increase latency over what classic 2x frame generation already did, nor does it look any worse in terms of image quality.
That’s not to say it’s immaculate sorcery. Input lag is input lag, and while MFG doesn’t make this tradeoff noticeably worse, it also doesn’t make it any better. Cyberpunk 2077 could also get quite blurry when making rapid camera movements – an issue I didn’t really have with AW2 and Dragon Age: The Veilguard , to be fair – and it’s important to remember that no matter how many imitation frames an AI generator can add, it’s not going to make these games feel faster in your hands. That 218fps will only ever have the mouse snappiness of a 64fps game, because those frames – the ones delivered via the usual PC pipeline – are the only ones that can accurately reflect your inputs.
All that in mind, the visual smoothness is a stark upgrade, and if you’re not playing something that needs hyper-accurate twitch aiming… why not? Especially if the underlying GPU is strong enough to get comfortable ‘real’ framerates out of max-quality settings like path tracing, in which case frame generation becomes the luxury it really should be. Not a crutch that games without adequate low-end settings can use to pump their numbers up.
MFG is also but one part of DLSS 4, which covers a range of tricks that both are and aren’t exclusive to this new Nvidia generation. The RTX 5090 thus also has the duty of showcasing some tech that will benefit GPUs going right back to the RTX 20 series, such as DLSS 4’s new ‘Transformer’ model and support for ‘DLSS overrides’ in the Nvidia app .
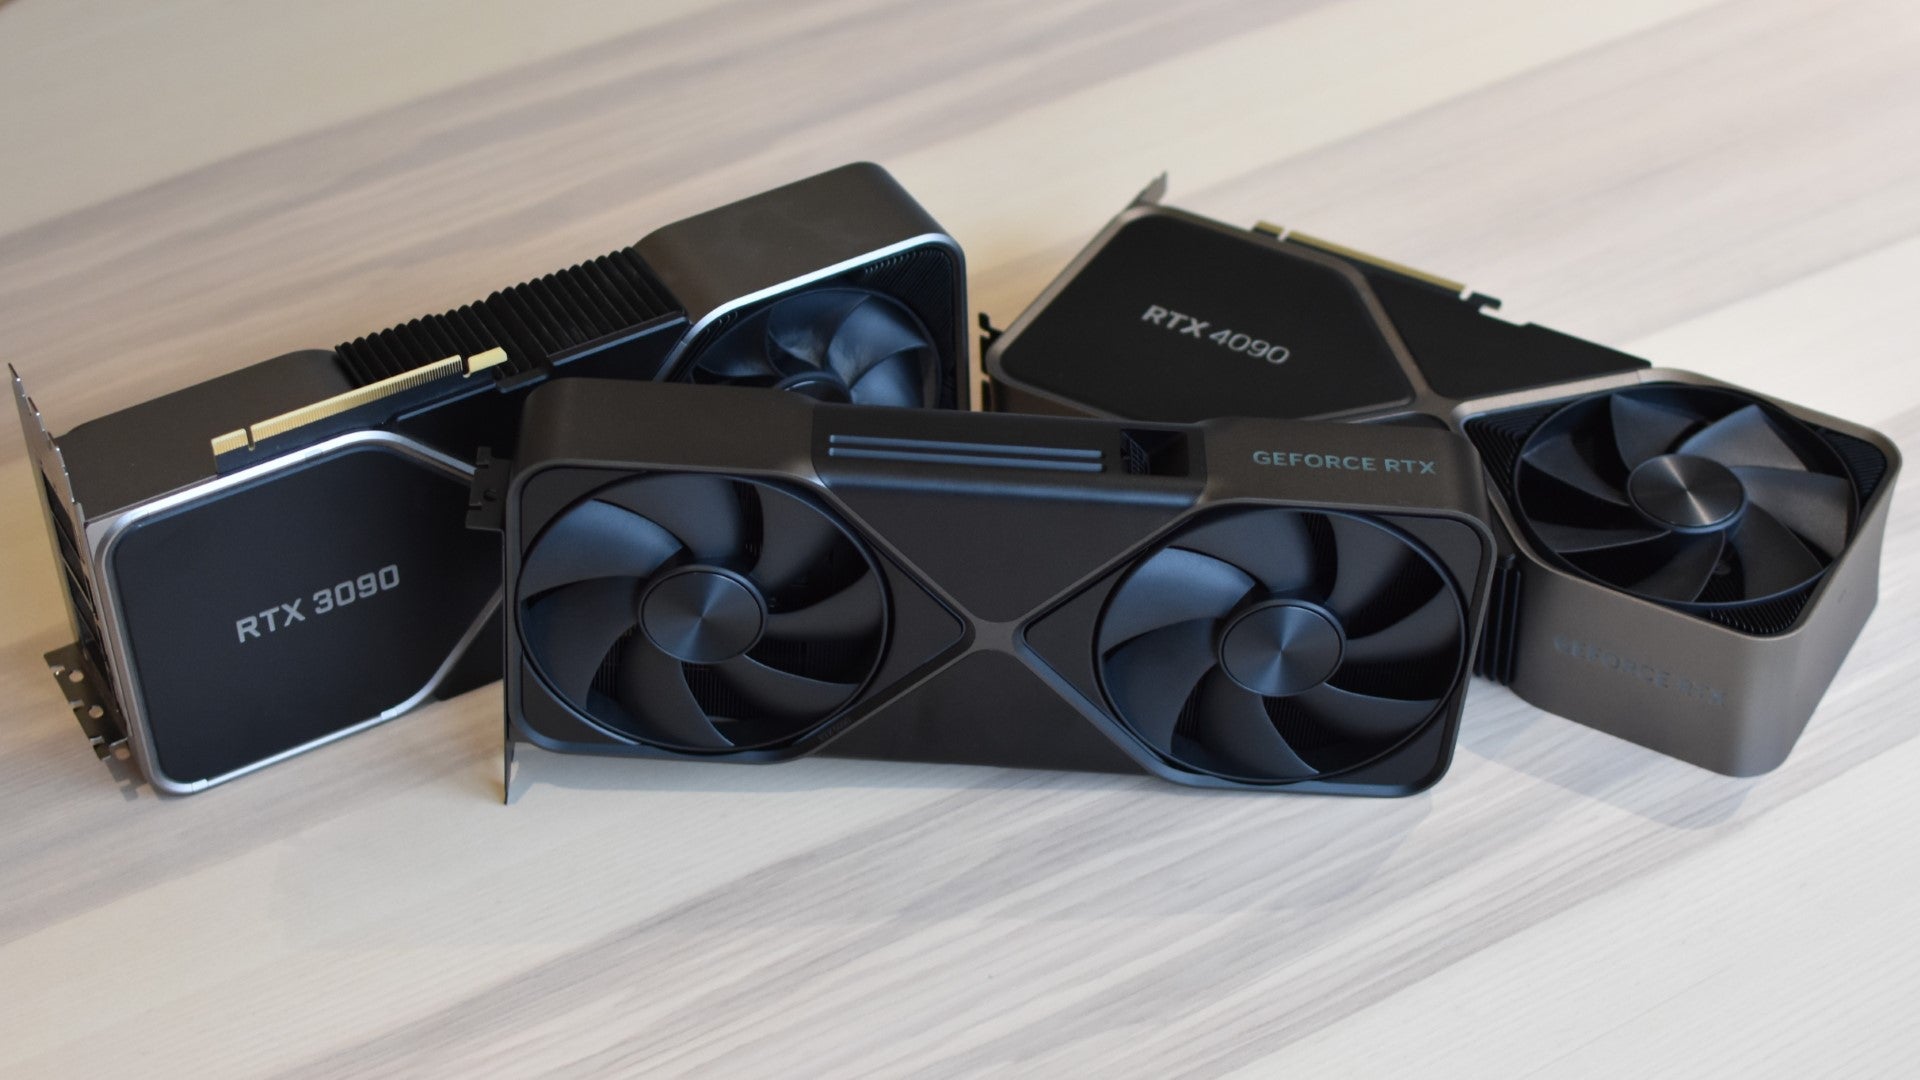
Image credit:Rock Paper Shotgun
Firstly, the Transformer model is a rejigged technique for how DLSS applies its best-in-class anti-aliasing. It runs slightly slower than the preexisting ‘Convolutional Neural Network’ model, averaging 120fps in Cyberpunk 2077 at 4K/Ultra versus the 132fps of the older version. But it does look sharper and more detailed: a lot of Nvidia’s promotional comparison images have focused on textures, but what I found most noticeable was the improvement to fine-edged objects like grass and wire fences. DLSS already looked better than its rivals FSR and XeSS on these, but the Transformer model cleans and sharpens them up even further, bringing the overall picture closer than ever to true native-rez quality. Good stuff.
Secondly, DLSS overrides could be a very big deal in bringing newer, superior versions of DLSS to games that either never updated their support or lacked it in the first place. It still requires a degree of support in the Nvidia app – you can’t just go slapping DLSS 4 on anything ever made – but there will be a batch of 75 compatible games at launch, and the options are impressively flexible. You could force a game to use DLAA anti-aliasing if it was never officially implemented, for example, or take a game that has Convolutional Neural Network DLSS support and upgrade it to the new Transformer model. And, if you’ve got a 50 series GPU like this one, you can have a game with DLSS 3 frame gen capability also work with full 4x MFG, as I did with Dragon Age: The Veilguard to get those benchmark results above.
I’m still not seeing the value in a lot of what Nvidia does with AI, up to and including their attempts at creating creepy, artless NPCs . But it’s much, much easier to get on board with these DLSS advancements, which devalue nothing, steal from nowhere, and could well breathe life into older hardware as much as they enrich the new.
Nvidia GeForce RTX 5090 review: 1440p benchmarks
Before we get too lovey-dovey, though, time for another reminder of the RTX 5090’s limitations. Buying a top-shelf GPU and hooking it up to less demanding 1440p screen might seem like galaxy brain setup-building to some – the PC equivalent of those Fiats with massive engines poking out the back because they won’t fit inside. In practice, your mismatched rigmobile will just send you crashing into a CPU bottleneck:
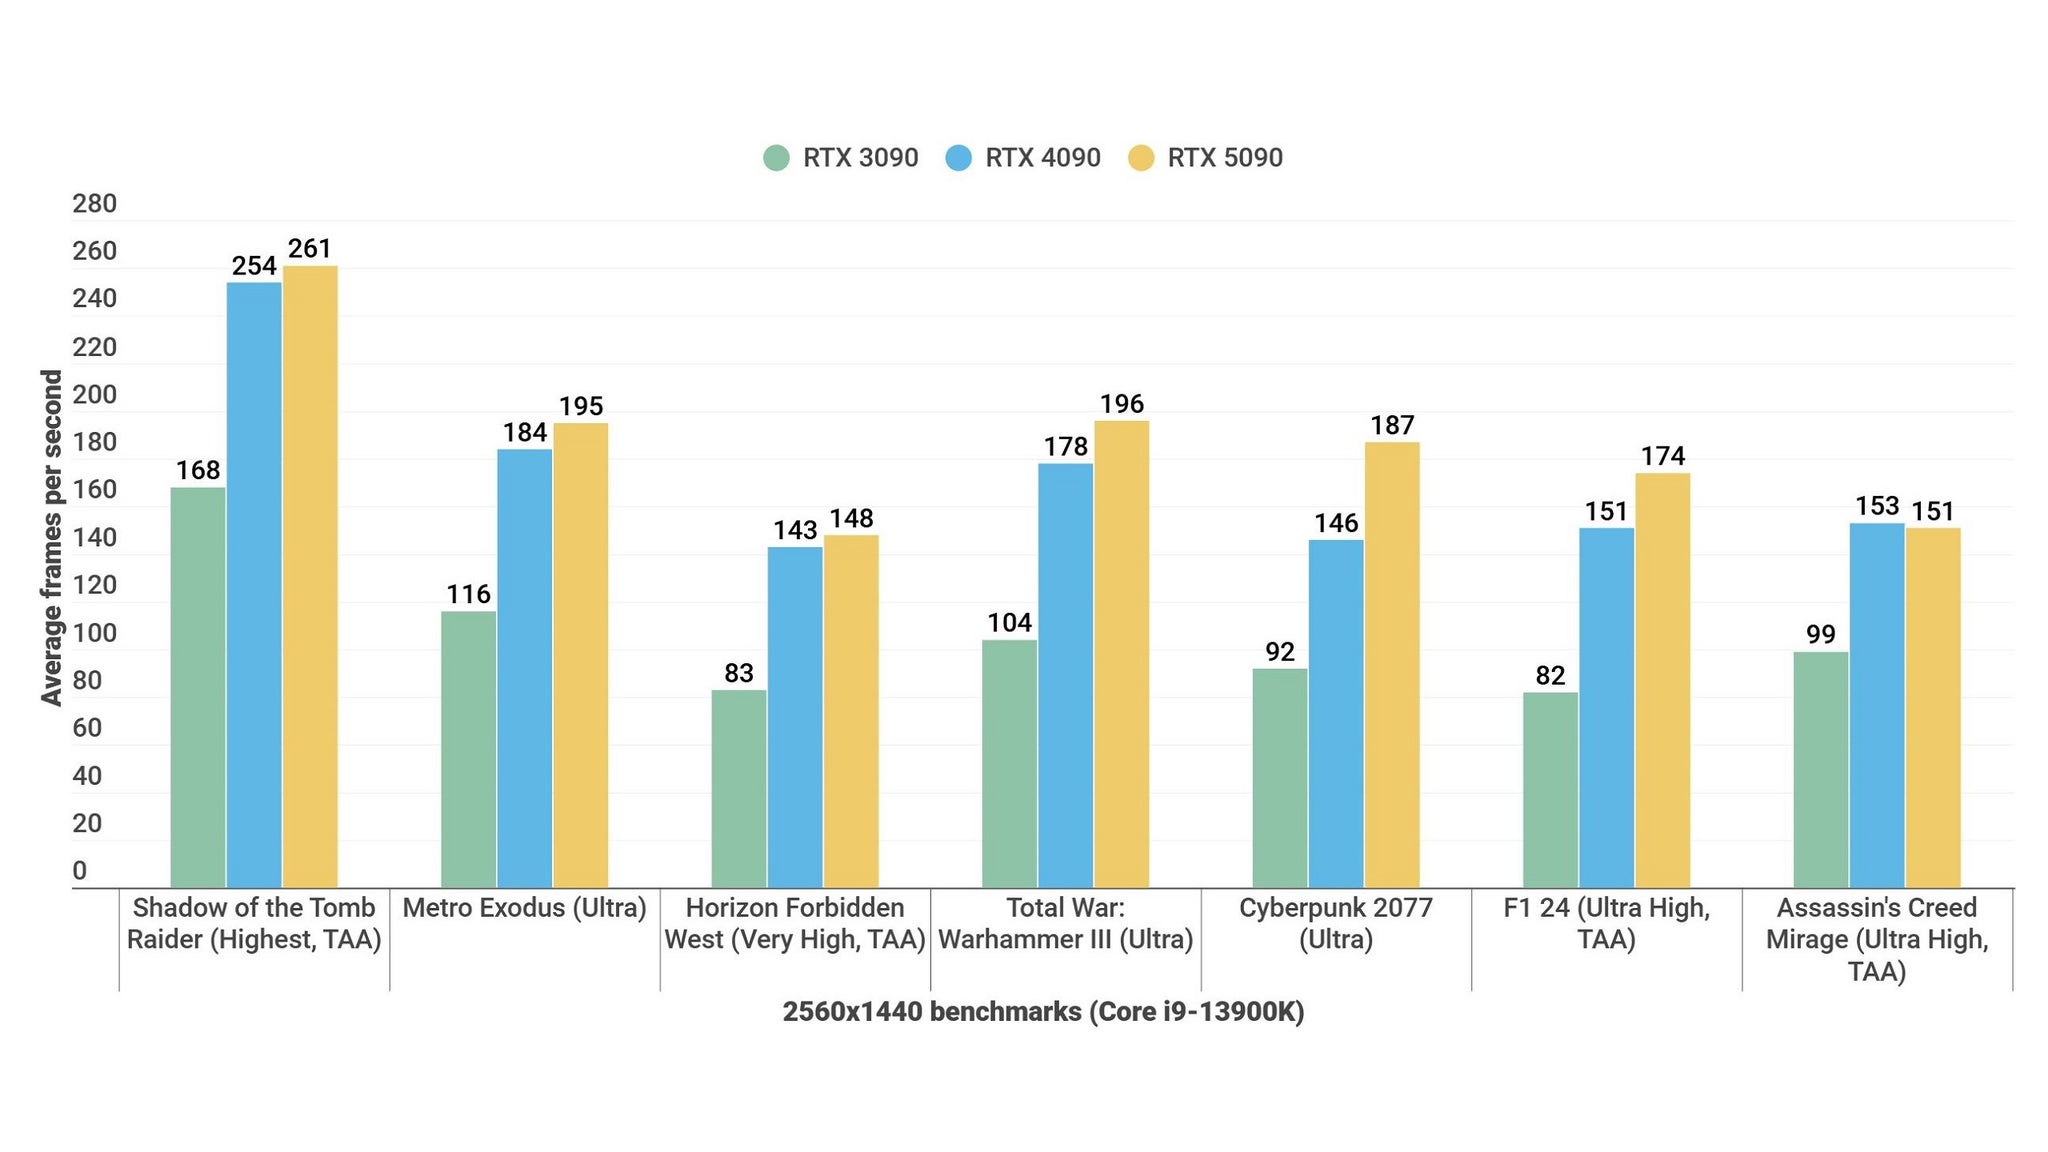
Image credit:Rock Paper Shotgun
Again, the RTX 3090 is left well behind, but at this resolution the RTX 5090 is effectively only as powerful as the GPU it replaces. You could potentially open up the gap again by laying on thick with the ray tracing, but still, the results underwhelm: Cyberpunk 2077, with Psycho RT effects and Quality DLSS, averaged 124fps on the RTX 5090 and 111fps on the RTX 4090. All that cash for an extra 11fps? Not a great deal. MFG isn’t really useful here either, as you’re already getting so many frames shoved down your eyes that regular 2x frame generation will push supporting games beyond the point where you’ll seldom be able to perceive a load more.
Nope, 4K is where the RTX 5090 is at. But then, trying to be practical with a card like this kind of feels like missing its point. Yes, we once had the GTX 1080 Ti and the RTX 2080 Ti, GPUs that could top a range while still being somewhat attainable high-enders. I miss those days too. But is the RTX 5090 not more of an aspirational device anyway? A concept model that’s just happened to escape the design wing and sneak into the production factory?
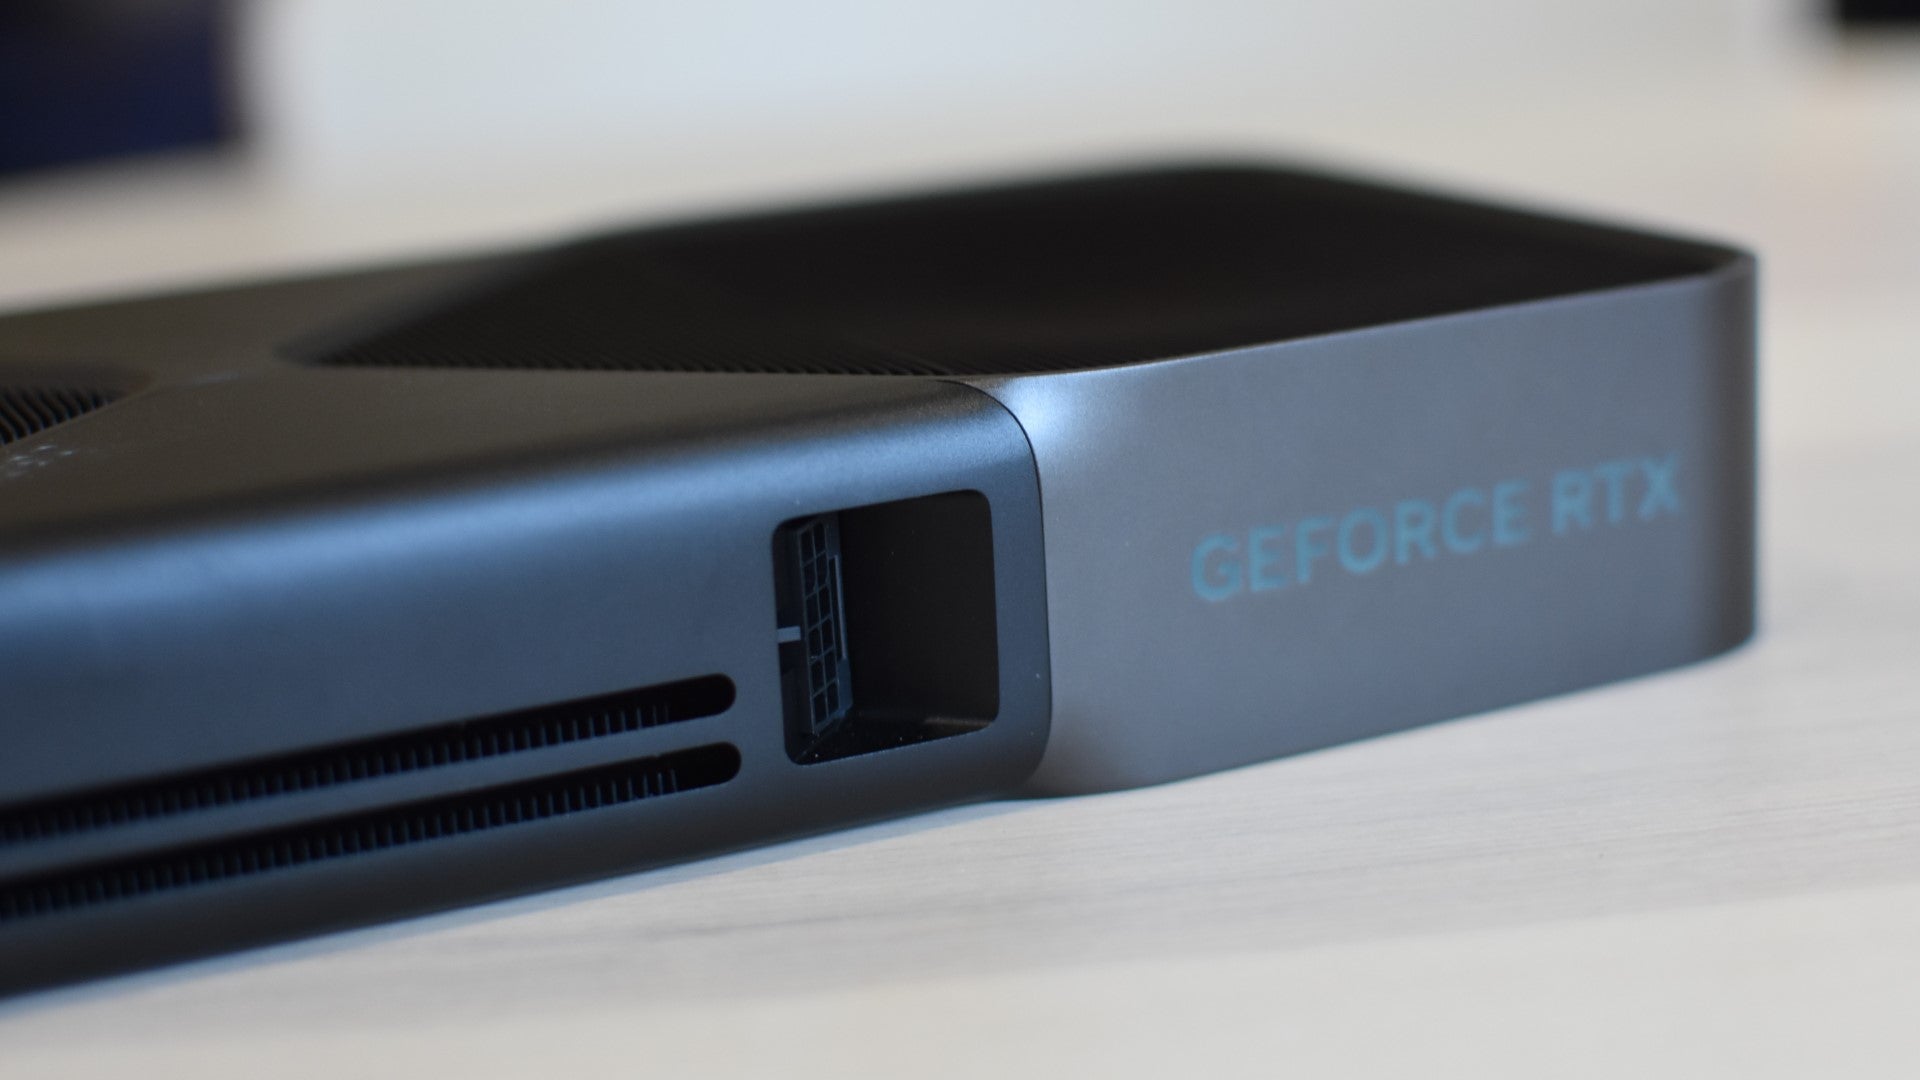
Image credit:Rock Paper Shotgun
Let’s be real: you were never going to buy this. I was never going to buy this. Even the people who might buy this, presumably when they’re not busy executing their generals, probably have at least one eye on the RTX 5080 as well. It’s just so far beyond us normies that there doesn’t seem to be much sense in hating it either. The GPU itself won’t care, and Nvidia certainly won’t. They’re probably already planning the RTX 6090 for £2,500.
Instead, let’s just see this for what it really is, an eye-grabbing exercise for DLSS features that are far more likely to make waves than any one single graphics card. You’ve got me there, RTX 5090, even if you aren’t getting my money.
This review is based on a retail unit provided by the manufacturer.

Find out how we conduct our reviews by reading our review policy .
Rock Paper Shotgun is better when you sign in
Sign in and join us on our journey to discover strange and compelling PC games.

All 75 Arc Raiders Blueprints and where to get them
These areas have the highest chance of giving you Blueprints

Image credit:Rock Paper Shotgun/Embark Studios

Looking for more Arc Raiders Blueprints? It’s a special day when you find a Blueprint, as they’re among the most valuable items in Arc Raiders. If you find a Blueprint that you haven’t already found, then you must make sure you hold onto it at all costs, because Blueprints are the key to one of the most important and powerful systems of meta-progression in the game.
This guide aims to be the very best guide on Blueprints you can find, starting with a primer on what exactly they are and how they work in Arc Raiders, before delving into exactly where to get Blueprints and the very best farming spots for you to take in your search.
We’ll also go over how to get Blueprints from other unlikely activities, such as destroying Surveyors and completing specific quests. And you’ll also find the full list of all 75 Blueprints in Arc Raiders on this page (including the newest Blueprints added with the Cold Snap update , such as the Deadline Blueprint and Firework Box Blueprint), giving you all the information you need to expand your own crafting repertoire.
In this guide:
- What are Blueprints in Arc Raiders?
- Full Blueprint list: All crafting recipes
- Where to find Blueprints in Arc Raiders Blueprints obtained from quests Blueprints obtained from Trials Best Blueprint farming locations

What are Blueprints in Arc Raiders?
Blueprints in Arc Raiders are special items which, if you manage to extract with them, you can expend to permanently unlock a new crafting recipe in your Workshop. If you manage to extract from a raid with an Anvil Blueprint, for example, you can unlock the ability to craft your very own Anvil Pistol, as many times as you like (as long as you have the crafting materials).
To use a Blueprint, simply open your Inventory while in the lobby, then right-click on the Blueprint and click “Learn And Consume” . This will permanently unlock the recipe for that item in your Workshop. As of the Stella Montis update, there are allegedly 75 different Blueprints to unlock - although only 68 are confirmed to be in the game so far. You can see all the Blueprints you’ve found and unlocked by going to the Workshop menu, and hitting “R” to bring up the Blueprint screen.
It’s possible to find duplicates of past Blueprints you’ve already unlocked. If you find these, then you can either sell them, or - if you like to play with friends - you can take it into a match and gift it to your friend so they can unlock that recipe for themselves. Another option is to keep hold of them until the time comes to donate them to the Expedition.
Full Blueprint list: All crafting recipes
Below is the full list of all the Blueprints that are currently available to find in Arc Raiders, and the crafting recipe required for each item:
| Blueprint | Type | Recipe | Crafted At |
|---|---|---|---|
| Bettina | Weapon | 3x Advanced Mechanical Components 3x Heavy Gun Parts 3x Canister | Gunsmith 3 |
| Blue Light Stick | Quick Use | 3x Chemicals | Utility Station 1 |
| Aphelion | Weapon | 3x Magnetic Accelerator 3x Complex Gun Parts 1x Matriarch Reactor | Gunsmith 3 |
| Combat Mk. 3 (Flanking) | Augment | 2x Advanced Electrical Components 3x Processor | Gear Bench 3 |
| Combat Mk. 3 (Aggressive) | Augment | 2x Advanced Electrical Components 3x Processor | Gear Bench 3 |
| Complex Gun Parts | Material | 2x Light Gun Parts 2x Medium Gun Parts 2x Heavy Gun Parts | Refiner 3 |
| Fireworks Box | Quick Use | 1x Explosive Compound 3x Pop Trigger | Explosives Station 2 |
| Gas Mine | Mine | 4x Chemicals 2x Rubber Parts | Explosives Station 1 |
| Green Light Stick | Quick Use | 3x Chemicals | Utility Station 1 |
| Pulse Mine | Mine | 1x Crude Explosives 1x Wires | Explosives Station 1 |
| Seeker Grenade | Grenade | 1x Crude Explosives 2x ARC Alloy | Explosives Station 1 |
| Looting Mk. 3 (Survivor) | Augment | 2x Advanced Electrical Components 3x Processor | Gear Bench 3 |
| Angled Grip II | Mod | 2x Mechanical Components 3x Duct Tape | Gunsmith 2 |
| Angled Grip III | Mod | 2x Mod Components 5x Duct Tape | Gunsmith 3 |
| Hullcracker | Weapon | 1x Magnetic Accelerator 3x Heavy Gun Parts 1x Exodus Modules | Gunsmith 3 |
| Launcher Ammo | Ammo | 5x Metal Parts 1x Crude Explosives | Workbench 1 |
| Anvil | Weapon | 5x Mechanical Components 5x Simple Gun Parts | Gunsmith 2 |
| Anvil Splitter | Mod | 2x Mod Components 3x Processor | Gunsmith 3 |
| ??? | ??? | ??? | ??? |
| Barricade Kit | Quick Use | 1x Mechanical Components | Utility Station 2 |
| Blaze Grenade | Grenade | 1x Explosive Compound 2x Oil | Explosives Station 3 |
| Bobcat | Weapon | 3x Advanced Mechanical Components 3x Light Gun Parts | Gunsmith 3 |
| Osprey | Weapon | 2x Advanced Mechanical Components 3x Medium Gun Parts 7x Wires | Gunsmith 3 |
| Burletta | Weapon | 3x Mechanical Components 3x Simple Gun Parts | Gunsmith 1 |
| Compensator II | Mod | 2x Mechanical Components 4x Wires | Gunsmith 2 |
| Compensator III | Mod | 2x Mod Components 8x Wires | Gunsmith 3 |
| Defibrillator | Quick Use | 9x Plastic Parts 1x Moss | Medical Lab 2 |
| ??? | ??? | ??? | ??? |
| Equalizer | Weapon | 3x Magnetic Accelerator 3x Complex Gun Parts 1x Queen Reactor | Gunsmith 3 |
| Extended Barrel | Mod | 2x Mod Components 8x Wires | Gunsmith 3 |
| Extended Light Mag II | Mod | 2x Mechanical Components 3x Steel Spring | Gunsmith 2 |
| Extended Light Mag III | Mod | 2x Mod Components 5x Steel Spring | Gunsmith 3 |
| Extended Medium Mag II | Mod | 2x Mechanical Components 3x Steel Spring | Gunsmith 2 |
| Extended Medium Mag III | Mod | 2x Mod Components 5x Steel Spring | Gunsmith 3 |
| Extended Shotgun Mag II | Mod | 2x Mechanical Components 3x Steel Spring | Gunsmith 2 |
| Extended Shotgun Mag III | Mod | 2x Mod Components 5x Steel Spring | Gunsmith 3 |
| Remote Raider Flare | Quick Use | 2x Chemicals 4x Rubber Parts | Utility Station 1 |
| Heavy Gun Parts | Material | 4x Simple Gun Parts | Refiner 2 |
| Venator | Weapon | 2x Advanced Mechanical Components 3x Medium Gun Parts 5x Magnet | Gunsmith 3 |
| Il Toro | Weapon | 5x Mechanical Components 6x Simple Gun Parts | Gunsmith 1 |
| Jolt Mine | Mine | 1x Electrical Components 1x Battery | Explosives Station 2 |
| Explosive Mine | Mine | 1x Explosive Compound 1x Sensors | Explosives Station 3 |
| Jupiter | Weapon | 3x Magnetic Accelerator 3x Complex Gun Parts 1x Queen Reactor | Gunsmith 3 |
| Light Gun Parts | Material | 4x Simple Gun Parts | Refiner 2 |
| Lightweight Stock | Mod | 2x Mod Components 5x Duct Tape | Gunsmith 3 |
| Lure Grenade | Grenade | 1x Speaker Component 1x Electrical Components | Utility Station 2 |
| Medium Gun Parts | Material | 4x Simple Gun Parts | Refiner 2 |
| Torrente | Weapon | 2x Advanced Mechanical Components 3x Medium Gun Parts 6x Steel Spring | Gunsmith 3 |
| Muzzle Brake II | Mod | 2x Mechanical Components 4x Wires | Gunsmith 2 |
| Muzzle Brake III | Mod | 2x Mod Components 8x Wires | Gunsmith 3 |
| Padded Stock | Mod | 2x Mod Components 5x Duct Tape | Gunsmith 3 |
| Shotgun Choke II | Mod | 2x Mechanical Components 4x Wires | Gunsmith 2 |
| Shotgun Choke III | Mod | 2x Mod Components 8x Wires | Gunsmith 3 |
| Shotgun Silencer | Mod | 2x Mod Components 8x Wires | Gunsmith 3 |
| Showstopper | Grenade | 1x Advanced Electrical Components 1x Voltage Converter | Explosives Station 3 |
| Silencer I | Mod | 2x Mechanical Components 4x Wires | Gunsmith 2 |
| Silencer II | Mod | 2x Mod Components 8x Wires | Gunsmith 3 |
| Snap Hook | Quick Use | 2x Power Rod 3x Rope 1x Exodus Modules | Utility Station 3 |
| Stable Stock II | Mod | 2x Mechanical Components 3x Duct Tape | Gunsmith 2 |
| Stable Stock III | Mod | 2x Mod Components 5x Duct Tape | Gunsmith 3 |
| Tagging Grenade | Grenade | 1x Electrical Components 1x Sensors | Utility Station 3 |
| Tempest | Weapon | 3x Advanced Mechanical Components 3x Medium Gun Parts 3x Canister | Gunsmith 3 |
| Trigger Nade | Grenade | 2x Crude Explosives 1x Processor | Explosives Station 2 |
| Vertical Grip II | Mod | 2x Mechanical Components 3x Duct Tape | Gunsmith 2 |
| Vertical Grip III | Mod | 2x Mod Components 5x Duct Tape | Gunsmith 3 |
| Vita Shot | Quick Use | 2x Antiseptic 1x Syringe | Medical Lab 3 |
| Vita Spray | Quick Use | 3x Antiseptic 1x Canister | Medical Lab 3 |
| Vulcano | Weapon | 1x Magnetic Accelerator 3x Heavy Gun Parts 1x Exodus Modules | Gunsmith 3 |
| Wolfpack | Grenade | 2x Explosive Compound 2x Sensors | Explosives Station 3 |
| Red Light Stick | Quick Use | 3x Chemicals | Utility Station 1 |
| Smoke Grenade | Grenade | 14x Chemicals 1x Canister | Utility Station 2 |
| Deadline | Mine | 3x Explosive Compound 2x ARC Circuitry | Explosives Station 3 |
| Trailblazer | Grenade | 1x Explosive Compound 1x Synthesized Fuel | Explosives Station 3 |
| Tactical Mk. 3 (Defensive) | Augment | 2x Advanced Electrical Components 3x Processor | Gear Bench 3 |
| Tactical Mk. 3 (Healing) | Augment | 2x Advanced Electrical Components 3x Processor | Gear Bench 3 |
| Yellow Light Stick | Quick Use | 3x Chemicals | Utility Station 1 |
Note: The missing Blueprints in this list likely have not actually been added to the game at the time of writing, because none of the playerbase has managed to find any of them. As they are added to the game, I will update this page with the most relevant information so you know exactly how to get all 75 Arc Raiders Blueprints.
Where to find Blueprints in Arc Raiders
Below is a list of all containers, modifiers, and events which maximise your chances of finding Blueprints:
- Certain quests reward you with specific Blueprints .
- Completing Trials has a high chance of offering Blueprints as rewards.
- Surveyors have a decent chance of dropping Blueprints on death.
- High loot value areas tend to have a greater chance of spawning Blueprints.
- Night Raids and Storms may increase rare Blueprint spawn chances in containers.
- Containers with higher numbers of items may have a higher tendency to spawn Blueprints. As a result, Blue Gate (which has many “large” containers containing multiple items) may give you a higher chance of spawning Blueprints.
- Raider containers (Raider Caches, Weapon Boxes, Medical Bags, Grenade Tubes) have increased Blueprint drop rates. As a result, the Uncovered Caches event gives you a high chance of finding Blueprints.
- Security Lockers have a higher than average chance of containing Blueprints.
- Certain Blueprints only seem to spawn under specific circumstances: Tempest Blueprint only spawns during Night Raid events. Vulcano Blueprint only spawns during Hidden Bunker events. Jupiter and Equaliser Blueprints only spawn during Harvester events.

Raider Caches, Weapon Boxes, and other raider-oriented container types have a good chance of offering Blueprints. |Image credit:Rock Paper Shotgun/Embark Studios
Blueprints have a very low chance of spawning in any container in Arc Raiders, around 1-2% on average. However, there is a higher chance of finding Blueprints in particular container types. Specifically, you can find more Blueprints in Raider containers and security lockers.
Beyond this, if you’re looking for Blueprints you should focus on regions of the map which are marked as having particularly high-value loot. Areas such as the Control Tower in Dam Battlegrounds, the Arrival and Departure Buildings in Spaceport, and Pilgrim’s Peak in Blue Gate all have a better-than-average chance of spawning Blueprints somewhere amongst all their containers. Night Raids and Electromagnetic Storm events also increase the drop chances of certain Blueprints .
In addition to these containers, you can often loot Blueprints from destroyed Surveyors - the largest of the rolling ball ARC. Surveyors are more commonly found on the later maps - Spaceport and Blue Gate - and if one spawns in your match, you’ll likely see it by the blue laser beam that it casts into the sky while “surveying”.
Surveyors are quite well-armoured and will very speedily run away from you once it notices you, but if you can take one down then make sure you loot all its parts for a chance of obtaining certain unusual Blueprints.
Blueprints obtained from quests
One way in which you can get Blueprints is by completing certain quests for the vendors in Speranza. Some quests will reward you with a specific item Blueprint upon completion, so as long as you work through all the quests in Arc Raiders, you are guaranteed those Blueprints.
Here is the full list of all Blueprints you can get from quest rewards:
- Trigger Nade Blueprint: Rewarded after completing “Sparks Fly”.
- Lure Grenade Blueprint: Rewarded after completing “Greasing Her Palms”.
- Burletta Blueprint: Rewarded after completing “Industrial Espionage”.
- Hullcracker Blueprint (and Launcher Ammo Blueprint): Rewarded after completing “The Major’s Footlocker”.
Alas, that’s only 4 Blueprints out of a total of 75 to unlock, so for the vast majority you will need to find them yourself during a raid. If you’re intent on farming Blueprints, then it’s best to equip yourself with cheap gear in case you lose it, but don’t use a free loadout because then you won’t get a safe pocket to stash any new Blueprint you find. No pain in Arc Raiders is sharper than failing to extract with a new Blueprint you’ve been after for a dozen hours already.

One of the best ways to get Blueprints is by hitting three stars on all five Trials every week. |Image credit:Rock Paper Shotgun/Embark Studios
Blueprints obtained from Trials
One of the very best ways to get Blueprints is as rewards for completing Trials in Arc Raiders. Trials are unlocked from Level 15 onwards, and allow you to earn rewards by focusing on certain tasks over the course of several raids. For example, one Trial might task you with dealing damage to Hornets, while another might challenge you to loot Supply Drops.
Trials refresh on a weekly basis, with a new week bringing five new Trials. Each Trial can offer up to three rewards after passing certain score milestones, and it’s possible to receive very high level loot from these reward crates - including Blueprints. So if you want to unlock as many Blueprints as possible, you should make a point of completing as many Trials as possible each week.
Best Blueprint farming locations
The very best way to get Blueprints is to frequent specific areas of the maps which combine high-tier loot pools with the right types of containers to search. Here are my recommendations for where to find Blueprints on every map, so you can always keep the search going for new crafting recipes to unlock.

Image credit:Rock Paper Shotgun/Embark Studios
Dam Battlegrounds
The best places to farm Blueprints on Dam Battlegrounds are the Control Tower, Power Generation Complex, Ruby Residence, and Pale Apartments . The first two regions, despite only being marked on the map as mid-tier loot, contain a phenomenal number of containers to loot. The Control Tower can also contain a couple of high-tier Security Lockers - though of course, you’ll need to have unlocked the Security Breach skill at the end of the Survival tree.
There’s also a lot of reporting amongst the playerbase that the Residential areas in the top-left of the map - Pale Apartments and Ruby Residence - give you a comparatively strong chance of finding Blueprints. Considering their size, there’s a high density of containers to loot in both locations, and they also have the benefit of being fairly out of the way. So you’re more likely to have all the containers to yourself.
Buried City
The best Blueprint farming locations on Buried City are the Santa Maria Houses, Grandioso Apartments, Town Hall, and the various buildings of the New District . Grandioso Apartments has a lower number of containers than the rest, but a high chance of spawning weapon cases - which have good Blueprint drop rates. The others are high-tier loot areas, with plenty of lootable containers - including Security Lockers.
Spaceport
The best places to find Blueprints on Spaceport are the Arrival and Departure Buildings, as well as Control Tower A6 and the Launch Towers . All these areas are labelled as high-value loot regions, and many of them are also very handily connected to one another by the Spaceport wall, which you can use to quickly run from one area to the next. At the tops of most of these buildings you’ll find at least one Security Locker, so this is an excellent farming route for players looking to find Blueprints.
The downside to looting Blueprints on Spaceport is that all these areas are hotly contested, particularly in Duos and Squads. You’ll need to be very focused and fast in order to complete the full farming route.

Image credit:Rock Paper Shotgun/Embark Studios
Blue Gate
Blue Gate tends to have a good chance of dropping Blueprints, potentially because it generally has a high number of containers which can hold lots of items; so there’s a higher chance of a Blueprint spawning in each container. In my experience, the best Blueprint farming spots on Blue Gate are Pilgrim’s Peak, Raider’s Refuge, the Ancient Fort, and the Underground Complex beneath the Warehouse .
All of these areas contain a wealth of containers to loot. Raider’s Refuge has less to loot, but the majority of the containers in and around the Refuge are raider containers, which have a high chance of containing Blueprints - particularly during major events.
Stella Montis
On the whole, Stella Montis seems to have a very low drop rate for Blueprints (though a high chance of dropping other high-tier loot). If you do want to try farming Blueprints on this map, the best places to find Blueprints in Stella Montis are Medical Research, Assembly Workshop, and the Business Center . These areas have the highest density of containers to loot on the map.
In addition to this, the Western Tunnel has a few different Security Lockers to loot, so while there’s very little to loot elsewhere in this area of the map, it’s worth hitting those Security Lockers if you spawn there at the start of a match.
That wraps up this primer on how to get all the Blueprints in Arc Raiders as quickly as possible. With the Expedition system constantly resetting a large number of players’ Blueprints, it’s more important than ever to have the most up-to-date information on where to find all these Blueprints.
While you’re here, be sure to check out our Arc Raiders best guns tier list , as well as our primers on the best skills to unlock and all the different Field Depot locations on every map.


ARC Raiders
PS5 , Xbox Series X/S , PC
Rock Paper Shotgun is better when you sign in
Sign in and join us on our journey to discover strange and compelling PC games.
