No Assassin’s Creed sequel has ever matched the weird poetry of the first game’s towers
Resynchronising with 2007

Image credit:Ubisoft

Maybe five or ten years ago, everybody was absolutely sick of climbing towers in Ubisoft games. Are we still? I’m not sure. If you’ve never scaled one of these landmarks, possibly because you have recently arrived from Mars, let me start you off on the ground floor. The open world tower mechanic dates back to the original Assassin’s Creed in 2007, and is a simple, perennially gratifying narrative loop. It goes like this: you spy the tower on the horizon, you scuffle and shoulder through the city towards it, you savour the ensuing clamber - all those sinuous parkour animations, the wind around your ears as the urban backdrop fades - and then you get a nice view of Creation that also renders the scenery more consumable, by unfogging your map and populating it with content.
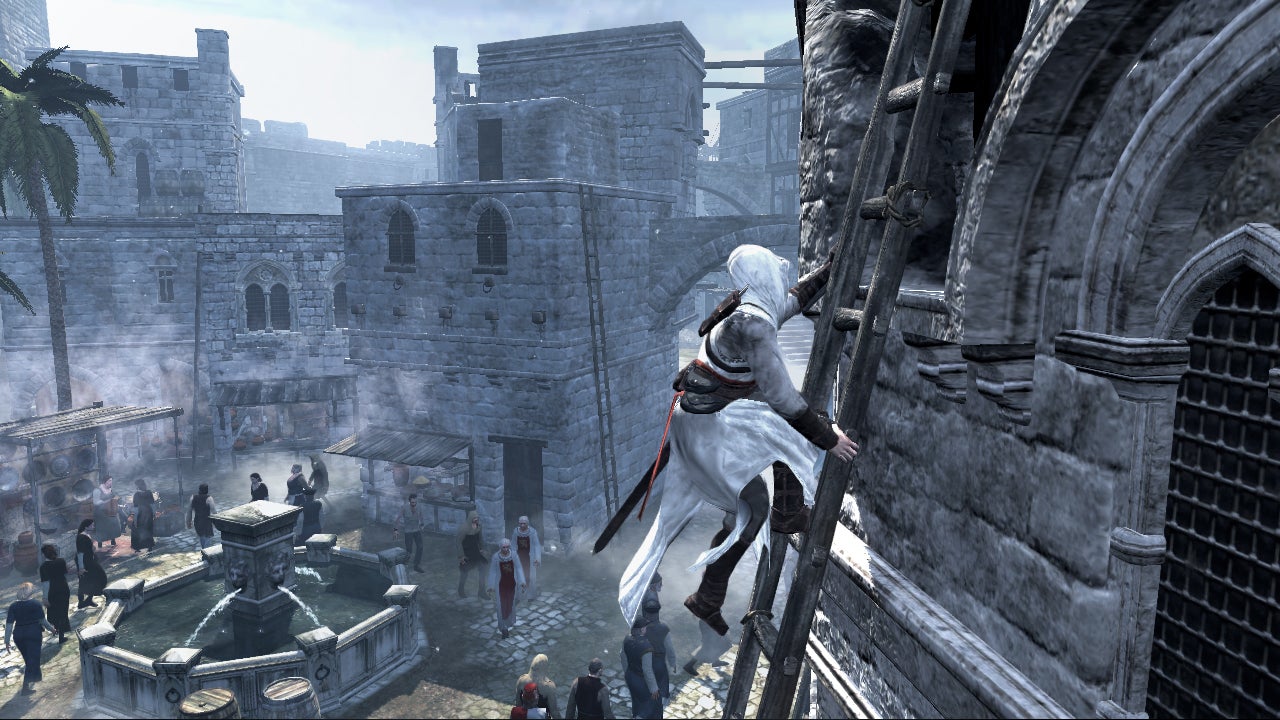
Image credit:Ubisoft
Towers used to be all the rage among the open-worldly, particularly when coupled with region-based design. The tower loop creates a reassuring foundation for exploration, perhaps to the extent that no real exploration happens at all: it gives you an immediate objective whenever you stray into uncharted territory. But tower-climbing’s Ubiquity has inevitably bred contempt. I’ve mocked towers, radio masts and the like myself in many reviews of Ubiworlds from the 2010s. Lately, though, I find myself thinking wistfully of the original Assassin’s Creed’s bygone summits, which are strange in a way the sequels have squandered by minimising Assassin’s Creed’s old metafictional framing in order to lose you in the splendour of each period setting.
It’s easy to forget that Assassin’s Creed is, on some level, supposed to feel not splendid but provocatively fake. The original game depicts controlling your avatar as “puppeteering”, with a controller button layout corresponding to hands, head and legs. For all the fluidity of the parkour, there’s a showy awkwardness to how it thinks about video game embodiment - a sense of strings being yanked that speaks to a larger plot incompatibility of, in essence, choosing to have no choice at all. Assassin’s Creed is all about puppeteers who are also puppets, a Ligottian scenario if ever there was one. It dangles the idea that history is a sandbox in which “nothing is true, everything is permitted”, but also insists that you use this agency to “synchronise” with the given lifestory of another character.
You need to “synchronise” because this isn’t actually a historical simulation. It’s a simulation of a historical simulation. You are plugged into the Animus, a nowadays quaint-seeming VR machine devised by Ubisoft’s authorial surrogate Abstergo to extract and recreate “genetic memories”, passed down by your ancestors. The game’s narrative is one big act of synchronisation: held captive by Abstergo, protagonist Desmond Miles must reenact several days in the life of the 13th century assassin Altaïr Ibn-La’Ahad, chewing through a menu of memories in order to strengthen the Animus connection and eventually, access knowledge desired by the corporation. In the process, staple mechanics such as stealth, killing NPCs or taking damage are reimagined, albeit superficially, as rituals of continuity or discontinuity between Desmond and Altaïr. It’s all in the name of assembling the one, true-and-permitted history that Abstergo require to fulfil their globe-straddling ambitions.

Image credit:Ubisoft
Given that blockbuster games typically want to “immerse” you, persuading you to forget that you’re interacting with a machine in order to inculcate a flow state, I’m charmed by Assassin’s Creed’s insistence that you labour across a gap between player and simulation. It requires you to “play well” not just to make progress, but to stop the world from flaking away to whitebox. In other words, Assassin’s Creed dramatises an interval between acting as the game requires, and the player’s dissatisfying of those expectations - whether through fumbling the inputs or perhaps, through active disobedience.
“Disobedience” against the simulation’s creators isn’t, admittedly, a very coherent ideal in a game that is designed to be “hacked”, offering up QTE “glitches” for you to poke during cutscenes. But this doesn’t, for me, lessen the intrigue of synchronisation as a practice of calibrating a representation “from the inside”. There is so much that other designers could achieve here, I think, if they were offered the rope you don’t generally get from triple-A management. In particular, I’m struck by how synchronisation characterises the tower-climbing loop and, dare I say, lends it a certain poetic complexity. It’s not just about synching up people across different periods, but piecing together facets of symbolism and metaphor.
Climbing towers in Assassin’s Creed is one of the major ways you synchronise. That’s what you’re doing when you unfog the map: consolidating the technology’s grip on the Middle Ages as though driving in a piton. But there’s also a sense that you and the protagonists are engaged in a more open-ended form of synchronisation - that you are organising and unifying these “puppets” as literary devices, rather than clinically retrieving memories from a double-helix.
The synchronisation point itself is typically a little beam jutting from the tower’s summit, with an eagle perched on it. Synchronise, and the view launches outward, mimicking the disturbed eagle’s flight around the tower. “Altaïr” is an Arabic name derived from “al-tair” meaning “bird” - I’ve read that it refers specifically to birds of prey. So in a sense, when you climb to the synchronisation point you are Altaïr synchronising with al-tair. You are performing the poetics of Altaïr’s name, reconciling the assassin with his archetype.
You are doing all this, again, as Desmond synchronising with Altaïr. The name “Desmond” doesn’t have any avian resonance, as far as I can tell - Ubisoft Montreal’s writers could have plucked it from the air during a lunchbreak. But I find “synchronisation” as I’ve here redefined it such an inviting process that it’s hard to resist expanding the Animus bandwidth - remember, “everything is permitted” - and straining to incorporate more data. In the process, synchronisation again becomes something more than a rhythmic unlocking of map content, more like stringing together stars into constellations.
As a proper noun, “Desmond” can be traced to Mór Muman, a Gaelic mother goddess held to personify the Irish province of Munster. According to legend, Mór Muman once strode to the summit of Sliabh an Iolair, the Irish for “eagle mountain”, to view the surrounding landscape. Perhaps Desmond is another such regional sovereign deity, not just a man climbing into the body of another man climbing into the body of an eagle, but the very architecture and geography of the open world trampled and revealed by Altaïr’s ascent.
Among the things spoiling the poetry here is that, according to that folk tale I’ve just fished from the wikipool, Mór Muman didn’t just behold the view from Eagle Mountain, but lingered for an absolutely monstrous piss, carving great ravines through the terrain. It’s hard to think of an Assassin’s Creed parallel there, but perhaps we can rescue the decaying synchronisation by hand-waving some allusions to streaming textures and the yellow straw of the haystacks that wait to intercept Altaïr’s fall.

Image credit:Ubisoft
Those haystacks are, of course, the hidden heroes of the AssCreed tower loop. Supplanted in later open worlds by ziplines and gliders, they’re vital shortcuts in a game that makes an absolute dog’s dinner out of climbing down, with handholds forever grabbing at your gluey fingers. Falling from a tower in Assassin’s Creed is an irresistible crescendo, and it’s all thanks to those haystacks, which are always there to catch you providing you dive from ledges haunted by birds, and which always negate your fall damage no matter how far you tumble.
Those miraculous “eagle dives” are designed to be “believable” rather than “realistic”, according to original AC animation director Alex Drouin . I find the reference to “belief” apt here, in that eagle dives are referred to in-game as a “leap of faith”. Invoking “faith” suggests that this is Assassin’s Creed at its least “true” and most “permissive”, inasmuch as acting on faith is acting with no sure outcome. But if there’s one thing Assassin’s Creed guarantees it’s that when you leap from a synchronisation point, you’ll find a haystack beneath. In the process, the sense of ethereal, networked possibility I’ve just identified as a component of the climb collapses into plodding, designerly certainty.
To be fair, one early scene does feature a leap of faith ending in disaster. During the prologue, you and two other assassins plunge from a tower simultaneously to show an invading Templar general that the brotherhood hold no fear of death. One of your brothers surfaces screaming with a broken leg, but this is simply a level scripter’s excuse for Altaïr proceeding unaccompanied: from that point on, the Animus interface drums home the lesson that you will always emerge from the straw unscathed.
Imagine if you were told in advance that there was a 1% chance of any tower climb and “leap of faith” going wrong. How many percentage points would they need to add, before “faith” became a meaningful element of tower-loop synchronisation? And what might that bring to the idea of “synchronisation” as imaginative and interpretative, rather than extractive - a constellating of artistic and historical potentials? I wonder if Ubisoft/Abstergo could have designed Assassin’s Creed in such a way as to make operating the Animus less about obedient content consumption, and more of a risky process of tinkering with a fretful simulation and pursuing its eccentricities - going beyond gimmicks like “hacking” cutscenes, and fleshing out synchronisation as a form of play.
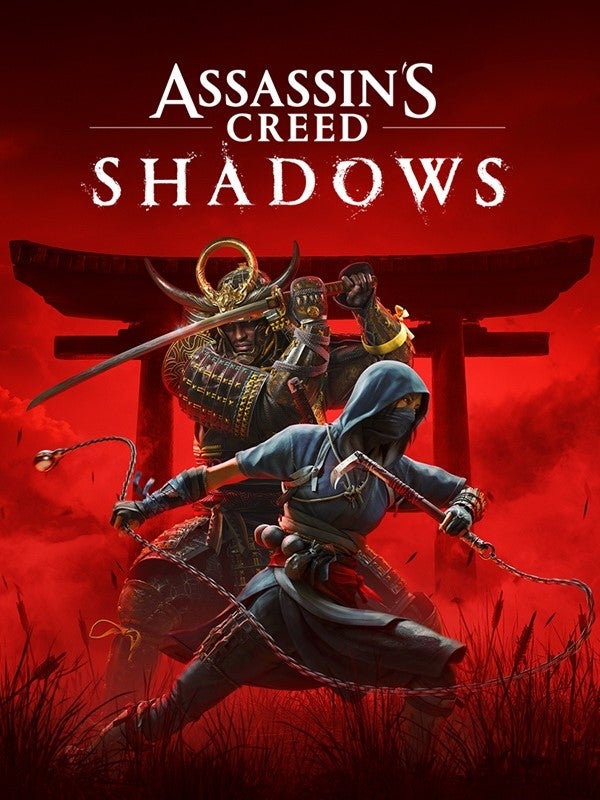
I don’t think the forthcoming Assassin’s Creed Shadows or any other contemporary Ubiworld has much appetite for such shenanigans. It’s not the kind of pie-eyed nonsense shareholders appreciate, especially right now , though Shadows does aim to reboot the series’ Animus storyline . But perhaps this is a haystack that another, less inhibited development team might hurl themselves into, 17 years on.

Assassin’s Creed
PS3 , Xbox 360 , PC
Assassin’s Creed Shadows
PS5 , Xbox Series X/S , PC , Mac , Nintendo Switch 2
Rock Paper Shotgun is better when you sign in
Sign in and join us on our journey to discover strange and compelling PC games.

All 75 Arc Raiders Blueprints and where to get them
These areas have the highest chance of giving you Blueprints

Image credit:Rock Paper Shotgun/Embark Studios

Looking for more Arc Raiders Blueprints? It’s a special day when you find a Blueprint, as they’re among the most valuable items in Arc Raiders. If you find a Blueprint that you haven’t already found, then you must make sure you hold onto it at all costs, because Blueprints are the key to one of the most important and powerful systems of meta-progression in the game.
This guide aims to be the very best guide on Blueprints you can find, starting with a primer on what exactly they are and how they work in Arc Raiders, before delving into exactly where to get Blueprints and the very best farming spots for you to take in your search.
We’ll also go over how to get Blueprints from other unlikely activities, such as destroying Surveyors and completing specific quests. And you’ll also find the full list of all 75 Blueprints in Arc Raiders on this page (including the newest Blueprints added with the Cold Snap update , such as the Deadline Blueprint and Firework Box Blueprint), giving you all the information you need to expand your own crafting repertoire.
In this guide:
- What are Blueprints in Arc Raiders?
- Full Blueprint list: All crafting recipes
- Where to find Blueprints in Arc Raiders Blueprints obtained from quests Blueprints obtained from Trials Best Blueprint farming locations

What are Blueprints in Arc Raiders?
Blueprints in Arc Raiders are special items which, if you manage to extract with them, you can expend to permanently unlock a new crafting recipe in your Workshop. If you manage to extract from a raid with an Anvil Blueprint, for example, you can unlock the ability to craft your very own Anvil Pistol, as many times as you like (as long as you have the crafting materials).
To use a Blueprint, simply open your Inventory while in the lobby, then right-click on the Blueprint and click “Learn And Consume” . This will permanently unlock the recipe for that item in your Workshop. As of the Stella Montis update, there are allegedly 75 different Blueprints to unlock - although only 68 are confirmed to be in the game so far. You can see all the Blueprints you’ve found and unlocked by going to the Workshop menu, and hitting “R” to bring up the Blueprint screen.
It’s possible to find duplicates of past Blueprints you’ve already unlocked. If you find these, then you can either sell them, or - if you like to play with friends - you can take it into a match and gift it to your friend so they can unlock that recipe for themselves. Another option is to keep hold of them until the time comes to donate them to the Expedition.
Full Blueprint list: All crafting recipes
Below is the full list of all the Blueprints that are currently available to find in Arc Raiders, and the crafting recipe required for each item:
| Blueprint | Type | Recipe | Crafted At |
|---|---|---|---|
| Bettina | Weapon | 3x Advanced Mechanical Components 3x Heavy Gun Parts 3x Canister | Gunsmith 3 |
| Blue Light Stick | Quick Use | 3x Chemicals | Utility Station 1 |
| Aphelion | Weapon | 3x Magnetic Accelerator 3x Complex Gun Parts 1x Matriarch Reactor | Gunsmith 3 |
| Combat Mk. 3 (Flanking) | Augment | 2x Advanced Electrical Components 3x Processor | Gear Bench 3 |
| Combat Mk. 3 (Aggressive) | Augment | 2x Advanced Electrical Components 3x Processor | Gear Bench 3 |
| Complex Gun Parts | Material | 2x Light Gun Parts 2x Medium Gun Parts 2x Heavy Gun Parts | Refiner 3 |
| Fireworks Box | Quick Use | 1x Explosive Compound 3x Pop Trigger | Explosives Station 2 |
| Gas Mine | Mine | 4x Chemicals 2x Rubber Parts | Explosives Station 1 |
| Green Light Stick | Quick Use | 3x Chemicals | Utility Station 1 |
| Pulse Mine | Mine | 1x Crude Explosives 1x Wires | Explosives Station 1 |
| Seeker Grenade | Grenade | 1x Crude Explosives 2x ARC Alloy | Explosives Station 1 |
| Looting Mk. 3 (Survivor) | Augment | 2x Advanced Electrical Components 3x Processor | Gear Bench 3 |
| Angled Grip II | Mod | 2x Mechanical Components 3x Duct Tape | Gunsmith 2 |
| Angled Grip III | Mod | 2x Mod Components 5x Duct Tape | Gunsmith 3 |
| Hullcracker | Weapon | 1x Magnetic Accelerator 3x Heavy Gun Parts 1x Exodus Modules | Gunsmith 3 |
| Launcher Ammo | Ammo | 5x Metal Parts 1x Crude Explosives | Workbench 1 |
| Anvil | Weapon | 5x Mechanical Components 5x Simple Gun Parts | Gunsmith 2 |
| Anvil Splitter | Mod | 2x Mod Components 3x Processor | Gunsmith 3 |
| ??? | ??? | ??? | ??? |
| Barricade Kit | Quick Use | 1x Mechanical Components | Utility Station 2 |
| Blaze Grenade | Grenade | 1x Explosive Compound 2x Oil | Explosives Station 3 |
| Bobcat | Weapon | 3x Advanced Mechanical Components 3x Light Gun Parts | Gunsmith 3 |
| Osprey | Weapon | 2x Advanced Mechanical Components 3x Medium Gun Parts 7x Wires | Gunsmith 3 |
| Burletta | Weapon | 3x Mechanical Components 3x Simple Gun Parts | Gunsmith 1 |
| Compensator II | Mod | 2x Mechanical Components 4x Wires | Gunsmith 2 |
| Compensator III | Mod | 2x Mod Components 8x Wires | Gunsmith 3 |
| Defibrillator | Quick Use | 9x Plastic Parts 1x Moss | Medical Lab 2 |
| ??? | ??? | ??? | ??? |
| Equalizer | Weapon | 3x Magnetic Accelerator 3x Complex Gun Parts 1x Queen Reactor | Gunsmith 3 |
| Extended Barrel | Mod | 2x Mod Components 8x Wires | Gunsmith 3 |
| Extended Light Mag II | Mod | 2x Mechanical Components 3x Steel Spring | Gunsmith 2 |
| Extended Light Mag III | Mod | 2x Mod Components 5x Steel Spring | Gunsmith 3 |
| Extended Medium Mag II | Mod | 2x Mechanical Components 3x Steel Spring | Gunsmith 2 |
| Extended Medium Mag III | Mod | 2x Mod Components 5x Steel Spring | Gunsmith 3 |
| Extended Shotgun Mag II | Mod | 2x Mechanical Components 3x Steel Spring | Gunsmith 2 |
| Extended Shotgun Mag III | Mod | 2x Mod Components 5x Steel Spring | Gunsmith 3 |
| Remote Raider Flare | Quick Use | 2x Chemicals 4x Rubber Parts | Utility Station 1 |
| Heavy Gun Parts | Material | 4x Simple Gun Parts | Refiner 2 |
| Venator | Weapon | 2x Advanced Mechanical Components 3x Medium Gun Parts 5x Magnet | Gunsmith 3 |
| Il Toro | Weapon | 5x Mechanical Components 6x Simple Gun Parts | Gunsmith 1 |
| Jolt Mine | Mine | 1x Electrical Components 1x Battery | Explosives Station 2 |
| Explosive Mine | Mine | 1x Explosive Compound 1x Sensors | Explosives Station 3 |
| Jupiter | Weapon | 3x Magnetic Accelerator 3x Complex Gun Parts 1x Queen Reactor | Gunsmith 3 |
| Light Gun Parts | Material | 4x Simple Gun Parts | Refiner 2 |
| Lightweight Stock | Mod | 2x Mod Components 5x Duct Tape | Gunsmith 3 |
| Lure Grenade | Grenade | 1x Speaker Component 1x Electrical Components | Utility Station 2 |
| Medium Gun Parts | Material | 4x Simple Gun Parts | Refiner 2 |
| Torrente | Weapon | 2x Advanced Mechanical Components 3x Medium Gun Parts 6x Steel Spring | Gunsmith 3 |
| Muzzle Brake II | Mod | 2x Mechanical Components 4x Wires | Gunsmith 2 |
| Muzzle Brake III | Mod | 2x Mod Components 8x Wires | Gunsmith 3 |
| Padded Stock | Mod | 2x Mod Components 5x Duct Tape | Gunsmith 3 |
| Shotgun Choke II | Mod | 2x Mechanical Components 4x Wires | Gunsmith 2 |
| Shotgun Choke III | Mod | 2x Mod Components 8x Wires | Gunsmith 3 |
| Shotgun Silencer | Mod | 2x Mod Components 8x Wires | Gunsmith 3 |
| Showstopper | Grenade | 1x Advanced Electrical Components 1x Voltage Converter | Explosives Station 3 |
| Silencer I | Mod | 2x Mechanical Components 4x Wires | Gunsmith 2 |
| Silencer II | Mod | 2x Mod Components 8x Wires | Gunsmith 3 |
| Snap Hook | Quick Use | 2x Power Rod 3x Rope 1x Exodus Modules | Utility Station 3 |
| Stable Stock II | Mod | 2x Mechanical Components 3x Duct Tape | Gunsmith 2 |
| Stable Stock III | Mod | 2x Mod Components 5x Duct Tape | Gunsmith 3 |
| Tagging Grenade | Grenade | 1x Electrical Components 1x Sensors | Utility Station 3 |
| Tempest | Weapon | 3x Advanced Mechanical Components 3x Medium Gun Parts 3x Canister | Gunsmith 3 |
| Trigger Nade | Grenade | 2x Crude Explosives 1x Processor | Explosives Station 2 |
| Vertical Grip II | Mod | 2x Mechanical Components 3x Duct Tape | Gunsmith 2 |
| Vertical Grip III | Mod | 2x Mod Components 5x Duct Tape | Gunsmith 3 |
| Vita Shot | Quick Use | 2x Antiseptic 1x Syringe | Medical Lab 3 |
| Vita Spray | Quick Use | 3x Antiseptic 1x Canister | Medical Lab 3 |
| Vulcano | Weapon | 1x Magnetic Accelerator 3x Heavy Gun Parts 1x Exodus Modules | Gunsmith 3 |
| Wolfpack | Grenade | 2x Explosive Compound 2x Sensors | Explosives Station 3 |
| Red Light Stick | Quick Use | 3x Chemicals | Utility Station 1 |
| Smoke Grenade | Grenade | 14x Chemicals 1x Canister | Utility Station 2 |
| Deadline | Mine | 3x Explosive Compound 2x ARC Circuitry | Explosives Station 3 |
| Trailblazer | Grenade | 1x Explosive Compound 1x Synthesized Fuel | Explosives Station 3 |
| Tactical Mk. 3 (Defensive) | Augment | 2x Advanced Electrical Components 3x Processor | Gear Bench 3 |
| Tactical Mk. 3 (Healing) | Augment | 2x Advanced Electrical Components 3x Processor | Gear Bench 3 |
| Yellow Light Stick | Quick Use | 3x Chemicals | Utility Station 1 |
Note: The missing Blueprints in this list likely have not actually been added to the game at the time of writing, because none of the playerbase has managed to find any of them. As they are added to the game, I will update this page with the most relevant information so you know exactly how to get all 75 Arc Raiders Blueprints.
Where to find Blueprints in Arc Raiders
Below is a list of all containers, modifiers, and events which maximise your chances of finding Blueprints:
- Certain quests reward you with specific Blueprints .
- Completing Trials has a high chance of offering Blueprints as rewards.
- Surveyors have a decent chance of dropping Blueprints on death.
- High loot value areas tend to have a greater chance of spawning Blueprints.
- Night Raids and Storms may increase rare Blueprint spawn chances in containers.
- Containers with higher numbers of items may have a higher tendency to spawn Blueprints. As a result, Blue Gate (which has many “large” containers containing multiple items) may give you a higher chance of spawning Blueprints.
- Raider containers (Raider Caches, Weapon Boxes, Medical Bags, Grenade Tubes) have increased Blueprint drop rates. As a result, the Uncovered Caches event gives you a high chance of finding Blueprints.
- Security Lockers have a higher than average chance of containing Blueprints.
- Certain Blueprints only seem to spawn under specific circumstances: Tempest Blueprint only spawns during Night Raid events. Vulcano Blueprint only spawns during Hidden Bunker events. Jupiter and Equaliser Blueprints only spawn during Harvester events.

Raider Caches, Weapon Boxes, and other raider-oriented container types have a good chance of offering Blueprints. |Image credit:Rock Paper Shotgun/Embark Studios
Blueprints have a very low chance of spawning in any container in Arc Raiders, around 1-2% on average. However, there is a higher chance of finding Blueprints in particular container types. Specifically, you can find more Blueprints in Raider containers and security lockers.
Beyond this, if you’re looking for Blueprints you should focus on regions of the map which are marked as having particularly high-value loot. Areas such as the Control Tower in Dam Battlegrounds, the Arrival and Departure Buildings in Spaceport, and Pilgrim’s Peak in Blue Gate all have a better-than-average chance of spawning Blueprints somewhere amongst all their containers. Night Raids and Electromagnetic Storm events also increase the drop chances of certain Blueprints .
In addition to these containers, you can often loot Blueprints from destroyed Surveyors - the largest of the rolling ball ARC. Surveyors are more commonly found on the later maps - Spaceport and Blue Gate - and if one spawns in your match, you’ll likely see it by the blue laser beam that it casts into the sky while “surveying”.
Surveyors are quite well-armoured and will very speedily run away from you once it notices you, but if you can take one down then make sure you loot all its parts for a chance of obtaining certain unusual Blueprints.
Blueprints obtained from quests
One way in which you can get Blueprints is by completing certain quests for the vendors in Speranza. Some quests will reward you with a specific item Blueprint upon completion, so as long as you work through all the quests in Arc Raiders, you are guaranteed those Blueprints.
Here is the full list of all Blueprints you can get from quest rewards:
- Trigger Nade Blueprint: Rewarded after completing “Sparks Fly”.
- Lure Grenade Blueprint: Rewarded after completing “Greasing Her Palms”.
- Burletta Blueprint: Rewarded after completing “Industrial Espionage”.
- Hullcracker Blueprint (and Launcher Ammo Blueprint): Rewarded after completing “The Major’s Footlocker”.
Alas, that’s only 4 Blueprints out of a total of 75 to unlock, so for the vast majority you will need to find them yourself during a raid. If you’re intent on farming Blueprints, then it’s best to equip yourself with cheap gear in case you lose it, but don’t use a free loadout because then you won’t get a safe pocket to stash any new Blueprint you find. No pain in Arc Raiders is sharper than failing to extract with a new Blueprint you’ve been after for a dozen hours already.

One of the best ways to get Blueprints is by hitting three stars on all five Trials every week. |Image credit:Rock Paper Shotgun/Embark Studios
Blueprints obtained from Trials
One of the very best ways to get Blueprints is as rewards for completing Trials in Arc Raiders. Trials are unlocked from Level 15 onwards, and allow you to earn rewards by focusing on certain tasks over the course of several raids. For example, one Trial might task you with dealing damage to Hornets, while another might challenge you to loot Supply Drops.
Trials refresh on a weekly basis, with a new week bringing five new Trials. Each Trial can offer up to three rewards after passing certain score milestones, and it’s possible to receive very high level loot from these reward crates - including Blueprints. So if you want to unlock as many Blueprints as possible, you should make a point of completing as many Trials as possible each week.
Best Blueprint farming locations
The very best way to get Blueprints is to frequent specific areas of the maps which combine high-tier loot pools with the right types of containers to search. Here are my recommendations for where to find Blueprints on every map, so you can always keep the search going for new crafting recipes to unlock.

Image credit:Rock Paper Shotgun/Embark Studios
Dam Battlegrounds
The best places to farm Blueprints on Dam Battlegrounds are the Control Tower, Power Generation Complex, Ruby Residence, and Pale Apartments . The first two regions, despite only being marked on the map as mid-tier loot, contain a phenomenal number of containers to loot. The Control Tower can also contain a couple of high-tier Security Lockers - though of course, you’ll need to have unlocked the Security Breach skill at the end of the Survival tree.
There’s also a lot of reporting amongst the playerbase that the Residential areas in the top-left of the map - Pale Apartments and Ruby Residence - give you a comparatively strong chance of finding Blueprints. Considering their size, there’s a high density of containers to loot in both locations, and they also have the benefit of being fairly out of the way. So you’re more likely to have all the containers to yourself.
Buried City
The best Blueprint farming locations on Buried City are the Santa Maria Houses, Grandioso Apartments, Town Hall, and the various buildings of the New District . Grandioso Apartments has a lower number of containers than the rest, but a high chance of spawning weapon cases - which have good Blueprint drop rates. The others are high-tier loot areas, with plenty of lootable containers - including Security Lockers.
Spaceport
The best places to find Blueprints on Spaceport are the Arrival and Departure Buildings, as well as Control Tower A6 and the Launch Towers . All these areas are labelled as high-value loot regions, and many of them are also very handily connected to one another by the Spaceport wall, which you can use to quickly run from one area to the next. At the tops of most of these buildings you’ll find at least one Security Locker, so this is an excellent farming route for players looking to find Blueprints.
The downside to looting Blueprints on Spaceport is that all these areas are hotly contested, particularly in Duos and Squads. You’ll need to be very focused and fast in order to complete the full farming route.

Image credit:Rock Paper Shotgun/Embark Studios
Blue Gate
Blue Gate tends to have a good chance of dropping Blueprints, potentially because it generally has a high number of containers which can hold lots of items; so there’s a higher chance of a Blueprint spawning in each container. In my experience, the best Blueprint farming spots on Blue Gate are Pilgrim’s Peak, Raider’s Refuge, the Ancient Fort, and the Underground Complex beneath the Warehouse .
All of these areas contain a wealth of containers to loot. Raider’s Refuge has less to loot, but the majority of the containers in and around the Refuge are raider containers, which have a high chance of containing Blueprints - particularly during major events.
Stella Montis
On the whole, Stella Montis seems to have a very low drop rate for Blueprints (though a high chance of dropping other high-tier loot). If you do want to try farming Blueprints on this map, the best places to find Blueprints in Stella Montis are Medical Research, Assembly Workshop, and the Business Center . These areas have the highest density of containers to loot on the map.
In addition to this, the Western Tunnel has a few different Security Lockers to loot, so while there’s very little to loot elsewhere in this area of the map, it’s worth hitting those Security Lockers if you spawn there at the start of a match.
That wraps up this primer on how to get all the Blueprints in Arc Raiders as quickly as possible. With the Expedition system constantly resetting a large number of players’ Blueprints, it’s more important than ever to have the most up-to-date information on where to find all these Blueprints.
While you’re here, be sure to check out our Arc Raiders best guns tier list , as well as our primers on the best skills to unlock and all the different Field Depot locations on every map.

ARC Raiders
PS5 , Xbox Series X/S , PC
Rock Paper Shotgun is better when you sign in
Sign in and join us on our journey to discover strange and compelling PC games.
