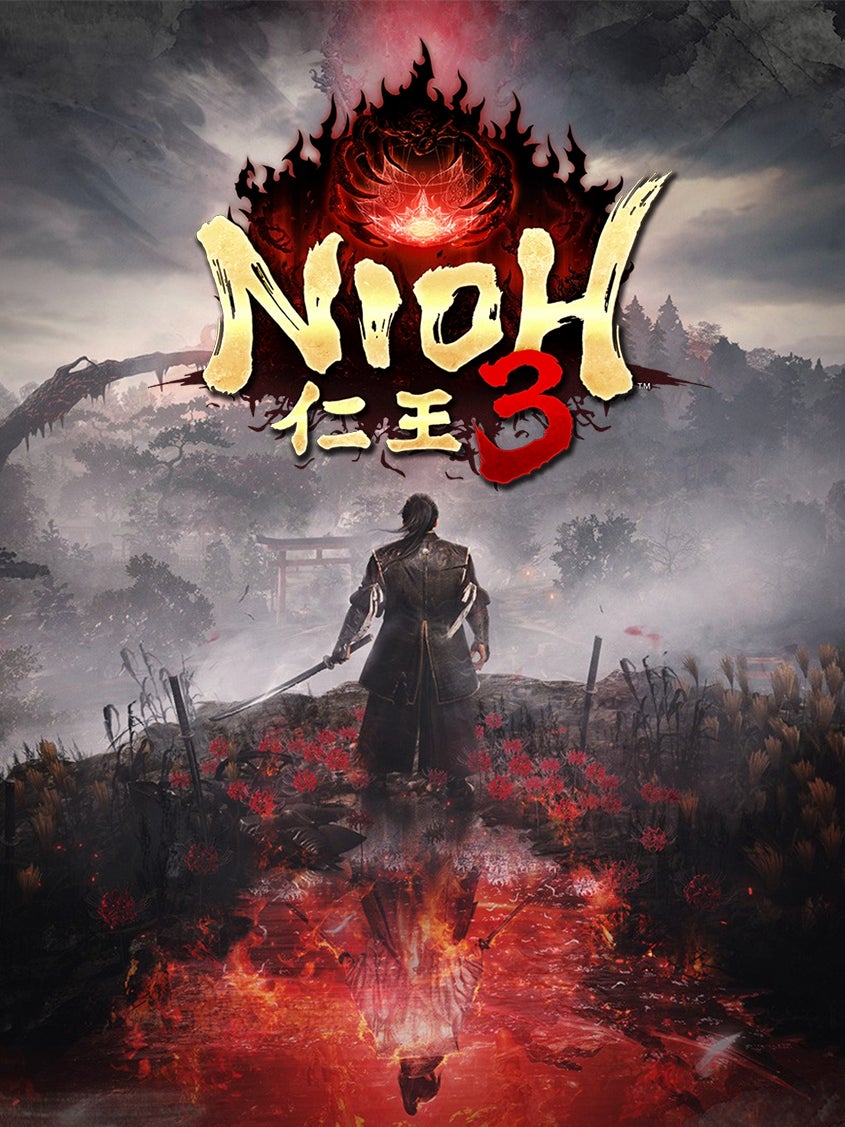
Nioh 3: All bosses, Masters, and Formidable Enemies in order
All bosses from every era of the game

Image credit:Rock Paper Shotgun/Koei Tecmo

Want a full list of all of Nioh 3’s bosses and their locations in order? The world of Nioh 3 is full of devious yokai who want to bring your shogun-in-training down to size. From possessed generals right out of Japanese history to hags with sinuous fire and ice heads, there’s a wide variety of bosses on display - not to mention Formidable Enemies, which are difficult foes that you can run into by completing sidequests, called Myths, or simply by exploring the wide open world. Then there are Masters, who are expert human opponents designed to put your Martial Arts and Ninjutsu techniques to the test.
This guide aims to be a definitive list of all bosses, Formidable Enemies, and Masters in Nioh 3 , in all of the game’s time periods, including Edo, the Warring States, Heian, Antiquity, and the Bakumatsu era. We’ve also listed all boss locations, so you know how to hunt down each and every one of these opponents to test your mettle.
All Nioh 3 bosses and locations in order
The table below lists all bosses, Formidable Enemies, and Masters found across Nioh 3 in the rough order that you come across them, as well as the eras that they appear in and boss locations. There’s tremendous freedom in Nioh 3’s open world, and since many of these bosses are missable on a playthrough, we’ve also marked which are mandatory and optional. Also, in our goal to be as comprehensive as possible, we’ve defined “bosses and Formidable Enemies” as anything with a health bar that appears atop the screen when you’re fighting them.
This boss list is a work in progress! So far, we’ve listed as many bosses as we could from the first two eras of the game, the Warring States and the Heian period. We’ll update this guide over time with those that we’ve missed, and we’ll add additional bosses for Nioh 3’s other eras soon!
| Order | Boss | Era | Location | Type |
|---|---|---|---|---|
| 1 | Tokugawa Kunimatsu | Edo | Prologue | Mandatory |
| 2 | Yamagata Masakage | Warring States | Hitokoto Slope | Mandatory |
| 3 | Yoki | Warring States | Hamamatsu | Optional |
| 4 | Green Shadows Blade | Warring States | Tokaido | Optional |
| 5 | Mezuki | Warring States | Tokaido | Optional |
| 6 | Jakotsu-Baba | Warring States | Hamamatsu Crucible | Mandatory |
| 7 | Kamaitachi | Warring States | Maisaka | Optional |
| 8 | Hino-enma | Warring States | Maisaka | Optional |
| 9 | Blood-Spurting Ogin | Warring States | Hamamatsu Hill | Optional |
| 10 | Ryomen Sukunema | Warring States | Iinoya | Optional |
| 11 | Kyokotsu | Warring States | Futamata | Optional |
| 12 | Itto Itosai | Warring States | Futamata | Optional |
| 13 | Anayama Nobutada | Warring States | Futamata | Mandatory |
| 14 | Baba Nobuhara | Warring States | Futamata | Mandatory |
| 15 | Naito Masatoyo | Warring States | Futamata or Mikatagahara Crucible | Optional |
| 16 | Yamagata Masakage 2 | Warring States | Mikatagahara | Mandatory |
| 17 | Takeda Shingen | Warring States | Mikatagahara | Mandatory |
| 18 | Takeda Shingen 2 | Warring States | Saigagake | Mandatory |
| 19 | Bloodedge Demon | Varies | Varies | Optional |
| 20 | Great Tengu | Heian | Mount Kurama | Mandatory |
| 21 | All-Seeing Mage | Heian | Kamo Village | Optional |
| 22 | Yasha | Heian | Funaokayama | Optional |
| 23 | Tomoe Gozen | Heian | Kamo Village | Optional |
| 24 | Onryoki | Heian | Sagano | Optional |
| 25 | Otoroshi | Heian | Sagano | Mandatory |
| 26 | One-Eyed Oni & Gaki | Heian | Nishiichi | Optional |
| 27 | Ibaraki Doji | Heian | Hachijo | Mandatory |
1. Tokugawa Kunimatsu

Your angry brother challenges you for control of the shogunate in the ultimate sibling rivalry. |Image credit:Rock Paper Shotgun/Koei Tecmo
Tokugawa Kunimatsu is one of those beginning Soulslike bosses that you’re not expected to beat. But for all those gluttons for punishment, know that at 50% he’ll summon his Guardian Spirit and start inflicting poison attacks. If you really want to try your luck, fight him as a Ninja, as Samurai are too slow. Whether you win or lose, the outcome is the same - he’ll get all emo, rage at you, and the game will continue.
2. Yamagata Masakage
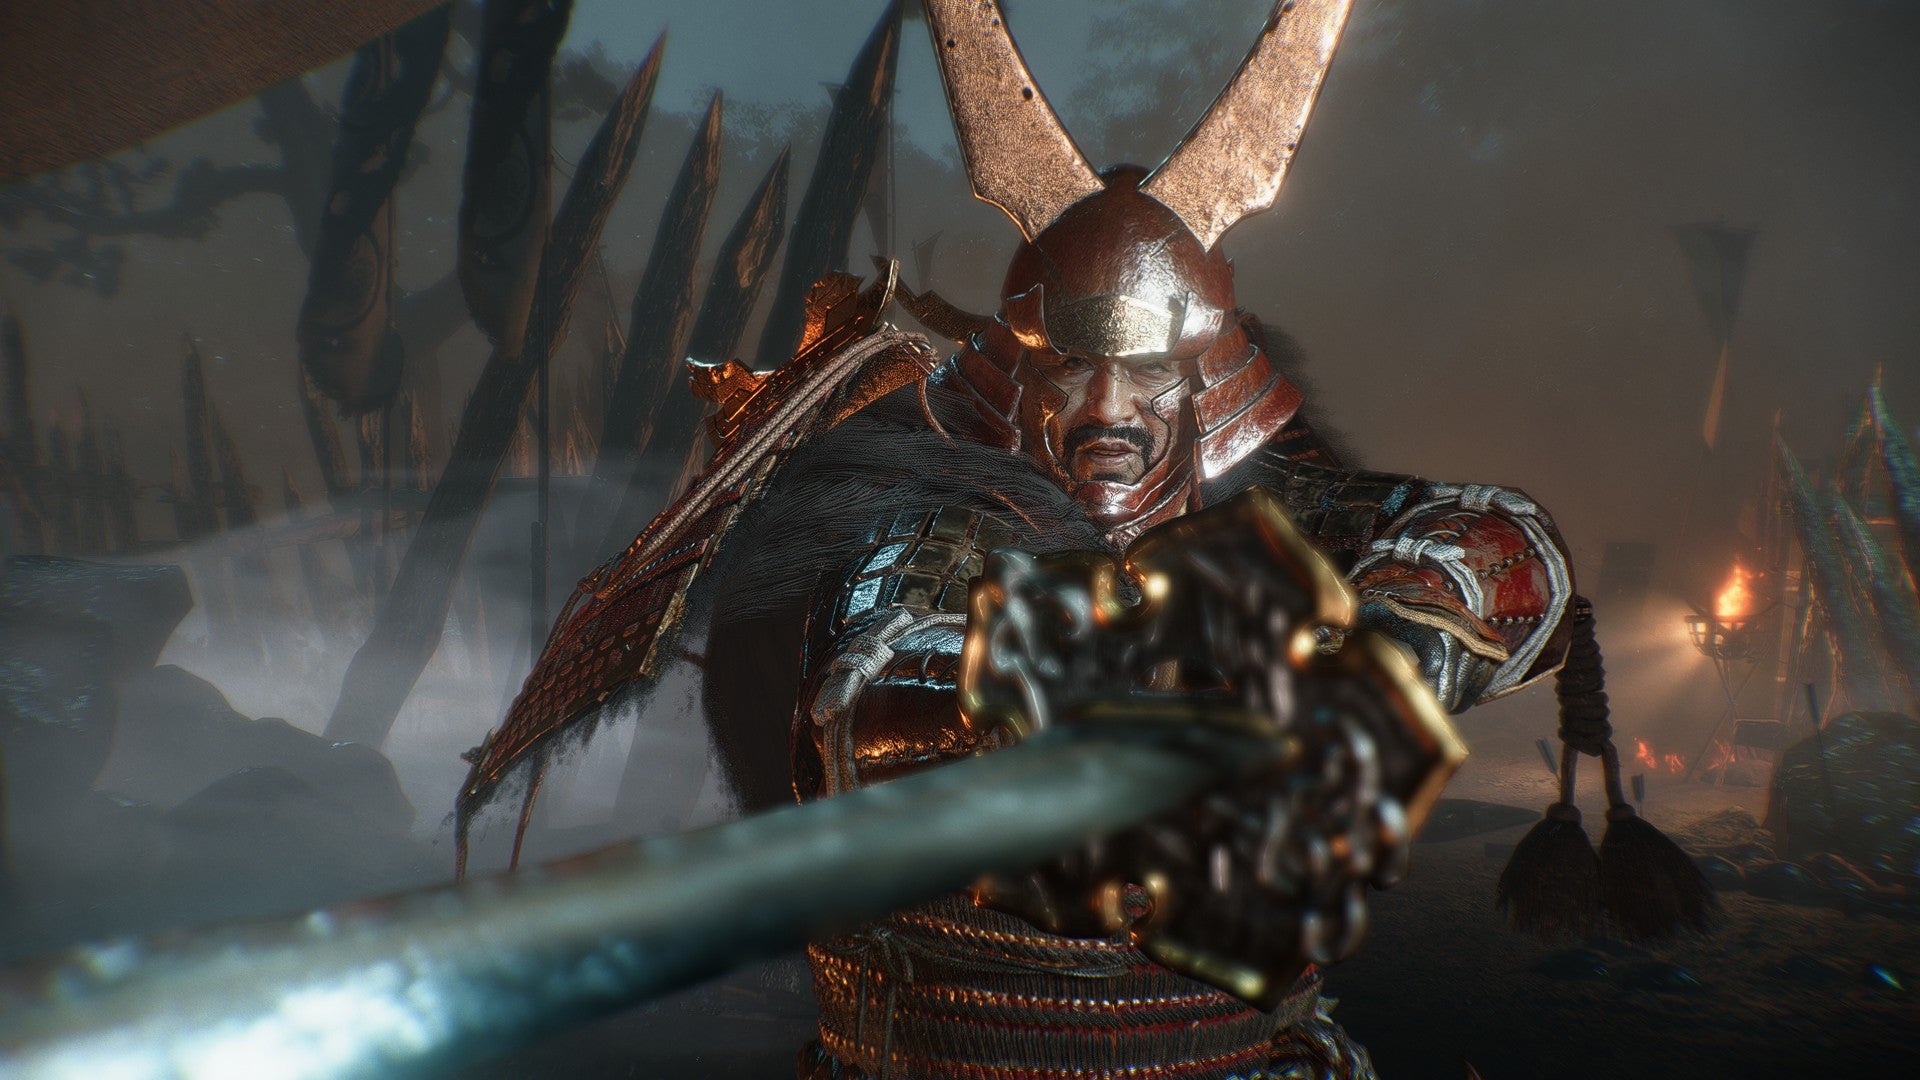
A wall for newbie players to step up their game, Yamagata Masakage is a pain. |Image credit:Rock Paper Shotgun/Koei Tecmo
This beefy red-armoured guy serves as the first real boss and a wake-up call to start mastering Nioh 3’s mechanics. Take a look at our guide on how to beat Yamagata Masakage for a full breakdown of his tactics. In brief, try to get Ninja backstabs, time your Burst Breaks well to activate Living Artifact, and when in doubt, summon an Acolyte for assistance. There’s a reason why the road outside his arena is littered with Bloody Graves, which you can farm for Ochokyo Cups to summon Acolytes .
3. Yoki
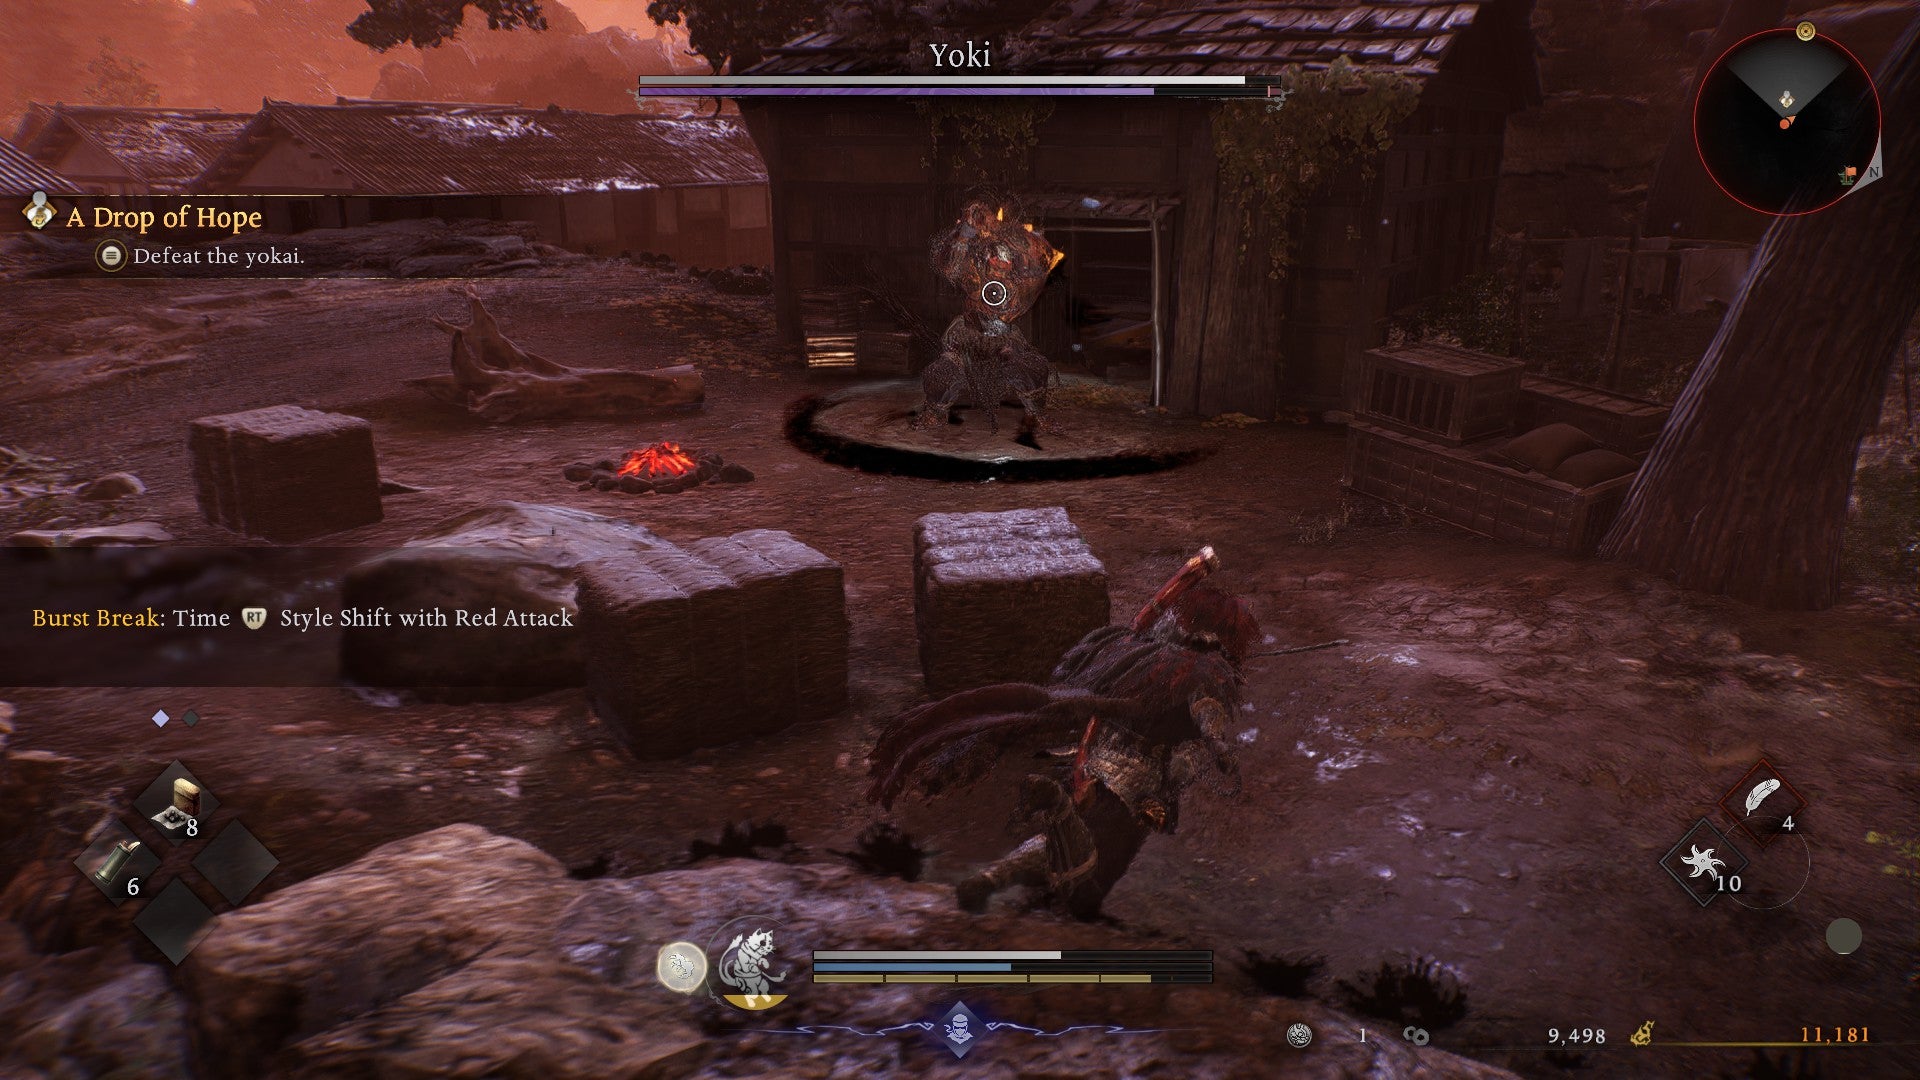
A pretty easy foe, though at this point in the game you’re still weak, so be wary. |Image credit:Rock Paper Shotgun/Koei Tecmo
An oni encountered at the sidequest A Drop of Hope, which sees you gathering medicine for a wraith in Hamamatsu Village. You’ve got to explore all houses in the village until you finally encounter this fellow, who is only a tad harder than the normal foes lurking about the area. (I had more trouble beating Yamainu , the big wolf who lurks nearby.)
4. Green Shadows Blade

This fellow seems like he wants a fair duel. Shoot him in the head to start the fight, why don’t ya. |Image credit:Rock Paper Shotgun/Koei Tecmo
Green Shadows Blade is the first of several Formidable Enemies who hang around the map, waiting for a strong warrior to challenge them. You can find him southeast of the Forest of Souls Shrine, sitting by a campfire. Luckily, you can sneak up and get a backstab or headshot him from afar, which gives you an advantage from the getgo. Afterwards, use charged heavy attacks as a Samurai to bring him down.
5. Mezuki
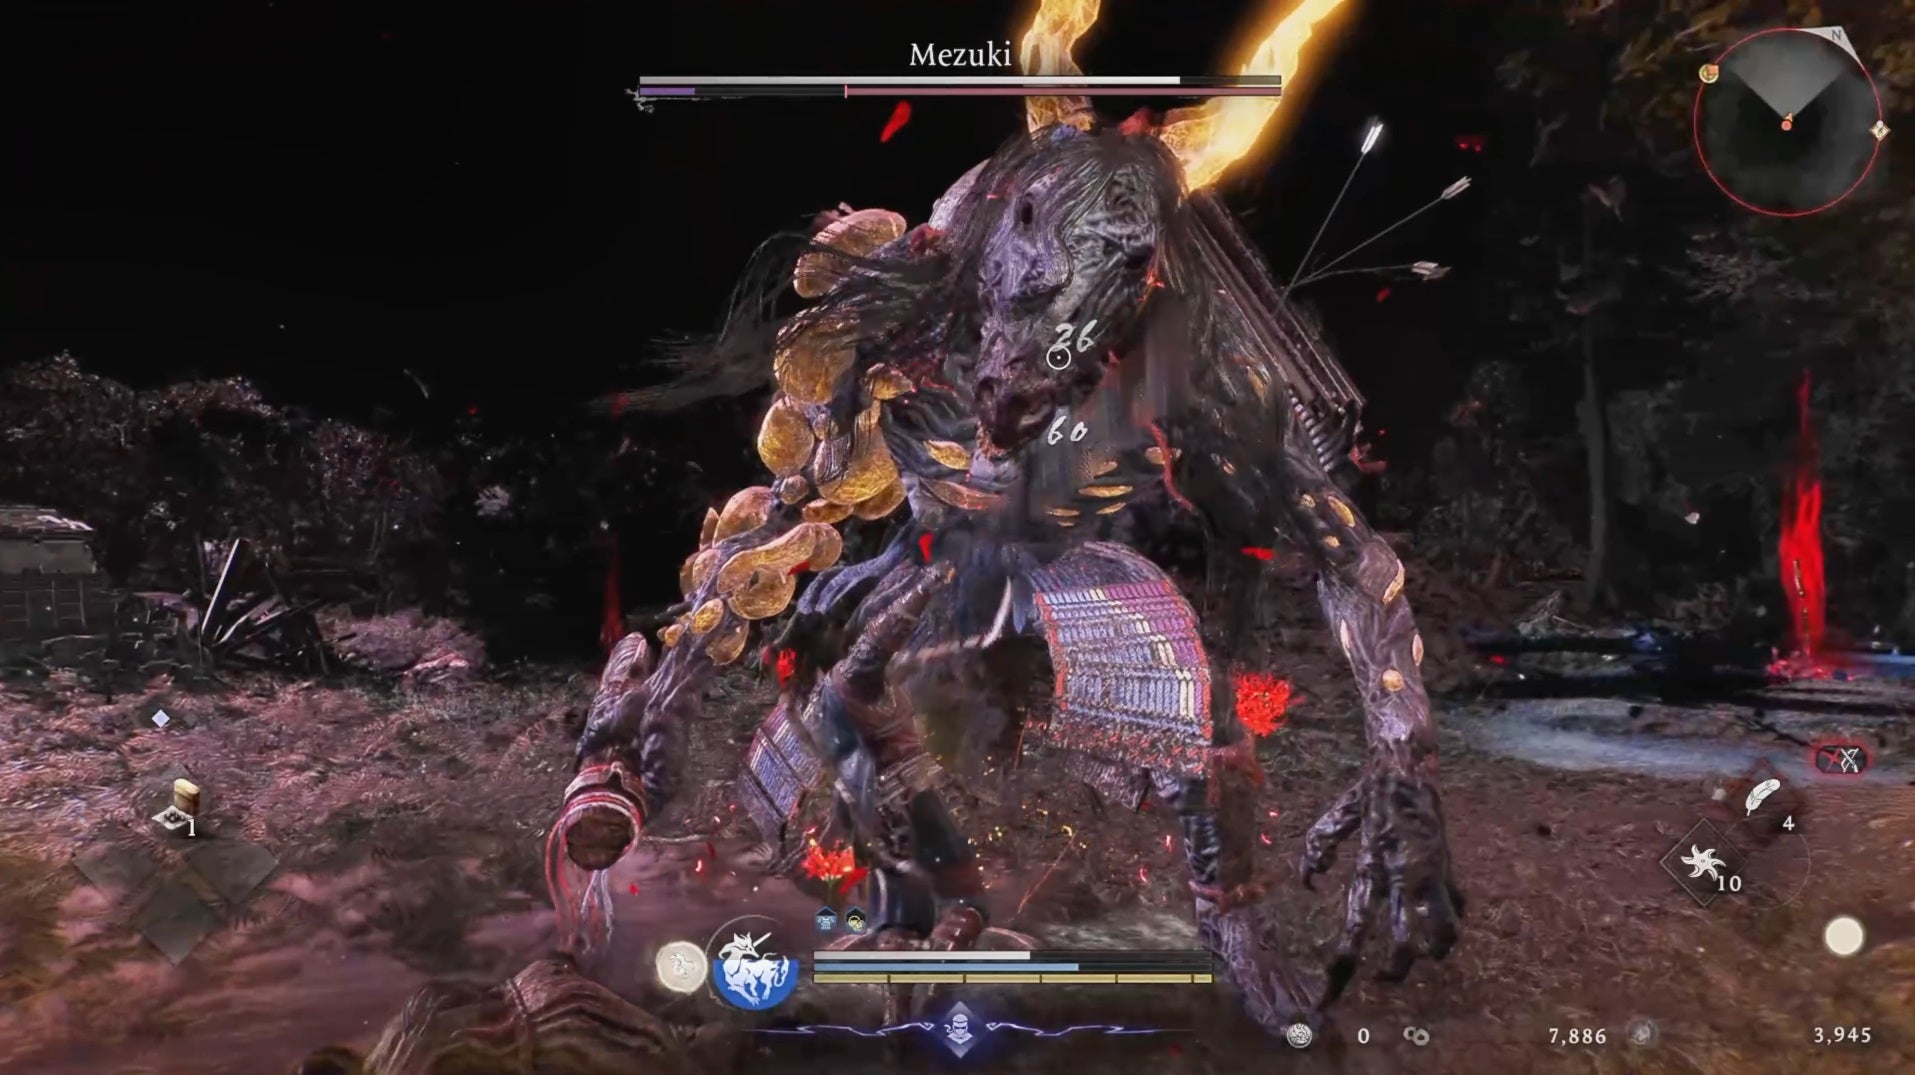
Now that’s one rotting lump of horse meat… |Image credit:Rock Paper Shotgun/Koei Tecmo
Mezuki is a large horse-faced yokai who can be found beneath the pagoda on the map of Tokaido. This is a good chance to get good at fighting large, oversized enemies - stay close, slash away as a Samurai, never miss a chance to use Deflect, and avoid those large sweeping swings. There are plenty of opportunities for Burst Breaks here that will disable Mezuki and let you shift between Samurai and Ninja forms.
6. Jakotsu-Baba

Jakotsu-Baba, a fiery hag with two snake heads sticking out of her back! She should probably get that checked out. |Image credit:Rock Paper Shotgun/Koei Tecmo
The techniques that you learned against Mezuki will come in handy for Jakotsu-Baba, who marks the end of your first Crucible mission. Watch out for her serpent-like heads, which lash across the battlefield with great prejudice, and see if you can use your Mist as a Ninja to sweep around her for a few backstabs. As the fight rages on she’ll unleash fire and ice elemental attacks from both of her heads and also summon the Dark Realm, after which an Amrita crystal appears on her head. Bash it to cause huge damage and wreck her Ki bar.
7. Kamaitachi
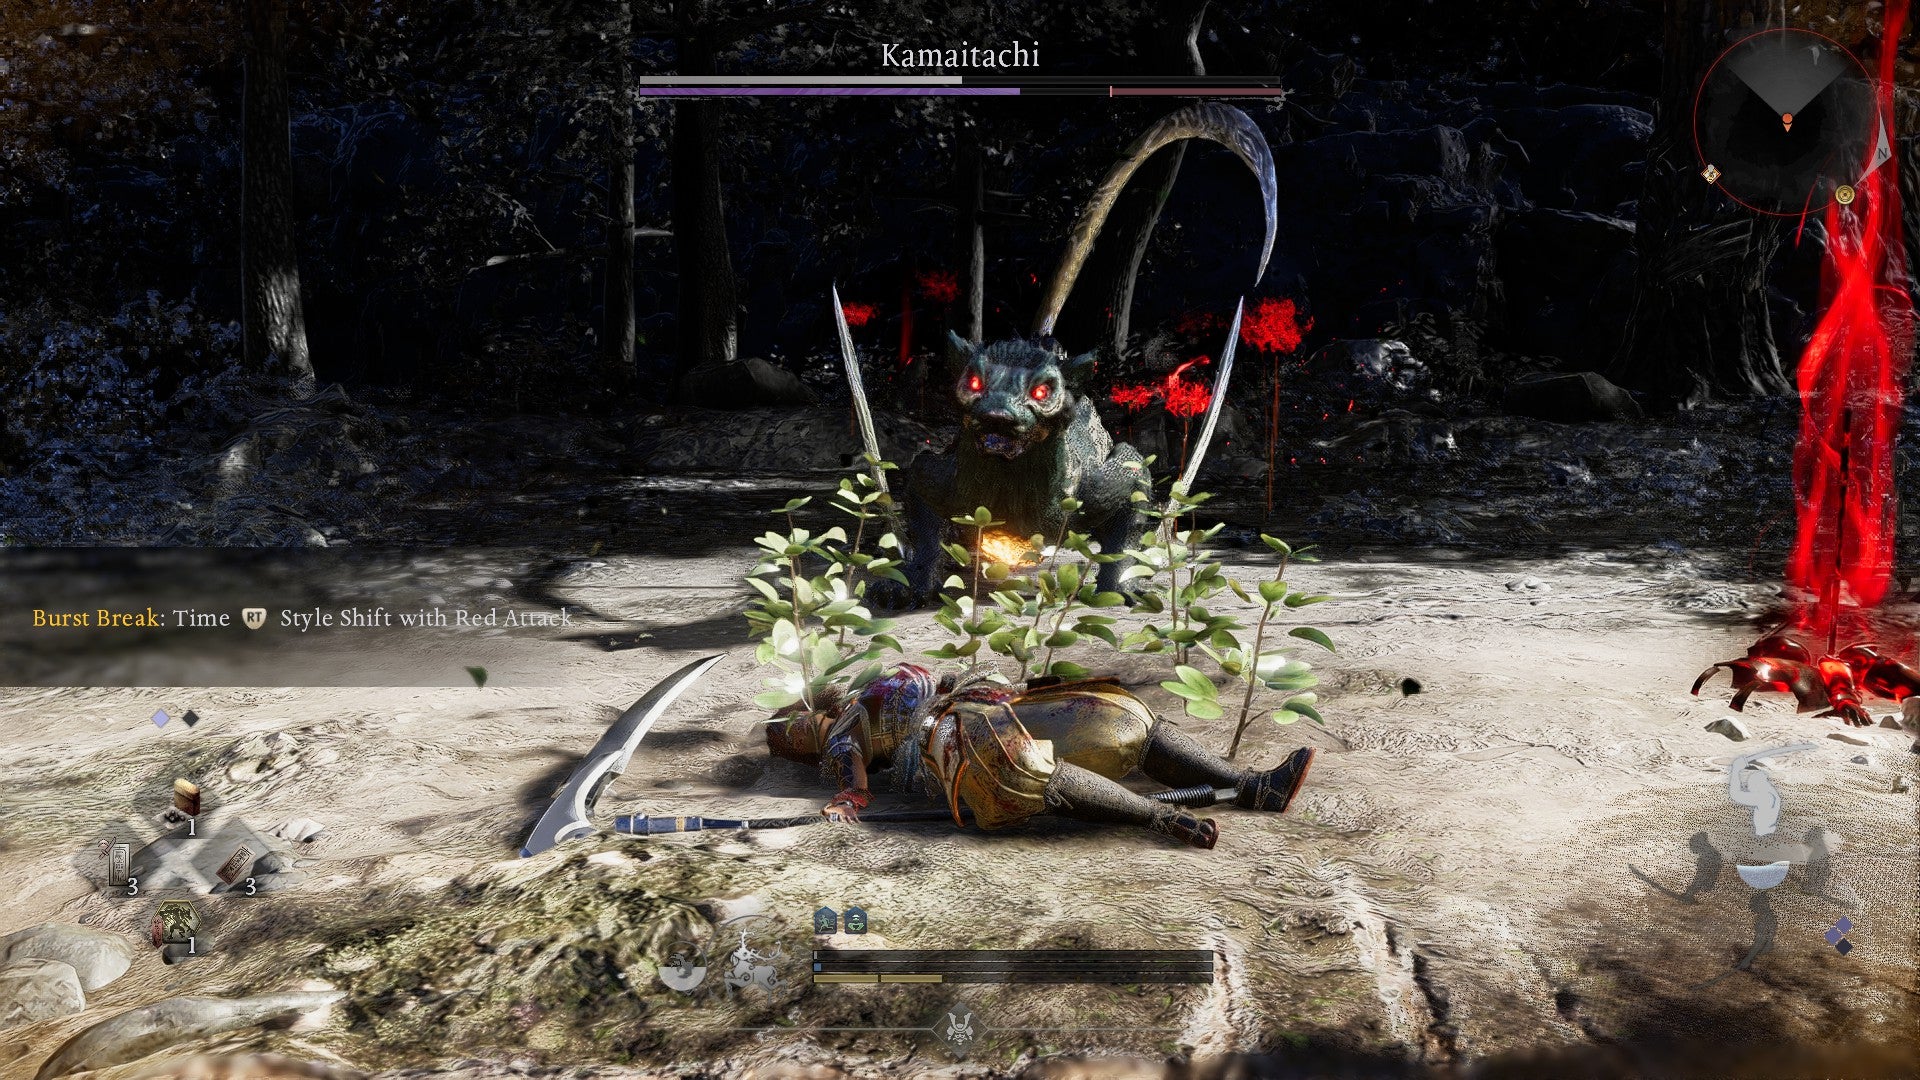
Kamaitachi kind of reminds me of a Displacer Beast, just with more wind-based attacks. |Image credit:Rock Paper Shotgun/Koei Tecmo
You can bump into Kamaitachi lurking around Maisaka, east of the Maisaka Junction Shrine. This big cat is ridiculously fast and will regularly unleash wind barrages against you, making the fight harder than it needs to be. A Ninja can keep up with Kamaitachi’s speed, while Samurai have their work cut out for them trying to Deflect a wide variety of projectiles slicing their way.
8. Hino-enma
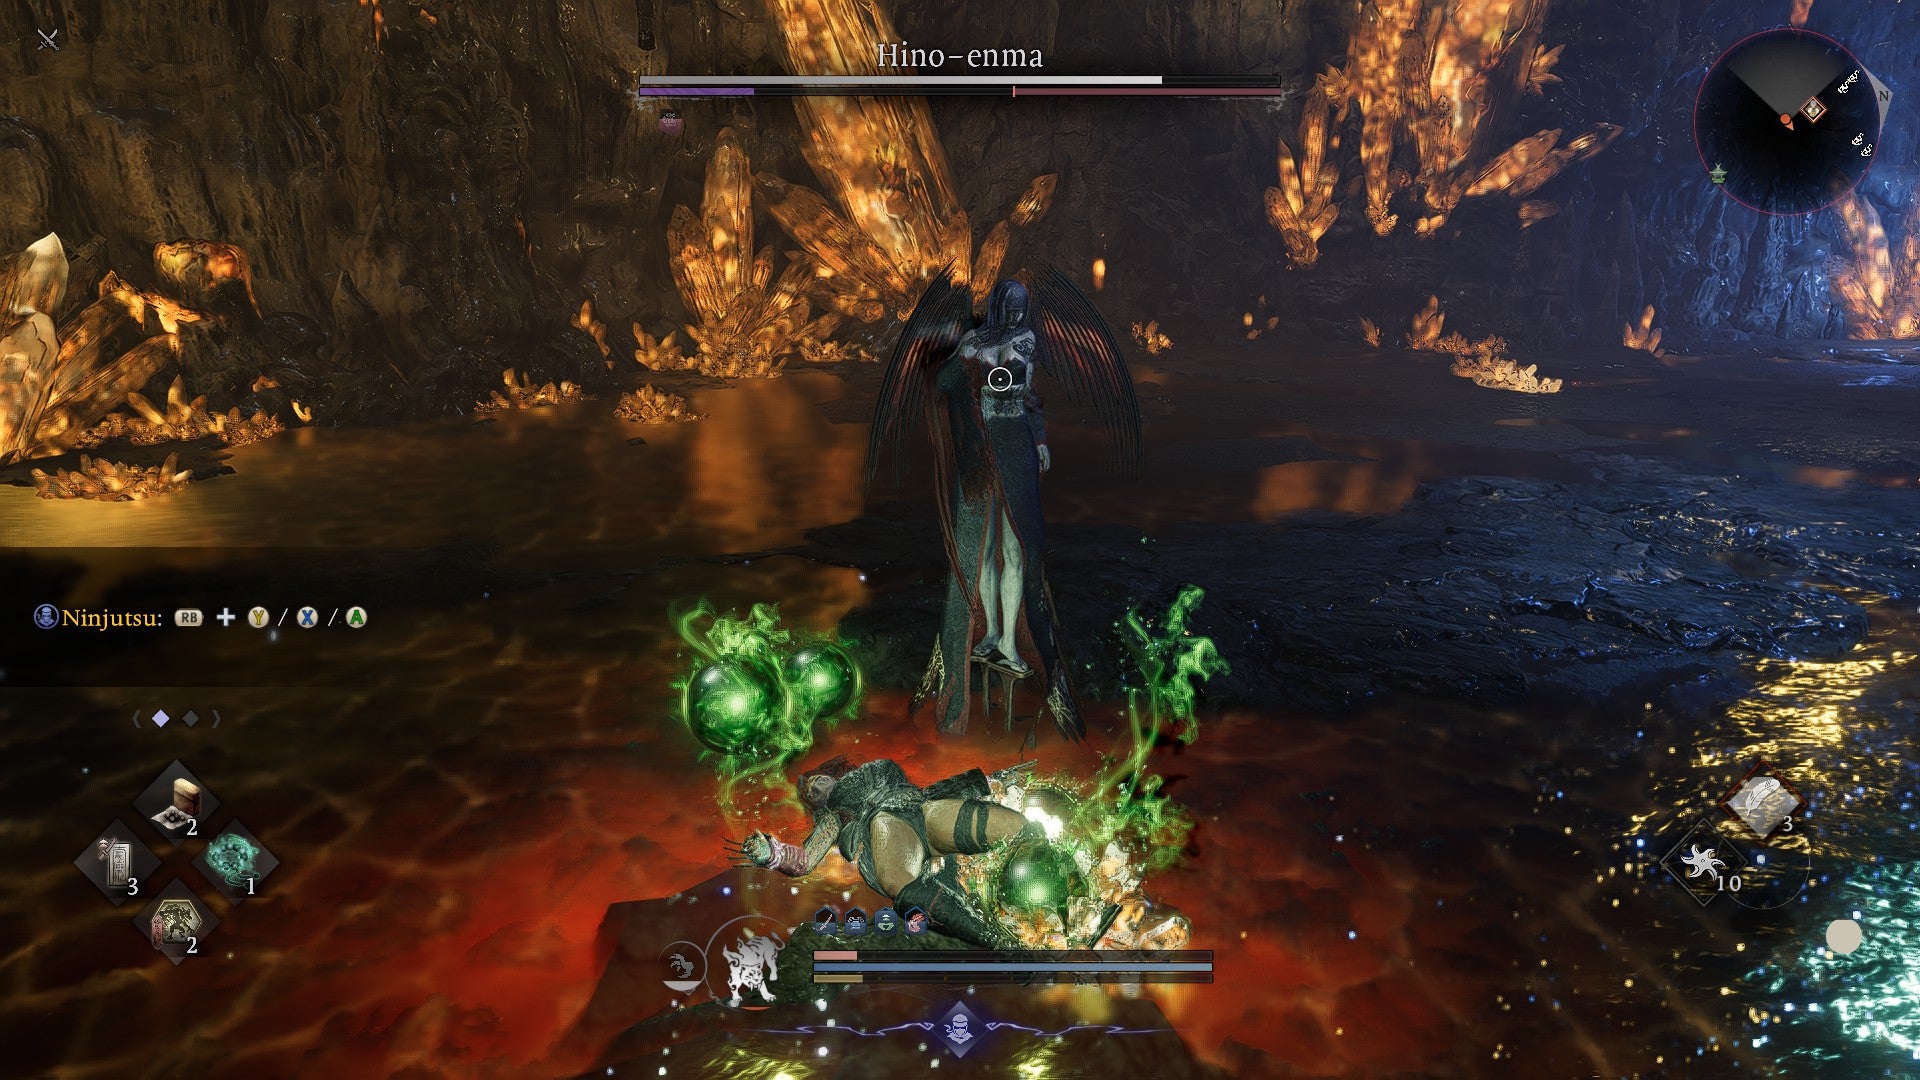
Hino-enma’s been tormenting players with her vampire-esque tactics since Nioh 1. |Image credit:Rock Paper Shotgun/Koei Tecmo
You’ll come across Hino-enma, a notable recurring boss from the other Nioh games, at the end of An Abundant Evil, a quest that takes you into the Haunting Caves in Maisaka. She can cause paralysis, so it’s recommended that you come into this fight with a healthy supply of Antiparalytic Needles. Be wary of her grab attack, which causes her to suck your blood and lose a whole bunch of health. Spam lightning attacks if you’ve got them (the Sudama Soul Core works well here) as she’s very weak to this element.
9. Blood-Spurting Ogin
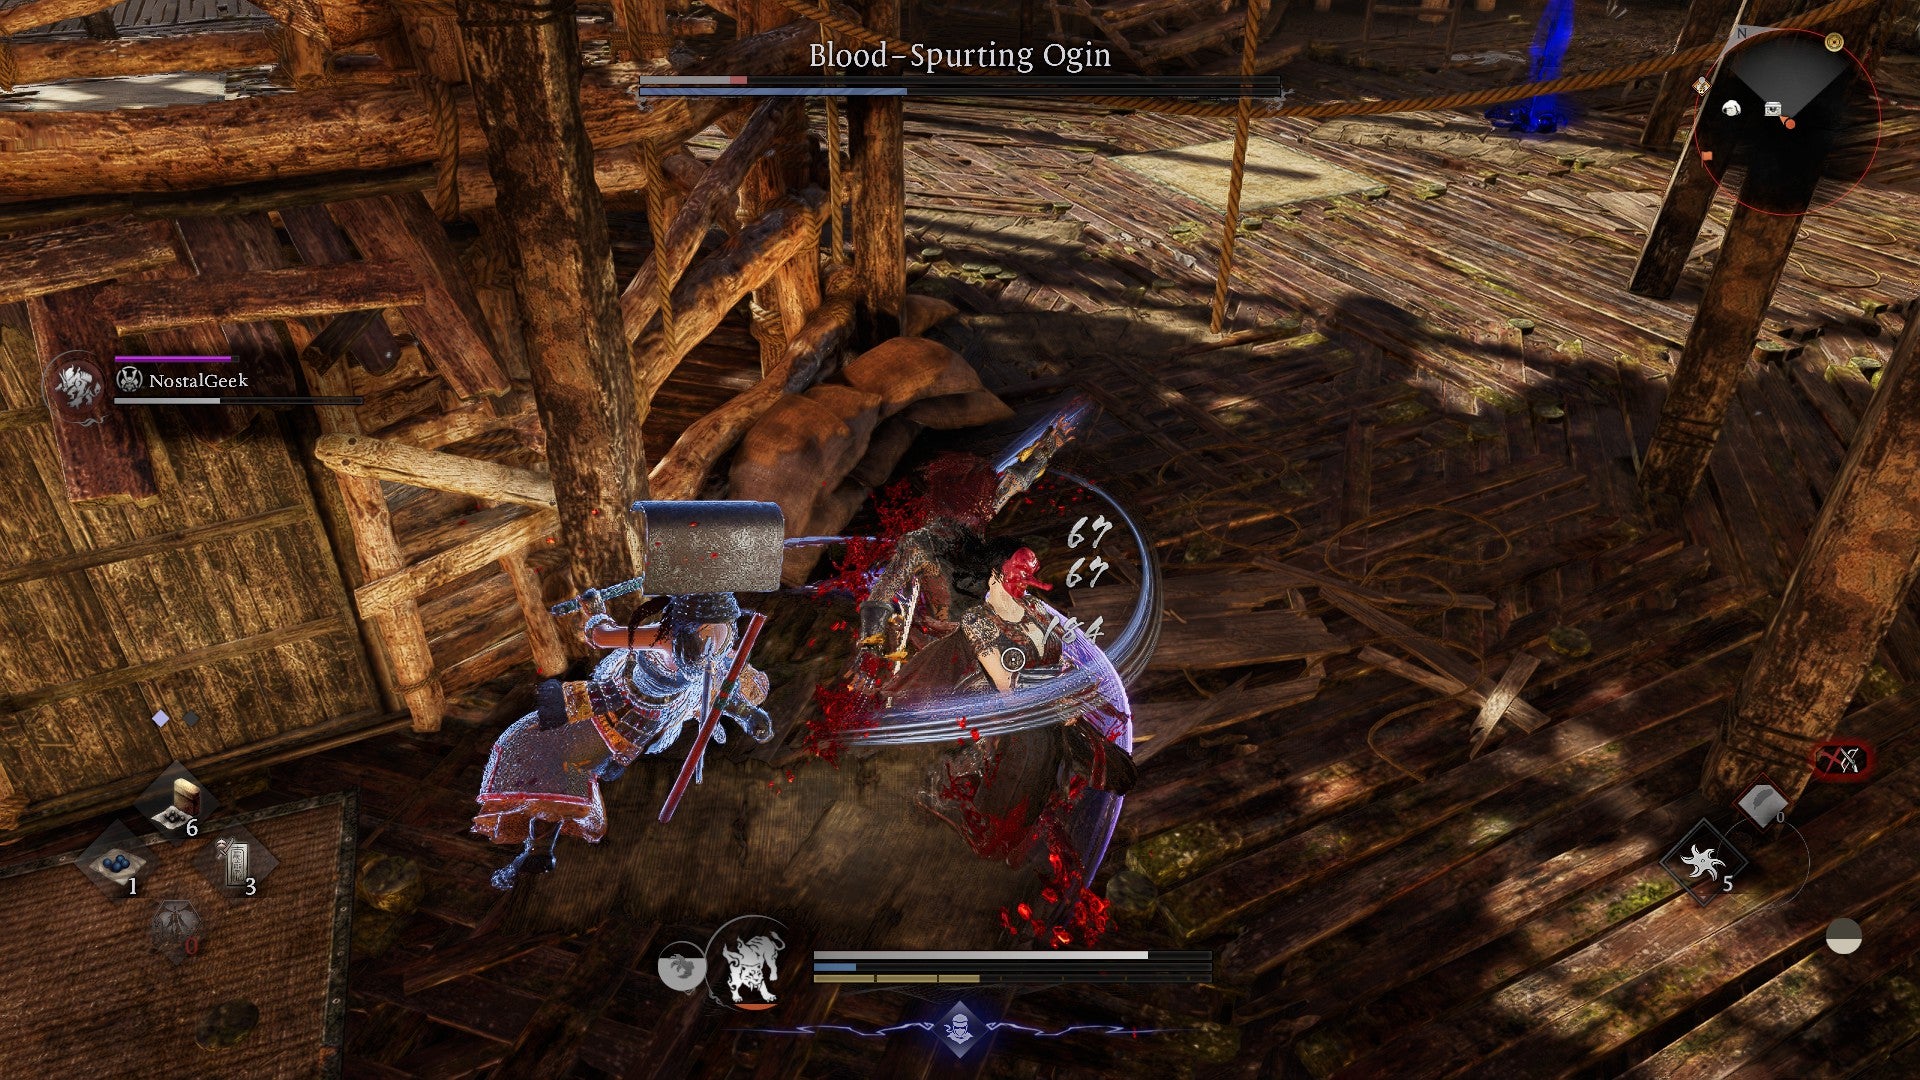
This fight can get crowded fast if you fail to take out the additional forces in the enemy camp first. |Image credit:Rock Paper Shotgun/Koei Tecmo
A human boss leader in an enemy camp around the northern section of Hamamatsu Hill, Blood-Spurting Ogin attacks like a ninja and does some really hefty damage with a single strike. It’s helpful to bring an Acolyte to hold aggro if you can, and be sure to wipe out all of the additional soldiers in the area, lest they join in on the combat.
10. Ryomen Sukunema
Fire and water, all in one giant form! |Image credit:Rock Paper Shotgun/Koei Tecmo
This huge, multiarmed boss is encountered at the end of the Fated Land quest in Iinoya, in a courtyard atop Ryotan Temple. Pay attention to the two sides of their statue-like appearance; one unleashes fire attacks while the other utilises water. Thankfully, all that bulk makes Ryomen Sukunema fairly slow, and you should be able to dash around their elemental strikes for lots of melee damage. Ranged attacks work well - you should have a Hand Cannon by now, so use it!
11. Kyokotsu
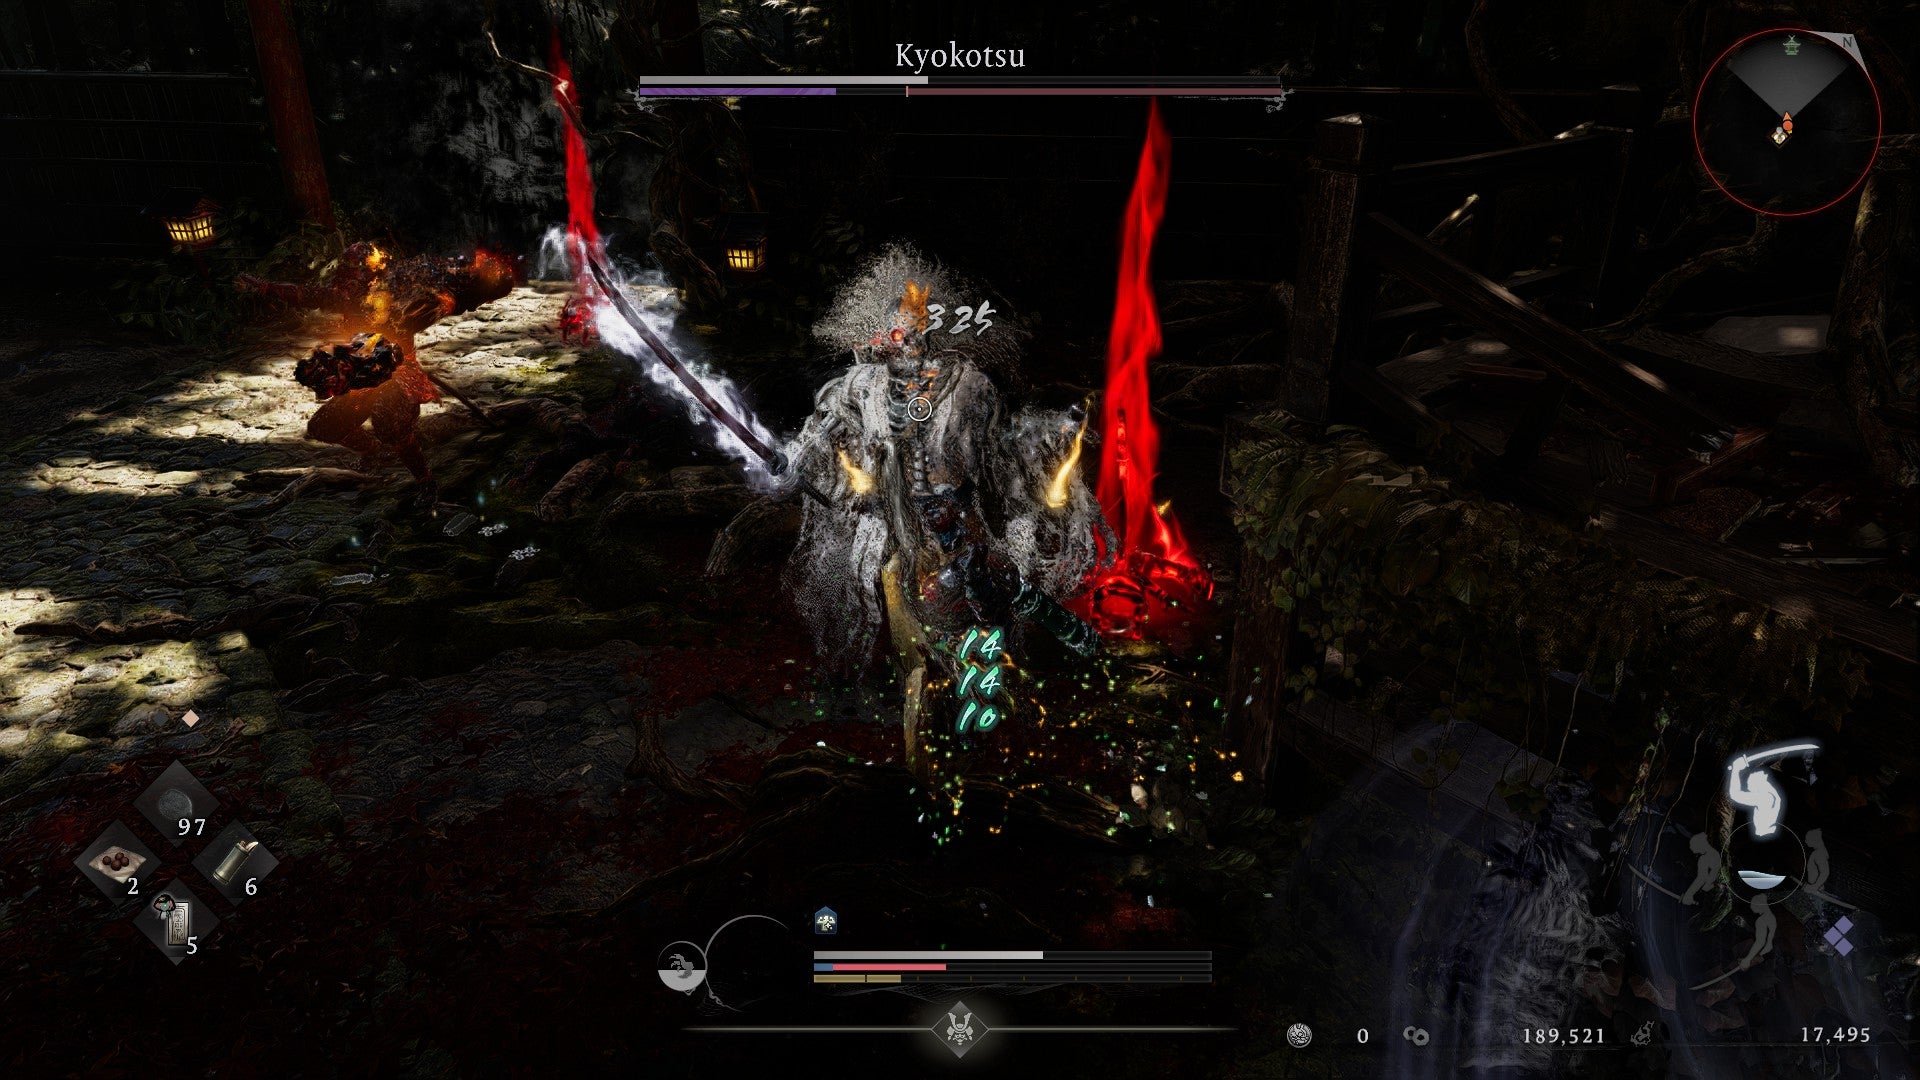
This ghost is no match for me and two ninjas - one of ’em feline. |Image credit:Rock Paper Shotgun/Koei Tecmo
Found as part of the Searching for a Spy sidequest that begins in Futamata’s Tealife Village, Kyokotsu is a whirling ghost-like yokai who is fought with the help of your ninja buddy, Hattori Hanzo, as well as a roly poly Scampuss who’s actually a secret ninja, believe it or not! Kyokotsu isn’t very difficult - you should have fought a few of these ghouls by now - and with Hattori Hanzo and his furry buddy in the fray, the fight won’t last long at all.
12. Itto Itosai

Oh, I’ll land a hit on you, alright. |Image credit:Rock Paper Shotgun/Koei Tecmo
Itto Itosai is a Master who waits in a house in Tealife Village for a good duel. You can face him after beating Kyokotsu and completing the Searching for a Spy sidequest, but be ready for a tricky contest against a guy who really knows how to guard. His worst attack is when he twirls his body multiple times with his odachi, landing it on you with extreme impact. That said, you can run circles around him as a Ninja and use projectiles to whittle him down without much trouble. Show this dude who the true Master is around these parts!
13. Anayama Nobutada
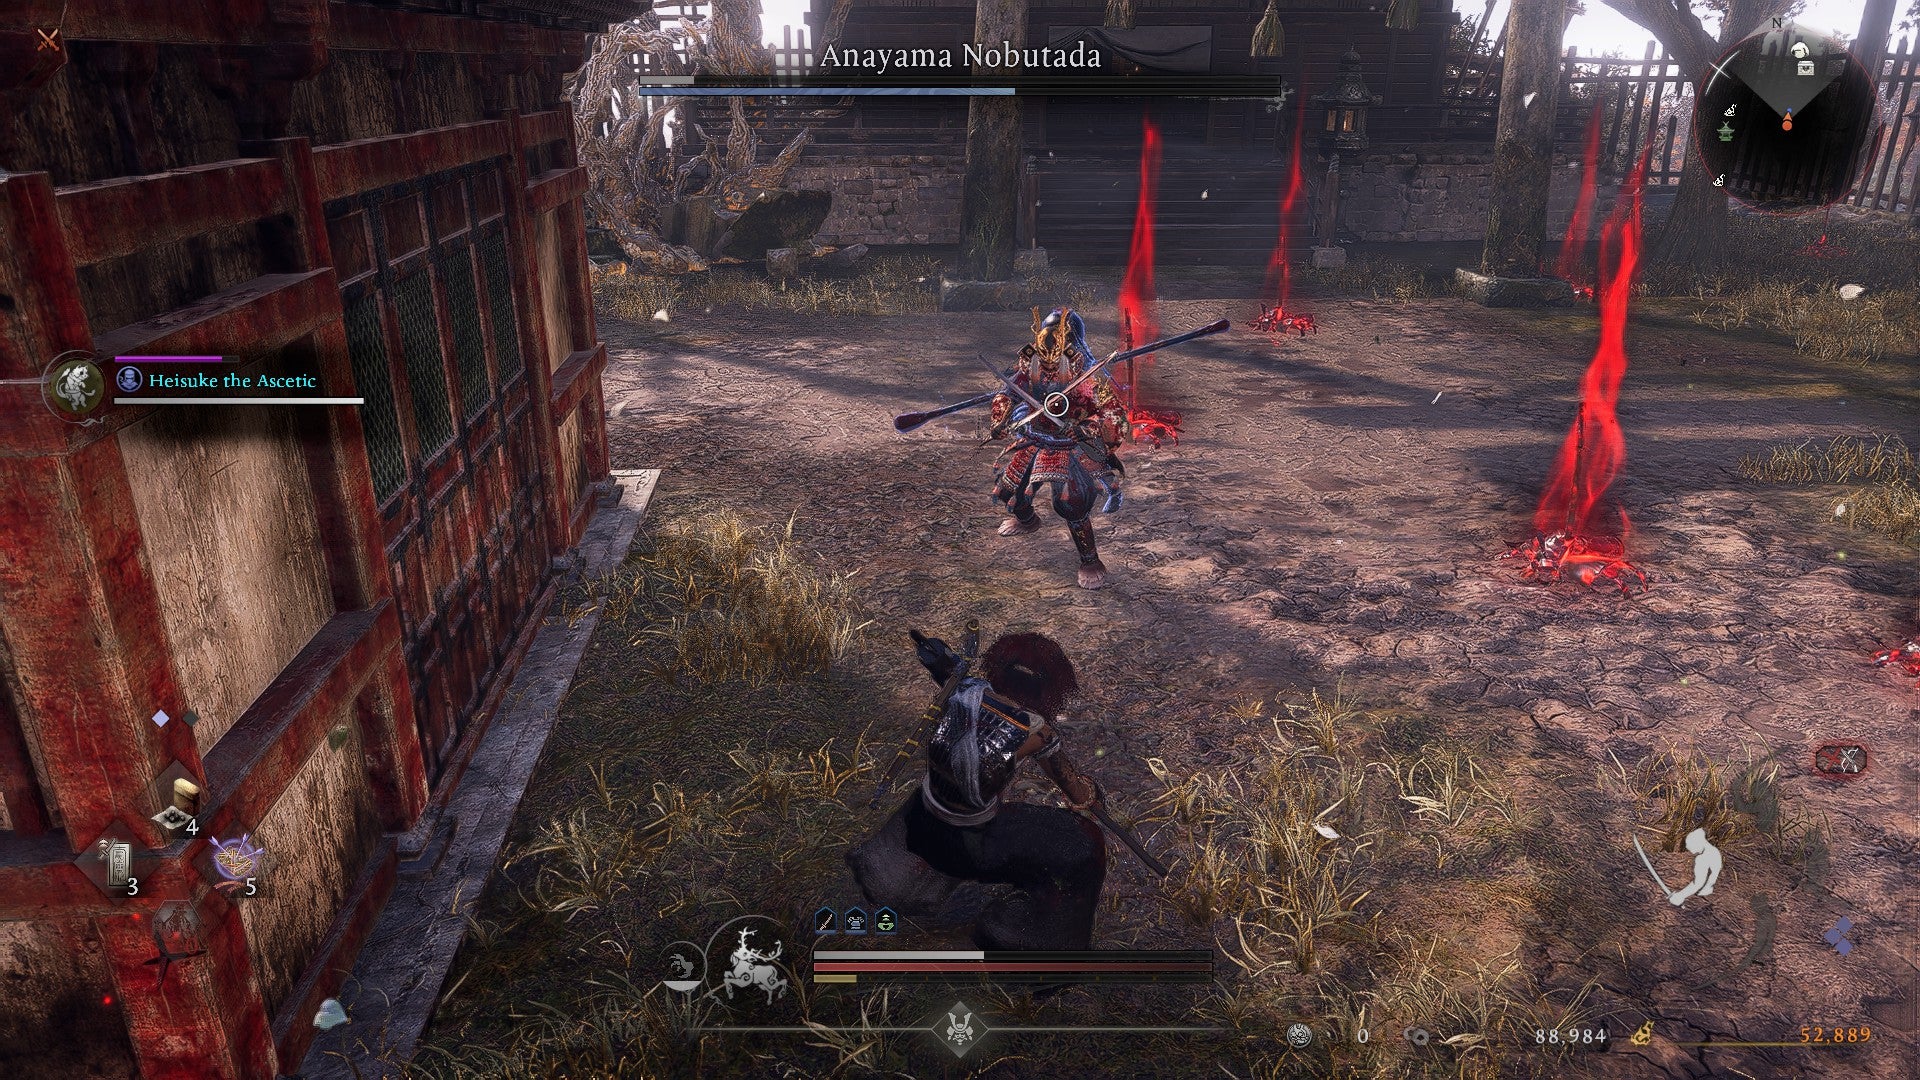
An exercise in breaking poise, Anayama Nobutada is. |Image credit:Rock Paper Shotgun/Koei Tecmo
A humanoid general who can be found midway through The Battle of Futama Castle, Anayama Nobutada has extremely high poise and defense. Attack him from behind, or even better, use a poise-shattering weapon like the Axe or the Talons - both ranked S-tier in our best weapons tier list - to stagger him.
14. Baba Nobuhara

This buy guy’s watery attacks really hurt…best burst back with some lightning. |Image credit:Rock Paper Shotgun/Koei Tecmo
Found at the end of The Battle of Futama Castle, Baba Nobuhara is certainly a big guy with a mighty cleaver. He unleashes water attacks with his strikes, so counteract with lightning to give him a shock to his system. It’s worth equipping Shin-Roku as your Guardian Spirit here - a few good parries, a Burst Break or two, and Baba Nobuhara will soon be fried by the deer’s sizzling energy, especially if you manage to fill your Amrita Gauge enough to activate Living Artifact.
15. Naito Masatoyo
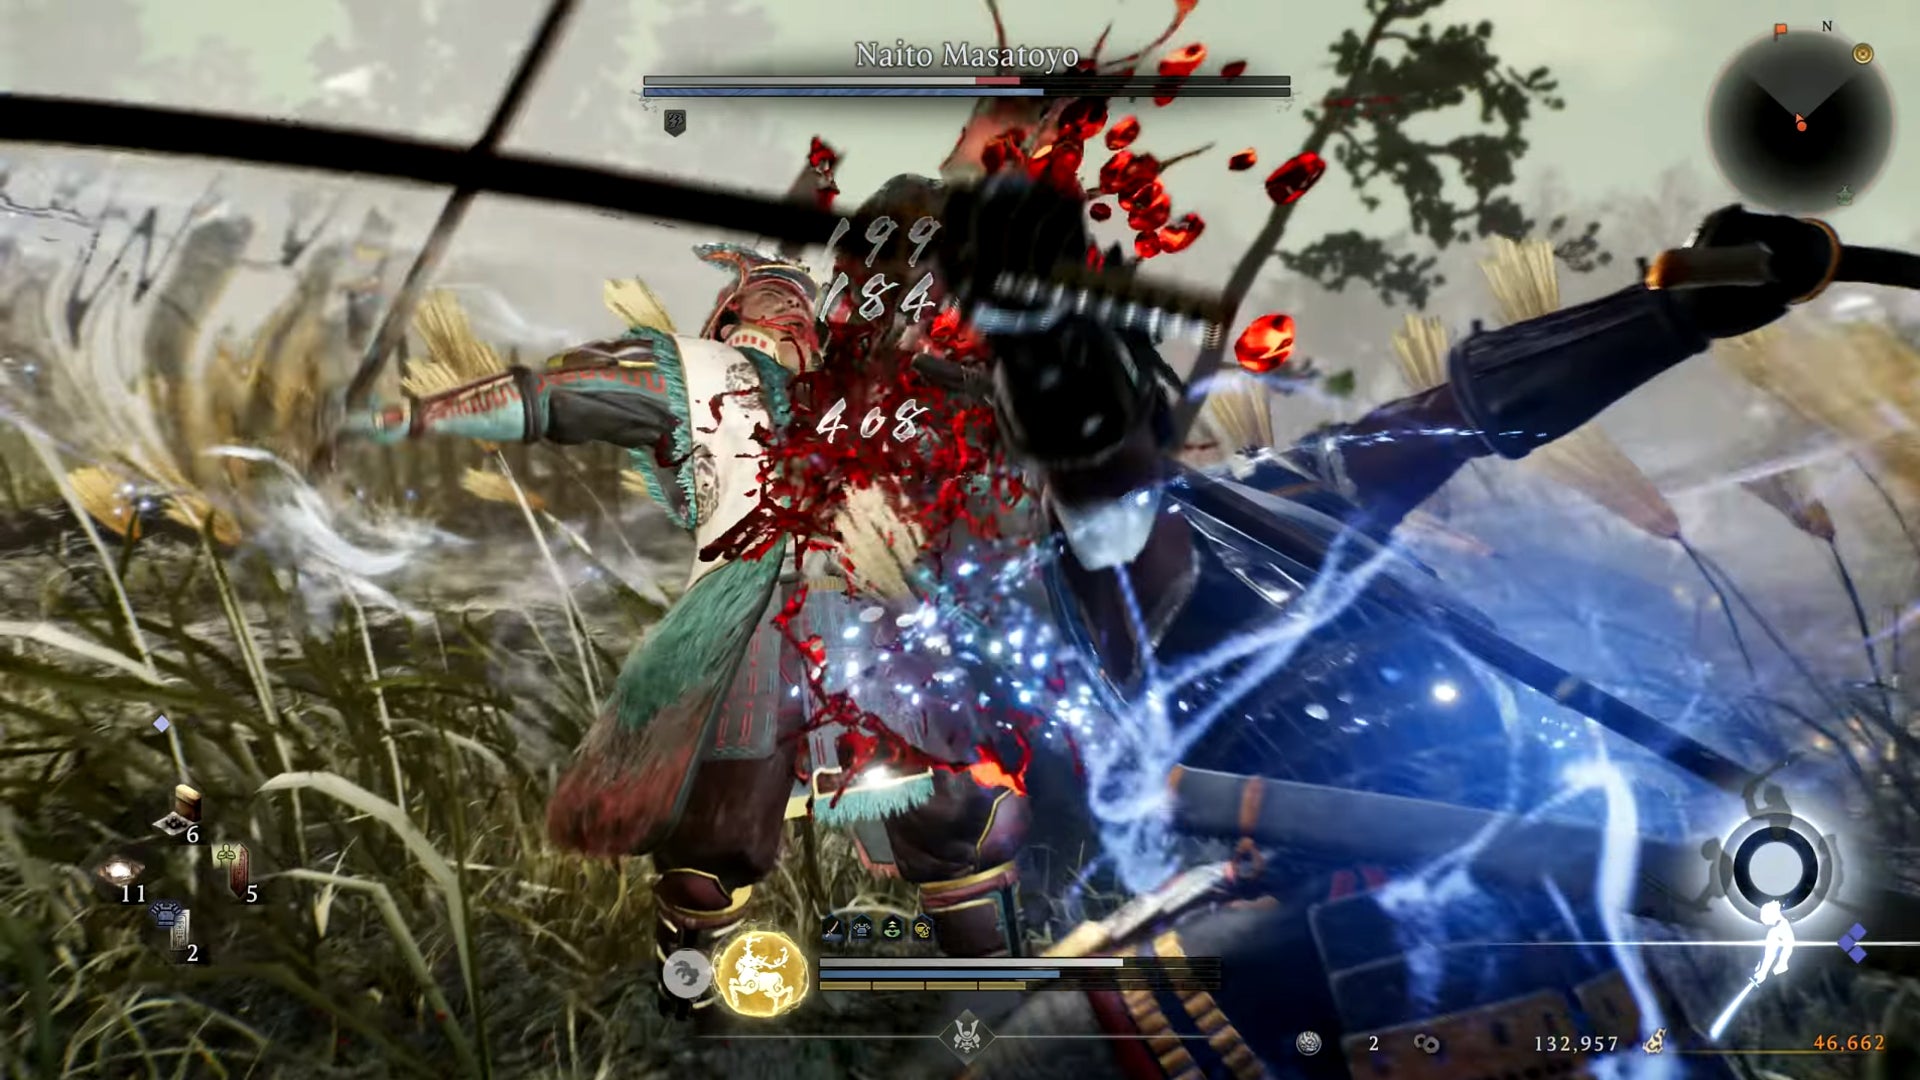
Hope you enjoy bleeding out, Naito Masatoyo. |Image credit:Rock Paper Shotgun/Koei Tecmo
This fellow is a Formidable Enemy who either pops up in the Silver Grass Meadow along Futamata Road, or in the Crucible mission after Futama Castle if you miss him the first time around. Despite holding a very long spear, I found him to be a pushover, “blink and you’ll miss ‘im” enemy. Sneak behind him and wreck his poise with some well-timed slices to show this member of Takeda’s Four Vassals who the real top dog is.
16. Yamagata Masakage (yokai form)

He’s back! And this time he’s ugly and on a steed! |Image credit:Rock Paper Shotgun/Koei Tecmo
Yamagata is back, and this time he’s monstrous and riding around on a headless horse! Luckily, you’re not as helpless as you were before. I defeated him with a good array of Ninjutsu projectiles, including Kunai and Shrapnel Bombs. Use Burst Break against his giant glaive when it swings down to switch into Samurai form, and then get as many heavy charged strikes in as possible. When he summons the Dark Realm, jump to avoid the ring of fire that exudes from him, then continue your assault. A Burst Break opportunity often follows this ring of fire.
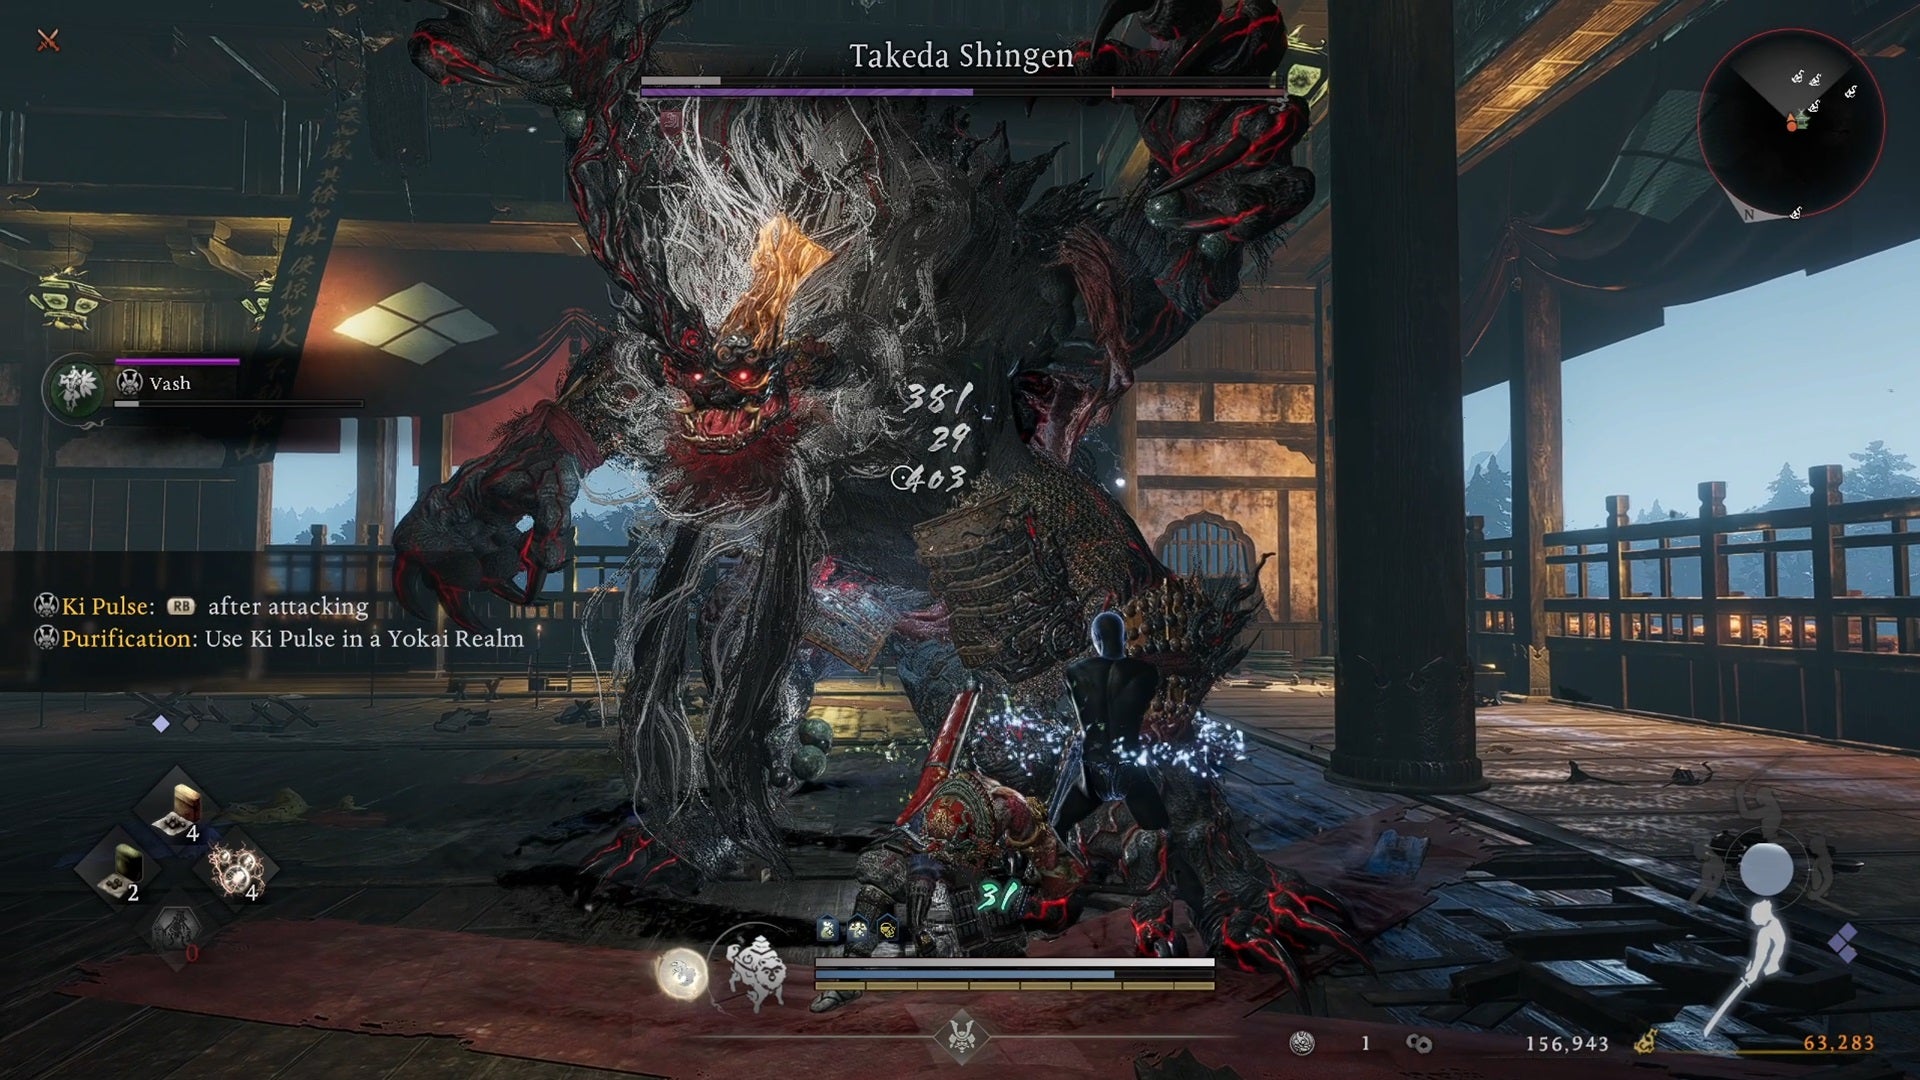
17. Takeda Shingen

Ahhh, Takeda, you bastard. How many times you killed me, I lost count. |Image credit:Rock Paper Shotgun/Koei Tecmo
You’ll encounter Takeda at the end of your second Crucible mission, and it’s a fight that really, really frustrated me. Takeda boasts a grab with his spear that can pull you upwards and knock off half of your life bar, and he’s also got plenty of elemental attacks, including a summonable yokai who does a fiery butt slam and wind/fire energy that supplement his spear. Pay attention to the colour of his weapon for a hint on his next elemental attack, and get close as a Samurai for parries until you can Burst Break into Ninja for a strike from behind. Takeda is a pain, but once his Ki is exhausted, there are numerous moments for revenge.
18. Takeda Shingen (yokai form)
Bring on Takeda’s Ganon form! (That’s a Legend of Zelda reference, if you didn’t get it.) |Image credit:Rock Paper Shotgun/Koei Tecmo
Round 2 against the big boss of the Warring States era. Takeda Shingen’s yokai form hits very hard, and often begins the fight with a jump attack that you should absolutely use Deflect against. Other times, he’ll rear forwards with glowing yellow arms for a lunge that’ll lay you on your back if it connects. That said, his human form gave me more trouble in the long run - once you learn to dodge his patterns and hit him with a powerful Living Artifact strike or two to deplete his Ki, he’s toast.
19. Bloodedge Demon

A demon of malice, designed to ruin the day of Nioh 3 demo players everywhere. |Image credit:Rock Paper Shotgun/Koei Tecmo
The Bloodedge Demon is a special boss who appears in any era, and only if you’ve repeatedly killed Revenants and followed the trail of their Malice. Take a look at our guide on how to find and beat the Bloodedge Demon for a full rundown on how to wreck this optional but difficult boss, who is frankly a massive pain in the ass that is best defeated by a variety of cheese tactics.
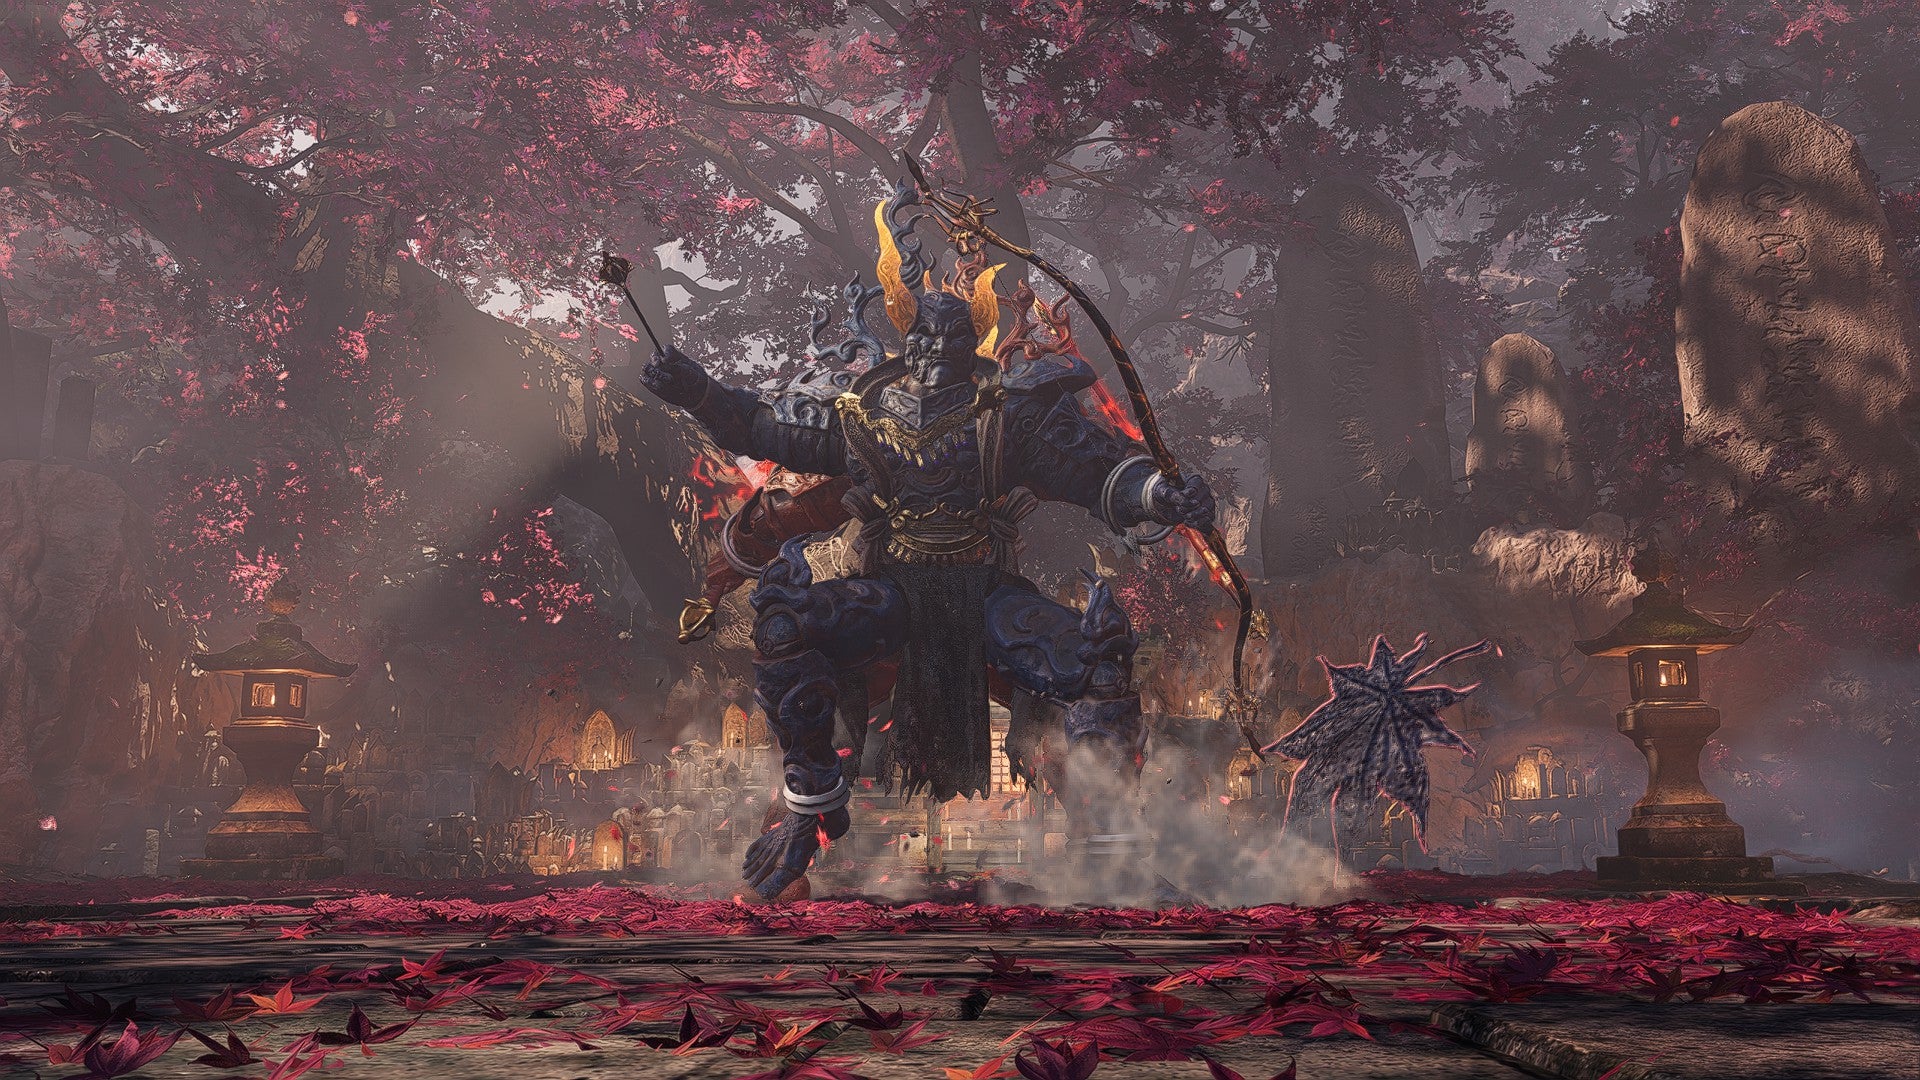
20. Great Tengu
This Great Tengu was apparently once a pretty decent yokai before he got corrupted. Oh well, time to clip his wings. |Image credit:Rock Paper Shotgun/Koei Tecmo
Great Tengu marks the start of the Heian period with a variety of wind and lightning attacks from on high. Dodge behind him for some combos and toss as much Ninjutsu as you can to pepper him even if he’s in the sky. Once his health is halfway depleted, his wind attacks become more numerous, so be sure to hit that Evade button. When he glows red and swoops down at you, practice activating Burst Break at the right moment or risk getting grabbed upwards in a lightning storm.
21. All-Seeing Mage

This nerdy mage thinks he can outdo me with sword and spells? Think again! |Image credit:Rock Paper Shotgun/Koei Tecmo
This kitsune mask-wearing jobber is a Formidable Enemy who hangs out in a house in Kamo Village alongside other magic users. He has spell attacks (including an annoying ice crystal summon that does repeated damage) and some sword slashes that can inflict surprisingly large chunks of damage. But if you take out the goons surrounding him, he’ll go down fast.
22. Yasha
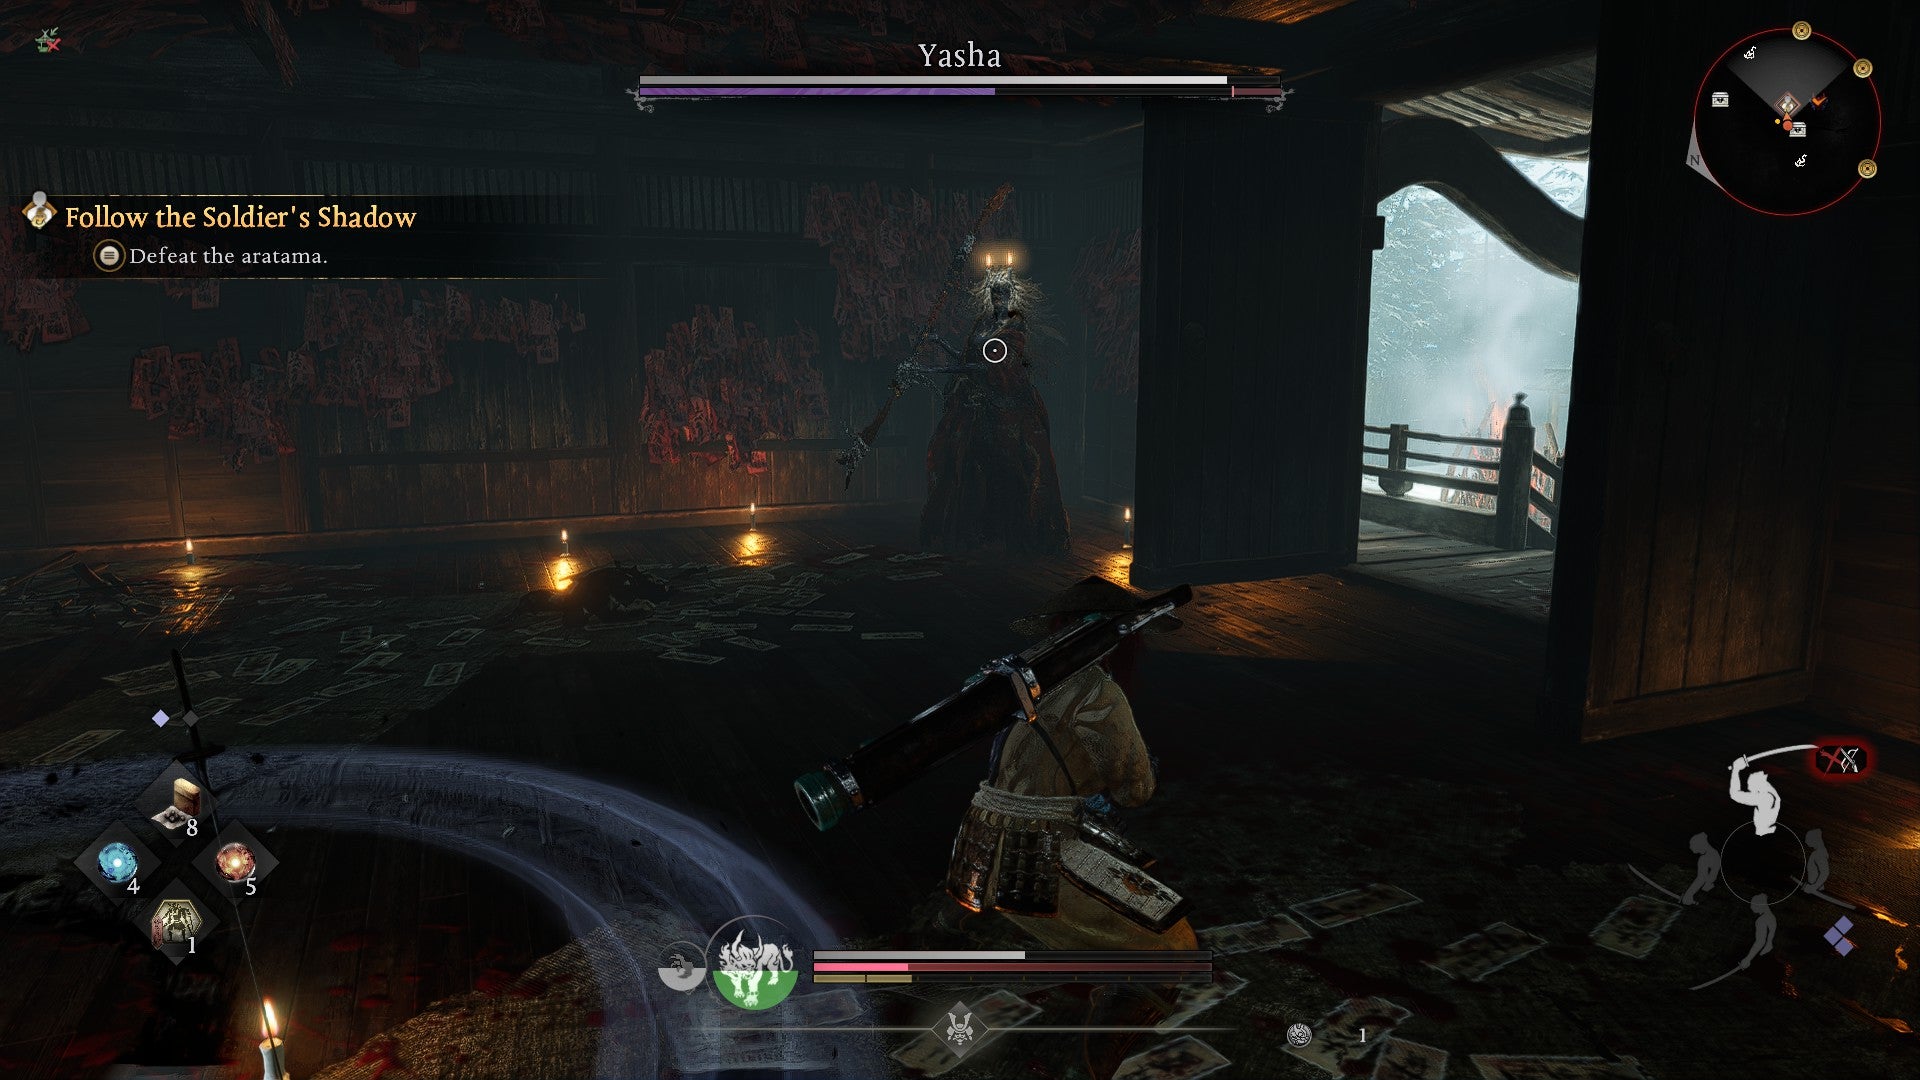
Familiar entry level bosses from the other Nioh games, this particular Yasha is actually a friend in disguise. |Image credit:Rock Paper Shotgun/Koei Tecmo
Yasha can be found at the end of the Follow the Soldier’s Shadow sidequest, which sees you allying with Minamoto no Yoshitsune to infiltrate an Enemy Base and find an ally who’s turned into a yokai. With his assistance, this fight will likely end quickly. Corner Yasha in a wall and spam her with Ninjutsu and heavy strikes to send her packing.
23. Tomoe Gozen
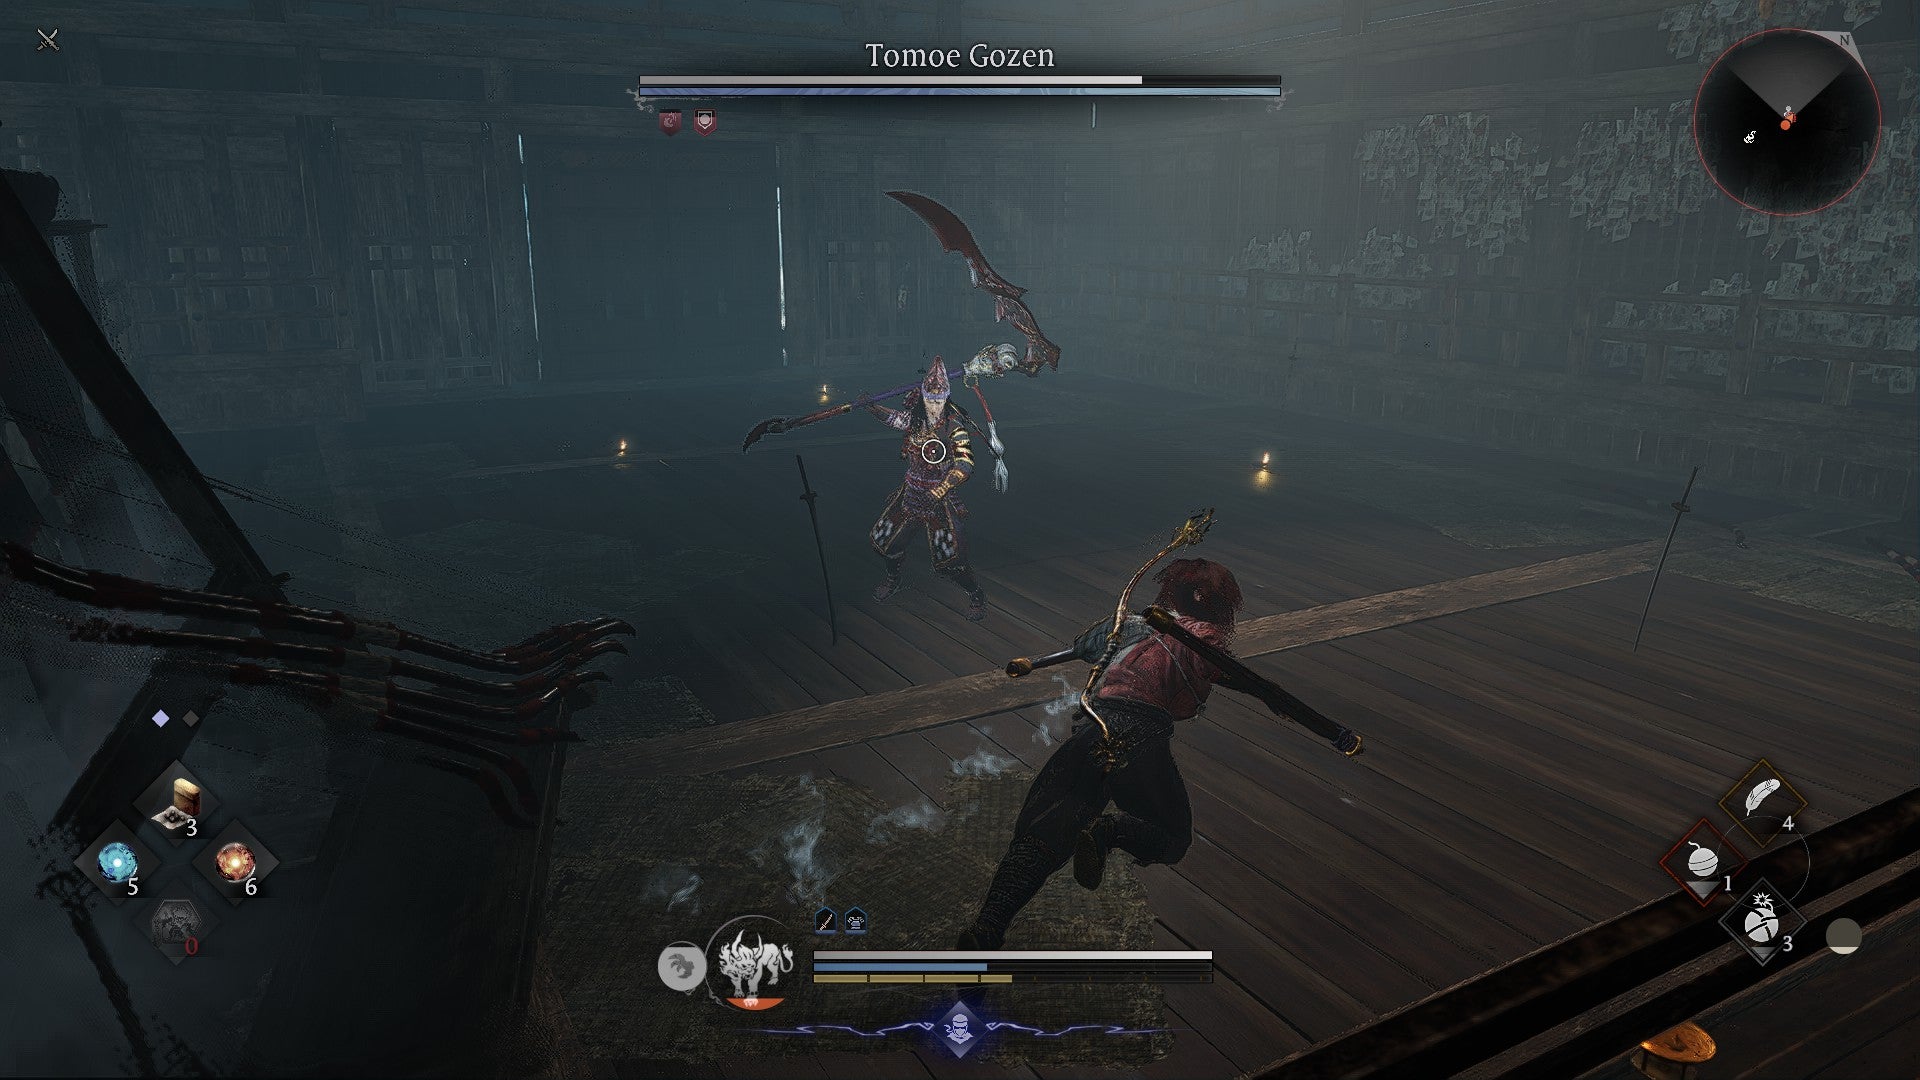
After breaking the Yasha’s curse, now it’s time to break Tomoe Gozen (in a friendly way, of course.) |Image credit:Rock Paper Shotgun/Koei Tecmo
It appears that Tomoe Gozen was stuck in that Yasha form! Once you’ve freed her, head to Kamo Village to challenge her as a Master. Her Switchglaive hits very hard and has a variety of forms and stances to monitor, making this combat possibly take longer than expected. But use an array of Ninjutsu to weaken her down and like most Masters, she’ll fall. (If you’re trying to learn how to use Switchglaives - S-tier weapons if you can figure ’em out - this fight is a good learning experience!)
24. Onryoki

Shoot Onryoki as he charges towards you, but don’t back up too much, as it’ll restart the fight and refresh his health. |Image credit:Rock Paper Shotgun/Koei Tecmo
Onryoki is a large fella on the bridge crossing Katsura River that leads into Sagano from Funaokayama. Get a few ranged shots in before he lumbers towards you, then dodge around his feet and slash away. The additional yokai on the bridge can be annoying, so try to take them out first before felling the big guy.
25. Otoroshi
Otoroshi can be a nuisance, especially that damn Dark Realm form. |Image credit:Rock Paper Shotgun/Koei Tecmo
The boss of Matsuo-taisha Shrine, Otoroshi an exercise in how well you can Deflect his massive paw strikes and pounces. When his limbs glow with yellow sparkles, watch out for a lunge that’ll send you into this hairy beast’s maw, which is of course full of serrated teeth. Otoroshi’s Dark Realm form is also frustratingly unpredictable, especially when he summons two huge icicles to use as clubs. I suggest that you stick close to him in Samurai form rather than far away when he does this, as rolling under his jump attacks while you’re near is far easier than trying to avoid the icicles from afar. Lighting damage also seems to work very well against Otoroshi, all things considered.
26. One-Eyed Oni & Gaki
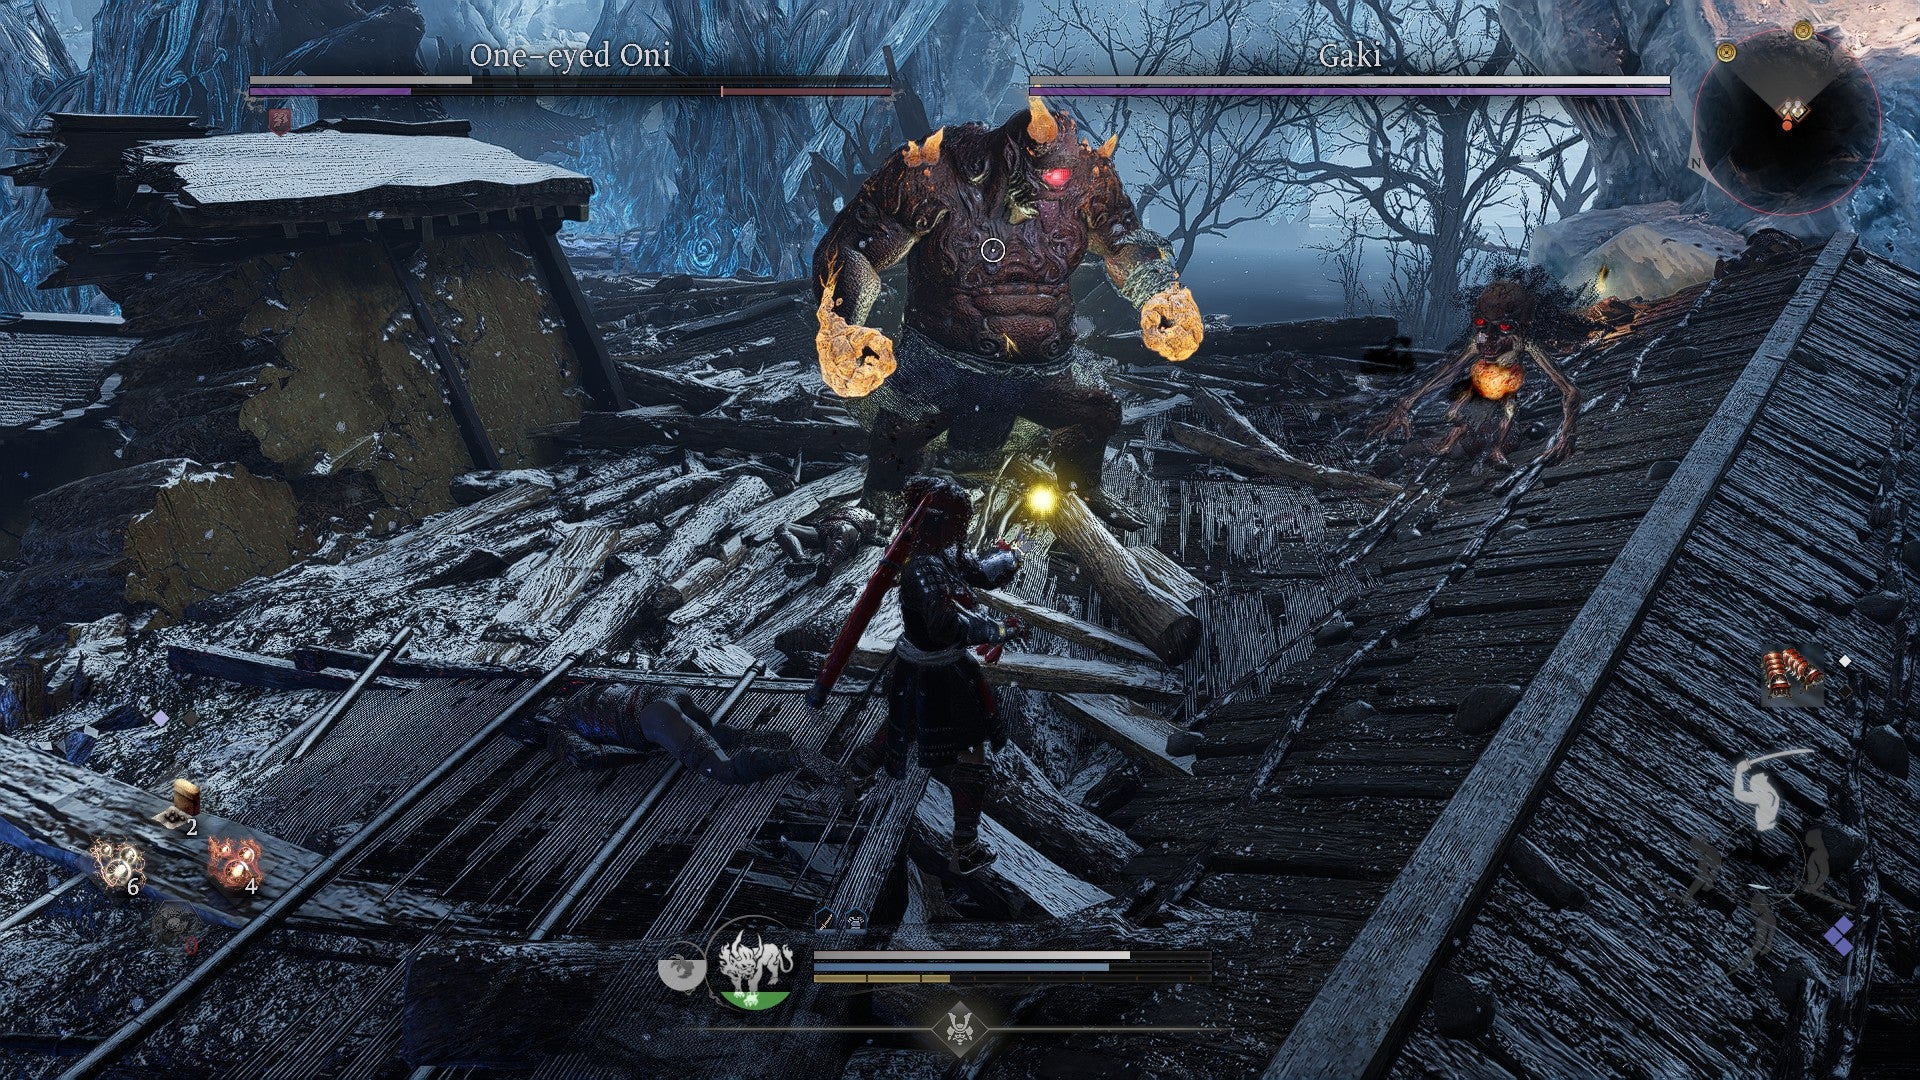
Fighting this duo on a watery rooftop can be a little harrowing. |Image credit:Rock Paper Shotgun/Koei Tecmo
A tag team duo that you won’t run into unless you’re partaking in the In Search of Eternal Youth sidequest, One-Eyed Oni and Gaki can be found on a roof in Nishiichi. They’re a pair of unlucky brothers who were cursed to become yokai, and the fight first begins against One-Eyed Oni before Gaki tags in. By now, you should be used to dealing with these guys, but don’t get cocky and fall into the water as you fight.
27. Ibaraki Doji

If you get too close, Ibaraki Doji will crush you under your heel. This is someone’s kink, I’m sure. |Image credit:Rock Paper Shotgun/Koei Tecmo
Ibaraki Doji guards the second shrine you’ve got to clear in the Heian era, and she’s big, musclebound, and wields a lightning arm that delivers a shock to the system. But if you slam into her with repeated heavy strikes via an Axe or another hefty weapon of your choice, she’s not too bad! Just be wary of her lightning arm, which extends forward like a whip to crackle and grab you in its cluthes. She’ll also stomp on your face and occasionally unleash thunderous waves across the arena. Obviously, using any talismans or equipping armour that can raise your Lighting resistance prior to entering this battle is a must.
More bosses to come later!
Good luck as you match your Samurai swords and Ninja kunai against the fierce bosses listed above. If you’re more interested in learning which weapons are best for tackling these opponents, be sure to check out our Nioh 3 weapons tier list . We’ve also got guides aplenty on how to respec your character , how to level up and farm Amrita fast , and how to use Titles to get Prestige . And while you’re at it, why not read our glowing review of Nioh 3 - definitely one of the most exciting and expansive Soulslikes in a long while.
Nioh 3
PS5 , PC
Rock Paper Shotgun is better when you sign in
Sign in and join us on our journey to discover strange and compelling PC games.

All 75 Arc Raiders Blueprints and where to get them
These areas have the highest chance of giving you Blueprints

Image credit:Rock Paper Shotgun/Embark Studios

Looking for more Arc Raiders Blueprints? It’s a special day when you find a Blueprint, as they’re among the most valuable items in Arc Raiders. If you find a Blueprint that you haven’t already found, then you must make sure you hold onto it at all costs, because Blueprints are the key to one of the most important and powerful systems of meta-progression in the game.
This guide aims to be the very best guide on Blueprints you can find, starting with a primer on what exactly they are and how they work in Arc Raiders, before delving into exactly where to get Blueprints and the very best farming spots for you to take in your search.
We’ll also go over how to get Blueprints from other unlikely activities, such as destroying Surveyors and completing specific quests. And you’ll also find the full list of all 75 Blueprints in Arc Raiders on this page (including the newest Blueprints added with the Cold Snap update , such as the Deadline Blueprint and Firework Box Blueprint), giving you all the information you need to expand your own crafting repertoire.
In this guide:
- What are Blueprints in Arc Raiders?
- Full Blueprint list: All crafting recipes
- Where to find Blueprints in Arc Raiders Blueprints obtained from quests Blueprints obtained from Trials Best Blueprint farming locations

What are Blueprints in Arc Raiders?
Blueprints in Arc Raiders are special items which, if you manage to extract with them, you can expend to permanently unlock a new crafting recipe in your Workshop. If you manage to extract from a raid with an Anvil Blueprint, for example, you can unlock the ability to craft your very own Anvil Pistol, as many times as you like (as long as you have the crafting materials).
To use a Blueprint, simply open your Inventory while in the lobby, then right-click on the Blueprint and click “Learn And Consume” . This will permanently unlock the recipe for that item in your Workshop. As of the Stella Montis update, there are allegedly 75 different Blueprints to unlock - although only 68 are confirmed to be in the game so far. You can see all the Blueprints you’ve found and unlocked by going to the Workshop menu, and hitting “R” to bring up the Blueprint screen.
It’s possible to find duplicates of past Blueprints you’ve already unlocked. If you find these, then you can either sell them, or - if you like to play with friends - you can take it into a match and gift it to your friend so they can unlock that recipe for themselves. Another option is to keep hold of them until the time comes to donate them to the Expedition.
Full Blueprint list: All crafting recipes
Below is the full list of all the Blueprints that are currently available to find in Arc Raiders, and the crafting recipe required for each item:
| Blueprint | Type | Recipe | Crafted At |
|---|---|---|---|
| Bettina | Weapon | 3x Advanced Mechanical Components 3x Heavy Gun Parts 3x Canister | Gunsmith 3 |
| Blue Light Stick | Quick Use | 3x Chemicals | Utility Station 1 |
| Aphelion | Weapon | 3x Magnetic Accelerator 3x Complex Gun Parts 1x Matriarch Reactor | Gunsmith 3 |
| Combat Mk. 3 (Flanking) | Augment | 2x Advanced Electrical Components 3x Processor | Gear Bench 3 |
| Combat Mk. 3 (Aggressive) | Augment | 2x Advanced Electrical Components 3x Processor | Gear Bench 3 |
| Complex Gun Parts | Material | 2x Light Gun Parts 2x Medium Gun Parts 2x Heavy Gun Parts | Refiner 3 |
| Fireworks Box | Quick Use | 1x Explosive Compound 3x Pop Trigger | Explosives Station 2 |
| Gas Mine | Mine | 4x Chemicals 2x Rubber Parts | Explosives Station 1 |
| Green Light Stick | Quick Use | 3x Chemicals | Utility Station 1 |
| Pulse Mine | Mine | 1x Crude Explosives 1x Wires | Explosives Station 1 |
| Seeker Grenade | Grenade | 1x Crude Explosives 2x ARC Alloy | Explosives Station 1 |
| Looting Mk. 3 (Survivor) | Augment | 2x Advanced Electrical Components 3x Processor | Gear Bench 3 |
| Angled Grip II | Mod | 2x Mechanical Components 3x Duct Tape | Gunsmith 2 |
| Angled Grip III | Mod | 2x Mod Components 5x Duct Tape | Gunsmith 3 |
| Hullcracker | Weapon | 1x Magnetic Accelerator 3x Heavy Gun Parts 1x Exodus Modules | Gunsmith 3 |
| Launcher Ammo | Ammo | 5x Metal Parts 1x Crude Explosives | Workbench 1 |
| Anvil | Weapon | 5x Mechanical Components 5x Simple Gun Parts | Gunsmith 2 |
| Anvil Splitter | Mod | 2x Mod Components 3x Processor | Gunsmith 3 |
| ??? | ??? | ??? | ??? |
| Barricade Kit | Quick Use | 1x Mechanical Components | Utility Station 2 |
| Blaze Grenade | Grenade | 1x Explosive Compound 2x Oil | Explosives Station 3 |
| Bobcat | Weapon | 3x Advanced Mechanical Components 3x Light Gun Parts | Gunsmith 3 |
| Osprey | Weapon | 2x Advanced Mechanical Components 3x Medium Gun Parts 7x Wires | Gunsmith 3 |
| Burletta | Weapon | 3x Mechanical Components 3x Simple Gun Parts | Gunsmith 1 |
| Compensator II | Mod | 2x Mechanical Components 4x Wires | Gunsmith 2 |
| Compensator III | Mod | 2x Mod Components 8x Wires | Gunsmith 3 |
| Defibrillator | Quick Use | 9x Plastic Parts 1x Moss | Medical Lab 2 |
| ??? | ??? | ??? | ??? |
| Equalizer | Weapon | 3x Magnetic Accelerator 3x Complex Gun Parts 1x Queen Reactor | Gunsmith 3 |
| Extended Barrel | Mod | 2x Mod Components 8x Wires | Gunsmith 3 |
| Extended Light Mag II | Mod | 2x Mechanical Components 3x Steel Spring | Gunsmith 2 |
| Extended Light Mag III | Mod | 2x Mod Components 5x Steel Spring | Gunsmith 3 |
| Extended Medium Mag II | Mod | 2x Mechanical Components 3x Steel Spring | Gunsmith 2 |
| Extended Medium Mag III | Mod | 2x Mod Components 5x Steel Spring | Gunsmith 3 |
| Extended Shotgun Mag II | Mod | 2x Mechanical Components 3x Steel Spring | Gunsmith 2 |
| Extended Shotgun Mag III | Mod | 2x Mod Components 5x Steel Spring | Gunsmith 3 |
| Remote Raider Flare | Quick Use | 2x Chemicals 4x Rubber Parts | Utility Station 1 |
| Heavy Gun Parts | Material | 4x Simple Gun Parts | Refiner 2 |
| Venator | Weapon | 2x Advanced Mechanical Components 3x Medium Gun Parts 5x Magnet | Gunsmith 3 |
| Il Toro | Weapon | 5x Mechanical Components 6x Simple Gun Parts | Gunsmith 1 |
| Jolt Mine | Mine | 1x Electrical Components 1x Battery | Explosives Station 2 |
| Explosive Mine | Mine | 1x Explosive Compound 1x Sensors | Explosives Station 3 |
| Jupiter | Weapon | 3x Magnetic Accelerator 3x Complex Gun Parts 1x Queen Reactor | Gunsmith 3 |
| Light Gun Parts | Material | 4x Simple Gun Parts | Refiner 2 |
| Lightweight Stock | Mod | 2x Mod Components 5x Duct Tape | Gunsmith 3 |
| Lure Grenade | Grenade | 1x Speaker Component 1x Electrical Components | Utility Station 2 |
| Medium Gun Parts | Material | 4x Simple Gun Parts | Refiner 2 |
| Torrente | Weapon | 2x Advanced Mechanical Components 3x Medium Gun Parts 6x Steel Spring | Gunsmith 3 |
| Muzzle Brake II | Mod | 2x Mechanical Components 4x Wires | Gunsmith 2 |
| Muzzle Brake III | Mod | 2x Mod Components 8x Wires | Gunsmith 3 |
| Padded Stock | Mod | 2x Mod Components 5x Duct Tape | Gunsmith 3 |
| Shotgun Choke II | Mod | 2x Mechanical Components 4x Wires | Gunsmith 2 |
| Shotgun Choke III | Mod | 2x Mod Components 8x Wires | Gunsmith 3 |
| Shotgun Silencer | Mod | 2x Mod Components 8x Wires | Gunsmith 3 |
| Showstopper | Grenade | 1x Advanced Electrical Components 1x Voltage Converter | Explosives Station 3 |
| Silencer I | Mod | 2x Mechanical Components 4x Wires | Gunsmith 2 |
| Silencer II | Mod | 2x Mod Components 8x Wires | Gunsmith 3 |
| Snap Hook | Quick Use | 2x Power Rod 3x Rope 1x Exodus Modules | Utility Station 3 |
| Stable Stock II | Mod | 2x Mechanical Components 3x Duct Tape | Gunsmith 2 |
| Stable Stock III | Mod | 2x Mod Components 5x Duct Tape | Gunsmith 3 |
| Tagging Grenade | Grenade | 1x Electrical Components 1x Sensors | Utility Station 3 |
| Tempest | Weapon | 3x Advanced Mechanical Components 3x Medium Gun Parts 3x Canister | Gunsmith 3 |
| Trigger Nade | Grenade | 2x Crude Explosives 1x Processor | Explosives Station 2 |
| Vertical Grip II | Mod | 2x Mechanical Components 3x Duct Tape | Gunsmith 2 |
| Vertical Grip III | Mod | 2x Mod Components 5x Duct Tape | Gunsmith 3 |
| Vita Shot | Quick Use | 2x Antiseptic 1x Syringe | Medical Lab 3 |
| Vita Spray | Quick Use | 3x Antiseptic 1x Canister | Medical Lab 3 |
| Vulcano | Weapon | 1x Magnetic Accelerator 3x Heavy Gun Parts 1x Exodus Modules | Gunsmith 3 |
| Wolfpack | Grenade | 2x Explosive Compound 2x Sensors | Explosives Station 3 |
| Red Light Stick | Quick Use | 3x Chemicals | Utility Station 1 |
| Smoke Grenade | Grenade | 14x Chemicals 1x Canister | Utility Station 2 |
| Deadline | Mine | 3x Explosive Compound 2x ARC Circuitry | Explosives Station 3 |
| Trailblazer | Grenade | 1x Explosive Compound 1x Synthesized Fuel | Explosives Station 3 |
| Tactical Mk. 3 (Defensive) | Augment | 2x Advanced Electrical Components 3x Processor | Gear Bench 3 |
| Tactical Mk. 3 (Healing) | Augment | 2x Advanced Electrical Components 3x Processor | Gear Bench 3 |
| Yellow Light Stick | Quick Use | 3x Chemicals | Utility Station 1 |
Note: The missing Blueprints in this list likely have not actually been added to the game at the time of writing, because none of the playerbase has managed to find any of them. As they are added to the game, I will update this page with the most relevant information so you know exactly how to get all 75 Arc Raiders Blueprints.
Where to find Blueprints in Arc Raiders
Below is a list of all containers, modifiers, and events which maximise your chances of finding Blueprints:
- Certain quests reward you with specific Blueprints .
- Completing Trials has a high chance of offering Blueprints as rewards.
- Surveyors have a decent chance of dropping Blueprints on death.
- High loot value areas tend to have a greater chance of spawning Blueprints.
- Night Raids and Storms may increase rare Blueprint spawn chances in containers.
- Containers with higher numbers of items may have a higher tendency to spawn Blueprints. As a result, Blue Gate (which has many “large” containers containing multiple items) may give you a higher chance of spawning Blueprints.
- Raider containers (Raider Caches, Weapon Boxes, Medical Bags, Grenade Tubes) have increased Blueprint drop rates. As a result, the Uncovered Caches event gives you a high chance of finding Blueprints.
- Security Lockers have a higher than average chance of containing Blueprints.
- Certain Blueprints only seem to spawn under specific circumstances: Tempest Blueprint only spawns during Night Raid events. Vulcano Blueprint only spawns during Hidden Bunker events. Jupiter and Equaliser Blueprints only spawn during Harvester events.

Raider Caches, Weapon Boxes, and other raider-oriented container types have a good chance of offering Blueprints. |Image credit:Rock Paper Shotgun/Embark Studios
Blueprints have a very low chance of spawning in any container in Arc Raiders, around 1-2% on average. However, there is a higher chance of finding Blueprints in particular container types. Specifically, you can find more Blueprints in Raider containers and security lockers.
Beyond this, if you’re looking for Blueprints you should focus on regions of the map which are marked as having particularly high-value loot. Areas such as the Control Tower in Dam Battlegrounds, the Arrival and Departure Buildings in Spaceport, and Pilgrim’s Peak in Blue Gate all have a better-than-average chance of spawning Blueprints somewhere amongst all their containers. Night Raids and Electromagnetic Storm events also increase the drop chances of certain Blueprints .
In addition to these containers, you can often loot Blueprints from destroyed Surveyors - the largest of the rolling ball ARC. Surveyors are more commonly found on the later maps - Spaceport and Blue Gate - and if one spawns in your match, you’ll likely see it by the blue laser beam that it casts into the sky while “surveying”.
Surveyors are quite well-armoured and will very speedily run away from you once it notices you, but if you can take one down then make sure you loot all its parts for a chance of obtaining certain unusual Blueprints.
Blueprints obtained from quests
One way in which you can get Blueprints is by completing certain quests for the vendors in Speranza. Some quests will reward you with a specific item Blueprint upon completion, so as long as you work through all the quests in Arc Raiders, you are guaranteed those Blueprints.
Here is the full list of all Blueprints you can get from quest rewards:
- Trigger Nade Blueprint: Rewarded after completing “Sparks Fly”.
- Lure Grenade Blueprint: Rewarded after completing “Greasing Her Palms”.
- Burletta Blueprint: Rewarded after completing “Industrial Espionage”.
- Hullcracker Blueprint (and Launcher Ammo Blueprint): Rewarded after completing “The Major’s Footlocker”.
Alas, that’s only 4 Blueprints out of a total of 75 to unlock, so for the vast majority you will need to find them yourself during a raid. If you’re intent on farming Blueprints, then it’s best to equip yourself with cheap gear in case you lose it, but don’t use a free loadout because then you won’t get a safe pocket to stash any new Blueprint you find. No pain in Arc Raiders is sharper than failing to extract with a new Blueprint you’ve been after for a dozen hours already.

One of the best ways to get Blueprints is by hitting three stars on all five Trials every week. |Image credit:Rock Paper Shotgun/Embark Studios
Blueprints obtained from Trials
One of the very best ways to get Blueprints is as rewards for completing Trials in Arc Raiders. Trials are unlocked from Level 15 onwards, and allow you to earn rewards by focusing on certain tasks over the course of several raids. For example, one Trial might task you with dealing damage to Hornets, while another might challenge you to loot Supply Drops.
Trials refresh on a weekly basis, with a new week bringing five new Trials. Each Trial can offer up to three rewards after passing certain score milestones, and it’s possible to receive very high level loot from these reward crates - including Blueprints. So if you want to unlock as many Blueprints as possible, you should make a point of completing as many Trials as possible each week.
Best Blueprint farming locations
The very best way to get Blueprints is to frequent specific areas of the maps which combine high-tier loot pools with the right types of containers to search. Here are my recommendations for where to find Blueprints on every map, so you can always keep the search going for new crafting recipes to unlock.

Image credit:Rock Paper Shotgun/Embark Studios
Dam Battlegrounds
The best places to farm Blueprints on Dam Battlegrounds are the Control Tower, Power Generation Complex, Ruby Residence, and Pale Apartments . The first two regions, despite only being marked on the map as mid-tier loot, contain a phenomenal number of containers to loot. The Control Tower can also contain a couple of high-tier Security Lockers - though of course, you’ll need to have unlocked the Security Breach skill at the end of the Survival tree.
There’s also a lot of reporting amongst the playerbase that the Residential areas in the top-left of the map - Pale Apartments and Ruby Residence - give you a comparatively strong chance of finding Blueprints. Considering their size, there’s a high density of containers to loot in both locations, and they also have the benefit of being fairly out of the way. So you’re more likely to have all the containers to yourself.
Buried City
The best Blueprint farming locations on Buried City are the Santa Maria Houses, Grandioso Apartments, Town Hall, and the various buildings of the New District . Grandioso Apartments has a lower number of containers than the rest, but a high chance of spawning weapon cases - which have good Blueprint drop rates. The others are high-tier loot areas, with plenty of lootable containers - including Security Lockers.
Spaceport
The best places to find Blueprints on Spaceport are the Arrival and Departure Buildings, as well as Control Tower A6 and the Launch Towers . All these areas are labelled as high-value loot regions, and many of them are also very handily connected to one another by the Spaceport wall, which you can use to quickly run from one area to the next. At the tops of most of these buildings you’ll find at least one Security Locker, so this is an excellent farming route for players looking to find Blueprints.
The downside to looting Blueprints on Spaceport is that all these areas are hotly contested, particularly in Duos and Squads. You’ll need to be very focused and fast in order to complete the full farming route.

Image credit:Rock Paper Shotgun/Embark Studios
Blue Gate
Blue Gate tends to have a good chance of dropping Blueprints, potentially because it generally has a high number of containers which can hold lots of items; so there’s a higher chance of a Blueprint spawning in each container. In my experience, the best Blueprint farming spots on Blue Gate are Pilgrim’s Peak, Raider’s Refuge, the Ancient Fort, and the Underground Complex beneath the Warehouse .
All of these areas contain a wealth of containers to loot. Raider’s Refuge has less to loot, but the majority of the containers in and around the Refuge are raider containers, which have a high chance of containing Blueprints - particularly during major events.
Stella Montis
On the whole, Stella Montis seems to have a very low drop rate for Blueprints (though a high chance of dropping other high-tier loot). If you do want to try farming Blueprints on this map, the best places to find Blueprints in Stella Montis are Medical Research, Assembly Workshop, and the Business Center . These areas have the highest density of containers to loot on the map.
In addition to this, the Western Tunnel has a few different Security Lockers to loot, so while there’s very little to loot elsewhere in this area of the map, it’s worth hitting those Security Lockers if you spawn there at the start of a match.
That wraps up this primer on how to get all the Blueprints in Arc Raiders as quickly as possible. With the Expedition system constantly resetting a large number of players’ Blueprints, it’s more important than ever to have the most up-to-date information on where to find all these Blueprints.
While you’re here, be sure to check out our Arc Raiders best guns tier list , as well as our primers on the best skills to unlock and all the different Field Depot locations on every map.

ARC Raiders
PS5 , Xbox Series X/S , PC
Rock Paper Shotgun is better when you sign in
Sign in and join us on our journey to discover strange and compelling PC games.
