Ninja Gaiden: Ragebound review
One-hit kill?
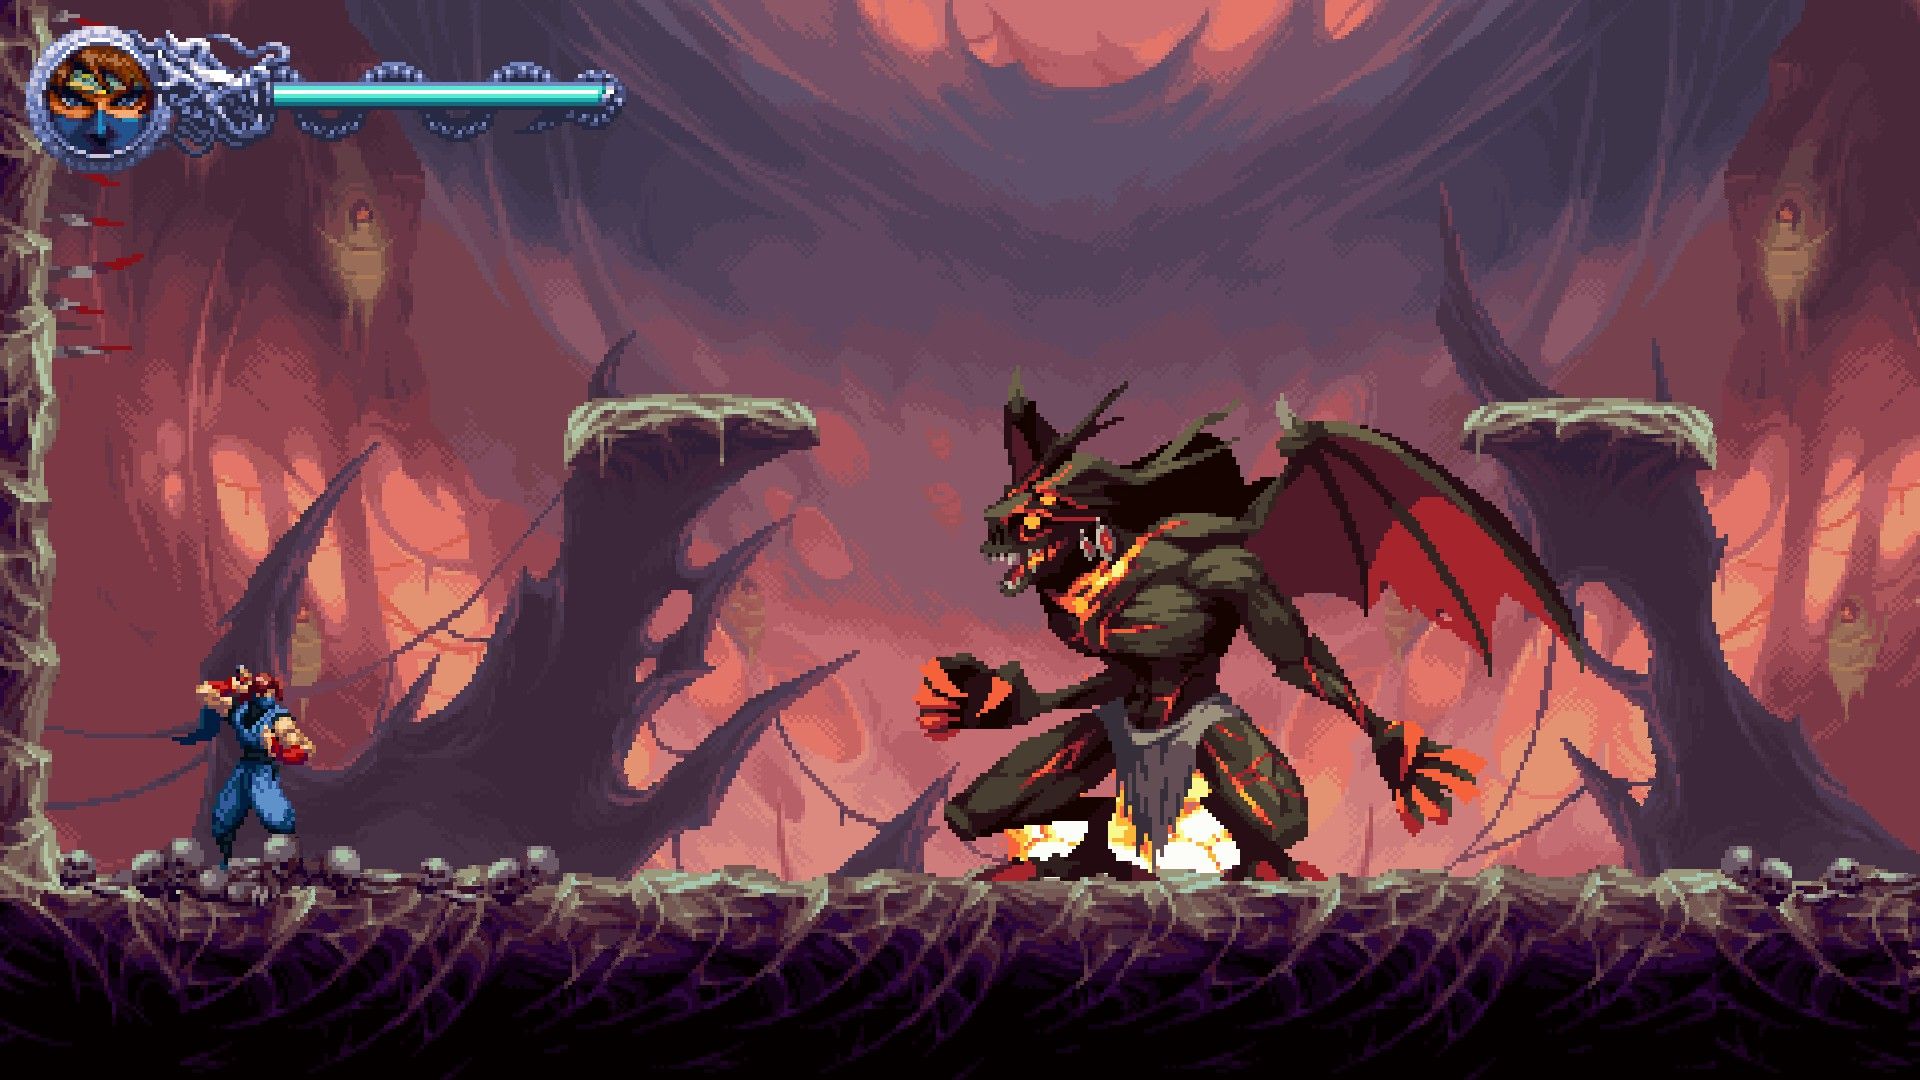
Image credit:Rock Paper Shotgun / Dotemu

A pixellly striking retro action platformer with a few new ninja tricks hidden in its folds, although if it does lose some of its violently tactile flow by the halfway point.
- Developer: The Game Kitchen
- Publisher: Dotemu, Joystick
- Release: July 31st, 2025
- On: Windows
- From: Steam
- Price: TBA
- Reviewed on: Intel Core-i7-11700F, 16GB RAM, Nvidia GeForce RTX 3060, Windows 10
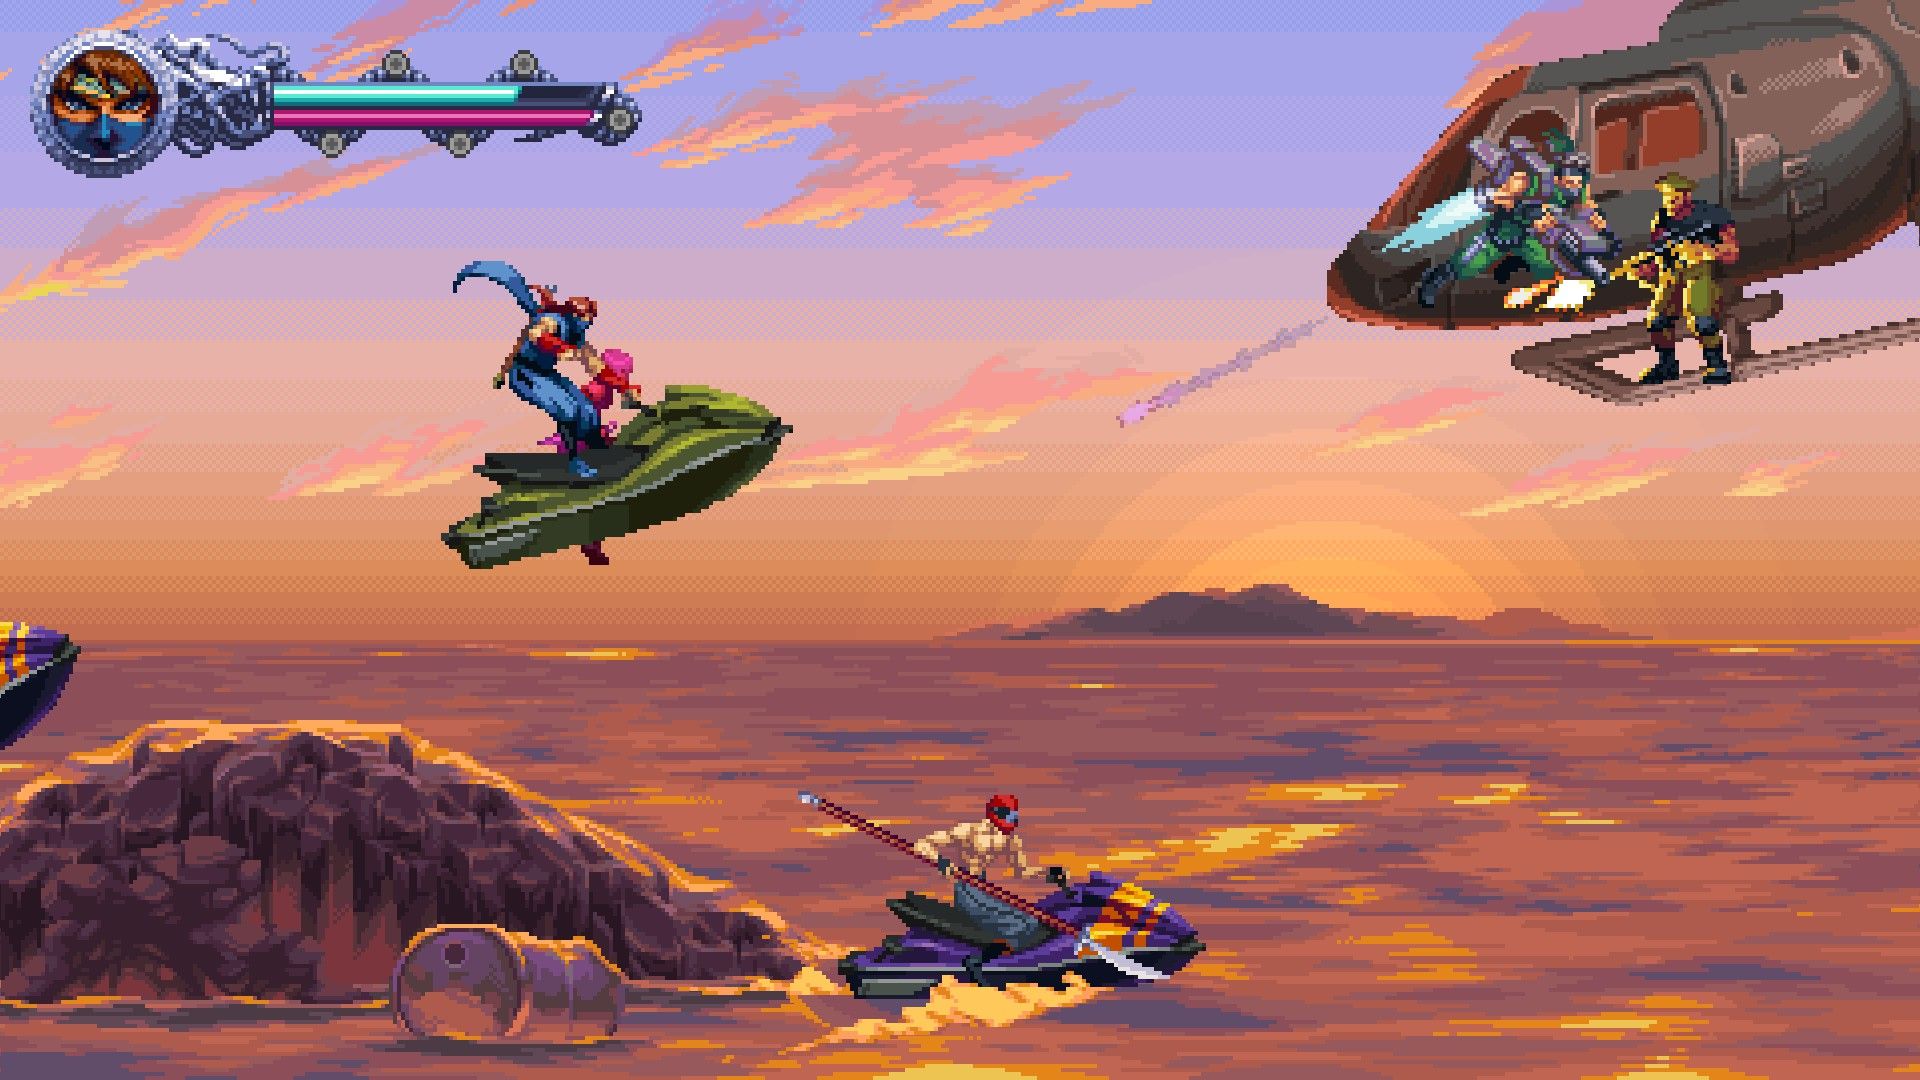
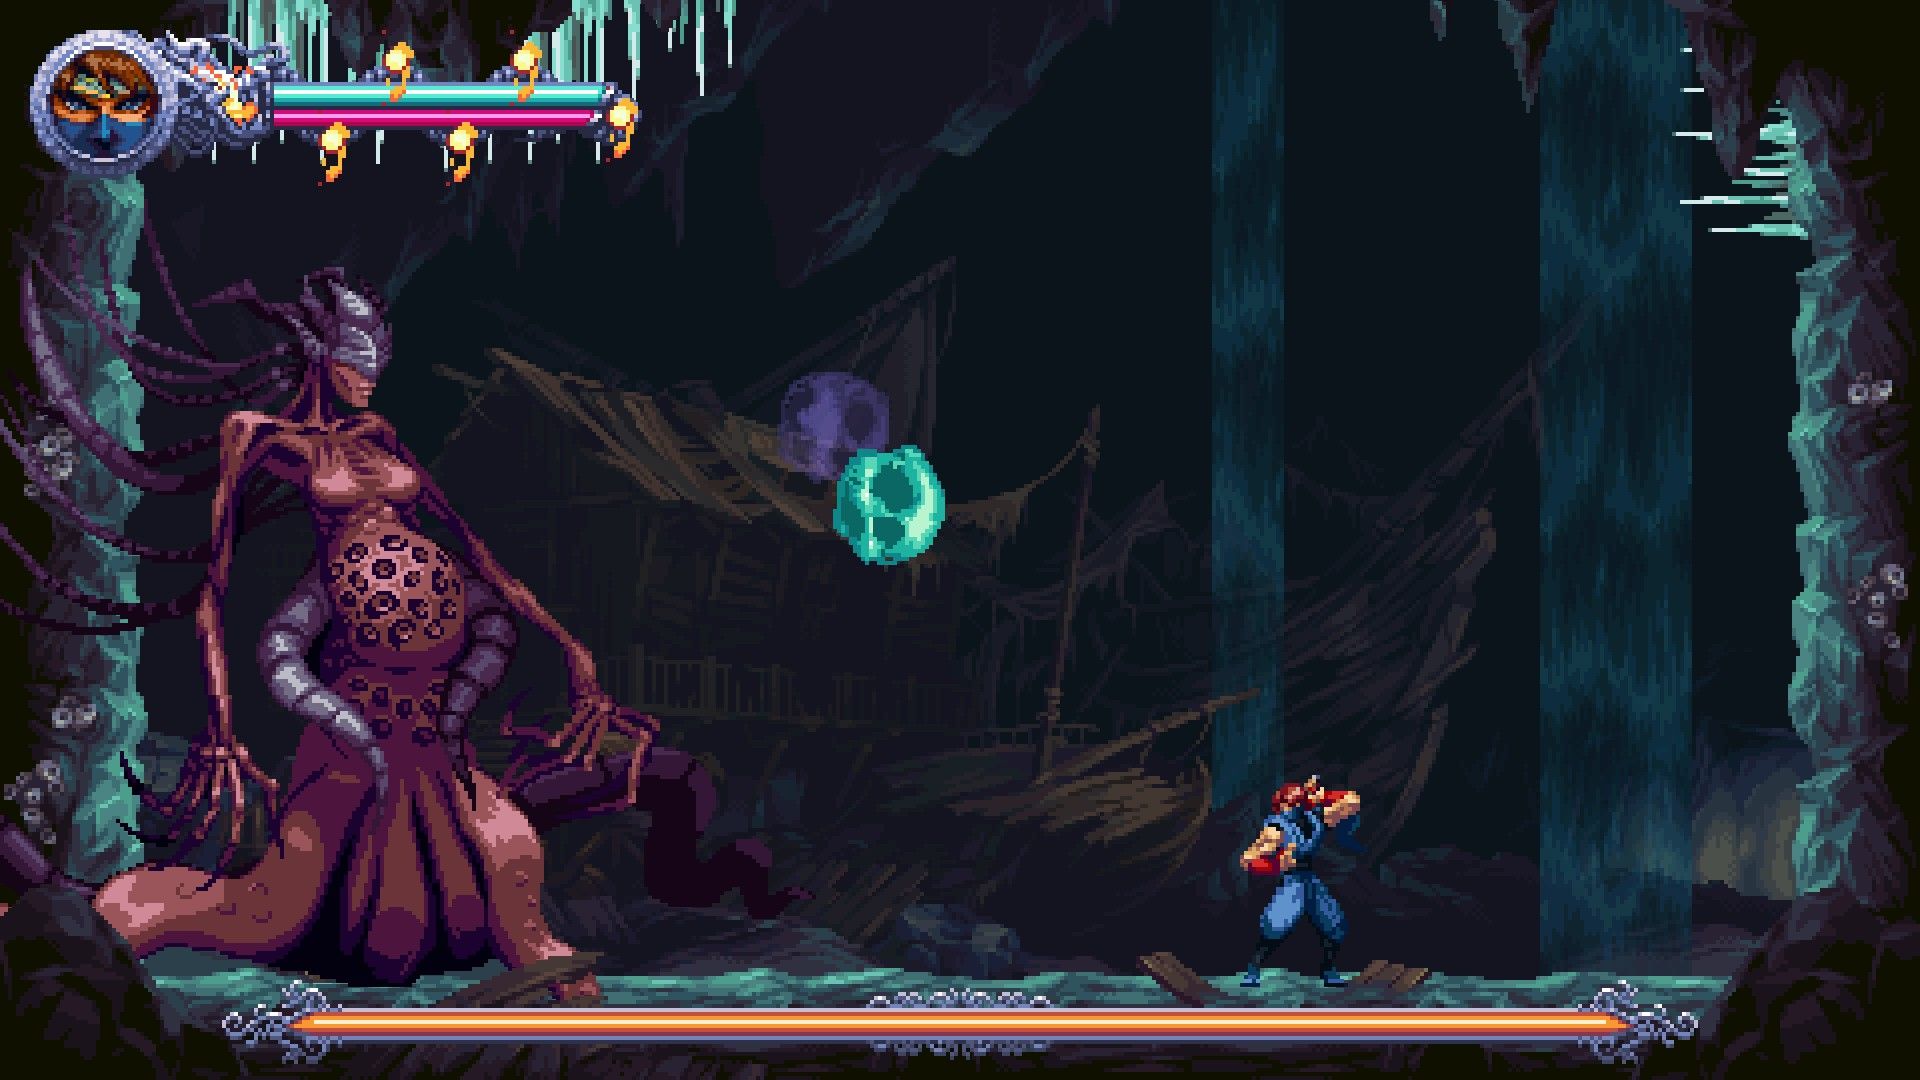
In the realm of pixel artistry, action platformer Ninja Gaiden: Ragebound is a pretty work of dither and parallax. It’s full of set pieces reminiscent of a misremembered arcade’s heyday. Between the more standard run ’n’ chop levels, there are jetski chasedowns, motorcycle pursuits, cargo train battles, bulldozer escapes, and gas chamber breakouts. If it didn’t frequently result in a death screen, I’d say it barely pauses for breath. The whole game is less a mineshaft of nostalgia as it is a shale fracking job, flushing you with jets of high pressure pseudomemory. I’m just a little sad that its strongest gimmick soon dissolves into the background, overwhelmed by floods of demon baddies.
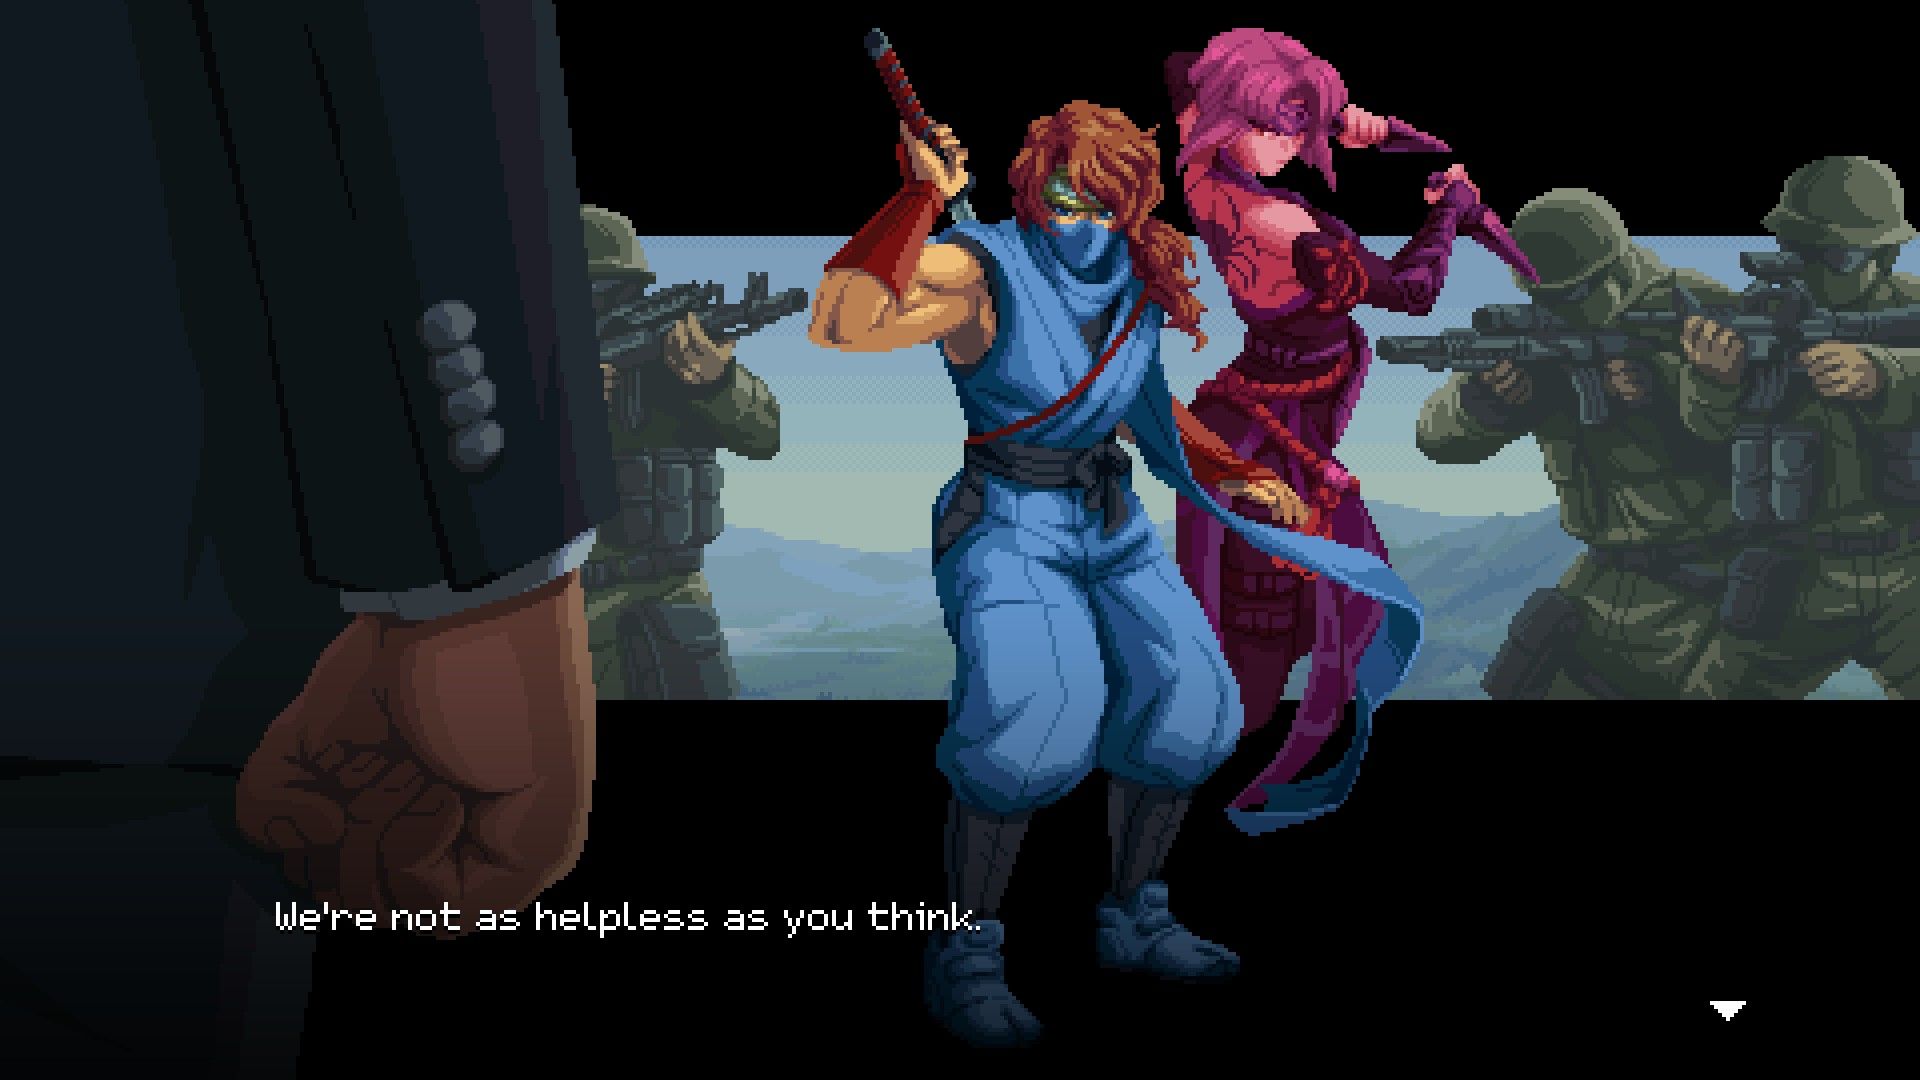
As you can probably tell, it’s a retro throwback to the Ninja Gaiden trilogy of yore, which originally appeared on NES and SNES in the 1990s. This is a sideways scrolling action wrecker full of dashing, slashing and ninja knife yeeting. The world is under threat by a demon lord who is manipulating those rascals in the CIA into releasing him from his infernal realm. You play a ninja lad (although not one fans will recognise) haunted by a purple-shaded phantom lass. Their clans are ancient enemies, but they’ve got to work together to get the demons stabbed. GO! ->

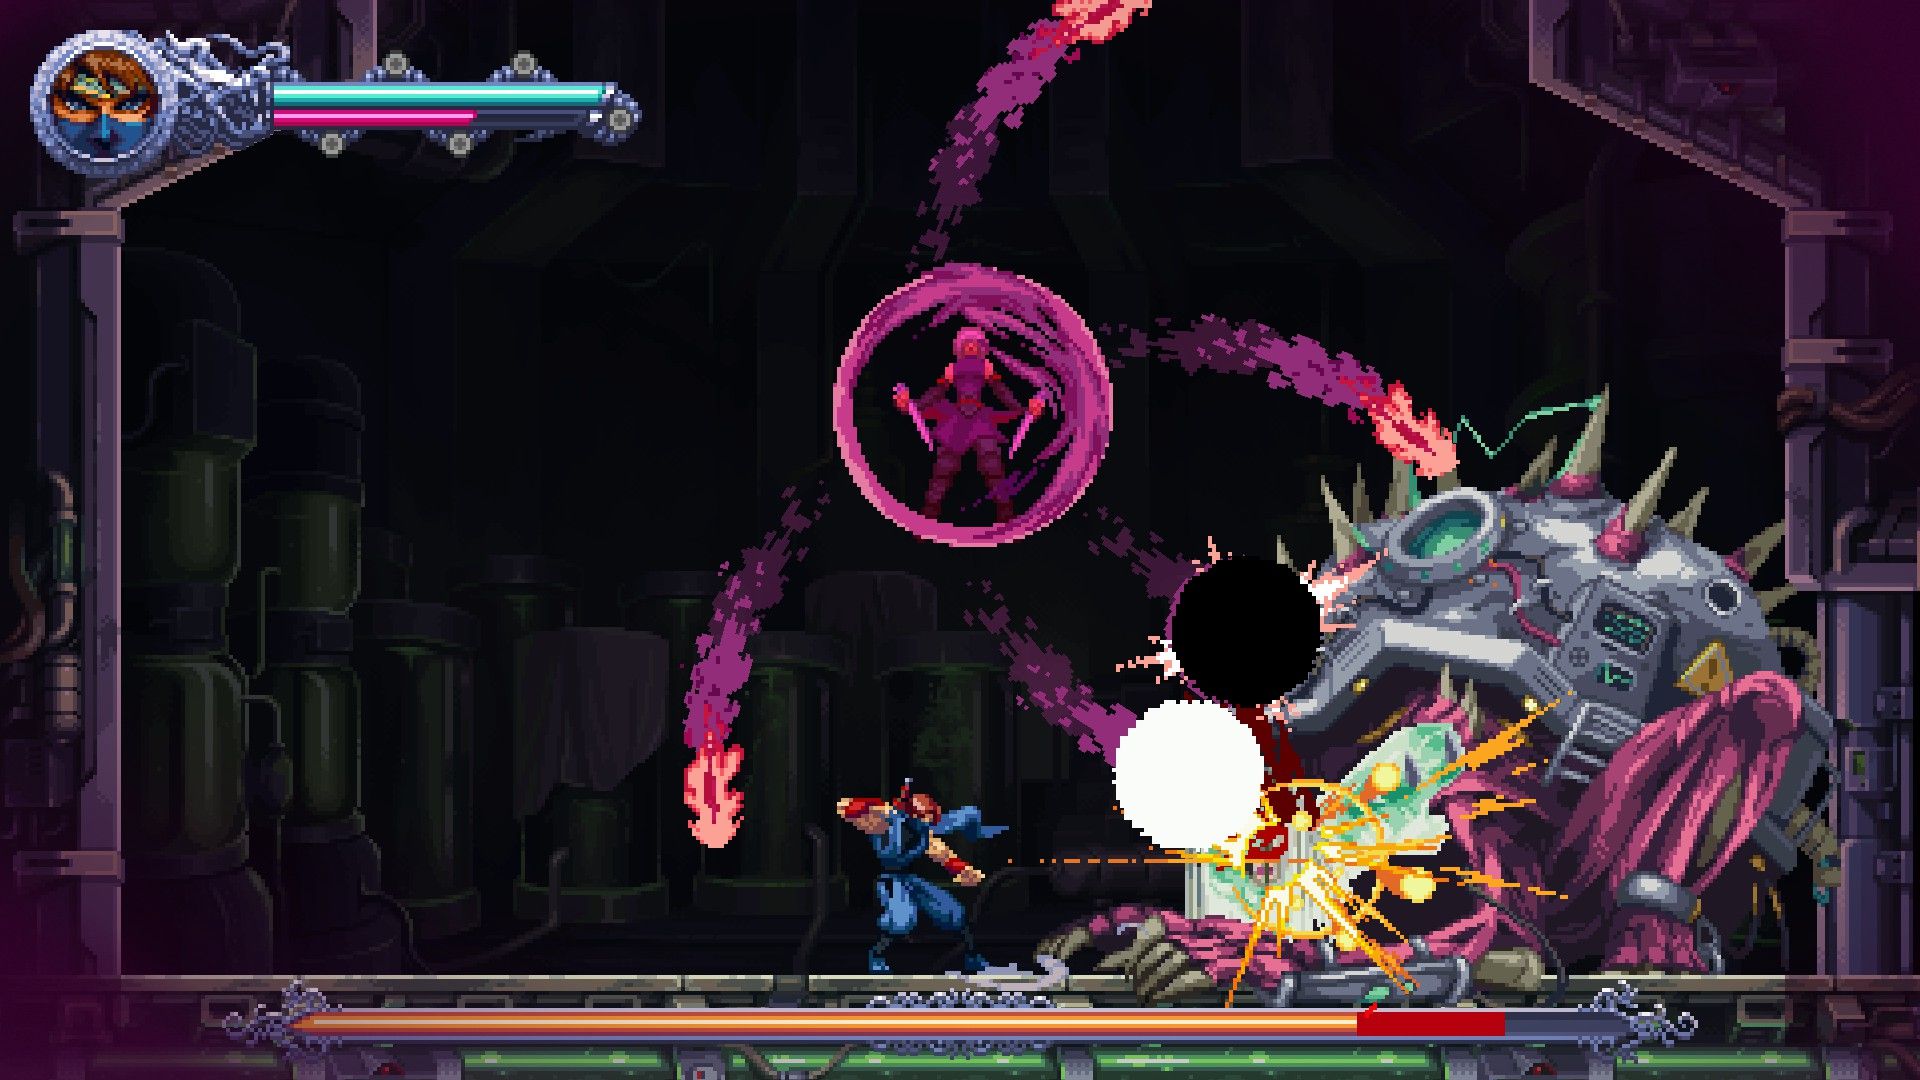
Ninjaboy handles the close-range dicing, while Purplegal puffs in and out of existence to perform ranged kunai-throwing attacks over his shoulder. You can bounce off an enemy’s head (or their projectile attacks) with a second well-timed tap of the jump button as you collide, and a dodge-roll can get you past shielded foes for a quick back-shiv. Harness stabbyboy and floatygirl together by pressing both sword and ranged attack buttons simultaneously, and you’ll activate a superpowered blast of projectiles (you can also swap out this ultimate attack for other unlockable options later).
If this was all there was to Ragebound, I’d quickly throw it into RPS’ big pile of pixel-peppered nostalgia bait, along with all the other low-res revisitations that recreate the olden days without investigating the layers of game design that have accumulated like sediment in the intervening decades (hello, every PS1 tank controls horror game with fixed cameras and nothing interesting to say). Luckily, there’s one other fancy trick to Game Kitchen’s ninja antics.
What a gender reveal party looked like in 1995. For a boy, a blue man with a sword appeared and cut throats. A purple ghost appeared and knifed everyone if it was a girl. |Image credit:Rock Paper Shotgun / Dotemu
Certain enemies glow blue or pink. Hit the blue buggers with the swordfella’s attack to become supercharged; cut down the pink pissants with ghostlady’s attack to become likewise charged-up. Mix up your colours by close-combatting a pink-coded baddie, for example, and you’ll miss out on the beefy glow of your next extra-powerful slice, an essential move you’ll need to cut down “blocker” enemies who slow down your sprint through the level. It’s only a thin layer of extra challenge, as you could technically batter your way through the whole game without using these super attacks. But the intention is clear: figure out a nippy run that instantaneously cuts down as many foes as possible in as quick a time as possible. This game is built for speedrunners.
In an earlier preview , I was impressed by the fluidity this feature granted to the levels. I liked that it leant into a “kill anything in one hit” philosophy - but only if you do things exactly in the right order, or with quick enough reflexes to at least fudge it. Those few enemies who took multiple whacks were sliceable in one bash, so long as you followed the patterns and pre-killed the correct enemy with the right-coloured attack.
This boss deserved it. |Image credit:Rock Paper Shotgun / Dotemu
But having now played the whole game, I’ve seen how this philosophy falters partway through. Many more enemies who require multiple slices appear, and sometimes even the glowing “charger” fodder who grant you that superslash will require more than one shanking. This does make it more challenging - something I’m sure plenty will relish - but it also slaps that sense of fluidity out of your hands and onto the floor. That’s especially true in later boss fights, where the rhythm becomes dictated by a classic pattern-discerning combat waltz.
You still need a fair amount of precision to get through levels, but I think that failure to commit hard to a totally precise lethality disappoints me. What early on seems like an invitation to dance and figure out a slick order of attack, becomes a more ordinary retro dash ’n’ slash once you’re slowed by the weight of button bashing more and more often.
It’s not punitive in its restarts and checkpointing, at least. You’ll rarely lose more than a few seconds when you tumble into a pit. But some places could’ve been refined and shortened even more. Why send me five seconds back outside a boss gate if the only way for me to go is straight back in there? It would be better to instantaneously begin the boss fight again.
Jet skis are in the ancient ninja texts as an anti-helicopter measure. |Image credit:Rock Paper Shotgun / Dotemu
I especially grated at some of these bosses, which are beautifully rendered yet also the most typical genre element in the entire game, all pattern recognition and multi-phase wreckage. How I feel about the reflex-honing and the trial-by-game-over approach is dependent on mood, motivation, and whether or not I just like how things feel in my hands. Facing Genichiro in Sekiro after countless failed attempts resulted in a series of perfectly practiced steps which felt downright transcendent to perform perfectly. In Ragebound, defeating a weird mutant slimeball feels… I don’t know, rewarding, I guess? I get better at beating things, sure, but sometimes it’s only just enough to make up for the frustration of taking another electrical globule of spit to the face.
They’re hit and miss, rather than all terrible. I liked a big bad battleship that had me pinballing around its many eye-like turrets while soldiers took pot shots from me at the sides. I liked the twin mega eels who required me to use both blue and pink super-cuts in a strange act of one-person teamwork. I did not like the hulking apebeast who ejected spikey crystals at me. Mostly because these crystals were the “charger” enemies I needed to destroy to become hyperviolently charged, and you needed to hit these crystals three times to crack them and earn that juiceboost. There was barely enough time to hit these crystals once or twice before the beastbastard was standing right on top of me again. Go away, you zoo reject.
This boss also deserved it. |Image credit:Rock Paper Shotgun / Dotemu
There is an assist mode, which might make some of my complaints moot, or might not. Generally speaking, I appreciate Kojima mentality of “pretend you won” when it comes to bosses. But Death Stranding 2 is a story-heavy game where bosses are wild outliers full of trash combat you haven’t been taught to expect. In something like Ninja Gaiden, the bosses arguably are the game. This makes me feel bad about bodging through them with a reduction to 75% damage or completely turning off knockbacks - assists I used more than once. It isn’t really meeting the game on its own terms. But I did make use of it, if only to speed the review along.

Some of the accessibility options available. |Image credit:Rock Paper Shotgun / Dotemu
Before you get into a flame war over assist modes (they’re fine, shut up) you should know there’s also plenty here for masochists. For instance, you’ll sometimes find golden scarabs, which can be spent on special talismans between levels. This can mean bonuses, like a health cashback for kills, or tricksy new weapons for Ms Purple to cast through walls. But there are a bunch of others that handicap you for no other reason than providing an extra challenge. As I say, speedrunners: rejoice.
There is one talisman that sends you the whole way back to the beginning of the stage when you die (rather than simply the last checkpoint), and another that triples any damage you receive. This universal approach to difficulty - providing both assist modes and extra hard modes - is neat. I don’t think many people actually do complain in good faith about assist modes (sorry I told you to shut up) but to anyone who might, know that Ninja Gaiden: Ragebound runs a sharpening shuriken along the spectrum of difficulty, and it will cut you as deeply or as shallowly as you please. I put the damage down to 0% to get through a tough bit where you dangle from a helicopter. Meanwhile, you can remove all health pickups from every level. Knock yourself out.

How I feel when typing captions 20 minutes before deadline. |Image credit:Rock Paper Shotgun / Dotemu
I should also stress that none of this difficulty tweaking eventually fixed my disappointment about the loss of early levels’ sense of fluency. In games like this, where a steady flow is gained by practice, I sometimes wonder: what is the least amount of practice I must invest before I feel that sense of flow? In early sequences, Ragebound asks very little investment: you quickly earn a basic understanding of all the dashing, dodging, slashing, and boinging required to bloodstomp through an average level with a speedrunner’s abandon.
But later, particularly in some of those bosses, the time requirements for practice spike, and you’re forced to run the rigamarole of repetition expected of an arcade machine. This I have less desire to indulge, even if it does result in a game that feels like a perfect challenge for anyone who has finally drained all 50 games in UFO 50 of their sport. I can only speak for myself, someone who is effectively remembering a game I never actually played. Unsurprisingly, that anti-memory is not enough to goad me into the hard mode that appears, like a toothless boxer’s grin, when you complete the game.
Find out how we conduct our reviews by reading our review policy .
Ninja Gaiden: Ragebound
PC
Rock Paper Shotgun is better when you sign in
Sign in and join us on our journey to discover strange and compelling PC games.

All 75 Arc Raiders Blueprints and where to get them
These areas have the highest chance of giving you Blueprints

Image credit:Rock Paper Shotgun/Embark Studios

Looking for more Arc Raiders Blueprints? It’s a special day when you find a Blueprint, as they’re among the most valuable items in Arc Raiders. If you find a Blueprint that you haven’t already found, then you must make sure you hold onto it at all costs, because Blueprints are the key to one of the most important and powerful systems of meta-progression in the game.
This guide aims to be the very best guide on Blueprints you can find, starting with a primer on what exactly they are and how they work in Arc Raiders, before delving into exactly where to get Blueprints and the very best farming spots for you to take in your search.
We’ll also go over how to get Blueprints from other unlikely activities, such as destroying Surveyors and completing specific quests. And you’ll also find the full list of all 75 Blueprints in Arc Raiders on this page (including the newest Blueprints added with the Cold Snap update , such as the Deadline Blueprint and Firework Box Blueprint), giving you all the information you need to expand your own crafting repertoire.
In this guide:
- What are Blueprints in Arc Raiders?
- Full Blueprint list: All crafting recipes
- Where to find Blueprints in Arc Raiders Blueprints obtained from quests Blueprints obtained from Trials Best Blueprint farming locations

What are Blueprints in Arc Raiders?
Blueprints in Arc Raiders are special items which, if you manage to extract with them, you can expend to permanently unlock a new crafting recipe in your Workshop. If you manage to extract from a raid with an Anvil Blueprint, for example, you can unlock the ability to craft your very own Anvil Pistol, as many times as you like (as long as you have the crafting materials).
To use a Blueprint, simply open your Inventory while in the lobby, then right-click on the Blueprint and click “Learn And Consume” . This will permanently unlock the recipe for that item in your Workshop. As of the Stella Montis update, there are allegedly 75 different Blueprints to unlock - although only 68 are confirmed to be in the game so far. You can see all the Blueprints you’ve found and unlocked by going to the Workshop menu, and hitting “R” to bring up the Blueprint screen.
It’s possible to find duplicates of past Blueprints you’ve already unlocked. If you find these, then you can either sell them, or - if you like to play with friends - you can take it into a match and gift it to your friend so they can unlock that recipe for themselves. Another option is to keep hold of them until the time comes to donate them to the Expedition.
Full Blueprint list: All crafting recipes
Below is the full list of all the Blueprints that are currently available to find in Arc Raiders, and the crafting recipe required for each item:
| Blueprint | Type | Recipe | Crafted At |
|---|---|---|---|
| Bettina | Weapon | 3x Advanced Mechanical Components 3x Heavy Gun Parts 3x Canister | Gunsmith 3 |
| Blue Light Stick | Quick Use | 3x Chemicals | Utility Station 1 |
| Aphelion | Weapon | 3x Magnetic Accelerator 3x Complex Gun Parts 1x Matriarch Reactor | Gunsmith 3 |
| Combat Mk. 3 (Flanking) | Augment | 2x Advanced Electrical Components 3x Processor | Gear Bench 3 |
| Combat Mk. 3 (Aggressive) | Augment | 2x Advanced Electrical Components 3x Processor | Gear Bench 3 |
| Complex Gun Parts | Material | 2x Light Gun Parts 2x Medium Gun Parts 2x Heavy Gun Parts | Refiner 3 |
| Fireworks Box | Quick Use | 1x Explosive Compound 3x Pop Trigger | Explosives Station 2 |
| Gas Mine | Mine | 4x Chemicals 2x Rubber Parts | Explosives Station 1 |
| Green Light Stick | Quick Use | 3x Chemicals | Utility Station 1 |
| Pulse Mine | Mine | 1x Crude Explosives 1x Wires | Explosives Station 1 |
| Seeker Grenade | Grenade | 1x Crude Explosives 2x ARC Alloy | Explosives Station 1 |
| Looting Mk. 3 (Survivor) | Augment | 2x Advanced Electrical Components 3x Processor | Gear Bench 3 |
| Angled Grip II | Mod | 2x Mechanical Components 3x Duct Tape | Gunsmith 2 |
| Angled Grip III | Mod | 2x Mod Components 5x Duct Tape | Gunsmith 3 |
| Hullcracker | Weapon | 1x Magnetic Accelerator 3x Heavy Gun Parts 1x Exodus Modules | Gunsmith 3 |
| Launcher Ammo | Ammo | 5x Metal Parts 1x Crude Explosives | Workbench 1 |
| Anvil | Weapon | 5x Mechanical Components 5x Simple Gun Parts | Gunsmith 2 |
| Anvil Splitter | Mod | 2x Mod Components 3x Processor | Gunsmith 3 |
| ??? | ??? | ??? | ??? |
| Barricade Kit | Quick Use | 1x Mechanical Components | Utility Station 2 |
| Blaze Grenade | Grenade | 1x Explosive Compound 2x Oil | Explosives Station 3 |
| Bobcat | Weapon | 3x Advanced Mechanical Components 3x Light Gun Parts | Gunsmith 3 |
| Osprey | Weapon | 2x Advanced Mechanical Components 3x Medium Gun Parts 7x Wires | Gunsmith 3 |
| Burletta | Weapon | 3x Mechanical Components 3x Simple Gun Parts | Gunsmith 1 |
| Compensator II | Mod | 2x Mechanical Components 4x Wires | Gunsmith 2 |
| Compensator III | Mod | 2x Mod Components 8x Wires | Gunsmith 3 |
| Defibrillator | Quick Use | 9x Plastic Parts 1x Moss | Medical Lab 2 |
| ??? | ??? | ??? | ??? |
| Equalizer | Weapon | 3x Magnetic Accelerator 3x Complex Gun Parts 1x Queen Reactor | Gunsmith 3 |
| Extended Barrel | Mod | 2x Mod Components 8x Wires | Gunsmith 3 |
| Extended Light Mag II | Mod | 2x Mechanical Components 3x Steel Spring | Gunsmith 2 |
| Extended Light Mag III | Mod | 2x Mod Components 5x Steel Spring | Gunsmith 3 |
| Extended Medium Mag II | Mod | 2x Mechanical Components 3x Steel Spring | Gunsmith 2 |
| Extended Medium Mag III | Mod | 2x Mod Components 5x Steel Spring | Gunsmith 3 |
| Extended Shotgun Mag II | Mod | 2x Mechanical Components 3x Steel Spring | Gunsmith 2 |
| Extended Shotgun Mag III | Mod | 2x Mod Components 5x Steel Spring | Gunsmith 3 |
| Remote Raider Flare | Quick Use | 2x Chemicals 4x Rubber Parts | Utility Station 1 |
| Heavy Gun Parts | Material | 4x Simple Gun Parts | Refiner 2 |
| Venator | Weapon | 2x Advanced Mechanical Components 3x Medium Gun Parts 5x Magnet | Gunsmith 3 |
| Il Toro | Weapon | 5x Mechanical Components 6x Simple Gun Parts | Gunsmith 1 |
| Jolt Mine | Mine | 1x Electrical Components 1x Battery | Explosives Station 2 |
| Explosive Mine | Mine | 1x Explosive Compound 1x Sensors | Explosives Station 3 |
| Jupiter | Weapon | 3x Magnetic Accelerator 3x Complex Gun Parts 1x Queen Reactor | Gunsmith 3 |
| Light Gun Parts | Material | 4x Simple Gun Parts | Refiner 2 |
| Lightweight Stock | Mod | 2x Mod Components 5x Duct Tape | Gunsmith 3 |
| Lure Grenade | Grenade | 1x Speaker Component 1x Electrical Components | Utility Station 2 |
| Medium Gun Parts | Material | 4x Simple Gun Parts | Refiner 2 |
| Torrente | Weapon | 2x Advanced Mechanical Components 3x Medium Gun Parts 6x Steel Spring | Gunsmith 3 |
| Muzzle Brake II | Mod | 2x Mechanical Components 4x Wires | Gunsmith 2 |
| Muzzle Brake III | Mod | 2x Mod Components 8x Wires | Gunsmith 3 |
| Padded Stock | Mod | 2x Mod Components 5x Duct Tape | Gunsmith 3 |
| Shotgun Choke II | Mod | 2x Mechanical Components 4x Wires | Gunsmith 2 |
| Shotgun Choke III | Mod | 2x Mod Components 8x Wires | Gunsmith 3 |
| Shotgun Silencer | Mod | 2x Mod Components 8x Wires | Gunsmith 3 |
| Showstopper | Grenade | 1x Advanced Electrical Components 1x Voltage Converter | Explosives Station 3 |
| Silencer I | Mod | 2x Mechanical Components 4x Wires | Gunsmith 2 |
| Silencer II | Mod | 2x Mod Components 8x Wires | Gunsmith 3 |
| Snap Hook | Quick Use | 2x Power Rod 3x Rope 1x Exodus Modules | Utility Station 3 |
| Stable Stock II | Mod | 2x Mechanical Components 3x Duct Tape | Gunsmith 2 |
| Stable Stock III | Mod | 2x Mod Components 5x Duct Tape | Gunsmith 3 |
| Tagging Grenade | Grenade | 1x Electrical Components 1x Sensors | Utility Station 3 |
| Tempest | Weapon | 3x Advanced Mechanical Components 3x Medium Gun Parts 3x Canister | Gunsmith 3 |
| Trigger Nade | Grenade | 2x Crude Explosives 1x Processor | Explosives Station 2 |
| Vertical Grip II | Mod | 2x Mechanical Components 3x Duct Tape | Gunsmith 2 |
| Vertical Grip III | Mod | 2x Mod Components 5x Duct Tape | Gunsmith 3 |
| Vita Shot | Quick Use | 2x Antiseptic 1x Syringe | Medical Lab 3 |
| Vita Spray | Quick Use | 3x Antiseptic 1x Canister | Medical Lab 3 |
| Vulcano | Weapon | 1x Magnetic Accelerator 3x Heavy Gun Parts 1x Exodus Modules | Gunsmith 3 |
| Wolfpack | Grenade | 2x Explosive Compound 2x Sensors | Explosives Station 3 |
| Red Light Stick | Quick Use | 3x Chemicals | Utility Station 1 |
| Smoke Grenade | Grenade | 14x Chemicals 1x Canister | Utility Station 2 |
| Deadline | Mine | 3x Explosive Compound 2x ARC Circuitry | Explosives Station 3 |
| Trailblazer | Grenade | 1x Explosive Compound 1x Synthesized Fuel | Explosives Station 3 |
| Tactical Mk. 3 (Defensive) | Augment | 2x Advanced Electrical Components 3x Processor | Gear Bench 3 |
| Tactical Mk. 3 (Healing) | Augment | 2x Advanced Electrical Components 3x Processor | Gear Bench 3 |
| Yellow Light Stick | Quick Use | 3x Chemicals | Utility Station 1 |
Note: The missing Blueprints in this list likely have not actually been added to the game at the time of writing, because none of the playerbase has managed to find any of them. As they are added to the game, I will update this page with the most relevant information so you know exactly how to get all 75 Arc Raiders Blueprints.
Where to find Blueprints in Arc Raiders
Below is a list of all containers, modifiers, and events which maximise your chances of finding Blueprints:
- Certain quests reward you with specific Blueprints .
- Completing Trials has a high chance of offering Blueprints as rewards.
- Surveyors have a decent chance of dropping Blueprints on death.
- High loot value areas tend to have a greater chance of spawning Blueprints.
- Night Raids and Storms may increase rare Blueprint spawn chances in containers.
- Containers with higher numbers of items may have a higher tendency to spawn Blueprints. As a result, Blue Gate (which has many “large” containers containing multiple items) may give you a higher chance of spawning Blueprints.
- Raider containers (Raider Caches, Weapon Boxes, Medical Bags, Grenade Tubes) have increased Blueprint drop rates. As a result, the Uncovered Caches event gives you a high chance of finding Blueprints.
- Security Lockers have a higher than average chance of containing Blueprints.
- Certain Blueprints only seem to spawn under specific circumstances: Tempest Blueprint only spawns during Night Raid events. Vulcano Blueprint only spawns during Hidden Bunker events. Jupiter and Equaliser Blueprints only spawn during Harvester events.

Raider Caches, Weapon Boxes, and other raider-oriented container types have a good chance of offering Blueprints. |Image credit:Rock Paper Shotgun/Embark Studios
Blueprints have a very low chance of spawning in any container in Arc Raiders, around 1-2% on average. However, there is a higher chance of finding Blueprints in particular container types. Specifically, you can find more Blueprints in Raider containers and security lockers.
Beyond this, if you’re looking for Blueprints you should focus on regions of the map which are marked as having particularly high-value loot. Areas such as the Control Tower in Dam Battlegrounds, the Arrival and Departure Buildings in Spaceport, and Pilgrim’s Peak in Blue Gate all have a better-than-average chance of spawning Blueprints somewhere amongst all their containers. Night Raids and Electromagnetic Storm events also increase the drop chances of certain Blueprints .
In addition to these containers, you can often loot Blueprints from destroyed Surveyors - the largest of the rolling ball ARC. Surveyors are more commonly found on the later maps - Spaceport and Blue Gate - and if one spawns in your match, you’ll likely see it by the blue laser beam that it casts into the sky while “surveying”.
Surveyors are quite well-armoured and will very speedily run away from you once it notices you, but if you can take one down then make sure you loot all its parts for a chance of obtaining certain unusual Blueprints.
Blueprints obtained from quests
One way in which you can get Blueprints is by completing certain quests for the vendors in Speranza. Some quests will reward you with a specific item Blueprint upon completion, so as long as you work through all the quests in Arc Raiders, you are guaranteed those Blueprints.
Here is the full list of all Blueprints you can get from quest rewards:
- Trigger Nade Blueprint: Rewarded after completing “Sparks Fly”.
- Lure Grenade Blueprint: Rewarded after completing “Greasing Her Palms”.
- Burletta Blueprint: Rewarded after completing “Industrial Espionage”.
- Hullcracker Blueprint (and Launcher Ammo Blueprint): Rewarded after completing “The Major’s Footlocker”.
Alas, that’s only 4 Blueprints out of a total of 75 to unlock, so for the vast majority you will need to find them yourself during a raid. If you’re intent on farming Blueprints, then it’s best to equip yourself with cheap gear in case you lose it, but don’t use a free loadout because then you won’t get a safe pocket to stash any new Blueprint you find. No pain in Arc Raiders is sharper than failing to extract with a new Blueprint you’ve been after for a dozen hours already.

One of the best ways to get Blueprints is by hitting three stars on all five Trials every week. |Image credit:Rock Paper Shotgun/Embark Studios
Blueprints obtained from Trials
One of the very best ways to get Blueprints is as rewards for completing Trials in Arc Raiders. Trials are unlocked from Level 15 onwards, and allow you to earn rewards by focusing on certain tasks over the course of several raids. For example, one Trial might task you with dealing damage to Hornets, while another might challenge you to loot Supply Drops.
Trials refresh on a weekly basis, with a new week bringing five new Trials. Each Trial can offer up to three rewards after passing certain score milestones, and it’s possible to receive very high level loot from these reward crates - including Blueprints. So if you want to unlock as many Blueprints as possible, you should make a point of completing as many Trials as possible each week.
Best Blueprint farming locations
The very best way to get Blueprints is to frequent specific areas of the maps which combine high-tier loot pools with the right types of containers to search. Here are my recommendations for where to find Blueprints on every map, so you can always keep the search going for new crafting recipes to unlock.

Image credit:Rock Paper Shotgun/Embark Studios
Dam Battlegrounds
The best places to farm Blueprints on Dam Battlegrounds are the Control Tower, Power Generation Complex, Ruby Residence, and Pale Apartments . The first two regions, despite only being marked on the map as mid-tier loot, contain a phenomenal number of containers to loot. The Control Tower can also contain a couple of high-tier Security Lockers - though of course, you’ll need to have unlocked the Security Breach skill at the end of the Survival tree.
There’s also a lot of reporting amongst the playerbase that the Residential areas in the top-left of the map - Pale Apartments and Ruby Residence - give you a comparatively strong chance of finding Blueprints. Considering their size, there’s a high density of containers to loot in both locations, and they also have the benefit of being fairly out of the way. So you’re more likely to have all the containers to yourself.
Buried City
The best Blueprint farming locations on Buried City are the Santa Maria Houses, Grandioso Apartments, Town Hall, and the various buildings of the New District . Grandioso Apartments has a lower number of containers than the rest, but a high chance of spawning weapon cases - which have good Blueprint drop rates. The others are high-tier loot areas, with plenty of lootable containers - including Security Lockers.
Spaceport
The best places to find Blueprints on Spaceport are the Arrival and Departure Buildings, as well as Control Tower A6 and the Launch Towers . All these areas are labelled as high-value loot regions, and many of them are also very handily connected to one another by the Spaceport wall, which you can use to quickly run from one area to the next. At the tops of most of these buildings you’ll find at least one Security Locker, so this is an excellent farming route for players looking to find Blueprints.
The downside to looting Blueprints on Spaceport is that all these areas are hotly contested, particularly in Duos and Squads. You’ll need to be very focused and fast in order to complete the full farming route.

Image credit:Rock Paper Shotgun/Embark Studios
Blue Gate
Blue Gate tends to have a good chance of dropping Blueprints, potentially because it generally has a high number of containers which can hold lots of items; so there’s a higher chance of a Blueprint spawning in each container. In my experience, the best Blueprint farming spots on Blue Gate are Pilgrim’s Peak, Raider’s Refuge, the Ancient Fort, and the Underground Complex beneath the Warehouse .
All of these areas contain a wealth of containers to loot. Raider’s Refuge has less to loot, but the majority of the containers in and around the Refuge are raider containers, which have a high chance of containing Blueprints - particularly during major events.
Stella Montis
On the whole, Stella Montis seems to have a very low drop rate for Blueprints (though a high chance of dropping other high-tier loot). If you do want to try farming Blueprints on this map, the best places to find Blueprints in Stella Montis are Medical Research, Assembly Workshop, and the Business Center . These areas have the highest density of containers to loot on the map.
In addition to this, the Western Tunnel has a few different Security Lockers to loot, so while there’s very little to loot elsewhere in this area of the map, it’s worth hitting those Security Lockers if you spawn there at the start of a match.
That wraps up this primer on how to get all the Blueprints in Arc Raiders as quickly as possible. With the Expedition system constantly resetting a large number of players’ Blueprints, it’s more important than ever to have the most up-to-date information on where to find all these Blueprints.
While you’re here, be sure to check out our Arc Raiders best guns tier list , as well as our primers on the best skills to unlock and all the different Field Depot locations on every map.

ARC Raiders
PS5 , Xbox Series X/S , PC
Rock Paper Shotgun is better when you sign in
Sign in and join us on our journey to discover strange and compelling PC games.
