Leda questline guide - Elden Ring: Shadow Of The Erdtree
Here is a full walkthrough of Leda’s sidequest and all possible outcomes

Image credit:Rock Paper Shotgun/Bandai Namco

Looking for a walkthrough of the Needle Knight Leda quest in Elden Ring: Shadow Of The Erdtree? Needle Knight Leda is a dedicated follower of Miquella in Shadow Of The Erdtree . So much so, that she plays a primary role in guiding the Tarnished through the Land of Shadow, following Kindly Miquella’s footsteps in the correct progression order .
Leda has a group of allies. Naturally, this means she has the largest, most complex quest that spans across multiple NPC questlines too. Read our full rundown of Leda’s quest in Elden Ring to make sure you don’t miss out on important Leda questline steps and to make informed decisions about choices like ‘assist Leda or Hornsent’ ‘assist Ansbach or Leda’ with all outcomes and rewards listed.
Elden Ring Leda questline steps
Below is a summary of the key Leda quest steps in Shadow Of The Erdtree . We recommend seeing our full explanation for each stage below this, however, as this is a quest with many winding paths and will take you throughout the DLC, right to the last boss. We also have a full summary section which details which NPCs will side with or against you in the penultimate fight of the DLC.
Here are the key steps for Leda’s questline in Elden Ring:
- Speak to Leda in Mohgwyn Palace and touch the withered arm as instructed.
- Optional: Pick up the note from Leda inside Belurat, Tower Settlement (beyond the Divine Beast Dancing Lion boss arena).
- Travel to Scadu Altus either via the Fort of Reprimand route or through Castle Ensis.
- Optional: Pick up the note from Leda at the Castle Ensis Checkpoint Site Of Grace.
- Optional: Summon Leda or Dryleaf Dane for the boss of Castle Ensis, Rellana, Twin Moon Knight .
- Meet with Leda again, this time at the Highroad Cross Site Of Grace in Scadu Altus.
- Break Miquella’s charm.
- Speak to Leda at the Highroad Cross and choose either Hornsent or Thiollier .
- Within the Shadow Keep, choose from gold and red summoning signs to either aid Hornsent or Leda in their fight.
- Defeat Messmer.
- Speak again to Leda at the Highroad Cross. Otherwise, her quest will pause here if you choose to assist Hornsent and will continue in Enir-Ilim.
- Find the Secret Rite Scroll and deliver it to Ansbach within the Specimen Storehouse (first floor) of the Shadow Keep.
- Aid either Ansbach or Leda. Choose from the summoning signs in Ansbach’s room at the Shadow Keep.
- Progress through the main story and reach Enir-Ilim. To do so, travel to the Church of the Bud in the Ancient Ruins of Rauh, beat the boss there ( Romina, Saint of the Bud ) and use Messmer’s fire on the Sealing Tree.
- After burning the tree beyond the church and travelling to Enir-Ilim, advance to the Cleansing Chamber Anteroom Site Of Grace.
- Fight Leda and her allies . The enemies and summons available to you will depend on the choices you have made so far. See our final fight section for more details.
How to start the Knight Leda quest in Shadow Of The Erdtree
As mentioned above, Leda is the very first NPC you’ll encounter in the Shadow Of The Erdtree DLC. She is a Knight of Miquella and a staunch loyalist who promises to offer you aid in the Land of Shadow if you follow the footsteps of Kindly Miquella.
This promise does come to fruition as Leda acts as something of a guide, offering clues as to where you need to go to progress the main quest of finding Miquella.

You’ll need to progress through Castle Ensis to get to the Scadu Altus region. |Image credit:Rock Paper Shotgun/Bandai Namco
After touching the withered arm in Mohgwyn Palace , feel free to explore the Gravesite Plain and the first major legacy dungeon, Belurat, Tower Settlement. At the top will be the first boss of the game, the Divine Beast Dancing Lion . Once defeated, take the lift to the top of the tower and you’ll find a note left behind by Leda and her followers, instructing you that they have headed to The Shadow Keep in Scadu Altus. This is your next destination.
How to get to Scadu Altus
There are two major ways to enter the Scadu Altus region. The first is to make your way to Castle Ensis in the eastern region of the Gravesite Plain. The second is to travel via the southeastern road from the Castle Front Site Of Grace and take a few Spiritsprings from below the Fort of Reprimand.
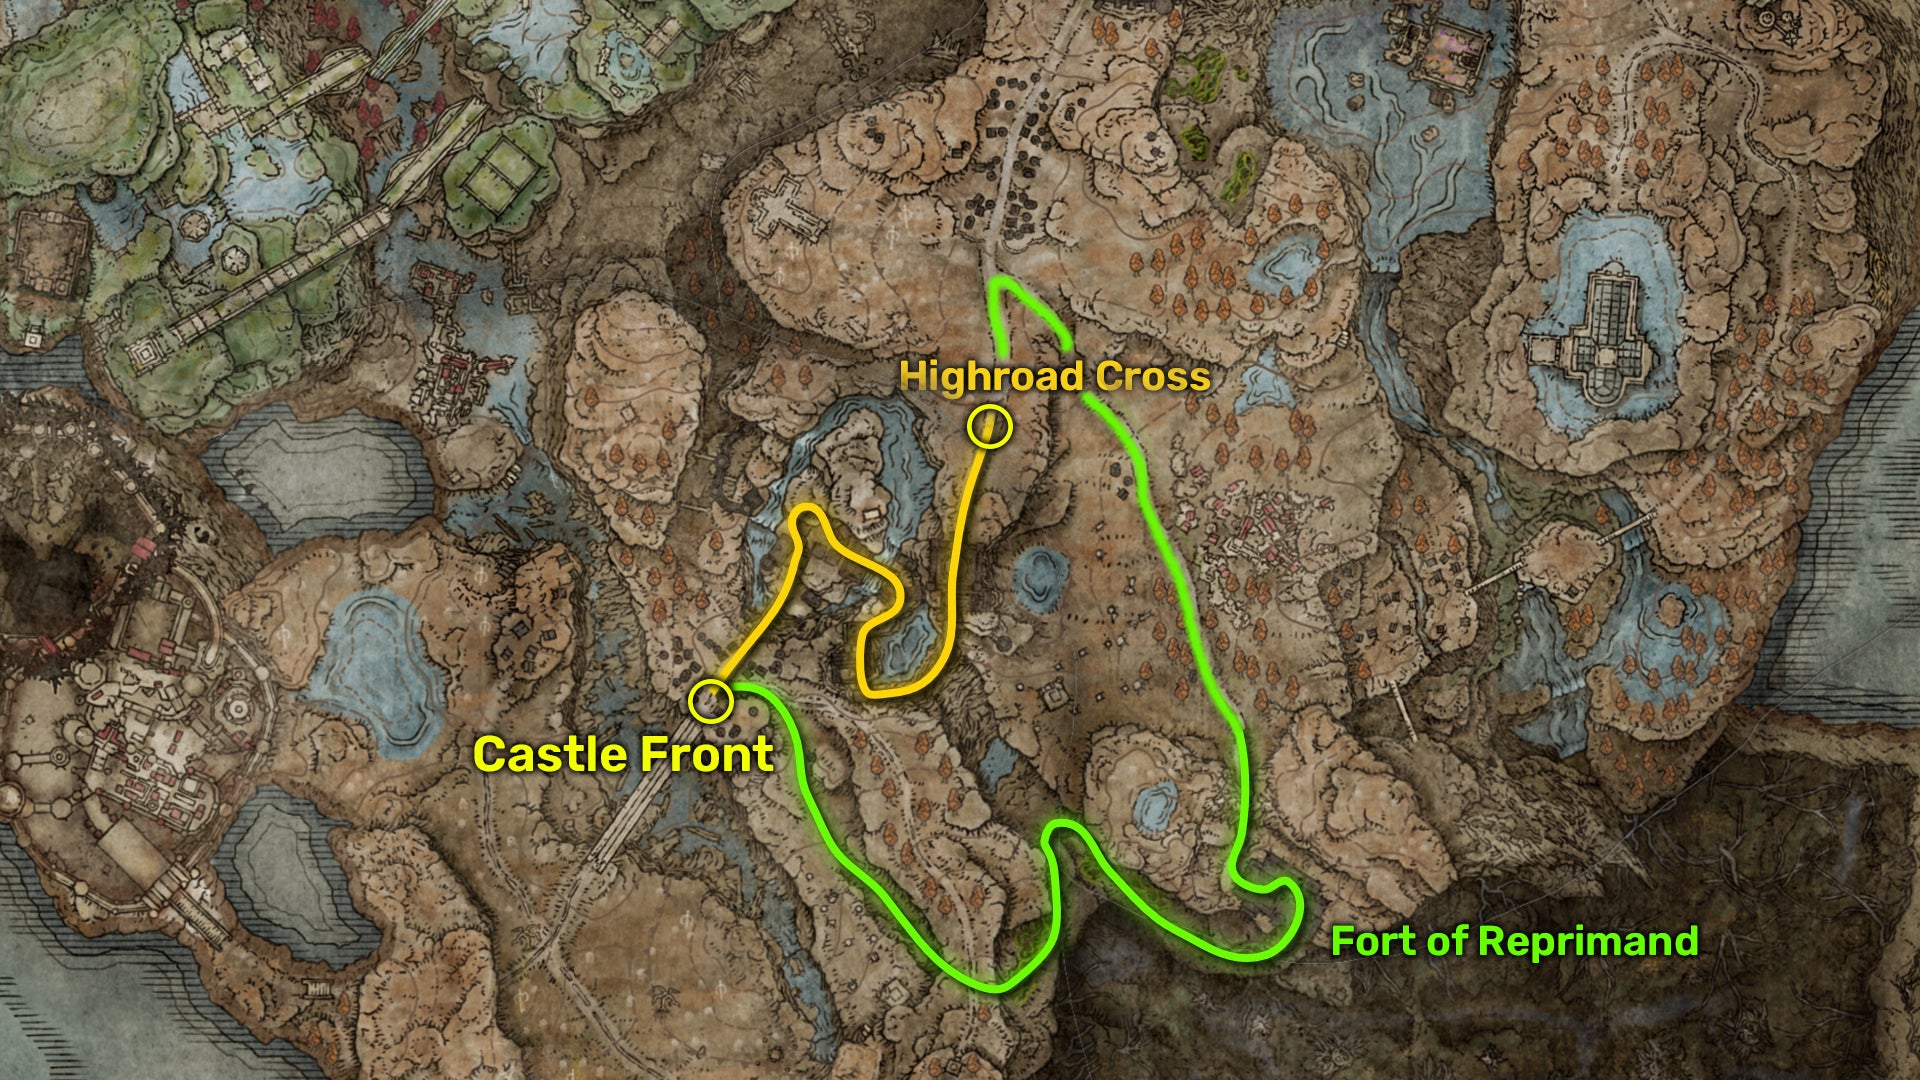
Here are both the optional routes into Scadu Altus. |Image credit:Rock Paper Shotgun/Bandai Namco
If you choose Castle Ensis, there will be a letter from Leda at the Castle Ensis Checkpoint Site Of Grace , which explains that the tower of shadow is locked behind shadowy branches. To expel the branches and reach Miquella, you’ll need to go to the ruins beyond the Shadow Keep and ‘burn the tree that seals the path’.
In short, the way forward and the next time you meet Leda will be at the Highroad Cross Site Of Grace in Scadu Altus. To progress through Castle Ensis you’ll need to defeat Rellana, Twin Moon Knight . For this fight, you can summon either Leda or Dryleaf Dane to assist you.
Meet Leda at the Highroad Cross
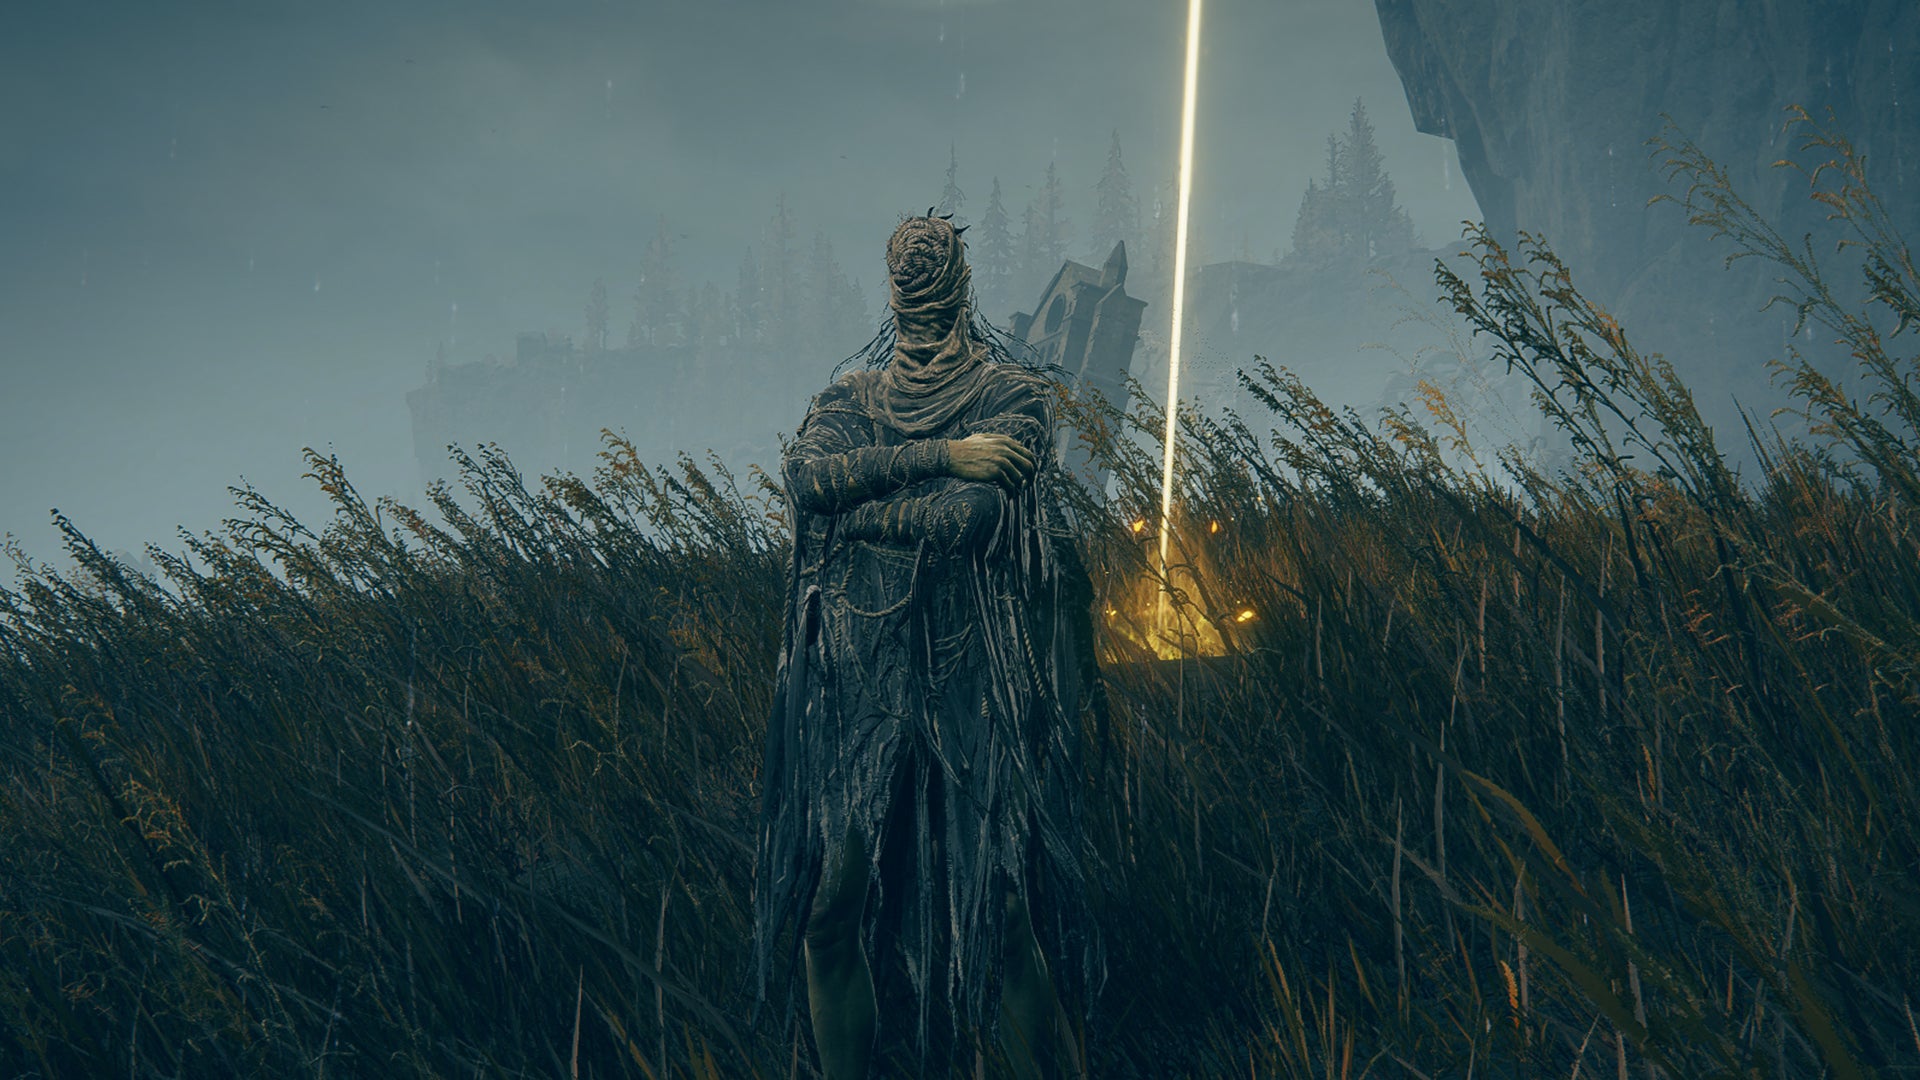
When Marika installed Messmer in the Land of Shadow, he started an unjust ‘culling’ of the Hornsent’s people. |Image credit:Rock Paper Shotgun/Bandai Namco
After travelling to the Highroad Cross Site Of Grace, Leda will explain that Miquella has placed a charm on her fellow travellers which has allowed them to serve Miquella together and quelled any friction amongst them.
Here, you can pick up the ‘Monk’s Missive’ and ‘May the Best Win’ gesture (which you’ll need later on to gain Hand-to-Hand Arts, a new weapon type ). You can also converse with both Leda and Hornsent and ask Leda about Hornsent and his people:
Long ago, Queen Marika commanded Sir Messmer to purge the tower folk. A cleansing by fire. It’s no wonder the hornsent holds the Erdtree in contempt.
You can gain additional dialogue about Dryleaf Dane after advancing his questline and meeting him at Moorth Ruins. Upon returning to Leda, she will suggest that Dane has followed Miquella for longer than even she has.
How to break Miquella’s charm
Now, to progress Leda’s quest in Shadow Of The Erdtree you must break Miquella’s charm . This will subsequently move along most of the other NPCs’ quests, so make sure you’re ready to do so first and consult our hub guide full of all NPC questlines for more info to make sure you haven’t been locked out of anything. To break Miquella’s charm, travel to one of the following areas for the first time:
- The Shadow Keep.
- Rauh Base .
- Eastern Scadu Altus (beyond Bonny Village).
You’ll know when the charm has broken when you hear a shattering sound and receive the following notification:
Somewhere, a great rune has broken … And so too has a powerful charm.
Hornsent or Thiollier?
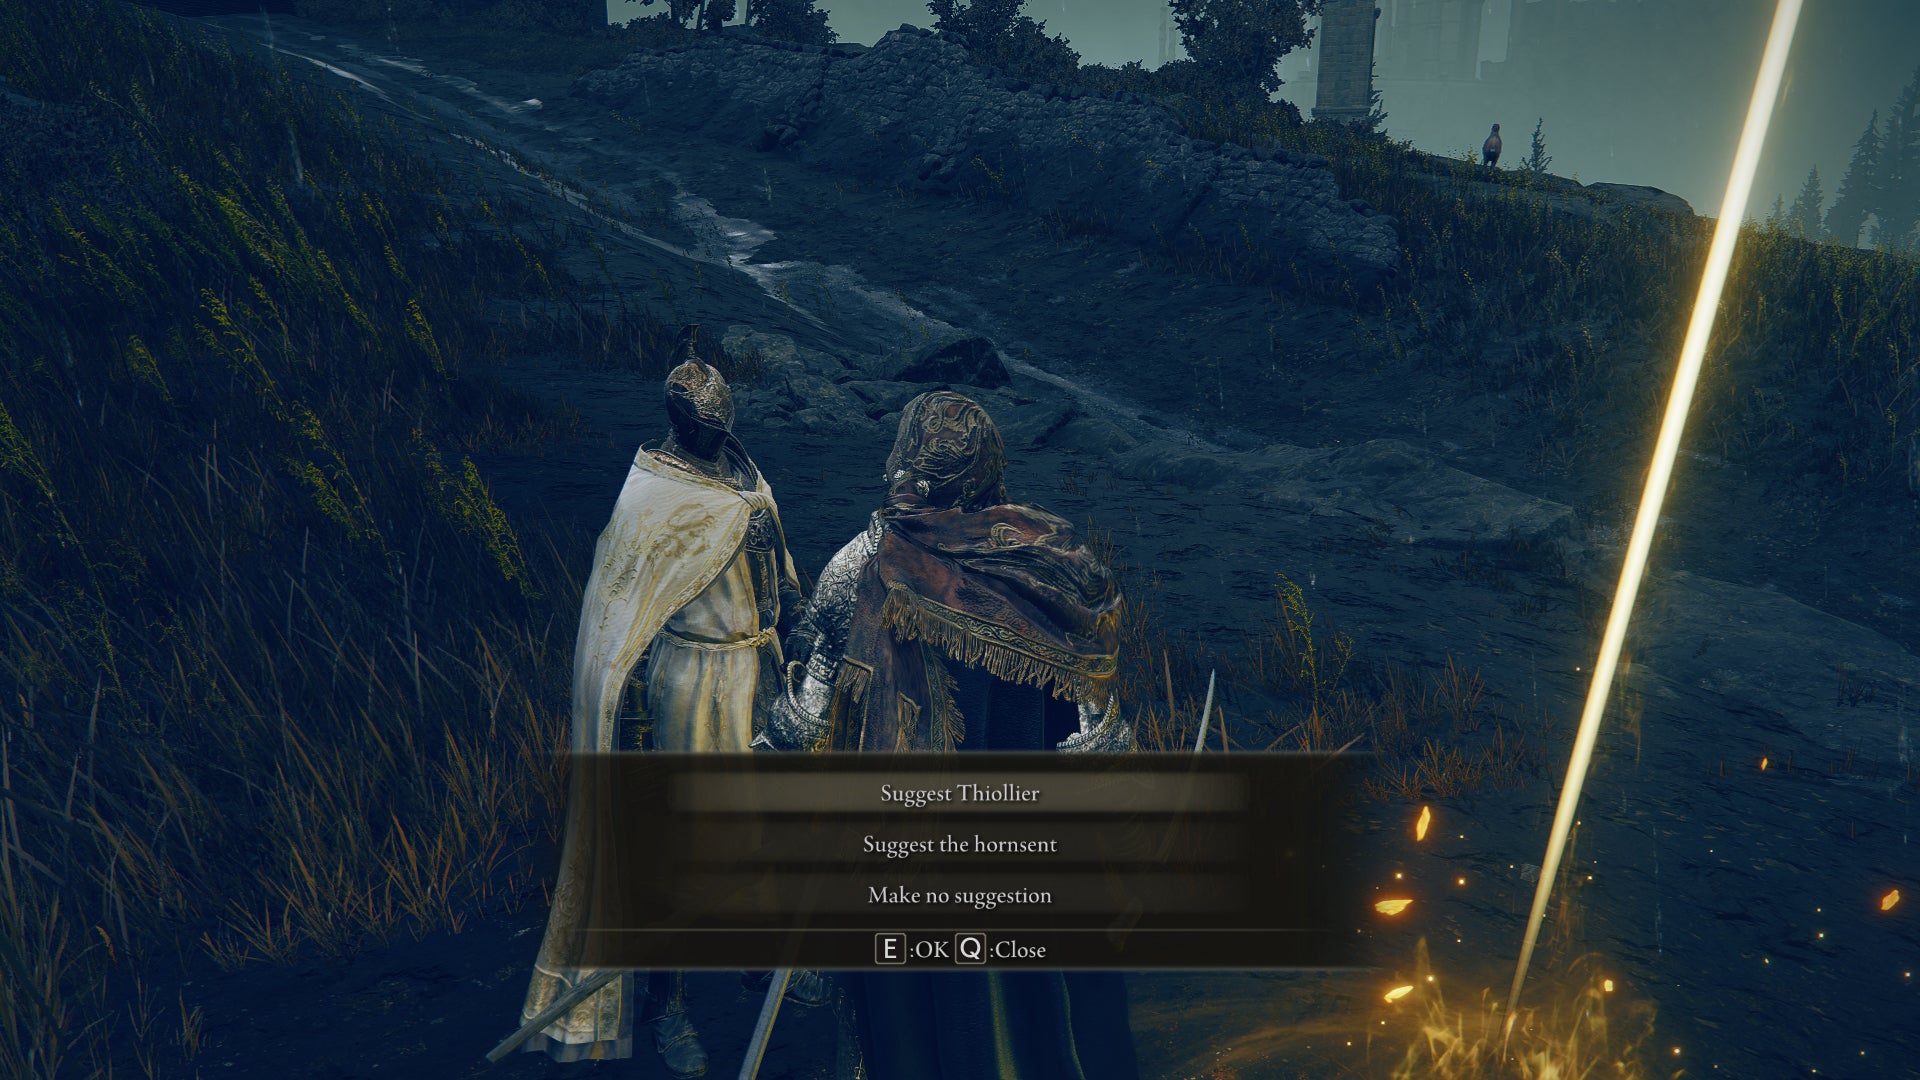
All choices seem to lead back to the Hornsent; however, the outcomes are different later on down the line. |Image credit:Rock Paper Shotgun/Bandai Namco
After breaking the charm, return to Leda at the Highroad Cross Site Of Grace. She will confirm that Miquella’s charm has broken, and whilst her devotion to the god remains unchanged, she becomes paranoid as to whether her comrades feel the same devotion to Miquella or not.
She resolves to ‘weed out’ the non-believers and asks you who she should target first. Here you can suggest the following options:
Beware from this point on story spoilers concerning Leda, various other NPCs and quest outcomes.
- Suggest Thiollier: Leda will consider this and determine that Thiollier is no threat to Miquella due to his love for St Trina. She asks you to pick again, leaving the Hornsent as the next object of pursuit. This leaves you free to pursue Thiollier’s questline if you wish.
- Suggest the hornsent: Leda will require time to consider this. Rest at a Site Of Grace and speak to her again. She agrees to pursue the Hornsent at the Shadow Keep and after another rest, both NPCs will disappear from this Site Of Grace.
- Make no suggestion: Temporarily pause making a desicion and come back later. If you wait too long, Leda will choose to pursue Hornsent at the Shadow Keep anyway.
Whichever option you choose, Leda will ultimately target and follow Hornsent to The Shadow Keep. Depending on your next few choices it is possible, however, to keep him alive.
Assist Hornsent or Leda?
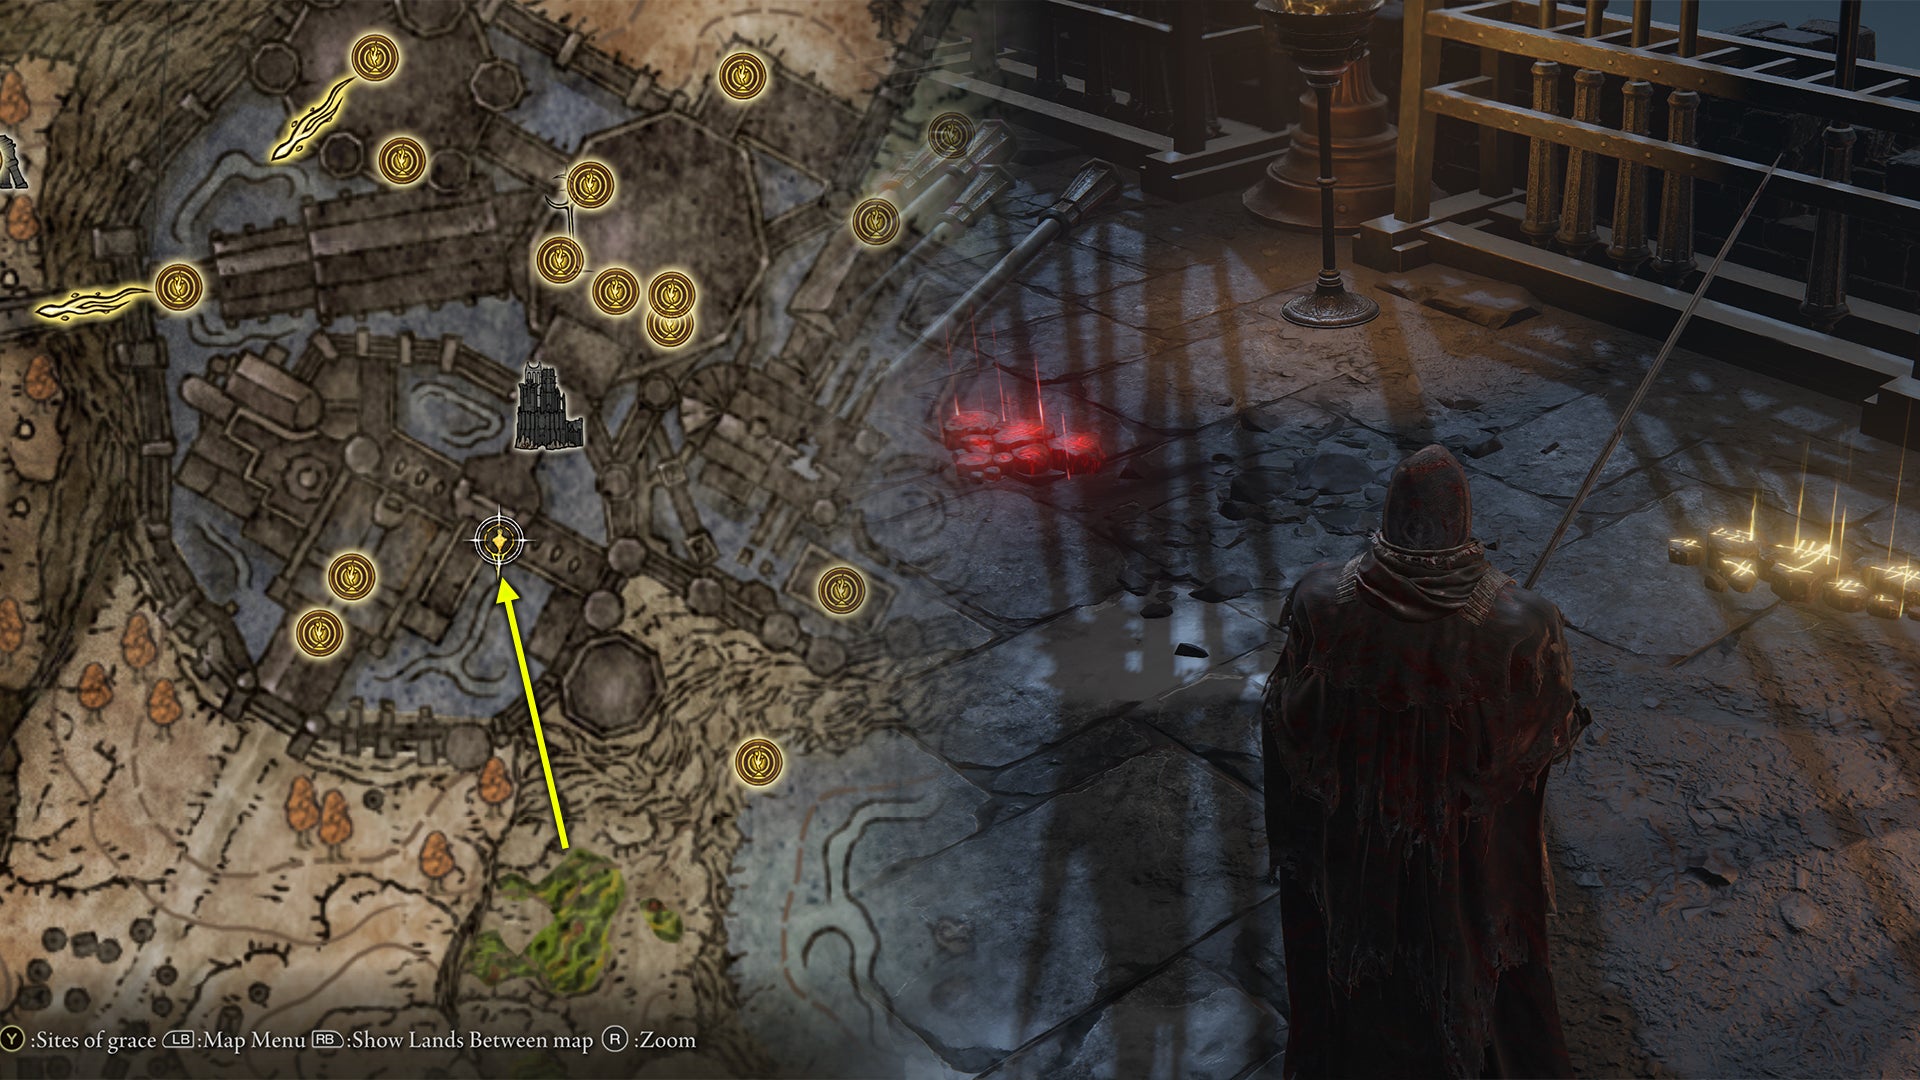
Alternatively, you can choose neither NPC and ignore the summon sign. |Image credit:Rock Paper Shotgun/Bandai Namco
True to their word, both Hornsent and Leda will move to the Shadow Keep. Specifically, you’ll want to travel to the map location above. There will be two summon signs in the eastern corner above the large stone incline. This is located opposite the stairs with the patroling Messmer soldier which leads to the large lift, right before the Specimen Storehouse.
There are a few possible outcomes depending on what you choose here:
- Assist Leda: Hornsent will die, ending his story here. Upon speaking to Leda at the Highroad Cross afterwards, she will decide that Ansbach needs culling too. You’ll receive the Lacerating Crossed-Tree Talisman which enhances dash attacks. You’ll also receive Hornsent’s gear, the Falx curved sword, Caterpillar Mask, Braided Cord Robe, Braided Arm Wraps and Soiled Loincloth.
- Assist Hornsent: Leda will die temporarily and you’ll receive Leda’s Rune (worth 40,000 Runes) and Leda’s Spirit Ashes (Swift Slash). The next section regarding Ansbach will skip and you’ll next see her at the Enir-Ilim fight at the end of this questline. You’ll receive Hornsent as an optional summon for the Messmer boss fight.
- Do nothing and ignore the signs: Hornsent survives and becomes an optional summon for the Messmer boss fight. Upon returning to Leda at the Highroad Cross, she expresses that the Hornsent is no longer a threat and she will move on to another quarry - Ansbach.
If you sided with Hornsent or avoided making a choice, after killing Messmer Hornsent is somewhat driven to madness and decides that his vengeance has yet to be quelled. He decides to target the rest of Marika’s offspring and says:
Now comes the piper to collect from Marika, her offspring, and all the Erdtree’s denizens.
The next time you’ll see him will be at the Ancient Ruins of Rauh, where he will invade and you’ll have to kill him (earning his gear in the process). You can avoid this confrontation and keep him alive, however, if you discover the Ancient Ruins of Rauh before defeating Messmer at The Shadow Keep.
Progress Ansbach’s quest
To progress this quest (if you sided with Leda or ignored the above choice), you must next speak to Ansbach in the Specimen Storehouse (first floor, Shadow Keep) and assist him. This involves the following steps:
- Speak to Ansbach from within his room on the Storehouse’s first floor. (From the Storehouse First Floor Site Of Grace, walk around the large specimen to the left, continue up the stairs then take another left. Turn left around the bookshelves and then take a right into a little room where Ansbach is studying).
- Progress up the Storeroom until you discover the Storehouse, Fourth Floor Site Of Grace.
- From the Storehouse, Fourth Floor Site Of Grace, turn left at the balcony and go up the stairs.
- Continue up the next flight of stairs, past the patrolling Messmer soldier.
- Take the stairs downwards to the left. Take a right into a room overlooking more specimens.
- Inside this room, to the back-right corner will be a desk and lootable item. This is the Secret Rite Scroll .
- Continue through the Specimen Storhouse until you reach Freyja on the seventh floor. Speak to her.
- Return to Ansbach with the Secret Rite Scroll.
- Ansbach will relate the information to you from the scroll. Essentially, Miquella plans to use Mohg’s corpse to resurrect Radahn and make him his king consort and in doing so, abandon Mohg’s soul . Understandably, Ansbach is upset by this.
- Rest at a Site Of Grace and return to Ansbach, he will give you a letter to pass onto Freyja (if you have also spoken to Freyja in the Specimen Storehouse).
- Choose whether you wish to give the letter to Freyja. She is located at the Storehouse, Seventh Floor Site Of Grace. If you give it to her, she will fight against you in a future fight , meaning you will receive her armor and Greatsword. If you withhold the letter she will not fight you but will disappear from the Shadow Keep once you discover Enir-Ilim. See our Freyja questline walkthrough for more information.
- Rest again and speak with Leda at the Highroad Cross where she will confirm that Ansbach is her next target.
Note: Make sure you speak to Freyja on the 7th floor before giving the Secret Rite scroll to Ansbach. Otherwise, the only way to obtain the ‘Letter to Freyja’ quest item is by siding with Leda against Ansbach and killing him. More on this below.

You’ll need to pick up the Secret Rite Scroll to advance Ansbach, Freyja and Leda’s questlines. |Image credit:Rock Paper Shotgun/Bandai Namco
Assist Ansbach or Leda?
After completing these steps and resting at a Site Of Grace, Ansbach will no longer be in his usual room. Instead, there will be two summon signs to choose from - either to help Leda or Ansbach. These are the following outcomes depending on what you choose:
- Assist Leda: Ansbach dies, you’ll get Ansbach’s Longbow, Wise Man’s Mask, Ansbach’s Attire, Ansbach’s Manchettes and Ansbach’s Boots. Leda will disappear from the map for now. You’ll receive the Noble Sanguine Nataan as an optional summon in an upcoming fight and the Retaliatory Crossed-Tree Talisman which enhances attacks executed after rolling or backstepping.
- Assist Ansbach: Leda dies temporarily and you’ll receive Leda’s Rune (worth 40,000 Runes) and Ansbach’s Longbow. Ansbach will be a summonable aid in two upcoming fights (one of these is the final boss of the DLC). After the last boss , if you summoned Ansbach, you’ll get the gear mentioned above as well as the Obsidian Lamina and Furious Blade of Ansbach.
- Skip the fight: If you choose to ignore the fight altogether, Ansbach will survive and he will be available as a summon for the Enir-Ilim fight.
Whichever option you choose will ultimately affect your next encounter with these NPCs. To get to this point, you need to advance to Enir-Ilim . This will take a fair bit of progression as this is ultimately where Miquella is located.
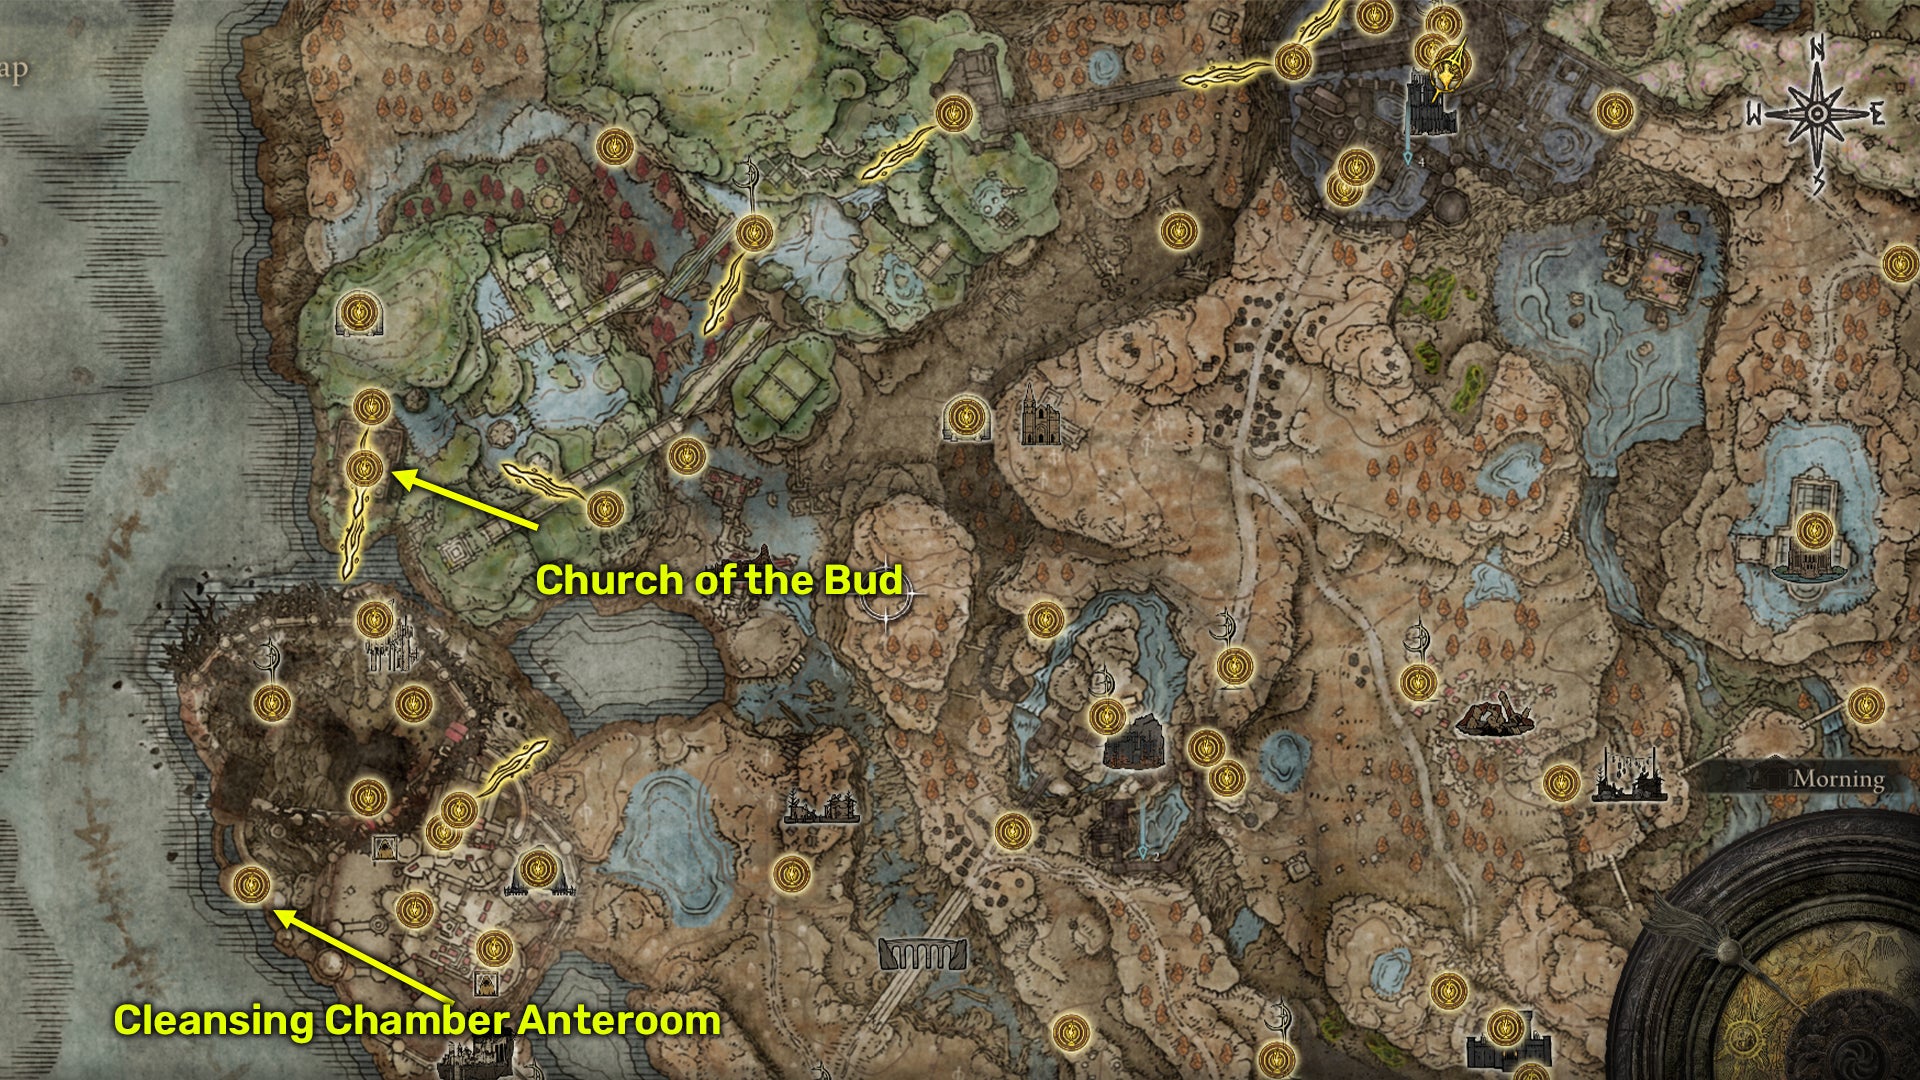
To progress to the Church of the Bud, you need to travel to the Ancient Ruins of Rauh from the Shadow Keep. |Image credit:Rock Paper Shotgun/Bandai Namco
To access this area beyond the Belurat, Tower Settlement, you need to travel to the Church of the Bud within the Ancient Ruins of Rauh and defeat Romina, Saint of the Bud. Afterwards, light the Sealing Tree beyond with Messmer’s fire. Then, you’ll be transported to Enir-Ilim where you’ll need to progress and climb the tower until you discover the Cleansing Chamber Anteroom Site Of Grace (see the map image above).
Leda fight in Enir-Ilim
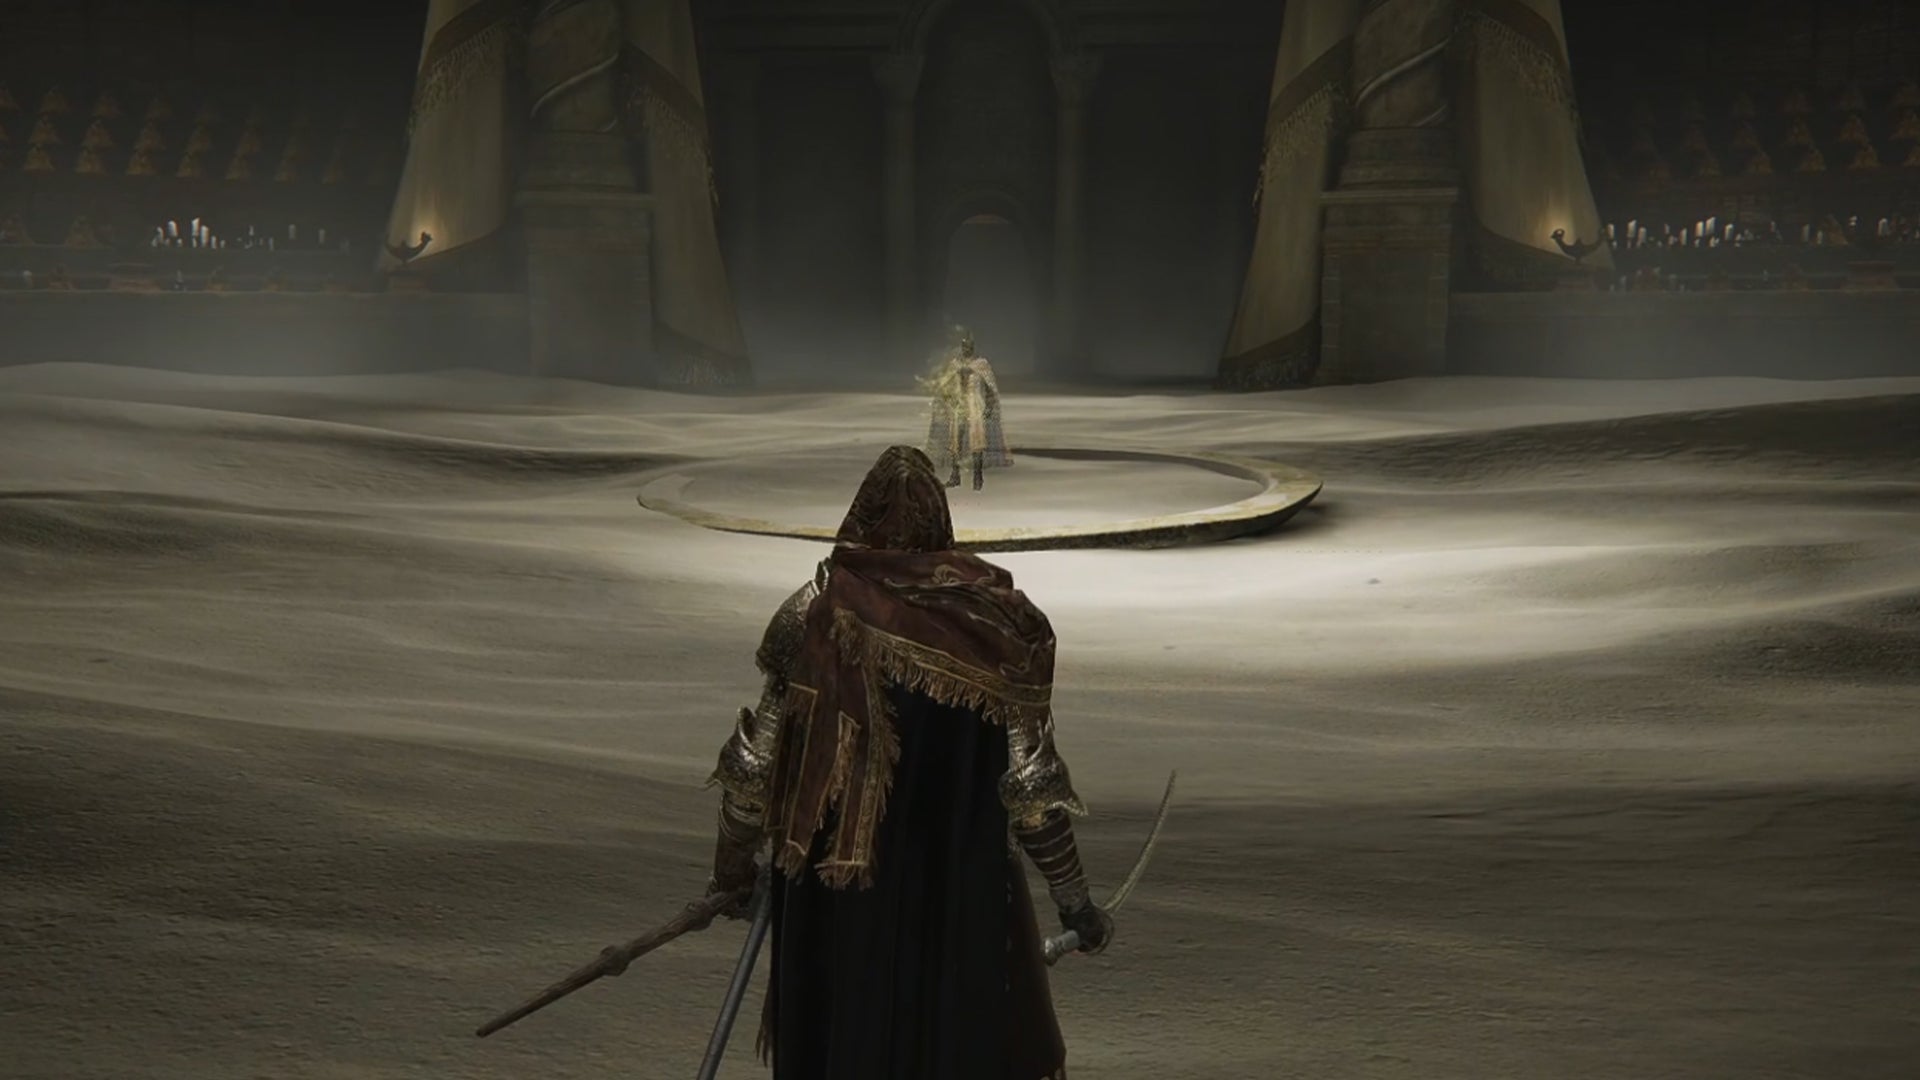
The number of foes in this fight depends on your previous quest choices. |Image credit:Rock Paper Shotgun/Bandai Namco
Upon discovering the Cleansing Chamber Anteroom Site Of Grace in Enir-Ilim, advance to the next room and Leda will appear. She has come to the realisation that your efforts to find Minquella aren’t the same as hers and that you have come to challenge him for power. She cannot accept this so she initiates a fight to stop you.
The choices you have made so far will determine who appears in the fight and whether they will fight with or against you. These are the following possibilities:
| NPC | Ally or enemy? | Reason |
|---|---|---|
| Leda | Enemy | Regardless of your choices, Leda will always turn against you at Enir-Ilim. |
| Dryleaf Dane | Enemy | Regardless of your choices, Dryleaf Dane will always turn against you at Enir-Ilim. |
| Hornsent | Enemy | He will fight against you at Enir-Ilim if you did not summon him for the Messmer fight and/or you killed his invader form in Rauh. |
| Moore | Enemy | If you tell Moore to ‘put it behind you’ during his questline he will fight against you at Enir-Ilim. Tell him to ‘remain sad forever’ to eliminate him early. |
| Redmane Freyja | Enemy | If you delivered Ansbach’s letter to her before the Enir-Ilim fight. |
| Ansbach | Ally | If you sided with him against Leda and delivered the Secret Rite Scroll to him. |
| Thiollier | Ally | If you delivered St. Trina’s message to him before the Enir-Ilim fight. |
| Noble Sanguine Nataan | Ally | If you sided with Leda both times. |
Leda’s Armor, Oathseeker Knight Set and more rewards

Leda’s Armor is a unique, upgraded version of the Oathseeker Knight set. |Image credit:Rock Paper Shotgun/Bandai Namco
After this fight, you should receive Leda’s Sword and 300,000 Runes , plus whatever you loot from the surrounding corpses. We got Freyja and Dryleaf Dane’s weapons and armor (having already acquired Moore’s earlier on in our playthrough). Don’t forget to also loot Leda’s body to the right of the archway to get her armor.
Leda’s Armor is actually an upgraded version of the Oathseeker Knight set. This means it has a buff to attacks performed after a dodge, roll, backstep, or dash. With a weight of 10.6, it is a good option for players that want to remain light on their feet.
Now that most of Miquella’s followers are dead, that just leaves the god himself. You can continue through Enir-Ilim to face him. Depending on your choices, you may recieve a summon to help you take him on.
If you sided with Ansbach against Leda he will be available as a summon. After the fight you can gain his equipment along with the Obsidian Lamina and Furious Blade of Ansbach .
If you completed Thiollier’s questline before advancing through Enir-Ilim (and relayed St. Trina’s message to him), he may join you as a summon against Miquella. Afterwards, you can retrieve his gear along with Thiollier’s Hidden Needle .
This concludes Leda’s questline in Shadow Of The Erdtree.
That’s all for Leda’s quest in Elden Ring Shadow Of The Erdtree. For more Elden Ring tips and tricks , check out our guide to the best early weapons in Shadow Of The Erdtree to get you started. Or, if you’re further along in the DLC, see our best weapons guide that goes through the best of the bunch. Be sure to also check out our Map Fragment locations guide to help you access and uncover every region in the DLC and see our boss locations guide so you won’t miss a single one.


Elden Ring
PS4 , PS5 , Xbox One , Xbox Series X/S , PC
Rock Paper Shotgun is better when you sign in
Sign in and join us on our journey to discover strange and compelling PC games.

All 75 Arc Raiders Blueprints and where to get them
These areas have the highest chance of giving you Blueprints

Image credit:Rock Paper Shotgun/Embark Studios

Looking for more Arc Raiders Blueprints? It’s a special day when you find a Blueprint, as they’re among the most valuable items in Arc Raiders. If you find a Blueprint that you haven’t already found, then you must make sure you hold onto it at all costs, because Blueprints are the key to one of the most important and powerful systems of meta-progression in the game.
This guide aims to be the very best guide on Blueprints you can find, starting with a primer on what exactly they are and how they work in Arc Raiders, before delving into exactly where to get Blueprints and the very best farming spots for you to take in your search.
We’ll also go over how to get Blueprints from other unlikely activities, such as destroying Surveyors and completing specific quests. And you’ll also find the full list of all 75 Blueprints in Arc Raiders on this page (including the newest Blueprints added with the Cold Snap update , such as the Deadline Blueprint and Firework Box Blueprint), giving you all the information you need to expand your own crafting repertoire.
In this guide:
- What are Blueprints in Arc Raiders?
- Full Blueprint list: All crafting recipes
- Where to find Blueprints in Arc Raiders Blueprints obtained from quests Blueprints obtained from Trials Best Blueprint farming locations

What are Blueprints in Arc Raiders?
Blueprints in Arc Raiders are special items which, if you manage to extract with them, you can expend to permanently unlock a new crafting recipe in your Workshop. If you manage to extract from a raid with an Anvil Blueprint, for example, you can unlock the ability to craft your very own Anvil Pistol, as many times as you like (as long as you have the crafting materials).
To use a Blueprint, simply open your Inventory while in the lobby, then right-click on the Blueprint and click “Learn And Consume” . This will permanently unlock the recipe for that item in your Workshop. As of the Stella Montis update, there are allegedly 75 different Blueprints to unlock - although only 68 are confirmed to be in the game so far. You can see all the Blueprints you’ve found and unlocked by going to the Workshop menu, and hitting “R” to bring up the Blueprint screen.
It’s possible to find duplicates of past Blueprints you’ve already unlocked. If you find these, then you can either sell them, or - if you like to play with friends - you can take it into a match and gift it to your friend so they can unlock that recipe for themselves. Another option is to keep hold of them until the time comes to donate them to the Expedition.
Full Blueprint list: All crafting recipes
Below is the full list of all the Blueprints that are currently available to find in Arc Raiders, and the crafting recipe required for each item:
| Blueprint | Type | Recipe | Crafted At |
|---|---|---|---|
| Bettina | Weapon | 3x Advanced Mechanical Components 3x Heavy Gun Parts 3x Canister | Gunsmith 3 |
| Blue Light Stick | Quick Use | 3x Chemicals | Utility Station 1 |
| Aphelion | Weapon | 3x Magnetic Accelerator 3x Complex Gun Parts 1x Matriarch Reactor | Gunsmith 3 |
| Combat Mk. 3 (Flanking) | Augment | 2x Advanced Electrical Components 3x Processor | Gear Bench 3 |
| Combat Mk. 3 (Aggressive) | Augment | 2x Advanced Electrical Components 3x Processor | Gear Bench 3 |
| Complex Gun Parts | Material | 2x Light Gun Parts 2x Medium Gun Parts 2x Heavy Gun Parts | Refiner 3 |
| Fireworks Box | Quick Use | 1x Explosive Compound 3x Pop Trigger | Explosives Station 2 |
| Gas Mine | Mine | 4x Chemicals 2x Rubber Parts | Explosives Station 1 |
| Green Light Stick | Quick Use | 3x Chemicals | Utility Station 1 |
| Pulse Mine | Mine | 1x Crude Explosives 1x Wires | Explosives Station 1 |
| Seeker Grenade | Grenade | 1x Crude Explosives 2x ARC Alloy | Explosives Station 1 |
| Looting Mk. 3 (Survivor) | Augment | 2x Advanced Electrical Components 3x Processor | Gear Bench 3 |
| Angled Grip II | Mod | 2x Mechanical Components 3x Duct Tape | Gunsmith 2 |
| Angled Grip III | Mod | 2x Mod Components 5x Duct Tape | Gunsmith 3 |
| Hullcracker | Weapon | 1x Magnetic Accelerator 3x Heavy Gun Parts 1x Exodus Modules | Gunsmith 3 |
| Launcher Ammo | Ammo | 5x Metal Parts 1x Crude Explosives | Workbench 1 |
| Anvil | Weapon | 5x Mechanical Components 5x Simple Gun Parts | Gunsmith 2 |
| Anvil Splitter | Mod | 2x Mod Components 3x Processor | Gunsmith 3 |
| ??? | ??? | ??? | ??? |
| Barricade Kit | Quick Use | 1x Mechanical Components | Utility Station 2 |
| Blaze Grenade | Grenade | 1x Explosive Compound 2x Oil | Explosives Station 3 |
| Bobcat | Weapon | 3x Advanced Mechanical Components 3x Light Gun Parts | Gunsmith 3 |
| Osprey | Weapon | 2x Advanced Mechanical Components 3x Medium Gun Parts 7x Wires | Gunsmith 3 |
| Burletta | Weapon | 3x Mechanical Components 3x Simple Gun Parts | Gunsmith 1 |
| Compensator II | Mod | 2x Mechanical Components 4x Wires | Gunsmith 2 |
| Compensator III | Mod | 2x Mod Components 8x Wires | Gunsmith 3 |
| Defibrillator | Quick Use | 9x Plastic Parts 1x Moss | Medical Lab 2 |
| ??? | ??? | ??? | ??? |
| Equalizer | Weapon | 3x Magnetic Accelerator 3x Complex Gun Parts 1x Queen Reactor | Gunsmith 3 |
| Extended Barrel | Mod | 2x Mod Components 8x Wires | Gunsmith 3 |
| Extended Light Mag II | Mod | 2x Mechanical Components 3x Steel Spring | Gunsmith 2 |
| Extended Light Mag III | Mod | 2x Mod Components 5x Steel Spring | Gunsmith 3 |
| Extended Medium Mag II | Mod | 2x Mechanical Components 3x Steel Spring | Gunsmith 2 |
| Extended Medium Mag III | Mod | 2x Mod Components 5x Steel Spring | Gunsmith 3 |
| Extended Shotgun Mag II | Mod | 2x Mechanical Components 3x Steel Spring | Gunsmith 2 |
| Extended Shotgun Mag III | Mod | 2x Mod Components 5x Steel Spring | Gunsmith 3 |
| Remote Raider Flare | Quick Use | 2x Chemicals 4x Rubber Parts | Utility Station 1 |
| Heavy Gun Parts | Material | 4x Simple Gun Parts | Refiner 2 |
| Venator | Weapon | 2x Advanced Mechanical Components 3x Medium Gun Parts 5x Magnet | Gunsmith 3 |
| Il Toro | Weapon | 5x Mechanical Components 6x Simple Gun Parts | Gunsmith 1 |
| Jolt Mine | Mine | 1x Electrical Components 1x Battery | Explosives Station 2 |
| Explosive Mine | Mine | 1x Explosive Compound 1x Sensors | Explosives Station 3 |
| Jupiter | Weapon | 3x Magnetic Accelerator 3x Complex Gun Parts 1x Queen Reactor | Gunsmith 3 |
| Light Gun Parts | Material | 4x Simple Gun Parts | Refiner 2 |
| Lightweight Stock | Mod | 2x Mod Components 5x Duct Tape | Gunsmith 3 |
| Lure Grenade | Grenade | 1x Speaker Component 1x Electrical Components | Utility Station 2 |
| Medium Gun Parts | Material | 4x Simple Gun Parts | Refiner 2 |
| Torrente | Weapon | 2x Advanced Mechanical Components 3x Medium Gun Parts 6x Steel Spring | Gunsmith 3 |
| Muzzle Brake II | Mod | 2x Mechanical Components 4x Wires | Gunsmith 2 |
| Muzzle Brake III | Mod | 2x Mod Components 8x Wires | Gunsmith 3 |
| Padded Stock | Mod | 2x Mod Components 5x Duct Tape | Gunsmith 3 |
| Shotgun Choke II | Mod | 2x Mechanical Components 4x Wires | Gunsmith 2 |
| Shotgun Choke III | Mod | 2x Mod Components 8x Wires | Gunsmith 3 |
| Shotgun Silencer | Mod | 2x Mod Components 8x Wires | Gunsmith 3 |
| Showstopper | Grenade | 1x Advanced Electrical Components 1x Voltage Converter | Explosives Station 3 |
| Silencer I | Mod | 2x Mechanical Components 4x Wires | Gunsmith 2 |
| Silencer II | Mod | 2x Mod Components 8x Wires | Gunsmith 3 |
| Snap Hook | Quick Use | 2x Power Rod 3x Rope 1x Exodus Modules | Utility Station 3 |
| Stable Stock II | Mod | 2x Mechanical Components 3x Duct Tape | Gunsmith 2 |
| Stable Stock III | Mod | 2x Mod Components 5x Duct Tape | Gunsmith 3 |
| Tagging Grenade | Grenade | 1x Electrical Components 1x Sensors | Utility Station 3 |
| Tempest | Weapon | 3x Advanced Mechanical Components 3x Medium Gun Parts 3x Canister | Gunsmith 3 |
| Trigger Nade | Grenade | 2x Crude Explosives 1x Processor | Explosives Station 2 |
| Vertical Grip II | Mod | 2x Mechanical Components 3x Duct Tape | Gunsmith 2 |
| Vertical Grip III | Mod | 2x Mod Components 5x Duct Tape | Gunsmith 3 |
| Vita Shot | Quick Use | 2x Antiseptic 1x Syringe | Medical Lab 3 |
| Vita Spray | Quick Use | 3x Antiseptic 1x Canister | Medical Lab 3 |
| Vulcano | Weapon | 1x Magnetic Accelerator 3x Heavy Gun Parts 1x Exodus Modules | Gunsmith 3 |
| Wolfpack | Grenade | 2x Explosive Compound 2x Sensors | Explosives Station 3 |
| Red Light Stick | Quick Use | 3x Chemicals | Utility Station 1 |
| Smoke Grenade | Grenade | 14x Chemicals 1x Canister | Utility Station 2 |
| Deadline | Mine | 3x Explosive Compound 2x ARC Circuitry | Explosives Station 3 |
| Trailblazer | Grenade | 1x Explosive Compound 1x Synthesized Fuel | Explosives Station 3 |
| Tactical Mk. 3 (Defensive) | Augment | 2x Advanced Electrical Components 3x Processor | Gear Bench 3 |
| Tactical Mk. 3 (Healing) | Augment | 2x Advanced Electrical Components 3x Processor | Gear Bench 3 |
| Yellow Light Stick | Quick Use | 3x Chemicals | Utility Station 1 |
Note: The missing Blueprints in this list likely have not actually been added to the game at the time of writing, because none of the playerbase has managed to find any of them. As they are added to the game, I will update this page with the most relevant information so you know exactly how to get all 75 Arc Raiders Blueprints.
Where to find Blueprints in Arc Raiders
Below is a list of all containers, modifiers, and events which maximise your chances of finding Blueprints:
- Certain quests reward you with specific Blueprints .
- Completing Trials has a high chance of offering Blueprints as rewards.
- Surveyors have a decent chance of dropping Blueprints on death.
- High loot value areas tend to have a greater chance of spawning Blueprints.
- Night Raids and Storms may increase rare Blueprint spawn chances in containers.
- Containers with higher numbers of items may have a higher tendency to spawn Blueprints. As a result, Blue Gate (which has many “large” containers containing multiple items) may give you a higher chance of spawning Blueprints.
- Raider containers (Raider Caches, Weapon Boxes, Medical Bags, Grenade Tubes) have increased Blueprint drop rates. As a result, the Uncovered Caches event gives you a high chance of finding Blueprints.
- Security Lockers have a higher than average chance of containing Blueprints.
- Certain Blueprints only seem to spawn under specific circumstances: Tempest Blueprint only spawns during Night Raid events. Vulcano Blueprint only spawns during Hidden Bunker events. Jupiter and Equaliser Blueprints only spawn during Harvester events.

Raider Caches, Weapon Boxes, and other raider-oriented container types have a good chance of offering Blueprints. |Image credit:Rock Paper Shotgun/Embark Studios
Blueprints have a very low chance of spawning in any container in Arc Raiders, around 1-2% on average. However, there is a higher chance of finding Blueprints in particular container types. Specifically, you can find more Blueprints in Raider containers and security lockers.
Beyond this, if you’re looking for Blueprints you should focus on regions of the map which are marked as having particularly high-value loot. Areas such as the Control Tower in Dam Battlegrounds, the Arrival and Departure Buildings in Spaceport, and Pilgrim’s Peak in Blue Gate all have a better-than-average chance of spawning Blueprints somewhere amongst all their containers. Night Raids and Electromagnetic Storm events also increase the drop chances of certain Blueprints .
In addition to these containers, you can often loot Blueprints from destroyed Surveyors - the largest of the rolling ball ARC. Surveyors are more commonly found on the later maps - Spaceport and Blue Gate - and if one spawns in your match, you’ll likely see it by the blue laser beam that it casts into the sky while “surveying”.
Surveyors are quite well-armoured and will very speedily run away from you once it notices you, but if you can take one down then make sure you loot all its parts for a chance of obtaining certain unusual Blueprints.
Blueprints obtained from quests
One way in which you can get Blueprints is by completing certain quests for the vendors in Speranza. Some quests will reward you with a specific item Blueprint upon completion, so as long as you work through all the quests in Arc Raiders, you are guaranteed those Blueprints.
Here is the full list of all Blueprints you can get from quest rewards:
- Trigger Nade Blueprint: Rewarded after completing “Sparks Fly”.
- Lure Grenade Blueprint: Rewarded after completing “Greasing Her Palms”.
- Burletta Blueprint: Rewarded after completing “Industrial Espionage”.
- Hullcracker Blueprint (and Launcher Ammo Blueprint): Rewarded after completing “The Major’s Footlocker”.
Alas, that’s only 4 Blueprints out of a total of 75 to unlock, so for the vast majority you will need to find them yourself during a raid. If you’re intent on farming Blueprints, then it’s best to equip yourself with cheap gear in case you lose it, but don’t use a free loadout because then you won’t get a safe pocket to stash any new Blueprint you find. No pain in Arc Raiders is sharper than failing to extract with a new Blueprint you’ve been after for a dozen hours already.

One of the best ways to get Blueprints is by hitting three stars on all five Trials every week. |Image credit:Rock Paper Shotgun/Embark Studios
Blueprints obtained from Trials
One of the very best ways to get Blueprints is as rewards for completing Trials in Arc Raiders. Trials are unlocked from Level 15 onwards, and allow you to earn rewards by focusing on certain tasks over the course of several raids. For example, one Trial might task you with dealing damage to Hornets, while another might challenge you to loot Supply Drops.
Trials refresh on a weekly basis, with a new week bringing five new Trials. Each Trial can offer up to three rewards after passing certain score milestones, and it’s possible to receive very high level loot from these reward crates - including Blueprints. So if you want to unlock as many Blueprints as possible, you should make a point of completing as many Trials as possible each week.
Best Blueprint farming locations
The very best way to get Blueprints is to frequent specific areas of the maps which combine high-tier loot pools with the right types of containers to search. Here are my recommendations for where to find Blueprints on every map, so you can always keep the search going for new crafting recipes to unlock.

Image credit:Rock Paper Shotgun/Embark Studios
Dam Battlegrounds
The best places to farm Blueprints on Dam Battlegrounds are the Control Tower, Power Generation Complex, Ruby Residence, and Pale Apartments . The first two regions, despite only being marked on the map as mid-tier loot, contain a phenomenal number of containers to loot. The Control Tower can also contain a couple of high-tier Security Lockers - though of course, you’ll need to have unlocked the Security Breach skill at the end of the Survival tree.
There’s also a lot of reporting amongst the playerbase that the Residential areas in the top-left of the map - Pale Apartments and Ruby Residence - give you a comparatively strong chance of finding Blueprints. Considering their size, there’s a high density of containers to loot in both locations, and they also have the benefit of being fairly out of the way. So you’re more likely to have all the containers to yourself.
Buried City
The best Blueprint farming locations on Buried City are the Santa Maria Houses, Grandioso Apartments, Town Hall, and the various buildings of the New District . Grandioso Apartments has a lower number of containers than the rest, but a high chance of spawning weapon cases - which have good Blueprint drop rates. The others are high-tier loot areas, with plenty of lootable containers - including Security Lockers.
Spaceport
The best places to find Blueprints on Spaceport are the Arrival and Departure Buildings, as well as Control Tower A6 and the Launch Towers . All these areas are labelled as high-value loot regions, and many of them are also very handily connected to one another by the Spaceport wall, which you can use to quickly run from one area to the next. At the tops of most of these buildings you’ll find at least one Security Locker, so this is an excellent farming route for players looking to find Blueprints.
The downside to looting Blueprints on Spaceport is that all these areas are hotly contested, particularly in Duos and Squads. You’ll need to be very focused and fast in order to complete the full farming route.

Image credit:Rock Paper Shotgun/Embark Studios
Blue Gate
Blue Gate tends to have a good chance of dropping Blueprints, potentially because it generally has a high number of containers which can hold lots of items; so there’s a higher chance of a Blueprint spawning in each container. In my experience, the best Blueprint farming spots on Blue Gate are Pilgrim’s Peak, Raider’s Refuge, the Ancient Fort, and the Underground Complex beneath the Warehouse .
All of these areas contain a wealth of containers to loot. Raider’s Refuge has less to loot, but the majority of the containers in and around the Refuge are raider containers, which have a high chance of containing Blueprints - particularly during major events.
Stella Montis
On the whole, Stella Montis seems to have a very low drop rate for Blueprints (though a high chance of dropping other high-tier loot). If you do want to try farming Blueprints on this map, the best places to find Blueprints in Stella Montis are Medical Research, Assembly Workshop, and the Business Center . These areas have the highest density of containers to loot on the map.
In addition to this, the Western Tunnel has a few different Security Lockers to loot, so while there’s very little to loot elsewhere in this area of the map, it’s worth hitting those Security Lockers if you spawn there at the start of a match.
That wraps up this primer on how to get all the Blueprints in Arc Raiders as quickly as possible. With the Expedition system constantly resetting a large number of players’ Blueprints, it’s more important than ever to have the most up-to-date information on where to find all these Blueprints.
While you’re here, be sure to check out our Arc Raiders best guns tier list , as well as our primers on the best skills to unlock and all the different Field Depot locations on every map.


ARC Raiders
PS5 , Xbox Series X/S , PC
Rock Paper Shotgun is better when you sign in
Sign in and join us on our journey to discover strange and compelling PC games.
