Last Epoch: Best Primalist builds and skills
Learn the best builds and skills for the Primalist class in Last Epoch

Image credit:Rock Paper Shotgun/Eleventh Hour Games

Wondering what the best Primalist skills and builds are in Last Epoch? From the depths of the harsh frontier comes the Primalist, the barbarian, berserker, and druid of Last Epoch . With the ability to summon animal armies, elemental fury, and a wide variety of different totems, the Primalist embodies the best traits of the wandering nature warrior trope present in many sword and sorcery stories.
Whether you want to conquer the opposition with a wave of ferocious creatures or shapeshift, the Primalist’s three Masteries - Beastmaster, Druid, and Shaman - all have something impressive to offer. Below, we’ve outlined our preferred builds for each Mastery, along with the right Skills, Specialization Tree nodes, and Passives for each. Read on to rise above all foes in Last Epoch as master of the wilds.
- Last Epoch Best Primalist Shaman build
- Last Epoch Best Primalist Beastmaster build
- Last Epoch Best Primalist Druid build

Last Epoch’s launch trailer shows off the game’s classes as well as its time-travelling theme.Watch on YouTube
Last Epoch Best Primalist Beastmaster build

Behold, ’tis I…and a small legion of squirrels at my command. |Image credit:Rock Paper Shotgun/Eleventh Hour Games
The Beastmaster is friend to all creatures, from the large to the small. And the Squirrel Beastmaster Primalist build below takes the idea of having small friends to the extreme by giving you a skillset that revolves around summonable squirrels. You heard that right, squirrels! If these bushy-tailed lads never struck you as reliable companions, just wait until you sic ’em on a boss and watch them whittle its health down to nothingness. Keep in mind that this build is dependent on a piece of gear - the Primalist’s Herald of the Scurry . We’ve explained why you need this helmet down below; for now, get started by Specializing in the following Skills and Passives.
Fury Leap
You’ve got to get around in order to bring the squirrels out to play, and Fury Leap will help you clear obsctacles with ease. This Skill also deals damage the second you come crashing to the earth, helping to clear any mobs who might be hanging around by your feet.
On the Fury Leap Specialization Tree, take the Warrior’s Entrance node to deal additional damage when you land. Following that, take Pack Leader to ensure that your squirrels can leap with you, which not only makes for an awesome visual effect but means that they also do damage when they come crashing down. Finally, select Regain Stamina to have the chance to reset Fury Leap’s cooldown whenever you kill an enemy with another Skill.
Summon Frenzy Totem
To amplify the aggression displayed by your squirrel buddies, you need Summon Frenzy Totem . This Skill pops a totem by your Primalist, boosting the attack and cast speed of nearby allies by 20%. You’ll be using this buff regularly, especially as you and your squirrels stand down against a boss.
Go for Rabidity and Bestial Frenzy as your most important nodes on the Specialization Tree. These will increase the totem’s buffs and the melee damage inflicted by your squirrels. Furious Cry and Lead The Pack are excellent nodes to invest in further, while Reinforced Totem and Grounded , on the opposite side of the Specialization Tree, are worth taking to make your totem more resilient and untargetable by foes.
Summon Wolf
Here it is, the main Skill of our build - and yes, by default, it summons wolves, not squirrels. As we’ve previously stated, you need the Primalist’s Herald of the Scurry, a legendary helmet, to change this ability and make it bring out the bushy tails instead of the dogs. If you don’t have it, this build technically works okay with wolves, but we’ve focused it on squirrels due to their 75% chance to inflict bleed and shred physical resistance on a hit. This means that a pack of squirrels is way more effective at decimating a boss’ health than a pack of wolves, surprisingly!
Once you’ve got the helmet equipped and squirrel friends going for the eyes of the baddies, amplify this Skill by taking the Save Hunters , Snarl , and Legendary Bite nodes. On The Hunt and Howl of Might should be your next bets.
Swipe
Swipe is a go-to melee damage skill with this build that hits all enemies in an arc in front of you. For extra giggles, you can make a successful Swipe manifest spirit wolves from your squirrels!
To set up this unbelievable display of animal-on-animal summoning, take the Wild Calling node, which gives you a chance to call forth a spirit wolf from any summoned wolves (or in this case, squirrels) you have nearby. You’ll also want to be sure that your Wengarian Reach and Culling nodes are filled out to increase Swipe’s attack speed and insta-kill potential.
Warcry
When the Primalist gets angry, he unleashes his mighty Warcry to gain the Berserker buff, which increases melee damage the more you use it. Your attack speed will also go up, giving this Skill excellent synergy with Swipe.
My favourite nodes for customising this Skill are on th left side of the Specialization Tree. Battle Cry is excellent for amplifying crit chance, while Jormun’s Wrath , Frost Claw , Frigid Breath , and Bringer of Winter all provide the wonderful ability to freeze enemies after popping Warcry.
Passives
To maximise your potential with the Squirrel Beastmaster build, we recommend the following Passives:
- Primalist Passives: Primal Strength , Survival of the Pack , Hunter’s Restoration , and Berserker are all excellent Passives to prioritise.
- Beastmaster Passives: There’s a whole lot of stuff here worth taking, but generally, you’re going to want to master Passives that will max out your strength and DPS, like Ursine Strength , The Chase , and Axe And Claw . Force of Nature is also necessary if you want to summon more squirrel buddies.
- Druid Passives: The Chitinous Plating Passive is your best bet here, since it grants additional armour to all minions, which includes your squirrels.
- Shaman Passives: Sky Warrior is a very good Passive that will increase the cooldown recovery speed for Fury Leap. If you want to be hardier while you have your totem active, take Silent Protector .
Last Epoch Best Primalist Druid build
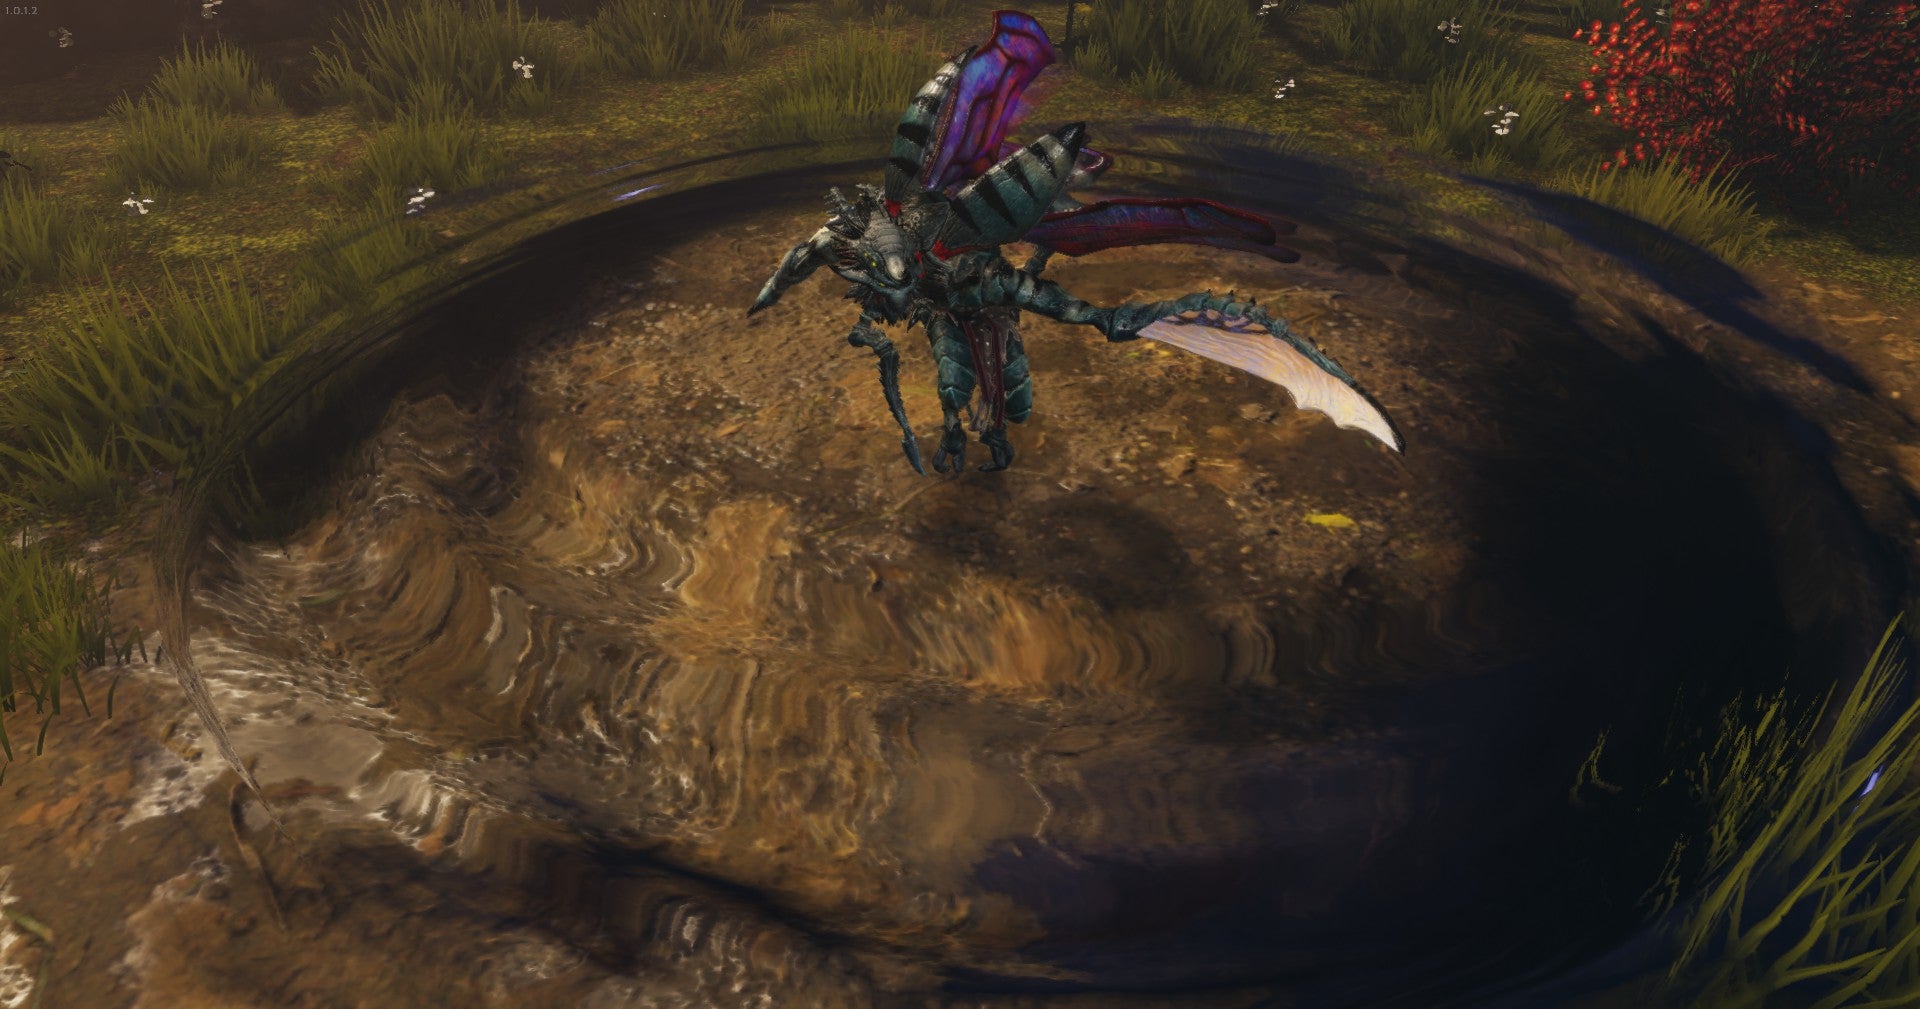
The Swarmblade might not be much of a looker, but this insect form sure cuts through baddies like butter. |Image credit:Rock Paper Shotgun/Eleventh Hour Games
The Primalist Druid Mastery specialises in shapeshifting into bestial forms, and this Lightning Swarmblade build morphs your Primalist into an insectoid with a wide variety of killer abilities, including summoning locusts and cutting via razor-sharp claws. We’ll be customising the Swarmblade’s skillset with skills that add on tornadoes, lightning strikes, and several other aspects of nature’s wrath.
Gathering Storm
Gathering Storm lets your Primalist stike opponents with lightning bolts, generating stacks that they can spend to unleash a Storm Bolt, hitting other enemies. This is a great ability that you’ll consistently rely on to wreck mobs with a steady onslaught of damage and critical hits.
To pump up Gathering Storm, fill out the Thunderous Strikes node to pierce through enemy lightning resistance. Then grab the Excited Bolts node, which will cause your Storm Bolts to deal more damage depending on how much mana you have. You should also invest as many points as you can into Concentrated Storm , In the Eye of the Storm , and Rending Vortex .
Maelstrom
A freezing vortex surrounds the Primalist when they use Maelstrom , and this can be cast multiple times to create more than one Maelstrom. You’ll use this Skill regularly to deliver big AoE bursts that’ll disorient foes and deal damage over time.
Get the Whirlpool node to increase the duration of your Maelstrom. Then pick up Sleet-Footed for additional dodge chance, Cyclone to convert Maelstrom’s cold damage to physical damage, and Essence of Debris to give you an increased chance to stun enemies. Windswept and Windfury are also good choices if you want your Primalist to have haste and frenzy every time they use this Skill.
Serpent Strike
Serpent Strike works well with your Swarmblade Form. Normally, this poison-inducing Skill requires a spear to use, but in the Swarmblade Specialization Tree below, we’ll choose certain nodes to ensure that Serpent Strike applies to your attacks when you’re transformed. That said, this is also a great all-around Skill to use outside of Swarmblade mode, and Primalists certainly do well with a legendary spear in their hefty paws.
Fill out the Culling Point , Slither , Hydra Strikes , and Corrosive Venom nodes for insta-kills, a better chance of dodging, and faster, more devastating Serpent Strikes that will shred enemy armour and poison resistance.
Swarmblade Form
With Swarmblade Form , your Druid transforms into a huge mantis-like insect with excellent agility and attack speed. You gain several new Skills upon turning into a Swarmblade, including a reliable melee attack dubbed Armblade Slash, the locust-summoning ability Summon Hive, a divebomb move aptly named Dive, and Circular Strike, which unleashes a giant arc of pain at everything around you.
We’re going to tweak the Swarmblade’s abilities to play nicely with the other Skills in this build. Viper’s Call is a must-have node, since it lets the Serpent Strike Skill tree apply to the Swarmblade’s Armblade Slashes. Water Strider is also needed, as it will auto-cast Maelstrom when you use Dive. Finally, Windfury Strikes lets you generate stacks whenever you use Armblade Slash, and these stacks can be expended to cast Tornado.
Tornado
Last but certainly not least, we have Tornado , which lets you conjure a whirlwind that pulls in nearby foes and deals damage to them. This Skill, alongside Gathering Storm and Maelstrom, ensures that you’ll always be a raging vortex of weather whenever you wade into the throes of combat.
Take the Charged Storm and Frequent Lighting nodes to create synergy with Gathering Storm, casting even more Storm Bolts at all in your path. Lasting Storm , Hurricane , and Eye of the Storm are all must-haves for casting additional Tornadoes at once and making them more powerful, and we also recommend taking Aspect of the Storm and Storm Dervish as well.
Passives
To maximise your potential with the Lightning Swarmblade Druid build, we recommend the following Passives:
- Primalist Passives: Natural Attunement , Wisdom of the Wild and Hunter’s Restoration are all must-have Passives. Take Harmony of Blades if you’d like to dual wield or Berserker for dealing more melee damage at low health.
- Beastmaster Passives: A fair number of Beastmaster Passives will help the Druid, namely Ursine Strength , Boar Heart , and Porcine Constitution.
- Druid Passives: Go all in on Chitinous Plating , Druidic Prowess , and Wind in the Leaves . Harmonious Wisdom , Rageborn , Hideskin , and Impervious are also fine Passives that’ll keep your Swarmblade Druid in the fight.
- Shaman Passives: Shamanic Infusion isn’t a bad Passive to pour a few points into. You can ignore the other options here.
Best Primalist Shaman build
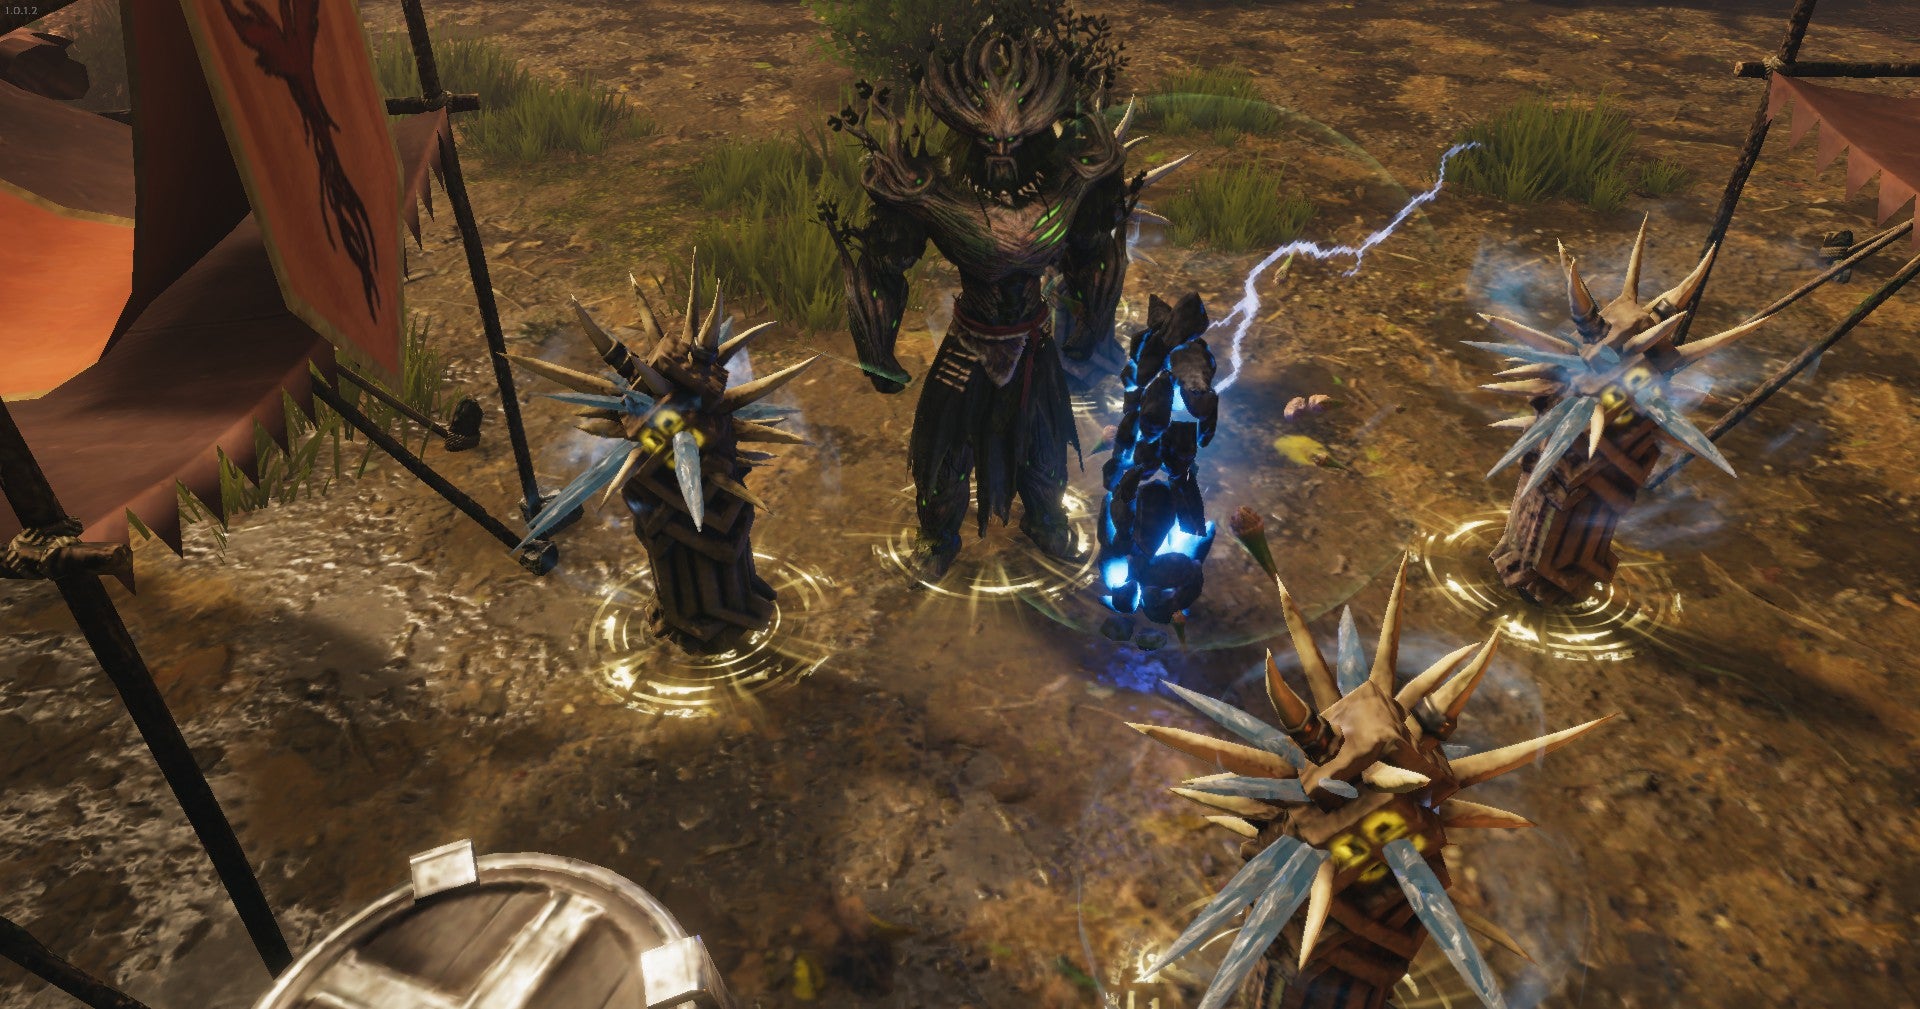
For an impressive Spriggan body and tonnes of totems by your side, you can’t go wrong with this cool-looking, epic build. |Image credit:Rock Paper Shotgun/Eleventh Hour Games
The Shaman Mastery embraces the natural world, usually via totems that generate stellar buffs. Out of the various totem combinations in this game, the Thorn Totem Shaman build is my favourite for blasting projectiles all across the screen, similar to the full-on AoE attacks that you’ll find with Last Epoch’s Mage class. This Primalist build also has a nifty Spriggan transformation and can work multiple roles as a tank or a skilled healer. There’s really a little bit of everything in the Thorn Totem Shaman’s ever-reliable bag of totemic tricks!
Eterra’s Blessing
Eterra’s Blessing heals a nearby ally for 100 health, and can triple this healing for minions and energise them, increasing their size and doubling their damage. You’ll regularly use Eterra’s Blessing not just to keep your friends alive, but to boost your summoned Spriggans and reign supreme as lord of a leafy army.
Grab Conservation , Improved Blessing , Purge , Efflorescence , and Regrowth to keep the healing potential of Eterra’s Blessing high. Technically, you also don’t need to keep Eterra’s Blessing in your hotbar, because taking the Rosebloom node activates it whenever you cast Thorn Shield via your Spriggan form, as described below. If you decide on this option, feel free to replace Eterra’s Blessing with another attack Skill of your choice (or a traversal Skill like Fury Leap ).
Spriggan Form
Your Shaman relies on totems, but they can also become the stuff that totems are made of with Spriggan Form , shapeshifting into a bark-encrusted forest fey with new abilities at their beck and call: Summon Vines, Summon Healing Totem, Thorn Shield, and Spirit Thorns. All are excellent battle and healing Skills, and we can make them even better by focusing on the following nodes.
Ironbark is a good first node thanks to the additional armour it grants the Spriggan form. Following this, choose Totem Warden to grant your healing totems higher health and duration, Guardian of Nature to amplify their healing effectiveness, and Wrath of the Glade for the chance to case Spirit Thorns from each healing totem whenever you directly cast Spirit Thorn. You’ll also want Spiked Totems and Unbound Garden . Boom, thorns everywhere - and we’re going to have even more when we activate Summon Thorn Torem, described below.
Summon Spriggan
If becoming a Spriggan wasn’t enough, why not bring forth another tree pal to have your back? Summon Spriggan does just that, and your summon will support you by casting spells and emanating an aura that restores 10 health per second.
To make your Spriggan companion beefier, Arboreal Vitality and Warding Bark are necessities. I also recommend taking Aura of Life , Aura of Kinship , and Aura of Retribution to elevate the healing aura of your Spriggan comrades.
Summon Storm Totem
One of two totem Skills in the Shaman’s aresenal, Summon Storm Torem brings forth lighting storms around nearby foes. Keep in mind that you can’t activate it while in your Spriggan Form, but it’s still a worthy Skill that deals extreme DPS for all those moments when you aren’t kicking butt as a treeman.
Invest in nodes that scale the damage of your storms. This means Lightning Raider , Storm’s Reach , or Intensity . To shock enemies, try taking Static Field and all of the nodes attached to it, like Fulgurite Core and Exploit Weakness .
Summon Thorn Totem
The other totem in your skillset, Summon Thorn Totem will be a constant presence as you rain down sharp missiles on anything coming your way. By default, you can have two totems active, but we’ll amp things up to make totems cover every direction you could possibly face.
Forested Expanse is the node you’re looking for to have three extra totems active at once, while Memories of Eterra will help you regain mana whenever one of your totems dies. Ancient Power is worth maxing out to make your totems deal more damage, and you can take matters a step further with Impale , which offers thorns a chance to deal double damage on a hit. If you really want to go big, invest in Titan’s Bane at the bottom of the Specialization Tree to shoot a single massive thorn from each totem instead of a selection of projectiles.
Passives
To maximise your potential with the Thorn Totem Shaman build, we recommend the following Passives:
- Primalist Passives: Gift of the Wilderness , Natural Attunement , Wisdom of the Wild and Hunter’s Restoration are your priorities. Then take Berserker and especially Elder Branch for additional totemic spell damage.
- Beastmaster Passives: For some extra constitution and durabilty, take Ursine Strength , Boar Heart , and Call of the Pack .
- Druid Passives: Chitinous Plating , Thicket of Thorns , and Wind in the Leaves are all good picks for reinforcing your thorn attacks and your Spriggans.
- Shaman Passives: Start with Shamanic Infusion before moving on to Tempest Form and Ancestral Speed . Protective Circle will give you additional physical and elemental resistance for each active totem you have on screen, while Ruin of Awe is an overall solid boost to spell and minion damage.
That finishes our look at the best builds available for the animal-friendly powerhouse that is the Primalist. For more on all the class options available to you in Last Epoch, keep an eye on Rock Paper Shotgun in the coming days as we proceed to delve into the gothic Acolyte , the spell-slinging Mage, the shifty Rogue , and the noble Sentinel .

Last Epoch
Video Game
Rock Paper Shotgun is better when you sign in
Sign in and join us on our journey to discover strange and compelling PC games.

All 75 Arc Raiders Blueprints and where to get them
These areas have the highest chance of giving you Blueprints

Image credit:Rock Paper Shotgun/Embark Studios

Looking for more Arc Raiders Blueprints? It’s a special day when you find a Blueprint, as they’re among the most valuable items in Arc Raiders. If you find a Blueprint that you haven’t already found, then you must make sure you hold onto it at all costs, because Blueprints are the key to one of the most important and powerful systems of meta-progression in the game.
This guide aims to be the very best guide on Blueprints you can find, starting with a primer on what exactly they are and how they work in Arc Raiders, before delving into exactly where to get Blueprints and the very best farming spots for you to take in your search.
We’ll also go over how to get Blueprints from other unlikely activities, such as destroying Surveyors and completing specific quests. And you’ll also find the full list of all 75 Blueprints in Arc Raiders on this page (including the newest Blueprints added with the Cold Snap update , such as the Deadline Blueprint and Firework Box Blueprint), giving you all the information you need to expand your own crafting repertoire.
In this guide:
- What are Blueprints in Arc Raiders?
- Full Blueprint list: All crafting recipes
- Where to find Blueprints in Arc Raiders Blueprints obtained from quests Blueprints obtained from Trials Best Blueprint farming locations

What are Blueprints in Arc Raiders?
Blueprints in Arc Raiders are special items which, if you manage to extract with them, you can expend to permanently unlock a new crafting recipe in your Workshop. If you manage to extract from a raid with an Anvil Blueprint, for example, you can unlock the ability to craft your very own Anvil Pistol, as many times as you like (as long as you have the crafting materials).
To use a Blueprint, simply open your Inventory while in the lobby, then right-click on the Blueprint and click “Learn And Consume” . This will permanently unlock the recipe for that item in your Workshop. As of the Stella Montis update, there are allegedly 75 different Blueprints to unlock - although only 68 are confirmed to be in the game so far. You can see all the Blueprints you’ve found and unlocked by going to the Workshop menu, and hitting “R” to bring up the Blueprint screen.
It’s possible to find duplicates of past Blueprints you’ve already unlocked. If you find these, then you can either sell them, or - if you like to play with friends - you can take it into a match and gift it to your friend so they can unlock that recipe for themselves. Another option is to keep hold of them until the time comes to donate them to the Expedition.
Full Blueprint list: All crafting recipes
Below is the full list of all the Blueprints that are currently available to find in Arc Raiders, and the crafting recipe required for each item:
| Blueprint | Type | Recipe | Crafted At |
|---|---|---|---|
| Bettina | Weapon | 3x Advanced Mechanical Components 3x Heavy Gun Parts 3x Canister | Gunsmith 3 |
| Blue Light Stick | Quick Use | 3x Chemicals | Utility Station 1 |
| Aphelion | Weapon | 3x Magnetic Accelerator 3x Complex Gun Parts 1x Matriarch Reactor | Gunsmith 3 |
| Combat Mk. 3 (Flanking) | Augment | 2x Advanced Electrical Components 3x Processor | Gear Bench 3 |
| Combat Mk. 3 (Aggressive) | Augment | 2x Advanced Electrical Components 3x Processor | Gear Bench 3 |
| Complex Gun Parts | Material | 2x Light Gun Parts 2x Medium Gun Parts 2x Heavy Gun Parts | Refiner 3 |
| Fireworks Box | Quick Use | 1x Explosive Compound 3x Pop Trigger | Explosives Station 2 |
| Gas Mine | Mine | 4x Chemicals 2x Rubber Parts | Explosives Station 1 |
| Green Light Stick | Quick Use | 3x Chemicals | Utility Station 1 |
| Pulse Mine | Mine | 1x Crude Explosives 1x Wires | Explosives Station 1 |
| Seeker Grenade | Grenade | 1x Crude Explosives 2x ARC Alloy | Explosives Station 1 |
| Looting Mk. 3 (Survivor) | Augment | 2x Advanced Electrical Components 3x Processor | Gear Bench 3 |
| Angled Grip II | Mod | 2x Mechanical Components 3x Duct Tape | Gunsmith 2 |
| Angled Grip III | Mod | 2x Mod Components 5x Duct Tape | Gunsmith 3 |
| Hullcracker | Weapon | 1x Magnetic Accelerator 3x Heavy Gun Parts 1x Exodus Modules | Gunsmith 3 |
| Launcher Ammo | Ammo | 5x Metal Parts 1x Crude Explosives | Workbench 1 |
| Anvil | Weapon | 5x Mechanical Components 5x Simple Gun Parts | Gunsmith 2 |
| Anvil Splitter | Mod | 2x Mod Components 3x Processor | Gunsmith 3 |
| ??? | ??? | ??? | ??? |
| Barricade Kit | Quick Use | 1x Mechanical Components | Utility Station 2 |
| Blaze Grenade | Grenade | 1x Explosive Compound 2x Oil | Explosives Station 3 |
| Bobcat | Weapon | 3x Advanced Mechanical Components 3x Light Gun Parts | Gunsmith 3 |
| Osprey | Weapon | 2x Advanced Mechanical Components 3x Medium Gun Parts 7x Wires | Gunsmith 3 |
| Burletta | Weapon | 3x Mechanical Components 3x Simple Gun Parts | Gunsmith 1 |
| Compensator II | Mod | 2x Mechanical Components 4x Wires | Gunsmith 2 |
| Compensator III | Mod | 2x Mod Components 8x Wires | Gunsmith 3 |
| Defibrillator | Quick Use | 9x Plastic Parts 1x Moss | Medical Lab 2 |
| ??? | ??? | ??? | ??? |
| Equalizer | Weapon | 3x Magnetic Accelerator 3x Complex Gun Parts 1x Queen Reactor | Gunsmith 3 |
| Extended Barrel | Mod | 2x Mod Components 8x Wires | Gunsmith 3 |
| Extended Light Mag II | Mod | 2x Mechanical Components 3x Steel Spring | Gunsmith 2 |
| Extended Light Mag III | Mod | 2x Mod Components 5x Steel Spring | Gunsmith 3 |
| Extended Medium Mag II | Mod | 2x Mechanical Components 3x Steel Spring | Gunsmith 2 |
| Extended Medium Mag III | Mod | 2x Mod Components 5x Steel Spring | Gunsmith 3 |
| Extended Shotgun Mag II | Mod | 2x Mechanical Components 3x Steel Spring | Gunsmith 2 |
| Extended Shotgun Mag III | Mod | 2x Mod Components 5x Steel Spring | Gunsmith 3 |
| Remote Raider Flare | Quick Use | 2x Chemicals 4x Rubber Parts | Utility Station 1 |
| Heavy Gun Parts | Material | 4x Simple Gun Parts | Refiner 2 |
| Venator | Weapon | 2x Advanced Mechanical Components 3x Medium Gun Parts 5x Magnet | Gunsmith 3 |
| Il Toro | Weapon | 5x Mechanical Components 6x Simple Gun Parts | Gunsmith 1 |
| Jolt Mine | Mine | 1x Electrical Components 1x Battery | Explosives Station 2 |
| Explosive Mine | Mine | 1x Explosive Compound 1x Sensors | Explosives Station 3 |
| Jupiter | Weapon | 3x Magnetic Accelerator 3x Complex Gun Parts 1x Queen Reactor | Gunsmith 3 |
| Light Gun Parts | Material | 4x Simple Gun Parts | Refiner 2 |
| Lightweight Stock | Mod | 2x Mod Components 5x Duct Tape | Gunsmith 3 |
| Lure Grenade | Grenade | 1x Speaker Component 1x Electrical Components | Utility Station 2 |
| Medium Gun Parts | Material | 4x Simple Gun Parts | Refiner 2 |
| Torrente | Weapon | 2x Advanced Mechanical Components 3x Medium Gun Parts 6x Steel Spring | Gunsmith 3 |
| Muzzle Brake II | Mod | 2x Mechanical Components 4x Wires | Gunsmith 2 |
| Muzzle Brake III | Mod | 2x Mod Components 8x Wires | Gunsmith 3 |
| Padded Stock | Mod | 2x Mod Components 5x Duct Tape | Gunsmith 3 |
| Shotgun Choke II | Mod | 2x Mechanical Components 4x Wires | Gunsmith 2 |
| Shotgun Choke III | Mod | 2x Mod Components 8x Wires | Gunsmith 3 |
| Shotgun Silencer | Mod | 2x Mod Components 8x Wires | Gunsmith 3 |
| Showstopper | Grenade | 1x Advanced Electrical Components 1x Voltage Converter | Explosives Station 3 |
| Silencer I | Mod | 2x Mechanical Components 4x Wires | Gunsmith 2 |
| Silencer II | Mod | 2x Mod Components 8x Wires | Gunsmith 3 |
| Snap Hook | Quick Use | 2x Power Rod 3x Rope 1x Exodus Modules | Utility Station 3 |
| Stable Stock II | Mod | 2x Mechanical Components 3x Duct Tape | Gunsmith 2 |
| Stable Stock III | Mod | 2x Mod Components 5x Duct Tape | Gunsmith 3 |
| Tagging Grenade | Grenade | 1x Electrical Components 1x Sensors | Utility Station 3 |
| Tempest | Weapon | 3x Advanced Mechanical Components 3x Medium Gun Parts 3x Canister | Gunsmith 3 |
| Trigger Nade | Grenade | 2x Crude Explosives 1x Processor | Explosives Station 2 |
| Vertical Grip II | Mod | 2x Mechanical Components 3x Duct Tape | Gunsmith 2 |
| Vertical Grip III | Mod | 2x Mod Components 5x Duct Tape | Gunsmith 3 |
| Vita Shot | Quick Use | 2x Antiseptic 1x Syringe | Medical Lab 3 |
| Vita Spray | Quick Use | 3x Antiseptic 1x Canister | Medical Lab 3 |
| Vulcano | Weapon | 1x Magnetic Accelerator 3x Heavy Gun Parts 1x Exodus Modules | Gunsmith 3 |
| Wolfpack | Grenade | 2x Explosive Compound 2x Sensors | Explosives Station 3 |
| Red Light Stick | Quick Use | 3x Chemicals | Utility Station 1 |
| Smoke Grenade | Grenade | 14x Chemicals 1x Canister | Utility Station 2 |
| Deadline | Mine | 3x Explosive Compound 2x ARC Circuitry | Explosives Station 3 |
| Trailblazer | Grenade | 1x Explosive Compound 1x Synthesized Fuel | Explosives Station 3 |
| Tactical Mk. 3 (Defensive) | Augment | 2x Advanced Electrical Components 3x Processor | Gear Bench 3 |
| Tactical Mk. 3 (Healing) | Augment | 2x Advanced Electrical Components 3x Processor | Gear Bench 3 |
| Yellow Light Stick | Quick Use | 3x Chemicals | Utility Station 1 |
Note: The missing Blueprints in this list likely have not actually been added to the game at the time of writing, because none of the playerbase has managed to find any of them. As they are added to the game, I will update this page with the most relevant information so you know exactly how to get all 75 Arc Raiders Blueprints.
Where to find Blueprints in Arc Raiders
Below is a list of all containers, modifiers, and events which maximise your chances of finding Blueprints:
- Certain quests reward you with specific Blueprints .
- Completing Trials has a high chance of offering Blueprints as rewards.
- Surveyors have a decent chance of dropping Blueprints on death.
- High loot value areas tend to have a greater chance of spawning Blueprints.
- Night Raids and Storms may increase rare Blueprint spawn chances in containers.
- Containers with higher numbers of items may have a higher tendency to spawn Blueprints. As a result, Blue Gate (which has many “large” containers containing multiple items) may give you a higher chance of spawning Blueprints.
- Raider containers (Raider Caches, Weapon Boxes, Medical Bags, Grenade Tubes) have increased Blueprint drop rates. As a result, the Uncovered Caches event gives you a high chance of finding Blueprints.
- Security Lockers have a higher than average chance of containing Blueprints.
- Certain Blueprints only seem to spawn under specific circumstances: Tempest Blueprint only spawns during Night Raid events. Vulcano Blueprint only spawns during Hidden Bunker events. Jupiter and Equaliser Blueprints only spawn during Harvester events.

Raider Caches, Weapon Boxes, and other raider-oriented container types have a good chance of offering Blueprints. |Image credit:Rock Paper Shotgun/Embark Studios
Blueprints have a very low chance of spawning in any container in Arc Raiders, around 1-2% on average. However, there is a higher chance of finding Blueprints in particular container types. Specifically, you can find more Blueprints in Raider containers and security lockers.
Beyond this, if you’re looking for Blueprints you should focus on regions of the map which are marked as having particularly high-value loot. Areas such as the Control Tower in Dam Battlegrounds, the Arrival and Departure Buildings in Spaceport, and Pilgrim’s Peak in Blue Gate all have a better-than-average chance of spawning Blueprints somewhere amongst all their containers. Night Raids and Electromagnetic Storm events also increase the drop chances of certain Blueprints .
In addition to these containers, you can often loot Blueprints from destroyed Surveyors - the largest of the rolling ball ARC. Surveyors are more commonly found on the later maps - Spaceport and Blue Gate - and if one spawns in your match, you’ll likely see it by the blue laser beam that it casts into the sky while “surveying”.
Surveyors are quite well-armoured and will very speedily run away from you once it notices you, but if you can take one down then make sure you loot all its parts for a chance of obtaining certain unusual Blueprints.
Blueprints obtained from quests
One way in which you can get Blueprints is by completing certain quests for the vendors in Speranza. Some quests will reward you with a specific item Blueprint upon completion, so as long as you work through all the quests in Arc Raiders, you are guaranteed those Blueprints.
Here is the full list of all Blueprints you can get from quest rewards:
- Trigger Nade Blueprint: Rewarded after completing “Sparks Fly”.
- Lure Grenade Blueprint: Rewarded after completing “Greasing Her Palms”.
- Burletta Blueprint: Rewarded after completing “Industrial Espionage”.
- Hullcracker Blueprint (and Launcher Ammo Blueprint): Rewarded after completing “The Major’s Footlocker”.
Alas, that’s only 4 Blueprints out of a total of 75 to unlock, so for the vast majority you will need to find them yourself during a raid. If you’re intent on farming Blueprints, then it’s best to equip yourself with cheap gear in case you lose it, but don’t use a free loadout because then you won’t get a safe pocket to stash any new Blueprint you find. No pain in Arc Raiders is sharper than failing to extract with a new Blueprint you’ve been after for a dozen hours already.

One of the best ways to get Blueprints is by hitting three stars on all five Trials every week. |Image credit:Rock Paper Shotgun/Embark Studios
Blueprints obtained from Trials
One of the very best ways to get Blueprints is as rewards for completing Trials in Arc Raiders. Trials are unlocked from Level 15 onwards, and allow you to earn rewards by focusing on certain tasks over the course of several raids. For example, one Trial might task you with dealing damage to Hornets, while another might challenge you to loot Supply Drops.
Trials refresh on a weekly basis, with a new week bringing five new Trials. Each Trial can offer up to three rewards after passing certain score milestones, and it’s possible to receive very high level loot from these reward crates - including Blueprints. So if you want to unlock as many Blueprints as possible, you should make a point of completing as many Trials as possible each week.
Best Blueprint farming locations
The very best way to get Blueprints is to frequent specific areas of the maps which combine high-tier loot pools with the right types of containers to search. Here are my recommendations for where to find Blueprints on every map, so you can always keep the search going for new crafting recipes to unlock.

Image credit:Rock Paper Shotgun/Embark Studios
Dam Battlegrounds
The best places to farm Blueprints on Dam Battlegrounds are the Control Tower, Power Generation Complex, Ruby Residence, and Pale Apartments . The first two regions, despite only being marked on the map as mid-tier loot, contain a phenomenal number of containers to loot. The Control Tower can also contain a couple of high-tier Security Lockers - though of course, you’ll need to have unlocked the Security Breach skill at the end of the Survival tree.
There’s also a lot of reporting amongst the playerbase that the Residential areas in the top-left of the map - Pale Apartments and Ruby Residence - give you a comparatively strong chance of finding Blueprints. Considering their size, there’s a high density of containers to loot in both locations, and they also have the benefit of being fairly out of the way. So you’re more likely to have all the containers to yourself.
Buried City
The best Blueprint farming locations on Buried City are the Santa Maria Houses, Grandioso Apartments, Town Hall, and the various buildings of the New District . Grandioso Apartments has a lower number of containers than the rest, but a high chance of spawning weapon cases - which have good Blueprint drop rates. The others are high-tier loot areas, with plenty of lootable containers - including Security Lockers.
Spaceport
The best places to find Blueprints on Spaceport are the Arrival and Departure Buildings, as well as Control Tower A6 and the Launch Towers . All these areas are labelled as high-value loot regions, and many of them are also very handily connected to one another by the Spaceport wall, which you can use to quickly run from one area to the next. At the tops of most of these buildings you’ll find at least one Security Locker, so this is an excellent farming route for players looking to find Blueprints.
The downside to looting Blueprints on Spaceport is that all these areas are hotly contested, particularly in Duos and Squads. You’ll need to be very focused and fast in order to complete the full farming route.

Image credit:Rock Paper Shotgun/Embark Studios
Blue Gate
Blue Gate tends to have a good chance of dropping Blueprints, potentially because it generally has a high number of containers which can hold lots of items; so there’s a higher chance of a Blueprint spawning in each container. In my experience, the best Blueprint farming spots on Blue Gate are Pilgrim’s Peak, Raider’s Refuge, the Ancient Fort, and the Underground Complex beneath the Warehouse .
All of these areas contain a wealth of containers to loot. Raider’s Refuge has less to loot, but the majority of the containers in and around the Refuge are raider containers, which have a high chance of containing Blueprints - particularly during major events.
Stella Montis
On the whole, Stella Montis seems to have a very low drop rate for Blueprints (though a high chance of dropping other high-tier loot). If you do want to try farming Blueprints on this map, the best places to find Blueprints in Stella Montis are Medical Research, Assembly Workshop, and the Business Center . These areas have the highest density of containers to loot on the map.
In addition to this, the Western Tunnel has a few different Security Lockers to loot, so while there’s very little to loot elsewhere in this area of the map, it’s worth hitting those Security Lockers if you spawn there at the start of a match.
That wraps up this primer on how to get all the Blueprints in Arc Raiders as quickly as possible. With the Expedition system constantly resetting a large number of players’ Blueprints, it’s more important than ever to have the most up-to-date information on where to find all these Blueprints.
While you’re here, be sure to check out our Arc Raiders best guns tier list , as well as our primers on the best skills to unlock and all the different Field Depot locations on every map.

ARC Raiders
PS5 , Xbox Series X/S , PC
Rock Paper Shotgun is better when you sign in
Sign in and join us on our journey to discover strange and compelling PC games.
