Last Epoch: Best Acolyte builds and skills
Learn the best builds and skills for the Acolyte class in Last Epoch

Image credit:Rock Paper Shotgun/Eleventh Hour Games

Wondering what the best Acolyte skills and builds are in Last Epoch? The Acolyte class in Last Epoch is for those who aren’t afraid to challenge the powers of life and death - or rather undeath. If you’ve ever played an undead summoner in any other ARPG, you have some idea of what to expect here. Lots of henchmen skeletons and spirits are waiting for you, and Acolytes even possess the ability to morph into a deadly version of the Grim Reaper!
That said, it can be tricky to determine whether you’d rather unleash a hex on your nearest enemy or open a rift in the ground to send them straight to the Underworld. There are quite a lot of creepy options at your disposal when studying the Acolyte’s three Masteries: the Lich, the Necromancer, and the Warlock. But thankfully, we’ve done this frightening work for you, and below you’ll find our favourite builds for each of these Masteries, along with the right Skills, Specialization Tree nodes, and Passives to select for each. Read on, and pretty soon the horrors of the great beyond will be at your beck and call.
- Last Epoch Best Acolyte Lich build
- Last Epoch Best Acolyte Necromancer build
- Last Epoch Best Acolyte Warlock build

Last Epoch’s launch trailer shows off the game’s classes as well as its time-travelling theme.Watch on YouTube
Last Epoch Best Acolyte Lich build
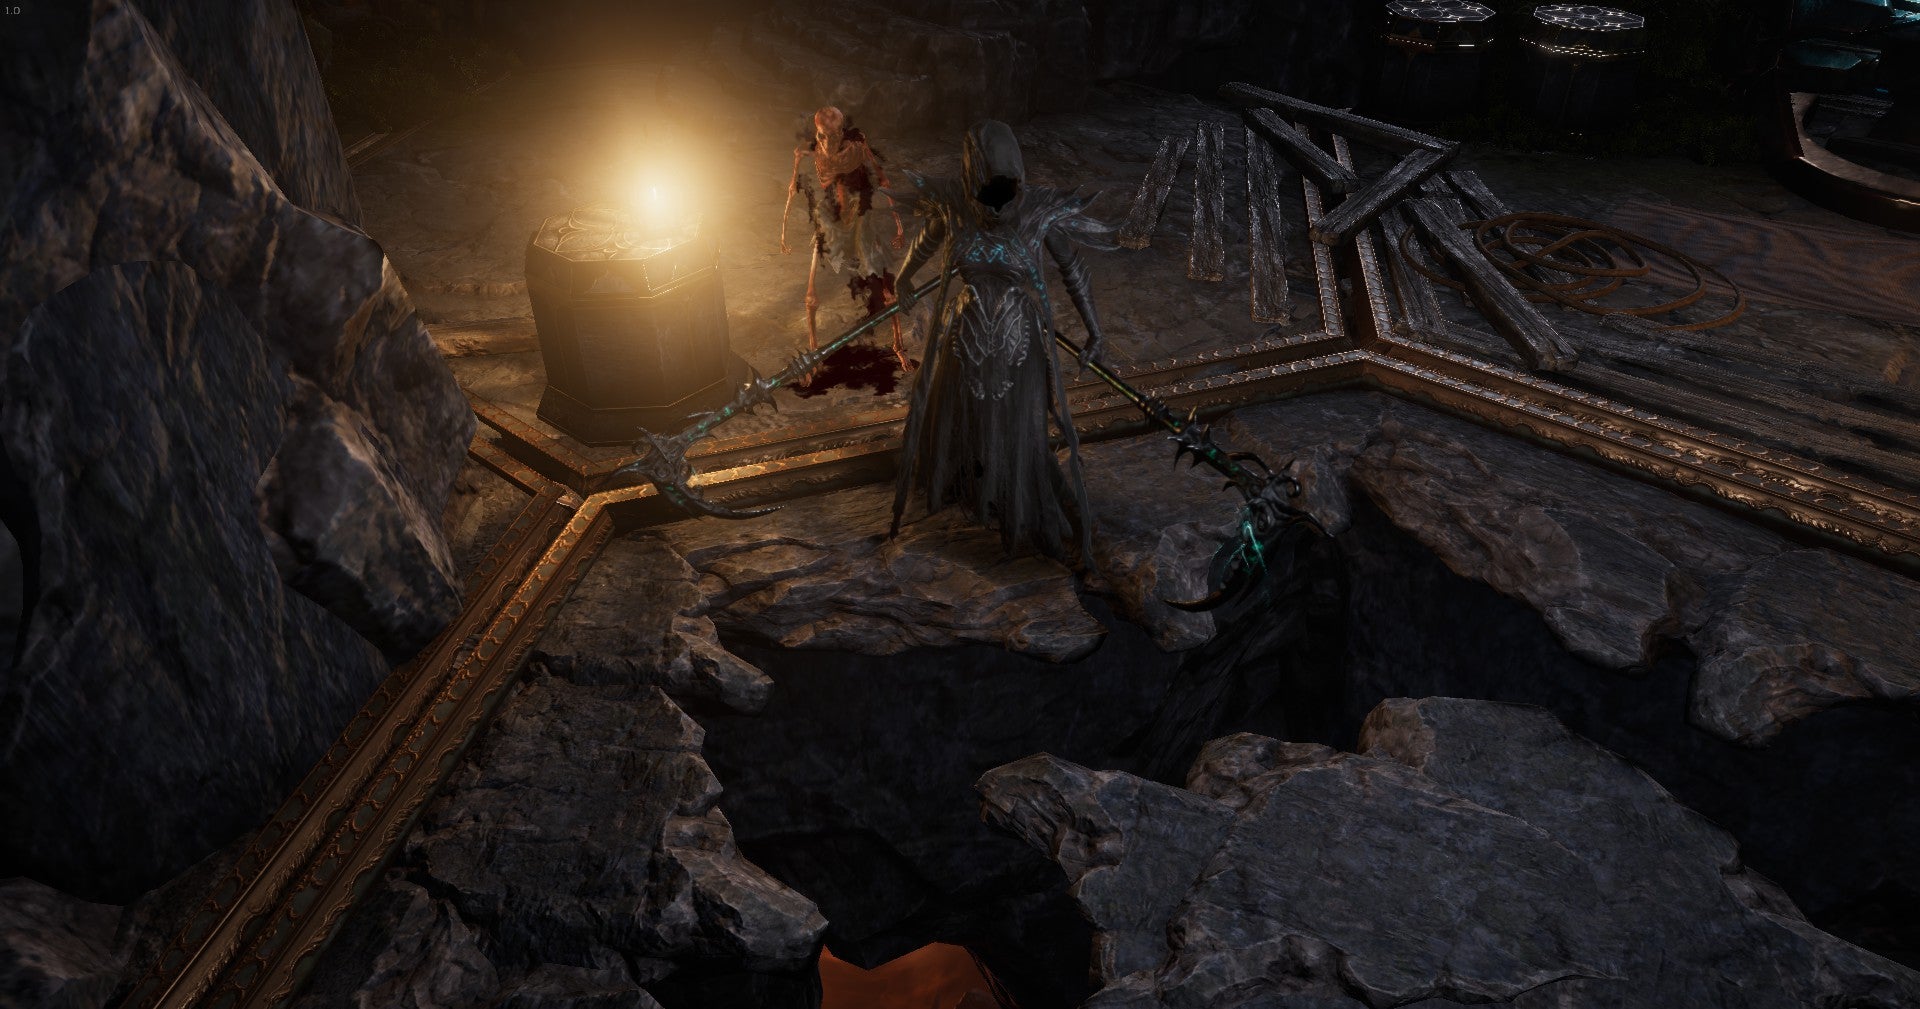
Behold the intimidating aura of the Lich Grim Reaper! |Image credit:Rock Paper Shotgun/Eleventh Hour Games
The Lich is an Acloyte who doesn’t fear their potentially corrupting magicks - rather, they relish in these forbidden skills and have progressed so far in their studies that they can turn into the Grim Reaper and deplete their own health in the pursuit of greater power. The Harvest Lich is an excellent Lich build for this Mastery, since it has great movement and traversal as well as stellar DPS potential, especially when facing large bosses. Get started by Specializing in the following Skills and Passives.
Bone Curse
Bone Curse is a reliable long-term Skill that gives an enemy a curse for 8 seconds. Hit the enemy when the curse is active, and watch them suffer the consequences. You can steadily build on Bone Curse, making the curse last longer, affect more enemies, and cause different types of damage.
After you’ve Specialized in this nefarious hex, pour points into Conflation to spread Bone Curse to a wider area. Follow up with Defile Defenses , which gives Bone Curse a chance to reduce enemy armour. From there, it’s a matter of choosing which way you want your curse to fall - I like to go for Marrow Thief and Bone Feast , which give your Acolyte a chance to gain handy Bone Armor after killing a foe suffering from Bone Curse. You can also work your way towards Bitter Winter if you like the idea of freezing your cursed foes.
Death Seal
Death Seal is a Skill for those who like to gamble on death’s door. It seals your Acolyte’s health, preventing it from going above its current value for five precious seconds. During that time, you can deal damage equal to your missing health and take less damage. This Skill can also be used to shoot off a wave of death dealing damage all at once.
This is obviously a risky Skill to Specialize in, but a calm Lich who masters it is a force to be reckoned with. On the Death Skill Specialization Tree, you’re going to want to max out Corrupted Consciousness , Desperate Shroud , and finally Deadlock to amplify damage even further and grant yourself extra armour, ensuring that you don’t accidentally bite the bullet before seeing Death Seal to its end.
Harvest
Welcome to your main method of attack; this is the Harvest Lich build after all! Harvest nicely sweeps through all enemies in front of you and will deal extra damage to those who are cursed. Aren’t you glad you took Bone Curse?
On the Harvest Specialization Tree, take the Great Scythe node to deal more damage in a larger area and Harrowing Blade to reduce enemy necrotic resistance with your successful hits. To continue building upon this Skill’s synergy with Bone Curse, max out Symbol of Loss next.
Reaper Form
It’s time to assume the form of the reaper of souls and slash the life out of anything that dares to challenge you! In my mind, this is one of the coolest Skills in all of Last Epoch , simply for the sheer novelty of becoming the Grim Reaper. Of course, there’s a trade-off, and your health will decay over time. Once you hit 0, you’re back to normal human form.
You can make the most of your eldritch transformation by putting all the points you can into Reaper’s Curse , which ups damage and increased critical strike chance. Mistress of Decay , Swift Harbinger , and Soul Shroud are also all handy for ensuring that every second of your reaping time counts.
Transplant
All of the builds listed here use Transplant to some extent, because it’s the best movement Skill that the Acolyte has at their disposal. It’s also very cool - activate it to teleport to a new body and detonate your old one for a brief blitz of physical damage. Since Transplant uses health instead of mana, it’s an appropriate inclusion for the Lich build.
Take the Fleeting Form and Acolyte’s Fervor nodes to gain increased cast and cooldown recovery speed for Fleeting Form, along with Haste and Frenzy for a brief duration. Then, work your way towards Bone Armor and Apostasy , which both work well alongside the Bone Armor you can gain from your Bone Curse Skill.
Passives
To maximise your potential with the Harvest Lich build, we recommend the following Passives:
- Acolyte Passives: Take Forbidden Knowledge and Stolen Vitality . You may also want to put some points into Bone Aura to increase your Lich’s survivability.
- Lich Passives: There are tonnes of possible Passives to take here, as you might imagine. My favourites are Dance With Death and Grasp of Fate for better damage, Deathbringer for superior crit chances, Necrotic Energy for adding necrotic effects to spells and Three Plagues for physical, nectrotic, and poison penetration. It’s also worth maximising all the Passives that boost your Intelligence, like Apocrypha.
- Necromancer Passives: You’re not a minion-user with this Acolyte build, so the only Necromancer skill worth taking is Elixir of Hunger .
- Warlock Passives: You can take Spiteful Decay or Soul Stealer if you want to deal more damage to cursed enemies or pull mana from them, but overall, the Warlock’s Passives aren’t a priority.
Last Epoch Best Acolyte Necromancer build
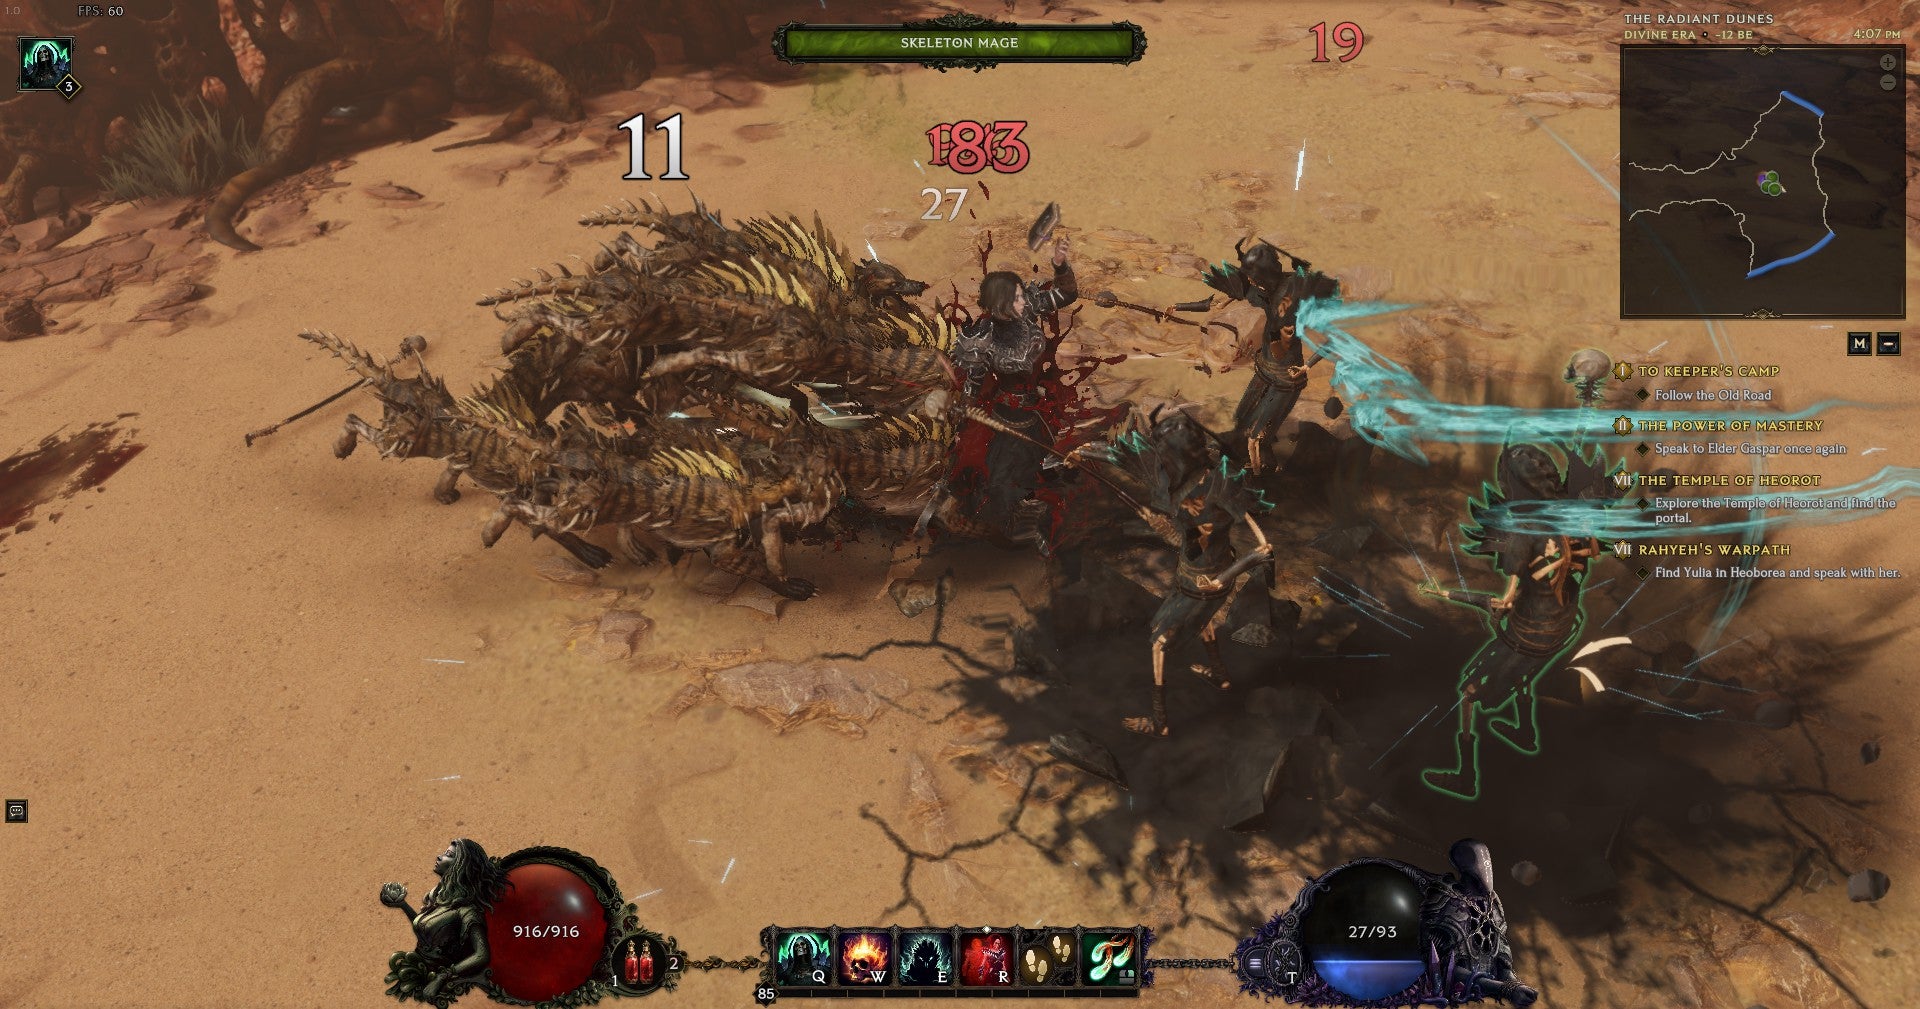
Skeletal minions, get to work and defend your master. |Image credit:Rock Paper Shotgun/Eleventh Hour Games
It’s not always worth it to wade into battle, and with this Skeletal Mage Necromancer build, you’ll find that it’s much more fun to manifest a bunch of bony spellcasters who can fling magic on your behalf. In other words, this is the perfect build for a mage who’d rather sit back and let their army do the tough stuff.
Chaos Bolts
Chaos Bolts fires an array of twisting projectiles all around the Acolyte, dealing necrotic and fire damage. This is a great offensive spell that becomes even better when you realise that you can customise it to empower your skeletal mages.
To do so, you’re going to want to veer towards the right side of the Chaos Bolts Specialization Tree - specifically Mana Anarchy and Revolution . Ensure that both nodes are filled out, and you’ll find that your Chaos Bolts consume more mana, deal more damage, and also empower your minions with additional spell damage and increased casting speed.
Dread Shade
Dread Shade is a useful trade-off used to empower your minions by draining their health slightly in favour of amplified necrotic attack and casting damage. This is a vitally important Skill to ensure that your skeletal goons stay in the fight.
The Lingering Doom node is a good starting choice to make your minions’ health drain more slowly. Following that, go for All For One and Egoism to increase damage and crit chance. Dying Coven and Flesh Harvest are also good nodes that respectively increase attack and cast speed along with the general buffs conferred by Dread Shade.
Infernal Shade
The icon for Infernal Shade shows a skull on fire, and that’s what this Skill does. Basically, you turn your enemies into Ghost Rider by sticking a shade on them that steadily burns for the next five seconds.
The nodes you should prioritise for Infernal Shade are Influence and Fanning the Flames , both of which make this Skill deal damage in a larger area. I’m also partial to Devour in Flames , Subjugation , Soulfire , and Manic Pyre to boost the strength of your fire shades just a little bit more.
Transplant
The Skeletal Mage Necromancer might be a bit squishy, which is what happens when you play a class that leaves the bulk of fighting up to their summons. Transplant is thus an essential Skill to ensure that your Acolyte can dart out of the way when mobs get too close.
Fleeting Form and Acolyte’s Fervor are vital for increased cast and cooldown recovery speed. along with Haste and Frenzy for a brief duration. Bone Armor and Apostasy are both good picks, and you may also want to take Reign of Blood and Violent Emergence to cause explosions every time you Transplant for a little extra safety insurance.
Summon Skeletal Mage
As you might have guessed, Summon Skeletal Mage is the cornerstone of this build. By default, you can have a maximum of two skeletal mages running around at once, casting Dread Bolt at everything in sight - though there are some options to tweak this in the Specialization Tree.
Would you rather have two skeletons with decent abilities, or one really big skeleton with beefier stats? That’s the question to consider as you choose your nodes. If you’d rather go for one bony fellow, then take the Archmage node, which gives your single mage much more health and damage and lets them fire twice the number of Dread Bolt blasts. You can amplify this singular skeleton’s skillset with Forbidden Arcana and Splintered Dominion , which are fine choices even if you’d rather stick to the default of two skeletal mages. Celer Mortis and Grey Merchant are also must-haves for improving critical strike chance, critical multipliers, and move speed.
Passives
To maximise your potential with the Skeletal Mage Necromancer build, we recommend the following Passives:
- Acolyte Passives: Make sure Forbidden Knowledge is filled out, and then do the same for Dark Ritual to make your minions stronger. It’s also worth putting a point or three into Mania of Mortality and Unnatural Preservation.
- Lich Passives: The only Necromancer Passive that’ll help this build is Apocrypha - the others are too reliant on decreasing your health for additional damage.
- Necromancer Passives: Lots to choose from here. Take Grave Thorns to increase health, armour, and reflected damage for your skeletal mages. Follow up with Cursed Blood and Aegisfall for all-around attack boosts and the great ability to shred armour on a hit. On the other side of the Passive Tree, there are a whole slew of Passives you’ll want to max out to make your Necromancer unstoppable, and these include Frantic Summons , River of Bones , Moonlight Pyre , Tyrant , Rite of Undeath , and finally Blades of the Forlorn .
- Warlock Passives: Spiteful Decay and Occultist’s Mind are worth picking up for increased damage over time and more intelligence.
Best Acolyte Warlock build
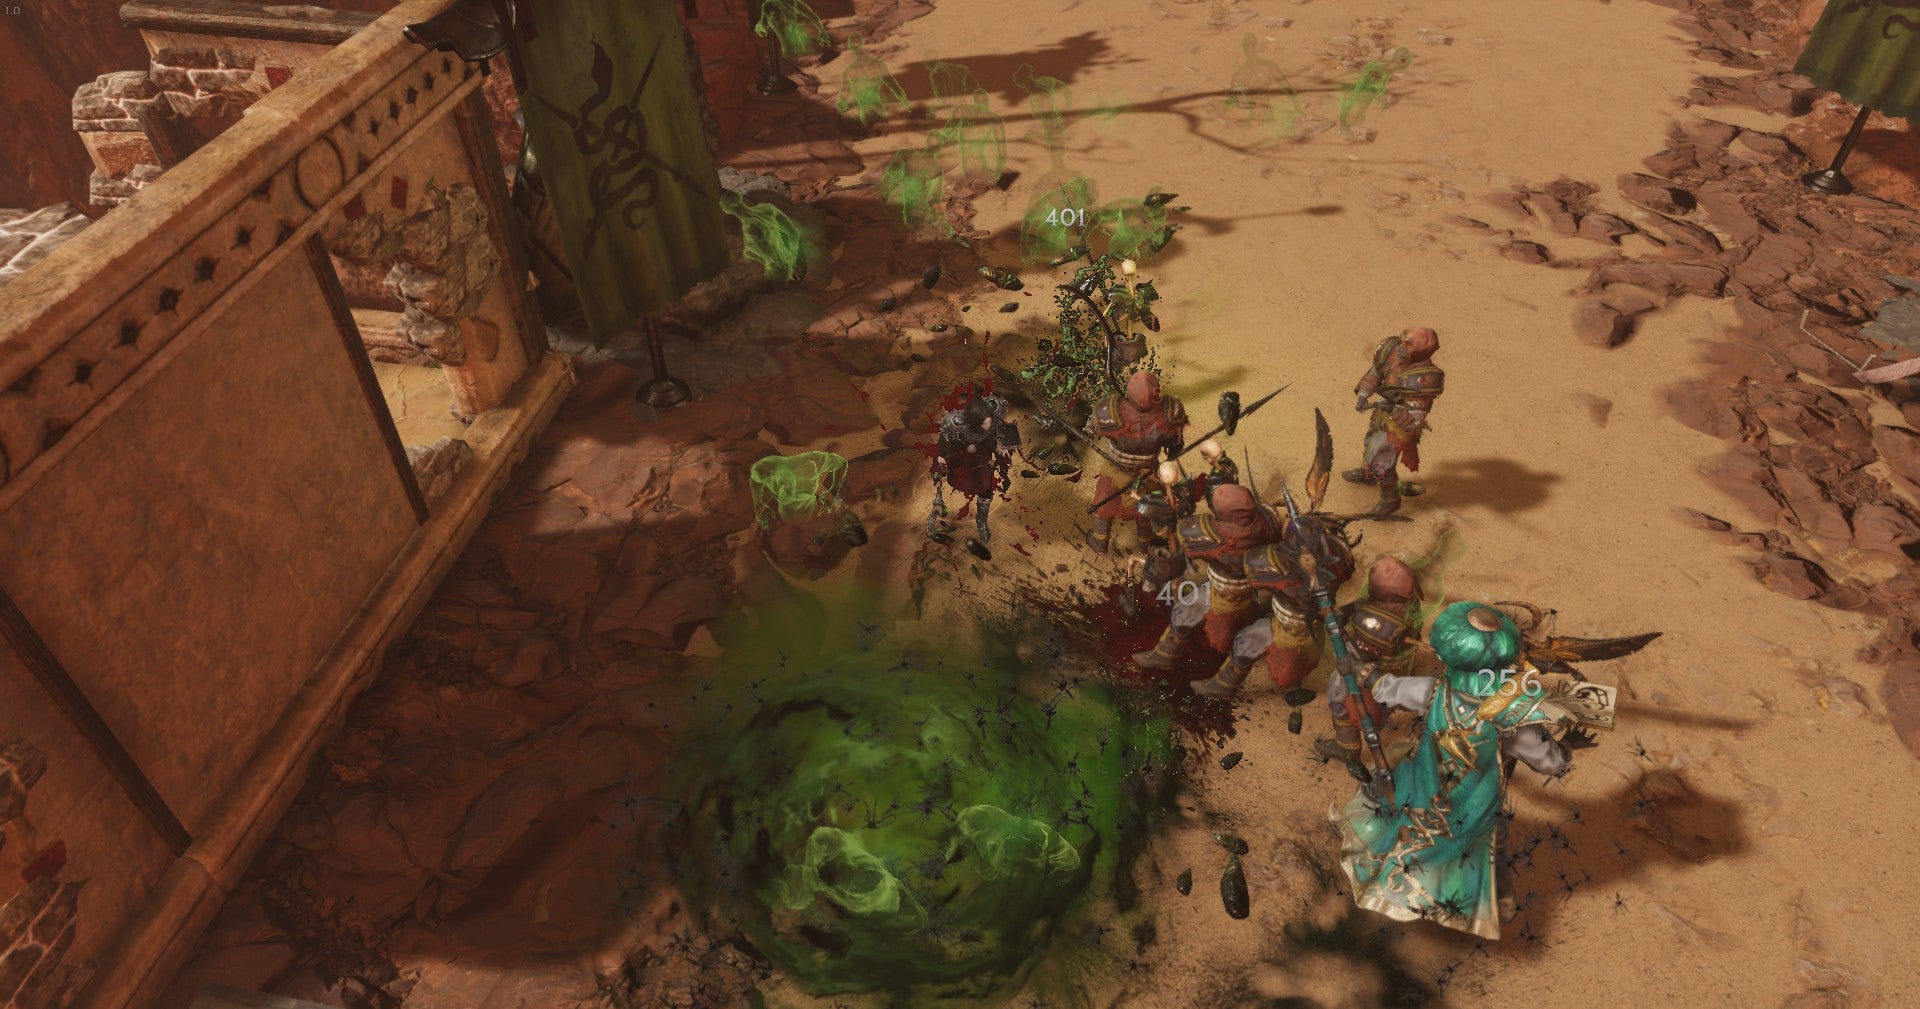
For erupting fissures and lots of stray spirits that will aid you in combat, you can’t go wrong with the Warlock. |Image credit:Rock Paper Shotgun/Eleventh Hour Games
The Warlock is an Acolyte Mastery that’s all about summoning spirits and forcing them to inflect long-lasting curses on your foes that deal damage over time. The Torment Warlock Acolyte build outlined below is a particularly effective option for slowly sapping the resources and lifeblood of your opponents in a most satisfying manner, ensuring that you’re the last one standing on a bed made out of their corpses.
Chthonic Fissure
This will be your primary attack spell. Cthonic Fissure opens up a sickly green rift in the ground, inflicting fire damage to foes atop it and sending out spirits to feast on their bones. The spirits deal Torment, a curse that slows and causes necrotic damage over time.
I recommend filling out the Fragile Crust node to make this Skill cost less mana, and then putting points into a smattering of Skills from the left side of the Cthonic Fissure Specialization Tree. For instance, Eradication to deal more damage to rare enemies and bosses, and Damned Waters to make your spirits inflict the Damned ailment.
Profane Veil
Profane Veil cloaks your Warlock in a sheen of energy that pierces surrounding foes with necrotic damage. It’s a great Skill for dodging hits (though by default, you can still take damage over time from ailments and other debuffs), and is superb for those moments with your Acolyte needs to slip through a fray of attackers and pop out the other side.
To reduce those pesky damage over time effects, take the Spirit Plate node. Seance is also a necessary choice for this build, as it’ll create great synergy with Wandering Spirits (outlined below). Basically, whenever one of your Wandering Spirits comes into contact with your Profane Veil, the spirit will do much more damage.
Spirit Plague
Specialise in Spirit Plague for your own damage over time effect. This handy curse generates necrotic damage on a target over three seconds before jumping to another foe once the first target dies.
Your goal with the nodes in the Spirit Plague Specialization Tree should be to ensure that your plague keeps growing in size and potency. This means putting points into Pleague Bearer , Rotten to the Core , Concentrated Rot and Exsanguination . It’s all a little disturbing, being a distributor of disease and all that, but you didn’t become a Warlock to keep people healthy.
Transplant
As with the other builds in this guide, Transplant will be your movement go-to. Need to get into an advantageous position to rip open the ground with Chthonic Fissure? Hoping to target a slippery enemy with Spirit Plague? Use Transplant, and be there in an instant.
Acolyte’s Fervor and Fleeting Form are both good nodes to fill out in the Transplant Specialization Tree, and consider investing in Anemia , Bone Armor , Plated Bone , and Apostasy to keep your Warlock healthy and sturdy in the field, even as they inflict waves on sickness on everyone else.
Wandering Spirits
Wandering Spirits is perhaps my favourite Skill out of this build. It does exactly what it says on the tin, setting free a group of spirits that swirls about you for six seconds, wrecking anything in your path. This Skill will be another of your main methods of assaulting enemies, and works excellently with Profane Veil, which buffs all your spirits to increase their potential as death-dealing chaos shades.
Take Spirit Swarm to give Wandering Spirits a shorter cooldown, and then Terrifying Presence and False Courage to ensure that your spirits inflict fear on foes. I’ve also found Familiar Souls useful if you want a more concentrated burst of spirits to spiral around you, Lingering Souls for making your spirits last longer in general, and Reap the Damned for granting your spirits the ability to deal more damage to cursed and damned enemies.
Passives
To maximise your potential with the Torment Warlock build, we recommend the following Passives:
- Acolyte Passives: Get Bone Aura and Forbidden Knowledge first and foremost. Then you can put a point or two into Mania of Mortality , but don’t go overboard, since your priority should be maxing out Unnatural Preservation .
- Lich Passives: Apocrypha is very useful for the increase to your intelligence stat and mana regen. You can safely ignore the other Passives here.
- Necromancer Passives: The Necromancer Passive Tree isn’t really worth bothering with, unless you want to experiment with Elixir of Hunger for additional health and some increased attack speed.
- Warlock Passives: Generally, you’re going to want passives that amplify intelligence and increase the power of your curses. This means Unholy Torment and Occultist’s Mind , Malefic Body , Encroaching Darkness and Duskbringer . To make your Warlock a little hardier, Harrowing Armor and Dark Protections are good, and it’s also worthwhile investing in Doom Herald .
That finishes our look at the best builds available for the undead-summoning necrotic goth that is the Acolyte. For more on all the class options available to you in Last Epoch, keep an eye on Rock Paper Shotgun in the coming days as we proceed to delve into the spell-slinging Mage , the brutal Primalist , the shifty Rogue , and the noble Sentinel .

Last Epoch
Video Game
Rock Paper Shotgun is better when you sign in
Sign in and join us on our journey to discover strange and compelling PC games.

All 75 Arc Raiders Blueprints and where to get them
These areas have the highest chance of giving you Blueprints

Image credit:Rock Paper Shotgun/Embark Studios

Looking for more Arc Raiders Blueprints? It’s a special day when you find a Blueprint, as they’re among the most valuable items in Arc Raiders. If you find a Blueprint that you haven’t already found, then you must make sure you hold onto it at all costs, because Blueprints are the key to one of the most important and powerful systems of meta-progression in the game.
This guide aims to be the very best guide on Blueprints you can find, starting with a primer on what exactly they are and how they work in Arc Raiders, before delving into exactly where to get Blueprints and the very best farming spots for you to take in your search.
We’ll also go over how to get Blueprints from other unlikely activities, such as destroying Surveyors and completing specific quests. And you’ll also find the full list of all 75 Blueprints in Arc Raiders on this page (including the newest Blueprints added with the Cold Snap update , such as the Deadline Blueprint and Firework Box Blueprint), giving you all the information you need to expand your own crafting repertoire.
In this guide:
- What are Blueprints in Arc Raiders?
- Full Blueprint list: All crafting recipes
- Where to find Blueprints in Arc Raiders Blueprints obtained from quests Blueprints obtained from Trials Best Blueprint farming locations

What are Blueprints in Arc Raiders?
Blueprints in Arc Raiders are special items which, if you manage to extract with them, you can expend to permanently unlock a new crafting recipe in your Workshop. If you manage to extract from a raid with an Anvil Blueprint, for example, you can unlock the ability to craft your very own Anvil Pistol, as many times as you like (as long as you have the crafting materials).
To use a Blueprint, simply open your Inventory while in the lobby, then right-click on the Blueprint and click “Learn And Consume” . This will permanently unlock the recipe for that item in your Workshop. As of the Stella Montis update, there are allegedly 75 different Blueprints to unlock - although only 68 are confirmed to be in the game so far. You can see all the Blueprints you’ve found and unlocked by going to the Workshop menu, and hitting “R” to bring up the Blueprint screen.
It’s possible to find duplicates of past Blueprints you’ve already unlocked. If you find these, then you can either sell them, or - if you like to play with friends - you can take it into a match and gift it to your friend so they can unlock that recipe for themselves. Another option is to keep hold of them until the time comes to donate them to the Expedition.
Full Blueprint list: All crafting recipes
Below is the full list of all the Blueprints that are currently available to find in Arc Raiders, and the crafting recipe required for each item:
| Blueprint | Type | Recipe | Crafted At |
|---|---|---|---|
| Bettina | Weapon | 3x Advanced Mechanical Components 3x Heavy Gun Parts 3x Canister | Gunsmith 3 |
| Blue Light Stick | Quick Use | 3x Chemicals | Utility Station 1 |
| Aphelion | Weapon | 3x Magnetic Accelerator 3x Complex Gun Parts 1x Matriarch Reactor | Gunsmith 3 |
| Combat Mk. 3 (Flanking) | Augment | 2x Advanced Electrical Components 3x Processor | Gear Bench 3 |
| Combat Mk. 3 (Aggressive) | Augment | 2x Advanced Electrical Components 3x Processor | Gear Bench 3 |
| Complex Gun Parts | Material | 2x Light Gun Parts 2x Medium Gun Parts 2x Heavy Gun Parts | Refiner 3 |
| Fireworks Box | Quick Use | 1x Explosive Compound 3x Pop Trigger | Explosives Station 2 |
| Gas Mine | Mine | 4x Chemicals 2x Rubber Parts | Explosives Station 1 |
| Green Light Stick | Quick Use | 3x Chemicals | Utility Station 1 |
| Pulse Mine | Mine | 1x Crude Explosives 1x Wires | Explosives Station 1 |
| Seeker Grenade | Grenade | 1x Crude Explosives 2x ARC Alloy | Explosives Station 1 |
| Looting Mk. 3 (Survivor) | Augment | 2x Advanced Electrical Components 3x Processor | Gear Bench 3 |
| Angled Grip II | Mod | 2x Mechanical Components 3x Duct Tape | Gunsmith 2 |
| Angled Grip III | Mod | 2x Mod Components 5x Duct Tape | Gunsmith 3 |
| Hullcracker | Weapon | 1x Magnetic Accelerator 3x Heavy Gun Parts 1x Exodus Modules | Gunsmith 3 |
| Launcher Ammo | Ammo | 5x Metal Parts 1x Crude Explosives | Workbench 1 |
| Anvil | Weapon | 5x Mechanical Components 5x Simple Gun Parts | Gunsmith 2 |
| Anvil Splitter | Mod | 2x Mod Components 3x Processor | Gunsmith 3 |
| ??? | ??? | ??? | ??? |
| Barricade Kit | Quick Use | 1x Mechanical Components | Utility Station 2 |
| Blaze Grenade | Grenade | 1x Explosive Compound 2x Oil | Explosives Station 3 |
| Bobcat | Weapon | 3x Advanced Mechanical Components 3x Light Gun Parts | Gunsmith 3 |
| Osprey | Weapon | 2x Advanced Mechanical Components 3x Medium Gun Parts 7x Wires | Gunsmith 3 |
| Burletta | Weapon | 3x Mechanical Components 3x Simple Gun Parts | Gunsmith 1 |
| Compensator II | Mod | 2x Mechanical Components 4x Wires | Gunsmith 2 |
| Compensator III | Mod | 2x Mod Components 8x Wires | Gunsmith 3 |
| Defibrillator | Quick Use | 9x Plastic Parts 1x Moss | Medical Lab 2 |
| ??? | ??? | ??? | ??? |
| Equalizer | Weapon | 3x Magnetic Accelerator 3x Complex Gun Parts 1x Queen Reactor | Gunsmith 3 |
| Extended Barrel | Mod | 2x Mod Components 8x Wires | Gunsmith 3 |
| Extended Light Mag II | Mod | 2x Mechanical Components 3x Steel Spring | Gunsmith 2 |
| Extended Light Mag III | Mod | 2x Mod Components 5x Steel Spring | Gunsmith 3 |
| Extended Medium Mag II | Mod | 2x Mechanical Components 3x Steel Spring | Gunsmith 2 |
| Extended Medium Mag III | Mod | 2x Mod Components 5x Steel Spring | Gunsmith 3 |
| Extended Shotgun Mag II | Mod | 2x Mechanical Components 3x Steel Spring | Gunsmith 2 |
| Extended Shotgun Mag III | Mod | 2x Mod Components 5x Steel Spring | Gunsmith 3 |
| Remote Raider Flare | Quick Use | 2x Chemicals 4x Rubber Parts | Utility Station 1 |
| Heavy Gun Parts | Material | 4x Simple Gun Parts | Refiner 2 |
| Venator | Weapon | 2x Advanced Mechanical Components 3x Medium Gun Parts 5x Magnet | Gunsmith 3 |
| Il Toro | Weapon | 5x Mechanical Components 6x Simple Gun Parts | Gunsmith 1 |
| Jolt Mine | Mine | 1x Electrical Components 1x Battery | Explosives Station 2 |
| Explosive Mine | Mine | 1x Explosive Compound 1x Sensors | Explosives Station 3 |
| Jupiter | Weapon | 3x Magnetic Accelerator 3x Complex Gun Parts 1x Queen Reactor | Gunsmith 3 |
| Light Gun Parts | Material | 4x Simple Gun Parts | Refiner 2 |
| Lightweight Stock | Mod | 2x Mod Components 5x Duct Tape | Gunsmith 3 |
| Lure Grenade | Grenade | 1x Speaker Component 1x Electrical Components | Utility Station 2 |
| Medium Gun Parts | Material | 4x Simple Gun Parts | Refiner 2 |
| Torrente | Weapon | 2x Advanced Mechanical Components 3x Medium Gun Parts 6x Steel Spring | Gunsmith 3 |
| Muzzle Brake II | Mod | 2x Mechanical Components 4x Wires | Gunsmith 2 |
| Muzzle Brake III | Mod | 2x Mod Components 8x Wires | Gunsmith 3 |
| Padded Stock | Mod | 2x Mod Components 5x Duct Tape | Gunsmith 3 |
| Shotgun Choke II | Mod | 2x Mechanical Components 4x Wires | Gunsmith 2 |
| Shotgun Choke III | Mod | 2x Mod Components 8x Wires | Gunsmith 3 |
| Shotgun Silencer | Mod | 2x Mod Components 8x Wires | Gunsmith 3 |
| Showstopper | Grenade | 1x Advanced Electrical Components 1x Voltage Converter | Explosives Station 3 |
| Silencer I | Mod | 2x Mechanical Components 4x Wires | Gunsmith 2 |
| Silencer II | Mod | 2x Mod Components 8x Wires | Gunsmith 3 |
| Snap Hook | Quick Use | 2x Power Rod 3x Rope 1x Exodus Modules | Utility Station 3 |
| Stable Stock II | Mod | 2x Mechanical Components 3x Duct Tape | Gunsmith 2 |
| Stable Stock III | Mod | 2x Mod Components 5x Duct Tape | Gunsmith 3 |
| Tagging Grenade | Grenade | 1x Electrical Components 1x Sensors | Utility Station 3 |
| Tempest | Weapon | 3x Advanced Mechanical Components 3x Medium Gun Parts 3x Canister | Gunsmith 3 |
| Trigger Nade | Grenade | 2x Crude Explosives 1x Processor | Explosives Station 2 |
| Vertical Grip II | Mod | 2x Mechanical Components 3x Duct Tape | Gunsmith 2 |
| Vertical Grip III | Mod | 2x Mod Components 5x Duct Tape | Gunsmith 3 |
| Vita Shot | Quick Use | 2x Antiseptic 1x Syringe | Medical Lab 3 |
| Vita Spray | Quick Use | 3x Antiseptic 1x Canister | Medical Lab 3 |
| Vulcano | Weapon | 1x Magnetic Accelerator 3x Heavy Gun Parts 1x Exodus Modules | Gunsmith 3 |
| Wolfpack | Grenade | 2x Explosive Compound 2x Sensors | Explosives Station 3 |
| Red Light Stick | Quick Use | 3x Chemicals | Utility Station 1 |
| Smoke Grenade | Grenade | 14x Chemicals 1x Canister | Utility Station 2 |
| Deadline | Mine | 3x Explosive Compound 2x ARC Circuitry | Explosives Station 3 |
| Trailblazer | Grenade | 1x Explosive Compound 1x Synthesized Fuel | Explosives Station 3 |
| Tactical Mk. 3 (Defensive) | Augment | 2x Advanced Electrical Components 3x Processor | Gear Bench 3 |
| Tactical Mk. 3 (Healing) | Augment | 2x Advanced Electrical Components 3x Processor | Gear Bench 3 |
| Yellow Light Stick | Quick Use | 3x Chemicals | Utility Station 1 |
Note: The missing Blueprints in this list likely have not actually been added to the game at the time of writing, because none of the playerbase has managed to find any of them. As they are added to the game, I will update this page with the most relevant information so you know exactly how to get all 75 Arc Raiders Blueprints.
Where to find Blueprints in Arc Raiders
Below is a list of all containers, modifiers, and events which maximise your chances of finding Blueprints:
- Certain quests reward you with specific Blueprints .
- Completing Trials has a high chance of offering Blueprints as rewards.
- Surveyors have a decent chance of dropping Blueprints on death.
- High loot value areas tend to have a greater chance of spawning Blueprints.
- Night Raids and Storms may increase rare Blueprint spawn chances in containers.
- Containers with higher numbers of items may have a higher tendency to spawn Blueprints. As a result, Blue Gate (which has many “large” containers containing multiple items) may give you a higher chance of spawning Blueprints.
- Raider containers (Raider Caches, Weapon Boxes, Medical Bags, Grenade Tubes) have increased Blueprint drop rates. As a result, the Uncovered Caches event gives you a high chance of finding Blueprints.
- Security Lockers have a higher than average chance of containing Blueprints.
- Certain Blueprints only seem to spawn under specific circumstances: Tempest Blueprint only spawns during Night Raid events. Vulcano Blueprint only spawns during Hidden Bunker events. Jupiter and Equaliser Blueprints only spawn during Harvester events.

Raider Caches, Weapon Boxes, and other raider-oriented container types have a good chance of offering Blueprints. |Image credit:Rock Paper Shotgun/Embark Studios
Blueprints have a very low chance of spawning in any container in Arc Raiders, around 1-2% on average. However, there is a higher chance of finding Blueprints in particular container types. Specifically, you can find more Blueprints in Raider containers and security lockers.
Beyond this, if you’re looking for Blueprints you should focus on regions of the map which are marked as having particularly high-value loot. Areas such as the Control Tower in Dam Battlegrounds, the Arrival and Departure Buildings in Spaceport, and Pilgrim’s Peak in Blue Gate all have a better-than-average chance of spawning Blueprints somewhere amongst all their containers. Night Raids and Electromagnetic Storm events also increase the drop chances of certain Blueprints .
In addition to these containers, you can often loot Blueprints from destroyed Surveyors - the largest of the rolling ball ARC. Surveyors are more commonly found on the later maps - Spaceport and Blue Gate - and if one spawns in your match, you’ll likely see it by the blue laser beam that it casts into the sky while “surveying”.
Surveyors are quite well-armoured and will very speedily run away from you once it notices you, but if you can take one down then make sure you loot all its parts for a chance of obtaining certain unusual Blueprints.
Blueprints obtained from quests
One way in which you can get Blueprints is by completing certain quests for the vendors in Speranza. Some quests will reward you with a specific item Blueprint upon completion, so as long as you work through all the quests in Arc Raiders, you are guaranteed those Blueprints.
Here is the full list of all Blueprints you can get from quest rewards:
- Trigger Nade Blueprint: Rewarded after completing “Sparks Fly”.
- Lure Grenade Blueprint: Rewarded after completing “Greasing Her Palms”.
- Burletta Blueprint: Rewarded after completing “Industrial Espionage”.
- Hullcracker Blueprint (and Launcher Ammo Blueprint): Rewarded after completing “The Major’s Footlocker”.
Alas, that’s only 4 Blueprints out of a total of 75 to unlock, so for the vast majority you will need to find them yourself during a raid. If you’re intent on farming Blueprints, then it’s best to equip yourself with cheap gear in case you lose it, but don’t use a free loadout because then you won’t get a safe pocket to stash any new Blueprint you find. No pain in Arc Raiders is sharper than failing to extract with a new Blueprint you’ve been after for a dozen hours already.

One of the best ways to get Blueprints is by hitting three stars on all five Trials every week. |Image credit:Rock Paper Shotgun/Embark Studios
Blueprints obtained from Trials
One of the very best ways to get Blueprints is as rewards for completing Trials in Arc Raiders. Trials are unlocked from Level 15 onwards, and allow you to earn rewards by focusing on certain tasks over the course of several raids. For example, one Trial might task you with dealing damage to Hornets, while another might challenge you to loot Supply Drops.
Trials refresh on a weekly basis, with a new week bringing five new Trials. Each Trial can offer up to three rewards after passing certain score milestones, and it’s possible to receive very high level loot from these reward crates - including Blueprints. So if you want to unlock as many Blueprints as possible, you should make a point of completing as many Trials as possible each week.
Best Blueprint farming locations
The very best way to get Blueprints is to frequent specific areas of the maps which combine high-tier loot pools with the right types of containers to search. Here are my recommendations for where to find Blueprints on every map, so you can always keep the search going for new crafting recipes to unlock.

Image credit:Rock Paper Shotgun/Embark Studios
Dam Battlegrounds
The best places to farm Blueprints on Dam Battlegrounds are the Control Tower, Power Generation Complex, Ruby Residence, and Pale Apartments . The first two regions, despite only being marked on the map as mid-tier loot, contain a phenomenal number of containers to loot. The Control Tower can also contain a couple of high-tier Security Lockers - though of course, you’ll need to have unlocked the Security Breach skill at the end of the Survival tree.
There’s also a lot of reporting amongst the playerbase that the Residential areas in the top-left of the map - Pale Apartments and Ruby Residence - give you a comparatively strong chance of finding Blueprints. Considering their size, there’s a high density of containers to loot in both locations, and they also have the benefit of being fairly out of the way. So you’re more likely to have all the containers to yourself.
Buried City
The best Blueprint farming locations on Buried City are the Santa Maria Houses, Grandioso Apartments, Town Hall, and the various buildings of the New District . Grandioso Apartments has a lower number of containers than the rest, but a high chance of spawning weapon cases - which have good Blueprint drop rates. The others are high-tier loot areas, with plenty of lootable containers - including Security Lockers.
Spaceport
The best places to find Blueprints on Spaceport are the Arrival and Departure Buildings, as well as Control Tower A6 and the Launch Towers . All these areas are labelled as high-value loot regions, and many of them are also very handily connected to one another by the Spaceport wall, which you can use to quickly run from one area to the next. At the tops of most of these buildings you’ll find at least one Security Locker, so this is an excellent farming route for players looking to find Blueprints.
The downside to looting Blueprints on Spaceport is that all these areas are hotly contested, particularly in Duos and Squads. You’ll need to be very focused and fast in order to complete the full farming route.

Image credit:Rock Paper Shotgun/Embark Studios
Blue Gate
Blue Gate tends to have a good chance of dropping Blueprints, potentially because it generally has a high number of containers which can hold lots of items; so there’s a higher chance of a Blueprint spawning in each container. In my experience, the best Blueprint farming spots on Blue Gate are Pilgrim’s Peak, Raider’s Refuge, the Ancient Fort, and the Underground Complex beneath the Warehouse .
All of these areas contain a wealth of containers to loot. Raider’s Refuge has less to loot, but the majority of the containers in and around the Refuge are raider containers, which have a high chance of containing Blueprints - particularly during major events.
Stella Montis
On the whole, Stella Montis seems to have a very low drop rate for Blueprints (though a high chance of dropping other high-tier loot). If you do want to try farming Blueprints on this map, the best places to find Blueprints in Stella Montis are Medical Research, Assembly Workshop, and the Business Center . These areas have the highest density of containers to loot on the map.
In addition to this, the Western Tunnel has a few different Security Lockers to loot, so while there’s very little to loot elsewhere in this area of the map, it’s worth hitting those Security Lockers if you spawn there at the start of a match.
That wraps up this primer on how to get all the Blueprints in Arc Raiders as quickly as possible. With the Expedition system constantly resetting a large number of players’ Blueprints, it’s more important than ever to have the most up-to-date information on where to find all these Blueprints.
While you’re here, be sure to check out our Arc Raiders best guns tier list , as well as our primers on the best skills to unlock and all the different Field Depot locations on every map.

ARC Raiders
PS5 , Xbox Series X/S , PC
Rock Paper Shotgun is better when you sign in
Sign in and join us on our journey to discover strange and compelling PC games.
