Kingdom Come Deliverance 2 Alchemy guide: All Potion recipes
The full recipes for all potions, poisons, and perfumes in KCD2
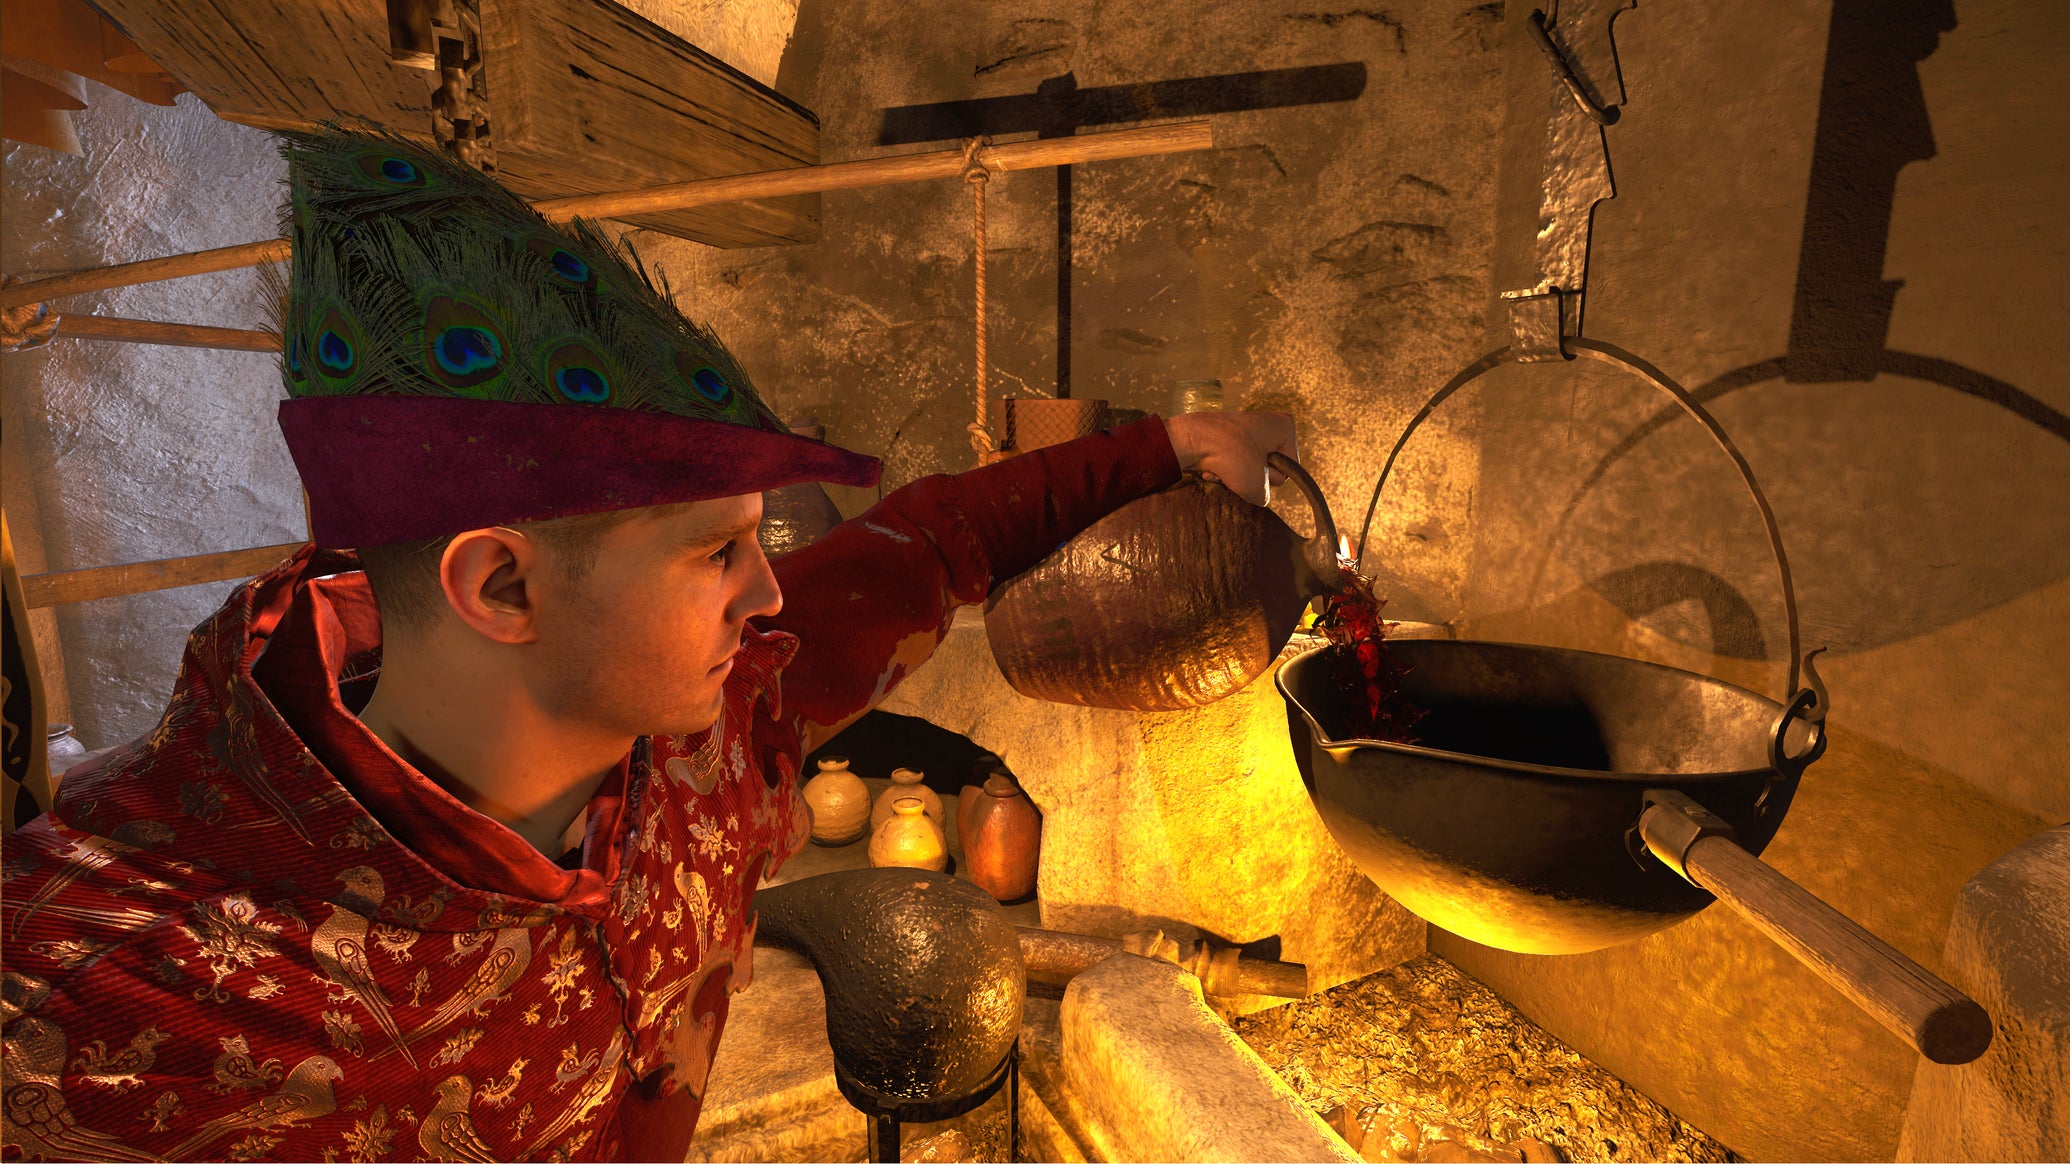
Image credit:Rock Paper Shotgun/Deep Silver

Looking for all the Potion recipes in the Kingdom Come: Deliverance 2 Alchemy system? If you’re here, you’ve probably already discovered just how many delightful little intricate minigames are packed into Kingdom Come: Deliverance 2 . From pickpocketing to Dice , from blacksmithing to lockpicking, there’s a huge amount to learn with these simulations. But my favourite of all is the Alchemy system, where you can brew a variety of powerful Potions by grinding up herbs, boiling spirits, and turning hourglass timers at just the right times.
Players coming from the original Kingdom Come: Deliverance will be largely familiar with the Alchemy system, the layout of the Alchemy Bench, and even the recipes for many of KCD2’s Potions. But there are also some key differences between KCD1 and KCD2 which you’ll need to be aware of, particularly when it comes to using the Bellows. All this will be revealed below.
If you’re entirely new to the world of Alchemy, then fear not, because we’ll go over everything from scratch in our ultimate Alchemy guide below. We’ve also included all 27 Potion recipes in Kingdom Come: Deliverance 2 , including perfumes, poisons, and gunpowder; and we’ve also laid out the effects of each quality of every Potion, including the rare fourth quality of Potion. Time for some brewing, I think.
In this guide:
- How to brew Potions at an Alchemy Bench
- Alchemy tips: How to brew perfect Potions
- All Kingdom Come Deliverance 2 Potion recipes

How to brew Potions at an Alchemy Bench
In Kingdom Come: Deliverance 2, you brew Potions at an Alchemy Bench. Each Potion must be brewed by following unique (and very specific) recipes which tell you when to add different ingredients, how long to boil the concoction, which ingredients need grinding with the mortar and pestle first, and so on.
Potions come in four qualities : Weak, Normal, Strong, and “Henry”. The quality depends on the freshness of your ingredients, and how closely you stick to the recipe. The fourth quality, “Henry”, is a special quality of Potion that only becomes available once you unlock the " Secret Of Secrets " Perk in the Alchemy Skill tree.
The first step is to find the ingredients. Each Potion takes different ingredients, and most of them are herbs of some kind or another. For example, you need Nettle and Marigold to make a Marigold Decoction Potion. Most ingredients will become less fresh over time in your inventory, but you can dry them at a Drying Rack to make them last much longer. The downside of doing that is that fresh herbs are better than dry herbs, and will result in better quality Potions.
When you interact with an Alchemy Bench, Henry will lay out a book of recipes which you can flick through to get an in-game reference of the recipe. However, you don’t actually need to use the book. You can just start making the Potion as long as you know the recipe.
Every Potion recipe begins by preparing the ingredients from your inventory and placing them on the shelf of the Alchemy Bench. The second step is always to pour one of four “base” liquids into the cauldron: Water, Wine, Oil, or Spirits . Each recipe will tell you which base to use. After that, you simply follow the recipe, using the turn timer to count “turns” of boiling. If specified in the recipe, you should also use the mortar and pestle to “grind” ingredients, and the bellows to increase the heat of the flame.
Finally, you have to finish the Potion either by “pouring”, “distilling”, or “grinding”. Most Potions just need to be poured from the cauldron straight into a phial. But if specified, you’ll need to use a phial on the Still to distill the Potion. And for gunpowder recipes, you’ll need to pour it into a mortar and grind it to finish the recipe.
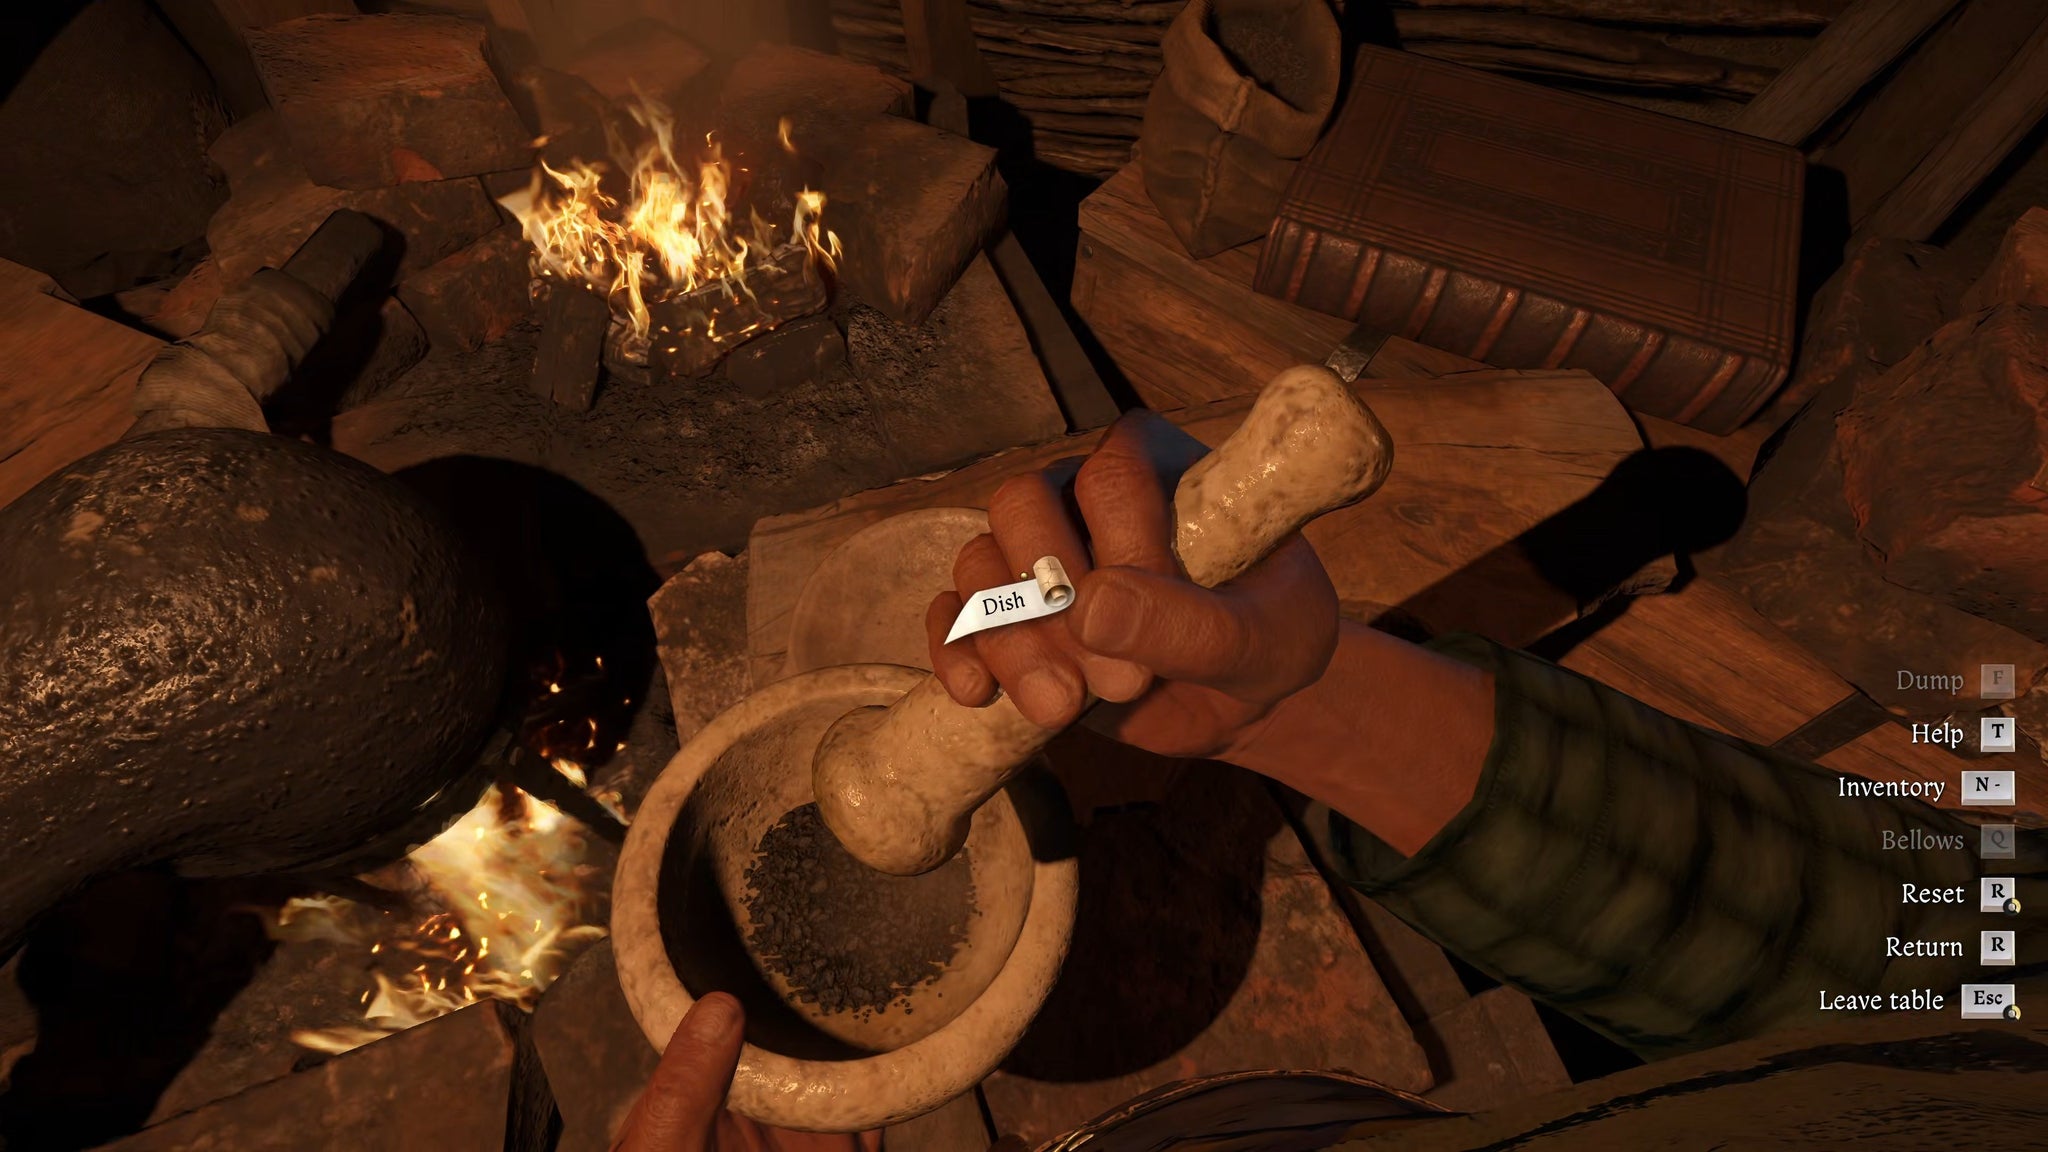
Image credit:Rock Paper Shotgun/Deep Silver
Alchemy tips: How to brew perfect Potions
Here are four invaluable tips for brewing the perfect Potion every time in Kingdom Come: Deliverance 2.
- You can brew Potions without the recipe, and doing this makes you learn the recipe!
- Don’t use the bellows unless it tells you.
- The order is: lower cauldron, start timer, use bellows.
- 1x fresh and 2x dried ingredients still gets you Strong quality.
The two things that really trip up new players when it comes to Alchemy is the bellows, and the turn timer. If you’re coming from the original KCD, hear this message: the bellows no longer counts as extra “turns”! There’s genuinely no reason to use the bellows at all unless the recipe specifically tells you to “boil with the bellows”. In which case, you lower the cauldron, start the timer, then pull on the bellows once . That’s literally everything you need to know about the bellows.
It’s also possible to make Potions of the ultimate “Henry” quality with 1x fresh and 1x dried, again assuming that the durability is still high on both ingredients.
All Kingdom Come Deliverance 2 Potion recipes
Here is the full list of all 27 Potion recipes in Kingdom Come: Deliverance 2’s Alchemy system:
- Aesop
- Aqua Vitalis
- Artemisia
- Bane (Poison)
- Bowman’s Brew
- Buck’s Blood
- Chamomile Brew
- Cockerel
- Digestive Potion
- Dollmaker (Poison)
- Embrocation
- Fever Tonic
- Fox
- Hair O’ The Dog
- Lethean Water
- Lion (Perfume)
- Lullaby (Poison)
- Marigold Decoction
- Mintha (Perfume)
- Moonshine
- Nighthawk
- Painkiller Brew
- Quickfinger
- Saviour Schnapps
- Soap
- Lead Shot Gunpowder
- Scattershot Powder
Below we’ll walk you through the ingredients and steps for each recipe, along with a description of the Potion’s effect at each quality level.
Aesop
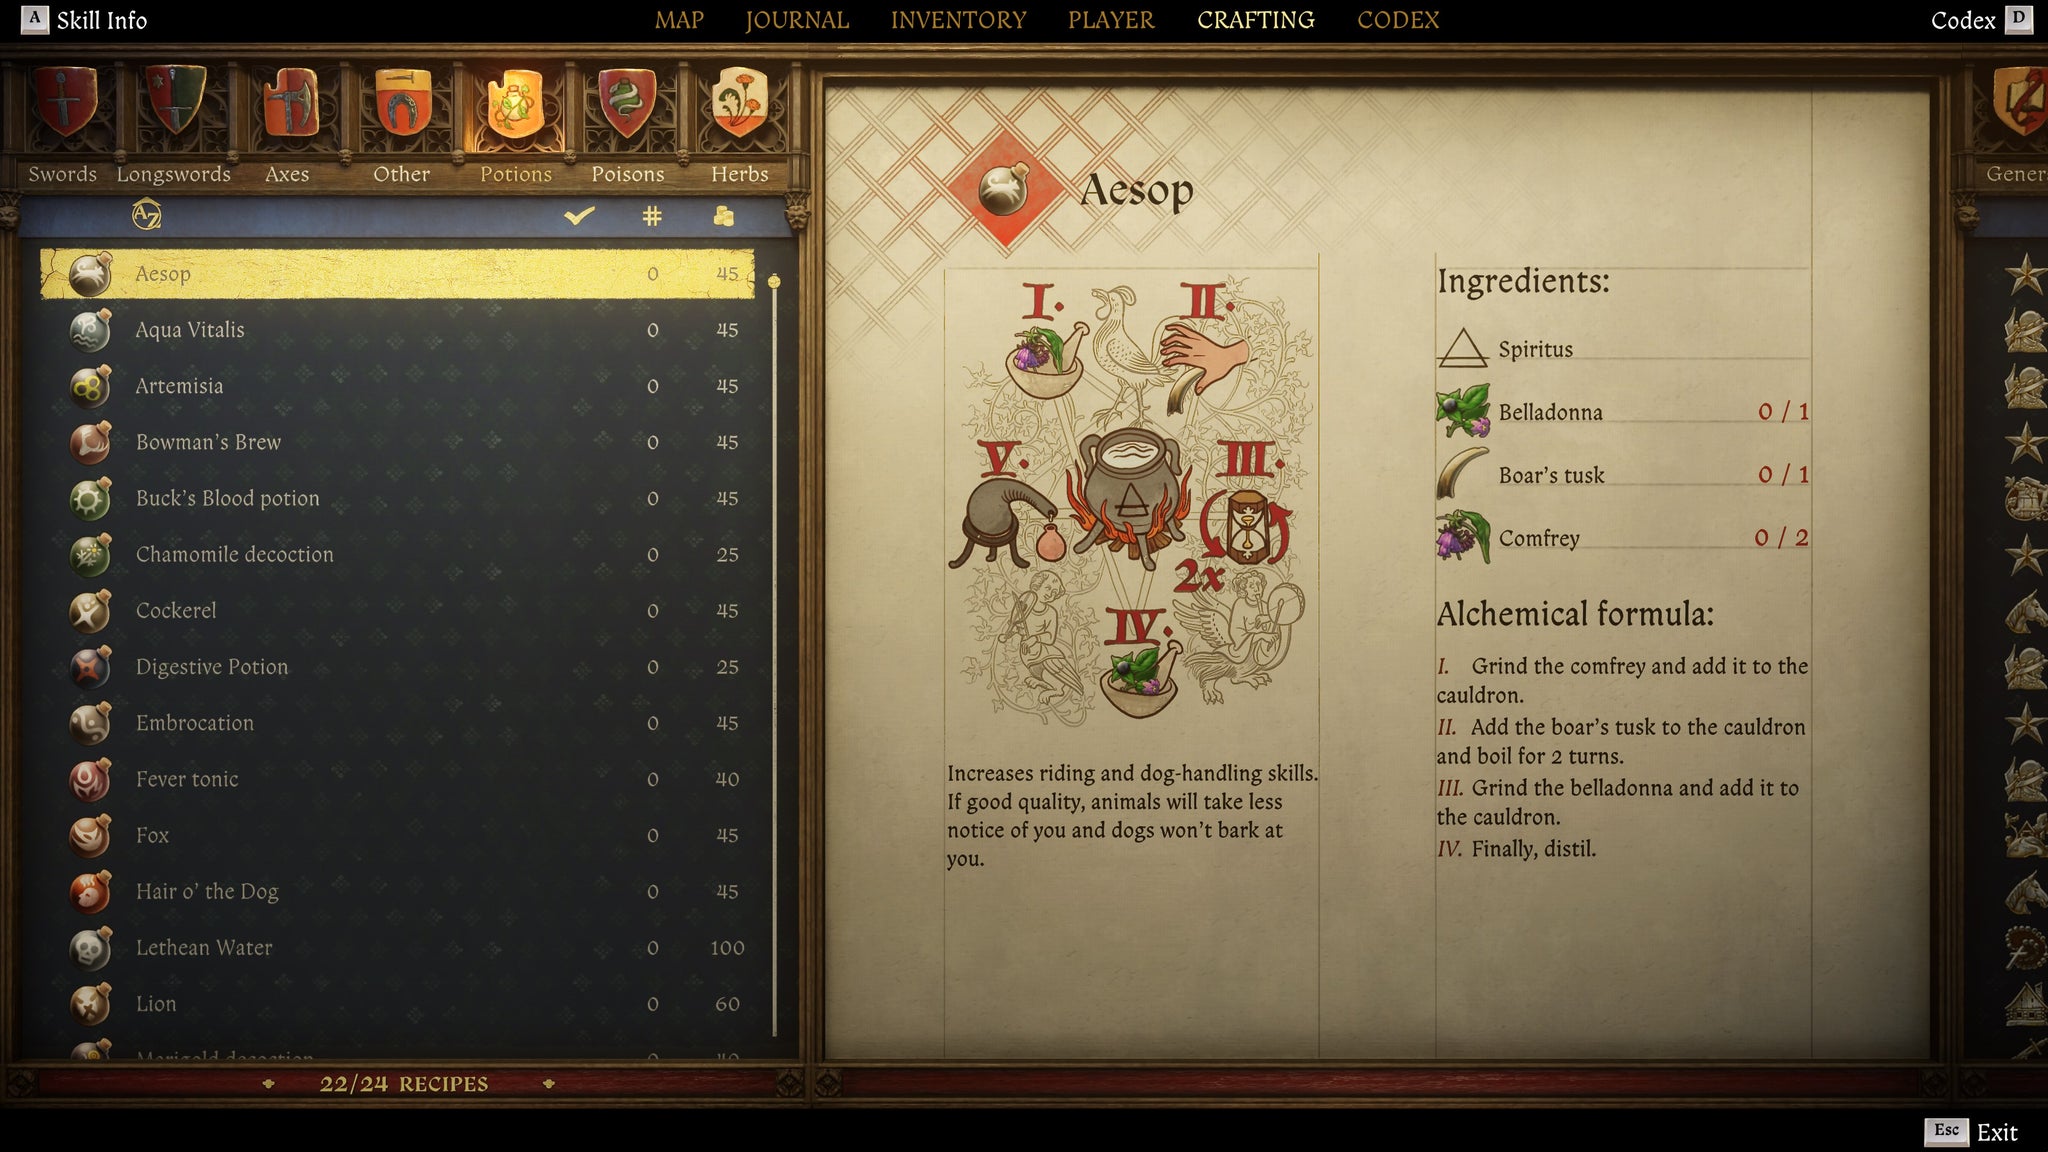
Image credit:Rock Paper Shotgun/Deep Silver
| Ingredients | 1x Belladonna, 1x Boar’s Tusk, 2x Comfrey |
|---|---|
| Liquid Base | Spiritus |
| Effect (Weak) | Increases Horsemanship and Houndmaster by 3 for a quarter of a day. Animals will take less notice of you, so you’ll find it easier to approach them. |
| Effect (Normal) | Increases Horsemanship and Houndmaster by 3 for half a day. Animals will take less notice of you, so you’ll find it easier to approach them. |
| Effect (Strong) | Increases Horsemanship and Houndmaster by 5 for half a day. Animals will take less notice of you, so you’ll find it easier to approach them. Dogs won’t notice you at all. |
| Effect (Henry) | Increases Horsemanship and Houndmaster by 7 for one day. Animals will take less notice of you, so you’ll find it easier to approach them. Dogs won’t notice you at all. |
| Recipe location | Purchase from Apothecary (Pschitoky). |
Aesop recipe steps:
- Prepare 1x Belladonna, 1x Boar’s Tusk, and 2x Comfrey.
- Add Spirits to the cauldron.
- Grind the Comfrey and add it to the cauldron.
- Add the Boar’s Tusk to the cauldron and boil for 2 turns.
- Grind the Belladonna and add it to the cauldron.
- Finally, distil.
Aqua Vitalis
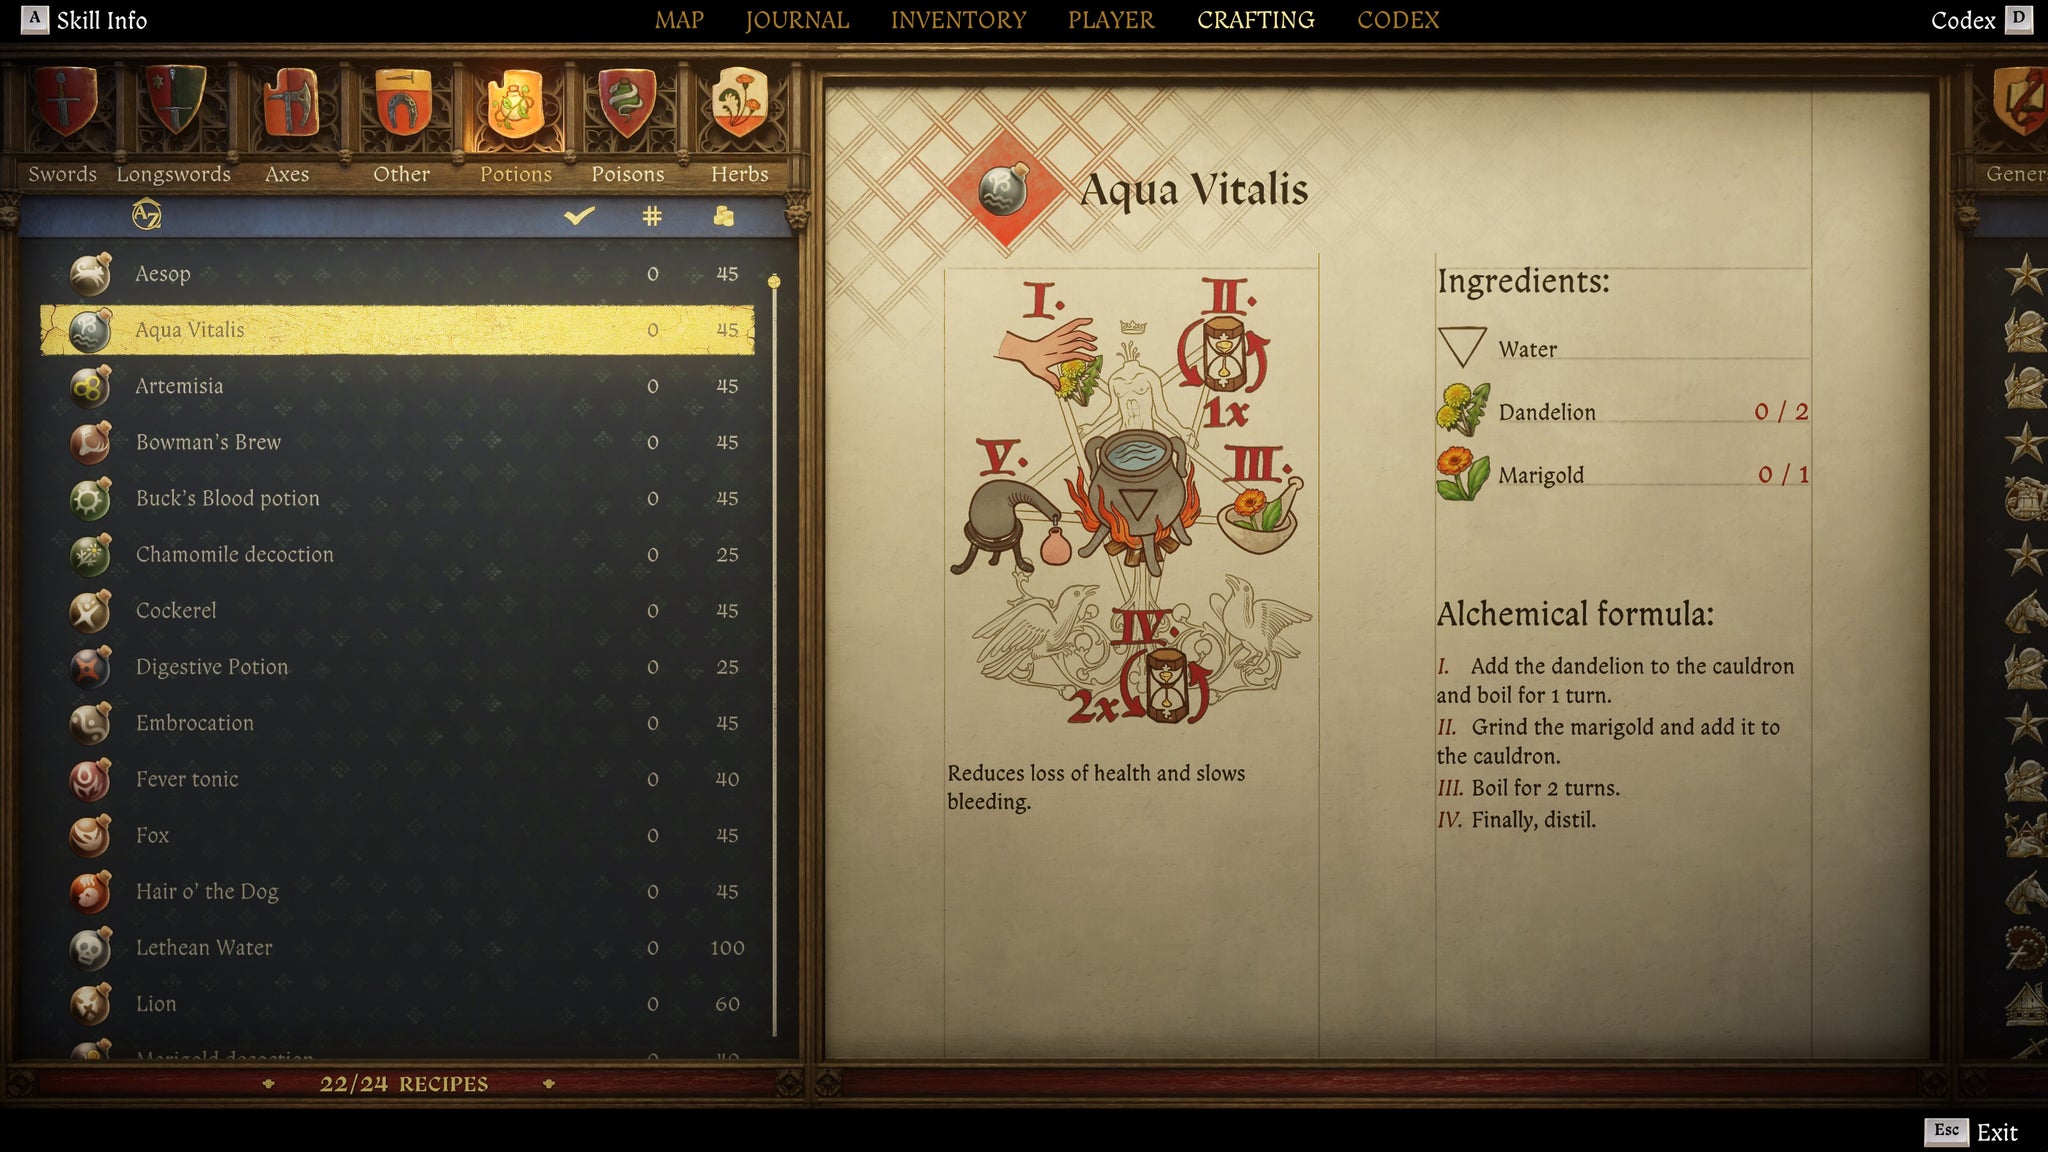
Image credit:Rock Paper Shotgun/Deep Silver
| Ingredients | 2x Dandelion, 1x Marigold |
|---|---|
| Liquid Base | Water |
| Effect (Weak) | You lose 15% less Health for 5 minutes. |
| Effect (Normal) | You lose 15% less Health and slows bleeding by 10%. Lasts 10 minutes. |
| Effect (Strong) | You lose 50% less Health and slows bleeding by 50%. Lasts 10 minutes. |
| Effect (Henry) | You lose 60% less Health and bleed 60% slower for 15 minutes. |
| Recipe location | Complete Thomlin Bruthans’ “Fight Dirty” quest in Horschan, or purchase from Aranka (Nomads’ Camp), Herbalist Barnaby (north of Trosky Castle), or Apothecary (Kuttenberg). |
Aqua Vitalis recipe steps:
- Prepare 2x Dandelion and 1x Marigold.
- Add Water to the cauldron.
- Add the Dandelion to the cauldron and boil for 1 turn.
- Grind the Marigold and add it to the cauldron.
- Boil for 2 turns.
- Finally, distil.
Artemisia
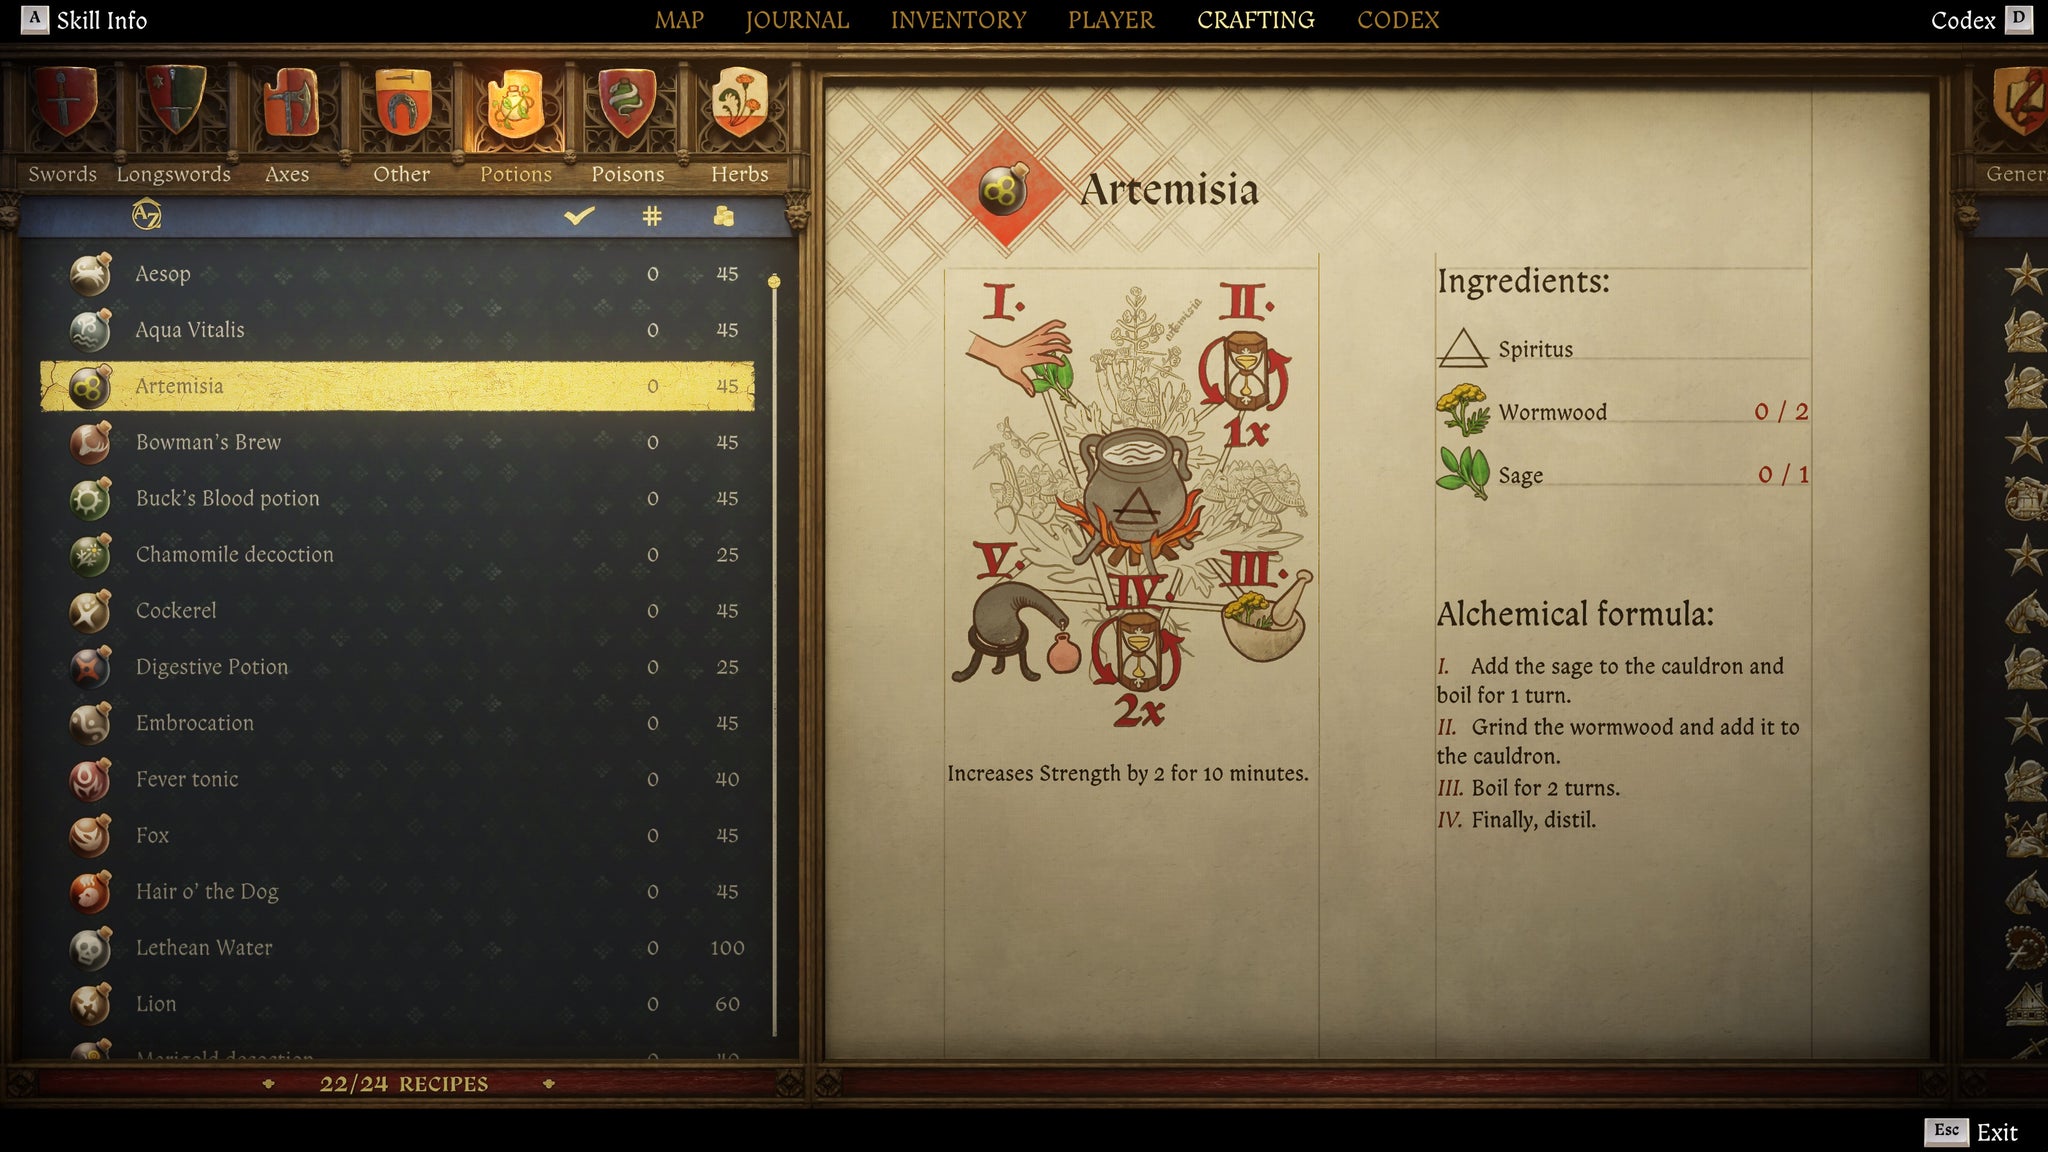
Image credit:Rock Paper Shotgun/Deep Silver
| Ingredients | 2x Wormwood, 1x Sage |
|---|---|
| Liquid Base | Spiritus |
| Effect (Weak) | Increases Strength by 2 for 10 minutes. |
| Effect (Normal) | Increases Strength by 4 for 10 minutes. |
| Effect (Strong) | Increases Strength by 4 and both attack and defence cost 25% less Stamina, lasts 10 minutes. |
| Effect (Henry) | Increases Strength by 6 and both attack and defence cost 35% less Stamina, lasts 15 minutes. |
| Recipe location | Purchase from Herbalist Barnaby (north of Trosky Castle), Apothecary (Kuttenberg), or Apothecary (Pschitoky). |
Artemisia recipe steps:
- Prepare 2x Wormwood and 1x Sage.
- Add Spirits to the cauldron.
- Add the Sage to the cauldron and boil for 1 turn.
- Grind the wormwood and add it to the cauldron.
- Boil for 2 turns.
- Finally, distil.
Bane Poison
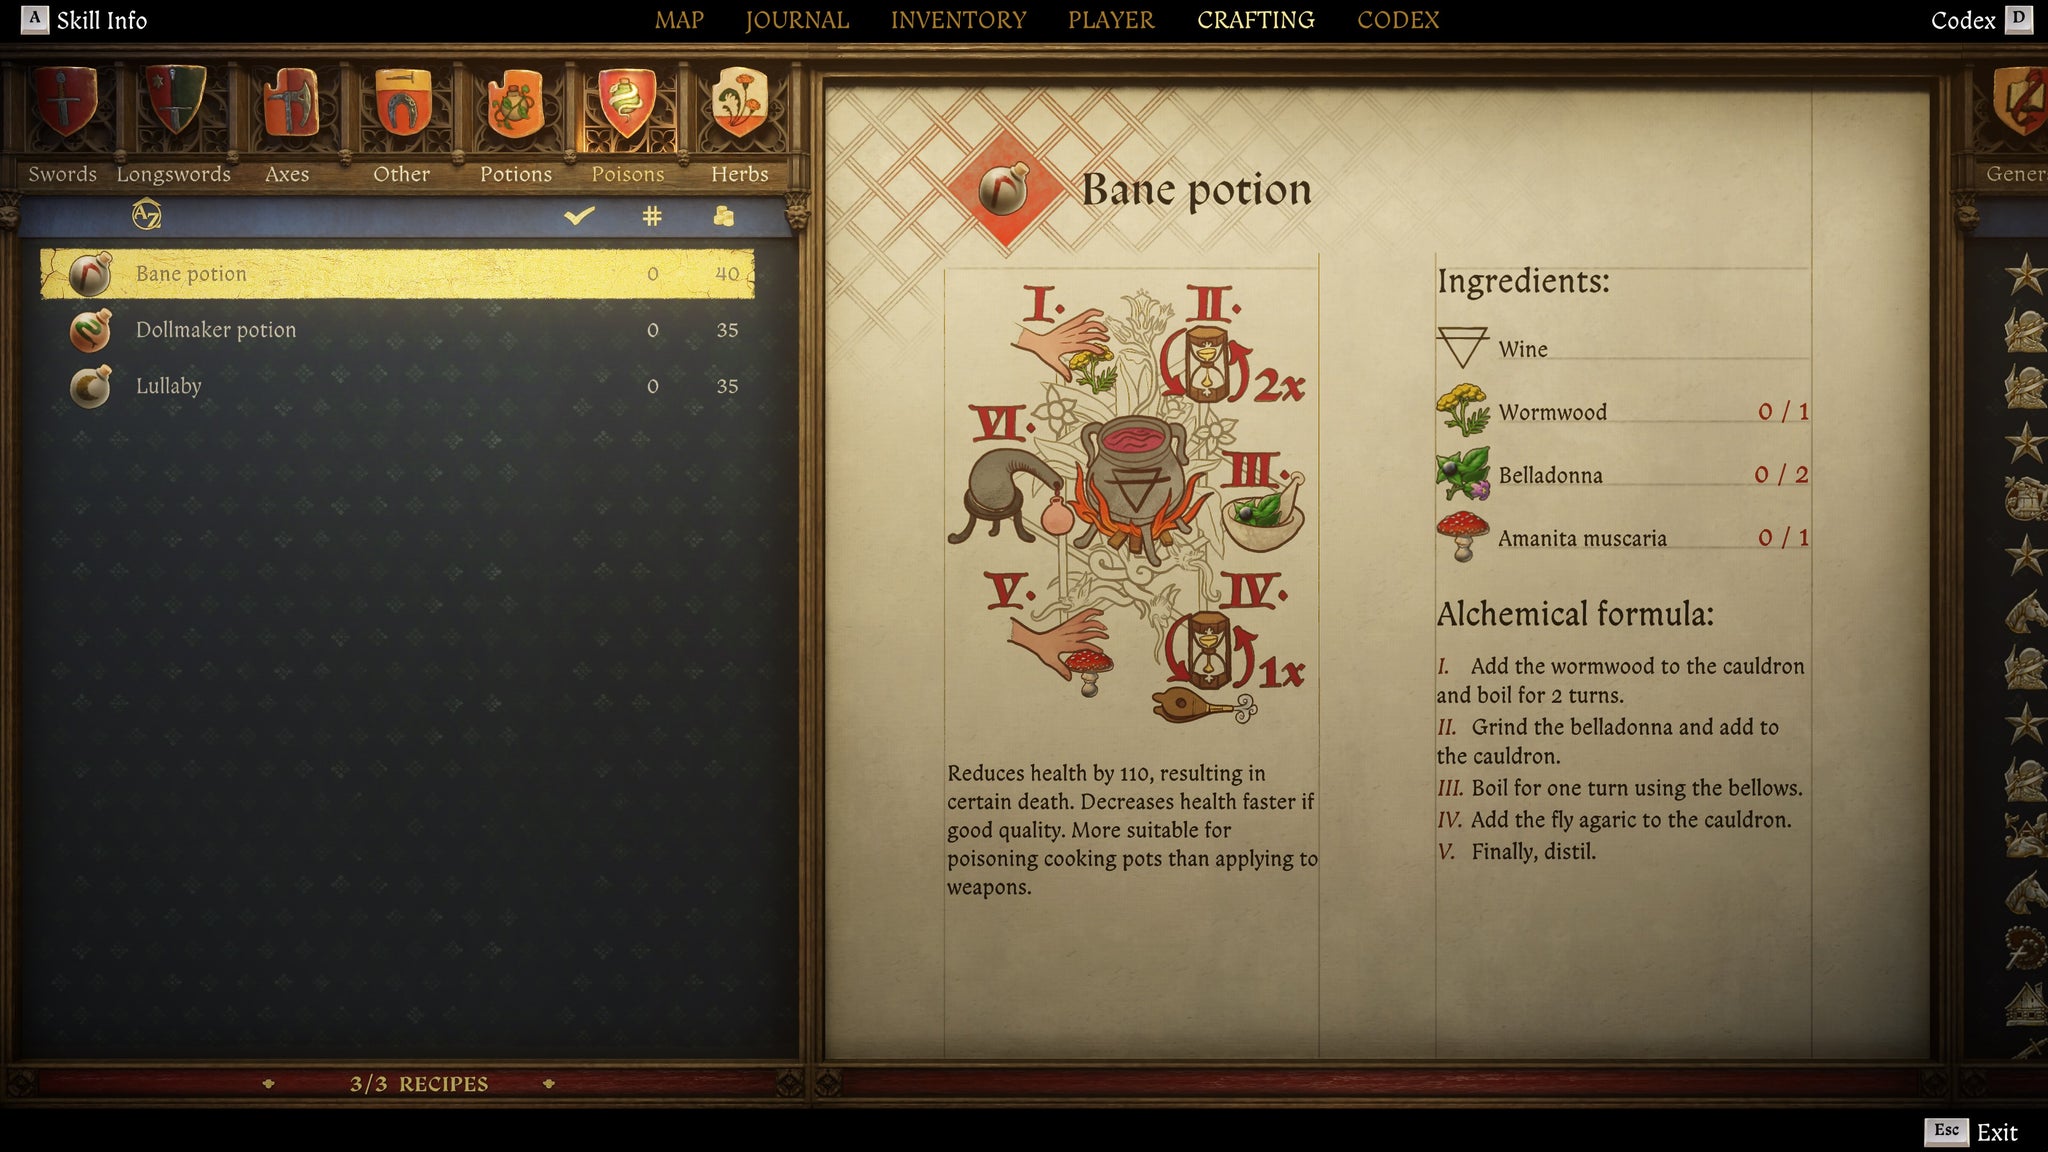
Image credit:Rock Paper Shotgun/Deep Silver
| Ingredients | 1x Wormwood, 2x Belladonna, 1x Amanita Muscaria |
|---|---|
| Liquid Base | Wine |
| Effect (Normal) | Makes running impossible and reduces health by 110 in 45 seconds. More suitable for poisoning cooking pots than applying to weapons. |
| Effect (Strong) | Makes running impossible and reduces health by 110 in 30 seconds. More suitable for poisoning cooking pots than applying to weapons. |
| Effect (Henry) | Makes running impossible and reduces health by 110 in 15 seconds. More suitable for poisoning cooking pots than applying to weapons. |
| Recipe location | Purchase from Aranka (Nomads’ Camp) or Balthazar (Random Encounter). |
Bane recipe steps:
- Prepare 1x Wormwood, 2x Belladonna, and 1x Amanita Muscaria.
- Add Wine to the cauldron.
- Add the Wormwood to the cauldron and boil for 2 turns.
- Grind the Belladonna and add to the cauldron.
- Boil for one turn using the Bellows.
- Add the Amanita Muscaria to the cauldron.
- Finally, distil.
Bowman’s Brew
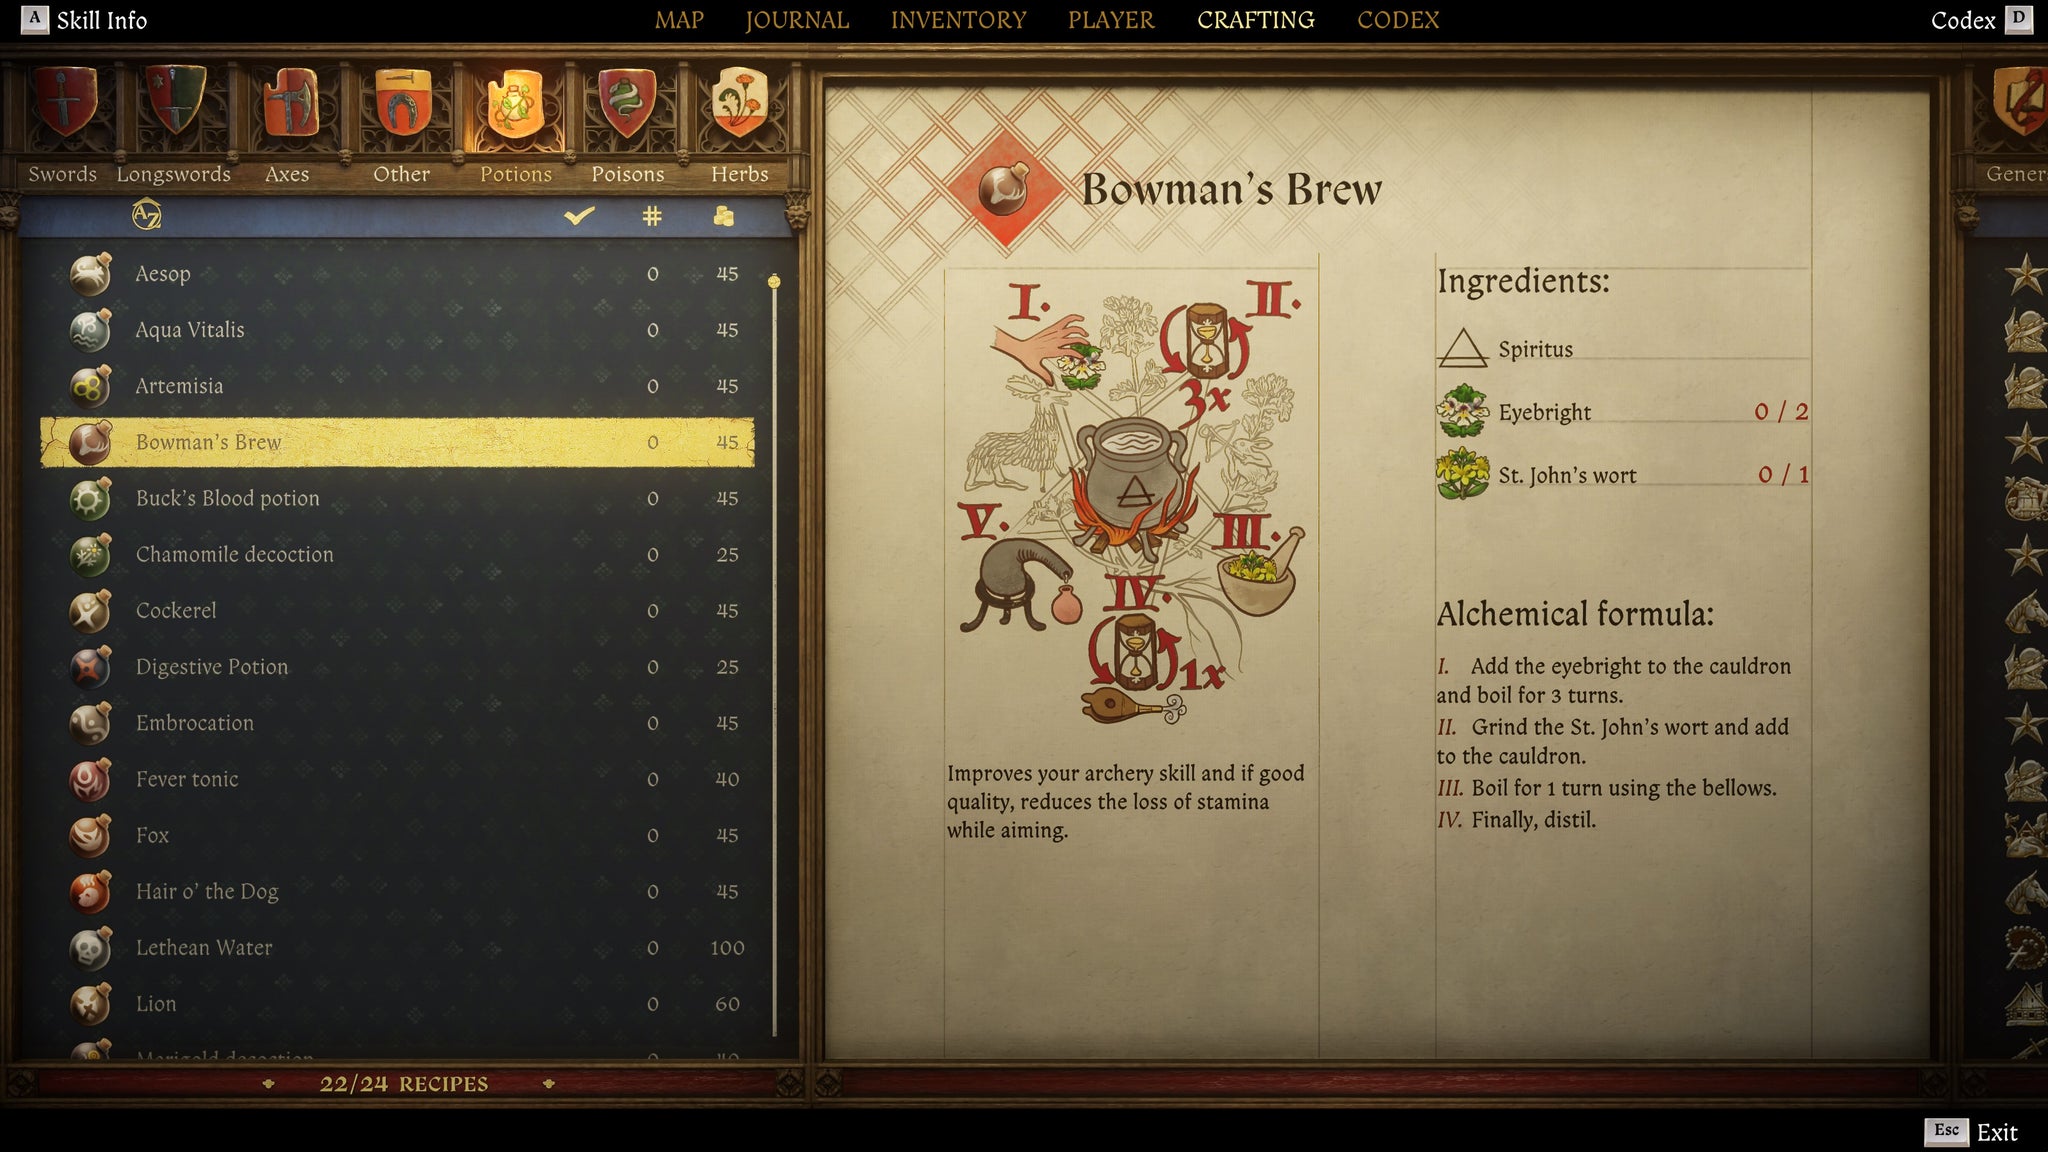
Image credit:Rock Paper Shotgun/Deep Silver
| Ingredients | 2x Eyebright, 1x St. John’s Wort |
|---|---|
| Liquid Base | Spiritus |
| Effect (Weak) | Increases Marksmanship by 3 for 10 minutes. |
| Effect (Normal) | Increases Marksmanship by 3 and slows down Stamina loss when aiming by 20% for 10 minutes. |
| Effect (Strong) | Increases Marksmanship by 5 and slows down Stamina loss when aiming by 50% for 10 minutes. |
| Effect (Henry) | Increases Marksmanship by 8 and stops Stamina loss when aiming for 15 minutes. |
| Recipe location | Purchase from Aranka (Nomads’ Camp) or Herbalist Barnaby (north of Trosky Castle). |
Bowman’s Brew recipe steps:
- Prepare 2x Eyebright and 1x St. John’s Wort.
- Add Spirits to the cauldron.
- Add the Eyebright to the cauldron and boil for 3 turns.
- Grind the St. John’s Wort and add to the cauldron.
- Boil for 1 turn using the Bellows.
- Finally, distil.
Buck’s Blood
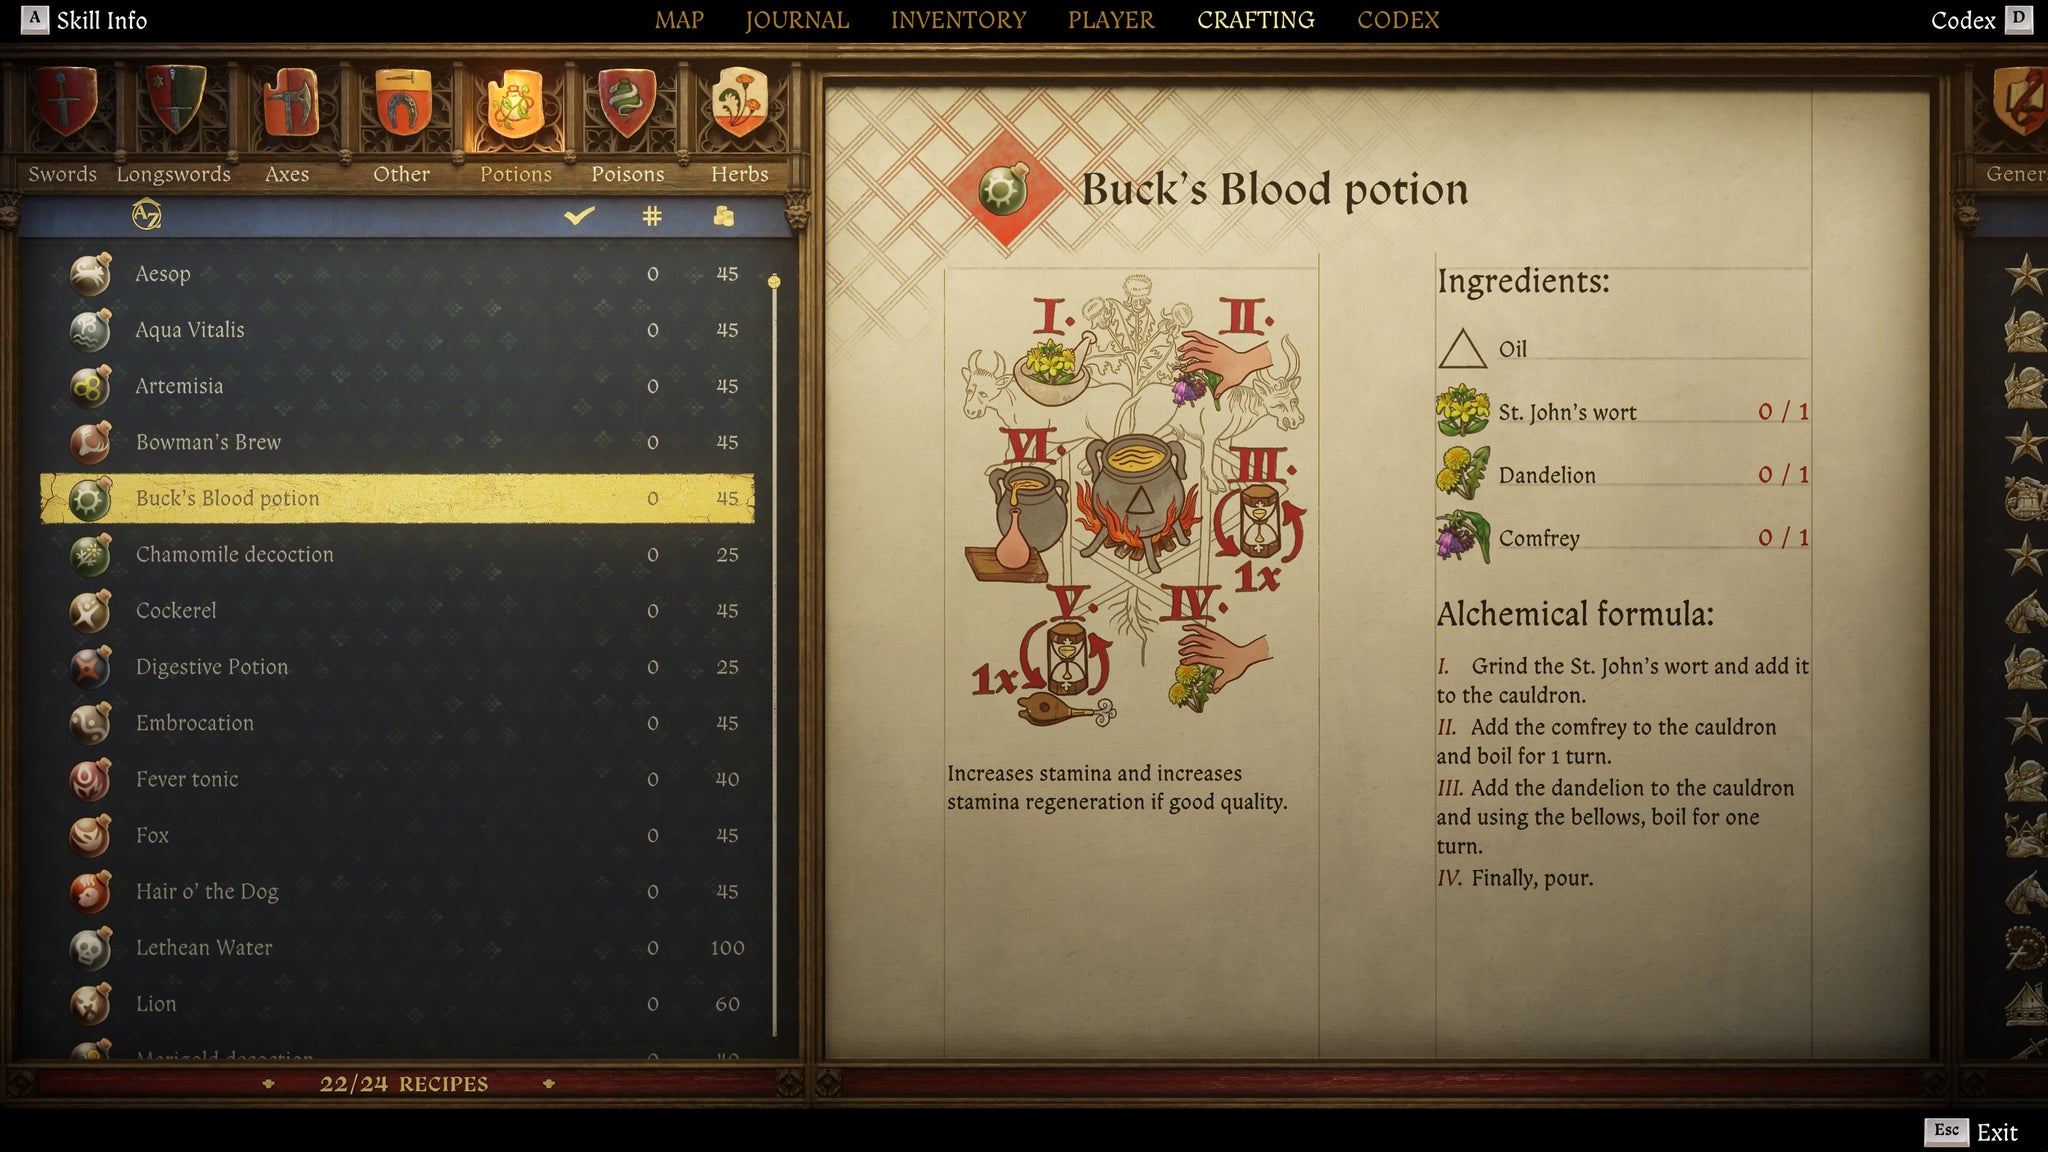
Image credit:Rock Paper Shotgun/Deep Silver
| Ingredients | 1x St. John’s Wort, 1x Dandelion, 1x Comfrey |
|---|---|
| Liquid Base | Oil |
| Effect (Weak) | Increases Stamina by 25% for 20 minutes. |
| Effect (Normal) | Increases Stamina by 30% for 20 minutes. |
| Effect (Strong) | Increases Stamina by 30% and Stamina regeneration by 15% for 40 minutes. |
| Effect (Henry) | Increases Stamina by 60% and Stamina regeneration by 30% for 1 hour. |
| Recipe location | Purchase from Aranka (Nomads’ Camp), Apothecary Emmerich (Troskowitz), Apothecary (Kuttenberg), or Apothecary (Pschitoky). |
Buck’s Blood recipe steps:
- Prepare 1x St. John’s Wort, 1x Dandelion, and 1x Comfrey.
- Add Oil to the cauldron.
- Grind the St. John’s Wort and add it to the cauldron.
- Add the Comfrey to the cauldron and boil for 1 turn.
- Add the Dandelion to the cauldron and boil for 1 turn using the Bellows.
- Finally, pour.
Chamomile Brew
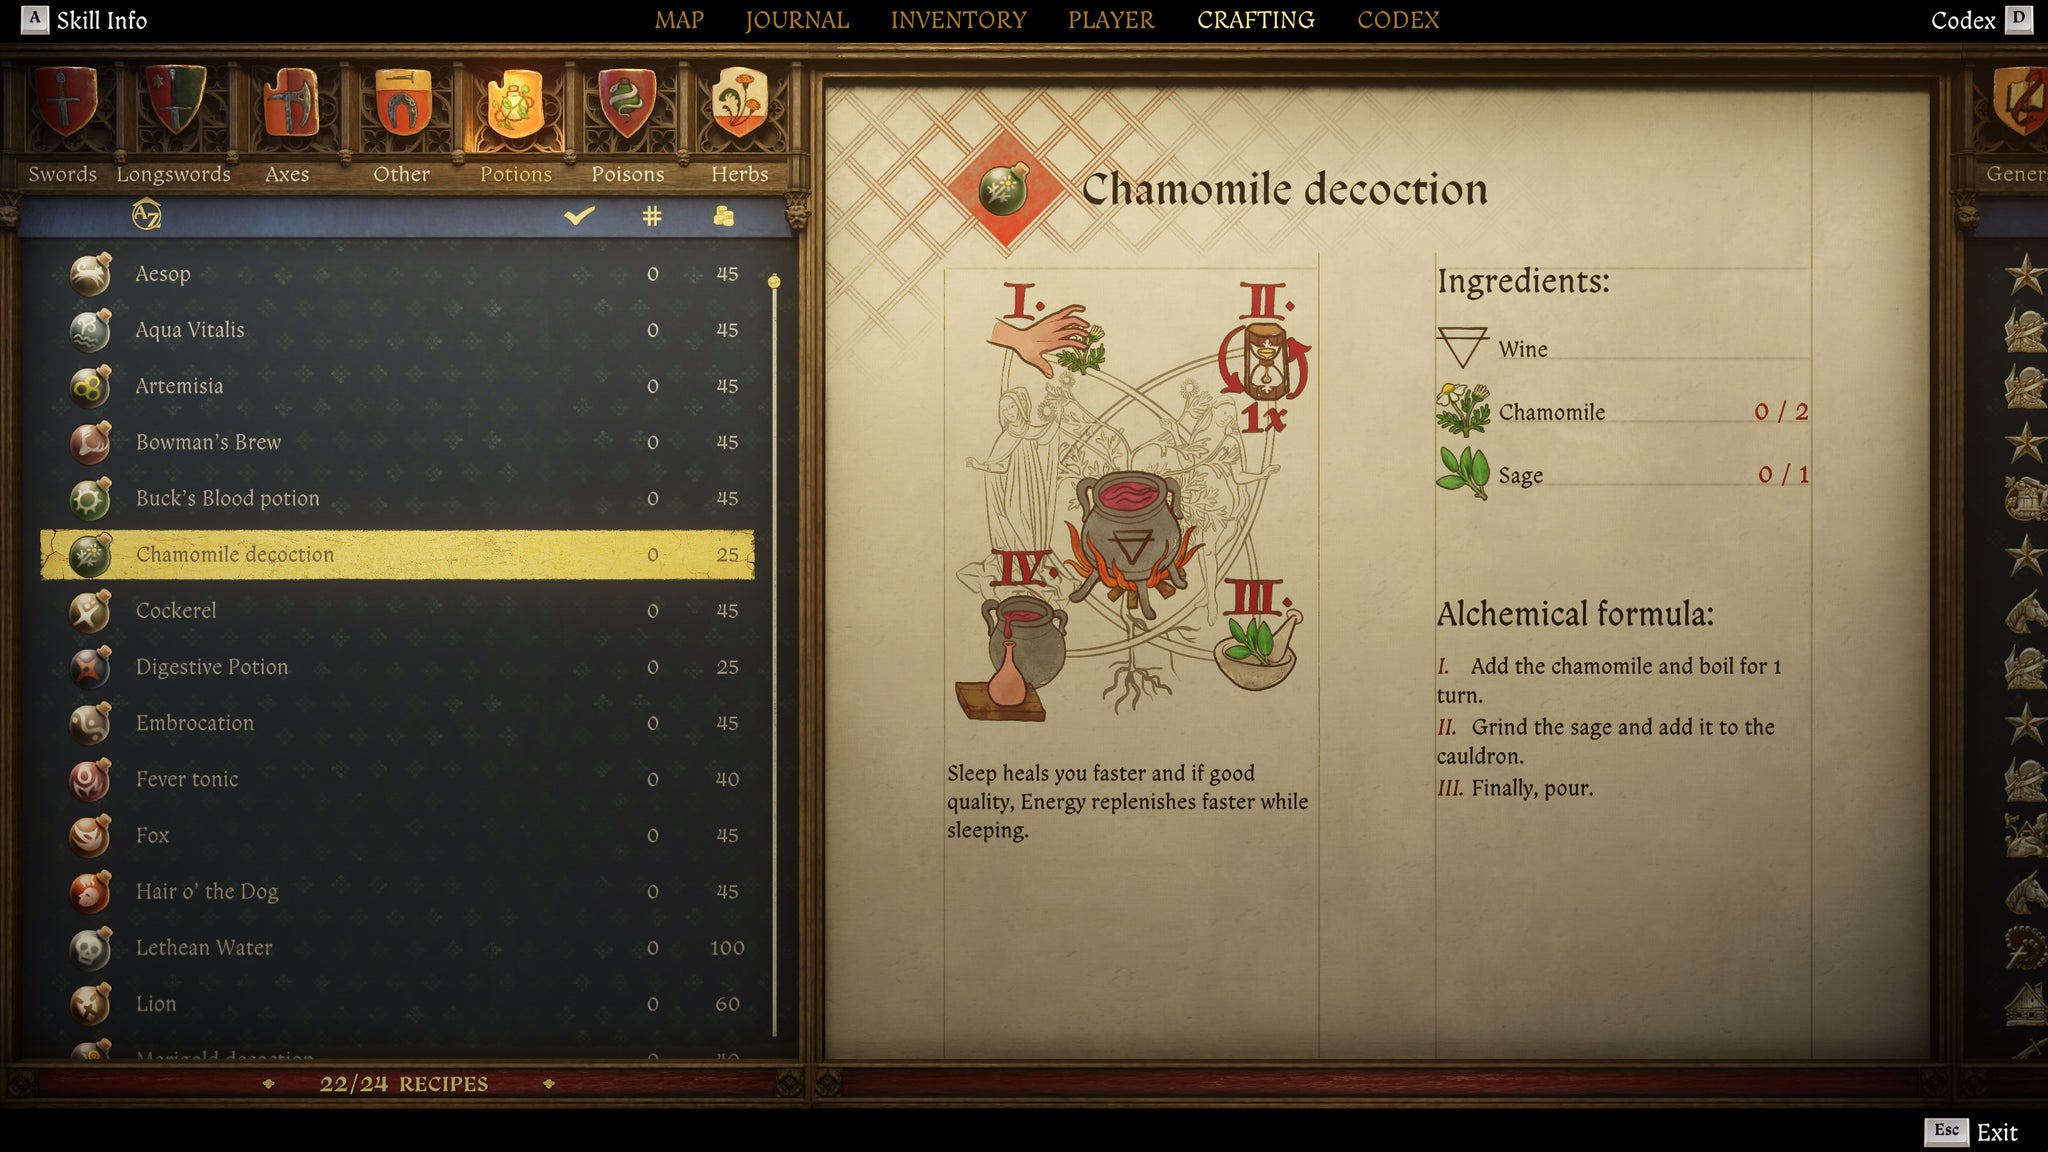
Image credit:Rock Paper Shotgun/Deep Silver
| Ingredients | 2x Chamomile, 1x Sage |
|---|---|
| Liquid Base | Wine |
| Effect (Weak) | For half a day, sleep will heal you two times faster. |
| Effect (Normal) | For one day, sleep will heal you three times faster. |
| Effect (Strong) | For one day, sleep will heal you four times faster and restore Energy two times faster. |
| Effect (Henry) | For two days, sleep will heal you five times faster and restore Energy three times faster. |
| Recipe location | Purchase from Aranka (Nomads’ Camp), Apothecary Emmerich (Troskowitz), Apothecary (Kuttenberg), or Apothecary (Pschitoky). |
Chamomile Brew recipe steps:
- Prepare 2x Chamomile and 1x Sage.
- Add Wine to the cauldron.
- Add the Chamomile and boil for 1 turn.
- Grind the Sage and add it to the cauldron.
- Finally, pour.
Cockerel
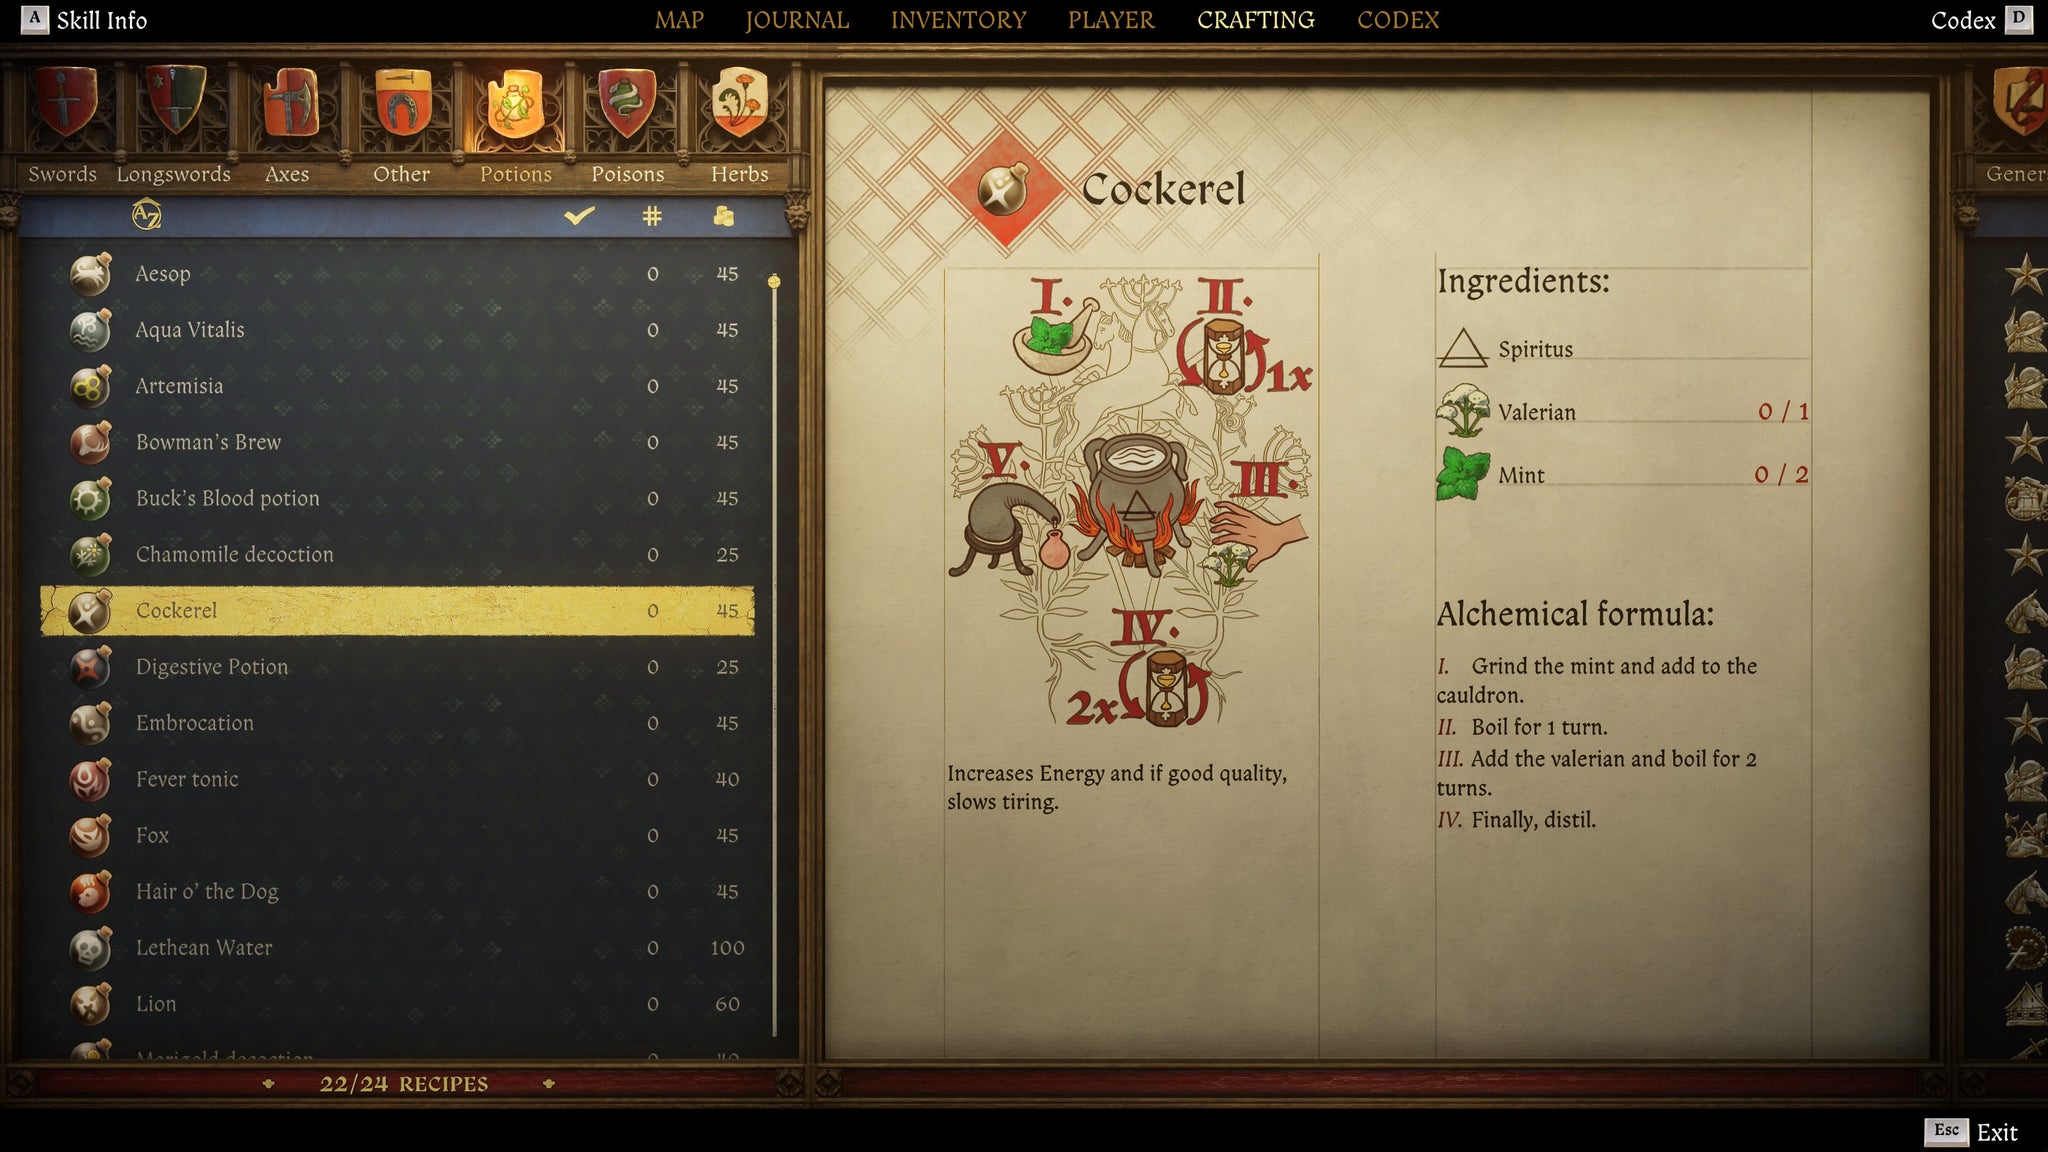
Image credit:Rock Paper Shotgun/Deep Silver
| Ingredients | 1x Valerian, 2x Mint |
|---|---|
| Liquid Base | Spiritus |
| Effect (Weak) | Increases Energy by 10. |
| Effect (Normal) | Increases Energy by 20. |
| Effect (Strong) | Increases Energy by 20 and Energy decreases 20% slower for half a day. |
| Effect (Henry) | Increases Energy by 30 and Energy decreases 50% slower for a day. |
| Recipe location | Purchase from Apothecary (Kuttenberg) or Apothecary (Pschitoky). |
Cockerel recipe steps:
- Prepare 1x Valerian and 2x Mint.
- Add Spirits to the cauldron.
- Grind the Mint and add to the cauldron.
- Boil for 1 turn.
- Add the Valerian and boil for 2 turns.
- Finally, distil.
Digestive Potion

Image credit:Rock Paper Shotgun/Deep Silver
| Ingredients | 1x Nettle, 2x Thistle, 1x Charcoal |
|---|---|
| Liquid Base | Water |
| Effect (Weak) | Decreases Nourishment by 20 and cures food poisoning. |
| Effect (Normal) | Decreases Nourishment by 20, cures poisoning and increases Vitality by 1 for 10 minutes. |
| Effect (Strong) | Decreases Nourishment by 20, cures poisoning and increases Vitality by 2 for 10 minutes. |
| Effect (Henry) | Decreases Nourishment by 30, cures poisoning and increases Vitality by 3 for 20 minutes. |
| Recipe location | Read Physician’s Journal in the Crone in Trosky Castle, or purchase from Apothecary Emmerich (Troskowitz), Herbalist Barnaby (north of Trosky Castle), or Apothecary (Kuttenberg). |
Digestive Potion recipe steps:
- Prepare 1x Nettle, 2x Thistle, and 1x Charcoal.
- Add Water to the cauldron.
- Add the Thistle to the cauldron and boil for 2 turns.
- Grind the Nettle and add it to the cauldron.
- Boil for 1 turn.
- Grind the Charcoal and add it to the cauldron.
- Finally, pour.
Dollmaker Poison
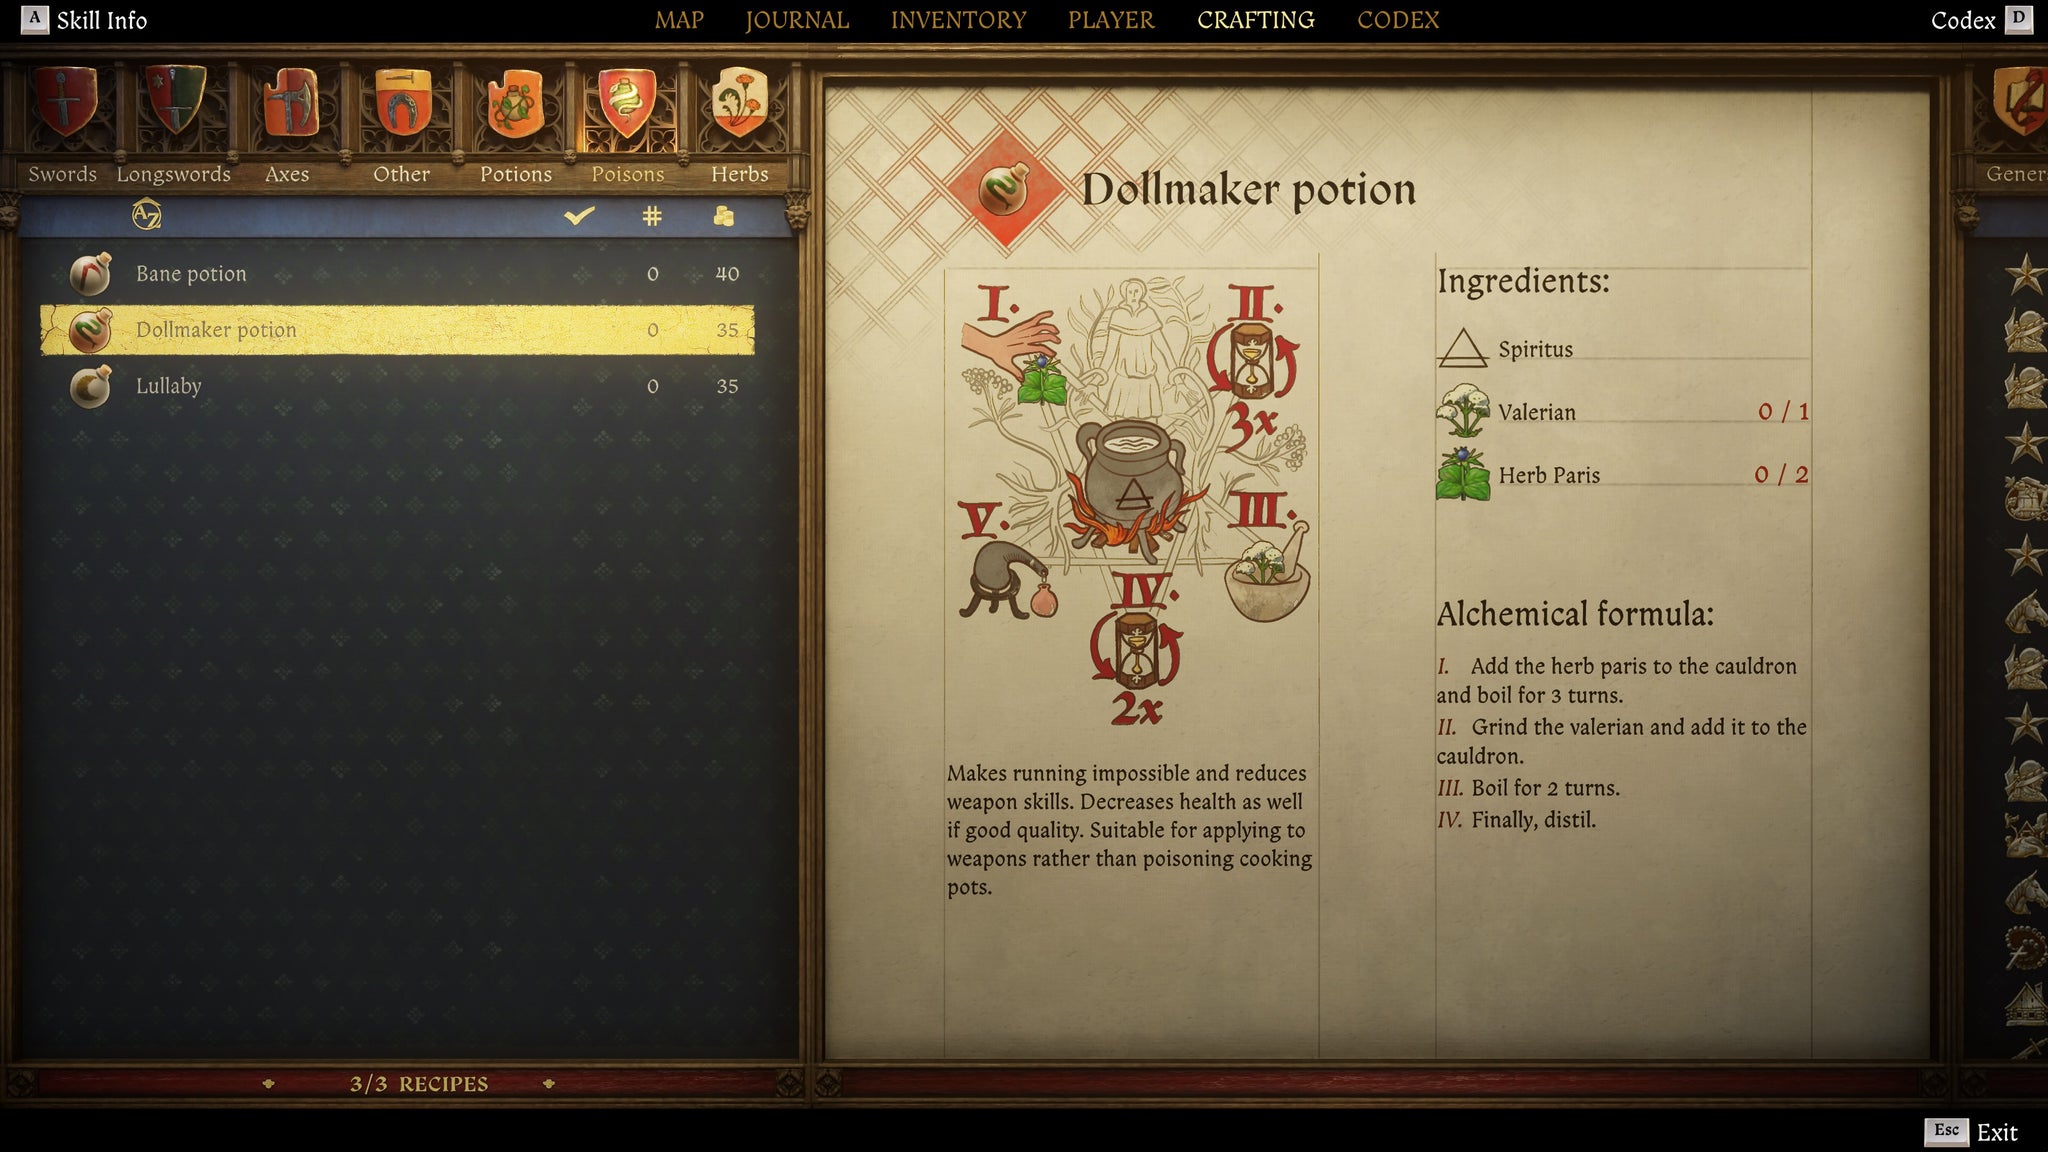
Image credit:Rock Paper Shotgun/Deep Silver
| Ingredients | 1x Valerian, 2x Herb Paris |
|---|---|
| Liquid Base | Spiritus |
| Effect (Normal) | Makes running impossible and reduces all weapon skills by 3. Gradually reduces Health by 20. |
| Effect (Strong) | Makes running impossible and reduces all weapon skills by 4. Gradually reduces Health by 30. |
| Effect (Henry) | Makes running impossible and reduces all weapon skills by 5. Gradually reduces Health by 50. |
| Recipe location | Purchase from Aranka (Nomads’ Camp), Herbalist Barnaby (north of Trosky Castle), or Balthazar (Random Encounter). |
Dollmaker recipe steps:
- Prepare 1x Valerian and 2x Herb Paris.
- Add Spirits to the cauldron.
- Add the Herb Paris to the cauldron and boil for 3 turns.
- Grind the Valerian and add it to the cauldron.
- Boil for 2 turns.
- Finally, distil.
Embrocation
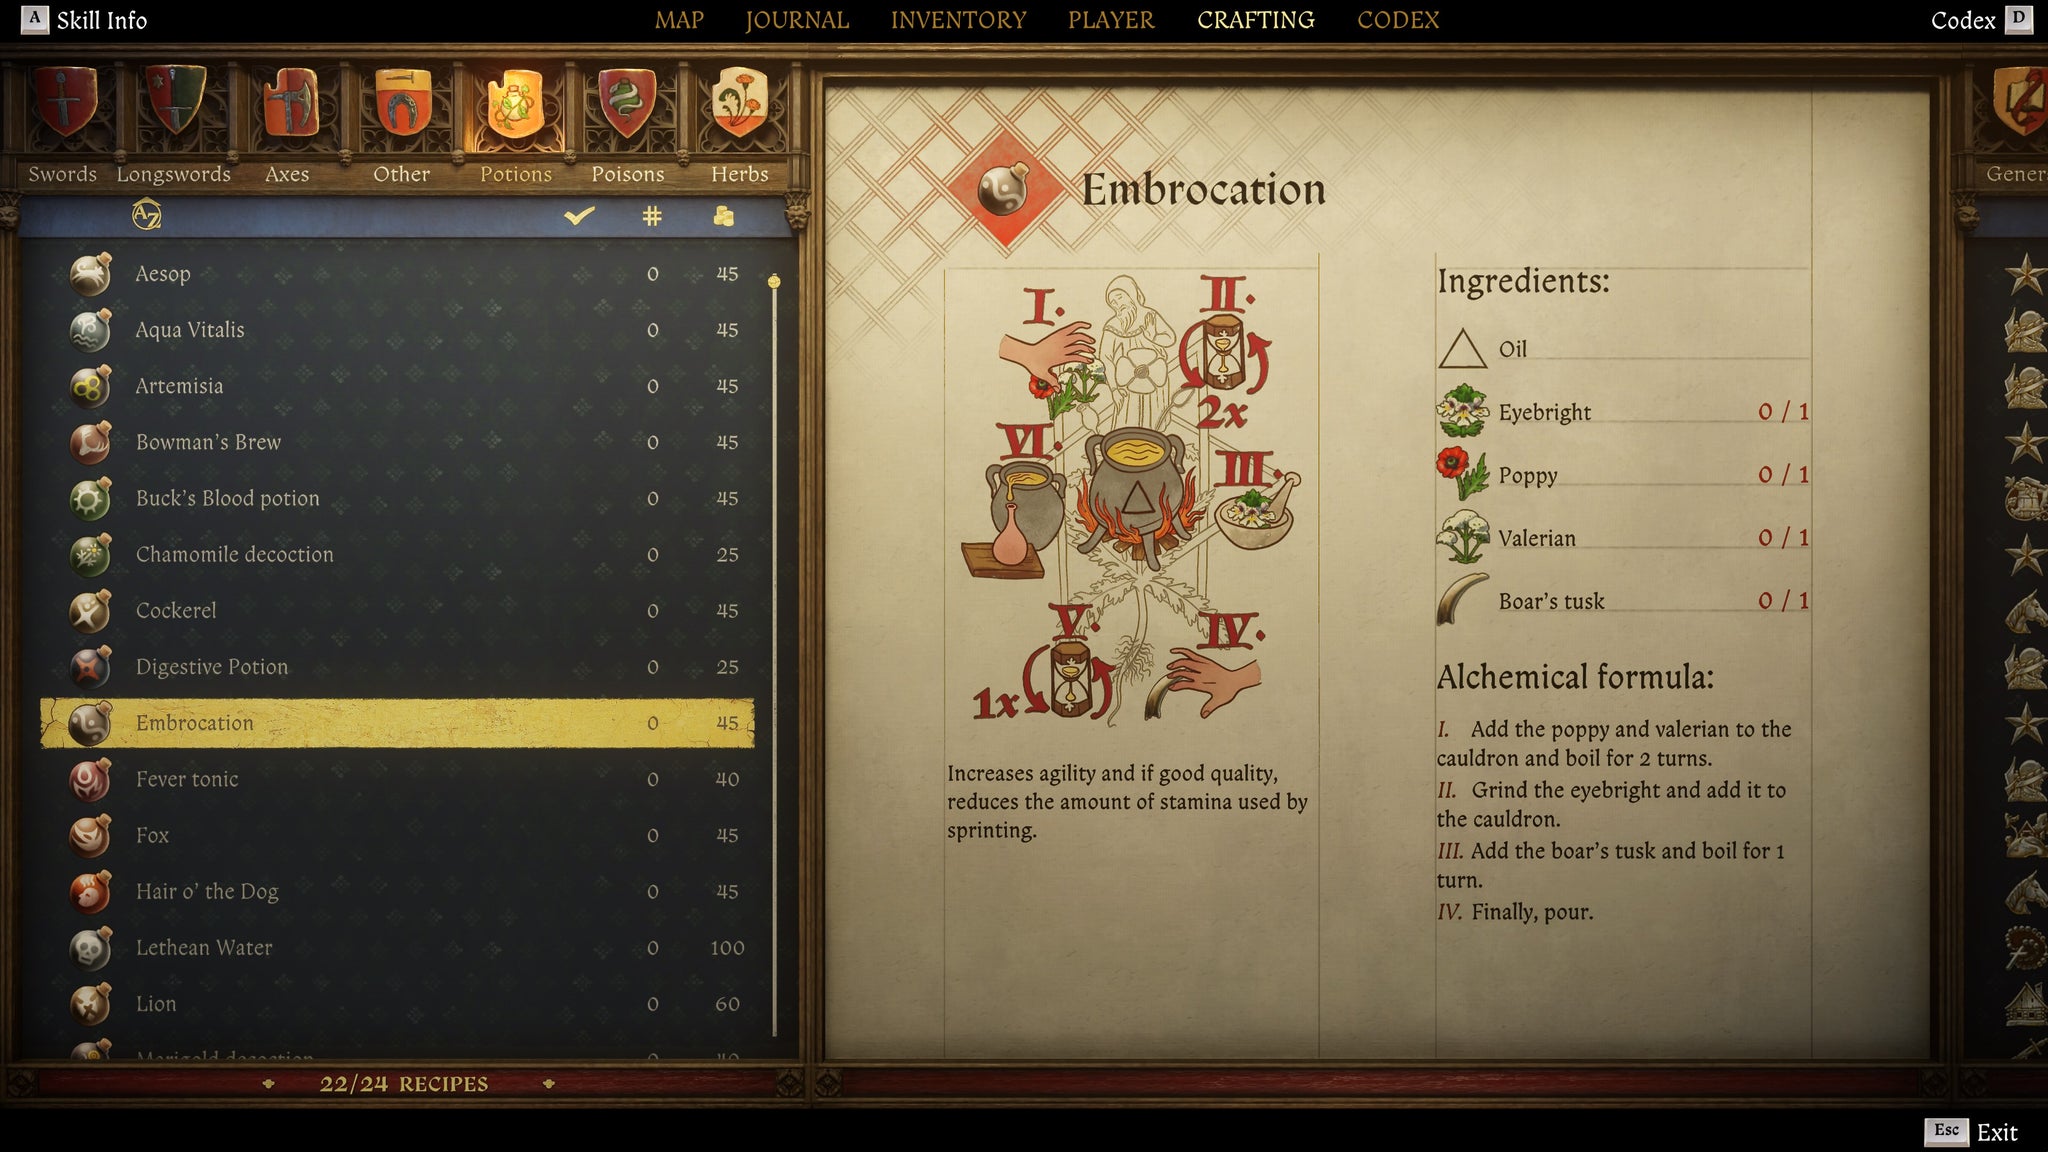
Image credit:Rock Paper Shotgun/Deep Silver
| Ingredients | 1x Eyebright, 1x Poppy, 1x Valerian, 1x Boar’s Tusk |
|---|---|
| Liquid Base | Oil |
| Effect (Weak) | Increases Agility by 2 for 10 minutes. |
| Effect (Normal) | Increases Agility by 4 and Sprint will cost 10% less Stamina, lasts 10 minutes. |
| Effect (Strong) | Increases Agility by 4 and Sprint will cost 20% less Stamina, lasts 15 minutes. |
| Effect (Henry) | Increases Agility by 6 and Sprint will cost 30% less Stamina, lasts 20 minutes. |
| Recipe location | Purchase from Aranka (Nomads’ Camp) or Apothecary (Kuttenberg). |
Embrocation recipe steps:
- Prepare 1x Eyebright, 1x Poppy, 1x Valerian, and 1x Boar’s Tusk.
- Add Oil to the cauldron.
- Add the Poppy and Valerian to the cauldron and boil for 2 turns.
- Grind the Eyebright and add it to the cauldron.
- Add the Boar’s Tusk and boil for 1 turn.
- Finally, pour.
Fever Tonic
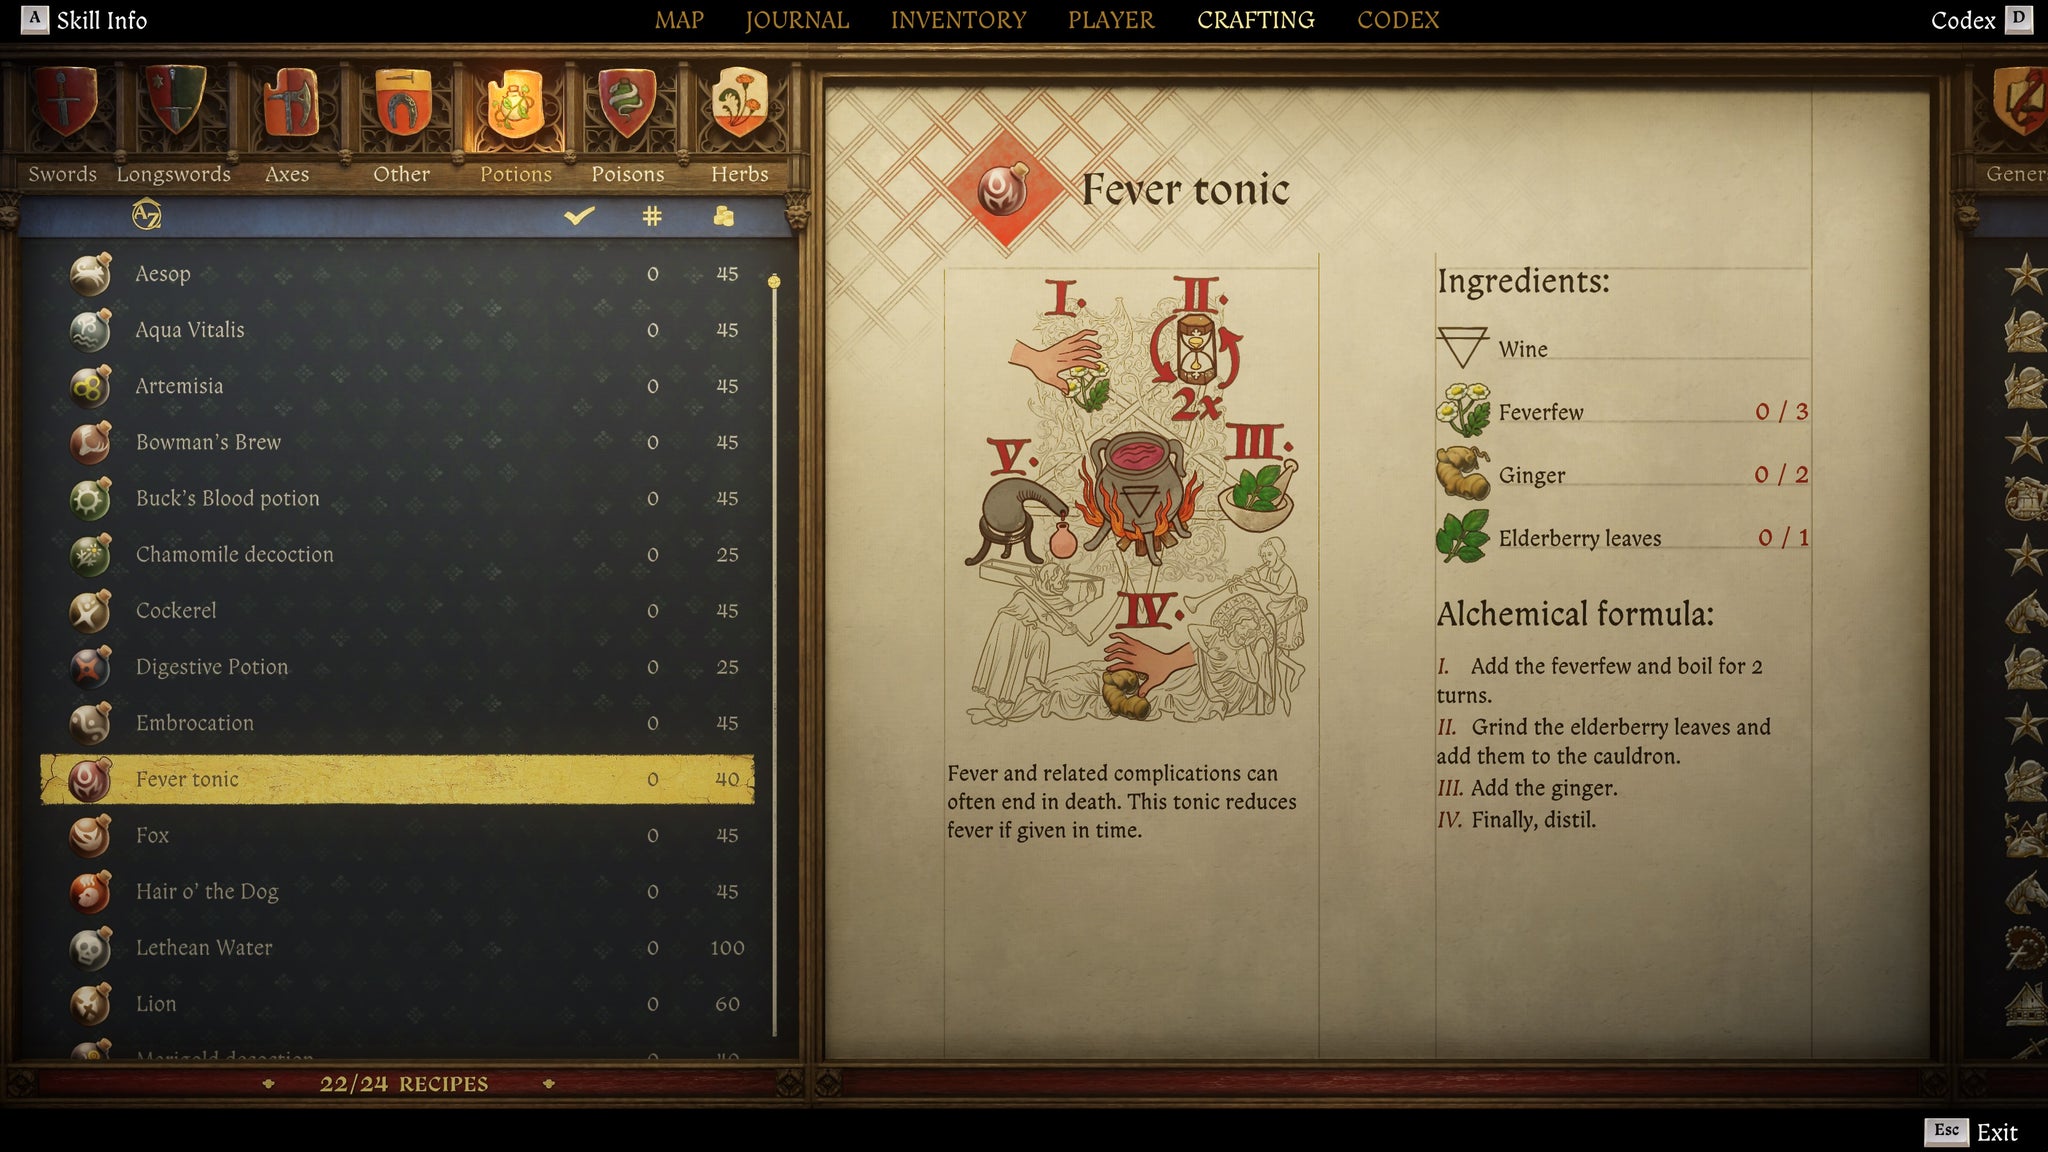
Image credit:Rock Paper Shotgun/Deep Silver
| Ingredients | 3x Feverfew, 2x Ginger, 1x Elderberry Leaves |
|---|---|
| Liquid Base | Wine |
| Effect | Fever and related complications can often lead to death. This tonicum will alleviate fever if given in time. |
| Recipe location | Read Physician’s Journal in the Crone in Trosky Castle. |
Fever Tonic recipe steps:
- Prepare 3x Feverfew, 2x Ginger, and 1x Elderberry Leaves.
- Add Wine to the cauldron.
- Add the Feverfew and boil for 2 turns.
- Grind the Elderberry Leaves and add them to the cauldron.
- Add the Ginger.
- Finally, distil.
Fox

Image credit:Rock Paper Shotgun/Deep Silver
| Ingredients | 1x Nettle, 1x St. John’s Wort, 1x Belladonna, 1x Charcoal |
|---|---|
| Liquid Base | Oil |
| Effect (Weak) | Increases Speech by 3 for half a day. |
| Effect (Normal) | Increases Speech by 3 and increases your reading speed for a day. |
| Effect (Strong) | Increases Speech by 5 and increases your reading speed for a day. |
| Effect (Henry) | Increases Speech by 7, increases reading speed and increases the amount of experience gained by 50% for two days. |
| Recipe location | Purchase from Apothecary (Kuttenberg) or Apothecary (Pschitoky). |
Fox recipe steps:
- Prepare 1x Nettle, 1x St. John’s Wort, 1x Belladonna, and 1x Charcoal.
- Add Oil to the cauldron.
- Grind the St. John’s Wort and Nettles.
- Add them to the cauldron and boil for 2 turns.
- Grind the Charcoal and add it to the cauldron.
- Add the Belladonna and boil for 1 turn.
- Finally, pour.
Hair O’ The Dog
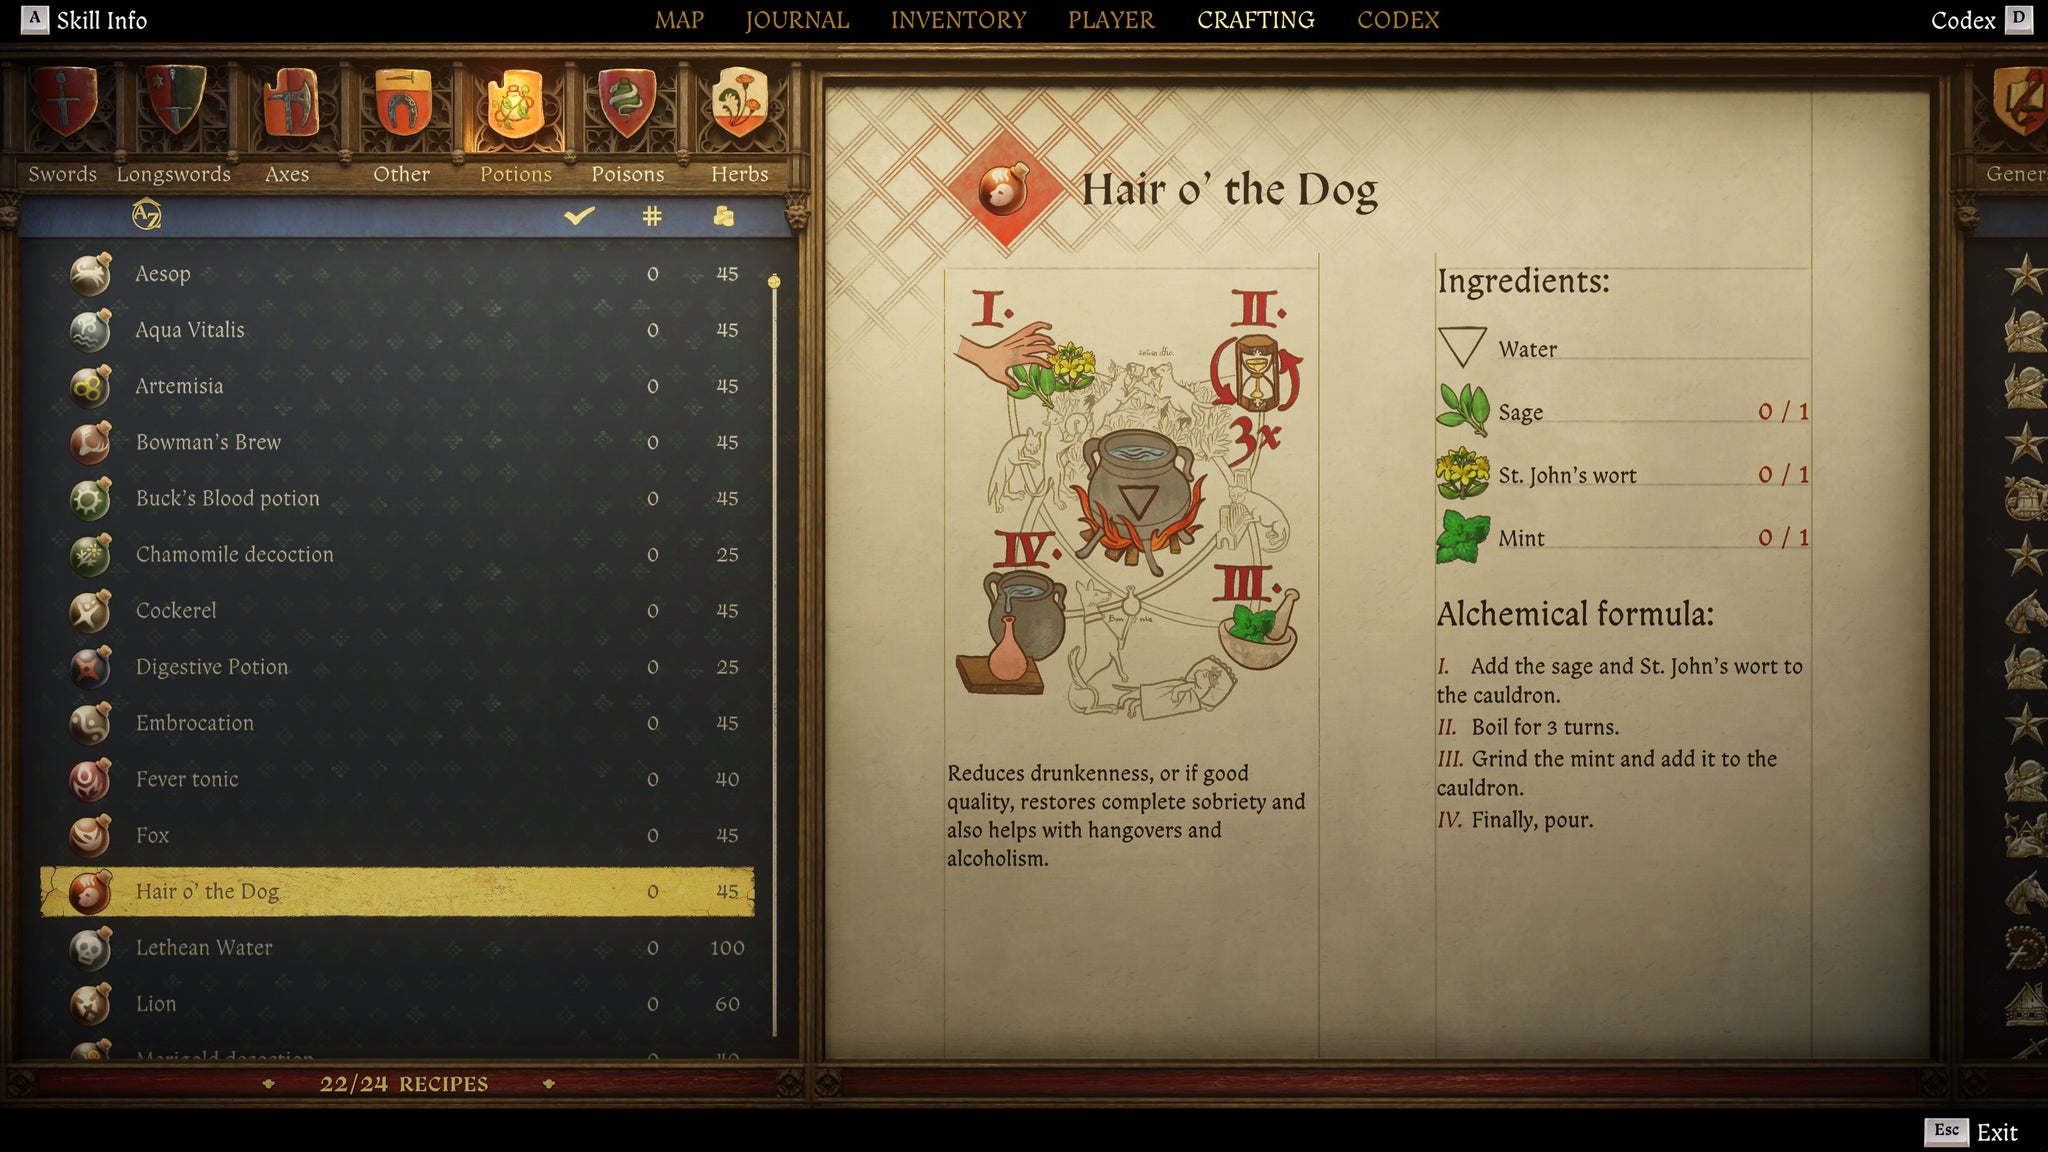
Image credit:Rock Paper Shotgun/Deep Silver
| Ingredients | 1x Sage, 1x St. John’s Wort, 1x Mint |
|---|---|
| Liquid Base | Water |
| Effect (Weak) | Decreases drunkenness. |
| Effect (Normal) | Decreases drunkenness or removes hangover. |
| Effect (Strong) | Eliminates drunkenness and hangover. |
| Effect (Henry) | Eliminates drunkenness, hangover and temporarily suppresses the effects of alcoholism. |
| Recipe location | Purchase from Apothecary Emmerich (Troskowitz), Herbalist Barnaby (north of Trosky Castle), or Apothecary (Kuttenberg). |
Hair O’ The Dog recipe steps:
- Prepare 1x Sage, 1x St. John’s Wort, and 1x Mint.
- Add Water to the cauldron.
- Add the Sage and St. John’s Wort to the cauldron.
- Boil for 3 turns.
- Grind the Mint and add it to the cauldron.
- Finally, pour.
Lethean Water
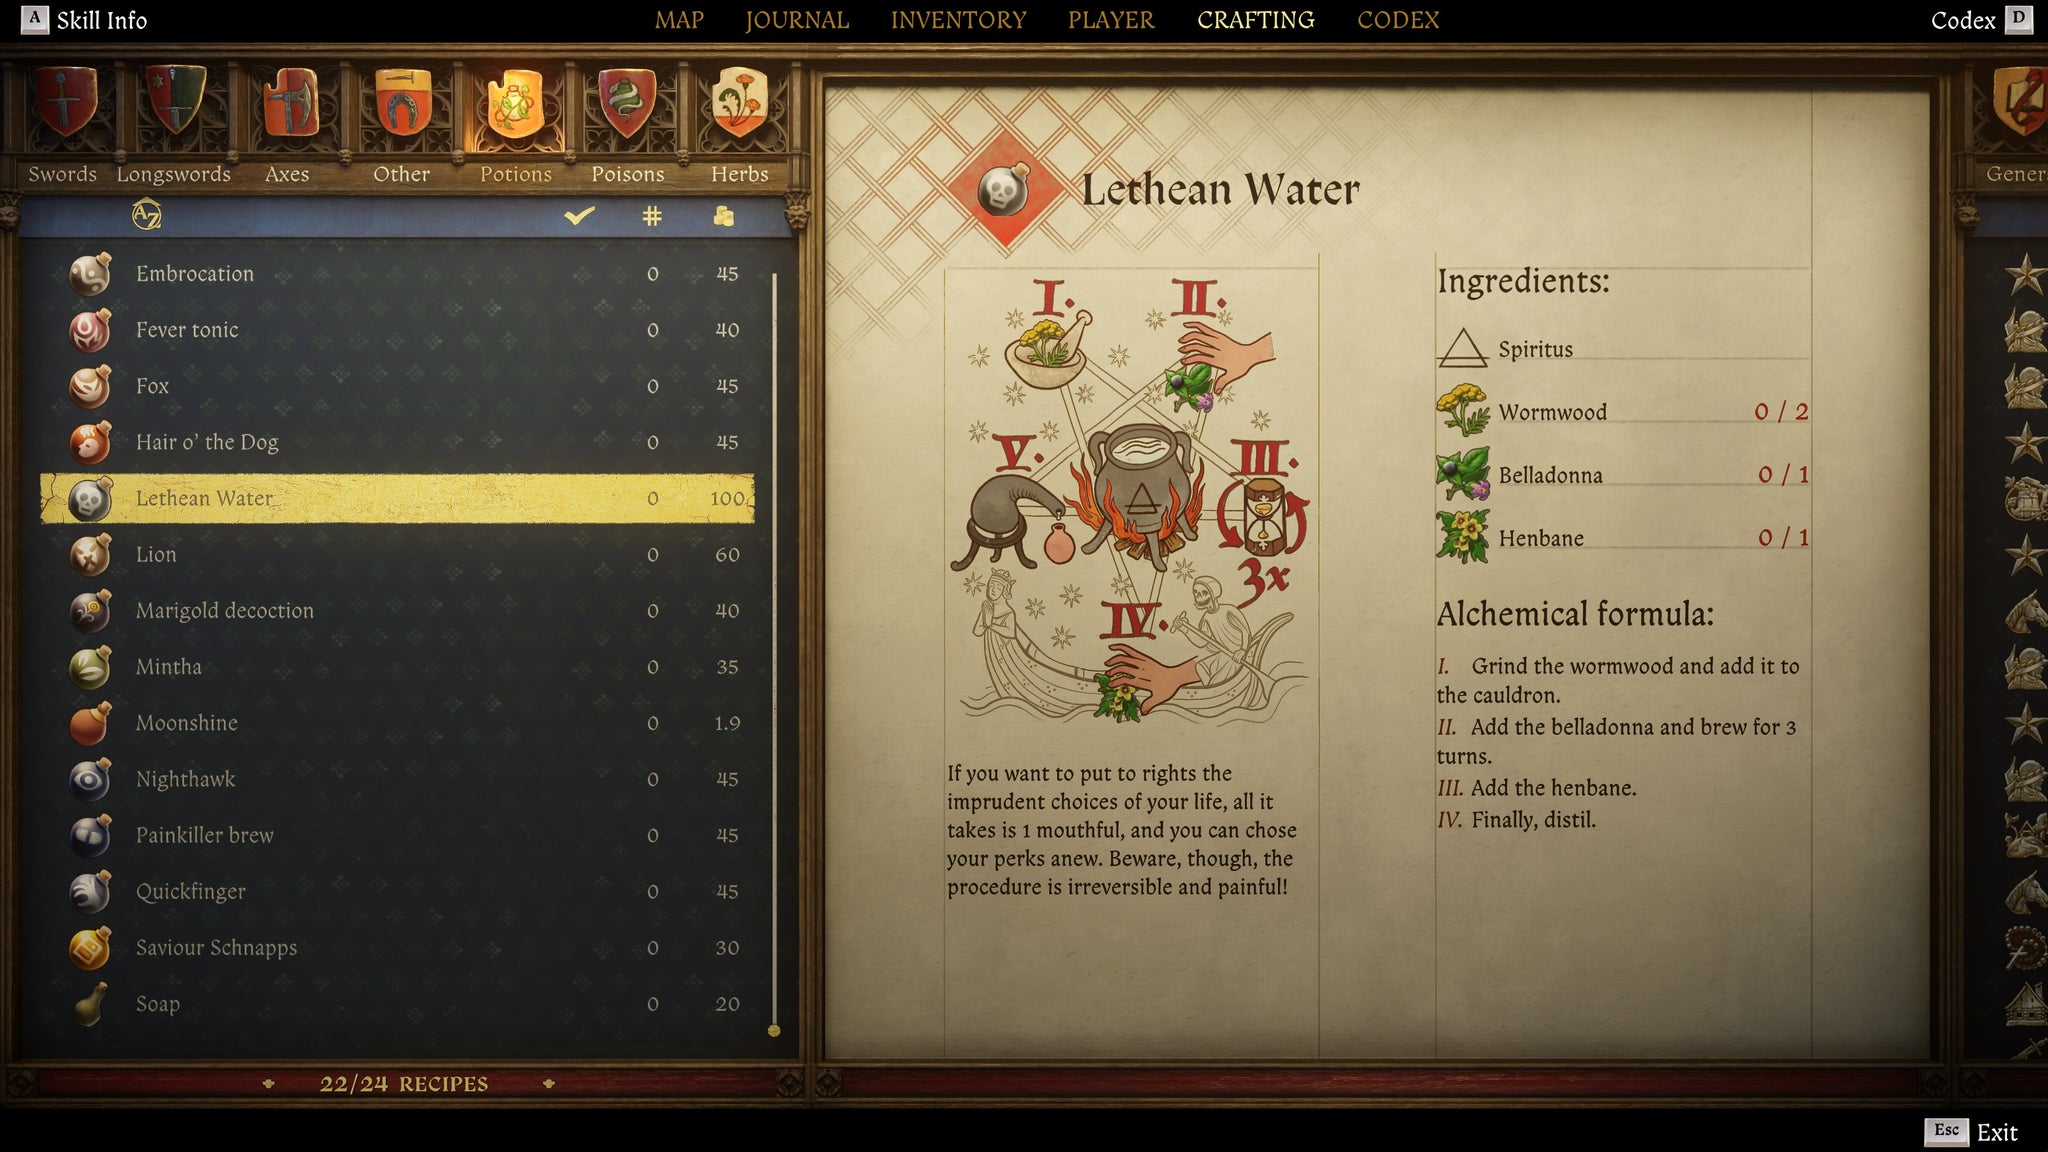
Image credit:Rock Paper Shotgun/Deep Silver
| Ingredients | 2x Wormwood, 1x Belladonna, 1x Henbane |
|---|---|
| Liquid Base | Spiritus |
| Effect | Drink one mouthful and you’ll forget all earthly experience. Obliterates all perk points, so they can be used elsewhere. |
| Recipe location | Given by Kona at the end of “The Thunderstone” quest (if you give her the stone), or purchase from Apothecary (Kuttenberg). |
Lethean Water recipe steps:
- Prepare 2x Wormwood, 1x Belladonna, and 1x Henbane.
- Add Spirits to the cauldron.
- Grind the Wormwood and add it to the cauldron.
- Add the Belladonna and brew for 3 turns.
- Add the Henbane.
- Finally, distil.
Lion Perfume
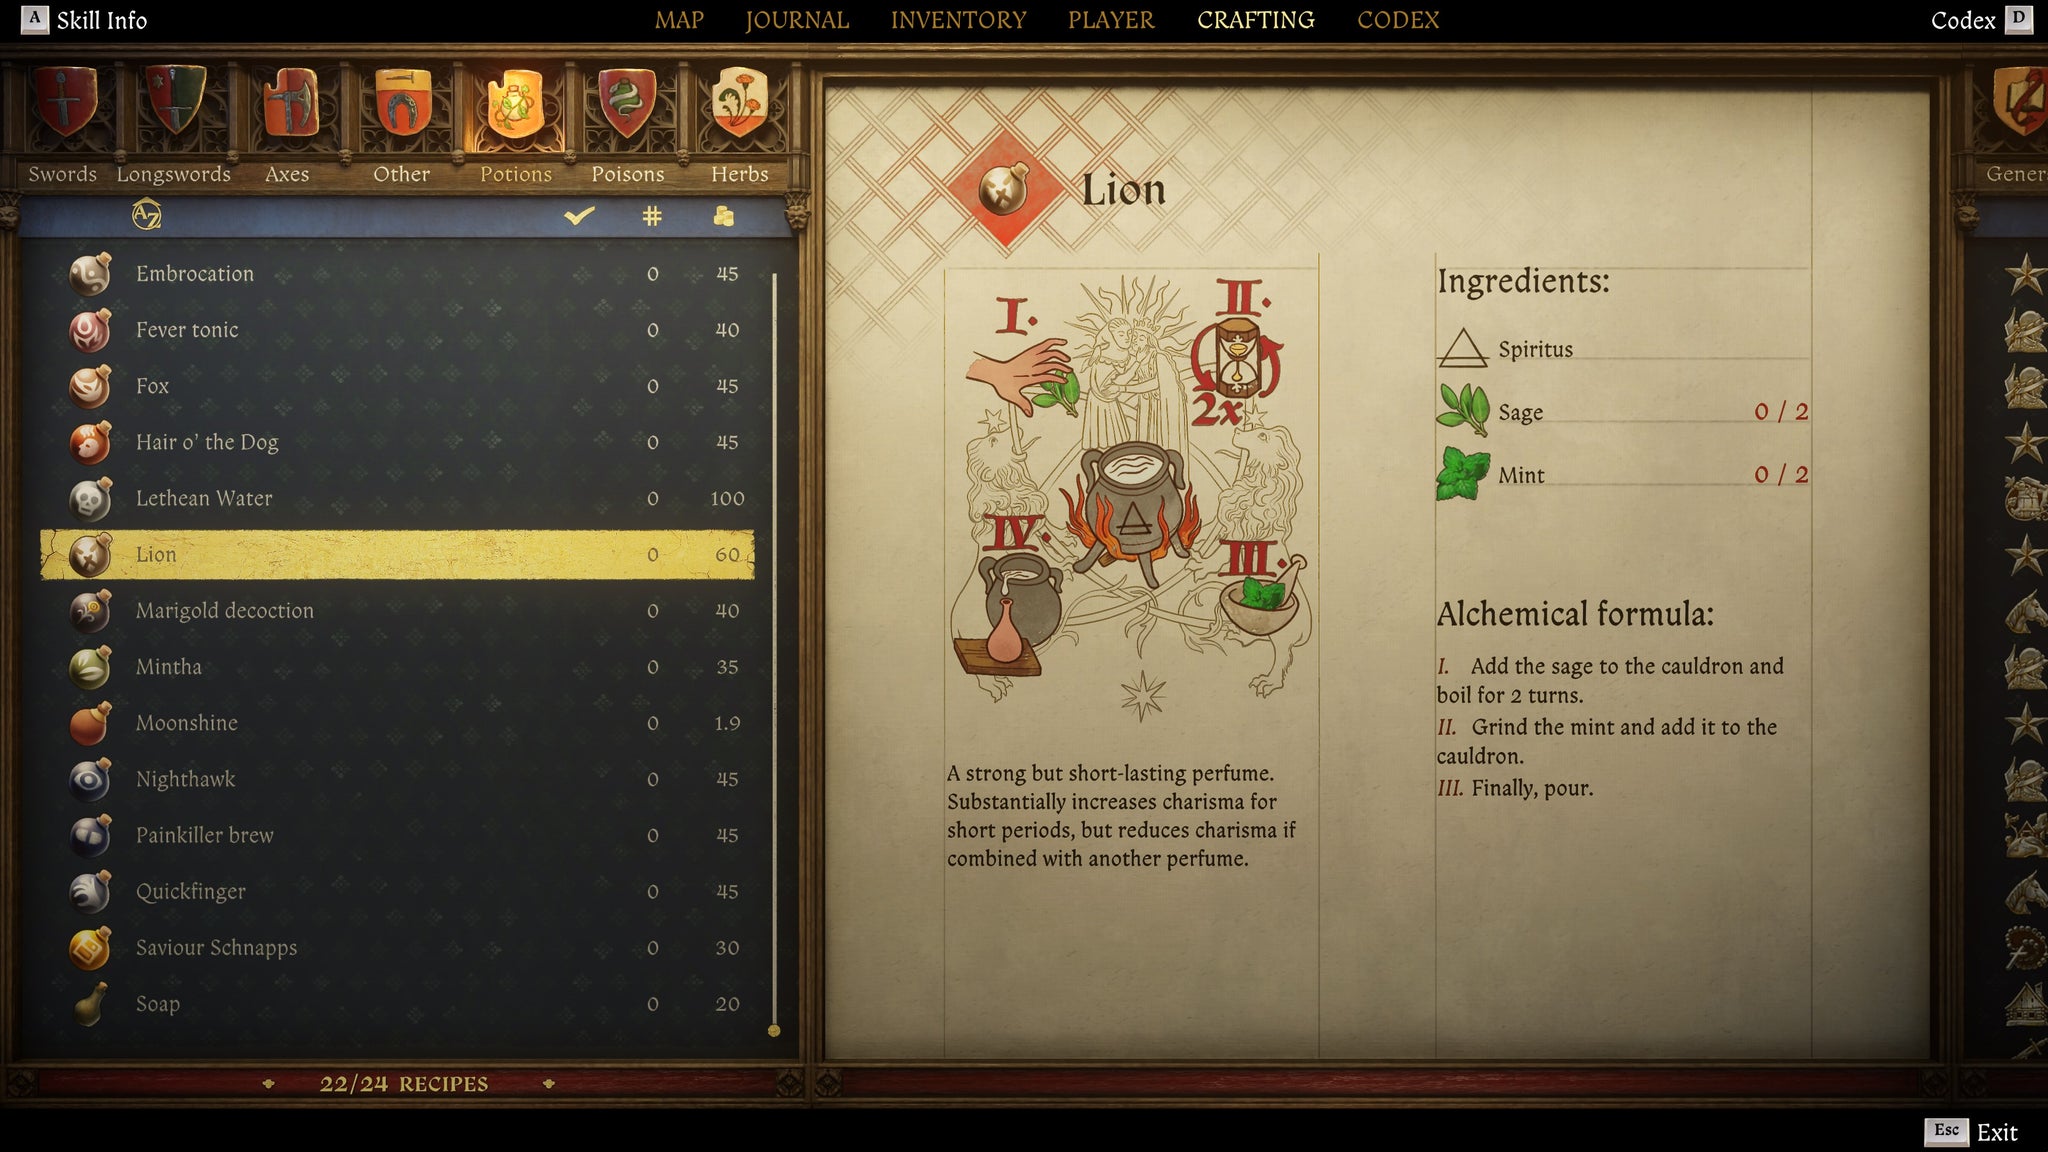
Image credit:Rock Paper Shotgun/Deep Silver
| Ingredients | 2x Sage, 2x Mint |
|---|---|
| Liquid Base | Spiritus |
| Effect (Weak) | Increases Charisma by 3 for 3 minutes. However, if you use it in combination with another perfume, it decreases Charisma by 7. |
| Effect (Normal) | Increases Charisma by 4 for 4 minutes. However, if you use it in combination with another perfume, it decreases Charisma by 7. |
| Effect (Strong) | Increases Charisma by 7 for 5 minutes. However, if you use it in combination with another perfume, it decreases Charisma by 7. |
| Effect (Henry) | Increases Charisma by 10 for 10 minutes. However, if you use it in combination with another perfume, it decreases Charisma by 7. |
| Recipe location | Purchase from Apothecary Emmerich (Troskowitz) or Apothecary (Kuttenberg). |
Lion recipe steps:
- Prepare 2x Sage and 2x Mint.
- Add Spirits to the cauldron.
- Add the Sage to the cauldron and boil for 2 turns.
- Grind the Mint and add it to the cauldron.
- Finally, pour.
Lullaby Poison
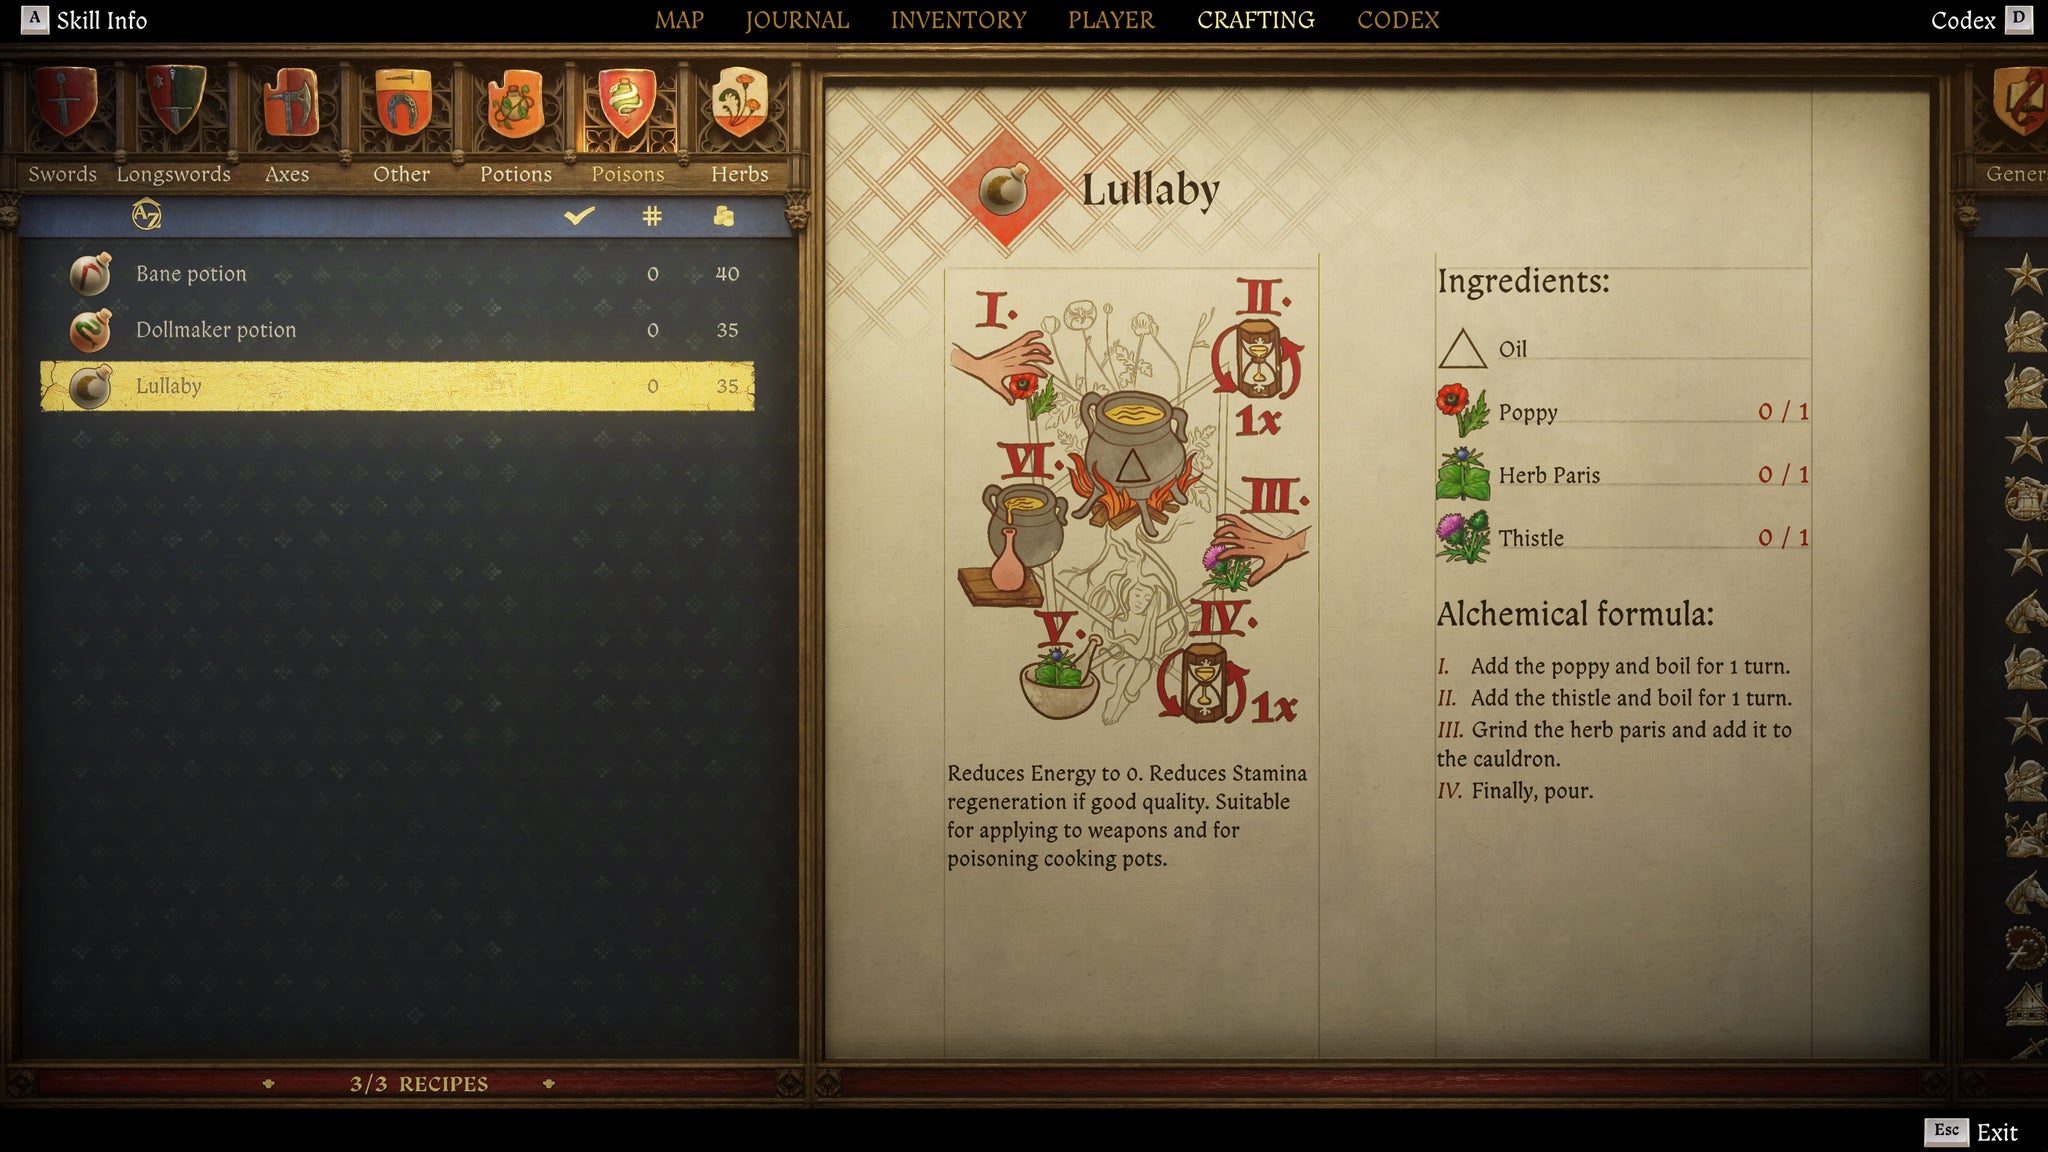
Image credit:Rock Paper Shotgun/Deep Silver
| Ingredients | 1x Poppy, 1x Herb Paris, 1x Thistle |
|---|---|
| Liquid Base | Oil |
| Effect (Normal) | Reduces Energy to 0 and decrease perception. Reduces Stamina and Stamina regeneration by 10% for a quarter of a day. |
| Effect (Strong) | Reduces Energy to 0 and decrease perception. Reduces Stamina and Stamina regeneration by 30% for half a day. |
| Effect (Henry) | Reduces Energy to 0 and decrease perception. Reduces Stamina and Stamina regeneration by 50% for a whole day. |
| Recipe location | Given by Blacksmith Radovan during the quest “Mice”, or purchase from Herbalist Barnaby (north of Trosky Castle). |
Lullaby recipe steps:
- Prepare 1x Poppy, 1x Herb Paris, and 1x Thistle.
- Add Oil to the cauldron.
- Add the Poppy and boil for 1 turn.
- Add the Thistle and boil for 1 turn.
- Grind the Herb Paris and add it to the cauldron.
- Finally, pour.
Marigold Decoction
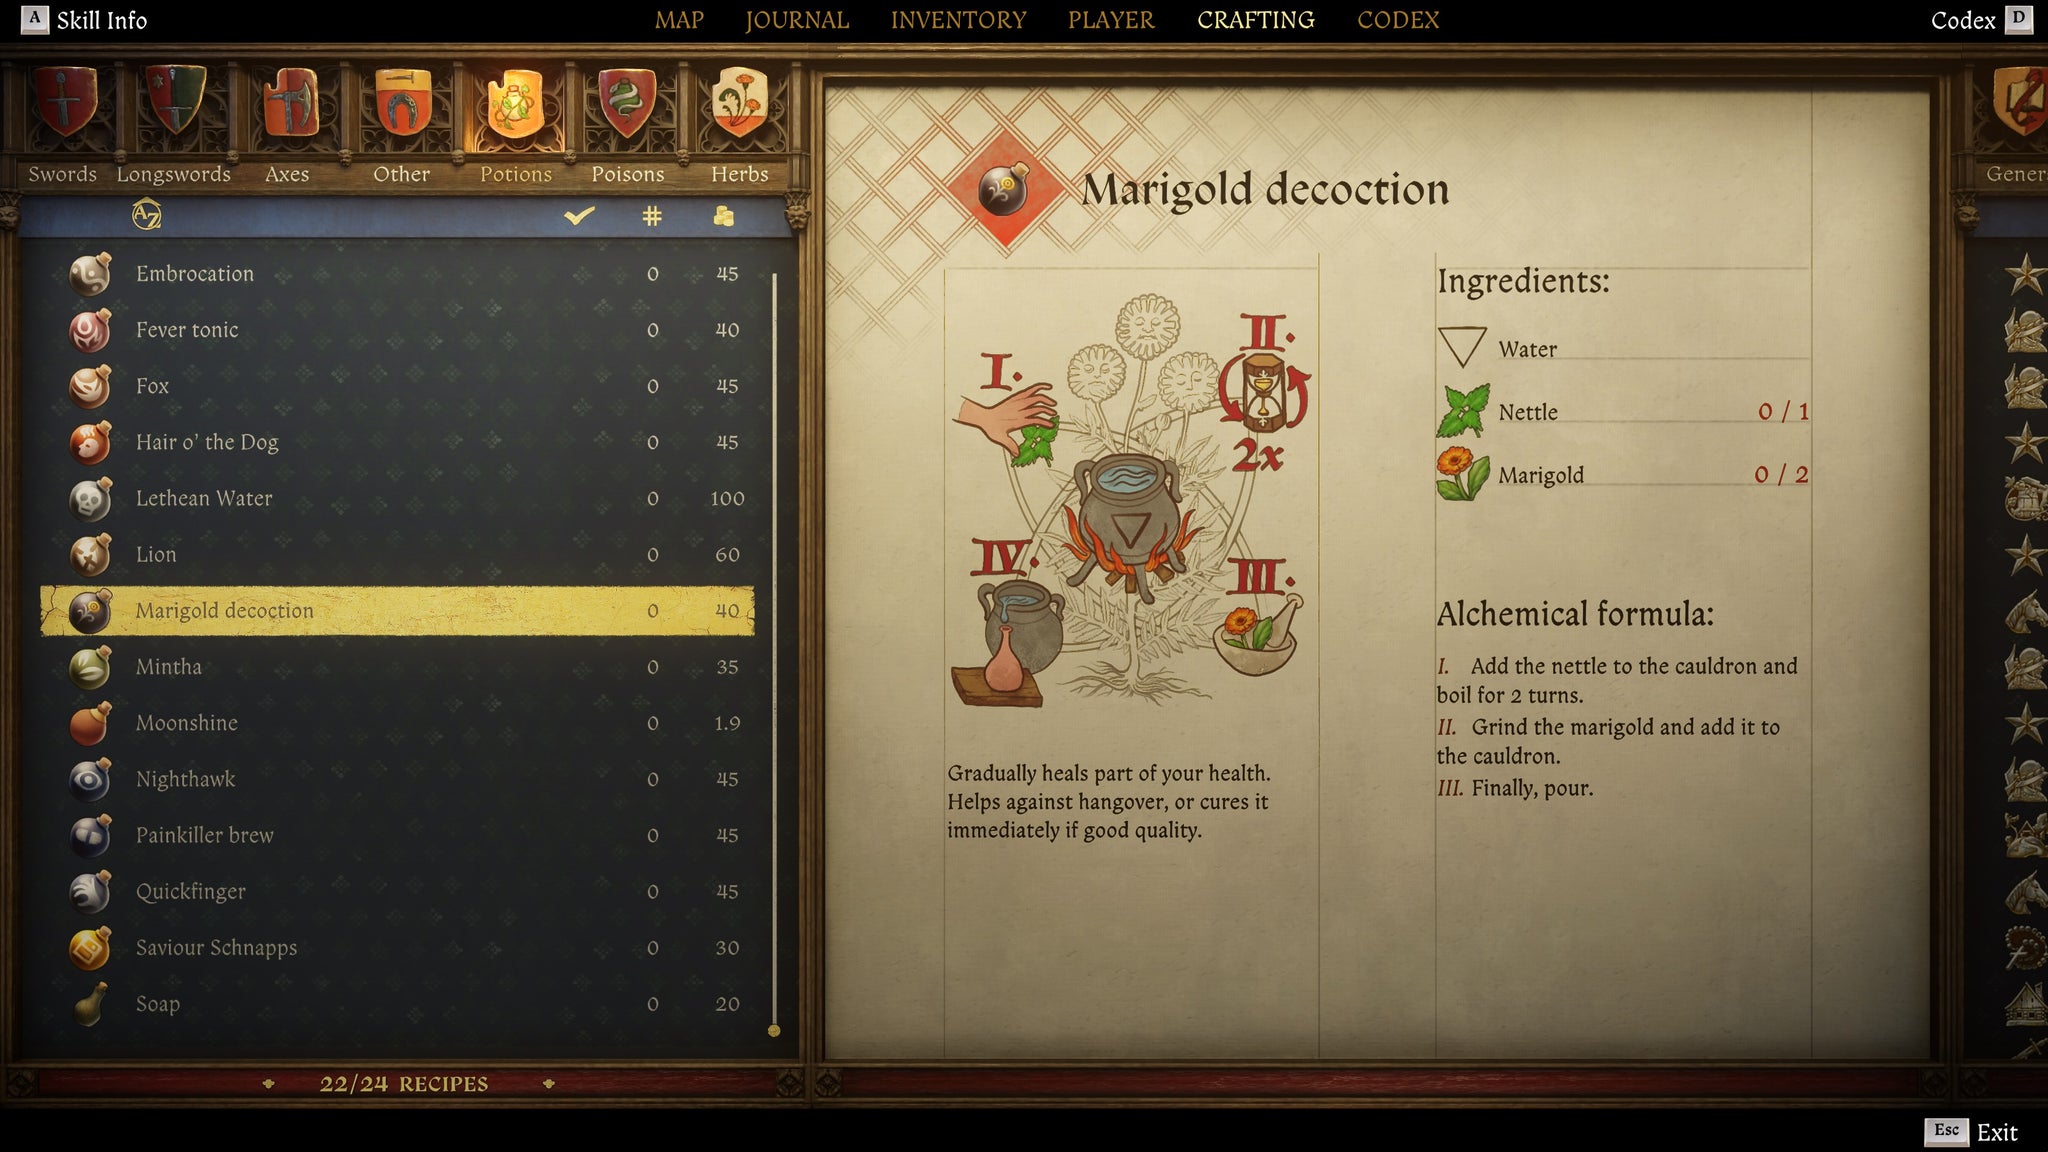
Image credit:Rock Paper Shotgun/Deep Silver
| Ingredients | 1x Nettle, 2x Marigold |
|---|---|
| Liquid Base | Water |
| Effect (Weak) | Heals 15 health over one minute and hangover passes 50% faster. |
| Effect (Normal) | Heals 25 health over one minute and hangover passes 100% faster. |
| Effect (Strong) | Heals 40 health over one minute and instantly cures hangover. |
| Effect (Henry) | Heals 60 health over one minute and instantly cures hangover. |
| Recipe location | Purchase from Apothecary Emmerich (Troskowitz), Herbalist Barnaby (north of Trosky Castle), Apothecary (Kuttenberg), or Apothecary (Pschitoky). |
Marigold Decoction recipe steps:
- Prepare 1x Nettle and 2x Marigold.
- Add Water to the cauldron.
- Add the Nettle to the cauldron and boil for 2 turns.
- Grind the Marigold and add it to the cauldron.
- Finally, pour.
Mintha Perfume
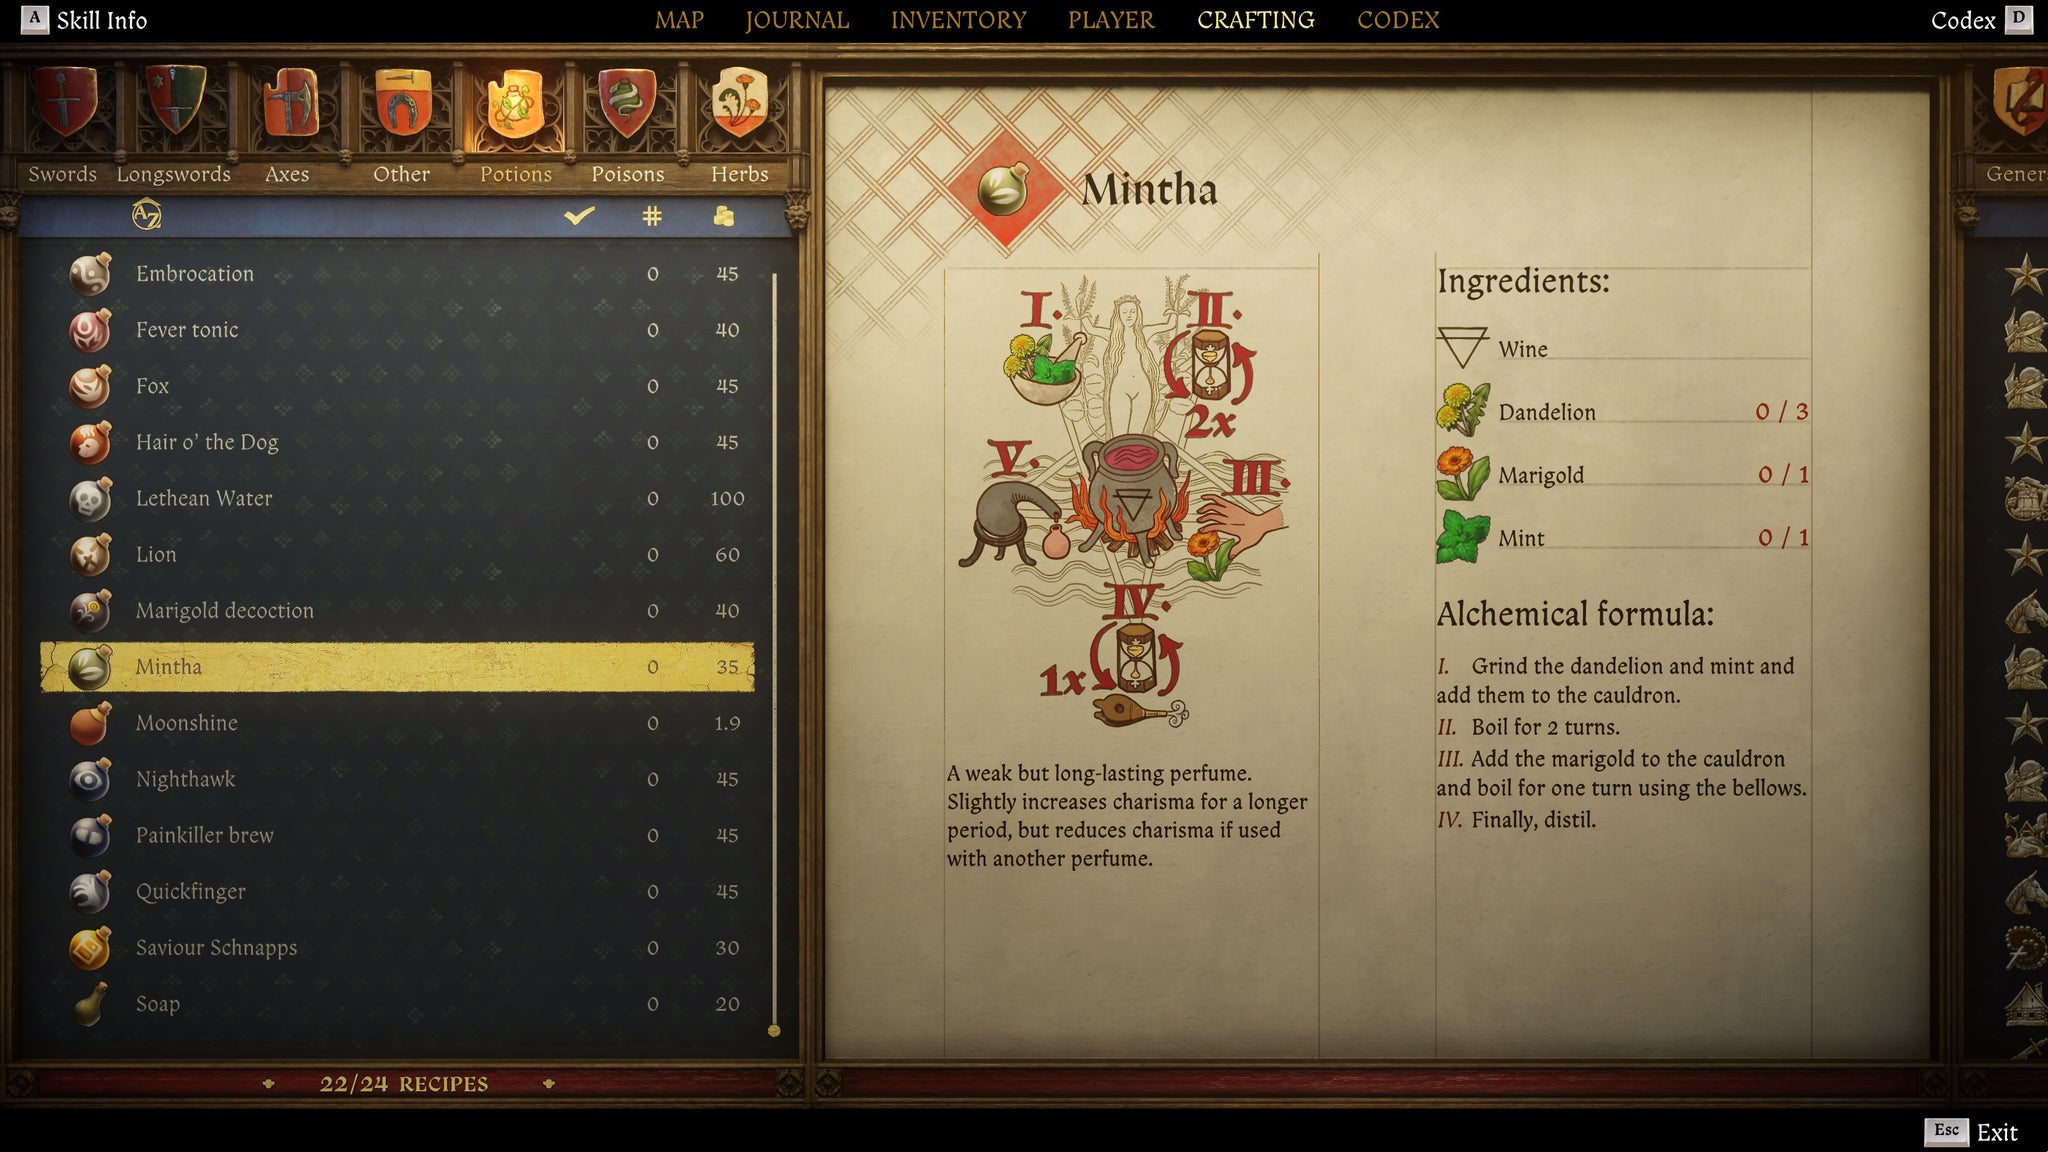
Image credit:Rock Paper Shotgun/Deep Silver
| Ingredients | 3x Dandelion, 1x Marigold, 1x Mint |
|---|---|
| Liquid Base | Wine |
| Effect (Weak) | Increases Charisma by 1 for 20 minutes. However, if you use it in combination with another perfume, it decreases Charisma by 5. |
| Effect (Normal) | Increases Charisma by 2 for 20 minutes. However, if you use it in combination with another perfume, it decreases Charisma by 5. |
| Effect (Strong) | Increases Charisma by 3 for 30 minutes. However, if you use it in combination with another perfume, it decreases Charisma by 5. |
| Effect (Henry) | Increases Charisma by 5 for 40 minutes. However, if you use it in combination with another perfume, it decreases Charisma by 5. |
| Recipe location | Purchase from Apothecary Emmerich (Troskowitz) or Apothecary (Kuttenberg). |
Mintha recipe steps:
- Prepare 3x Dandelion, 1x Marigold, and 1x Mint.
- Add Wine to the cauldron.
- Grind the Dandelion and Mint and add them to the cauldron.
- Boil for 2 turns.
- Add the Marigold to the cauldron and boil for 1 turn using the Bellows.
- Finally, distil.
Moonshine
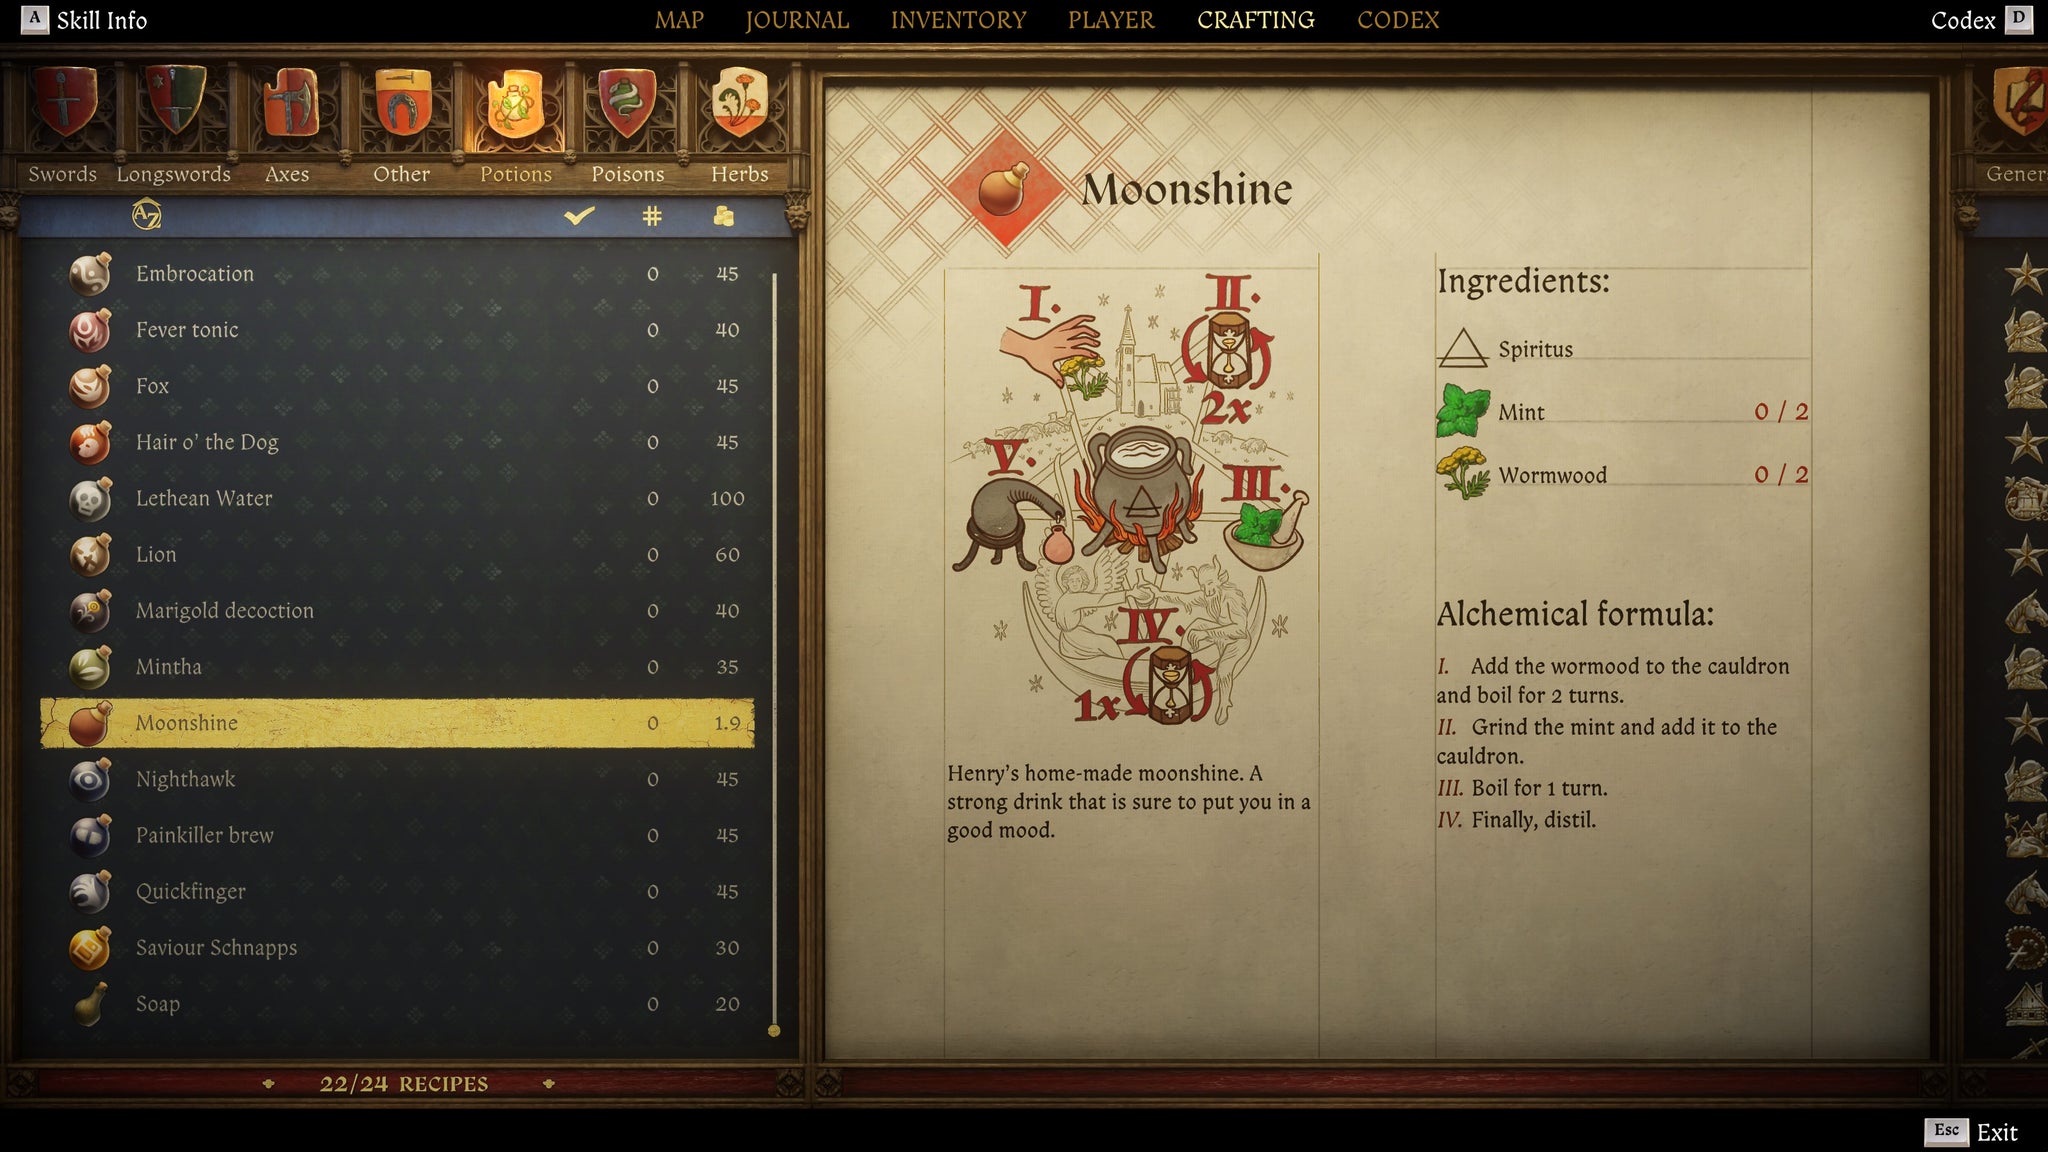
Image credit:Rock Paper Shotgun/Deep Silver
| Ingredients | 2x Mint, 2x Wormwood |
|---|---|
| Liquid Base | Spiritus |
| Description | Strong alcoholic drink. Watch out for the hangover! |
| Recipe location | Purchase from Aranka (Nomads’ Camp). |
Moonshine recipe steps:
- Prepare 2x Mint and 2x Wormwood.
- Add Spirits to the cauldron.
- Add the Wormwood to the cauldron and boil for 2 turns.
- Grind the Mint and add it to the cauldron.
- Boil for 1 turn.
- Finally, distil.
Nighthawk
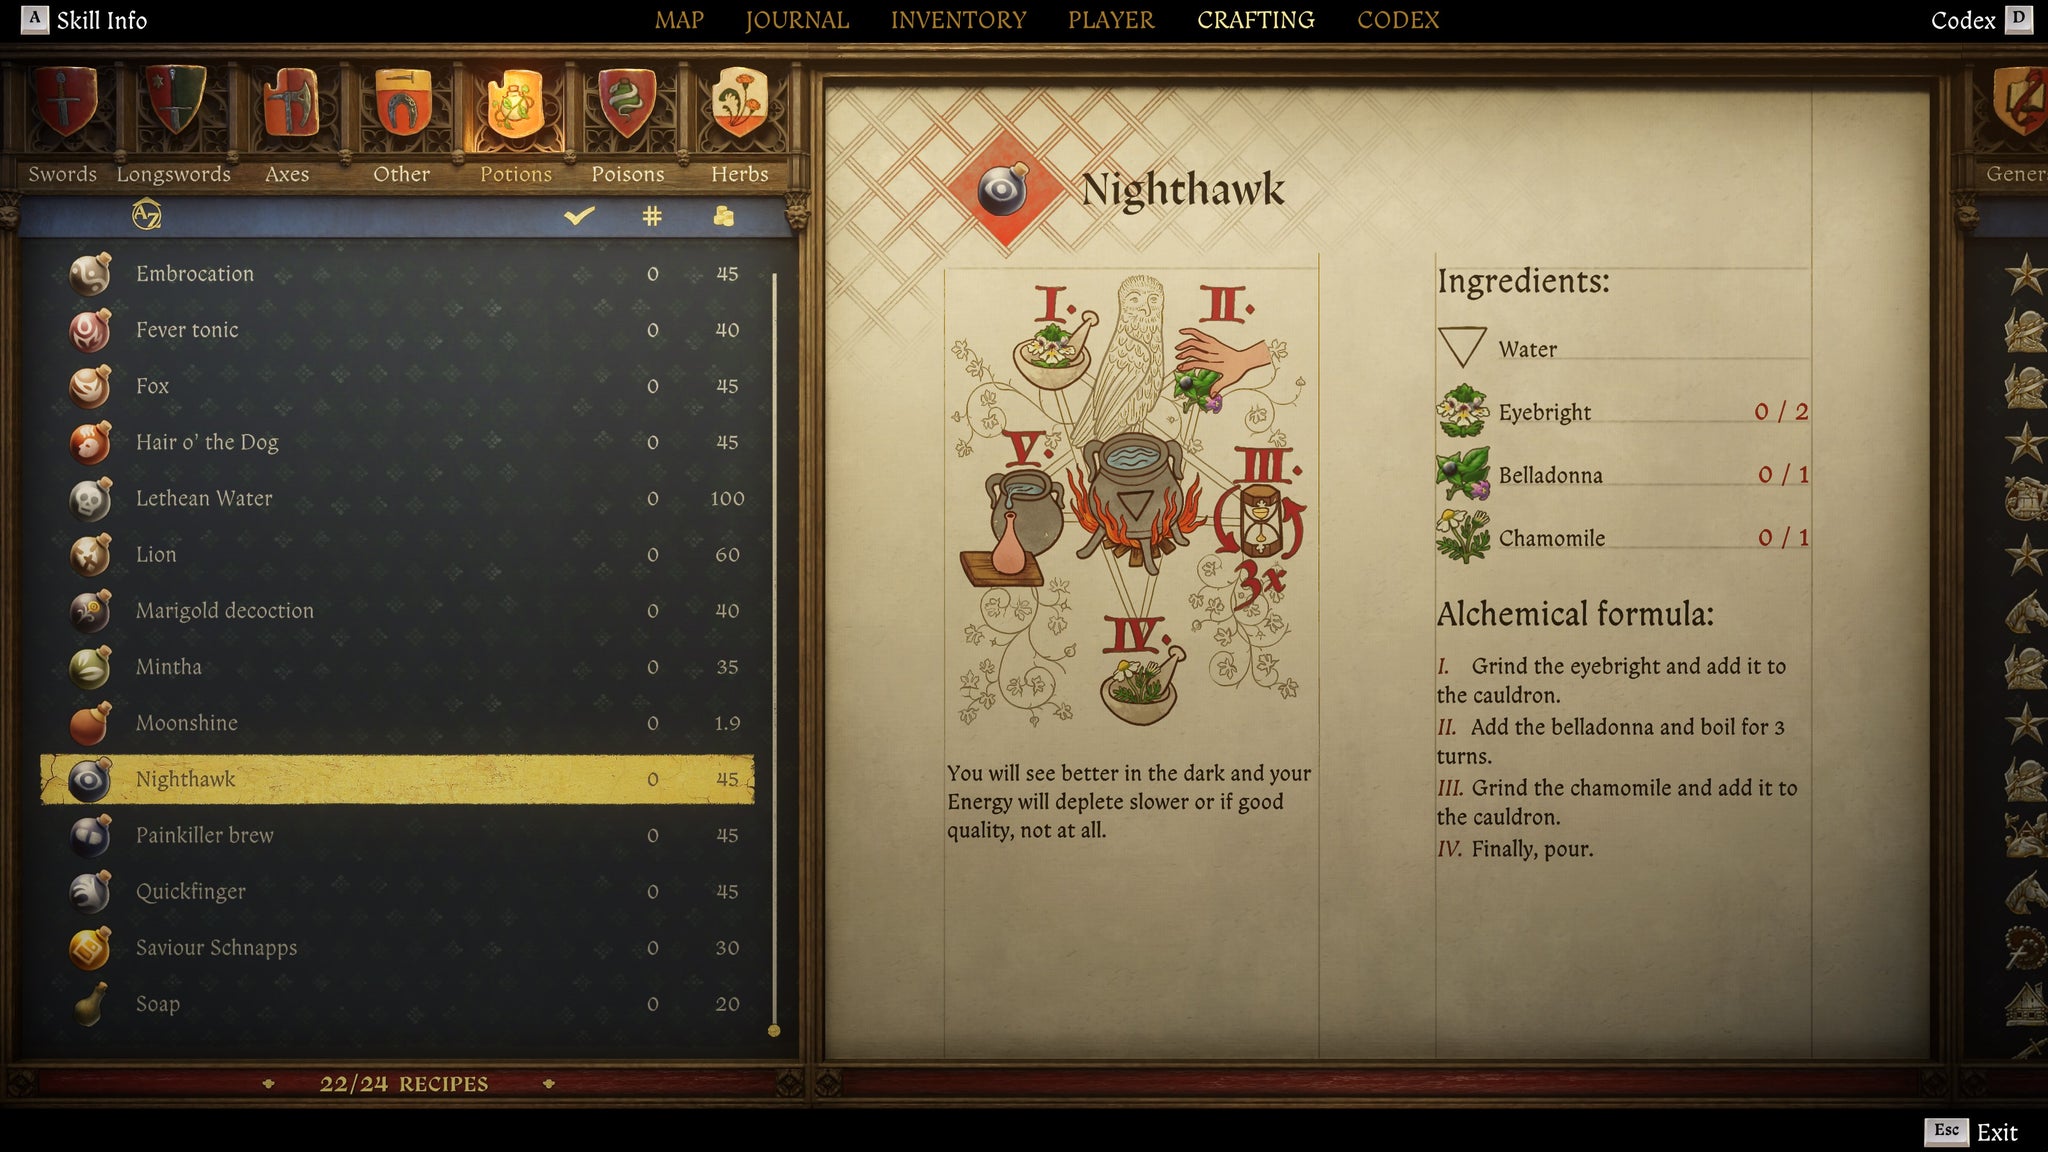
Image credit:Rock Paper Shotgun/Deep Silver
| Ingredients | 2x Eyebright, 1x Belladonna, 1x Chamomile |
|---|---|
| Liquid Base | Water |
| Effect (Weak) | You will see better in the dark for 10 minutes. |
| Effect (Normal) | You will see better in the dark and Energy will decrease 25% slower, lasts 15 minutes. |
| Effect (Strong) | You will see better in the dark and Energy will decrease 50% slower, lasts 20 minutes. |
| Effect (Henry) | You will see better in the dark and Energy will not decrease at all, lasts 25 minutes. |
| Recipe location | Purchase from Aranka (Nomads’ Camp) or Apothecary (Kuttenberg). |
Nighthawk recipe steps:
- Prepare 2x Eyebright, 1x Belladonna, and 1x Chamomile.
- Add Water to the cauldron.
- Grind the Eyebright and add it to the cauldron.
- Add the Belladonna and boil for 3 turns.
- Grind the Chamomile and add it to the cauldron.
- Finally, pour.
Painkiller Brew
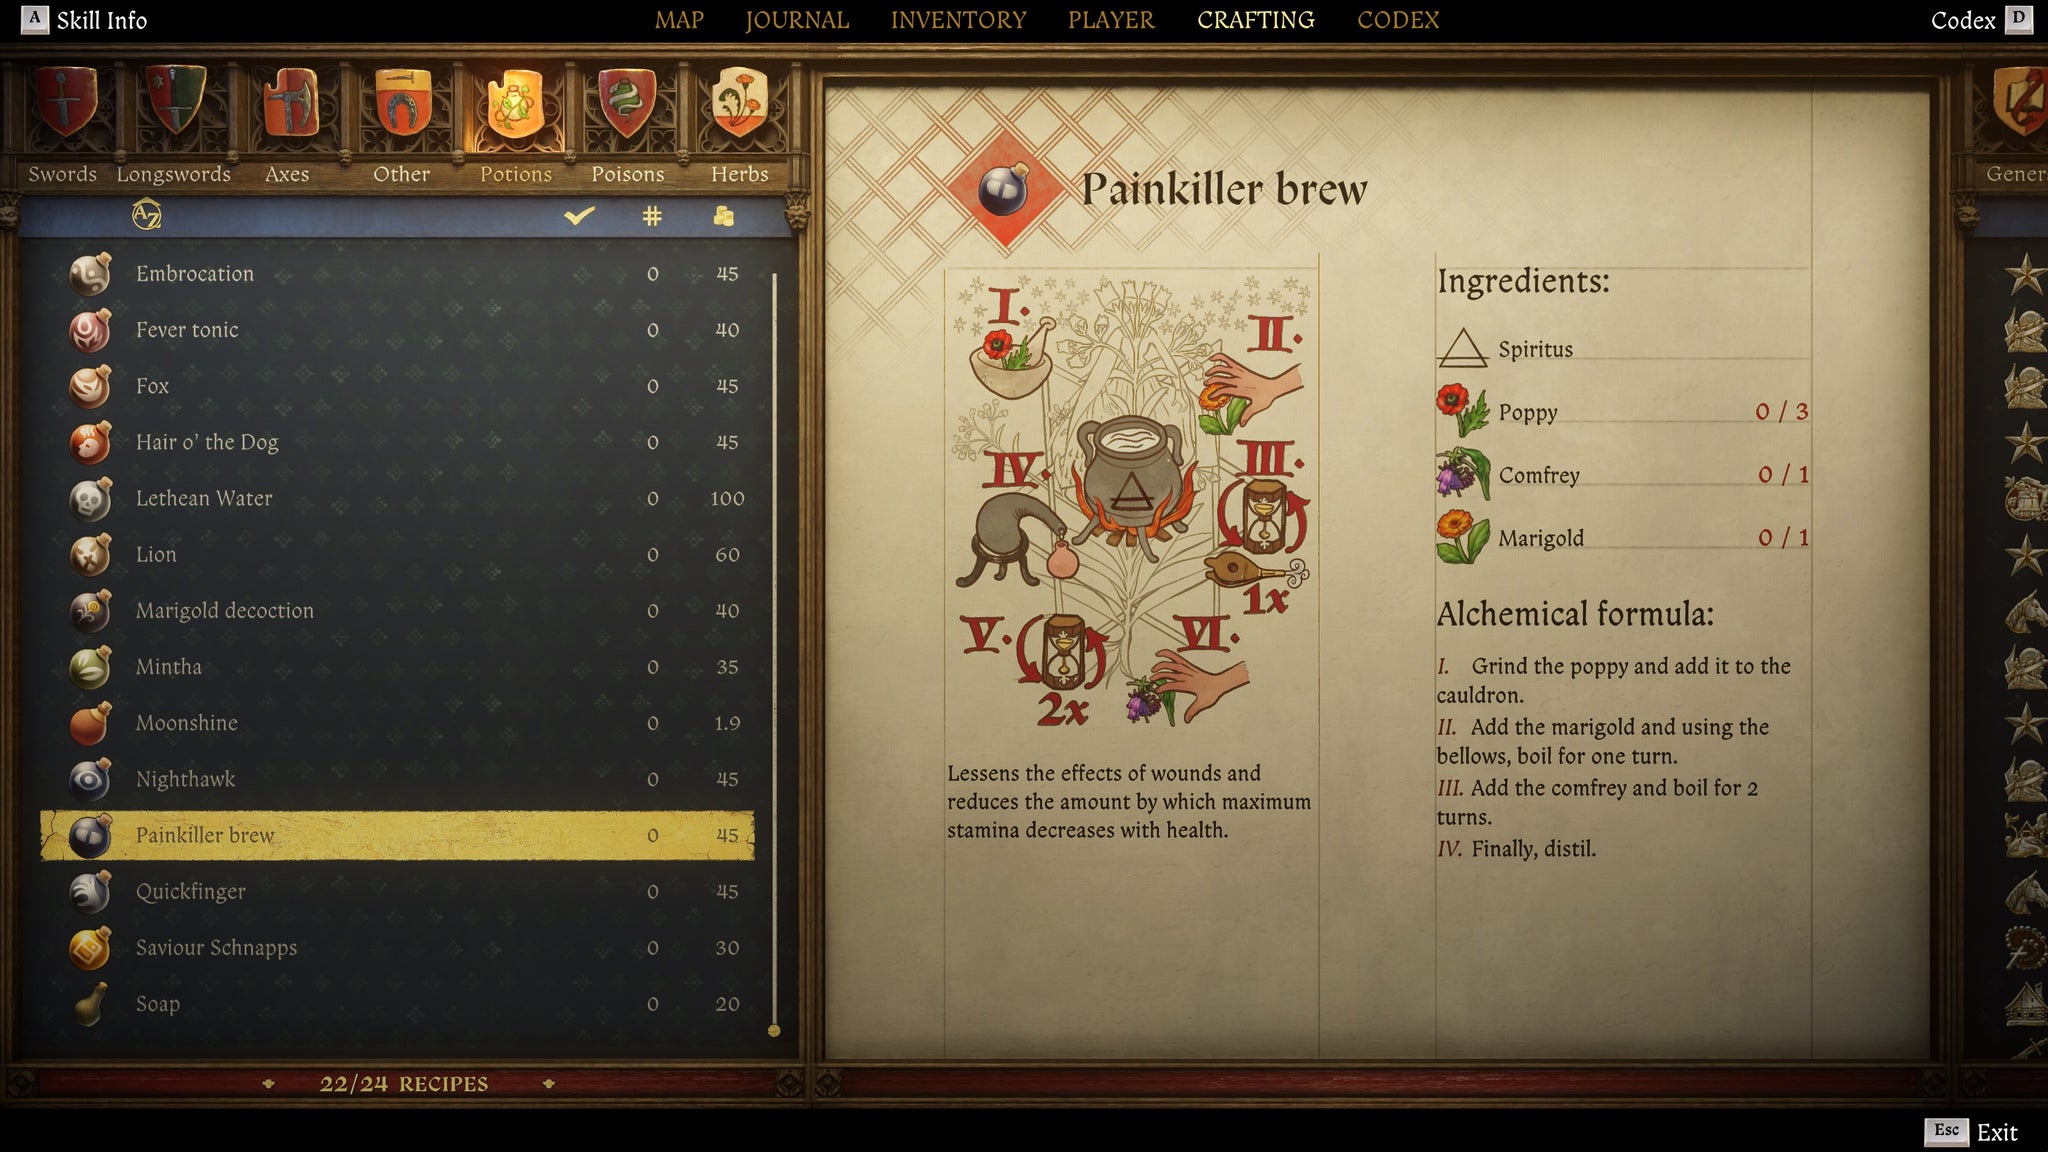
Image credit:Rock Paper Shotgun/Deep Silver
| Ingredients | 3x Poppy, 1x Comfrey, 1x Marigold |
|---|---|
| Liquid Base | Spiritus |
| Effect (Weak) | Suppresses the effects of injury and your maximum Stamina decreases with Health 15% less, lasts 10 minutes. |
| Effect (Normal) | Suppresses the effects of injury and your maximum Stamina decreases with Health 30% less, lasts 15 minutes. |
| Effect (Strong) | Suppresses the effects of injury and your maximum Stamina decreases with Health 50% less, lasts 20 minutes. |
| Effect (Henry) | Suppresses the effects of injury and your maximum Stamina decreases with Health 75% less, lasts 15 minutes. |
| Recipe location | Purchase from Aranka (Nomads’ Camp), Herbalist Barnaby (north of Trosky Castle), Apothecary (Kuttenberg), or Apothecary (Pschitoky). |
Painkiller Brew recipe steps:
- Prepare 3x Poppy, 1x Comfrey, and 1x Marigold.
- Add Spirits to the cauldron.
- Grind the Poppy and add it to the cauldron.
- Add the Marigold and boil for 1 turn using the Bellows.
- Add the Comfrey and boil for 2 turns.
- Finally, distil.
Quickfinger
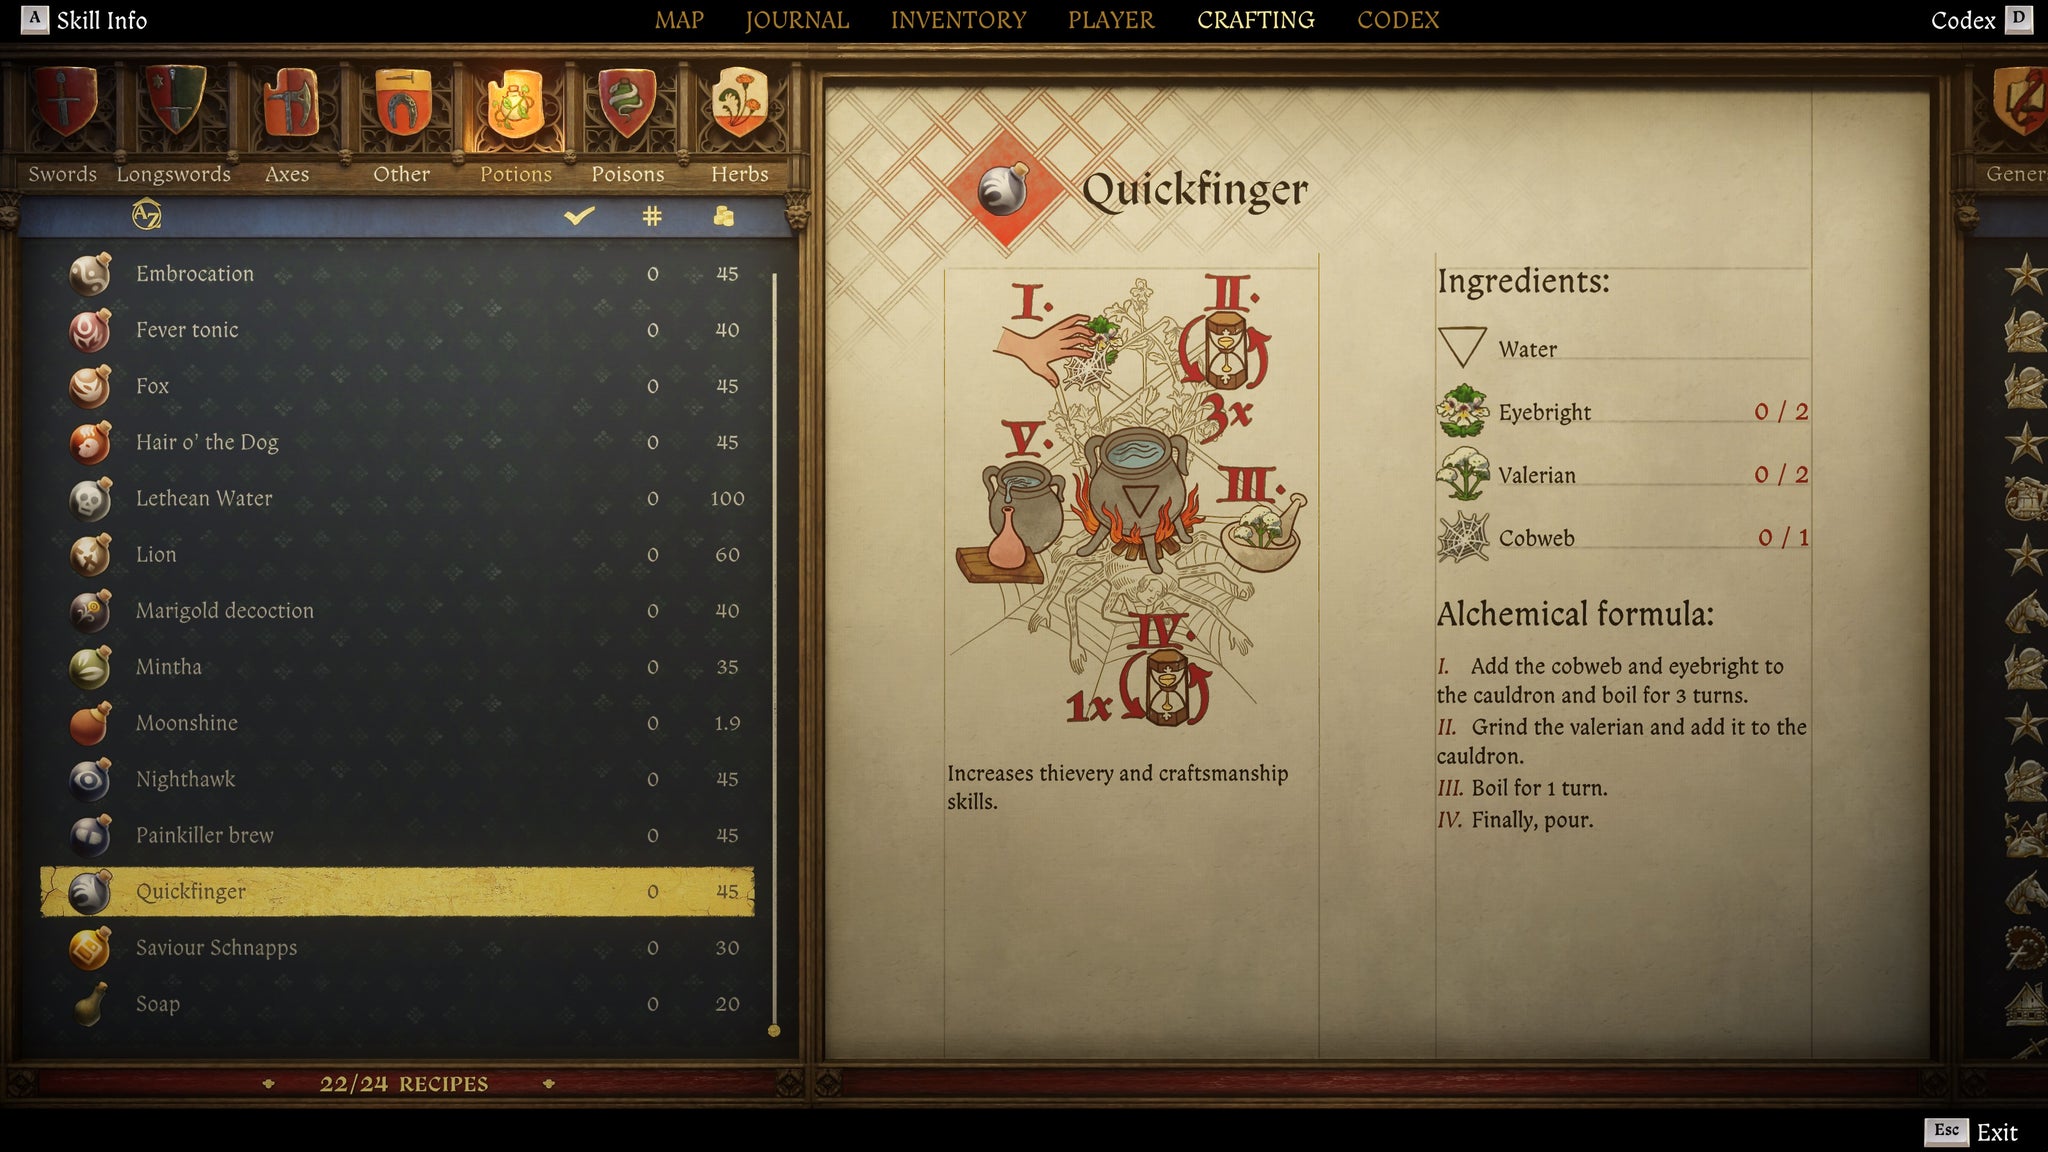
Image credit:Rock Paper Shotgun/Deep Silver
| Ingredients | 2x Eyebright, 2x Valerian, 1x Cobweb |
|---|---|
| Liquid Base | Water |
| Effect (Weak) | Increases Craftsmanship and Thievery by 2 for 20 minutes. |
| Effect (Normal) | Increases Craftsmanship and Thievery by 4 for 20 minutes. |
| Effect (Strong) | Increases Craftsmanship and Thievery by 6 for 40 minutes. |
| Effect (Henry) | Increases Craftsmanship and Thievery by 8 for 1 hour. |
| Recipe location | Purchase from Aranka (Nomads’ Camp) or Balthazar (Random Encounter). |
Quickfinger recipe steps:
- Prepare 2x Eyebright, 2x Valerian, and 1x Cobweb.
- Add Water to the cauldron.
- Add the Cobweb and Eyebright to the cauldron and boil for 3 turns.
- Grind the Valerian and add it to the cauldron.
- Boil for 1 turn.
- Finally, pour.
Saviour Schnapps

Image credit:Rock Paper Shotgun/Deep Silver
| Ingredients | 1x Nettle, 2x Belladonna |
|---|---|
| Liquid Base | Wine |
| Effect (Weak) | Saves the game . |
| Effect (Normal) | Saves the game, heals 10 Health points and increases Strength, Vitality and Agility by 1 for 3 minutes. |
| Effect (Strong) | Saves the game, heals 20 Health points and increases Strength, Vitality and Agility by 2 for 5 minutes. |
| Effect (Henry) | Saves the game, heals 30 Health points and increases Strength, Vitality and Agility by 3 for 8 minutes. |
| Recipe location | Given for free by Pavlena at the end of the quest “Fortuna”. |
Check out our guide on how to get more Saviour Schnapps for more details!
Saviour Schnapps recipe steps:
- Prepare 1x Nettle and 2x Belladonna.
- Add Wine to the cauldron.
- Add the Nettle to the cauldron and boil for 2 turns.
- Grind the Belladonna.
- Add the Belladonna to the cauldron and boil for 1 turn.
- Finally, pour.
Soap
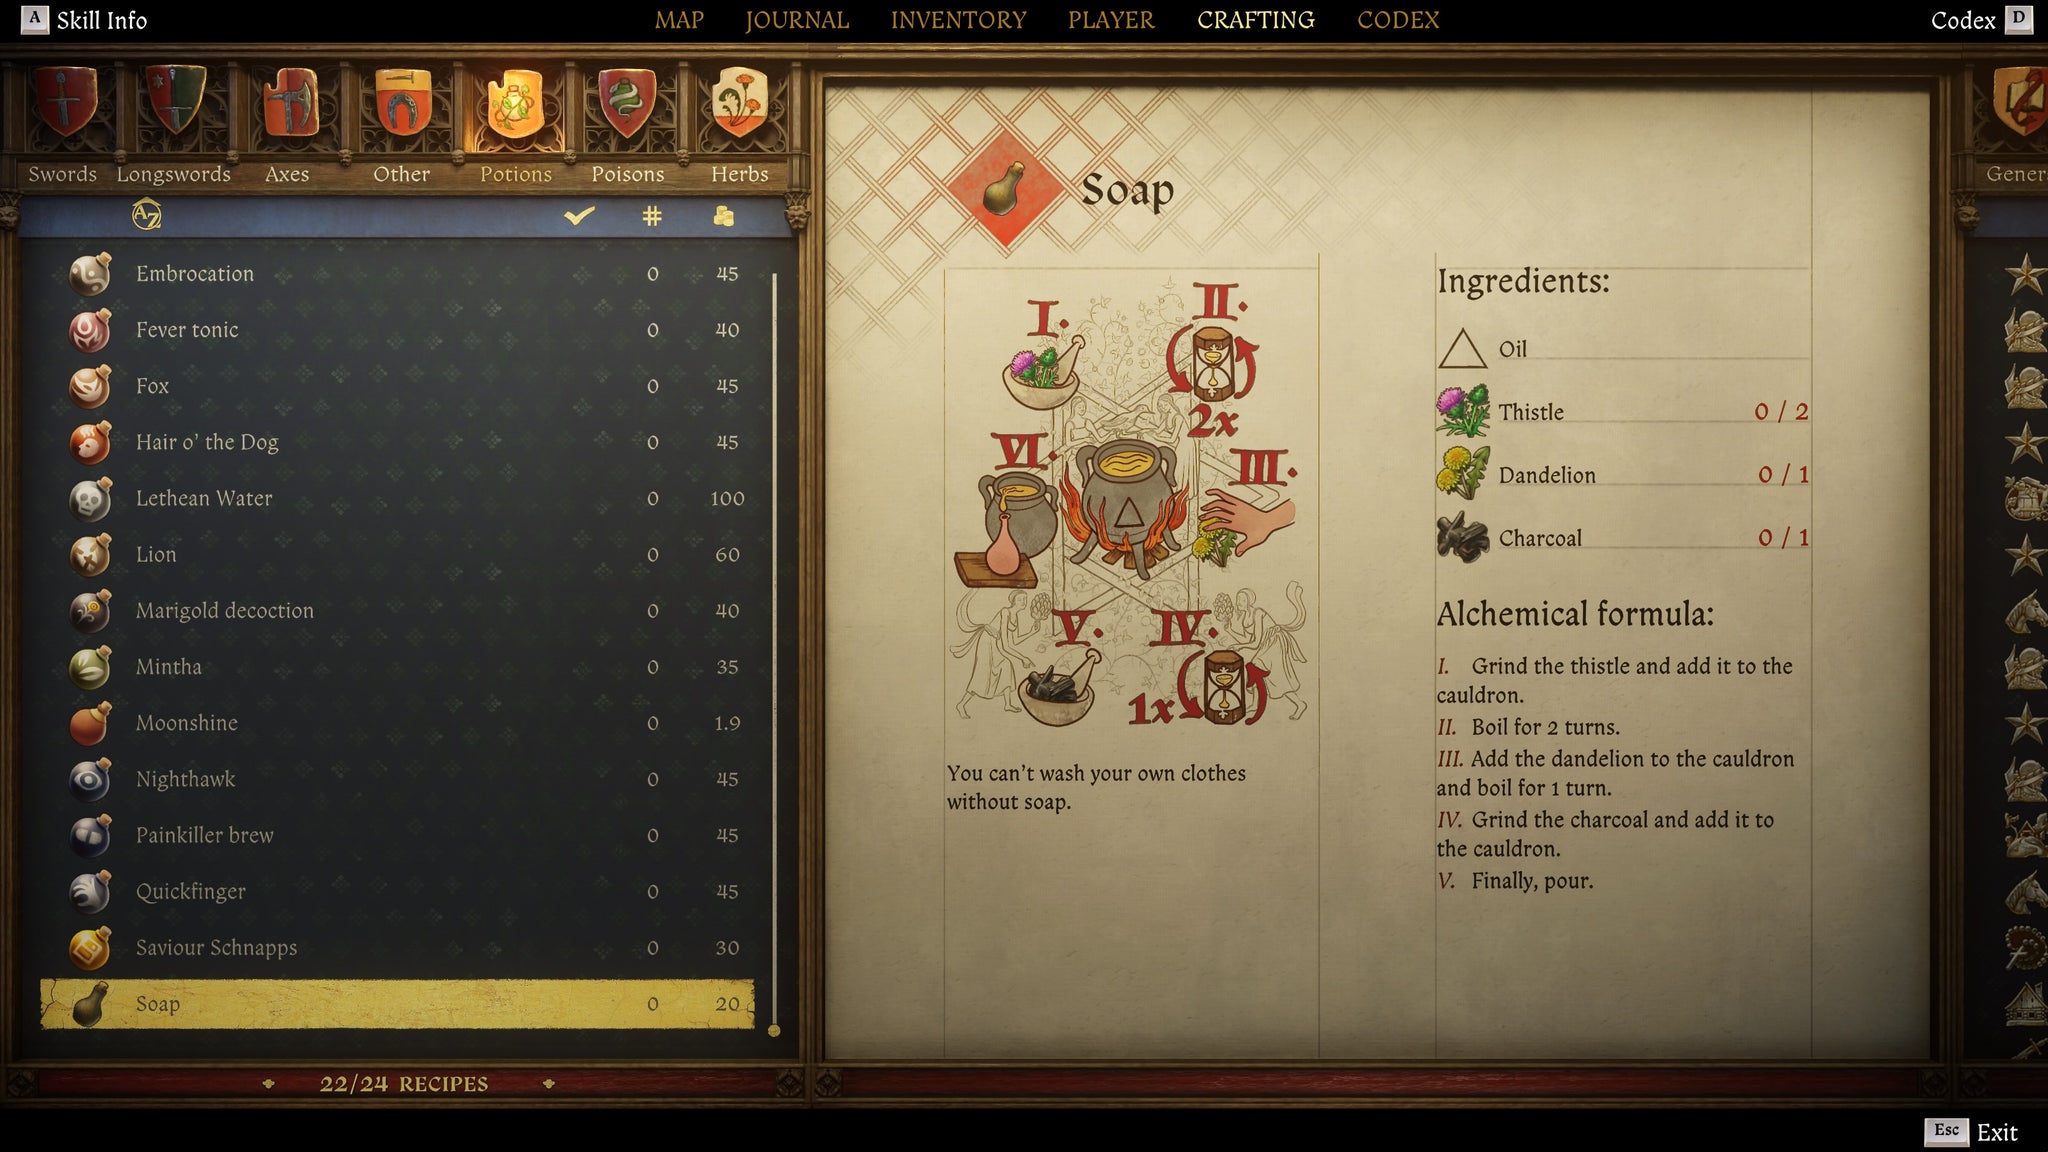
Image credit:Rock Paper Shotgun/Deep Silver
| Ingredients | 2x Thistle, 1x Dandelion, 1x Charcoal |
|---|---|
| Liquid Base | Oil |
| Description | Soap, a mix of fat, ash, and who knows what else. Combined with water, it works miracles on dirty clothes. |
| Recipe location | Steal from Trosky Bathhouse upper floor or Troskowitz trader building, or purchase from Apothecary Emmerich (Troskowitz) or Apothecary (Kuttenberg). |
Soap recipe steps:
- Prepare 2x Thistle, 1x Dandelion, and 1x Charcoal.
- Add Oil to the cauldron.
- Grind the Thistle and add it to the cauldron.
- Boil for 2 turns.
- Add the Dandelion to the cauldron and boil for 1 turn.
- Grind the Charcoal and add it to the cauldron.
- Finally, pour.
Lead Shot Gunpowder
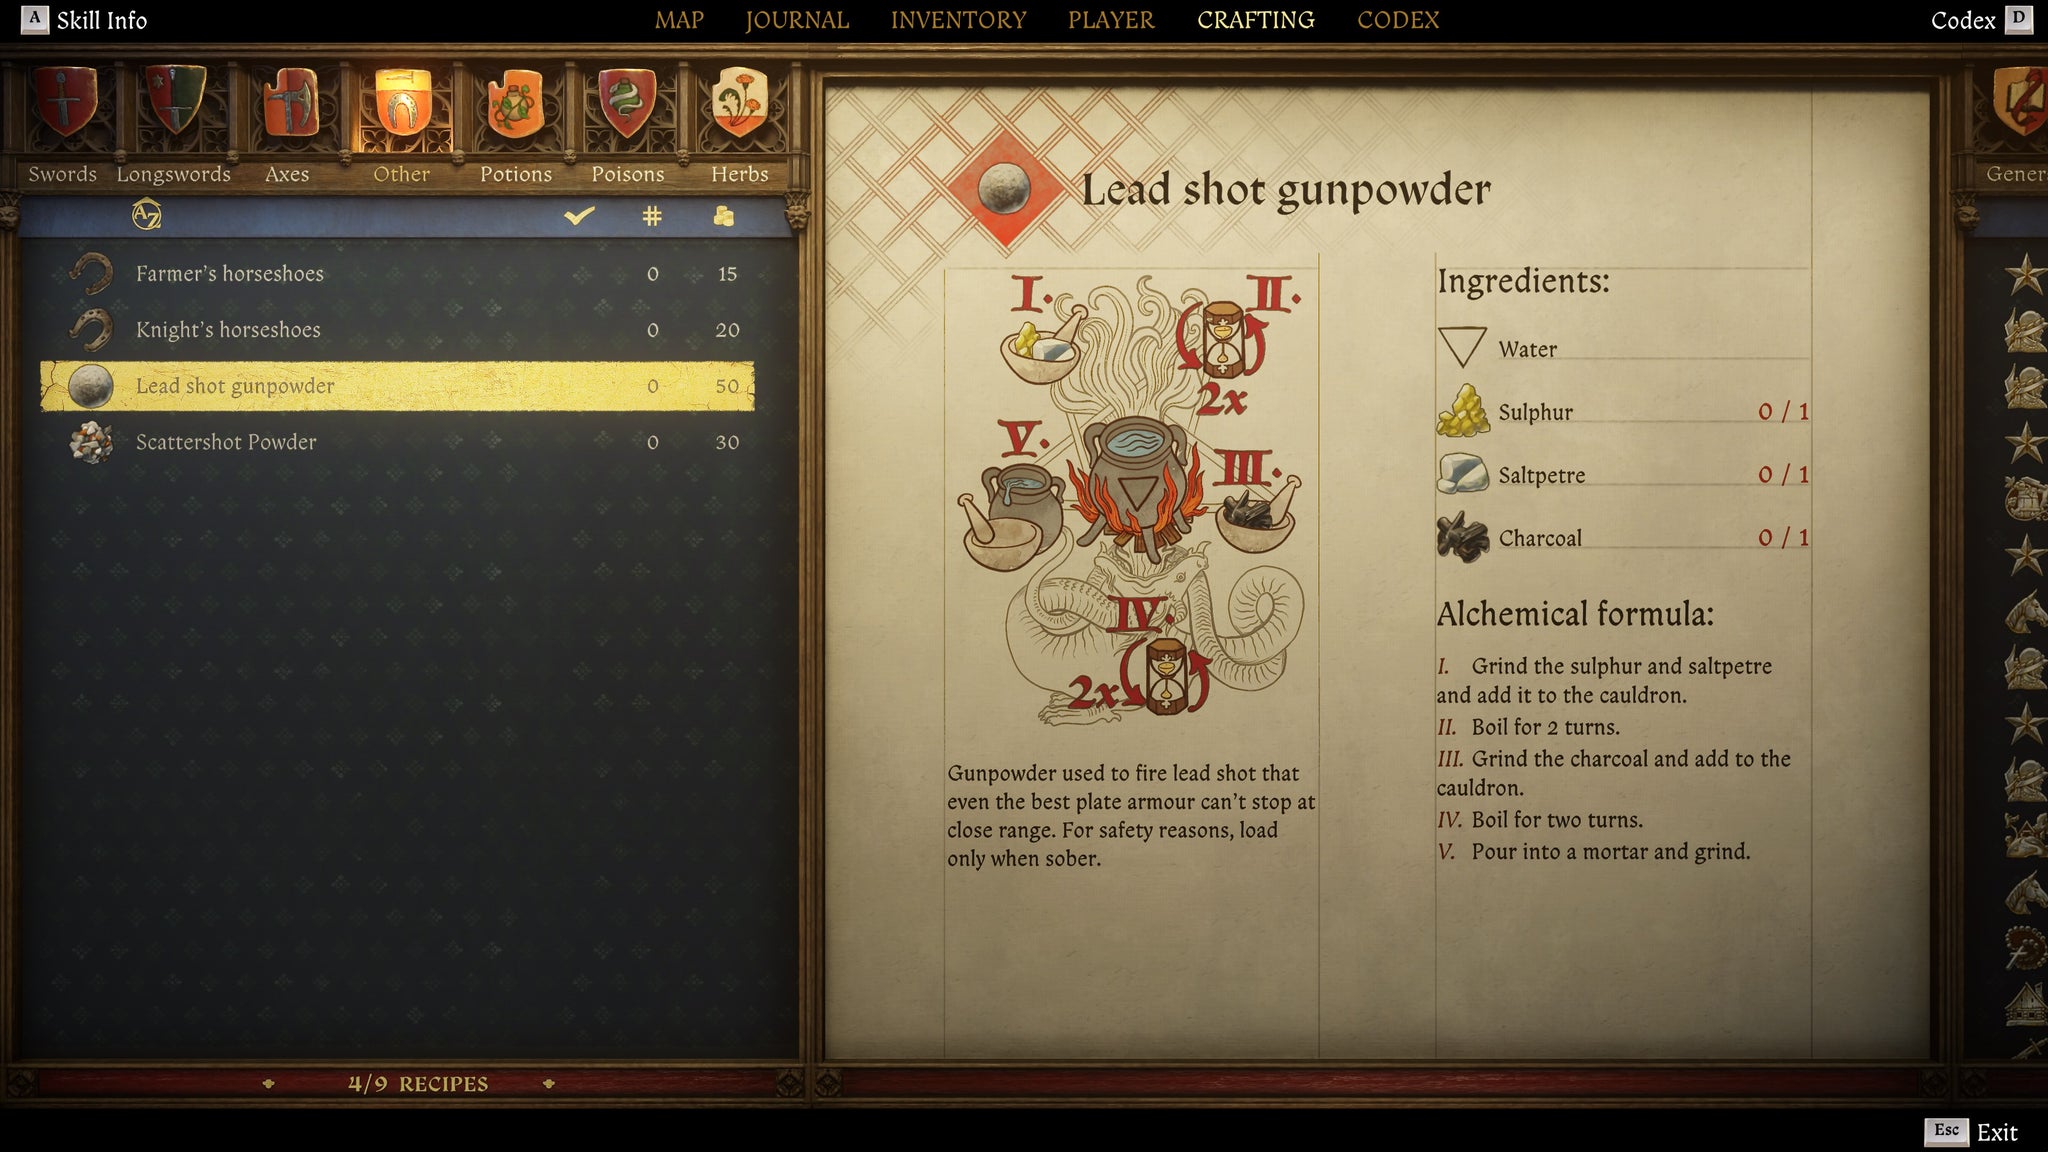
Image credit:Rock Paper Shotgun/Deep Silver
| Ingredients | 1x Sulphur, 1x Saltpetre, 1x Charcoal |
|---|---|
| Liquid Base | Water |
| Description | A lead ball. It rattles a little in the barrel, but at least it’s easy to load. Even the best plate armour can’t stop it up close! |
| Recipe location | Complete Miller Kreyzl’s quest “Opus Magnum”, or purchase from Apothecary (Kuttenberg). |
Lead Shot Gunpowder recipe steps:
- Prepare 1x Sulphur, 1x Saltpetre, and 1x Charcoal.
- Add Water to the cauldron.
- Grind the Sulphur and Saltpetre and add it to the cauldron.
- Boil for 2 turns.
- Grind the Charcoal and add to the cauldron.
- Boil for 2 turns.
- Pour into a mortar and grind.
Scattershot Gunpowder
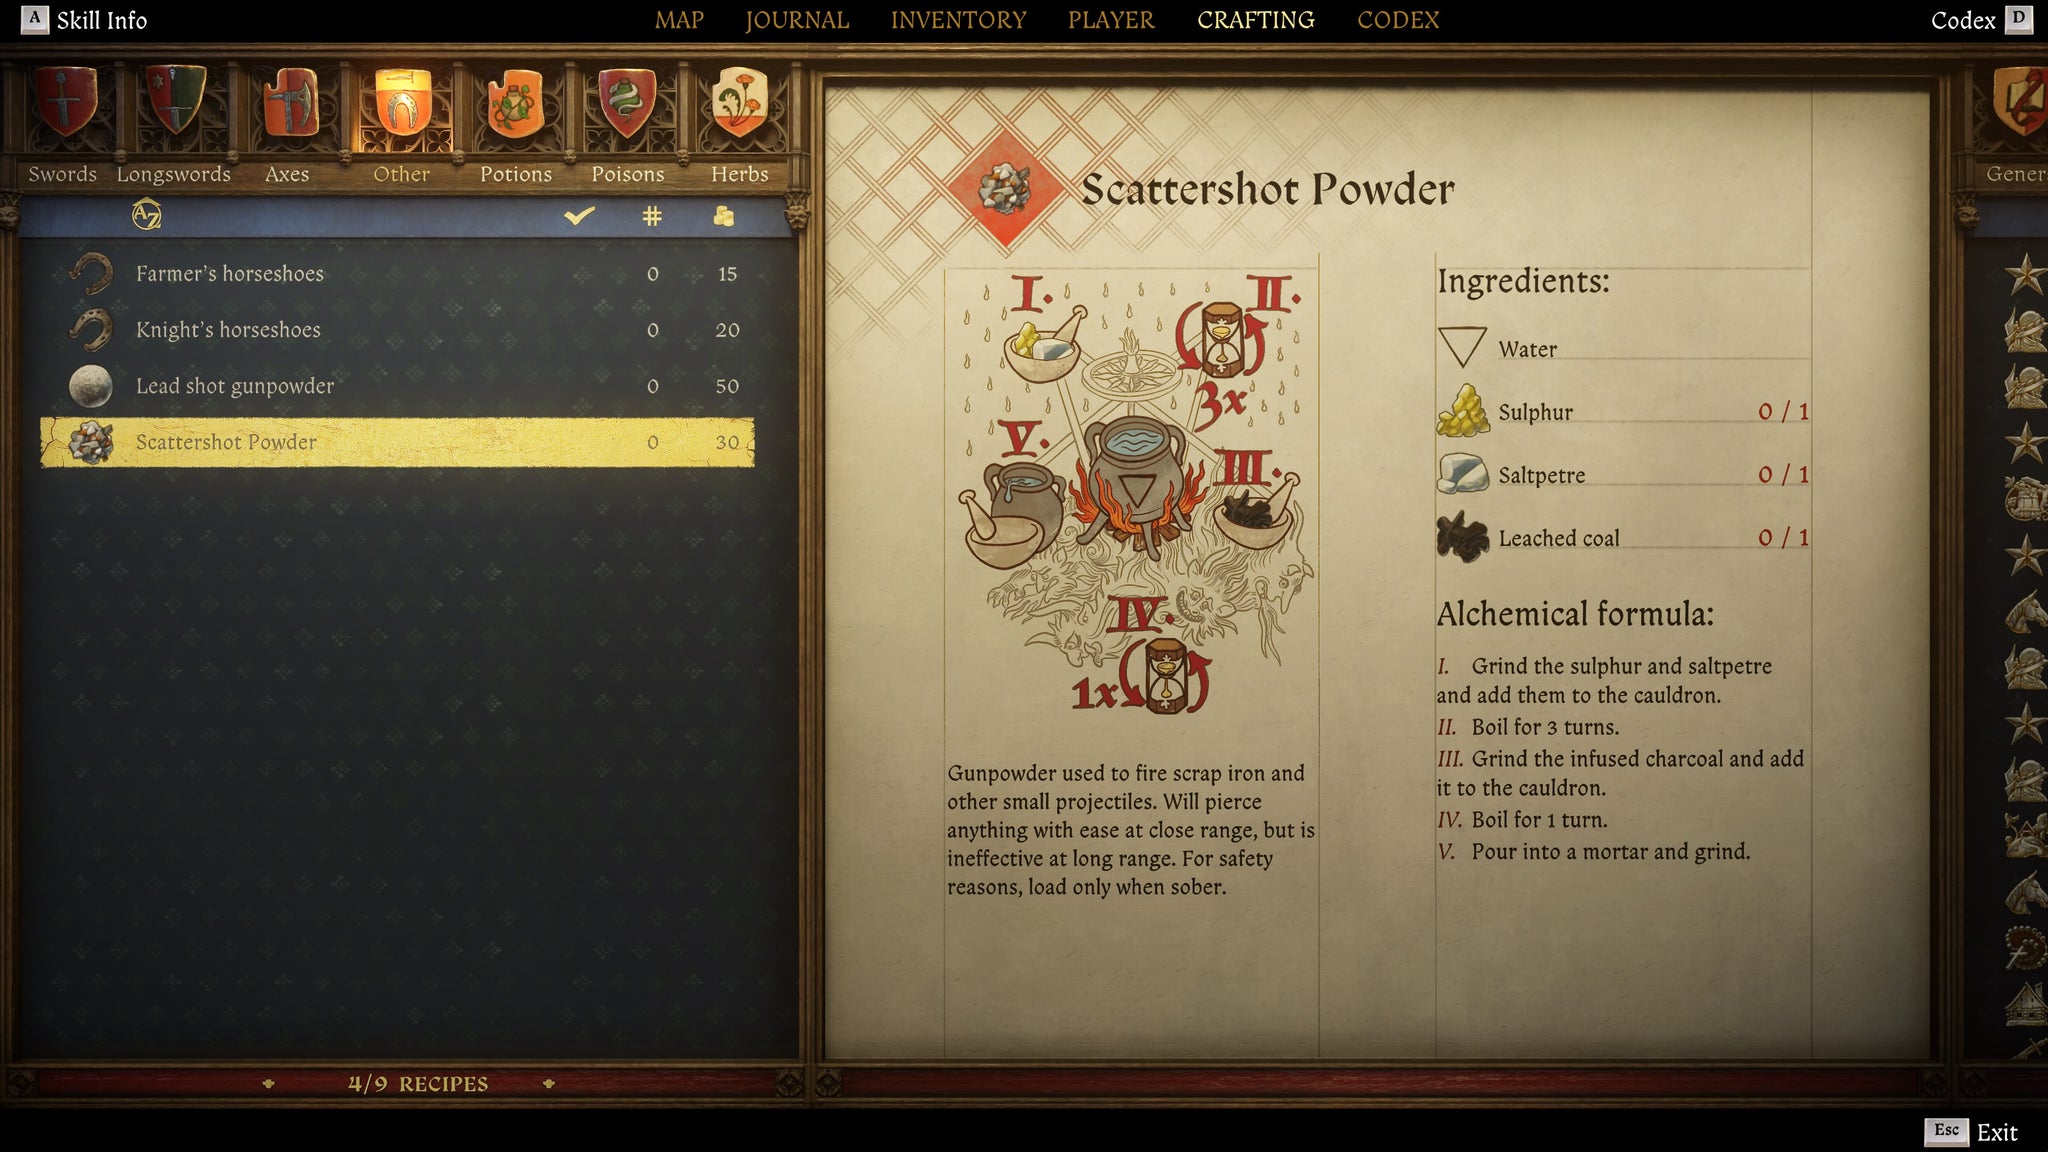
Image credit:Rock Paper Shotgun/Deep Silver
| Ingredients | 1x Sulphur, 1x Saltpetre, 1x Leached Coal |
|---|---|
| Liquid Base | Water |
| Description | A pile of scrap iron and rocks tied up in a small bag. It’ll shred anyone at close range, but at a distance it’s rather useless. |
| Recipe location | Purchase from Apothecary (Kuttenberg). |
Scattershot Gunpowder recipe steps:
- Prepare 1x Sulphur, 1x Saltpetre, and 1x Leached Coal.
- Add Water to the cauldron.
- Grind the Sulphur and Saltpetre and add them to the cauldron.
- Boil for 3 turns.
- Grind the Leached Coal and add it to the cauldron.
- Boil for 1 turn.
- Pour into a mortar and grind.
If you need some help gathering enough Groschen to buy all these recipes, then check out our handy guide on how to make money fast in KCD2 . And while you’re here, why not also check out our other guides on useful things such as how to get a horse for free , how to unlock the Master Strike, how to use a Torch , and how to repair weapons and armour .


Kingdom Come: Deliverance II
Video Game
Rock Paper Shotgun is better when you sign in
Sign in and join us on our journey to discover strange and compelling PC games.

All 75 Arc Raiders Blueprints and where to get them
These areas have the highest chance of giving you Blueprints

Image credit:Rock Paper Shotgun/Embark Studios

Looking for more Arc Raiders Blueprints? It’s a special day when you find a Blueprint, as they’re among the most valuable items in Arc Raiders. If you find a Blueprint that you haven’t already found, then you must make sure you hold onto it at all costs, because Blueprints are the key to one of the most important and powerful systems of meta-progression in the game.
This guide aims to be the very best guide on Blueprints you can find, starting with a primer on what exactly they are and how they work in Arc Raiders, before delving into exactly where to get Blueprints and the very best farming spots for you to take in your search.
We’ll also go over how to get Blueprints from other unlikely activities, such as destroying Surveyors and completing specific quests. And you’ll also find the full list of all 75 Blueprints in Arc Raiders on this page (including the newest Blueprints added with the Cold Snap update , such as the Deadline Blueprint and Firework Box Blueprint), giving you all the information you need to expand your own crafting repertoire.
In this guide:
- What are Blueprints in Arc Raiders?
- Full Blueprint list: All crafting recipes
- Where to find Blueprints in Arc Raiders Blueprints obtained from quests Blueprints obtained from Trials Best Blueprint farming locations

What are Blueprints in Arc Raiders?
Blueprints in Arc Raiders are special items which, if you manage to extract with them, you can expend to permanently unlock a new crafting recipe in your Workshop. If you manage to extract from a raid with an Anvil Blueprint, for example, you can unlock the ability to craft your very own Anvil Pistol, as many times as you like (as long as you have the crafting materials).
To use a Blueprint, simply open your Inventory while in the lobby, then right-click on the Blueprint and click “Learn And Consume” . This will permanently unlock the recipe for that item in your Workshop. As of the Stella Montis update, there are allegedly 75 different Blueprints to unlock - although only 68 are confirmed to be in the game so far. You can see all the Blueprints you’ve found and unlocked by going to the Workshop menu, and hitting “R” to bring up the Blueprint screen.
It’s possible to find duplicates of past Blueprints you’ve already unlocked. If you find these, then you can either sell them, or - if you like to play with friends - you can take it into a match and gift it to your friend so they can unlock that recipe for themselves. Another option is to keep hold of them until the time comes to donate them to the Expedition.
Full Blueprint list: All crafting recipes
Below is the full list of all the Blueprints that are currently available to find in Arc Raiders, and the crafting recipe required for each item:
| Blueprint | Type | Recipe | Crafted At |
|---|---|---|---|
| Bettina | Weapon | 3x Advanced Mechanical Components 3x Heavy Gun Parts 3x Canister | Gunsmith 3 |
| Blue Light Stick | Quick Use | 3x Chemicals | Utility Station 1 |
| Aphelion | Weapon | 3x Magnetic Accelerator 3x Complex Gun Parts 1x Matriarch Reactor | Gunsmith 3 |
| Combat Mk. 3 (Flanking) | Augment | 2x Advanced Electrical Components 3x Processor | Gear Bench 3 |
| Combat Mk. 3 (Aggressive) | Augment | 2x Advanced Electrical Components 3x Processor | Gear Bench 3 |
| Complex Gun Parts | Material | 2x Light Gun Parts 2x Medium Gun Parts 2x Heavy Gun Parts | Refiner 3 |
| Fireworks Box | Quick Use | 1x Explosive Compound 3x Pop Trigger | Explosives Station 2 |
| Gas Mine | Mine | 4x Chemicals 2x Rubber Parts | Explosives Station 1 |
| Green Light Stick | Quick Use | 3x Chemicals | Utility Station 1 |
| Pulse Mine | Mine | 1x Crude Explosives 1x Wires | Explosives Station 1 |
| Seeker Grenade | Grenade | 1x Crude Explosives 2x ARC Alloy | Explosives Station 1 |
| Looting Mk. 3 (Survivor) | Augment | 2x Advanced Electrical Components 3x Processor | Gear Bench 3 |
| Angled Grip II | Mod | 2x Mechanical Components 3x Duct Tape | Gunsmith 2 |
| Angled Grip III | Mod | 2x Mod Components 5x Duct Tape | Gunsmith 3 |
| Hullcracker | Weapon | 1x Magnetic Accelerator 3x Heavy Gun Parts 1x Exodus Modules | Gunsmith 3 |
| Launcher Ammo | Ammo | 5x Metal Parts 1x Crude Explosives | Workbench 1 |
| Anvil | Weapon | 5x Mechanical Components 5x Simple Gun Parts | Gunsmith 2 |
| Anvil Splitter | Mod | 2x Mod Components 3x Processor | Gunsmith 3 |
| ??? | ??? | ??? | ??? |
| Barricade Kit | Quick Use | 1x Mechanical Components | Utility Station 2 |
| Blaze Grenade | Grenade | 1x Explosive Compound 2x Oil | Explosives Station 3 |
| Bobcat | Weapon | 3x Advanced Mechanical Components 3x Light Gun Parts | Gunsmith 3 |
| Osprey | Weapon | 2x Advanced Mechanical Components 3x Medium Gun Parts 7x Wires | Gunsmith 3 |
| Burletta | Weapon | 3x Mechanical Components 3x Simple Gun Parts | Gunsmith 1 |
| Compensator II | Mod | 2x Mechanical Components 4x Wires | Gunsmith 2 |
| Compensator III | Mod | 2x Mod Components 8x Wires | Gunsmith 3 |
| Defibrillator | Quick Use | 9x Plastic Parts 1x Moss | Medical Lab 2 |
| ??? | ??? | ??? | ??? |
| Equalizer | Weapon | 3x Magnetic Accelerator 3x Complex Gun Parts 1x Queen Reactor | Gunsmith 3 |
| Extended Barrel | Mod | 2x Mod Components 8x Wires | Gunsmith 3 |
| Extended Light Mag II | Mod | 2x Mechanical Components 3x Steel Spring | Gunsmith 2 |
| Extended Light Mag III | Mod | 2x Mod Components 5x Steel Spring | Gunsmith 3 |
| Extended Medium Mag II | Mod | 2x Mechanical Components 3x Steel Spring | Gunsmith 2 |
| Extended Medium Mag III | Mod | 2x Mod Components 5x Steel Spring | Gunsmith 3 |
| Extended Shotgun Mag II | Mod | 2x Mechanical Components 3x Steel Spring | Gunsmith 2 |
| Extended Shotgun Mag III | Mod | 2x Mod Components 5x Steel Spring | Gunsmith 3 |
| Remote Raider Flare | Quick Use | 2x Chemicals 4x Rubber Parts | Utility Station 1 |
| Heavy Gun Parts | Material | 4x Simple Gun Parts | Refiner 2 |
| Venator | Weapon | 2x Advanced Mechanical Components 3x Medium Gun Parts 5x Magnet | Gunsmith 3 |
| Il Toro | Weapon | 5x Mechanical Components 6x Simple Gun Parts | Gunsmith 1 |
| Jolt Mine | Mine | 1x Electrical Components 1x Battery | Explosives Station 2 |
| Explosive Mine | Mine | 1x Explosive Compound 1x Sensors | Explosives Station 3 |
| Jupiter | Weapon | 3x Magnetic Accelerator 3x Complex Gun Parts 1x Queen Reactor | Gunsmith 3 |
| Light Gun Parts | Material | 4x Simple Gun Parts | Refiner 2 |
| Lightweight Stock | Mod | 2x Mod Components 5x Duct Tape | Gunsmith 3 |
| Lure Grenade | Grenade | 1x Speaker Component 1x Electrical Components | Utility Station 2 |
| Medium Gun Parts | Material | 4x Simple Gun Parts | Refiner 2 |
| Torrente | Weapon | 2x Advanced Mechanical Components 3x Medium Gun Parts 6x Steel Spring | Gunsmith 3 |
| Muzzle Brake II | Mod | 2x Mechanical Components 4x Wires | Gunsmith 2 |
| Muzzle Brake III | Mod | 2x Mod Components 8x Wires | Gunsmith 3 |
| Padded Stock | Mod | 2x Mod Components 5x Duct Tape | Gunsmith 3 |
| Shotgun Choke II | Mod | 2x Mechanical Components 4x Wires | Gunsmith 2 |
| Shotgun Choke III | Mod | 2x Mod Components 8x Wires | Gunsmith 3 |
| Shotgun Silencer | Mod | 2x Mod Components 8x Wires | Gunsmith 3 |
| Showstopper | Grenade | 1x Advanced Electrical Components 1x Voltage Converter | Explosives Station 3 |
| Silencer I | Mod | 2x Mechanical Components 4x Wires | Gunsmith 2 |
| Silencer II | Mod | 2x Mod Components 8x Wires | Gunsmith 3 |
| Snap Hook | Quick Use | 2x Power Rod 3x Rope 1x Exodus Modules | Utility Station 3 |
| Stable Stock II | Mod | 2x Mechanical Components 3x Duct Tape | Gunsmith 2 |
| Stable Stock III | Mod | 2x Mod Components 5x Duct Tape | Gunsmith 3 |
| Tagging Grenade | Grenade | 1x Electrical Components 1x Sensors | Utility Station 3 |
| Tempest | Weapon | 3x Advanced Mechanical Components 3x Medium Gun Parts 3x Canister | Gunsmith 3 |
| Trigger Nade | Grenade | 2x Crude Explosives 1x Processor | Explosives Station 2 |
| Vertical Grip II | Mod | 2x Mechanical Components 3x Duct Tape | Gunsmith 2 |
| Vertical Grip III | Mod | 2x Mod Components 5x Duct Tape | Gunsmith 3 |
| Vita Shot | Quick Use | 2x Antiseptic 1x Syringe | Medical Lab 3 |
| Vita Spray | Quick Use | 3x Antiseptic 1x Canister | Medical Lab 3 |
| Vulcano | Weapon | 1x Magnetic Accelerator 3x Heavy Gun Parts 1x Exodus Modules | Gunsmith 3 |
| Wolfpack | Grenade | 2x Explosive Compound 2x Sensors | Explosives Station 3 |
| Red Light Stick | Quick Use | 3x Chemicals | Utility Station 1 |
| Smoke Grenade | Grenade | 14x Chemicals 1x Canister | Utility Station 2 |
| Deadline | Mine | 3x Explosive Compound 2x ARC Circuitry | Explosives Station 3 |
| Trailblazer | Grenade | 1x Explosive Compound 1x Synthesized Fuel | Explosives Station 3 |
| Tactical Mk. 3 (Defensive) | Augment | 2x Advanced Electrical Components 3x Processor | Gear Bench 3 |
| Tactical Mk. 3 (Healing) | Augment | 2x Advanced Electrical Components 3x Processor | Gear Bench 3 |
| Yellow Light Stick | Quick Use | 3x Chemicals | Utility Station 1 |
Note: The missing Blueprints in this list likely have not actually been added to the game at the time of writing, because none of the playerbase has managed to find any of them. As they are added to the game, I will update this page with the most relevant information so you know exactly how to get all 75 Arc Raiders Blueprints.
Where to find Blueprints in Arc Raiders
Below is a list of all containers, modifiers, and events which maximise your chances of finding Blueprints:
- Certain quests reward you with specific Blueprints .
- Completing Trials has a high chance of offering Blueprints as rewards.
- Surveyors have a decent chance of dropping Blueprints on death.
- High loot value areas tend to have a greater chance of spawning Blueprints.
- Night Raids and Storms may increase rare Blueprint spawn chances in containers.
- Containers with higher numbers of items may have a higher tendency to spawn Blueprints. As a result, Blue Gate (which has many “large” containers containing multiple items) may give you a higher chance of spawning Blueprints.
- Raider containers (Raider Caches, Weapon Boxes, Medical Bags, Grenade Tubes) have increased Blueprint drop rates. As a result, the Uncovered Caches event gives you a high chance of finding Blueprints.
- Security Lockers have a higher than average chance of containing Blueprints.
- Certain Blueprints only seem to spawn under specific circumstances: Tempest Blueprint only spawns during Night Raid events. Vulcano Blueprint only spawns during Hidden Bunker events. Jupiter and Equaliser Blueprints only spawn during Harvester events.

Raider Caches, Weapon Boxes, and other raider-oriented container types have a good chance of offering Blueprints. |Image credit:Rock Paper Shotgun/Embark Studios
Blueprints have a very low chance of spawning in any container in Arc Raiders, around 1-2% on average. However, there is a higher chance of finding Blueprints in particular container types. Specifically, you can find more Blueprints in Raider containers and security lockers.
Beyond this, if you’re looking for Blueprints you should focus on regions of the map which are marked as having particularly high-value loot. Areas such as the Control Tower in Dam Battlegrounds, the Arrival and Departure Buildings in Spaceport, and Pilgrim’s Peak in Blue Gate all have a better-than-average chance of spawning Blueprints somewhere amongst all their containers. Night Raids and Electromagnetic Storm events also increase the drop chances of certain Blueprints .
In addition to these containers, you can often loot Blueprints from destroyed Surveyors - the largest of the rolling ball ARC. Surveyors are more commonly found on the later maps - Spaceport and Blue Gate - and if one spawns in your match, you’ll likely see it by the blue laser beam that it casts into the sky while “surveying”.
Surveyors are quite well-armoured and will very speedily run away from you once it notices you, but if you can take one down then make sure you loot all its parts for a chance of obtaining certain unusual Blueprints.
Blueprints obtained from quests
One way in which you can get Blueprints is by completing certain quests for the vendors in Speranza. Some quests will reward you with a specific item Blueprint upon completion, so as long as you work through all the quests in Arc Raiders, you are guaranteed those Blueprints.
Here is the full list of all Blueprints you can get from quest rewards:
- Trigger Nade Blueprint: Rewarded after completing “Sparks Fly”.
- Lure Grenade Blueprint: Rewarded after completing “Greasing Her Palms”.
- Burletta Blueprint: Rewarded after completing “Industrial Espionage”.
- Hullcracker Blueprint (and Launcher Ammo Blueprint): Rewarded after completing “The Major’s Footlocker”.
Alas, that’s only 4 Blueprints out of a total of 75 to unlock, so for the vast majority you will need to find them yourself during a raid. If you’re intent on farming Blueprints, then it’s best to equip yourself with cheap gear in case you lose it, but don’t use a free loadout because then you won’t get a safe pocket to stash any new Blueprint you find. No pain in Arc Raiders is sharper than failing to extract with a new Blueprint you’ve been after for a dozen hours already.

One of the best ways to get Blueprints is by hitting three stars on all five Trials every week. |Image credit:Rock Paper Shotgun/Embark Studios
Blueprints obtained from Trials
One of the very best ways to get Blueprints is as rewards for completing Trials in Arc Raiders. Trials are unlocked from Level 15 onwards, and allow you to earn rewards by focusing on certain tasks over the course of several raids. For example, one Trial might task you with dealing damage to Hornets, while another might challenge you to loot Supply Drops.
Trials refresh on a weekly basis, with a new week bringing five new Trials. Each Trial can offer up to three rewards after passing certain score milestones, and it’s possible to receive very high level loot from these reward crates - including Blueprints. So if you want to unlock as many Blueprints as possible, you should make a point of completing as many Trials as possible each week.
Best Blueprint farming locations
The very best way to get Blueprints is to frequent specific areas of the maps which combine high-tier loot pools with the right types of containers to search. Here are my recommendations for where to find Blueprints on every map, so you can always keep the search going for new crafting recipes to unlock.

Image credit:Rock Paper Shotgun/Embark Studios
Dam Battlegrounds
The best places to farm Blueprints on Dam Battlegrounds are the Control Tower, Power Generation Complex, Ruby Residence, and Pale Apartments . The first two regions, despite only being marked on the map as mid-tier loot, contain a phenomenal number of containers to loot. The Control Tower can also contain a couple of high-tier Security Lockers - though of course, you’ll need to have unlocked the Security Breach skill at the end of the Survival tree.
There’s also a lot of reporting amongst the playerbase that the Residential areas in the top-left of the map - Pale Apartments and Ruby Residence - give you a comparatively strong chance of finding Blueprints. Considering their size, there’s a high density of containers to loot in both locations, and they also have the benefit of being fairly out of the way. So you’re more likely to have all the containers to yourself.
Buried City
The best Blueprint farming locations on Buried City are the Santa Maria Houses, Grandioso Apartments, Town Hall, and the various buildings of the New District . Grandioso Apartments has a lower number of containers than the rest, but a high chance of spawning weapon cases - which have good Blueprint drop rates. The others are high-tier loot areas, with plenty of lootable containers - including Security Lockers.
Spaceport
The best places to find Blueprints on Spaceport are the Arrival and Departure Buildings, as well as Control Tower A6 and the Launch Towers . All these areas are labelled as high-value loot regions, and many of them are also very handily connected to one another by the Spaceport wall, which you can use to quickly run from one area to the next. At the tops of most of these buildings you’ll find at least one Security Locker, so this is an excellent farming route for players looking to find Blueprints.
The downside to looting Blueprints on Spaceport is that all these areas are hotly contested, particularly in Duos and Squads. You’ll need to be very focused and fast in order to complete the full farming route.

Image credit:Rock Paper Shotgun/Embark Studios
Blue Gate
Blue Gate tends to have a good chance of dropping Blueprints, potentially because it generally has a high number of containers which can hold lots of items; so there’s a higher chance of a Blueprint spawning in each container. In my experience, the best Blueprint farming spots on Blue Gate are Pilgrim’s Peak, Raider’s Refuge, the Ancient Fort, and the Underground Complex beneath the Warehouse .
All of these areas contain a wealth of containers to loot. Raider’s Refuge has less to loot, but the majority of the containers in and around the Refuge are raider containers, which have a high chance of containing Blueprints - particularly during major events.
Stella Montis
On the whole, Stella Montis seems to have a very low drop rate for Blueprints (though a high chance of dropping other high-tier loot). If you do want to try farming Blueprints on this map, the best places to find Blueprints in Stella Montis are Medical Research, Assembly Workshop, and the Business Center . These areas have the highest density of containers to loot on the map.
In addition to this, the Western Tunnel has a few different Security Lockers to loot, so while there’s very little to loot elsewhere in this area of the map, it’s worth hitting those Security Lockers if you spawn there at the start of a match.
That wraps up this primer on how to get all the Blueprints in Arc Raiders as quickly as possible. With the Expedition system constantly resetting a large number of players’ Blueprints, it’s more important than ever to have the most up-to-date information on where to find all these Blueprints.
While you’re here, be sure to check out our Arc Raiders best guns tier list , as well as our primers on the best skills to unlock and all the different Field Depot locations on every map.


ARC Raiders
PS5 , Xbox Series X/S , PC
Rock Paper Shotgun is better when you sign in
Sign in and join us on our journey to discover strange and compelling PC games.
