I’m certain the pirates in strategy game Menace are laughing at my mistakes
How was I to know an APC could carry personnel… armoured-ly?

Image credit:Rock Paper Shotgun / Hooded Horse / Overhype Studios

My Menace campaign hasn’t been a rousing success. In my first mission , I failed a string of optional objectives and saw one of my squads gunned down by a group of heavily-armed, jetpack-wearing space pirates. I got revenge by running them over with an APC. So, we’ll call it a draw. But I need to up my game if I’m to kick these freeloading bandits off the planet Backbone .
What is it? A turn-based tactical game from the makers of Battle Brothers.
Where can I get it? Steam and Epic
For my next mission in Operation The Pirates Of Menzance, I’m given the choice of protecting a settlement from a pirate raid or rescuing the planet’s governor and other bureaucratic bigwigs from captivity.
I’d like to believe I’m one of those navy types that comes from working class roots and protect their common kind. But, looking at how I arrived in command, with little training and by fluke of being the only person with a chevron pinned to their chest that wasn’t killed in the warp accident when we arrived in the Wayback system, I have to accept I’m the other kind. A military type who only signed up because their elder brother inherited the estate and a seat in the lords, leaving me the option of joining the church, the bar, or the military. Like one of the cads in a Jane Austen novel. The governor is probably a distant reli of mine.
I ditch the colonists and set the dropship’s nav computer to cousin Nige’s mansion.
It’s not all looking out for family. My reward for protecting the settlement is a on-planet garage that repairs my vehicles between missions for the rest of the operation. Rescuing the high-ranking cuz, however, earns me trust with the faction he works for. Menace is all about fostering those connections. When you level up a relationship with a faction, you’ll be able to buy specialist equipment from them. As much as an APC repair might be nice, I’m playing the long-game.
Hopefully through Early Access, Menace’s marine roster will become a little less trope-y |Image credit:Rock Paper Shotgun / Hooded Horse / Overhype Studios
At the start of the last mission, I realised I’d hired two vehicle pilots with only one APC between them. Happily, you can buy extra gear on the black market, so long as you have enough loot to trade. Unhappily, an APC costs far more than I can make from selling the grenades and pirate guns I scavenged after from the last mission. What I can afford, though, is a squad leader dossier, a document that unlocks a new recruit in the hiring screen.
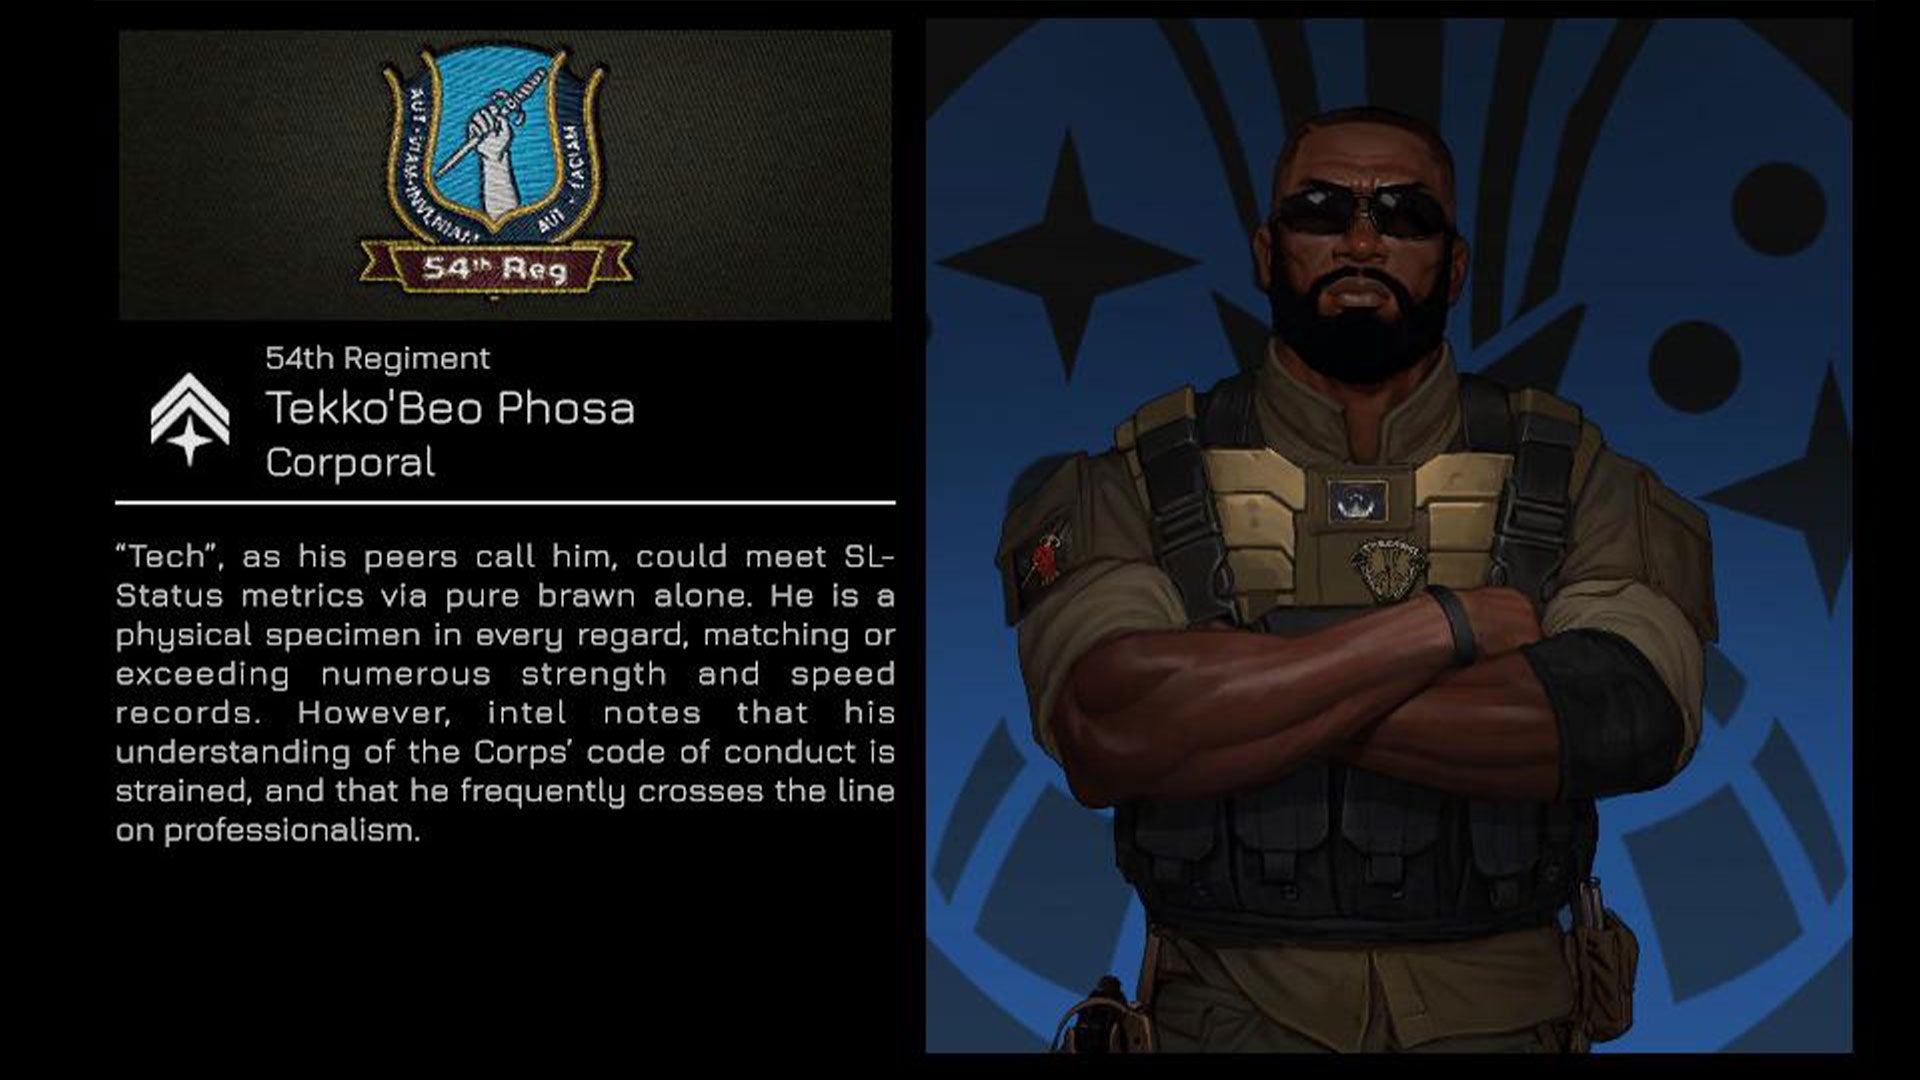
Tekko’Beo ‘Tech’ Phosa is an infantry leader who looks like he eats bullets for breakfast and shits howitzer shells. (Even if he does look like a walking ’80s action movie cliche.) Every squad leader and pilot in Menace has a different starting skill, suggesting how you may want to play them. Tech’s is the ability to fire heavy weapons without needing to deploy them first. He can basically hipfire a bazooka. Of course, I don’t yet have a bazooka, but it’s good to know Tech’s willing.
Despite missing out on three secondary objectives in my last mission, I’ve earned enough XP to promote my other squad leaders. Other than the unique starting skill, the rest of the abilities your squad leaders earn are duplicated across the roster, though they may appear as available unlocks in a different order. I pick a skill for Darby, Lim, and Gerry and start them on the path of specialisation.
For Darby, my wounded recon unit, I choose a perk that increases the accuracy of shots aimed at the same target. I want to build her into a sniper, and will choose anything that makes her more deadly at a distance. I want Lim to be more of a frontrunner, and after he was ambushed so easily in the last mission, I opt for a skill that increases his view range and detection ability. Gerry showed how vital mobile support can be in the last mission, turning up to support a dying Darby, so I pick a skill that reduces the cost of turning and reversing vehicles.
All my units are armed with starting weapons still, military grade carbines, but hopefully in time I’ll find the sniper rifles, shotguns, and light machine guns that will pair well with their skillsets.
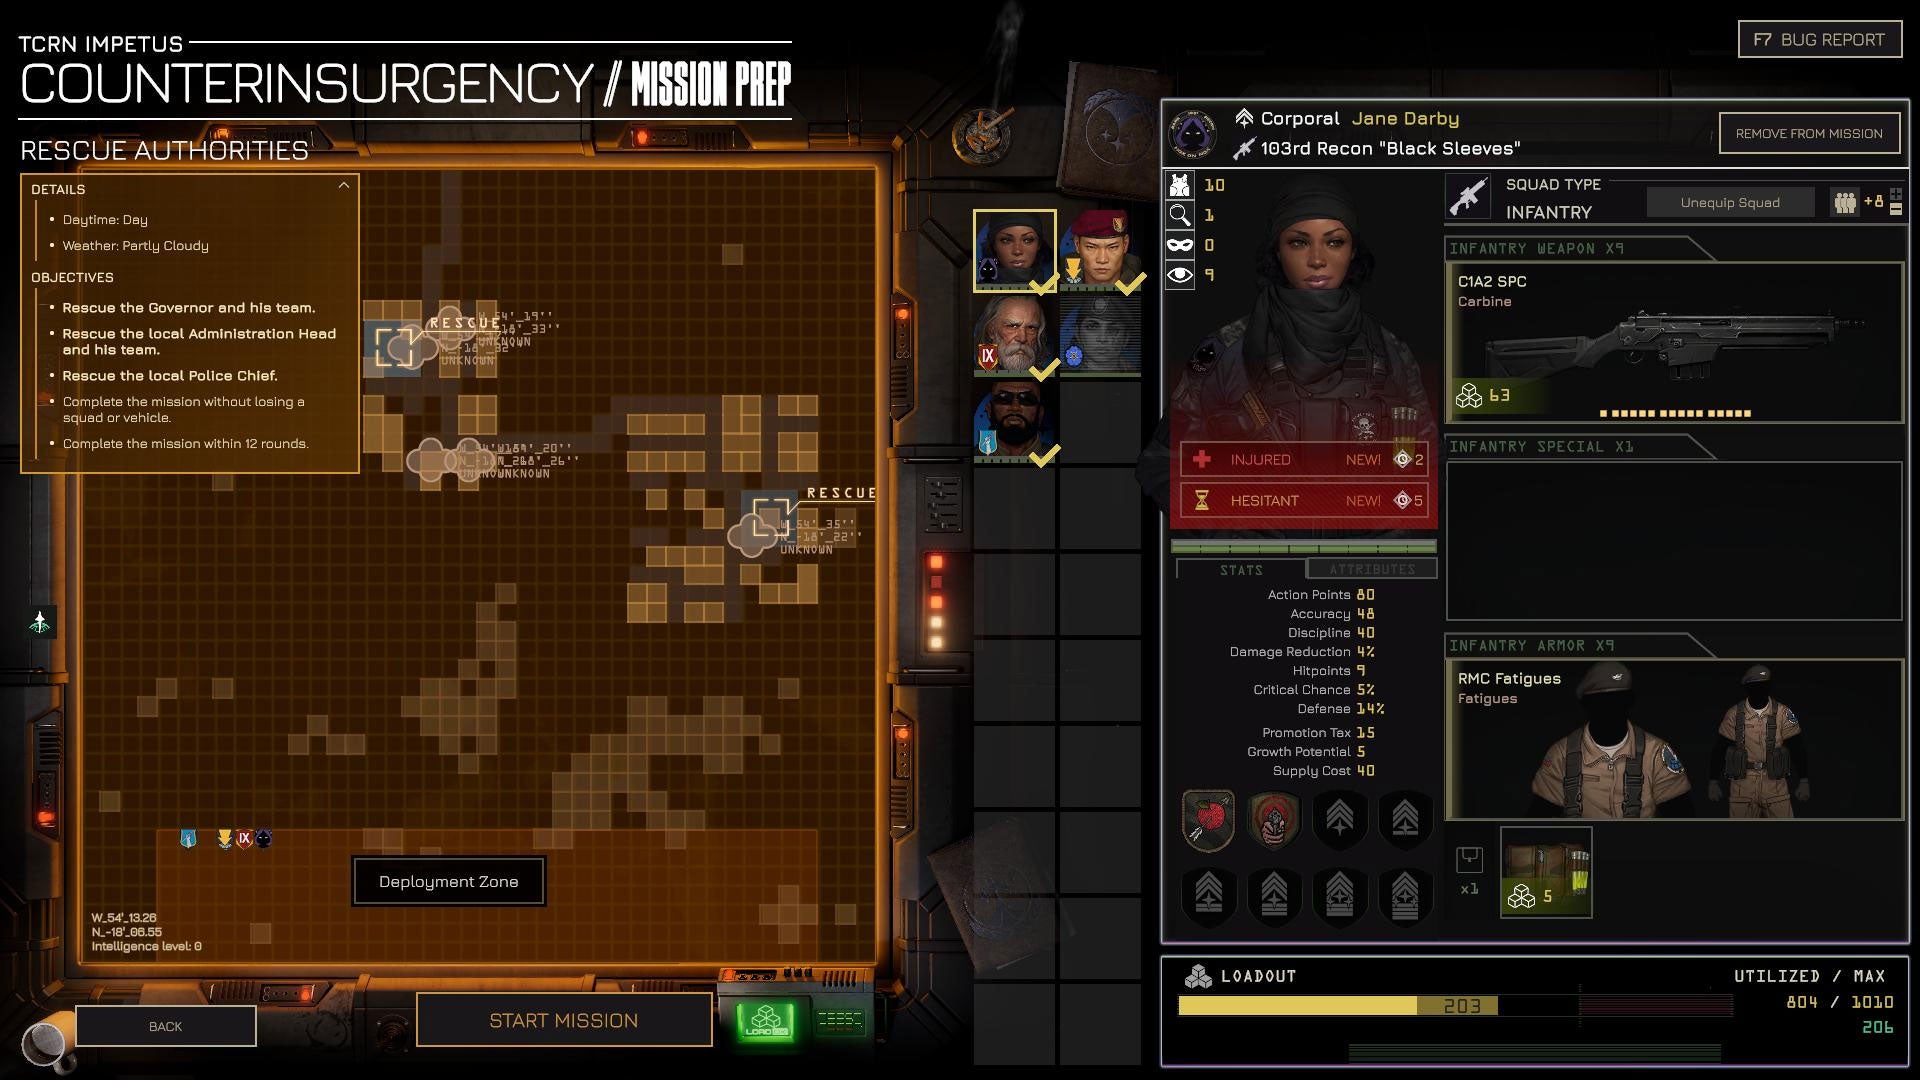
Image credit:Rock Paper Shotgun / Hooded Horse / Overhype Studios
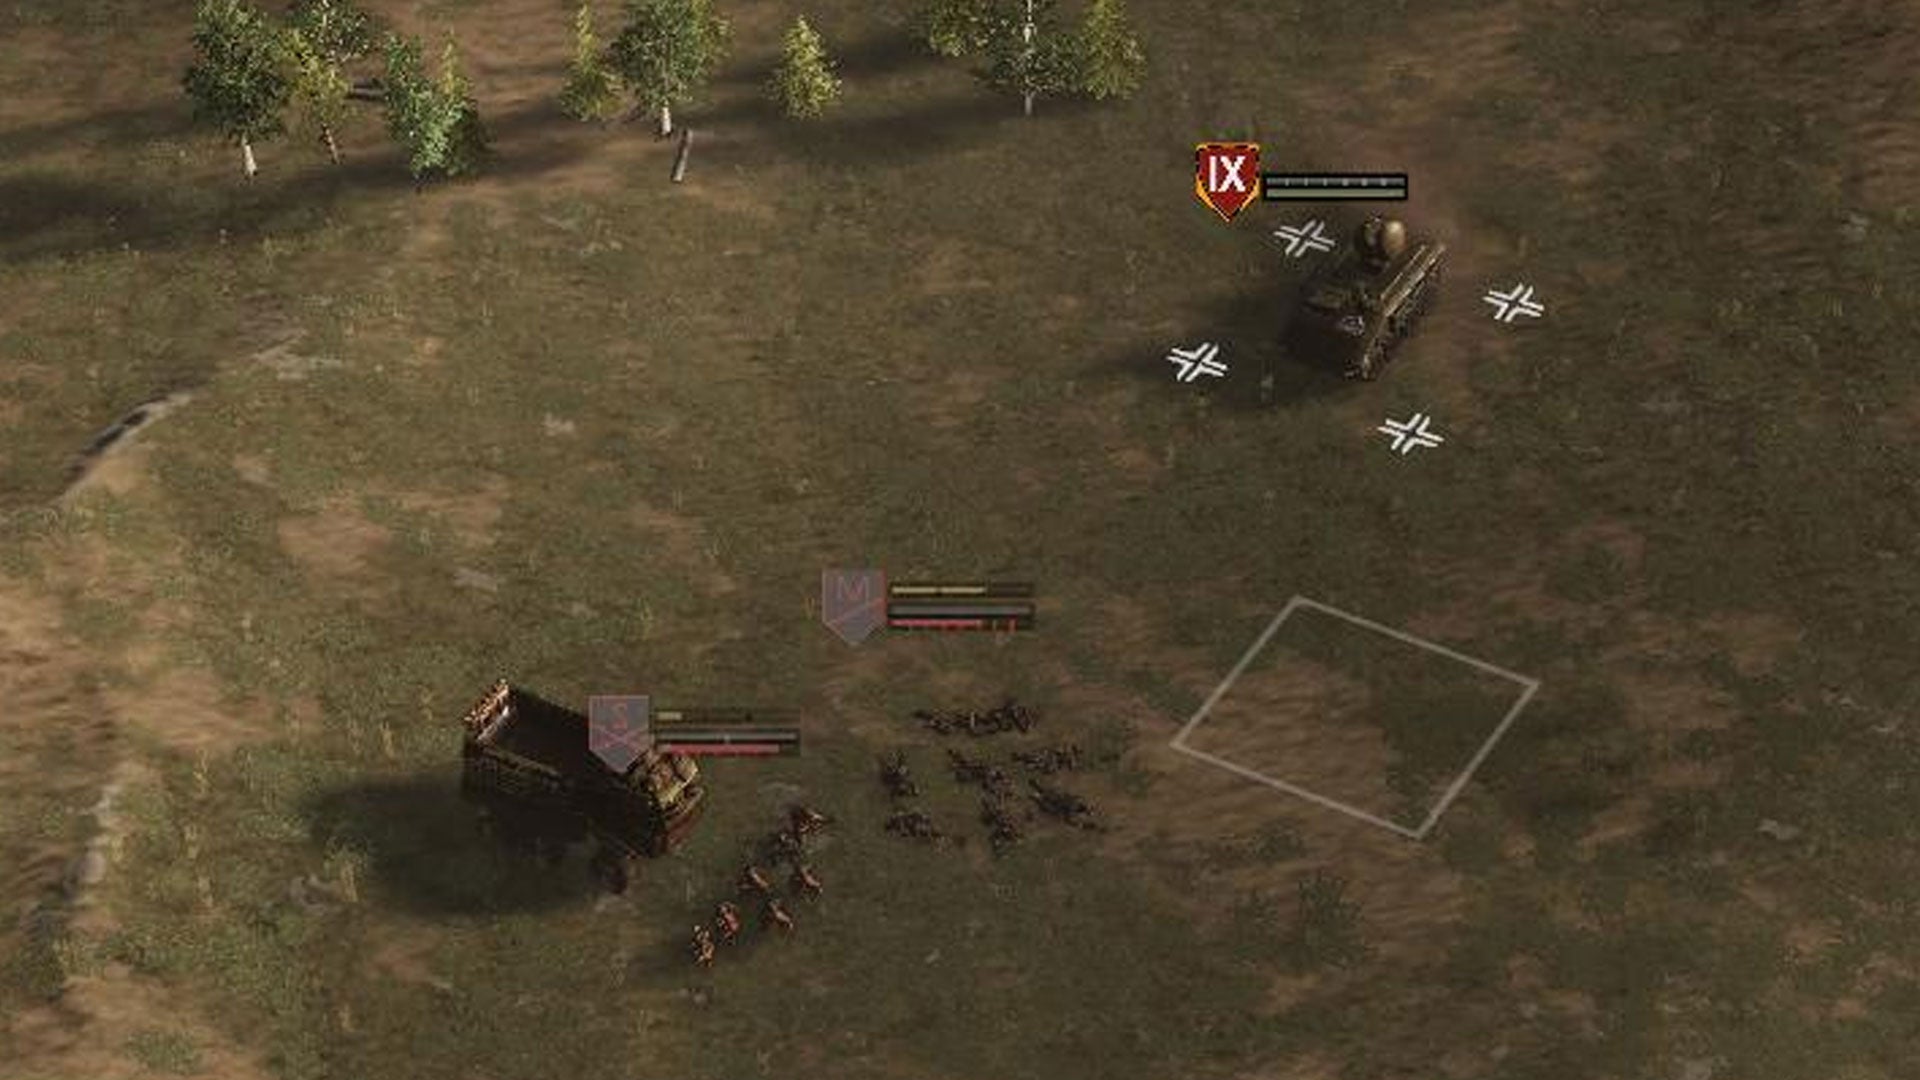
My mistake in the last mission – at least, one of them – was splitting my troops up and sending them after different objectives. I was aiming for speed but, on their own, they were easy to pin down. This time I’ll tackle the objectives one by one, moving my forces as a group.
When planning for the mission, you pick where to deploy your troops. The prep screen shows where the objectives are on the map, but without intelligence equipment installed on your ship, the TCRN Impetus, you don’t see any information about enemy troop numbers or placement. The prisoners are located in two townships in the centre of the map. The westernmost settlement is surrounded by forests, so I deploy my units in a cluster in the south. I’ll push north, using the forest as cover. Speed will be key, if I move quickly, maybe I can collect the first VIPs and move onto the second before the enemy organises a strong defence. It almost sounds like I know what I’m doing.
Between missions I’ve remembered one of the defining characteristics of an Armoured Personnel Carrier – that it can carry personnel… armoured-ly. I managed to go the whole of the last mission without once thinking to load my troops into the fast-moving protective vehicle. Gerry must have been watching Lim jog alongside his steel-plated taxi wondering if the squad leader had hit his head in the dropship.
Darby’s injuries mean she can only move a fraction of the distance of my other squads, so I load her into the back of Jerry’s meat wagon. I’d roar off into the woods immediately, but, as Gerry’s turn came up first, I had to skip his go. I can only imagine the awkward conversation in the back of that armoured cab. I later learn that Menace doesn’t have a rigid turn order: you can pick between characters that haven’t acted that turn by clicking on their portrait. With hindsight, this makes the awkward moment between Gerry and Darby even more palpable. It’s as though Gerry had paid for parking and refused to budge until he got his full hour.
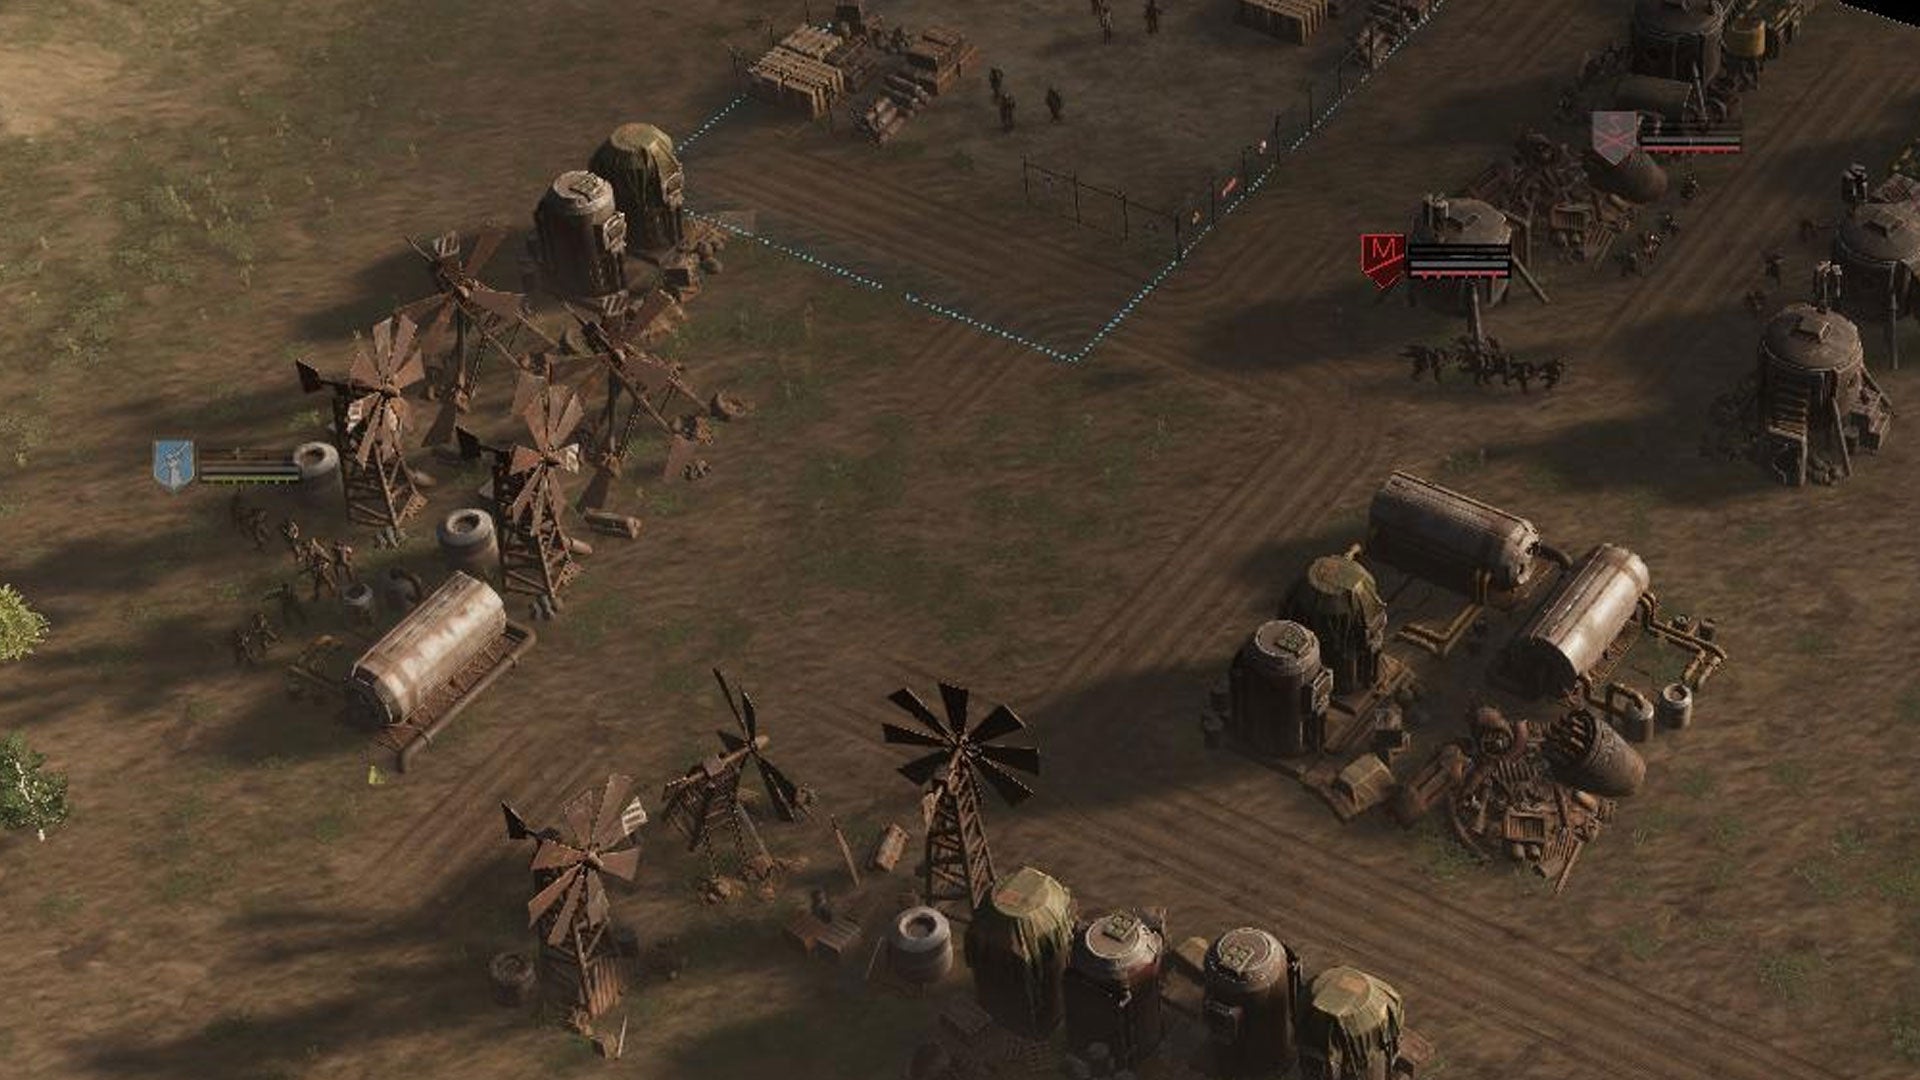
I send Tech and Lim ahead on foot, moving them into the trees. They can glimpse the settlement and the prisoners from their position. I’m not sure you would even call it a settlement, there’s a smattering of houses arranged in rows, a creaky windmill, and a yard surrounded by a chainlink fence where the prisoners are kept. There’s no sign of any pirates.
On their next turn, I move the Tech’s squad to the edge of the hamlet. I hold Lim back in the forest to see what happens. I’m hoping their positioning will make it easier to deter any flanking maneuvers. Gerry is finally able to kick his APC into gear and catch up with the others. His action points don’t quite take him all the way to the settlement but on his next turn, I want to pass Tech’s position, drop off Darby, and then carry on north to cover the infantry squads while they rescue the prisoners. I hope cousin Nige is watching. It’s shit like this that gets you an OBE.
I’ll look back on this moment and remember it as the last moment when everything was vaguely going to plan.
Cousin Nige is about to get quite the show |Image credit:Rock Paper Shotgun / Hooded Horse / Overhype Studios
As I end Gerry’s turn, the first pirates appear in the town. Taking up cover position among the row of houses, they immediately open fire on Tech. In cover himself, the pirates’ assault rifles don’t suppress his squad. But when Tech returns fire, neither does his salvo do much to worry the pirates. I order Lim out of the forest and into a spot south of the pirates. I use all his action points relocating, but from this angle, on his next turn Lim should be able to shoot into the enemies’ fleshy flanks. Operative word being ‘Should’ .
With the turn passing back to Gerry, he bombs the APC out of the forest and parks alongside the chain link fence, ready for Darby to disembark. After ending his turn, two more squads of pirates emerge from the fog of war and take up defensive positions alongside the first. Darby only has enough action points to get out the back of the vehicle before she needs to take a breather by the fence. She’ll have to wait out the rest of the turn in the open before I can send her through the fence to free the VIPs.
The pirates know a sitting duck when they see one. The first group fires on Darby, suppressing her immediately. Control passes back to Tech, but from his current spot his shots will do little. I order him further into the town to secure a better angle. Clocking his plan, the next two squads fire on Tech instead of Darby, this time suppressing him. I drive Gerry north to get him into position to flank the pirates on the next turn. Finally, control passes to Lim and his clear shot down the street where all the pirates have taken cover. A chance for the junior assault leader to make his mark. His squad fires and… it does nothing. The enemy is at the extreme end of their weapons’ range, so the Lim’s shots are about as effective as trying to throw a ping pong ball across the Channel. I just know cousin Nige’s is going to be telling everyone about this at the family Christmas.
It’s at this point I finally realise that I can choose which unit takes their turn first. The thing that stings is this important detail might actually make it into Menace’s otherwise useless tutorial. Darby is the most exposed so I make to move her into the paddock with the VIPs. Except, it turns out infantry can’t move through a chainlink fence. I don’t know why I assumed they could. But then am I the idiot for assuming heavily-armed space marines might take pliers with them on mission? From the pirates’ perspective, they saw a 20-tonne APC drive right up to the thin wall of the prison. Stop. Dump a squad of wounded troops into the firing line. Then speed away leaving them to be shot at. I order Darby behind some low cover, an effort that uses up all her action points.
I can kiss that OBE goodbye.
Likely drawn by the sound of pirate gunfire (and their cruel, mocking laughter), another group of bandits appears out of the fog of war to the East. They take up position in a tile of trees at Lim’s unprotected flank and begin firing. I had designs of turning Lim into a shock trooper, racing into battle to suppress and overwhelm the enemy. Look at him now, as he hides behind windmills and a pile of scrap. I imagine he’s whimpering.
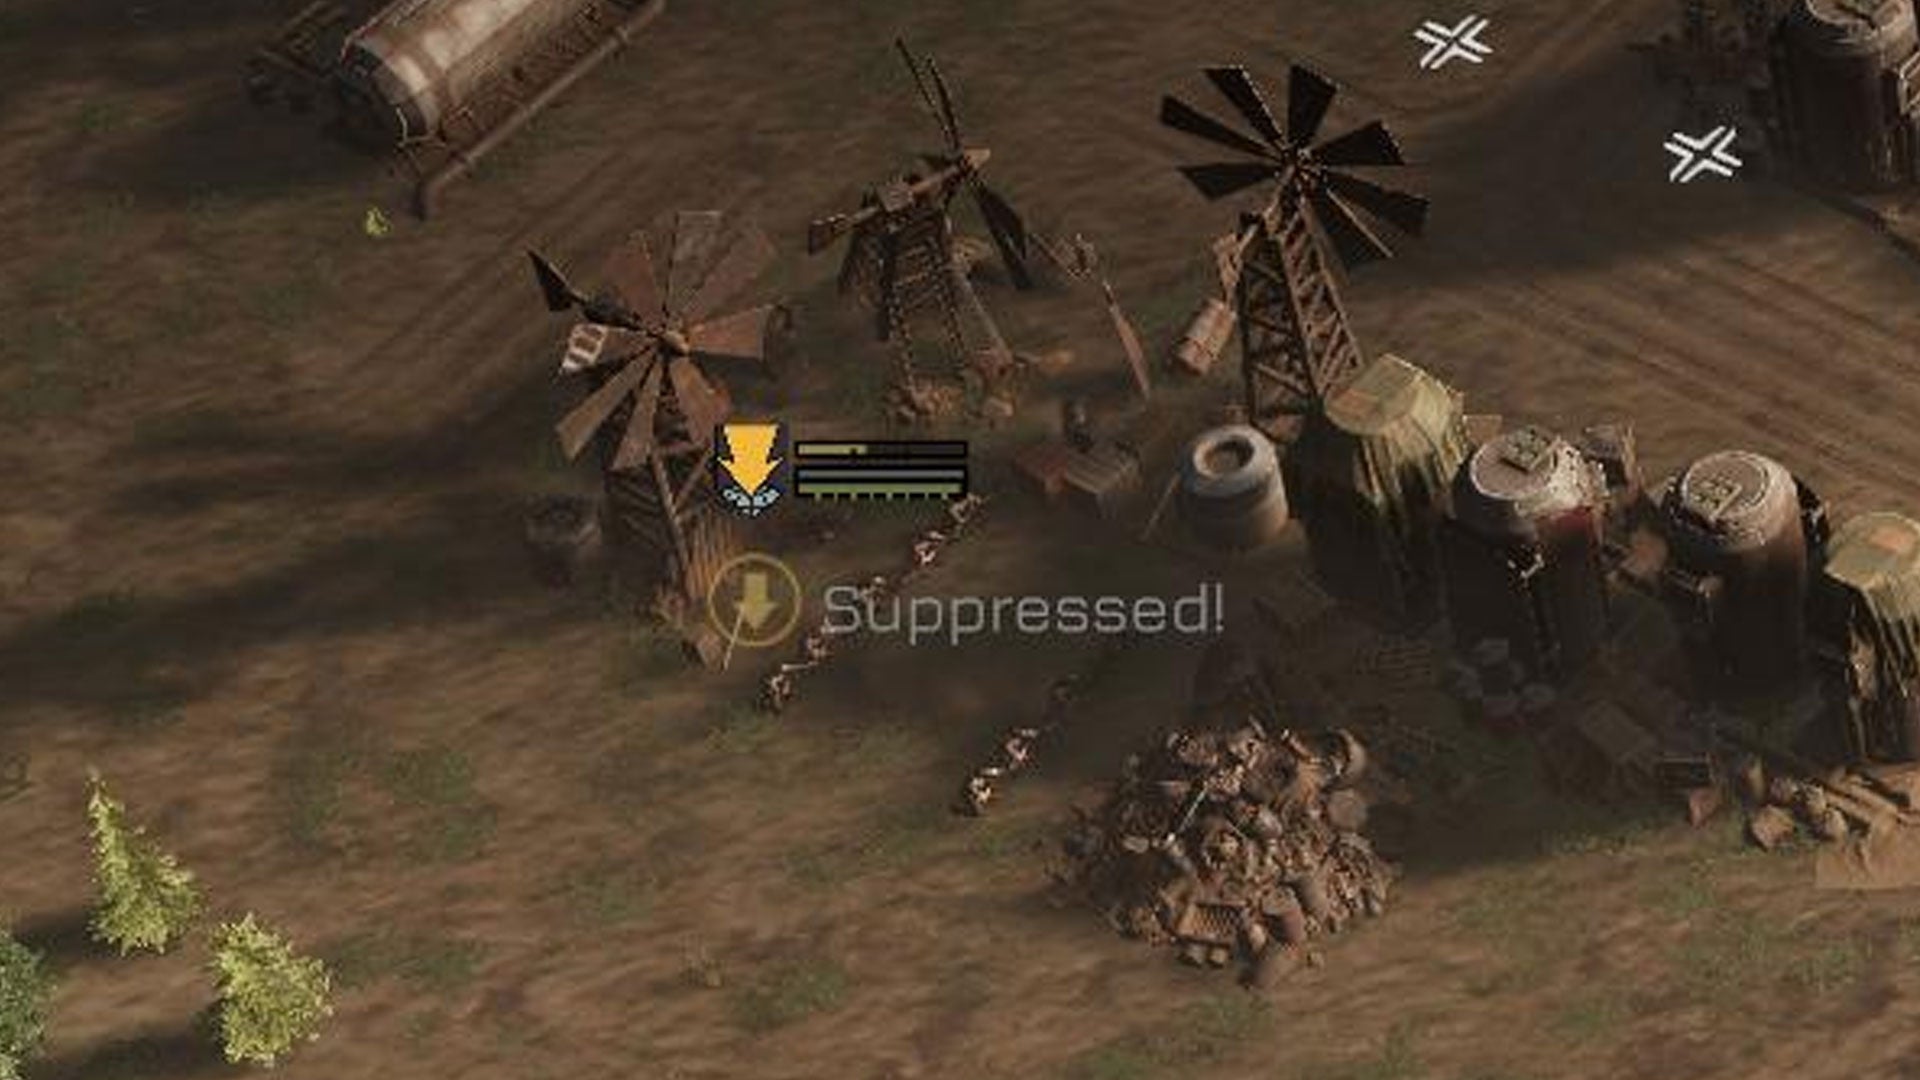
Image credit:Rock Paper Shotgun / Hooded Horse / Overhype Studios
As if things couldn’t get worse, on the hills behind me to the west, looking over where Darby’s just taken cover, another squad appears. I now have pirates on three sides of my infantry, all of whom are caught in the town with little cover. So much for moving quickly before the pirates can organise their defense.
Thank goodness Gerry’s still mobile. I complete his move to the north of the town where he now has clear sightlines down the street where the bulk of the pirates forces have taken up positions. I aim for the middle squad and open up with the APC’s machine gun, turning them into a chunky red mist.
Whether it was the sight of their comrades cut to shribbons or they’re still doubled over from laughing at the site of Darby’s dropoff, the pirates on either side are left suppressed and wavering. When they take their turns their shots all land wide of the mark. At least, Tech and Lim have gathered enough of their wits to finish off the bastards. There are still pirates massing to the west and on the hill to the east, but there’s no longer a threat in the town centre.
On Darby’s turn I move the wounded sniper out of the firing line of the pirates behind her. I sorely hope she is able to recover for the next mission. When wounded, squads in Menace are pretty useless. Not only are the reduced action points a killer, but even if Darby ever positions herself somewhere she can stay long enough to fire, her accuracy’s taken a real beating.
Onec again, Gerry saves the day |Image credit:Rock Paper Shotgun / Hooded Horse / Overhype Studios
Eliminating the pirates in the centre of town proves to be the tipping point in the battle. With Tech and Lim no longer under constant fire, their suppression counters expire and they can take out the pirates that were approaching from the east. Meanwhile, Gerry speeds up the hill to cause some mischief. Rather than use up his precious ammo, the APC simply runs over the troops instead.
With all three fronts cleared, I move Gerry and Lim over to the next town while Tech and Darby free the VIPs. I expect to meet some resistance but it appears I’ve killed every pirate on the map. That wasn’t one of the side objectives, mind, just a side effect of getting caught up in a firefight and not being able to disentangle myself.
As the last VIP makes it to safety and the mission comes to an end, I can’t help but think I’ve still not cracked how to play Menace well. I meant to move fast and remain mobile but I became bogged down. I was at least able to use my APC more effectively, but my infantry still aren’t making the mark they should. The key has to be suppression. Despite having three units in town, they struggled to defeat the much weaker pirate forces because they spent the entire time unable to shoot straight.
At least cousin Nige is safe and as a reward, he’s let me take all the bullet-riddled body armour from the dead pirates. One of them even had a rusty old LMG, so Tech can finally embrace his inner Rambo.
With only one mission left in Operation The Pirates Of Menzance, will I finally be able to play Menace well or will my hapless bumbling lead me to a well-deserved squad wipe?
Menace
PC
Rock Paper Shotgun is better when you sign in
Sign in and join us on our journey to discover strange and compelling PC games.

All 75 Arc Raiders Blueprints and where to get them
These areas have the highest chance of giving you Blueprints

Image credit:Rock Paper Shotgun/Embark Studios

Looking for more Arc Raiders Blueprints? It’s a special day when you find a Blueprint, as they’re among the most valuable items in Arc Raiders. If you find a Blueprint that you haven’t already found, then you must make sure you hold onto it at all costs, because Blueprints are the key to one of the most important and powerful systems of meta-progression in the game.
This guide aims to be the very best guide on Blueprints you can find, starting with a primer on what exactly they are and how they work in Arc Raiders, before delving into exactly where to get Blueprints and the very best farming spots for you to take in your search.
We’ll also go over how to get Blueprints from other unlikely activities, such as destroying Surveyors and completing specific quests. And you’ll also find the full list of all 75 Blueprints in Arc Raiders on this page (including the newest Blueprints added with the Cold Snap update , such as the Deadline Blueprint and Firework Box Blueprint), giving you all the information you need to expand your own crafting repertoire.
In this guide:
- What are Blueprints in Arc Raiders?
- Full Blueprint list: All crafting recipes
- Where to find Blueprints in Arc Raiders Blueprints obtained from quests Blueprints obtained from Trials Best Blueprint farming locations

What are Blueprints in Arc Raiders?
Blueprints in Arc Raiders are special items which, if you manage to extract with them, you can expend to permanently unlock a new crafting recipe in your Workshop. If you manage to extract from a raid with an Anvil Blueprint, for example, you can unlock the ability to craft your very own Anvil Pistol, as many times as you like (as long as you have the crafting materials).
To use a Blueprint, simply open your Inventory while in the lobby, then right-click on the Blueprint and click “Learn And Consume” . This will permanently unlock the recipe for that item in your Workshop. As of the Stella Montis update, there are allegedly 75 different Blueprints to unlock - although only 68 are confirmed to be in the game so far. You can see all the Blueprints you’ve found and unlocked by going to the Workshop menu, and hitting “R” to bring up the Blueprint screen.
It’s possible to find duplicates of past Blueprints you’ve already unlocked. If you find these, then you can either sell them, or - if you like to play with friends - you can take it into a match and gift it to your friend so they can unlock that recipe for themselves. Another option is to keep hold of them until the time comes to donate them to the Expedition.
Full Blueprint list: All crafting recipes
Below is the full list of all the Blueprints that are currently available to find in Arc Raiders, and the crafting recipe required for each item:
| Blueprint | Type | Recipe | Crafted At |
|---|---|---|---|
| Bettina | Weapon | 3x Advanced Mechanical Components 3x Heavy Gun Parts 3x Canister | Gunsmith 3 |
| Blue Light Stick | Quick Use | 3x Chemicals | Utility Station 1 |
| Aphelion | Weapon | 3x Magnetic Accelerator 3x Complex Gun Parts 1x Matriarch Reactor | Gunsmith 3 |
| Combat Mk. 3 (Flanking) | Augment | 2x Advanced Electrical Components 3x Processor | Gear Bench 3 |
| Combat Mk. 3 (Aggressive) | Augment | 2x Advanced Electrical Components 3x Processor | Gear Bench 3 |
| Complex Gun Parts | Material | 2x Light Gun Parts 2x Medium Gun Parts 2x Heavy Gun Parts | Refiner 3 |
| Fireworks Box | Quick Use | 1x Explosive Compound 3x Pop Trigger | Explosives Station 2 |
| Gas Mine | Mine | 4x Chemicals 2x Rubber Parts | Explosives Station 1 |
| Green Light Stick | Quick Use | 3x Chemicals | Utility Station 1 |
| Pulse Mine | Mine | 1x Crude Explosives 1x Wires | Explosives Station 1 |
| Seeker Grenade | Grenade | 1x Crude Explosives 2x ARC Alloy | Explosives Station 1 |
| Looting Mk. 3 (Survivor) | Augment | 2x Advanced Electrical Components 3x Processor | Gear Bench 3 |
| Angled Grip II | Mod | 2x Mechanical Components 3x Duct Tape | Gunsmith 2 |
| Angled Grip III | Mod | 2x Mod Components 5x Duct Tape | Gunsmith 3 |
| Hullcracker | Weapon | 1x Magnetic Accelerator 3x Heavy Gun Parts 1x Exodus Modules | Gunsmith 3 |
| Launcher Ammo | Ammo | 5x Metal Parts 1x Crude Explosives | Workbench 1 |
| Anvil | Weapon | 5x Mechanical Components 5x Simple Gun Parts | Gunsmith 2 |
| Anvil Splitter | Mod | 2x Mod Components 3x Processor | Gunsmith 3 |
| ??? | ??? | ??? | ??? |
| Barricade Kit | Quick Use | 1x Mechanical Components | Utility Station 2 |
| Blaze Grenade | Grenade | 1x Explosive Compound 2x Oil | Explosives Station 3 |
| Bobcat | Weapon | 3x Advanced Mechanical Components 3x Light Gun Parts | Gunsmith 3 |
| Osprey | Weapon | 2x Advanced Mechanical Components 3x Medium Gun Parts 7x Wires | Gunsmith 3 |
| Burletta | Weapon | 3x Mechanical Components 3x Simple Gun Parts | Gunsmith 1 |
| Compensator II | Mod | 2x Mechanical Components 4x Wires | Gunsmith 2 |
| Compensator III | Mod | 2x Mod Components 8x Wires | Gunsmith 3 |
| Defibrillator | Quick Use | 9x Plastic Parts 1x Moss | Medical Lab 2 |
| ??? | ??? | ??? | ??? |
| Equalizer | Weapon | 3x Magnetic Accelerator 3x Complex Gun Parts 1x Queen Reactor | Gunsmith 3 |
| Extended Barrel | Mod | 2x Mod Components 8x Wires | Gunsmith 3 |
| Extended Light Mag II | Mod | 2x Mechanical Components 3x Steel Spring | Gunsmith 2 |
| Extended Light Mag III | Mod | 2x Mod Components 5x Steel Spring | Gunsmith 3 |
| Extended Medium Mag II | Mod | 2x Mechanical Components 3x Steel Spring | Gunsmith 2 |
| Extended Medium Mag III | Mod | 2x Mod Components 5x Steel Spring | Gunsmith 3 |
| Extended Shotgun Mag II | Mod | 2x Mechanical Components 3x Steel Spring | Gunsmith 2 |
| Extended Shotgun Mag III | Mod | 2x Mod Components 5x Steel Spring | Gunsmith 3 |
| Remote Raider Flare | Quick Use | 2x Chemicals 4x Rubber Parts | Utility Station 1 |
| Heavy Gun Parts | Material | 4x Simple Gun Parts | Refiner 2 |
| Venator | Weapon | 2x Advanced Mechanical Components 3x Medium Gun Parts 5x Magnet | Gunsmith 3 |
| Il Toro | Weapon | 5x Mechanical Components 6x Simple Gun Parts | Gunsmith 1 |
| Jolt Mine | Mine | 1x Electrical Components 1x Battery | Explosives Station 2 |
| Explosive Mine | Mine | 1x Explosive Compound 1x Sensors | Explosives Station 3 |
| Jupiter | Weapon | 3x Magnetic Accelerator 3x Complex Gun Parts 1x Queen Reactor | Gunsmith 3 |
| Light Gun Parts | Material | 4x Simple Gun Parts | Refiner 2 |
| Lightweight Stock | Mod | 2x Mod Components 5x Duct Tape | Gunsmith 3 |
| Lure Grenade | Grenade | 1x Speaker Component 1x Electrical Components | Utility Station 2 |
| Medium Gun Parts | Material | 4x Simple Gun Parts | Refiner 2 |
| Torrente | Weapon | 2x Advanced Mechanical Components 3x Medium Gun Parts 6x Steel Spring | Gunsmith 3 |
| Muzzle Brake II | Mod | 2x Mechanical Components 4x Wires | Gunsmith 2 |
| Muzzle Brake III | Mod | 2x Mod Components 8x Wires | Gunsmith 3 |
| Padded Stock | Mod | 2x Mod Components 5x Duct Tape | Gunsmith 3 |
| Shotgun Choke II | Mod | 2x Mechanical Components 4x Wires | Gunsmith 2 |
| Shotgun Choke III | Mod | 2x Mod Components 8x Wires | Gunsmith 3 |
| Shotgun Silencer | Mod | 2x Mod Components 8x Wires | Gunsmith 3 |
| Showstopper | Grenade | 1x Advanced Electrical Components 1x Voltage Converter | Explosives Station 3 |
| Silencer I | Mod | 2x Mechanical Components 4x Wires | Gunsmith 2 |
| Silencer II | Mod | 2x Mod Components 8x Wires | Gunsmith 3 |
| Snap Hook | Quick Use | 2x Power Rod 3x Rope 1x Exodus Modules | Utility Station 3 |
| Stable Stock II | Mod | 2x Mechanical Components 3x Duct Tape | Gunsmith 2 |
| Stable Stock III | Mod | 2x Mod Components 5x Duct Tape | Gunsmith 3 |
| Tagging Grenade | Grenade | 1x Electrical Components 1x Sensors | Utility Station 3 |
| Tempest | Weapon | 3x Advanced Mechanical Components 3x Medium Gun Parts 3x Canister | Gunsmith 3 |
| Trigger Nade | Grenade | 2x Crude Explosives 1x Processor | Explosives Station 2 |
| Vertical Grip II | Mod | 2x Mechanical Components 3x Duct Tape | Gunsmith 2 |
| Vertical Grip III | Mod | 2x Mod Components 5x Duct Tape | Gunsmith 3 |
| Vita Shot | Quick Use | 2x Antiseptic 1x Syringe | Medical Lab 3 |
| Vita Spray | Quick Use | 3x Antiseptic 1x Canister | Medical Lab 3 |
| Vulcano | Weapon | 1x Magnetic Accelerator 3x Heavy Gun Parts 1x Exodus Modules | Gunsmith 3 |
| Wolfpack | Grenade | 2x Explosive Compound 2x Sensors | Explosives Station 3 |
| Red Light Stick | Quick Use | 3x Chemicals | Utility Station 1 |
| Smoke Grenade | Grenade | 14x Chemicals 1x Canister | Utility Station 2 |
| Deadline | Mine | 3x Explosive Compound 2x ARC Circuitry | Explosives Station 3 |
| Trailblazer | Grenade | 1x Explosive Compound 1x Synthesized Fuel | Explosives Station 3 |
| Tactical Mk. 3 (Defensive) | Augment | 2x Advanced Electrical Components 3x Processor | Gear Bench 3 |
| Tactical Mk. 3 (Healing) | Augment | 2x Advanced Electrical Components 3x Processor | Gear Bench 3 |
| Yellow Light Stick | Quick Use | 3x Chemicals | Utility Station 1 |
Note: The missing Blueprints in this list likely have not actually been added to the game at the time of writing, because none of the playerbase has managed to find any of them. As they are added to the game, I will update this page with the most relevant information so you know exactly how to get all 75 Arc Raiders Blueprints.
Where to find Blueprints in Arc Raiders
Below is a list of all containers, modifiers, and events which maximise your chances of finding Blueprints:
- Certain quests reward you with specific Blueprints .
- Completing Trials has a high chance of offering Blueprints as rewards.
- Surveyors have a decent chance of dropping Blueprints on death.
- High loot value areas tend to have a greater chance of spawning Blueprints.
- Night Raids and Storms may increase rare Blueprint spawn chances in containers.
- Containers with higher numbers of items may have a higher tendency to spawn Blueprints. As a result, Blue Gate (which has many “large” containers containing multiple items) may give you a higher chance of spawning Blueprints.
- Raider containers (Raider Caches, Weapon Boxes, Medical Bags, Grenade Tubes) have increased Blueprint drop rates. As a result, the Uncovered Caches event gives you a high chance of finding Blueprints.
- Security Lockers have a higher than average chance of containing Blueprints.
- Certain Blueprints only seem to spawn under specific circumstances: Tempest Blueprint only spawns during Night Raid events. Vulcano Blueprint only spawns during Hidden Bunker events. Jupiter and Equaliser Blueprints only spawn during Harvester events.

Raider Caches, Weapon Boxes, and other raider-oriented container types have a good chance of offering Blueprints. |Image credit:Rock Paper Shotgun/Embark Studios
Blueprints have a very low chance of spawning in any container in Arc Raiders, around 1-2% on average. However, there is a higher chance of finding Blueprints in particular container types. Specifically, you can find more Blueprints in Raider containers and security lockers.
Beyond this, if you’re looking for Blueprints you should focus on regions of the map which are marked as having particularly high-value loot. Areas such as the Control Tower in Dam Battlegrounds, the Arrival and Departure Buildings in Spaceport, and Pilgrim’s Peak in Blue Gate all have a better-than-average chance of spawning Blueprints somewhere amongst all their containers. Night Raids and Electromagnetic Storm events also increase the drop chances of certain Blueprints .
In addition to these containers, you can often loot Blueprints from destroyed Surveyors - the largest of the rolling ball ARC. Surveyors are more commonly found on the later maps - Spaceport and Blue Gate - and if one spawns in your match, you’ll likely see it by the blue laser beam that it casts into the sky while “surveying”.
Surveyors are quite well-armoured and will very speedily run away from you once it notices you, but if you can take one down then make sure you loot all its parts for a chance of obtaining certain unusual Blueprints.
Blueprints obtained from quests
One way in which you can get Blueprints is by completing certain quests for the vendors in Speranza. Some quests will reward you with a specific item Blueprint upon completion, so as long as you work through all the quests in Arc Raiders, you are guaranteed those Blueprints.
Here is the full list of all Blueprints you can get from quest rewards:
- Trigger Nade Blueprint: Rewarded after completing “Sparks Fly”.
- Lure Grenade Blueprint: Rewarded after completing “Greasing Her Palms”.
- Burletta Blueprint: Rewarded after completing “Industrial Espionage”.
- Hullcracker Blueprint (and Launcher Ammo Blueprint): Rewarded after completing “The Major’s Footlocker”.
Alas, that’s only 4 Blueprints out of a total of 75 to unlock, so for the vast majority you will need to find them yourself during a raid. If you’re intent on farming Blueprints, then it’s best to equip yourself with cheap gear in case you lose it, but don’t use a free loadout because then you won’t get a safe pocket to stash any new Blueprint you find. No pain in Arc Raiders is sharper than failing to extract with a new Blueprint you’ve been after for a dozen hours already.

One of the best ways to get Blueprints is by hitting three stars on all five Trials every week. |Image credit:Rock Paper Shotgun/Embark Studios
Blueprints obtained from Trials
One of the very best ways to get Blueprints is as rewards for completing Trials in Arc Raiders. Trials are unlocked from Level 15 onwards, and allow you to earn rewards by focusing on certain tasks over the course of several raids. For example, one Trial might task you with dealing damage to Hornets, while another might challenge you to loot Supply Drops.
Trials refresh on a weekly basis, with a new week bringing five new Trials. Each Trial can offer up to three rewards after passing certain score milestones, and it’s possible to receive very high level loot from these reward crates - including Blueprints. So if you want to unlock as many Blueprints as possible, you should make a point of completing as many Trials as possible each week.
Best Blueprint farming locations
The very best way to get Blueprints is to frequent specific areas of the maps which combine high-tier loot pools with the right types of containers to search. Here are my recommendations for where to find Blueprints on every map, so you can always keep the search going for new crafting recipes to unlock.

Image credit:Rock Paper Shotgun/Embark Studios
Dam Battlegrounds
The best places to farm Blueprints on Dam Battlegrounds are the Control Tower, Power Generation Complex, Ruby Residence, and Pale Apartments . The first two regions, despite only being marked on the map as mid-tier loot, contain a phenomenal number of containers to loot. The Control Tower can also contain a couple of high-tier Security Lockers - though of course, you’ll need to have unlocked the Security Breach skill at the end of the Survival tree.
There’s also a lot of reporting amongst the playerbase that the Residential areas in the top-left of the map - Pale Apartments and Ruby Residence - give you a comparatively strong chance of finding Blueprints. Considering their size, there’s a high density of containers to loot in both locations, and they also have the benefit of being fairly out of the way. So you’re more likely to have all the containers to yourself.
Buried City
The best Blueprint farming locations on Buried City are the Santa Maria Houses, Grandioso Apartments, Town Hall, and the various buildings of the New District . Grandioso Apartments has a lower number of containers than the rest, but a high chance of spawning weapon cases - which have good Blueprint drop rates. The others are high-tier loot areas, with plenty of lootable containers - including Security Lockers.
Spaceport
The best places to find Blueprints on Spaceport are the Arrival and Departure Buildings, as well as Control Tower A6 and the Launch Towers . All these areas are labelled as high-value loot regions, and many of them are also very handily connected to one another by the Spaceport wall, which you can use to quickly run from one area to the next. At the tops of most of these buildings you’ll find at least one Security Locker, so this is an excellent farming route for players looking to find Blueprints.
The downside to looting Blueprints on Spaceport is that all these areas are hotly contested, particularly in Duos and Squads. You’ll need to be very focused and fast in order to complete the full farming route.

Image credit:Rock Paper Shotgun/Embark Studios
Blue Gate
Blue Gate tends to have a good chance of dropping Blueprints, potentially because it generally has a high number of containers which can hold lots of items; so there’s a higher chance of a Blueprint spawning in each container. In my experience, the best Blueprint farming spots on Blue Gate are Pilgrim’s Peak, Raider’s Refuge, the Ancient Fort, and the Underground Complex beneath the Warehouse .
All of these areas contain a wealth of containers to loot. Raider’s Refuge has less to loot, but the majority of the containers in and around the Refuge are raider containers, which have a high chance of containing Blueprints - particularly during major events.
Stella Montis
On the whole, Stella Montis seems to have a very low drop rate for Blueprints (though a high chance of dropping other high-tier loot). If you do want to try farming Blueprints on this map, the best places to find Blueprints in Stella Montis are Medical Research, Assembly Workshop, and the Business Center . These areas have the highest density of containers to loot on the map.
In addition to this, the Western Tunnel has a few different Security Lockers to loot, so while there’s very little to loot elsewhere in this area of the map, it’s worth hitting those Security Lockers if you spawn there at the start of a match.
That wraps up this primer on how to get all the Blueprints in Arc Raiders as quickly as possible. With the Expedition system constantly resetting a large number of players’ Blueprints, it’s more important than ever to have the most up-to-date information on where to find all these Blueprints.
While you’re here, be sure to check out our Arc Raiders best guns tier list , as well as our primers on the best skills to unlock and all the different Field Depot locations on every map.

ARC Raiders
PS5 , Xbox Series X/S , PC
Rock Paper Shotgun is better when you sign in
Sign in and join us on our journey to discover strange and compelling PC games.
