Hollow Knight Silksong walkthrough: Part 9 (Shellwood)
Here’s how to follow the ideal path through the mysterious Shellwood

Image credit:Rock Paper Shotgun/Team Cherry

Looking for a walkthrough for the region of Shellwood in Hollow Knight: Silksong? The entire reason for making your way through the Wormways in the previous part of our walkthrough was so we could reach the Shellwood - home to hidden creatures galore, as well as a frightful new boss, and a brand new and game-changing movement skill.
In Part 9 of our Silksong walkthrough , we’ll guide you down the optimal route through Shellwood, pointing out key locations such as Mask Shards, and all the Pollip Hearts you need to complete the mysterious Greyroot’s quest!
Want the walkthrough for a different area of the game? Check out our Hollow Knight: Silksong walkthrough hub!
Shellwood walkthrough steps:
- Defeat the Covetous Pilgrim.
- Find Shakra for the Shellwood map.
- Rest at the Bellhart Bench.
- Survive the Gauntlet to the north.
- Find Greyroot and accept their quest.
- Pollip Heart #1.
- Rescue the Flea amongst the white flowers.
- Collect the Mask Shard.
- Unlock the Bellway.
- Pollip Heart #2.
- Ride the elevator down and rest.
- Defeat Sister Splinter.
- Pollip Heart #3.
- Obtain the Cling Grip skill.
- Pollip Heart #4.
- Pollip Heart #5.
- Obtain the Longpin behind the Wasp Nest.
- Unlock the Bench west of the Bellway.
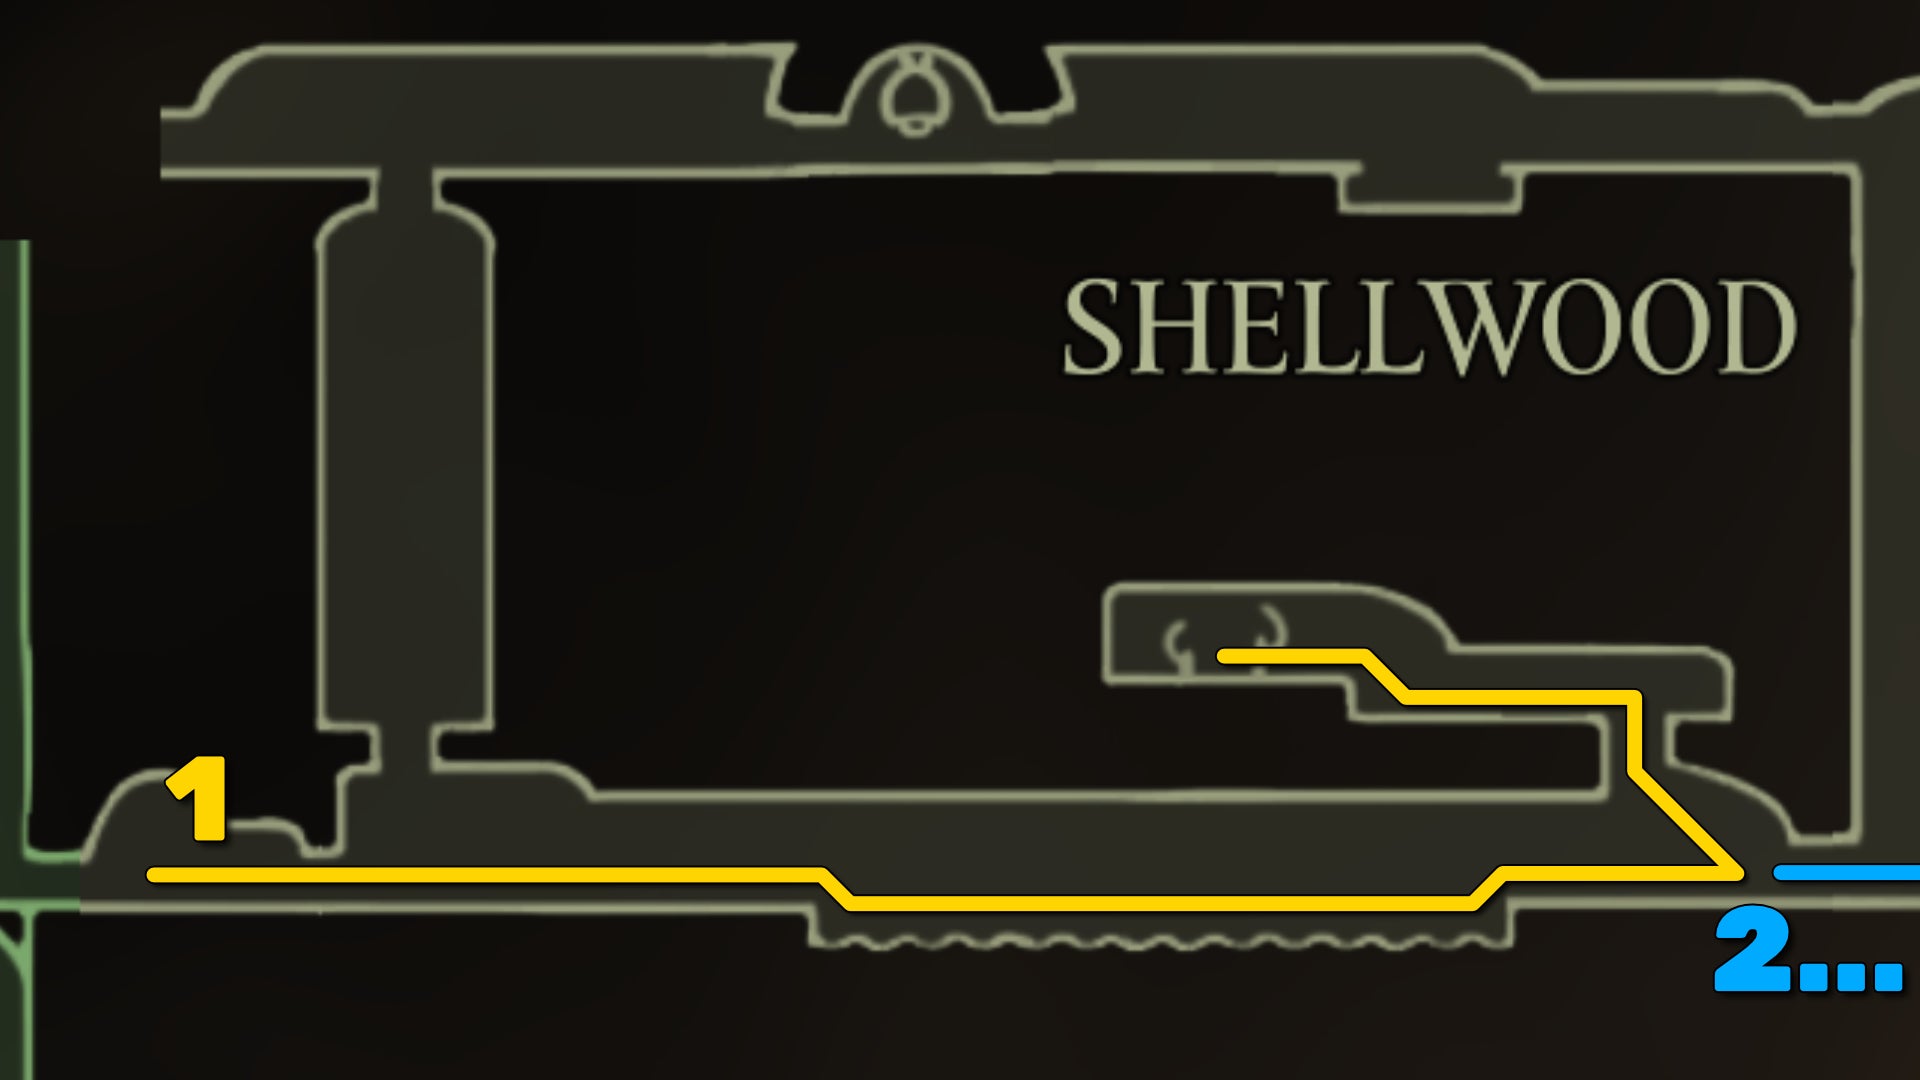
Image credit:Rock Paper Shotgun/Team Cherry
1. Defeat the Covetous Pilgrim.

No, it’s not just you; these flying Pondcatchers are indeed a pain in the ass. |Image credit:Rock Paper Shotgun/Team Cherry
From the Bench you last rested at, head right, into Shellwood itself. Make your way to the end of the room, paying care not to underestimate the flying Pondcatcher enemies. There’s an element of slight randomness to the angle in which they throw their spears when they target you, so they can easily hit you despite your attempts to evade.
Once you reach the end of the room, use the hanging platforms to reach the room above you. Here you can read an inscribed tablet for some lore, before jumping up the ledge to face a large Covetous Pilgrim.

Image credit:Rock Paper Shotgun/Team Cherry
This big beefy Pilgrim uses a string of Rosaries as a whip. It has a surprising range, and deals double damage per hit, so take your time and make liberal use of ranged tool attacks to take it down safely. It’ll burst into Rosaries when it does, so hoover all of them up before returning to the ground level of the first room again.

Image credit:Rock Paper Shotgun/Team Cherry
2. Find Shakra for the Shellwood map.
The next step is to procure the Shellwood map from Shakra, who is mercifully easy to find this time around. Head into the next room to your right, and run along the ground level all the way into the room beyond. You can Pogo off the white plants in this region, so employ this tactic to reach the centre of the room where Shakra is waiting.

Image credit:Rock Paper Shotgun/Team Cherry
Buy the Shellwood map from her for 70x Rosaries.
3. Rest at the Bellhart Bench.

Image credit:Rock Paper Shotgun/Team Cherry
Continue right into the next room, and again make your way along the ground level of the room, ignoring anything going on above you for now. Stand on the pressure plate at the end of the room to unlock the door leading further east.
Then, once again, head right along ground level, through the door, and past the bell-littered corridor beyond. As you enter the next room, you’ll be treated to a rather disturbing cinematic, welcoming you to the haunted town of Bellhart.

Something’s very, very not right here… But we’ll sort it out later. |Image credit:Rock Paper Shotgun/Team Cherry
We’re not staying here. Once the cutscene ends, rest at the Bench right next to you, and then go back the way you came, through the corridor and into Shellwood again.
4. Survive the Gauntlet to the north.
Now it’s finally time to start exploring upwards. Go back to the left-hand side of the room, and climb up the platforms above you. They’ll lead you up, to the left, and then back around to the right. Keep an eye out for grey shells in the floors and ceilings; these are Shellwood Gnats - low danger, but they can still give you a point of damage if you’re not careful.

Make sure you kill the Gnats “twice”. |Image credit:Rock Paper Shotgun/Team Cherry
Once you reach the point where you can’t go higher, drop down a couple of ledges (and hit that silver bell hanging off the nearby platform for some Shell Shards). A little further down you can loot a Frayed Rosary String from a Pilgrim’s body. Then keep heading across the platforms to the right and you’ll find your way up to the exit in the top-left corner.

Image credit:Rock Paper Shotgun/Team Cherry
Drop down the hole in the next room and you’ll land inside another gauntlet arena, where you must survive several waves of Shellwood enemies. Among them are a tricky new class of enemy - Splinters. These stick insects are fast-moving and dangerous, so you should try to keep your distance and employ hit-and-run tactics to keep yourself safe from them.

Image credit:Rock Paper Shotgun/Team Cherry
5. Find Greyroot and accept their quest.
Once the gauntlet is cleared of enemies, head up the passage to your left, and pay 60 Rosaries to unlock the Bench above you so you can rest.

Image credit:Rock Paper Shotgun/Team Cherry
Then exit out the left doorway, and activate the elevator cage, riding it down to the bottom of one of the rooms you skirted through earlier. Climb on top of the elevator once you’re at the bottom, and use the ledge above to jump over to the left-hand side.
Continue climbing the platforms up the left side of the room, and you’ll find an exit on the left which leads to a little cave, with a building of white light at the end.

Image credit:Rock Paper Shotgun/Team Cherry
Enter the building, and you’ll find Greyroot - a new NPC of unknown origin, who gives you a quest to track down 6 Pollip Hearts from within Shellwood. These Pollip Hearts are extracted from the giant purple flowers strewn about the region. As we continue with the walkthrough, I’ll highlight their locations so you can collect them all.
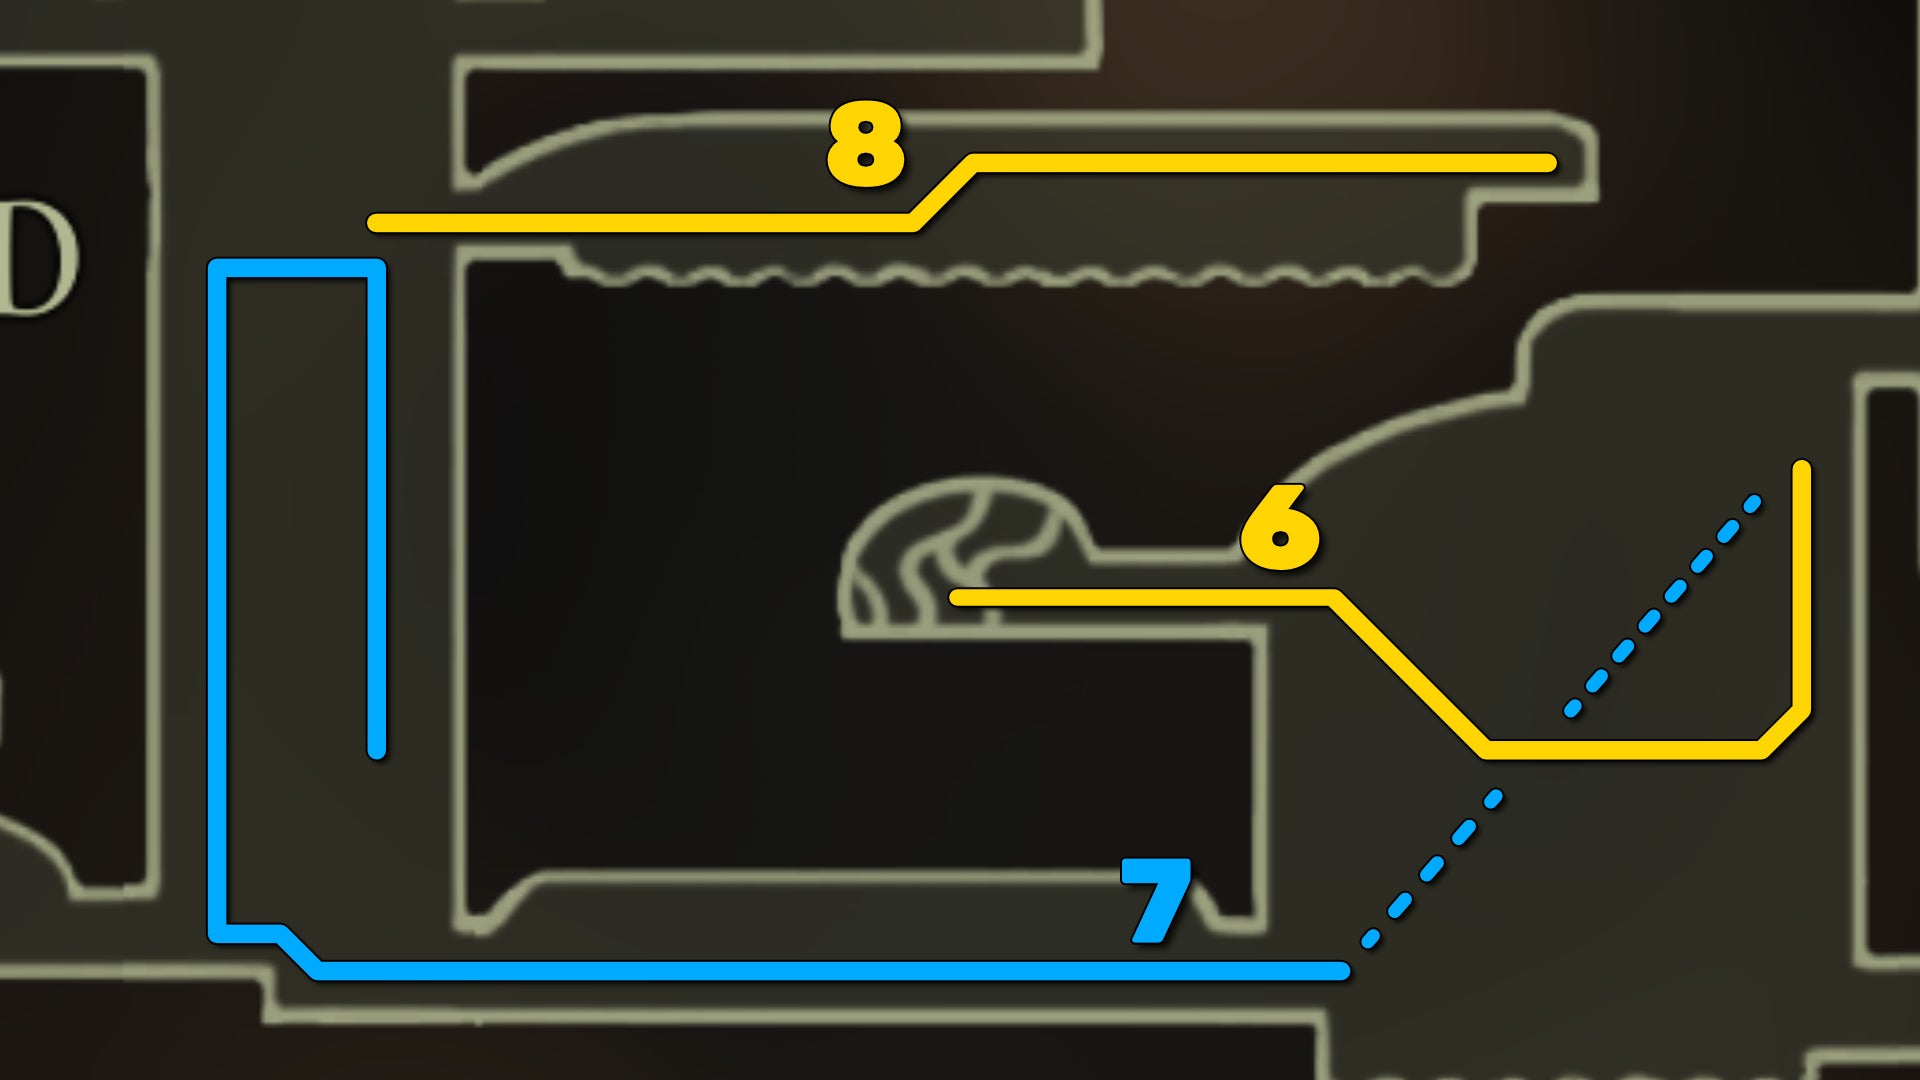
Image credit:Rock Paper Shotgun/Team Cherry
6. Pollip Heart #1.
The first Pollip Heart is very close by. Head back out into the main room and make your way to the centre of the room, where you’ll see a Gnat floating around above a central platform.
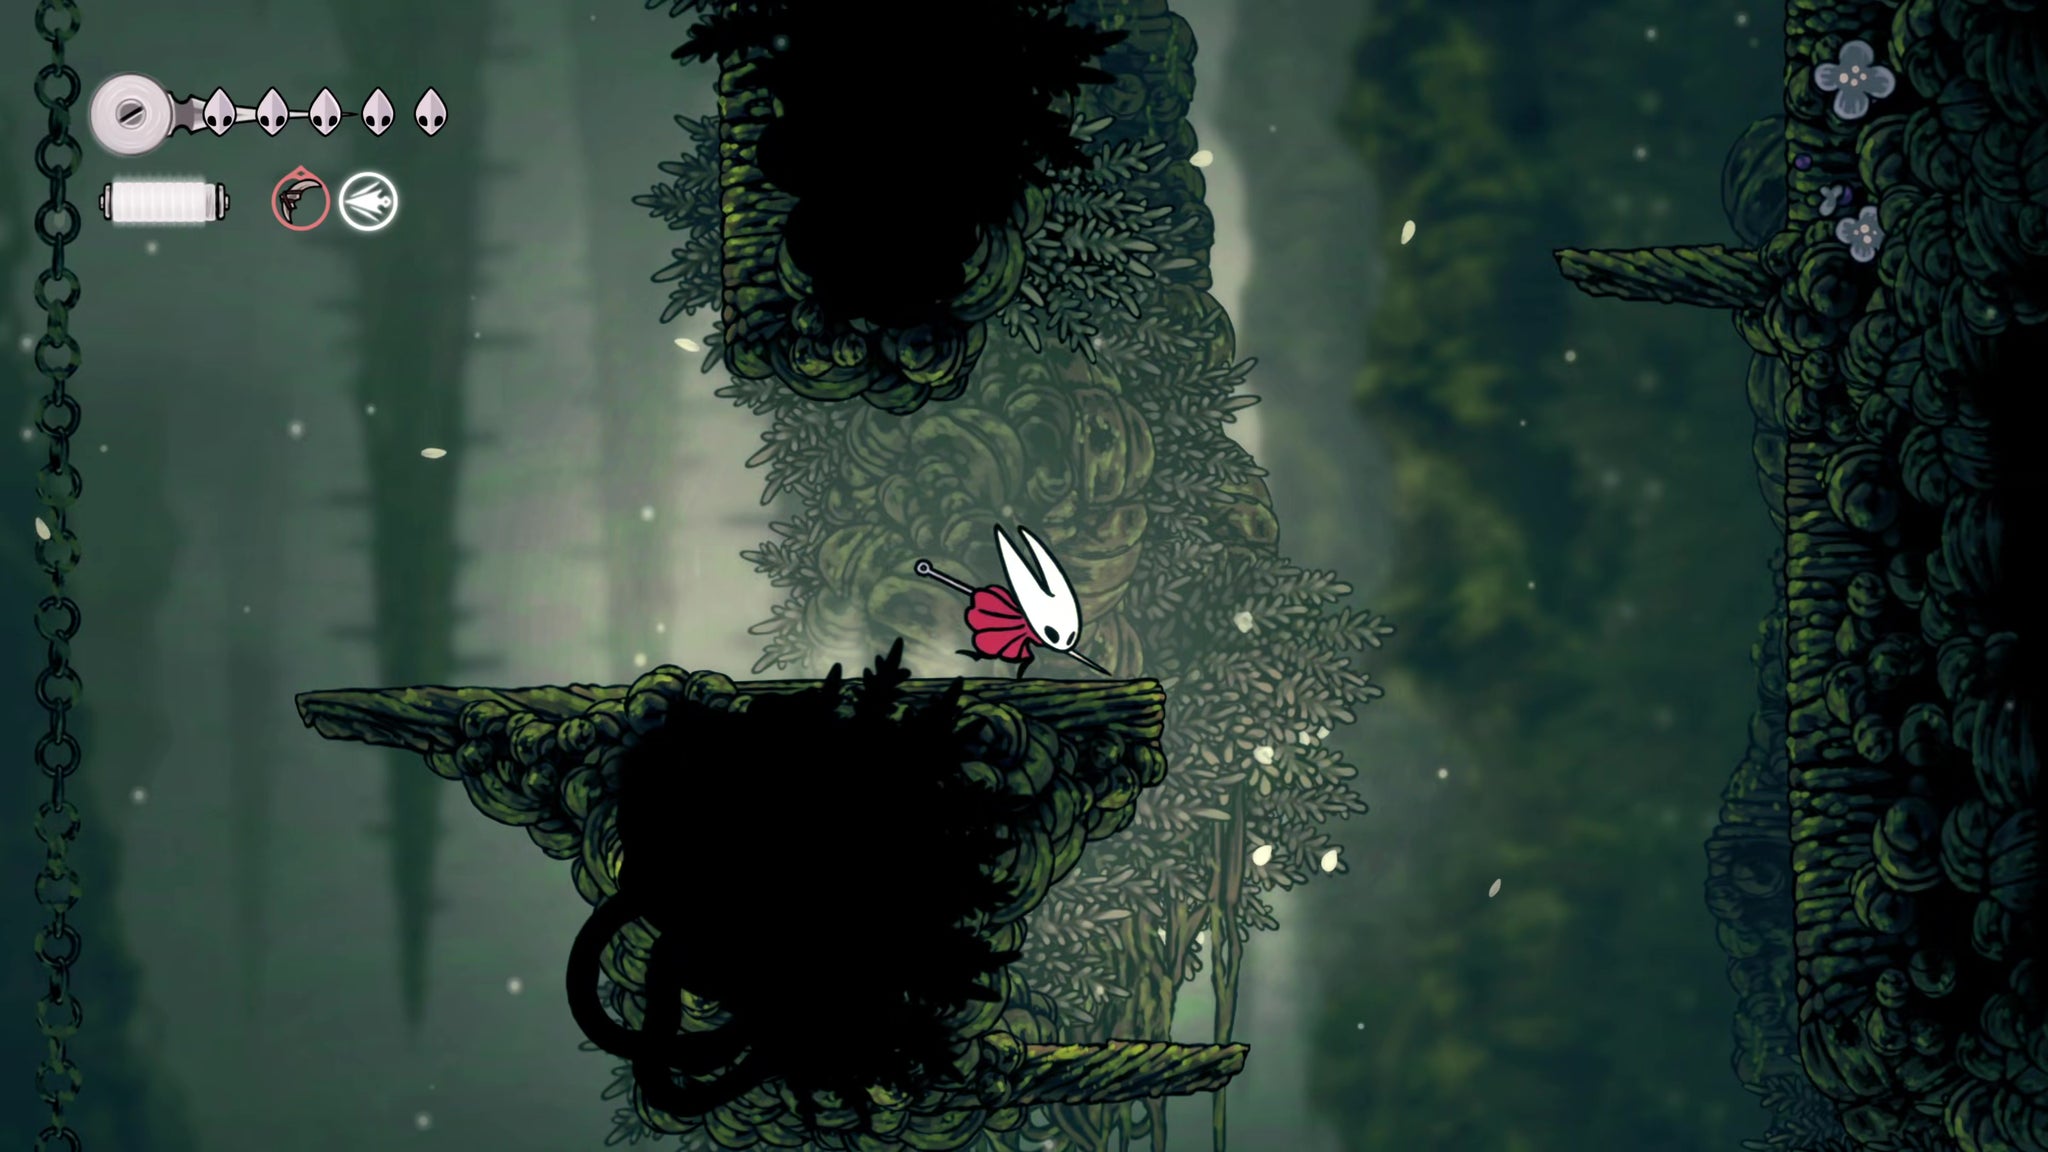
Image credit:Rock Paper Shotgun/Team Cherry

Image credit:Rock Paper Shotgun/Team Cherry
Go to the right side of this platform and use the ledges above you to climb upwards. Kill the nasty little purple Wood Wasps up there, and attack the purple flower to gain your first Pollip Heart.
7. Rescue the Flea amongst the white flowers.
Drop down to the bottom of the room and head left, past the next two rooms until you arrive at the large vertical shaft. Use the white flowers on the left side to Pogo your way up, and watch out for the flowers which turn into Phacia enemies as you draw near.

Image credit:Rock Paper Shotgun/Team Cherry
Once you’re on the middle ledge, carefully drop down the right-hand side. On this side, you’ll have to contend with Pollenicas - wall flowers which spit globules of yellow badness at you. At the bottom is a bed of spikes, and just above that, a Flea is trapped in a vine wall, opposite another Pollenica. Kill the Pollenica and free the Flea before climbing back up.

Image credit:Rock Paper Shotgun/Team Cherry
8. Collect the Mask Shard.
Once you’re back on the central ledge, jump across to the exit on the right. Pogo across the next room and hack away the vines on the right to reveal the path further on. Keep parkouring to the very end of the path, where you’ll find a Mask Shard.

Image credit:Rock Paper Shotgun/Team Cherry
On your way back several Phacias will spawn, so take your time and make liberal use of your Silkspear skill and ranged tools to take them out safely.
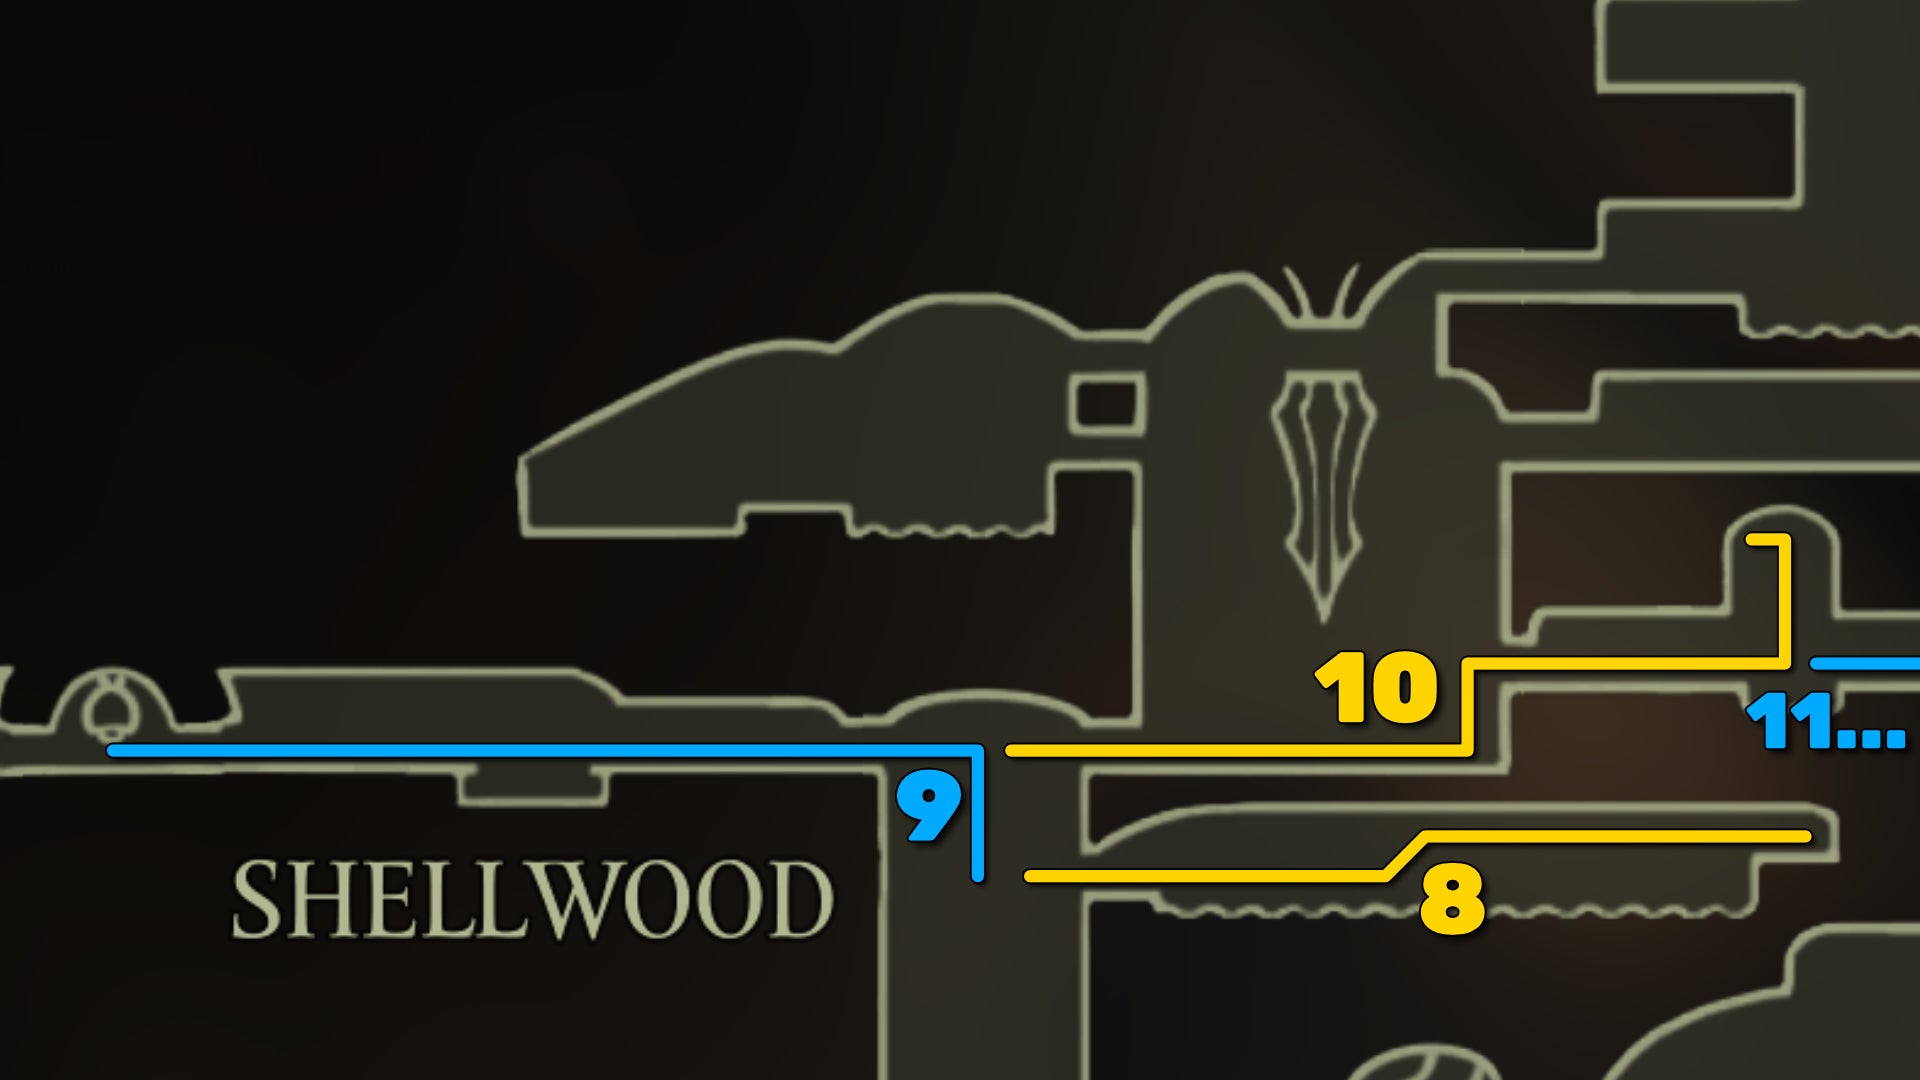
Image credit:Rock Paper Shotgun/Team Cherry
9. Unlock the Bellway.
Back in the vertical shaft, climb all the way to the top and take the exit on your left. Here you’ll be able to pay 60 Rosaries to unlock the Shellwood Bellway.

Image credit:Rock Paper Shotgun/Team Cherry
Note that there’s a locked door on the left side of the Bellway; you’ll be able to reach the other side of it and unlock it in the final step of this part of our walkthrough.
10. Pollip Heart #2.
Head back into the main shaft and through to the room opposite the Bellway. At the far end is a group of ledges you can use to climb upwards to the next room.
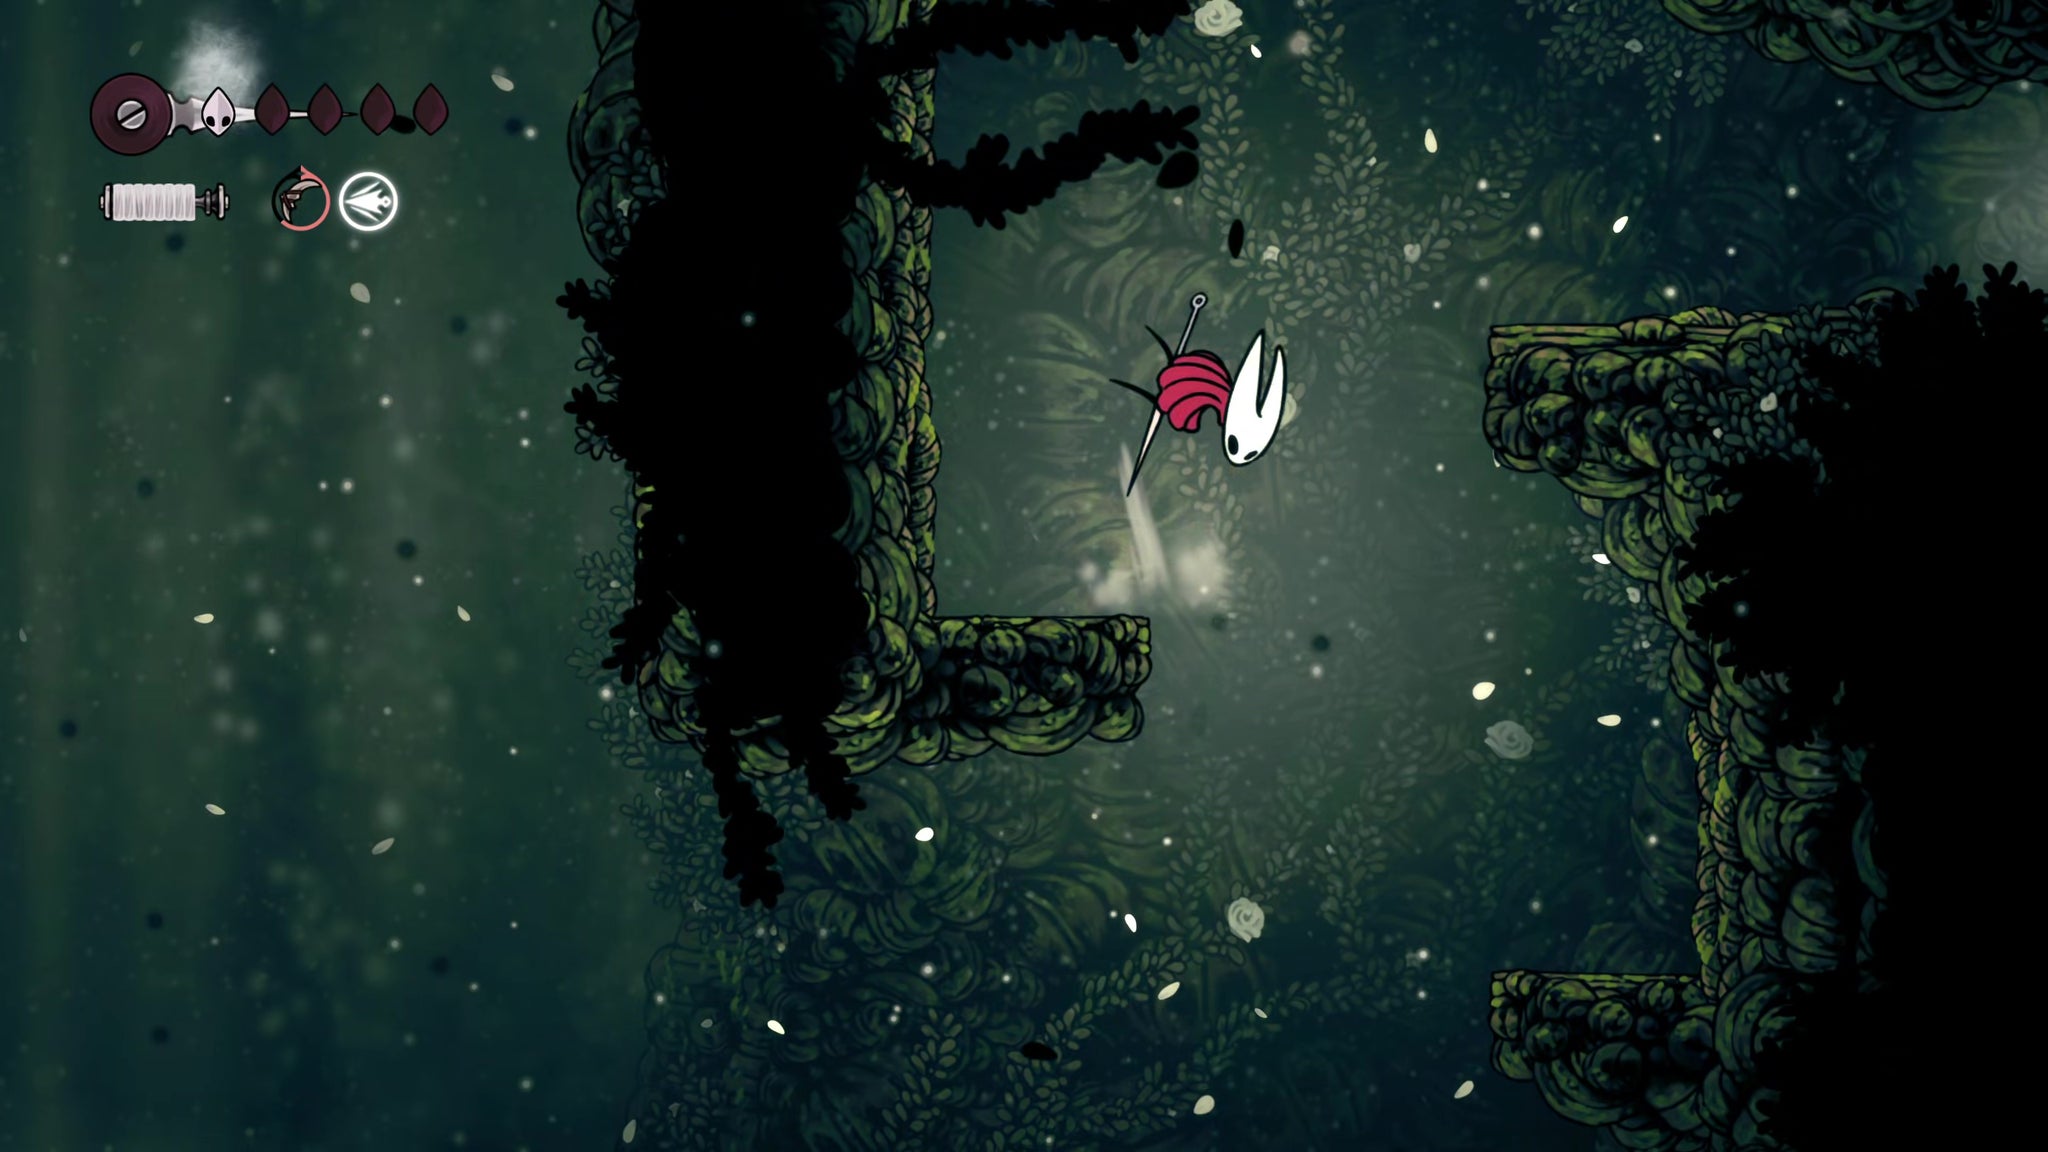
Image credit:Rock Paper Shotgun/Team Cherry
The next room is peaceful at least, but you’ll need to do some good Pogo-parkouring to reach the second Pollip Heart embedded in the ceiling. If you haven’t already, it’s probably best to use the Wanderer Crest for its more straightforward downward-slash attacks.

Image credit:Rock Paper Shotgun/Team Cherry
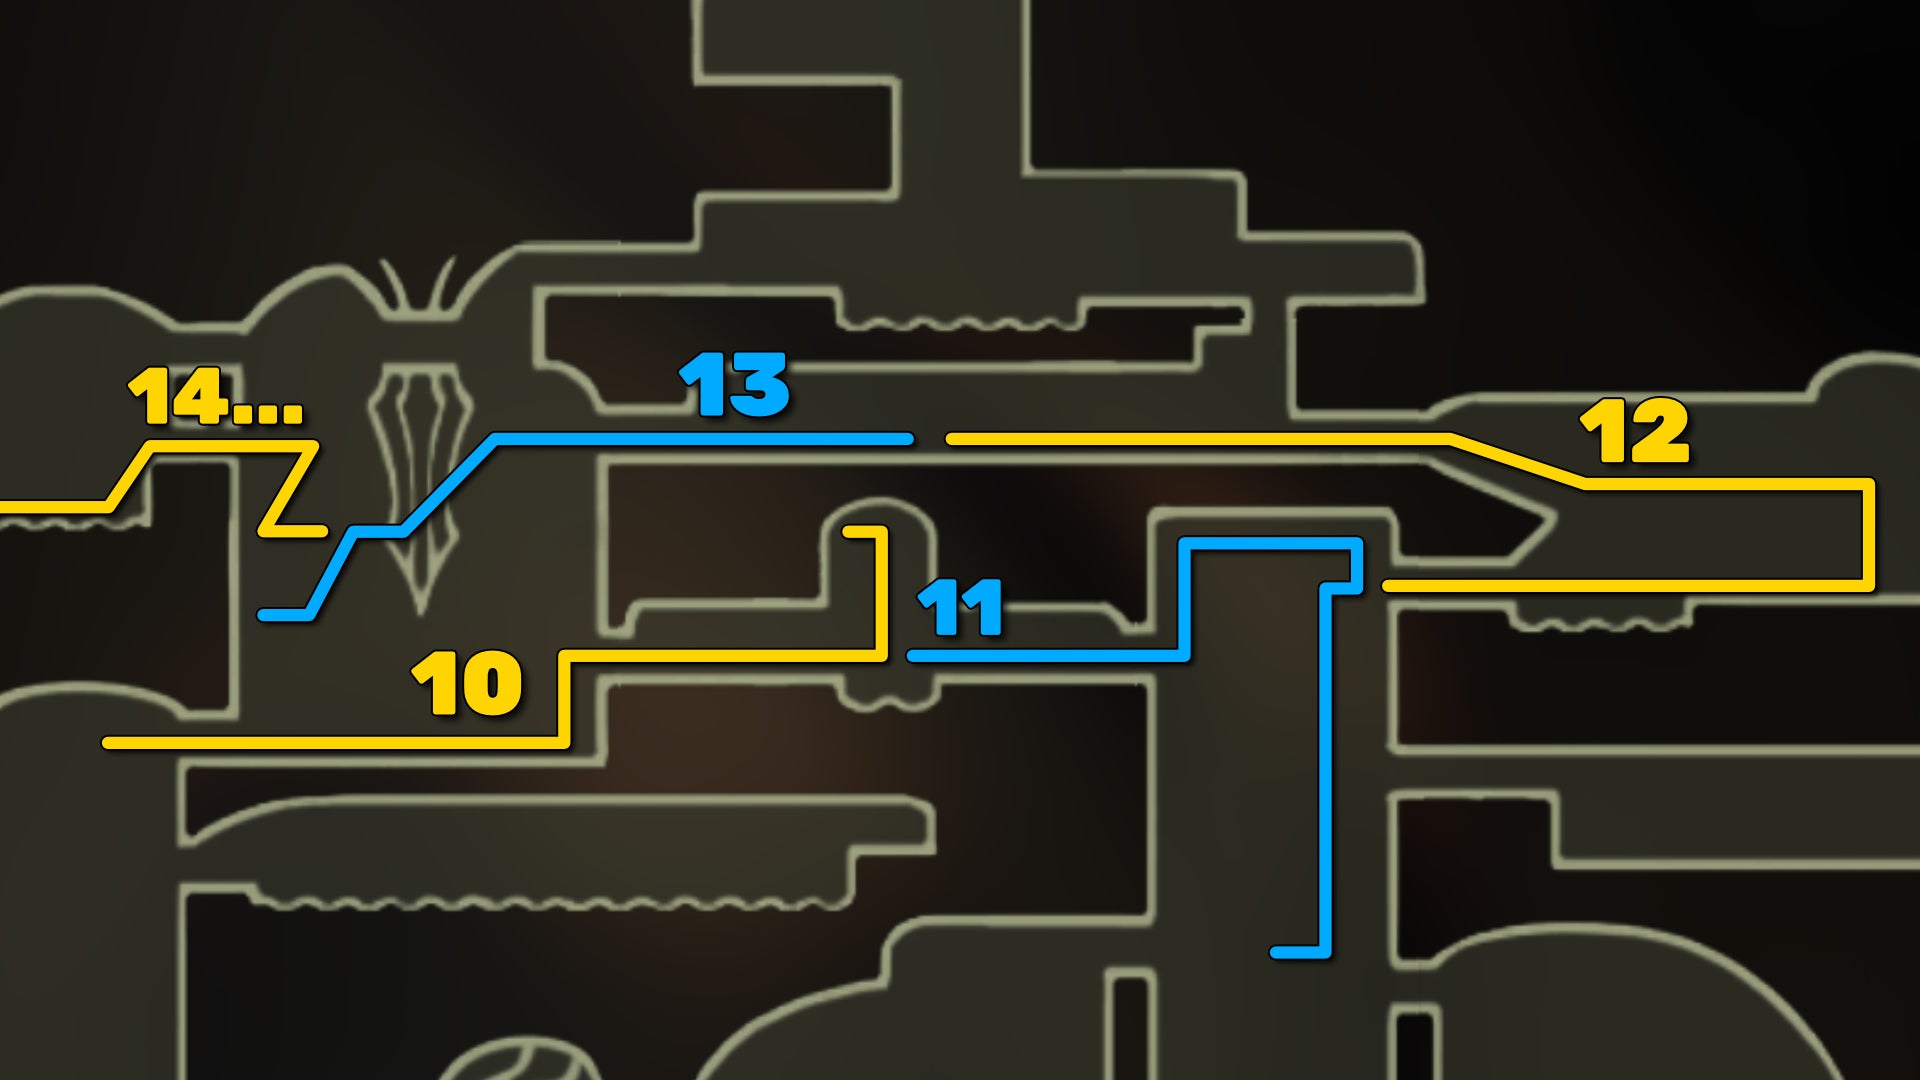
Image credit:Rock Paper Shotgun/Team Cherry
11. Ride the elevator down and rest.
Exit the Pollip Heart room to the right, and start climbing upwards. Be aware of the white wall plants (called Gahlias) - they extend far outwards when they attack, so bait them before attacking.

Image credit:Rock Paper Shotgun/Team Cherry
Climb to the very top, kill the Phacia there, and drop down on the right to activate the elevator downwards. Ride the elevator down to the Bench you unlocked earlier, and rest there. You’re about to face a boss.
12. Defeat Sister Splinter.
Ride the elevator back up to the top, and head right. Follow the path up the ledges in the next room, and after a couple of Pogos over some spikes, you’ll come to the boss room. Walk into the centre of the arena to meet Sister Splinter.


Fortunately, Sister Splinter isn’t too difficult. She sends spiked vines down at you which you must dodge, and her combo punches can catch you off-guard at first, but they’re actually very easy to dodge and you can get multiple hits in afterwards each time she does it.

Image credit:Rock Paper Shotgun/Team Cherry
In her second phase she’ll conjure some Splinterbark minions to hound and harry you, but as long as you don’t panic, manoeuvring them in the way of Sister Splinter’s ground attacks will make short work of them.
Eventually you’ll cut Sister Splinter down, and then you can exit to the left.
13. Pollip Heart #3.
In the next room, head diagonally down and to the left, and kill the Gahlia in your way, then drop down the hole below it. Just below and to the left, you’ll see the telltale sign of flowers in the left-hand wall, indicating the presence of another Pollip Heart nearby.

Image credit:Rock Paper Shotgun/Team Cherry
Drop down and glide to reach the lower ledge where you can destroy the purple flower and gain your third Pollip Heart. Then use the white Pogo-able flowers to bounce back up to where you were.
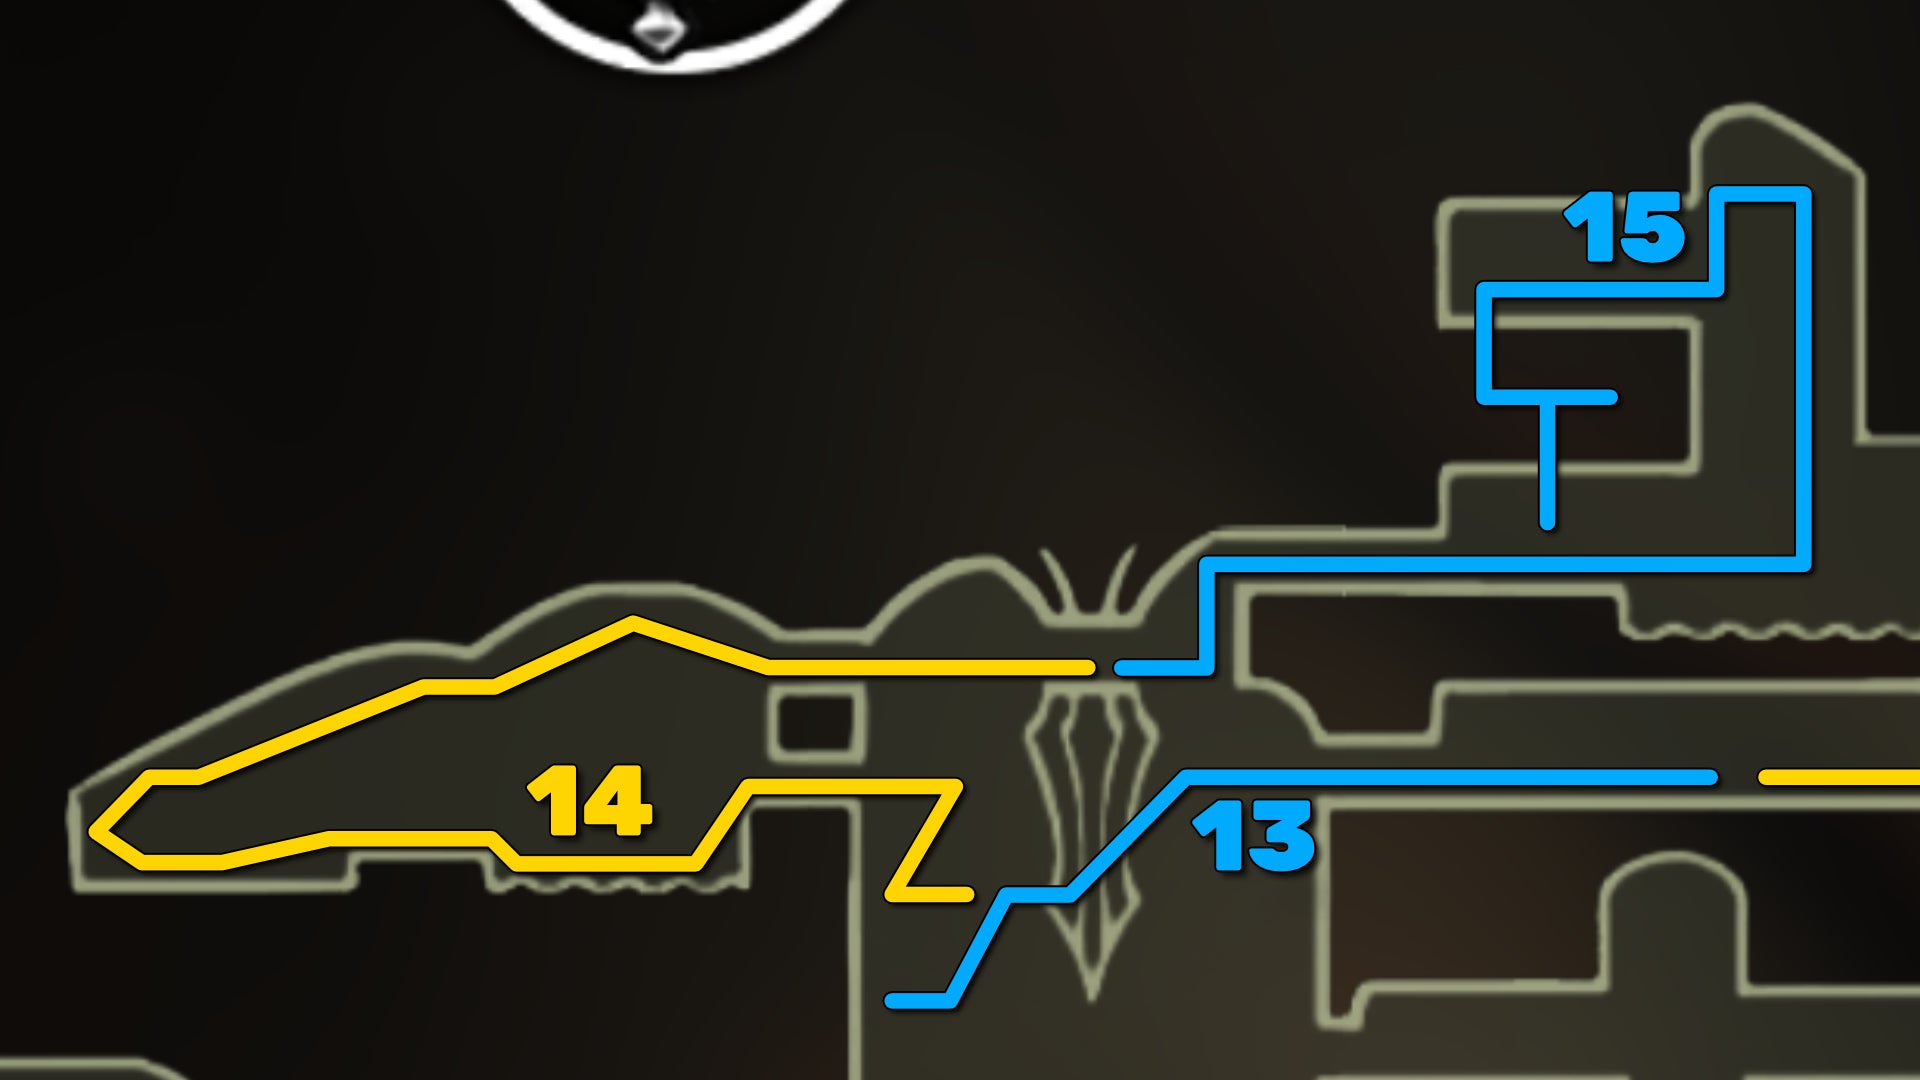
Image credit:Rock Paper Shotgun/Team Cherry
14. Obtain the Cling Grip skill.
Make your way past the next three Gahlias along the path above you, and then Pogo across the spikes to the room on your left. Swim to the other side of the room, and follow the parkour course upwards. Remember to bait the Gahlias before attacking; patience is the best policy with these irritating enemies.

Image credit:Rock Paper Shotgun/Team Cherry
Past the two Gahlias immediately atop one another, you can drop down the opposite side of the ledge to collect some Rosary Beads; then keep climbing upwards until you reach the top-right corner exit.

Finally, you can climb walls properly! |Image credit:Rock Paper Shotgun/Team Cherry
Now just jump across the gap and interact with the monument to receive another all-important skill: Cling Grip. With this ability, you can now wall-jump and climb flat walls with ease. The world of Silksong just got a whole lot bigger.
15. Pollip Heart #4.
Now that you have Cling Grip, you can reach the final Pollip Hearts. Head to the right of the monument, and jump over the large rectangular rock in the middle of the room. You can skirt beneath the ground level in the water to reach some Rosaries and a path downwards, but don’t take it.
Go back and complete the fairly simple wall-climbing puzzle in this section to reach the top. Destroy the breakable wall in the top-left corner and then drop down into the water.

Image credit:Rock Paper Shotgun/Team Cherry
This bit’s a little nasty; you’ll need to contend with a nest of those purple Wood Wasps. Attack the nest as quickly as possible to destroy it, or it’ll keep spitting out new Wasps. When they’re all dead, pass through the doorway opened up by the destroyed nest, and drop down into the secret area below, where you’ll find the fourth Pollip Heart. After that, you can drop to the bottom of the section and return to the monument.
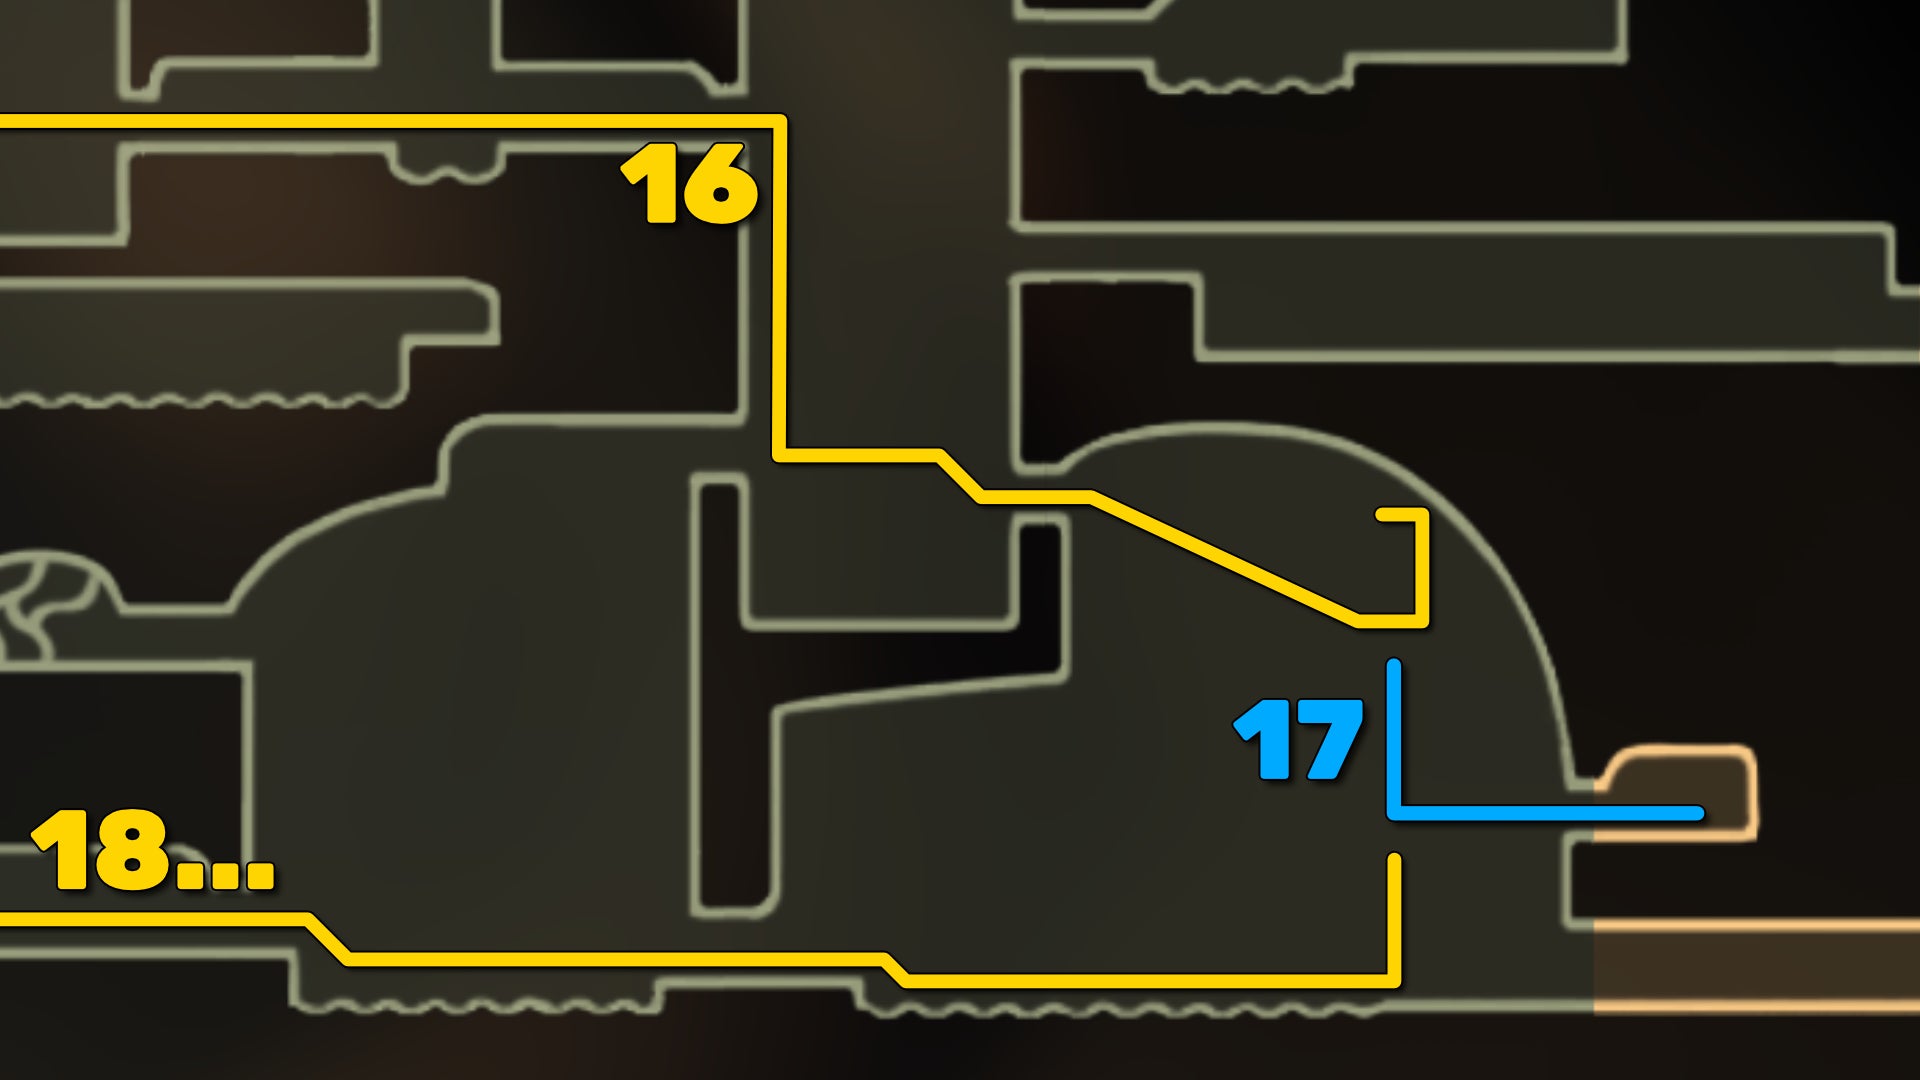
Image credit:Rock Paper Shotgun/Team Cherry
16. Pollip Heart #5.
To reach Pollip Heart #5, drop to the bottom of the monument room, and exit to the right. Cross the next corridor, and drop down to the Bench by the elevator (you can rest here while you’re at it).
Drop down the right-hand side, and exit into the room to your right. Glide over to the right-hand side, staying near the ceiling, and you’ll see the purple flowers of the nearby Pollip. Claw Grip your way up the wall to the right, and you can reach the top area with the Pollip Heart. Wasps, too, so watch out.
17. Obtain the Longpin behind the Wasp Nest.

Image credit:Rock Paper Shotgun/Team Cherry
Drop down from the fifth Pollip Heart location, and hang a right as you descend. Halfway up the right-hand wall of the room you’ll find another Wood Wasp nest. Destroy the nest, and you’ll open up a passage into a small hidden room.
At the far end of the room is a weapon rack you can loot to obtain a very nice weapon tool - the Longpin. It’s like the basic Straight Pin, except it penetrates through multiple foes with a single throw.
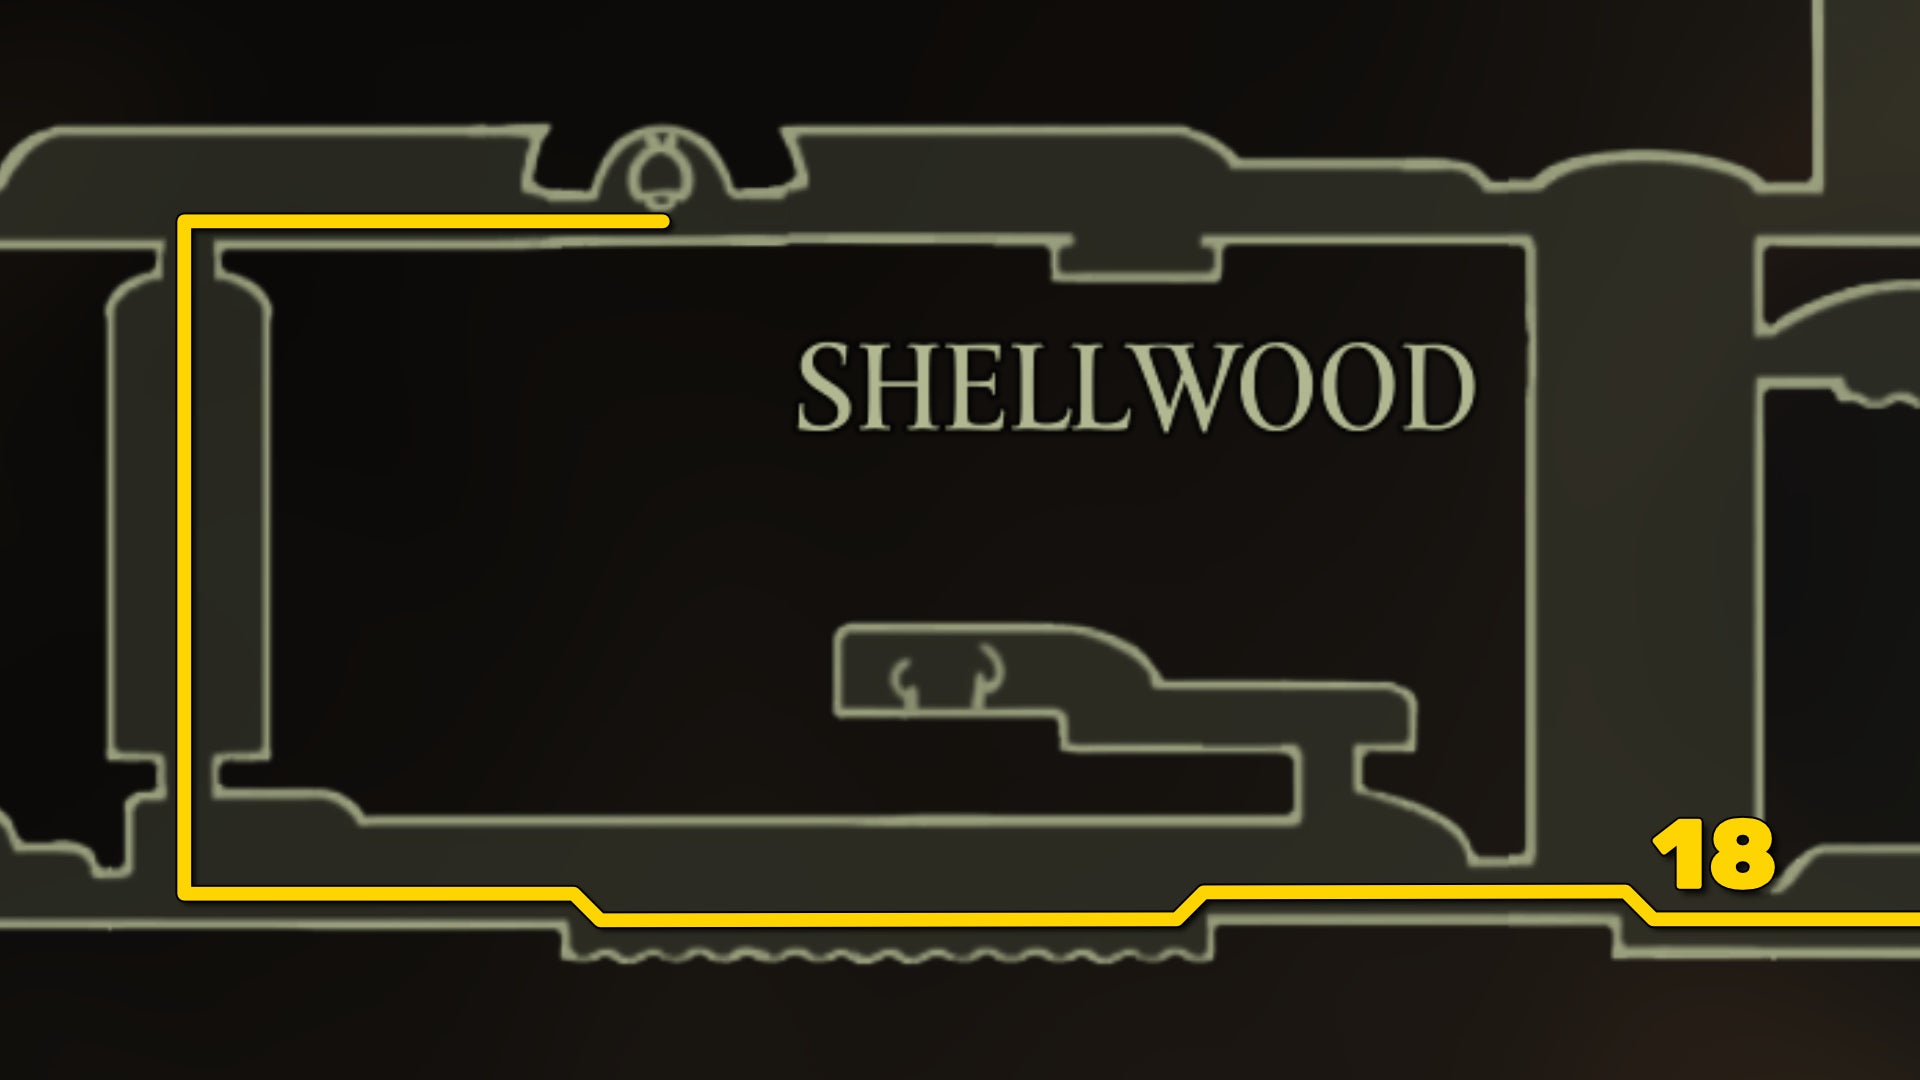
Image credit:Rock Paper Shotgun/Team Cherry
18. Unlock the Bench west of the Bellway.

Image credit:Rock Paper Shotgun/Team Cherry
The final step for this part of the walkthrough is to find your way back to the Bellway, this time from the other side. Retrace your steps to head all the way back to the very beginning of Shellwood, by the far western entrance.
You might recall that there were some big hanging blocks of rock near the entrance in that first Shellwood room, next to a gilded cart on the ground. Now that you have the Claw Grip skill, you can make your way up there and into the room above.
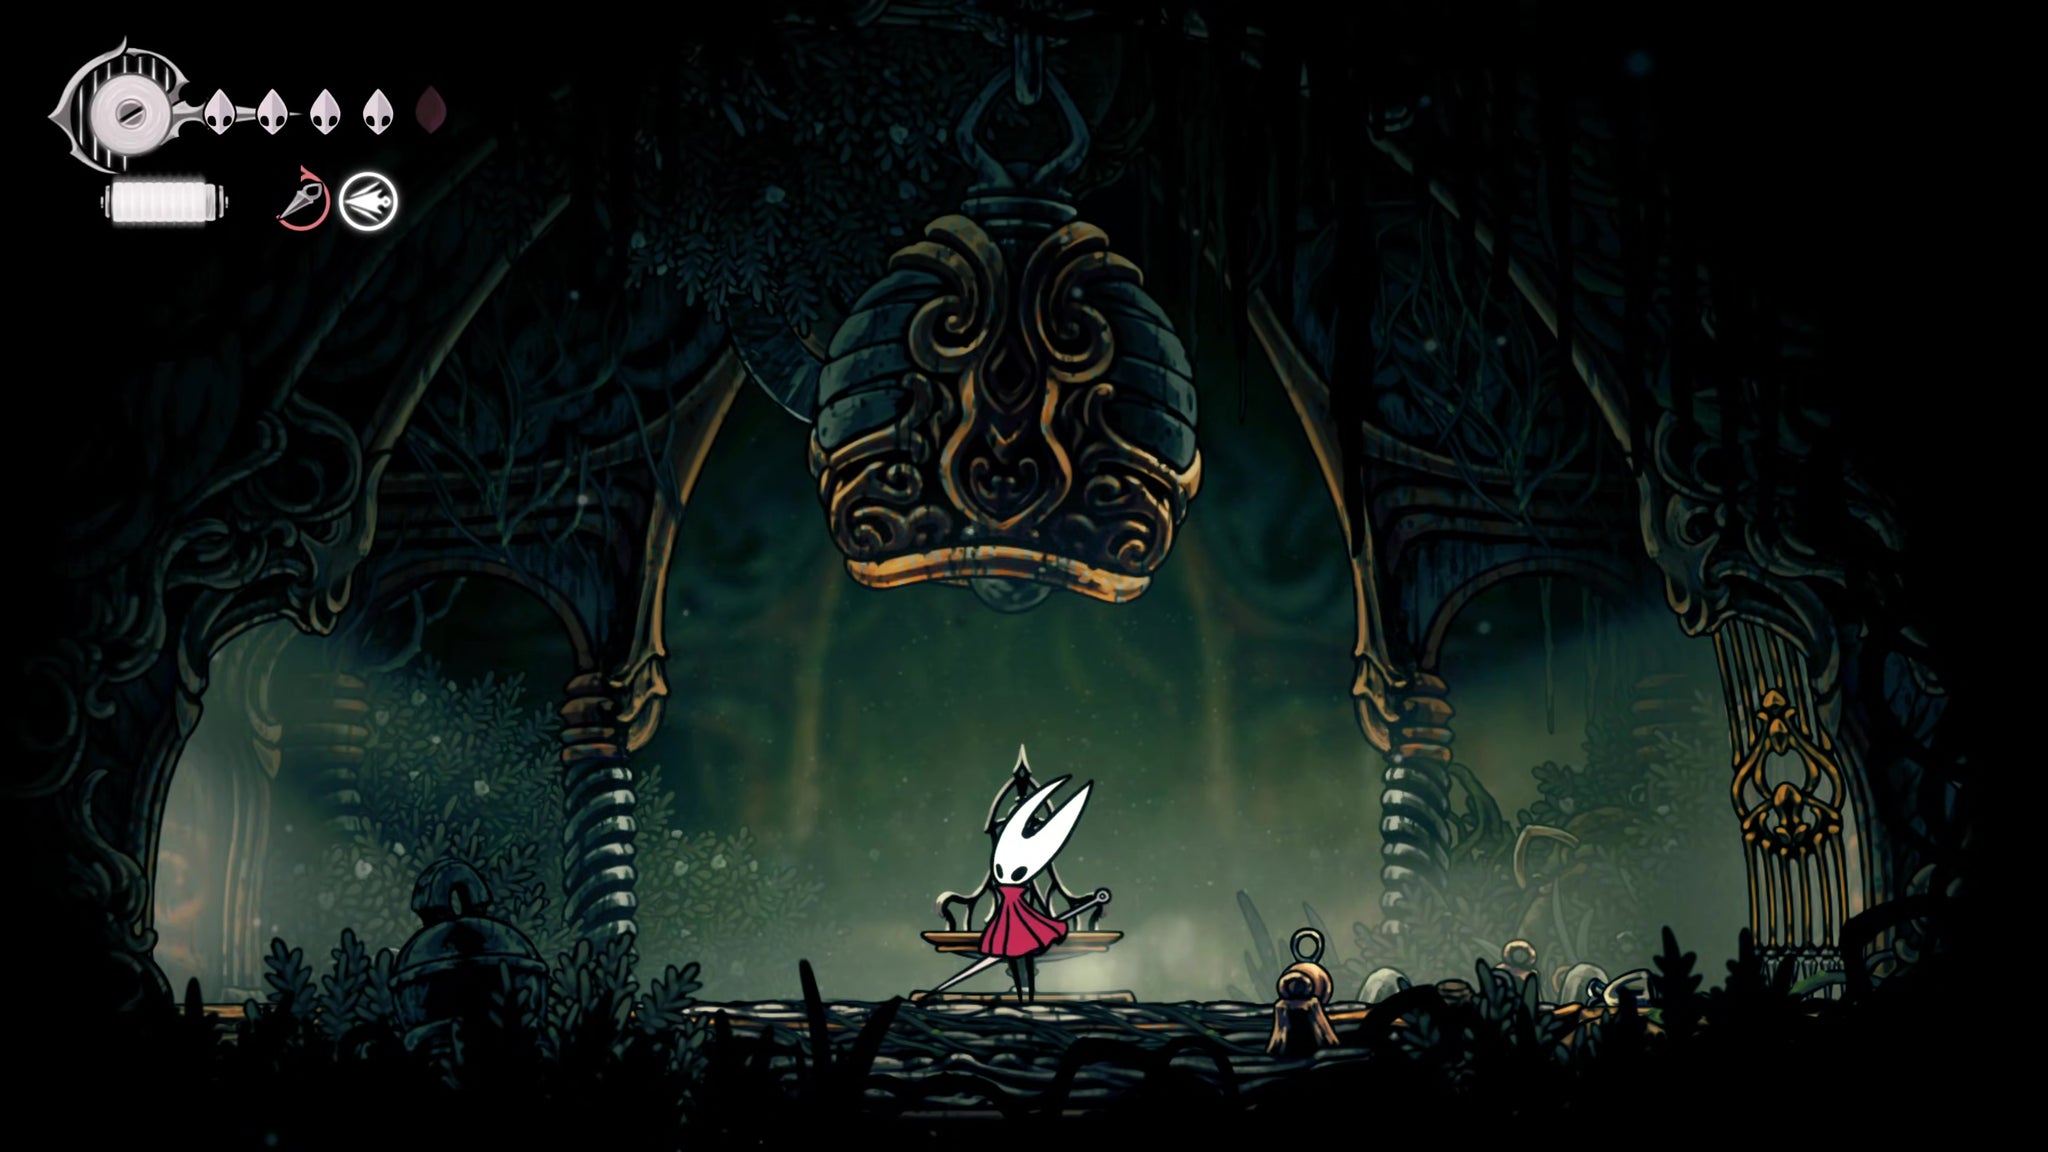
Image credit:Rock Paper Shotgun/Team Cherry
There’s not much to explain here - just parkour and wall-climb your way up to the very top, evading or killing the Winged Pilgrim Bellbearers that approach you. Once you’re in the room up above, you can head right to unlock a new Bench, and the doorway to the Bellway. To the left is a new (and very windy) biome, but we won’t be entering it quite yet in this walkthrough.
Now that we’ve fully mapped the Shellwood (or near enough), it’s time to venture further into the Bellhart and figure out how to save the town. Join us in Part 10 of our Silksong walkthrough for those next steps!


Hollow Knight: Silksong
PC , Nintendo Switch
Rock Paper Shotgun is better when you sign in
Sign in and join us on our journey to discover strange and compelling PC games.

All 75 Arc Raiders Blueprints and where to get them
These areas have the highest chance of giving you Blueprints

Image credit:Rock Paper Shotgun/Embark Studios

Looking for more Arc Raiders Blueprints? It’s a special day when you find a Blueprint, as they’re among the most valuable items in Arc Raiders. If you find a Blueprint that you haven’t already found, then you must make sure you hold onto it at all costs, because Blueprints are the key to one of the most important and powerful systems of meta-progression in the game.
This guide aims to be the very best guide on Blueprints you can find, starting with a primer on what exactly they are and how they work in Arc Raiders, before delving into exactly where to get Blueprints and the very best farming spots for you to take in your search.
We’ll also go over how to get Blueprints from other unlikely activities, such as destroying Surveyors and completing specific quests. And you’ll also find the full list of all 75 Blueprints in Arc Raiders on this page (including the newest Blueprints added with the Cold Snap update , such as the Deadline Blueprint and Firework Box Blueprint), giving you all the information you need to expand your own crafting repertoire.
In this guide:
- What are Blueprints in Arc Raiders?
- Full Blueprint list: All crafting recipes
- Where to find Blueprints in Arc Raiders Blueprints obtained from quests Blueprints obtained from Trials Best Blueprint farming locations

What are Blueprints in Arc Raiders?
Blueprints in Arc Raiders are special items which, if you manage to extract with them, you can expend to permanently unlock a new crafting recipe in your Workshop. If you manage to extract from a raid with an Anvil Blueprint, for example, you can unlock the ability to craft your very own Anvil Pistol, as many times as you like (as long as you have the crafting materials).
To use a Blueprint, simply open your Inventory while in the lobby, then right-click on the Blueprint and click “Learn And Consume” . This will permanently unlock the recipe for that item in your Workshop. As of the Stella Montis update, there are allegedly 75 different Blueprints to unlock - although only 68 are confirmed to be in the game so far. You can see all the Blueprints you’ve found and unlocked by going to the Workshop menu, and hitting “R” to bring up the Blueprint screen.
It’s possible to find duplicates of past Blueprints you’ve already unlocked. If you find these, then you can either sell them, or - if you like to play with friends - you can take it into a match and gift it to your friend so they can unlock that recipe for themselves. Another option is to keep hold of them until the time comes to donate them to the Expedition.
Full Blueprint list: All crafting recipes
Below is the full list of all the Blueprints that are currently available to find in Arc Raiders, and the crafting recipe required for each item:
| Blueprint | Type | Recipe | Crafted At |
|---|---|---|---|
| Bettina | Weapon | 3x Advanced Mechanical Components 3x Heavy Gun Parts 3x Canister | Gunsmith 3 |
| Blue Light Stick | Quick Use | 3x Chemicals | Utility Station 1 |
| Aphelion | Weapon | 3x Magnetic Accelerator 3x Complex Gun Parts 1x Matriarch Reactor | Gunsmith 3 |
| Combat Mk. 3 (Flanking) | Augment | 2x Advanced Electrical Components 3x Processor | Gear Bench 3 |
| Combat Mk. 3 (Aggressive) | Augment | 2x Advanced Electrical Components 3x Processor | Gear Bench 3 |
| Complex Gun Parts | Material | 2x Light Gun Parts 2x Medium Gun Parts 2x Heavy Gun Parts | Refiner 3 |
| Fireworks Box | Quick Use | 1x Explosive Compound 3x Pop Trigger | Explosives Station 2 |
| Gas Mine | Mine | 4x Chemicals 2x Rubber Parts | Explosives Station 1 |
| Green Light Stick | Quick Use | 3x Chemicals | Utility Station 1 |
| Pulse Mine | Mine | 1x Crude Explosives 1x Wires | Explosives Station 1 |
| Seeker Grenade | Grenade | 1x Crude Explosives 2x ARC Alloy | Explosives Station 1 |
| Looting Mk. 3 (Survivor) | Augment | 2x Advanced Electrical Components 3x Processor | Gear Bench 3 |
| Angled Grip II | Mod | 2x Mechanical Components 3x Duct Tape | Gunsmith 2 |
| Angled Grip III | Mod | 2x Mod Components 5x Duct Tape | Gunsmith 3 |
| Hullcracker | Weapon | 1x Magnetic Accelerator 3x Heavy Gun Parts 1x Exodus Modules | Gunsmith 3 |
| Launcher Ammo | Ammo | 5x Metal Parts 1x Crude Explosives | Workbench 1 |
| Anvil | Weapon | 5x Mechanical Components 5x Simple Gun Parts | Gunsmith 2 |
| Anvil Splitter | Mod | 2x Mod Components 3x Processor | Gunsmith 3 |
| ??? | ??? | ??? | ??? |
| Barricade Kit | Quick Use | 1x Mechanical Components | Utility Station 2 |
| Blaze Grenade | Grenade | 1x Explosive Compound 2x Oil | Explosives Station 3 |
| Bobcat | Weapon | 3x Advanced Mechanical Components 3x Light Gun Parts | Gunsmith 3 |
| Osprey | Weapon | 2x Advanced Mechanical Components 3x Medium Gun Parts 7x Wires | Gunsmith 3 |
| Burletta | Weapon | 3x Mechanical Components 3x Simple Gun Parts | Gunsmith 1 |
| Compensator II | Mod | 2x Mechanical Components 4x Wires | Gunsmith 2 |
| Compensator III | Mod | 2x Mod Components 8x Wires | Gunsmith 3 |
| Defibrillator | Quick Use | 9x Plastic Parts 1x Moss | Medical Lab 2 |
| ??? | ??? | ??? | ??? |
| Equalizer | Weapon | 3x Magnetic Accelerator 3x Complex Gun Parts 1x Queen Reactor | Gunsmith 3 |
| Extended Barrel | Mod | 2x Mod Components 8x Wires | Gunsmith 3 |
| Extended Light Mag II | Mod | 2x Mechanical Components 3x Steel Spring | Gunsmith 2 |
| Extended Light Mag III | Mod | 2x Mod Components 5x Steel Spring | Gunsmith 3 |
| Extended Medium Mag II | Mod | 2x Mechanical Components 3x Steel Spring | Gunsmith 2 |
| Extended Medium Mag III | Mod | 2x Mod Components 5x Steel Spring | Gunsmith 3 |
| Extended Shotgun Mag II | Mod | 2x Mechanical Components 3x Steel Spring | Gunsmith 2 |
| Extended Shotgun Mag III | Mod | 2x Mod Components 5x Steel Spring | Gunsmith 3 |
| Remote Raider Flare | Quick Use | 2x Chemicals 4x Rubber Parts | Utility Station 1 |
| Heavy Gun Parts | Material | 4x Simple Gun Parts | Refiner 2 |
| Venator | Weapon | 2x Advanced Mechanical Components 3x Medium Gun Parts 5x Magnet | Gunsmith 3 |
| Il Toro | Weapon | 5x Mechanical Components 6x Simple Gun Parts | Gunsmith 1 |
| Jolt Mine | Mine | 1x Electrical Components 1x Battery | Explosives Station 2 |
| Explosive Mine | Mine | 1x Explosive Compound 1x Sensors | Explosives Station 3 |
| Jupiter | Weapon | 3x Magnetic Accelerator 3x Complex Gun Parts 1x Queen Reactor | Gunsmith 3 |
| Light Gun Parts | Material | 4x Simple Gun Parts | Refiner 2 |
| Lightweight Stock | Mod | 2x Mod Components 5x Duct Tape | Gunsmith 3 |
| Lure Grenade | Grenade | 1x Speaker Component 1x Electrical Components | Utility Station 2 |
| Medium Gun Parts | Material | 4x Simple Gun Parts | Refiner 2 |
| Torrente | Weapon | 2x Advanced Mechanical Components 3x Medium Gun Parts 6x Steel Spring | Gunsmith 3 |
| Muzzle Brake II | Mod | 2x Mechanical Components 4x Wires | Gunsmith 2 |
| Muzzle Brake III | Mod | 2x Mod Components 8x Wires | Gunsmith 3 |
| Padded Stock | Mod | 2x Mod Components 5x Duct Tape | Gunsmith 3 |
| Shotgun Choke II | Mod | 2x Mechanical Components 4x Wires | Gunsmith 2 |
| Shotgun Choke III | Mod | 2x Mod Components 8x Wires | Gunsmith 3 |
| Shotgun Silencer | Mod | 2x Mod Components 8x Wires | Gunsmith 3 |
| Showstopper | Grenade | 1x Advanced Electrical Components 1x Voltage Converter | Explosives Station 3 |
| Silencer I | Mod | 2x Mechanical Components 4x Wires | Gunsmith 2 |
| Silencer II | Mod | 2x Mod Components 8x Wires | Gunsmith 3 |
| Snap Hook | Quick Use | 2x Power Rod 3x Rope 1x Exodus Modules | Utility Station 3 |
| Stable Stock II | Mod | 2x Mechanical Components 3x Duct Tape | Gunsmith 2 |
| Stable Stock III | Mod | 2x Mod Components 5x Duct Tape | Gunsmith 3 |
| Tagging Grenade | Grenade | 1x Electrical Components 1x Sensors | Utility Station 3 |
| Tempest | Weapon | 3x Advanced Mechanical Components 3x Medium Gun Parts 3x Canister | Gunsmith 3 |
| Trigger Nade | Grenade | 2x Crude Explosives 1x Processor | Explosives Station 2 |
| Vertical Grip II | Mod | 2x Mechanical Components 3x Duct Tape | Gunsmith 2 |
| Vertical Grip III | Mod | 2x Mod Components 5x Duct Tape | Gunsmith 3 |
| Vita Shot | Quick Use | 2x Antiseptic 1x Syringe | Medical Lab 3 |
| Vita Spray | Quick Use | 3x Antiseptic 1x Canister | Medical Lab 3 |
| Vulcano | Weapon | 1x Magnetic Accelerator 3x Heavy Gun Parts 1x Exodus Modules | Gunsmith 3 |
| Wolfpack | Grenade | 2x Explosive Compound 2x Sensors | Explosives Station 3 |
| Red Light Stick | Quick Use | 3x Chemicals | Utility Station 1 |
| Smoke Grenade | Grenade | 14x Chemicals 1x Canister | Utility Station 2 |
| Deadline | Mine | 3x Explosive Compound 2x ARC Circuitry | Explosives Station 3 |
| Trailblazer | Grenade | 1x Explosive Compound 1x Synthesized Fuel | Explosives Station 3 |
| Tactical Mk. 3 (Defensive) | Augment | 2x Advanced Electrical Components 3x Processor | Gear Bench 3 |
| Tactical Mk. 3 (Healing) | Augment | 2x Advanced Electrical Components 3x Processor | Gear Bench 3 |
| Yellow Light Stick | Quick Use | 3x Chemicals | Utility Station 1 |
Note: The missing Blueprints in this list likely have not actually been added to the game at the time of writing, because none of the playerbase has managed to find any of them. As they are added to the game, I will update this page with the most relevant information so you know exactly how to get all 75 Arc Raiders Blueprints.
Where to find Blueprints in Arc Raiders
Below is a list of all containers, modifiers, and events which maximise your chances of finding Blueprints:
- Certain quests reward you with specific Blueprints .
- Completing Trials has a high chance of offering Blueprints as rewards.
- Surveyors have a decent chance of dropping Blueprints on death.
- High loot value areas tend to have a greater chance of spawning Blueprints.
- Night Raids and Storms may increase rare Blueprint spawn chances in containers.
- Containers with higher numbers of items may have a higher tendency to spawn Blueprints. As a result, Blue Gate (which has many “large” containers containing multiple items) may give you a higher chance of spawning Blueprints.
- Raider containers (Raider Caches, Weapon Boxes, Medical Bags, Grenade Tubes) have increased Blueprint drop rates. As a result, the Uncovered Caches event gives you a high chance of finding Blueprints.
- Security Lockers have a higher than average chance of containing Blueprints.
- Certain Blueprints only seem to spawn under specific circumstances: Tempest Blueprint only spawns during Night Raid events. Vulcano Blueprint only spawns during Hidden Bunker events. Jupiter and Equaliser Blueprints only spawn during Harvester events.

Raider Caches, Weapon Boxes, and other raider-oriented container types have a good chance of offering Blueprints. |Image credit:Rock Paper Shotgun/Embark Studios
Blueprints have a very low chance of spawning in any container in Arc Raiders, around 1-2% on average. However, there is a higher chance of finding Blueprints in particular container types. Specifically, you can find more Blueprints in Raider containers and security lockers.
Beyond this, if you’re looking for Blueprints you should focus on regions of the map which are marked as having particularly high-value loot. Areas such as the Control Tower in Dam Battlegrounds, the Arrival and Departure Buildings in Spaceport, and Pilgrim’s Peak in Blue Gate all have a better-than-average chance of spawning Blueprints somewhere amongst all their containers. Night Raids and Electromagnetic Storm events also increase the drop chances of certain Blueprints .
In addition to these containers, you can often loot Blueprints from destroyed Surveyors - the largest of the rolling ball ARC. Surveyors are more commonly found on the later maps - Spaceport and Blue Gate - and if one spawns in your match, you’ll likely see it by the blue laser beam that it casts into the sky while “surveying”.
Surveyors are quite well-armoured and will very speedily run away from you once it notices you, but if you can take one down then make sure you loot all its parts for a chance of obtaining certain unusual Blueprints.
Blueprints obtained from quests
One way in which you can get Blueprints is by completing certain quests for the vendors in Speranza. Some quests will reward you with a specific item Blueprint upon completion, so as long as you work through all the quests in Arc Raiders, you are guaranteed those Blueprints.
Here is the full list of all Blueprints you can get from quest rewards:
- Trigger Nade Blueprint: Rewarded after completing “Sparks Fly”.
- Lure Grenade Blueprint: Rewarded after completing “Greasing Her Palms”.
- Burletta Blueprint: Rewarded after completing “Industrial Espionage”.
- Hullcracker Blueprint (and Launcher Ammo Blueprint): Rewarded after completing “The Major’s Footlocker”.
Alas, that’s only 4 Blueprints out of a total of 75 to unlock, so for the vast majority you will need to find them yourself during a raid. If you’re intent on farming Blueprints, then it’s best to equip yourself with cheap gear in case you lose it, but don’t use a free loadout because then you won’t get a safe pocket to stash any new Blueprint you find. No pain in Arc Raiders is sharper than failing to extract with a new Blueprint you’ve been after for a dozen hours already.

One of the best ways to get Blueprints is by hitting three stars on all five Trials every week. |Image credit:Rock Paper Shotgun/Embark Studios
Blueprints obtained from Trials
One of the very best ways to get Blueprints is as rewards for completing Trials in Arc Raiders. Trials are unlocked from Level 15 onwards, and allow you to earn rewards by focusing on certain tasks over the course of several raids. For example, one Trial might task you with dealing damage to Hornets, while another might challenge you to loot Supply Drops.
Trials refresh on a weekly basis, with a new week bringing five new Trials. Each Trial can offer up to three rewards after passing certain score milestones, and it’s possible to receive very high level loot from these reward crates - including Blueprints. So if you want to unlock as many Blueprints as possible, you should make a point of completing as many Trials as possible each week.
Best Blueprint farming locations
The very best way to get Blueprints is to frequent specific areas of the maps which combine high-tier loot pools with the right types of containers to search. Here are my recommendations for where to find Blueprints on every map, so you can always keep the search going for new crafting recipes to unlock.

Image credit:Rock Paper Shotgun/Embark Studios
Dam Battlegrounds
The best places to farm Blueprints on Dam Battlegrounds are the Control Tower, Power Generation Complex, Ruby Residence, and Pale Apartments . The first two regions, despite only being marked on the map as mid-tier loot, contain a phenomenal number of containers to loot. The Control Tower can also contain a couple of high-tier Security Lockers - though of course, you’ll need to have unlocked the Security Breach skill at the end of the Survival tree.
There’s also a lot of reporting amongst the playerbase that the Residential areas in the top-left of the map - Pale Apartments and Ruby Residence - give you a comparatively strong chance of finding Blueprints. Considering their size, there’s a high density of containers to loot in both locations, and they also have the benefit of being fairly out of the way. So you’re more likely to have all the containers to yourself.
Buried City
The best Blueprint farming locations on Buried City are the Santa Maria Houses, Grandioso Apartments, Town Hall, and the various buildings of the New District . Grandioso Apartments has a lower number of containers than the rest, but a high chance of spawning weapon cases - which have good Blueprint drop rates. The others are high-tier loot areas, with plenty of lootable containers - including Security Lockers.
Spaceport
The best places to find Blueprints on Spaceport are the Arrival and Departure Buildings, as well as Control Tower A6 and the Launch Towers . All these areas are labelled as high-value loot regions, and many of them are also very handily connected to one another by the Spaceport wall, which you can use to quickly run from one area to the next. At the tops of most of these buildings you’ll find at least one Security Locker, so this is an excellent farming route for players looking to find Blueprints.
The downside to looting Blueprints on Spaceport is that all these areas are hotly contested, particularly in Duos and Squads. You’ll need to be very focused and fast in order to complete the full farming route.

Image credit:Rock Paper Shotgun/Embark Studios
Blue Gate
Blue Gate tends to have a good chance of dropping Blueprints, potentially because it generally has a high number of containers which can hold lots of items; so there’s a higher chance of a Blueprint spawning in each container. In my experience, the best Blueprint farming spots on Blue Gate are Pilgrim’s Peak, Raider’s Refuge, the Ancient Fort, and the Underground Complex beneath the Warehouse .
All of these areas contain a wealth of containers to loot. Raider’s Refuge has less to loot, but the majority of the containers in and around the Refuge are raider containers, which have a high chance of containing Blueprints - particularly during major events.
Stella Montis
On the whole, Stella Montis seems to have a very low drop rate for Blueprints (though a high chance of dropping other high-tier loot). If you do want to try farming Blueprints on this map, the best places to find Blueprints in Stella Montis are Medical Research, Assembly Workshop, and the Business Center . These areas have the highest density of containers to loot on the map.
In addition to this, the Western Tunnel has a few different Security Lockers to loot, so while there’s very little to loot elsewhere in this area of the map, it’s worth hitting those Security Lockers if you spawn there at the start of a match.
That wraps up this primer on how to get all the Blueprints in Arc Raiders as quickly as possible. With the Expedition system constantly resetting a large number of players’ Blueprints, it’s more important than ever to have the most up-to-date information on where to find all these Blueprints.
While you’re here, be sure to check out our Arc Raiders best guns tier list , as well as our primers on the best skills to unlock and all the different Field Depot locations on every map.


ARC Raiders
PS5 , Xbox Series X/S , PC
Rock Paper Shotgun is better when you sign in
Sign in and join us on our journey to discover strange and compelling PC games.
