Hollow Knight Silksong walkthrough: Part 32 (Misc Quests 3)
Here’s what to do before you finish Act 2 of Silksong

Image credit:Rock Paper Shotgun/Team Cherry

What should you do before ascending the elevator at the end of Act 2 in Hollow Knight: Silksong? We’re nearing the end credits of Silksong at this point. Don’t worry, an entire (hidden) third Act is awaiting us afterwards, but it’s still a good time to go back over the world of Pharloom and tie off any loose ends before we play the Threefold Melody and reach Pharloom’s highest point for the finale.
In Part 32 of our Hollow Knight: Silksong walkthrough , I’ll guide you step by step through a handy checklist of quests, collectibles, and side activities to ensure that you’re as strong as you can possibly be before ascending to the Cradle.
Want the walkthrough for a different area of the game? Check out our Hollow Knight: Silksong walkthrough hub!
Misc Quests 3 walkthrough steps:
- Complete the Second Sentinel’s questline.
- Complete the Broodfeast quest.
- Complete the Couriers’ quests.
- Finish Great Taste Of Pharloom.
- Unlock your Bellhome.
- Complete all Wishwall quests.
- Purchase every item from every shop.
- Bind Eva.
- Complete Loddie’s challenge.
- Fill out your Hunter’s Journal.
- Hand in all your collectibles.
- Duel with Shakra.
1. Complete the Second Sentinel’s questline.
If you’ve been following along with this walkthrough, then by now you’ve collected all three Cogheart Pieces in the Citadel, and assembled them into a single Cogheart. In case you missed any, here are the three locations again:
- Cogheart Piece 1: In the Choral Chambers, in a left-hand room above the Citadel Spa.
- Cogheart Piece 2: In the Whispering Vaults, below the path leading to The Stage.
- Cogheart Piece 3: In the Memorium, just above the map room on the east side.
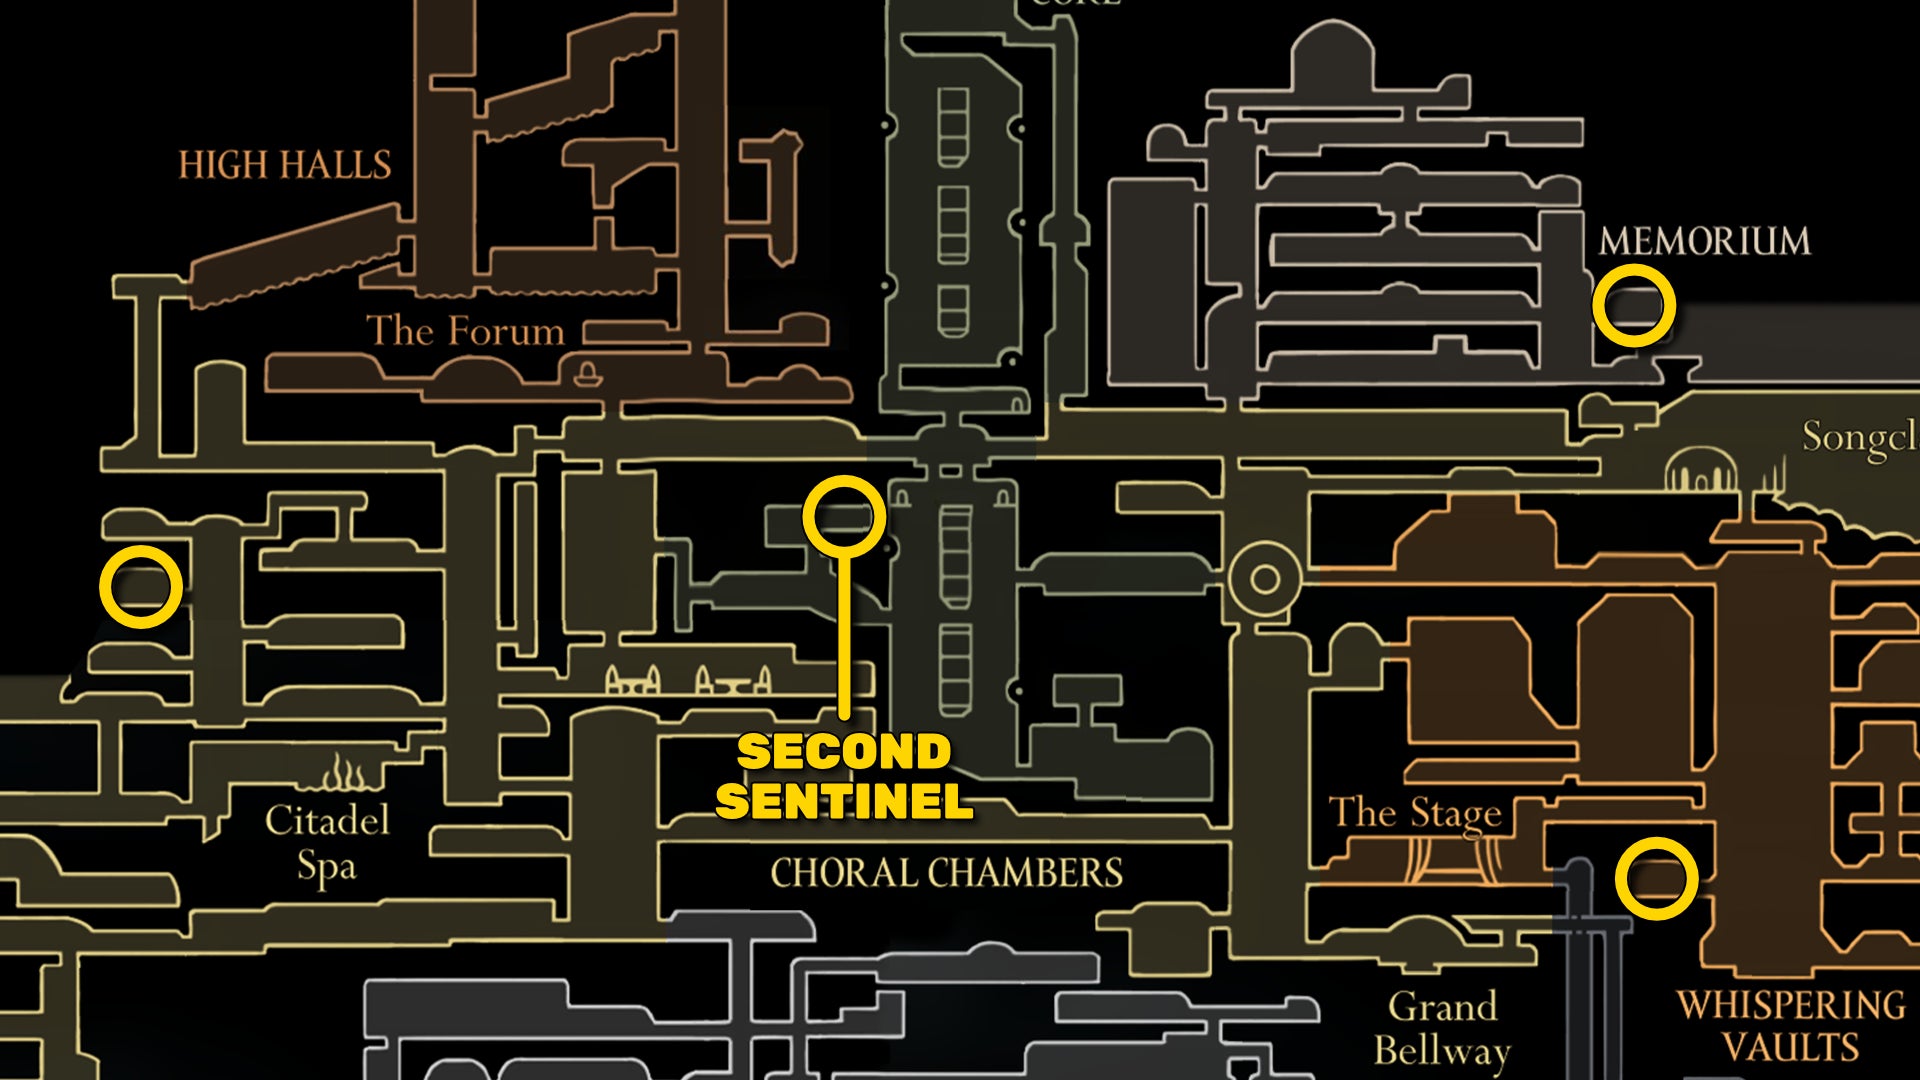
Image credit:Rock Paper Shotgun/Team Cherry
With all three Cogheart Pieces collected, head down into the lower section of the Cogwork Core, and take the only left-hand exit. In the next room, you can double-jump up through the hole in the ceiling and break the wall on your right to find a compartment containing an automaton: the Second Sentinel.
Break the glass and insert the Cogheart into the Second Sentinel to awaken it. It will then disappear.

Image credit:Rock Paper Shotgun/Team Cherry
Now, you should explore the marked places on the map below in order to find the Second Sentinel again, fighting alongside you much like Garmond and Zaza did before now. After each fight, the Second Sentinel will zoom away before you get a chance to speak with it, but that’s fine. Just make sure you find him at least twice at any of the below locations.

Image credit:Rock Paper Shotgun/Team Cherry
Once that’s done, head to the Songclave Wishwall and you should find the Final Audience Wish, left behind by the Second Sentinel. Head up to the High Halls through the shortcut to the east, and climb upwards outside the Bellway room. You’ll find a new pathway heading out to the right.

Image credit:Rock Paper Shotgun/Team Cherry
Speak with the Second Sentinel, and he will wordlessly challenge you to a duel. It’s a fun fight, this one. The Sentinel takes after the likes of Lace and Phantom, with quick flurries and the ability to block and counterattack.

Image credit:Rock Paper Shotgun/Team Cherry
A lot of this fight is down to correctly distancing yourself from the Sentinel. Keep half the arena’s width away from him, and you’ll have time to respond to any of his attacks. The trick after that is finding the moments where you can dash in and punish him before retreating once more.
Pogo attacks are effective as long as he’s already in the middle of an attack. Don’t continue to Pogo after he’s finished, because he can very quickly jump upwards and hit you if you dawdle.

Image credit:Rock Paper Shotgun/Team Cherry
Once you defeat him, he will deem you as pure and innocent, and the quest will be completed. Your reward: the Reserve Bind tool, a very handy item in difficult fights which allows you to heal once even if you don’t have enough Silk to do so.
2. Complete the Broodfeast quest.

Image credit:Rock Paper Shotgun/Team Cherry
This quest is all about killing enemies using tools (or very specific attacks). The key to this quest is that killing enemies with different types of tools will force them to drop different types of organs. Here are the tools you must use for each organ type:
- Seared Organs: Flintslate (Recommended) Pimpillo Voltvessels Wispfire Lantern
- Shredded Organs: Delver’s Drill (Recommended) Conchcutter Sawtooth Circlet Cogwork Wheel Architect Crust’s charge attacks Beast Crest’s downward attacks
- Skewered Organs: Longpin (Recommended) Sting Shard
Once you have all the required organs, return at any point to the Huntress in her cave in the Putrified Ducts, and exhaust her dialogue to complete the Broodfeast quest. As a reward, she’ll bequeath to you the Longclaw - a tool which slightly (but noticeably) increases the reach of all your melee attacks.
3. Complete the Couriers’ quests.
If you’ve been doing some Wishwall quests on the side while following this walkthrough, you might’ve already partially (or fully) completed this next step. Ever since you defeated Widow and freed Bellhart, a questline has been available starting with the “My Missing Courier” quest.
The “missing courier” in question is Tipp, and he can be found on the left-hand side of the massive outside shaft above Bone Bottom, about halfway between the two entrances to the Wormways. Drop down from above to reach them, and kill the creatures hounding them.
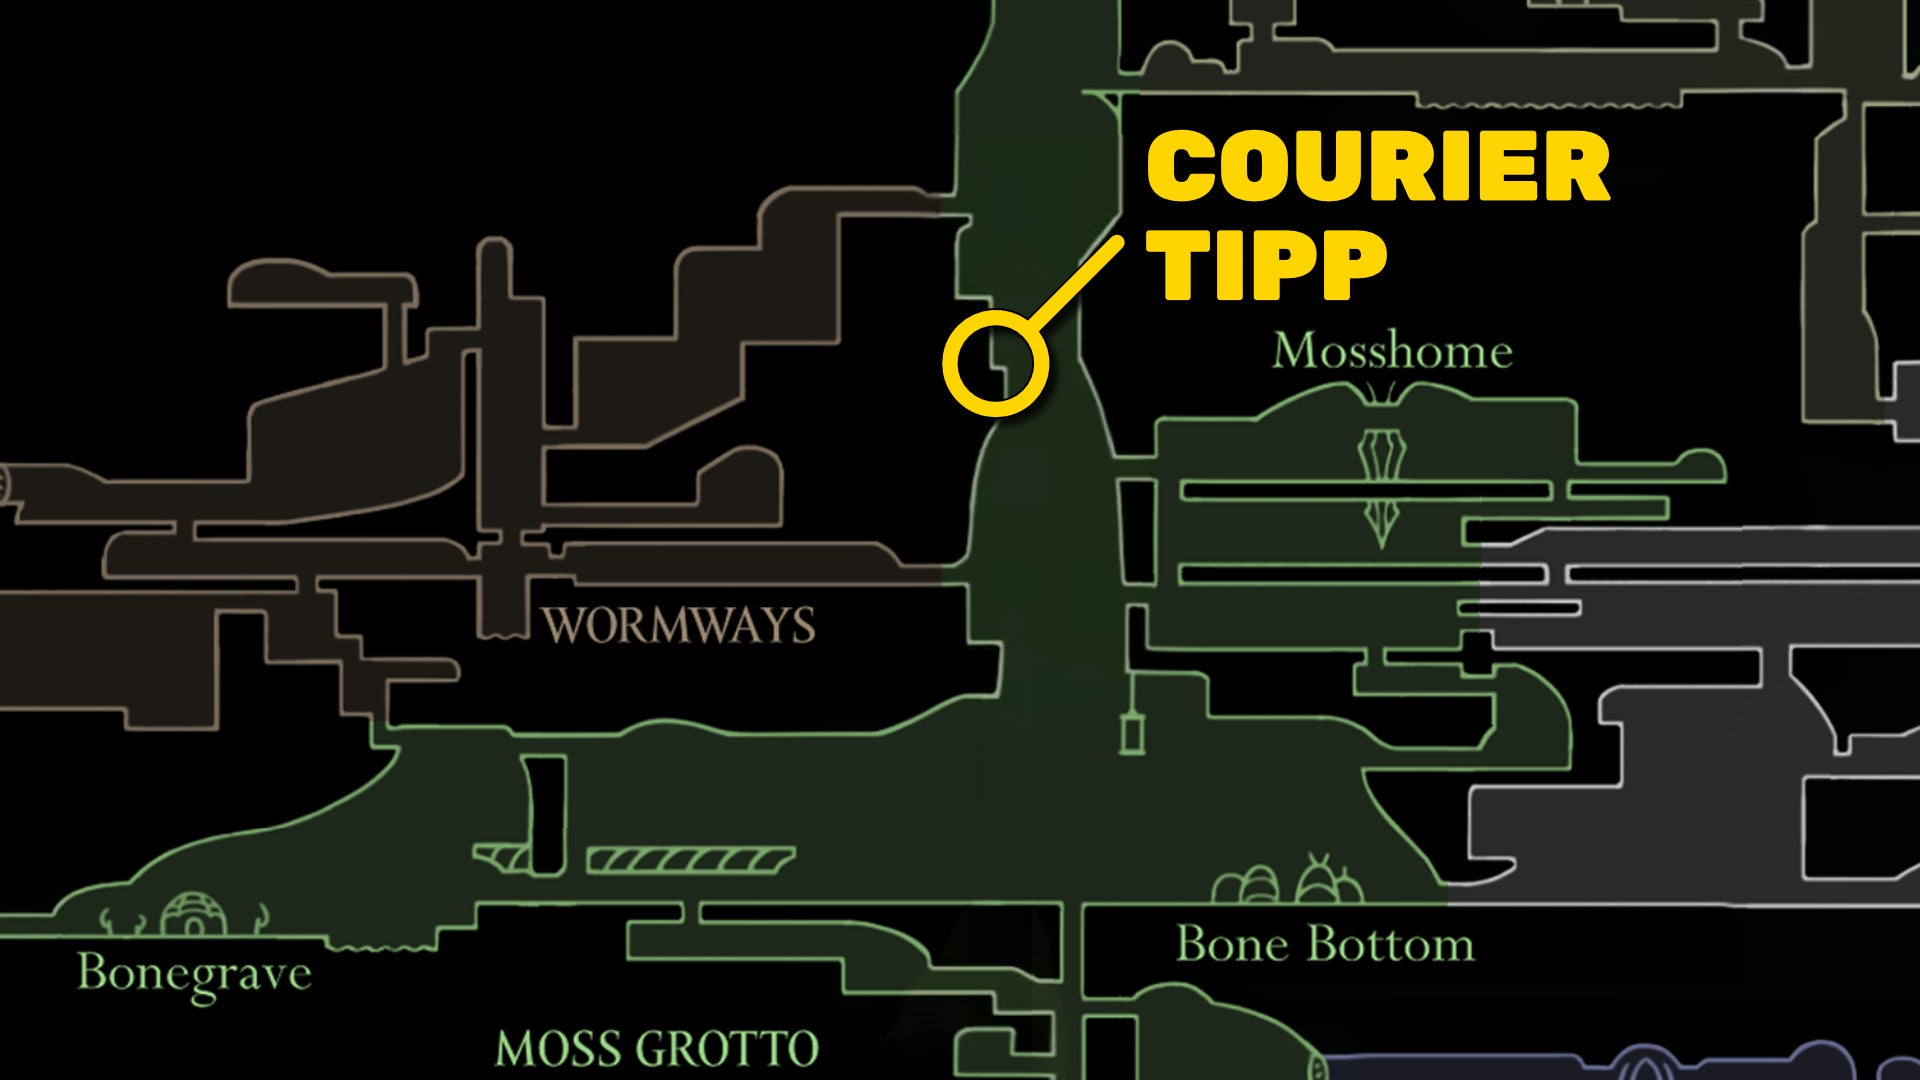
Image credit:Rock Paper Shotgun/Team Cherry
Once you’ve done this, you’ll find another Wish on the Bellhart Wishwall - “My Missing Brother”. Tipp has a brother called Pill, who is also missing. To find them, head into Sinner’s Road. You know the large room with all the crates, where you can find Crull and Benjin on the right-hand side? Head to the top-left of that large room and you’ll be able to save Pill from the enemies attacking them.
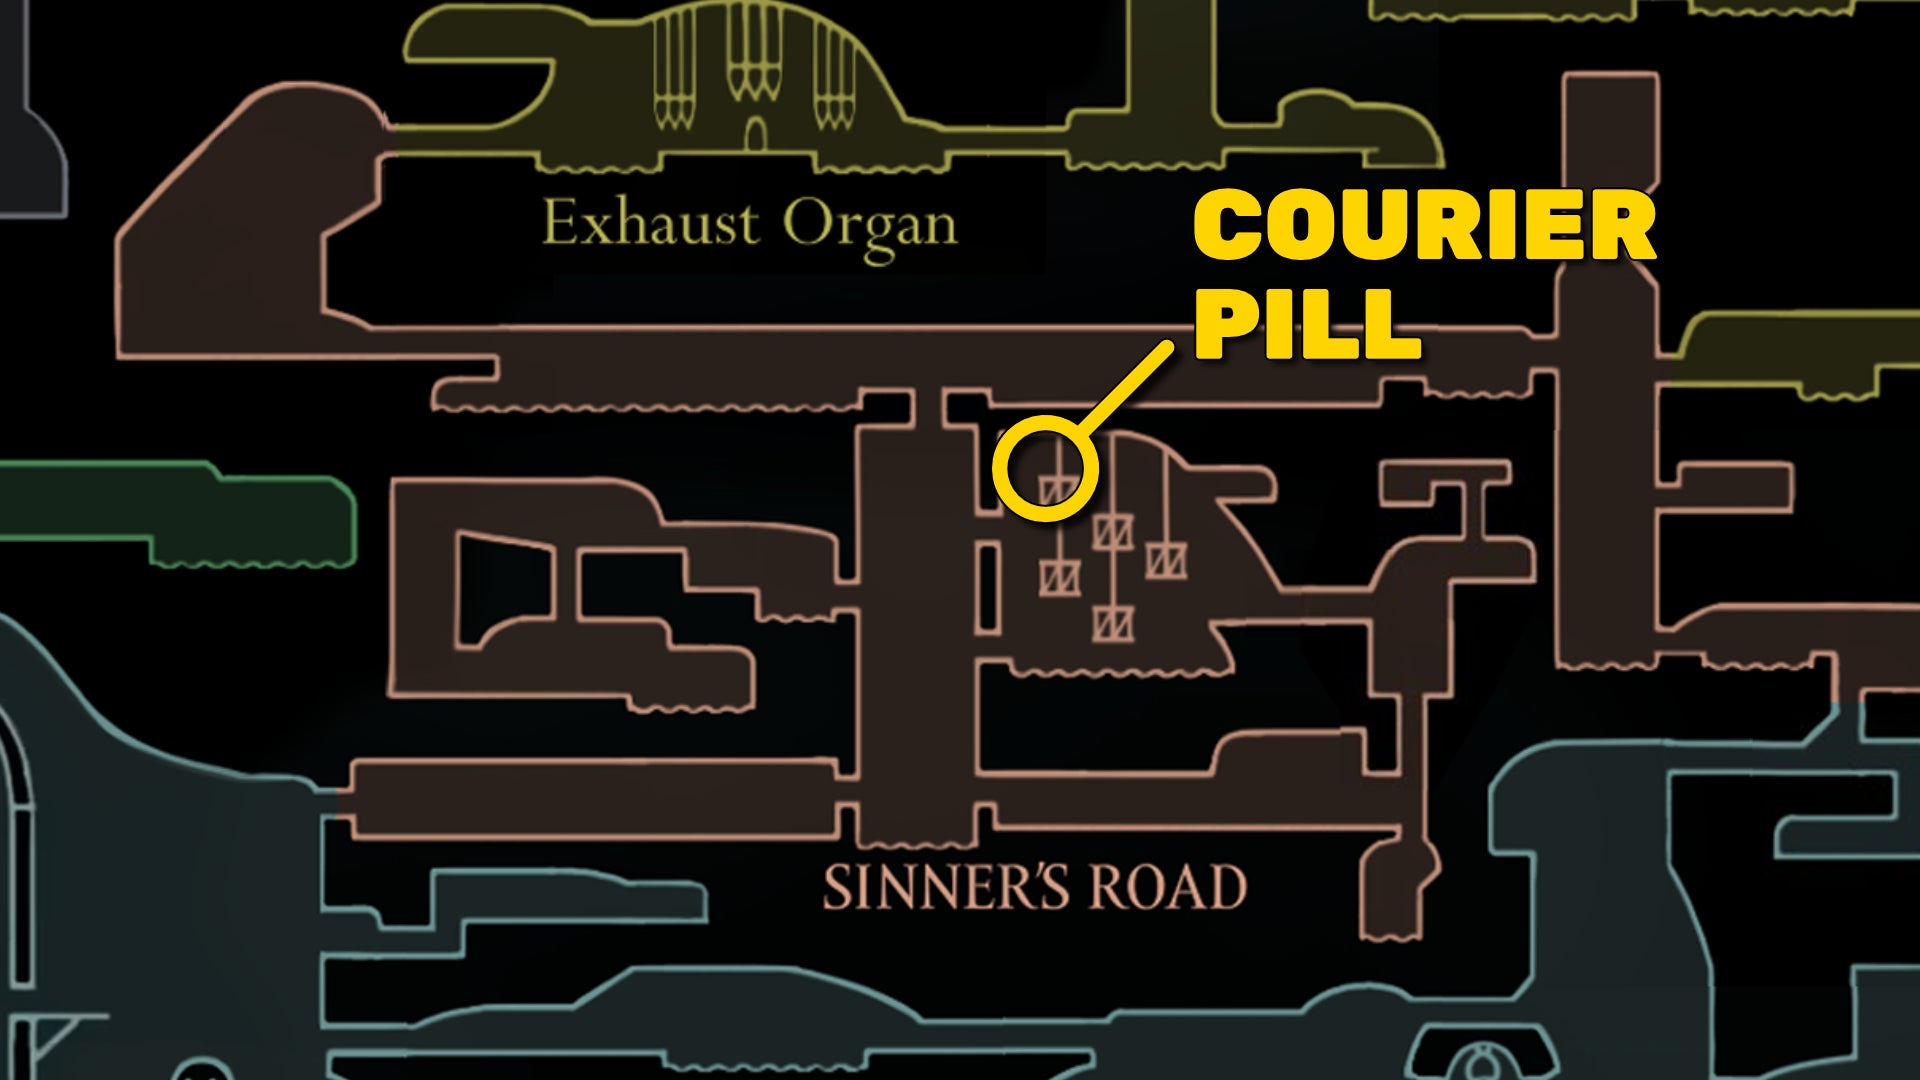
Image credit:Rock Paper Shotgun/Team Cherry
With both couriers saved, you can speak with them on the upper level of Bellhart. They’ll offer you various repeatable courier quests where you must safely transport cargo to different places without using any fast travel, and without taking too much damage (or the cargo breaks). A couple of these quests are one-off, however, and involve other NPCs and their quests - for example, the quest to deliver the Queen’s Egg to Styx in Sinner’s Road. And another delivery, which ties in with the next step…
4. Finish Great Taste Of Pharloom.
It’s now time to finish the Great Taste Of Pharloom quest, and retrieve the Pale Oil that Loyal Mergwin has been keeping under lock and key all this time. If you’ve been following this walkthrough, you already have the Pickled Muckmaggot and the Crustnut, two of the five ingredients required. The others are fairly easy to obtain, so let’s deal with them now.

Image credit:Rock Paper Shotgun/Team Cherry
To get the Mossberry Stew, head to The Marrow Bellway, and then ascend a little higher to visit the Moss Druid. She’ll give you the Mossberry Stew free of charge.
Next, head to the Halfway Home in Greymoor, and speak with Creige. Ask him for the Vintage Nectar, and pay him 480 Rosaries for it. He’ll open the way down into the cellar below. Be warned - this is actually an arena fight in disguise. As you descend and go to pick up the Nectar, you’ll be attacked by waves of ant enemies, including a Skarrgard near the end. By this point in the game they shouldn’t pose much of an issue to you though.
Finally, you need to speak with Couriers Tipp and Pill in Bellhart, and ask for a Courier’s Rasher. This acts as one of Tipp and Pill’s courier quests - you need to very quickly make your way up to Loyal Mergwin in the Choral Chambers from Bellhart, without using fast travel or taking too much damage. You’re also on a tough time limit based on the meat’s “freshness”. Here’s the best route to take:
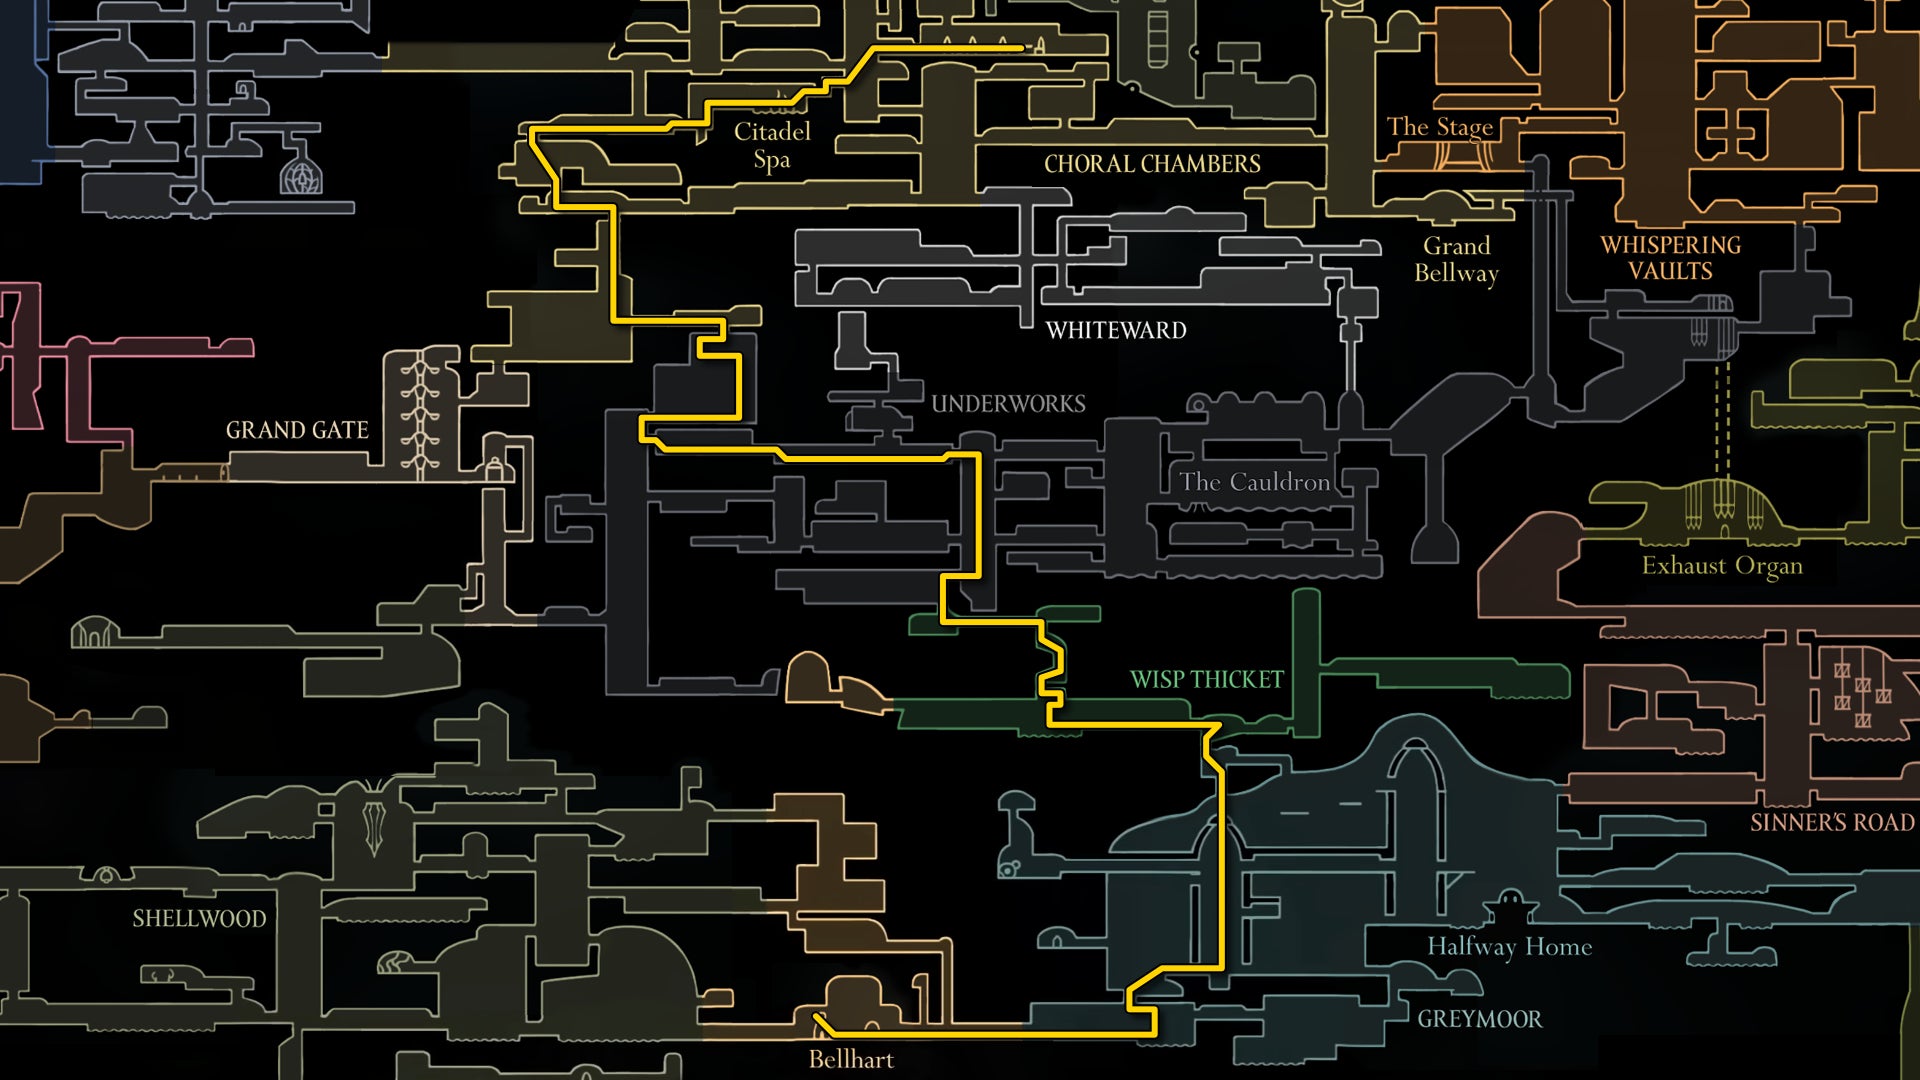
Image credit:Rock Paper Shotgun/Team Cherry
Once you’ve reached Loyal Mergwin with the Rasher intact, present all your ingredients to him there and then, and he’ll create a meal for his master, the Grand Gourmand. Afterwards, he’ll allow you to take the Pale Oil - after which you should immediately head back to Plinney and get another weapon upgrade for the low low price of 450 Rosaries.
5. Unlock your Bellhome.

Image credit:Rock Paper Shotgun/Team Cherry
While you’re in Bellhart, it’s about time you got yourself a permanent place of residence here (if you haven’t already). To do this, you need to complete both Bellhart’s donation Wishes (“Restoration Of Bellhart”, and “Bellhart’s Glory”).
The first donation quest appears as soon as you defeat Widow, give Scrounge any relic, and receive your first damage upgrade from Plinney. The donation amount is 250 Rosaries.
The second donation quest appears some time after completing the first, and requires you to donate an additional 400 Rosaries. Once you’ve done this, reload the area and speak with Pavo, the singing bug near the Bellhart Bench. He’ll give you the Bellhome Key, allowing you to unlock the top-left Bellhome in the upper sections of Bellhart.

Image credit:Rock Paper Shotgun/Team Cherry
Inside, you have access to a Bench and you can also assemble the Materium, allowing you to read about all the resources and substances you’ve discovered so far. You can also now speak with the shopkeeper Frey below, and unlock more nice things in and around your Bellhome, including a personal spa, a Desk, and several decorative items.
6. Complete all Wishwall quests.
Now we’re getting more broad - if you want to leave no stone unturned before ascending to the final boss fight of Act 2, then you should spend time completing the various Wishwall quests in all three settlements: Bone Bottom, Bellhart, and Songclave.
I won’t guide you through all of these quests because most of them are fairly simple, but here’s the full list of all Wishes you can complete before the end of Act 2:
| Quest | Location | Prior Quest(s) | Reward |
|---|---|---|---|
| Bone Bottom Repairs | Bone Bottom | None | None |
| Garb Of The Pilgrims | Bone Bottom | None | Rosary Necklace |
| A Lifesaving Bridge | Bone Bottom | None | Bridge built |
| Volatile Flintbeetles | Bone Bottom | None | Memory Locket |
| The Terrible Tyrant | Bone Bottom | None | Heavy Rosary Necklace |
| An Icon Of Hope | Bone Bottom | None | Hornet Statuette |
| Silver Bells | Bellhart | None | Rosary Necklace |
| My Missing Courier | Bellhart | None | Frey’s shop expands |
| My Missing Brother | Bellhart | My Missing Courier | None |
| Queen’s Egg | Bellhart | My Missing Brother | 260 Rosaries |
| Liquid Lacquer | Bellhart | Queen’s Egg | 650 Rosaries |
| Crawbug Clearing | Bellhart | None | Crafting Kit Upgrade |
| Pinmaster’s Oil | Bellhart | None | Weapon upgrade |
| Restoration Of Bellhart | Bellhart | None | None |
| Bellhart’s Glory | Bellhart | Restoration Of Bellhart | Bellhome Key |
| Savage Beastfly | Bellhart | None | Mask Shard |
| Building Up Songclave | Songclave | None | None |
| Fine Pins | Songclave | None | Heavy Rosary Necklace |
| The Wandering Merchant | Songclave | None | Jubilana’s Shop |
| Balm For The Wounded | Songclave | None | Spool Fragment |
| Cloaks Of The Choir | Songclave | Building Up Songclave, Fine Pins | Heavy Rosary Necklace |
| Strengthening Songclave | Songclave | Building Up Songclave | None |
| The Lost Merchant | Songclave | Strengthening Songclave | Jubilana’s shop expands |
| The Wailing Mother | Songclave | Strengthening Songclave | Heavy Rosary String |
| Final Audience | Songclave | Awaken Second Sentinel | Reserve Bind |
| The Lost Fleas | The Marrow | None | Travel to Greymoor |
| Berry Picking | Mosshome | None | Druid’s Eye |
| Flexile Spines | Far Fields | None | Drifter’s Cloak |
| Rite Of The Pollip | Shellwood | None | Pollip Pouch |
| Rite Of Rebirth | Shellwood | Rite Of The Pollip | None |
| Infestation Operation | Shellwood | Rite Of Rebirth | Witch Crest |
| Bugs Of Pharloom | Halfway Home | None | Tool Pouch Upgrade |
| Roach Guts | Sinner’s Road | None | Tacks |
| Alchemist’s Assistant | Wormways | None | Plasmium Phial |
| Great Taste Of Pharloom | Choral Chambers | None | Pale Oil |
| Broodfeast | Putrified Ducts | None | Longclaw |
| Trail’s End | Any Wishwall | Meet Shakra everywhere | Throwing Ring |
7. Purchase every item from every shop.

Here’s an extra tip from Ollie…
If you’re in need of Rosaries, the best place to collect them at this stage of the game is at the top-left corner of the Choral Chambers, just below the entrance to the High Halls. Rest at the Bench, kill the Pilgrims to the right, rinse and repeat. Equip Sharpdart or Silkspear infused with the Volt Filament tool to quickly kill them all.
Similarly, if you want to be as powerful as possible ahead of the final boss, now is a very good time to build up a large supply of Rosaries and buy out all the single-purchase items at every shop. The shops in question are:
- Pebb (Bone Bottom)
- Forge Daughter (Deep Docks)
- Mort (Far Fields)
- Mottled Skarr (Hunter’s March)
- Frey (Bellhart)
- Grindle (Blasted Steps)
- Twelfth Architect (Underworks)
- Jubilana (Songclave)
Of particular interest will be any upgrade items, such as Spool Fragments and especially Mask Shards. Also, Frey’s Multibinder, the Forge Daughter’s Magma Bell, Mort’s Weighted Belt, and Mottled Skarr’s Fractured Mask are among the most powerful and essential tools in Silksong, so make sure you’ve bought these at the very least.
8. Bind Eva.
By around this point, you should have found all 18 Memory Lockets that are available before the end of Act 2. This should be enough to fully unlock every slot in all of your Crests. Here’s a map of all the Memory Lockets’ locations in case you’re missing one or two:
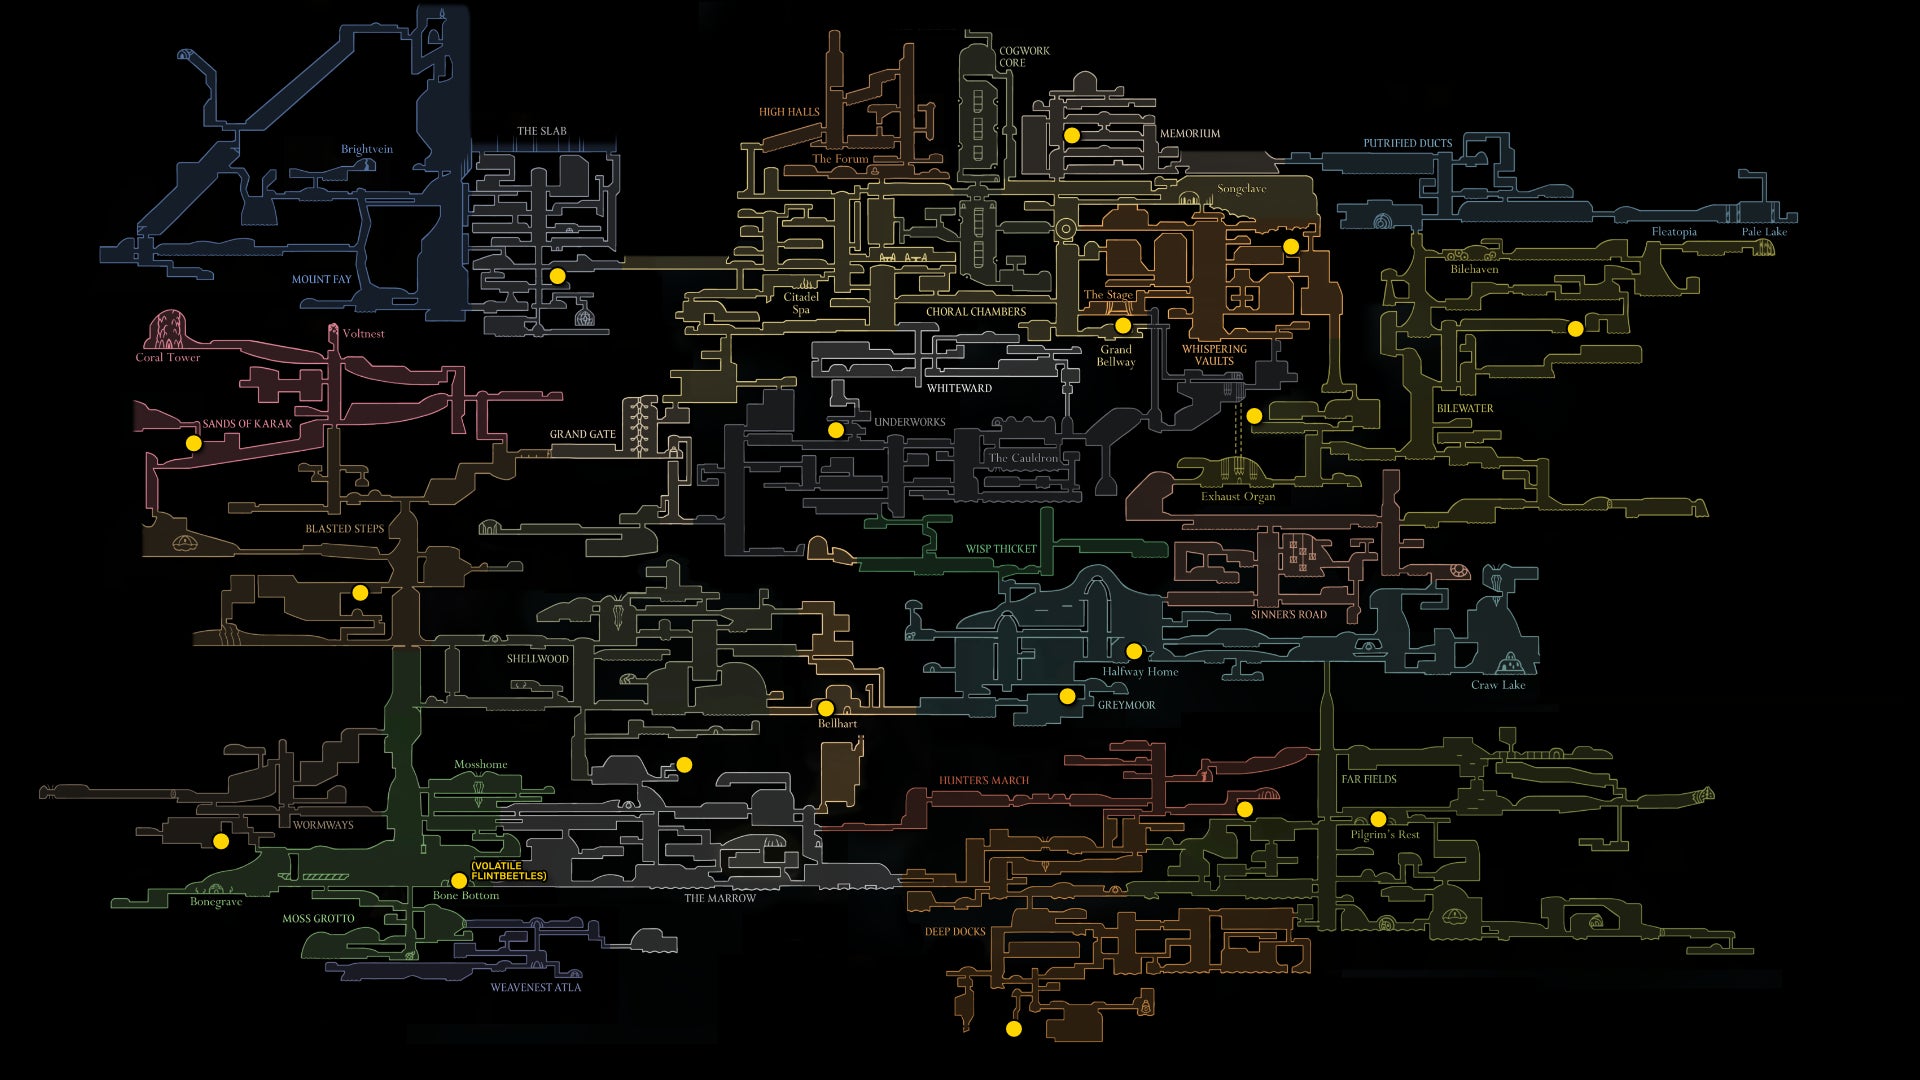
Image credit:Rock Paper Shotgun/Team Cherry
Take this moment to unlock every slot on every Crest, even the ones you don’t use. Once you’ve done that, fast travel to Bone Bottom, duck down into Moss Grotto , and open the Needolin door to Weavenest Atla.

Image credit:Rock Paper Shotgun/Team Cherry
Use the teleporter to reach the bottom of the Weavenest, and then head to the right to visit the mysterious Eva. With all 18 Memory Lockets, she’ll give you a number of rewards (if you haven’t visited her in the interim), including a Vesticrest Upgrade which allows you to equip a yellow and a blue slot tool in addition to your Crest slots.
The true reward, though, is that after obtaining and using all 18 Memory Lockets, Eva will ask you to Bind her. Do so, and you’ll free her from her strange imprisoned existence, and she’ll provide you with the incredibly powerful Sylphsong ability - a passive ability which allows Silk to regenerate while you’re resting at a Bench.

Image credit:Rock Paper Shotgun/Team Cherry
9. Complete Loddie’s challenge.
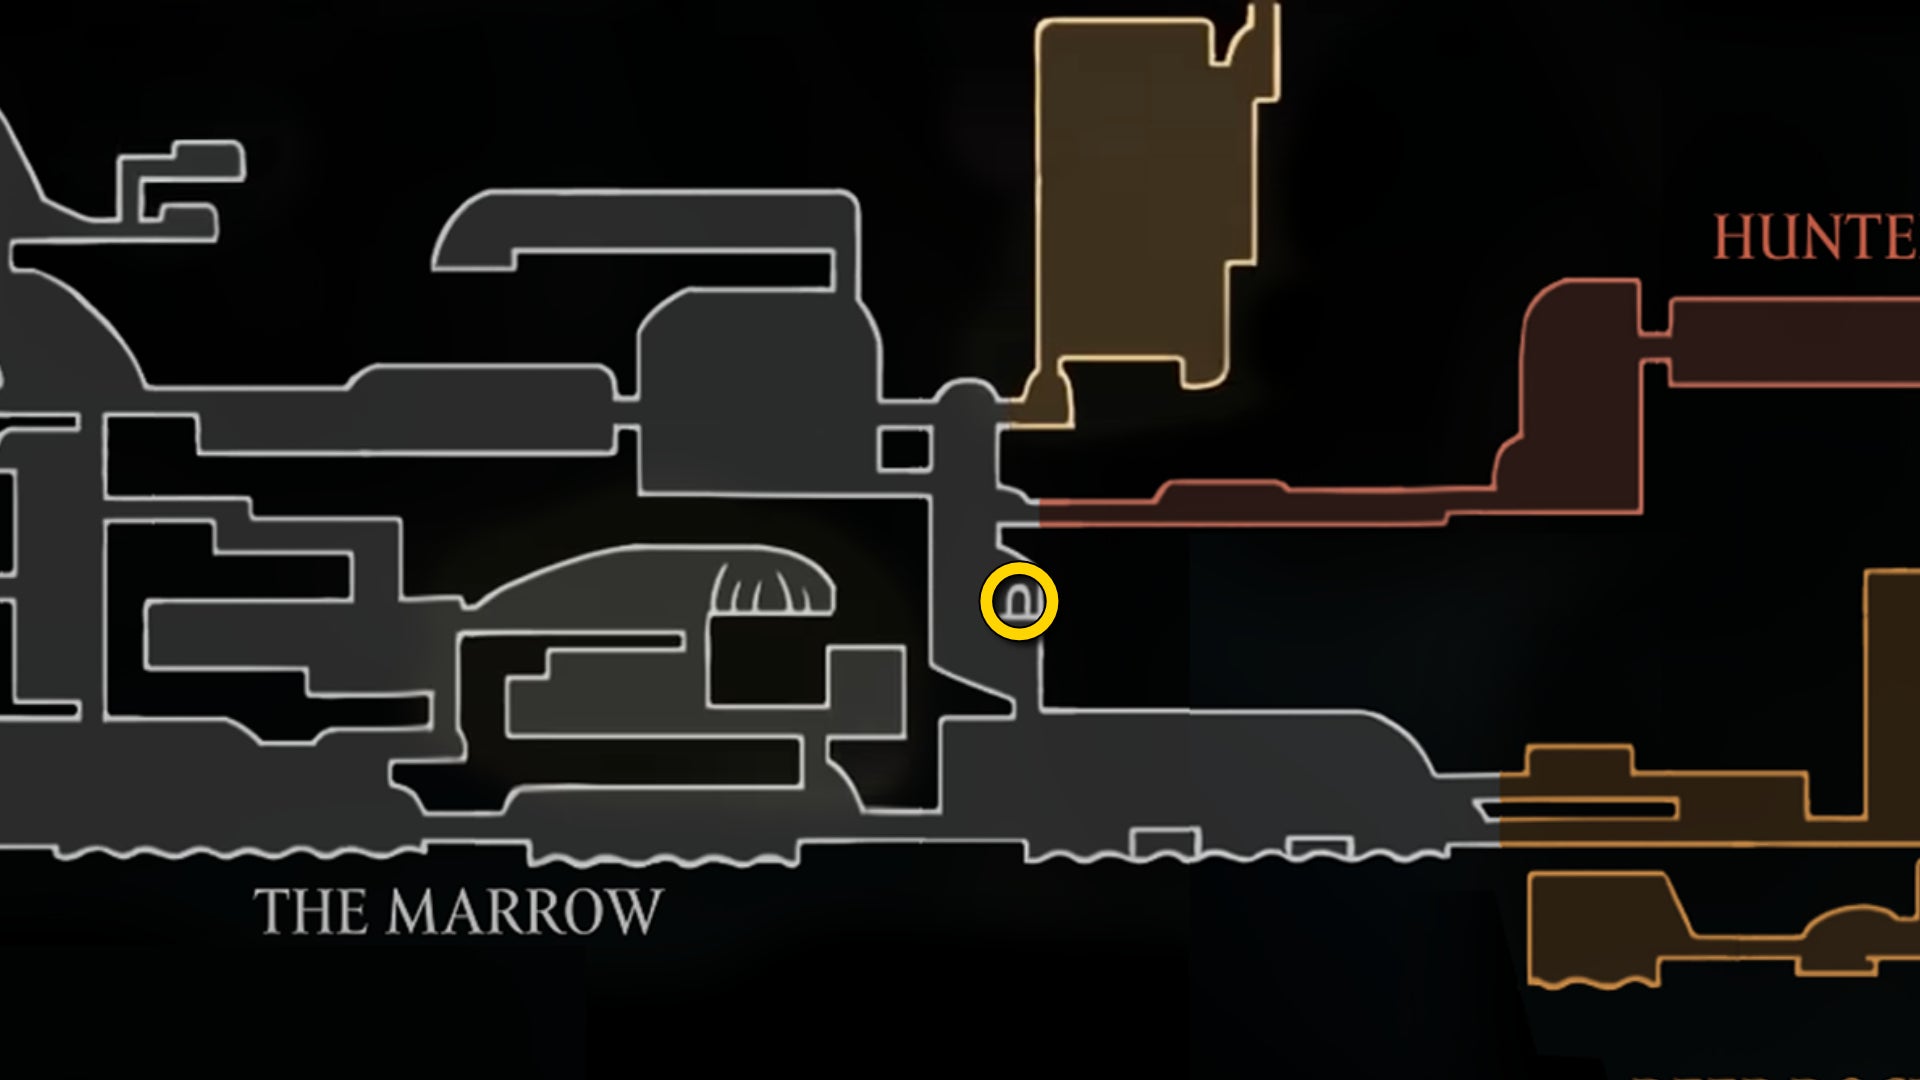
Image credit:Rock Paper Shotgun/Team Cherry
Remember that little jail where you first met (and freed) Grindle, within The Marrow? By this point it’s long since been taken over by Loddie, an NPC who has set up a dart-throwing minigame there for you to try.

Image credit:Rock Paper Shotgun/Team Cherry
Head over to the jail - in case you’ve forgotten, it’s just below the path that leads from The Marrow into Hunter’s March. Speak with Loddie to begin the minigame, where you must hit the ladybird target using throwing darts. You’re only allowed to jump - you cannot cross the red line at your feet, or you’ll be disqualified.

Image credit:Rock Paper Shotgun/Team Cherry
Hit the target 15 times, and Loddie will reward you with a Tool Pouch Upgrade. Strike the target 25 times, and he’ll hand over a Heavy Rosary Necklace. The downside is that you have to pay Loddie 25 Rosaries each time you want to try the challenge. That bastard.
10. Fill out your Hunter’s Journal.
Nuu’s Hunter’s Journal is a compendium that you will of course continue to fill out well into Act 3. But at the very least you should try to complete Nuu’s quest by adding 100 enemies to the Journal if you haven’t already done so. Once you’ve got 100, speak with Nuu in the Halfway Home again and she’ll give you a Tool Pouch Upgrade for your trouble.

Image credit:Rock Paper Shotgun/Team Cherry
If you like, you can also spend time ensuring that you’ve unlocked the entries for every Act 1 and Act 2 enemy, but this will be very time-consuming and not necessary to complete before the end of Act 2.
11. Hand in all your collectibles.
Another thing you can do at this point, for completion’s sake, is to hand in all your collectible items to the relevant curators. By collectibles, I mean:
- Mossberries
- Relics (Bone Scrolls, Choral Commandments, Weaver Effigies, and Rune Harps)
- Psalm Cylinders
Mossberries should be given in to the Moss Druid in Mosshome - your final reward is that she’ll upgrade the Druid’s Eye tool to its more powerful Druid’s Eyes form.
The others will simply provide you with Rosaries as a reward for each Relic or Psalm Cylinder handed in (to Scrounge in Bellhart and Vaultkeeper Cardinius in the Whispering Vaults, respectively). In case you missed any, consult the map below!
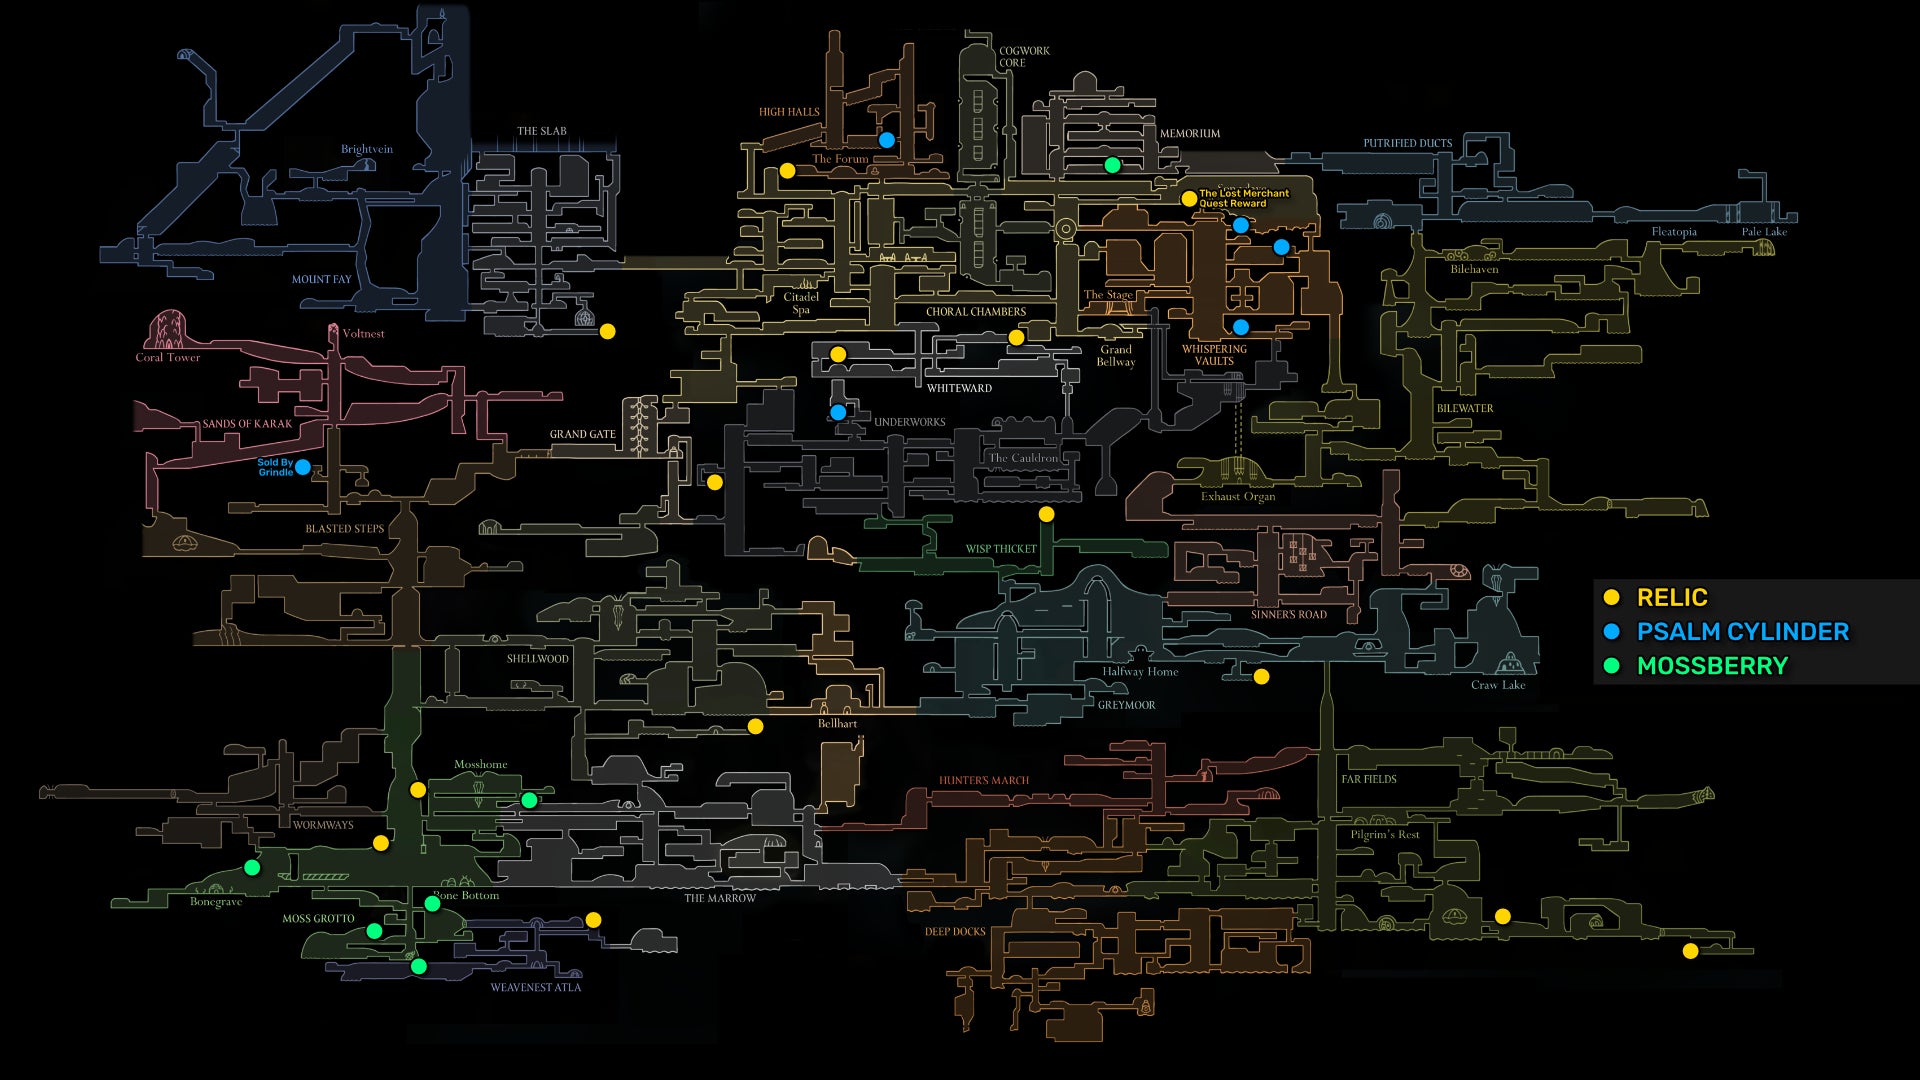
Image credit:Rock Paper Shotgun/Team Cherry
12. Duel with Shakra.
You’ve pretty much completed everything there is to complete before reaching the end of Act 2. Just one side task is left - a friendly duel with one of Pharloom’s greatest warriors, and one of your greatest allies.
This is only available once you’ve completed Shakra’s Last Wish quest. Head to the area of Greymoor that’s right next to Bellhart, the flat section of land where the Flea Caravan once was located. Here you’ll find one of Shakra’s throwing rings on top of a stick in the ground. Attack it to sound a bell noise and summon Shakra from her tucked away spot in Bellhart.

Image credit:Rock Paper Shotgun/Team Cherry

Here’s an extra tip from Ollie…
With a bit of good timing, you can strike the rings that Shakra throws at you just before they hit you to avoid damage. It won’t deflect them back at her, but it will nullify all damage and is a good thing to remember for situations where you can’t dodge in time.
She’ll challenge you to a duel here. There are no rewards except for adding Shakra to the Hunter’s Journal, but it’s a very fun fight which will prepare you well for what’s ahead.
Shakra moves very quickly, and her constant barrage of throwing rings can be hard to read at first. Thankfully, she only has the one phase, and she doesn’t have a particularly high health pool, so once you get the rhythm down, it won’t take you too long to beat her.
Alright. Now that we’ve got all of this busywork out of the way, I think it’s time to play the Threefold Song and face the finale of Act 2. Join us in Part 33 of our Silksong walkthrough and I’ll show you what awaits in the Cradle at the top of Pharloom.


Hollow Knight: Silksong
PC , Nintendo Switch
Rock Paper Shotgun is better when you sign in
Sign in and join us on our journey to discover strange and compelling PC games.

All 75 Arc Raiders Blueprints and where to get them
These areas have the highest chance of giving you Blueprints

Image credit:Rock Paper Shotgun/Embark Studios

Looking for more Arc Raiders Blueprints? It’s a special day when you find a Blueprint, as they’re among the most valuable items in Arc Raiders. If you find a Blueprint that you haven’t already found, then you must make sure you hold onto it at all costs, because Blueprints are the key to one of the most important and powerful systems of meta-progression in the game.
This guide aims to be the very best guide on Blueprints you can find, starting with a primer on what exactly they are and how they work in Arc Raiders, before delving into exactly where to get Blueprints and the very best farming spots for you to take in your search.
We’ll also go over how to get Blueprints from other unlikely activities, such as destroying Surveyors and completing specific quests. And you’ll also find the full list of all 75 Blueprints in Arc Raiders on this page (including the newest Blueprints added with the Cold Snap update , such as the Deadline Blueprint and Firework Box Blueprint), giving you all the information you need to expand your own crafting repertoire.
In this guide:
- What are Blueprints in Arc Raiders?
- Full Blueprint list: All crafting recipes
- Where to find Blueprints in Arc Raiders Blueprints obtained from quests Blueprints obtained from Trials Best Blueprint farming locations

What are Blueprints in Arc Raiders?
Blueprints in Arc Raiders are special items which, if you manage to extract with them, you can expend to permanently unlock a new crafting recipe in your Workshop. If you manage to extract from a raid with an Anvil Blueprint, for example, you can unlock the ability to craft your very own Anvil Pistol, as many times as you like (as long as you have the crafting materials).
To use a Blueprint, simply open your Inventory while in the lobby, then right-click on the Blueprint and click “Learn And Consume” . This will permanently unlock the recipe for that item in your Workshop. As of the Stella Montis update, there are allegedly 75 different Blueprints to unlock - although only 68 are confirmed to be in the game so far. You can see all the Blueprints you’ve found and unlocked by going to the Workshop menu, and hitting “R” to bring up the Blueprint screen.
It’s possible to find duplicates of past Blueprints you’ve already unlocked. If you find these, then you can either sell them, or - if you like to play with friends - you can take it into a match and gift it to your friend so they can unlock that recipe for themselves. Another option is to keep hold of them until the time comes to donate them to the Expedition.
Full Blueprint list: All crafting recipes
Below is the full list of all the Blueprints that are currently available to find in Arc Raiders, and the crafting recipe required for each item:
| Blueprint | Type | Recipe | Crafted At |
|---|---|---|---|
| Bettina | Weapon | 3x Advanced Mechanical Components 3x Heavy Gun Parts 3x Canister | Gunsmith 3 |
| Blue Light Stick | Quick Use | 3x Chemicals | Utility Station 1 |
| Aphelion | Weapon | 3x Magnetic Accelerator 3x Complex Gun Parts 1x Matriarch Reactor | Gunsmith 3 |
| Combat Mk. 3 (Flanking) | Augment | 2x Advanced Electrical Components 3x Processor | Gear Bench 3 |
| Combat Mk. 3 (Aggressive) | Augment | 2x Advanced Electrical Components 3x Processor | Gear Bench 3 |
| Complex Gun Parts | Material | 2x Light Gun Parts 2x Medium Gun Parts 2x Heavy Gun Parts | Refiner 3 |
| Fireworks Box | Quick Use | 1x Explosive Compound 3x Pop Trigger | Explosives Station 2 |
| Gas Mine | Mine | 4x Chemicals 2x Rubber Parts | Explosives Station 1 |
| Green Light Stick | Quick Use | 3x Chemicals | Utility Station 1 |
| Pulse Mine | Mine | 1x Crude Explosives 1x Wires | Explosives Station 1 |
| Seeker Grenade | Grenade | 1x Crude Explosives 2x ARC Alloy | Explosives Station 1 |
| Looting Mk. 3 (Survivor) | Augment | 2x Advanced Electrical Components 3x Processor | Gear Bench 3 |
| Angled Grip II | Mod | 2x Mechanical Components 3x Duct Tape | Gunsmith 2 |
| Angled Grip III | Mod | 2x Mod Components 5x Duct Tape | Gunsmith 3 |
| Hullcracker | Weapon | 1x Magnetic Accelerator 3x Heavy Gun Parts 1x Exodus Modules | Gunsmith 3 |
| Launcher Ammo | Ammo | 5x Metal Parts 1x Crude Explosives | Workbench 1 |
| Anvil | Weapon | 5x Mechanical Components 5x Simple Gun Parts | Gunsmith 2 |
| Anvil Splitter | Mod | 2x Mod Components 3x Processor | Gunsmith 3 |
| ??? | ??? | ??? | ??? |
| Barricade Kit | Quick Use | 1x Mechanical Components | Utility Station 2 |
| Blaze Grenade | Grenade | 1x Explosive Compound 2x Oil | Explosives Station 3 |
| Bobcat | Weapon | 3x Advanced Mechanical Components 3x Light Gun Parts | Gunsmith 3 |
| Osprey | Weapon | 2x Advanced Mechanical Components 3x Medium Gun Parts 7x Wires | Gunsmith 3 |
| Burletta | Weapon | 3x Mechanical Components 3x Simple Gun Parts | Gunsmith 1 |
| Compensator II | Mod | 2x Mechanical Components 4x Wires | Gunsmith 2 |
| Compensator III | Mod | 2x Mod Components 8x Wires | Gunsmith 3 |
| Defibrillator | Quick Use | 9x Plastic Parts 1x Moss | Medical Lab 2 |
| ??? | ??? | ??? | ??? |
| Equalizer | Weapon | 3x Magnetic Accelerator 3x Complex Gun Parts 1x Queen Reactor | Gunsmith 3 |
| Extended Barrel | Mod | 2x Mod Components 8x Wires | Gunsmith 3 |
| Extended Light Mag II | Mod | 2x Mechanical Components 3x Steel Spring | Gunsmith 2 |
| Extended Light Mag III | Mod | 2x Mod Components 5x Steel Spring | Gunsmith 3 |
| Extended Medium Mag II | Mod | 2x Mechanical Components 3x Steel Spring | Gunsmith 2 |
| Extended Medium Mag III | Mod | 2x Mod Components 5x Steel Spring | Gunsmith 3 |
| Extended Shotgun Mag II | Mod | 2x Mechanical Components 3x Steel Spring | Gunsmith 2 |
| Extended Shotgun Mag III | Mod | 2x Mod Components 5x Steel Spring | Gunsmith 3 |
| Remote Raider Flare | Quick Use | 2x Chemicals 4x Rubber Parts | Utility Station 1 |
| Heavy Gun Parts | Material | 4x Simple Gun Parts | Refiner 2 |
| Venator | Weapon | 2x Advanced Mechanical Components 3x Medium Gun Parts 5x Magnet | Gunsmith 3 |
| Il Toro | Weapon | 5x Mechanical Components 6x Simple Gun Parts | Gunsmith 1 |
| Jolt Mine | Mine | 1x Electrical Components 1x Battery | Explosives Station 2 |
| Explosive Mine | Mine | 1x Explosive Compound 1x Sensors | Explosives Station 3 |
| Jupiter | Weapon | 3x Magnetic Accelerator 3x Complex Gun Parts 1x Queen Reactor | Gunsmith 3 |
| Light Gun Parts | Material | 4x Simple Gun Parts | Refiner 2 |
| Lightweight Stock | Mod | 2x Mod Components 5x Duct Tape | Gunsmith 3 |
| Lure Grenade | Grenade | 1x Speaker Component 1x Electrical Components | Utility Station 2 |
| Medium Gun Parts | Material | 4x Simple Gun Parts | Refiner 2 |
| Torrente | Weapon | 2x Advanced Mechanical Components 3x Medium Gun Parts 6x Steel Spring | Gunsmith 3 |
| Muzzle Brake II | Mod | 2x Mechanical Components 4x Wires | Gunsmith 2 |
| Muzzle Brake III | Mod | 2x Mod Components 8x Wires | Gunsmith 3 |
| Padded Stock | Mod | 2x Mod Components 5x Duct Tape | Gunsmith 3 |
| Shotgun Choke II | Mod | 2x Mechanical Components 4x Wires | Gunsmith 2 |
| Shotgun Choke III | Mod | 2x Mod Components 8x Wires | Gunsmith 3 |
| Shotgun Silencer | Mod | 2x Mod Components 8x Wires | Gunsmith 3 |
| Showstopper | Grenade | 1x Advanced Electrical Components 1x Voltage Converter | Explosives Station 3 |
| Silencer I | Mod | 2x Mechanical Components 4x Wires | Gunsmith 2 |
| Silencer II | Mod | 2x Mod Components 8x Wires | Gunsmith 3 |
| Snap Hook | Quick Use | 2x Power Rod 3x Rope 1x Exodus Modules | Utility Station 3 |
| Stable Stock II | Mod | 2x Mechanical Components 3x Duct Tape | Gunsmith 2 |
| Stable Stock III | Mod | 2x Mod Components 5x Duct Tape | Gunsmith 3 |
| Tagging Grenade | Grenade | 1x Electrical Components 1x Sensors | Utility Station 3 |
| Tempest | Weapon | 3x Advanced Mechanical Components 3x Medium Gun Parts 3x Canister | Gunsmith 3 |
| Trigger Nade | Grenade | 2x Crude Explosives 1x Processor | Explosives Station 2 |
| Vertical Grip II | Mod | 2x Mechanical Components 3x Duct Tape | Gunsmith 2 |
| Vertical Grip III | Mod | 2x Mod Components 5x Duct Tape | Gunsmith 3 |
| Vita Shot | Quick Use | 2x Antiseptic 1x Syringe | Medical Lab 3 |
| Vita Spray | Quick Use | 3x Antiseptic 1x Canister | Medical Lab 3 |
| Vulcano | Weapon | 1x Magnetic Accelerator 3x Heavy Gun Parts 1x Exodus Modules | Gunsmith 3 |
| Wolfpack | Grenade | 2x Explosive Compound 2x Sensors | Explosives Station 3 |
| Red Light Stick | Quick Use | 3x Chemicals | Utility Station 1 |
| Smoke Grenade | Grenade | 14x Chemicals 1x Canister | Utility Station 2 |
| Deadline | Mine | 3x Explosive Compound 2x ARC Circuitry | Explosives Station 3 |
| Trailblazer | Grenade | 1x Explosive Compound 1x Synthesized Fuel | Explosives Station 3 |
| Tactical Mk. 3 (Defensive) | Augment | 2x Advanced Electrical Components 3x Processor | Gear Bench 3 |
| Tactical Mk. 3 (Healing) | Augment | 2x Advanced Electrical Components 3x Processor | Gear Bench 3 |
| Yellow Light Stick | Quick Use | 3x Chemicals | Utility Station 1 |
Note: The missing Blueprints in this list likely have not actually been added to the game at the time of writing, because none of the playerbase has managed to find any of them. As they are added to the game, I will update this page with the most relevant information so you know exactly how to get all 75 Arc Raiders Blueprints.
Where to find Blueprints in Arc Raiders
Below is a list of all containers, modifiers, and events which maximise your chances of finding Blueprints:
- Certain quests reward you with specific Blueprints .
- Completing Trials has a high chance of offering Blueprints as rewards.
- Surveyors have a decent chance of dropping Blueprints on death.
- High loot value areas tend to have a greater chance of spawning Blueprints.
- Night Raids and Storms may increase rare Blueprint spawn chances in containers.
- Containers with higher numbers of items may have a higher tendency to spawn Blueprints. As a result, Blue Gate (which has many “large” containers containing multiple items) may give you a higher chance of spawning Blueprints.
- Raider containers (Raider Caches, Weapon Boxes, Medical Bags, Grenade Tubes) have increased Blueprint drop rates. As a result, the Uncovered Caches event gives you a high chance of finding Blueprints.
- Security Lockers have a higher than average chance of containing Blueprints.
- Certain Blueprints only seem to spawn under specific circumstances: Tempest Blueprint only spawns during Night Raid events. Vulcano Blueprint only spawns during Hidden Bunker events. Jupiter and Equaliser Blueprints only spawn during Harvester events.

Raider Caches, Weapon Boxes, and other raider-oriented container types have a good chance of offering Blueprints. |Image credit:Rock Paper Shotgun/Embark Studios
Blueprints have a very low chance of spawning in any container in Arc Raiders, around 1-2% on average. However, there is a higher chance of finding Blueprints in particular container types. Specifically, you can find more Blueprints in Raider containers and security lockers.
Beyond this, if you’re looking for Blueprints you should focus on regions of the map which are marked as having particularly high-value loot. Areas such as the Control Tower in Dam Battlegrounds, the Arrival and Departure Buildings in Spaceport, and Pilgrim’s Peak in Blue Gate all have a better-than-average chance of spawning Blueprints somewhere amongst all their containers. Night Raids and Electromagnetic Storm events also increase the drop chances of certain Blueprints .
In addition to these containers, you can often loot Blueprints from destroyed Surveyors - the largest of the rolling ball ARC. Surveyors are more commonly found on the later maps - Spaceport and Blue Gate - and if one spawns in your match, you’ll likely see it by the blue laser beam that it casts into the sky while “surveying”.
Surveyors are quite well-armoured and will very speedily run away from you once it notices you, but if you can take one down then make sure you loot all its parts for a chance of obtaining certain unusual Blueprints.
Blueprints obtained from quests
One way in which you can get Blueprints is by completing certain quests for the vendors in Speranza. Some quests will reward you with a specific item Blueprint upon completion, so as long as you work through all the quests in Arc Raiders, you are guaranteed those Blueprints.
Here is the full list of all Blueprints you can get from quest rewards:
- Trigger Nade Blueprint: Rewarded after completing “Sparks Fly”.
- Lure Grenade Blueprint: Rewarded after completing “Greasing Her Palms”.
- Burletta Blueprint: Rewarded after completing “Industrial Espionage”.
- Hullcracker Blueprint (and Launcher Ammo Blueprint): Rewarded after completing “The Major’s Footlocker”.
Alas, that’s only 4 Blueprints out of a total of 75 to unlock, so for the vast majority you will need to find them yourself during a raid. If you’re intent on farming Blueprints, then it’s best to equip yourself with cheap gear in case you lose it, but don’t use a free loadout because then you won’t get a safe pocket to stash any new Blueprint you find. No pain in Arc Raiders is sharper than failing to extract with a new Blueprint you’ve been after for a dozen hours already.

One of the best ways to get Blueprints is by hitting three stars on all five Trials every week. |Image credit:Rock Paper Shotgun/Embark Studios
Blueprints obtained from Trials
One of the very best ways to get Blueprints is as rewards for completing Trials in Arc Raiders. Trials are unlocked from Level 15 onwards, and allow you to earn rewards by focusing on certain tasks over the course of several raids. For example, one Trial might task you with dealing damage to Hornets, while another might challenge you to loot Supply Drops.
Trials refresh on a weekly basis, with a new week bringing five new Trials. Each Trial can offer up to three rewards after passing certain score milestones, and it’s possible to receive very high level loot from these reward crates - including Blueprints. So if you want to unlock as many Blueprints as possible, you should make a point of completing as many Trials as possible each week.
Best Blueprint farming locations
The very best way to get Blueprints is to frequent specific areas of the maps which combine high-tier loot pools with the right types of containers to search. Here are my recommendations for where to find Blueprints on every map, so you can always keep the search going for new crafting recipes to unlock.

Image credit:Rock Paper Shotgun/Embark Studios
Dam Battlegrounds
The best places to farm Blueprints on Dam Battlegrounds are the Control Tower, Power Generation Complex, Ruby Residence, and Pale Apartments . The first two regions, despite only being marked on the map as mid-tier loot, contain a phenomenal number of containers to loot. The Control Tower can also contain a couple of high-tier Security Lockers - though of course, you’ll need to have unlocked the Security Breach skill at the end of the Survival tree.
There’s also a lot of reporting amongst the playerbase that the Residential areas in the top-left of the map - Pale Apartments and Ruby Residence - give you a comparatively strong chance of finding Blueprints. Considering their size, there’s a high density of containers to loot in both locations, and they also have the benefit of being fairly out of the way. So you’re more likely to have all the containers to yourself.
Buried City
The best Blueprint farming locations on Buried City are the Santa Maria Houses, Grandioso Apartments, Town Hall, and the various buildings of the New District . Grandioso Apartments has a lower number of containers than the rest, but a high chance of spawning weapon cases - which have good Blueprint drop rates. The others are high-tier loot areas, with plenty of lootable containers - including Security Lockers.
Spaceport
The best places to find Blueprints on Spaceport are the Arrival and Departure Buildings, as well as Control Tower A6 and the Launch Towers . All these areas are labelled as high-value loot regions, and many of them are also very handily connected to one another by the Spaceport wall, which you can use to quickly run from one area to the next. At the tops of most of these buildings you’ll find at least one Security Locker, so this is an excellent farming route for players looking to find Blueprints.
The downside to looting Blueprints on Spaceport is that all these areas are hotly contested, particularly in Duos and Squads. You’ll need to be very focused and fast in order to complete the full farming route.

Image credit:Rock Paper Shotgun/Embark Studios
Blue Gate
Blue Gate tends to have a good chance of dropping Blueprints, potentially because it generally has a high number of containers which can hold lots of items; so there’s a higher chance of a Blueprint spawning in each container. In my experience, the best Blueprint farming spots on Blue Gate are Pilgrim’s Peak, Raider’s Refuge, the Ancient Fort, and the Underground Complex beneath the Warehouse .
All of these areas contain a wealth of containers to loot. Raider’s Refuge has less to loot, but the majority of the containers in and around the Refuge are raider containers, which have a high chance of containing Blueprints - particularly during major events.
Stella Montis
On the whole, Stella Montis seems to have a very low drop rate for Blueprints (though a high chance of dropping other high-tier loot). If you do want to try farming Blueprints on this map, the best places to find Blueprints in Stella Montis are Medical Research, Assembly Workshop, and the Business Center . These areas have the highest density of containers to loot on the map.
In addition to this, the Western Tunnel has a few different Security Lockers to loot, so while there’s very little to loot elsewhere in this area of the map, it’s worth hitting those Security Lockers if you spawn there at the start of a match.
That wraps up this primer on how to get all the Blueprints in Arc Raiders as quickly as possible. With the Expedition system constantly resetting a large number of players’ Blueprints, it’s more important than ever to have the most up-to-date information on where to find all these Blueprints.
While you’re here, be sure to check out our Arc Raiders best guns tier list , as well as our primers on the best skills to unlock and all the different Field Depot locations on every map.


ARC Raiders
PS5 , Xbox Series X/S , PC
Rock Paper Shotgun is better when you sign in
Sign in and join us on our journey to discover strange and compelling PC games.
