Hollow Knight Silksong walkthrough: Part 23 (Misc Quests 2)
There’s plenty more to explore now that you have the Clawline and Faydown Cloak

Image credit:Rock Paper Shotgun/Team Cherry

Where can you now access in Hollow Knight: Silksong with your Faydown Cloak and Clawline skills? You ought to know by now that anytime you unlock a new movement ability in Silksong, it opens the map way up. And if you’ve been following along with our walkthrough, you’ll have recently unlocked two movement techs in quick succession - the Clawline in the Underworks, and the Faydown Cloak at the top of Mount Fay. So where can you now go that you couldn’t reach before?
In Part 23 of our Hollow Knight: Silksong walkthrough , I’ll guide you along a step-by-step path of stops through previous regions, unlocking many new areas with the Clawline and Faydown Cloak. We’ll collect multiple new Mask Shards in quick succession, along with several new tools, some tricky arena fights, and a couple of very memorable bosses.
Want the walkthrough for a different area of the game? Check out our Hollow Knight: Silksong walkthrough hub!
Misc Quests 2 walkthrough steps:
- Obtain the Sharpdart from Weavenest Karn.
- Get the Snare Setter from Weavenest Atla.
- Defeat the Savage Beastfly in Far Fields.
- Complete Skull Cavern in Far Fields.
- Reach the Mask Shard in Blasted Steps.
- Speak to Grindle in Blasted Steps.
- Collect Lumble’s Magnetite Dice.
- Collect the Halfway Home Memory Locket.
- Find Disgraced Chef Lugoli in Sinner’s Road.
- Obtain the Witch’s Crest.
- Unlock the final part of the Whiteward.
- Defeat The Unravelled.

Image credit:Rock Paper Shotgun/Team Cherry
1. Obtain the Sharpdart from Weavenest Karn.


The first thing to do is fast travel all the way back to Bone Bottom, then take the elevator north and cross over into the dreaded Wormways. Head to the very end of the first corridor of worms, and climb up into the room above.
On your left is a Weavenest door that you can only now reach with your new movement abilities. Do a running jump off the upper ledge near the hole you came up from, and with a double-jump and a dash (or a clawline) you can reach the doorway. Play your Needolin to open the door and enter Weavenest Karn.
Weavenest Karn is little more than a single straightforward corridor, and the threats are the same as in the Wormways - worms dropping from the ceiling, and occasional Gromlings coming out from the floor to charge you. Just hop over them and head to the far end of the corridor, where you’ll find a Weaver monument. Interact with it to obtain the powerful Sharpdart skill.

Image credit:Rock Paper Shotgun/Team Cherry
Sharpdart is a strong contender for my favourite attack skill in Silksong. It does high damage, pierces multiple foes, and also acts as a movement ability, allowing Hornet to escape difficult spots. On your way back, try it out on one of the falling worms to finally kill one and reveal its true name - a Grom.
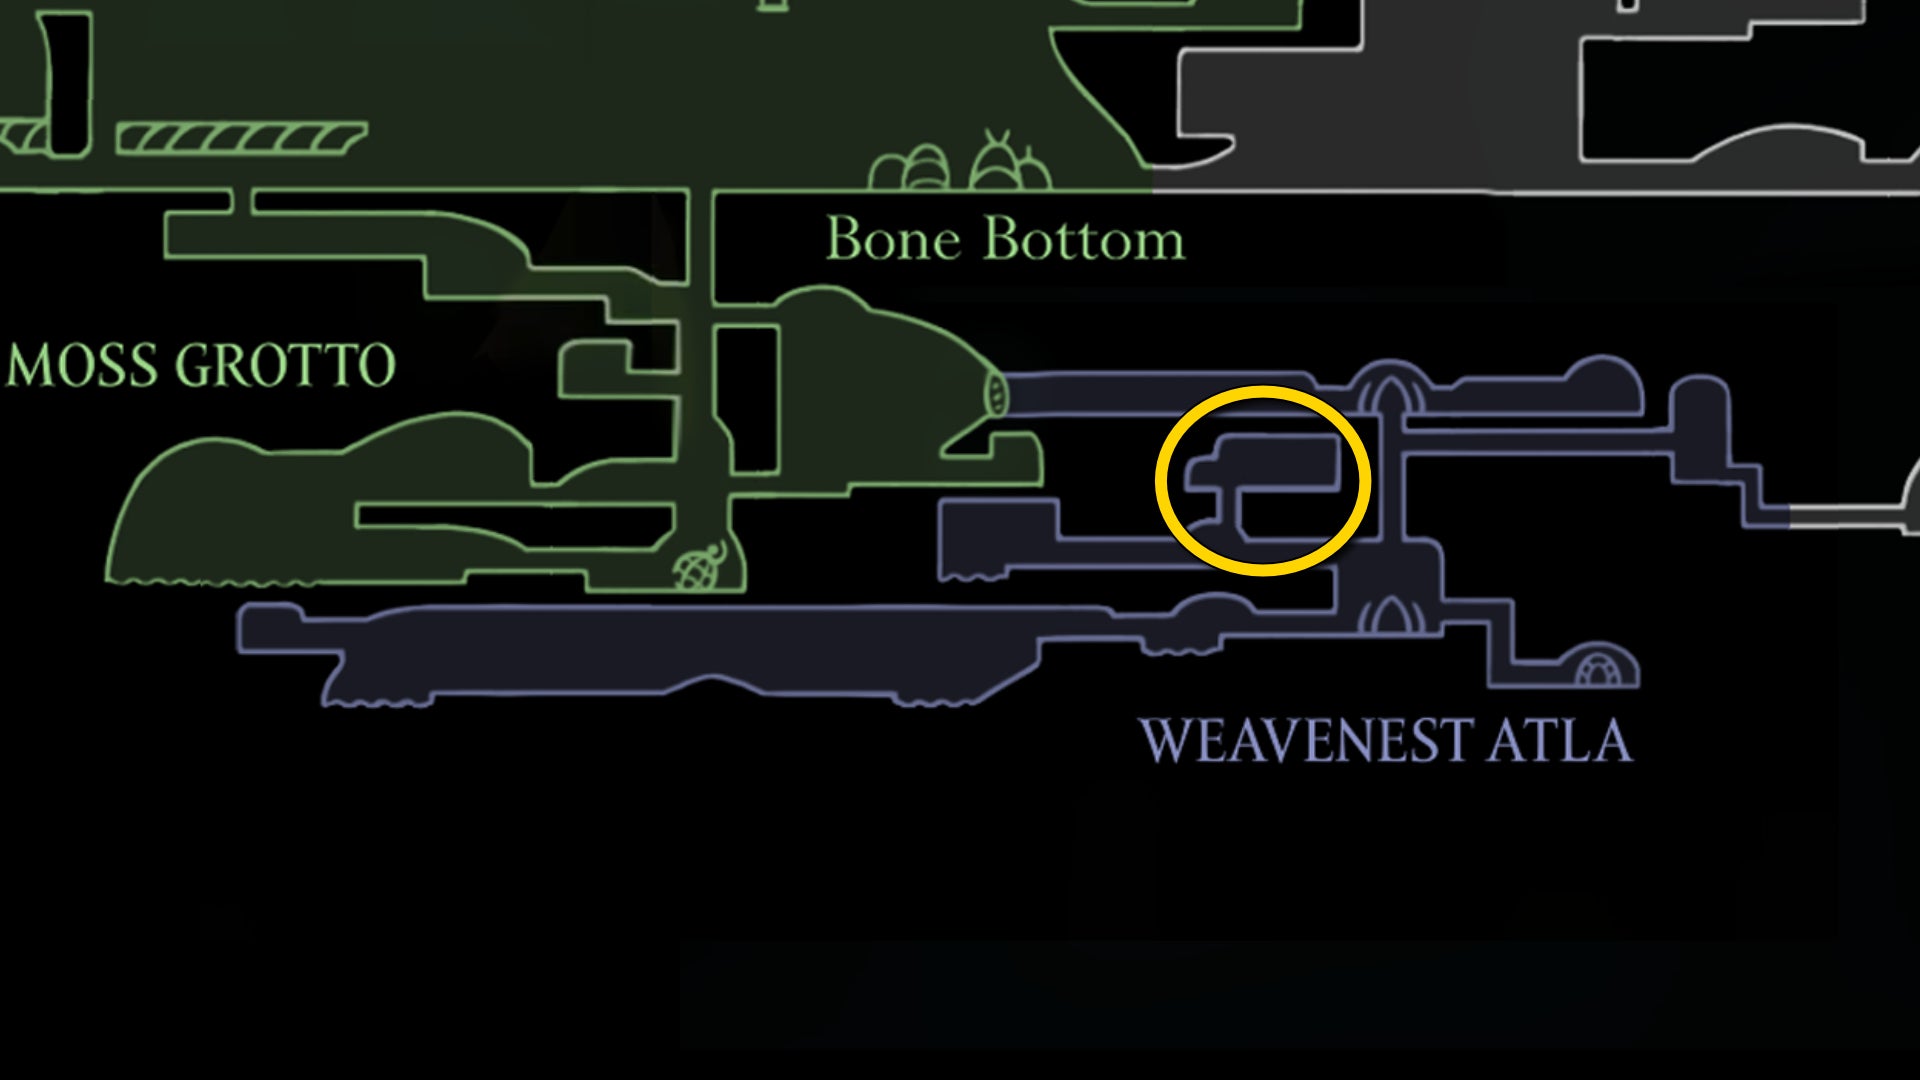
Image credit:Rock Paper Shotgun/Team Cherry
2. Get the Snare Setter from Weavenest Atla.
Your next stop is Weavenest Atla next to Moss Grotto , so head back down there and open the Needolin door into Atla. Take the teleporter down to the bottom, and then climb up the right-hand side and jump over to the upper-left walkway.


In the next room, just before you reach the lilypad pond, double-jump up towards the hole in the ceiling where the light shafts are coming in, and try to grab onto the right-hand side. From there you can climb upwards into a new room. On the right is a table; interact with it to take the Snare Setter tool.
Like the Silkshot tool you crafted in Mount Fay, this tool is of Weaver design - which means as well as requiring Shell Shards to craft the ammo, it also uses a little bit of your Silk every time you use it. When used, it places a Silk rune on the ground which activates when an enemy steps on it, dealing high damage in one go. It’s not useful in every situation of course, but it’s very powerful against bosses who like to stay on the ground and charge around everywhere.
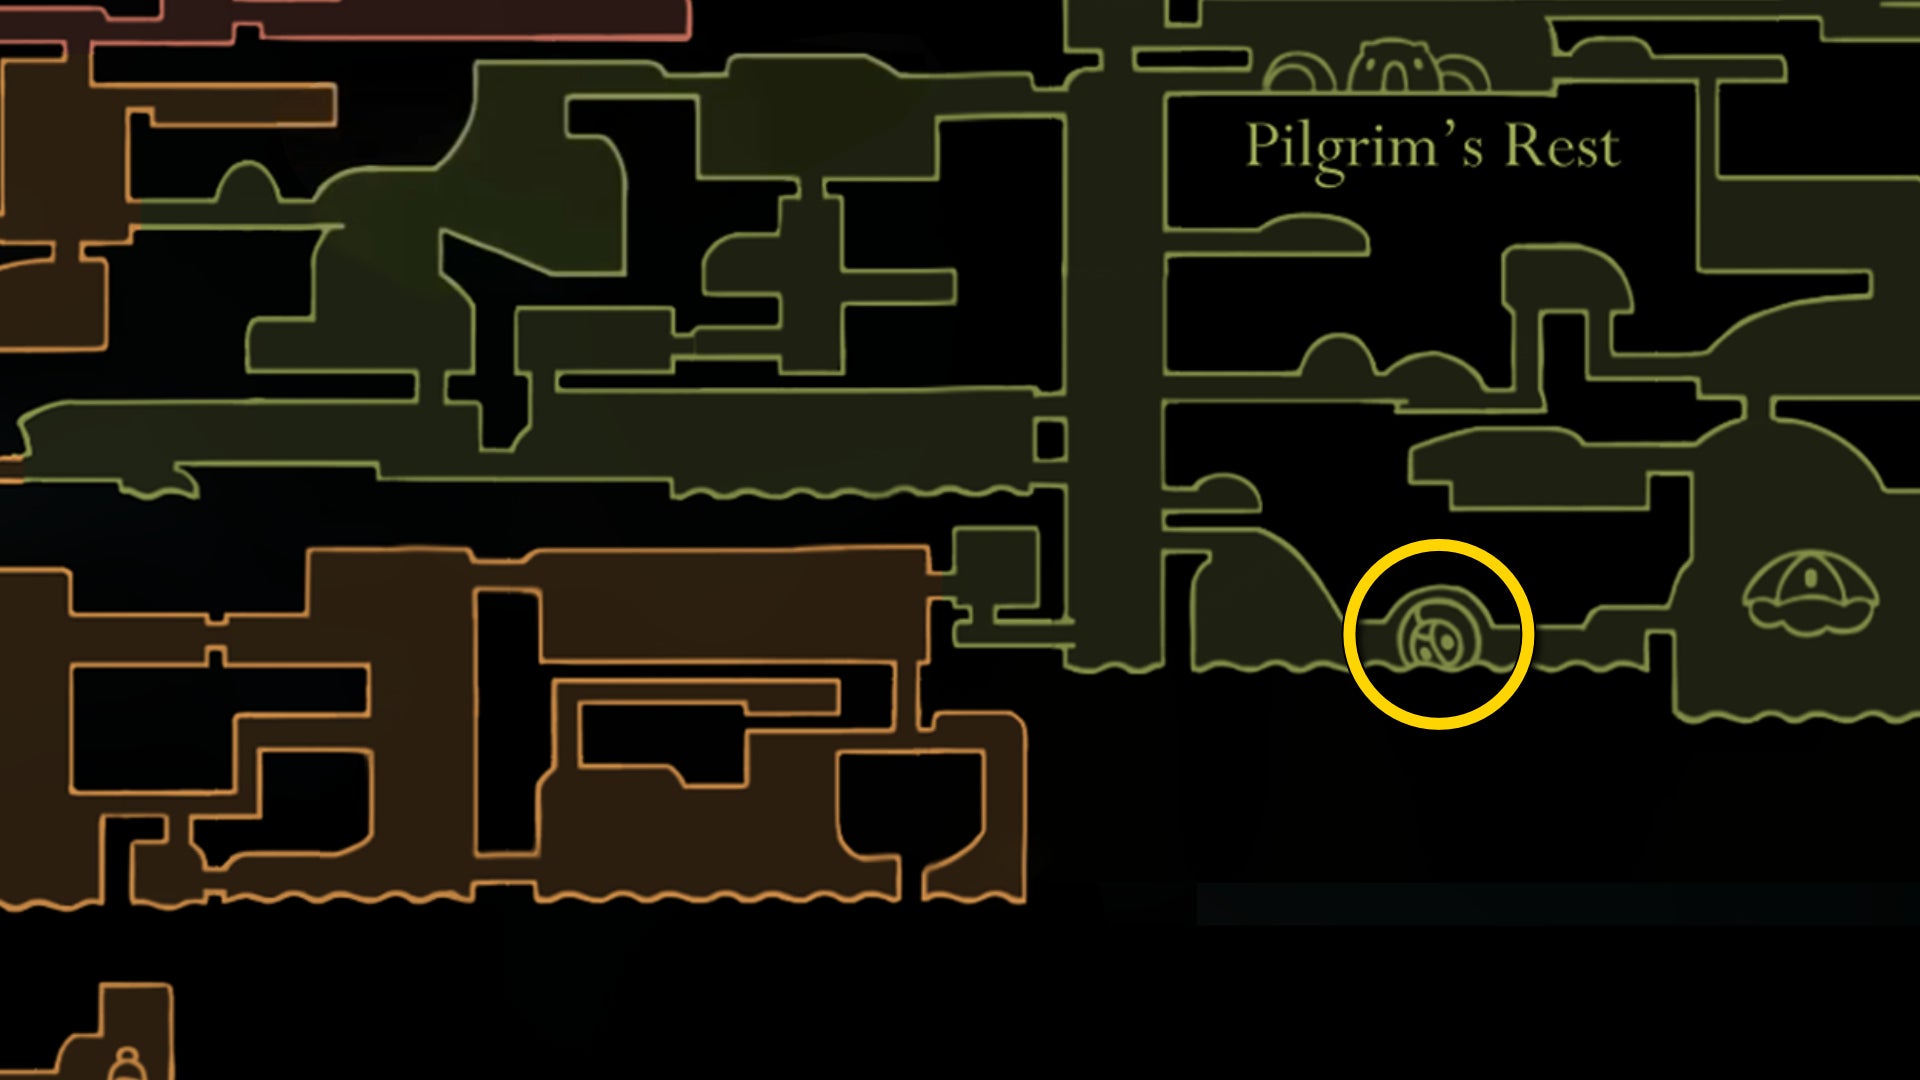
Image credit:Rock Paper Shotgun/Team Cherry
3. Defeat the Savage Beastfly in Far Fields.
If you haven’t already, now’s a good time to deal with the Grand Hunt quest on the Bellhart Wishwall. This quest tasks you with defeating another Savage Beastfly, like the one you found in the Chapel Of The Beast in Hunter’s March. This one’s found in Far Fields, so fast travel there and head to the arena where you fought the Fourth Chorus.
The Beastfly will spawn as you try to pass the Fourth Chorus arena. This one’s harder than the last Beastfly you fought, simply because the floor under you is frequently destroyed by its attacks (just as in the Fourth Chorus fight in the same location).

Image credit:Rock Paper Shotgun/Team Cherry
The Beastfly will also spawn a new kind of enemy - a flying creature called a Tarmite, which spits explosive fire projectiles at you. Don’t underestimate these little minions - they will absolutely destroy you if you leave them unchecked. I urge you to equip your Silkspear or your new Sharpdart so you can deal with them easily in a single hit before returning your focus to the Beastfly.
Once it’s dead, loot its Horn Fragment and return to Bellhart for the ample reward of another Mask Shard!
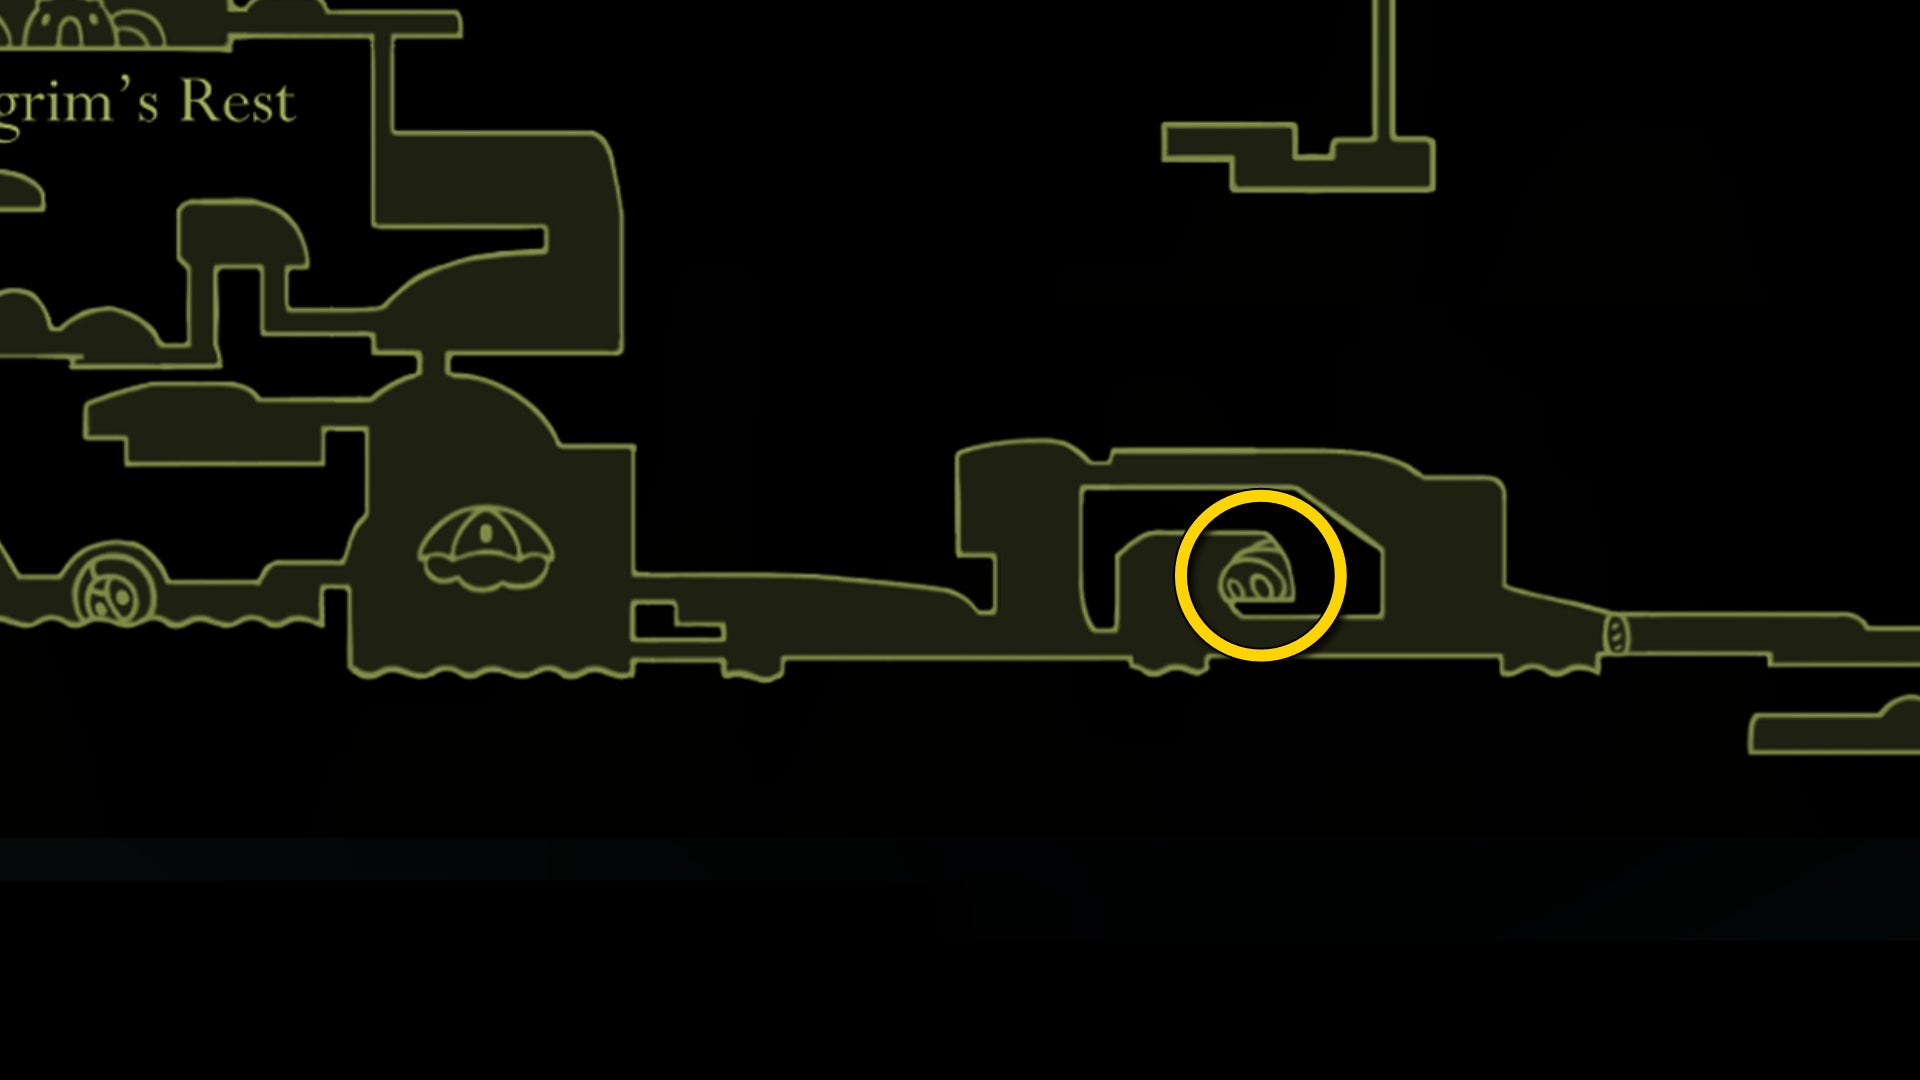
Image credit:Rock Paper Shotgun/Team Cherry
4. Complete Skull Cavern in Far Fields.

Image credit:Rock Paper Shotgun/Team Cherry
Your next objective is also in Far Fields, and it’s a tricky one. To get there, head to the second of the Hoker-filled rooms to the east of the Seamstress’s home, and climb up the left-hand wall to reach the Clawline hooks above. From there you can reach an upper ledge to the right where you can enter Skull Cavern.
As you enter, the ceiling of the entrance will rather inconveniently cave in behind you, so your only path is down.
Float softly all the way to the very very bottom of the cavern, watching out for the spikes and particularly the spike-topped vertical ledges on the way. At the bottom, hit the explosive rock to start a very nasty gauntlet fight.

Image credit:Rock Paper Shotgun/Team Cherry
This arena is particularly nasty because the floor is lava, with only a couple of temporary crumbling platforms on the surface. You’ll need to spend most of your time clinging to the walls and Pogo-ing off the tops of the enemies that spawn if you are to survive. Again, that Magma Bell will be of great use here.

Image credit:Rock Paper Shotgun/Team Cherry
After the final wave, the entire cavern will start exploding, and the lava level will rise quickly. You need to climb up the way you came as quickly as possible, all the way to the top. If you die before reaching the top, you have to complete the entire gauntlet again from the start. It’s pretty painful.

Image credit:Rock Paper Shotgun/Team Cherry
Once you reach the top, the lava will stop rising, and an air current will appear leading up to yet another Mask Shard for your trouble. You can then feel free to drop back down and exit Skull Cavern once and for all.
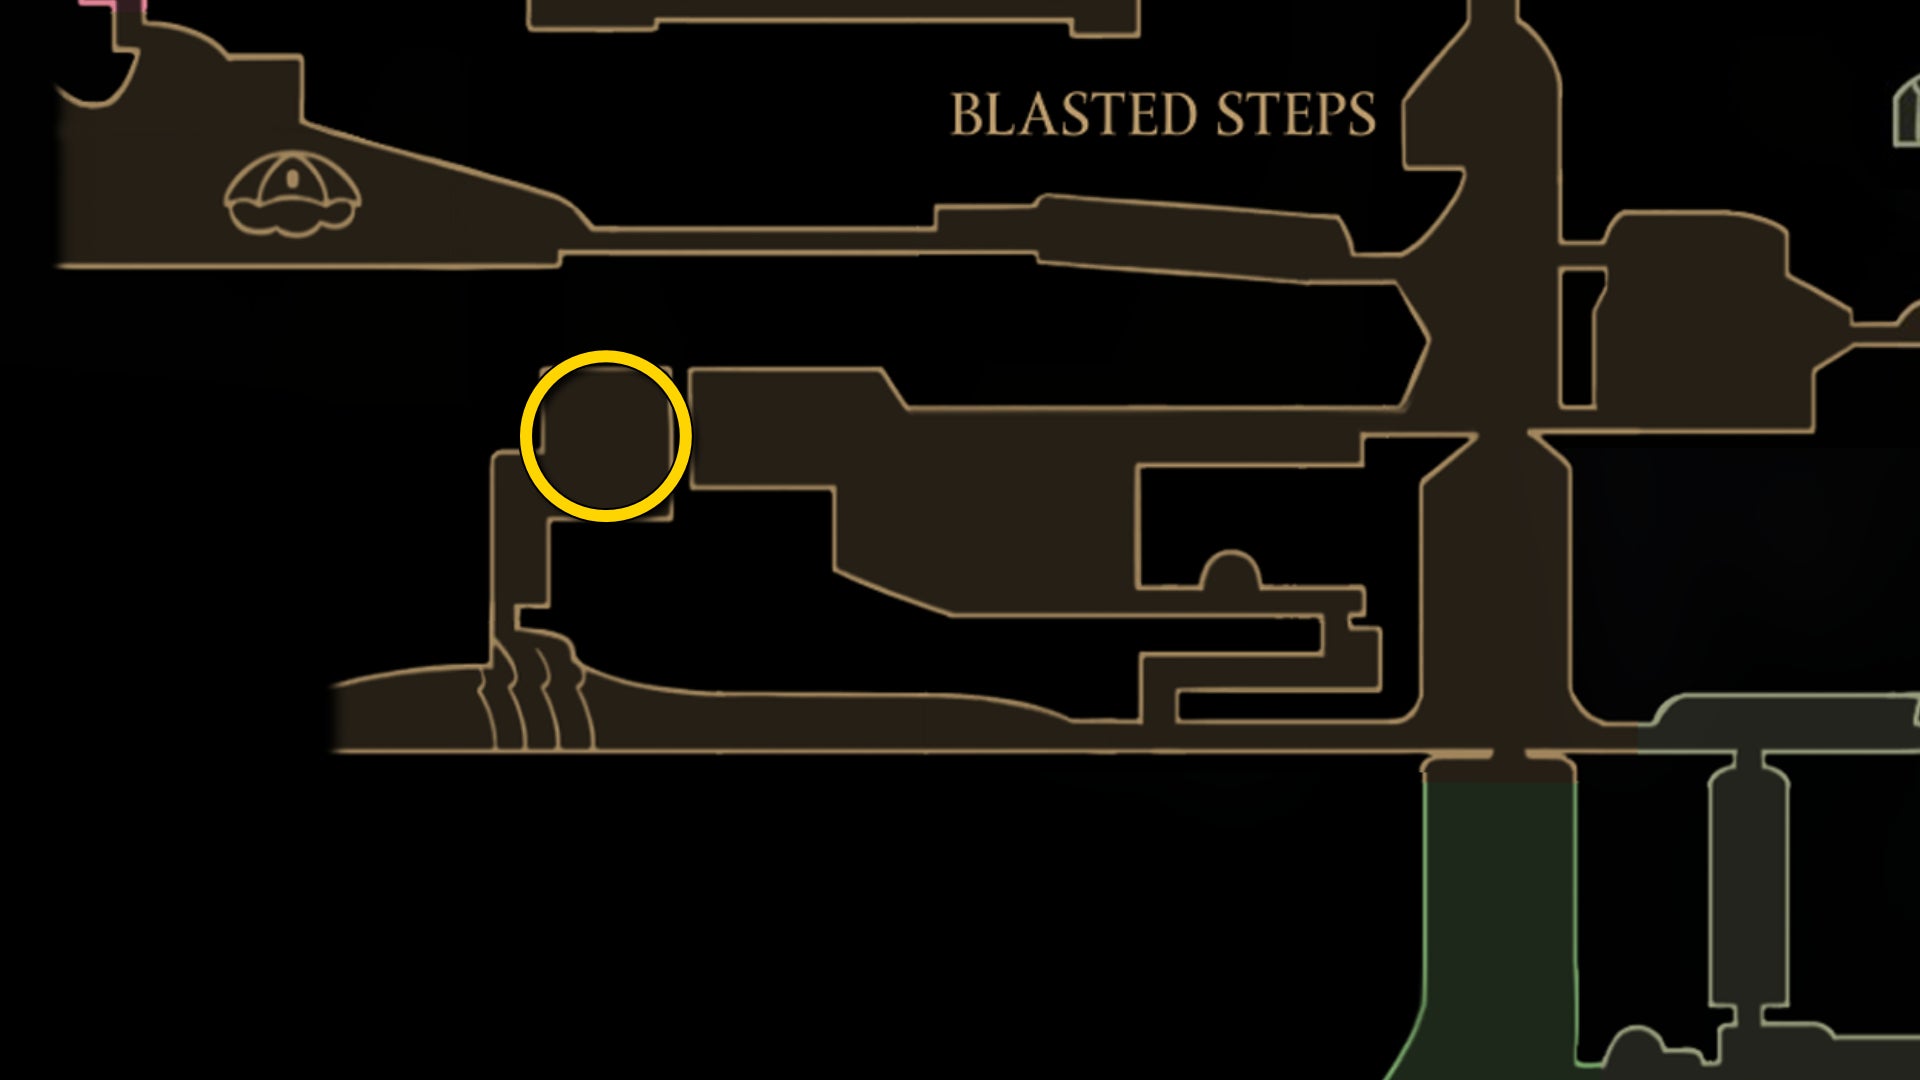
Image credit:Rock Paper Shotgun/Team Cherry
5. Reach the Mask Shard in Blasted Steps.
Yet another Mask Shard awaits you next, at the very beginning of the Blasted Steps. It’s best to fast travel to the Shellwood Bellway for this one, seeing as the Blasted Steps Bellway is at the top of Blasted Steps, and where we’re going is the bottom.

Image credit:Rock Paper Shotgun/Team Cherry
From the Shellwood Bellway, head all the way to the left until you’re nearly at the edge of the map. Start from the platform of rock amid the sand, then sprint-jump, clawline, and double-jump to the high-up ledge to your left. Do the same again to reach the next couple of ledges to your left, and exit upwards off-screen.

Image credit:Rock Paper Shotgun/Team Cherry
Mind the Pharlids on the wall as you climb up the next room, but otherwise make your way to the very top where you’ll find a Mask Shard. That’s three in quick succession so far! This is why taking the time to re-explore old regions with new movement abilities is so fruitful.

Image credit:Rock Paper Shotgun/Team Cherry
6. Speak to Grindle in Blasted Steps.
Go back to the Shellwood Bellway, and this time fast travel to the Blasted Steps Bellway. From there, exit to the left and climb up to the left-hand doorway with the triangular sign.

Image credit:Rock Paper Shotgun/Team Cherry
With your new Faydown Cloak, you can double-jump up to the wall in the next room, and climb to the top. Here you’ll find Grindle, eager to part you with your Rosaries in exchange for a shopful of interesting goods.
It’s worth picking up the Crafting Kit upgrade for 700 Rosaries if you can afford it. The Spool Fragment, too, is always useful; and the Psalm Cylinder if you like. None of them are necessary at this point, though. Just remember that you now have access to this new shop whenever you like.
7. Collect Lumble’s Magnetite Dice.
Now for a bit of a sad moment. Drop down from Grindle’s shop and take the bottom-left exit all the way to the end, where you previously found (and maybe played Dice with) Lumble The Lucky.

Image credit:Rock Paper Shotgun/Team Cherry
Sadly, Lumble is no more. But he left behind a parting gift, and it’s better suited for you than for Grindle. Lumble’s lucky Magnetite Dice is a tool that allows you to occasionally evade a hit of damage that you otherwise would have taken. It’s not something to be relied upon, but it’s a very handy tool - one of the best in the game, arguably.
If you don’t see the Magnetite Dice on the floor by Lumble’s body, then Grindle has already got his hands on it. Go back up and pay Grindle a visit; you can purchase it from him for 300 Rosaries.
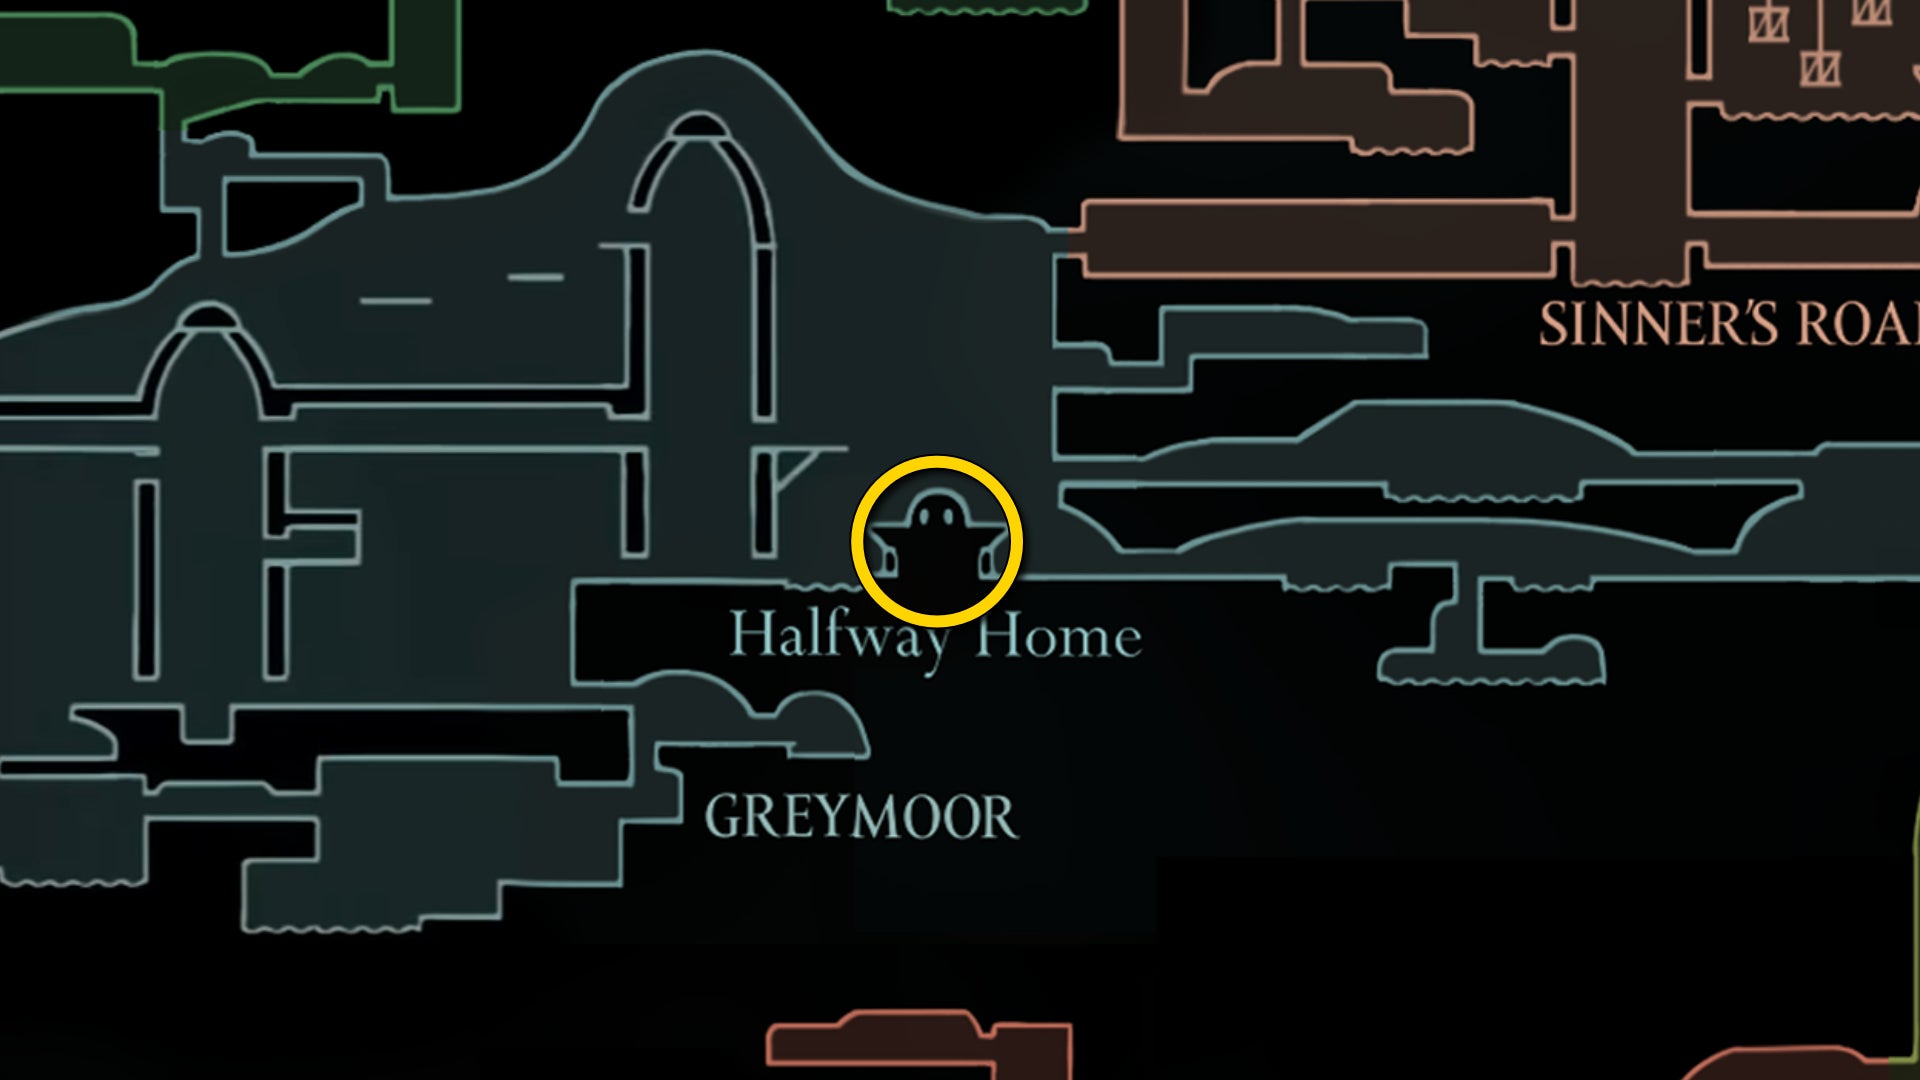
Image credit:Rock Paper Shotgun/Team Cherry
8. Collect the Halfway Home Memory Locket.

Image credit:Rock Paper Shotgun/Team Cherry
Next, head to Greymoor and visit the Halfway Home. There’s a high-up ledge on the left side of the Halfway Home’s interior which you can now reach with your Faydown Cloak.
Step to the left of this ledge and you’ll find a teeny tiny hiding space, where you can pick up a Memory Locket. Nice and easy!
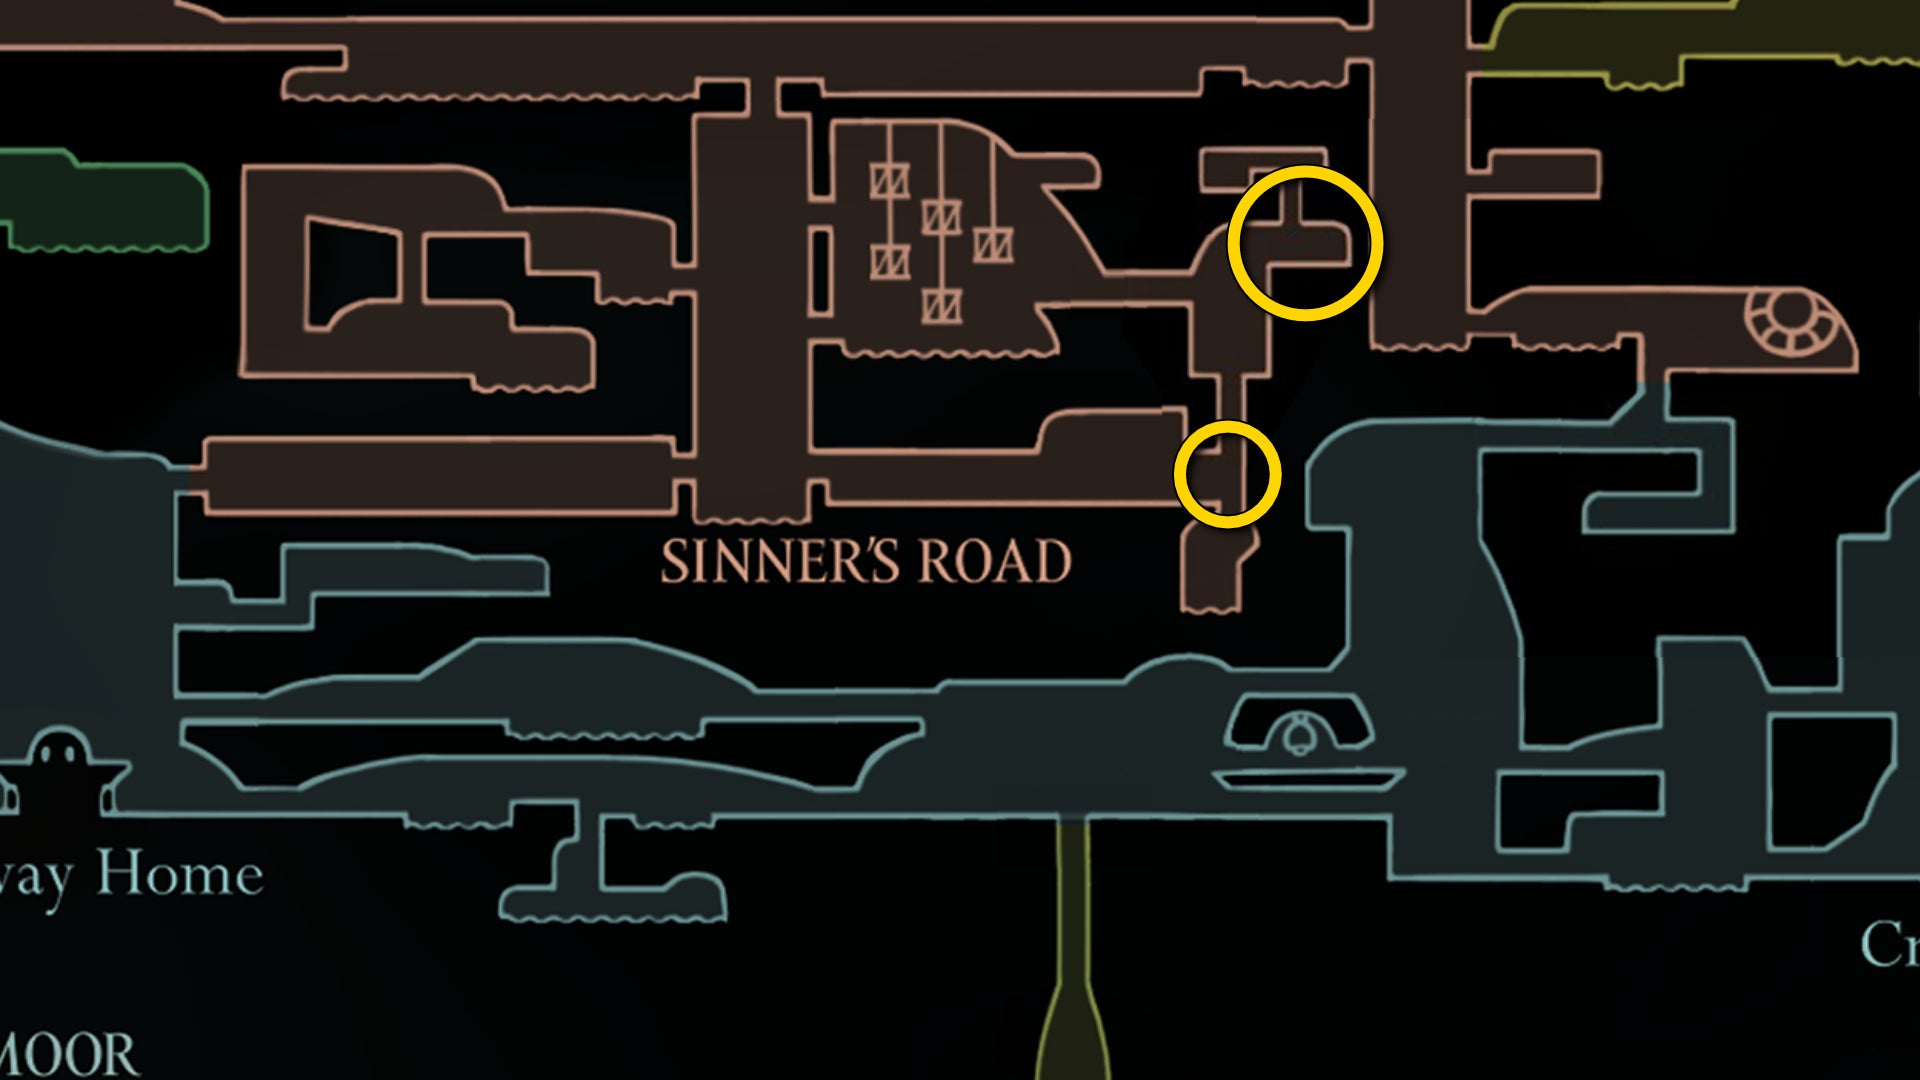
Image credit:Rock Paper Shotgun/Team Cherry
9. Find Disgraced Chef Lugoli in Sinner’s Road.
Alas, it’s time to return to Sinner’s Road now. Make your way along the bottom level of Sinner’s Road until you reach the section on the map with a shaft leading straight up into unexplored territory.

Image credit:Rock Paper Shotgun/Team Cherry
Double-jump to reach the wall of this shaft, and climb up to the top. Once you’re out of the tunnels, hit the lever above you to open a shortcut back into the main part of Sinner’s Road; then jump up and to the right and ring the gong to start a boss fight.
Before the boss appears, you’ll need to defeat two of a new type of Sinner’s Road enemy - the Roachserver. They’re not too difficult. Once you kill them, the true boss - Disgraced Chef Lugoli - will drop down from the ceiling.

Image credit:Rock Paper Shotgun/Team Cherry
Caution is imperative here; you don’t want to get hit by those big green globules, because they instantly infect you just like worm-infested water, preventing you from healing. Getting infected isn’t worth any amount of damage you can inflict by being aggressive, so just take your time. Lugoli’s moveset is very simple really.
When Lugoli dies, they’ll leave behind an item to loot: Pickled Muckmaggot. This is one of the ingredients you need for the Great Taste Of Pharloom sidequest, and now it’s yours. You can also exit off-screen and then return back into the arena, and you’ll see there’s a way up through the centre of the ceiling where you can play your Needolin for some morose tidbits of lore.

Image credit:Rock Paper Shotgun/Team Cherry
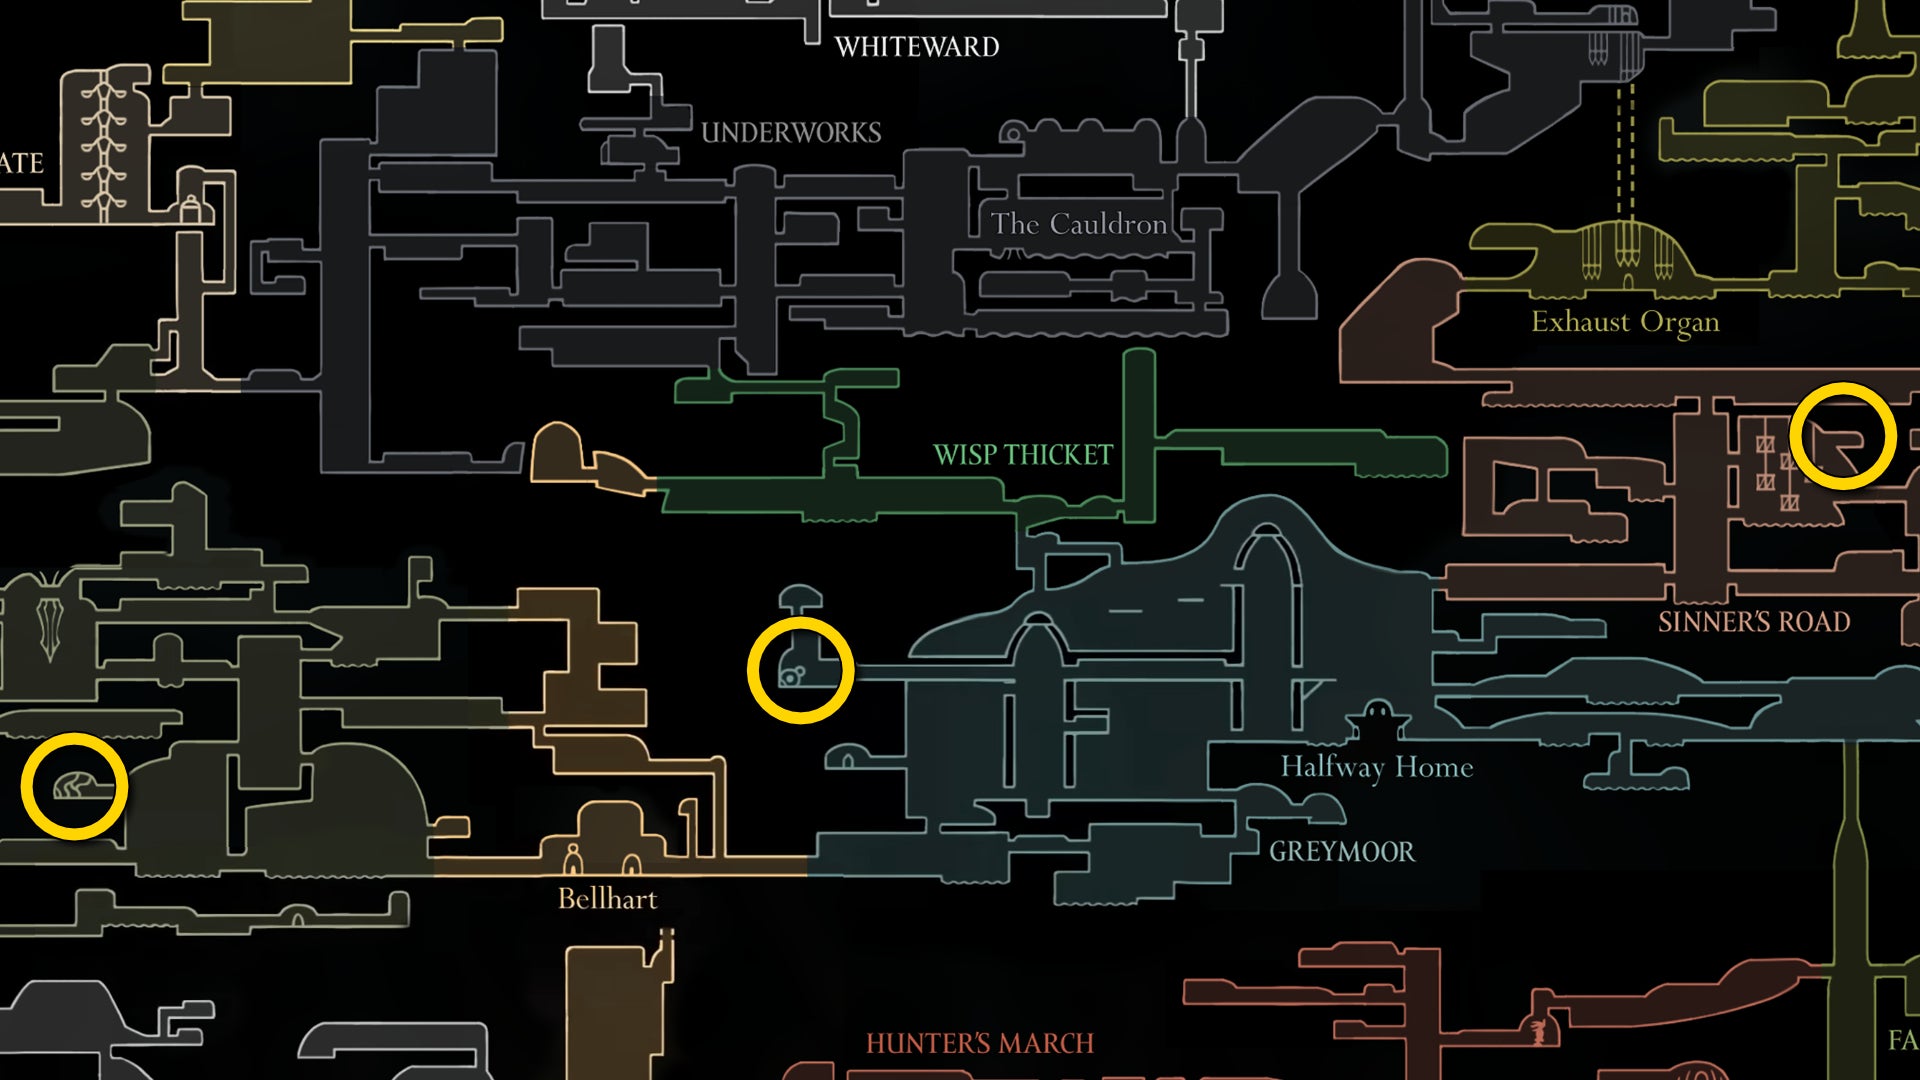
Image credit:Rock Paper Shotgun/Team Cherry
10. Obtain the Witch’s Crest.
Now for a rather fascinating little questline. Remember your last dip into Bilewater, when you obtained the strangely wailing Twisted Bud? You can hand it in to Greyroot, the strange being in the centre of Shellwood. It’s a fairly quick trek from the Shellwood Bellway now that you have double-jump.

Image credit:Rock Paper Shotgun/Team Cherry
Give Greyroot the Twisted Bud, and they will… infect you with it. Hornet will awaken trapped in some roots inside the Chapel Of The Witch. You have no tools, no attack skill, and barely any Silk. Your goal now is to cure yourself of this parasite as quickly as possible.
Exit to the left, out of the Chapel. Swim to the right, break through the vines in your way, and climb to the top of the shaft ahead to loot a Weaver Effigy. Then drop down and head all the way to the left until the path diverges upward and downward.

Image credit:Rock Paper Shotgun/Team Cherry
Take the upward path and cut through the vines to reach a body with a Rosary String. Then take the downward path and cut the vines on your left to exit out into Shellwood again. Explore downwards first, and you’ll find a Bench you can rest at. You may also discover at this point, as I did, that you can’t change your Crest until you’ve cured this malicious infection.

Image credit:Rock Paper Shotgun/Team Cherry
Below the Bench, there’s an explosive rock which opens a shortcut between the bottom of Shellwood and the top of The Marrow. No need to take it right now though. Climb up above the Bench to the top of the room, and attack the vines in the ceiling to return to more familiar Shellwood territory.
You can visit Greyroot’s lair again at this point, but all that’s left is the creature’s petrified remains. To cure yourself, head straight to the Halfway Home in Greymoor. You can also stop and ask Pavo, the singing bug in Bellhart; but they’ll just direct you to the Halfway Home as well.

Image credit:Rock Paper Shotgun/Team Cherry
At the Halfway Home, speak with Creige and he’ll tell you to visit the “old doctor” at the top of Greymoor. The old doctor he speaks of is Yarnaby, inside the bellhome just beneath where you found and crafted the Pimpillo tool (above the Chapel Of The Reaper on the west edge of Greymoor).
Knock on Yarnaby’s door and explain the situation, and Yarnaby will invite you in, examine you, and explain that you’ll need to procure some Steel Spines from Benjin and Crull - the odd pair you found in Sinner’s Road who gave you the Tacks tool.
Head to Benjin and Crull’s home in Sinner’s Road, and buy their Steel Spines for 160 Rosaries. Then head straight back to Yarnaby. After a rather distressing cutscene, the parasite will be (mostly) extricated from you - and you’ll have tamed the power inside enough to activate the Witch Crest.

Image credit:Rock Paper Shotgun/Team Cherry

Image credit:Rock Paper Shotgun/Team Cherry
11. Unlock the final part of the Whiteward.
Our final stop for now is Whiteward. Head to the entrance via the Choral Chambers Ventrica Station, and take the elevator down to the bottom of the Whiteward.
Make your way to the middle level of the elevator shaft, and cross over to the right-hand side, where you’ll see a crossroads, with paths both above and below, as well as to the right. It’s tricky, but you can at this point use a combination of your movement skills to reach the wall of the upper tunnel and climb up it. Start from the right-hand side, double-jump up to the middle, clawline to the left wall, and then immediately jump off the wall to the higher wall opposite.

Image credit:Rock Paper Shotgun/Team Cherry
It may take a few attempts, but you should be able to scale up the tunnel and reach the end of the path for a Choral Commandment. Then drop back down to the bottom.
Head along the corridor to your right, jumping over the Mortician enemies, and climb up to the exit above you at the far end. Keep climbing upwards, and once you’re at the top, head to the left. At the end of the path you’ll find a single clawline hook hanging from the ceiling. Hook onto it, and a body will drop down. Loot the body for the Surgeon’s Key - and be aware that an enemy will spawn behind you when you do this, so prepare to cut them down as they approach.

Image credit:Rock Paper Shotgun/Team Cherry
Now take the elevator back to the top, and rest at the Bench to your right. You’re about to face a pretty damn tough boss.
Take the elevator down to the bottom again, and run to the left until you come across that mysterious lock on the ground. Use the Surgeon’s Key to open it, and drop all the way down to the arena at the bottom, where you’ll meet The Unravelled.
12. Defeat The Unravelled.

Image credit:Rock Paper Shotgun/Team Cherry
To begin with, you’re in near-total darkness in this arena. First, some simple enemies will spawn. There’ll be a Dreg Husk, which you can very easily and safely kill just by staying beneath it and slashing upwards. Then another will spawn, along with a new enemy type - a Dregwheel, which periodically starts spinning and bouncing around everywhere. Stay aggressive against these guys - with a little practice, you can keep hitting them safely even while they’re spinning.
After that, the Unravelled will appear, and it’s a really nasty piece of work - albeit much easier with double-jump. It has two main attack types: one where it spits out projectiles at you (one high and one low, in random order), and another where it charges at you across the arena. It can also quickly follow up the spitting with the charging if it likes.

Image credit:Rock Paper Shotgun/Team Cherry
Your aim is to be right next to it whenever it appears out of the ground, slash once, and then immediately dash away and prepare to jump over either its projectiles or its charge. Tacks and other traps are great against the Unravelled’s charge attacks, but I’d recommend holding onto them until the second phase, where things get much harder and you’ll need the extra firepower.
In the second phase, more minions will be summoned, and then the Unravelled will start to use telekinetic spears against you, often weaving them amongst his other attacks. Make no mistake, it’s challenging to avoid damage at this point. Try to use the walls to your advantage when you need to get some space to heal. Also be aware that in this second phase, the Unravelled will spit three projectiles instead of two, each at a different height level.

Image credit:Rock Paper Shotgun/Team Cherry
I won this fight using Tacks and the Curveclaw, both with poison. I’d also highly encourage the use of the Injector Band to speed up your heals in the later stages of this challenging fight.
Once you finally beat The Unravelled, you’ll be transported to a silk dimension once again; reach the very top, and you’ll be rewarded with a Silk Heart - your second since defeating the Bell Beast way back at the beginning of the game!

Image credit:Rock Paper Shotgun/Team Cherry
You might think that’s all for our miscellaneous sidequest-hunting for the time being, but actually we’ve another couple of stops to make - they were just too large to fit into this section! Join us in Part 24 of our Silksong walkthrough as we delve deeper than every before into the unrevealed areas of the Deep Docks.


Hollow Knight: Silksong
PC , Nintendo Switch
Rock Paper Shotgun is better when you sign in
Sign in and join us on our journey to discover strange and compelling PC games.

All 75 Arc Raiders Blueprints and where to get them
These areas have the highest chance of giving you Blueprints

Image credit:Rock Paper Shotgun/Embark Studios

Looking for more Arc Raiders Blueprints? It’s a special day when you find a Blueprint, as they’re among the most valuable items in Arc Raiders. If you find a Blueprint that you haven’t already found, then you must make sure you hold onto it at all costs, because Blueprints are the key to one of the most important and powerful systems of meta-progression in the game.
This guide aims to be the very best guide on Blueprints you can find, starting with a primer on what exactly they are and how they work in Arc Raiders, before delving into exactly where to get Blueprints and the very best farming spots for you to take in your search.
We’ll also go over how to get Blueprints from other unlikely activities, such as destroying Surveyors and completing specific quests. And you’ll also find the full list of all 75 Blueprints in Arc Raiders on this page (including the newest Blueprints added with the Cold Snap update , such as the Deadline Blueprint and Firework Box Blueprint), giving you all the information you need to expand your own crafting repertoire.
In this guide:
- What are Blueprints in Arc Raiders?
- Full Blueprint list: All crafting recipes
- Where to find Blueprints in Arc Raiders Blueprints obtained from quests Blueprints obtained from Trials Best Blueprint farming locations

What are Blueprints in Arc Raiders?
Blueprints in Arc Raiders are special items which, if you manage to extract with them, you can expend to permanently unlock a new crafting recipe in your Workshop. If you manage to extract from a raid with an Anvil Blueprint, for example, you can unlock the ability to craft your very own Anvil Pistol, as many times as you like (as long as you have the crafting materials).
To use a Blueprint, simply open your Inventory while in the lobby, then right-click on the Blueprint and click “Learn And Consume” . This will permanently unlock the recipe for that item in your Workshop. As of the Stella Montis update, there are allegedly 75 different Blueprints to unlock - although only 68 are confirmed to be in the game so far. You can see all the Blueprints you’ve found and unlocked by going to the Workshop menu, and hitting “R” to bring up the Blueprint screen.
It’s possible to find duplicates of past Blueprints you’ve already unlocked. If you find these, then you can either sell them, or - if you like to play with friends - you can take it into a match and gift it to your friend so they can unlock that recipe for themselves. Another option is to keep hold of them until the time comes to donate them to the Expedition.
Full Blueprint list: All crafting recipes
Below is the full list of all the Blueprints that are currently available to find in Arc Raiders, and the crafting recipe required for each item:
| Blueprint | Type | Recipe | Crafted At |
|---|---|---|---|
| Bettina | Weapon | 3x Advanced Mechanical Components 3x Heavy Gun Parts 3x Canister | Gunsmith 3 |
| Blue Light Stick | Quick Use | 3x Chemicals | Utility Station 1 |
| Aphelion | Weapon | 3x Magnetic Accelerator 3x Complex Gun Parts 1x Matriarch Reactor | Gunsmith 3 |
| Combat Mk. 3 (Flanking) | Augment | 2x Advanced Electrical Components 3x Processor | Gear Bench 3 |
| Combat Mk. 3 (Aggressive) | Augment | 2x Advanced Electrical Components 3x Processor | Gear Bench 3 |
| Complex Gun Parts | Material | 2x Light Gun Parts 2x Medium Gun Parts 2x Heavy Gun Parts | Refiner 3 |
| Fireworks Box | Quick Use | 1x Explosive Compound 3x Pop Trigger | Explosives Station 2 |
| Gas Mine | Mine | 4x Chemicals 2x Rubber Parts | Explosives Station 1 |
| Green Light Stick | Quick Use | 3x Chemicals | Utility Station 1 |
| Pulse Mine | Mine | 1x Crude Explosives 1x Wires | Explosives Station 1 |
| Seeker Grenade | Grenade | 1x Crude Explosives 2x ARC Alloy | Explosives Station 1 |
| Looting Mk. 3 (Survivor) | Augment | 2x Advanced Electrical Components 3x Processor | Gear Bench 3 |
| Angled Grip II | Mod | 2x Mechanical Components 3x Duct Tape | Gunsmith 2 |
| Angled Grip III | Mod | 2x Mod Components 5x Duct Tape | Gunsmith 3 |
| Hullcracker | Weapon | 1x Magnetic Accelerator 3x Heavy Gun Parts 1x Exodus Modules | Gunsmith 3 |
| Launcher Ammo | Ammo | 5x Metal Parts 1x Crude Explosives | Workbench 1 |
| Anvil | Weapon | 5x Mechanical Components 5x Simple Gun Parts | Gunsmith 2 |
| Anvil Splitter | Mod | 2x Mod Components 3x Processor | Gunsmith 3 |
| ??? | ??? | ??? | ??? |
| Barricade Kit | Quick Use | 1x Mechanical Components | Utility Station 2 |
| Blaze Grenade | Grenade | 1x Explosive Compound 2x Oil | Explosives Station 3 |
| Bobcat | Weapon | 3x Advanced Mechanical Components 3x Light Gun Parts | Gunsmith 3 |
| Osprey | Weapon | 2x Advanced Mechanical Components 3x Medium Gun Parts 7x Wires | Gunsmith 3 |
| Burletta | Weapon | 3x Mechanical Components 3x Simple Gun Parts | Gunsmith 1 |
| Compensator II | Mod | 2x Mechanical Components 4x Wires | Gunsmith 2 |
| Compensator III | Mod | 2x Mod Components 8x Wires | Gunsmith 3 |
| Defibrillator | Quick Use | 9x Plastic Parts 1x Moss | Medical Lab 2 |
| ??? | ??? | ??? | ??? |
| Equalizer | Weapon | 3x Magnetic Accelerator 3x Complex Gun Parts 1x Queen Reactor | Gunsmith 3 |
| Extended Barrel | Mod | 2x Mod Components 8x Wires | Gunsmith 3 |
| Extended Light Mag II | Mod | 2x Mechanical Components 3x Steel Spring | Gunsmith 2 |
| Extended Light Mag III | Mod | 2x Mod Components 5x Steel Spring | Gunsmith 3 |
| Extended Medium Mag II | Mod | 2x Mechanical Components 3x Steel Spring | Gunsmith 2 |
| Extended Medium Mag III | Mod | 2x Mod Components 5x Steel Spring | Gunsmith 3 |
| Extended Shotgun Mag II | Mod | 2x Mechanical Components 3x Steel Spring | Gunsmith 2 |
| Extended Shotgun Mag III | Mod | 2x Mod Components 5x Steel Spring | Gunsmith 3 |
| Remote Raider Flare | Quick Use | 2x Chemicals 4x Rubber Parts | Utility Station 1 |
| Heavy Gun Parts | Material | 4x Simple Gun Parts | Refiner 2 |
| Venator | Weapon | 2x Advanced Mechanical Components 3x Medium Gun Parts 5x Magnet | Gunsmith 3 |
| Il Toro | Weapon | 5x Mechanical Components 6x Simple Gun Parts | Gunsmith 1 |
| Jolt Mine | Mine | 1x Electrical Components 1x Battery | Explosives Station 2 |
| Explosive Mine | Mine | 1x Explosive Compound 1x Sensors | Explosives Station 3 |
| Jupiter | Weapon | 3x Magnetic Accelerator 3x Complex Gun Parts 1x Queen Reactor | Gunsmith 3 |
| Light Gun Parts | Material | 4x Simple Gun Parts | Refiner 2 |
| Lightweight Stock | Mod | 2x Mod Components 5x Duct Tape | Gunsmith 3 |
| Lure Grenade | Grenade | 1x Speaker Component 1x Electrical Components | Utility Station 2 |
| Medium Gun Parts | Material | 4x Simple Gun Parts | Refiner 2 |
| Torrente | Weapon | 2x Advanced Mechanical Components 3x Medium Gun Parts 6x Steel Spring | Gunsmith 3 |
| Muzzle Brake II | Mod | 2x Mechanical Components 4x Wires | Gunsmith 2 |
| Muzzle Brake III | Mod | 2x Mod Components 8x Wires | Gunsmith 3 |
| Padded Stock | Mod | 2x Mod Components 5x Duct Tape | Gunsmith 3 |
| Shotgun Choke II | Mod | 2x Mechanical Components 4x Wires | Gunsmith 2 |
| Shotgun Choke III | Mod | 2x Mod Components 8x Wires | Gunsmith 3 |
| Shotgun Silencer | Mod | 2x Mod Components 8x Wires | Gunsmith 3 |
| Showstopper | Grenade | 1x Advanced Electrical Components 1x Voltage Converter | Explosives Station 3 |
| Silencer I | Mod | 2x Mechanical Components 4x Wires | Gunsmith 2 |
| Silencer II | Mod | 2x Mod Components 8x Wires | Gunsmith 3 |
| Snap Hook | Quick Use | 2x Power Rod 3x Rope 1x Exodus Modules | Utility Station 3 |
| Stable Stock II | Mod | 2x Mechanical Components 3x Duct Tape | Gunsmith 2 |
| Stable Stock III | Mod | 2x Mod Components 5x Duct Tape | Gunsmith 3 |
| Tagging Grenade | Grenade | 1x Electrical Components 1x Sensors | Utility Station 3 |
| Tempest | Weapon | 3x Advanced Mechanical Components 3x Medium Gun Parts 3x Canister | Gunsmith 3 |
| Trigger Nade | Grenade | 2x Crude Explosives 1x Processor | Explosives Station 2 |
| Vertical Grip II | Mod | 2x Mechanical Components 3x Duct Tape | Gunsmith 2 |
| Vertical Grip III | Mod | 2x Mod Components 5x Duct Tape | Gunsmith 3 |
| Vita Shot | Quick Use | 2x Antiseptic 1x Syringe | Medical Lab 3 |
| Vita Spray | Quick Use | 3x Antiseptic 1x Canister | Medical Lab 3 |
| Vulcano | Weapon | 1x Magnetic Accelerator 3x Heavy Gun Parts 1x Exodus Modules | Gunsmith 3 |
| Wolfpack | Grenade | 2x Explosive Compound 2x Sensors | Explosives Station 3 |
| Red Light Stick | Quick Use | 3x Chemicals | Utility Station 1 |
| Smoke Grenade | Grenade | 14x Chemicals 1x Canister | Utility Station 2 |
| Deadline | Mine | 3x Explosive Compound 2x ARC Circuitry | Explosives Station 3 |
| Trailblazer | Grenade | 1x Explosive Compound 1x Synthesized Fuel | Explosives Station 3 |
| Tactical Mk. 3 (Defensive) | Augment | 2x Advanced Electrical Components 3x Processor | Gear Bench 3 |
| Tactical Mk. 3 (Healing) | Augment | 2x Advanced Electrical Components 3x Processor | Gear Bench 3 |
| Yellow Light Stick | Quick Use | 3x Chemicals | Utility Station 1 |
Note: The missing Blueprints in this list likely have not actually been added to the game at the time of writing, because none of the playerbase has managed to find any of them. As they are added to the game, I will update this page with the most relevant information so you know exactly how to get all 75 Arc Raiders Blueprints.
Where to find Blueprints in Arc Raiders
Below is a list of all containers, modifiers, and events which maximise your chances of finding Blueprints:
- Certain quests reward you with specific Blueprints .
- Completing Trials has a high chance of offering Blueprints as rewards.
- Surveyors have a decent chance of dropping Blueprints on death.
- High loot value areas tend to have a greater chance of spawning Blueprints.
- Night Raids and Storms may increase rare Blueprint spawn chances in containers.
- Containers with higher numbers of items may have a higher tendency to spawn Blueprints. As a result, Blue Gate (which has many “large” containers containing multiple items) may give you a higher chance of spawning Blueprints.
- Raider containers (Raider Caches, Weapon Boxes, Medical Bags, Grenade Tubes) have increased Blueprint drop rates. As a result, the Uncovered Caches event gives you a high chance of finding Blueprints.
- Security Lockers have a higher than average chance of containing Blueprints.
- Certain Blueprints only seem to spawn under specific circumstances: Tempest Blueprint only spawns during Night Raid events. Vulcano Blueprint only spawns during Hidden Bunker events. Jupiter and Equaliser Blueprints only spawn during Harvester events.

Raider Caches, Weapon Boxes, and other raider-oriented container types have a good chance of offering Blueprints. |Image credit:Rock Paper Shotgun/Embark Studios
Blueprints have a very low chance of spawning in any container in Arc Raiders, around 1-2% on average. However, there is a higher chance of finding Blueprints in particular container types. Specifically, you can find more Blueprints in Raider containers and security lockers.
Beyond this, if you’re looking for Blueprints you should focus on regions of the map which are marked as having particularly high-value loot. Areas such as the Control Tower in Dam Battlegrounds, the Arrival and Departure Buildings in Spaceport, and Pilgrim’s Peak in Blue Gate all have a better-than-average chance of spawning Blueprints somewhere amongst all their containers. Night Raids and Electromagnetic Storm events also increase the drop chances of certain Blueprints .
In addition to these containers, you can often loot Blueprints from destroyed Surveyors - the largest of the rolling ball ARC. Surveyors are more commonly found on the later maps - Spaceport and Blue Gate - and if one spawns in your match, you’ll likely see it by the blue laser beam that it casts into the sky while “surveying”.
Surveyors are quite well-armoured and will very speedily run away from you once it notices you, but if you can take one down then make sure you loot all its parts for a chance of obtaining certain unusual Blueprints.
Blueprints obtained from quests
One way in which you can get Blueprints is by completing certain quests for the vendors in Speranza. Some quests will reward you with a specific item Blueprint upon completion, so as long as you work through all the quests in Arc Raiders, you are guaranteed those Blueprints.
Here is the full list of all Blueprints you can get from quest rewards:
- Trigger Nade Blueprint: Rewarded after completing “Sparks Fly”.
- Lure Grenade Blueprint: Rewarded after completing “Greasing Her Palms”.
- Burletta Blueprint: Rewarded after completing “Industrial Espionage”.
- Hullcracker Blueprint (and Launcher Ammo Blueprint): Rewarded after completing “The Major’s Footlocker”.
Alas, that’s only 4 Blueprints out of a total of 75 to unlock, so for the vast majority you will need to find them yourself during a raid. If you’re intent on farming Blueprints, then it’s best to equip yourself with cheap gear in case you lose it, but don’t use a free loadout because then you won’t get a safe pocket to stash any new Blueprint you find. No pain in Arc Raiders is sharper than failing to extract with a new Blueprint you’ve been after for a dozen hours already.

One of the best ways to get Blueprints is by hitting three stars on all five Trials every week. |Image credit:Rock Paper Shotgun/Embark Studios
Blueprints obtained from Trials
One of the very best ways to get Blueprints is as rewards for completing Trials in Arc Raiders. Trials are unlocked from Level 15 onwards, and allow you to earn rewards by focusing on certain tasks over the course of several raids. For example, one Trial might task you with dealing damage to Hornets, while another might challenge you to loot Supply Drops.
Trials refresh on a weekly basis, with a new week bringing five new Trials. Each Trial can offer up to three rewards after passing certain score milestones, and it’s possible to receive very high level loot from these reward crates - including Blueprints. So if you want to unlock as many Blueprints as possible, you should make a point of completing as many Trials as possible each week.
Best Blueprint farming locations
The very best way to get Blueprints is to frequent specific areas of the maps which combine high-tier loot pools with the right types of containers to search. Here are my recommendations for where to find Blueprints on every map, so you can always keep the search going for new crafting recipes to unlock.

Image credit:Rock Paper Shotgun/Embark Studios
Dam Battlegrounds
The best places to farm Blueprints on Dam Battlegrounds are the Control Tower, Power Generation Complex, Ruby Residence, and Pale Apartments . The first two regions, despite only being marked on the map as mid-tier loot, contain a phenomenal number of containers to loot. The Control Tower can also contain a couple of high-tier Security Lockers - though of course, you’ll need to have unlocked the Security Breach skill at the end of the Survival tree.
There’s also a lot of reporting amongst the playerbase that the Residential areas in the top-left of the map - Pale Apartments and Ruby Residence - give you a comparatively strong chance of finding Blueprints. Considering their size, there’s a high density of containers to loot in both locations, and they also have the benefit of being fairly out of the way. So you’re more likely to have all the containers to yourself.
Buried City
The best Blueprint farming locations on Buried City are the Santa Maria Houses, Grandioso Apartments, Town Hall, and the various buildings of the New District . Grandioso Apartments has a lower number of containers than the rest, but a high chance of spawning weapon cases - which have good Blueprint drop rates. The others are high-tier loot areas, with plenty of lootable containers - including Security Lockers.
Spaceport
The best places to find Blueprints on Spaceport are the Arrival and Departure Buildings, as well as Control Tower A6 and the Launch Towers . All these areas are labelled as high-value loot regions, and many of them are also very handily connected to one another by the Spaceport wall, which you can use to quickly run from one area to the next. At the tops of most of these buildings you’ll find at least one Security Locker, so this is an excellent farming route for players looking to find Blueprints.
The downside to looting Blueprints on Spaceport is that all these areas are hotly contested, particularly in Duos and Squads. You’ll need to be very focused and fast in order to complete the full farming route.

Image credit:Rock Paper Shotgun/Embark Studios
Blue Gate
Blue Gate tends to have a good chance of dropping Blueprints, potentially because it generally has a high number of containers which can hold lots of items; so there’s a higher chance of a Blueprint spawning in each container. In my experience, the best Blueprint farming spots on Blue Gate are Pilgrim’s Peak, Raider’s Refuge, the Ancient Fort, and the Underground Complex beneath the Warehouse .
All of these areas contain a wealth of containers to loot. Raider’s Refuge has less to loot, but the majority of the containers in and around the Refuge are raider containers, which have a high chance of containing Blueprints - particularly during major events.
Stella Montis
On the whole, Stella Montis seems to have a very low drop rate for Blueprints (though a high chance of dropping other high-tier loot). If you do want to try farming Blueprints on this map, the best places to find Blueprints in Stella Montis are Medical Research, Assembly Workshop, and the Business Center . These areas have the highest density of containers to loot on the map.
In addition to this, the Western Tunnel has a few different Security Lockers to loot, so while there’s very little to loot elsewhere in this area of the map, it’s worth hitting those Security Lockers if you spawn there at the start of a match.
That wraps up this primer on how to get all the Blueprints in Arc Raiders as quickly as possible. With the Expedition system constantly resetting a large number of players’ Blueprints, it’s more important than ever to have the most up-to-date information on where to find all these Blueprints.
While you’re here, be sure to check out our Arc Raiders best guns tier list , as well as our primers on the best skills to unlock and all the different Field Depot locations on every map.


ARC Raiders
PS5 , Xbox Series X/S , PC
Rock Paper Shotgun is better when you sign in
Sign in and join us on our journey to discover strange and compelling PC games.
