Hollow Knight Silksong walkthrough: Part 10 (Misc Quests)
Now’s a good time to complete some side tasks

Image credit:Rock Paper Shotgun/Team Cherry

What’s the next job for you to complete in Part 10 of our Silksong walkthrough? When you take a step back and think about it, you’ve already accomplished a lot in Hollow Knight: Silksong. Or so the Fleas would tell you, anyway. Still, there’s a colossal amount left to discover; we’ve only scratched the surface so far.
In Part 10 of our Silksong walkthrough below, we’ll guide you through a number of miscellaneous tasks and quests which you should consider completing before making any big next steps in the main story. You’ll thank me later for carrying out these tasks now, trust me!
Want the walkthrough for a different area of the game? Check out our Hollow Knight: Silksong walkthrough hub!
Misc Quests walkthrough steps:
- Build the Lifesaving Bridge.
- Hunt 3x Flintbeetles.
- Hunt the Terrible Tyrant.
- Conquer the East Marrow gauntlet for a Mask Shard.
- Survive the attack on Bone Bottom.
- Buy the Bellhart map from Shakra.
- Fight the 2nd Skarrgard in Hunter’s March.
- Complete the Far Fields obstacle courses.
- Find Zylotol in the Wormways.
- Collect 3 Plasmium from the Wormways.
- Obtain the Plasmium Phial.
1. Build the Lifesaving Bridge.
First step: head back to Bone Bottom, and interact with the Wishwall. By this point there should be 2-3 new additions, one of which you can complete immediately by donating 300 Shell Shards.

Image credit:Rock Paper Shotgun/Team Cherry
The Lifesaving Bridge, quite simply, is a small bridge built over the nearby hole in the ground leading into Moss Grotto . The same hole, in fact, which Hornet escapes in Silksong’s opening cinematic. Now’s as good a time as any to donate the money to have it built. You can reload the area to see the bridge in its finished state.
2. Hunt 3x Flintbeetles.
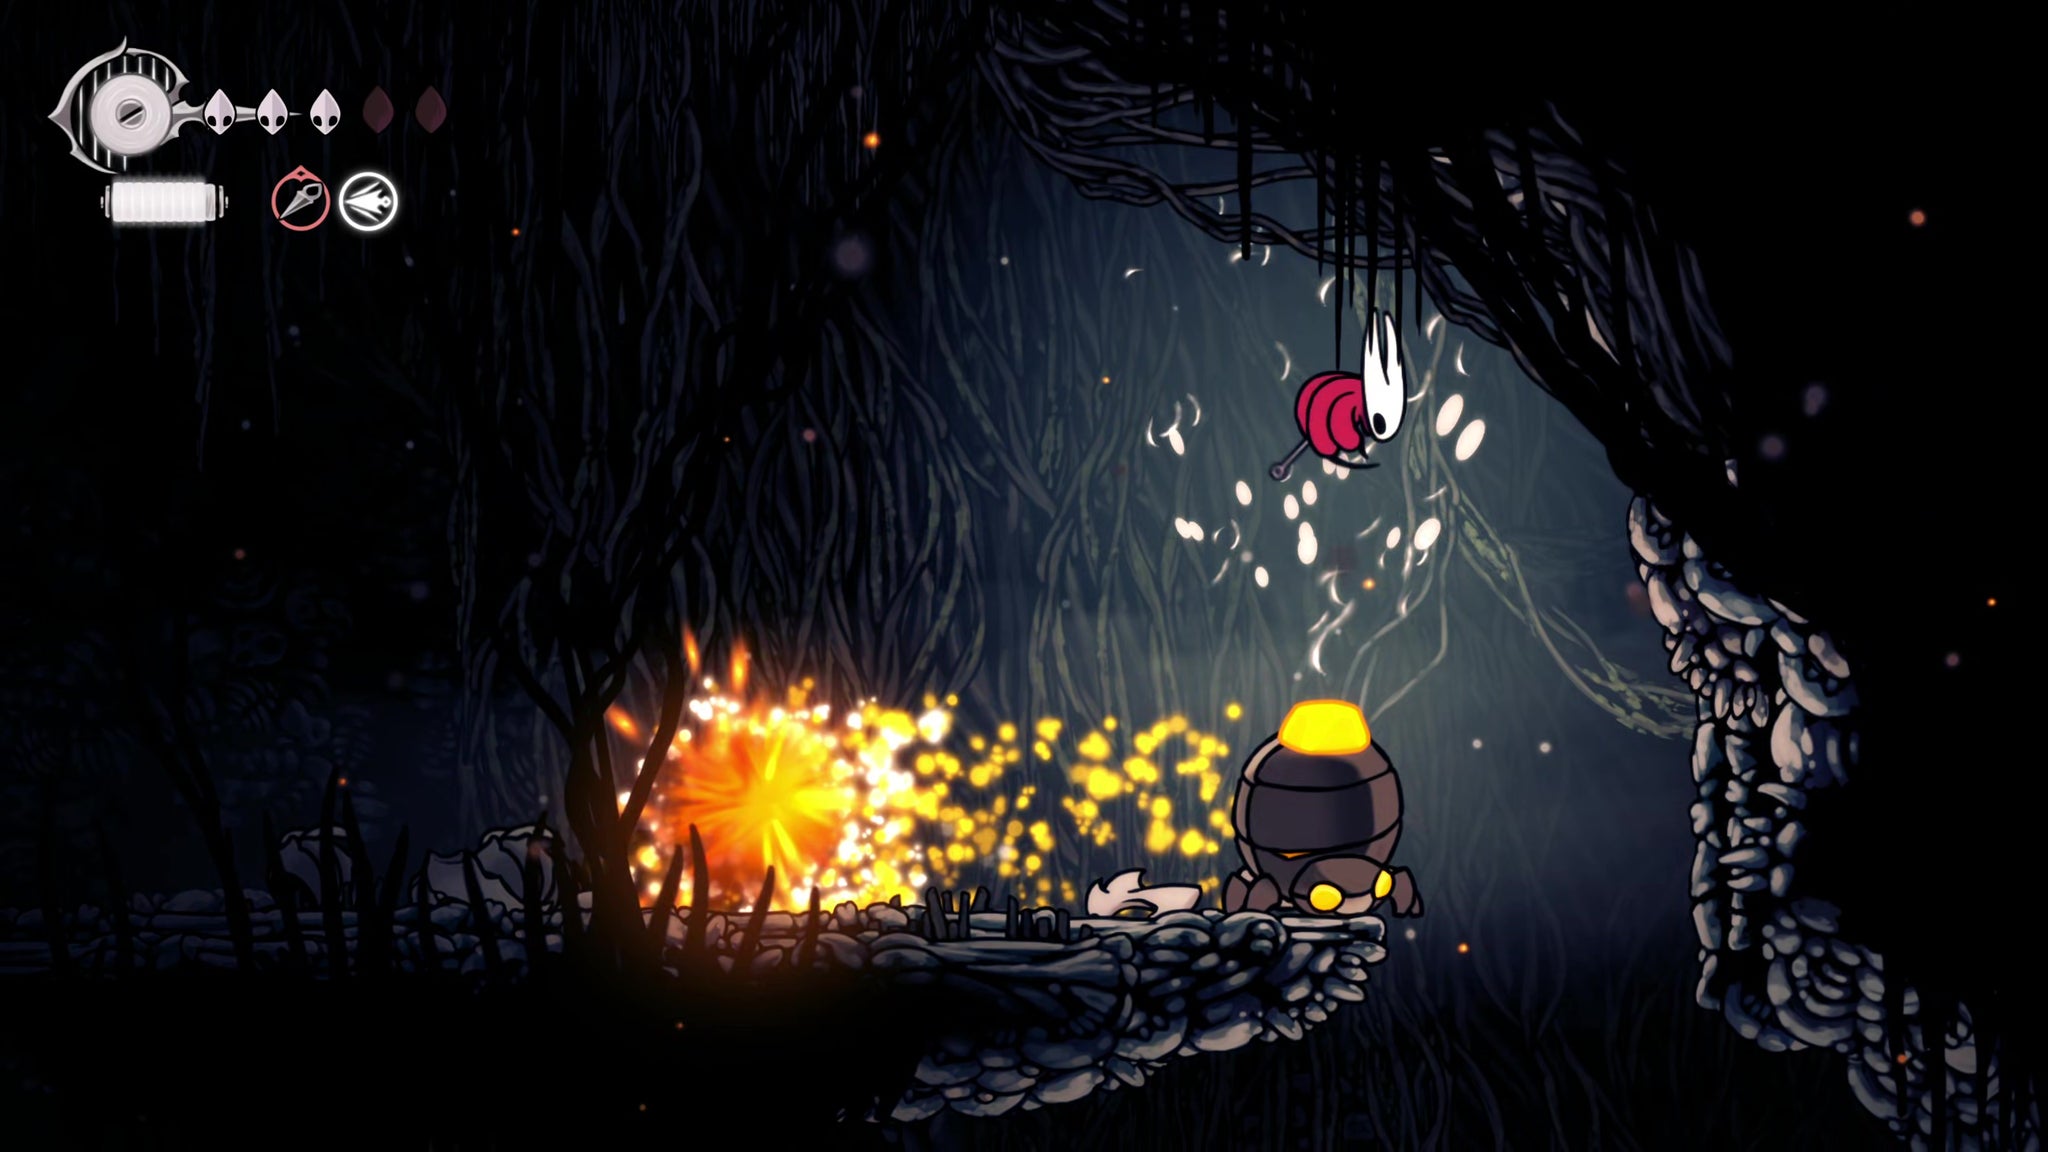
Image credit:Rock Paper Shotgun/Team Cherry
Another of the quests on the Wishwall is Volatile Flintbeetles - a hunting quest where you must track down and kill 3x Flintbeetles in The Marrow. These Flintbeetles are very easy to find, as each one has left behind a trail that Hornet can follow by interacting with what they leave behind. But to clear any doubt, here are the locations of the three Flintbeetles:

Image credit:Rock Paper Shotgun/Team Cherry
The Flintbeetles are quite aggressive, and can catch you unawares with that trail of explosions that follows their movements. Try to avoid jumping over them, and stay on one side to avoid the explosions. They’re still regular enemies, so it won’t take long to kill them.
3. Hunt the Terrible Tyrant.
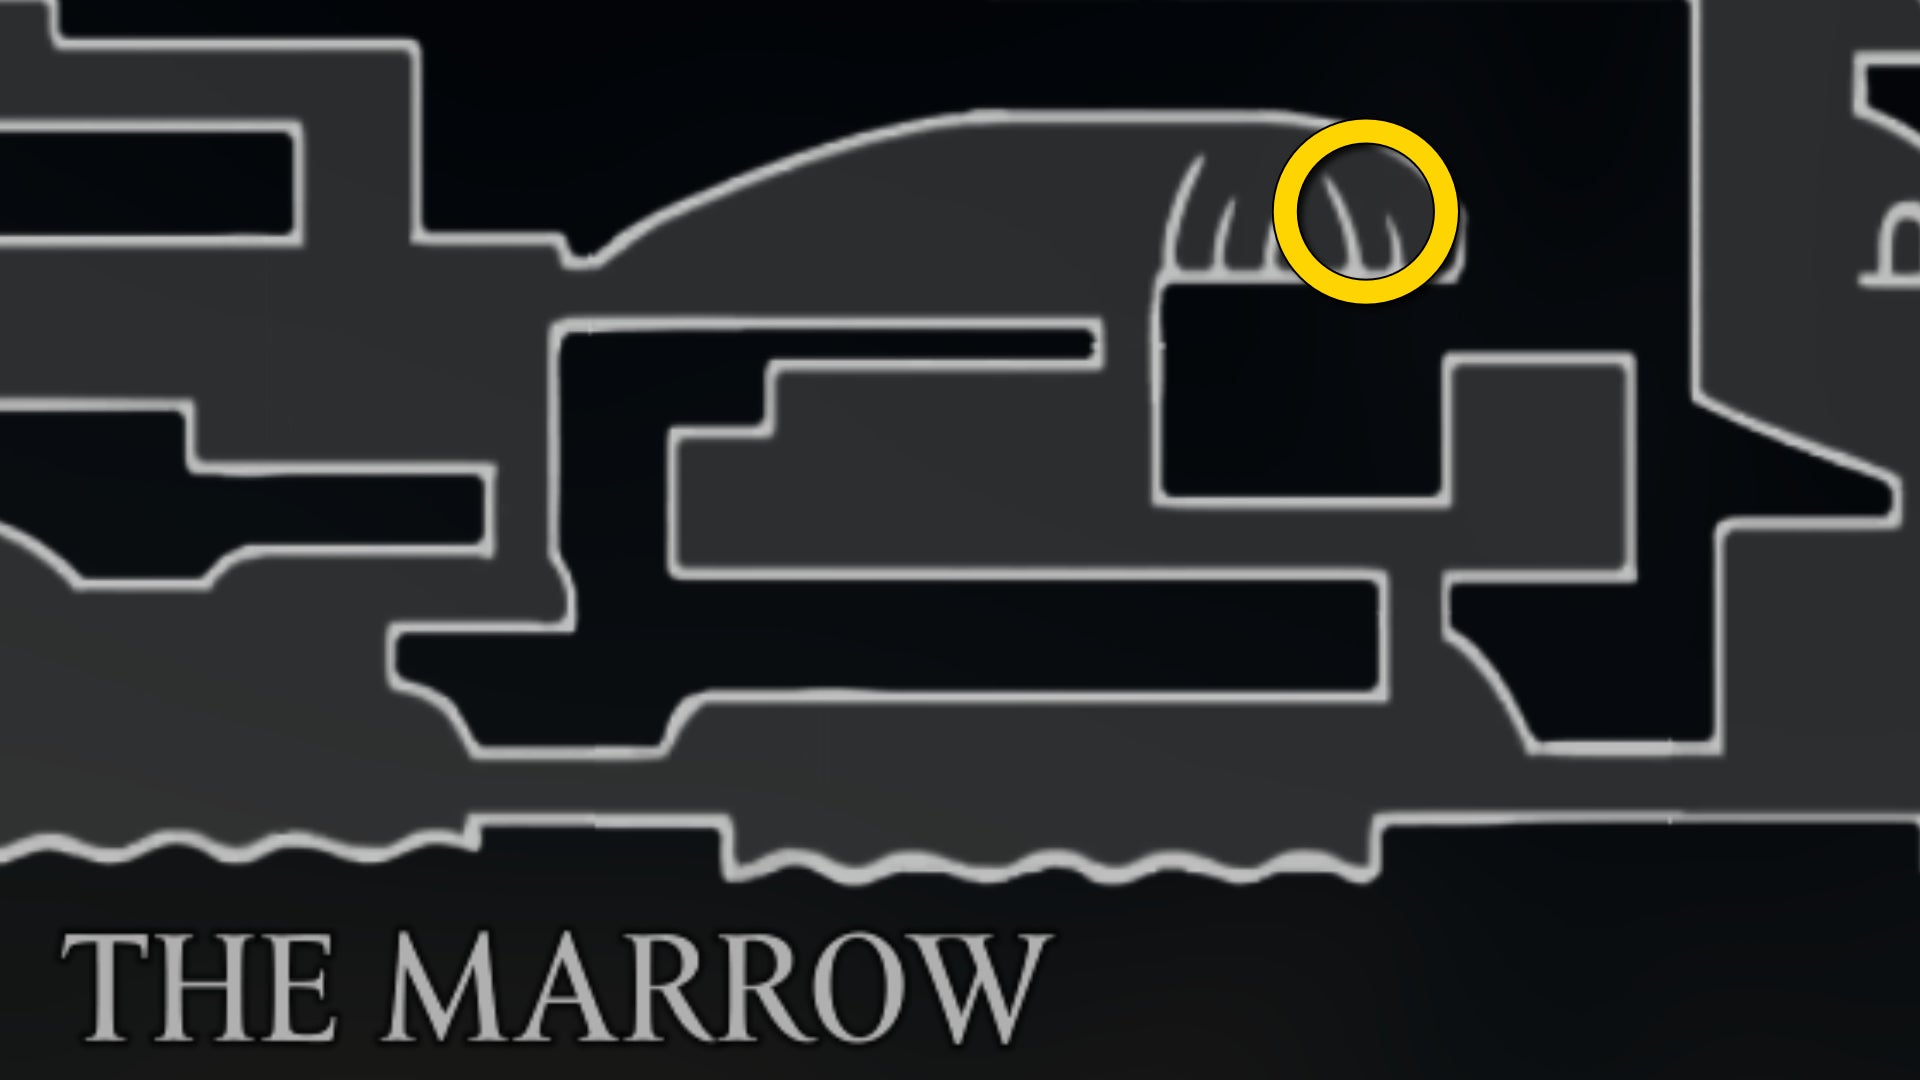
Image credit:Rock Paper Shotgun/Team Cherry
When you head back to claim your reward for the Volatile Flintbeetles quest, make sure you accept the Terrible Tyrant hunting quest if you haven’t already. This Wish appears on the Wishwall after you gain the Claw Grip skill from Shellwood, and requires you to find the lair of the largest Skull bug of all, again in The Marrow.

Image credit:Rock Paper Shotgun/Team Cherry
The lair is easy to find - it’s just about the only part of The Marrow map you haven’t yet filled in. Head east from Bone Bottom and ride the moving platform to the right-hand side. Then climb above it to unlock this new area. Explore it fully - there’s a breakable wall, the path behind which leads to two Rosary caches.
At the end of the path, you’ll find (on the left) a shortcut opposite the Flea Caravan, and (on the right) the Skull Tyrant itself.

Image credit:Rock Paper Shotgun/Team Cherry
He’s a nasty one, but his tells are obvious once you’ve learnt them. If it takes a run-up, it will charge and you should jump over it. If it wiggles on the spot, it will jump, and you can dash under it. If it roars, then watch out for the raining boulders. That’s pretty much all you need to know to kill it and loot the Crown Fragment from its body as proof.
4. Conquer the Deep Docks gauntlet for a Mask Shard.
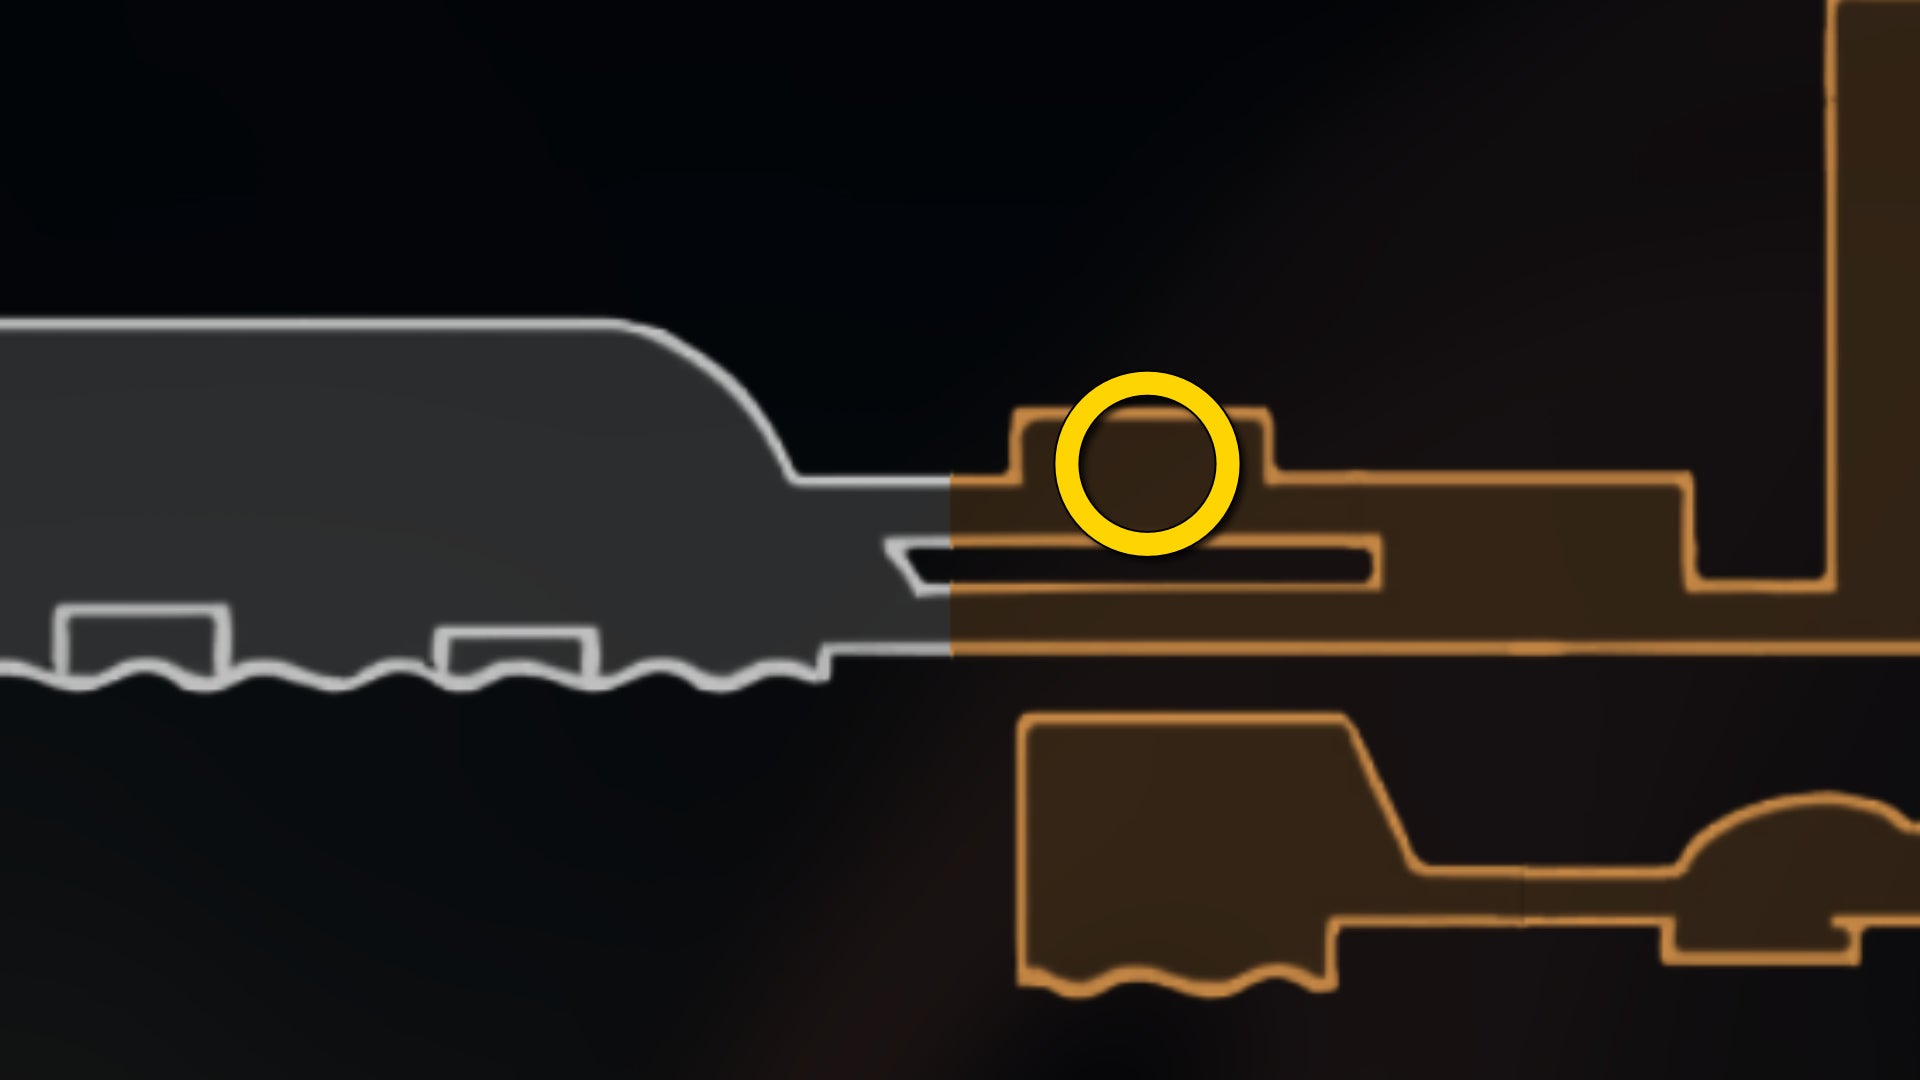
Image credit:Rock Paper Shotgun/Team Cherry
While you’re in the vicinity, head back to the right-most room in The Marrow, and climb up the walls to get as high as possible. Then follow the metal platforms to the very right-hand side to unlock a little extra upper-level room just into Deep Docks, where you can face a gauntlet of enemies for a Mask Shard.


5. Survive the attack on Bone Bottom.

Image credit:Rock Paper Shotgun/Team Cherry
Return to Bone Bottom, turn in your Crown Fragment for the reward, and then head to the left. As you do, you’ll quickly be interrupted by the aggressive appearance of another Skull Tyrant (the first one’s mate, perhaps?). If it doesn’t spawn immediately, exit the area and come back , and the Skull Tyrant should spawn.
This Skull Tyrant is a carbon copy of the previous one (raining boulders included), so you already know how to defeat it. Once it’s slain, speak with the residents of Bone Bottom again, and you’ll learn that there was an unfortunate casualty during the attack.
You can return at any later point to witness the funeral of the fallen Pilgrim.
6. Buy the Bellhart map from Shakra.
While in Bone Bottom, make sure you procure the Bellhart map from Shakra - it will be of great help in the next chapter of our walkthrough!

Image credit:Rock Paper Shotgun/Team Cherry
After the Skull Tyrant’s attack on the village, the platform up to Shakra’s spot in Bone Bottom may be broken. If that’s the case, take the elevator upwards, and then make your way along to the right and drop down to reach Shakra from above instead.
7. Fight the 2nd Skarrgard in Hunter’s March.
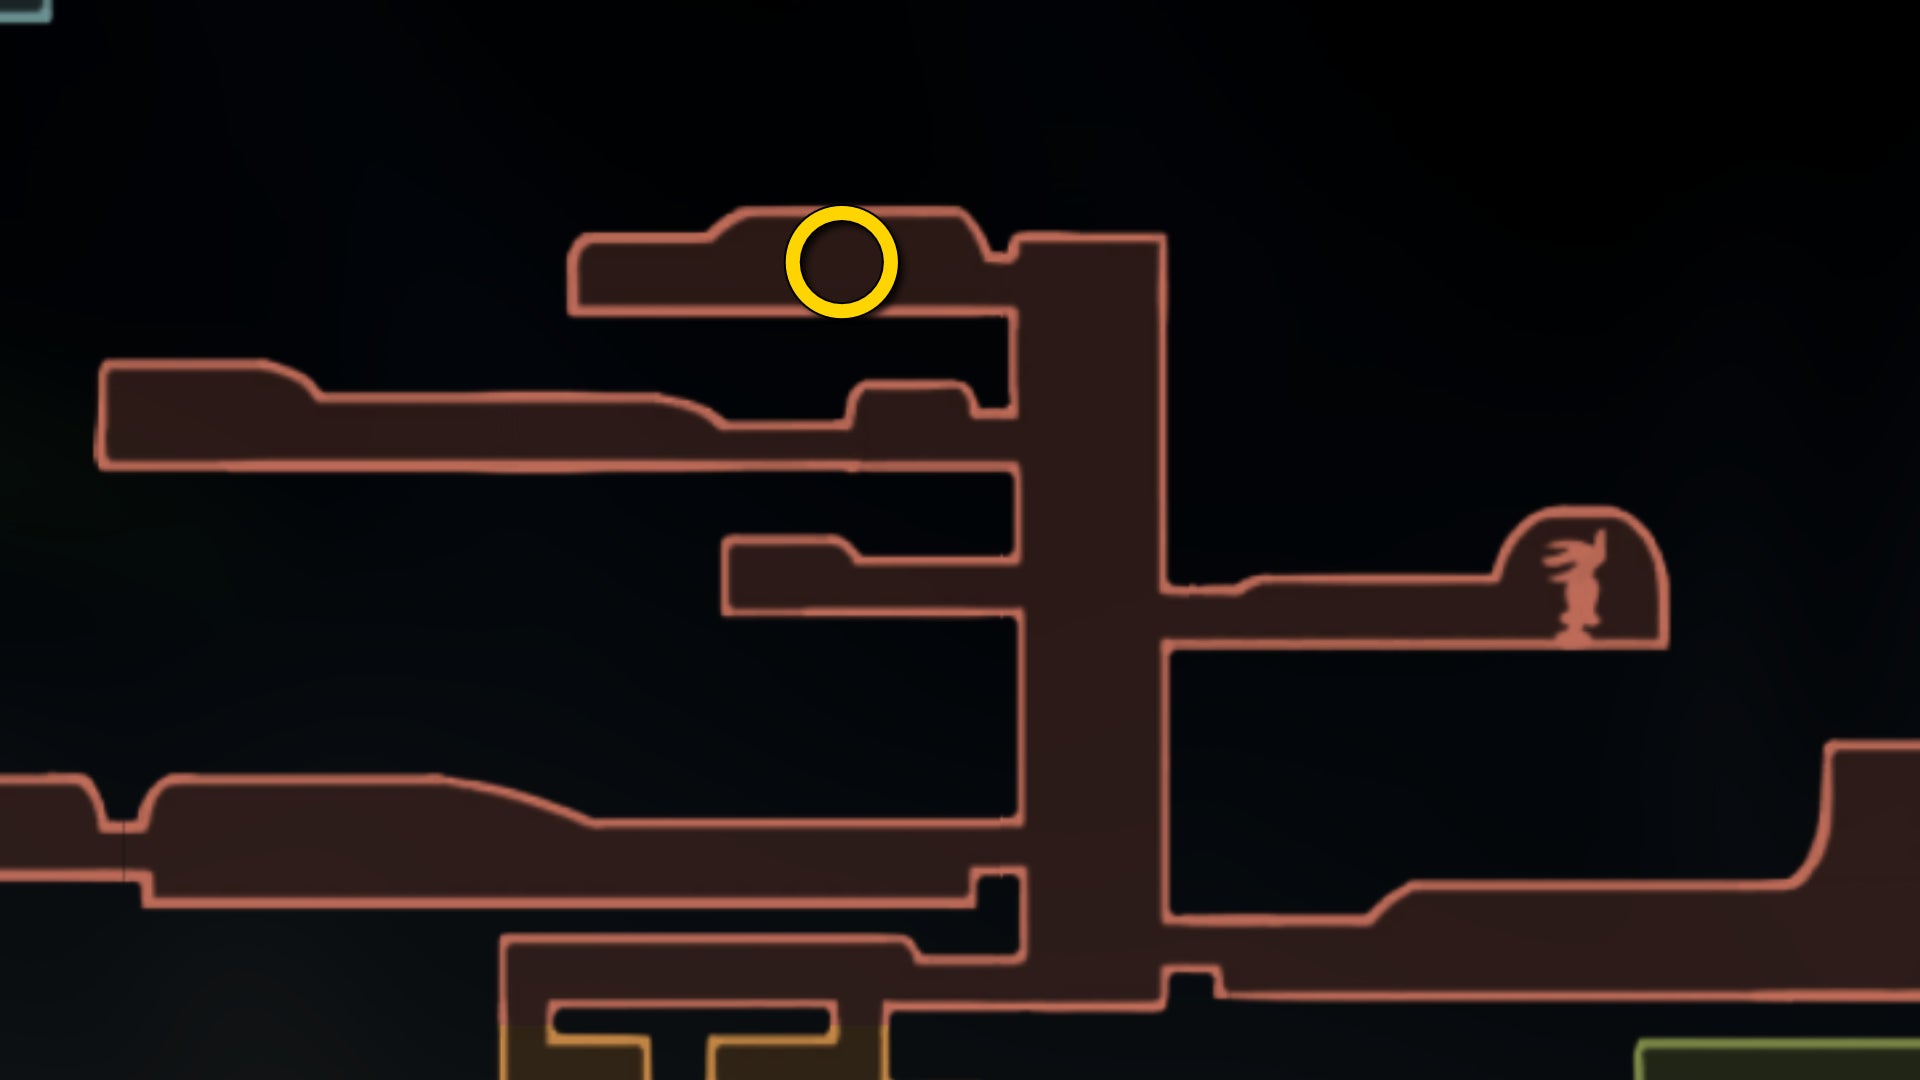
Image credit:Rock Paper Shotgun/Team Cherry

Image credit:Rock Paper Shotgun/Team Cherry
This task is pretty tricky, but there’s one more spot of the much-hated Hunter’s March region which you can now reach thanks to your Claw Grip skill. Head back into Hunter’s March and make your way to the vertical shaft, and rest at the (previously trapped) Bench. Then climb the walls up to the very top of the shaft, and enter the room beyond.
In this room - and I’m sorry to break the news to you - is another Skarrgard to defeat. Remember the giant ant warrior guarding the passage into Hunter’s March in the first place? Yeah, it’s another of those guys. And this one is much harder, because it’s joined immediately by a flying Spear Skarr who hounds you from a distance during the fight.

Image credit:Rock Paper Shotgun/Team Cherry
My recommendation is to use the Longpin liberally to damage both enemies at once from a (relatively) safe distance; and be very patient, because your windows for attacking are quite low with both enemies harrying you at once.
When you finally manage to defeat the Skarrgard, you get to enter a room behind, filled with Rosaries as a reward.
8. Complete the Far Fields obstacle courses.
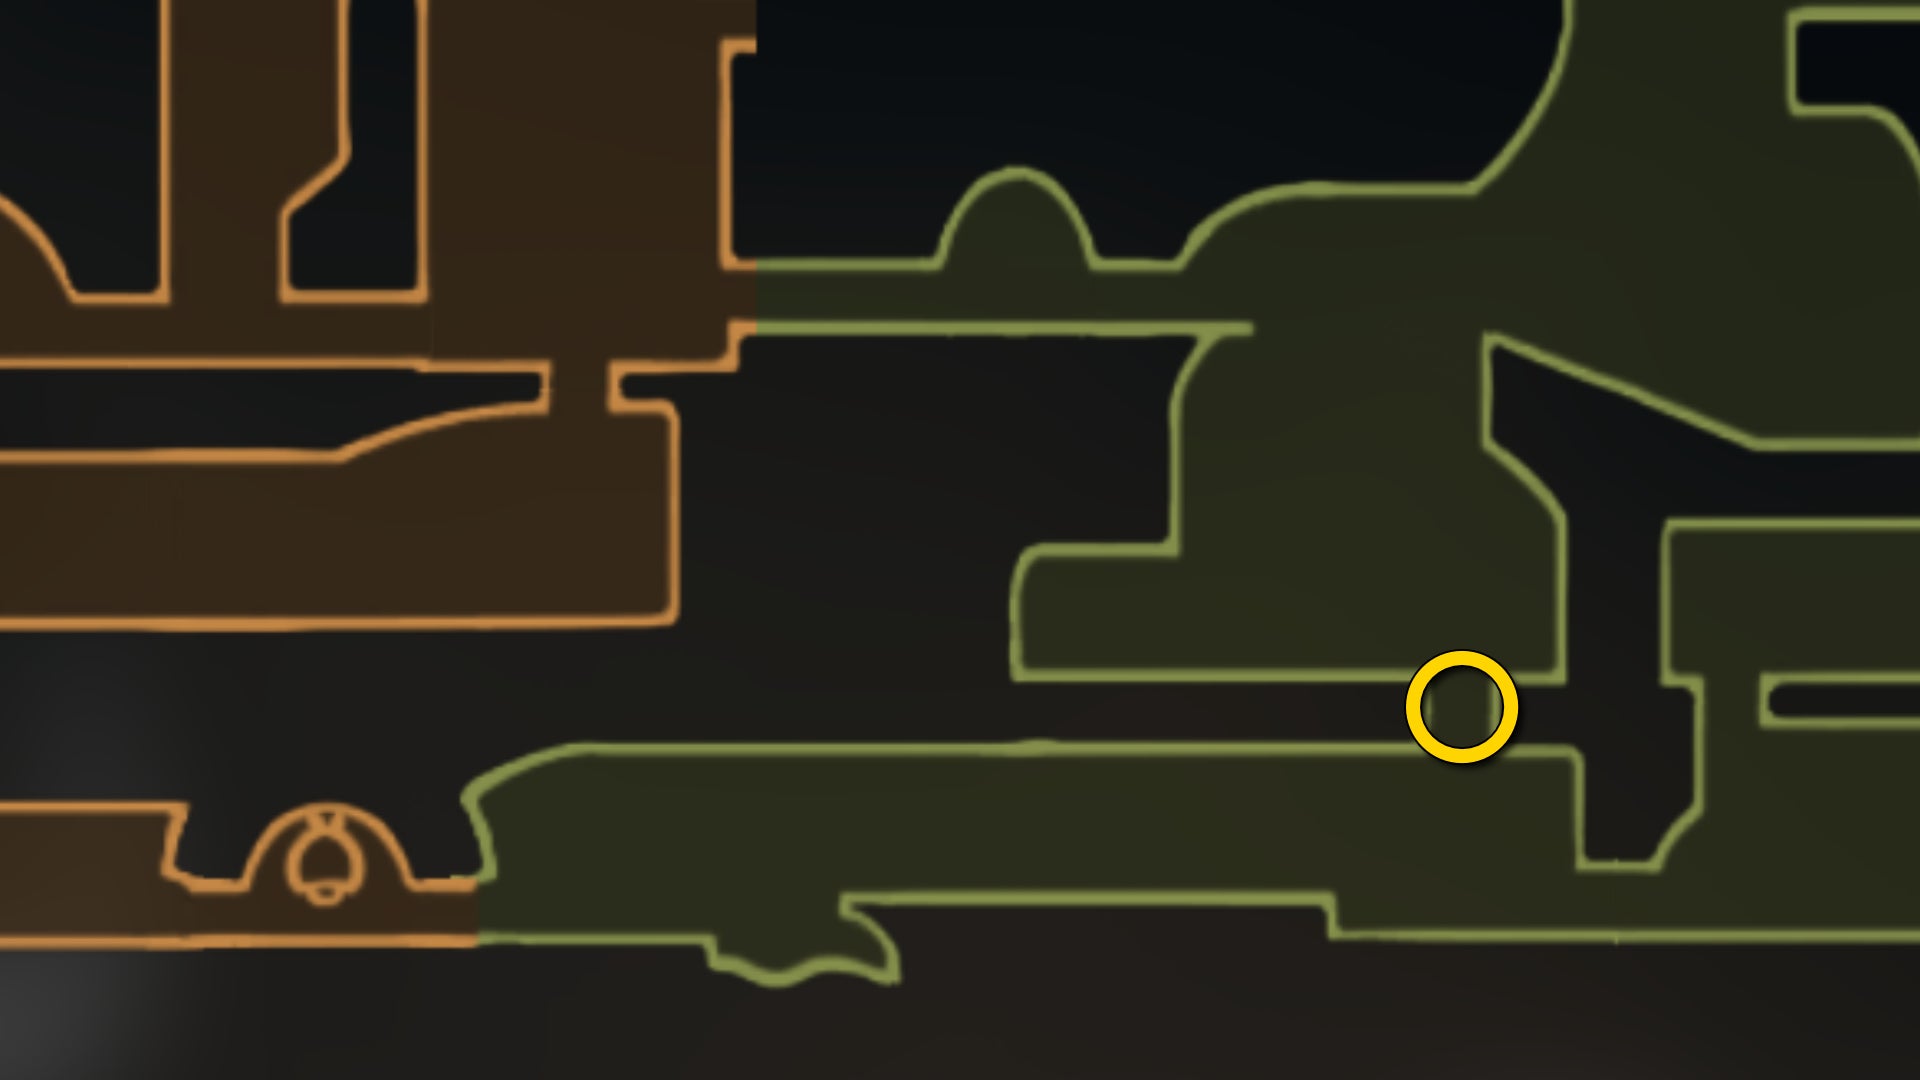
Image credit:Rock Paper Shotgun/Team Cherry

Image credit:Rock Paper Shotgun/Team Cherry
Next, there are two different (pretty tricky) obstacle courses hidden in Far Fields. So make your way into Far Fields via the entrance just past where you fought Lace. In this first room, you can now wall-climb to make your way into an upper room.
This room houses a fairly tricky obstacle course filled with spikes, air currents, and those red Pogo-able plants from Hunter’s March. You can also unlock the upper shortcut to the Bench in Deep Docks, and it’s a good idea to rest there in case you lose too much Health while attempting the obstacle course.

Image credit:Rock Paper Shotgun/Team Cherry
There’s not much to explain here; complete the course, and you’ll find a chest at the end filled with Rosaries. Next to the chest, you can then unlock a short stepladder down to more familiar ground within Far Fields.

Image credit:Rock Paper Shotgun/Team Cherry
Next, head to the Far Fields Bellway, and stand on the bell floor, then walk right to enter a secret passage that leads to an even harder obstacle course. This course at last allows you to reach the other side of that ominous banging door by Pilgrim’s Rest - and there’s also a Flea here for you to rescue.

Image credit:Rock Paper Shotgun/Team Cherry
As for the source of the banging, it’s a large scarab beetle miniboss called a Rhinogrund, and it really packs a punch. You can either defeat it here and now - in which case, be careful, because death means having to repeat the obstacle course in order to try again - or you can flick the lever by the door to let it out into the world.
If you let the Rhinogrund loose, you can find it again only after reaching Act 3 of the game; it’ll be waiting for you in one of the first rooms of Far Fields. I prefer to kill it here and now, but the reward is a bit meagre - just a Beast Shard for your efforts.
9. Find Zylotol in the Wormways.
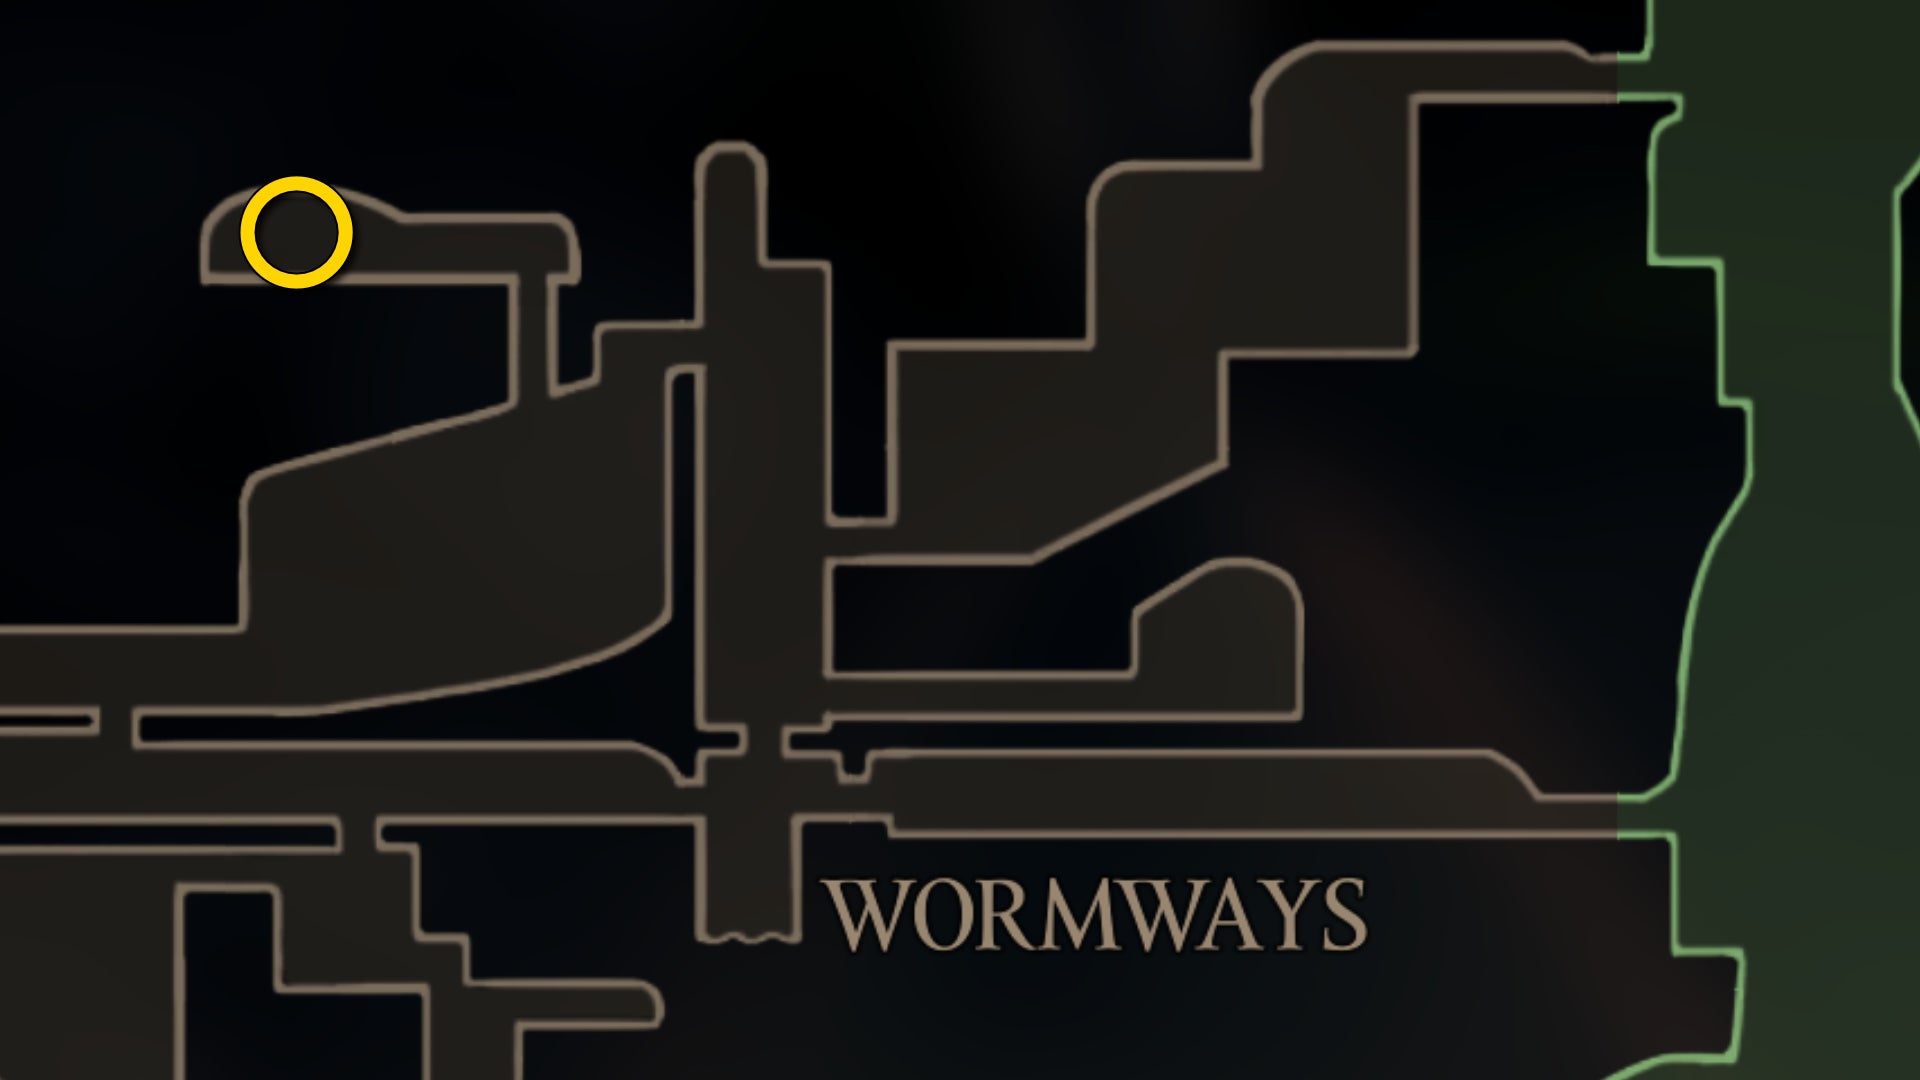
Image credit:Rock Paper Shotgun/Team Cherry
Our final task for Part 10 of our Silksong walkthrough sees you return to the perilous Wormways northwest of Bone Bottom. Use the elevator to reach it as you did before, and climb up the shortcut you unlocked, right next to the doorway into the Wormways. Climb up to the very top of the shaft and exit through the top-left doorway.

Image credit:Rock Paper Shotgun/Team Cherry
In the room beyond, bypass the first worm, and then climb up the next entrance you see above you. This will take you to a little hidey-hole where you’ll meet a new NPC - Alchemist Zylotol.

Image credit:Rock Paper Shotgun/Team Cherry
Exhaust Zylotol’s dialogue to accept his quest to collect Plasmium from the glowing blue orbs in the Wormways.
10. Collect 3 Plasmium from the Wormways.
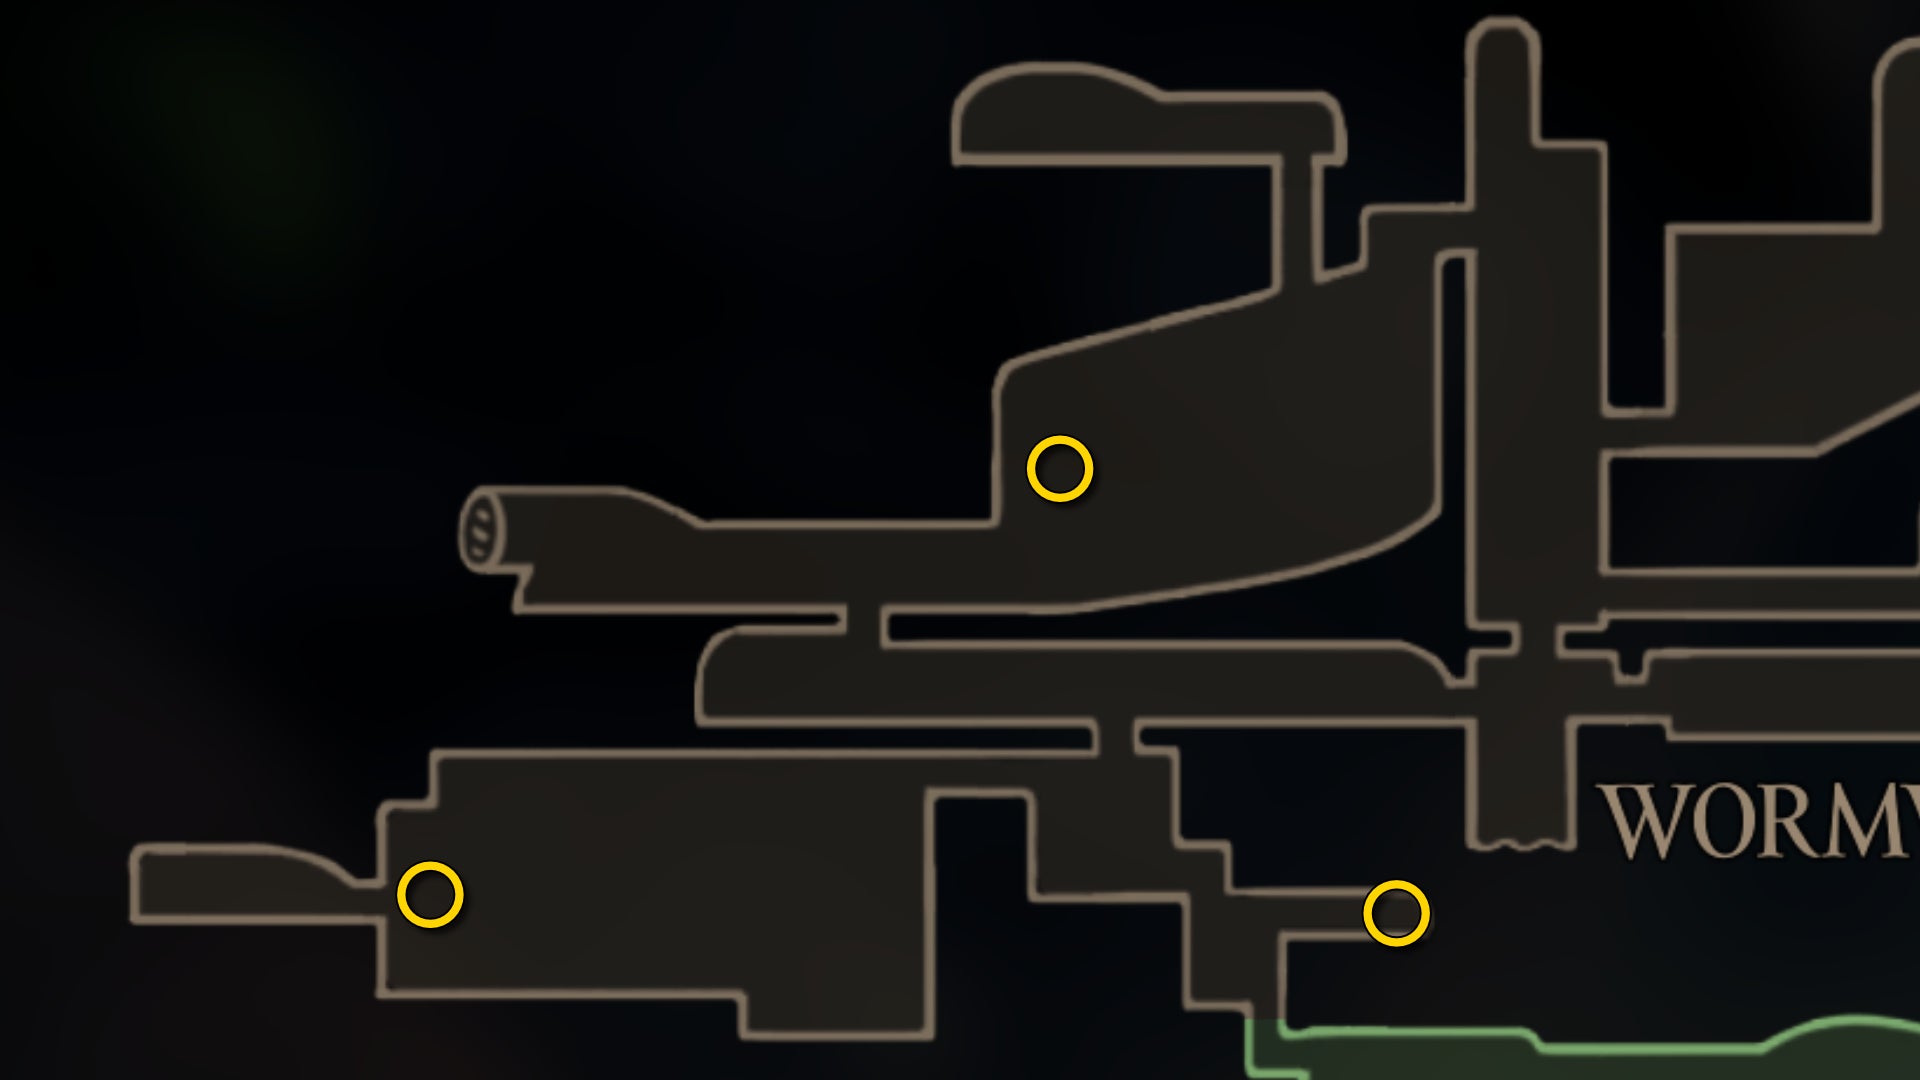
Image credit:Rock Paper Shotgun/Team Cherry
Once you accept Zylotol’s quest, he’ll give you a Needle Phial (which needs equipping!). Rest at the Bench next to Zylotol, and equip the Needle Phial in your red tool slot. Then head back down into the Wormways.

Image credit:Rock Paper Shotgun/Team Cherry

Image credit:Rock Paper Shotgun/Team Cherry
The first Plasmium is found in the room you’re in at the moment. Head left, and climb the wall above the spike pit, then just follow the path to find the Plasmium orb. Walk up to the orb, activate your tool and keep it held to charge up the Needle Phial; then release it to extract the Plasmium.

Image credit:Rock Paper Shotgun/Team Cherry
The second Plasmium is the one you saw previously, which is on the way south to the Chapel Of The Wanderer. Head to it and suck out the Plasmium again with your Needle Phial.

Image credit:Rock Paper Shotgun/Team Cherry
The final Plasmium is in a new area of the Wormways you’ll explore right now. Head back up to the top of the room of the second Plasmium, then head left and climb the wall past the Gromling. There are lots of Gromlings in this area, but take your time, heal off the Worms as needed, and explore the room fully to find and extract the third Plasmium.
Note: This room also contains a body in the sand at the end of one path, which you can loot for a valuable Memory Locket for expanding your Crests’ tool slots.

Image credit:Rock Paper Shotgun/Team Cherry
11. Obtain the Plasmium Phial.
With the three Plasmium extracted, return to Zylotol, and he’ll reward you with a very valuable prize: the Plasmium Phial. This Phial is equipped in your red tool slot, and allows you to expend a charge to give yourself a temporary extra point of Health.

Image credit:Rock Paper Shotgun/Team Cherry
You can only use it three times per rest, and also it has a maximum number of overall uses before you must return to Zylotol in the Wormways and pay him Rosaries to top it up for you. Still, it’s a very useful item, particularly in the next section where you’ll be facing one of the most challenging bosses in Act 1 of Silksong.
Well done; that was a lot of little tasks you just checked off the list. Now join us in Part 11 of our Silksong walkthrough to return to Hornet’s main quest.


Hollow Knight: Silksong
PC , Nintendo Switch
Rock Paper Shotgun is better when you sign in
Sign in and join us on our journey to discover strange and compelling PC games.

All 75 Arc Raiders Blueprints and where to get them
These areas have the highest chance of giving you Blueprints

Image credit:Rock Paper Shotgun/Embark Studios

Looking for more Arc Raiders Blueprints? It’s a special day when you find a Blueprint, as they’re among the most valuable items in Arc Raiders. If you find a Blueprint that you haven’t already found, then you must make sure you hold onto it at all costs, because Blueprints are the key to one of the most important and powerful systems of meta-progression in the game.
This guide aims to be the very best guide on Blueprints you can find, starting with a primer on what exactly they are and how they work in Arc Raiders, before delving into exactly where to get Blueprints and the very best farming spots for you to take in your search.
We’ll also go over how to get Blueprints from other unlikely activities, such as destroying Surveyors and completing specific quests. And you’ll also find the full list of all 75 Blueprints in Arc Raiders on this page (including the newest Blueprints added with the Cold Snap update , such as the Deadline Blueprint and Firework Box Blueprint), giving you all the information you need to expand your own crafting repertoire.
In this guide:
- What are Blueprints in Arc Raiders?
- Full Blueprint list: All crafting recipes
- Where to find Blueprints in Arc Raiders Blueprints obtained from quests Blueprints obtained from Trials Best Blueprint farming locations

What are Blueprints in Arc Raiders?
Blueprints in Arc Raiders are special items which, if you manage to extract with them, you can expend to permanently unlock a new crafting recipe in your Workshop. If you manage to extract from a raid with an Anvil Blueprint, for example, you can unlock the ability to craft your very own Anvil Pistol, as many times as you like (as long as you have the crafting materials).
To use a Blueprint, simply open your Inventory while in the lobby, then right-click on the Blueprint and click “Learn And Consume” . This will permanently unlock the recipe for that item in your Workshop. As of the Stella Montis update, there are allegedly 75 different Blueprints to unlock - although only 68 are confirmed to be in the game so far. You can see all the Blueprints you’ve found and unlocked by going to the Workshop menu, and hitting “R” to bring up the Blueprint screen.
It’s possible to find duplicates of past Blueprints you’ve already unlocked. If you find these, then you can either sell them, or - if you like to play with friends - you can take it into a match and gift it to your friend so they can unlock that recipe for themselves. Another option is to keep hold of them until the time comes to donate them to the Expedition.
Full Blueprint list: All crafting recipes
Below is the full list of all the Blueprints that are currently available to find in Arc Raiders, and the crafting recipe required for each item:
| Blueprint | Type | Recipe | Crafted At |
|---|---|---|---|
| Bettina | Weapon | 3x Advanced Mechanical Components 3x Heavy Gun Parts 3x Canister | Gunsmith 3 |
| Blue Light Stick | Quick Use | 3x Chemicals | Utility Station 1 |
| Aphelion | Weapon | 3x Magnetic Accelerator 3x Complex Gun Parts 1x Matriarch Reactor | Gunsmith 3 |
| Combat Mk. 3 (Flanking) | Augment | 2x Advanced Electrical Components 3x Processor | Gear Bench 3 |
| Combat Mk. 3 (Aggressive) | Augment | 2x Advanced Electrical Components 3x Processor | Gear Bench 3 |
| Complex Gun Parts | Material | 2x Light Gun Parts 2x Medium Gun Parts 2x Heavy Gun Parts | Refiner 3 |
| Fireworks Box | Quick Use | 1x Explosive Compound 3x Pop Trigger | Explosives Station 2 |
| Gas Mine | Mine | 4x Chemicals 2x Rubber Parts | Explosives Station 1 |
| Green Light Stick | Quick Use | 3x Chemicals | Utility Station 1 |
| Pulse Mine | Mine | 1x Crude Explosives 1x Wires | Explosives Station 1 |
| Seeker Grenade | Grenade | 1x Crude Explosives 2x ARC Alloy | Explosives Station 1 |
| Looting Mk. 3 (Survivor) | Augment | 2x Advanced Electrical Components 3x Processor | Gear Bench 3 |
| Angled Grip II | Mod | 2x Mechanical Components 3x Duct Tape | Gunsmith 2 |
| Angled Grip III | Mod | 2x Mod Components 5x Duct Tape | Gunsmith 3 |
| Hullcracker | Weapon | 1x Magnetic Accelerator 3x Heavy Gun Parts 1x Exodus Modules | Gunsmith 3 |
| Launcher Ammo | Ammo | 5x Metal Parts 1x Crude Explosives | Workbench 1 |
| Anvil | Weapon | 5x Mechanical Components 5x Simple Gun Parts | Gunsmith 2 |
| Anvil Splitter | Mod | 2x Mod Components 3x Processor | Gunsmith 3 |
| ??? | ??? | ??? | ??? |
| Barricade Kit | Quick Use | 1x Mechanical Components | Utility Station 2 |
| Blaze Grenade | Grenade | 1x Explosive Compound 2x Oil | Explosives Station 3 |
| Bobcat | Weapon | 3x Advanced Mechanical Components 3x Light Gun Parts | Gunsmith 3 |
| Osprey | Weapon | 2x Advanced Mechanical Components 3x Medium Gun Parts 7x Wires | Gunsmith 3 |
| Burletta | Weapon | 3x Mechanical Components 3x Simple Gun Parts | Gunsmith 1 |
| Compensator II | Mod | 2x Mechanical Components 4x Wires | Gunsmith 2 |
| Compensator III | Mod | 2x Mod Components 8x Wires | Gunsmith 3 |
| Defibrillator | Quick Use | 9x Plastic Parts 1x Moss | Medical Lab 2 |
| ??? | ??? | ??? | ??? |
| Equalizer | Weapon | 3x Magnetic Accelerator 3x Complex Gun Parts 1x Queen Reactor | Gunsmith 3 |
| Extended Barrel | Mod | 2x Mod Components 8x Wires | Gunsmith 3 |
| Extended Light Mag II | Mod | 2x Mechanical Components 3x Steel Spring | Gunsmith 2 |
| Extended Light Mag III | Mod | 2x Mod Components 5x Steel Spring | Gunsmith 3 |
| Extended Medium Mag II | Mod | 2x Mechanical Components 3x Steel Spring | Gunsmith 2 |
| Extended Medium Mag III | Mod | 2x Mod Components 5x Steel Spring | Gunsmith 3 |
| Extended Shotgun Mag II | Mod | 2x Mechanical Components 3x Steel Spring | Gunsmith 2 |
| Extended Shotgun Mag III | Mod | 2x Mod Components 5x Steel Spring | Gunsmith 3 |
| Remote Raider Flare | Quick Use | 2x Chemicals 4x Rubber Parts | Utility Station 1 |
| Heavy Gun Parts | Material | 4x Simple Gun Parts | Refiner 2 |
| Venator | Weapon | 2x Advanced Mechanical Components 3x Medium Gun Parts 5x Magnet | Gunsmith 3 |
| Il Toro | Weapon | 5x Mechanical Components 6x Simple Gun Parts | Gunsmith 1 |
| Jolt Mine | Mine | 1x Electrical Components 1x Battery | Explosives Station 2 |
| Explosive Mine | Mine | 1x Explosive Compound 1x Sensors | Explosives Station 3 |
| Jupiter | Weapon | 3x Magnetic Accelerator 3x Complex Gun Parts 1x Queen Reactor | Gunsmith 3 |
| Light Gun Parts | Material | 4x Simple Gun Parts | Refiner 2 |
| Lightweight Stock | Mod | 2x Mod Components 5x Duct Tape | Gunsmith 3 |
| Lure Grenade | Grenade | 1x Speaker Component 1x Electrical Components | Utility Station 2 |
| Medium Gun Parts | Material | 4x Simple Gun Parts | Refiner 2 |
| Torrente | Weapon | 2x Advanced Mechanical Components 3x Medium Gun Parts 6x Steel Spring | Gunsmith 3 |
| Muzzle Brake II | Mod | 2x Mechanical Components 4x Wires | Gunsmith 2 |
| Muzzle Brake III | Mod | 2x Mod Components 8x Wires | Gunsmith 3 |
| Padded Stock | Mod | 2x Mod Components 5x Duct Tape | Gunsmith 3 |
| Shotgun Choke II | Mod | 2x Mechanical Components 4x Wires | Gunsmith 2 |
| Shotgun Choke III | Mod | 2x Mod Components 8x Wires | Gunsmith 3 |
| Shotgun Silencer | Mod | 2x Mod Components 8x Wires | Gunsmith 3 |
| Showstopper | Grenade | 1x Advanced Electrical Components 1x Voltage Converter | Explosives Station 3 |
| Silencer I | Mod | 2x Mechanical Components 4x Wires | Gunsmith 2 |
| Silencer II | Mod | 2x Mod Components 8x Wires | Gunsmith 3 |
| Snap Hook | Quick Use | 2x Power Rod 3x Rope 1x Exodus Modules | Utility Station 3 |
| Stable Stock II | Mod | 2x Mechanical Components 3x Duct Tape | Gunsmith 2 |
| Stable Stock III | Mod | 2x Mod Components 5x Duct Tape | Gunsmith 3 |
| Tagging Grenade | Grenade | 1x Electrical Components 1x Sensors | Utility Station 3 |
| Tempest | Weapon | 3x Advanced Mechanical Components 3x Medium Gun Parts 3x Canister | Gunsmith 3 |
| Trigger Nade | Grenade | 2x Crude Explosives 1x Processor | Explosives Station 2 |
| Vertical Grip II | Mod | 2x Mechanical Components 3x Duct Tape | Gunsmith 2 |
| Vertical Grip III | Mod | 2x Mod Components 5x Duct Tape | Gunsmith 3 |
| Vita Shot | Quick Use | 2x Antiseptic 1x Syringe | Medical Lab 3 |
| Vita Spray | Quick Use | 3x Antiseptic 1x Canister | Medical Lab 3 |
| Vulcano | Weapon | 1x Magnetic Accelerator 3x Heavy Gun Parts 1x Exodus Modules | Gunsmith 3 |
| Wolfpack | Grenade | 2x Explosive Compound 2x Sensors | Explosives Station 3 |
| Red Light Stick | Quick Use | 3x Chemicals | Utility Station 1 |
| Smoke Grenade | Grenade | 14x Chemicals 1x Canister | Utility Station 2 |
| Deadline | Mine | 3x Explosive Compound 2x ARC Circuitry | Explosives Station 3 |
| Trailblazer | Grenade | 1x Explosive Compound 1x Synthesized Fuel | Explosives Station 3 |
| Tactical Mk. 3 (Defensive) | Augment | 2x Advanced Electrical Components 3x Processor | Gear Bench 3 |
| Tactical Mk. 3 (Healing) | Augment | 2x Advanced Electrical Components 3x Processor | Gear Bench 3 |
| Yellow Light Stick | Quick Use | 3x Chemicals | Utility Station 1 |
Note: The missing Blueprints in this list likely have not actually been added to the game at the time of writing, because none of the playerbase has managed to find any of them. As they are added to the game, I will update this page with the most relevant information so you know exactly how to get all 75 Arc Raiders Blueprints.
Where to find Blueprints in Arc Raiders
Below is a list of all containers, modifiers, and events which maximise your chances of finding Blueprints:
- Certain quests reward you with specific Blueprints .
- Completing Trials has a high chance of offering Blueprints as rewards.
- Surveyors have a decent chance of dropping Blueprints on death.
- High loot value areas tend to have a greater chance of spawning Blueprints.
- Night Raids and Storms may increase rare Blueprint spawn chances in containers.
- Containers with higher numbers of items may have a higher tendency to spawn Blueprints. As a result, Blue Gate (which has many “large” containers containing multiple items) may give you a higher chance of spawning Blueprints.
- Raider containers (Raider Caches, Weapon Boxes, Medical Bags, Grenade Tubes) have increased Blueprint drop rates. As a result, the Uncovered Caches event gives you a high chance of finding Blueprints.
- Security Lockers have a higher than average chance of containing Blueprints.
- Certain Blueprints only seem to spawn under specific circumstances: Tempest Blueprint only spawns during Night Raid events. Vulcano Blueprint only spawns during Hidden Bunker events. Jupiter and Equaliser Blueprints only spawn during Harvester events.

Raider Caches, Weapon Boxes, and other raider-oriented container types have a good chance of offering Blueprints. |Image credit:Rock Paper Shotgun/Embark Studios
Blueprints have a very low chance of spawning in any container in Arc Raiders, around 1-2% on average. However, there is a higher chance of finding Blueprints in particular container types. Specifically, you can find more Blueprints in Raider containers and security lockers.
Beyond this, if you’re looking for Blueprints you should focus on regions of the map which are marked as having particularly high-value loot. Areas such as the Control Tower in Dam Battlegrounds, the Arrival and Departure Buildings in Spaceport, and Pilgrim’s Peak in Blue Gate all have a better-than-average chance of spawning Blueprints somewhere amongst all their containers. Night Raids and Electromagnetic Storm events also increase the drop chances of certain Blueprints .
In addition to these containers, you can often loot Blueprints from destroyed Surveyors - the largest of the rolling ball ARC. Surveyors are more commonly found on the later maps - Spaceport and Blue Gate - and if one spawns in your match, you’ll likely see it by the blue laser beam that it casts into the sky while “surveying”.
Surveyors are quite well-armoured and will very speedily run away from you once it notices you, but if you can take one down then make sure you loot all its parts for a chance of obtaining certain unusual Blueprints.
Blueprints obtained from quests
One way in which you can get Blueprints is by completing certain quests for the vendors in Speranza. Some quests will reward you with a specific item Blueprint upon completion, so as long as you work through all the quests in Arc Raiders, you are guaranteed those Blueprints.
Here is the full list of all Blueprints you can get from quest rewards:
- Trigger Nade Blueprint: Rewarded after completing “Sparks Fly”.
- Lure Grenade Blueprint: Rewarded after completing “Greasing Her Palms”.
- Burletta Blueprint: Rewarded after completing “Industrial Espionage”.
- Hullcracker Blueprint (and Launcher Ammo Blueprint): Rewarded after completing “The Major’s Footlocker”.
Alas, that’s only 4 Blueprints out of a total of 75 to unlock, so for the vast majority you will need to find them yourself during a raid. If you’re intent on farming Blueprints, then it’s best to equip yourself with cheap gear in case you lose it, but don’t use a free loadout because then you won’t get a safe pocket to stash any new Blueprint you find. No pain in Arc Raiders is sharper than failing to extract with a new Blueprint you’ve been after for a dozen hours already.

One of the best ways to get Blueprints is by hitting three stars on all five Trials every week. |Image credit:Rock Paper Shotgun/Embark Studios
Blueprints obtained from Trials
One of the very best ways to get Blueprints is as rewards for completing Trials in Arc Raiders. Trials are unlocked from Level 15 onwards, and allow you to earn rewards by focusing on certain tasks over the course of several raids. For example, one Trial might task you with dealing damage to Hornets, while another might challenge you to loot Supply Drops.
Trials refresh on a weekly basis, with a new week bringing five new Trials. Each Trial can offer up to three rewards after passing certain score milestones, and it’s possible to receive very high level loot from these reward crates - including Blueprints. So if you want to unlock as many Blueprints as possible, you should make a point of completing as many Trials as possible each week.
Best Blueprint farming locations
The very best way to get Blueprints is to frequent specific areas of the maps which combine high-tier loot pools with the right types of containers to search. Here are my recommendations for where to find Blueprints on every map, so you can always keep the search going for new crafting recipes to unlock.

Image credit:Rock Paper Shotgun/Embark Studios
Dam Battlegrounds
The best places to farm Blueprints on Dam Battlegrounds are the Control Tower, Power Generation Complex, Ruby Residence, and Pale Apartments . The first two regions, despite only being marked on the map as mid-tier loot, contain a phenomenal number of containers to loot. The Control Tower can also contain a couple of high-tier Security Lockers - though of course, you’ll need to have unlocked the Security Breach skill at the end of the Survival tree.
There’s also a lot of reporting amongst the playerbase that the Residential areas in the top-left of the map - Pale Apartments and Ruby Residence - give you a comparatively strong chance of finding Blueprints. Considering their size, there’s a high density of containers to loot in both locations, and they also have the benefit of being fairly out of the way. So you’re more likely to have all the containers to yourself.
Buried City
The best Blueprint farming locations on Buried City are the Santa Maria Houses, Grandioso Apartments, Town Hall, and the various buildings of the New District . Grandioso Apartments has a lower number of containers than the rest, but a high chance of spawning weapon cases - which have good Blueprint drop rates. The others are high-tier loot areas, with plenty of lootable containers - including Security Lockers.
Spaceport
The best places to find Blueprints on Spaceport are the Arrival and Departure Buildings, as well as Control Tower A6 and the Launch Towers . All these areas are labelled as high-value loot regions, and many of them are also very handily connected to one another by the Spaceport wall, which you can use to quickly run from one area to the next. At the tops of most of these buildings you’ll find at least one Security Locker, so this is an excellent farming route for players looking to find Blueprints.
The downside to looting Blueprints on Spaceport is that all these areas are hotly contested, particularly in Duos and Squads. You’ll need to be very focused and fast in order to complete the full farming route.

Image credit:Rock Paper Shotgun/Embark Studios
Blue Gate
Blue Gate tends to have a good chance of dropping Blueprints, potentially because it generally has a high number of containers which can hold lots of items; so there’s a higher chance of a Blueprint spawning in each container. In my experience, the best Blueprint farming spots on Blue Gate are Pilgrim’s Peak, Raider’s Refuge, the Ancient Fort, and the Underground Complex beneath the Warehouse .
All of these areas contain a wealth of containers to loot. Raider’s Refuge has less to loot, but the majority of the containers in and around the Refuge are raider containers, which have a high chance of containing Blueprints - particularly during major events.
Stella Montis
On the whole, Stella Montis seems to have a very low drop rate for Blueprints (though a high chance of dropping other high-tier loot). If you do want to try farming Blueprints on this map, the best places to find Blueprints in Stella Montis are Medical Research, Assembly Workshop, and the Business Center . These areas have the highest density of containers to loot on the map.
In addition to this, the Western Tunnel has a few different Security Lockers to loot, so while there’s very little to loot elsewhere in this area of the map, it’s worth hitting those Security Lockers if you spawn there at the start of a match.
That wraps up this primer on how to get all the Blueprints in Arc Raiders as quickly as possible. With the Expedition system constantly resetting a large number of players’ Blueprints, it’s more important than ever to have the most up-to-date information on where to find all these Blueprints.
While you’re here, be sure to check out our Arc Raiders best guns tier list , as well as our primers on the best skills to unlock and all the different Field Depot locations on every map.


ARC Raiders
PS5 , Xbox Series X/S , PC
Rock Paper Shotgun is better when you sign in
Sign in and join us on our journey to discover strange and compelling PC games.
