Grounded 2: All 50 Milk Molar locations
Grab all 50 Milk Molars to permanently boost your stats
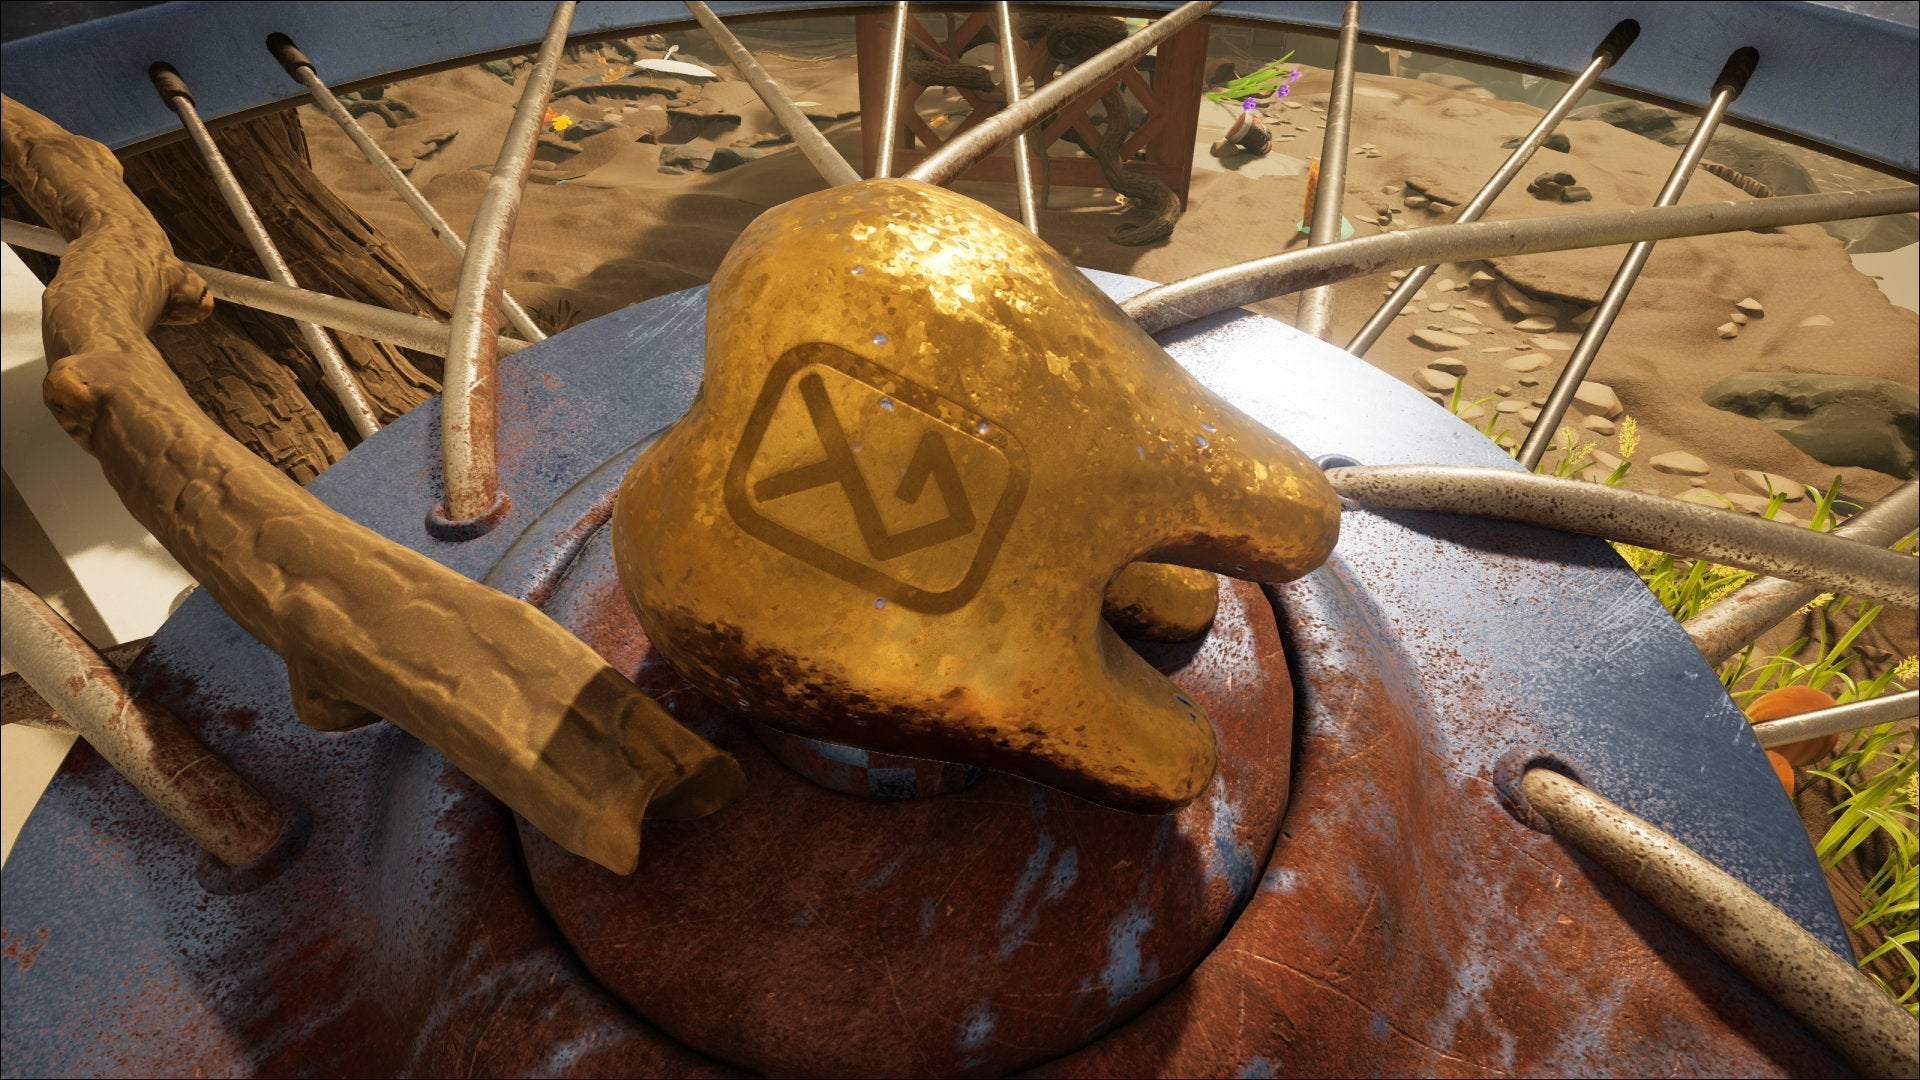
Image credit:Rock Paper Shotgun/Xbox Game Studios

Looking for all Milk Molar locations in Grounded 2? Sourcing these collectables will give you a series of permanent stat boosts - from increasing max health and stamina, to slowing your rate of thirst and hunger - making survival in the park much easier.
As well as standard Milk Molars, there’s also Mega Milk Molars, which offer slightly different bonuses (such as increasing the stacks of various item types you can hold) with the added benefit of their effects spreading to your entire party.
This guide explains where to find all 50 Milk Molar and Mega Milk Molar locations in Grounded 2, region-by-region.
In this guide:
- How Milk Molar and Mega Milk Molar locations work
- Snackbar Milk Molar locations
- Snackbar Front Milk Molar locations
- Picnic Table Milk Molar locations
- Fire Pit Milk Molar locations
- Pine Hill Milk Molar locations
- Entrance Milk Molar locations
- Ice Cream Cart Milk Molar locations
- Ceremony Milk Molar locations
- Statue Milk Molar locations

Milk Molars and Mega Milk Molars explained
Though it’s best to discover Milk Molars naturally as you explore the park, at some point it’s a good idea to intentionally gather some to give you a stat boost, especially when you find Grounded 2’s difficulty increasing a notch. If you decide to start collecting Molars en masse, there’s a few things to prep first.
To collect Mega Milk Molars, you need an Omni-Hammer level 2 - which requires finding some Lingonberries first - and for several Molars, you’ll need an explosive (such as the Bratburst ) to remove cracked walls that gate their locations. And, since you’ll be exploring a lot of caves and tunnels, bring a Torch (or three) to light the way.
Finally: although the following descriptions, map and in-game screenshots should be enough, the game’s unique Honey I Shrunk the Kids perspective can make branches, rocks, or mounds of dirt easily obscure the cave entrance or Molar you’re looking for. We found pausing the action, switching over to the game’s photo mode, and using the free camera mode particularly useful, especially when surrounded by enemies.
Snackbar Milk Molar locations
Snackbar Anthill dungeon (Milk Molar)
Likely the first Milk Molar you’ll come across, the early Snackbar Anthill dungeon has a Milk Molar at the end of the opening passage on the right side. Even without a Torch, it should be lit up enough for you to see it from a short distance.

Image credit:Rock Paper Shotgun/Xbox Game Studios
Ant Hill dungeon (Milk Molar)
This is in the Ant Hill, located in the area ‘above’ where you first start the game near the glass biome, with the entrance best accessed by travelling from the north or south. This is a very short cave with a Milk Molar at the end.


Behind the Snackbar (Mega Milk Molar)
Despite this being in the ‘opening’ area, it’s best to wait until you’ve at least got your Buggy mount to grab this one.
Work your way around the back of the Snackbar, going clockwise, and tucked away at the top of a dead end is a Mega Milk Molar. There is a stinkbug just before you reach this dead end (which you can dash past) and an Orb Weaver (which you might have to fight); otherwise all you need to do is dismount from your Buggy mount and climb up the ledges to reach it.


Snackbar Front Milk Molar locations
Cup north of Snackbar Ranger Outpost (Milk Molar)
North of the Snackbar Ranger Outpost is a small body of water with mushrooms on one end and a cup on the other. Inside the cup is a Milk Molar ready for the taking.

Image credit:Rock Paper Shotgun/Xbox Game Studios
Small story dungeon (Milk Molar)
This Milk Molar is found in a small dungeon just in front of the Snackbar you will visit as part of the story’s ‘The Art of War’ mission. After you pick up the TURBO Stolen Optical Disk, the Milk Molar will be against the wall under the roots.

Image credit:Rock Paper Shotgun/Xbox Game Studios
KLBBII News Camera (Mega Milk Molar)
This is found underneath the KLBBII News Camera wonder, on a cliff that’s just too high to reach from the ground. To get to it, scale the camera from the east, and drop into the camera body where there’s a wire and a gap you can squeeze through. The Mega Milk Molar is now just a level below you.


Hatchery Anthill (Mega Milk Molar)
This is found deep within the Hatchery Anthill, and requires the Buggy mount and its ability to chew through Dead Roots.
There’s a number of ways to get here, but if you start from the North Entrance, at the first open space with many ways onward, go straight ahead to come to a room with some Raw Science below and a ‘bridge’ above. Ignore these options and go straight through to the other side and down the passage, until you come to an Ominent door.
Go left here, then right at the consoles, to come to a table with Red Ant Soldier Eggs at the end of a passage. Climb the steps behind and chomp through the Dead Roots to find the Mega Molar.


Hatchery Anthill (Milk Molar)
This is found in the Hatchery Anthill, and requires the Buggy mount and the ability to chew through Dead Roots. Essentially, you need to return very close to where you found your first Red Soldier Ant Egg , and in case you forgot the route, the easiest way is to start from the South Entrance, and when you come across the cable on the ground, follow it all the way until the end.
Go left at this fork to come to a door on your left where you discovered the Red Ant Soldier Ant Egg. However, don’t go this way, but instead go right, into a cave-like series of passage, where there are Dead Roots on the left side. The Milk Molar is behind these.


Headless BURG.L (Mega Milk Molar)
A Mega Milk Molar is found on top of the Headless BURG.L at the edge of the region. To scale this wonder, climb along the ‘arm’ on the east side - use the spiderweb to get onto the arm proper, then make your way up until you can use a leaf then another web to the top - where it’s on the far side. There’s a few mosquitoes on the top to be wary of, so make sure you take them out first, or do you best to fend them off so you can grab it and flee.


Snackbar front planks (Milk Molar)
This is on top of the wooden ‘awning’ that shelters some of the map in front of the Snackbar. To climb on top, approach one of the eastern corners from the south or the north. The Molar is at the southeast corner, and aside from a Bombardier Beetle on the same plank, is pretty accessible.


Picnic Table Milk Molar locations
Briefcase Molar (1 Milk Molar)
As you climb up the Picnic Table, you will pass a Briefcase that you can open by discovering both Briefcase codes . Among various other rewards is a Milk Molar in the candy box.


Picnic Table cooler (Milk Molar)
As you climb up the Picnic Table - which you will need to do as part of the story - you have to head through a cooler just before you reach the top. On the ground level of the cooler, enter the jar on the left side to find a Milk Molar within.


Picnic Table top blanket (Mega Milk Molar)
On top of the Picnic Table - in the same location where you hack the O.R.C Transmitter - you can go underneath the blanket to find a number of Blueberries and an Orb Weaver. In the centre of this blanketed area, on top of a hotdog wrapper which you can reach with a web bridge, is a Mega Milk Molar.

Image credit:Rock Paper Shotgun/Xbox Game Studios
Cave under hotdog wrapper (Milk Molar)
Just to the south of the Picnic Table proper is an upside down hotdog wrapper - on the map it looks like a white block - that’s acting as a bridge for the valley below. Inside the valley is a cave entrance facing northwest. Go into the entrance, and you’ll find the Milk Molar - and a handful of Larva to fight off - at the end of the short passage.


Toxic Anthill dungeon (Milk Molar)
Head to the North Entrance of the Toxic Anthill - it’s next to a bottle underneath the southeast corner of the Picnic Table’s blanket - then take the first left, where you’ll find the Molar in the first open area after the long passage. Unlike other parts of the Toxic Anthill, you won’t need a Gas Mask to explore this - so no need to hunt down any Stinkbug parts first.


Northeast cup (Milk Molar)
In the northeast of the region, there is a cup on its side - you can see it on the map, so it should be easy enough to find. Less easy is that it’s guarded by an Orb Weaver, but approaching from the north quietly means you should be able to launch a surprise attack first.

Image credit:Rock Paper Shotgun/Xbox Game Studios
Fire Pit Milk Molar locations
Wooden stumps (Milk Molar)
In the east of the Fire Pit region are two wooden stumps laid down on top of one another. On the south side, underneath the edge of a stump and next to a rock, is a Milk Molar ready and waiting.
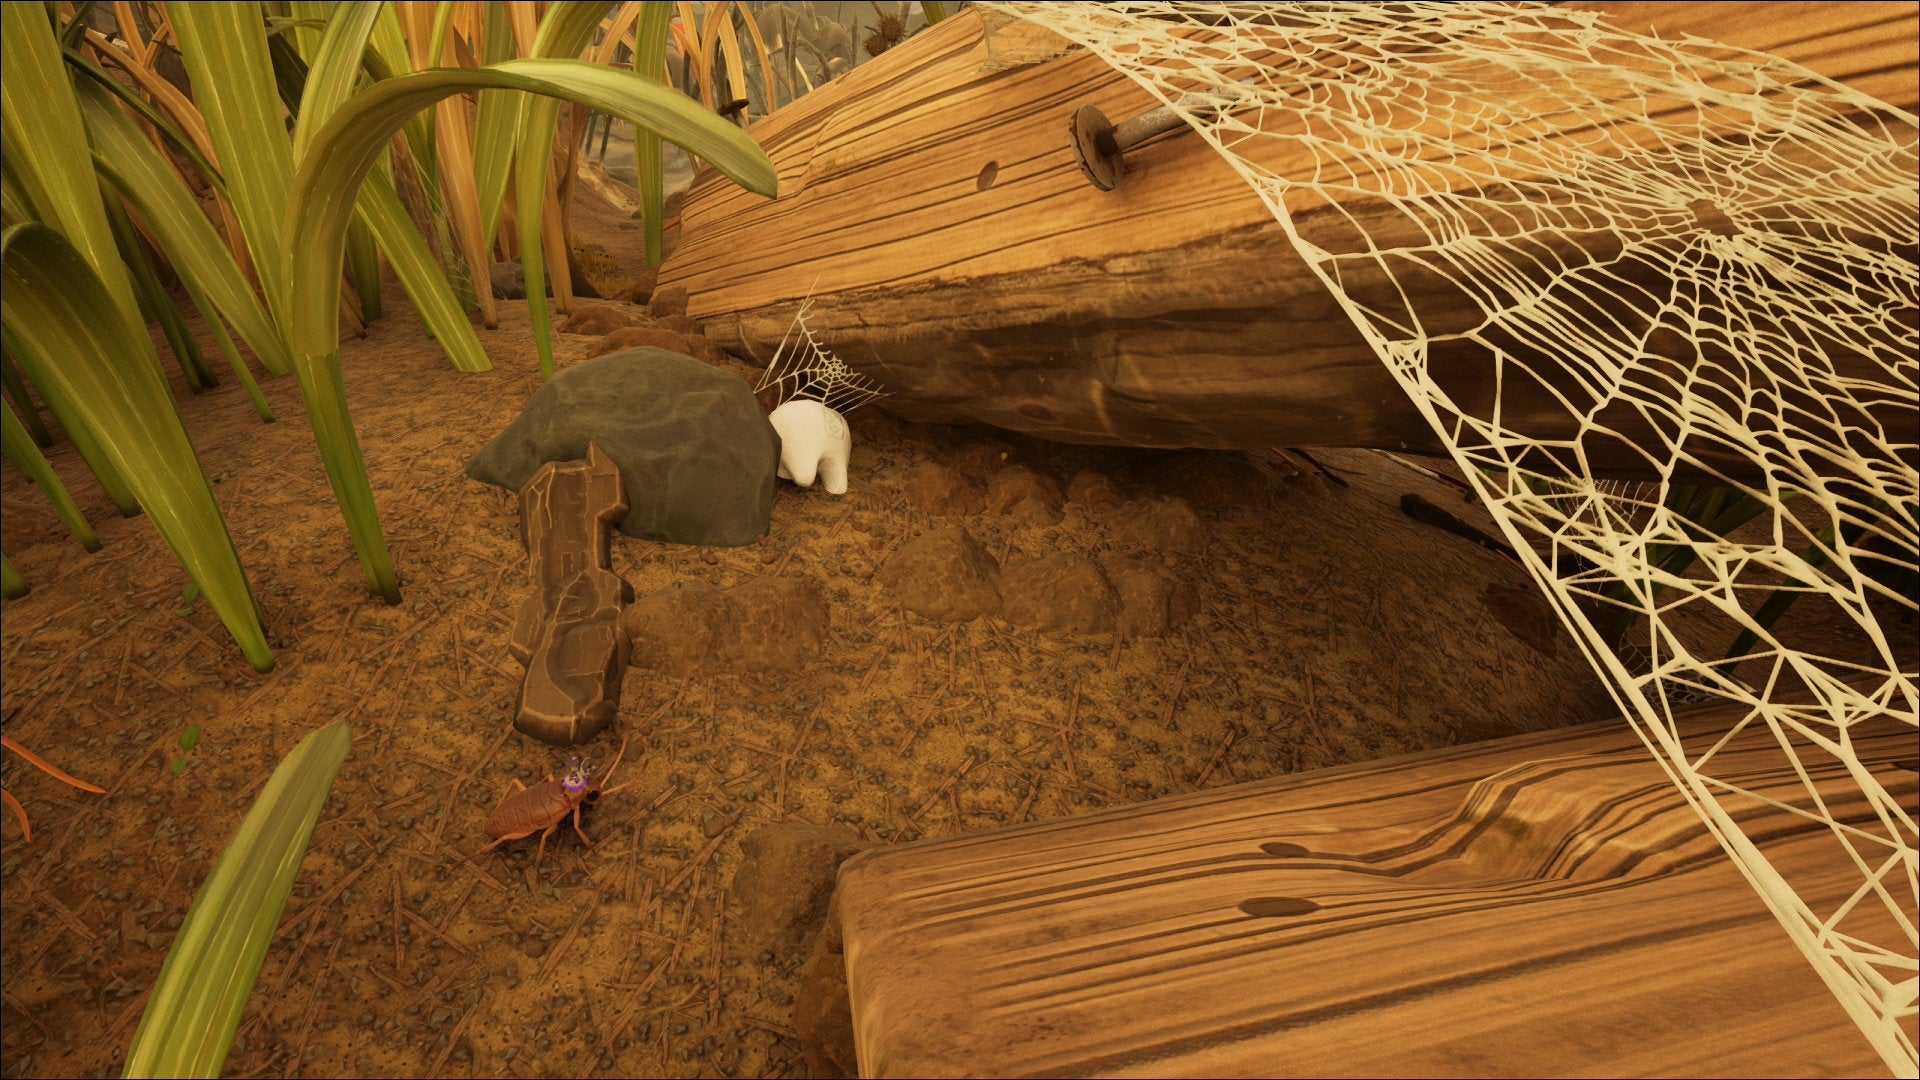
Image credit:Rock Paper Shotgun/Xbox Game Studios
Inside the Fire Pit (Milk Molar)
Enter the Fire Pit itself - there are a few holes you can jump into from the north, next to the Melted Army Men wonder - and you’ll see a Milk Molar being held by a hand in the middle. Though you’ll get sizzling damage when you get close, you should have plenty of time to grab this and flee to the outskirts of the Fire Pit before you take any real damage.

Image credit:Rock Paper Shotgun/Xbox Game Studios
On top of the Fire Pit (Mega Milk Molar)
This Mega Molar is on the top of the Fire Pit, next to the hotdog in the corner. Enter the Fire Pit itself - there are a few holes you can jump into from the north, next to the Melted Army Men wonder landmark - and scale one of the planks inside to reach the top (protection against sizzling damage is handy, but not required if you go fast enough).
There’s a number of enemies at the top of the Fire Pit, but we found going on the southern edge and waiting for them to deaggro once round the side of the hotdog was all we needed to get this Mega Milk Molar without any hassle.

Image credit:Rock Paper Shotgun/Xbox Game Studios
Pinch Whacker cave (Mega Milk Molar)
This is found in a short cave in the north of the region. Enter the cave entrance facing south, and in the end of the open room is a cracked wall you can remove with an explosive. Inside is the Pinch Whacker weapon, and a Mega Milk Molar in the corner.


Pine Hill Milk Molar locations
Milk Molar stash (2x Milk Molar)
As part of the story, once you have hacked the O.R.C Transmitter on the Picnic Table, you’re directed to the location of a “Milk Molar stash” which contains two Milk Molars. You have to clear out the enemies - including a fearsome Orb Weaver - but provided you use the nearby Pine Hill Ranger Outpost as a place to retreat to, fire arrows from, and/or use as a respawn point, the fight shouldn’t be insurmountable.
Once done, the two Milk Molars are ready for the taking. You deserved it!
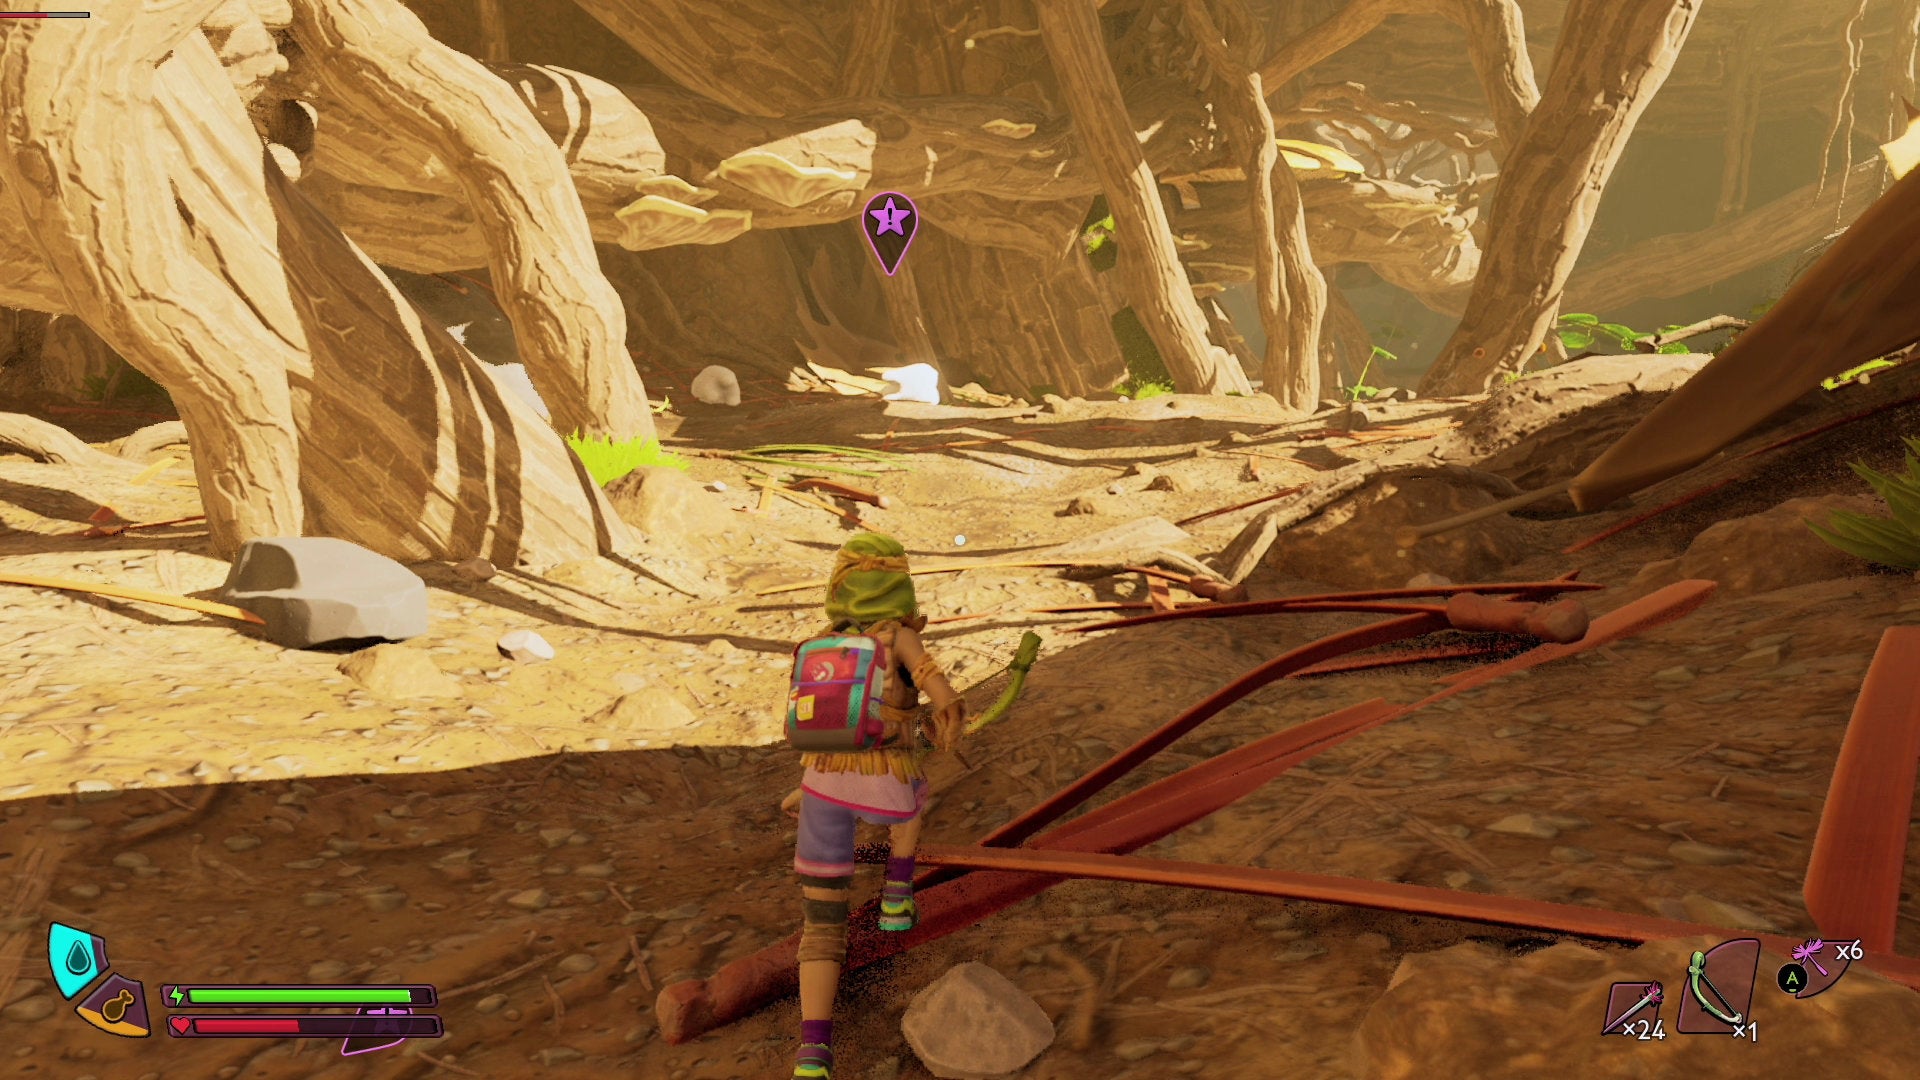
Image credit:Rock Paper Shotgun/Xbox Game Studios
Spider Den Anthill dungeon (Milk Molar)
This is in the Spider Den Anthill in Pine Hill’s upper forested area, which is best explored from the North Entrance.
To reach this dungeon, enter Pine Hill along the top of the map going west so you see the Autographed Baseball wonder. Don’t enter the dense forest to your right (where you can find Lingonberries ) but instead go south and chomp through the Dead Roots under the tree branch with your Buggy mount.
You’ll now see an upturned purple rocket. Just south of that, next to a pinecone and a rock and under a branch, is the dungeon entrance. It’s pretty easy to miss, so look carefully!
As for the dungeon itself, it’s long and windy, but thankfully the route to the Milk Molar is fairly straightforward - there will be a single fork along the way, where you must go right (straight ahead is a dead end room with some Raw Science clearly visible) to reach a cave area populated by O.R.C Red Soldier Ants. The Milk Molar is on a ledge on the left.


Western crate (Mega Milk Molar)
In the west outer edge of Pine Hill’s upper forest area is an open area with a skeleton, rocks and a number of roots. Amongst them is a green crate. (Head to the map location shown below while staying out of the dense forest and you should find it swiftly enough.) Climb along the side or top of the crate and hop inside for the Mega Milk Molar.


Forested ledge (Milk Molar)
The west side of Pine Hill has an upper forested area. There are a few ways to reach here, but the most accessible for this Milk Molar is to chew through these routes west of the Picnic Table and climb up:
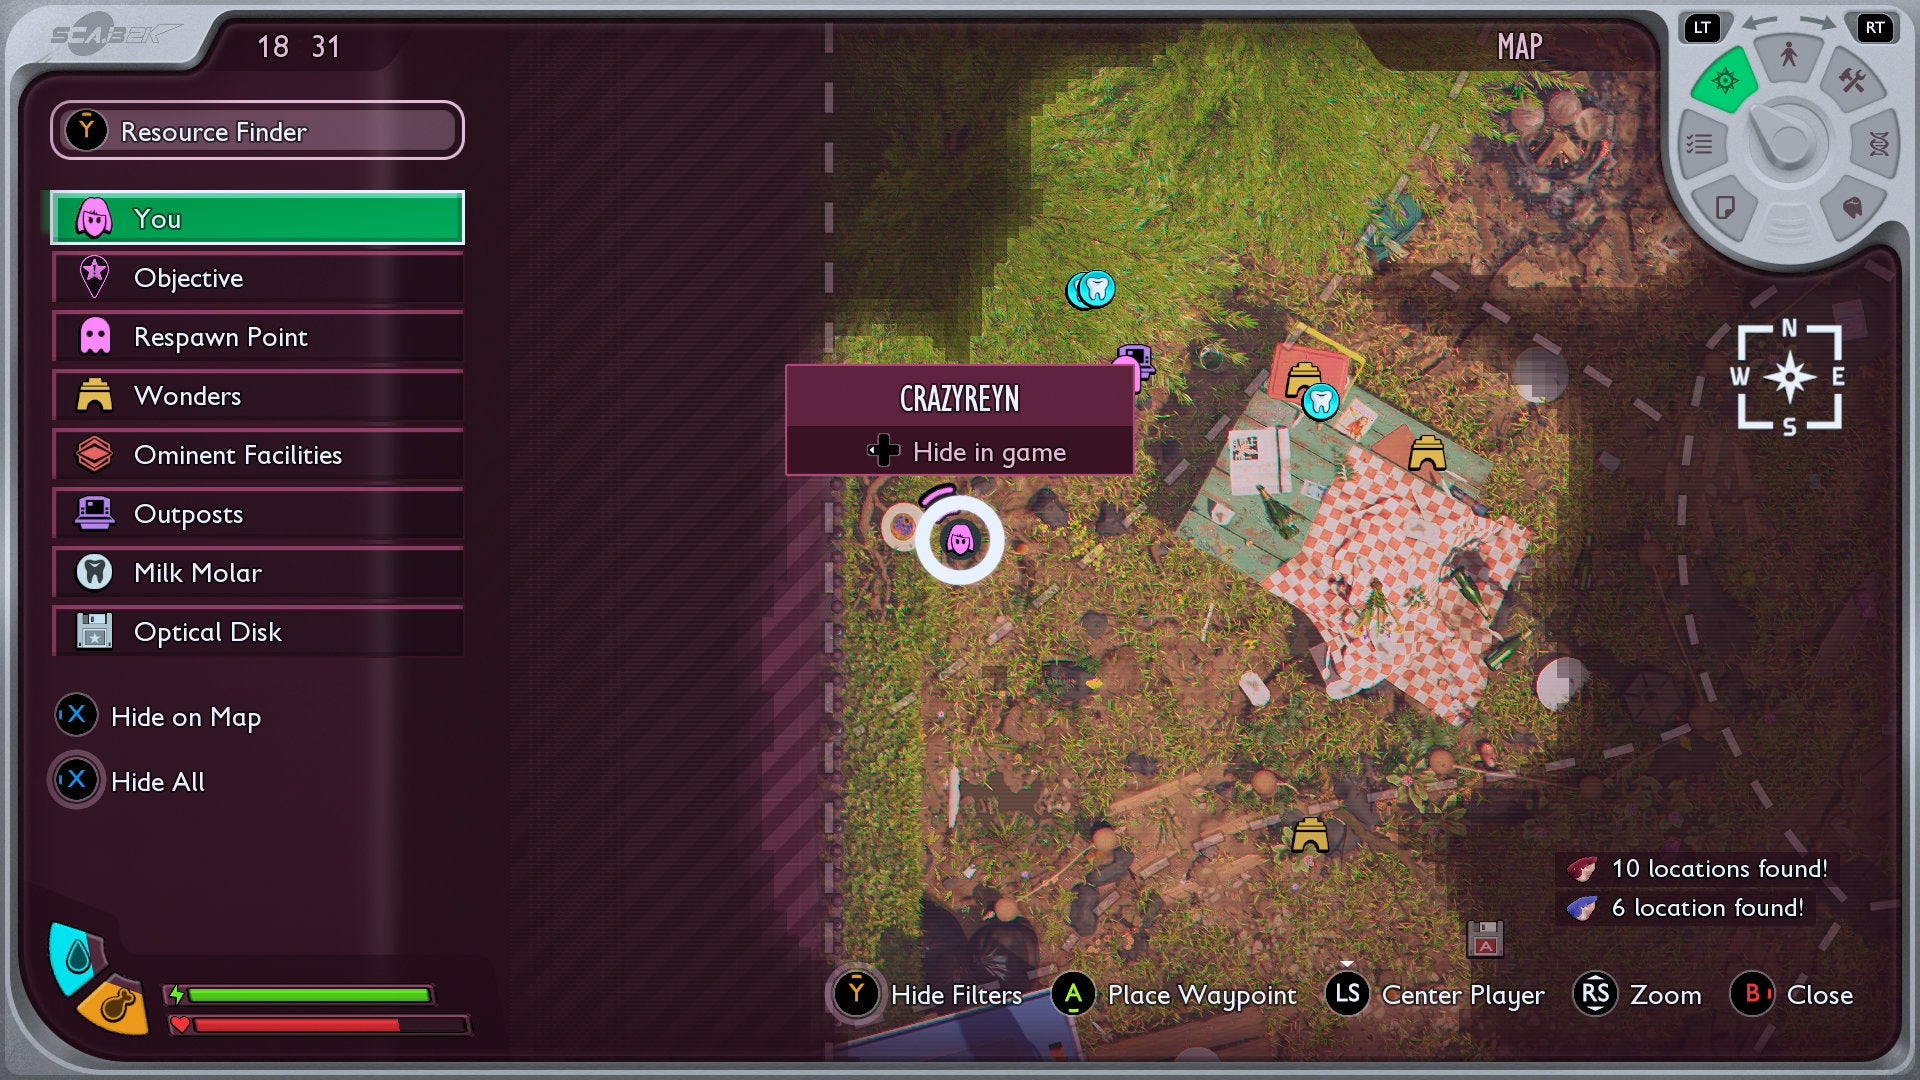
Image credit:Rock Paper Shotgun/Xbox Game Studios
From here, go south into the forested area, and at the white circle on the map, you’ll find the Milk Molar just tucked under the greenery to the side.

Image credit:Rock Paper Shotgun/Xbox Game Studios
Cracked tunnel north of Snackbar (Mega Milk Molar)
Just north of the Snackbar, there is a tunnel accessible either on the ground level, or in the upper forested area described above, with both entrances blocked by a cracked tunnel. Blow it up with an explosive, and the short passage has a Mega Milk Molar inside.


Entrance Milk Molar locations
Snackbar Ranger Outpost tunnel (Mega Milk Molar)
Returning to one of the first tunnels you explored - which led you to the back of the Snackbar Ranger Outpost - with your Buggy mount means you can chew through the Dead Roots on your right. Just behind them is a Mega Milk Molar.


Near the two Acorns (Milk Molar)
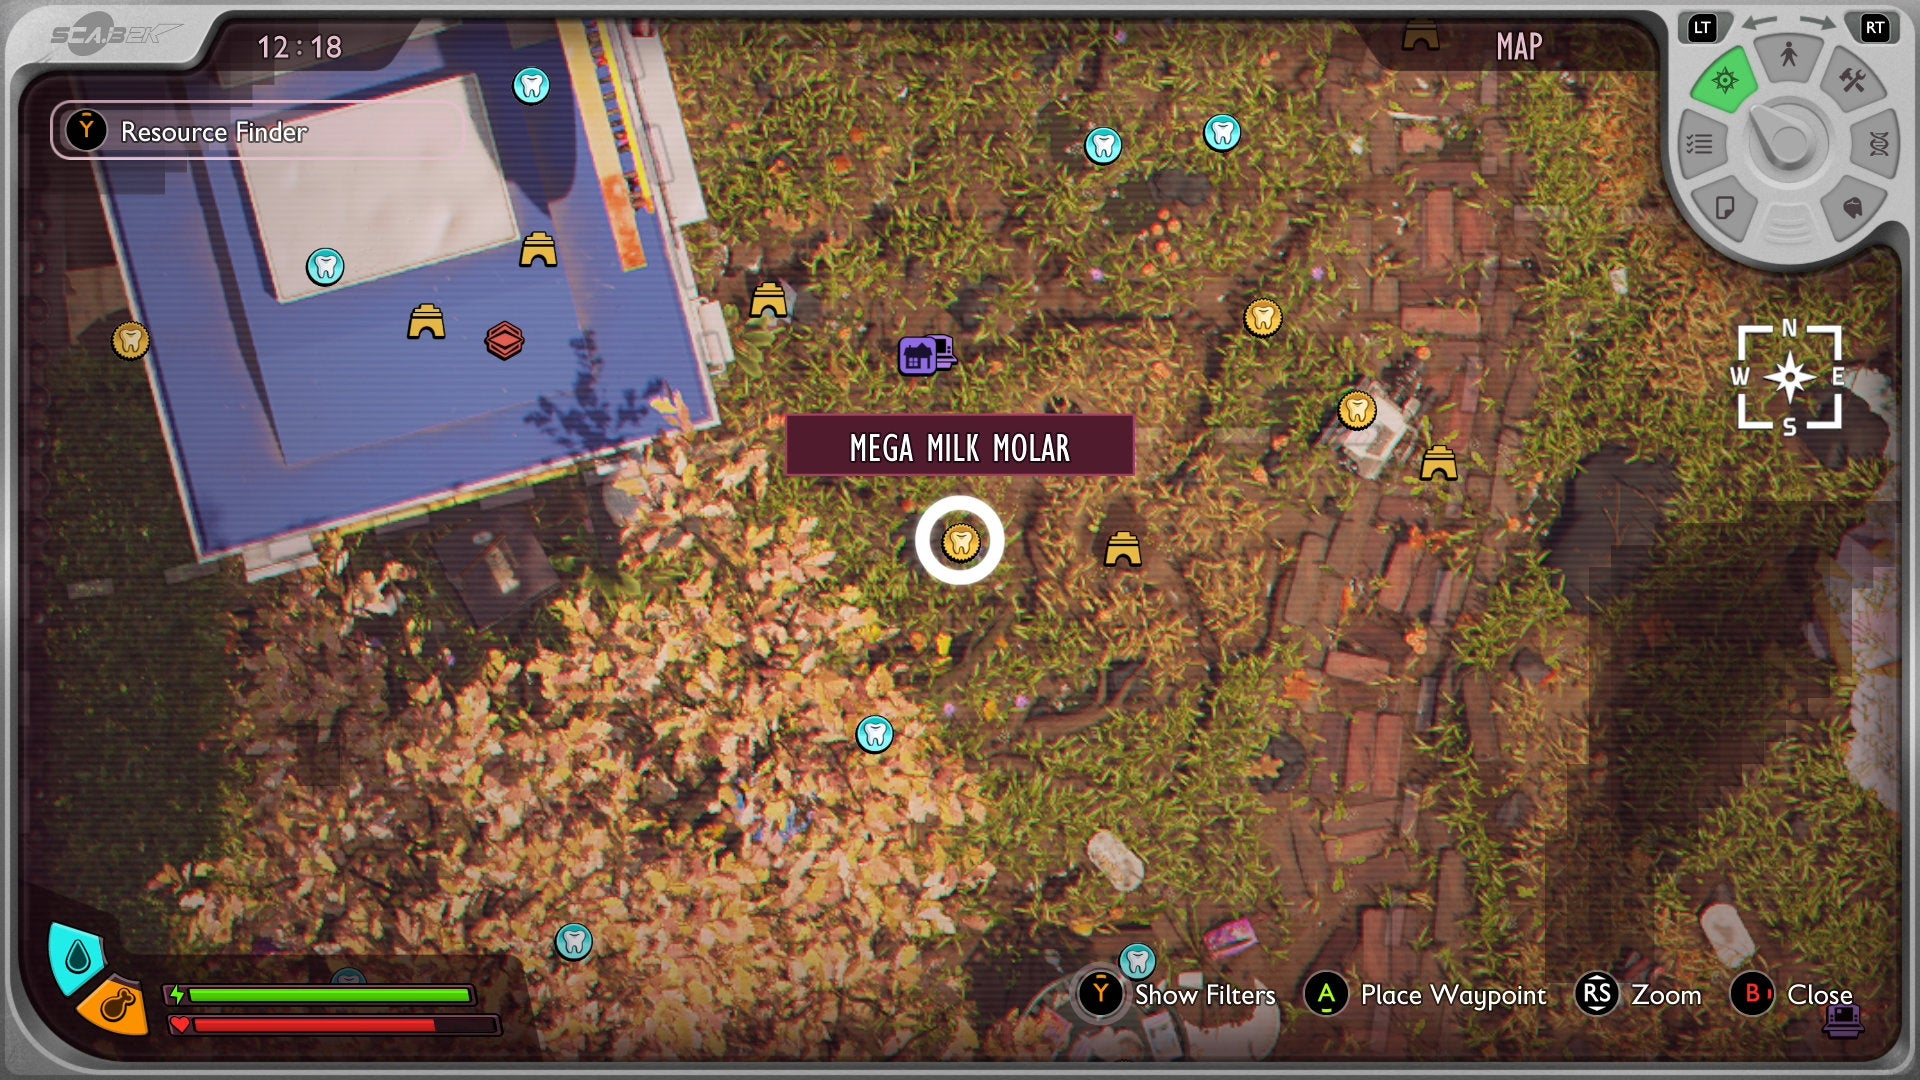
This is between the Snackbar Ranger Outpost and the Entrance’s tree. From the Snackbar Ranger Outpost, go southeast along the path to find a giant drinks can to your left. Follow the valley south, take a right at the fork, then left, to see the Milk Molar next to two Acorns . Be warned - an Orb Weaver is patrolling, so it’s best to take it down first, or be quick about getting this Molar.

Image credit:Rock Paper Shotgun/Xbox Game Studios
Western cave with a cracked wall (Milk Molar)
In the west of the Entrance area is a tunnel entrance facing west that’s blocked off by Dead Roots. Use your Buggy mount to munch through it, and there are two routes within - left with some Raw Science, and right with two larva and a cracked wall. There’s a Milk Molar behind the latter.


North side of the tree (Milk Molar)
In the Entrance area is a large tree. On the north side there is a series of mushrooms, one of which has a Milk Molar resting on top. You know you’re in the right place when you can see a Raw Science on the mushroom just below. Use your Buggy mount to climb up and grab both.


On the Entrance’s eastern side is a Garbage Can. To the north, next to the base of the Garbage Can, is a cup with a Milk Molar inside. It’s recommended you travel in from the south or west to avoid the huge drop on the other sides, as well as coming equipped with a Gas Mask (which requires Stinkbug parts to craft).


On top of Garbage Can (Mega Milk Molar)
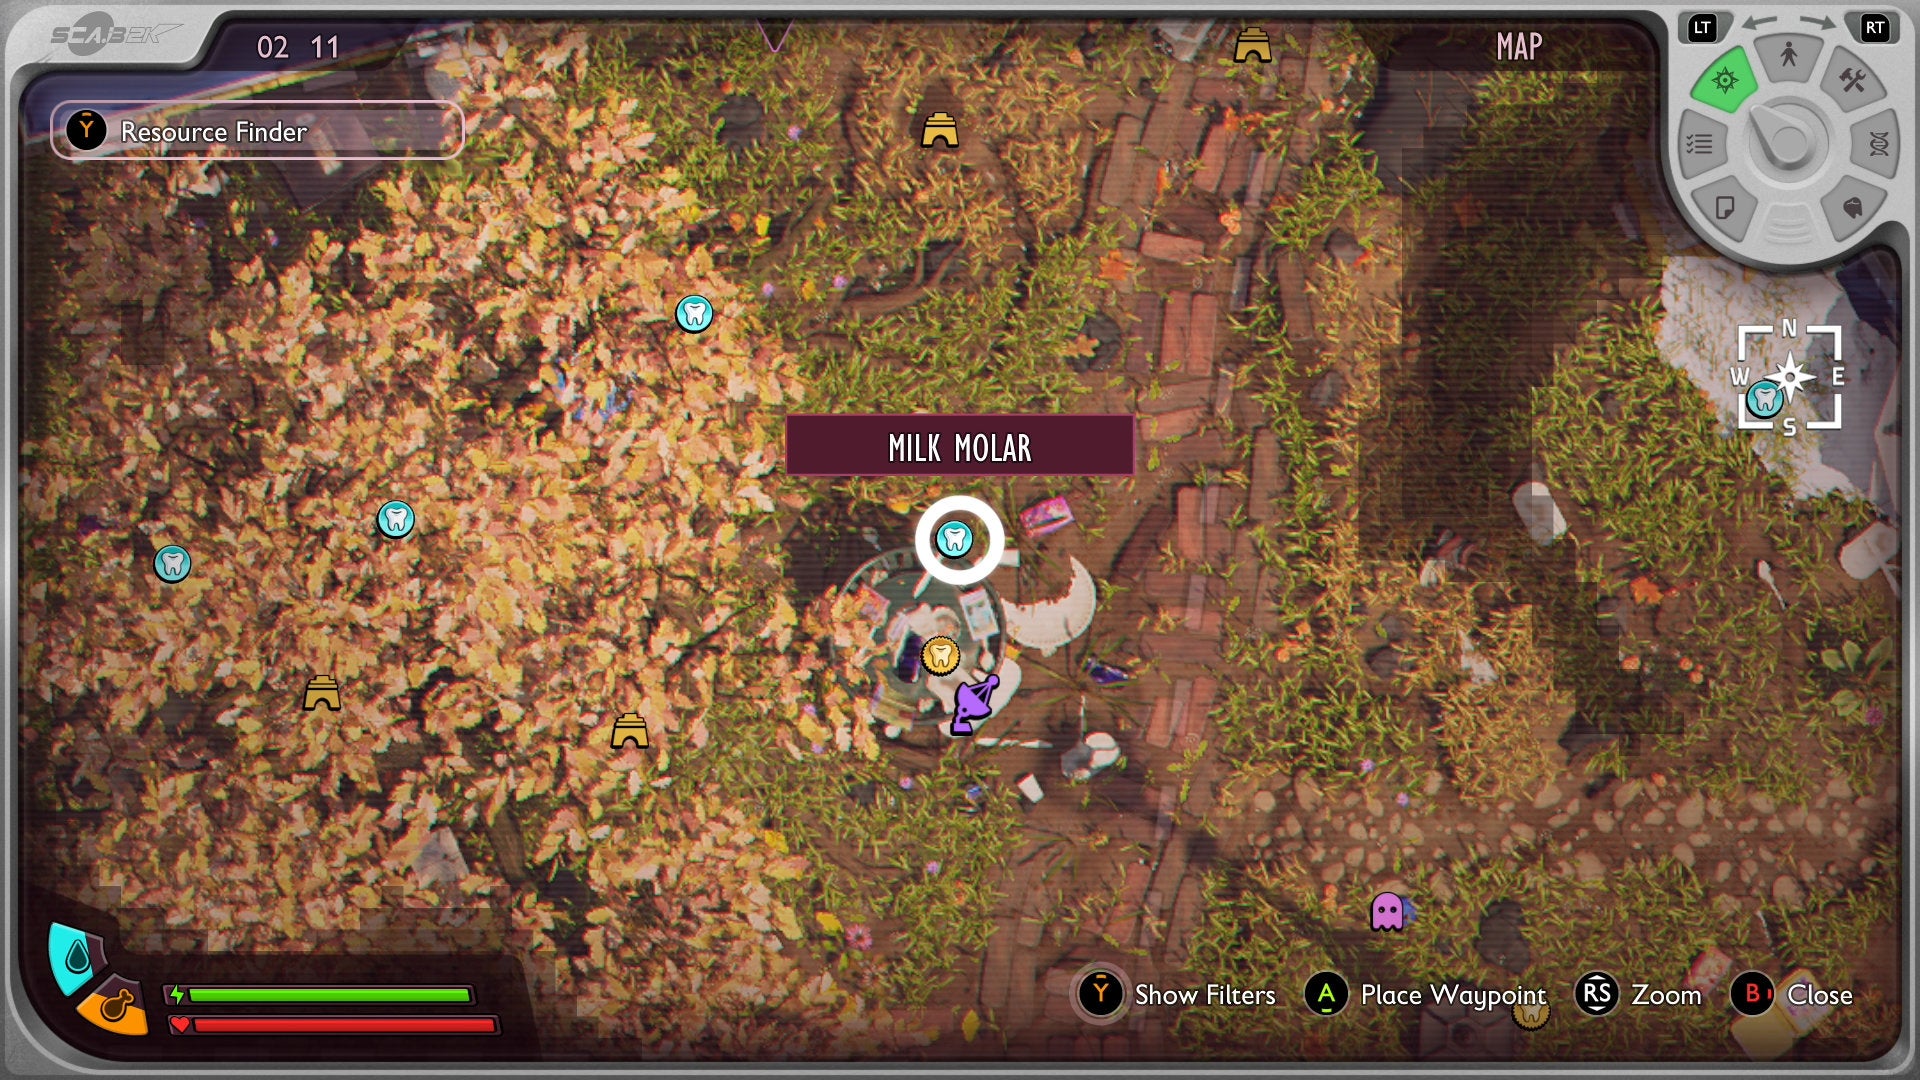
This is one of the trickiest Mega Milk Molars to find, but the good news is you need to visit this location as part of the story, so it’s best to wait until then. Whenever you decide to visit, make sure you have a Gas Mask (it requires Stinkbug parts) first.
When you’re ready, use a twig on the west side of the Garbage Can as a bridge to get across to the midway point, then climb up the outer rim using the various pieces of trash available (you might have to double back on yourself and go outside, but you’re always aiming to go up).
Then, at the very top, the Mega Milk Molar is well hidden; find the large hotdog wrapper, then underneath that, is a brightly coloured pamphlet. The Mega Milk Molar is tucked underneath that again.


Ice Cream Cart Milk Molar locations
Corner of the Ice Cream Cart (Milk Molar)
Climb inside of the giant open Ice Cream Cart - you can do so from the west - and in the northwest corner, on the ground level, is a Milk Molar waiting for you. (The only challenge here - and with the other Milk Molars in this region - is managing the chilling status effect if you don’t have protective gear or a supply of Spicy sweets, but you can technically explore as normal provided you top up your health and don’t mind being frozen solid every few moments.)

Image credit:Rock Paper Shotgun/Xbox Game Studios
Fan room of the Ice Cream Cart (Mega Milk Molar)
From the vast open Ice Cream Cart’s entrance, climb up the back and scale the metal rod that takes you to a bright light up above, which leads you to a room with a fan. Smash the icicles at the gears at the base of the fan to see the blades shift so you can drop down to a Raw Science and Mega Milk Molar below.


On top of the Ice Cream Cart (Mega Milk Molar)
The final Ice Cream Cart Molar is on top of the upturned cart itself, specifically the middle of the wheel. You can reach the top by scaling up to the fan room (see the Molar above) then platforming up the leaves and out. From here, run over to the wheel, round the otherside to the twig that acts as a bridge, and grab the Mega Molar in the centre.


In a frosty southwest cave (Milk Molar)
Go west of the Ice Cream Cart and north of the region’s Ranger Outpost, where the ground starts to turn to ice, and you’ll find a cave facing south. Inside is a Milk Molar in the middle of a small but chilly cave.


In a frosty southwest cave (Milk Molar)
Southeast of the Ice Cream Cart is a tunnel, with the entrance looking like a hollowed log that’s facing south. Enter, and the Milk Molar is easily accessible on the right.


At the base of big tree (Mega Milk Molar)
In the northeast of the Ice Cream Cart region is a large tree. On the northeast side, at the base, is an alcove blocked by a pinecone. Squeeze past the pinecone, and the Mega Milk Molar is just on the other side. Be wary of the Northern Scorpion on the approach, however!

Under the lamppost (Mega Milk Molar)
In the southwest of the region is a lamppost. Enter the base from the northside - be wary of the Orb Weaver and smaller spiders guarding it - and enter a cave to your left. There’s a Northern Scorpion halfway down the tunnel, but your reward is some Raw Science and a Mega Milk Molar at the end.


Ceremony Milk Molar locations
Empty Terrarium (Mega Milk Molar)
To the south of the region is an Empty Terrarium, with a Mega Milk Molar on an upper level, behind a branch. In case you were wondering, the ’empty’ part of the wonder location is a lie - there’s a mighty Wolf Spider to be wary of, though since it lingers at the bottom, you can quickly enter from the north, climb up to the upper level, and grab the Mega Milk Molar before it clambers after you.


Large rock in center (2x Milk Molar)
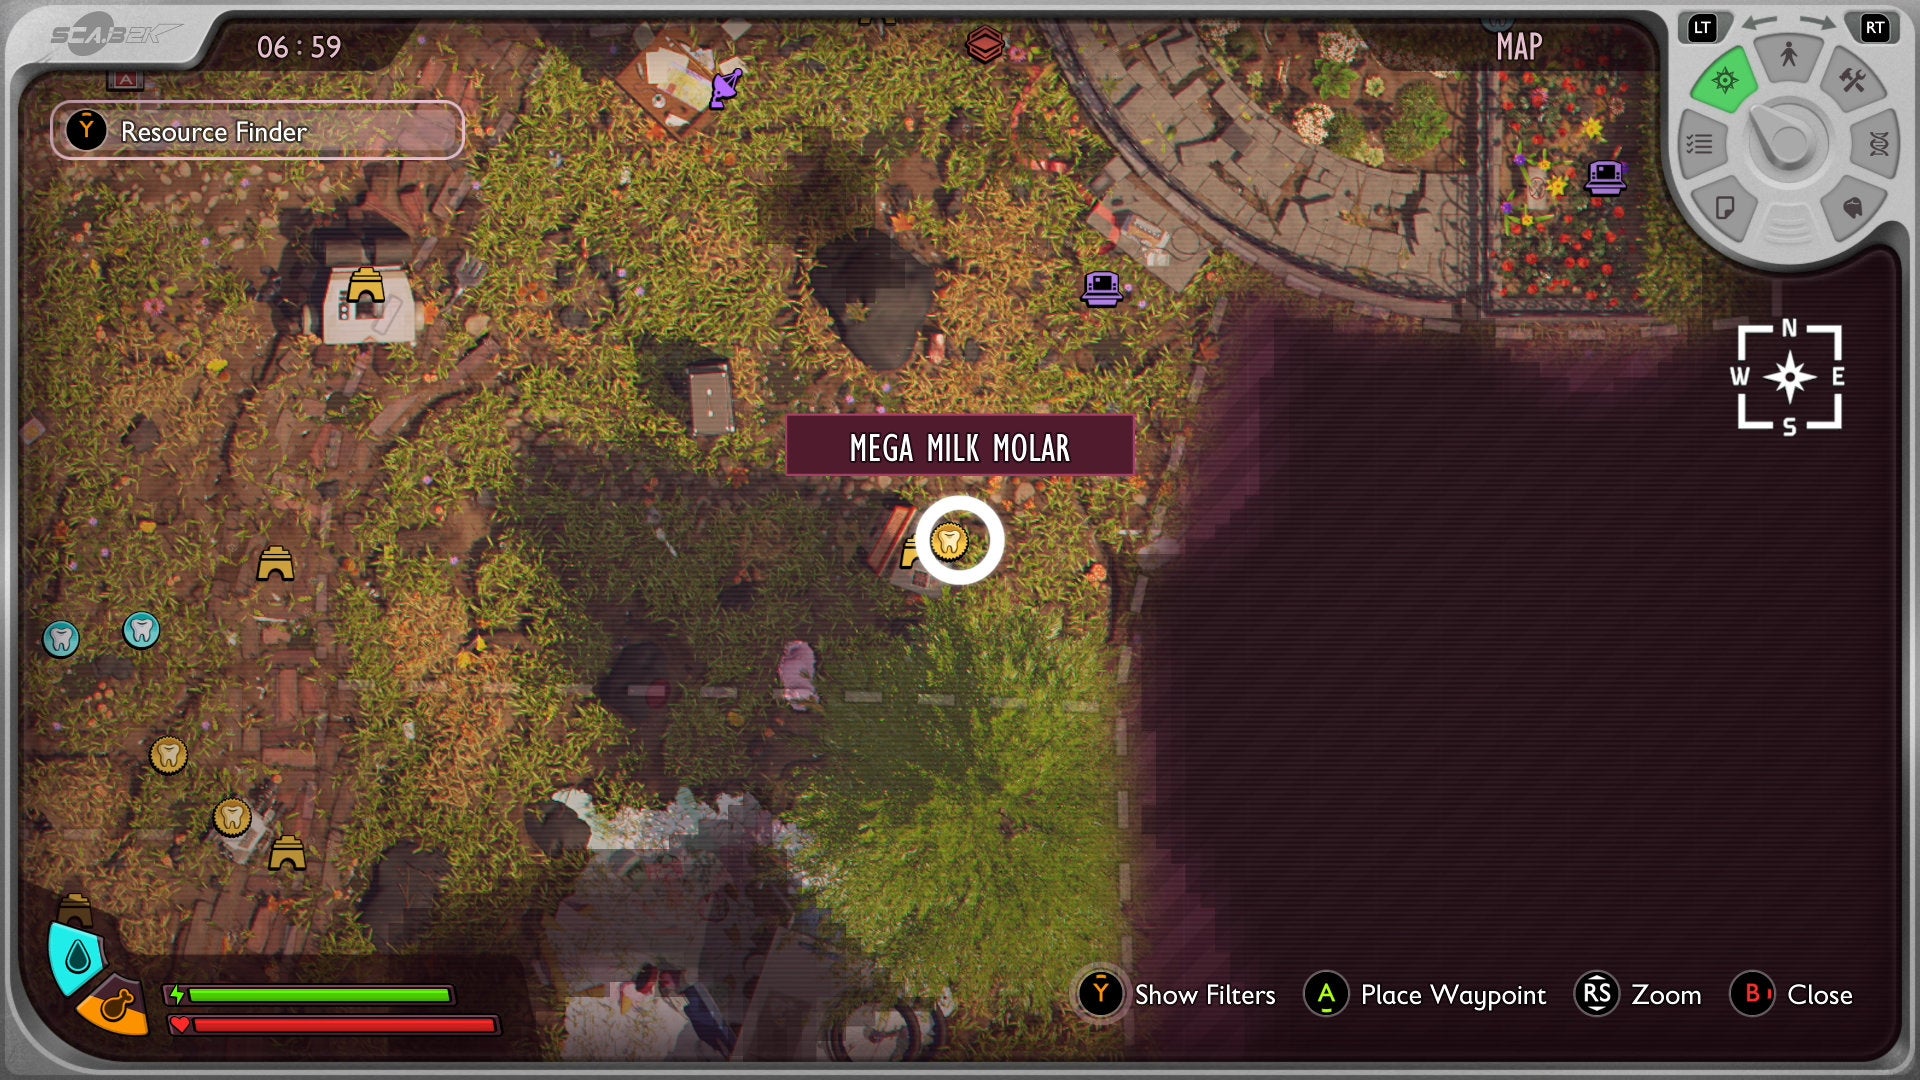
These two Milk Molars are very close to one another. Find the large rock in the middle of the region, and approach it from the east. Tucked underneath is a clearly visible Milk Molar. Now travel to the other side of the rock clockwise - stick close to the south of the rock to avoid having to climb up a cliff - to see another Milk Molar also out in the open.


Podium (Mega Milk Molar)
In the north is a podium, with the Mega Milk Molar found inside a cup halfway up the structure. This requires a spot of light platforming, with the first step requiring you to go up the screwdriver on the ground level. You know you’re in the right place when you see a body leaning against a cup, with the Mega Milk Molar inside.


Under the bricked path (Milk Molar)
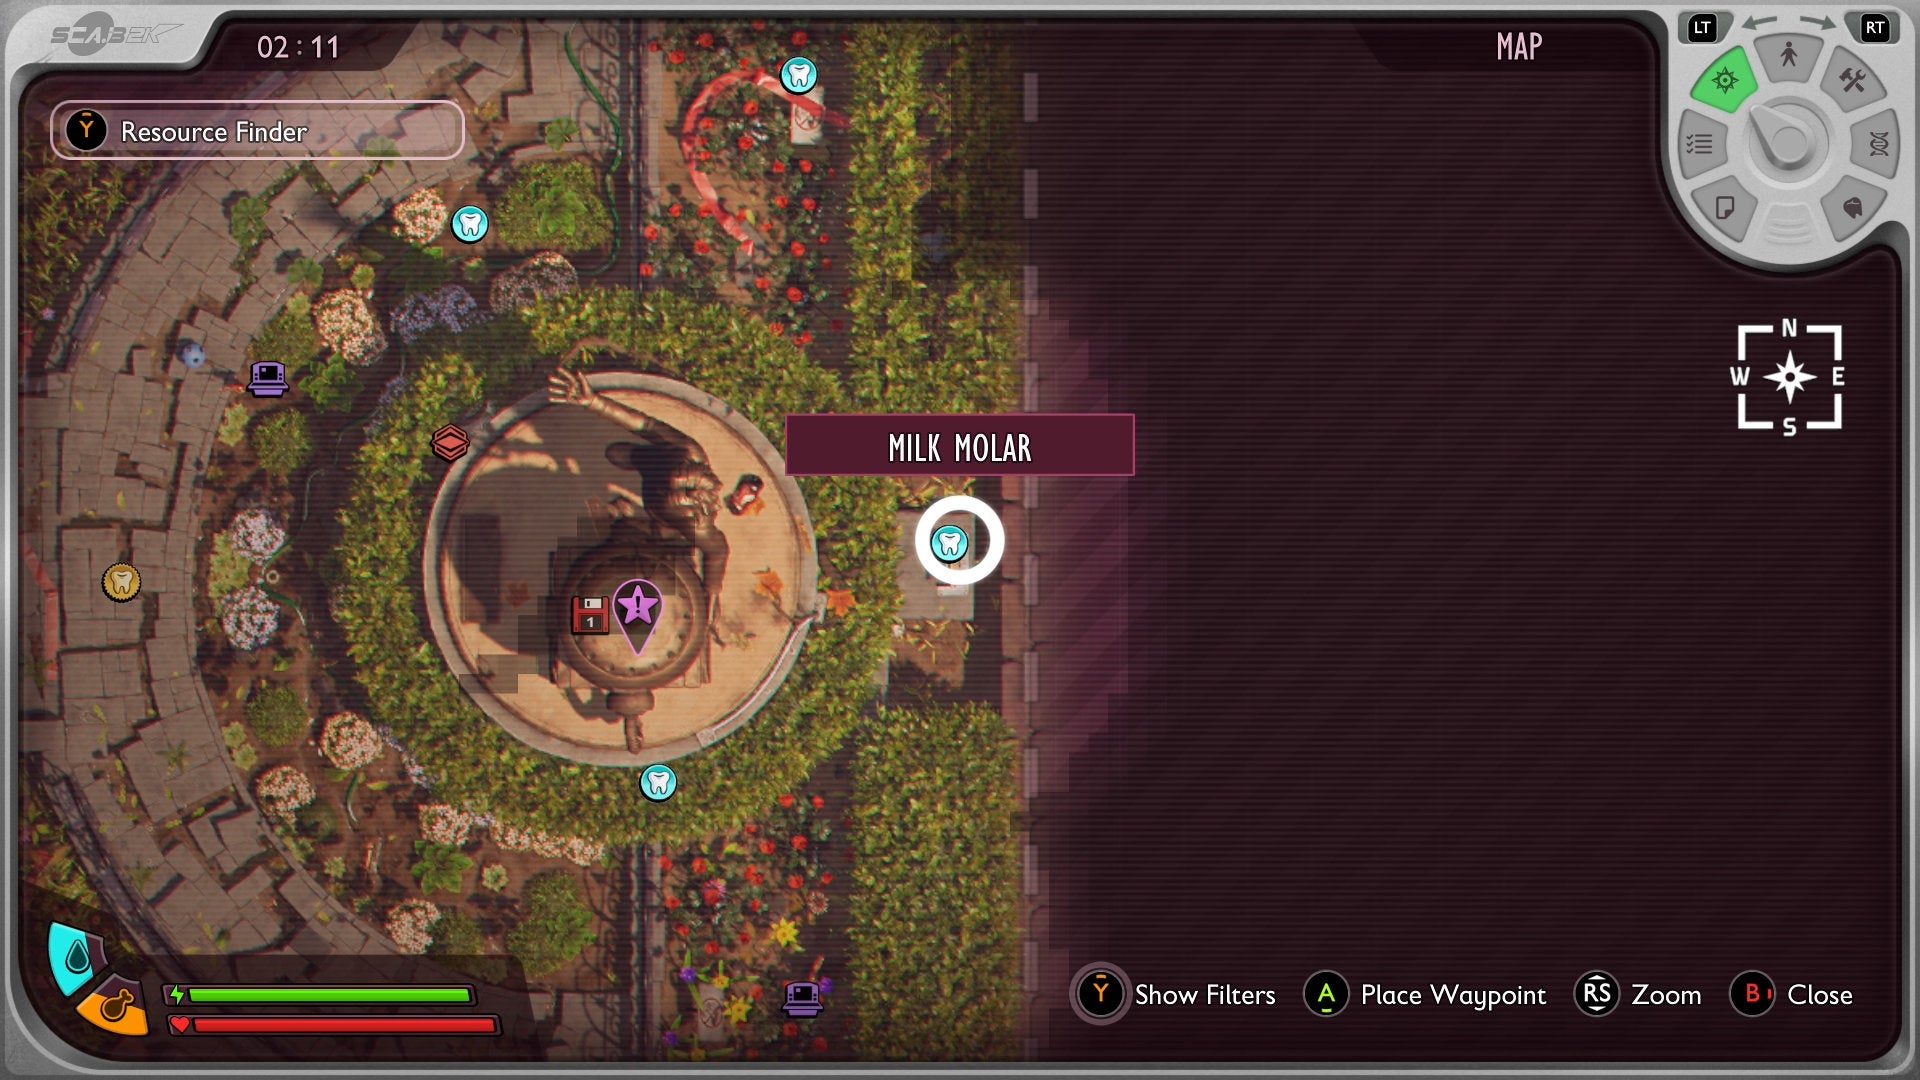
Running through this region is a brick-lined path leading to the Statue area. Not far from the front of the statue, you can find some Raw Science hovering above a brick. Just below it is the Milk Molar location.

Image credit:Rock Paper Shotgun/Xbox Game Studios
Under the sprinkler (Milk Molar)
In the north of the location is a garden sprinkler, where a Milk Molar lies amongst some rocks and leaves. Fight off the mosquitos to reach this location safely.


Statue Milk Molar locations
Inside the red ball (Milk Molar)
When you first enter the Statue area proper - which has you go through some pipes and a maze - you’ll emerge in the northwest. Near from where you come out is a red ball. Inside is a Milk Molar.

Image credit:Rock Paper Shotgun/Xbox Game Studios
Along the southern divide (Milk Molar)
You will find this on the way to the Rose Garden Ranger Outpost. On the southside of the Statue area is a fence that divides the front and back (or west and east). Follow that wall north where there is overgrowth that you enter, and just inside, nestled against a root on the ground, is a Milk Molar. (If you want to reach the Ranger Outpost, continue going further then turn right, and it’s on the far wall halfway down the area.)


Behind the statue (Milk Molar)
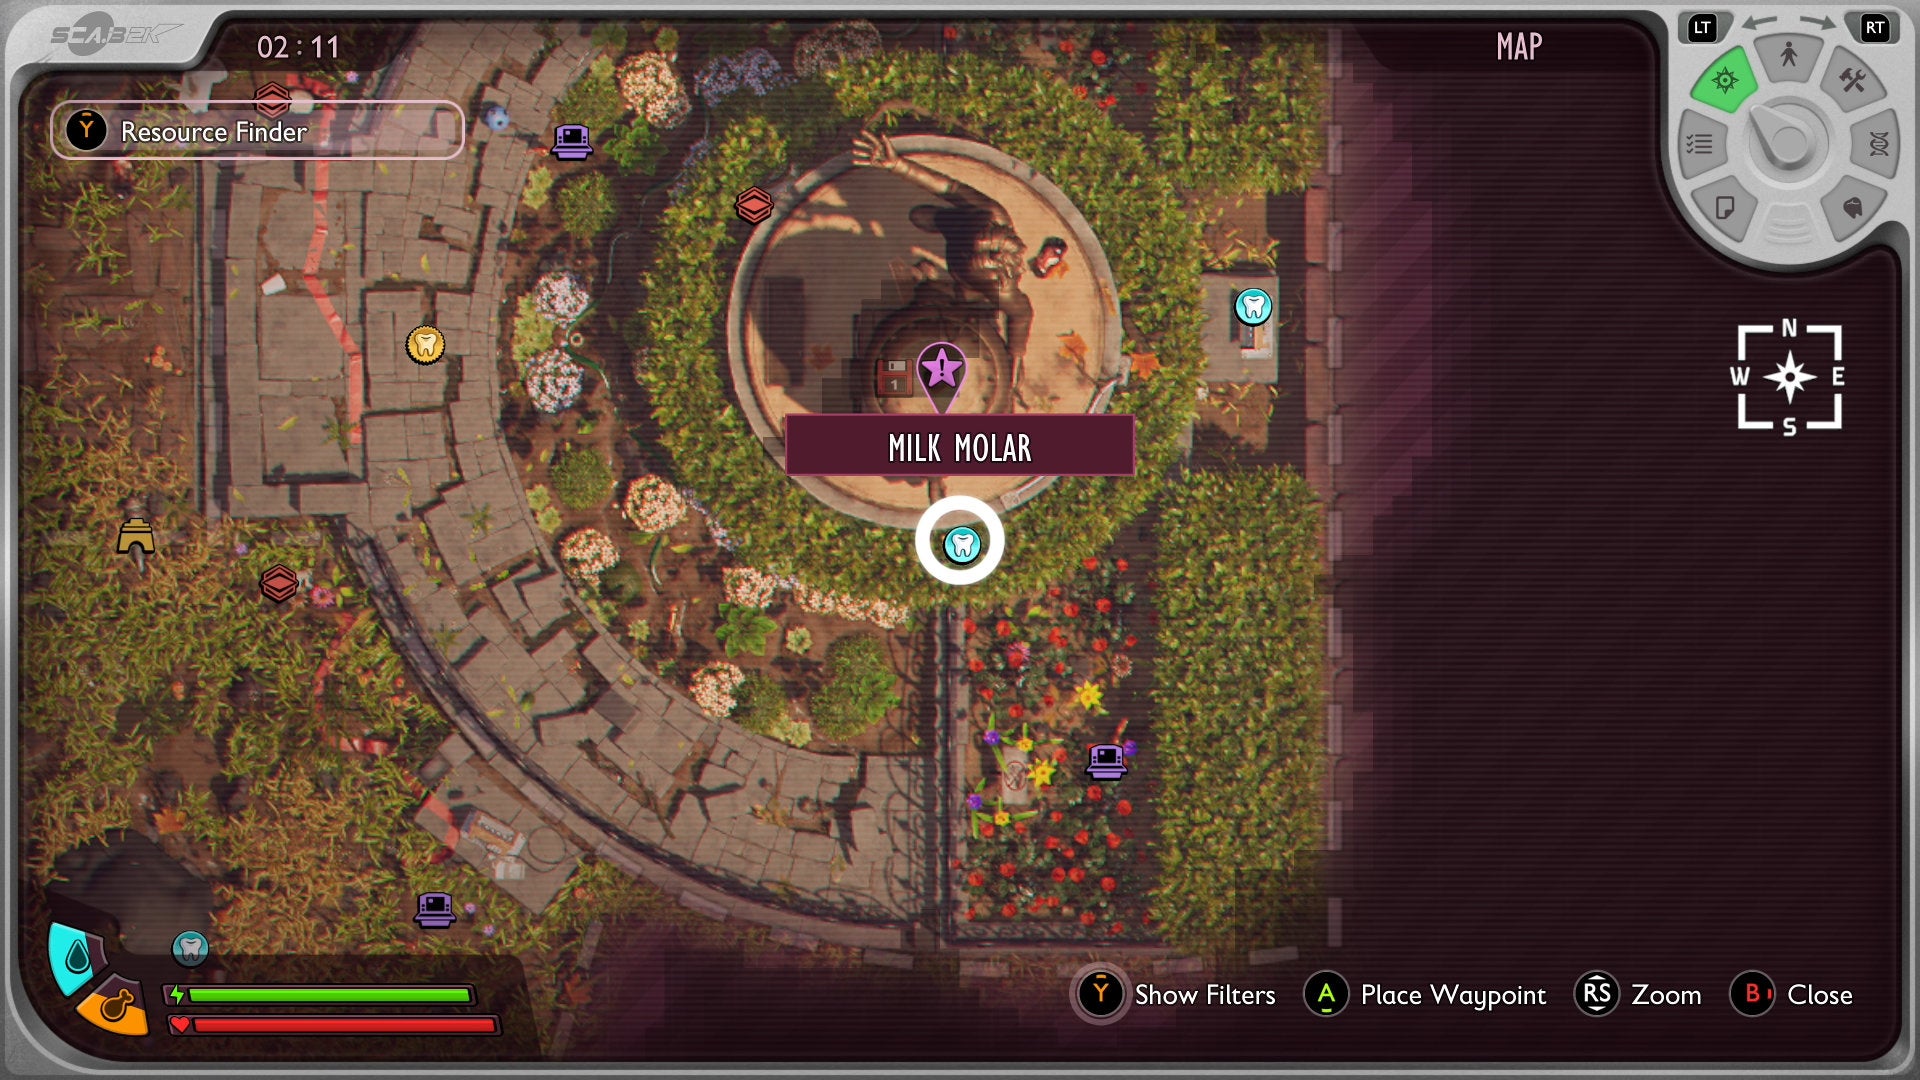
In the overgrown route in the middle of the map where you can access the Rose Garden Ranger Outpost to the east, continue north, and you will come out round the ‘back’ of the Statue area. Immediately on your left, climb the twig that is resting against the cup with a Raw Science on it, then go up to the next level, where a Milk Molar awaits on the far side.


B11 underground (Mega Milk Molar)
In the front of the statue, on the west side, is a hole in the ground with a ladder. (It’s easy to miss, but use the green hose pipe that runs through this area as a guide, since it snakes around it at one point.)
Climb down to enter a facility (named B10) and use the pneumatic transit system to take you down to B11. Go down either corridor, and opposite the locked door is a smashed wall with a Mega Milk Molar inside. Before you leave, open said locked door to open an easy way back through the pipe system to the other outer regions.


Northeast ‘Network Center’ route (Milk Molar)
This is found in the northeast of the Statue area, which you’ll visit as part of the ‘Enter the Network Center’ story mission.
To reach it, once inside the Statue region proper, follow the green hose pipe in front of the hedge, and chew through the Dead Roots under the hedge guarded by the named O.R.C Northern Scorpion. While in the undergrowth, take the branches up until you reach the Statue Checkpoint facility door, but ignore this for now - take the branch below, where it will take you through a series of Dead Root walls in and out of the hedge, until you reach the northeast area.
The Milk Molar is on the ground in the far northeast corner, next to a body of water.


That’s all there is for Milk Molar locations and Mega Milk Molar locations in Grounded 2, or at least as it stands in where we’re at in the Game Preview. As with Buggy mounts , it’s possible these locations - and the stats and unlocks you can get from finding them - will expand with the updates to come.

Grounded 2
Video Game
Rock Paper Shotgun is better when you sign in
Sign in and join us on our journey to discover strange and compelling PC games.

All 75 Arc Raiders Blueprints and where to get them
These areas have the highest chance of giving you Blueprints

Image credit:Rock Paper Shotgun/Embark Studios

Looking for more Arc Raiders Blueprints? It’s a special day when you find a Blueprint, as they’re among the most valuable items in Arc Raiders. If you find a Blueprint that you haven’t already found, then you must make sure you hold onto it at all costs, because Blueprints are the key to one of the most important and powerful systems of meta-progression in the game.
This guide aims to be the very best guide on Blueprints you can find, starting with a primer on what exactly they are and how they work in Arc Raiders, before delving into exactly where to get Blueprints and the very best farming spots for you to take in your search.
We’ll also go over how to get Blueprints from other unlikely activities, such as destroying Surveyors and completing specific quests. And you’ll also find the full list of all 75 Blueprints in Arc Raiders on this page (including the newest Blueprints added with the Cold Snap update , such as the Deadline Blueprint and Firework Box Blueprint), giving you all the information you need to expand your own crafting repertoire.
In this guide:
- What are Blueprints in Arc Raiders?
- Full Blueprint list: All crafting recipes
- Where to find Blueprints in Arc Raiders Blueprints obtained from quests Blueprints obtained from Trials Best Blueprint farming locations

What are Blueprints in Arc Raiders?
Blueprints in Arc Raiders are special items which, if you manage to extract with them, you can expend to permanently unlock a new crafting recipe in your Workshop. If you manage to extract from a raid with an Anvil Blueprint, for example, you can unlock the ability to craft your very own Anvil Pistol, as many times as you like (as long as you have the crafting materials).
To use a Blueprint, simply open your Inventory while in the lobby, then right-click on the Blueprint and click “Learn And Consume” . This will permanently unlock the recipe for that item in your Workshop. As of the Stella Montis update, there are allegedly 75 different Blueprints to unlock - although only 68 are confirmed to be in the game so far. You can see all the Blueprints you’ve found and unlocked by going to the Workshop menu, and hitting “R” to bring up the Blueprint screen.
It’s possible to find duplicates of past Blueprints you’ve already unlocked. If you find these, then you can either sell them, or - if you like to play with friends - you can take it into a match and gift it to your friend so they can unlock that recipe for themselves. Another option is to keep hold of them until the time comes to donate them to the Expedition.
Full Blueprint list: All crafting recipes
Below is the full list of all the Blueprints that are currently available to find in Arc Raiders, and the crafting recipe required for each item:
| Blueprint | Type | Recipe | Crafted At |
|---|---|---|---|
| Bettina | Weapon | 3x Advanced Mechanical Components 3x Heavy Gun Parts 3x Canister | Gunsmith 3 |
| Blue Light Stick | Quick Use | 3x Chemicals | Utility Station 1 |
| Aphelion | Weapon | 3x Magnetic Accelerator 3x Complex Gun Parts 1x Matriarch Reactor | Gunsmith 3 |
| Combat Mk. 3 (Flanking) | Augment | 2x Advanced Electrical Components 3x Processor | Gear Bench 3 |
| Combat Mk. 3 (Aggressive) | Augment | 2x Advanced Electrical Components 3x Processor | Gear Bench 3 |
| Complex Gun Parts | Material | 2x Light Gun Parts 2x Medium Gun Parts 2x Heavy Gun Parts | Refiner 3 |
| Fireworks Box | Quick Use | 1x Explosive Compound 3x Pop Trigger | Explosives Station 2 |
| Gas Mine | Mine | 4x Chemicals 2x Rubber Parts | Explosives Station 1 |
| Green Light Stick | Quick Use | 3x Chemicals | Utility Station 1 |
| Pulse Mine | Mine | 1x Crude Explosives 1x Wires | Explosives Station 1 |
| Seeker Grenade | Grenade | 1x Crude Explosives 2x ARC Alloy | Explosives Station 1 |
| Looting Mk. 3 (Survivor) | Augment | 2x Advanced Electrical Components 3x Processor | Gear Bench 3 |
| Angled Grip II | Mod | 2x Mechanical Components 3x Duct Tape | Gunsmith 2 |
| Angled Grip III | Mod | 2x Mod Components 5x Duct Tape | Gunsmith 3 |
| Hullcracker | Weapon | 1x Magnetic Accelerator 3x Heavy Gun Parts 1x Exodus Modules | Gunsmith 3 |
| Launcher Ammo | Ammo | 5x Metal Parts 1x Crude Explosives | Workbench 1 |
| Anvil | Weapon | 5x Mechanical Components 5x Simple Gun Parts | Gunsmith 2 |
| Anvil Splitter | Mod | 2x Mod Components 3x Processor | Gunsmith 3 |
| ??? | ??? | ??? | ??? |
| Barricade Kit | Quick Use | 1x Mechanical Components | Utility Station 2 |
| Blaze Grenade | Grenade | 1x Explosive Compound 2x Oil | Explosives Station 3 |
| Bobcat | Weapon | 3x Advanced Mechanical Components 3x Light Gun Parts | Gunsmith 3 |
| Osprey | Weapon | 2x Advanced Mechanical Components 3x Medium Gun Parts 7x Wires | Gunsmith 3 |
| Burletta | Weapon | 3x Mechanical Components 3x Simple Gun Parts | Gunsmith 1 |
| Compensator II | Mod | 2x Mechanical Components 4x Wires | Gunsmith 2 |
| Compensator III | Mod | 2x Mod Components 8x Wires | Gunsmith 3 |
| Defibrillator | Quick Use | 9x Plastic Parts 1x Moss | Medical Lab 2 |
| ??? | ??? | ??? | ??? |
| Equalizer | Weapon | 3x Magnetic Accelerator 3x Complex Gun Parts 1x Queen Reactor | Gunsmith 3 |
| Extended Barrel | Mod | 2x Mod Components 8x Wires | Gunsmith 3 |
| Extended Light Mag II | Mod | 2x Mechanical Components 3x Steel Spring | Gunsmith 2 |
| Extended Light Mag III | Mod | 2x Mod Components 5x Steel Spring | Gunsmith 3 |
| Extended Medium Mag II | Mod | 2x Mechanical Components 3x Steel Spring | Gunsmith 2 |
| Extended Medium Mag III | Mod | 2x Mod Components 5x Steel Spring | Gunsmith 3 |
| Extended Shotgun Mag II | Mod | 2x Mechanical Components 3x Steel Spring | Gunsmith 2 |
| Extended Shotgun Mag III | Mod | 2x Mod Components 5x Steel Spring | Gunsmith 3 |
| Remote Raider Flare | Quick Use | 2x Chemicals 4x Rubber Parts | Utility Station 1 |
| Heavy Gun Parts | Material | 4x Simple Gun Parts | Refiner 2 |
| Venator | Weapon | 2x Advanced Mechanical Components 3x Medium Gun Parts 5x Magnet | Gunsmith 3 |
| Il Toro | Weapon | 5x Mechanical Components 6x Simple Gun Parts | Gunsmith 1 |
| Jolt Mine | Mine | 1x Electrical Components 1x Battery | Explosives Station 2 |
| Explosive Mine | Mine | 1x Explosive Compound 1x Sensors | Explosives Station 3 |
| Jupiter | Weapon | 3x Magnetic Accelerator 3x Complex Gun Parts 1x Queen Reactor | Gunsmith 3 |
| Light Gun Parts | Material | 4x Simple Gun Parts | Refiner 2 |
| Lightweight Stock | Mod | 2x Mod Components 5x Duct Tape | Gunsmith 3 |
| Lure Grenade | Grenade | 1x Speaker Component 1x Electrical Components | Utility Station 2 |
| Medium Gun Parts | Material | 4x Simple Gun Parts | Refiner 2 |
| Torrente | Weapon | 2x Advanced Mechanical Components 3x Medium Gun Parts 6x Steel Spring | Gunsmith 3 |
| Muzzle Brake II | Mod | 2x Mechanical Components 4x Wires | Gunsmith 2 |
| Muzzle Brake III | Mod | 2x Mod Components 8x Wires | Gunsmith 3 |
| Padded Stock | Mod | 2x Mod Components 5x Duct Tape | Gunsmith 3 |
| Shotgun Choke II | Mod | 2x Mechanical Components 4x Wires | Gunsmith 2 |
| Shotgun Choke III | Mod | 2x Mod Components 8x Wires | Gunsmith 3 |
| Shotgun Silencer | Mod | 2x Mod Components 8x Wires | Gunsmith 3 |
| Showstopper | Grenade | 1x Advanced Electrical Components 1x Voltage Converter | Explosives Station 3 |
| Silencer I | Mod | 2x Mechanical Components 4x Wires | Gunsmith 2 |
| Silencer II | Mod | 2x Mod Components 8x Wires | Gunsmith 3 |
| Snap Hook | Quick Use | 2x Power Rod 3x Rope 1x Exodus Modules | Utility Station 3 |
| Stable Stock II | Mod | 2x Mechanical Components 3x Duct Tape | Gunsmith 2 |
| Stable Stock III | Mod | 2x Mod Components 5x Duct Tape | Gunsmith 3 |
| Tagging Grenade | Grenade | 1x Electrical Components 1x Sensors | Utility Station 3 |
| Tempest | Weapon | 3x Advanced Mechanical Components 3x Medium Gun Parts 3x Canister | Gunsmith 3 |
| Trigger Nade | Grenade | 2x Crude Explosives 1x Processor | Explosives Station 2 |
| Vertical Grip II | Mod | 2x Mechanical Components 3x Duct Tape | Gunsmith 2 |
| Vertical Grip III | Mod | 2x Mod Components 5x Duct Tape | Gunsmith 3 |
| Vita Shot | Quick Use | 2x Antiseptic 1x Syringe | Medical Lab 3 |
| Vita Spray | Quick Use | 3x Antiseptic 1x Canister | Medical Lab 3 |
| Vulcano | Weapon | 1x Magnetic Accelerator 3x Heavy Gun Parts 1x Exodus Modules | Gunsmith 3 |
| Wolfpack | Grenade | 2x Explosive Compound 2x Sensors | Explosives Station 3 |
| Red Light Stick | Quick Use | 3x Chemicals | Utility Station 1 |
| Smoke Grenade | Grenade | 14x Chemicals 1x Canister | Utility Station 2 |
| Deadline | Mine | 3x Explosive Compound 2x ARC Circuitry | Explosives Station 3 |
| Trailblazer | Grenade | 1x Explosive Compound 1x Synthesized Fuel | Explosives Station 3 |
| Tactical Mk. 3 (Defensive) | Augment | 2x Advanced Electrical Components 3x Processor | Gear Bench 3 |
| Tactical Mk. 3 (Healing) | Augment | 2x Advanced Electrical Components 3x Processor | Gear Bench 3 |
| Yellow Light Stick | Quick Use | 3x Chemicals | Utility Station 1 |
Note: The missing Blueprints in this list likely have not actually been added to the game at the time of writing, because none of the playerbase has managed to find any of them. As they are added to the game, I will update this page with the most relevant information so you know exactly how to get all 75 Arc Raiders Blueprints.
Where to find Blueprints in Arc Raiders
Below is a list of all containers, modifiers, and events which maximise your chances of finding Blueprints:
- Certain quests reward you with specific Blueprints .
- Completing Trials has a high chance of offering Blueprints as rewards.
- Surveyors have a decent chance of dropping Blueprints on death.
- High loot value areas tend to have a greater chance of spawning Blueprints.
- Night Raids and Storms may increase rare Blueprint spawn chances in containers.
- Containers with higher numbers of items may have a higher tendency to spawn Blueprints. As a result, Blue Gate (which has many “large” containers containing multiple items) may give you a higher chance of spawning Blueprints.
- Raider containers (Raider Caches, Weapon Boxes, Medical Bags, Grenade Tubes) have increased Blueprint drop rates. As a result, the Uncovered Caches event gives you a high chance of finding Blueprints.
- Security Lockers have a higher than average chance of containing Blueprints.
- Certain Blueprints only seem to spawn under specific circumstances: Tempest Blueprint only spawns during Night Raid events. Vulcano Blueprint only spawns during Hidden Bunker events. Jupiter and Equaliser Blueprints only spawn during Harvester events.

Raider Caches, Weapon Boxes, and other raider-oriented container types have a good chance of offering Blueprints. |Image credit:Rock Paper Shotgun/Embark Studios
Blueprints have a very low chance of spawning in any container in Arc Raiders, around 1-2% on average. However, there is a higher chance of finding Blueprints in particular container types. Specifically, you can find more Blueprints in Raider containers and security lockers.
Beyond this, if you’re looking for Blueprints you should focus on regions of the map which are marked as having particularly high-value loot. Areas such as the Control Tower in Dam Battlegrounds, the Arrival and Departure Buildings in Spaceport, and Pilgrim’s Peak in Blue Gate all have a better-than-average chance of spawning Blueprints somewhere amongst all their containers. Night Raids and Electromagnetic Storm events also increase the drop chances of certain Blueprints .
In addition to these containers, you can often loot Blueprints from destroyed Surveyors - the largest of the rolling ball ARC. Surveyors are more commonly found on the later maps - Spaceport and Blue Gate - and if one spawns in your match, you’ll likely see it by the blue laser beam that it casts into the sky while “surveying”.
Surveyors are quite well-armoured and will very speedily run away from you once it notices you, but if you can take one down then make sure you loot all its parts for a chance of obtaining certain unusual Blueprints.
Blueprints obtained from quests
One way in which you can get Blueprints is by completing certain quests for the vendors in Speranza. Some quests will reward you with a specific item Blueprint upon completion, so as long as you work through all the quests in Arc Raiders, you are guaranteed those Blueprints.
Here is the full list of all Blueprints you can get from quest rewards:
- Trigger Nade Blueprint: Rewarded after completing “Sparks Fly”.
- Lure Grenade Blueprint: Rewarded after completing “Greasing Her Palms”.
- Burletta Blueprint: Rewarded after completing “Industrial Espionage”.
- Hullcracker Blueprint (and Launcher Ammo Blueprint): Rewarded after completing “The Major’s Footlocker”.
Alas, that’s only 4 Blueprints out of a total of 75 to unlock, so for the vast majority you will need to find them yourself during a raid. If you’re intent on farming Blueprints, then it’s best to equip yourself with cheap gear in case you lose it, but don’t use a free loadout because then you won’t get a safe pocket to stash any new Blueprint you find. No pain in Arc Raiders is sharper than failing to extract with a new Blueprint you’ve been after for a dozen hours already.

One of the best ways to get Blueprints is by hitting three stars on all five Trials every week. |Image credit:Rock Paper Shotgun/Embark Studios
Blueprints obtained from Trials
One of the very best ways to get Blueprints is as rewards for completing Trials in Arc Raiders. Trials are unlocked from Level 15 onwards, and allow you to earn rewards by focusing on certain tasks over the course of several raids. For example, one Trial might task you with dealing damage to Hornets, while another might challenge you to loot Supply Drops.
Trials refresh on a weekly basis, with a new week bringing five new Trials. Each Trial can offer up to three rewards after passing certain score milestones, and it’s possible to receive very high level loot from these reward crates - including Blueprints. So if you want to unlock as many Blueprints as possible, you should make a point of completing as many Trials as possible each week.
Best Blueprint farming locations
The very best way to get Blueprints is to frequent specific areas of the maps which combine high-tier loot pools with the right types of containers to search. Here are my recommendations for where to find Blueprints on every map, so you can always keep the search going for new crafting recipes to unlock.

Image credit:Rock Paper Shotgun/Embark Studios
Dam Battlegrounds
The best places to farm Blueprints on Dam Battlegrounds are the Control Tower, Power Generation Complex, Ruby Residence, and Pale Apartments . The first two regions, despite only being marked on the map as mid-tier loot, contain a phenomenal number of containers to loot. The Control Tower can also contain a couple of high-tier Security Lockers - though of course, you’ll need to have unlocked the Security Breach skill at the end of the Survival tree.
There’s also a lot of reporting amongst the playerbase that the Residential areas in the top-left of the map - Pale Apartments and Ruby Residence - give you a comparatively strong chance of finding Blueprints. Considering their size, there’s a high density of containers to loot in both locations, and they also have the benefit of being fairly out of the way. So you’re more likely to have all the containers to yourself.
Buried City
The best Blueprint farming locations on Buried City are the Santa Maria Houses, Grandioso Apartments, Town Hall, and the various buildings of the New District . Grandioso Apartments has a lower number of containers than the rest, but a high chance of spawning weapon cases - which have good Blueprint drop rates. The others are high-tier loot areas, with plenty of lootable containers - including Security Lockers.
Spaceport
The best places to find Blueprints on Spaceport are the Arrival and Departure Buildings, as well as Control Tower A6 and the Launch Towers . All these areas are labelled as high-value loot regions, and many of them are also very handily connected to one another by the Spaceport wall, which you can use to quickly run from one area to the next. At the tops of most of these buildings you’ll find at least one Security Locker, so this is an excellent farming route for players looking to find Blueprints.
The downside to looting Blueprints on Spaceport is that all these areas are hotly contested, particularly in Duos and Squads. You’ll need to be very focused and fast in order to complete the full farming route.

Image credit:Rock Paper Shotgun/Embark Studios
Blue Gate
Blue Gate tends to have a good chance of dropping Blueprints, potentially because it generally has a high number of containers which can hold lots of items; so there’s a higher chance of a Blueprint spawning in each container. In my experience, the best Blueprint farming spots on Blue Gate are Pilgrim’s Peak, Raider’s Refuge, the Ancient Fort, and the Underground Complex beneath the Warehouse .
All of these areas contain a wealth of containers to loot. Raider’s Refuge has less to loot, but the majority of the containers in and around the Refuge are raider containers, which have a high chance of containing Blueprints - particularly during major events.
Stella Montis
On the whole, Stella Montis seems to have a very low drop rate for Blueprints (though a high chance of dropping other high-tier loot). If you do want to try farming Blueprints on this map, the best places to find Blueprints in Stella Montis are Medical Research, Assembly Workshop, and the Business Center . These areas have the highest density of containers to loot on the map.
In addition to this, the Western Tunnel has a few different Security Lockers to loot, so while there’s very little to loot elsewhere in this area of the map, it’s worth hitting those Security Lockers if you spawn there at the start of a match.
That wraps up this primer on how to get all the Blueprints in Arc Raiders as quickly as possible. With the Expedition system constantly resetting a large number of players’ Blueprints, it’s more important than ever to have the most up-to-date information on where to find all these Blueprints.
While you’re here, be sure to check out our Arc Raiders best guns tier list , as well as our primers on the best skills to unlock and all the different Field Depot locations on every map.


ARC Raiders
PS5 , Xbox Series X/S , PC
Rock Paper Shotgun is better when you sign in
Sign in and join us on our journey to discover strange and compelling PC games.
