Factorio: Space Age review: a stellar expansion produces a masterful final form
The factory has grown

Image credit:Rock Paper Shotgun/Wube Software

- Developer: Wube Software
- Publisher: Wube Software
- Release: October 21st, 2024
- On: Windows, macOS, SteamOS, Linux
- From: Steam , GOG , Humble
- Price: £30/€32/$35
- Reviewed on: AMD Ryzen 9 7950X, Nvidia RTX 4080, 32GB RAM, Windows 10
To say that Factorio: Space Age throws out the rulebook is an understatement. It’d be more fitting to say it’s somehow automated the whole process: an inserter plucked out the rulebook from my brain and deposited it in hot magma, while a new rulebook was churned out in a nearby machine and plopped into my brain from the other side - only for that to be immediately plucked out and incinerated as well. With each new planet and each new phase, Space Age reinvents itself. I’m battling hyperbole here, but ah hell, I admit defeat. Factorio: Space Age is a masterpiece, the final form of perhaps the most well-crafted building game I’ll ever play.
Space Age seems entirely content with the first few hours, even the first few dozen, being pretty much exactly the same as it always was. Aside from a handful of quality of life changes, you basically just play a new game of Factorio. Punch rocks and trees. Place miners on iron and copper. Spin plates that keep everything manually fed until you have some boilers and steam engines up and running. Automate your first science packs. Research your first few techs so you can do everything again, but bigger and better. If you never clicked with Factorio before, Space Age is unlikely to change anything for you, because you’re unlikely to hang around long enough to see what Space Age truly has in store.
Me though, I’ve always been a factory game addict. I blasted through the first 40 automation-filled hours, and at last I reached the moment where the DLC truly began. In Space Age there are multiple new planets to explore, but first you need to construct ships capable of getting you there (and preferably back) in one piece. The moment I started to craft my first rocket, my production levels ground to a halt.
None of my previous knowledge helped me up there in alien territory. I had to slowly piece together how to send bits of foundation and other items up to my ship to start expanding it; how to place asteroid-grabbers on the perimeter and then filter the different asteroid types through specialised crushers to extract new resources like carbon and ice. How to then turn those into rocket fuel, and then automate ammo production for my gun turrets so I could blast apart large asteroid chunks before they turned my creation into a lonely, silent Hindenburg.
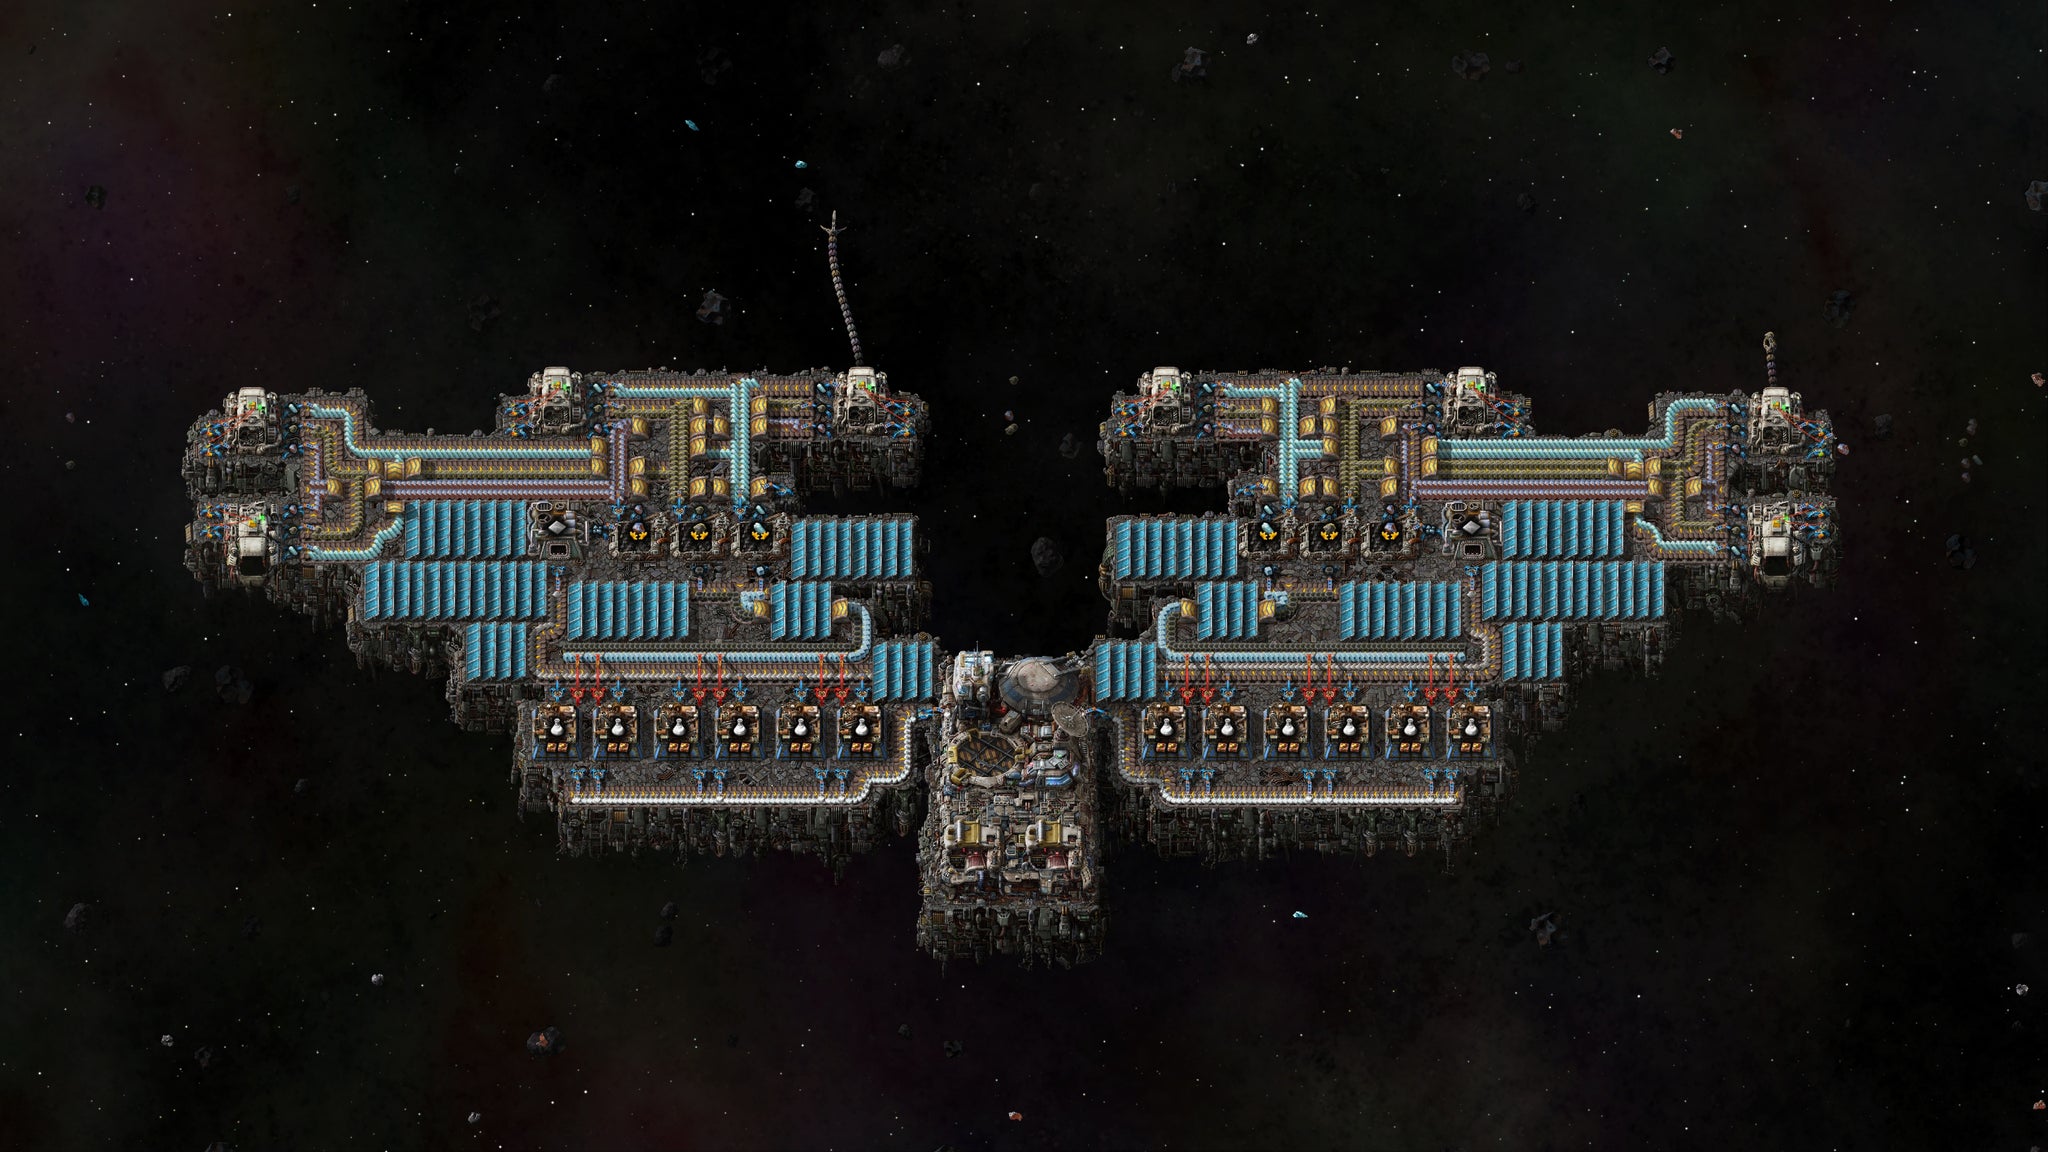
This is Albatross, my first spaceship. It has no thrusters - it’s designed purely to orbit Nauvis forever, catching asteroids and processing them into Space Science, which is then shipped down to my Nauvis base. |Image credit:Rock Paper Shotgun/Wube Software
Like a pump placed exactly as far down the pipeline as needed to ensure throughput, Space Age came along at exactly the point in my playthrough where I might ordinarily have started to feel burnt out. Aboard my ship, it not only felt like starting a new game, it felt like learning Factorio all over again. Goodbye, efficiency and careful calculations. Greetings, endless bottlenecks, asteroid collisions, and staring at item descriptions without even a modicum of gorm . It sounds frustrating, but I loved every moment. If I ever got tired, I’d just chill out and watch the gorgeous animations on the spaceship. The foundations unfurling themselves bit by bit like chunky metal origami. The Doc Ock tentacles of the asteroid collectors, yoinking nearby chunks of metal and carbon out of space. The animations have always been stellar in Factorio, but the new buildings are works of art.
Eventually I got to my first new planet - Vulcanus. I jettisoned from my (thankfully still working) spaceship Hephaestus, and landed on a gorgeously hellish, lava-filled landscape. My inventory had to be completely empty to even start a journey through space, so when I landed on Vulcanus, I was starting from scratch. And the rulebook had once again been shredded.
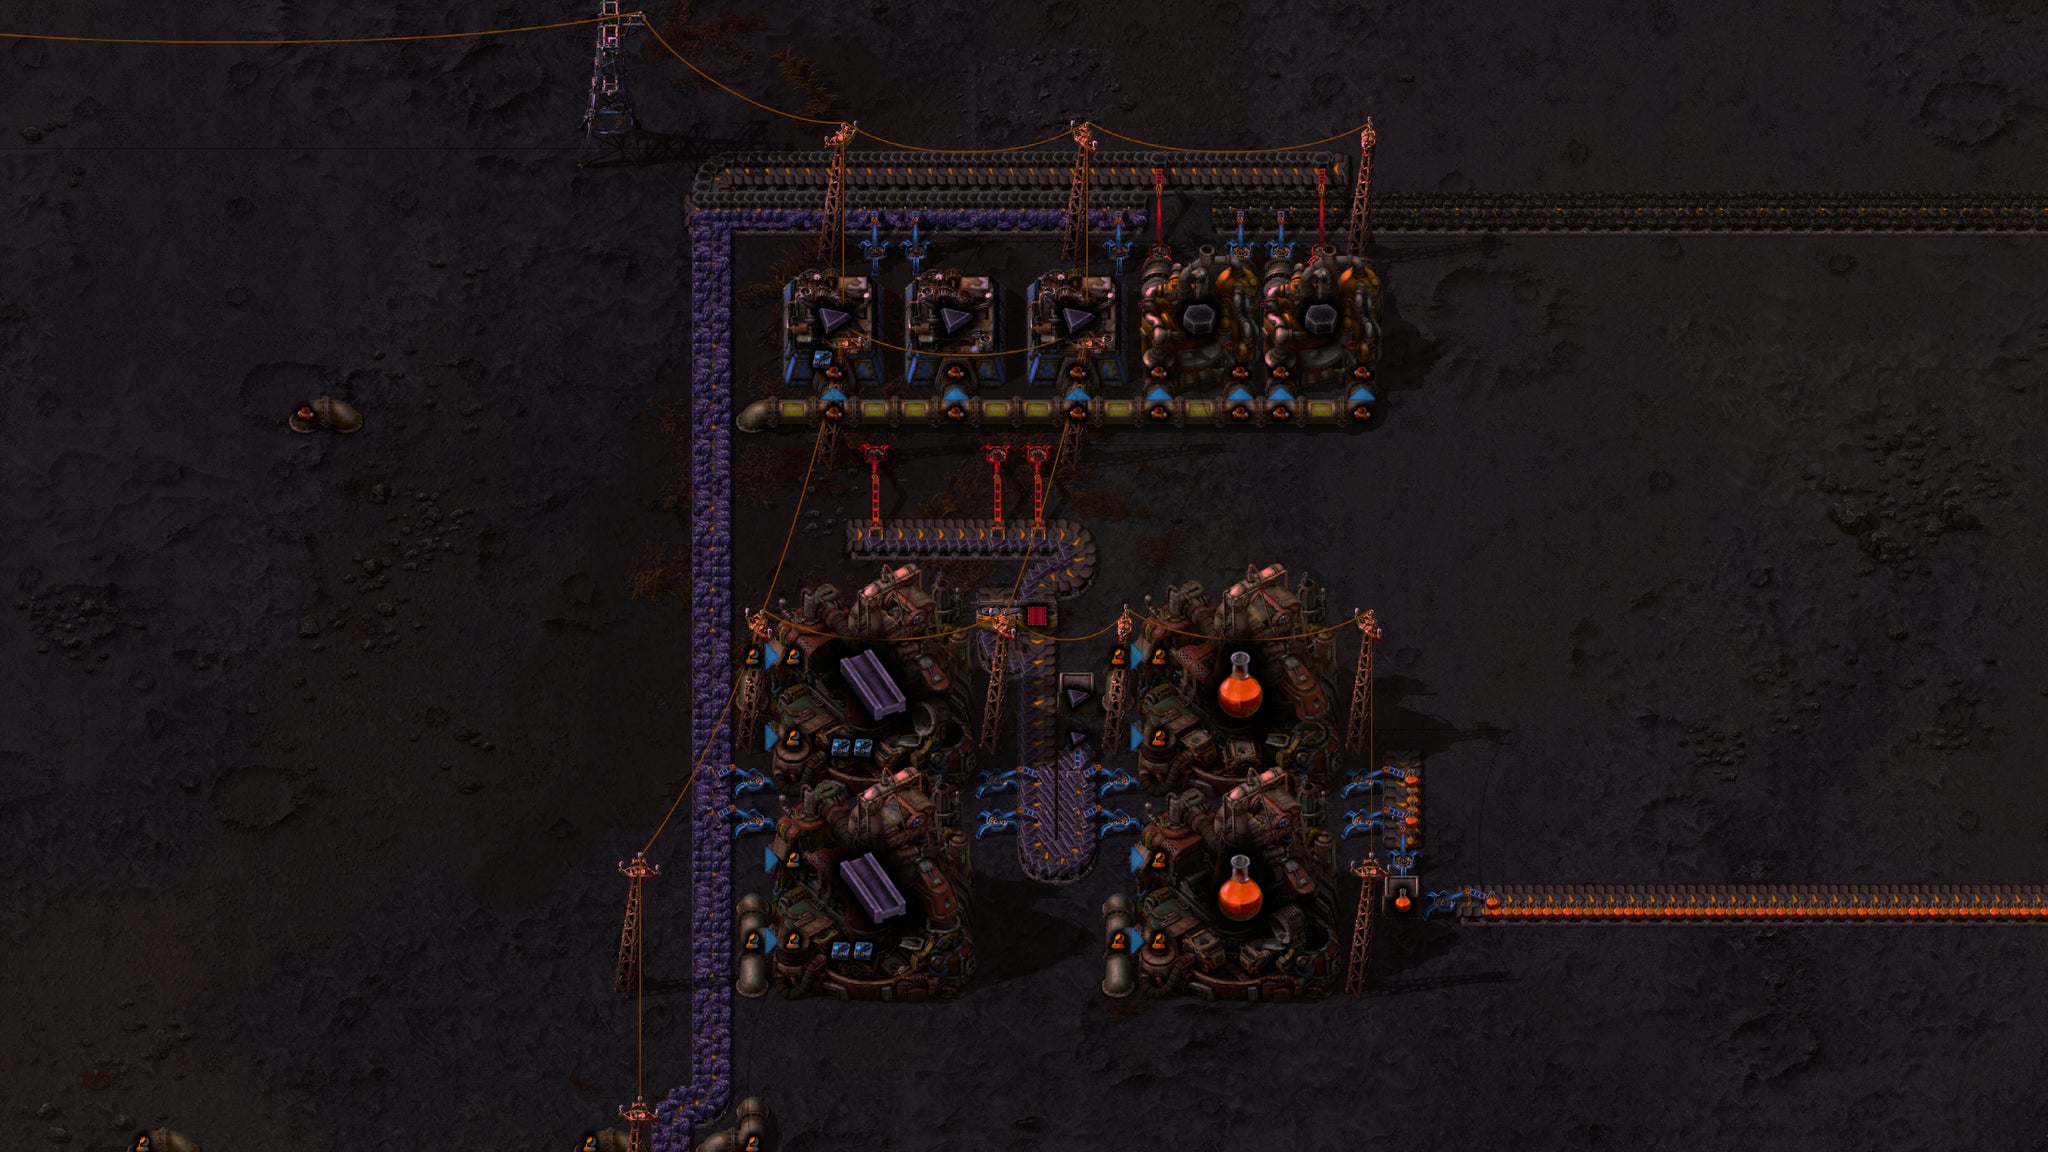
Image credit:Rock Paper Shotgun/Wube Software
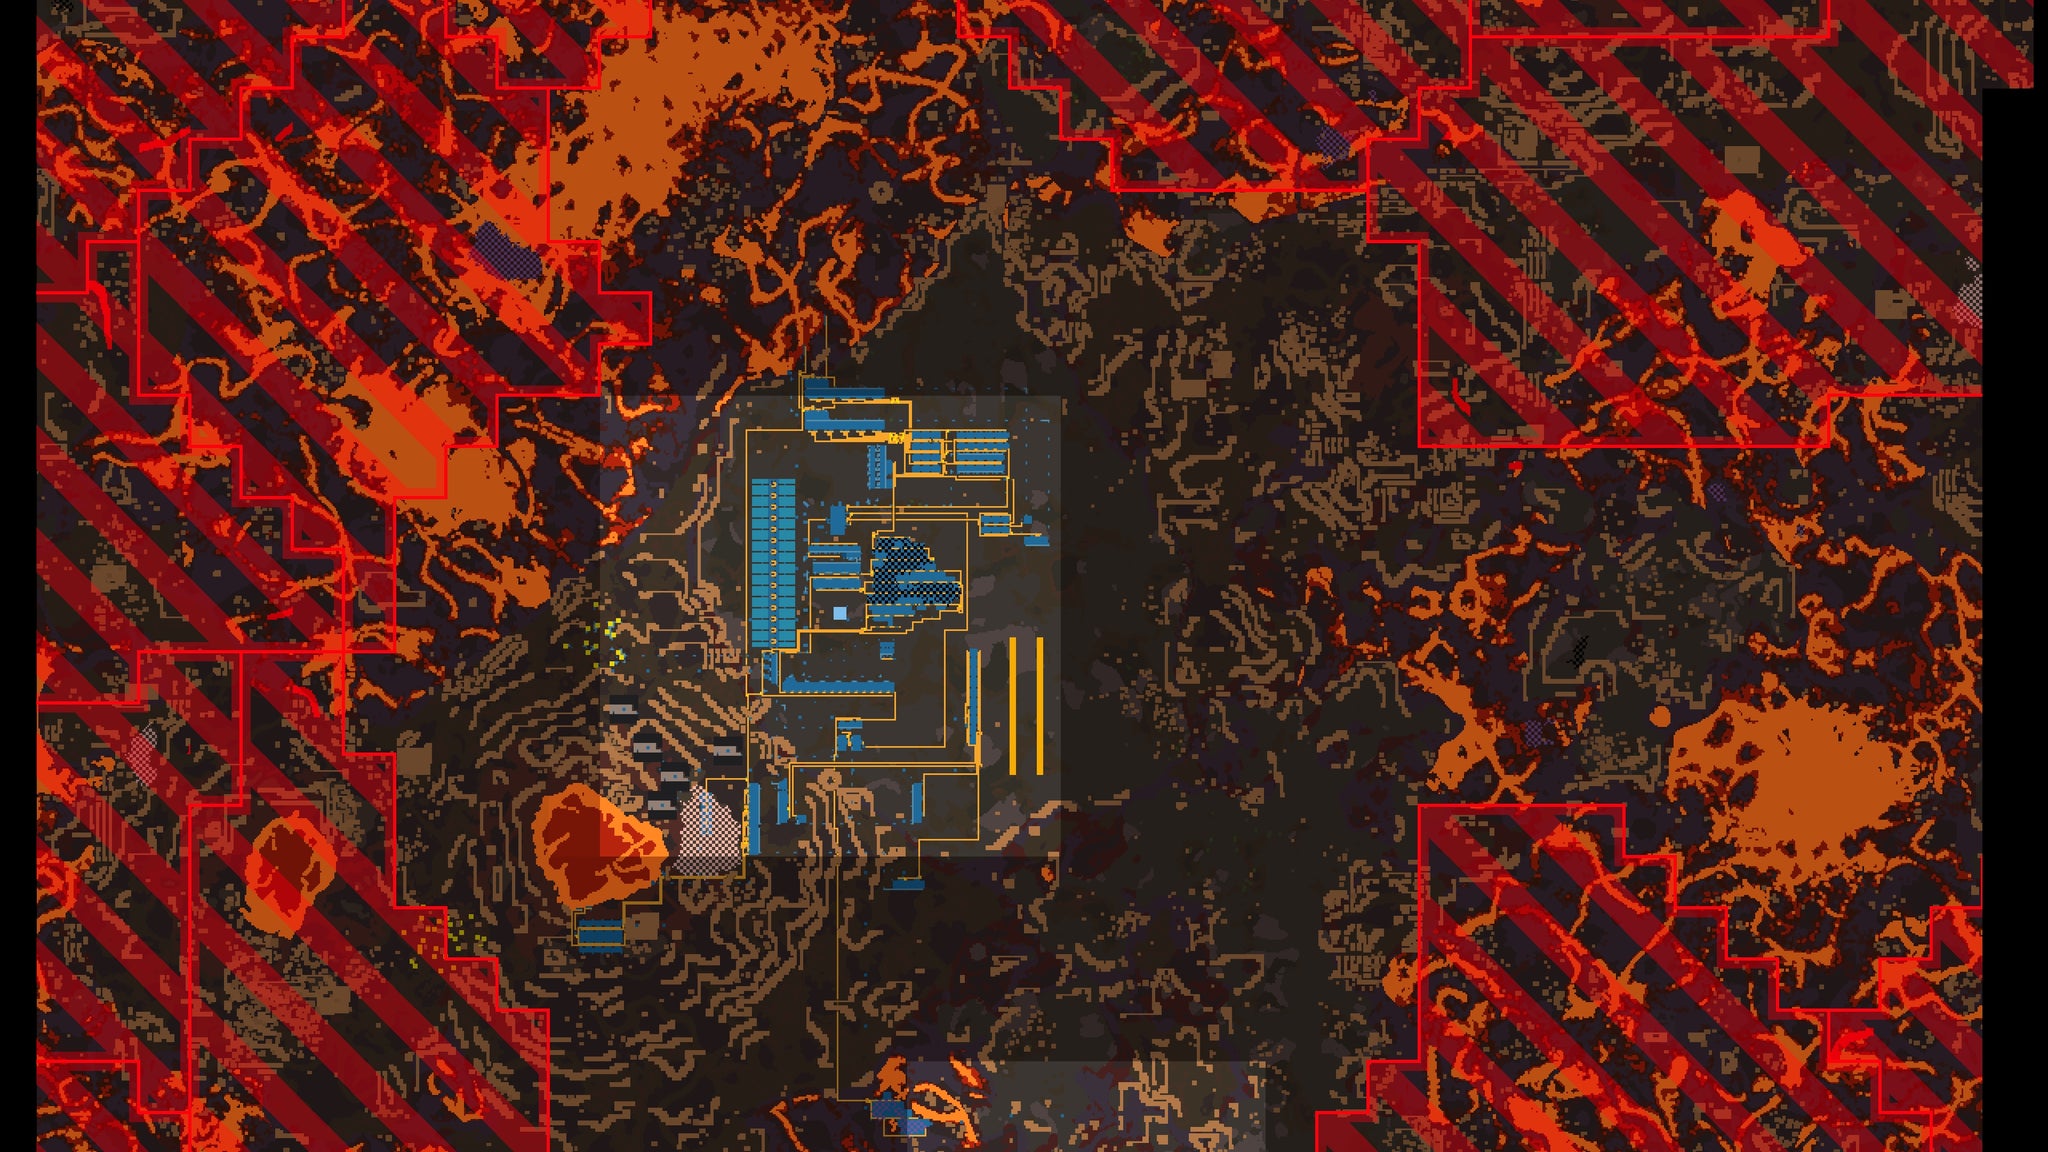
The map of Vulcanus is quite foreboding. All the red areas are Demolisher territory, and - at least in my playthrough - certain key resources are gated behind said territory, so you have to contend with at least one Demolisher at some point. |Image credit:Rock Paper Shotgun/Wube Software
Vulcanus feels truly different. Not just in the atmosphere and landscape, but the processes themselves. Familiar resources were present, but the ways I got hold of them were completely different. There were no iron or copper patches on the ground. Instead, I had to hit rocks to give me iron, copper, stone, and a new resource called Tungsten. Before I could do anything worthwhile, I needed a power source. But what to use? I was close to the sun, so solar power was a strong option, but I didn’t have the resources to build a single battery, and I didn’t fancy my entire factory switching off every evening. Steam power sounded good, but how could I get water for steam on a lava planet?
Turns out, all you need is some sulfuric acid, pumped in through geysers, and then you feed it into a chemical plant with a bit of a new resource called calcite, and that’s enough to get oodles of super-heated steam. You can then cool the steam to produce water, before feeding it into a familiar boiler and steam engine setup to produce steam at a lower, more useful temperature. Hey presto, you’ve got steam power on Vulcanus! And what a delightful process of discovery it was. Course, I realised later that night that I didn’t need to do any of that; all I needed was to pump the original super-heated steam into some turbines for huge amounts of energy. But hey, now I know for next time.
The whole purpose of going to Vulcanus is to produce the planet’s unique type of science pack: Metallurgic Science. Each planet has its own type of science which you need to automate if you want to research everything and get to the endgame. Gradually, I saw possibilities. I could pipe magma into the new Foundry building for an unlimited supply of iron and copper; I could use sulfuric acid to liquify coal into oil to make plastic for circuit boards; I could venture out into the fog of war to find some Tungsten deposits… Except that the landscape was crawling with colossal worms called demolishers which slaughtered me at a single touch and were almost impossible to kill. The first time I saw a (small) demolisher rumbling along the outskirts of my base, I actually laughed nervously at the screen.
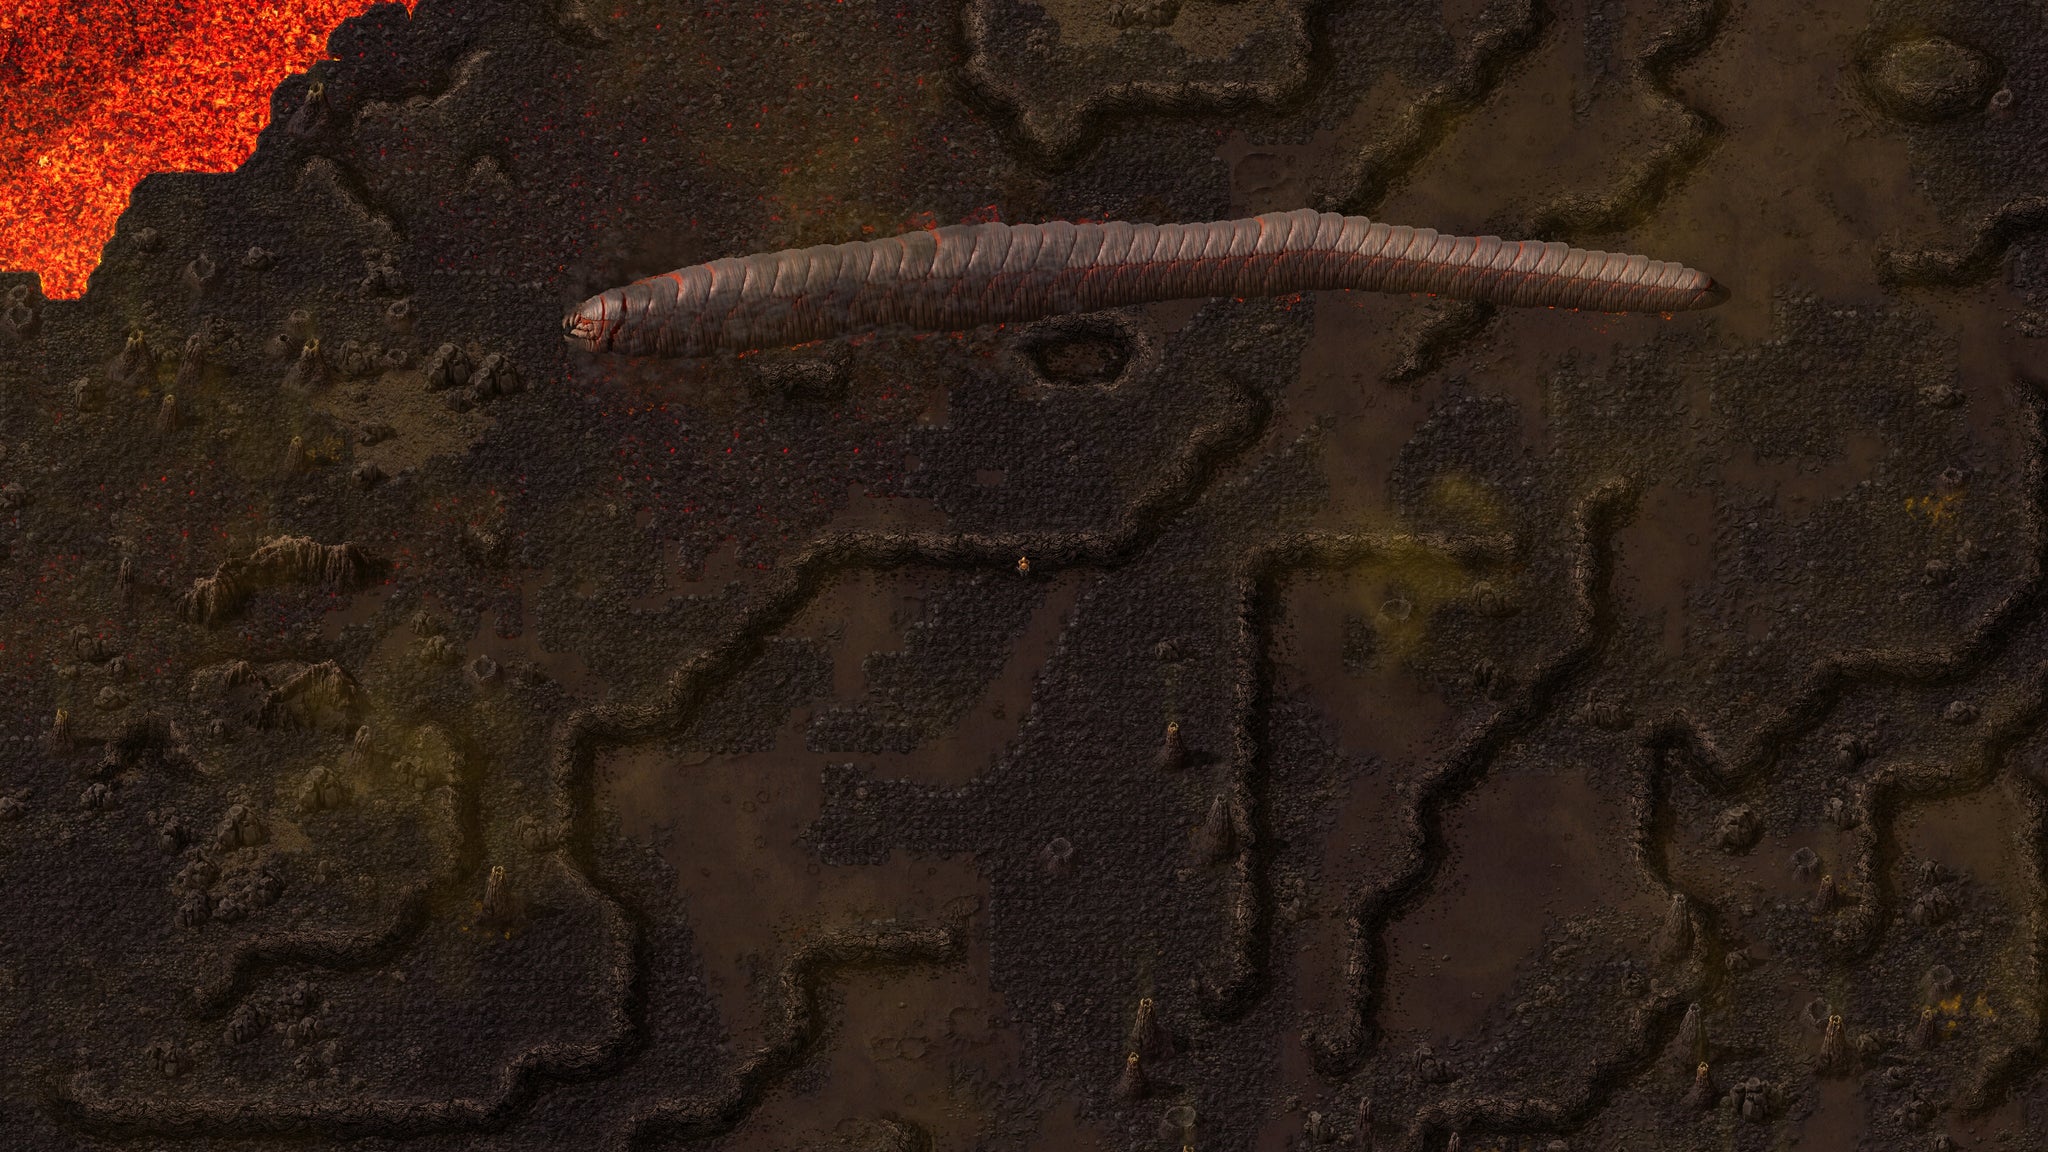
Oh… hello there. |Image credit:Rock Paper Shotgun/Wube Software
At least the demolishers were passive. They’ll leave you alone unless you disturb their territory with buildings, or shoot them in the bum with a tank shell. Conversely, I soon discovered through repeated alerts that I’d perhaps left my home planet Nauvis a little hastily, as everything continues to run in realtime throughout the entire solar system no matter where you are. Up in orbit, my ship Hephaestus continued to be caressed by asteroids. And back on Nauvis, my turrets steadily ran out of ammo and were being destroyed by Biter attacks. I could see it all unfolding, but I couldn’t do anything about it until I found a way off-planet. That was a new kind of tension I hadn’t felt before in Factorio, and it was brilliant.
Thankfully some fast, focused work allowed me to cobble together a rocket and head back up to Hephaestus. 15 hours of worms and lava was enough to make Hephaestus feel quite nostalgic. It was a real moment of triumph. And then, a few minutes later, that same feeling was magnified as I returned to Nauvis, where I’d spend the next several hours shoring up defences, replacing depleted resource patches, and just generally making sure things would more adequately handle my next absence.

I could have chosen any of the new planets to visit first, but Vulcanus was closest to the sun, and I’d also caught a sneaky glimpse in the new solar system map of a far-off object called the “Shattered Planet” far beyond the outer solar system, which seemed very much like an endgame goal. So I thought, why not start as far from that goal as possible, and work my way outwards. |Image credit:Rock Paper Shotgun/Wube Software
All the new interstellar systems and processes do remind me just how long it took to become even passably knowledgeable in Factorio. Space Age does nothing to help onboard new players and is as dense as ever. Probably much more so. Thankfully, the DLC does come alongside the free 2.0 update, which provides all players (of both Space Age and the base game itself) with a huge variety of quality of life improvements, as well as a couple of fundamental changes. There are new (far simpler and more satisfying) fluid dynamics, excellent new terrain generation, and a tonne of other tiny changes. Most of those changes would sound laughably inconsequential for non-addicts, but for automation husks like me, they’re music to my ears. And new features like the Factoriopedia and an excellent series of tips and tricks (complete with illustrative videos) available at a click do help to cut the learning curve and make things a bit more intuitive. None of that stops Factorio from being one of the most complex, confusing, consuming games I’ve played. With Space Age, the journey is longer and more mind-boggling than ever, but there’s also no better time to start.
All of Wube’s signature depth and engineering quality is present in nearly every part of Space Age. There’s a lightness of touch at work with all these new features and changes, a lessening of complexity in some areas and a heightening in others, all in the pursuit of fun and fascination. I sadly haven’t seen any of the other planets on offer besides Vulcanus, even after 100 hours in my save file. But several years of some of the most satisfying, addictive, cerebral fun I’ve ever had in a game has convinced me that Wube really know what they’re talking about. And from everything I’ve seen so far, Space Age is what Factorio was always meant to be.
Update: since writing this review I’ve started work on Gleba, and good lord, if I thought Vulcanus threw out the rulebook… You’re in for a treat here, folks.
Find out how we conduct our reviews by reading our review policy .
Factorio
PC
Rock Paper Shotgun is better when you sign in
Sign in and join us on our journey to discover strange and compelling PC games.

All 75 Arc Raiders Blueprints and where to get them
These areas have the highest chance of giving you Blueprints

Image credit:Rock Paper Shotgun/Embark Studios
Looking for more Arc Raiders Blueprints? It’s a special day when you find a Blueprint, as they’re among the most valuable items in Arc Raiders. If you find a Blueprint that you haven’t already found, then you must make sure you hold onto it at all costs, because Blueprints are the key to one of the most important and powerful systems of meta-progression in the game.
This guide aims to be the very best guide on Blueprints you can find, starting with a primer on what exactly they are and how they work in Arc Raiders, before delving into exactly where to get Blueprints and the very best farming spots for you to take in your search.
We’ll also go over how to get Blueprints from other unlikely activities, such as destroying Surveyors and completing specific quests. And you’ll also find the full list of all 75 Blueprints in Arc Raiders on this page (including the newest Blueprints added with the Cold Snap update , such as the Deadline Blueprint and Firework Box Blueprint), giving you all the information you need to expand your own crafting repertoire.
In this guide:
- What are Blueprints in Arc Raiders?
- Full Blueprint list: All crafting recipes
- Where to find Blueprints in Arc Raiders Blueprints obtained from quests Blueprints obtained from Trials Best Blueprint farming locations

What are Blueprints in Arc Raiders?
Blueprints in Arc Raiders are special items which, if you manage to extract with them, you can expend to permanently unlock a new crafting recipe in your Workshop. If you manage to extract from a raid with an Anvil Blueprint, for example, you can unlock the ability to craft your very own Anvil Pistol, as many times as you like (as long as you have the crafting materials).
To use a Blueprint, simply open your Inventory while in the lobby, then right-click on the Blueprint and click “Learn And Consume” . This will permanently unlock the recipe for that item in your Workshop. As of the Stella Montis update, there are allegedly 75 different Blueprints to unlock - although only 68 are confirmed to be in the game so far. You can see all the Blueprints you’ve found and unlocked by going to the Workshop menu, and hitting “R” to bring up the Blueprint screen.
It’s possible to find duplicates of past Blueprints you’ve already unlocked. If you find these, then you can either sell them, or - if you like to play with friends - you can take it into a match and gift it to your friend so they can unlock that recipe for themselves. Another option is to keep hold of them until the time comes to donate them to the Expedition.
Full Blueprint list: All crafting recipes
Below is the full list of all the Blueprints that are currently available to find in Arc Raiders, and the crafting recipe required for each item:
| Blueprint | Type | Recipe | Crafted At |
|---|---|---|---|
| Bettina | Weapon | 3x Advanced Mechanical Components 3x Heavy Gun Parts 3x Canister | Gunsmith 3 |
| Blue Light Stick | Quick Use | 3x Chemicals | Utility Station 1 |
| Aphelion | Weapon | 3x Magnetic Accelerator 3x Complex Gun Parts 1x Matriarch Reactor | Gunsmith 3 |
| Combat Mk. 3 (Flanking) | Augment | 2x Advanced Electrical Components 3x Processor | Gear Bench 3 |
| Combat Mk. 3 (Aggressive) | Augment | 2x Advanced Electrical Components 3x Processor | Gear Bench 3 |
| Complex Gun Parts | Material | 2x Light Gun Parts 2x Medium Gun Parts 2x Heavy Gun Parts | Refiner 3 |
| Fireworks Box | Quick Use | 1x Explosive Compound 3x Pop Trigger | Explosives Station 2 |
| Gas Mine | Mine | 4x Chemicals 2x Rubber Parts | Explosives Station 1 |
| Green Light Stick | Quick Use | 3x Chemicals | Utility Station 1 |
| Pulse Mine | Mine | 1x Crude Explosives 1x Wires | Explosives Station 1 |
| Seeker Grenade | Grenade | 1x Crude Explosives 2x ARC Alloy | Explosives Station 1 |
| Looting Mk. 3 (Survivor) | Augment | 2x Advanced Electrical Components 3x Processor | Gear Bench 3 |
| Angled Grip II | Mod | 2x Mechanical Components 3x Duct Tape | Gunsmith 2 |
| Angled Grip III | Mod | 2x Mod Components 5x Duct Tape | Gunsmith 3 |
| Hullcracker | Weapon | 1x Magnetic Accelerator 3x Heavy Gun Parts 1x Exodus Modules | Gunsmith 3 |
| Launcher Ammo | Ammo | 5x Metal Parts 1x Crude Explosives | Workbench 1 |
| Anvil | Weapon | 5x Mechanical Components 5x Simple Gun Parts | Gunsmith 2 |
| Anvil Splitter | Mod | 2x Mod Components 3x Processor | Gunsmith 3 |
| ??? | ??? | ??? | ??? |
| Barricade Kit | Quick Use | 1x Mechanical Components | Utility Station 2 |
| Blaze Grenade | Grenade | 1x Explosive Compound 2x Oil | Explosives Station 3 |
| Bobcat | Weapon | 3x Advanced Mechanical Components 3x Light Gun Parts | Gunsmith 3 |
| Osprey | Weapon | 2x Advanced Mechanical Components 3x Medium Gun Parts 7x Wires | Gunsmith 3 |
| Burletta | Weapon | 3x Mechanical Components 3x Simple Gun Parts | Gunsmith 1 |
| Compensator II | Mod | 2x Mechanical Components 4x Wires | Gunsmith 2 |
| Compensator III | Mod | 2x Mod Components 8x Wires | Gunsmith 3 |
| Defibrillator | Quick Use | 9x Plastic Parts 1x Moss | Medical Lab 2 |
| ??? | ??? | ??? | ??? |
| Equalizer | Weapon | 3x Magnetic Accelerator 3x Complex Gun Parts 1x Queen Reactor | Gunsmith 3 |
| Extended Barrel | Mod | 2x Mod Components 8x Wires | Gunsmith 3 |
| Extended Light Mag II | Mod | 2x Mechanical Components 3x Steel Spring | Gunsmith 2 |
| Extended Light Mag III | Mod | 2x Mod Components 5x Steel Spring | Gunsmith 3 |
| Extended Medium Mag II | Mod | 2x Mechanical Components 3x Steel Spring | Gunsmith 2 |
| Extended Medium Mag III | Mod | 2x Mod Components 5x Steel Spring | Gunsmith 3 |
| Extended Shotgun Mag II | Mod | 2x Mechanical Components 3x Steel Spring | Gunsmith 2 |
| Extended Shotgun Mag III | Mod | 2x Mod Components 5x Steel Spring | Gunsmith 3 |
| Remote Raider Flare | Quick Use | 2x Chemicals 4x Rubber Parts | Utility Station 1 |
| Heavy Gun Parts | Material | 4x Simple Gun Parts | Refiner 2 |
| Venator | Weapon | 2x Advanced Mechanical Components 3x Medium Gun Parts 5x Magnet | Gunsmith 3 |
| Il Toro | Weapon | 5x Mechanical Components 6x Simple Gun Parts | Gunsmith 1 |
| Jolt Mine | Mine | 1x Electrical Components 1x Battery | Explosives Station 2 |
| Explosive Mine | Mine | 1x Explosive Compound 1x Sensors | Explosives Station 3 |
| Jupiter | Weapon | 3x Magnetic Accelerator 3x Complex Gun Parts 1x Queen Reactor | Gunsmith 3 |
| Light Gun Parts | Material | 4x Simple Gun Parts | Refiner 2 |
| Lightweight Stock | Mod | 2x Mod Components 5x Duct Tape | Gunsmith 3 |
| Lure Grenade | Grenade | 1x Speaker Component 1x Electrical Components | Utility Station 2 |
| Medium Gun Parts | Material | 4x Simple Gun Parts | Refiner 2 |
| Torrente | Weapon | 2x Advanced Mechanical Components 3x Medium Gun Parts 6x Steel Spring | Gunsmith 3 |
| Muzzle Brake II | Mod | 2x Mechanical Components 4x Wires | Gunsmith 2 |
| Muzzle Brake III | Mod | 2x Mod Components 8x Wires | Gunsmith 3 |
| Padded Stock | Mod | 2x Mod Components 5x Duct Tape | Gunsmith 3 |
| Shotgun Choke II | Mod | 2x Mechanical Components 4x Wires | Gunsmith 2 |
| Shotgun Choke III | Mod | 2x Mod Components 8x Wires | Gunsmith 3 |
| Shotgun Silencer | Mod | 2x Mod Components 8x Wires | Gunsmith 3 |
| Showstopper | Grenade | 1x Advanced Electrical Components 1x Voltage Converter | Explosives Station 3 |
| Silencer I | Mod | 2x Mechanical Components 4x Wires | Gunsmith 2 |
| Silencer II | Mod | 2x Mod Components 8x Wires | Gunsmith 3 |
| Snap Hook | Quick Use | 2x Power Rod 3x Rope 1x Exodus Modules | Utility Station 3 |
| Stable Stock II | Mod | 2x Mechanical Components 3x Duct Tape | Gunsmith 2 |
| Stable Stock III | Mod | 2x Mod Components 5x Duct Tape | Gunsmith 3 |
| Tagging Grenade | Grenade | 1x Electrical Components 1x Sensors | Utility Station 3 |
| Tempest | Weapon | 3x Advanced Mechanical Components 3x Medium Gun Parts 3x Canister | Gunsmith 3 |
| Trigger Nade | Grenade | 2x Crude Explosives 1x Processor | Explosives Station 2 |
| Vertical Grip II | Mod | 2x Mechanical Components 3x Duct Tape | Gunsmith 2 |
| Vertical Grip III | Mod | 2x Mod Components 5x Duct Tape | Gunsmith 3 |
| Vita Shot | Quick Use | 2x Antiseptic 1x Syringe | Medical Lab 3 |
| Vita Spray | Quick Use | 3x Antiseptic 1x Canister | Medical Lab 3 |
| Vulcano | Weapon | 1x Magnetic Accelerator 3x Heavy Gun Parts 1x Exodus Modules | Gunsmith 3 |
| Wolfpack | Grenade | 2x Explosive Compound 2x Sensors | Explosives Station 3 |
| Red Light Stick | Quick Use | 3x Chemicals | Utility Station 1 |
| Smoke Grenade | Grenade | 14x Chemicals 1x Canister | Utility Station 2 |
| Deadline | Mine | 3x Explosive Compound 2x ARC Circuitry | Explosives Station 3 |
| Trailblazer | Grenade | 1x Explosive Compound 1x Synthesized Fuel | Explosives Station 3 |
| Tactical Mk. 3 (Defensive) | Augment | 2x Advanced Electrical Components 3x Processor | Gear Bench 3 |
| Tactical Mk. 3 (Healing) | Augment | 2x Advanced Electrical Components 3x Processor | Gear Bench 3 |
| Yellow Light Stick | Quick Use | 3x Chemicals | Utility Station 1 |
Note: The missing Blueprints in this list likely have not actually been added to the game at the time of writing, because none of the playerbase has managed to find any of them. As they are added to the game, I will update this page with the most relevant information so you know exactly how to get all 75 Arc Raiders Blueprints.
Where to find Blueprints in Arc Raiders
Below is a list of all containers, modifiers, and events which maximise your chances of finding Blueprints:
- Certain quests reward you with specific Blueprints .
- Completing Trials has a high chance of offering Blueprints as rewards.
- Surveyors have a decent chance of dropping Blueprints on death.
- High loot value areas tend to have a greater chance of spawning Blueprints.
- Night Raids and Storms may increase rare Blueprint spawn chances in containers.
- Containers with higher numbers of items may have a higher tendency to spawn Blueprints. As a result, Blue Gate (which has many “large” containers containing multiple items) may give you a higher chance of spawning Blueprints.
- Raider containers (Raider Caches, Weapon Boxes, Medical Bags, Grenade Tubes) have increased Blueprint drop rates. As a result, the Uncovered Caches event gives you a high chance of finding Blueprints.
- Security Lockers have a higher than average chance of containing Blueprints.
- Certain Blueprints only seem to spawn under specific circumstances: Tempest Blueprint only spawns during Night Raid events. Vulcano Blueprint only spawns during Hidden Bunker events. Jupiter and Equaliser Blueprints only spawn during Harvester events.

Raider Caches, Weapon Boxes, and other raider-oriented container types have a good chance of offering Blueprints. |Image credit:Rock Paper Shotgun/Embark Studios
Blueprints have a very low chance of spawning in any container in Arc Raiders, around 1-2% on average. However, there is a higher chance of finding Blueprints in particular container types. Specifically, you can find more Blueprints in Raider containers and security lockers.
Beyond this, if you’re looking for Blueprints you should focus on regions of the map which are marked as having particularly high-value loot. Areas such as the Control Tower in Dam Battlegrounds, the Arrival and Departure Buildings in Spaceport, and Pilgrim’s Peak in Blue Gate all have a better-than-average chance of spawning Blueprints somewhere amongst all their containers. Night Raids and Electromagnetic Storm events also increase the drop chances of certain Blueprints .
In addition to these containers, you can often loot Blueprints from destroyed Surveyors - the largest of the rolling ball ARC. Surveyors are more commonly found on the later maps - Spaceport and Blue Gate - and if one spawns in your match, you’ll likely see it by the blue laser beam that it casts into the sky while “surveying”.
Surveyors are quite well-armoured and will very speedily run away from you once it notices you, but if you can take one down then make sure you loot all its parts for a chance of obtaining certain unusual Blueprints.
Blueprints obtained from quests
One way in which you can get Blueprints is by completing certain quests for the vendors in Speranza. Some quests will reward you with a specific item Blueprint upon completion, so as long as you work through all the quests in Arc Raiders, you are guaranteed those Blueprints.
Here is the full list of all Blueprints you can get from quest rewards:
- Trigger Nade Blueprint: Rewarded after completing “Sparks Fly”.
- Lure Grenade Blueprint: Rewarded after completing “Greasing Her Palms”.
- Burletta Blueprint: Rewarded after completing “Industrial Espionage”.
- Hullcracker Blueprint (and Launcher Ammo Blueprint): Rewarded after completing “The Major’s Footlocker”.
Alas, that’s only 4 Blueprints out of a total of 75 to unlock, so for the vast majority you will need to find them yourself during a raid. If you’re intent on farming Blueprints, then it’s best to equip yourself with cheap gear in case you lose it, but don’t use a free loadout because then you won’t get a safe pocket to stash any new Blueprint you find. No pain in Arc Raiders is sharper than failing to extract with a new Blueprint you’ve been after for a dozen hours already.

One of the best ways to get Blueprints is by hitting three stars on all five Trials every week. |Image credit:Rock Paper Shotgun/Embark Studios
Blueprints obtained from Trials
One of the very best ways to get Blueprints is as rewards for completing Trials in Arc Raiders. Trials are unlocked from Level 15 onwards, and allow you to earn rewards by focusing on certain tasks over the course of several raids. For example, one Trial might task you with dealing damage to Hornets, while another might challenge you to loot Supply Drops.
Trials refresh on a weekly basis, with a new week bringing five new Trials. Each Trial can offer up to three rewards after passing certain score milestones, and it’s possible to receive very high level loot from these reward crates - including Blueprints. So if you want to unlock as many Blueprints as possible, you should make a point of completing as many Trials as possible each week.
Best Blueprint farming locations
The very best way to get Blueprints is to frequent specific areas of the maps which combine high-tier loot pools with the right types of containers to search. Here are my recommendations for where to find Blueprints on every map, so you can always keep the search going for new crafting recipes to unlock.

Image credit:Rock Paper Shotgun/Embark Studios
Dam Battlegrounds
The best places to farm Blueprints on Dam Battlegrounds are the Control Tower, Power Generation Complex, Ruby Residence, and Pale Apartments . The first two regions, despite only being marked on the map as mid-tier loot, contain a phenomenal number of containers to loot. The Control Tower can also contain a couple of high-tier Security Lockers - though of course, you’ll need to have unlocked the Security Breach skill at the end of the Survival tree.
There’s also a lot of reporting amongst the playerbase that the Residential areas in the top-left of the map - Pale Apartments and Ruby Residence - give you a comparatively strong chance of finding Blueprints. Considering their size, there’s a high density of containers to loot in both locations, and they also have the benefit of being fairly out of the way. So you’re more likely to have all the containers to yourself.
Buried City
The best Blueprint farming locations on Buried City are the Santa Maria Houses, Grandioso Apartments, Town Hall, and the various buildings of the New District . Grandioso Apartments has a lower number of containers than the rest, but a high chance of spawning weapon cases - which have good Blueprint drop rates. The others are high-tier loot areas, with plenty of lootable containers - including Security Lockers.
Spaceport
The best places to find Blueprints on Spaceport are the Arrival and Departure Buildings, as well as Control Tower A6 and the Launch Towers . All these areas are labelled as high-value loot regions, and many of them are also very handily connected to one another by the Spaceport wall, which you can use to quickly run from one area to the next. At the tops of most of these buildings you’ll find at least one Security Locker, so this is an excellent farming route for players looking to find Blueprints.
The downside to looting Blueprints on Spaceport is that all these areas are hotly contested, particularly in Duos and Squads. You’ll need to be very focused and fast in order to complete the full farming route.

Image credit:Rock Paper Shotgun/Embark Studios
Blue Gate
Blue Gate tends to have a good chance of dropping Blueprints, potentially because it generally has a high number of containers which can hold lots of items; so there’s a higher chance of a Blueprint spawning in each container. In my experience, the best Blueprint farming spots on Blue Gate are Pilgrim’s Peak, Raider’s Refuge, the Ancient Fort, and the Underground Complex beneath the Warehouse .
All of these areas contain a wealth of containers to loot. Raider’s Refuge has less to loot, but the majority of the containers in and around the Refuge are raider containers, which have a high chance of containing Blueprints - particularly during major events.
Stella Montis
On the whole, Stella Montis seems to have a very low drop rate for Blueprints (though a high chance of dropping other high-tier loot). If you do want to try farming Blueprints on this map, the best places to find Blueprints in Stella Montis are Medical Research, Assembly Workshop, and the Business Center . These areas have the highest density of containers to loot on the map.
In addition to this, the Western Tunnel has a few different Security Lockers to loot, so while there’s very little to loot elsewhere in this area of the map, it’s worth hitting those Security Lockers if you spawn there at the start of a match.
That wraps up this primer on how to get all the Blueprints in Arc Raiders as quickly as possible. With the Expedition system constantly resetting a large number of players’ Blueprints, it’s more important than ever to have the most up-to-date information on where to find all these Blueprints.
While you’re here, be sure to check out our Arc Raiders best guns tier list , as well as our primers on the best skills to unlock and all the different Field Depot locations on every map.

ARC Raiders
PS5 , Xbox Series X/S , PC
Rock Paper Shotgun is better when you sign in
Sign in and join us on our journey to discover strange and compelling PC games.
