Elden Ring: Shadow Of The Erdtree Ymir questline walkthrough
A full walkthrough of Count Ymir’s questline in the Cathedral Of Manus Metyr

Image credit:Rock Paper Shotgun/Bandai Namco

Stuck on Count Ymir’s questline in Elden Ring: Shadow Of The Erdtree? Count Ymir is a charismatic NPC in Shadow Of The Erdtree who gifts you a Ruins Map and instructions to ring the ’ Hanging Bell ’ without much further guidance. Joined by his stoic protector, Swordhand Of Night Jolán, this quest is one of many that will see you traversing across large regions of The Land of Shadow .
In true Elden Ring fashion, the cryptic nuance of this NPC questline can leave you a tad confused. Luckily, we’ve written a step-by-step below, covering all parts of this quest. This includes all Ruins Map locations, where to find the Puppet of Anna, how to complete Ymir and Jolán’s quest, the “O Mother” gesture location and all Iris of Occultation and Iris of Grace rewards.
Count Ymir questline steps
Below is a summary of all the steps for completing Ymir’s questline in Elden Ring: Shadow Of The Erdtree:
- Speak to Count Ymir at the Cathedral Of Manus Metyr.
- (Optional) Ask Ymir about Glintstone Sorcery.
- Reload the area and listen to Ymir’s words.
- Speak to Jolán.
- (Optional) Speak to Ymir about Jolán.
- Sound the Hanging Bell at the Finger Ruins Of Rhia.
- Return to Ymir to receive the 2nd Ruins Map.
- (Optional) Ask Ymir about the nature of the world, and Miquella.
- Speak to Jolán again.
- Reload the area and speak to Ymir in the graveyard.
- Interact with Ymir’s throne.
- Defeat Swordhand Of Night Anna .
- Reload the area and tell Jolán about Anna .
- Speak to Ymir again.
- Obtain the “O Mother” gesture from Bonny Village.
- Enter the Hinterlands behind Shadow Keep.
- Sound the Hanging Bell at the Finger Ruins Of Dheo.
- Speak to Ymir and Jolán once more.
- (Optional) Ask Ymir again about the nature of the world.
- Reload the area and interact with the throne again.
- Sound the Hanging Bell at the Finger Ruins Of Miyr.
- Defeat Metyr, Mother Of Fingers .
- Return to the Cathedral and defeat Jolán and Ymir .
- Reload the area and speak to Jolán.
- (Choice) Give Jolán an Iris Of Grace or Iris Of Occultation.
- (Optional) Explore the top of Rabbath’s Rise via the Hinterland.
- Loot the Cherishing Fingers Sorcery from the Cathedral graveyard.
There’s a fair bit of dancing back and forth across the Land Of Shadow for this quest, and a few of the areas are really quite challenging to reach. So below, we’ll walk you through each of these steps so you can finish Ymir’s questline with ease.
How to start Ymir’s quest
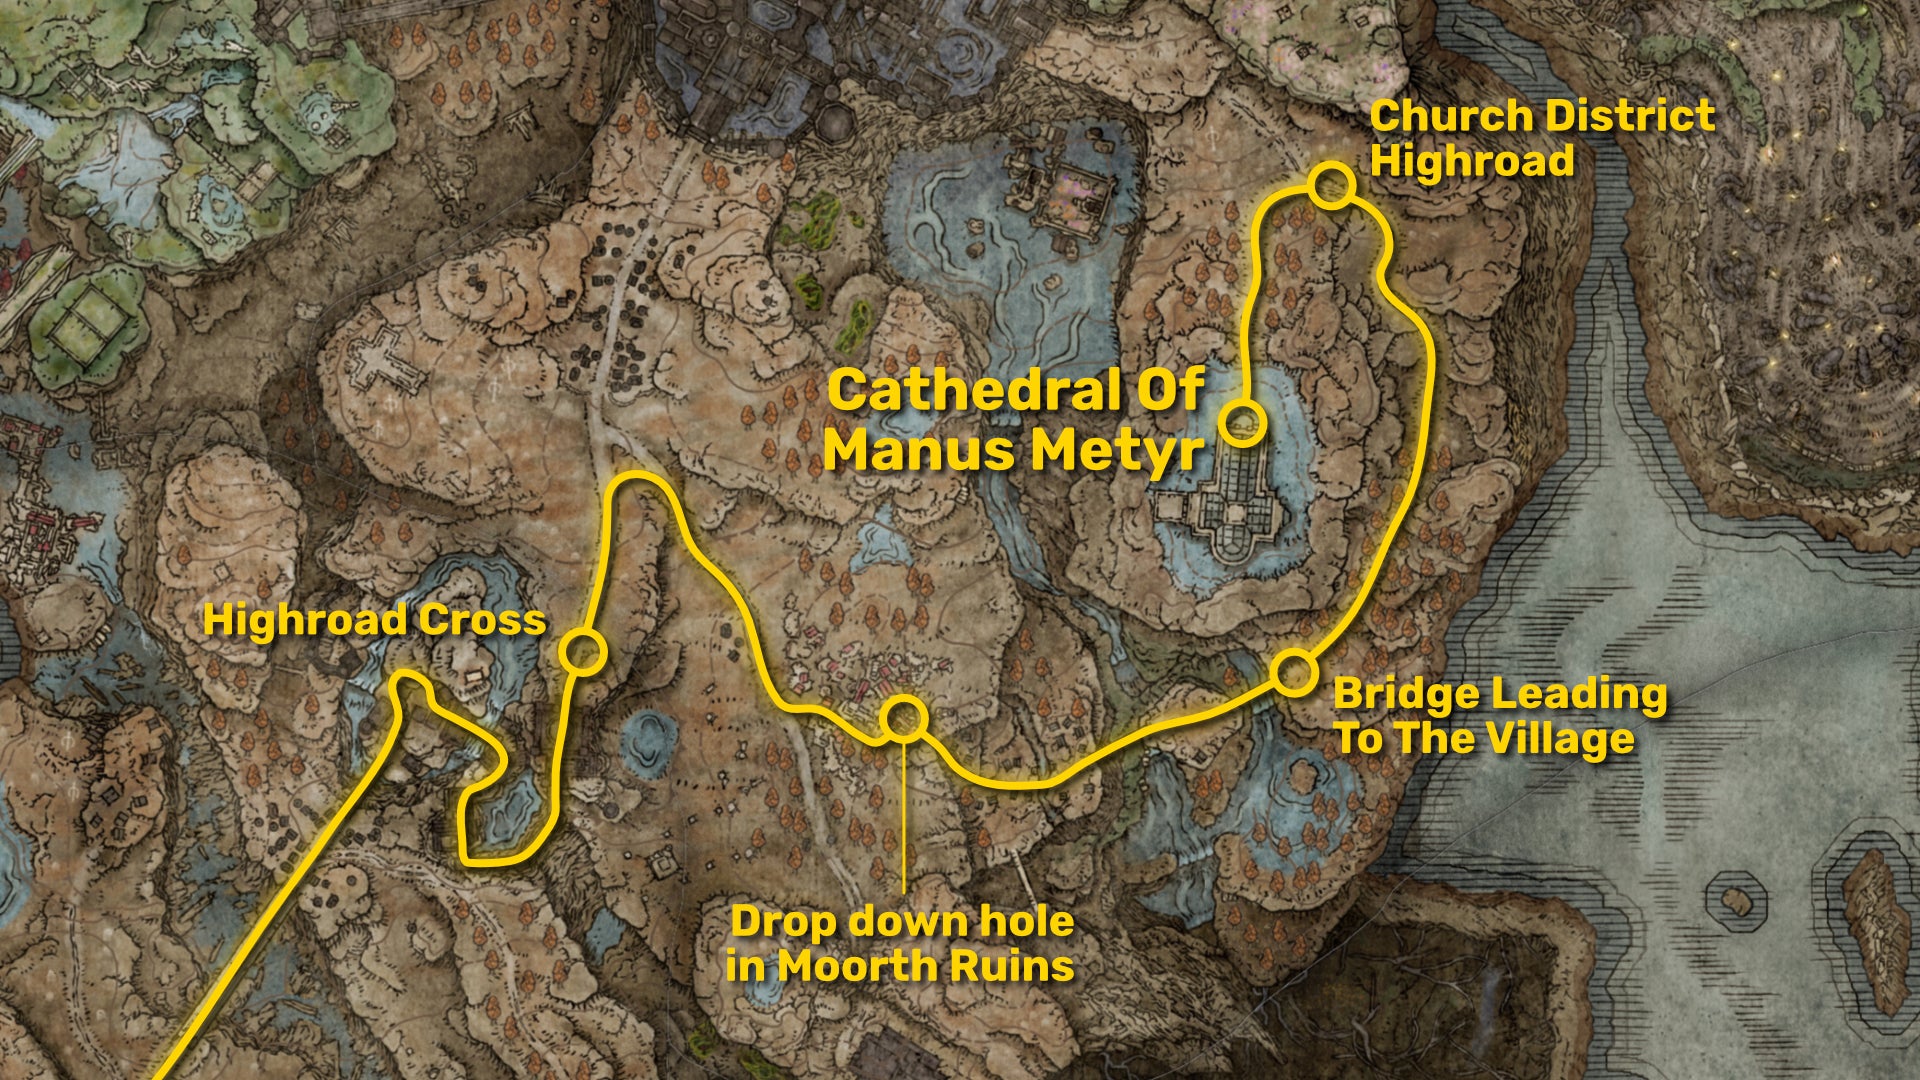
Follow this path to reach the Cathedral Of Manus Metyr and begin Ymir’s questline. |Image credit:Rock Paper Shotgun/Bandai Namco
Where to find Count Ymir
Count Ymir is found inside the Cathedral Of Manus Metyr , the building that dominates the eastern half of the Scadu Altus. To get there, you first need to reach Scadu Altus - either by clearing out Castle Ensis and defeating the boss within or by using the Spiritspring Jump up to the Fort Of Reprimand.
After that, head to the Moorth Ruins in the centre of the Scadu Altus. Towards the south side of the Ruins, you’ll see a giant hole in the ground. Carefully parkour down the hole to the very bottom, and follow the path out to reach Bonny Village.
From Bonny Village, cross the two bridges and then follow the main path up to the Church District Highroad Site Of Grace . You’ll have to defeat or evade a Furnace Golem as you travel north up the path.
Once you reach the Church District Highroad Site Of Grace, the path forks. Take the left path through the forest, and you’ll soon arrive at the Cathedral Of Manus Metyr.

Speak to Count Ymir and he’ll immediately kick off his quest by giving you a map to some Ruins. |Image credit:Rock Paper Shotgun/Bandai Namco
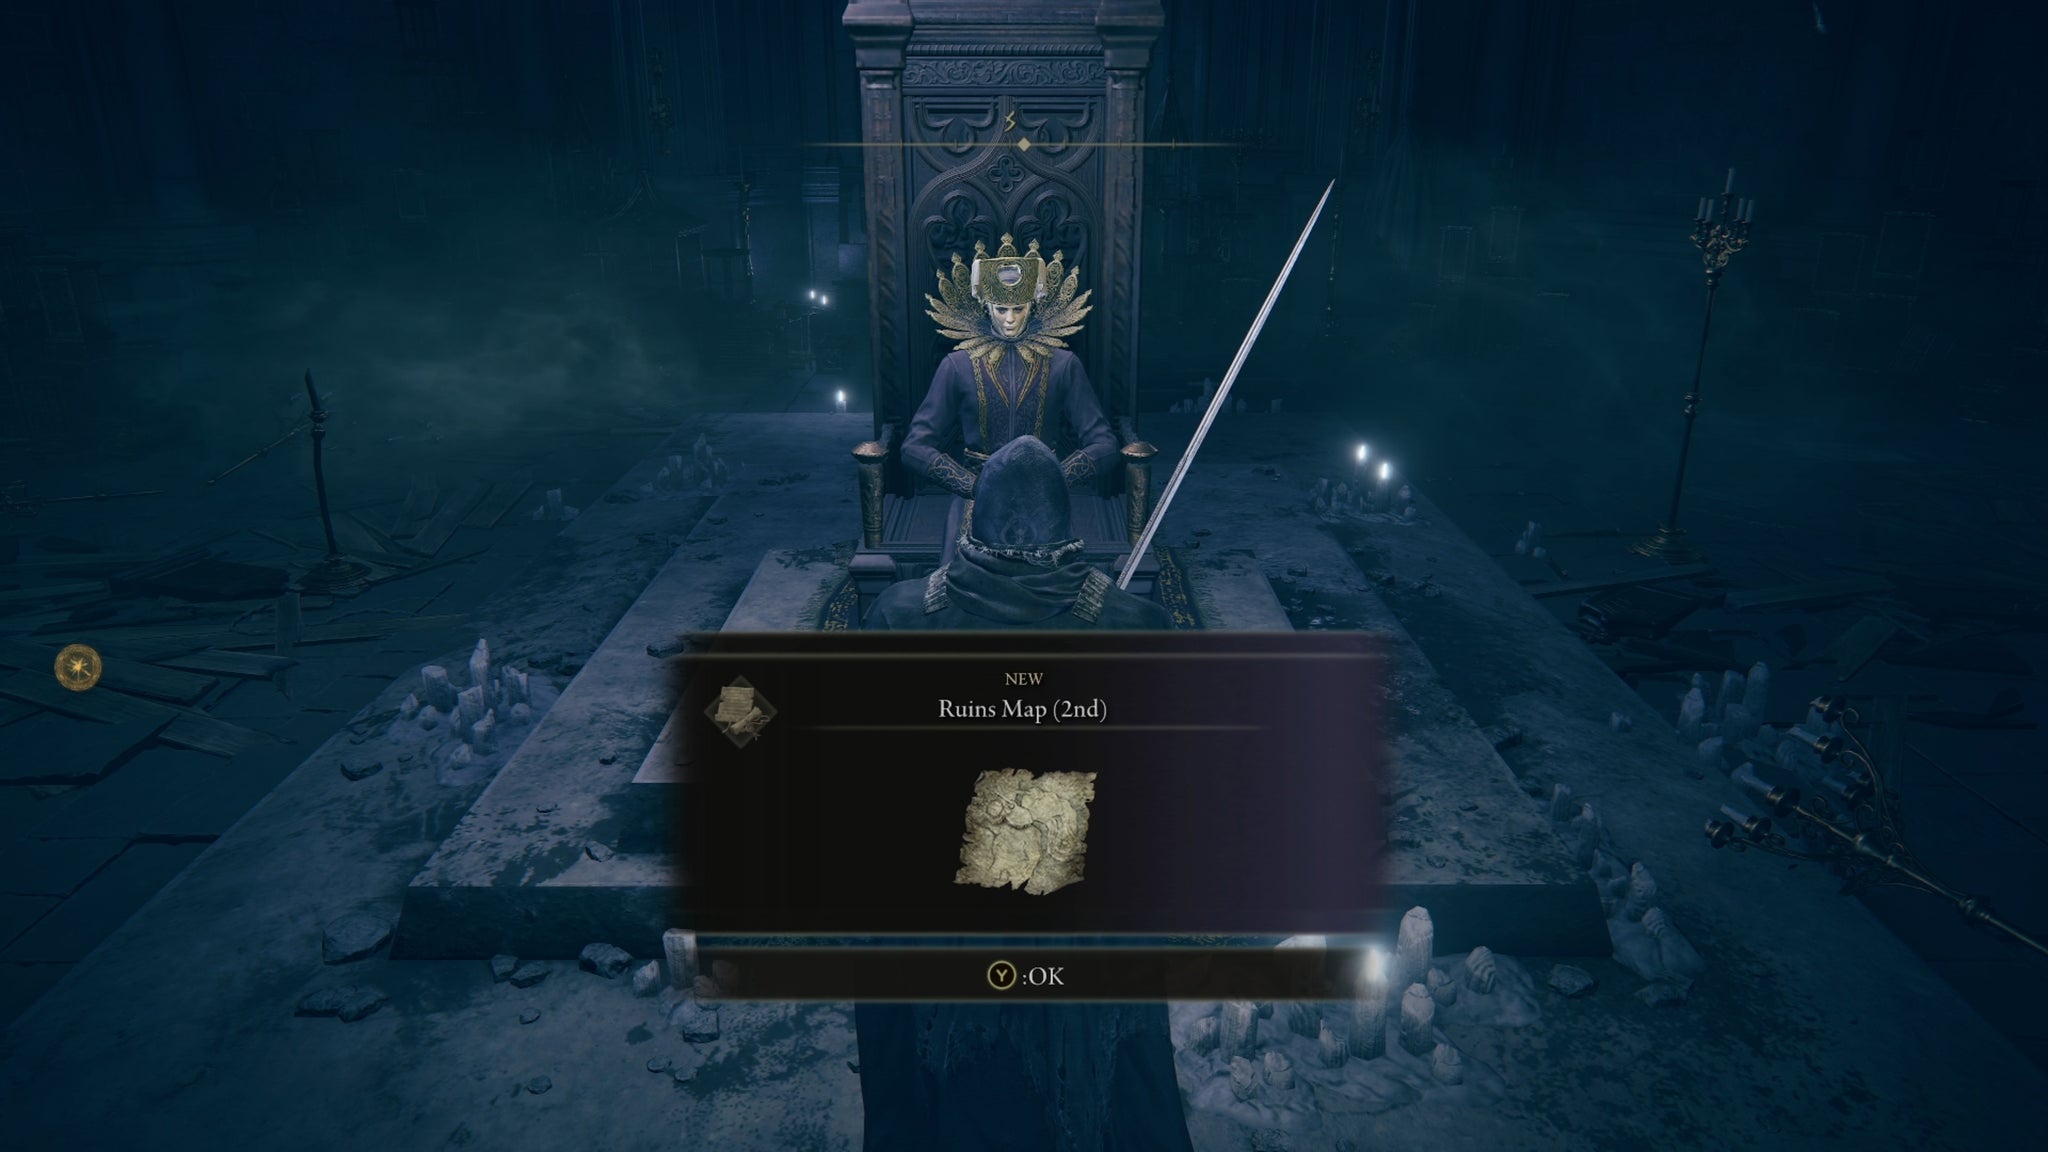
Receiving the first Ruins Map
Feel free to rest first at the Cathedral Of Manus Metyr Site Of Grace, and then go and speak to Count Ymir himself. He’ll welcome you and offer you two things right off the bat: a Hole-Laden Necklace , and a Ruins Map . You can view the Ruins Map in your inventory if you like; it crudely describes the location of the ruins to be the Finger Ruins Of Rhia, situated in the south between the Cerulean Coast and the Jagged Peak.
While you’re here you can speak to Ymir again and ask him about Glintstone Sorcery. You can read his dialogue below:
“I am a glintstone sorcerer. We study the stars, and examine the life therein. Are you familiar with our findings? Long ago, we began as stardust, born of a great rupture far across the skies. We, too, are children of the Greater Will. Is that not divine? Is that not sublime? …And yet, none can fathom its implications, its utter brilliance!”
You can also purchase a variety of Sorceries from Ymir at any point. He’ll have more Sorceries to offer in his shop once you complete the second Ruins Map.
Reload the area to get new dialogue
One more thing to do before you go off in search of the Ruins highlighted in Ymir’s map: reload the area, and enter the throne room again. You’ll hear Ymir say the following words as you approach:
“Oh my, you poor thing. Another bad dream, Yuri? Put that rotten thing out of your mind. That tangled mess can’t hurt you.”
As you approach, you’ll see that Ymir is cradling a little baby Fingercreeper. Fairly creepy. He has nothing new to say if you talk to him though; he evidently considers this perfectly ordinary behaviour.
Swordhand Of Night Jolán appears in Ymir’s throne room when you reload the area. |Image credit:Rock Paper Shotgun/Bandai Namco
Where is Jolán in Elden Ring?
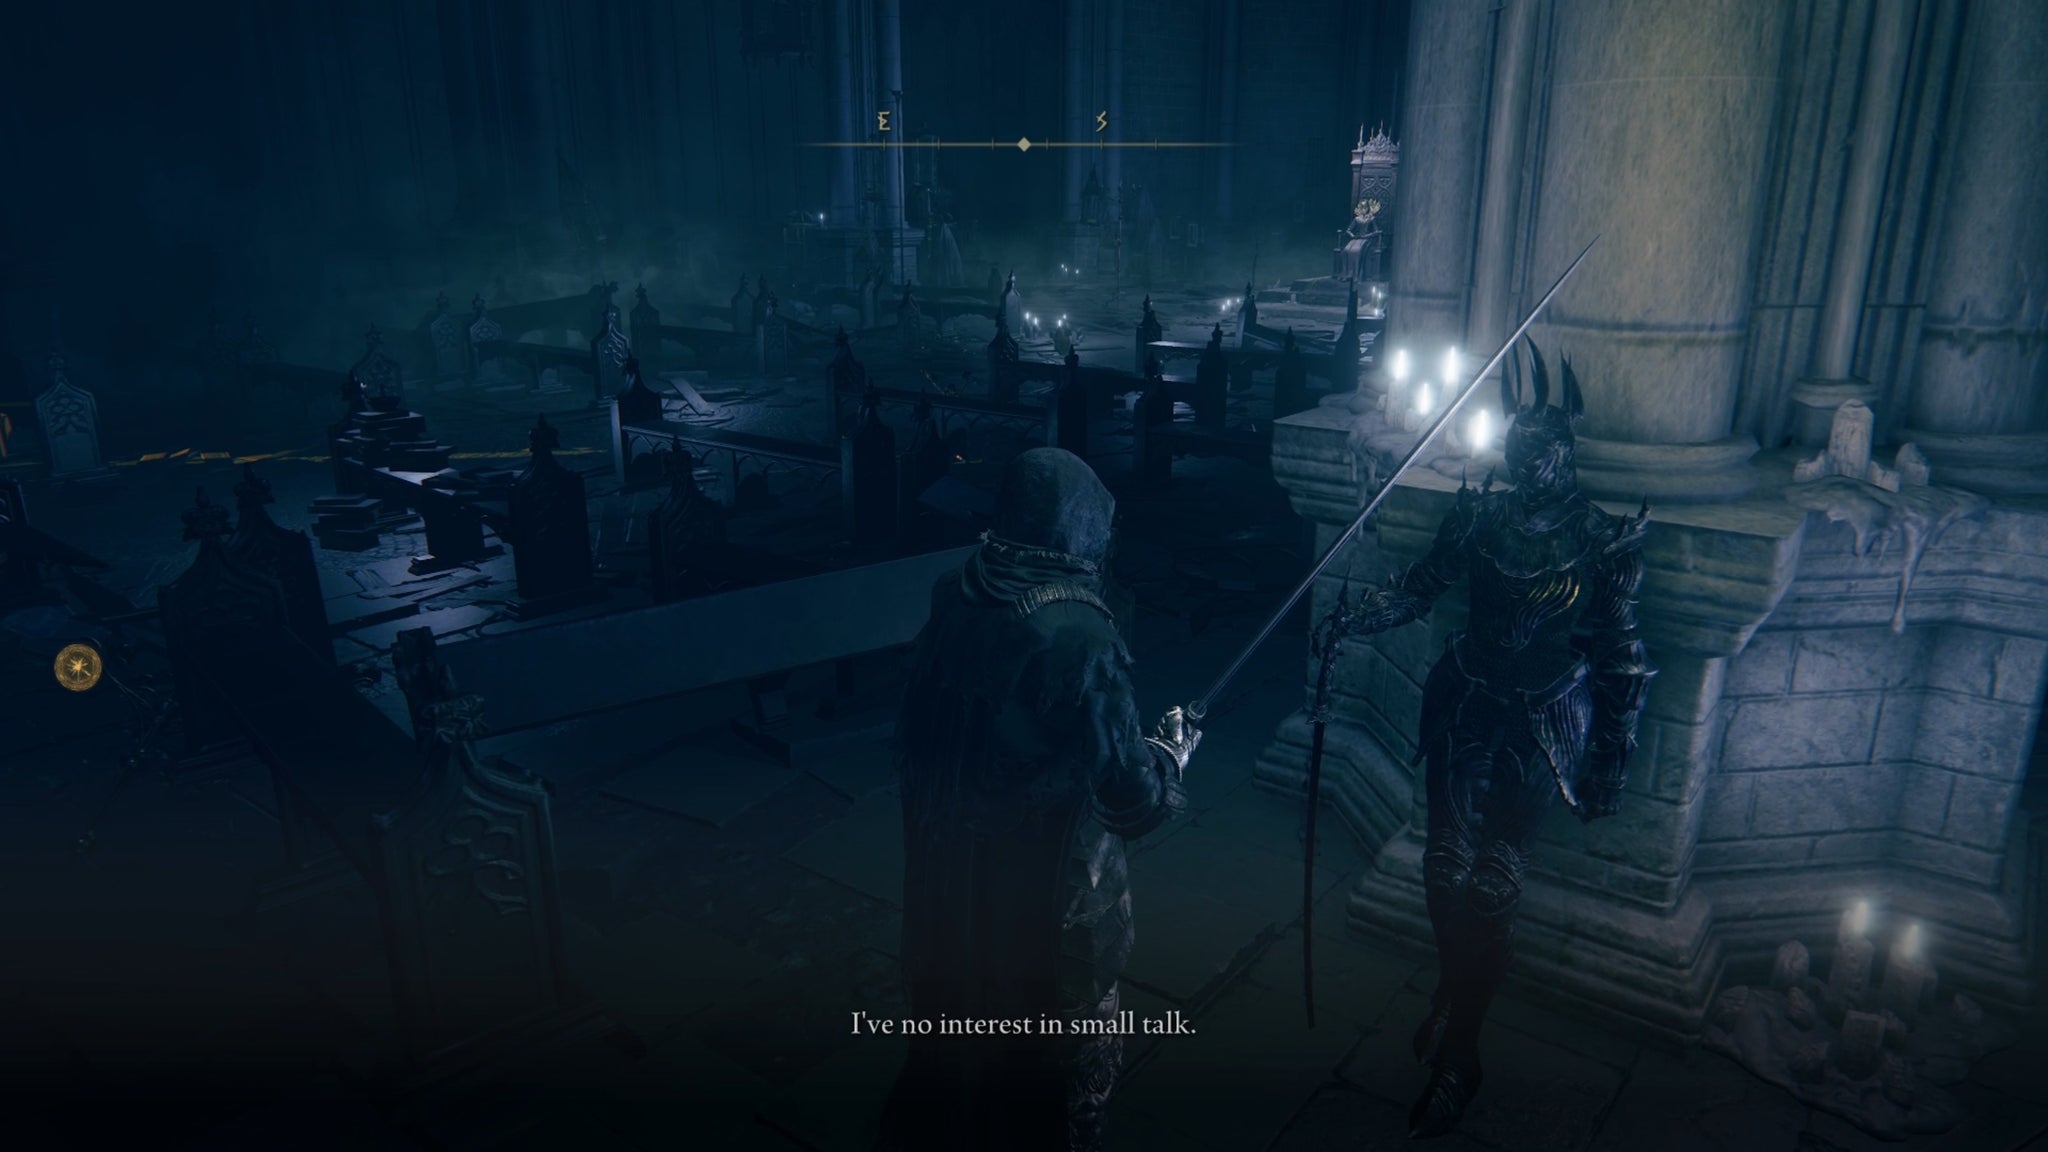
After speaking to Ymir, talk to the armoured knight who has newly appeared next to the righthand pillar as you enter the throne room. She won’t say much, but she will warn you not to cross Ymir.
Once you’ve spoken to her, you can talk to Ymir and mention that you met her. He’ll introduce her as Swordhand Of Night Jolán.
Ruins Map (1st) location

Follow this path to reach the Finger Ruins Of Rhia via the Cerulean Coast. |Image credit:Rock Paper Shotgun/Bandai Namco
Getting to the Finger Ruins Of Rhia
Now it’s time to head to the Ruin on Ymir’s map. To get there, head to the Cerulean Coast and proceed down to the sandy beach on the south coast. Head east along the beach, and you’ll see a massive slab of some ancient ruin sticking out of the ground at an angle.
Climb up this ruin and past it, down the path to the right. There you’ll find the Finger Ruins Of Rhia Site Of Grace.
Sound the Hanging Bell

There are three Finger Ruins in Shadow Of The Erdtree. To complete Ymir’s questline you must sound the Hanging Bell at all three of them. |Image credit:Rock Paper Shotgun/Bandai Namco
The next step in Ymir’s quest is to use that Hole-Laden Necklace Ymir gave you to sound the Hanging Bell at the end of the Finger Ruins. The place is crawling with Fingercreepers and Finger Sorcery-casting worms, so be careful not to draw too much attention at once. But otherwise, you should be able to reach the centre of the Finger Ruins without much difficulty.
In the centre of the circle of stone fingers, you’ll see one finger that’s hanging down towards you. Walk up and interact with it to sound the Hanging Bell. Doing so will award you with the Crimson Seed Talisman +1 .
Returning to the Cathedral
Return to Ymir and he will give you the second Ruins Map, which points to the far north. |Image credit:Rock Paper Shotgun/Bandai Namco
Speak to Ymir and Jolán again
Fast travel back to the Cathedral Of Manus Metyr, and speak with Ymir. He’ll be very pleased with you, and award you with a Beloved Stardust Talisman , and a second Ruins Map.
You can also optionally speak to Ymir again and pick the option, “Ask about the nature of the world.” Ymir’s dialogue follows:
“I fear that you have borne witness to the whole of it. The conceits - the hypocrisy - of the world built upon the Erdtree. The follies of men. Their bitter suffering. Is there no hope for redemption? The answer, sadly, is clear. There never was any hope. They were each of them defective. Unhinged, from the start. Marika herself. And the fingers that guided her. And this is what troubles me. No matter our efforts, if the roots are rotten… then we have little recourse.”
After that, you can choose “Ask about Miquella”:
“Ever-young Miquella saw things for what they were. He knew that his bloodline was tainted. His roots mired in madness. A tragedy if ever there was one. That he would feel compelled to renounce everything. When the blame… lay squarely with the mother.”
Beyond this interesting dialogue, you can speak to Jolán again, and this time she’ll be slightly more welcoming of you. Crucially, Jolán will now be an optional summon against Messmer when you face him within The Shadow Keep. This is in addition to Hornsent (depending if you assisted Leda or not against him).
Finger Ruins of Miyr location
Reload the area and interact with Ymir’s empty throne to reveal a ladder below the Cathedral. |Image credit:Rock Paper Shotgun/Bandai Namco
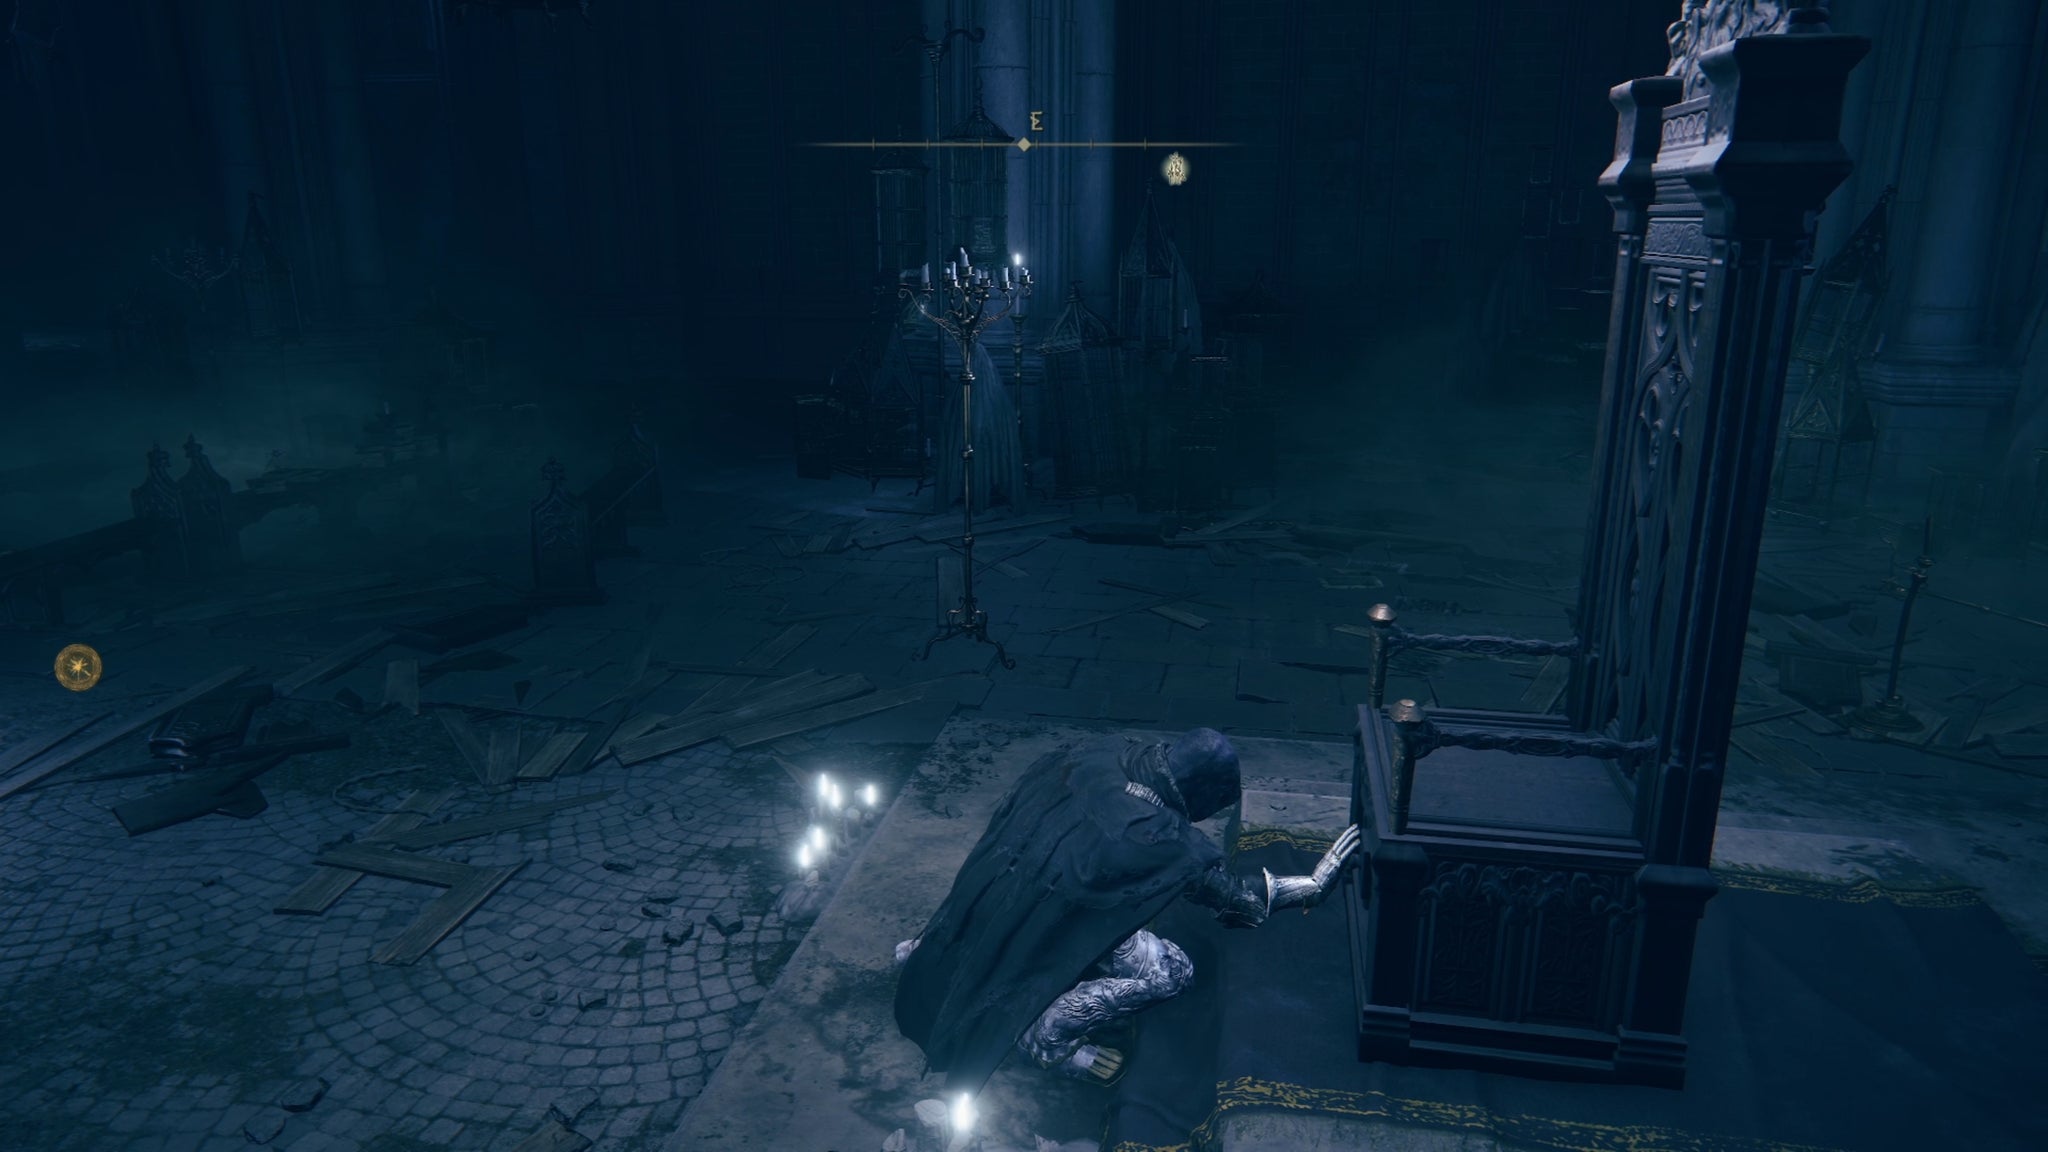
Reload and interact with the empty throne
Reload the area once you’ve finished chatting, and enter the throne room of the Cathedral again. This time, Ymir is nowhere to be seen (he’ll actually be outside in the graveyard, west of the throne). You can overhear him say:
Forgive me. I failed you. Failed to birth you whole. I was not ready to be your mother. But I can still stay here, nice and close. For now, my dear, sleep soundly…
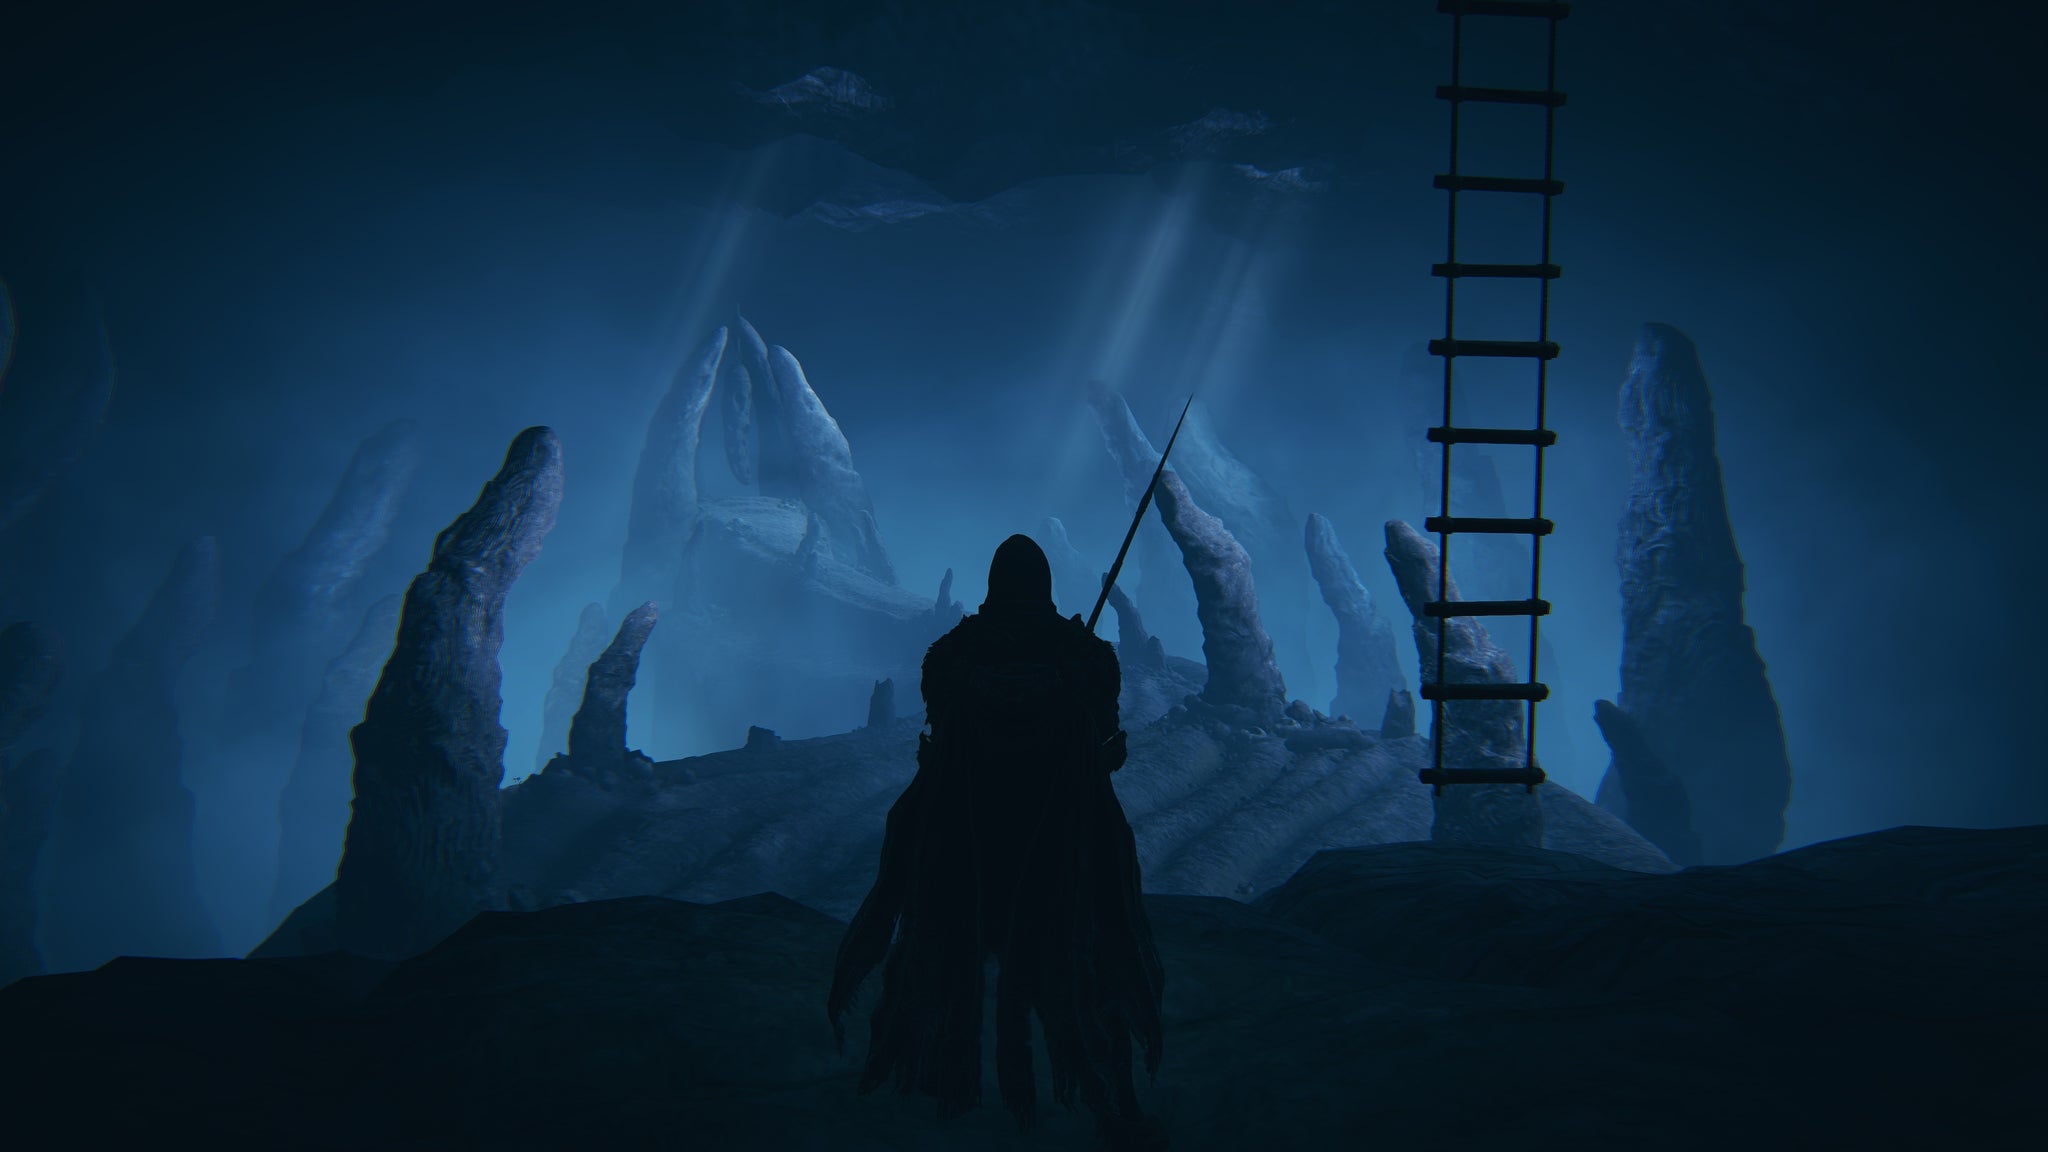
It seems that Yuri, the baby Fingercreeper we saw Ymir cradle earlier, has died. Upon interacting with Ymir he will ask to be left alone, leaving the throne room clear for a closer inspection. If you go to his throne you can interact with it.
Turns out, there’s a button at the base of the throne which, when pressed, will move the entire throne out of the way to reveal a ladder leading down below the Cathedral. Descend the ladder, and you’ll find yourself inside the hidden Finger Ruins Of Miyr .
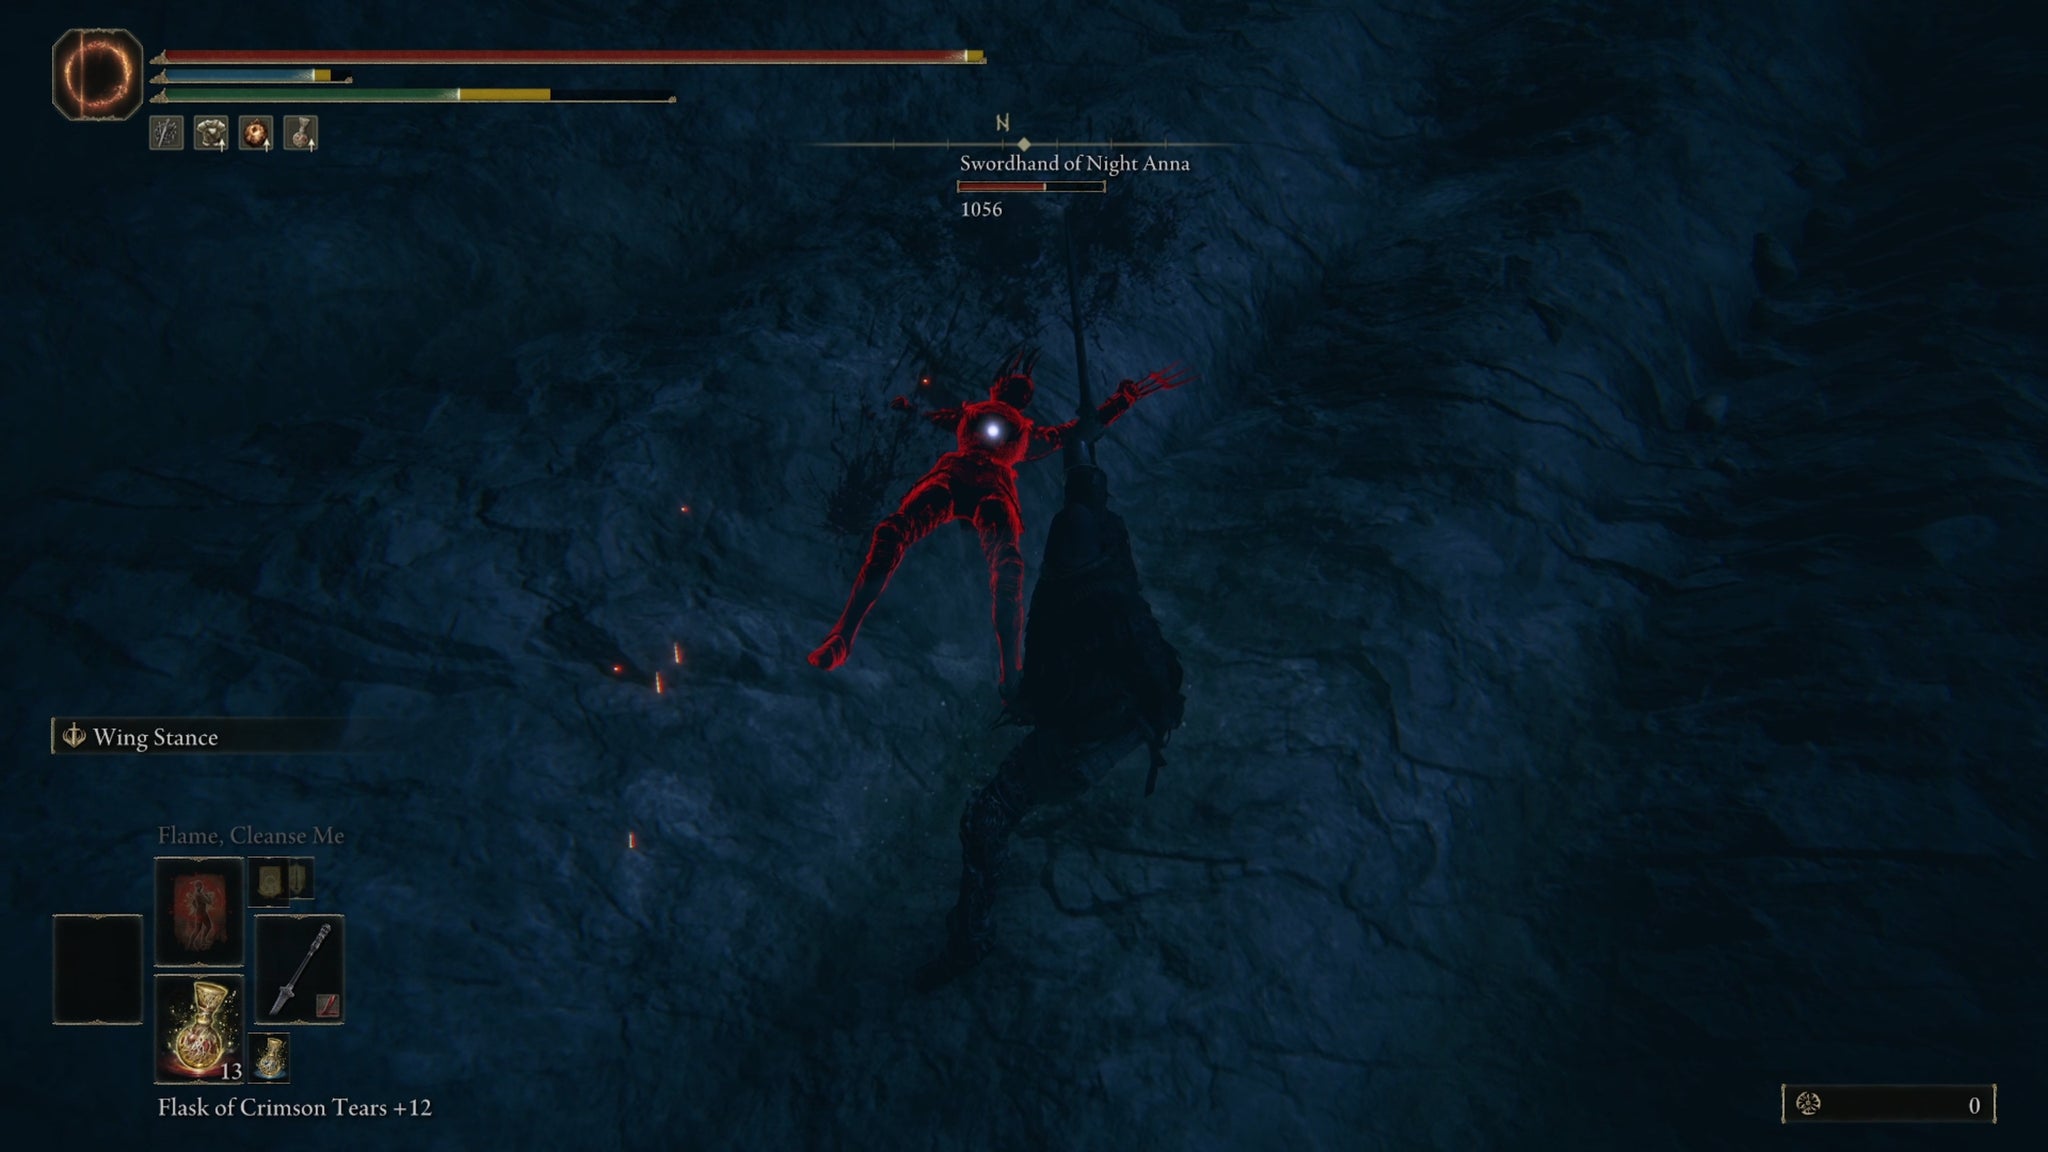
Swordhand Of Night Anna invades you as you walk down the path towards the Hanging Bell. |Image credit:Rock Paper Shotgun/Bandai Namco
Swordhand Of Night Anna
A short way along the linear path inside the Finger Ruins, you’ll be invaded by an NPC called Swordhand Of Night Anna. She wields a sword and a pair of claws which can stack bleed fairly quickly if you let them. But, like most NPCs in Elden Ring, she’s not too much of a threat.
Once you’ve dispatched Anna, you’ll obtain her Claws Of Night , and you can progress ahead and down to the left to receive the Finger-Weaver’s Cookbook [2] . Beyond that, there’s nothing else to do down here for now.
Reporting back to Jolán and Ymir
Reload the area and go speak to Jolán. Tell her about Anna, and she’ll thank you for bringing it to her attention but say little more on the matter.
Ymir is also back on his throne, so you can speak to him again. He’ll merely ask you to put aside what you saw down there. “The stars will reveal the truth, in time.”
Ruins Map (2nd) location

Follow this path to reach the Finger Ruins Of Dheo from the Shadow Keep Back Gate. |Image credit:Rock Paper Shotgun/Bandai Namco
Entering the Hinterlands
It will likely be much later in the game before you reach the next Finger Ruins in Ymir’s questline, because you first need to reach the Hinterlands in the top-right of the map, via the gigantic Shadow Keep legacy dungeon.
The entrance to the Hinterlands is found next to the Shadow Keep, Back Gate Site Of Grace. In the adjoining room is a statue of Marika. To enter the Hinterlands you must perform the “O Mother” Gesture in front of the statue. The “O Mother” Gesture can be found to the north of Bonny Village in Scadu Altus (travel through the village until you pass the large gulf separating the region, then turn north and interact with the headless corpse to obtain the gesture ).

To reach the second Finger Ruins beyond the Hinterlands, perform the O Mother Gesture in front of the Marika statue by the back entrance of the Shadow Keep. |Image credit:Rock Paper Shotgun/Bandai Namco
Additionally, to gain access to the Shadow Keep, Back Gate Site Of Grace and the upper loft areas of the keep, you must first drain the water in the Church District . We have a handy guide to the Church District but essentially, you must platform across the rooftops in this region and pull a lever to drain the water away. Doing so will reveal areas like the Tree-Worship Passage (where you can pick up an Iris of Grace, which you may need later in this questline) and the back sections of the Storehouse.
When all that’s done, you can head through the Hinterlands towards the second Finger Ruins.
The Finger Ruins Of Dheo
The second Finger Ruins are almost identical to the first, so you should know what you’re getting into this time. Again, lots of Fingercreepers and sorcery worms. Head straight to the centre and interact with the hanging finger to sound the Hanging Bell. This time, you’ll receive a Cerulean Seed Talisman +1 for your troubles.
Report back to Ymir and Jolán
Head back to the Cathedral and speak to Ymir. He’ll be very pleased with you once again for sounding the Hanging Bell at the second Ruins. He’ll give you a third and final Ruins Map as a result and will additionally have three new Glintstone Sorceries on offer in his shop. You can also optionally ask him once again about the nature of the world, to which he’ll respond:
“Do you recall what I said? That Marika, and the fingers that guided her, were unsound from the start. Well, the truth lies deeper still. It is their mother who is damaged and unhinged. The fingers are but unripe children. Victims in their own right. We all need a mother, do we not? A new mother, a true mother, who will not give birth to further malady.”
You can also speak to Jolán again, and she’ll open up slightly more than before, speaking about Ymir as a bright star “upon the black canvas of the night”.
Ruins Map (3rd) location
The third and final Finger Ruins and the ones you’ve already discovered beneath the Cathedral itself. |Image credit:Rock Paper Shotgun/Bandai Namco
Enter the Finger Ruins beneath the Cathedral again
If you take a look at the third and final Ruins Map that Ymir gave you, it’ll point towards a familiar location: the Cathedral Of Manus Metyr itself. Reload the area and you’ll find that once again Ymir is gone, allowing you to interact with the throne and descend once again into the hidden Finger Ruins Of Miyr.
Here, the Swordhand Of Night Anna will invade unless you have already defeated her earlier in the questline. Head to the end of the pathway and sound the Hanging Bell there. Make sure you’re geared up for a boss fight beforehand however, as you’ll be instantly teleported to a new Remembrance boss: Metyr, Mother Of Fingers.
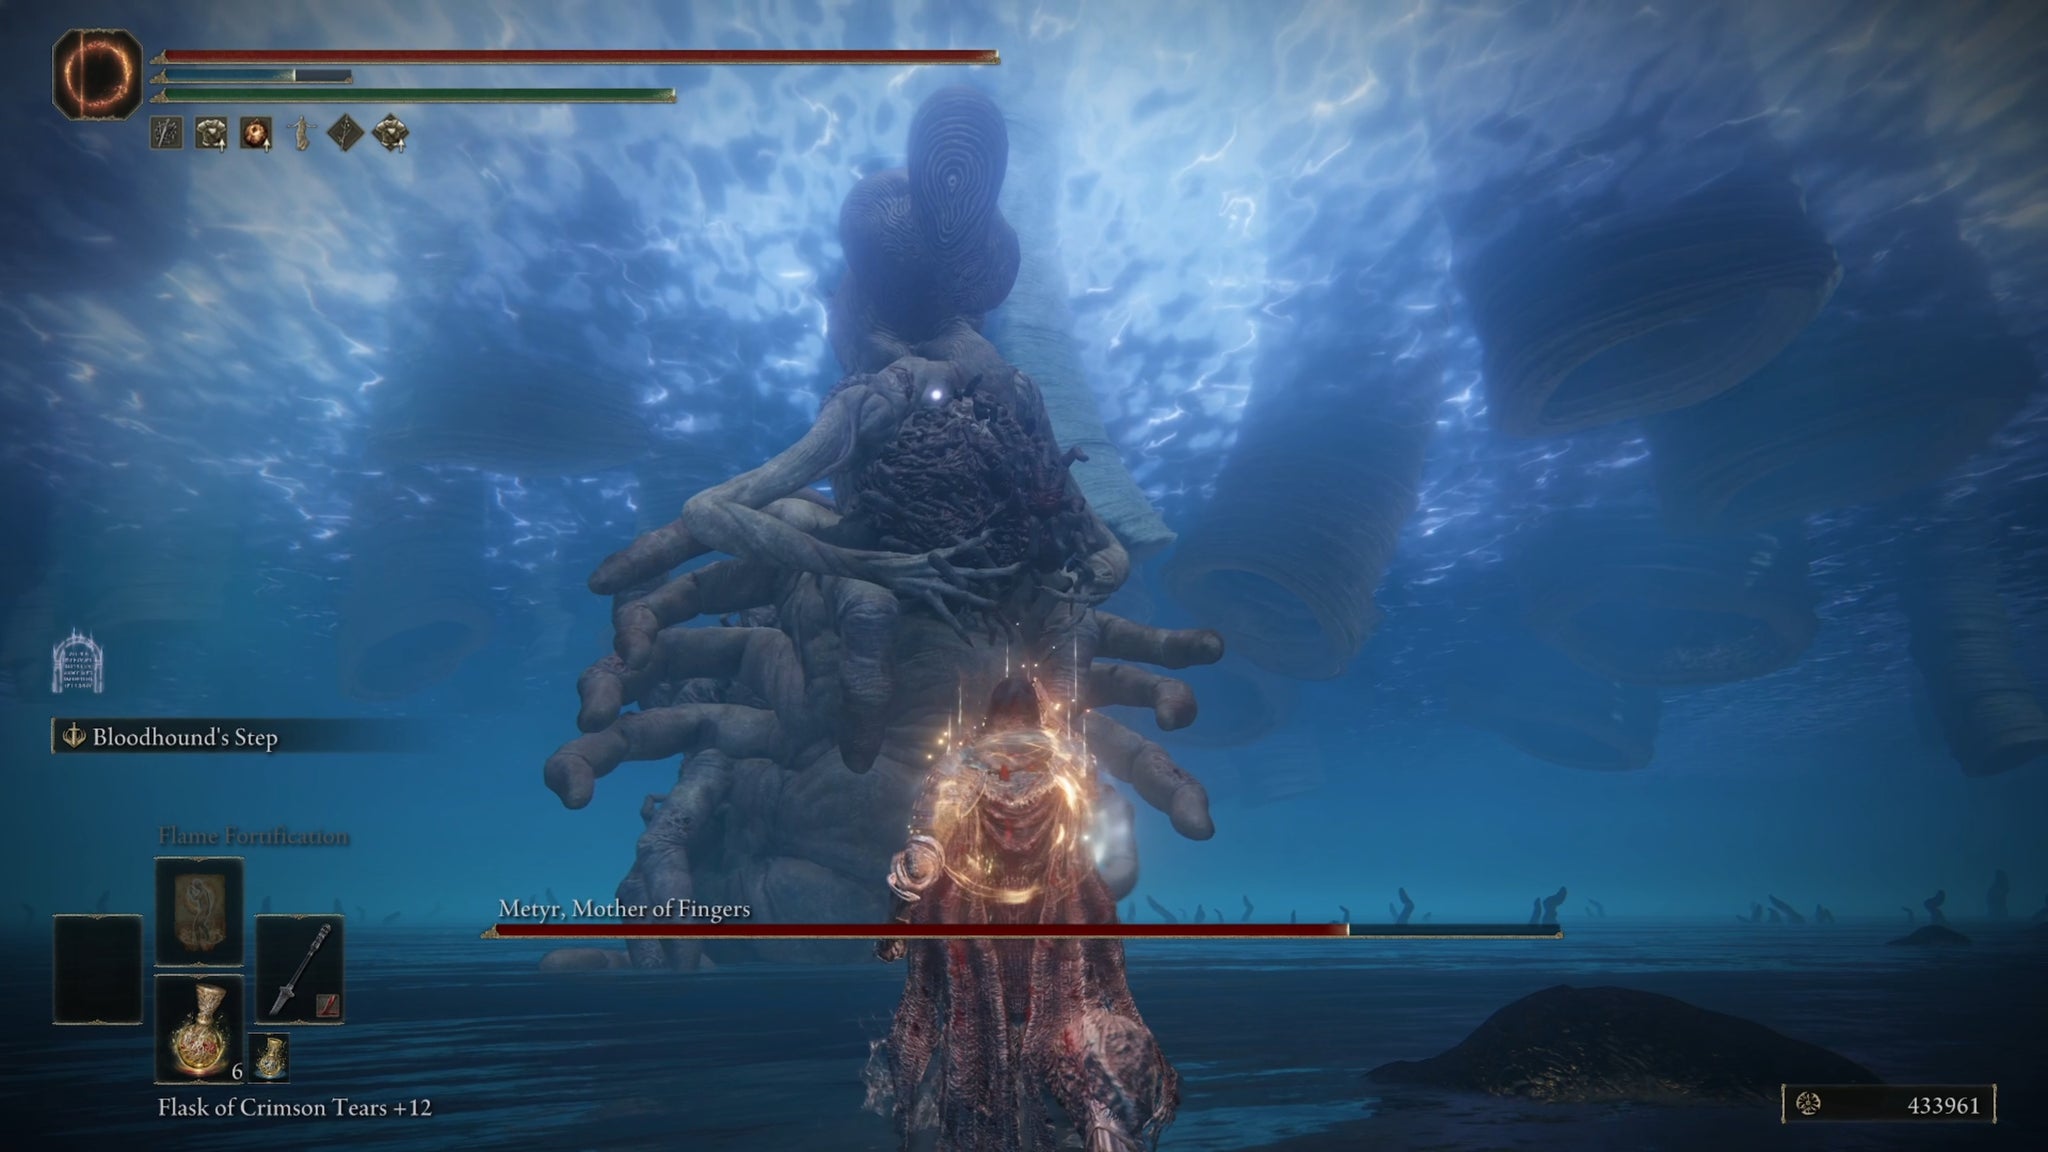
Sound the Hanging Bell to teleport to the boss arena of Metyr, Mother Of Fingers. |Image credit:Rock Paper Shotgun/Bandai Namco
Metyr, Mother Of Fingers
This horrifying abomination is Metyr, Mother Of Fingers, and will attack you as you approach. Strangely, however, it doesn’t pose an enormous threat by Shadow Of The Erdtree standards.
Metyr’s “face” can shoot out quite dangerous beams of finger Sorcery when you’re at a distance, so it’s best to stay up close and personal against this boss. The chest area beneath the face is a weak spot, and takes plenty of damage from slashing and piercing attacks. Expect to be knocked around a bit by its charges and lunges; back off and heal when it gives you a moment.
During her second stage, a black hole-like sphere will appear above her rear end, and she’ll start to use fairly powerful area-of-effect Sorceries to force you back. Try to look for an opening to get back to her chest and continue whaling away at her.
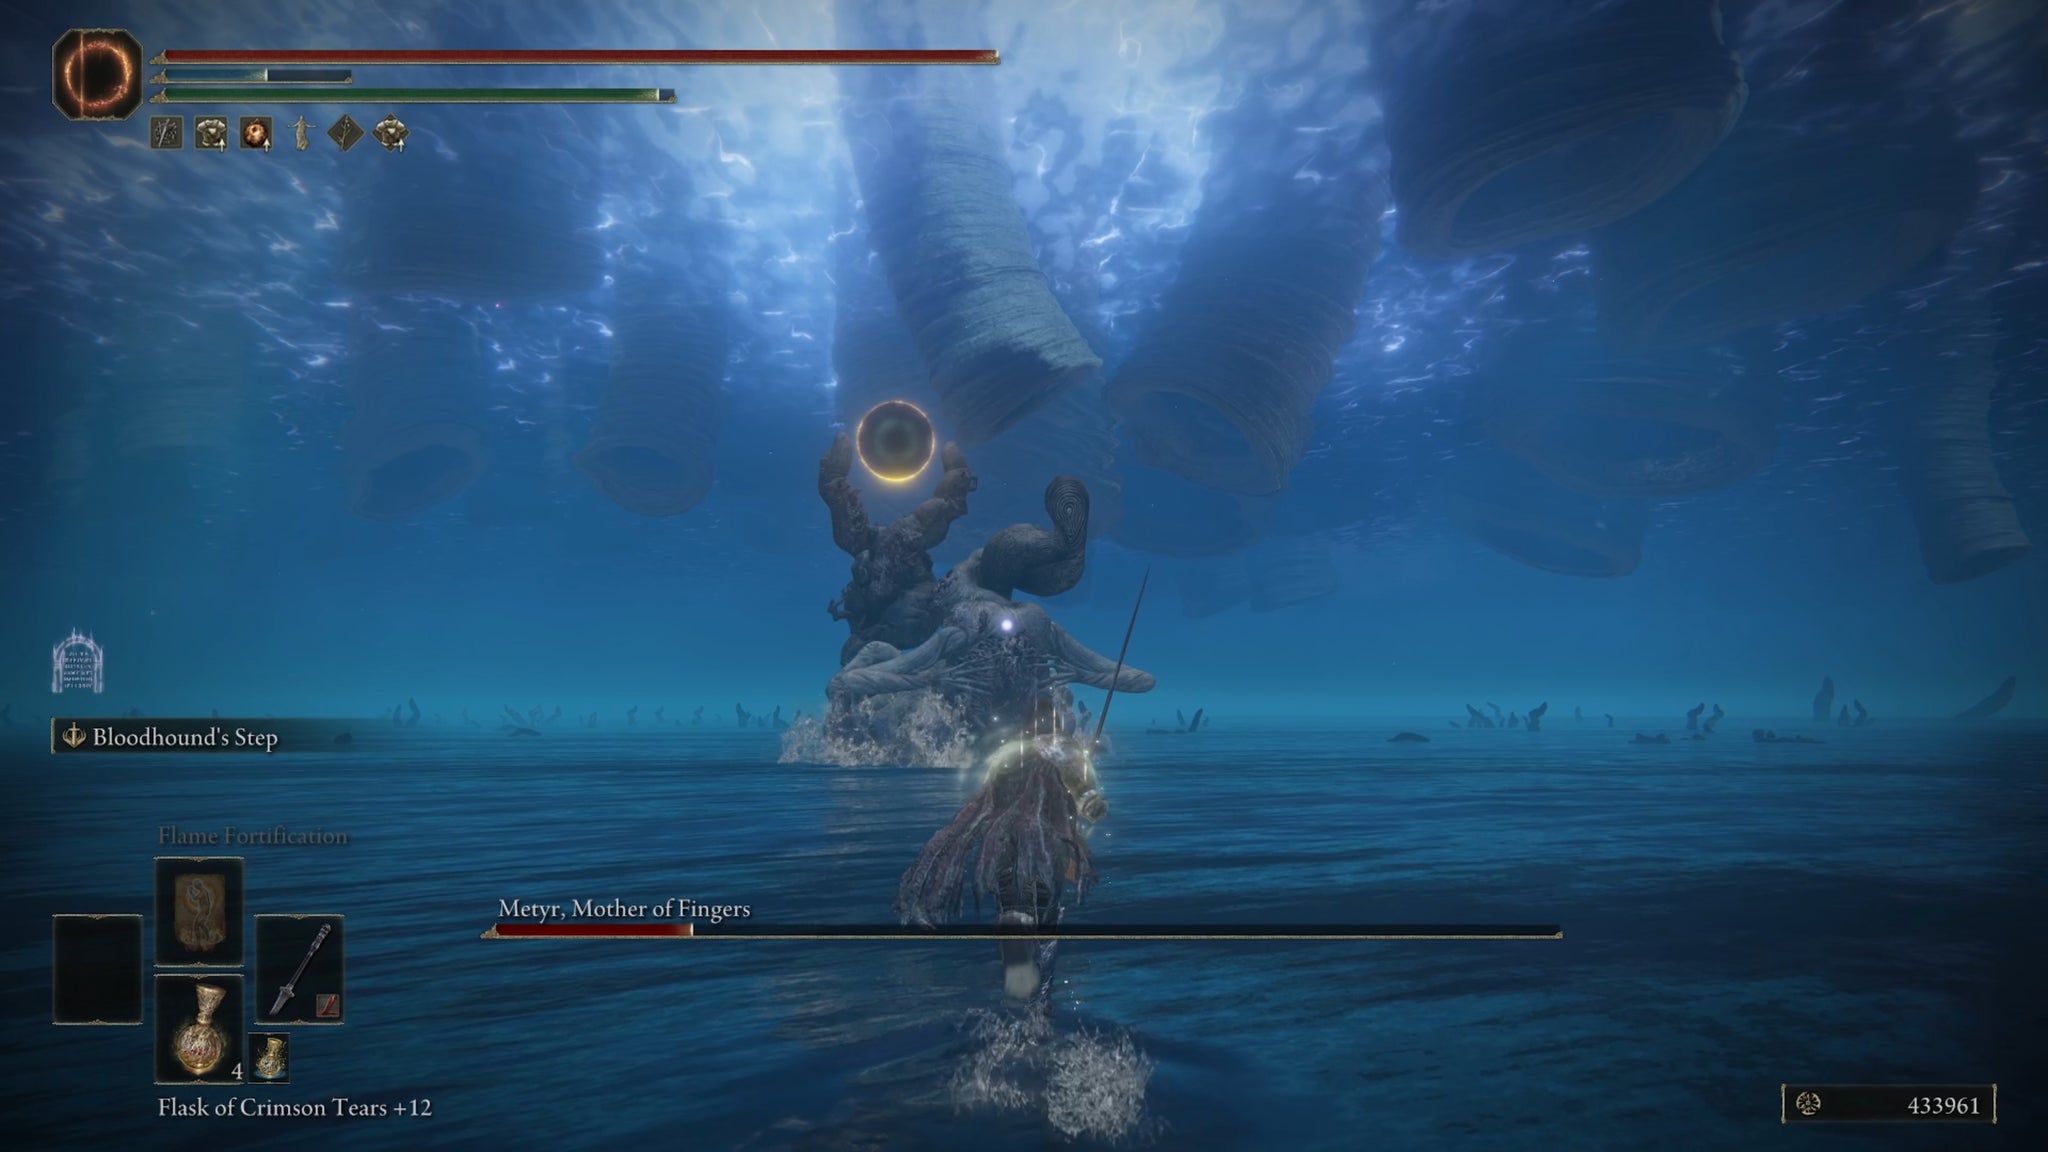
During Metyr’s second stage, watch out for the large area-of-effect attacks emanating from the black hole above her. |Image credit:Rock Paper Shotgun/Bandai Namco
Metyr also appears to be fairly susceptible to bleed, so using a weapon with a decent ability to combo together attacks will help here. I used Milady with a blood infusion, and beat Metyr first time.
Once Metyr is defeated, you’ll gain her Remembrance (as well as a whopping 420,000 Runes), and you’re free to return to the Cathedral via fast travel. Don’t bother spending any time exploring the Finger-Birthing Grounds apart from to rest at the Site Of Grace; there’s nothing to find down here.
Facing Jolán and Ymir

Once you return to the Cathedral, you will be invaded by Jolán, wielding her Sword Of Night. |Image credit:Rock Paper Shotgun/Bandai Namco
Defeat Swordhand Of Night Jolán
Upon returning to the Cathedral, you’ll find that the throne room is empty. Go up to the throne and interact with it, and you’ll be invaded by our old friend Jolán.
Jolán is a more potent Swordhand Of Night than her sister Anna; she wields a katana with a powerful unique skill reminiscent of Malenia ’s waterfowl dance, and while not nearly as deadly, it can still ruin your day.
Thankfully, she telegraphs this one formidable attack very obviously with a wing stance first, so you can back off to avoid the attack before whaling away at her in the manner of your choosing.

Once Jolán has been defeated, Ymir will enter the fray as the new Mother Of Fingers. |Image credit:Rock Paper Shotgun/Bandai Namco
Defeat Count Ymir, Mother Of Fingers
As Jolán falls, Count Ymir will appear next to his throne as the new wannabe Mother Of Fingers now that Metyr has been slain. He is capable of summoning Fingercreepers, and his other skills mostly revolve around sporadic teleportation and casting finger Sorceries which, thankfully, aren’t too difficult to dodge as long as you wait for the right moment.
Defeat Ymir, and you’ll receive his Bell Bearing for use at the Roundtable Hold , along with his High Priest armor set and the Maternal Staff . After that, reload the area and you will see a dying Jolán at her usual position by the pillar in the throne room.
Should you use Iris of Grace or Iris of Occultation?
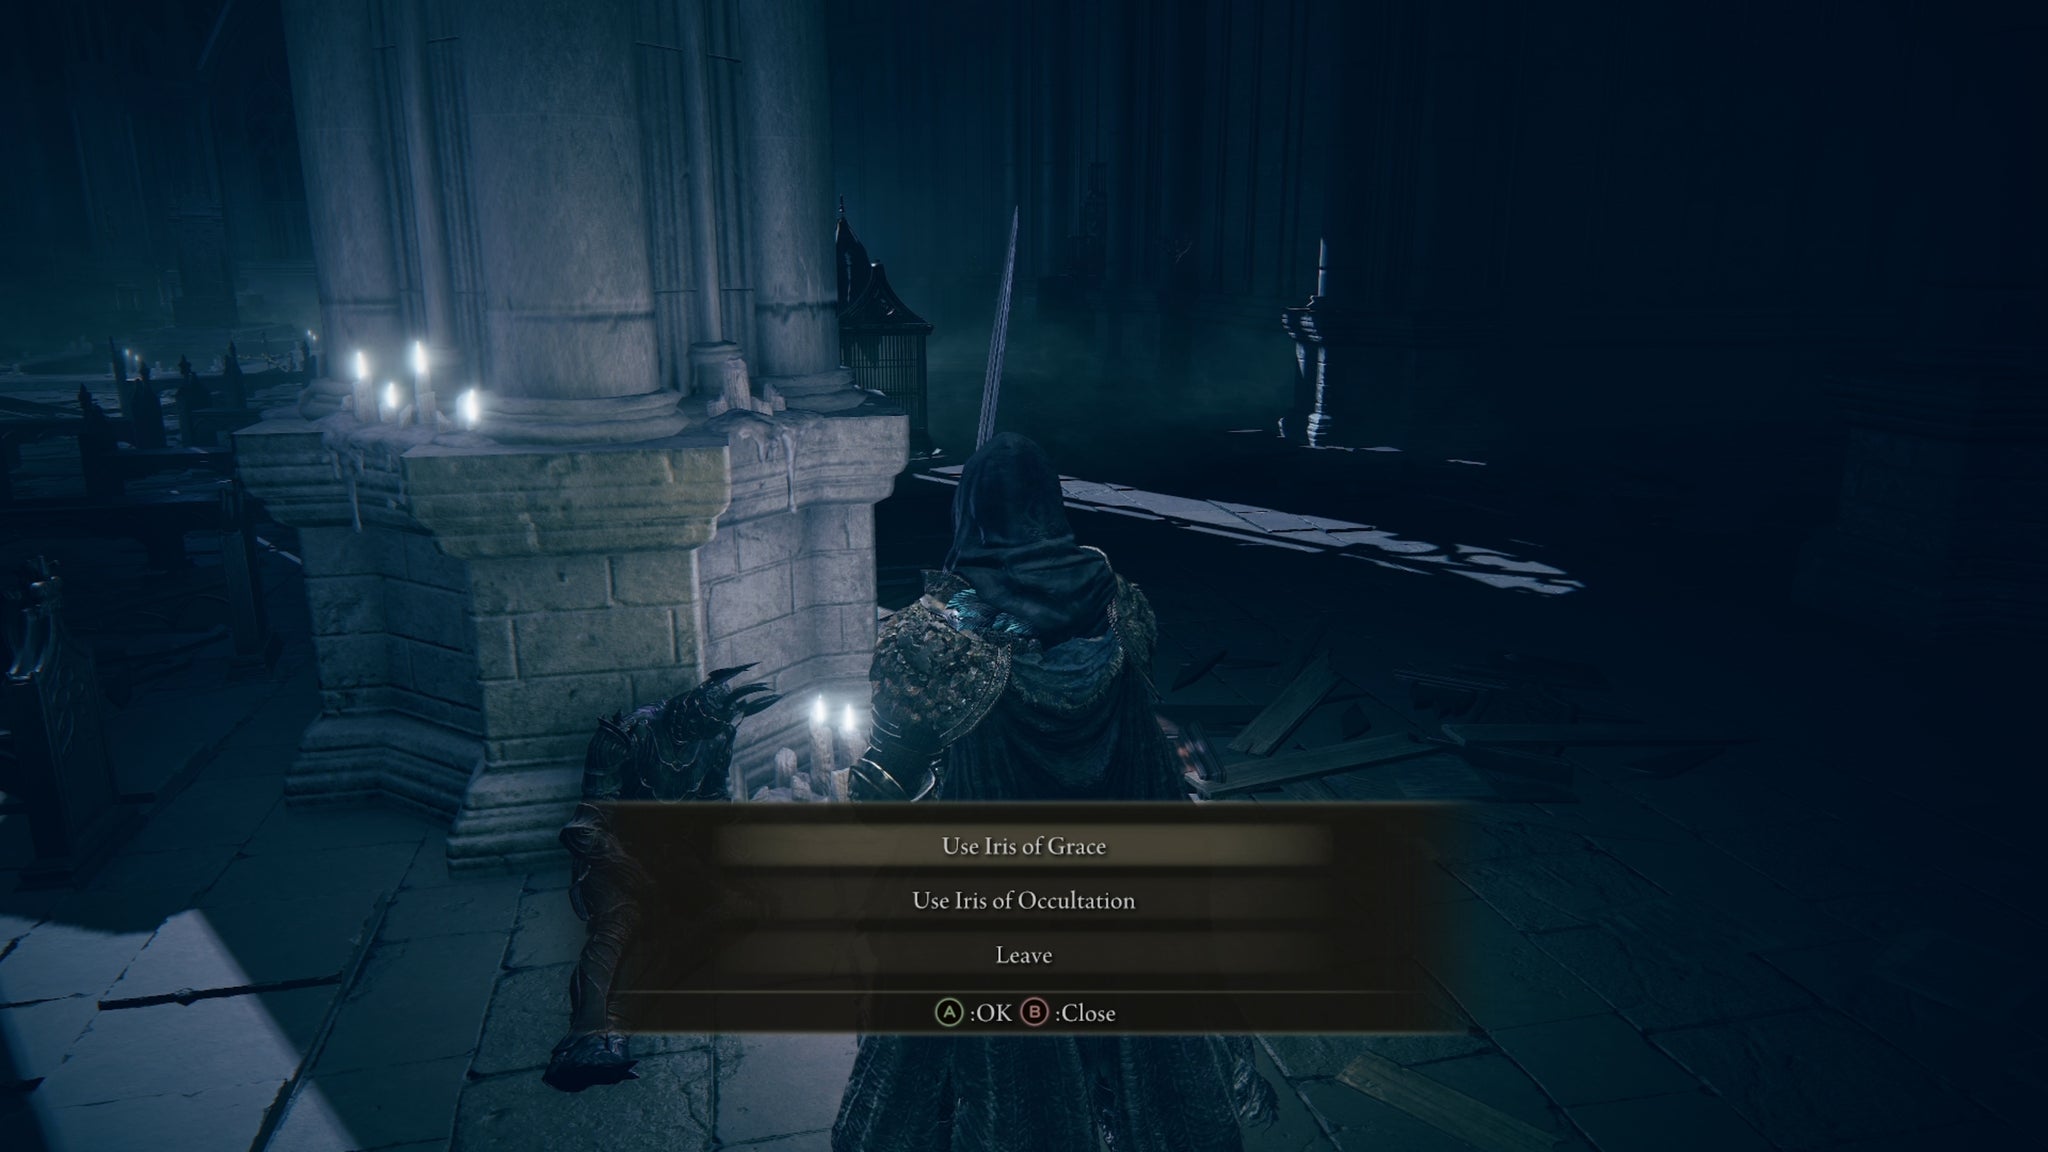
As Jolán lies dying by the pillar, you can choose to give her an Iris Of Grace or an Iris Of Occultation for different final quest rewards. |Image credit:Rock Paper Shotgun/Bandai Namco
Speak to Jolán on the floor, and she’ll call out to Ymir, saying that she can’t see the stars in the night sky. At this point, you have a choice: you can either use an Iris Of Grace on her, or use an Iris Of Occultation .
These two items can be used for multiple quests; the other is Fire Knight Queelign’s quest , who gives you the Prayer Room Key .
If you don’t have them, there are 2 Irises Of Occultation and 2 Irises of Grace in the DLC. You can get an Iris of Occultation as a drop from the Omenkiller underneath the Fort Of Reprimand or from the Ulcerated Tree Spirit in the Church District of The Shadow Keep (needs to be drained first). Meanwhile, you can find an Iris Of Grace inside the Jar-filled area at the bottom of the Specimen Storehouse in The Shadow Keep or within the Tree-Worship Passage (accessible via the Church District once it is drained).
If you use the Iris Of Grace
If you use the Iris Of Grace on Jolán, then you will receive the Swordhand Of Night Jolán Spirit Ash as Jolán fades away forever. As far as last words go, they’re not the most uplifting:
“Oh, it blinds… As if our Night simply never was…”
The Jolán Spirit Ash throws further light on her nebulous fate:
Though it was not by the shining star that she had longed for, thus was her Night illuminated. But this was an at times blinding light, and threatened to expunge the Night entirely.
If you choose this path, you can also receive the Jolán And Anna Spirit Ash in the next step.
If you use the Iris Of Occultation
If you use the Iris Of Occultation on Jolán, then you’ll receive the Sword Of Night, her unique Katana (and far better prize, in my humble opinion). Effectively, using the Iris Of Occultation will give her a more natural death, but one which ends with total blackness - an ending that feels more natural to a Swordhand of Night than blinding light:
“No light… Anywhere at all… This is the night I know. Our Night…”
Of the two rewards, the Sword of Night is a Katana with a C Dexterity scaling that requires 11 Strength and 20 Dexterity to wield. It has passive Bleed buildup (45) and cannot be infused with Ashes of War. Its Weapon Skill is called the Witching Hour Slash and allows the Tarnished to perform the same unblockable slash combos that Jolán has just inflicted on you. In comparison, the Swordhand Of Night Jolán Spirit Ash costs 86 FP to summon, allowing Jolán to aid you in battle and perform stance-damaging attacks on foes. This can then be combined into a more powerful Sprirt Ash with an additional summon if you follow the next steps in this guide.
If you want my opinion, you should use the Iris Of Occultation on Jolán . You get a better prize, and it also seems like a slightly morally better ending to Jolán’s character. But the choice, as always, is yours.
How to get the Jolán and Anna ashes
One optional extra to Count Ymir’s questline is to jump down onto the balcony at the very top of Rabbath’s Rise via the Hinterlands. Rabbath’s Rise is located quite close to the Cathedral Of Manus Metyr, but its topmost section is unreachable until you enter the Hinterlands.
From the first Hinterland Site Of Grace, travel southeast to the Shaman Village (this area will be flocked with wildflowers). Travel to the furthest edge of the village, past the buildings (southeast) to the spot that overlooks the cliff. You should be able to use Torrent to climb down onto the platform below. Continue towards a spectacular view of the Cathedral of Manus Metyr and descend to another platform. Continue northeast, climbing down the ledges until you come to the top of Rabbath’s Rise and a balcony below.

Jump from the Hinterlands down onto the top floor of Rabbath’s Rise in Scadu Altus, and you’ll come across a puppet of Anna. |Image credit:Rock Paper Shotgun/Bandai Namco
Drop down onto the balcony, and you’ll immediately see how this detour pertains to Ymir’s questline. Inside this level of the tower is a walkway, and on the walkway is a lifeless Puppet of Anna - the one who invaded you in the Finger Ruins Of Miyr beneath the Cathedral.
If you chose to use the Iris Of Grace on Jolán in order to obtain the Swordhand Of Night Jolán Spirit Ash, then you can now interact with the puppet of Anna to receive another Spirit Ash: " Jolán And Anna “. This Spirit Ash summons both Jolán and Anna at once, at the cost of 144 FP. The item description sheds further light on their sad lives:
“Ashen remains in which spirits yet dwell. Use to summon the spirits of Jolán and Anna. Spirits of two Swordhands of Night, one of them being possessed by Count Ymir’s doll Anna. Together, Jolán’s sword and Anna’s claws are as bottomless black, and penetrate the enemy’s guard. Jolán and Anna were born in a cold, dark gaol, where they were raised, deprived of light, to be Swordhands of Night. Thus were they cultivated to become the most terrifying masters of their blades, though the burden of the deed left their hearts frail and pliant.”
You cannot obtain the Jolán and Anna combined Spirit Ash if you chose to use the Iris Of Occultation on Jolán in the Cathedral. This reward is only possible if you used the Iris Of Grace.
Loot the Cherishing Fingers Sorcery from the Cathedral graveyard

Head to the graveyard in the Cathedral to loot the final reward for Ymir’s questline. |Image credit:Rock Paper Shotgun/Bandai Namco
One final step: now that Count Ymir is dead, head west through the exit right next to where Jolán always stood, and you’ll come out into a small graveyard. At one of the graves on the right-hand side you’ll see a new item. Loot it to obtain the Cherishing Fingers Sorcery that Ymir used in the fight against you.
You can also interact with the grave to examine it. When you do, you’ll see the words: “Yuri, beloved child. Taken before his time.” If you recall, Yuri was the baby Fingercreeper that Count Ymir was cradling the second time you spoke to him, way back at the beginning of his questline. Poor baby Fingercreeper.
Count Ymir questline rewards

You can get some very nifty rewards from fully completing Ymir’s quest. |Image credit:Rock Paper Shotgun/Bandai Namco
Count Ymir’s questline has among the most rewards for the player out of any of Shadow Of The Erdtree’s side quests. By the end, you will have received the following quest rewards:
- Crimson Seed Talisman +1: Boosts HP restoration from the Flask of Crimson Tears.
- Beloved Stardust Talisman: Shortens casting speed for Sorcery and Incantations by the utmost but increases potential damage taken.
- Cerulean Seed Talisman +1: Boosts FP restoration from the Flask of Cerulean Tears.
- Claws Of Night: Dexterity C scaling Claw weapon that has passive Blood buildup of 45.
- Remembrance Of The Mother Of Fingers: With this you can choose between the Staff of the Great Beyond or the Gazing Finger.
- Ymir’s Bell Bearing: Can be given to the Twin Maiden Husks at the Roundtable Hold.
- Maternal Staff: Staff that boosts Finger Sorceries by 15%. Arcane Scaling C.
- High Priest Hat: Increases Intelligence and Arcane by 1.
- High Priest Robe: Light armor that excels in Magic, Fire, Lightning and Holy damage negation.
- High Priest Undergarments: Leg armor worth 1,000 Runes.
- High Priest Gloves: Gauntlets worth 1,000 Runes.
- Sword Of Night (Choice): Katana with Dexterity Scaling C and the Witching Hour Slash Weapon Skill.
- Swordhand Of Night Jolán Spirit Ash (Choice): Costs 86 FP.
- Jolán And Anna Spirit Ash (Choice): Costs 144 FP.
- Cherishing Fingers Sorcery: Costs 20 FP to summon an AOE of fingers.
- 630,000 Runes: From defeating both Ymir and Metyr, Mother of Fingers.
In addition, you’ll have gained the ability to purchase from Ymir (or from the Twin Maiden Husks using Ymir’s Bell Bearing) a variety of Finger Sorceries which were added to Elden Ring with the Shadow Of The Erdtree DLC. Overall, a questline well worth seeing through to the very end!
Count Ymir questline explained
Count Ymir’s intentions aren’t exactly the most honourable. |Image credit:Rock Paper Shotgun/Bandai Namco
So, what was Count Ymir’s questline really all about, now that you’ve finished it? Clearly, Ymir was set against Marika, the Erdtree, the Golden Order, all of it. Deep beneath the Land Of Shadow, he had discovered (or at least knew of) Metyr, Mother Of Fingers - the very first Finger creature ever sent down by the Greater Will. A being possibly as old as the Elden Beast itself, or even older.
And Ymir was not impressed with the “tangled mess” that was the Mother Of Fingers. He saw it more or less as the cause of all the suffering that the Golden Order brought (particularly within the Land Of Shadow). He said it plainly with his words: “Marika, and the fingers that guided her, were unsound from the start”, but in truth “it is their mother who is damaged and unhinged.”
So, ever-ambitious Ymir resolved to become the new Mother Of Fingers. To this end, he employed the Tarnished - that’s you - to sound the bells in the various Finger Ruins in order to reach Metyr, Mother Of Fingers and slay it once and for all. With that done, Ymir uses his Swordhands Of Night to attempt to slay you, and when they fail, he himself tries (and fails) to finish the job as the new (short-lived) Mother Of Fingers.
That brings Ymir’s full questline in Elden Ring to a close. If you’re looking to finish other notable Shadow Of The Erdtree quests, check out our similar walkthrough on the Thiollier questline . We’ve also got guides for the Leda questline and Moore questline . Alternatively, check out our guides on the best weapons and best builds in Elden Ring, along with our primer on the 8 new weapon types in Shadow Of The Erdtree .
Elden Ring
PS4 , PS5 , Xbox One , Xbox Series X/S , PC
Rock Paper Shotgun is better when you sign in
Sign in and join us on our journey to discover strange and compelling PC games.

All 75 Arc Raiders Blueprints and where to get them
These areas have the highest chance of giving you Blueprints

Image credit:Rock Paper Shotgun/Embark Studios
Looking for more Arc Raiders Blueprints? It’s a special day when you find a Blueprint, as they’re among the most valuable items in Arc Raiders. If you find a Blueprint that you haven’t already found, then you must make sure you hold onto it at all costs, because Blueprints are the key to one of the most important and powerful systems of meta-progression in the game.
This guide aims to be the very best guide on Blueprints you can find, starting with a primer on what exactly they are and how they work in Arc Raiders, before delving into exactly where to get Blueprints and the very best farming spots for you to take in your search.
We’ll also go over how to get Blueprints from other unlikely activities, such as destroying Surveyors and completing specific quests. And you’ll also find the full list of all 75 Blueprints in Arc Raiders on this page (including the newest Blueprints added with the Cold Snap update , such as the Deadline Blueprint and Firework Box Blueprint), giving you all the information you need to expand your own crafting repertoire.
In this guide:
- What are Blueprints in Arc Raiders?
- Full Blueprint list: All crafting recipes
- Where to find Blueprints in Arc Raiders Blueprints obtained from quests Blueprints obtained from Trials Best Blueprint farming locations

What are Blueprints in Arc Raiders?
Blueprints in Arc Raiders are special items which, if you manage to extract with them, you can expend to permanently unlock a new crafting recipe in your Workshop. If you manage to extract from a raid with an Anvil Blueprint, for example, you can unlock the ability to craft your very own Anvil Pistol, as many times as you like (as long as you have the crafting materials).
To use a Blueprint, simply open your Inventory while in the lobby, then right-click on the Blueprint and click “Learn And Consume” . This will permanently unlock the recipe for that item in your Workshop. As of the Stella Montis update, there are allegedly 75 different Blueprints to unlock - although only 68 are confirmed to be in the game so far. You can see all the Blueprints you’ve found and unlocked by going to the Workshop menu, and hitting “R” to bring up the Blueprint screen.
It’s possible to find duplicates of past Blueprints you’ve already unlocked. If you find these, then you can either sell them, or - if you like to play with friends - you can take it into a match and gift it to your friend so they can unlock that recipe for themselves. Another option is to keep hold of them until the time comes to donate them to the Expedition.
Full Blueprint list: All crafting recipes
Below is the full list of all the Blueprints that are currently available to find in Arc Raiders, and the crafting recipe required for each item:
| Blueprint | Type | Recipe | Crafted At |
|---|---|---|---|
| Bettina | Weapon | 3x Advanced Mechanical Components 3x Heavy Gun Parts 3x Canister | Gunsmith 3 |
| Blue Light Stick | Quick Use | 3x Chemicals | Utility Station 1 |
| Aphelion | Weapon | 3x Magnetic Accelerator 3x Complex Gun Parts 1x Matriarch Reactor | Gunsmith 3 |
| Combat Mk. 3 (Flanking) | Augment | 2x Advanced Electrical Components 3x Processor | Gear Bench 3 |
| Combat Mk. 3 (Aggressive) | Augment | 2x Advanced Electrical Components 3x Processor | Gear Bench 3 |
| Complex Gun Parts | Material | 2x Light Gun Parts 2x Medium Gun Parts 2x Heavy Gun Parts | Refiner 3 |
| Fireworks Box | Quick Use | 1x Explosive Compound 3x Pop Trigger | Explosives Station 2 |
| Gas Mine | Mine | 4x Chemicals 2x Rubber Parts | Explosives Station 1 |
| Green Light Stick | Quick Use | 3x Chemicals | Utility Station 1 |
| Pulse Mine | Mine | 1x Crude Explosives 1x Wires | Explosives Station 1 |
| Seeker Grenade | Grenade | 1x Crude Explosives 2x ARC Alloy | Explosives Station 1 |
| Looting Mk. 3 (Survivor) | Augment | 2x Advanced Electrical Components 3x Processor | Gear Bench 3 |
| Angled Grip II | Mod | 2x Mechanical Components 3x Duct Tape | Gunsmith 2 |
| Angled Grip III | Mod | 2x Mod Components 5x Duct Tape | Gunsmith 3 |
| Hullcracker | Weapon | 1x Magnetic Accelerator 3x Heavy Gun Parts 1x Exodus Modules | Gunsmith 3 |
| Launcher Ammo | Ammo | 5x Metal Parts 1x Crude Explosives | Workbench 1 |
| Anvil | Weapon | 5x Mechanical Components 5x Simple Gun Parts | Gunsmith 2 |
| Anvil Splitter | Mod | 2x Mod Components 3x Processor | Gunsmith 3 |
| ??? | ??? | ??? | ??? |
| Barricade Kit | Quick Use | 1x Mechanical Components | Utility Station 2 |
| Blaze Grenade | Grenade | 1x Explosive Compound 2x Oil | Explosives Station 3 |
| Bobcat | Weapon | 3x Advanced Mechanical Components 3x Light Gun Parts | Gunsmith 3 |
| Osprey | Weapon | 2x Advanced Mechanical Components 3x Medium Gun Parts 7x Wires | Gunsmith 3 |
| Burletta | Weapon | 3x Mechanical Components 3x Simple Gun Parts | Gunsmith 1 |
| Compensator II | Mod | 2x Mechanical Components 4x Wires | Gunsmith 2 |
| Compensator III | Mod | 2x Mod Components 8x Wires | Gunsmith 3 |
| Defibrillator | Quick Use | 9x Plastic Parts 1x Moss | Medical Lab 2 |
| ??? | ??? | ??? | ??? |
| Equalizer | Weapon | 3x Magnetic Accelerator 3x Complex Gun Parts 1x Queen Reactor | Gunsmith 3 |
| Extended Barrel | Mod | 2x Mod Components 8x Wires | Gunsmith 3 |
| Extended Light Mag II | Mod | 2x Mechanical Components 3x Steel Spring | Gunsmith 2 |
| Extended Light Mag III | Mod | 2x Mod Components 5x Steel Spring | Gunsmith 3 |
| Extended Medium Mag II | Mod | 2x Mechanical Components 3x Steel Spring | Gunsmith 2 |
| Extended Medium Mag III | Mod | 2x Mod Components 5x Steel Spring | Gunsmith 3 |
| Extended Shotgun Mag II | Mod | 2x Mechanical Components 3x Steel Spring | Gunsmith 2 |
| Extended Shotgun Mag III | Mod | 2x Mod Components 5x Steel Spring | Gunsmith 3 |
| Remote Raider Flare | Quick Use | 2x Chemicals 4x Rubber Parts | Utility Station 1 |
| Heavy Gun Parts | Material | 4x Simple Gun Parts | Refiner 2 |
| Venator | Weapon | 2x Advanced Mechanical Components 3x Medium Gun Parts 5x Magnet | Gunsmith 3 |
| Il Toro | Weapon | 5x Mechanical Components 6x Simple Gun Parts | Gunsmith 1 |
| Jolt Mine | Mine | 1x Electrical Components 1x Battery | Explosives Station 2 |
| Explosive Mine | Mine | 1x Explosive Compound 1x Sensors | Explosives Station 3 |
| Jupiter | Weapon | 3x Magnetic Accelerator 3x Complex Gun Parts 1x Queen Reactor | Gunsmith 3 |
| Light Gun Parts | Material | 4x Simple Gun Parts | Refiner 2 |
| Lightweight Stock | Mod | 2x Mod Components 5x Duct Tape | Gunsmith 3 |
| Lure Grenade | Grenade | 1x Speaker Component 1x Electrical Components | Utility Station 2 |
| Medium Gun Parts | Material | 4x Simple Gun Parts | Refiner 2 |
| Torrente | Weapon | 2x Advanced Mechanical Components 3x Medium Gun Parts 6x Steel Spring | Gunsmith 3 |
| Muzzle Brake II | Mod | 2x Mechanical Components 4x Wires | Gunsmith 2 |
| Muzzle Brake III | Mod | 2x Mod Components 8x Wires | Gunsmith 3 |
| Padded Stock | Mod | 2x Mod Components 5x Duct Tape | Gunsmith 3 |
| Shotgun Choke II | Mod | 2x Mechanical Components 4x Wires | Gunsmith 2 |
| Shotgun Choke III | Mod | 2x Mod Components 8x Wires | Gunsmith 3 |
| Shotgun Silencer | Mod | 2x Mod Components 8x Wires | Gunsmith 3 |
| Showstopper | Grenade | 1x Advanced Electrical Components 1x Voltage Converter | Explosives Station 3 |
| Silencer I | Mod | 2x Mechanical Components 4x Wires | Gunsmith 2 |
| Silencer II | Mod | 2x Mod Components 8x Wires | Gunsmith 3 |
| Snap Hook | Quick Use | 2x Power Rod 3x Rope 1x Exodus Modules | Utility Station 3 |
| Stable Stock II | Mod | 2x Mechanical Components 3x Duct Tape | Gunsmith 2 |
| Stable Stock III | Mod | 2x Mod Components 5x Duct Tape | Gunsmith 3 |
| Tagging Grenade | Grenade | 1x Electrical Components 1x Sensors | Utility Station 3 |
| Tempest | Weapon | 3x Advanced Mechanical Components 3x Medium Gun Parts 3x Canister | Gunsmith 3 |
| Trigger Nade | Grenade | 2x Crude Explosives 1x Processor | Explosives Station 2 |
| Vertical Grip II | Mod | 2x Mechanical Components 3x Duct Tape | Gunsmith 2 |
| Vertical Grip III | Mod | 2x Mod Components 5x Duct Tape | Gunsmith 3 |
| Vita Shot | Quick Use | 2x Antiseptic 1x Syringe | Medical Lab 3 |
| Vita Spray | Quick Use | 3x Antiseptic 1x Canister | Medical Lab 3 |
| Vulcano | Weapon | 1x Magnetic Accelerator 3x Heavy Gun Parts 1x Exodus Modules | Gunsmith 3 |
| Wolfpack | Grenade | 2x Explosive Compound 2x Sensors | Explosives Station 3 |
| Red Light Stick | Quick Use | 3x Chemicals | Utility Station 1 |
| Smoke Grenade | Grenade | 14x Chemicals 1x Canister | Utility Station 2 |
| Deadline | Mine | 3x Explosive Compound 2x ARC Circuitry | Explosives Station 3 |
| Trailblazer | Grenade | 1x Explosive Compound 1x Synthesized Fuel | Explosives Station 3 |
| Tactical Mk. 3 (Defensive) | Augment | 2x Advanced Electrical Components 3x Processor | Gear Bench 3 |
| Tactical Mk. 3 (Healing) | Augment | 2x Advanced Electrical Components 3x Processor | Gear Bench 3 |
| Yellow Light Stick | Quick Use | 3x Chemicals | Utility Station 1 |
Note: The missing Blueprints in this list likely have not actually been added to the game at the time of writing, because none of the playerbase has managed to find any of them. As they are added to the game, I will update this page with the most relevant information so you know exactly how to get all 75 Arc Raiders Blueprints.
Where to find Blueprints in Arc Raiders
Below is a list of all containers, modifiers, and events which maximise your chances of finding Blueprints:
- Certain quests reward you with specific Blueprints .
- Completing Trials has a high chance of offering Blueprints as rewards.
- Surveyors have a decent chance of dropping Blueprints on death.
- High loot value areas tend to have a greater chance of spawning Blueprints.
- Night Raids and Storms may increase rare Blueprint spawn chances in containers.
- Containers with higher numbers of items may have a higher tendency to spawn Blueprints. As a result, Blue Gate (which has many “large” containers containing multiple items) may give you a higher chance of spawning Blueprints.
- Raider containers (Raider Caches, Weapon Boxes, Medical Bags, Grenade Tubes) have increased Blueprint drop rates. As a result, the Uncovered Caches event gives you a high chance of finding Blueprints.
- Security Lockers have a higher than average chance of containing Blueprints.
- Certain Blueprints only seem to spawn under specific circumstances: Tempest Blueprint only spawns during Night Raid events. Vulcano Blueprint only spawns during Hidden Bunker events. Jupiter and Equaliser Blueprints only spawn during Harvester events.

Raider Caches, Weapon Boxes, and other raider-oriented container types have a good chance of offering Blueprints. |Image credit:Rock Paper Shotgun/Embark Studios
Blueprints have a very low chance of spawning in any container in Arc Raiders, around 1-2% on average. However, there is a higher chance of finding Blueprints in particular container types. Specifically, you can find more Blueprints in Raider containers and security lockers.
Beyond this, if you’re looking for Blueprints you should focus on regions of the map which are marked as having particularly high-value loot. Areas such as the Control Tower in Dam Battlegrounds, the Arrival and Departure Buildings in Spaceport, and Pilgrim’s Peak in Blue Gate all have a better-than-average chance of spawning Blueprints somewhere amongst all their containers. Night Raids and Electromagnetic Storm events also increase the drop chances of certain Blueprints .
In addition to these containers, you can often loot Blueprints from destroyed Surveyors - the largest of the rolling ball ARC. Surveyors are more commonly found on the later maps - Spaceport and Blue Gate - and if one spawns in your match, you’ll likely see it by the blue laser beam that it casts into the sky while “surveying”.
Surveyors are quite well-armoured and will very speedily run away from you once it notices you, but if you can take one down then make sure you loot all its parts for a chance of obtaining certain unusual Blueprints.
Blueprints obtained from quests
One way in which you can get Blueprints is by completing certain quests for the vendors in Speranza. Some quests will reward you with a specific item Blueprint upon completion, so as long as you work through all the quests in Arc Raiders, you are guaranteed those Blueprints.
Here is the full list of all Blueprints you can get from quest rewards:
- Trigger Nade Blueprint: Rewarded after completing “Sparks Fly”.
- Lure Grenade Blueprint: Rewarded after completing “Greasing Her Palms”.
- Burletta Blueprint: Rewarded after completing “Industrial Espionage”.
- Hullcracker Blueprint (and Launcher Ammo Blueprint): Rewarded after completing “The Major’s Footlocker”.
Alas, that’s only 4 Blueprints out of a total of 75 to unlock, so for the vast majority you will need to find them yourself during a raid. If you’re intent on farming Blueprints, then it’s best to equip yourself with cheap gear in case you lose it, but don’t use a free loadout because then you won’t get a safe pocket to stash any new Blueprint you find. No pain in Arc Raiders is sharper than failing to extract with a new Blueprint you’ve been after for a dozen hours already.

One of the best ways to get Blueprints is by hitting three stars on all five Trials every week. |Image credit:Rock Paper Shotgun/Embark Studios
Blueprints obtained from Trials
One of the very best ways to get Blueprints is as rewards for completing Trials in Arc Raiders. Trials are unlocked from Level 15 onwards, and allow you to earn rewards by focusing on certain tasks over the course of several raids. For example, one Trial might task you with dealing damage to Hornets, while another might challenge you to loot Supply Drops.
Trials refresh on a weekly basis, with a new week bringing five new Trials. Each Trial can offer up to three rewards after passing certain score milestones, and it’s possible to receive very high level loot from these reward crates - including Blueprints. So if you want to unlock as many Blueprints as possible, you should make a point of completing as many Trials as possible each week.
Best Blueprint farming locations
The very best way to get Blueprints is to frequent specific areas of the maps which combine high-tier loot pools with the right types of containers to search. Here are my recommendations for where to find Blueprints on every map, so you can always keep the search going for new crafting recipes to unlock.

Image credit:Rock Paper Shotgun/Embark Studios
Dam Battlegrounds
The best places to farm Blueprints on Dam Battlegrounds are the Control Tower, Power Generation Complex, Ruby Residence, and Pale Apartments . The first two regions, despite only being marked on the map as mid-tier loot, contain a phenomenal number of containers to loot. The Control Tower can also contain a couple of high-tier Security Lockers - though of course, you’ll need to have unlocked the Security Breach skill at the end of the Survival tree.
There’s also a lot of reporting amongst the playerbase that the Residential areas in the top-left of the map - Pale Apartments and Ruby Residence - give you a comparatively strong chance of finding Blueprints. Considering their size, there’s a high density of containers to loot in both locations, and they also have the benefit of being fairly out of the way. So you’re more likely to have all the containers to yourself.
Buried City
The best Blueprint farming locations on Buried City are the Santa Maria Houses, Grandioso Apartments, Town Hall, and the various buildings of the New District . Grandioso Apartments has a lower number of containers than the rest, but a high chance of spawning weapon cases - which have good Blueprint drop rates. The others are high-tier loot areas, with plenty of lootable containers - including Security Lockers.
Spaceport
The best places to find Blueprints on Spaceport are the Arrival and Departure Buildings, as well as Control Tower A6 and the Launch Towers . All these areas are labelled as high-value loot regions, and many of them are also very handily connected to one another by the Spaceport wall, which you can use to quickly run from one area to the next. At the tops of most of these buildings you’ll find at least one Security Locker, so this is an excellent farming route for players looking to find Blueprints.
The downside to looting Blueprints on Spaceport is that all these areas are hotly contested, particularly in Duos and Squads. You’ll need to be very focused and fast in order to complete the full farming route.

Image credit:Rock Paper Shotgun/Embark Studios
Blue Gate
Blue Gate tends to have a good chance of dropping Blueprints, potentially because it generally has a high number of containers which can hold lots of items; so there’s a higher chance of a Blueprint spawning in each container. In my experience, the best Blueprint farming spots on Blue Gate are Pilgrim’s Peak, Raider’s Refuge, the Ancient Fort, and the Underground Complex beneath the Warehouse .
All of these areas contain a wealth of containers to loot. Raider’s Refuge has less to loot, but the majority of the containers in and around the Refuge are raider containers, which have a high chance of containing Blueprints - particularly during major events.
Stella Montis
On the whole, Stella Montis seems to have a very low drop rate for Blueprints (though a high chance of dropping other high-tier loot). If you do want to try farming Blueprints on this map, the best places to find Blueprints in Stella Montis are Medical Research, Assembly Workshop, and the Business Center . These areas have the highest density of containers to loot on the map.
In addition to this, the Western Tunnel has a few different Security Lockers to loot, so while there’s very little to loot elsewhere in this area of the map, it’s worth hitting those Security Lockers if you spawn there at the start of a match.
That wraps up this primer on how to get all the Blueprints in Arc Raiders as quickly as possible. With the Expedition system constantly resetting a large number of players’ Blueprints, it’s more important than ever to have the most up-to-date information on where to find all these Blueprints.
While you’re here, be sure to check out our Arc Raiders best guns tier list , as well as our primers on the best skills to unlock and all the different Field Depot locations on every map.

ARC Raiders
PS5 , Xbox Series X/S , PC
Rock Paper Shotgun is better when you sign in
Sign in and join us on our journey to discover strange and compelling PC games.
