Elden Ring: Shadow Of The Erdtree Church District walkthrough
Here’s how to drain the water in Shadow Keep’s Church District
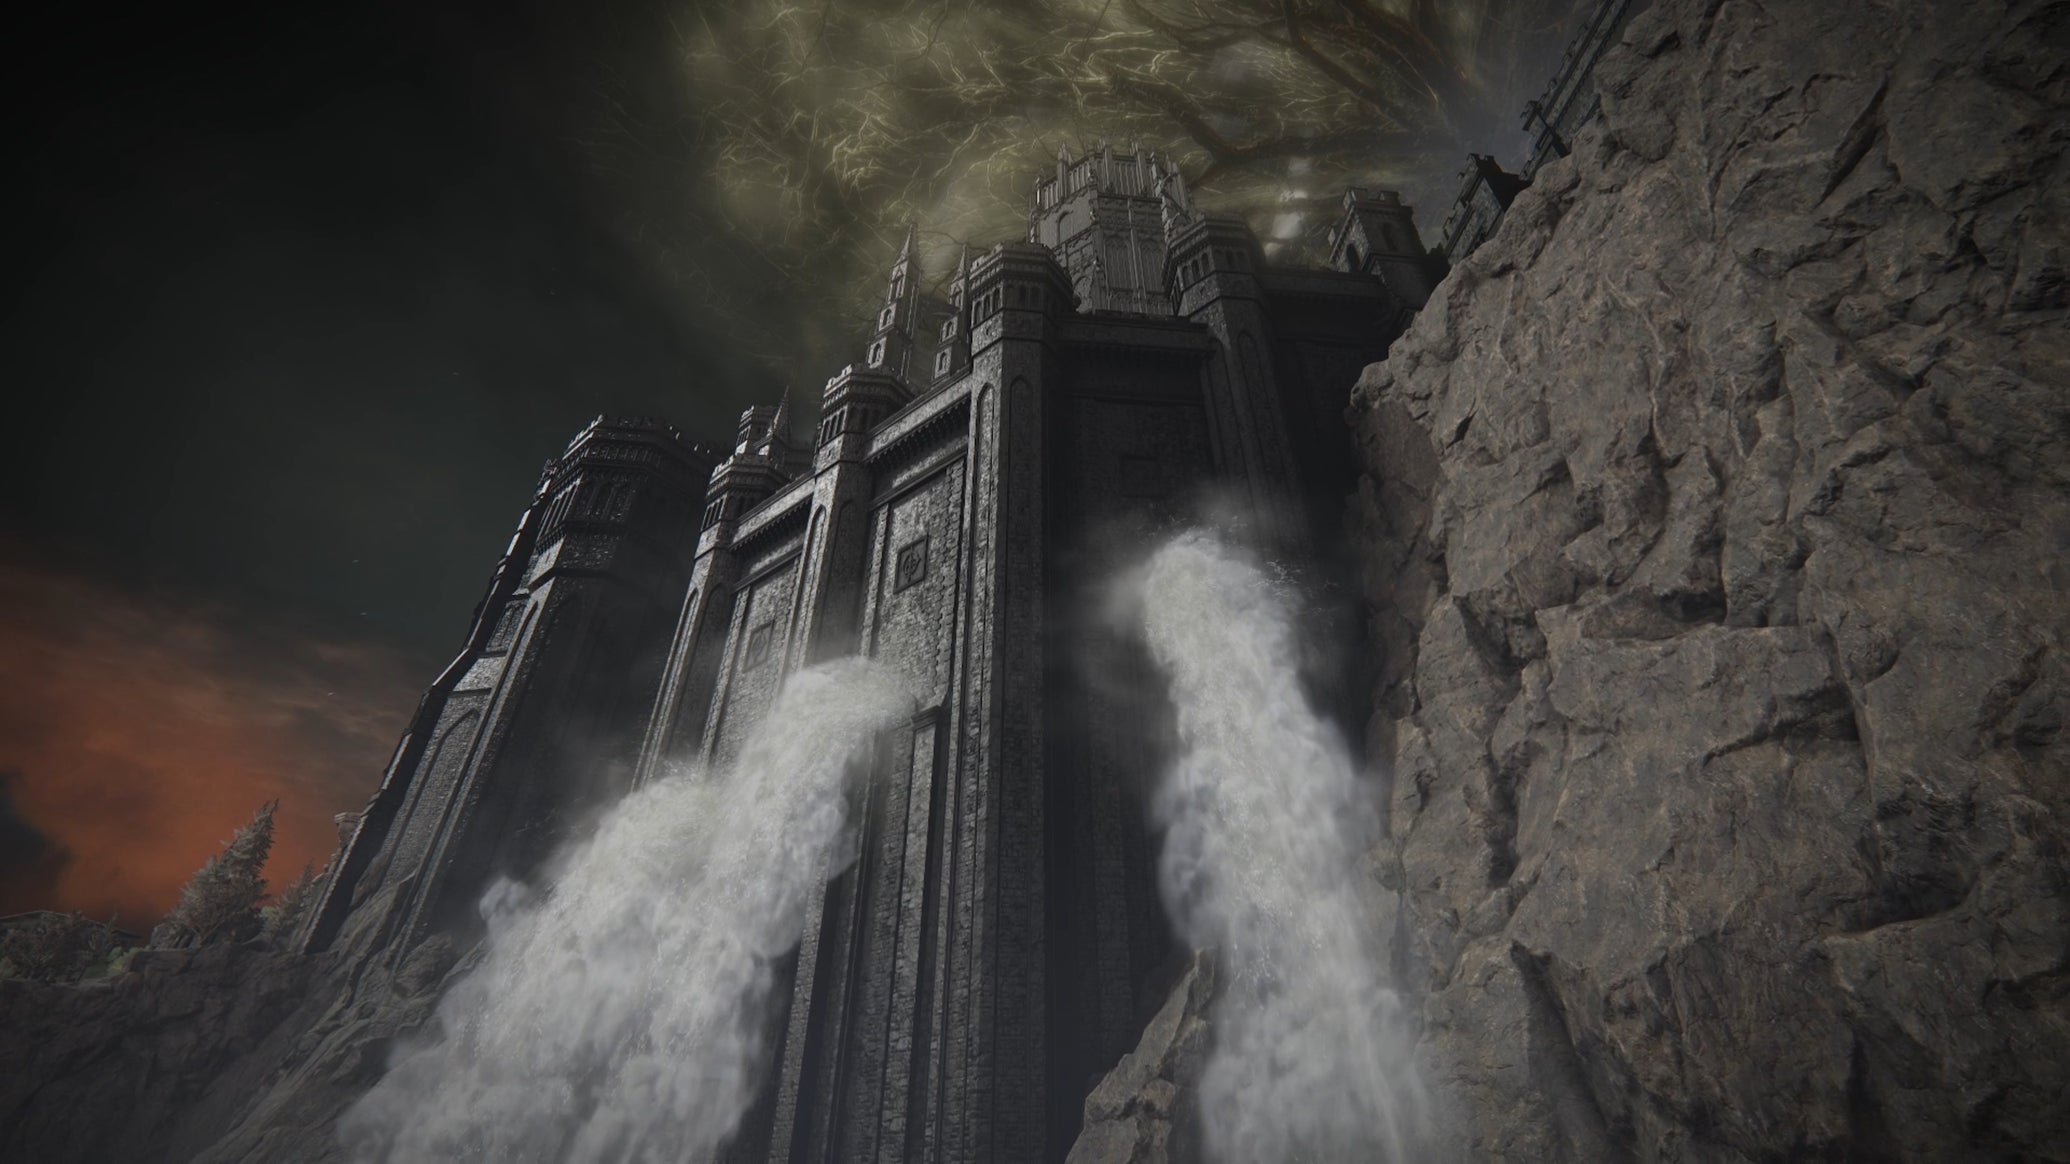
Image credit:Rock Paper Shotgun/Bandai Namco

Looking for a Church District walkthrough in Elden Ring: Shadow Of The Erdtree? The Shadow Keep is one of the most complicated and confusing legacy dungeons that From Software has ever created, not just in Elden Ring - and the Church District accounts for a fair bit of that confusion. Conquer the Church District, and an unprecedented number of new pathways will open themselves up to you, some of which lead to entire regions within the Shadow Of The Erdtree DLC that you can’t reach any other way. It’s an important place, is what I’m saying.
In this Elden Ring Church District walkthrough , we’ll explore how to reach the Church District of the Shadow Keep, how to lower the water level to explore it fully, and how to reach every other area that the Church District adjoins, including the Tree-Worship Passage, so you can move on in whichever direction you prefer within Shadow Of The Erdtree.
In this guide:
- How to get to the Church District
- Church District walkthrough
- How to drain the Church District
- Where to go after the Church District
How to get to the Church District
You can reach the Church District in Elden Ring by following the path northwest from the Church District Highroad Site Of Grace in eastern Scadu Altus. If you haven’t yet reached Scadu Altus, you can get there either by making your way through the Castle Ensis legacy dungeon, or by following the lower path east of the Castle Front Site Of Grace and using the Spiritspring Jump up into the Fort Of Reprimand.
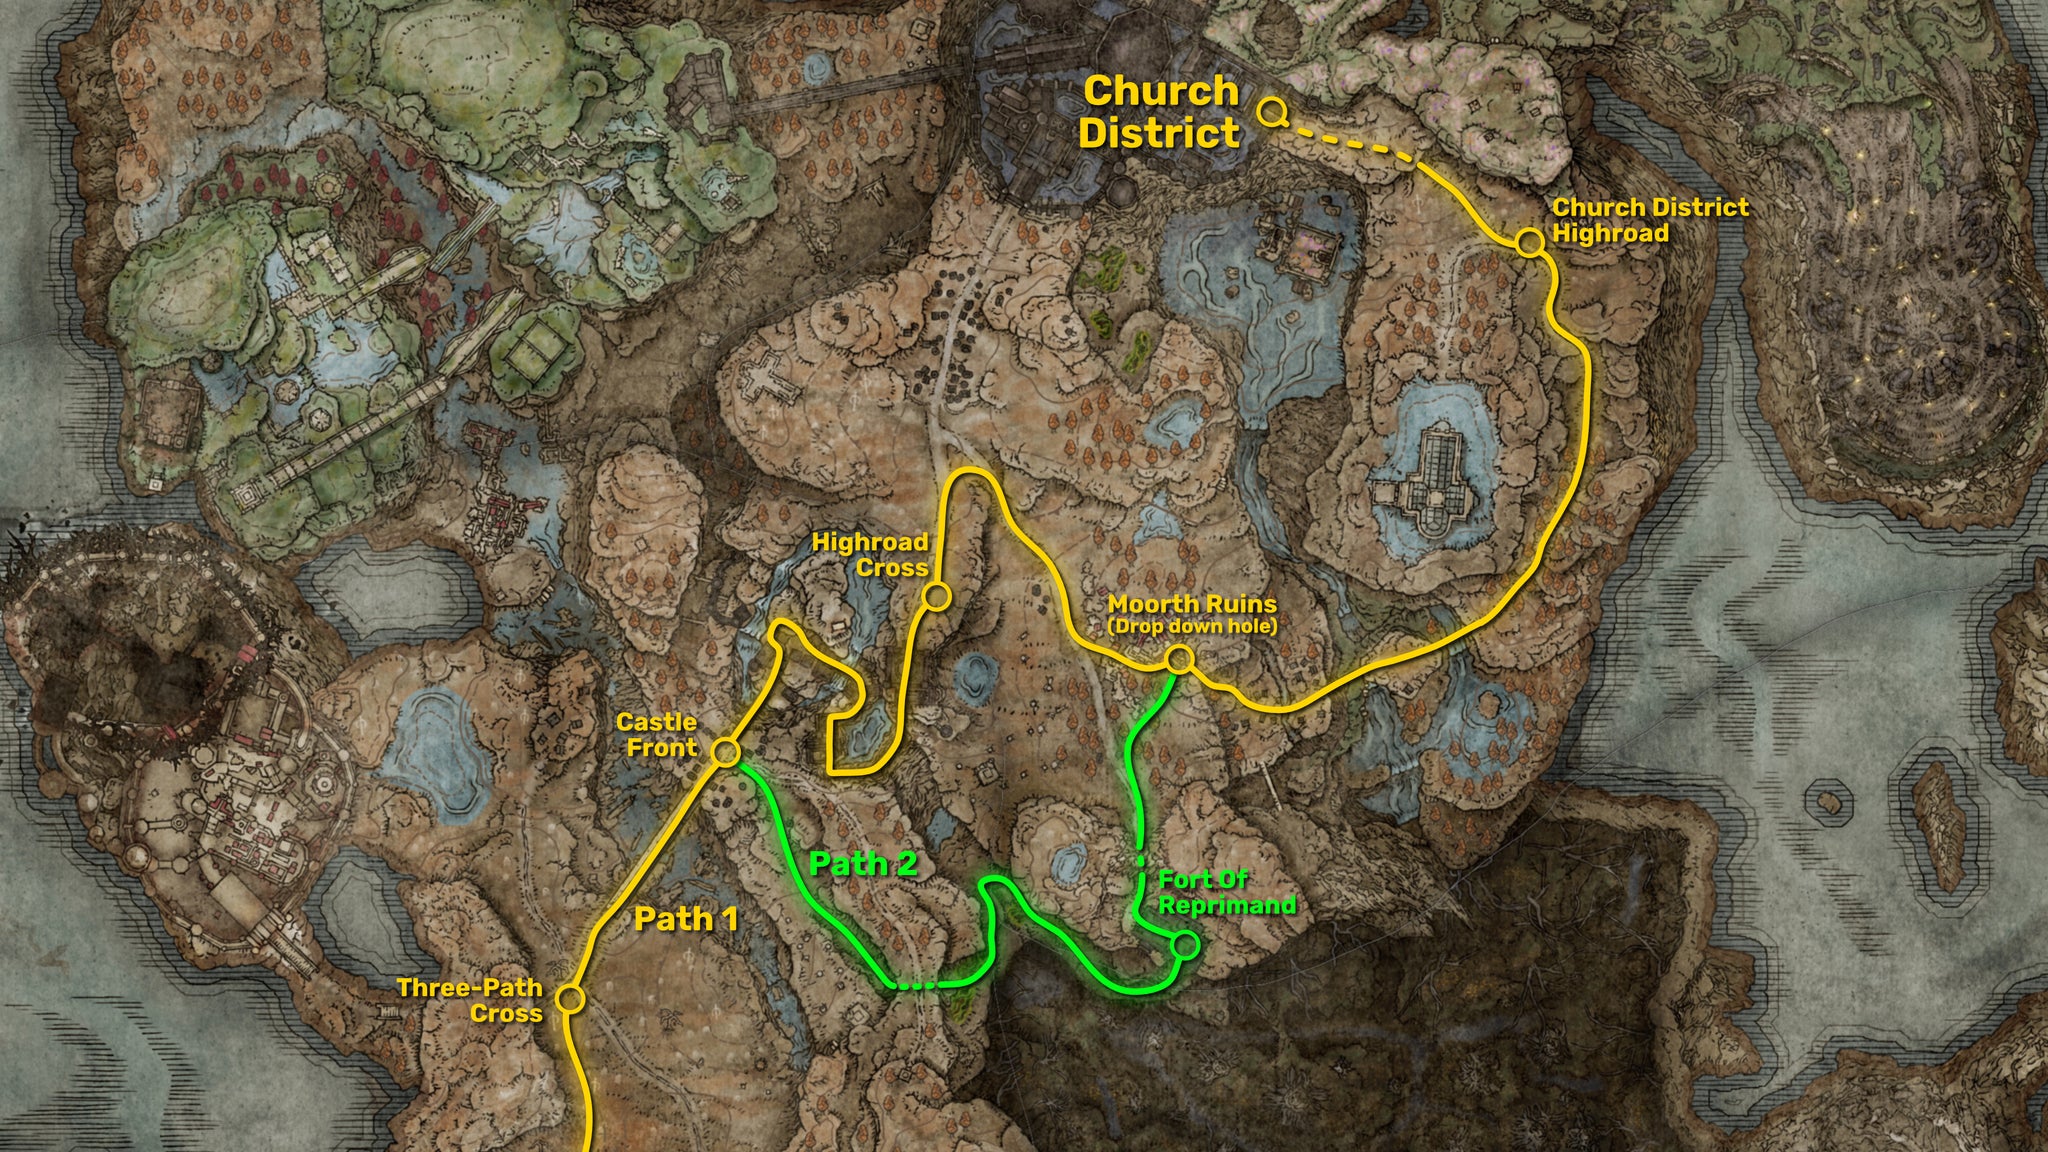
Image credit:Rock Paper Shotgun/Bandai Namco
To get to the Church District from there, you need to drop down the giant hole in the southern side of the Moorth Ruins. At the bottom of the hole is a pathway that leads out into Bonny Village. From there, cross both the bridges to the east and follow the path all the way north (past the Furnace Golem ) until you reach the Church District Highroad Site Of Grace.
From there, the path forks. If you turn left, you’ll reach the Cathedral Of Manus Metyr . But if you take the righthand path, you’ll be taken all the way into the Church District of the Shadow Keep, where our walkthrough begins.
Elden Ring: Church District walkthrough
The Church District is flooded, and going into the water will instantly kill you. Your first task is to drain the Church District of water, and to do that you will need to jump across a few rooftops.
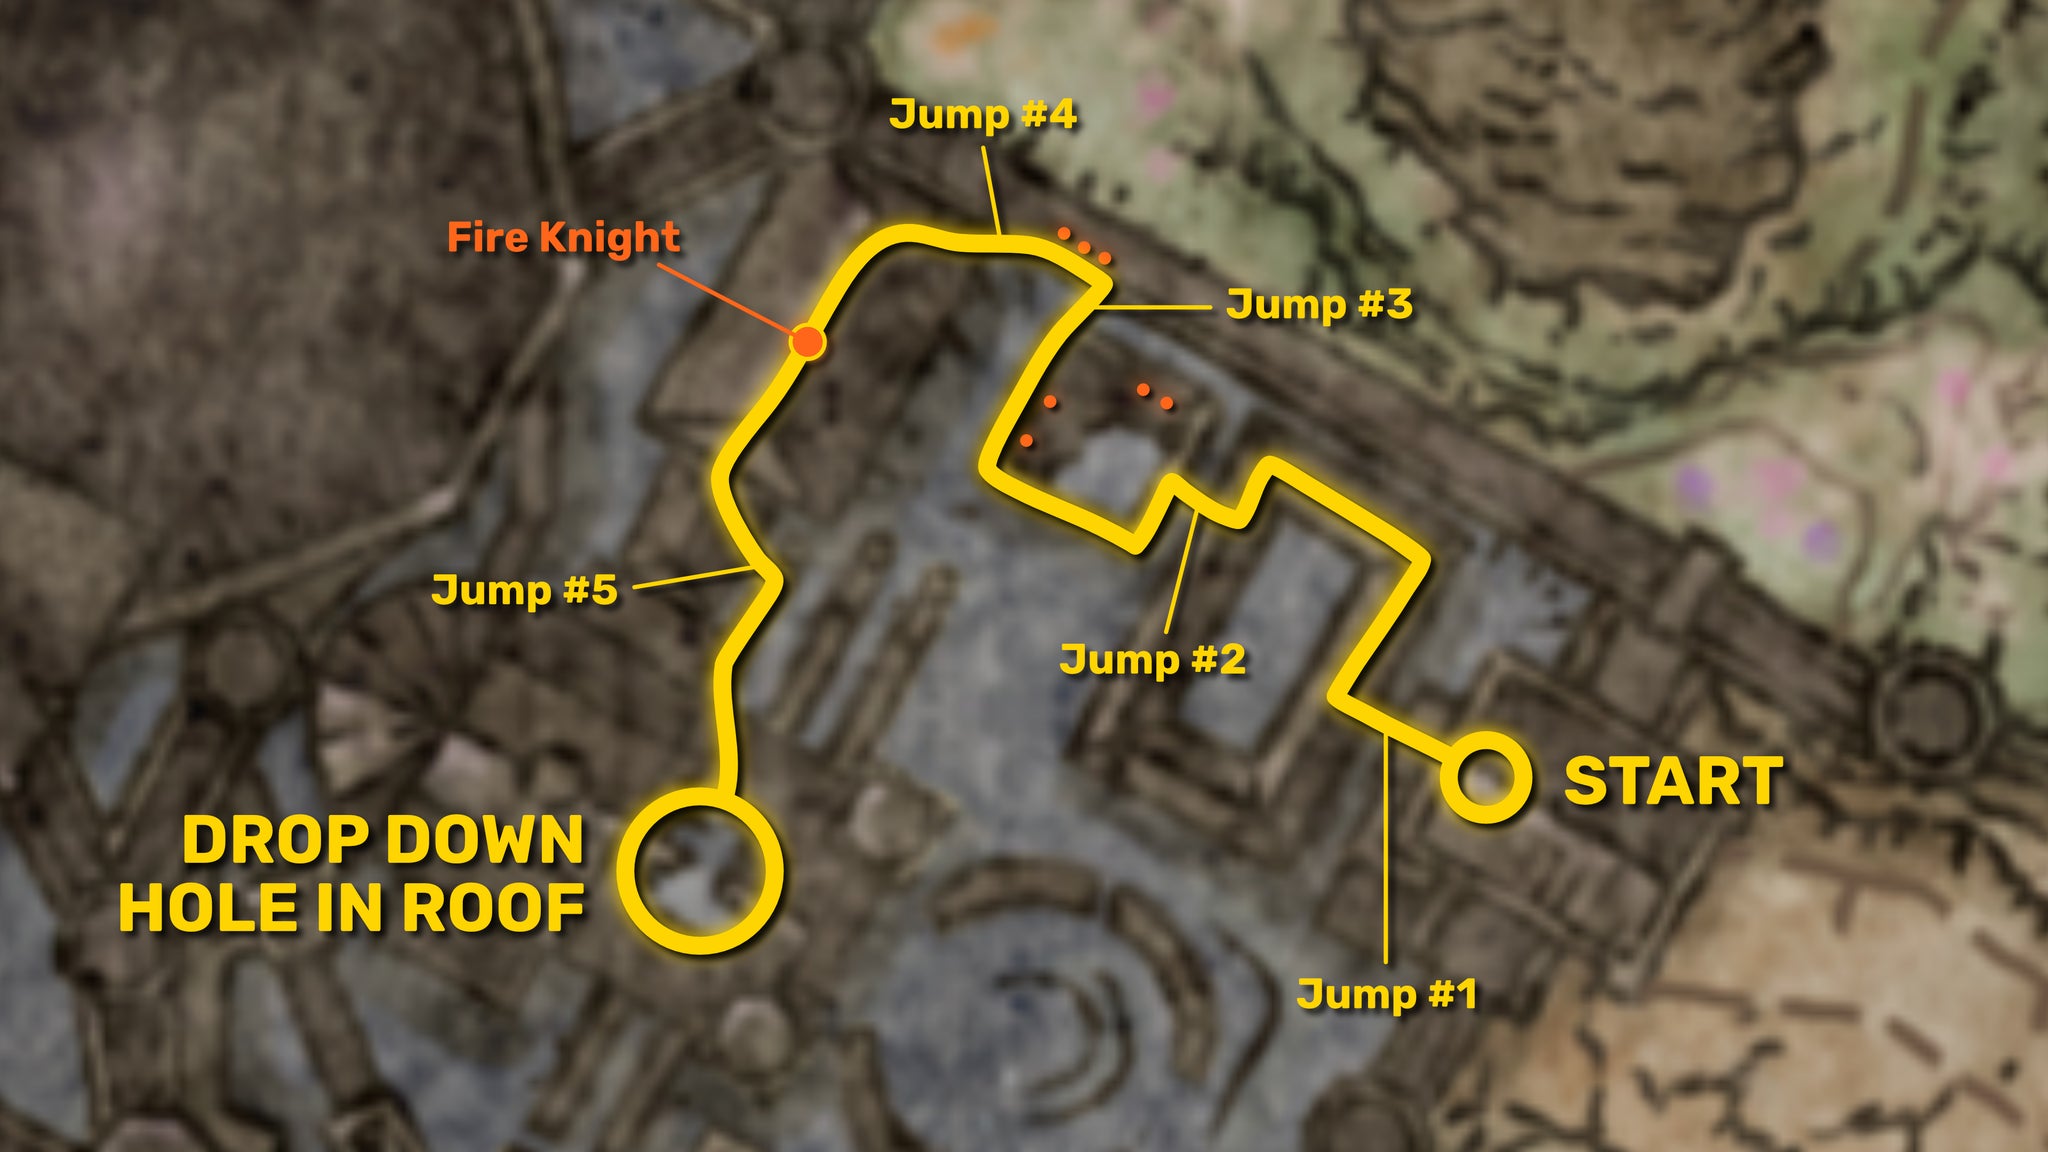
Image credit:Rock Paper Shotgun/Bandai Namco
From the Site Of Grace, jump off the end of the ledge and onto the rectangular roof in front of you. Make your way around to the other side, and do a running jump off one of the little jutting out dormers on the rooftop to reach the next building’s roof.
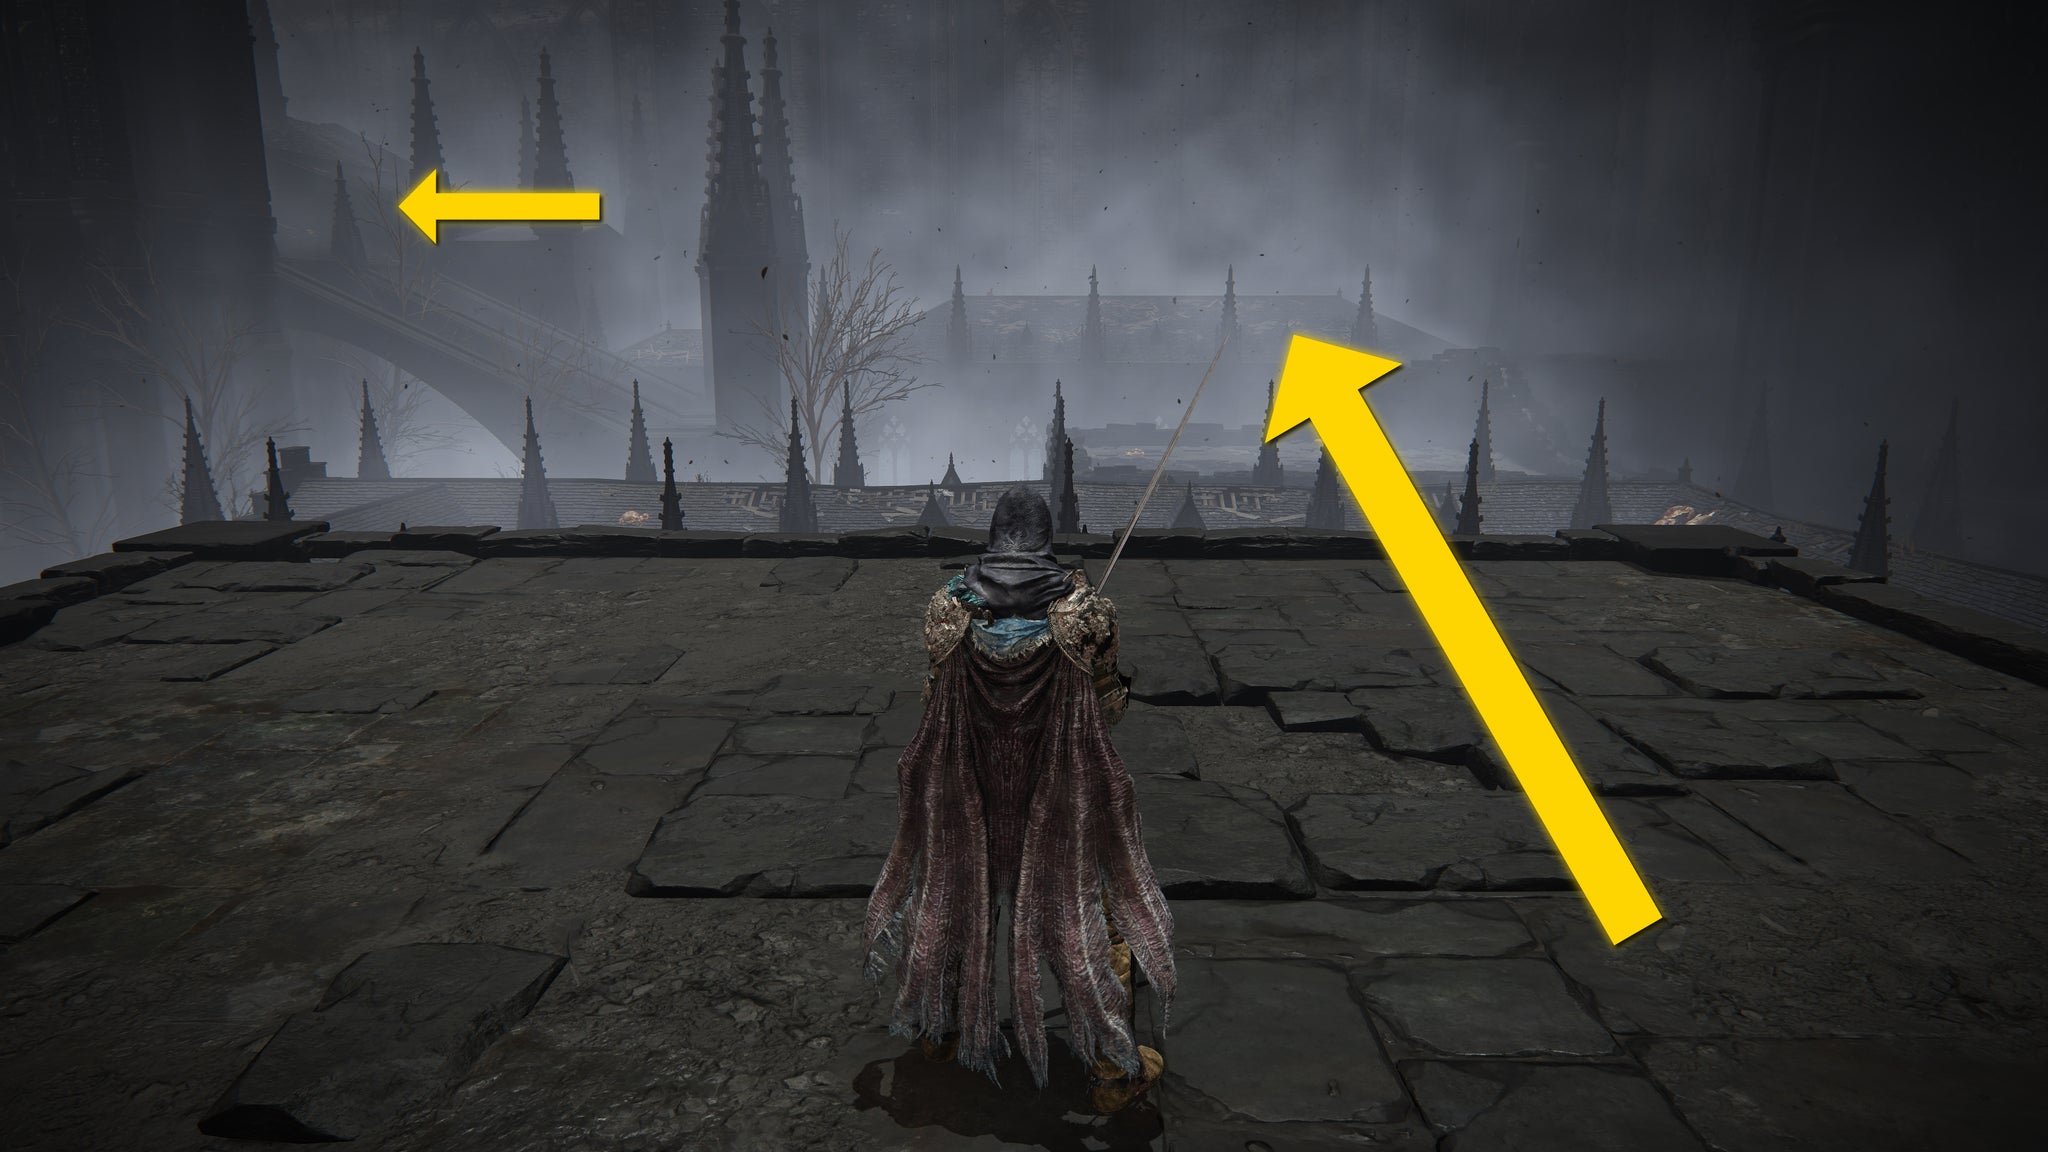
Image credit:Rock Paper Shotgun/Bandai Namco
Walk around the edge of this second roof, and make your way up to the far right corner, where the edge inclines. A few Burning Putrid Corpses will spawn on the rooftop as you walk; you can either kill them or ignore them. Just make sure they don’t explode on you.
Once you’re at the far right edge of the roof at its highest point, jump off the edge northeast and onto the ledge abutting the castle wall. More Putrid Corpses will spawn as you land there, but you can ignore them completely; turn left and run-jump onto the third rooftop.
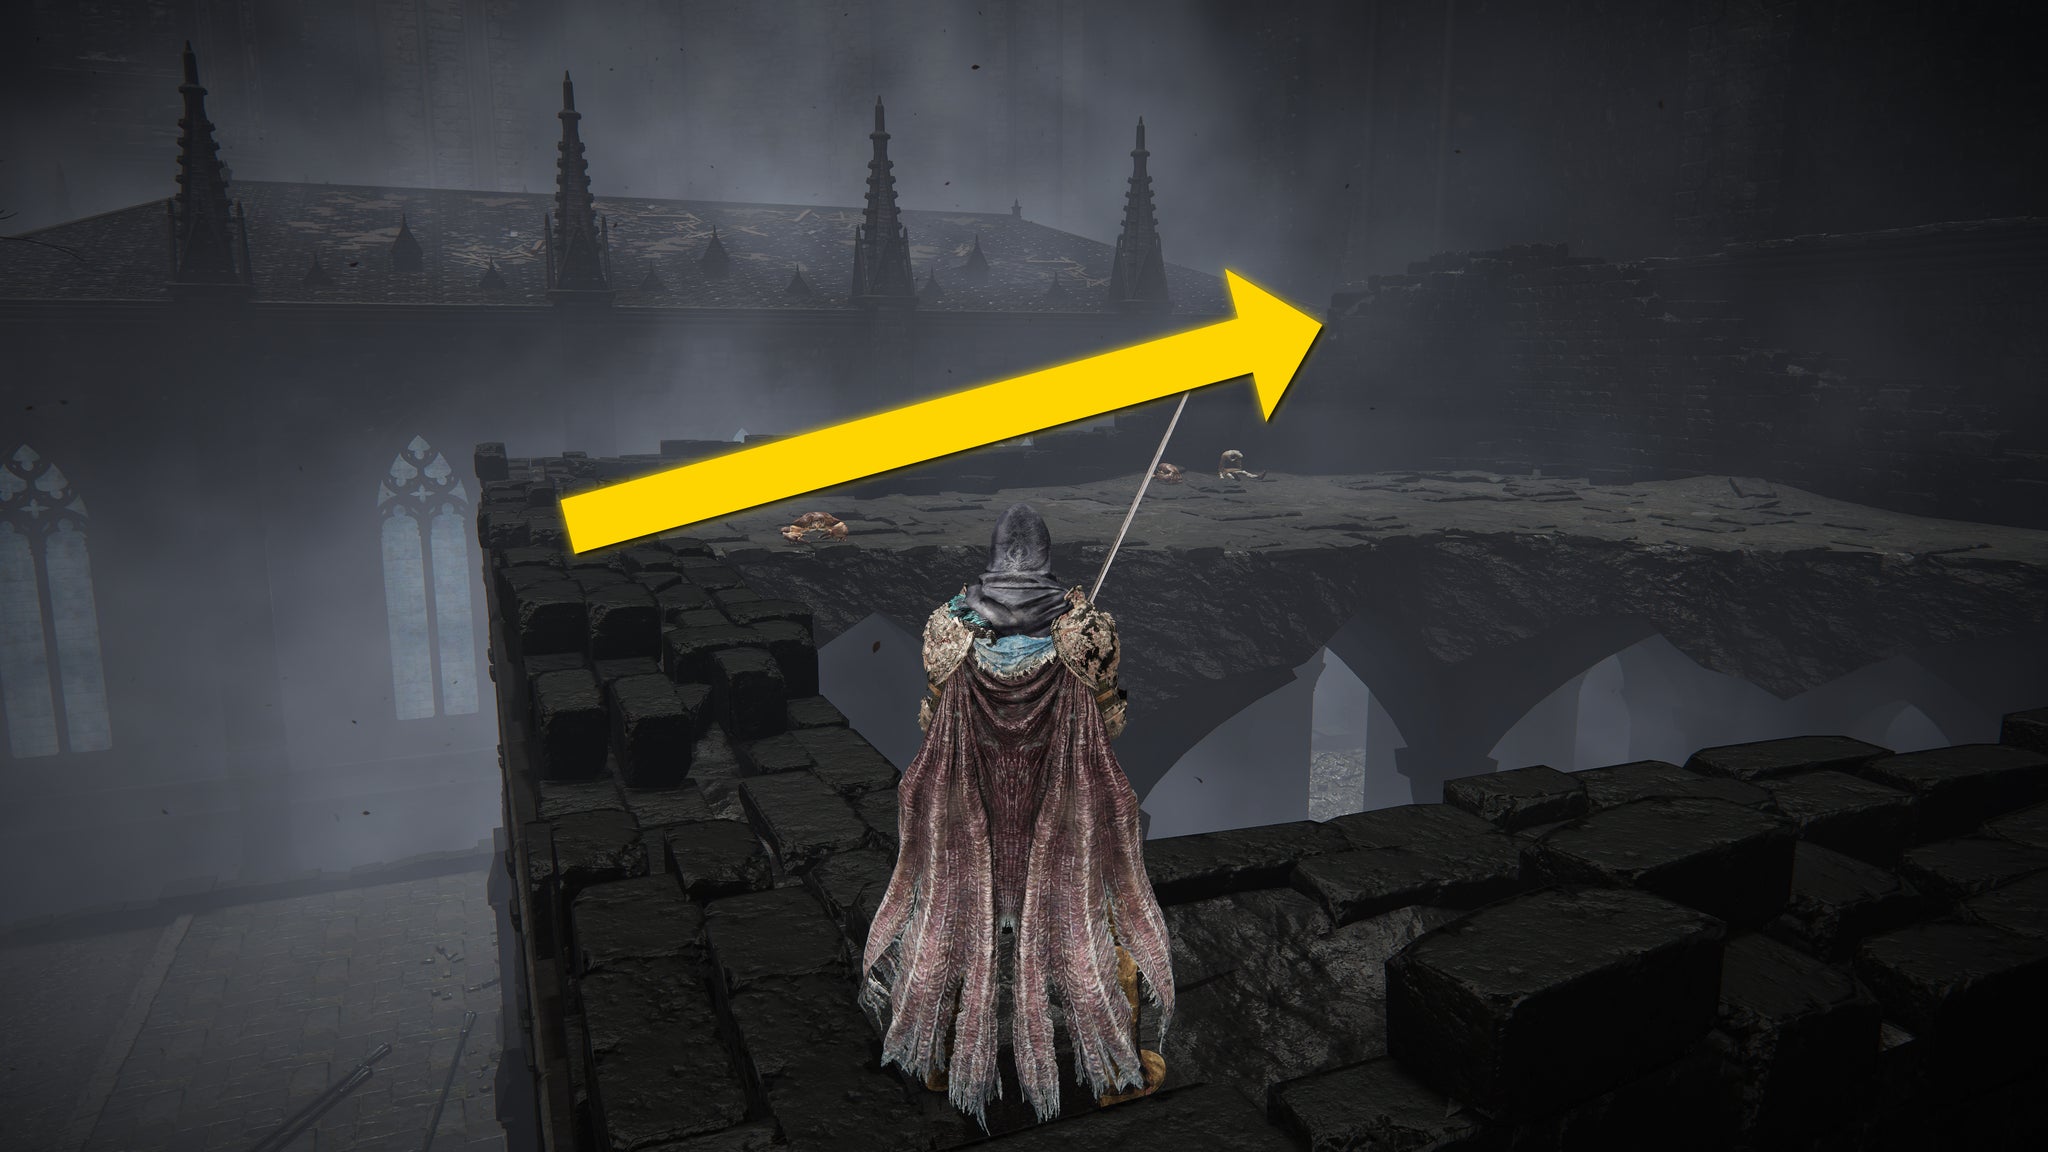
Image credit:Rock Paper Shotgun/Bandai Namco
This rooftop is guarded by a prowling Fire Knight. If you haven’t fought one before, these guys are tough. Probably the toughest humanoid non-boss enemies in the entire DLC (at least until you get to the final area). So don’t underestimate this Fire Knight. Kill it or sneak past it, and then proceed to the southwest edge of the roof.
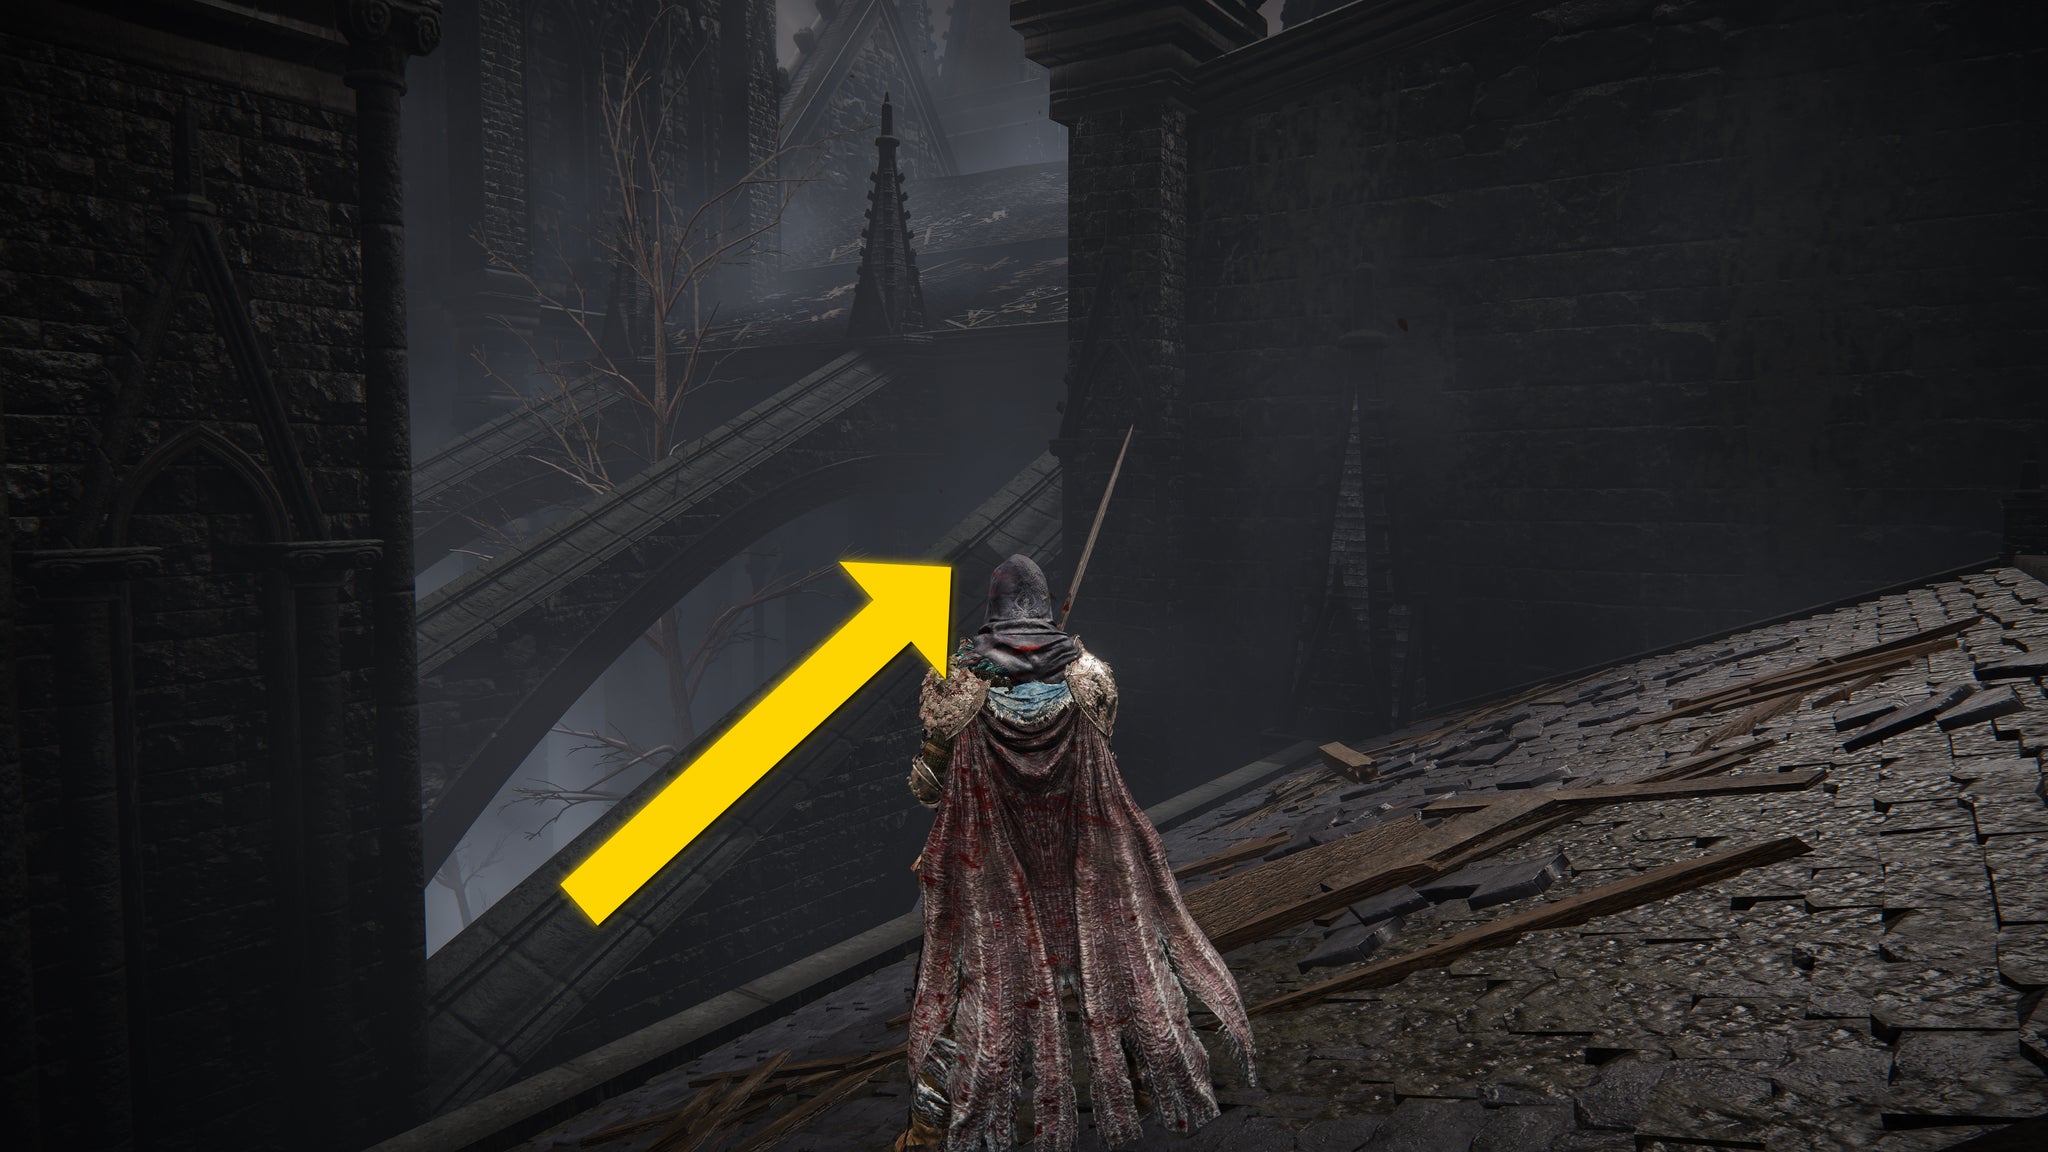
Image credit:Rock Paper Shotgun/Bandai Namco
At the end of the roof, look to your left and you’ll see several stone pillar struts leading up to the rooftop of the Church proper. Do a running jump off the roof and onto the nearest strut. Walk up the strut and jump onto the Church roof.
There’s a large hole in the centre of this roof, and just below it is a criss-cross of support beams. Carefully drop down onto the beams. While you’re up here you can loot 3 Stormhawk Feathers from a corpse on the far end of a beam if you wish. Either way, you should then drop down onto the upper floor with the large hole in it, and then drop down the hole.
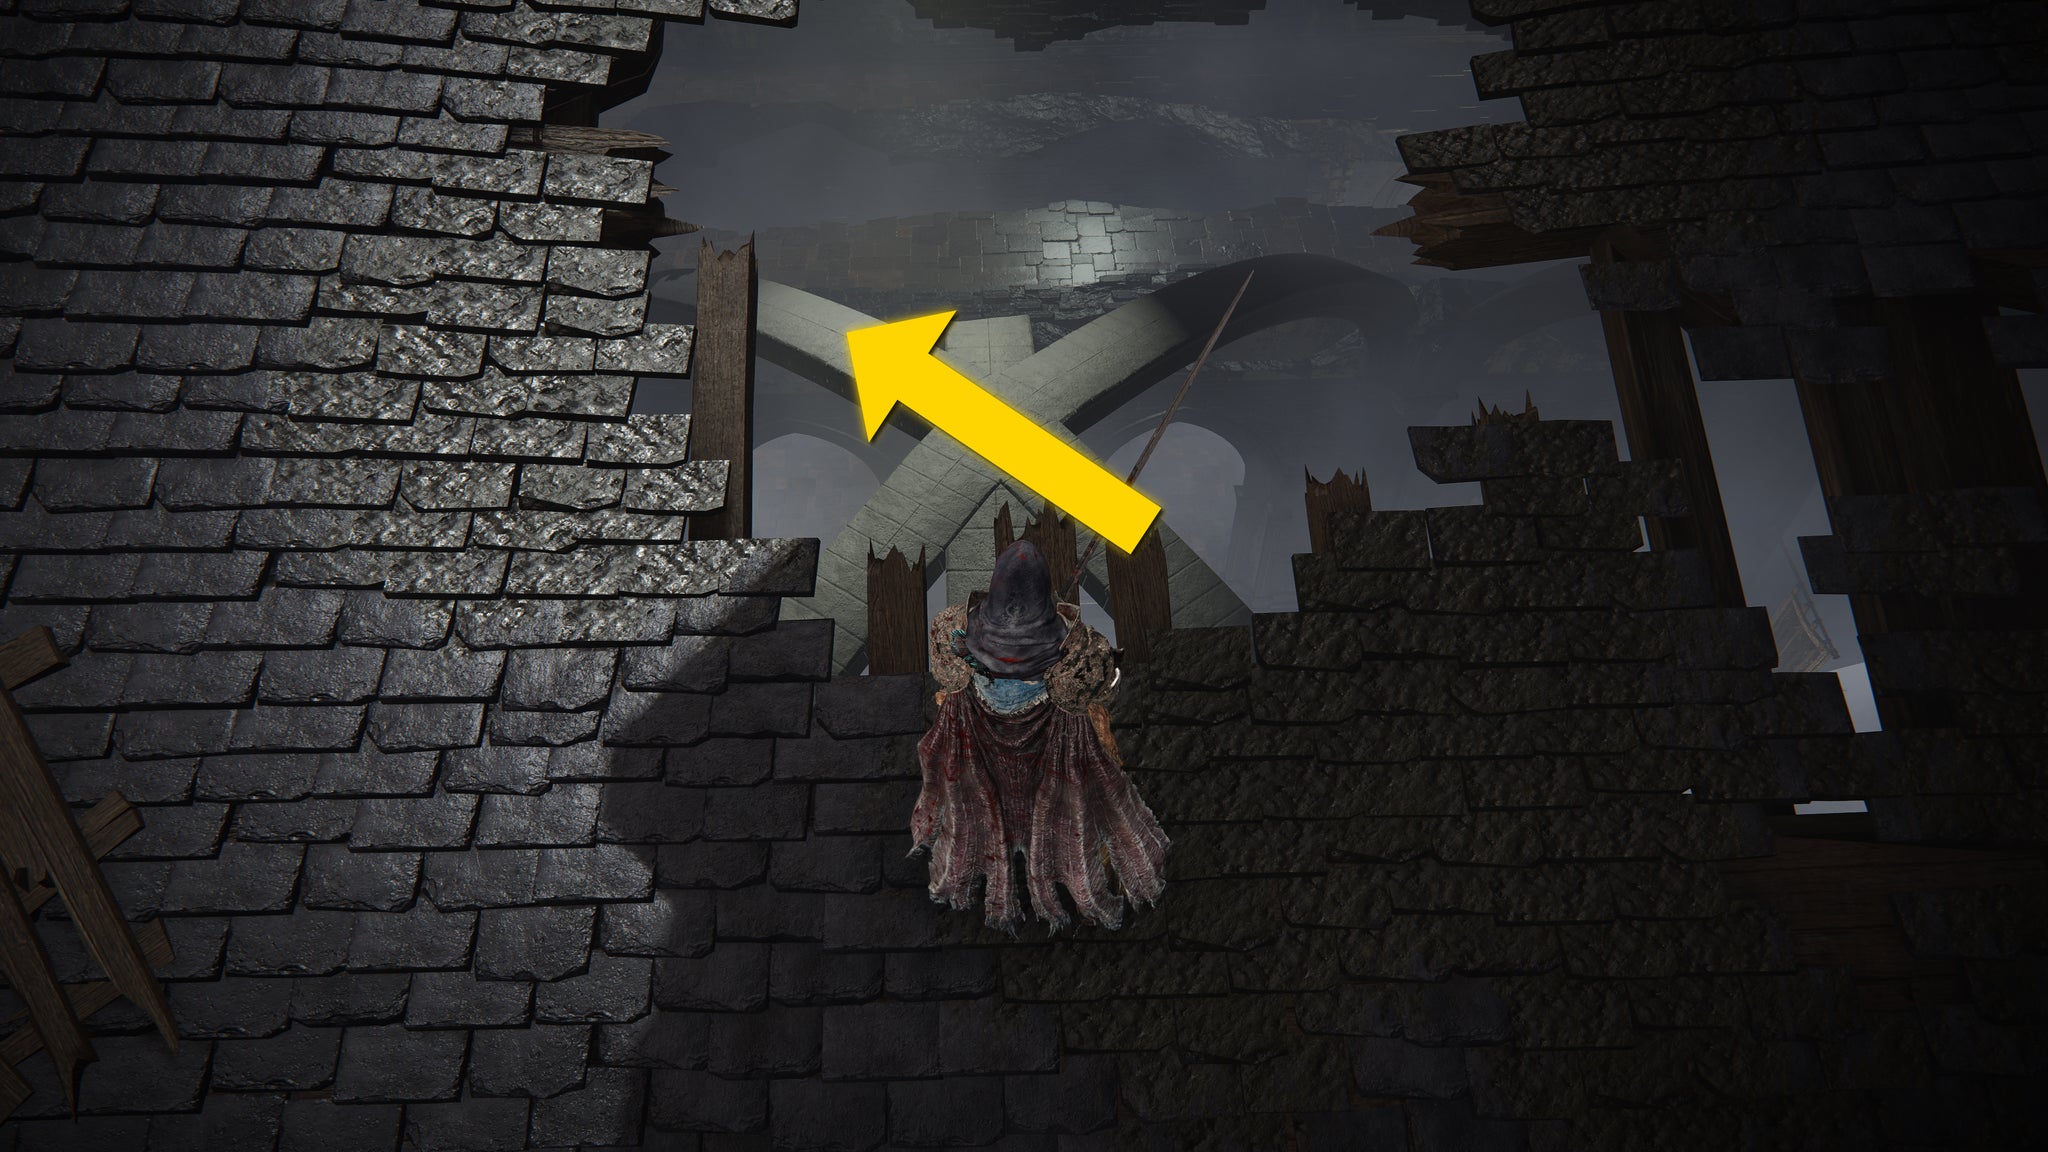
Image credit:Rock Paper Shotgun/Bandai Namco
How to drain the Church District
Once you’ve dropped down the hole in the Church’s upper floor, head west towards the nearby doorway. As you near the doorway, a Fire Knight will approach from beyond and head in your direction. There’s a small room to the left you can hide in so you can wait for the Fire Knight to go past and then backstab them. Either way, defeat the Fire Knight, and then just beyond the doorway, turn left and cross the bridge outside to the castle wall.


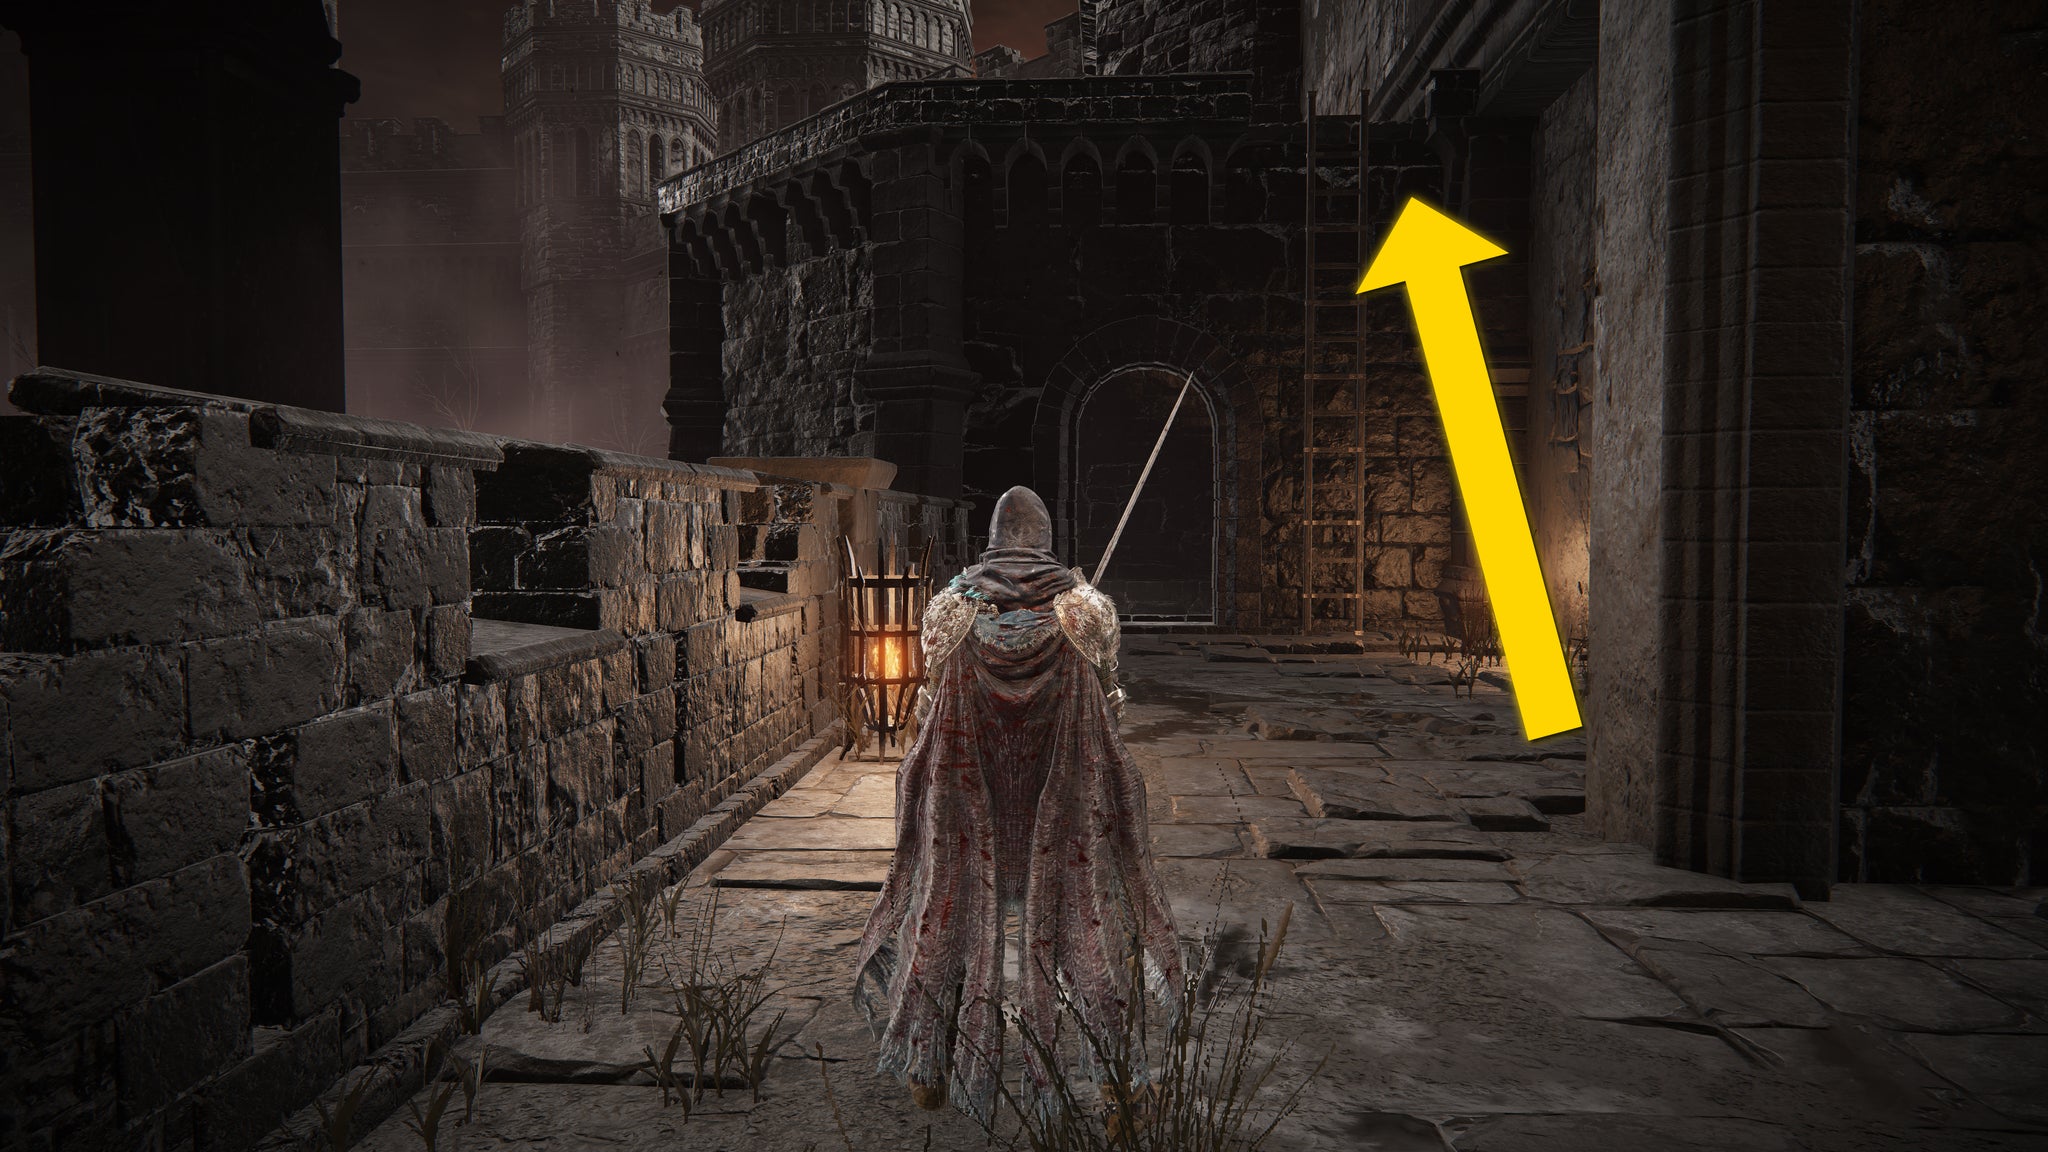
There will be a few bats along this path; kill them as you go. This path is very short - just keep going until you reach a doorway with a ladder next to it. Go up the ladder, and at the top there will be a mechanism with a lever you can interact with. Crank the lever, and a cutscene will play showing you opening the Shadow Keep’s dam and draining the entire Church District of water.
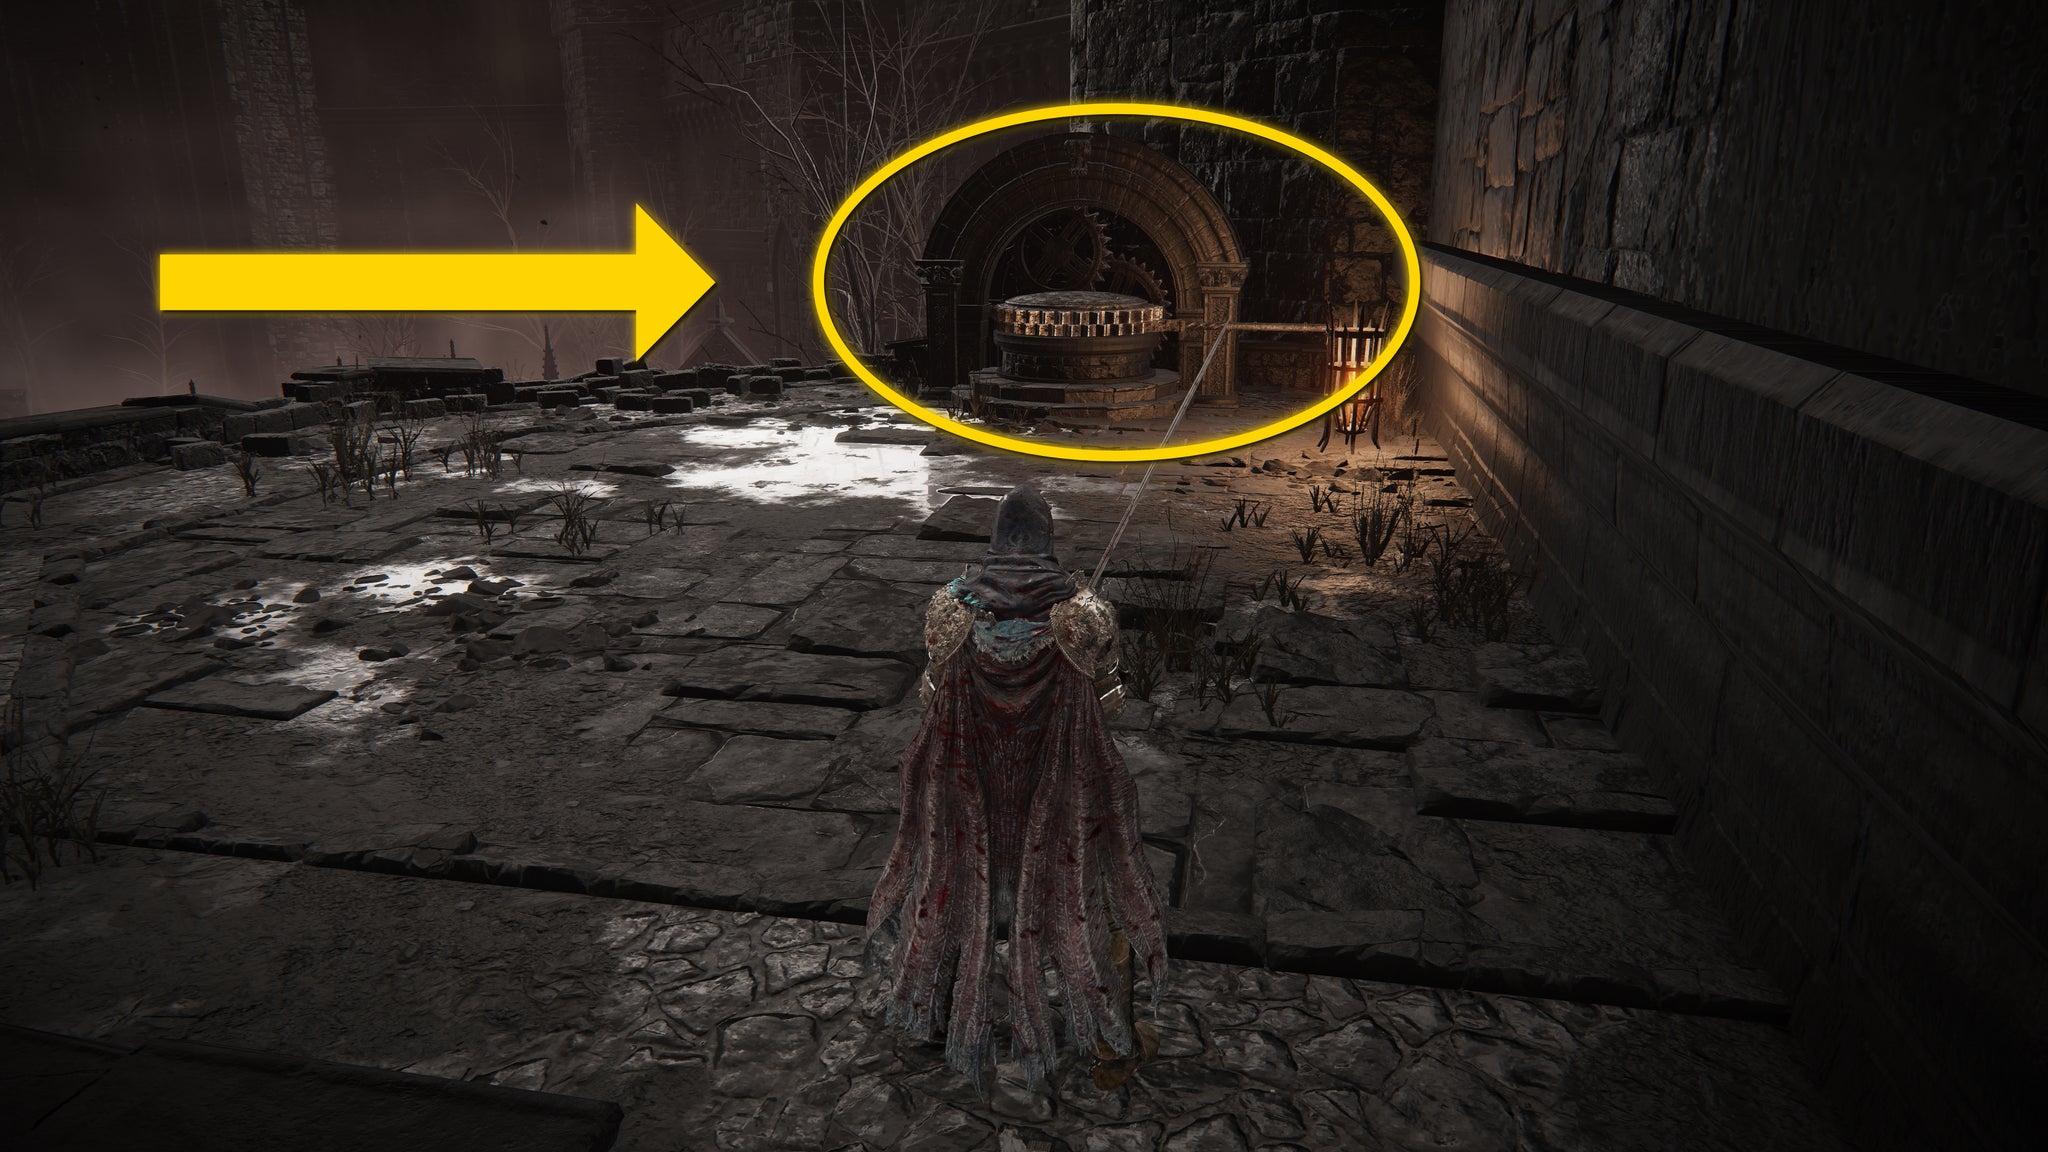
Image credit:Rock Paper Shotgun/Bandai Namco
Where to go after the Church District
Now that the Church District has been drained, you have a total of three different paths to take in order to progress. These three paths lead you to:
- The Prayer Room.
- The Church District grounds.
- The Tree-Worship Passage.
- The Specimen Storehouse upper levels.
1. Path to the Prayer Room
To get to the Prayer Room, backtrack to the point where you dropped down through the Church roof and down from the criss-crossing support beams. Around the corner you’ll see a locked door which leads to the Prayer Room.
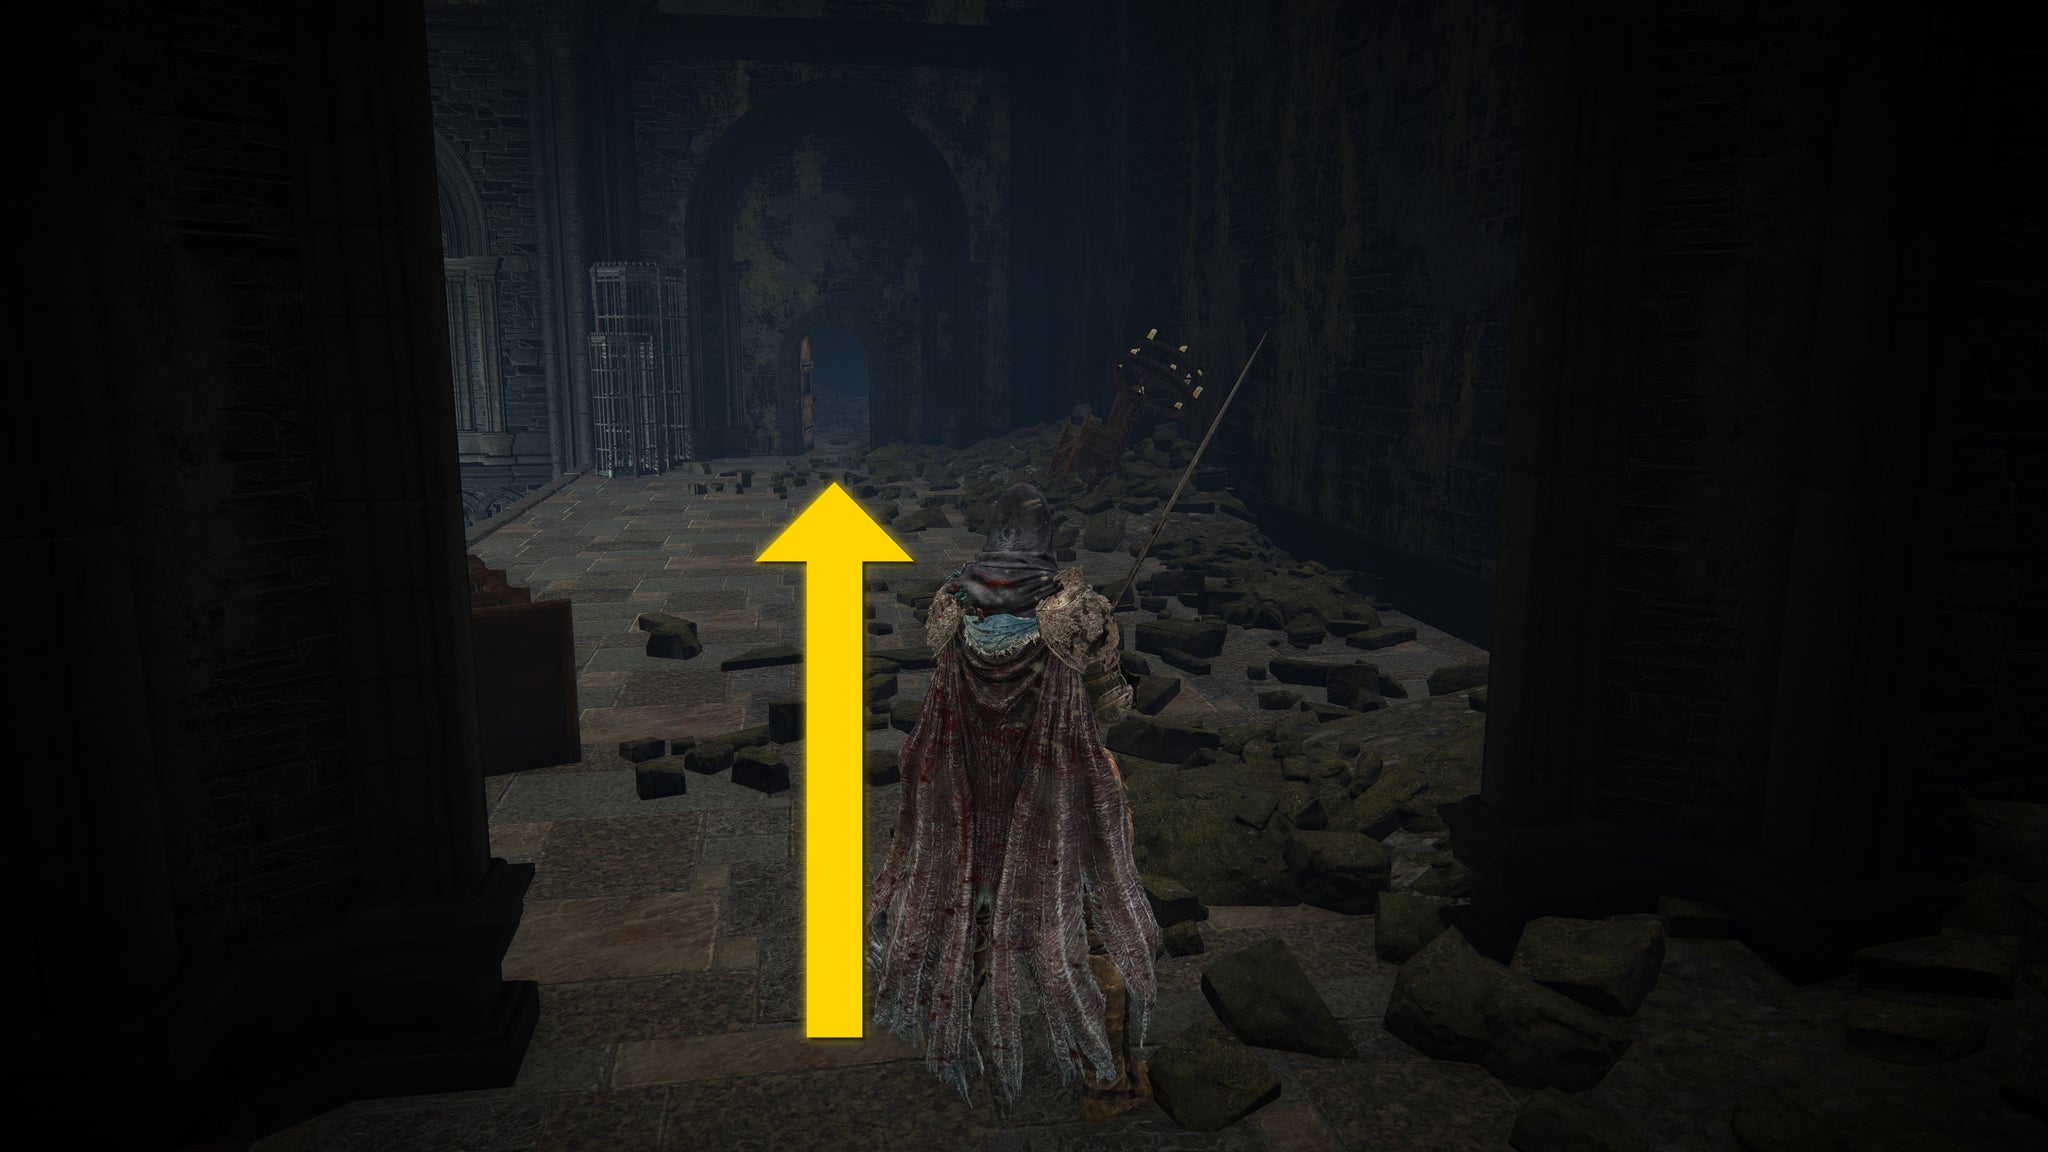
Image credit:Rock Paper Shotgun/Bandai Namco
2. Path through the Church District grounds
With the water drained from the Church District, you can safely exit out into the grounds. To do this, go to where you fought the second Fire Knight, and instead of turning left to reach the lever, head straight on, all the way around the circular passage.
You’ll meet yet another Fire Knight patrolling the area at the far end; dispatch them, and then use the elevator behind them to reach the ground floor of the Church.
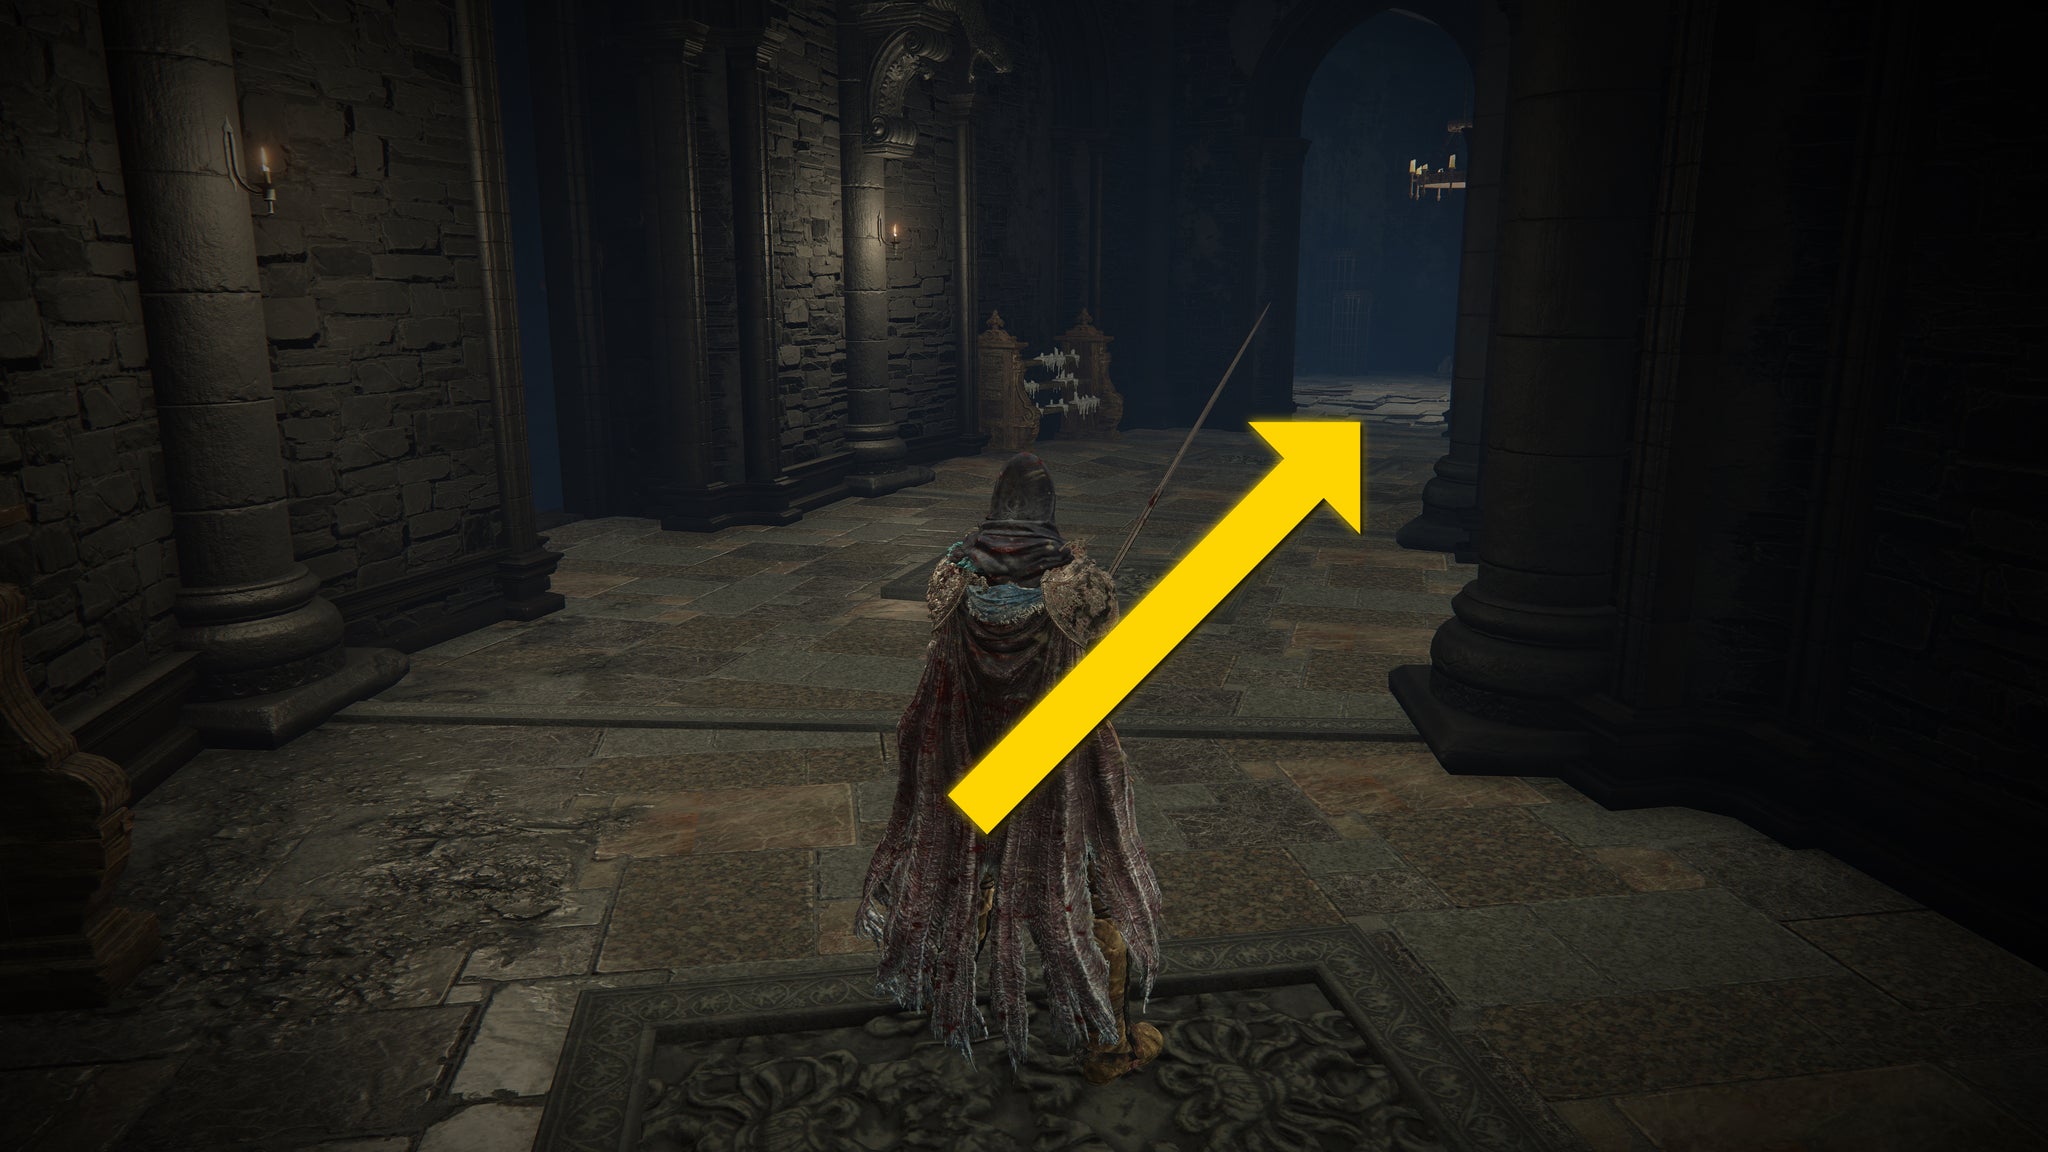
Image credit:Rock Paper Shotgun/Bandai Namco
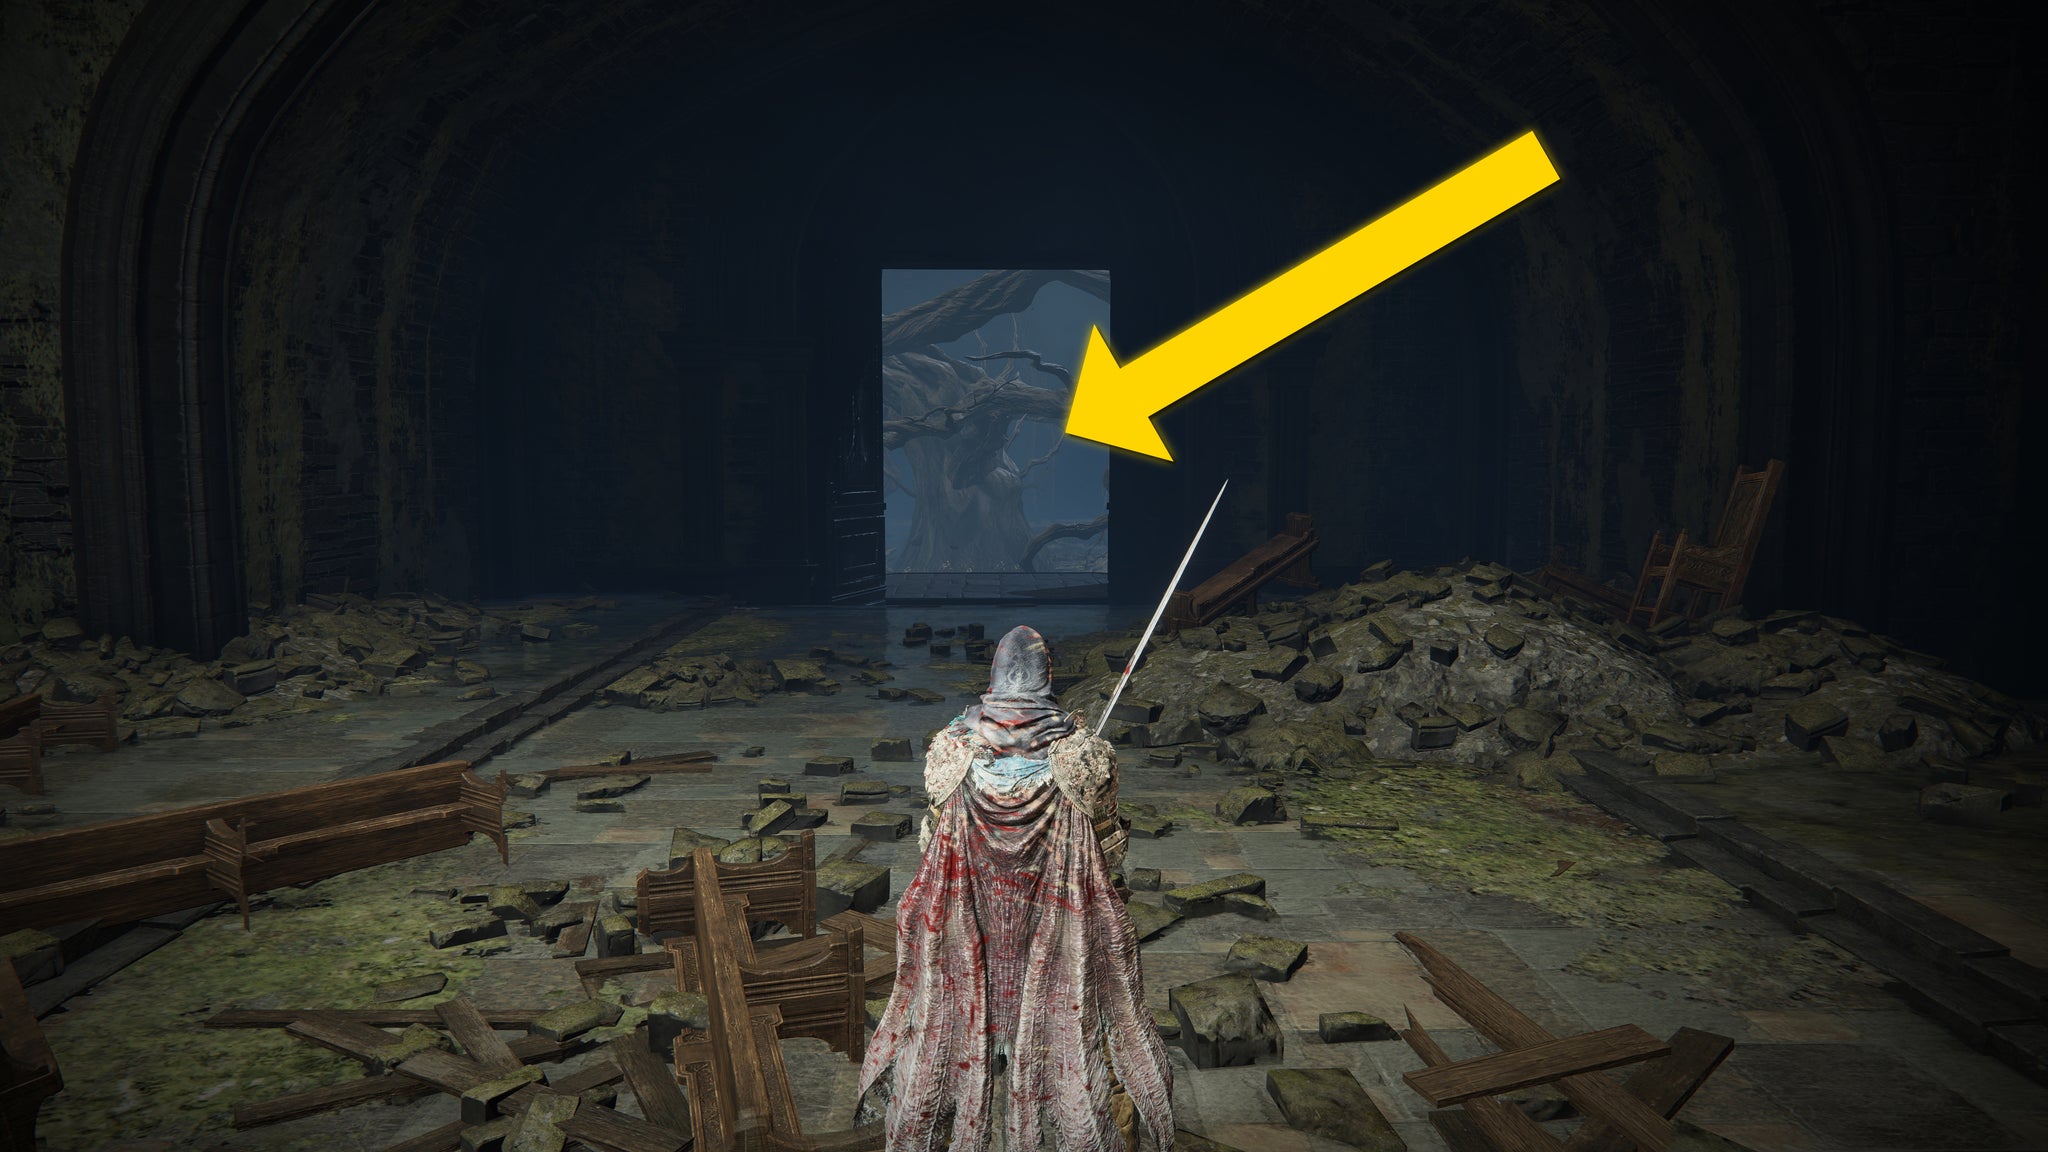
Image credit:Rock Paper Shotgun/Bandai Namco
From here, turn left and exit out the front of the Church towards the large planted tree. Be wary though - as you approach the tree, you’ll be attacked by an Ulcerated Tree Spirit . Defeat it to obtain the Mantle Of Thorns Sorcery.
There’s another Ulcerated Tree Spirit in the Church District grounds, just a few steps north of the first. Defeat this one, and you’ll receive an Iris Of Occultation for your trouble (which incidentally you can use inside the Prayer Room, and at the end of Ymir’s questline ).
Other than the two Ulcerated Tree Spirits, you can activate the Sunken Chapel Site Of Grace inside the building on the southern edge of the Church District, and you can also take on the Giant Crabs in the northern buildings - though the only decent prize you’ll receive from these buildings is a Shadow Realm Rune [5]. Finally, you can activate an elevator just outside the first Ulcerated Tree Spirit garden, which leads up to the Church District Entrance Site Of Grace once more.
3. Path to the Tree-Worship Passage
The Church District connects to a secret area called the Tree-Worship Passage, which takes you all the way to the base of the Scadutree. To reach this path, again take the elevator down to the ground floor of the Church, but this time turn right. There will be a small room with a statue in front of you, behind which you can loot the Fire Knight’s Seal. After that, exit out of the statue room and turn left.


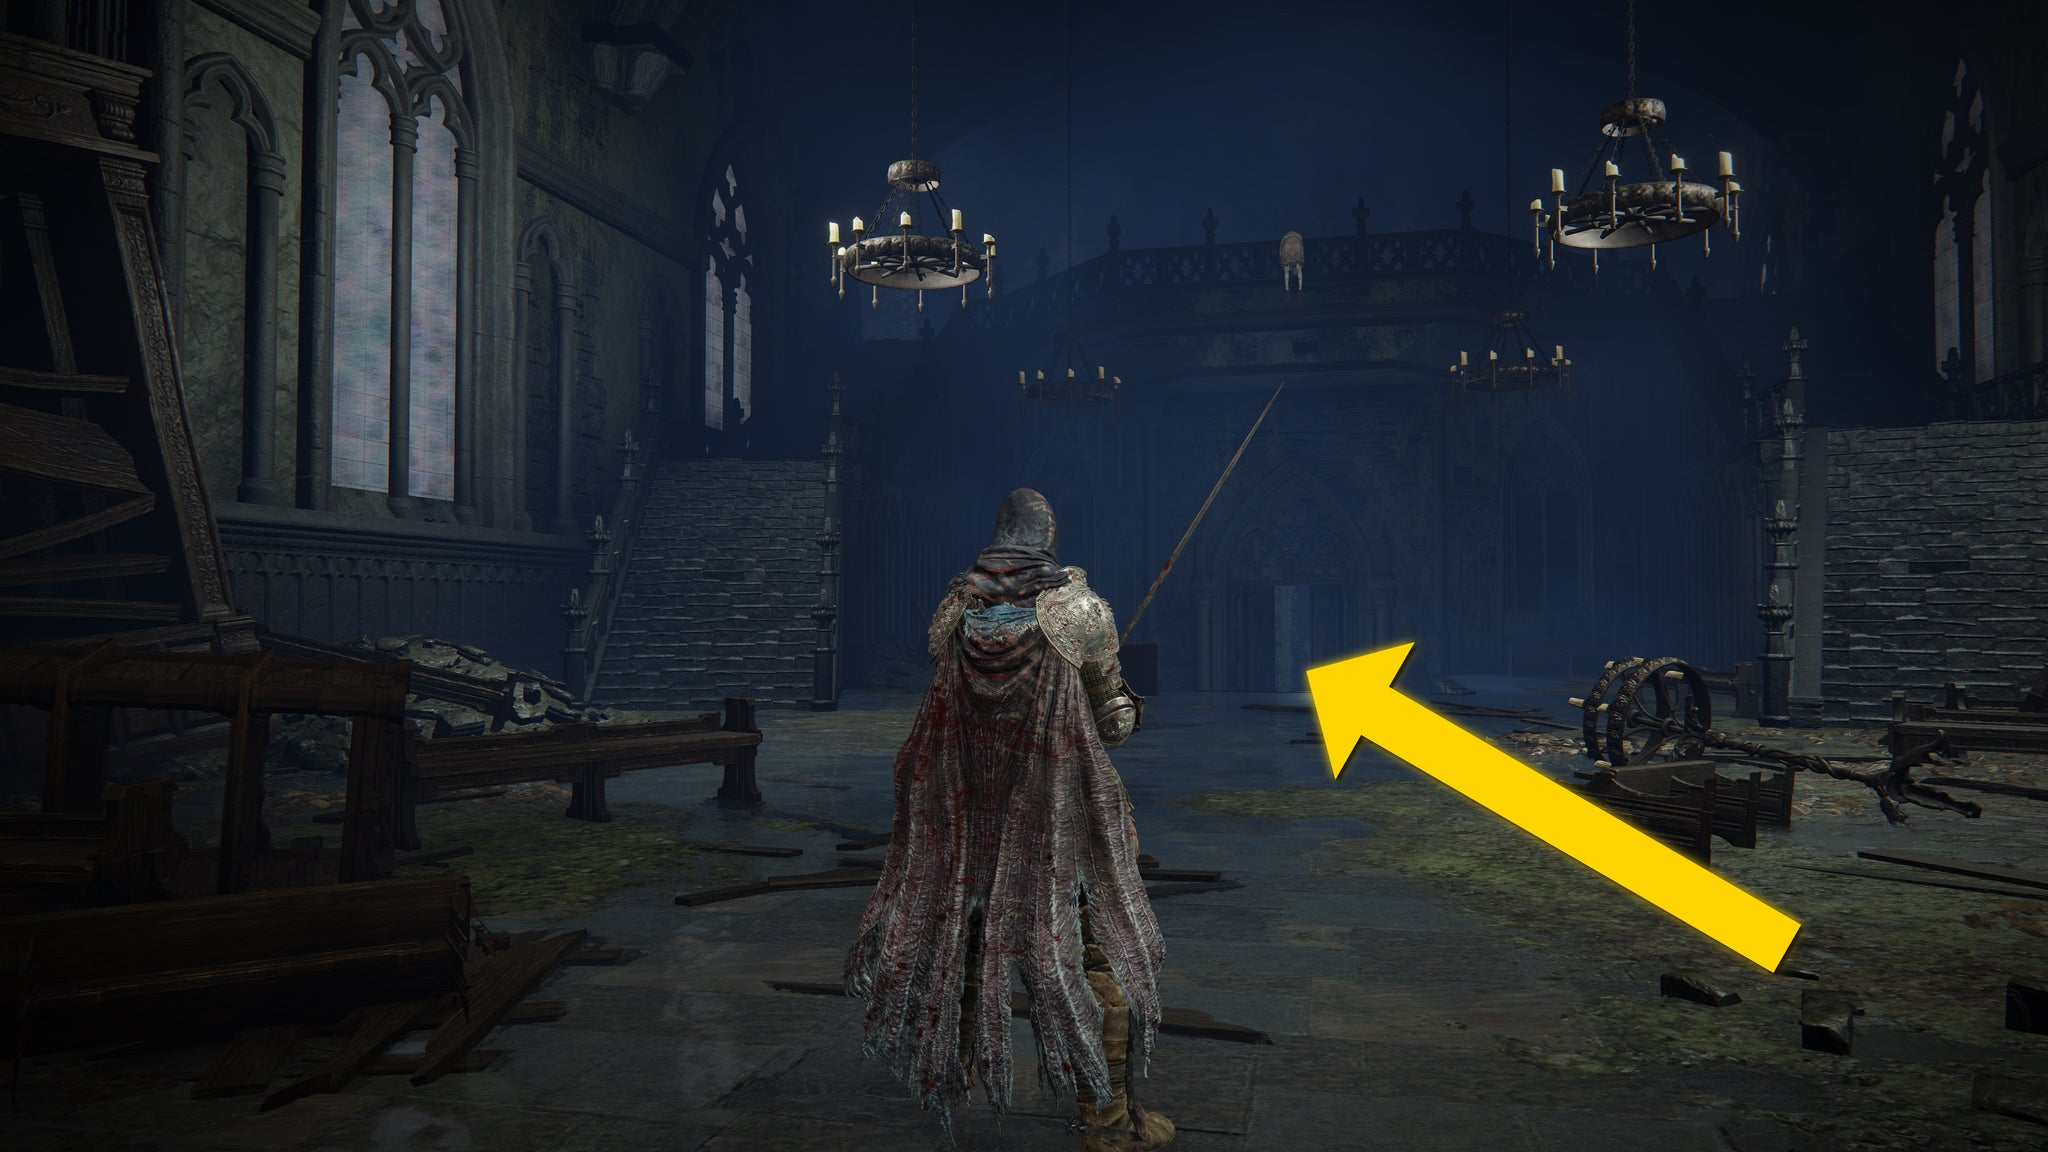
Follow this path all the way to the end, and you’ll see a pair of staircases, one on either side of a balcony. Below the balcony is a door. Open the door and proceed down the elevator to reach the Tree-Worship Passage Site Of Grace.
Beyond this Site Of Grace, you can reach the Tree-Worship Sanctum , which then opens out into the Scadutree Base - an arena where you will face an important Remembrance boss of the DLC.
4. Path to the Specimen Storehouse upper levels
Once you’ve completed everything else in this walkthrough, the final thing to do in the Church District is to ascend to the upper levels of the Specimen Storehouse. You may already have reached the lower levels of the Specimen Storehouse by progressing through the main entrance to the Shadow Keep, but you can only reach the upper levels and the loft via the Church District.
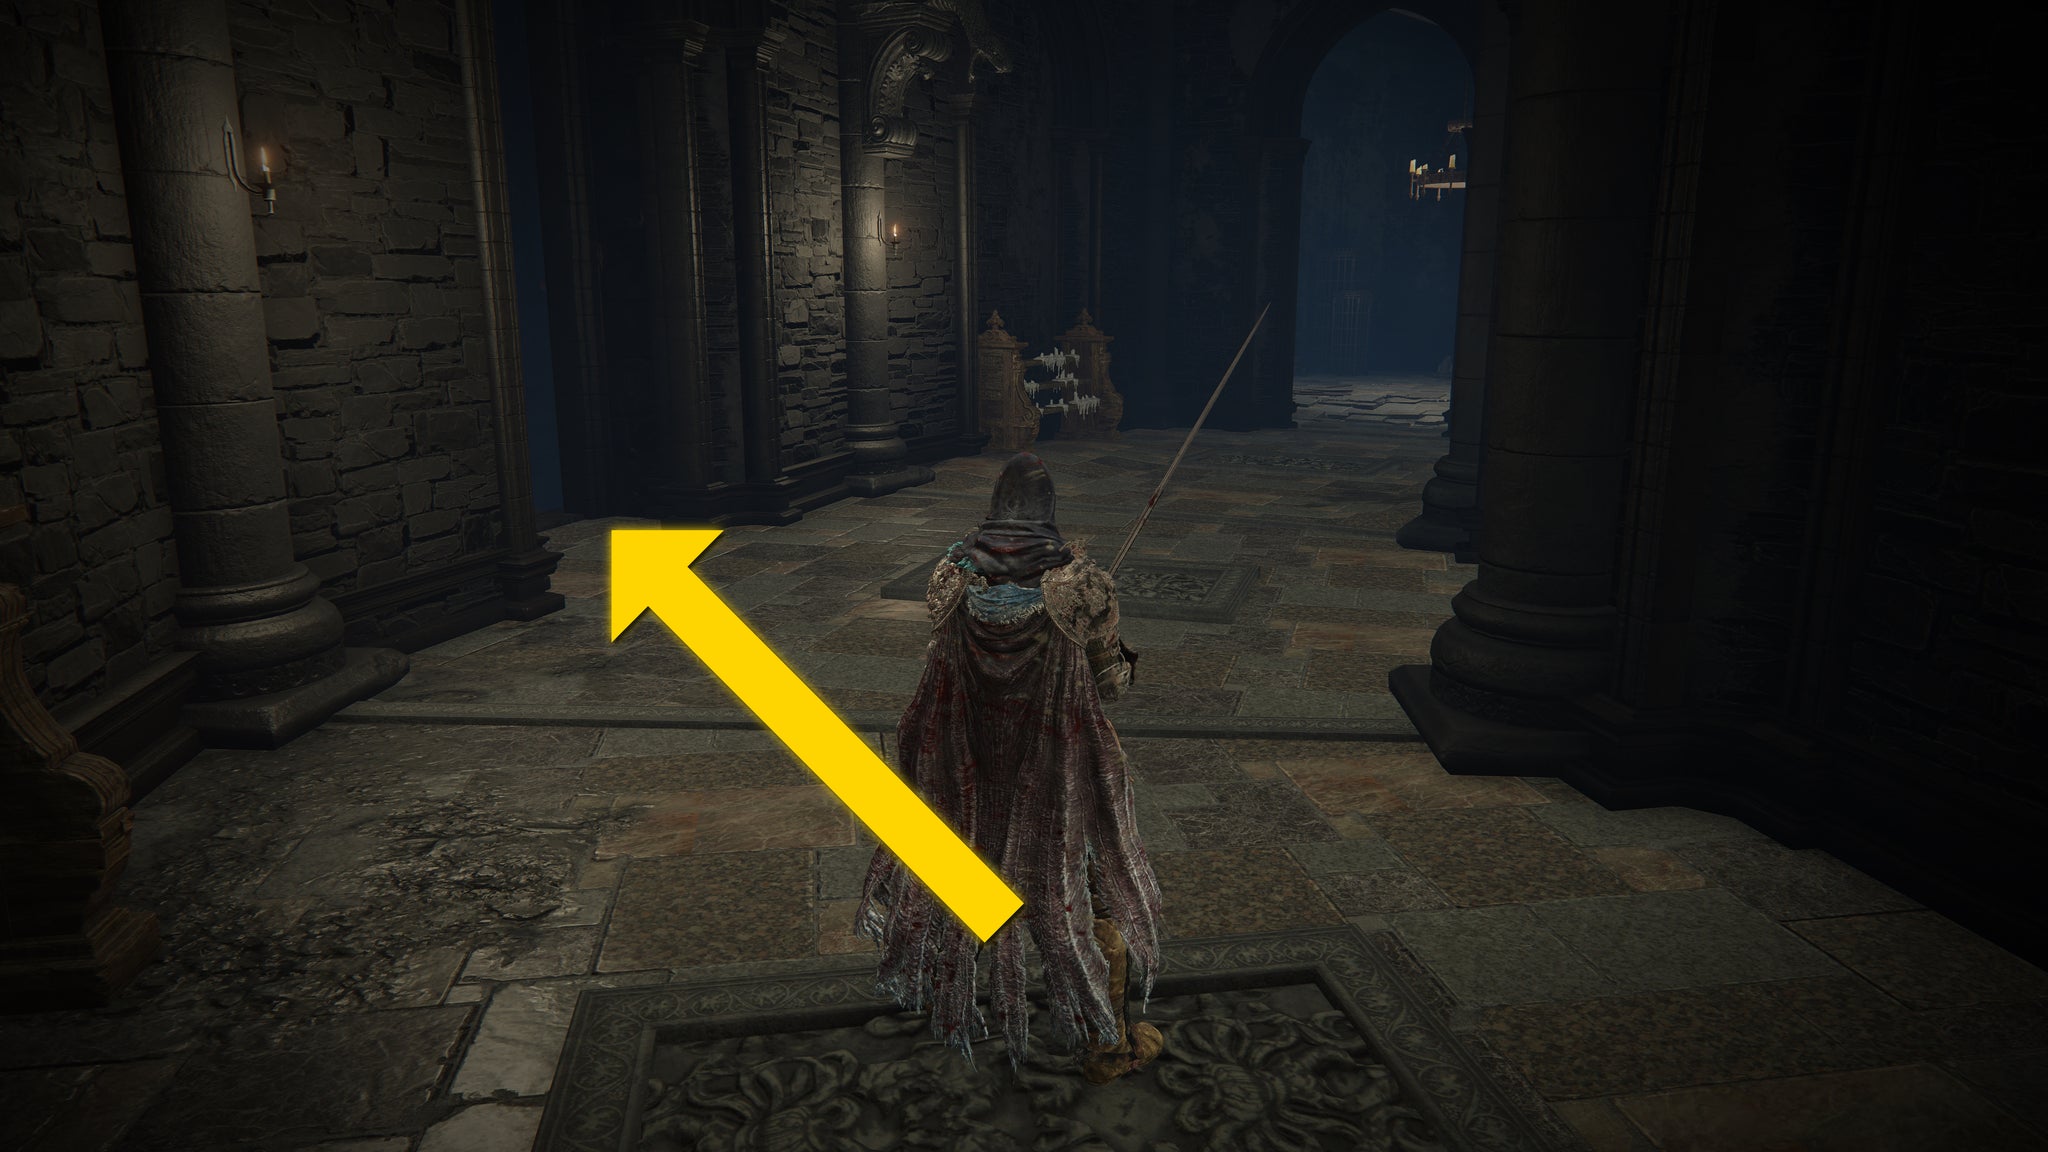
Image credit:Rock Paper Shotgun/Bandai Namco
To reach the Specimen Storehouse from the Church District, head back once again to the circular walkway within the first floor of the Church, where you faced those two Fire Knights. Stop at the point where you fought the second Fire Knight. In front of you is the elevator down to the ground floor. To the right, there should be a statue you can jump atop to loot a Scadutree Fragment . But to the left is the path to the Specimen Storehouse.
Take this lefthand path outside and cross the bridge. At the end of the bridge is an elevator. Ascend the elevator all the way up into the Specimen Storehouse. From there you can take a left turn and easily reach the “Storehouse, Back Section” Site Of Grace.
From here, you can ascend a long ladder which takes you all the way to the upper levels of the Specimen Storehouse, and the Loft. This is the main story path, because it’s via the Loft that you can reach the main boss of the Shadow Keep , and head beyond the Shadow Keep into the Ancient Ruins Of Rauh .
With that, you’ve successfully navigated the Church District of the Shadow Keep, one of the more complex areas within Elden Ring’s Shadow Of The Erdtree DLC. If you’re struggling to beat those Fire Knights, check out our list of all the Shadow Of The Erdtree weapons on offer, along with our guide to the best weapons in the DLC . If you need more help with the Elden Ring DLC, make sure you check out our other Erdtree guides, including our pages for the Shadow of the Erdtree boss order , Erdtree progression route order and all Erdtree quests .


Elden Ring
PS4 , PS5 , Xbox One , Xbox Series X/S , PC
Rock Paper Shotgun is better when you sign in
Sign in and join us on our journey to discover strange and compelling PC games.

All 75 Arc Raiders Blueprints and where to get them
These areas have the highest chance of giving you Blueprints

Image credit:Rock Paper Shotgun/Embark Studios

Looking for more Arc Raiders Blueprints? It’s a special day when you find a Blueprint, as they’re among the most valuable items in Arc Raiders. If you find a Blueprint that you haven’t already found, then you must make sure you hold onto it at all costs, because Blueprints are the key to one of the most important and powerful systems of meta-progression in the game.
This guide aims to be the very best guide on Blueprints you can find, starting with a primer on what exactly they are and how they work in Arc Raiders, before delving into exactly where to get Blueprints and the very best farming spots for you to take in your search.
We’ll also go over how to get Blueprints from other unlikely activities, such as destroying Surveyors and completing specific quests. And you’ll also find the full list of all 75 Blueprints in Arc Raiders on this page (including the newest Blueprints added with the Cold Snap update , such as the Deadline Blueprint and Firework Box Blueprint), giving you all the information you need to expand your own crafting repertoire.
In this guide:
- What are Blueprints in Arc Raiders?
- Full Blueprint list: All crafting recipes
- Where to find Blueprints in Arc Raiders Blueprints obtained from quests Blueprints obtained from Trials Best Blueprint farming locations

What are Blueprints in Arc Raiders?
Blueprints in Arc Raiders are special items which, if you manage to extract with them, you can expend to permanently unlock a new crafting recipe in your Workshop. If you manage to extract from a raid with an Anvil Blueprint, for example, you can unlock the ability to craft your very own Anvil Pistol, as many times as you like (as long as you have the crafting materials).
To use a Blueprint, simply open your Inventory while in the lobby, then right-click on the Blueprint and click “Learn And Consume” . This will permanently unlock the recipe for that item in your Workshop. As of the Stella Montis update, there are allegedly 75 different Blueprints to unlock - although only 68 are confirmed to be in the game so far. You can see all the Blueprints you’ve found and unlocked by going to the Workshop menu, and hitting “R” to bring up the Blueprint screen.
It’s possible to find duplicates of past Blueprints you’ve already unlocked. If you find these, then you can either sell them, or - if you like to play with friends - you can take it into a match and gift it to your friend so they can unlock that recipe for themselves. Another option is to keep hold of them until the time comes to donate them to the Expedition.
Full Blueprint list: All crafting recipes
Below is the full list of all the Blueprints that are currently available to find in Arc Raiders, and the crafting recipe required for each item:
| Blueprint | Type | Recipe | Crafted At |
|---|---|---|---|
| Bettina | Weapon | 3x Advanced Mechanical Components 3x Heavy Gun Parts 3x Canister | Gunsmith 3 |
| Blue Light Stick | Quick Use | 3x Chemicals | Utility Station 1 |
| Aphelion | Weapon | 3x Magnetic Accelerator 3x Complex Gun Parts 1x Matriarch Reactor | Gunsmith 3 |
| Combat Mk. 3 (Flanking) | Augment | 2x Advanced Electrical Components 3x Processor | Gear Bench 3 |
| Combat Mk. 3 (Aggressive) | Augment | 2x Advanced Electrical Components 3x Processor | Gear Bench 3 |
| Complex Gun Parts | Material | 2x Light Gun Parts 2x Medium Gun Parts 2x Heavy Gun Parts | Refiner 3 |
| Fireworks Box | Quick Use | 1x Explosive Compound 3x Pop Trigger | Explosives Station 2 |
| Gas Mine | Mine | 4x Chemicals 2x Rubber Parts | Explosives Station 1 |
| Green Light Stick | Quick Use | 3x Chemicals | Utility Station 1 |
| Pulse Mine | Mine | 1x Crude Explosives 1x Wires | Explosives Station 1 |
| Seeker Grenade | Grenade | 1x Crude Explosives 2x ARC Alloy | Explosives Station 1 |
| Looting Mk. 3 (Survivor) | Augment | 2x Advanced Electrical Components 3x Processor | Gear Bench 3 |
| Angled Grip II | Mod | 2x Mechanical Components 3x Duct Tape | Gunsmith 2 |
| Angled Grip III | Mod | 2x Mod Components 5x Duct Tape | Gunsmith 3 |
| Hullcracker | Weapon | 1x Magnetic Accelerator 3x Heavy Gun Parts 1x Exodus Modules | Gunsmith 3 |
| Launcher Ammo | Ammo | 5x Metal Parts 1x Crude Explosives | Workbench 1 |
| Anvil | Weapon | 5x Mechanical Components 5x Simple Gun Parts | Gunsmith 2 |
| Anvil Splitter | Mod | 2x Mod Components 3x Processor | Gunsmith 3 |
| ??? | ??? | ??? | ??? |
| Barricade Kit | Quick Use | 1x Mechanical Components | Utility Station 2 |
| Blaze Grenade | Grenade | 1x Explosive Compound 2x Oil | Explosives Station 3 |
| Bobcat | Weapon | 3x Advanced Mechanical Components 3x Light Gun Parts | Gunsmith 3 |
| Osprey | Weapon | 2x Advanced Mechanical Components 3x Medium Gun Parts 7x Wires | Gunsmith 3 |
| Burletta | Weapon | 3x Mechanical Components 3x Simple Gun Parts | Gunsmith 1 |
| Compensator II | Mod | 2x Mechanical Components 4x Wires | Gunsmith 2 |
| Compensator III | Mod | 2x Mod Components 8x Wires | Gunsmith 3 |
| Defibrillator | Quick Use | 9x Plastic Parts 1x Moss | Medical Lab 2 |
| ??? | ??? | ??? | ??? |
| Equalizer | Weapon | 3x Magnetic Accelerator 3x Complex Gun Parts 1x Queen Reactor | Gunsmith 3 |
| Extended Barrel | Mod | 2x Mod Components 8x Wires | Gunsmith 3 |
| Extended Light Mag II | Mod | 2x Mechanical Components 3x Steel Spring | Gunsmith 2 |
| Extended Light Mag III | Mod | 2x Mod Components 5x Steel Spring | Gunsmith 3 |
| Extended Medium Mag II | Mod | 2x Mechanical Components 3x Steel Spring | Gunsmith 2 |
| Extended Medium Mag III | Mod | 2x Mod Components 5x Steel Spring | Gunsmith 3 |
| Extended Shotgun Mag II | Mod | 2x Mechanical Components 3x Steel Spring | Gunsmith 2 |
| Extended Shotgun Mag III | Mod | 2x Mod Components 5x Steel Spring | Gunsmith 3 |
| Remote Raider Flare | Quick Use | 2x Chemicals 4x Rubber Parts | Utility Station 1 |
| Heavy Gun Parts | Material | 4x Simple Gun Parts | Refiner 2 |
| Venator | Weapon | 2x Advanced Mechanical Components 3x Medium Gun Parts 5x Magnet | Gunsmith 3 |
| Il Toro | Weapon | 5x Mechanical Components 6x Simple Gun Parts | Gunsmith 1 |
| Jolt Mine | Mine | 1x Electrical Components 1x Battery | Explosives Station 2 |
| Explosive Mine | Mine | 1x Explosive Compound 1x Sensors | Explosives Station 3 |
| Jupiter | Weapon | 3x Magnetic Accelerator 3x Complex Gun Parts 1x Queen Reactor | Gunsmith 3 |
| Light Gun Parts | Material | 4x Simple Gun Parts | Refiner 2 |
| Lightweight Stock | Mod | 2x Mod Components 5x Duct Tape | Gunsmith 3 |
| Lure Grenade | Grenade | 1x Speaker Component 1x Electrical Components | Utility Station 2 |
| Medium Gun Parts | Material | 4x Simple Gun Parts | Refiner 2 |
| Torrente | Weapon | 2x Advanced Mechanical Components 3x Medium Gun Parts 6x Steel Spring | Gunsmith 3 |
| Muzzle Brake II | Mod | 2x Mechanical Components 4x Wires | Gunsmith 2 |
| Muzzle Brake III | Mod | 2x Mod Components 8x Wires | Gunsmith 3 |
| Padded Stock | Mod | 2x Mod Components 5x Duct Tape | Gunsmith 3 |
| Shotgun Choke II | Mod | 2x Mechanical Components 4x Wires | Gunsmith 2 |
| Shotgun Choke III | Mod | 2x Mod Components 8x Wires | Gunsmith 3 |
| Shotgun Silencer | Mod | 2x Mod Components 8x Wires | Gunsmith 3 |
| Showstopper | Grenade | 1x Advanced Electrical Components 1x Voltage Converter | Explosives Station 3 |
| Silencer I | Mod | 2x Mechanical Components 4x Wires | Gunsmith 2 |
| Silencer II | Mod | 2x Mod Components 8x Wires | Gunsmith 3 |
| Snap Hook | Quick Use | 2x Power Rod 3x Rope 1x Exodus Modules | Utility Station 3 |
| Stable Stock II | Mod | 2x Mechanical Components 3x Duct Tape | Gunsmith 2 |
| Stable Stock III | Mod | 2x Mod Components 5x Duct Tape | Gunsmith 3 |
| Tagging Grenade | Grenade | 1x Electrical Components 1x Sensors | Utility Station 3 |
| Tempest | Weapon | 3x Advanced Mechanical Components 3x Medium Gun Parts 3x Canister | Gunsmith 3 |
| Trigger Nade | Grenade | 2x Crude Explosives 1x Processor | Explosives Station 2 |
| Vertical Grip II | Mod | 2x Mechanical Components 3x Duct Tape | Gunsmith 2 |
| Vertical Grip III | Mod | 2x Mod Components 5x Duct Tape | Gunsmith 3 |
| Vita Shot | Quick Use | 2x Antiseptic 1x Syringe | Medical Lab 3 |
| Vita Spray | Quick Use | 3x Antiseptic 1x Canister | Medical Lab 3 |
| Vulcano | Weapon | 1x Magnetic Accelerator 3x Heavy Gun Parts 1x Exodus Modules | Gunsmith 3 |
| Wolfpack | Grenade | 2x Explosive Compound 2x Sensors | Explosives Station 3 |
| Red Light Stick | Quick Use | 3x Chemicals | Utility Station 1 |
| Smoke Grenade | Grenade | 14x Chemicals 1x Canister | Utility Station 2 |
| Deadline | Mine | 3x Explosive Compound 2x ARC Circuitry | Explosives Station 3 |
| Trailblazer | Grenade | 1x Explosive Compound 1x Synthesized Fuel | Explosives Station 3 |
| Tactical Mk. 3 (Defensive) | Augment | 2x Advanced Electrical Components 3x Processor | Gear Bench 3 |
| Tactical Mk. 3 (Healing) | Augment | 2x Advanced Electrical Components 3x Processor | Gear Bench 3 |
| Yellow Light Stick | Quick Use | 3x Chemicals | Utility Station 1 |
Note: The missing Blueprints in this list likely have not actually been added to the game at the time of writing, because none of the playerbase has managed to find any of them. As they are added to the game, I will update this page with the most relevant information so you know exactly how to get all 75 Arc Raiders Blueprints.
Where to find Blueprints in Arc Raiders
Below is a list of all containers, modifiers, and events which maximise your chances of finding Blueprints:
- Certain quests reward you with specific Blueprints .
- Completing Trials has a high chance of offering Blueprints as rewards.
- Surveyors have a decent chance of dropping Blueprints on death.
- High loot value areas tend to have a greater chance of spawning Blueprints.
- Night Raids and Storms may increase rare Blueprint spawn chances in containers.
- Containers with higher numbers of items may have a higher tendency to spawn Blueprints. As a result, Blue Gate (which has many “large” containers containing multiple items) may give you a higher chance of spawning Blueprints.
- Raider containers (Raider Caches, Weapon Boxes, Medical Bags, Grenade Tubes) have increased Blueprint drop rates. As a result, the Uncovered Caches event gives you a high chance of finding Blueprints.
- Security Lockers have a higher than average chance of containing Blueprints.
- Certain Blueprints only seem to spawn under specific circumstances: Tempest Blueprint only spawns during Night Raid events. Vulcano Blueprint only spawns during Hidden Bunker events. Jupiter and Equaliser Blueprints only spawn during Harvester events.

Raider Caches, Weapon Boxes, and other raider-oriented container types have a good chance of offering Blueprints. |Image credit:Rock Paper Shotgun/Embark Studios
Blueprints have a very low chance of spawning in any container in Arc Raiders, around 1-2% on average. However, there is a higher chance of finding Blueprints in particular container types. Specifically, you can find more Blueprints in Raider containers and security lockers.
Beyond this, if you’re looking for Blueprints you should focus on regions of the map which are marked as having particularly high-value loot. Areas such as the Control Tower in Dam Battlegrounds, the Arrival and Departure Buildings in Spaceport, and Pilgrim’s Peak in Blue Gate all have a better-than-average chance of spawning Blueprints somewhere amongst all their containers. Night Raids and Electromagnetic Storm events also increase the drop chances of certain Blueprints .
In addition to these containers, you can often loot Blueprints from destroyed Surveyors - the largest of the rolling ball ARC. Surveyors are more commonly found on the later maps - Spaceport and Blue Gate - and if one spawns in your match, you’ll likely see it by the blue laser beam that it casts into the sky while “surveying”.
Surveyors are quite well-armoured and will very speedily run away from you once it notices you, but if you can take one down then make sure you loot all its parts for a chance of obtaining certain unusual Blueprints.
Blueprints obtained from quests
One way in which you can get Blueprints is by completing certain quests for the vendors in Speranza. Some quests will reward you with a specific item Blueprint upon completion, so as long as you work through all the quests in Arc Raiders, you are guaranteed those Blueprints.
Here is the full list of all Blueprints you can get from quest rewards:
- Trigger Nade Blueprint: Rewarded after completing “Sparks Fly”.
- Lure Grenade Blueprint: Rewarded after completing “Greasing Her Palms”.
- Burletta Blueprint: Rewarded after completing “Industrial Espionage”.
- Hullcracker Blueprint (and Launcher Ammo Blueprint): Rewarded after completing “The Major’s Footlocker”.
Alas, that’s only 4 Blueprints out of a total of 75 to unlock, so for the vast majority you will need to find them yourself during a raid. If you’re intent on farming Blueprints, then it’s best to equip yourself with cheap gear in case you lose it, but don’t use a free loadout because then you won’t get a safe pocket to stash any new Blueprint you find. No pain in Arc Raiders is sharper than failing to extract with a new Blueprint you’ve been after for a dozen hours already.

One of the best ways to get Blueprints is by hitting three stars on all five Trials every week. |Image credit:Rock Paper Shotgun/Embark Studios
Blueprints obtained from Trials
One of the very best ways to get Blueprints is as rewards for completing Trials in Arc Raiders. Trials are unlocked from Level 15 onwards, and allow you to earn rewards by focusing on certain tasks over the course of several raids. For example, one Trial might task you with dealing damage to Hornets, while another might challenge you to loot Supply Drops.
Trials refresh on a weekly basis, with a new week bringing five new Trials. Each Trial can offer up to three rewards after passing certain score milestones, and it’s possible to receive very high level loot from these reward crates - including Blueprints. So if you want to unlock as many Blueprints as possible, you should make a point of completing as many Trials as possible each week.
Best Blueprint farming locations
The very best way to get Blueprints is to frequent specific areas of the maps which combine high-tier loot pools with the right types of containers to search. Here are my recommendations for where to find Blueprints on every map, so you can always keep the search going for new crafting recipes to unlock.

Image credit:Rock Paper Shotgun/Embark Studios
Dam Battlegrounds
The best places to farm Blueprints on Dam Battlegrounds are the Control Tower, Power Generation Complex, Ruby Residence, and Pale Apartments . The first two regions, despite only being marked on the map as mid-tier loot, contain a phenomenal number of containers to loot. The Control Tower can also contain a couple of high-tier Security Lockers - though of course, you’ll need to have unlocked the Security Breach skill at the end of the Survival tree.
There’s also a lot of reporting amongst the playerbase that the Residential areas in the top-left of the map - Pale Apartments and Ruby Residence - give you a comparatively strong chance of finding Blueprints. Considering their size, there’s a high density of containers to loot in both locations, and they also have the benefit of being fairly out of the way. So you’re more likely to have all the containers to yourself.
Buried City
The best Blueprint farming locations on Buried City are the Santa Maria Houses, Grandioso Apartments, Town Hall, and the various buildings of the New District . Grandioso Apartments has a lower number of containers than the rest, but a high chance of spawning weapon cases - which have good Blueprint drop rates. The others are high-tier loot areas, with plenty of lootable containers - including Security Lockers.
Spaceport
The best places to find Blueprints on Spaceport are the Arrival and Departure Buildings, as well as Control Tower A6 and the Launch Towers . All these areas are labelled as high-value loot regions, and many of them are also very handily connected to one another by the Spaceport wall, which you can use to quickly run from one area to the next. At the tops of most of these buildings you’ll find at least one Security Locker, so this is an excellent farming route for players looking to find Blueprints.
The downside to looting Blueprints on Spaceport is that all these areas are hotly contested, particularly in Duos and Squads. You’ll need to be very focused and fast in order to complete the full farming route.

Image credit:Rock Paper Shotgun/Embark Studios
Blue Gate
Blue Gate tends to have a good chance of dropping Blueprints, potentially because it generally has a high number of containers which can hold lots of items; so there’s a higher chance of a Blueprint spawning in each container. In my experience, the best Blueprint farming spots on Blue Gate are Pilgrim’s Peak, Raider’s Refuge, the Ancient Fort, and the Underground Complex beneath the Warehouse .
All of these areas contain a wealth of containers to loot. Raider’s Refuge has less to loot, but the majority of the containers in and around the Refuge are raider containers, which have a high chance of containing Blueprints - particularly during major events.
Stella Montis
On the whole, Stella Montis seems to have a very low drop rate for Blueprints (though a high chance of dropping other high-tier loot). If you do want to try farming Blueprints on this map, the best places to find Blueprints in Stella Montis are Medical Research, Assembly Workshop, and the Business Center . These areas have the highest density of containers to loot on the map.
In addition to this, the Western Tunnel has a few different Security Lockers to loot, so while there’s very little to loot elsewhere in this area of the map, it’s worth hitting those Security Lockers if you spawn there at the start of a match.
That wraps up this primer on how to get all the Blueprints in Arc Raiders as quickly as possible. With the Expedition system constantly resetting a large number of players’ Blueprints, it’s more important than ever to have the most up-to-date information on where to find all these Blueprints.
While you’re here, be sure to check out our Arc Raiders best guns tier list , as well as our primers on the best skills to unlock and all the different Field Depot locations on every map.


ARC Raiders
PS5 , Xbox Series X/S , PC
Rock Paper Shotgun is better when you sign in
Sign in and join us on our journey to discover strange and compelling PC games.
