Elden Ring progression route: Recommended level for each area
The recommended level for all areas in Elden Ring
Image credit:Rock Paper Shotgun/Bandai Namco

What is the ideal Elden Ring area order? Many would say that this is a pointless question - Elden Ring is very much an open-world game , after all, and the point is to go where you like and do things in the order you prefer. But what if you’re truly not sure where to go next, and don’t want to spend hours dying on repeat before realising that an area is too challenging for now?
In this guide, we’ll take you through our recommended Elden Ring area order , which - for the most part - organises areas by recommended level to ensure you get the best possible progression route through Elden Ring. We’ve also got an Elden Ring level map which has all the information you need in one handy place, showing you the recommended level you’ll need for each area and the order in which you should go through each location. We’ll break each of the main regions down into easily tackled segments, and we’ll also mention any particularly challenging bosses in each area which you might want to leave be until later on.
In this guide:
- Elden Ring progression route
- Elden Ring level map
- Recommended level for all areas
- Individual area breakdowns
Note: Tread lightly, Tarnished. Spoilers for certain areas and bosses follow!
Elden Ring progression route
Our recommended progression route through all 30 areas of Elden Ring is to deal with Limgrave and Liurnia in the early game; then deal with the Underground areas, Altus Plateau , and lower Caelid in the early-mid-game; bounce between Leyndell , Mount Gelmir , and the end areas of Ranni’s quest in the late-mid-game, and leave the Mountaintops , Haligtree , and Mohgwyn Palace until the late-game.
Here’s our full progression route through all of Elden Ring in an easy-to-follow list format:
| Order | Progression Route | Starting With | Ending With |
|---|---|---|---|
| 1 | West Limgrave | Church Of Elleh | Tree Sentinel |
| 2 | East Limgrave | Third Church Of Marika | Smoldering Church |
| 3 | Weeping Peninsula | Bridge Of Sacrifice | Castle Morne |
| 4 | Stormveil Castle | Margit, The Fell Omen | Godrick The Grafted |
| 5 | Liurnia Of The Lakes | Stillwater Cave | Glintstone Dragon Smarag |
| 6 | Raya Lucaria Academy | Ravenmount Assassin | Rennala, Queen Of The Full Moon |
| 7 | Caria Manor | Fingercreepers | Ranni’s Rise |
| 8 | Ainsel River | Ainsel River Well | Dragonkin Soldier Of Nokstella |
| 9 | Siofra River | Siofra River Well | Regal Ancestor Spirit |
| 10 | Altus Plateau | Ancient Dragon Lansseax | Tree Sentinel Duo |
| 11 | South Caelid | Gael Tunnel | Starscourge Radahn |
| 12 | Nokron, Eternal City | Death of Radahn | Dragonkin Soldier |
| 13 | Siofra Aqueduct | Crucible Knights | Valiant Gargoyles |
| 14 | Carian Study Hall | Preceptor Miriam | Divine Tower Of Liurnia |
| 15 | Deeproot Depths | Erdtree Avatar | Lichdragon Fortissax |
| 16 | Nokstella | Ranni Doll | Baleful Shadow |
| 17 | Lake Of Rot | A foreboding feeling… | Astel, Naturalborn Of The Void |
| 18 | Moonlight Altar | Glintstone Dragon Adula | Ringleader’s Evergaol |
| 19 | Mount Gelmir | Corpse-Stench Shack | Full-Grown Fallingstar Beast |
| 20 | Dragonbarrow | Caelid Colosseum | Bestial Sanctum |
| 21 | Leyndell, Royal Capital | Margit, The Fell Omen | Morgott, The Omen King |
| 22 | Forbidden Lands | Death of Morgott | Grand Lift Of Rold |
| 23 | Mountaintops Of The Giants | Zamor Ruins | Fire Giant |
| 24 | Volcano Manor | Assassination Contracts | Rykard, Lord Of Blasphemy |
| 25 | Consecrated Snowfield | Haligtree Secret Medallion | Ordina, Liturgical Town |
| 26 | Subterranean Shunning-Grounds | Leyndell Catacombs | Cathedral Of The Forsaken |
| 27 | Mohgwyn Palace | Nameless White Masks | Mohg, Lord Of Blood |
| 28 | Miquella’s Haligtree | Haligtree Canopy | Malenia, Blade Of Miquella |
| 29 | Crumbling Farum Azula | Forge Of The Giants | Maliketh, The Black Blade |
| 30 | Leyndell, Ashen Capital | Sir Gideon Ofnir | Radagon + Elden Beast |
Elden Ring level map
To help you visualise our recommended area order, here’s a full Elden Ring level map showcasing the recommended order and level for each area:
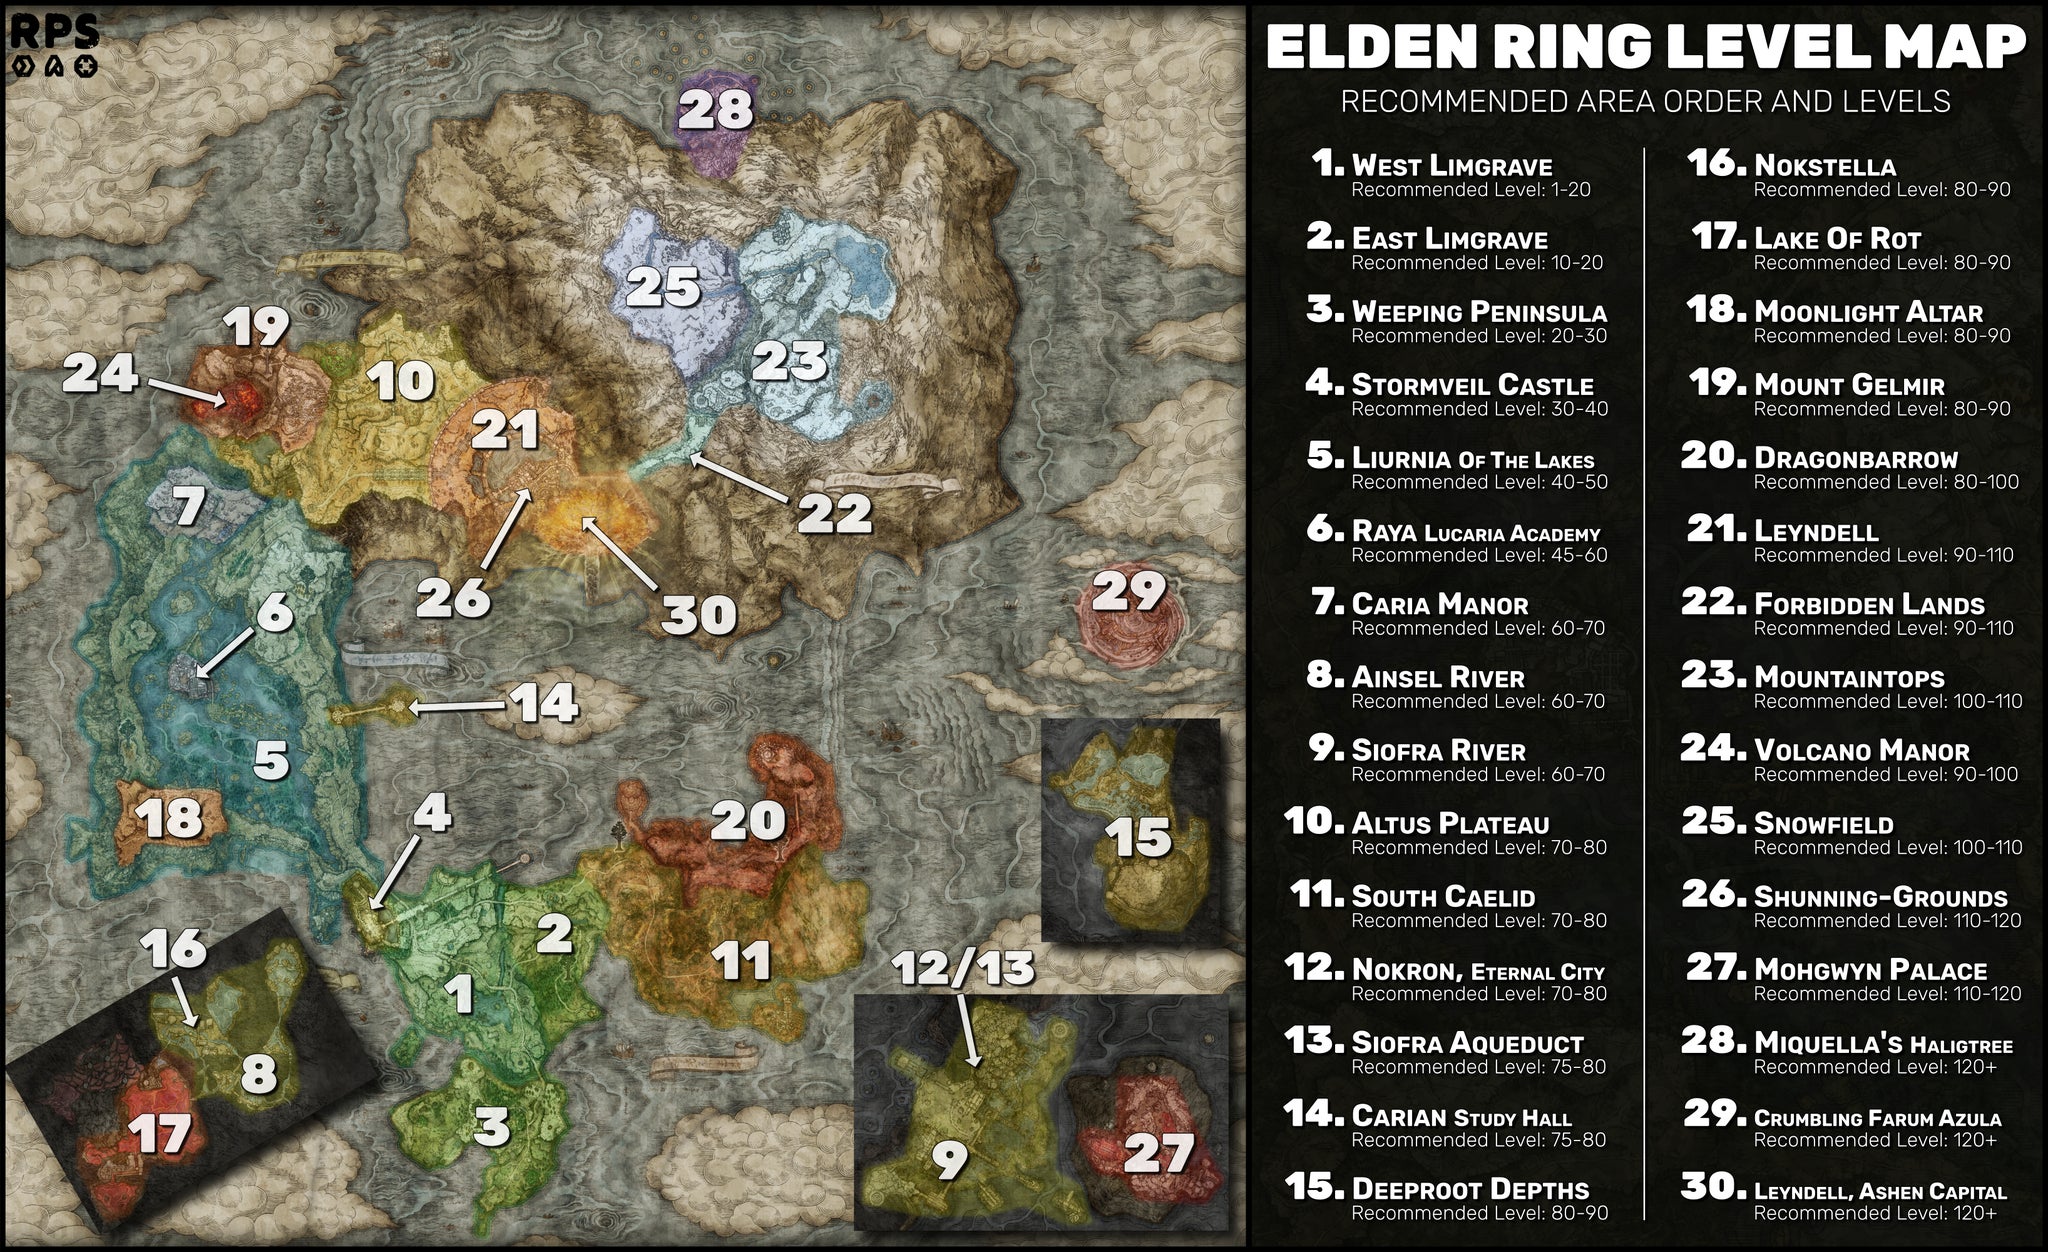
Our Elden Ring level map.Click hereto view it at full resolution! |Image credit:Rock Paper Shotgun
For more information on each of these areas and our recommended level for each one, read our full breakdown of the entire map below!
Recommended level for all areas
Below we’ll explore each of the different Elden Ring areas in greater depth. But first, here’s our recommended Elden Ring area order and recommended levels for first-time players:
| Order | Area | Recommended Level | Weapon Upgrade Level |
|---|---|---|---|
| 1 | West Limgrave | 1-20 | 0-2 |
| 2 | East Limgrave | 10-20 | 0-2 |
| 3 | Weeping Peninsula | 20-30 | 0-2 |
| 4 | Stormveil Castle | 30-40 | 3-4 |
| 5 | Liurnia Of The Lakes | 40-50 | 3-4 |
| 6 | Raya Lucaria Academy | 45-60 | 4-6 |
| 7 | Caria Manor | 60-70 | 6-8 |
| 8 | Ainsel River | 60-70 | 6-8 |
| 9 | Siofra River | 60-70 | 6-8 |
| 10 | Altus Plateau | 70-80 | 8-12 |
| 11 | South Caelid | 70-80 | 8-12 |
| 12 | Nokron, Eternal City | 70-80 | 8-10 |
| 13 | Siofra Aqueduct | 75-80 | 10-14 |
| 14 | Carian Study Hall | 75-80 | 12-14 |
| 15 | Deeproot Depths | 80-90 | 14-16 |
| 16 | Nokstella, Eternal City | 80-90 | 14-18 |
| 17 | Lake Of Rot | 80-90 | 16-20 |
| 18 | Moonlight Altar | 80-90 | 16-20 |
| 19 | Mount Gelmir | 80-90 | 15-20 |
| 20 | Dragonbarrow | 80-100 | 16-20 |
| 21 | Leyndell, Royal Capital | 90-110 | 16-20 |
| 22 | Forbidden Lands | 90-110 | 20-22 |
| 23 | Mountaintops Of The Giants | 100-110 | 20-22 |
| 24 | Volcano Manor | 90-100 | 16-20 |
| 25 | Consecrated Snowfield | 100-110 | 20-22 |
| 26 | Subterranean Shunning-Grounds | 110-120 | 20-25 |
| 27 | Mohgwyn Palace | 110-120 | 22-25 |
| 28 | Miquella’s Haligtree | 120+ | 24-25 |
| 29 | Crumbling Farum Azula | 120+ | 24-25 |
| 30 | Leyndell, Ashen Capital | 120+ | 24-25 |
Our area order takes into account not only the inherent level scaling of each area according to the game data, but also the general difficulty of the bosses you’ll find there, and how much freedom you have to avoid or take on certain troublesome bosses on your own terms.
This is why you might find sections of our progression route that you might not expect. For example, Dragonbarrow is among the highest scaled areas in the entire game - but we still encourage you to give it a go at around the same time as Leyndell or the Mountaintops Of The Giants, because the enemies and bosses you’ll encounter there are, in our experience, manageable at around Level 90-110.
When should you start the DLC? If you’re looking to start the Elden Ring DLC, we recommend fitting it in either just before or just after Miquella’s Haligtree - but you can also happily play through it after you’ve finished the main game. If you want to view our recommended area order in the Realm Of Shadow, check out our Shadow Of The Erdtree progression route guide!
1. West Limgrave

West Limgrave may be your starting point, but not everything here is meant to be tackled straight away. |Image credit:Rock Paper Shotgun
Recommended Level: 1-20 Recommended Weapon Upgrade Level: 0-2
West Limgrave is where all players begin their journey. Here more than anywhere, you’ll find a couple of bosses that are meant to be returned to later on, so feel free to skirt around them until you’re around level 20-30.
Bosses to watch out for: Tree Sentinel , Crucible Knight , Bell Bearing Hunter, Grafted Scion, Ulcerated Tree Spirit
2. East Limgrave

East Limgrave houses the Runebear-dominated Mistwood. Don’t go too far east, or you’ll end up in Caelid. |Image credit:Rock Paper Shotgun
Recommended Level: 10-20 Recommended Weapon Upgrade Level: 0-2
East Limgrave is fairly bereft of bosses, though it is a more challenging area on the whole - particularly the Mistwood, which is dominated by the aggressive Runebears. Make sure you talk to both Kenneth Haight and Blaidd on the Mistwood outskirts while you’re here - and while you can take the long and jaw-dropping ride down the Siofra River Well at this point, we wouldn’t recommend actually exploring it yet.
Bosses to watch out for: Anastasia, Tarnished-Eater
3. Weeping Peninsula

The Weeping Peninsula serves as a good final step before taking on Elden Ring’s first legacy dungeon. |Image credit:Rock Paper Shotgun
Recommended Level: 20-30 Recommended Weapon Upgrade Level: 0-2
The Weeping Peninsula lies to the south of Limgrave. Overall it’s not too much more difficult than the rest of Limgrave, but you may need to take your time once you arrive at Castle Morne on the south coast, because this castle is a step up in challenge.
Bosses to watch out for: Runebear, Leonine Misbegotten
4. Stormveil Castle

Stormveil Castle is much larger than you think, so take your time exploring. |Image credit:Rock Paper Shotgun
Recommended Level: 30-40 Recommended Weapon Upgrade Level: 3-4
Stormveil Castle is meant to test players before they enter the true second phase of the game in Liurnia. Elden Ring’s first legacy dungeon is sprawling, filled with hidden areas and challenging enemies - and, of course, the story bosses Margit and Godrick .
Bosses to watch out for: Margit, Godrick
5. Liurnia Of The Lakes

The largest region in the game, Liurnia has a whopping 40 bosses hidden away in various places. |Image credit:Rock Paper Shotgun
Recommended Level: 40-50 Recommended Weapon Upgrade Level: 3-4
Liurnia Of The Lakes is a gigantic wide-open region of The Lands Between, and a clear step up in difficulty from Limgrave, with its subterranean lobsters, Glintstone mages, and horrifying revenants. I’d recommend clearing the bosses around the open-world area before venturing into the two legacy dungeons of the region - Raya Lucaria Academy, and Caria Manor.
Bosses to watch out for: Glintstone Dragan Smarag , Death Rite Bird, Bell Bearing Hunter, Royal Revenant
6. Raya Lucaria Academy

Raya Lucaria Academy is home to many sorcerers and the second major boss of the game, Rennala. |Image credit:Rock Paper Shotgun
Recommended Level: 45-60 Recommended Weapon Upgrade Level: 4-6
Raya Lucaria Academy is dominated by Glintstone sorcerers which will prompt you to don some magic-resistant armour sets . It’s generally quite slow going, but you can actually get through the Acadmey at a fairly low level if you are careful and methodical.
Bosses to watch out for: Red Wolf Of Radagon , Rennala
7. Caria Manor

Caria Manor’s massive Fingercreepers and challenging bosses make it tough by Liurnia’s standards. |Image credit:Rock Paper Shotgun
Recommended Level: 60-70 Recommended Weapon Upgrade Level: 6-8
Though you may not expect it, Caria Manor is more challenging overall than Raya Lucaria Academy. We’d recommend it be the last place you tackle in Liurnia (apart from the areas that are blocked off for now), not only because it features some highly dangerous enemies for your current level, but because it will kickstart a long quest that takes you away from Liurnia immediately.
Bosses to watch out for: Royal Knight Loretta , Glintstone Dragon Adula
8. Ainsel River

Ainsel River may be beautiful, but its Claymen and Giant Ants are very much not. |Image credit:Rock Paper Shotgun
Recommended Level: 60-70 Recommended Weapon Upgrade Level: 6-8
Ainsel River is one of several underground regions of Elden Ring, this one found beneath Liurnia. Travel to the Ainsel River Well on the east coast to reach it. This area is populated mostly by Giant Ants and Claymen, but after Caria Manor they won’t be a significant step up in difficulty.
Bosses to watch out for: Dragonkin Soldier Of Nokstella
9. Siofra River

Siofra River is home to the Ancestral Followers, and the splendid spirit-boss they worship. |Image credit:Rock Paper Shotgun
Recommended Level: 60-70 Recommended Weapon Upgrade Level: 6-8
Back in Liurnia, you can use the elevator in the Mistwood to reach Siofra River, another underground region similar in difficulty to Ainsel River. Siofra’s most dangerous enemies are the Ancestral Followers, particularly their archers. But take your time and you can take most of them out from behind with ease.
Bosses to watch out for: Regal Ancestor Spirit , Dragonkin Soldier
10. Altus Plateau

The Altus Plateau is a step up in difficulty from Liurnia, that much is certain. |Image credit:Rock Paper Shotgun
Recommended Level: 70-80 Recommended Weapon Upgrade Level: 8-12
Many sites recommend you visit Caelid before the beautiful Altus Plateau , but we find the Altus Plateau easier on the whole. That said, there are a couple of boss encounters you may wish to leave for later - perhaps when you come back to tackle the capital, Leyndell.
Bosses to watch out for: Elemer Of The Briar, Sanguine Noble, Fallingstar Beast, Tree Sentinels
11. South Caelid

Caelid is a challenging mid-game area, but if you steer clear of the north it won’t be too bad. |Image credit:Rock Paper Shotgun
Recommended Level: 70-80 Recommended Weapon Upgrade Level: 8-12
Caelid’s Rot-infested enemies are all rather dangerous, but there are a few in particular that you should beware - including the dragon Decaying Ekzekes. Speaking of dragons, stay out of North Caelid for now. That’s Dragonbarrow, and it’s a significant step up in difficulty even from South Caelid. Deal with Starscourge Radahn and then come back out of the Rot for now.
Bosses to watch out for: Decaying Ekxykes, Death Rite Bird, Fallingstar Beast, Starscourge Radahn
12. Nokron, Eternal City

Nokron is one of two Eternal Cities in Elden Ring, and both are beautiful and deadly. |Image credit:Rock Paper Shotgun
Recommended Level: 70-80 Recommended Weapon Upgrade Level: 8-10
The Eternal City of Nokron is part of Siofra River. It barely features any bosses at all, though the Mimic Tear can surprise you if you’re not careful. The main reason we’ve added it here is because it’s the obvious next step for most players who are following Ranni’s quest after killing Starscourge Radahn.
Bosses to watch out for: Mimic Tear
13. Siofra Aqueduct

Siofra Aqueduct is home to one of my least favourite bosses in the game. Have fun. |Image credit:Rock Paper Shotgun
Recommended Level: 75-80 Recommended Weapon Upgrade Level: 10-14
The Siofra Aqueduct is joined to Nokron, and is mostly empty apart from a few nasty Crucible Knights and one boss fight which just so happens to be one of the hardest boss fights in the game (relative to the level most players encounter it). Therefore, I’d recommend you hit at least level 75 before attempting this area.
Bosses to watch out for: Valiant Gargoyles
14. Carian Study Hall

The Carian Study Hall leads to the Divine Tower Of Liurnia where you can claim Rennala’s Great Rune at last. |Image credit:Rock Paper Shotgun
Recommended Level: 75-80 Recommended Weapon Upgrade Level: 12-14
Most of the Carian Study Hall is actually no more dangerous really than the rest of Liurnia, but again it’s the logical next step in following Ranni’s quest. What you do have to watch out for is the Godskin Noble on the Divine Bridge, because that guy is no joke.
Bosses to watch out for: Preceptor Miriam, Godskin Noble
15. Deeproot Depths

Deeproot Depths is located far beneath the capital of Leyndell, but you can reach it via the Siofra Aqueduct. |Image credit:Rock Paper Shotgun
Recommended Level: 80-90 Recommended Weapon Upgrade Level: 14-16
Time to explore the final region of Elden Ring’s underground map. Deeproot Depths has some very challenging enemies and bosses, most notably Crucible Knight Siluria and the Lichdragon Fortissax. You should be nearing triple figures with your character level by this point.
Bosses to watch out for: Crucible Knight Siluria, Lichdragon Fortissax
16. Nokstella, Eternal City

Nokstella is the second Eternal City you’ll discover, and it’s filled with tricky enemies and traps. |Image credit:Rock Paper Shotgun
Recommended Level: 80-90 Recommended Weapon Upgrade Level: 14-18
Nokstella is the second Eternal City of Elden Ring, and it is found adjoining Ainsel River beneath Liurnia. This phase marks the second half of Ranni’s quest, and while Nokstella itself isn’t too terribly difficult for your current level, things are about to get harder.
Bosses to watch out for: Baleful Shadow
17. Lake Of Rot

Many players’ least favourite area in Elden Ring, the Lake Of Rot is one giant poisonous swamp. |Image credit:Rock Paper Shotgun
Recommended Level: 80-90 Recommended Weapon Upgrade Level: 16-20
We recommend level 80-90 for taking on the Lake Of Rot , but honestly it won’t hurt you to do a bit of rune farming before this point, because the Lake Of Rot is hard. It’s Elden Ring’s great big poisonous swamp area, and so it’s very slow going for the most part. The Dragonkin Soldier is a challenge to fight while avoiding the Rot, and at the end of the area you’ll face Astel, who can trip up a lot of unprepared players very easily.
Bosses to watch out for: Dragonkin Soldier, Astel Naturalborn Of The Void
18. Moonlight Altar

A breath of fresh air after the Lake Of Rot, the Moonlight Altar is the final piece of Liurnia to discover. |Image credit:Rock Paper Shotgun
Recommended Level: 80-90 Recommended Weapon Upgrade Level: 16-20
Finally you’ve reached the final area of Liurnia, the Moonlight Altar. Up here you’ll face several dragons, which immediately ups the difficulty on the rest of Liurnia. But they’re nothing compared to Alecto, the Black Knife Ringleader, who is one of the most difficult bosses you’ll find this side of Leyndell.
Bosses to watch out for: Glintstone Dragon Adula, Alecto Black Knife Ringleader
19. Mount Gelmir

Mount Gelmir adjoins the Altus Plateau, and it’s a step up in difficulty - particularly with its bosses. |Image credit:Rock Paper Shotgun
Recommended Level: 80-90 Recommended Weapon Upgrade Level: 15-20
I’d recommend leaving Volcano Manor for now, but you can freely explore around the rest of Mount Gelmir in the far northwest of the map. It’s a tough old place, and if you want my advice, don’t even try to fight the Full-Grown Fallingstar Beast until much later on. It’s easily one of the hardest bosses in Elden Ring .
Bosses to watch out for: Anastasia Tarnished-Eater, Fire Prelate, Full-Grown Fallingstar Beast
20. Dragonbarrow

Dragonbarrow is the most dangerous area of Caelid, filled with - yes, you guessed it. |Image credit:Rock Paper Shotgun
Recommended Level: 80-100 Recommended Weapon Upgrade Level: 16-20
Around this point is where we recommend players return to Caelid to deal with Dragonbarrow at last. There are some really nasty bosses and even some awful non-boss enemies here (looking at you, Runebear), and I’d honestly only be comfortable tackling this place once I hit level 90. Watch out in particular for the Divine Tower of Caelid, and Fort Faroth.
Bosses to watch out for: Bell Bearing Hunter, Godskin Apostle, Flying Dragon Greyll
21. Leyndell, Royal Capital

To enter the massive legacy dungeon that is Leyndell, you must first defeat a very challenging Draconic Tree Sentinel boss. |Image credit:Rock Paper Shotgun
Recommended Level: 90-110 Recommended Weapon Upgrade Level: 16-20
Leyndell is the place to be once you hit level 100. Immediately you’ll need to face down an upgraded Margit and a very challenging Draconic Tree Sentinel before working your way through one of the largest and densest legacy dungeons in the game. It’s a very tough place.
Bosses to watch out for: Margit, Draconic Tree Sentinel , Crucible Knight Ordovis, Godfrey, Morgott
22. Forbidden Lands

The Forbidden Lands act as the starting point for the late-game of Elden Ring, once you’ve conquered Leyndell. |Image credit:Rock Paper Shotgun
Recommended Level: 90-110 Recommended Weapon Upgrade Level: 20-22
The Forbidden Lands serves as a bridge between Leyndell and the Mountaintops Of The Giants. The good news is you’ll be in and out of this small area very quickly - if you can deal with the bad news, that is. The bad news being the Night’s Cavalry and Black Blade Kindred guarding the path.
Bosses to watch out for: Night’s Cavalry, Black Blade Kindred
23. Mountaintops Of The Giants

The Mountaintops Of The Giants look colossal on the map, but the actual traversable area is around the size of Limgrave. |Image credit:Rock Paper Shotgun
Recommended Level: 100-110 Recommended Weapon Upgrade Level: 20-22
The Mountaintops Of The Giants are a clear sign that you’re getting into the late-game of Elden Ring. The enemy population is very diverse in this region, and you’ll find a lot of challenges, including some truly awe-inspiring boss fights. The very worst though is Commander Niall, found in Castle Sol. This guy is the hardest boss in Elden Ring for me, so you may want to leave him for a bit.
Bosses to watch out for: Fire Giant , Borealis The Freezing Fog, Commander Niall
24. Volcano Manor

Volcano Manor is home to a few contract assassination quests that you may wish to complete before disposing of Lord Rykard. |Image credit:Rock Paper Shotgun
Recommended Level: 90-100 Recommended Weapon Upgrade Level: 16-20
Volcano Manor isn’t as difficult as the Mountaintops Of The Giants really, but if you want to complete all the Volcano Manor contracts then you’ll need to unlock the Mountaintops area first. Having said that, the fights against the Godskin Noble and in particular Rykard can be very difficult if you don’t know what you’re doing.
Bosses to watch out for: Godskin Noble, Rykard
25. Consecrated Snowfield

The Consecrated Snowfield is the slightly harder half of the Mountaintops, where visibility is near-zero. |Image credit:Rock Paper Shotgun
Recommended Level: 100-110 Recommended Weapon Upgrade Level: 20-22
The Consecrated Snowfield is essentially the western half of the Mountaintops Of The Giants, and we think it’s the slightly more difficult of the two halves overall. There’s a surprising number of bosses hidden away in this region, and some of them can be a real challenge even for level 100+ characters.
Bosses to watch out for: Sanguine Noble, Astel Stars Of Darkness
26. Subterranean Shunning-Grounds

Beneath Lenydell there exists a network of sewers and catacombs called the Subterranean Shunning-Grounds. |Image credit:Rock Paper Shotgun
Recommended Level: 110-120 Recommended Weapon Upgrade Level: 20-25
The Subterranean Shunning-Grounds are the sewers beneath Leyndell, and they are a bit of a step up in difficulty from the Leyndell you know and love from above ground. That’s why we recommend not going down there right away, but instead deal with the Mountaintops first, to beef up your character a bit more. There are some nasty Omens and other creatures waiting for you down here, including a challenging fight against Mohg The Omen.
Bosses to watch out for: Mohg The Omen
27. Mohgwyn Palace

Mohgwyn Palace is a very tricky area, and home to one of Elden Ring’s most memorable boss fights. |Image credit:Rock Paper Shotgun
Recommended Level: 110-120 Recommended Weapon Upgrade Level: 22-25
Speaking of Mohg! You can now teleport to Mohgwyn Palace using a portal found in the Consecrated Snowfield. And while it’s one of the most uniquely designed areas in the game, it’s also easily one of the most challenging, particularly when you factor in the area’s main boss, Mohg himself. Having said that, you’ll need to reach this point if you want to delve into the Shadow Of The Erdtree DLC.
Bosses to watch out for: Mohg Lord Of Blood
28. Miquella’s Haligtree

Miquella’s Haligtree is home to Malenia, Blade Of Miquella, who needs no introduction really. |Image credit:Rock Paper Shotgun
Recommended Level: 120+ Recommended Weapon Upgrade Level: 24-25
Miquella’s Haligtree is probably the hardest area in the entire game, so you can feel free to tackle it after finishing the base game in the Ashen Capital - but for neatness’ sake we’re putting it just before the ending, for a more sensible narrative journey.
The Haligtree is filled to the brim with extremely challenging bosses and non-boss enemies alike, many of whom are able to attack you simultaneously as a group. It’s very tough going, and when you reach Malenia, Blade Of Miquella , you may want to prepare yourself for a good several sessions of failure before you finally beat this iconic FromSoft boss.
Bosses to watch out for: Malenia Blade Of Miquella
29. Crumbling Farum Azula

Crumbling Farum Azula is the penultimate area in Elden Ring, and as such it’s filled with frighteningly challenging enemies. |Image credit:Rock Paper Shotgun
Recommended Level: 120+ Recommended Weapon Upgrade Level: 24-25
After you defeat the Fire Giant in the Mountaintops Of The Giants, you’re able to enter what is essentially the endgame of Elden Ring, and be whisked off to the timeless lands of Crumbling Farum Azula . This area is obviously meant only for very high-level characters who have more or less maxed out their weapon upgrades. Even then, the four bosses I’ve mentioned below are bound to cause you some real trouble.
Bosses to watch out for: Godskin Duo , Draconic Tree Sentinel, Dragonlord Placidusax , Maliketh
30. Leyndell, Ashen Capital

The final area of Elden Ring, the Ashen Capital is where you must fight those last few fights to earn your place as Elden Lord. |Image credit:Rock Paper Shotgun
Recommended Level: 120+ Recommended Weapon Upgrade Level: 24-25
The final region of Elden Ring is a transformed Leyndell, populated by very few non-boss enemies and a whole heap of bosses. There’s not much to say here except that it’s the ending , so make sure you’re prepared. Good luck!
Bosses to watch out for: Godfrey/Hoarah Loux , Radagon , Elden Beast
That brings us to an end of this exhaustive list of Elden Ring areas and their recommended levels! Elden Ring sure is big, isn’t it? To prepare yourself for the hundreds of different Elden Ring bosses on offer, why not take a look at our guides on the best Elden Ring builds and best Elden Ring weapons ? You can also check out our guide on how to level up fast in Elden Ring .

Elden Ring
PS4 , PS5 , Xbox One , Xbox Series X/S , PC
Rock Paper Shotgun is better when you sign in
Sign in and join us on our journey to discover strange and compelling PC games.

All 75 Arc Raiders Blueprints and where to get them
These areas have the highest chance of giving you Blueprints

Image credit:Rock Paper Shotgun/Embark Studios
Looking for more Arc Raiders Blueprints? It’s a special day when you find a Blueprint, as they’re among the most valuable items in Arc Raiders. If you find a Blueprint that you haven’t already found, then you must make sure you hold onto it at all costs, because Blueprints are the key to one of the most important and powerful systems of meta-progression in the game.
This guide aims to be the very best guide on Blueprints you can find, starting with a primer on what exactly they are and how they work in Arc Raiders, before delving into exactly where to get Blueprints and the very best farming spots for you to take in your search.
We’ll also go over how to get Blueprints from other unlikely activities, such as destroying Surveyors and completing specific quests. And you’ll also find the full list of all 75 Blueprints in Arc Raiders on this page (including the newest Blueprints added with the Cold Snap update , such as the Deadline Blueprint and Firework Box Blueprint), giving you all the information you need to expand your own crafting repertoire.
In this guide:
- What are Blueprints in Arc Raiders?
- Full Blueprint list: All crafting recipes
- Where to find Blueprints in Arc Raiders Blueprints obtained from quests Blueprints obtained from Trials Best Blueprint farming locations

What are Blueprints in Arc Raiders?
Blueprints in Arc Raiders are special items which, if you manage to extract with them, you can expend to permanently unlock a new crafting recipe in your Workshop. If you manage to extract from a raid with an Anvil Blueprint, for example, you can unlock the ability to craft your very own Anvil Pistol, as many times as you like (as long as you have the crafting materials).
To use a Blueprint, simply open your Inventory while in the lobby, then right-click on the Blueprint and click “Learn And Consume” . This will permanently unlock the recipe for that item in your Workshop. As of the Stella Montis update, there are allegedly 75 different Blueprints to unlock - although only 68 are confirmed to be in the game so far. You can see all the Blueprints you’ve found and unlocked by going to the Workshop menu, and hitting “R” to bring up the Blueprint screen.
It’s possible to find duplicates of past Blueprints you’ve already unlocked. If you find these, then you can either sell them, or - if you like to play with friends - you can take it into a match and gift it to your friend so they can unlock that recipe for themselves. Another option is to keep hold of them until the time comes to donate them to the Expedition.
Full Blueprint list: All crafting recipes
Below is the full list of all the Blueprints that are currently available to find in Arc Raiders, and the crafting recipe required for each item:
| Blueprint | Type | Recipe | Crafted At |
|---|---|---|---|
| Bettina | Weapon | 3x Advanced Mechanical Components 3x Heavy Gun Parts 3x Canister | Gunsmith 3 |
| Blue Light Stick | Quick Use | 3x Chemicals | Utility Station 1 |
| Aphelion | Weapon | 3x Magnetic Accelerator 3x Complex Gun Parts 1x Matriarch Reactor | Gunsmith 3 |
| Combat Mk. 3 (Flanking) | Augment | 2x Advanced Electrical Components 3x Processor | Gear Bench 3 |
| Combat Mk. 3 (Aggressive) | Augment | 2x Advanced Electrical Components 3x Processor | Gear Bench 3 |
| Complex Gun Parts | Material | 2x Light Gun Parts 2x Medium Gun Parts 2x Heavy Gun Parts | Refiner 3 |
| Fireworks Box | Quick Use | 1x Explosive Compound 3x Pop Trigger | Explosives Station 2 |
| Gas Mine | Mine | 4x Chemicals 2x Rubber Parts | Explosives Station 1 |
| Green Light Stick | Quick Use | 3x Chemicals | Utility Station 1 |
| Pulse Mine | Mine | 1x Crude Explosives 1x Wires | Explosives Station 1 |
| Seeker Grenade | Grenade | 1x Crude Explosives 2x ARC Alloy | Explosives Station 1 |
| Looting Mk. 3 (Survivor) | Augment | 2x Advanced Electrical Components 3x Processor | Gear Bench 3 |
| Angled Grip II | Mod | 2x Mechanical Components 3x Duct Tape | Gunsmith 2 |
| Angled Grip III | Mod | 2x Mod Components 5x Duct Tape | Gunsmith 3 |
| Hullcracker | Weapon | 1x Magnetic Accelerator 3x Heavy Gun Parts 1x Exodus Modules | Gunsmith 3 |
| Launcher Ammo | Ammo | 5x Metal Parts 1x Crude Explosives | Workbench 1 |
| Anvil | Weapon | 5x Mechanical Components 5x Simple Gun Parts | Gunsmith 2 |
| Anvil Splitter | Mod | 2x Mod Components 3x Processor | Gunsmith 3 |
| ??? | ??? | ??? | ??? |
| Barricade Kit | Quick Use | 1x Mechanical Components | Utility Station 2 |
| Blaze Grenade | Grenade | 1x Explosive Compound 2x Oil | Explosives Station 3 |
| Bobcat | Weapon | 3x Advanced Mechanical Components 3x Light Gun Parts | Gunsmith 3 |
| Osprey | Weapon | 2x Advanced Mechanical Components 3x Medium Gun Parts 7x Wires | Gunsmith 3 |
| Burletta | Weapon | 3x Mechanical Components 3x Simple Gun Parts | Gunsmith 1 |
| Compensator II | Mod | 2x Mechanical Components 4x Wires | Gunsmith 2 |
| Compensator III | Mod | 2x Mod Components 8x Wires | Gunsmith 3 |
| Defibrillator | Quick Use | 9x Plastic Parts 1x Moss | Medical Lab 2 |
| ??? | ??? | ??? | ??? |
| Equalizer | Weapon | 3x Magnetic Accelerator 3x Complex Gun Parts 1x Queen Reactor | Gunsmith 3 |
| Extended Barrel | Mod | 2x Mod Components 8x Wires | Gunsmith 3 |
| Extended Light Mag II | Mod | 2x Mechanical Components 3x Steel Spring | Gunsmith 2 |
| Extended Light Mag III | Mod | 2x Mod Components 5x Steel Spring | Gunsmith 3 |
| Extended Medium Mag II | Mod | 2x Mechanical Components 3x Steel Spring | Gunsmith 2 |
| Extended Medium Mag III | Mod | 2x Mod Components 5x Steel Spring | Gunsmith 3 |
| Extended Shotgun Mag II | Mod | 2x Mechanical Components 3x Steel Spring | Gunsmith 2 |
| Extended Shotgun Mag III | Mod | 2x Mod Components 5x Steel Spring | Gunsmith 3 |
| Remote Raider Flare | Quick Use | 2x Chemicals 4x Rubber Parts | Utility Station 1 |
| Heavy Gun Parts | Material | 4x Simple Gun Parts | Refiner 2 |
| Venator | Weapon | 2x Advanced Mechanical Components 3x Medium Gun Parts 5x Magnet | Gunsmith 3 |
| Il Toro | Weapon | 5x Mechanical Components 6x Simple Gun Parts | Gunsmith 1 |
| Jolt Mine | Mine | 1x Electrical Components 1x Battery | Explosives Station 2 |
| Explosive Mine | Mine | 1x Explosive Compound 1x Sensors | Explosives Station 3 |
| Jupiter | Weapon | 3x Magnetic Accelerator 3x Complex Gun Parts 1x Queen Reactor | Gunsmith 3 |
| Light Gun Parts | Material | 4x Simple Gun Parts | Refiner 2 |
| Lightweight Stock | Mod | 2x Mod Components 5x Duct Tape | Gunsmith 3 |
| Lure Grenade | Grenade | 1x Speaker Component 1x Electrical Components | Utility Station 2 |
| Medium Gun Parts | Material | 4x Simple Gun Parts | Refiner 2 |
| Torrente | Weapon | 2x Advanced Mechanical Components 3x Medium Gun Parts 6x Steel Spring | Gunsmith 3 |
| Muzzle Brake II | Mod | 2x Mechanical Components 4x Wires | Gunsmith 2 |
| Muzzle Brake III | Mod | 2x Mod Components 8x Wires | Gunsmith 3 |
| Padded Stock | Mod | 2x Mod Components 5x Duct Tape | Gunsmith 3 |
| Shotgun Choke II | Mod | 2x Mechanical Components 4x Wires | Gunsmith 2 |
| Shotgun Choke III | Mod | 2x Mod Components 8x Wires | Gunsmith 3 |
| Shotgun Silencer | Mod | 2x Mod Components 8x Wires | Gunsmith 3 |
| Showstopper | Grenade | 1x Advanced Electrical Components 1x Voltage Converter | Explosives Station 3 |
| Silencer I | Mod | 2x Mechanical Components 4x Wires | Gunsmith 2 |
| Silencer II | Mod | 2x Mod Components 8x Wires | Gunsmith 3 |
| Snap Hook | Quick Use | 2x Power Rod 3x Rope 1x Exodus Modules | Utility Station 3 |
| Stable Stock II | Mod | 2x Mechanical Components 3x Duct Tape | Gunsmith 2 |
| Stable Stock III | Mod | 2x Mod Components 5x Duct Tape | Gunsmith 3 |
| Tagging Grenade | Grenade | 1x Electrical Components 1x Sensors | Utility Station 3 |
| Tempest | Weapon | 3x Advanced Mechanical Components 3x Medium Gun Parts 3x Canister | Gunsmith 3 |
| Trigger Nade | Grenade | 2x Crude Explosives 1x Processor | Explosives Station 2 |
| Vertical Grip II | Mod | 2x Mechanical Components 3x Duct Tape | Gunsmith 2 |
| Vertical Grip III | Mod | 2x Mod Components 5x Duct Tape | Gunsmith 3 |
| Vita Shot | Quick Use | 2x Antiseptic 1x Syringe | Medical Lab 3 |
| Vita Spray | Quick Use | 3x Antiseptic 1x Canister | Medical Lab 3 |
| Vulcano | Weapon | 1x Magnetic Accelerator 3x Heavy Gun Parts 1x Exodus Modules | Gunsmith 3 |
| Wolfpack | Grenade | 2x Explosive Compound 2x Sensors | Explosives Station 3 |
| Red Light Stick | Quick Use | 3x Chemicals | Utility Station 1 |
| Smoke Grenade | Grenade | 14x Chemicals 1x Canister | Utility Station 2 |
| Deadline | Mine | 3x Explosive Compound 2x ARC Circuitry | Explosives Station 3 |
| Trailblazer | Grenade | 1x Explosive Compound 1x Synthesized Fuel | Explosives Station 3 |
| Tactical Mk. 3 (Defensive) | Augment | 2x Advanced Electrical Components 3x Processor | Gear Bench 3 |
| Tactical Mk. 3 (Healing) | Augment | 2x Advanced Electrical Components 3x Processor | Gear Bench 3 |
| Yellow Light Stick | Quick Use | 3x Chemicals | Utility Station 1 |
Note: The missing Blueprints in this list likely have not actually been added to the game at the time of writing, because none of the playerbase has managed to find any of them. As they are added to the game, I will update this page with the most relevant information so you know exactly how to get all 75 Arc Raiders Blueprints.
Where to find Blueprints in Arc Raiders
Below is a list of all containers, modifiers, and events which maximise your chances of finding Blueprints:
- Certain quests reward you with specific Blueprints .
- Completing Trials has a high chance of offering Blueprints as rewards.
- Surveyors have a decent chance of dropping Blueprints on death.
- High loot value areas tend to have a greater chance of spawning Blueprints.
- Night Raids and Storms may increase rare Blueprint spawn chances in containers.
- Containers with higher numbers of items may have a higher tendency to spawn Blueprints. As a result, Blue Gate (which has many “large” containers containing multiple items) may give you a higher chance of spawning Blueprints.
- Raider containers (Raider Caches, Weapon Boxes, Medical Bags, Grenade Tubes) have increased Blueprint drop rates. As a result, the Uncovered Caches event gives you a high chance of finding Blueprints.
- Security Lockers have a higher than average chance of containing Blueprints.
- Certain Blueprints only seem to spawn under specific circumstances: Tempest Blueprint only spawns during Night Raid events. Vulcano Blueprint only spawns during Hidden Bunker events. Jupiter and Equaliser Blueprints only spawn during Harvester events.

Raider Caches, Weapon Boxes, and other raider-oriented container types have a good chance of offering Blueprints. |Image credit:Rock Paper Shotgun/Embark Studios
Blueprints have a very low chance of spawning in any container in Arc Raiders, around 1-2% on average. However, there is a higher chance of finding Blueprints in particular container types. Specifically, you can find more Blueprints in Raider containers and security lockers.
Beyond this, if you’re looking for Blueprints you should focus on regions of the map which are marked as having particularly high-value loot. Areas such as the Control Tower in Dam Battlegrounds, the Arrival and Departure Buildings in Spaceport, and Pilgrim’s Peak in Blue Gate all have a better-than-average chance of spawning Blueprints somewhere amongst all their containers. Night Raids and Electromagnetic Storm events also increase the drop chances of certain Blueprints .
In addition to these containers, you can often loot Blueprints from destroyed Surveyors - the largest of the rolling ball ARC. Surveyors are more commonly found on the later maps - Spaceport and Blue Gate - and if one spawns in your match, you’ll likely see it by the blue laser beam that it casts into the sky while “surveying”.
Surveyors are quite well-armoured and will very speedily run away from you once it notices you, but if you can take one down then make sure you loot all its parts for a chance of obtaining certain unusual Blueprints.
Blueprints obtained from quests
One way in which you can get Blueprints is by completing certain quests for the vendors in Speranza. Some quests will reward you with a specific item Blueprint upon completion, so as long as you work through all the quests in Arc Raiders, you are guaranteed those Blueprints.
Here is the full list of all Blueprints you can get from quest rewards:
- Trigger Nade Blueprint: Rewarded after completing “Sparks Fly”.
- Lure Grenade Blueprint: Rewarded after completing “Greasing Her Palms”.
- Burletta Blueprint: Rewarded after completing “Industrial Espionage”.
- Hullcracker Blueprint (and Launcher Ammo Blueprint): Rewarded after completing “The Major’s Footlocker”.
Alas, that’s only 4 Blueprints out of a total of 75 to unlock, so for the vast majority you will need to find them yourself during a raid. If you’re intent on farming Blueprints, then it’s best to equip yourself with cheap gear in case you lose it, but don’t use a free loadout because then you won’t get a safe pocket to stash any new Blueprint you find. No pain in Arc Raiders is sharper than failing to extract with a new Blueprint you’ve been after for a dozen hours already.

One of the best ways to get Blueprints is by hitting three stars on all five Trials every week. |Image credit:Rock Paper Shotgun/Embark Studios
Blueprints obtained from Trials
One of the very best ways to get Blueprints is as rewards for completing Trials in Arc Raiders. Trials are unlocked from Level 15 onwards, and allow you to earn rewards by focusing on certain tasks over the course of several raids. For example, one Trial might task you with dealing damage to Hornets, while another might challenge you to loot Supply Drops.
Trials refresh on a weekly basis, with a new week bringing five new Trials. Each Trial can offer up to three rewards after passing certain score milestones, and it’s possible to receive very high level loot from these reward crates - including Blueprints. So if you want to unlock as many Blueprints as possible, you should make a point of completing as many Trials as possible each week.
Best Blueprint farming locations
The very best way to get Blueprints is to frequent specific areas of the maps which combine high-tier loot pools with the right types of containers to search. Here are my recommendations for where to find Blueprints on every map, so you can always keep the search going for new crafting recipes to unlock.

Image credit:Rock Paper Shotgun/Embark Studios
Dam Battlegrounds
The best places to farm Blueprints on Dam Battlegrounds are the Control Tower, Power Generation Complex, Ruby Residence, and Pale Apartments . The first two regions, despite only being marked on the map as mid-tier loot, contain a phenomenal number of containers to loot. The Control Tower can also contain a couple of high-tier Security Lockers - though of course, you’ll need to have unlocked the Security Breach skill at the end of the Survival tree.
There’s also a lot of reporting amongst the playerbase that the Residential areas in the top-left of the map - Pale Apartments and Ruby Residence - give you a comparatively strong chance of finding Blueprints. Considering their size, there’s a high density of containers to loot in both locations, and they also have the benefit of being fairly out of the way. So you’re more likely to have all the containers to yourself.
Buried City
The best Blueprint farming locations on Buried City are the Santa Maria Houses, Grandioso Apartments, Town Hall, and the various buildings of the New District . Grandioso Apartments has a lower number of containers than the rest, but a high chance of spawning weapon cases - which have good Blueprint drop rates. The others are high-tier loot areas, with plenty of lootable containers - including Security Lockers.
Spaceport
The best places to find Blueprints on Spaceport are the Arrival and Departure Buildings, as well as Control Tower A6 and the Launch Towers . All these areas are labelled as high-value loot regions, and many of them are also very handily connected to one another by the Spaceport wall, which you can use to quickly run from one area to the next. At the tops of most of these buildings you’ll find at least one Security Locker, so this is an excellent farming route for players looking to find Blueprints.
The downside to looting Blueprints on Spaceport is that all these areas are hotly contested, particularly in Duos and Squads. You’ll need to be very focused and fast in order to complete the full farming route.

Image credit:Rock Paper Shotgun/Embark Studios
Blue Gate
Blue Gate tends to have a good chance of dropping Blueprints, potentially because it generally has a high number of containers which can hold lots of items; so there’s a higher chance of a Blueprint spawning in each container. In my experience, the best Blueprint farming spots on Blue Gate are Pilgrim’s Peak, Raider’s Refuge, the Ancient Fort, and the Underground Complex beneath the Warehouse .
All of these areas contain a wealth of containers to loot. Raider’s Refuge has less to loot, but the majority of the containers in and around the Refuge are raider containers, which have a high chance of containing Blueprints - particularly during major events.
Stella Montis
On the whole, Stella Montis seems to have a very low drop rate for Blueprints (though a high chance of dropping other high-tier loot). If you do want to try farming Blueprints on this map, the best places to find Blueprints in Stella Montis are Medical Research, Assembly Workshop, and the Business Center . These areas have the highest density of containers to loot on the map.
In addition to this, the Western Tunnel has a few different Security Lockers to loot, so while there’s very little to loot elsewhere in this area of the map, it’s worth hitting those Security Lockers if you spawn there at the start of a match.
That wraps up this primer on how to get all the Blueprints in Arc Raiders as quickly as possible. With the Expedition system constantly resetting a large number of players’ Blueprints, it’s more important than ever to have the most up-to-date information on where to find all these Blueprints.
While you’re here, be sure to check out our Arc Raiders best guns tier list , as well as our primers on the best skills to unlock and all the different Field Depot locations on every map.

ARC Raiders
PS5 , Xbox Series X/S , PC
Rock Paper Shotgun is better when you sign in
Sign in and join us on our journey to discover strange and compelling PC games.
