Elden Ring: Nightreign tier list - Which is the best class to use?
All 10 Nightfarers ranked, including The Forsaken Hollows DLC characters
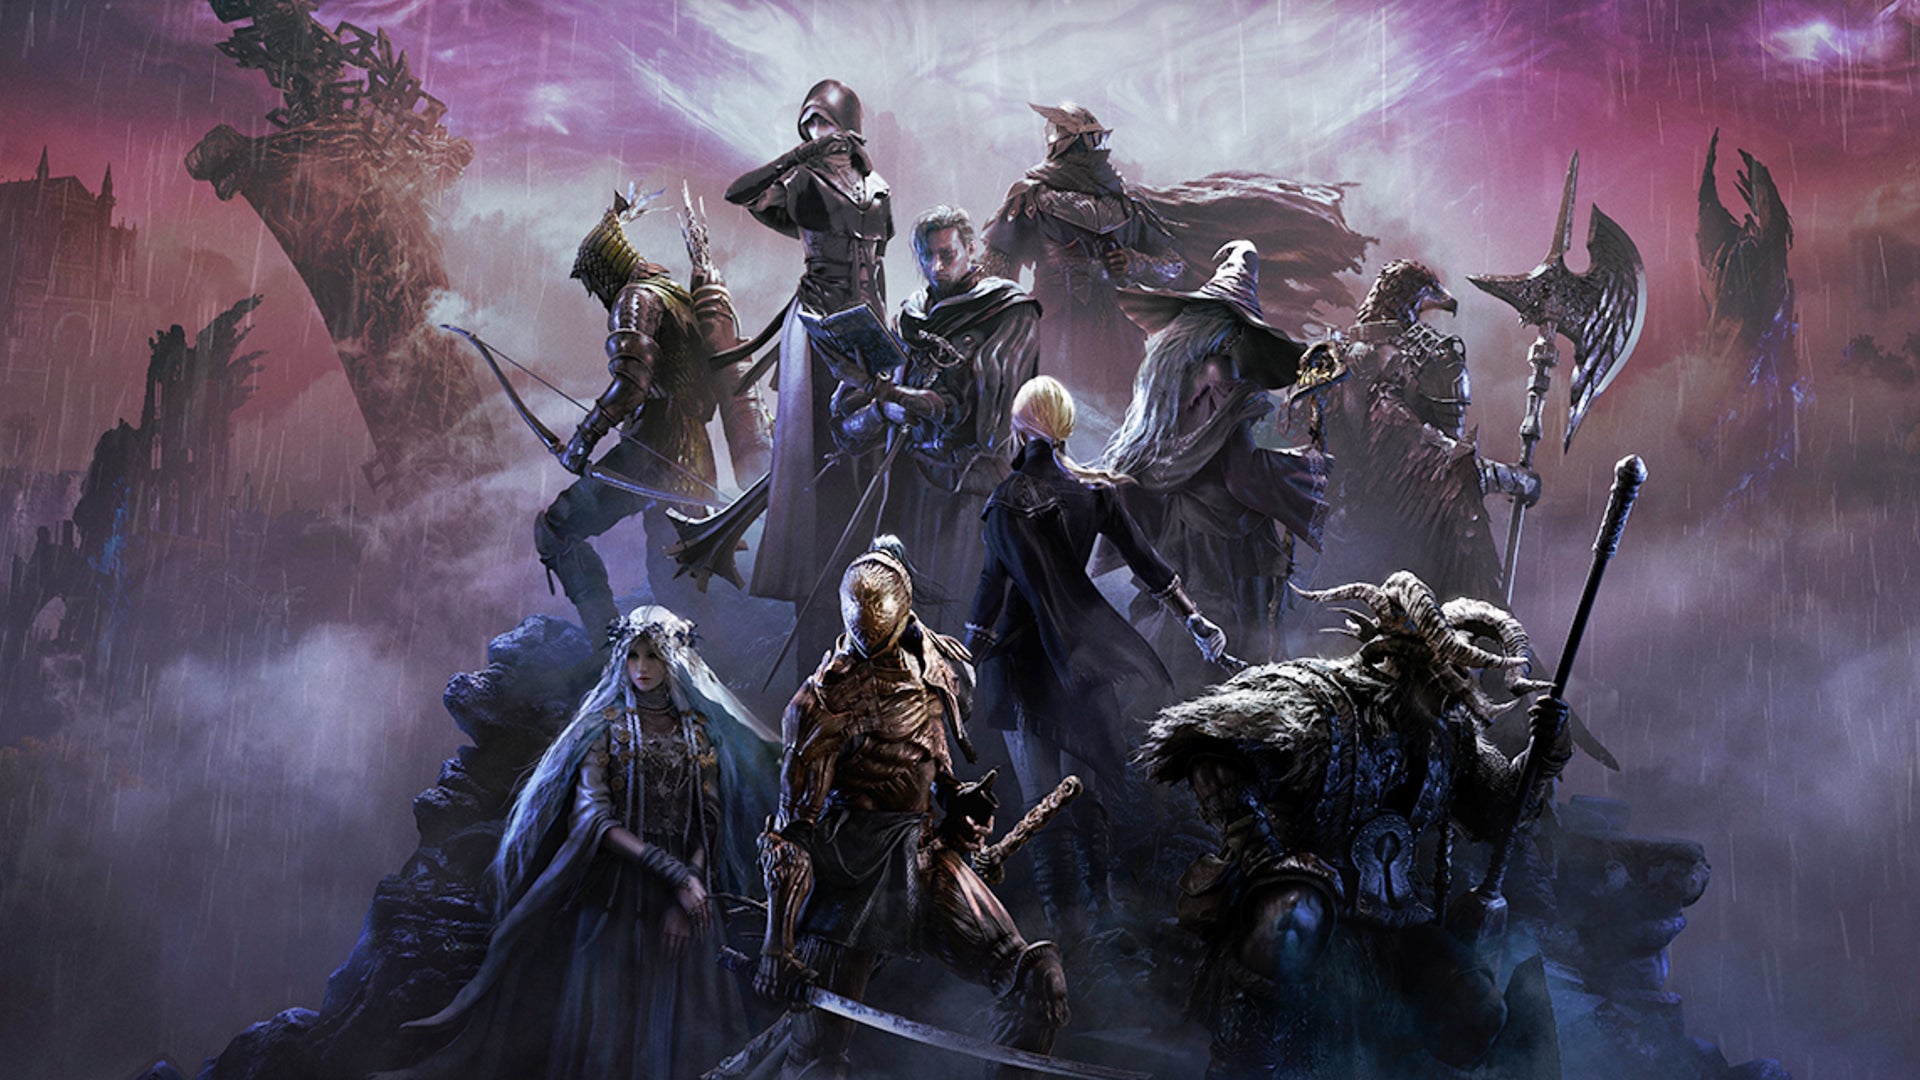
Image credit:Bandai Namco

Which is the best of the 10 character classes in Elden Ring: Nightreign? The roster of Nightfarers at your disposal is a complex one, and the two new characters to join Nightreign in The Forsaken Hollows DLC only up the ante. Unlike base Elden Ring , where all that changes between each class is your starting stats and armour, in Nightreign each Nightfarer has their own unique abilities, passives, stories, and even quests. The Scholar and the Undertaker are no different, and can be excceptionally good at taking down Nightlords in the right hands and with the right gear.
All ten classes can be powerhouses with a bit of practice. But if you want to know which Nightfarer will give you the highest chance of success from your very first run, then that’s where this guide comes in. My team and I have spent countless hours trying out every character with various different builds and playstyles, under a wide variety of circumstances and against a great many different bosses and other enemies.
This guide is the result of all that research: a primer on the strengths and weaknesses of each Nightfarer , and our Elden Ring: Nightreign tier list ranking each character from best to worst - including the Scholar and Undertaker. So if you’re struggling to figure out which character class is for you, read on and find out!

Elden Ring: Nightreign tier list
| Tier | Character Class |
|---|---|
| S-Tier | Ironeye , Undertaker , Raider |
| A-Tier | Guardian , Wylder , Recluse |
| B-Tier | Duchess , Executor |
| C-Tier | Scholar , Revenant |
Note: this tier list places a greater weight on each Nightfarer’s effectiveness as part of a 3-player squad than on solo play. If you’re looking to play in singleplayer, then check out our guide to the best solo characters in Nightreign .
Who is the best character in Elden Ring: Nightreign?
The best character is a highly subjective topic, but we consider Ironeye and Undertaker to be the most powerful classes in Elden Ring: Nightreign right now. After many hours of testing each character both in multiplayer and in solo Expeditions, we think these two Nightfarers offer newcomers the highest chance of surviving each night and defeating the final Nightlord bosses on Day 3.
We’ll go over each character class in more detail below, but briefly: Ironeye and Undertaker can survive a wide range of encounters in-game without sacrificing damage, and they’re both hugely fun to play as well. Undertaker might be a new DLC entry into the Nightfarer squad, but she’s taken second place in our tier list for a mobile and devastating playstyle that offers great synergy with other characters. And for players who prefer to maintain constant pressure while putting themselves in as little danger as possible, Ironeye’s ranged capabilities are second to none, and make him the best character in Nightreign and a fantastic choice for any player - especially newcomers to Nightreign and Elden Ring itself.
Character attributes comparison table
If you want to compare the strengths and weaknesses of each Nightfarer for yourself, we’ve laid out a table of all the attribute scaling ranks for all 8 characters. These attributes range from S (best) to D (worst), allowing you to better understand the intrinsic playstyles of each class:
| Name | HP | FP | STA | STR | DEX | INT | FAI | ARC |
|---|---|---|---|---|---|---|---|---|
| Ironeye | C | C | B | C | A | D | D | B |
| Undertaker | B | C | C | A | D | D | A | C |
| Raider | A | D | A | S | C | D | D | C |
| Guardian | S | C | A | B | C | D | C | C |
| Wylder | A | C | B | A | B | C | C | C |
| Recluse | D | A | C | D | C | S | S | C |
| Duchess | C | B | D | D | B | A | B | C |
| Executor | B | D | B | C | S | D | D | S |
| Scholar | B | B | B | D | C | C | C | S |
| Revenant | D | A | D | C | C | B | S | B |
You can refer back to this table of attributes to help provide important context while we explore in greater detail the strengths and weaknesses of each individual Nightfarer below, and why they rank where they do in our class tier list.
1. Ironeye
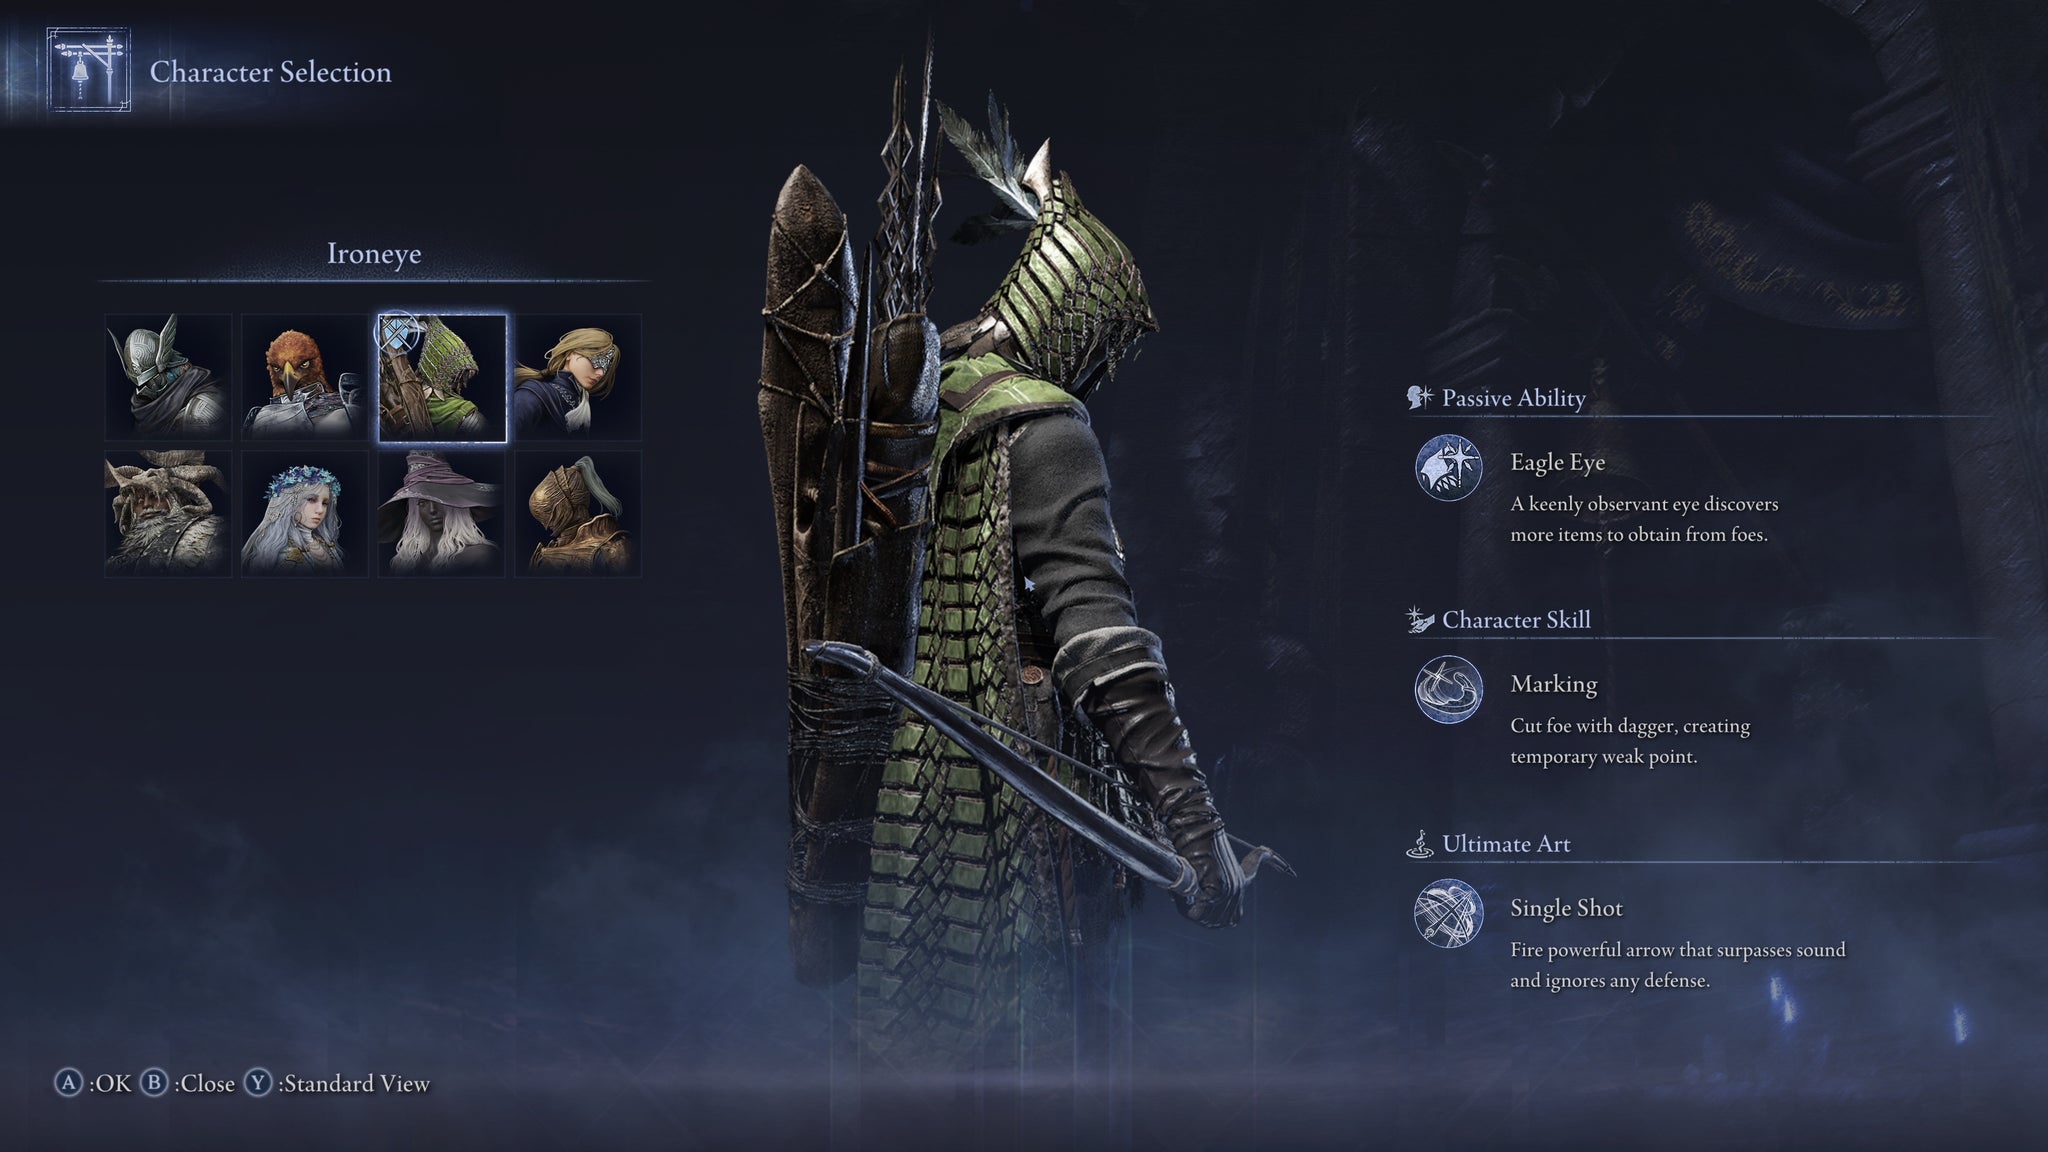
Image credit:Rock Paper Shotgun/Bandai Namco
| Pros | Cons |
|---|---|
| Consistent damage from a safe range | Struggles against relentless enemies |
| Can revive downed allies safely | Mediocre HP and Stamina |
| Very fast at farming |
If we had to pick a single best character in Elden Ring: Nightreign, then our choice would be Ironeye . This archer’s strengths are many, and prime among them is that your entire gameplan in each encounter can be played out from a distance, far away from the hitboxes of the big dangerous boss’s attacks. If you’re not comfortable parrying and dodging through enemy attacks constantly, then the Ironeye’s ranged nature is a perfect entry point into Nightreign . You certainly won’t be idle either; Ironeye can dish out some very consistent damage (remember, in Nightreign all ranged ammo is infinite , so you can keep firing forever!), and his abilities serve to increase the damage potential of the whole team with his Marking skill, and open up opportunities for massive damage by staggering enemies with a well-timed Single Shot.
The other excellent benefit of having Ironeye on your team is that when an ally is knocked down and near death, Ironeye can shoot them from a distance to revive them very safely. It can get quite tricky against very aggressive bosses when two teammates are down and Ironeye is left to fend for himself, but on the whole Ironeye is a real revival expert . For when things get dire during Day 3 Nightlord fights, it’s even worth saving your Ultimate so you can revive a downed ally near-instantly from across the arena, all while taking advantage of your i-frames (invincibility frames) to avoid damage.
Ironeye is also an asset when it comes to quickly farming at the start of a run. His arrows can quickly clear smaller camps, and the Eagle Eye passive affects his entire team , allowing everyone to gain powerful equipment more quickly. When everything is down to him, Ironeye can falter unless you’re well prepared, because his damage potential on his own can’t quite match those of certain hard-hitting Nightfarers . But the versatility and relative safety of his ranged playstyle makes him an exceptionally powerful Nightfarer, well worthy of S-Tier.
Abilities:
- Passive Ability: Eagle Eye - Allows the entire team to obtain more item drops from enemies.
- Character Skill: Marking - Leap forward and knife the target, creating a weakspot which increases the target’s damage taken, and allows you to stagger them by dealing enough subsequent damage.
- Ultimate Art: Single Shot - Unleash a powerful arrow that passes through all foes and structures, and creates a shockwave of secondary damage along its path.
2. Undertaker
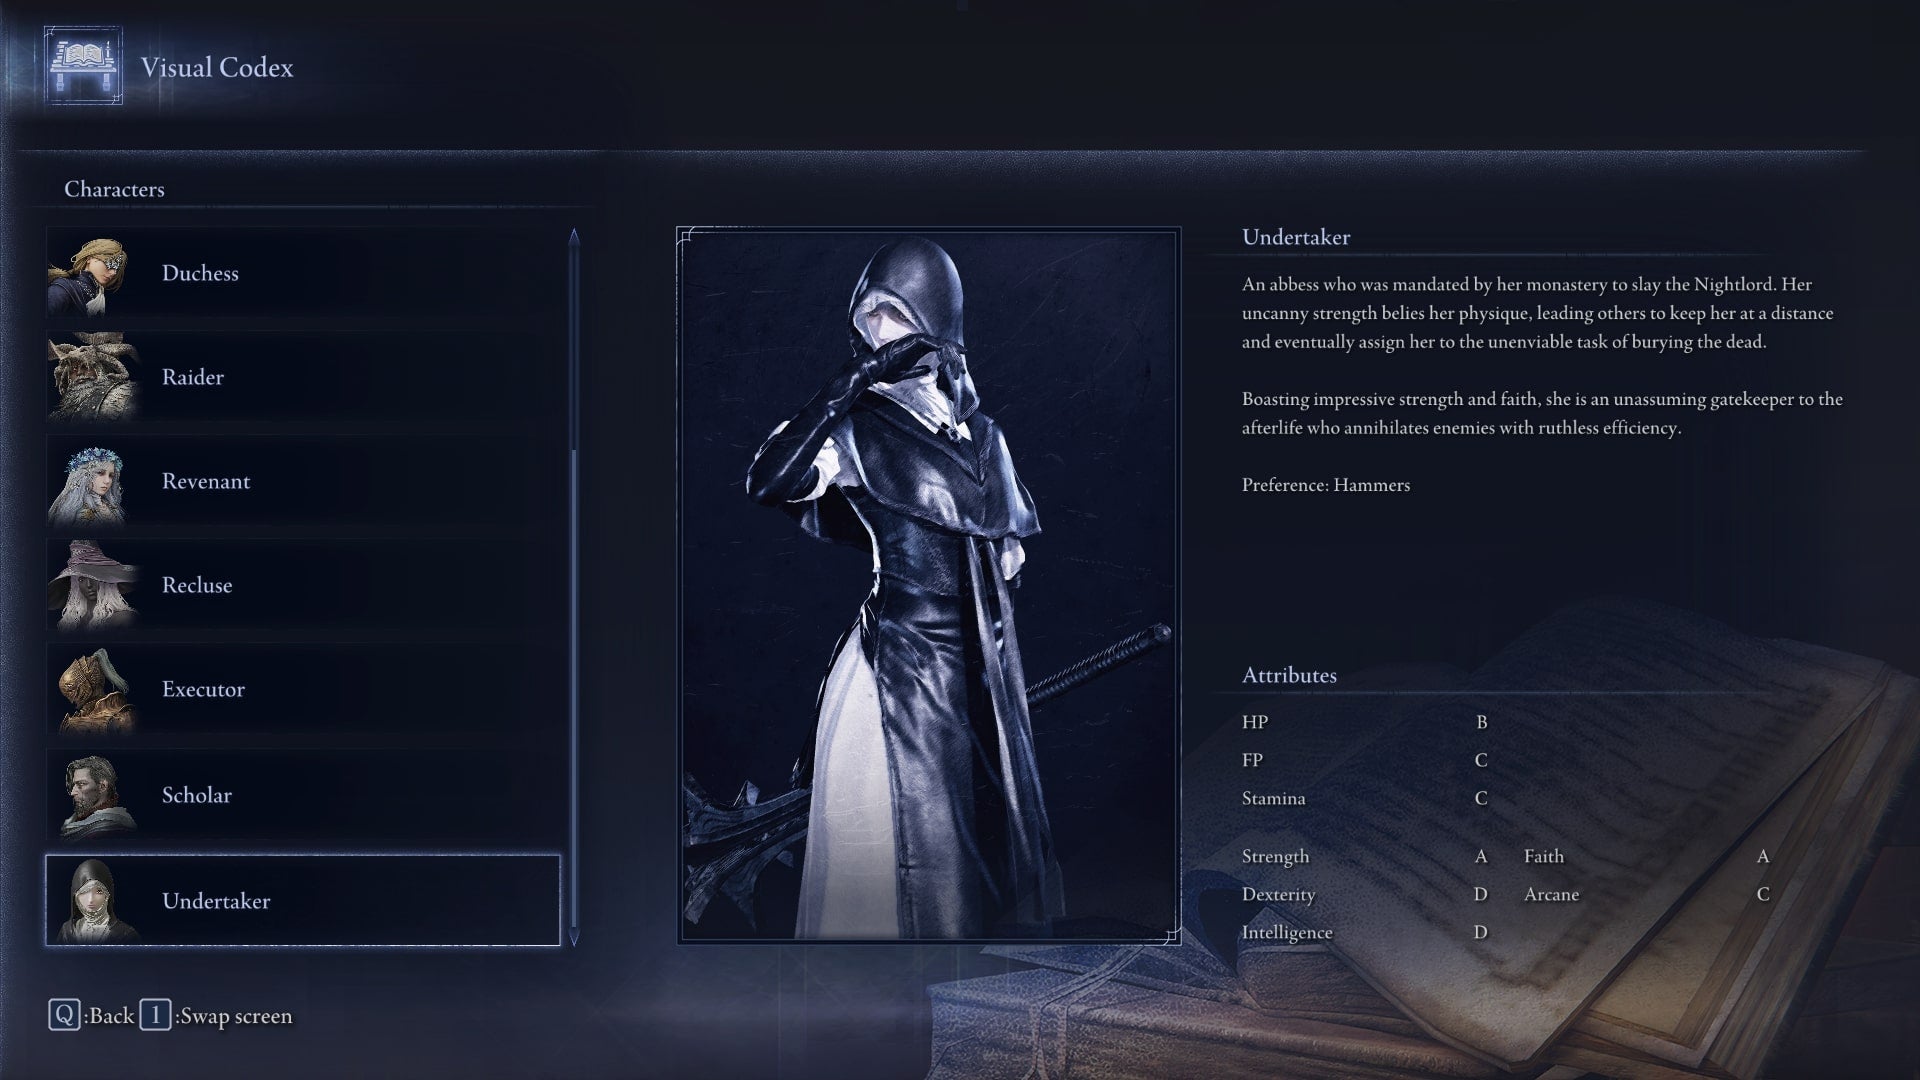
Image credit:Bandai Namco
| Pros | Cons |
|---|---|
| Specialises in hammers | Mediocre stats aside from Strength and Faith |
| Good co-op synergy | Limited defensive capabilities |
| Can stack Ultimate Arts within a party |
Undertaker’s one of two new Nightfarers to join the team in The Forsaken Hollows, and while she might look like a humble nun upon first glance, don’t let that fool you. She’s the only Nightreign character to specialise in wielding Hammers , and whenever she swings them, she’ll pack a holy punch with good Strength and Faith stats. While her rest of her stats don’t scale very well and she doesn’t have much in the way of defensive options, her incredibly fun kit makes up for this, especially if you’re hungry for a straightforward Strength-focused character. Notably, she doesn’t feel slow in the field, as her Trance skill offers agility boosts on the regular, and even an invincible dodge if you pop it when Undertaker’s Ultimate Art gauge is full .
Where this not-so-meek nun truly shines, however, is with that Ultimate Art. Loathsome Hex is one hell of a sight as Undertaker fiddles with her spine and pulls out an “uncanny bone”, propelling herself halfway across any boss arena to smite her enemy with a strike. Loathsome Hex offers excellent damage and can also be used for mobility purposes. Use it to deliver the final hit on a Nightlord, or if you’re far from your team, you can also utilise Loathsome Hex to clear the gap (as long as you don’t get caught on any trees in your flight path).
Undertaker can hold her own as a solo character, but she makes S-tier for providing some excellent opportunities in co-op play. Her Passive skill Confluence gives her a free Ultimate that she can use whenever an ally activates their own Ultimate Art . This means that she can essentially stack Ultimates within the party, unleashing stellar, consistent damage. This works especially well with just about every character on this list, and if you really want to have a fun time and wipe through Nightlords quickly, try pairing Undertaker with Duchess . Have Undertaker use Loathsome Hex first, then have Duchess repeat this damage with her Restage ability. Rinse and repeat, and watch enemy poise be shattered and many a critical hit achieved.
Abilities:
- Passive Ability: Confluence - Whenever an Ally executes an Ultimate Art, you’ll receive a free Ultimate Art activation regardless of your current Ultimate gauge.
- Character Skill: Trance - Increases agility, and additional repeated attacks boost attack power. If your Ultimate Art gauge is full, Trance is even stronger and grands an auto-dodge for its duration.
- Ultimate Art: Loathsome Hex - Pull a bone out from your body and propel yourself forward in the air for a strike, covering a huge distance.
3. Raider
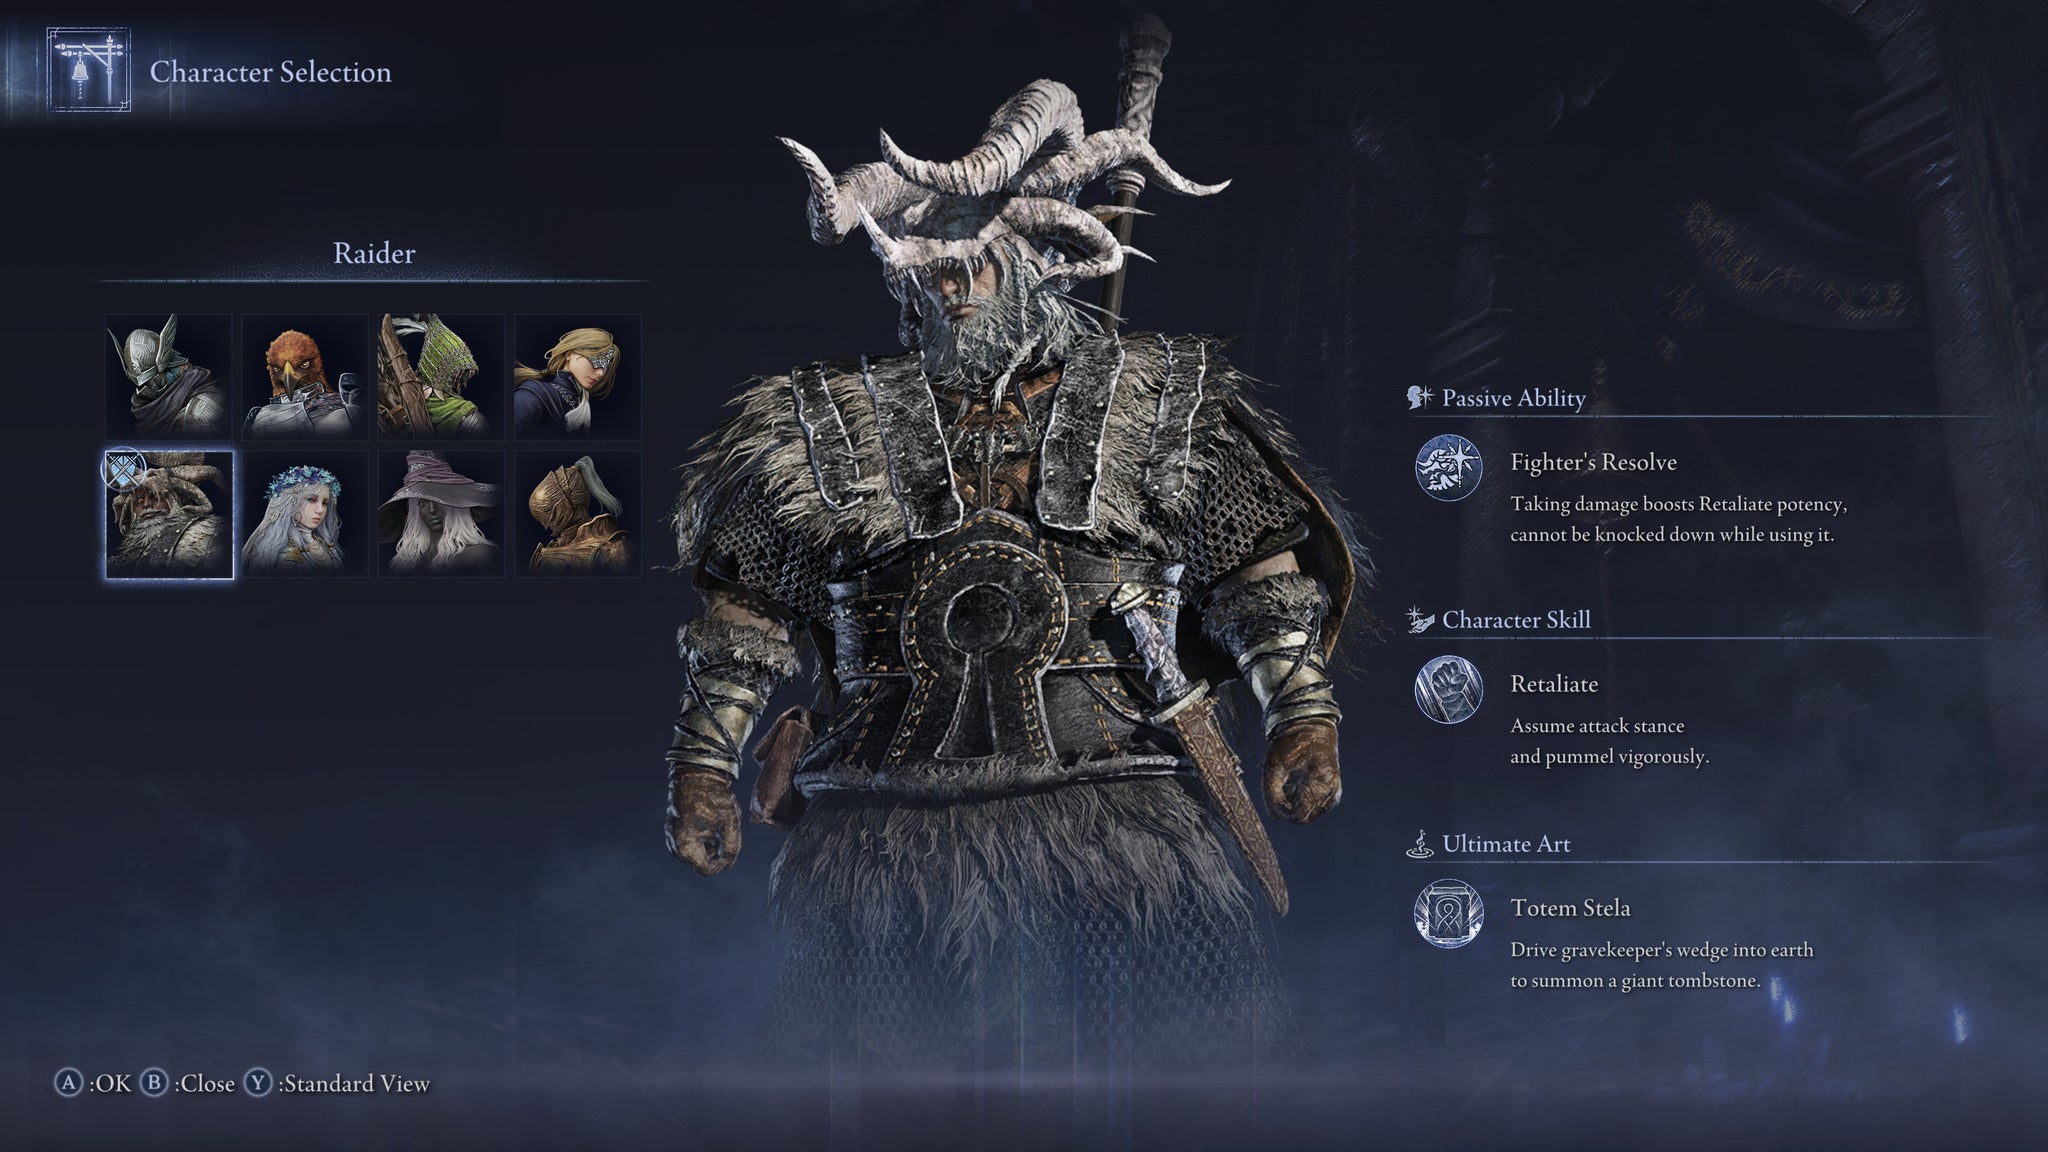
Image credit:Rock Paper Shotgun/Bandai Namco
| Pros | Cons |
|---|---|
| Extreme stagger potential | Low mobility |
| High HP and Stamina | High risk playstyle |
| Ultimate can change the flow of a boss fight |
In some ways, Raider occupies a similar role in an Expedition team to Guardian: low mobility but very high survivability , and the power to punish powerful foes with counterattacks. But Raider swaps out the giant tower shield and guard counter spam for a toolkit that focuses much more on aggression. He’s one of the riskier characters to play , and so it can be tricky to figure out the best way to play Raider at first. But once you learn to hold your nerve and meet a boss’s aggression with equal ferocity of your own, Raider is an incredible ally to have on your team.
Raider’s Passive and Skill both work together to allow him to stay right in the face of an enemy and withstand their attacks in ways no one else can. Retaliate as an enemy hits you, and you’ll not only take massively reduced damage from that attack, but you’ll also counter with a powerful headbutt that can easily stagger even large enemies . Taking damage also powers up this Skill; at max strength, it turns into a massive uppercut instead of a simple headbutt, which is slower but hard-hitting enough to stun even Nightlords at times. Fighter’s Resolve also comes with the powerful added benefit of ensuring you cannot die from the first hit you take during the Retaliate animation . Meaning: if you take a hit during Retaliate which would otherwise kill you, you’ll instead be brought down to 1 HP. If you take another hit after that (even during the Retaliate animation) then you’ll die, but it’s a strong feather in Raider’s crucible-horn-infested cap.
Raider’s Ultimate, Totem Stela, is another example of the Nightfarer’s ability to increase survivability and stagger enemies with a single blow. The massive tombstone that you can conjure with this Ultimate can be climbed, allowing the entire team to wait out certain very dangerous events (such as Gladius’s three dogs phase); and landing it on a boss can deal enough poise damage to stagger them instantly. You can also use the Totem to kite certain enemies, although again you should remember that Raider’s mobility is not his strong suit. Still, once you master Raider’s ability usage, you have access to a toolkit which can cause an incredible reversal of fortunes during difficult encounters. Add to this his high base damage with the massive two-handed weapons that are his forte, and there is little doubt Raider earns his place in the middle of S-Tier.
Abilities:
- Passive Ability: Fighter’s Resolve - Taking enough damage boosts Retaliate’s effect and prevents you from dying from the first hit you take while using it.
- Character Skill: Retaliate - Counter enemy attacks with a powerful delayed headbutt, during which you take reduced damage.
- Ultimate Art: Totem Stela - Raise a massive climbable tombstone which blocks projectiles and raises attack power of nearby allies.
4. Guardian
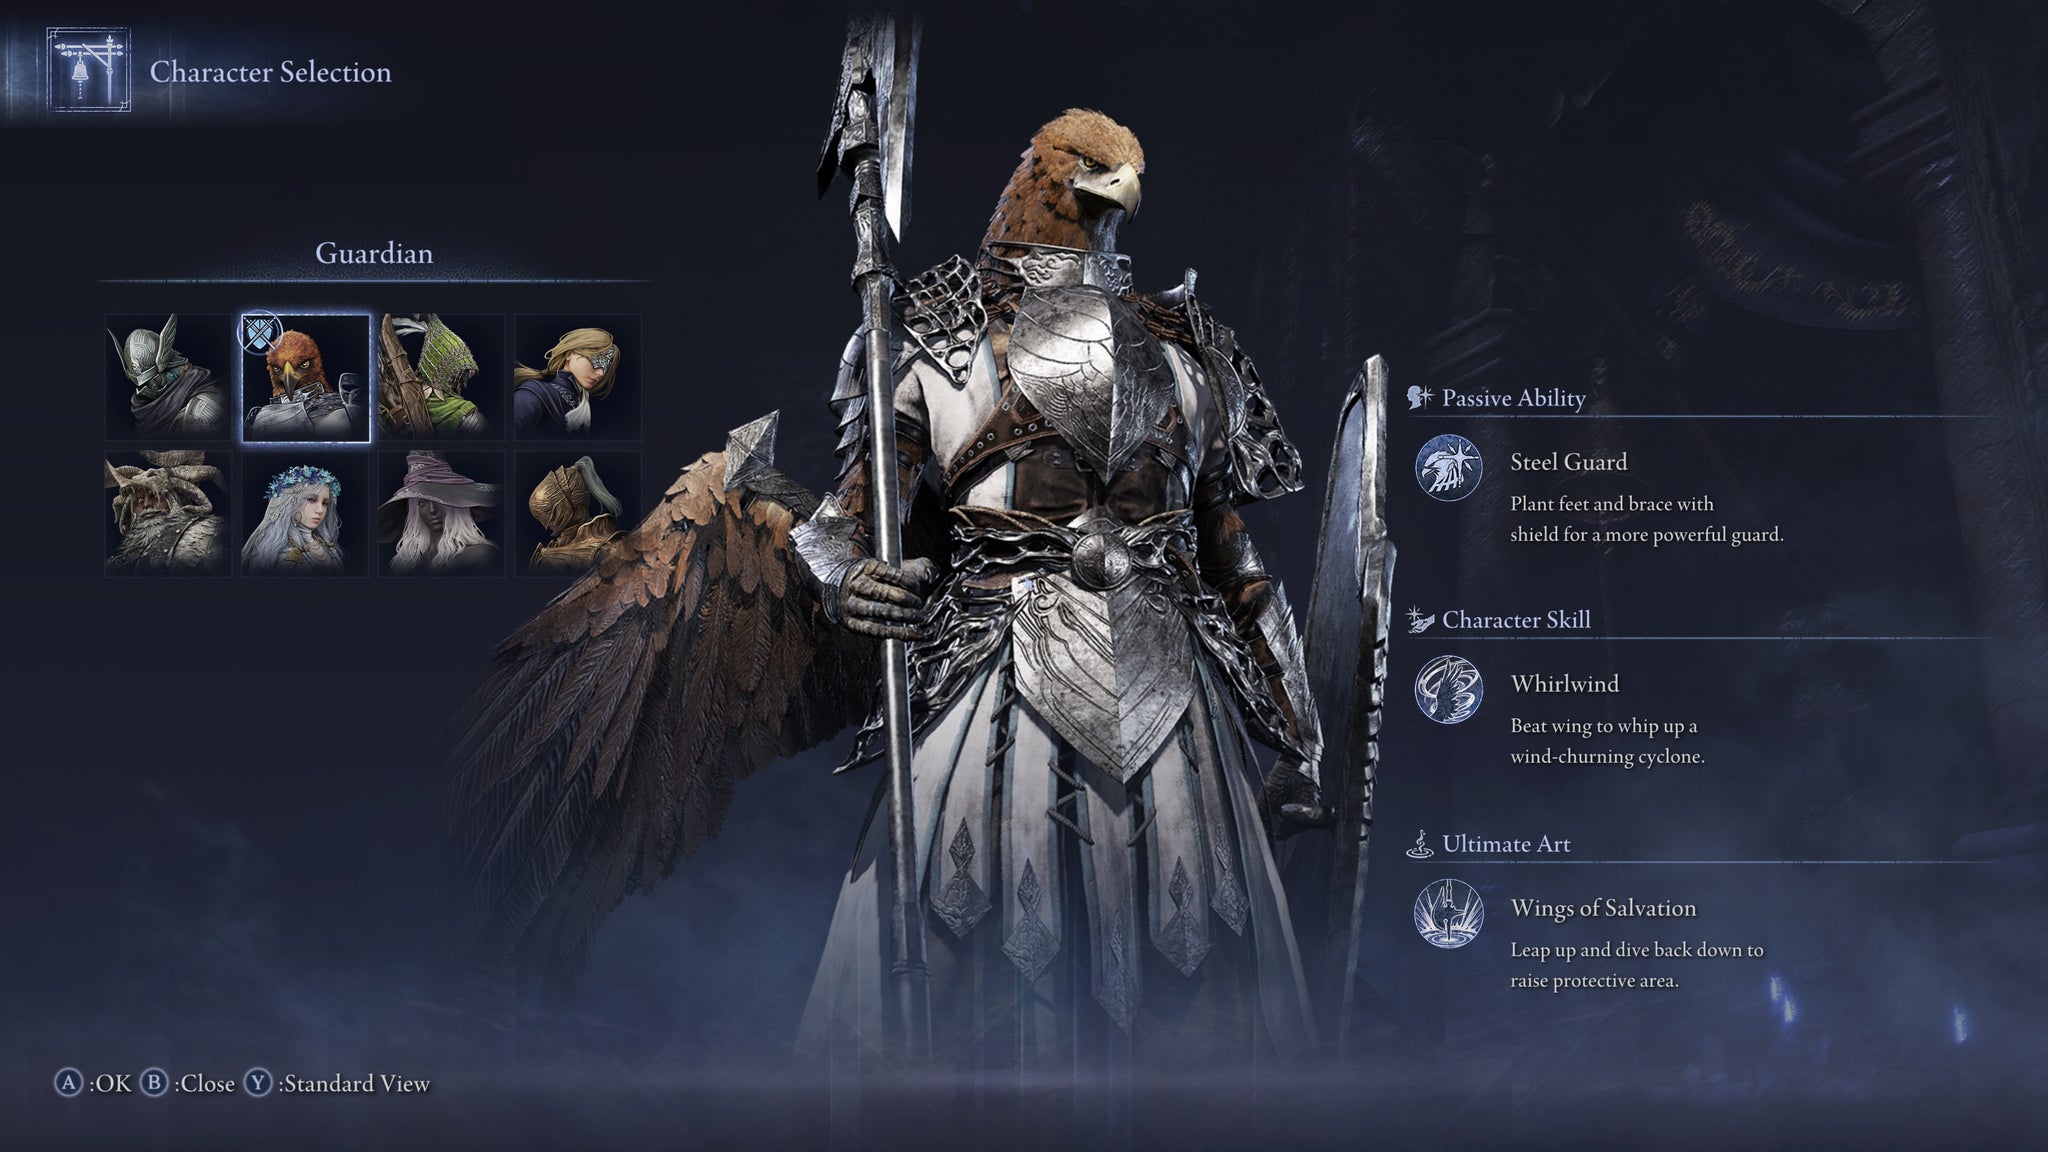
Image credit:Rock Paper Shotgun/Bandai Namco
| Pros | Cons |
|---|---|
| Extremely tanky while using Steel Guard | Low mobility |
| Potent guard counters | Relies on skills rather than magic |
| Abilities allow for easy revives |
Guardian’s playstyle won’t be a perfect fit for everyone - with his weak dodges and heavy equipment , he’s not the kind of character you should be attempting to evade lots of attacks with. Instead, his unmatched potential lies in absorbing damage with his tower shield and Steel Guard passive, and making use of relentless guard counters to punish enemies . The more aggressive the foe, the more punishing Guardian’s counterattacks.
Guardian is a bulwark, your team’s unyielding iron rod that can lead the charge, taking and keeping a dangerous enemy’s attention for as long as it takes. The tricky part about Guardian’s strength is that despite requiring your role to be right in an enemy’s face (giving you the highest-risk position on the team), Guardian’s abilities are also ideal for reviving downed allies (which means you have to make sure you’re not the first to die ). Whirlwind is a strong ability both for clearing smaller enemy camps and for reviving allies a little faster - particularly once you complete Guardian’s first Remembrance quest and gain his Relic, which keeps the Whirlwind active at the point you cast it for a while longer.
Similarly, Guardian’s Ultimate Art is a phenomenal tool for turning a bad situation into a good one. Slam it down on fallen allies and enemies at once to deal good damage and stagger, as well as bringing your team back into the fight and keeping them invulnerable for as long as you can hold the Ultimate. If you want the absolute highest damage potential or a nimbler playstyle then you may want to pick another Nightfarer, but for the ultimate defence and survivability - for your team as well as yourself - Guardian has no equal.
Abilities:
- Passive Ability: Steel Guard - Using dodge while guarding assumes a more powerful guard stance which makes any attack you block deplete far less Stamina than usual.
- Character Skill: Whirlwind - Beat your wings to create a cyclone around yourself which damages and knocks up enemies, and deflects smaller projectiles.
- Ultimate Art: Wings Of Salvation - Leap up and dive back down to deal large area damage and create a protective aura of invulnerability for as long as you hold the prompt.
5. Wylder
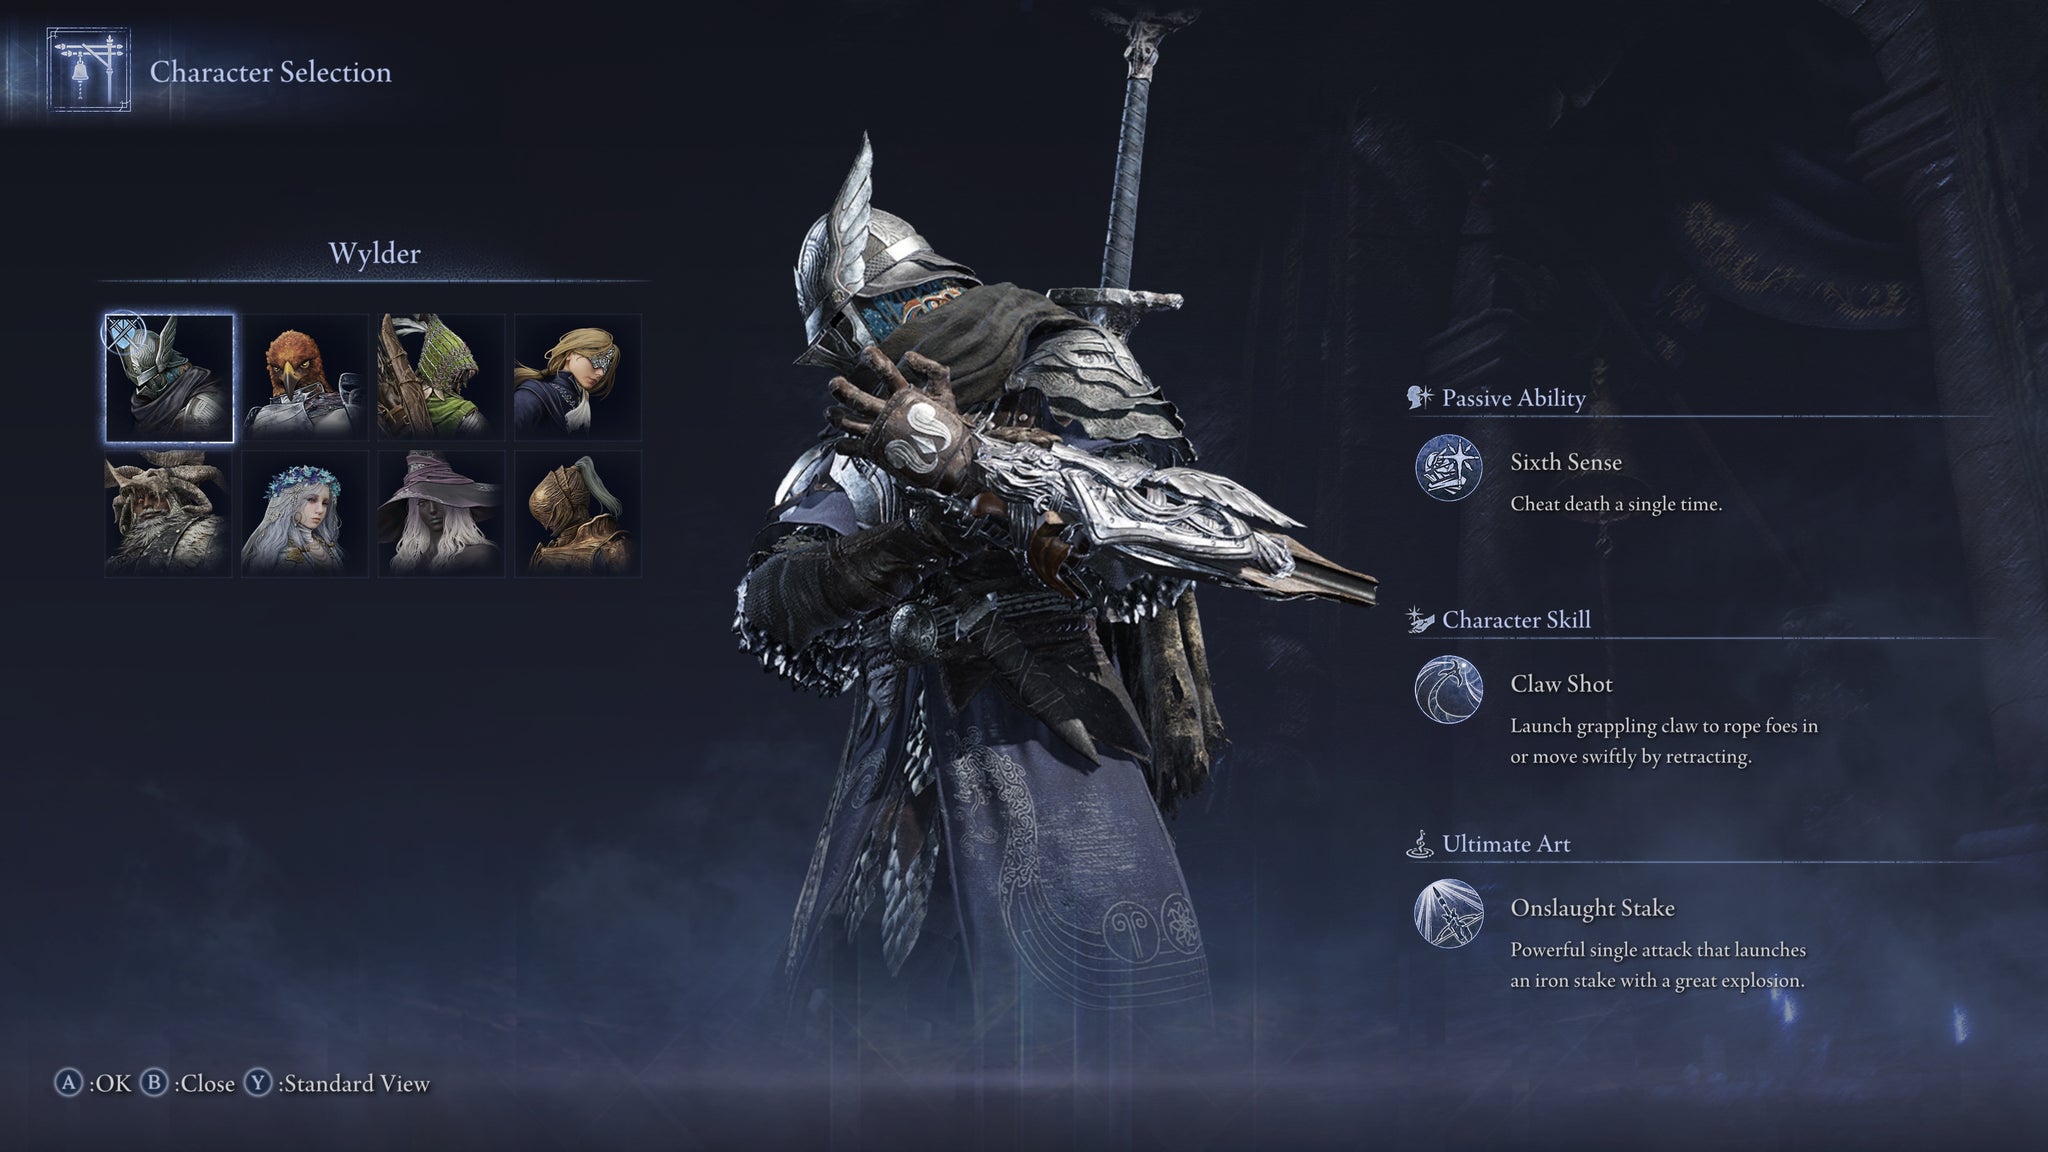
Image credit:Rock Paper Shotgun/Bandai Namco
| Pros | Cons |
|---|---|
| Excels at interrupting enemy attack patterns | Low FP and magic capabilities |
| Strong balance of attributes | Requires a well-oiled team to be most effective |
| Highly survivable |
It’s easy to see why the Wylder is the Nightfarer you’re given for Nightreign’s tutorial. With nicely balanced stats across the board and probably the most versatile set of skills in the game, Wylder is a highly autonomous, easy to learn, and undeniably powerful character who can slot into nearly any team composition.
These are some very fun abilities, as well. Claw Shot is great at disrupting enemy groups , and in particular at drawing troublesome ranged enemies like Perfumers and Albinauric Archers close to your kill zone. It also deals good damage in its own right, and can help to stagger bosses at times, so you should really try to launch it whenever it’s off cooldown. Wylder’s Onslaught Strike is even more spectacular, and probably the best Ultimate in the game. While it can be hard to land the strike at times, if you’re careful you’ll have a near-guaranteed stagger for all but the most mountainous of Nightreign bosses.
Wylder is held back slightly in two ways. The first is simple to explain: he’s a jack-of-all-trades, master of none . Without as specialised a vocation as the others, it can be trickier to find a solid direction for your build throughout an Expedition. Secondly, there’s a bit of dichotomy going on with Wylder’s set of abilities. On the face of it, they allow him to act very independently, offering him a mix of mobility, safety, crowd control, and damage all at once, which might make you think he’s a phenomenal solo option. But in reality, he needs to be backed by a very communicative team to be most effective: his Ultimate Art is far easier to use at the right time when the enemy is distracted by an ally; and your Sixth Sense passive can’t even remotely reach its full potential without an ally there to revive you when you do fall.
Abilities:
- Passive Ability: Sixth Sense - Auto-evade an attack that would have killed you, once. Replenish by passing through a Site Of Grace or being revived.
- Character Skill: Claw Shot - Launch a damaging grappling hook that can draw the target enemy to you or vice versa.
- Ultimate Art: Onslaught Strike - Launch a powerful short-range explosive stake that can stagger most enemies.
6. Recluse

Image credit:Rock Paper Shotgun/Bandai Namco
| Pros | Cons |
|---|---|
| The best spellcaster of the group | Very steep learning curve |
| Very versatile affinity usage | Low survivability |
| Strong with both staves and seals |
The Recluse will immediately appeal to a certain type of player. The strongest spellcaster in Nightreign, Recluse has access to an entirely new system of magic which involves dealing elemental affinity damage to enemies, so you can extract the “affinity residues” back out of them afterwards and combine them in specific ways to unleash handy spells available to no one else. The flipside is: she’s by far the most complex character in the game to learn.
The level of alertness you need to play Recluse well is higher than with any other character, because you need to constantly cast Magic Cocktail at the right times both to replenish your ever-dwindling FP (the source of all your damage) and to build Cocktail spells so you can cast them at the right times. By balancing all this and utilising the right staves and seals, you can often end up as a very powerful ranged attacker, one whose strength over Ironeye is the sheer versatility of attack types on offer . Odds are, with a Recluse on your team, you’ll always be able to exploit each Nightlord’s weakness on Day 3.
Soulblood Song is Recluse’s Ultimate ability, and it’s useful pretty much at any time as a way for the team to regain HP and FP, but never outstanding in the same way a well-timed Totem Stela or Wings Of Salvation can be. Recluse is very highly dependent on finding the right equipment. On Day 1, Glintstone Pebble, Magic Cocktail, and the pure “Magic” Cocktail spell all form a highly dependable, cyclical loop of consistent ranged damage. But beyond the first day, Recluse needs to evolve fast , because that starting damage combo is not enough to see you all the way through an Expedition. You need multiple elements, and a cool head well-used to combining them in the right orders and juggling the resources of FP and residues - and that’s not something every player will want to spend time learning how to do.
But if you have a good Recluse on your side, you’d better believe it makes a difference. Some spells can melt bosses faster than any melee weapon in the game. That could be your doing!
Abilities:
- Passive Ability: Elemental Defense - Apply affinity residues to targets by damaging them with an affinity-based attack.
- Character Skill: Magic Cocktail - Extract the affinity residue from a target to store it, and replenish your FP. If you have three residues stored, expend them to unleash a unique spell based on the residue types.
- Ultimate Art: Soulblood Song - Brand nearby enemies, allowing attacks dealt to them to replenish your HP and FP for a short time.
7. Duchess

Image credit:Rock Paper Shotgun/Bandai Namco
| Pros | Cons |
|---|---|
| Highly mobile and evasive | Low damage without good skill use |
| Potential for extreme damage | Requires a good team for full effectiveness |
| Flexible and synergistic Ultimate |
The Duchess , unlocked early after your first few Expeditions, is the most nimble and evasive Nightfarer in the game. There’s an argument to be made that she belongs higher up in the tier list, because not only is she the best melee character in Nightreign for avoiding trouble , but the difference she can make when it comes to increasing her team’s overall damage output is potentially very great.
Duchess’s most powerful tool is Restage - a low-cooldown skill which you should activate whenever large damage is dealt to your target. It instantly repeats the damage just inflicted (albeit at a lower effectiveness), effectively damaging the enemy without any effort or risk whatsoever. Proc it at every opportunity, and in particular you should try to coordinate with your allies to Restage after a powerful damaging event , like a critical hit, or an Ultimate such as Onslaught Strike or Single Shot. The downside is that if you take Restage out of the equation, Duchess has fairly low damage potential by herself. She can get the job done, but it’s slow going, and you need to be very careful because her HP pool is not very high at all .
Her passive and Ultimate both serve to give her increased evasiveness. Magnificent Poise allows you to chain together two of her unique lunging dodges in a row, which can take some getting used to but absolutely helps against very aggressive bosses. Your Ultimate as Duchess can be a powerful weapon, panic button, or utility skill depending on the situation. Turning your entire team invisible for a short while is great for dealing lots of fairly safe damage, getting out of danger, or even safely reviving downed allies - but the invisibility is not infallible, and enemies can still hit you if you get in their way.
All in all we consider there to be one too many tricky situations and caveats to place Duchess any higher in our tier list, but she’s still an excellent Nightfarer to learn, and very well-suited to players who favour very high Dex builds in Elden Ring and FromSoftware’s other games.
Abilities:
- Passive Ability: Magnificent Poise - Turns your dodge into a fast lunge that can be repeated twice in a row.
- Character Skill: Restage - Target an enemy to repeat the damage just dealt to them at roughly half the effectiveness.
- Ultimate Art: Finale - Turn yourself and nearby allies invisible for a short while.
8. Executor

Image credit:Rock Paper Shotgun/Bandai Namco
| Pros | Cons |
|---|---|
| Exceptional against solo foes | Struggles against groups |
| Very high Arcane and Bleed potential | Requires very good knowledge of enemy attack patterns |
| Ultimate is a great panic button |
Executor is my personal favourite character in Nightreign, which goes to show that the most important thing is picking a character that synergises with your preferred playstyle. Executor requires a lot of patience , and especially if you’re new to Elden Ring, you may find your first dozen Executor runs to be quite frustrating. Why? Because to be most effective, you need to have a very good knowledge of enemy attack patterns , so that you can deflect them consistently with your Cursed Blade.
Executor is most at home in 1v1 scenarios , because he can focus on timing his deflects. Often, Executor players will struggle when outnumbered - which often happens in Nightreign. So Executor relies more than most on having a strong team who can draw aggro and prevent him from being overwhelmed by numbers. When situations are dire, though, Executor’s ace in the hole is his Ultimate, which allows him to temporarily transform into a giant beast, giving him a set of splash damage attacks that can handily deal with groups. It doesn’t last long, but it’s enough to give you a lot more breathing room, and potentially enough damage potential to quickly stagger a powerful boss .
Ultimately, the main reason to ever play as Executor is to make use of his incredible deflecting mechanic . Unlike parries, which have a wind-up animation that you must account for which makes timing the parry very difficult, deflects with Executor are as simple as: tap block as the enemy’s attack lands. It’s wonderfully freeing, and if you’re good enough with it then you can quickly and repeatedly stagger bosses, making the fight much easier. But it’s a very high risk playstyle , and Executor isn’t the best at turning around a bad situation. For all these reasons he finds himself near the bottom of our tier list - but don’t take it to mean he’s not powerful. In the right hands, Executor can feel utterly untouchable.
Abilities:
- Passive Ability: Tenacity - Gain a temporary boost to damage and stamina recovery after recovering from any status ailment.
- Character Skill: Cursed Sword - Draw your Cursed sword, slowing movement but allowing Sekiro-like deflects that deal large poise damage. Repeated deflections charge the blade, increasing its damage and unlocking its unique weapon skill attack.
- Ultimate Art: Aspects Of The Crucible: Beast - Transform into a giant beast with its own moveset of attacks which all deal area-of-effect damage.
9. Scholar

Image credit:Rock Paper Shotgun/Bandai Namco
| Pros | Cons |
|---|---|
| A true support character | Needs to get close to maximise Analyse |
| Great for item-users | Leveling up items takes time |
| Requires skilled allies to take aggro |
Scholar takes on the role of a fully-focused support Nightfarer. He boasts a fascinating gameplay style that will go down well with some, but he’s fairly weak in the field and not suitable for solo play in the slightest . If you’ve got a group of capable comrades to keep the aggro off of you, though, Scholar will be a superb supplement to any party.
Item sickos will get a kick out of Scholar, as Bagcraft lets him carry more stacks and level up different categories of items the more he spams them>. Collect lots of Fire Pots, for instance, and keep chucking them at your foes to slowly level up all of your throwing tools. Items can be leveled up twice during a match , and the only issue is that this can take time. On the first day of your expedition you’re likely to be hyper-focused on collecting consumables and using them as much as possible before tougher Nightlords become present, though there’s definitely a certain type of player who will delight in this min-maxing.
Scholar’s other skills, Analyse and Communion, are support tactics that really excel against large groups of enemies, including the Balancers, the new Nightlord collective introduced in The Forsaken Hollows. Analyse, which targets foes and allies with circles that slowly fill up, lets you create either debuffs or buffs depending on how long you use it. There’s a tricky risk/reward game at play here - the Scholar is a squishy fellow, but needs to get in close for the Analyse circles to fill up faster . Meanwhile, Communion creates a tether between nearby allies or enemies , respectively increasing survivability within your party or the chances of dealing more damage. Both skills take practice to use well, however, and aren’t nearly as straightforward or flashy as the capabilites of Undertaker, the other DLC character in The Forsaken Hollows.
If you’re used to support characters in MMOs, MOBAs, or other games, there’s a good chance that Scholar may be your own personal S-tier. He requires devotion to maximise his potential, but hey, it takes time to study and reach academic excellence in real life. Why should scholarly mastery in Nightreign be any different?
Abilities:
- Passive Ability: Bagcraft - Carry more stacks of items, and increase the power of different item types by consistently using them.
- Character Skill: Analyse - Scope your target to determine its strengths and weaknesses. This can be done on large groups of both allies and enemies. When used on allies, Analyse lets you buff Stamina or enact a protective shield. When used on enemies, Analyse decreases their attack and causes extra damage on a hit.
- Ultimate Art: Communion - Link allies or enemies together with a series of threads. When allies are linked, the party’s damage output and healing is amplified. When enemies are linked, they all take extra damage as long as one of them is attacked.
10. Revenant
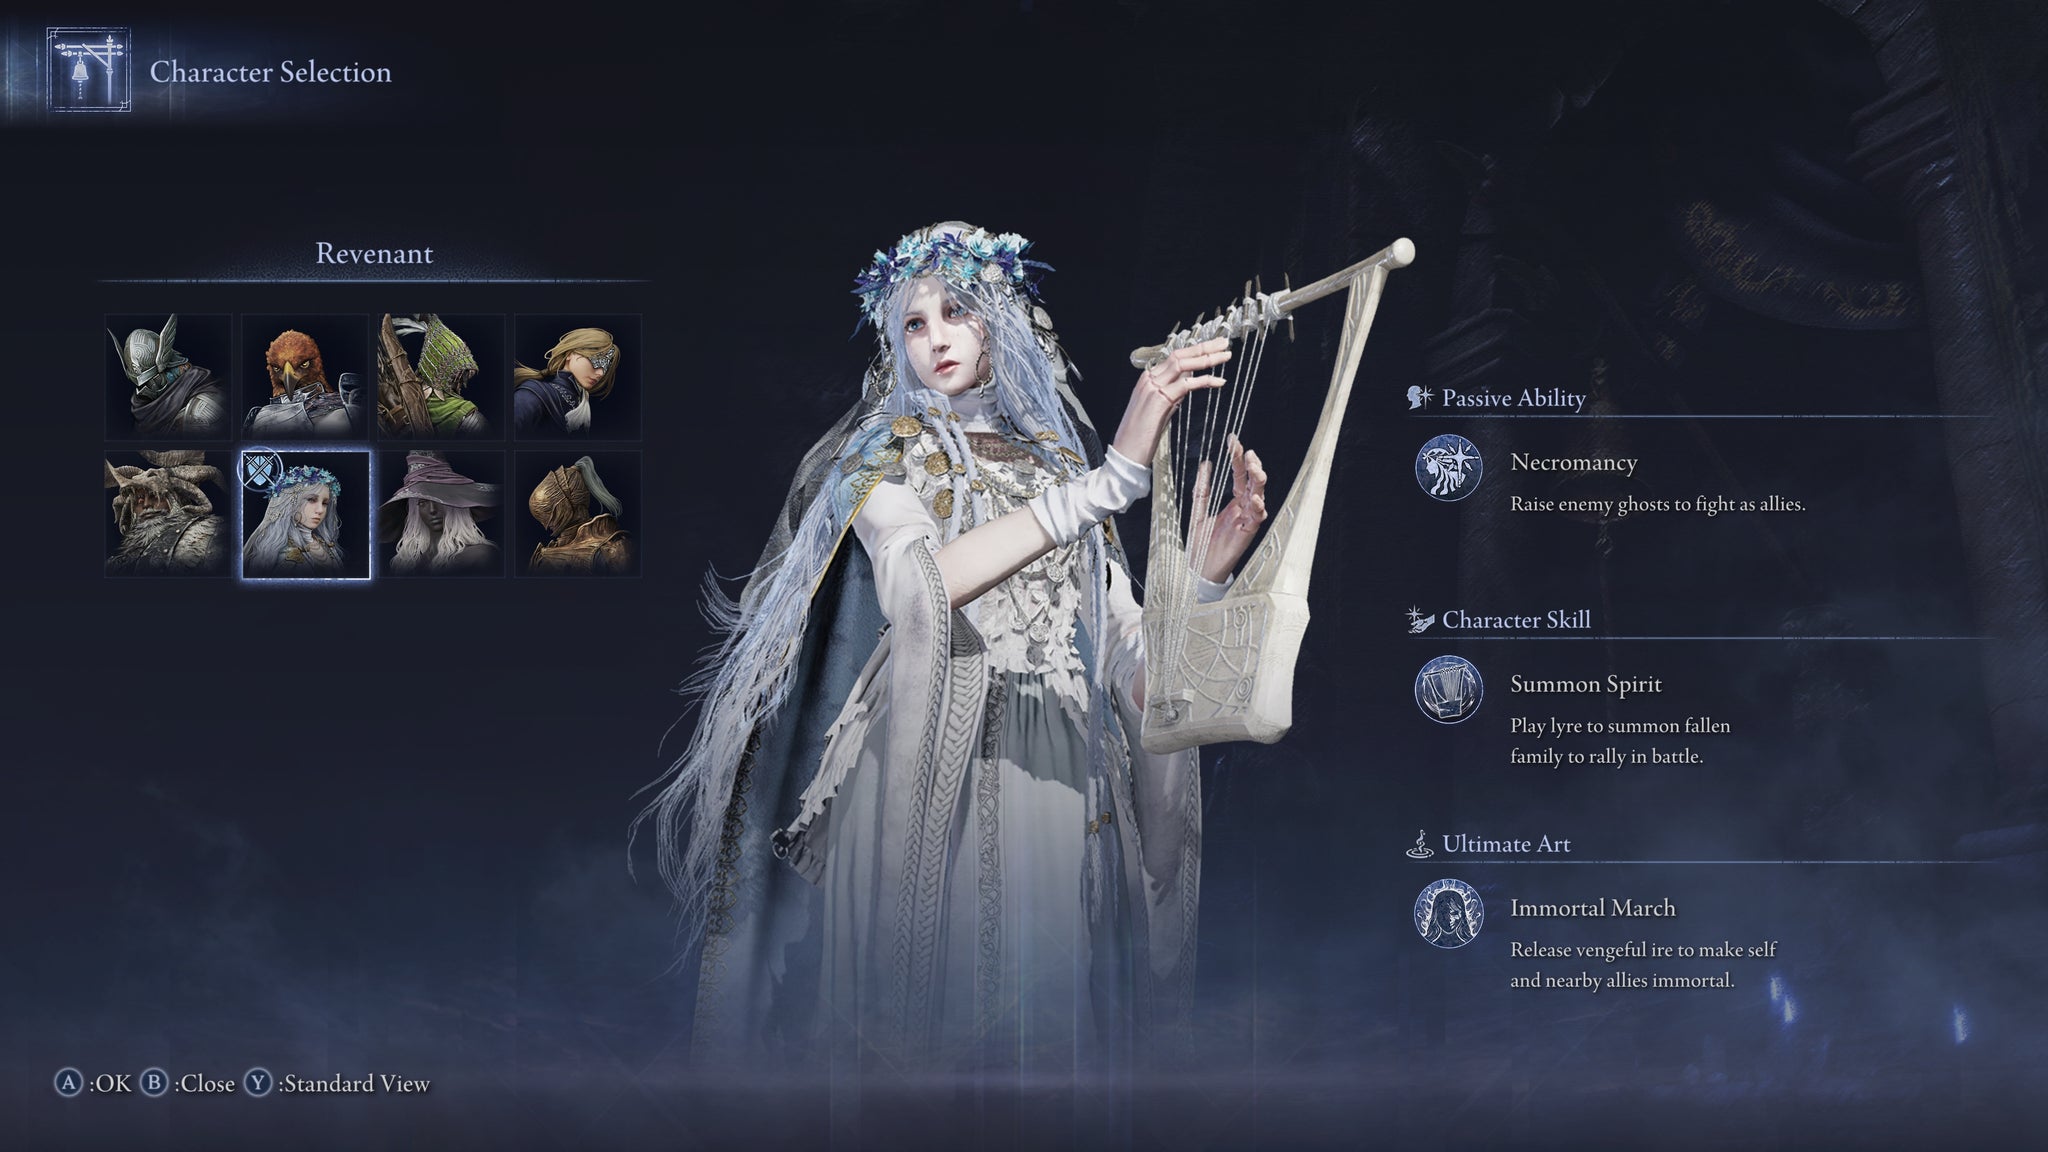
Image credit:Rock Paper Shotgun/Bandai Namco
| Pros | Cons |
|---|---|
| Great at creating diversions | Low HP and physical damage |
| Strong magic capabilities | Steep learning curve |
| Ultimate provides strong team survivability |
The Revenant , despite rounding off the lowest rung of our Nightfarer tier ladder, is by no means weak. Her forte lies with using summons to distract enemies - and we all know how easy summons make certain fights, even if the summons themselves aren’t able to do much except tank hits for a while. Revenant’s Passive gives her a chance to instantly re-summon fallen enemies as temporary allies, but her real power lies with her Summon Spirit skill, which allows her to summon a permanent and more powerful ally out of a choice of three.
Helen the Page is best suited for cleaning up groups of smaller enemies in our experience, while Frederick the Pumpkin Head is a strong choice for tanking and damaging larger targets. Sebastian the Giant Skeleton should be reserved for end-of-day boss fights, because it can soak up the boss’s attention for far longer than anything else Revenant can summon. The thing that holds Revenant back, though, is that she pays a lot for all this summoning ability. She’s got appalling HP and damage , and while she is a decent spellcaster with high FP, she’s outclassed in this field by Recluse, and overly reliant on FP-restoring items like Starlight Shards. And despite all that she’s giving up, Revenant’s summons don’t deal much damage at all. Their focus lies much more with keeping the focus off the actual Nightfarers for a while.
Having said that, the Revenant’s Ultimate is a potential game-changer when deployed at the right time. Immortal March will instantly revive nearby allies (it’s a low range, mind you, so make sure you’re close to them), and also prevent living allies in that same range from dying. Activating this ability also prompts your Summon Spirit ally (Helen, Frederick, or Sebastian) to use their special move, which is a nice little bonus that does somewhat increase the damage potential of Revenant’s spirits, but not enough for this to be a primary use for the Ultimate. All in all, Revenant is an intriguing character with a very unique playstyle which will absolutely suit certain players; but her abilities are not straightforward to use effectively , and in the current meta of Nightreign it’s generally better to go with characters that can greatly increase your team’s damage.
Abilities:
- Passive Ability: Necromancy - Slain enemies have a chance of respawning as a temporary friendly spirit.
- Character Skill: Summon Spirit - Summon either Helen the Page, Frederick the Pumpkin Head, or Sebastian the Giant Skeleton as a friendly spirit.
- Ultimate Art: Immortal March - All living allies nearby are rendered immortal for a short time, and all knocked allies nearby are immediately revived. Also prompts the “Summon Spirit” ally to unleash their special attack.
So, which character should you pick?
If you’re still having trouble picking out which character is right for you, it’s important to remember that all 10 Nightfarers are extremely powerful in their own way. With the right builds and encounters, all 10 characters can feel utterly overpowered - and the reverse is also true. Ultimately, you should choose based on your preferred playstyle, and only use our best character tier list as a secondary decision-making element.
To help you decide which character to play as, have a read of the statements below and see if any of them speak to your particular playstyle preference:
- Pick Wylder if you want a versatile and easy to learn jack-of-all-trades.
- Pick Guardian if you want fantastic melee survivability, and don’t mind leading the charge.
- Pick Ironeye if you want to stay at a distance, and farm smaller groups very easily.
- Pick Duchess if you value evading over blocking or parrying, and can coordinate skill usage with your team for massive damage.
- Pick Raider if you want to be slow, tanky, aggressive, and capable of staggering even bosses with well-timed retaliations.
- Pick Revenant if you want access to endless summons to help divert and distract troublesome foes.
- Pick Recluse if you want extreme magic abilities, versatile access to many elements, and don’t mind learning an entirely new spellcasting system.
- Pick Executor if you want to deflect like Sekiro rather than trying to time parries like in Elden Ring.
- Pick Scholar if you want to play as a support character who consistently uses items and buffs/debuffs allies and enemies.
- Pick Undertaker if you want to use a hammer, propel yourself across the battlefield at rapid speed, and play well with other Nightfarers.
That brings our class tier list guide to a close, so hopefully you’ve learned a thing or two about the capabilities or each Nightfarer, and our guide has helped you decide which character you’d like to dedicate your time to next!
If you need more help with Elden Ring: Nightreign, then you’re in the right place. We have plenty of other guides you can check out if you’re in need of a helping hand, like our explainer on whether you can play as a duo and our page on how to change your appearance . We’ve also got guides on how to increase flask charges , whether you should give the Priestess the Pocketwatch and how to get Rivers of Blood .
Elden Ring: Nightreign
PS5 , Xbox Series X/S , PC
Rock Paper Shotgun is better when you sign in
Sign in and join us on our journey to discover strange and compelling PC games.

All 75 Arc Raiders Blueprints and where to get them
These areas have the highest chance of giving you Blueprints

Image credit:Rock Paper Shotgun/Embark Studios
Looking for more Arc Raiders Blueprints? It’s a special day when you find a Blueprint, as they’re among the most valuable items in Arc Raiders. If you find a Blueprint that you haven’t already found, then you must make sure you hold onto it at all costs, because Blueprints are the key to one of the most important and powerful systems of meta-progression in the game.
This guide aims to be the very best guide on Blueprints you can find, starting with a primer on what exactly they are and how they work in Arc Raiders, before delving into exactly where to get Blueprints and the very best farming spots for you to take in your search.
We’ll also go over how to get Blueprints from other unlikely activities, such as destroying Surveyors and completing specific quests. And you’ll also find the full list of all 75 Blueprints in Arc Raiders on this page (including the newest Blueprints added with the Cold Snap update , such as the Deadline Blueprint and Firework Box Blueprint), giving you all the information you need to expand your own crafting repertoire.
In this guide:
- What are Blueprints in Arc Raiders?
- Full Blueprint list: All crafting recipes
- Where to find Blueprints in Arc Raiders Blueprints obtained from quests Blueprints obtained from Trials Best Blueprint farming locations

What are Blueprints in Arc Raiders?
Blueprints in Arc Raiders are special items which, if you manage to extract with them, you can expend to permanently unlock a new crafting recipe in your Workshop. If you manage to extract from a raid with an Anvil Blueprint, for example, you can unlock the ability to craft your very own Anvil Pistol, as many times as you like (as long as you have the crafting materials).
To use a Blueprint, simply open your Inventory while in the lobby, then right-click on the Blueprint and click “Learn And Consume” . This will permanently unlock the recipe for that item in your Workshop. As of the Stella Montis update, there are allegedly 75 different Blueprints to unlock - although only 68 are confirmed to be in the game so far. You can see all the Blueprints you’ve found and unlocked by going to the Workshop menu, and hitting “R” to bring up the Blueprint screen.
It’s possible to find duplicates of past Blueprints you’ve already unlocked. If you find these, then you can either sell them, or - if you like to play with friends - you can take it into a match and gift it to your friend so they can unlock that recipe for themselves. Another option is to keep hold of them until the time comes to donate them to the Expedition.
Full Blueprint list: All crafting recipes
Below is the full list of all the Blueprints that are currently available to find in Arc Raiders, and the crafting recipe required for each item:
| Blueprint | Type | Recipe | Crafted At |
|---|---|---|---|
| Bettina | Weapon | 3x Advanced Mechanical Components 3x Heavy Gun Parts 3x Canister | Gunsmith 3 |
| Blue Light Stick | Quick Use | 3x Chemicals | Utility Station 1 |
| Aphelion | Weapon | 3x Magnetic Accelerator 3x Complex Gun Parts 1x Matriarch Reactor | Gunsmith 3 |
| Combat Mk. 3 (Flanking) | Augment | 2x Advanced Electrical Components 3x Processor | Gear Bench 3 |
| Combat Mk. 3 (Aggressive) | Augment | 2x Advanced Electrical Components 3x Processor | Gear Bench 3 |
| Complex Gun Parts | Material | 2x Light Gun Parts 2x Medium Gun Parts 2x Heavy Gun Parts | Refiner 3 |
| Fireworks Box | Quick Use | 1x Explosive Compound 3x Pop Trigger | Explosives Station 2 |
| Gas Mine | Mine | 4x Chemicals 2x Rubber Parts | Explosives Station 1 |
| Green Light Stick | Quick Use | 3x Chemicals | Utility Station 1 |
| Pulse Mine | Mine | 1x Crude Explosives 1x Wires | Explosives Station 1 |
| Seeker Grenade | Grenade | 1x Crude Explosives 2x ARC Alloy | Explosives Station 1 |
| Looting Mk. 3 (Survivor) | Augment | 2x Advanced Electrical Components 3x Processor | Gear Bench 3 |
| Angled Grip II | Mod | 2x Mechanical Components 3x Duct Tape | Gunsmith 2 |
| Angled Grip III | Mod | 2x Mod Components 5x Duct Tape | Gunsmith 3 |
| Hullcracker | Weapon | 1x Magnetic Accelerator 3x Heavy Gun Parts 1x Exodus Modules | Gunsmith 3 |
| Launcher Ammo | Ammo | 5x Metal Parts 1x Crude Explosives | Workbench 1 |
| Anvil | Weapon | 5x Mechanical Components 5x Simple Gun Parts | Gunsmith 2 |
| Anvil Splitter | Mod | 2x Mod Components 3x Processor | Gunsmith 3 |
| ??? | ??? | ??? | ??? |
| Barricade Kit | Quick Use | 1x Mechanical Components | Utility Station 2 |
| Blaze Grenade | Grenade | 1x Explosive Compound 2x Oil | Explosives Station 3 |
| Bobcat | Weapon | 3x Advanced Mechanical Components 3x Light Gun Parts | Gunsmith 3 |
| Osprey | Weapon | 2x Advanced Mechanical Components 3x Medium Gun Parts 7x Wires | Gunsmith 3 |
| Burletta | Weapon | 3x Mechanical Components 3x Simple Gun Parts | Gunsmith 1 |
| Compensator II | Mod | 2x Mechanical Components 4x Wires | Gunsmith 2 |
| Compensator III | Mod | 2x Mod Components 8x Wires | Gunsmith 3 |
| Defibrillator | Quick Use | 9x Plastic Parts 1x Moss | Medical Lab 2 |
| ??? | ??? | ??? | ??? |
| Equalizer | Weapon | 3x Magnetic Accelerator 3x Complex Gun Parts 1x Queen Reactor | Gunsmith 3 |
| Extended Barrel | Mod | 2x Mod Components 8x Wires | Gunsmith 3 |
| Extended Light Mag II | Mod | 2x Mechanical Components 3x Steel Spring | Gunsmith 2 |
| Extended Light Mag III | Mod | 2x Mod Components 5x Steel Spring | Gunsmith 3 |
| Extended Medium Mag II | Mod | 2x Mechanical Components 3x Steel Spring | Gunsmith 2 |
| Extended Medium Mag III | Mod | 2x Mod Components 5x Steel Spring | Gunsmith 3 |
| Extended Shotgun Mag II | Mod | 2x Mechanical Components 3x Steel Spring | Gunsmith 2 |
| Extended Shotgun Mag III | Mod | 2x Mod Components 5x Steel Spring | Gunsmith 3 |
| Remote Raider Flare | Quick Use | 2x Chemicals 4x Rubber Parts | Utility Station 1 |
| Heavy Gun Parts | Material | 4x Simple Gun Parts | Refiner 2 |
| Venator | Weapon | 2x Advanced Mechanical Components 3x Medium Gun Parts 5x Magnet | Gunsmith 3 |
| Il Toro | Weapon | 5x Mechanical Components 6x Simple Gun Parts | Gunsmith 1 |
| Jolt Mine | Mine | 1x Electrical Components 1x Battery | Explosives Station 2 |
| Explosive Mine | Mine | 1x Explosive Compound 1x Sensors | Explosives Station 3 |
| Jupiter | Weapon | 3x Magnetic Accelerator 3x Complex Gun Parts 1x Queen Reactor | Gunsmith 3 |
| Light Gun Parts | Material | 4x Simple Gun Parts | Refiner 2 |
| Lightweight Stock | Mod | 2x Mod Components 5x Duct Tape | Gunsmith 3 |
| Lure Grenade | Grenade | 1x Speaker Component 1x Electrical Components | Utility Station 2 |
| Medium Gun Parts | Material | 4x Simple Gun Parts | Refiner 2 |
| Torrente | Weapon | 2x Advanced Mechanical Components 3x Medium Gun Parts 6x Steel Spring | Gunsmith 3 |
| Muzzle Brake II | Mod | 2x Mechanical Components 4x Wires | Gunsmith 2 |
| Muzzle Brake III | Mod | 2x Mod Components 8x Wires | Gunsmith 3 |
| Padded Stock | Mod | 2x Mod Components 5x Duct Tape | Gunsmith 3 |
| Shotgun Choke II | Mod | 2x Mechanical Components 4x Wires | Gunsmith 2 |
| Shotgun Choke III | Mod | 2x Mod Components 8x Wires | Gunsmith 3 |
| Shotgun Silencer | Mod | 2x Mod Components 8x Wires | Gunsmith 3 |
| Showstopper | Grenade | 1x Advanced Electrical Components 1x Voltage Converter | Explosives Station 3 |
| Silencer I | Mod | 2x Mechanical Components 4x Wires | Gunsmith 2 |
| Silencer II | Mod | 2x Mod Components 8x Wires | Gunsmith 3 |
| Snap Hook | Quick Use | 2x Power Rod 3x Rope 1x Exodus Modules | Utility Station 3 |
| Stable Stock II | Mod | 2x Mechanical Components 3x Duct Tape | Gunsmith 2 |
| Stable Stock III | Mod | 2x Mod Components 5x Duct Tape | Gunsmith 3 |
| Tagging Grenade | Grenade | 1x Electrical Components 1x Sensors | Utility Station 3 |
| Tempest | Weapon | 3x Advanced Mechanical Components 3x Medium Gun Parts 3x Canister | Gunsmith 3 |
| Trigger Nade | Grenade | 2x Crude Explosives 1x Processor | Explosives Station 2 |
| Vertical Grip II | Mod | 2x Mechanical Components 3x Duct Tape | Gunsmith 2 |
| Vertical Grip III | Mod | 2x Mod Components 5x Duct Tape | Gunsmith 3 |
| Vita Shot | Quick Use | 2x Antiseptic 1x Syringe | Medical Lab 3 |
| Vita Spray | Quick Use | 3x Antiseptic 1x Canister | Medical Lab 3 |
| Vulcano | Weapon | 1x Magnetic Accelerator 3x Heavy Gun Parts 1x Exodus Modules | Gunsmith 3 |
| Wolfpack | Grenade | 2x Explosive Compound 2x Sensors | Explosives Station 3 |
| Red Light Stick | Quick Use | 3x Chemicals | Utility Station 1 |
| Smoke Grenade | Grenade | 14x Chemicals 1x Canister | Utility Station 2 |
| Deadline | Mine | 3x Explosive Compound 2x ARC Circuitry | Explosives Station 3 |
| Trailblazer | Grenade | 1x Explosive Compound 1x Synthesized Fuel | Explosives Station 3 |
| Tactical Mk. 3 (Defensive) | Augment | 2x Advanced Electrical Components 3x Processor | Gear Bench 3 |
| Tactical Mk. 3 (Healing) | Augment | 2x Advanced Electrical Components 3x Processor | Gear Bench 3 |
| Yellow Light Stick | Quick Use | 3x Chemicals | Utility Station 1 |
Note: The missing Blueprints in this list likely have not actually been added to the game at the time of writing, because none of the playerbase has managed to find any of them. As they are added to the game, I will update this page with the most relevant information so you know exactly how to get all 75 Arc Raiders Blueprints.
Where to find Blueprints in Arc Raiders
Below is a list of all containers, modifiers, and events which maximise your chances of finding Blueprints:
- Certain quests reward you with specific Blueprints .
- Completing Trials has a high chance of offering Blueprints as rewards.
- Surveyors have a decent chance of dropping Blueprints on death.
- High loot value areas tend to have a greater chance of spawning Blueprints.
- Night Raids and Storms may increase rare Blueprint spawn chances in containers.
- Containers with higher numbers of items may have a higher tendency to spawn Blueprints. As a result, Blue Gate (which has many “large” containers containing multiple items) may give you a higher chance of spawning Blueprints.
- Raider containers (Raider Caches, Weapon Boxes, Medical Bags, Grenade Tubes) have increased Blueprint drop rates. As a result, the Uncovered Caches event gives you a high chance of finding Blueprints.
- Security Lockers have a higher than average chance of containing Blueprints.
- Certain Blueprints only seem to spawn under specific circumstances: Tempest Blueprint only spawns during Night Raid events. Vulcano Blueprint only spawns during Hidden Bunker events. Jupiter and Equaliser Blueprints only spawn during Harvester events.

Raider Caches, Weapon Boxes, and other raider-oriented container types have a good chance of offering Blueprints. |Image credit:Rock Paper Shotgun/Embark Studios
Blueprints have a very low chance of spawning in any container in Arc Raiders, around 1-2% on average. However, there is a higher chance of finding Blueprints in particular container types. Specifically, you can find more Blueprints in Raider containers and security lockers.
Beyond this, if you’re looking for Blueprints you should focus on regions of the map which are marked as having particularly high-value loot. Areas such as the Control Tower in Dam Battlegrounds, the Arrival and Departure Buildings in Spaceport, and Pilgrim’s Peak in Blue Gate all have a better-than-average chance of spawning Blueprints somewhere amongst all their containers. Night Raids and Electromagnetic Storm events also increase the drop chances of certain Blueprints .
In addition to these containers, you can often loot Blueprints from destroyed Surveyors - the largest of the rolling ball ARC. Surveyors are more commonly found on the later maps - Spaceport and Blue Gate - and if one spawns in your match, you’ll likely see it by the blue laser beam that it casts into the sky while “surveying”.
Surveyors are quite well-armoured and will very speedily run away from you once it notices you, but if you can take one down then make sure you loot all its parts for a chance of obtaining certain unusual Blueprints.
Blueprints obtained from quests
One way in which you can get Blueprints is by completing certain quests for the vendors in Speranza. Some quests will reward you with a specific item Blueprint upon completion, so as long as you work through all the quests in Arc Raiders, you are guaranteed those Blueprints.
Here is the full list of all Blueprints you can get from quest rewards:
- Trigger Nade Blueprint: Rewarded after completing “Sparks Fly”.
- Lure Grenade Blueprint: Rewarded after completing “Greasing Her Palms”.
- Burletta Blueprint: Rewarded after completing “Industrial Espionage”.
- Hullcracker Blueprint (and Launcher Ammo Blueprint): Rewarded after completing “The Major’s Footlocker”.
Alas, that’s only 4 Blueprints out of a total of 75 to unlock, so for the vast majority you will need to find them yourself during a raid. If you’re intent on farming Blueprints, then it’s best to equip yourself with cheap gear in case you lose it, but don’t use a free loadout because then you won’t get a safe pocket to stash any new Blueprint you find. No pain in Arc Raiders is sharper than failing to extract with a new Blueprint you’ve been after for a dozen hours already.

One of the best ways to get Blueprints is by hitting three stars on all five Trials every week. |Image credit:Rock Paper Shotgun/Embark Studios
Blueprints obtained from Trials
One of the very best ways to get Blueprints is as rewards for completing Trials in Arc Raiders. Trials are unlocked from Level 15 onwards, and allow you to earn rewards by focusing on certain tasks over the course of several raids. For example, one Trial might task you with dealing damage to Hornets, while another might challenge you to loot Supply Drops.
Trials refresh on a weekly basis, with a new week bringing five new Trials. Each Trial can offer up to three rewards after passing certain score milestones, and it’s possible to receive very high level loot from these reward crates - including Blueprints. So if you want to unlock as many Blueprints as possible, you should make a point of completing as many Trials as possible each week.
Best Blueprint farming locations
The very best way to get Blueprints is to frequent specific areas of the maps which combine high-tier loot pools with the right types of containers to search. Here are my recommendations for where to find Blueprints on every map, so you can always keep the search going for new crafting recipes to unlock.

Image credit:Rock Paper Shotgun/Embark Studios
Dam Battlegrounds
The best places to farm Blueprints on Dam Battlegrounds are the Control Tower, Power Generation Complex, Ruby Residence, and Pale Apartments . The first two regions, despite only being marked on the map as mid-tier loot, contain a phenomenal number of containers to loot. The Control Tower can also contain a couple of high-tier Security Lockers - though of course, you’ll need to have unlocked the Security Breach skill at the end of the Survival tree.
There’s also a lot of reporting amongst the playerbase that the Residential areas in the top-left of the map - Pale Apartments and Ruby Residence - give you a comparatively strong chance of finding Blueprints. Considering their size, there’s a high density of containers to loot in both locations, and they also have the benefit of being fairly out of the way. So you’re more likely to have all the containers to yourself.
Buried City
The best Blueprint farming locations on Buried City are the Santa Maria Houses, Grandioso Apartments, Town Hall, and the various buildings of the New District . Grandioso Apartments has a lower number of containers than the rest, but a high chance of spawning weapon cases - which have good Blueprint drop rates. The others are high-tier loot areas, with plenty of lootable containers - including Security Lockers.
Spaceport
The best places to find Blueprints on Spaceport are the Arrival and Departure Buildings, as well as Control Tower A6 and the Launch Towers . All these areas are labelled as high-value loot regions, and many of them are also very handily connected to one another by the Spaceport wall, which you can use to quickly run from one area to the next. At the tops of most of these buildings you’ll find at least one Security Locker, so this is an excellent farming route for players looking to find Blueprints.
The downside to looting Blueprints on Spaceport is that all these areas are hotly contested, particularly in Duos and Squads. You’ll need to be very focused and fast in order to complete the full farming route.

Image credit:Rock Paper Shotgun/Embark Studios
Blue Gate
Blue Gate tends to have a good chance of dropping Blueprints, potentially because it generally has a high number of containers which can hold lots of items; so there’s a higher chance of a Blueprint spawning in each container. In my experience, the best Blueprint farming spots on Blue Gate are Pilgrim’s Peak, Raider’s Refuge, the Ancient Fort, and the Underground Complex beneath the Warehouse .
All of these areas contain a wealth of containers to loot. Raider’s Refuge has less to loot, but the majority of the containers in and around the Refuge are raider containers, which have a high chance of containing Blueprints - particularly during major events.
Stella Montis
On the whole, Stella Montis seems to have a very low drop rate for Blueprints (though a high chance of dropping other high-tier loot). If you do want to try farming Blueprints on this map, the best places to find Blueprints in Stella Montis are Medical Research, Assembly Workshop, and the Business Center . These areas have the highest density of containers to loot on the map.
In addition to this, the Western Tunnel has a few different Security Lockers to loot, so while there’s very little to loot elsewhere in this area of the map, it’s worth hitting those Security Lockers if you spawn there at the start of a match.
That wraps up this primer on how to get all the Blueprints in Arc Raiders as quickly as possible. With the Expedition system constantly resetting a large number of players’ Blueprints, it’s more important than ever to have the most up-to-date information on where to find all these Blueprints.
While you’re here, be sure to check out our Arc Raiders best guns tier list , as well as our primers on the best skills to unlock and all the different Field Depot locations on every map.

ARC Raiders
PS5 , Xbox Series X/S , PC
Rock Paper Shotgun is better when you sign in
Sign in and join us on our journey to discover strange and compelling PC games.
