Elden Ring: How to get to Volcano Manor
Here’s the easiest way to get to Volcano Manor in Elden Ring

Image credit:Rock Paper Shotgun/Bandai Namco

Want to get to Volcano Manor in Elden Ring? Volcano Manor resides deep in the heart of Mount Gelmir, directly north of Liurnia on the massive Elden Ring map. And considering it’s… y’know… right there on the map, it’s amazingly tricky to figure out how to get to the Manor itself.
As it turns out, there is a grand total of four (yes, four) methods of getting to Volcano Manor in Elden Ring. Two of them are faster methods which involve teleporting yourself (or rather, having others teleport you) directly to Mount Gelmir; and the other two are more straightforward paths from the neighbouring Altus Plateau. Whichever path you choose, we’ll go over everything you need to know to get to Volcano Manor in this guide.
How to get to Volcano Manor in Elden Ring
There are four paths that will lead you to Volcano Manor in Elden Ring:
- Path 1: Abductor Virgin shortcut
- Path 2: Progress Rya’s quest
- Path 3: Via the Campsite ladders
- Path 4: Around Mount Gelmir
The fastest way to get to Volcano Manor is to let yourself be abducted by the Abductor Virgin beneath the water wheels in the Academy Of Raya Lucaria, in Liurnia. If you die while inside the Abductor Virgin, then you’ll wake up beneath Volcano Manor. However, you’ll then need to defeat two Abductor Virgins at once in order to reach the rest of Mount Gelmir and Volcano Manor, so it’s far from the easiest path.
You can also progress Rya’s questline for a shortcut to Volcano Manor. Rya can first be found in Liurnia, but will then move to the Altus Plateau. Upon completing every part of her quest and speaking to her at Altus Plateau, she will offer to teleport you directly into Volcano Manor.
However, the most straightforward methods are simply walking from the Altus Plateau directly through Mount Gelmir and into Volcano Manor. There are two paths that you can take: the longer and more scenic route around Mount Gelmir; and the far quicker ladder shortcut to the Full-Grown Fallingstar Beast arena.
Let’s cover each of the four paths to Volcano Manor in greater detail below.
Path 1: Abductor Virgin shortcut
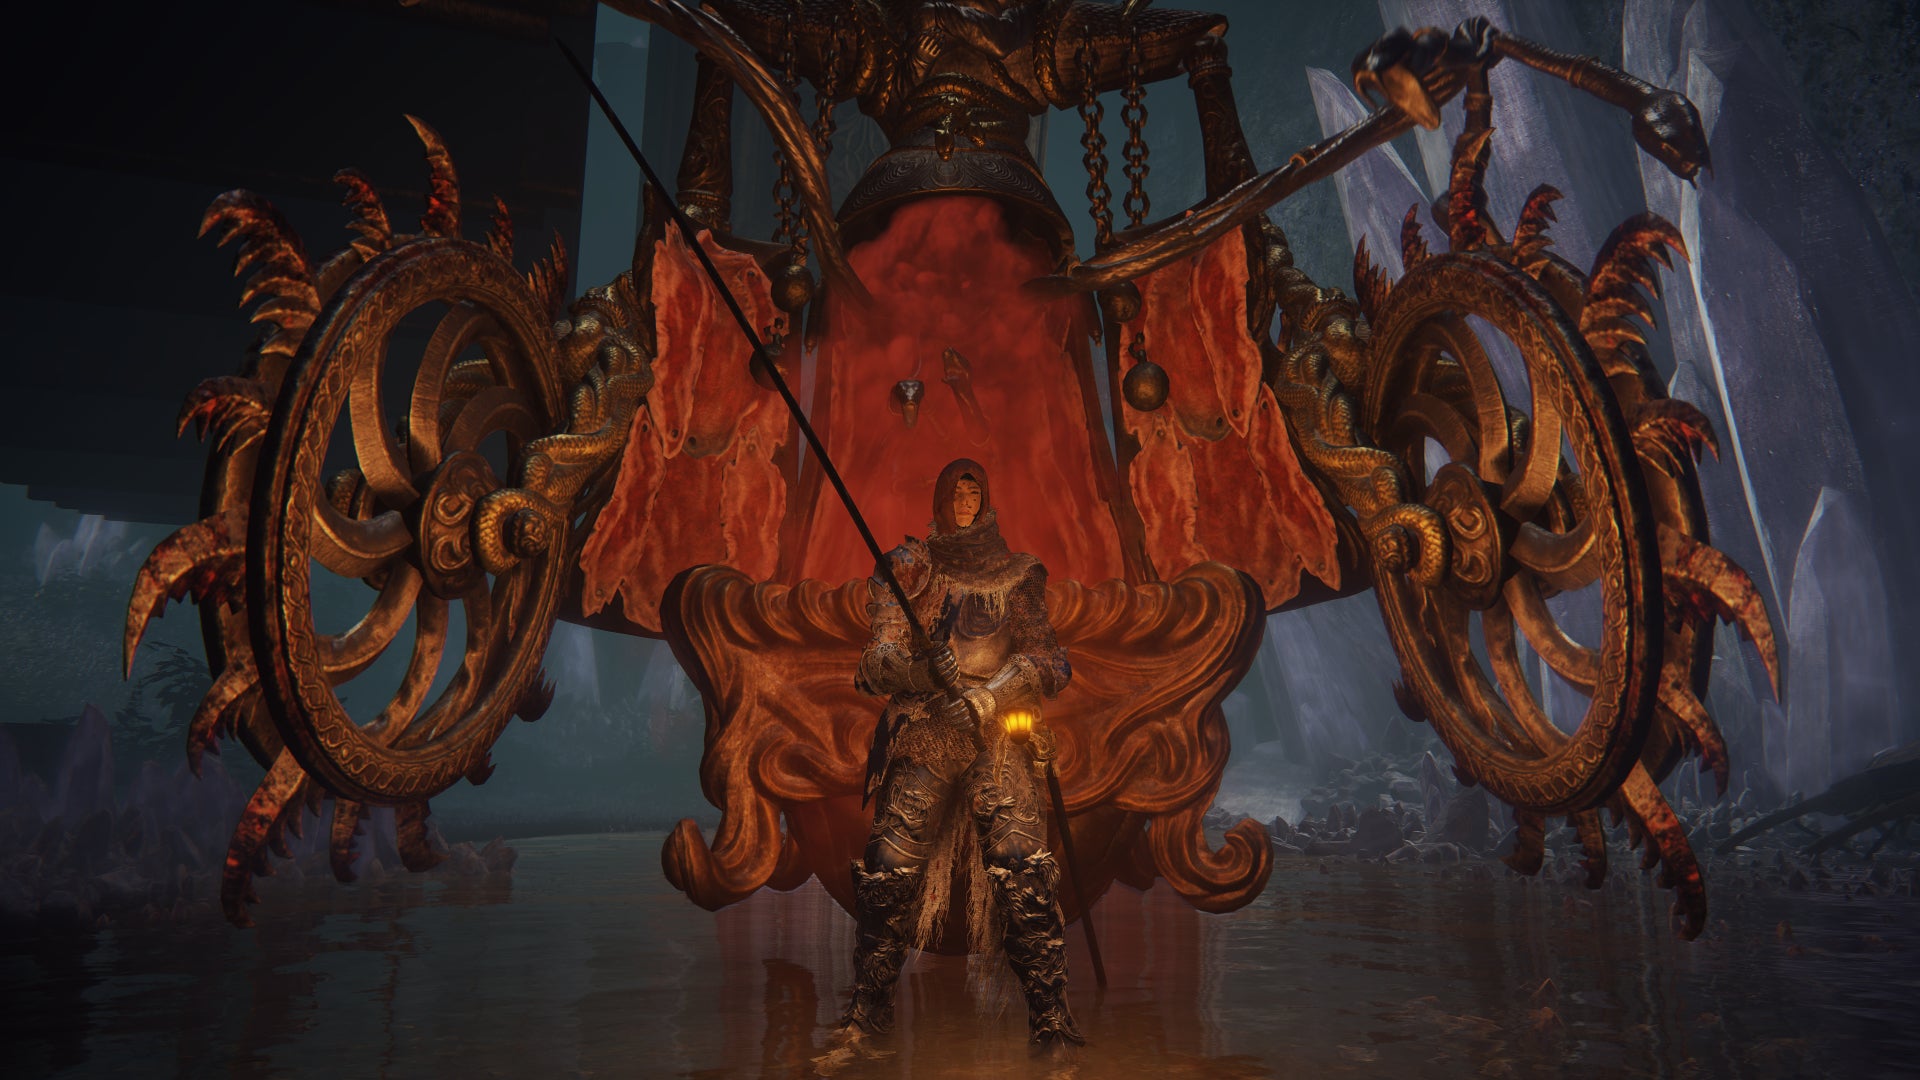
Get killed whileinsidethe Abductor Virgin below the Academy Of Raya Lucaria for a quick shortcut to Mount Gelmir and Volcano Manor.Image credit:Rock Paper Shotgun/Bandai Namco
| Pros | Cons |
|---|---|
| + Fastest method | - Confusing and finnicky path |
| + Only way to access this area of Mount Gelmir | - Challenging boss fight |
| - You’ll likely be underlevelled |
The earliest method of travelling to Volcano Manor involves entering the Academy Of Raya Lucaria in the centre of Liurnia. Near the Schoolhouse Classroom Site Of Grace in the Academy is a set of gigantic water wheels which you can ride like an elevator. Instead of jumping off at the top, let yourself be carried all the way over and down as far as you can go.
You’ll eventually be dropped down into a small area where an Abductor Virgin is waiting. This Abductor Virgin will often go for its grab attack where it pulls you inside its body and closes the door, dealing damage over time.
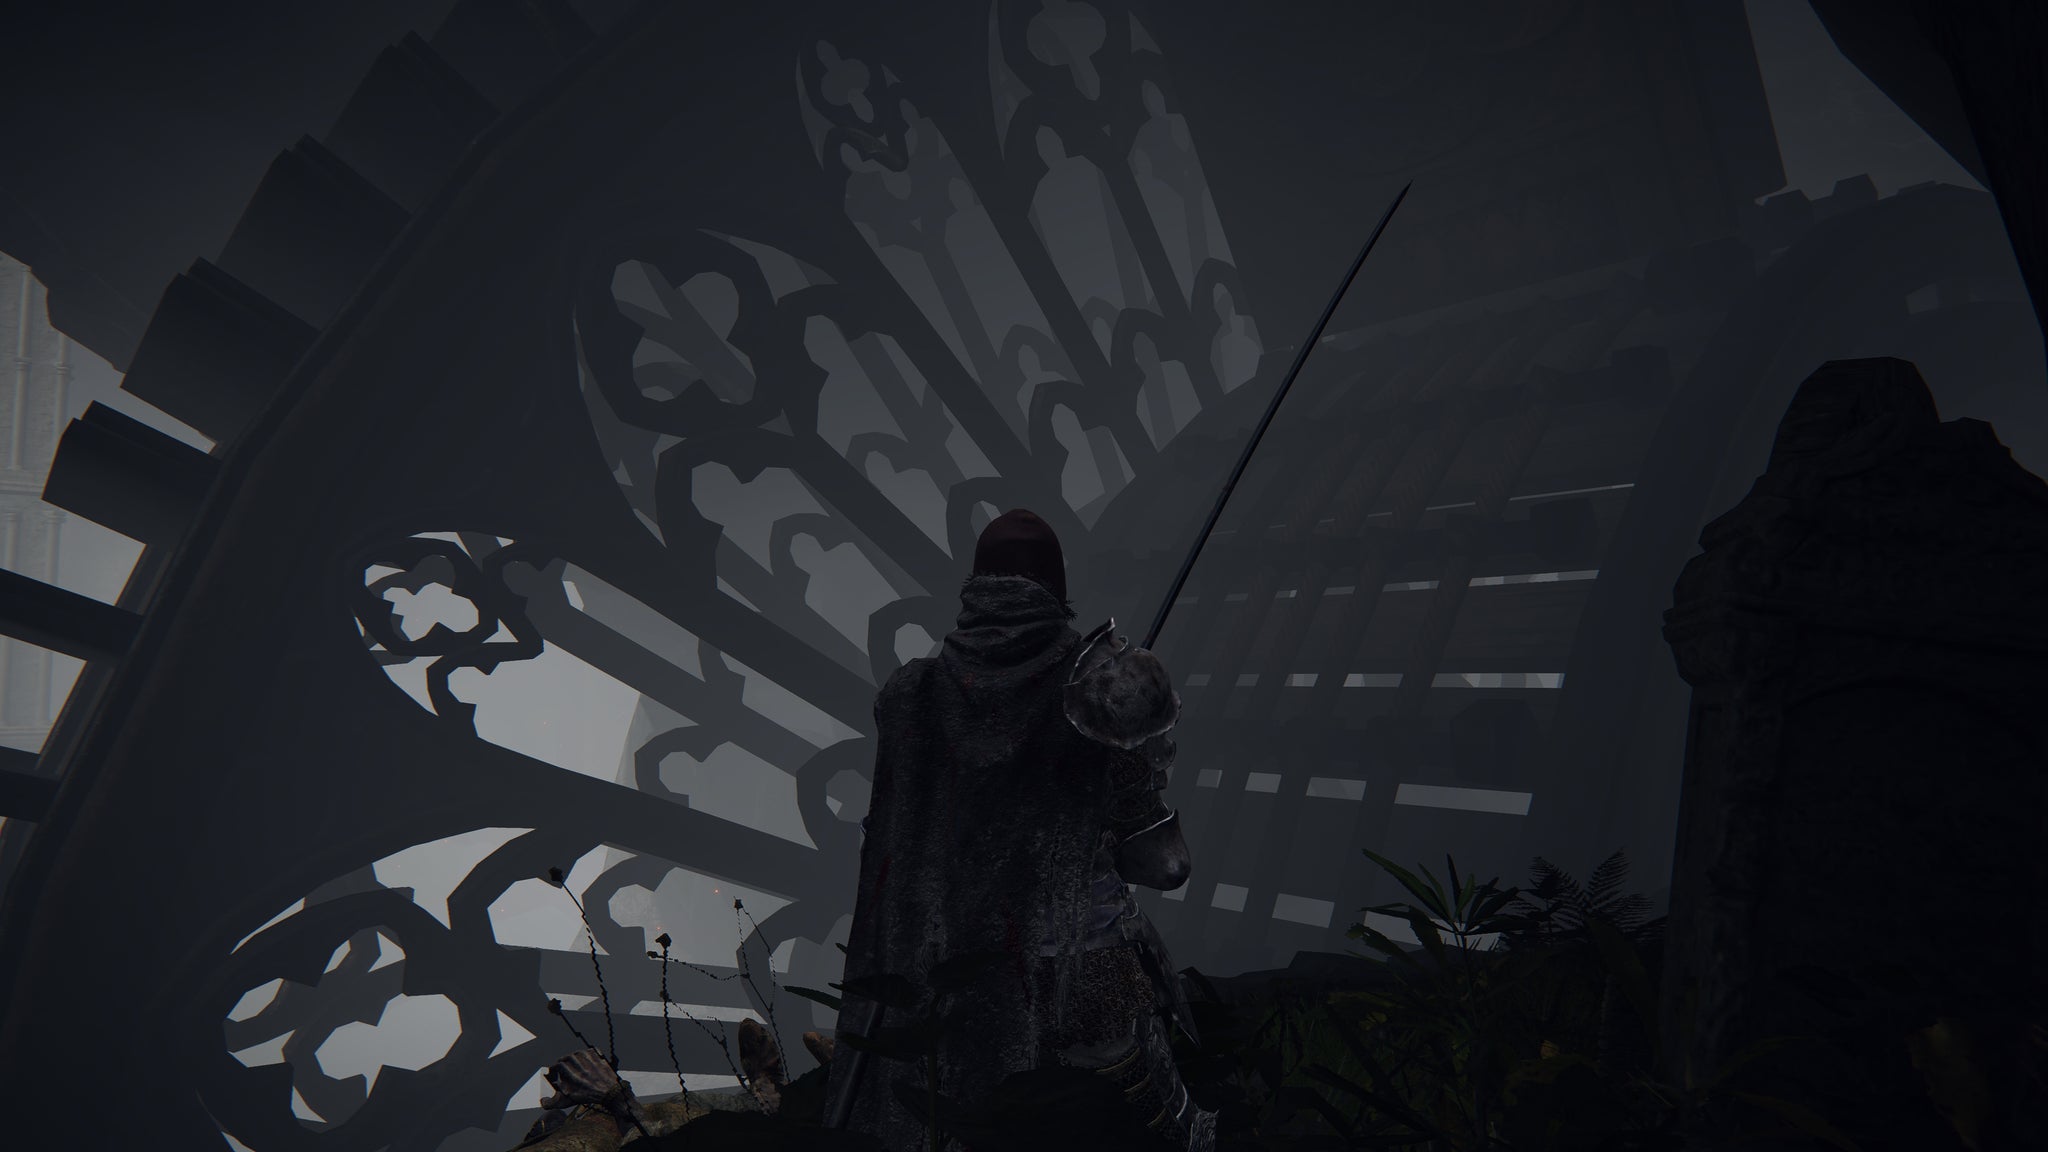
The water wheels in the Academy Of Raya Lucaria can be found just before the Schoolhouse Classroom. |Image credit:Rock Paper Shotgun/Bandai Namco
You must allow yourself to die while inside the Abductor Virgin’s body. You’ll be presented with the usual “You Died” message, but after that you’ll respawn in an area of Mount Gelmir below Volcano Manor, surrounded by magma.
Navigate the magma river and follow the path to the Subterranean Inquisition Chamber Site Of Grace. Rest there, and then jump across to the other side of the magma lake and follow the path down a drop and towards a fog door, behind which are two Abductor Virgins.
These Abductor Virgins are strong, particularly together, so it may be a very tough fight for a player at Liurnia scaling. However, once you beat the Abductor Virgins you can exit out into the upper area of Altus Plateau which usually would require players to circumnavigate Mount Gelmir to reach.
From here, you can continue along Path 4 in order to reach the entrance to Volcano Manor far earlier than using any other method.
Path 2: Progress Rya’s quest
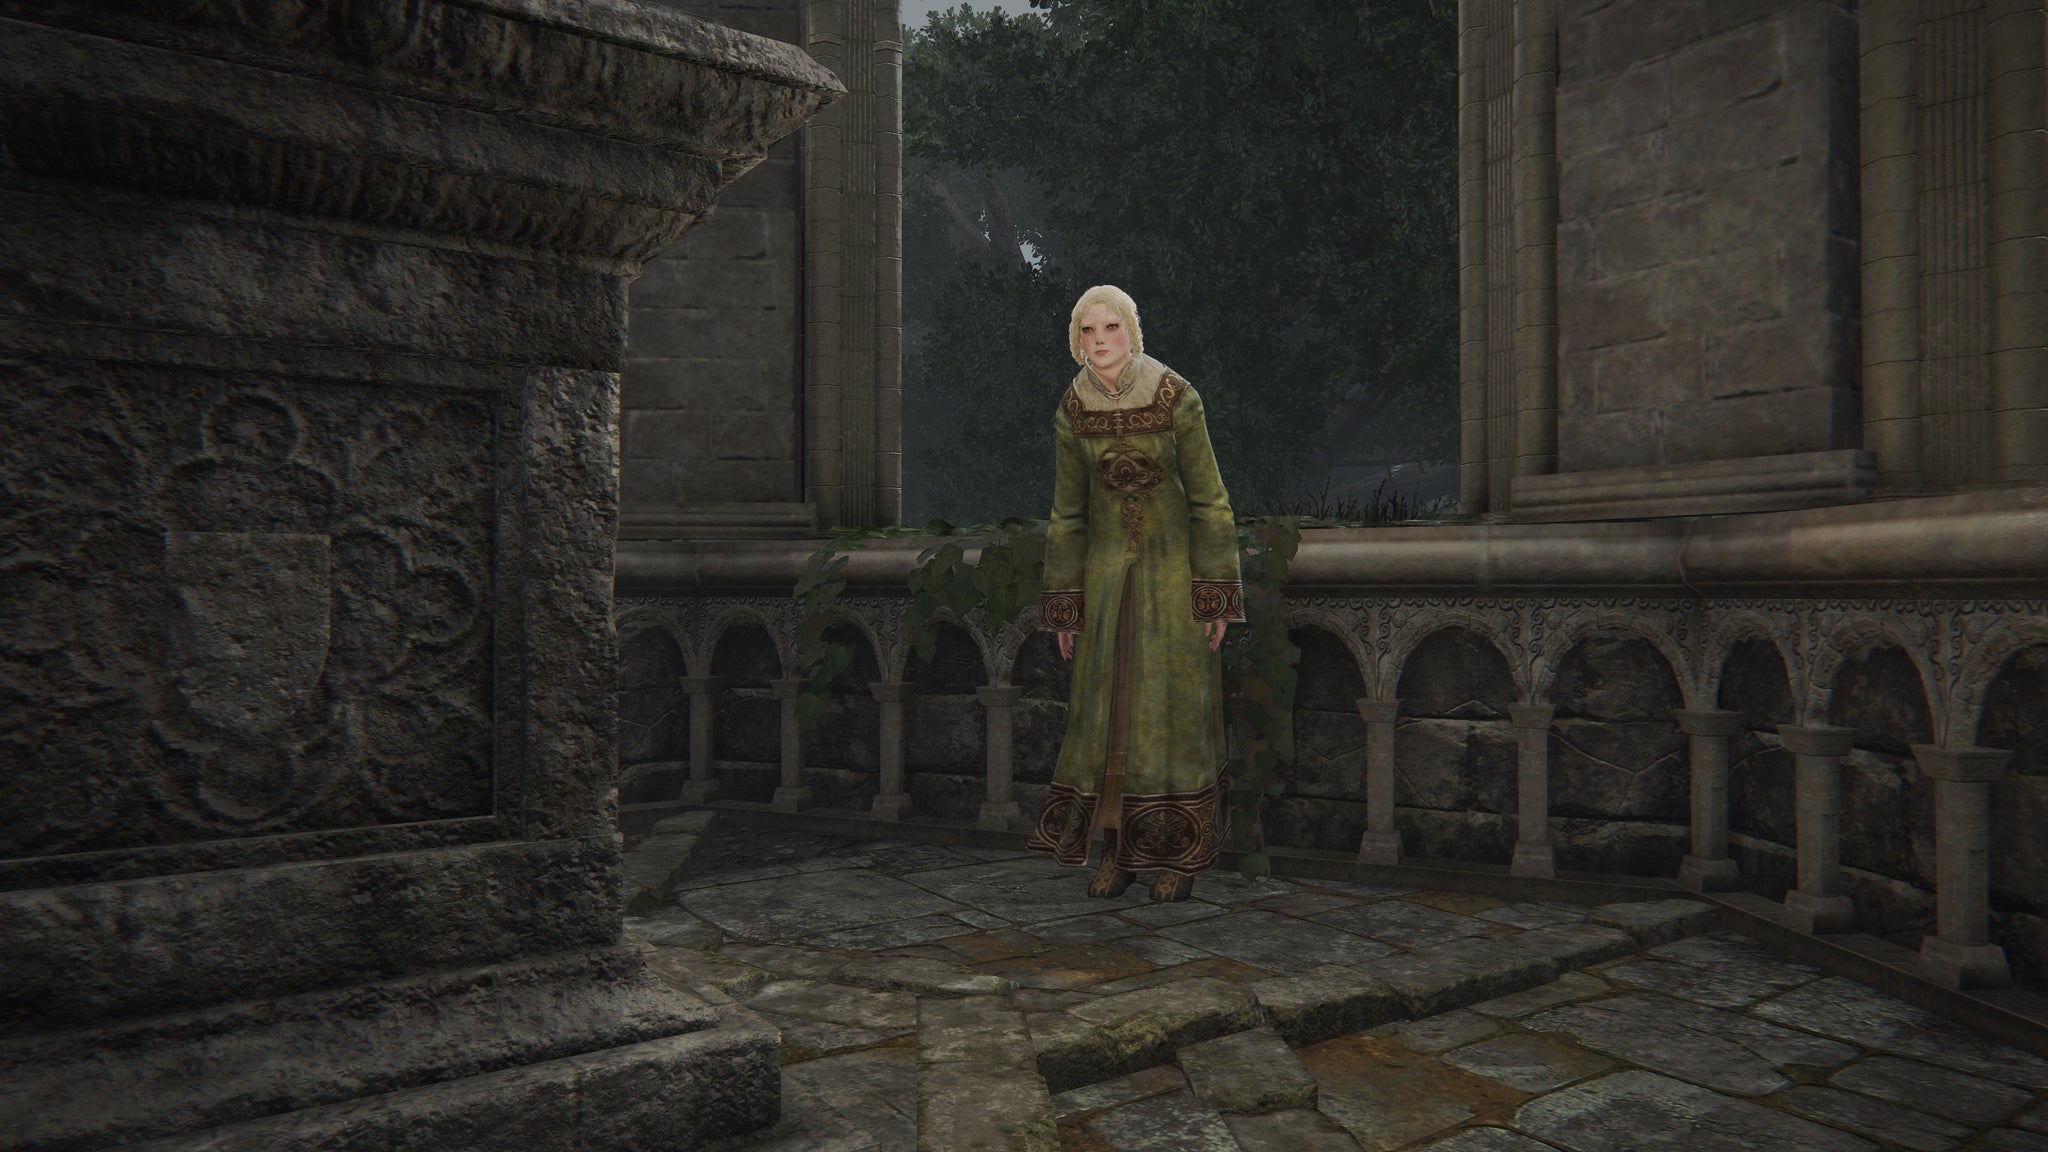
Progress Rya’s questline far enough, and she will teleport you straight into Volcano Manor. |Image credit:Rock Paper Shotgun/Bandai Namco
| Pros | Cons |
|---|---|
| + Requires no fighting | - Must first reach Altus Plateau |
| + Faster than going on foot | - Won’t see much of Mount Gelmir |
| - Might be slightly underlevelled |
The second-fastest way to get to Volcano Manor is by progressing Rya’s questline. Rya can first be found at Liurnia Of The Lakes, at the pavilion next to the Birdseye Telescope near Laskyar Ruins and Scenic Isle. See the below map for the exact location:
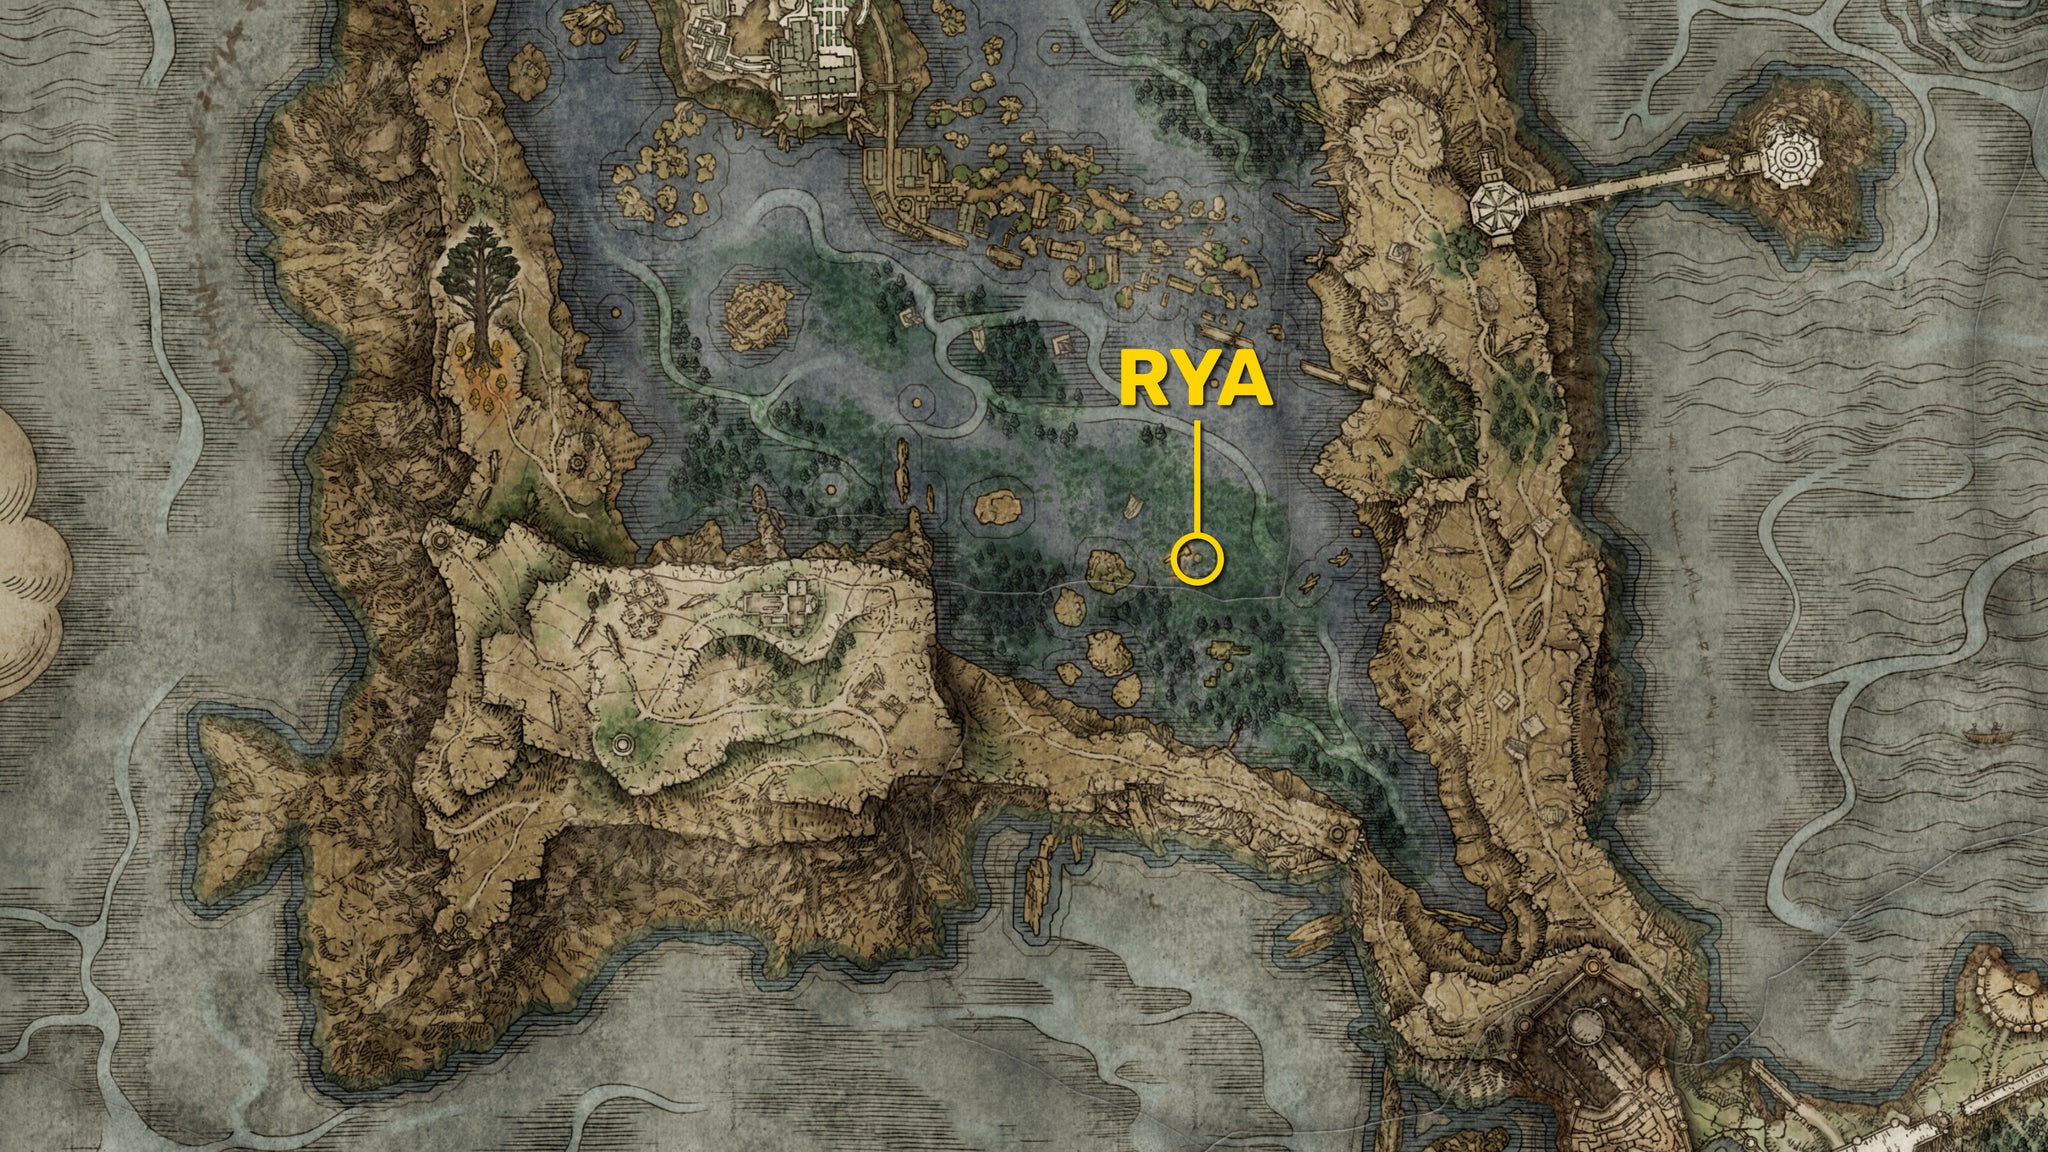
You can first find Rya here, under this pavilion in southern Liurnia. |Image credit:Rock Paper Shotgun/Bandai Namco
Speak with her and she’ll ask you to take back a stolen necklace of hers from the thief nearby. Head a short distance northwest to Boilprawn Shack, and speak with Blackguard Big Boggart. Buy back the necklace from him for 1,000 Runes (or kill him, but he has his own quest so I don’t recommend this).
Return to Rya and give her the necklace, and she will give you a Volcano Manor Invitation. Annoyingly however, she wants you to reach the Altus Plateau before she will teleport you into Volcano Manor. Once you get to Altus Plateau, you can find Rya waiting at one of these two locations depending on the path you took:
- If you took the Ruin-Strewn Precipice path: Rya will be near the Erdtree-Gazing Hill Site Of Grace.
- If you took the Grand Lift Of Dectus path: Rya will be waiting at the top of the Lift.
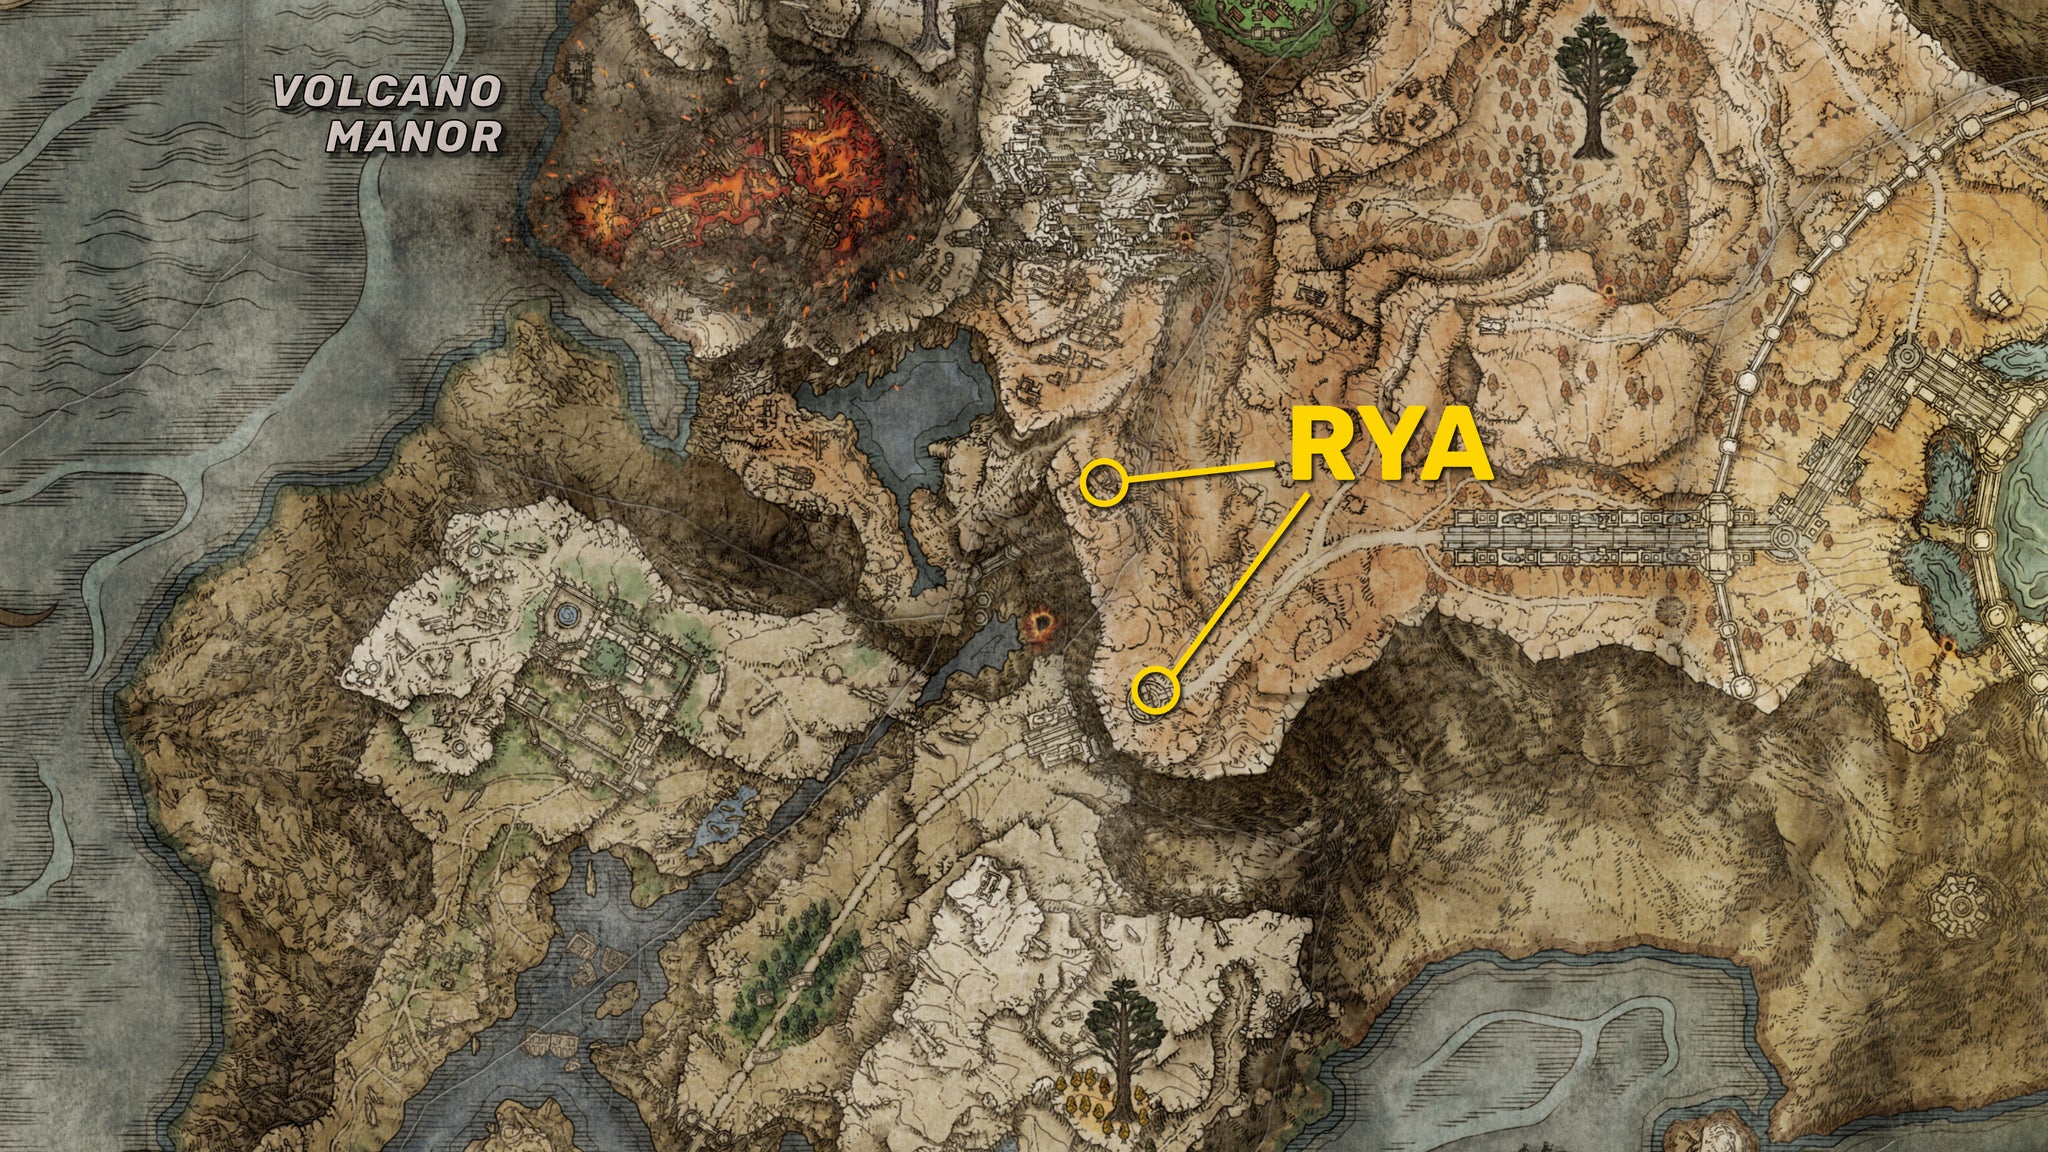
If you took the Grand Lift Of Dectus, Rya appears there. If not, she appears in the upper location. |Image credit:Rock Paper Shotgun/Bandai Namco
Speak with Rya again and she’ll offer to teleport you into Volcano Manor. This path is useful because it requires no direct fighting, apart from what is required to reach Altus Plateau. It also allows you to bypass most of Mount Gelmir itself, which can be a pro or a con depending on how you look at it.
Path 3: Via the Campsite ladders
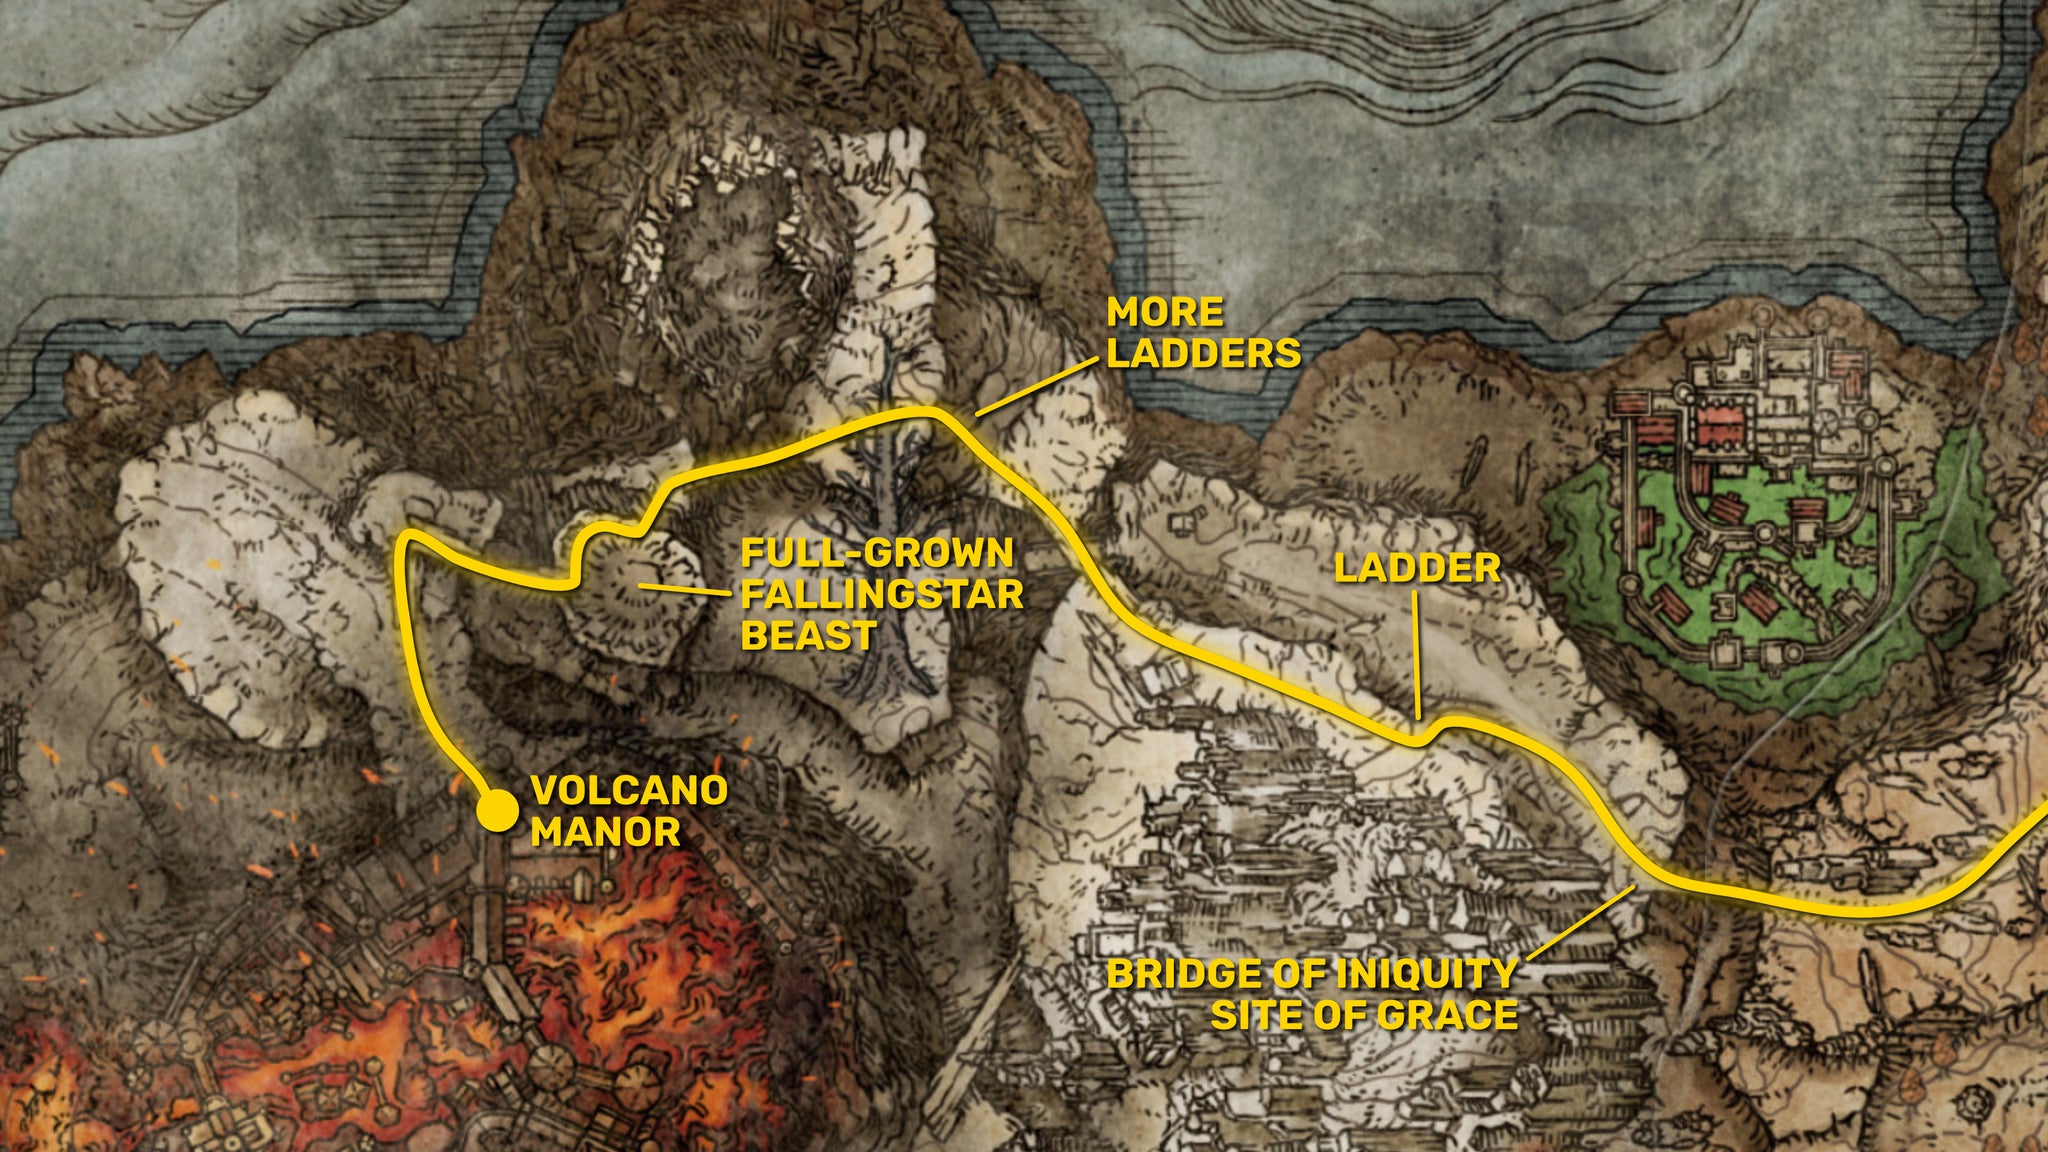
This is our recommended path if you want to reach Volcano Manor on foot. |Image credit:Rock Paper Shotgun/Bandai Namco
| Pros | Cons |
|---|---|
| + Faster than going around Mt Gelmir | - Slower than the first two options |
| + Can run past most fights | - Dangerous |
| + Likely be levelled enough for Volcano Manor |
If you want a more organic path to Volcano Manor, we recommend taking the ladders up to the Full-Grown Fallingstar Beast arena early on in Mount Gelmir. From the north of Altus Plateau (where the Windmill Village resides), follow the path west until you reach the Bridge Of Iniquity Site Of Grace.
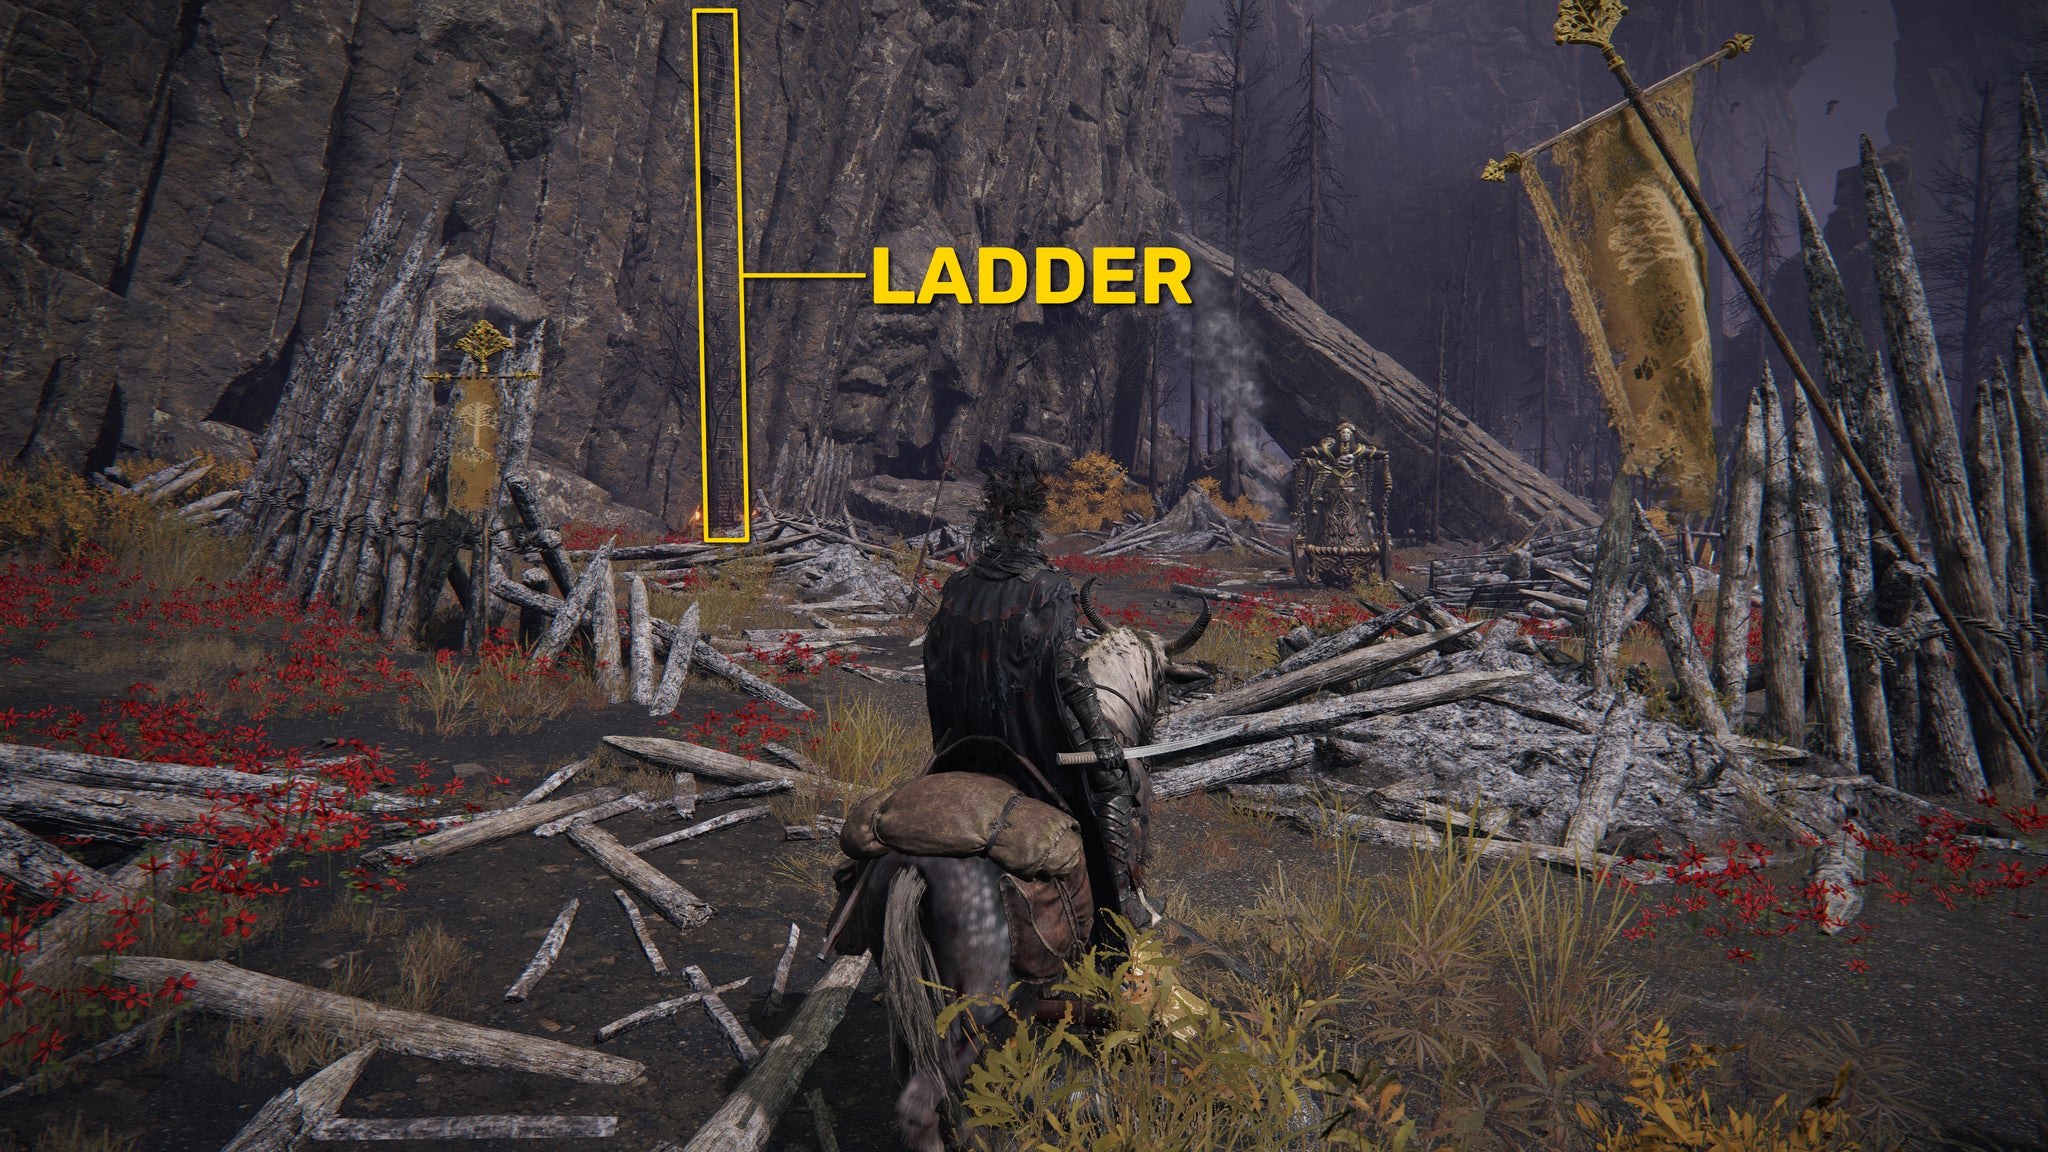
The first ladder is easy to miss, but you can find it on the left-hand side of the second campsite. |Image credit:Rock Paper Shotgun/Bandai Namco
Ahead of you there are two campsites with Abductor Virgins. You don’t need to fight them - just hug the left-hand cliff wall and run to the ladder on the wall in the second campsite. Climb it all the way up, and rest at the First Mt. Gelmir Campsite Site Of Grace on your left. Then kill (or run past) the soldiers resting near the tower ahead, and use the rock bridge leading away from the tower.
At the top is a Grafted Scion who you can fight or run past. Go up the ladder on the back wall just past the Scion, and then climb up any of the ladders you see, up and up until you reach an area with madness-spewing soldiers and knights. Head across the wooden bridge to the west, and rest at the Ninth Mt. Gelmir Campsite Site Of Grace.
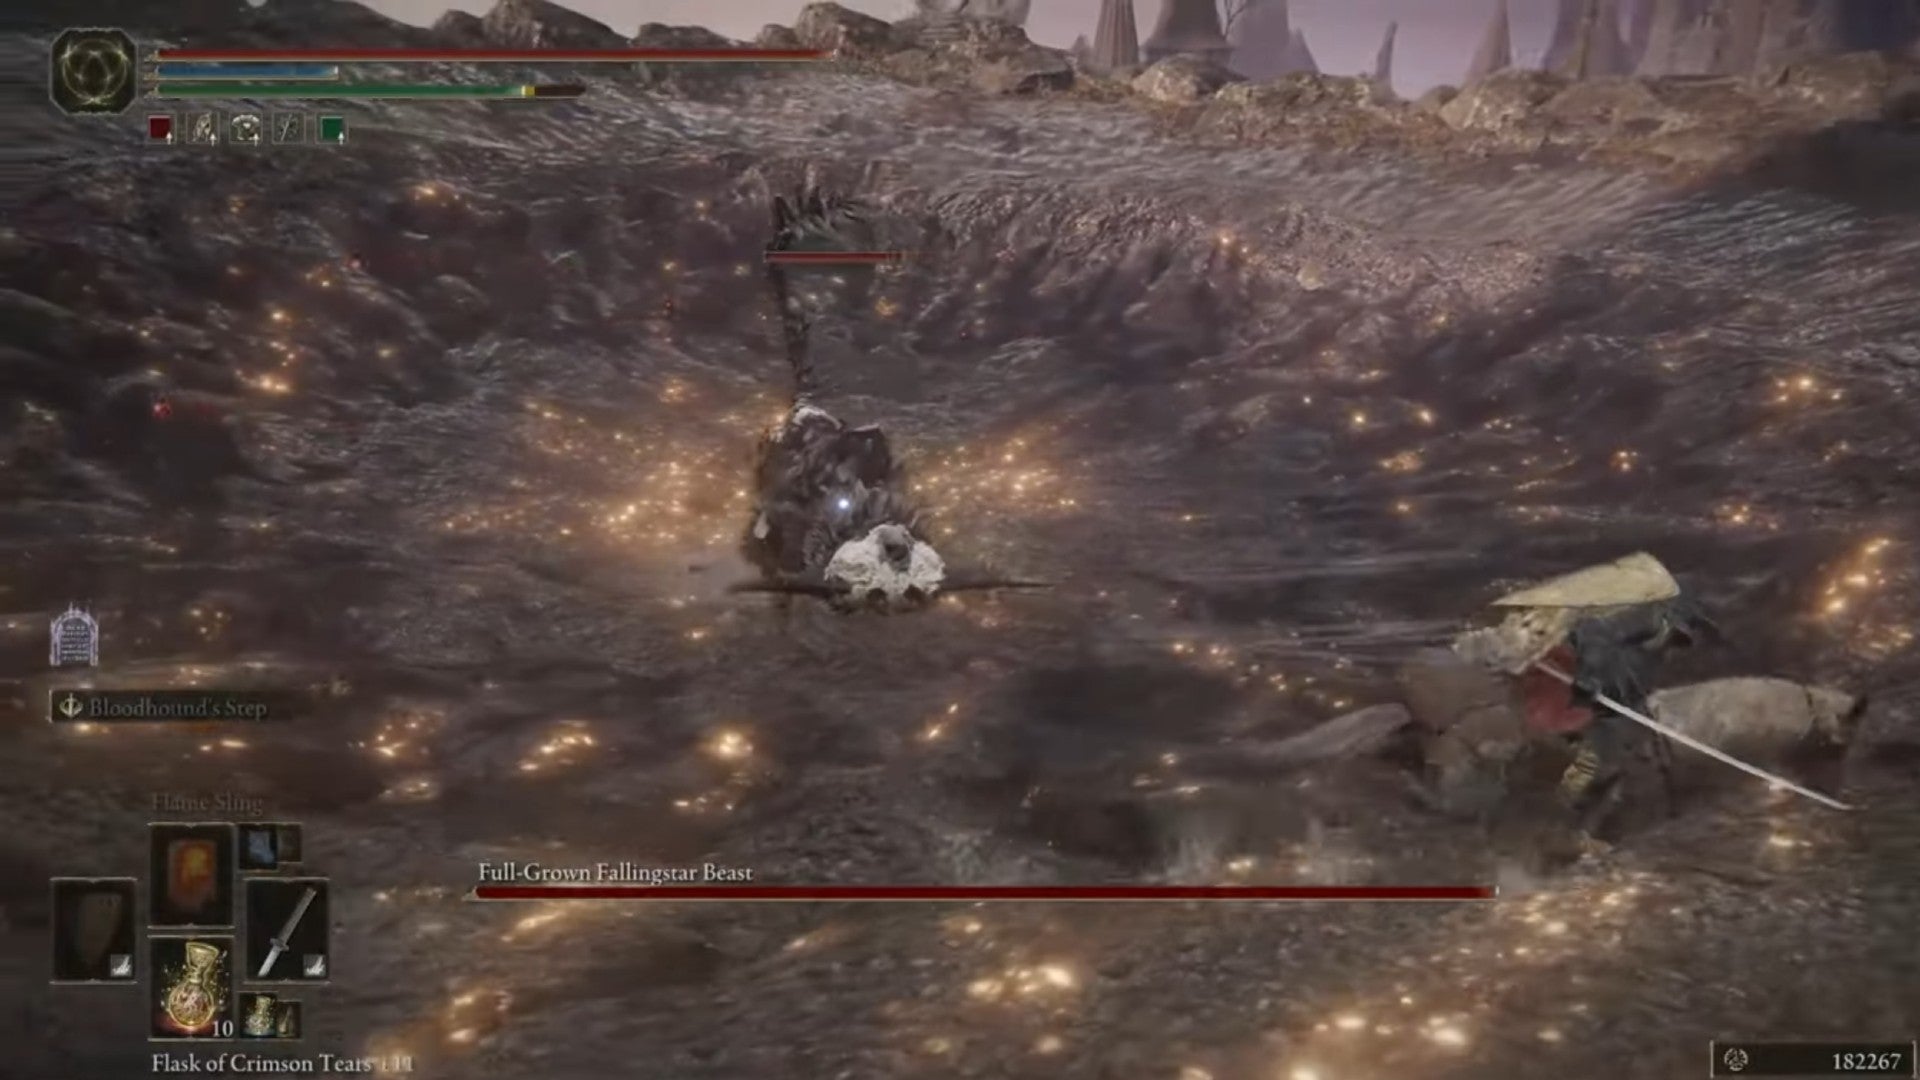
The Full-Grown Fallingstar Beast is very tough. For now, feel free to run past it on your way to Volcano Manor. |Image credit:Rock Paper Shotgun/Bandai Namco
Directly above you is a large boss arena where the extremely challenging Full-Grown Fallingstar Beast boss resides. You can either take the ladder up or jump up with Torrent using the Spiritspring. We recommend the latter, because it keeps you moving quickly. You don’t actually need to fight the Fallingstar Beast now; just run over to the rocky outcrop on the west side, and jump down from there onto the platform below.
The front entrance to Volcano Manor is clearly visible on your left, so make your way down there, dispatching any enemies along the way, until you reach the double doors. Push open the doors to enter Volcano Manor.
Path 4: Around Mount Gelmir

This is the longest path to Volcano Manor, but it also takes you through most of Mount Gelmir along the way. |Image credit:Rock Paper Shotgun/Bandai Namco
| Pros | Cons |
|---|---|
| + See most of Mount Gelmir | - By far the slowest path |
| + Most organic path to Volcano Manor | - Dangerous |
The longest and slowest path to Volcano Manor takes you all the way around Mount Gelmir. Starting at the Erdtree-Gazing Hill Site Of Grace in Altus Plateau, head up the slope to the north and turn left to cut through the Wyndham Ruins. From here, you can drop down into Seethewater River.
Follow the river north and then west, being careful to avoid the geysers that periodically spew from the ground. By following the river you’ll arrive at the outskirts of Fort Laiedd on the west coast of Mount Gelmir.

Be careful of the Magma Wyrm that emerges from the lake beside Fort Laiedd. |Image credit:Rock Paper Shotgun/Bandai Namco
You can clear out Fort Laiedd if you want or just bypass it; either way, ride south to the edge of the magma lake, where a Magma Wyrm will emerge to face you. After defeating it, head around the right-hand side of the lake, and follow the winding path past the Demi-Humans and Runebear, past the Craftsman’s Shack and the Hermit Village, until you reach the stone slope just past Demi-Human Queen Maggie.
From here, go up the stone slope and drop down next to Gelmir Hero’s Grave. Head straight on past the wolves and turn left at the tower to cross another stone slope.
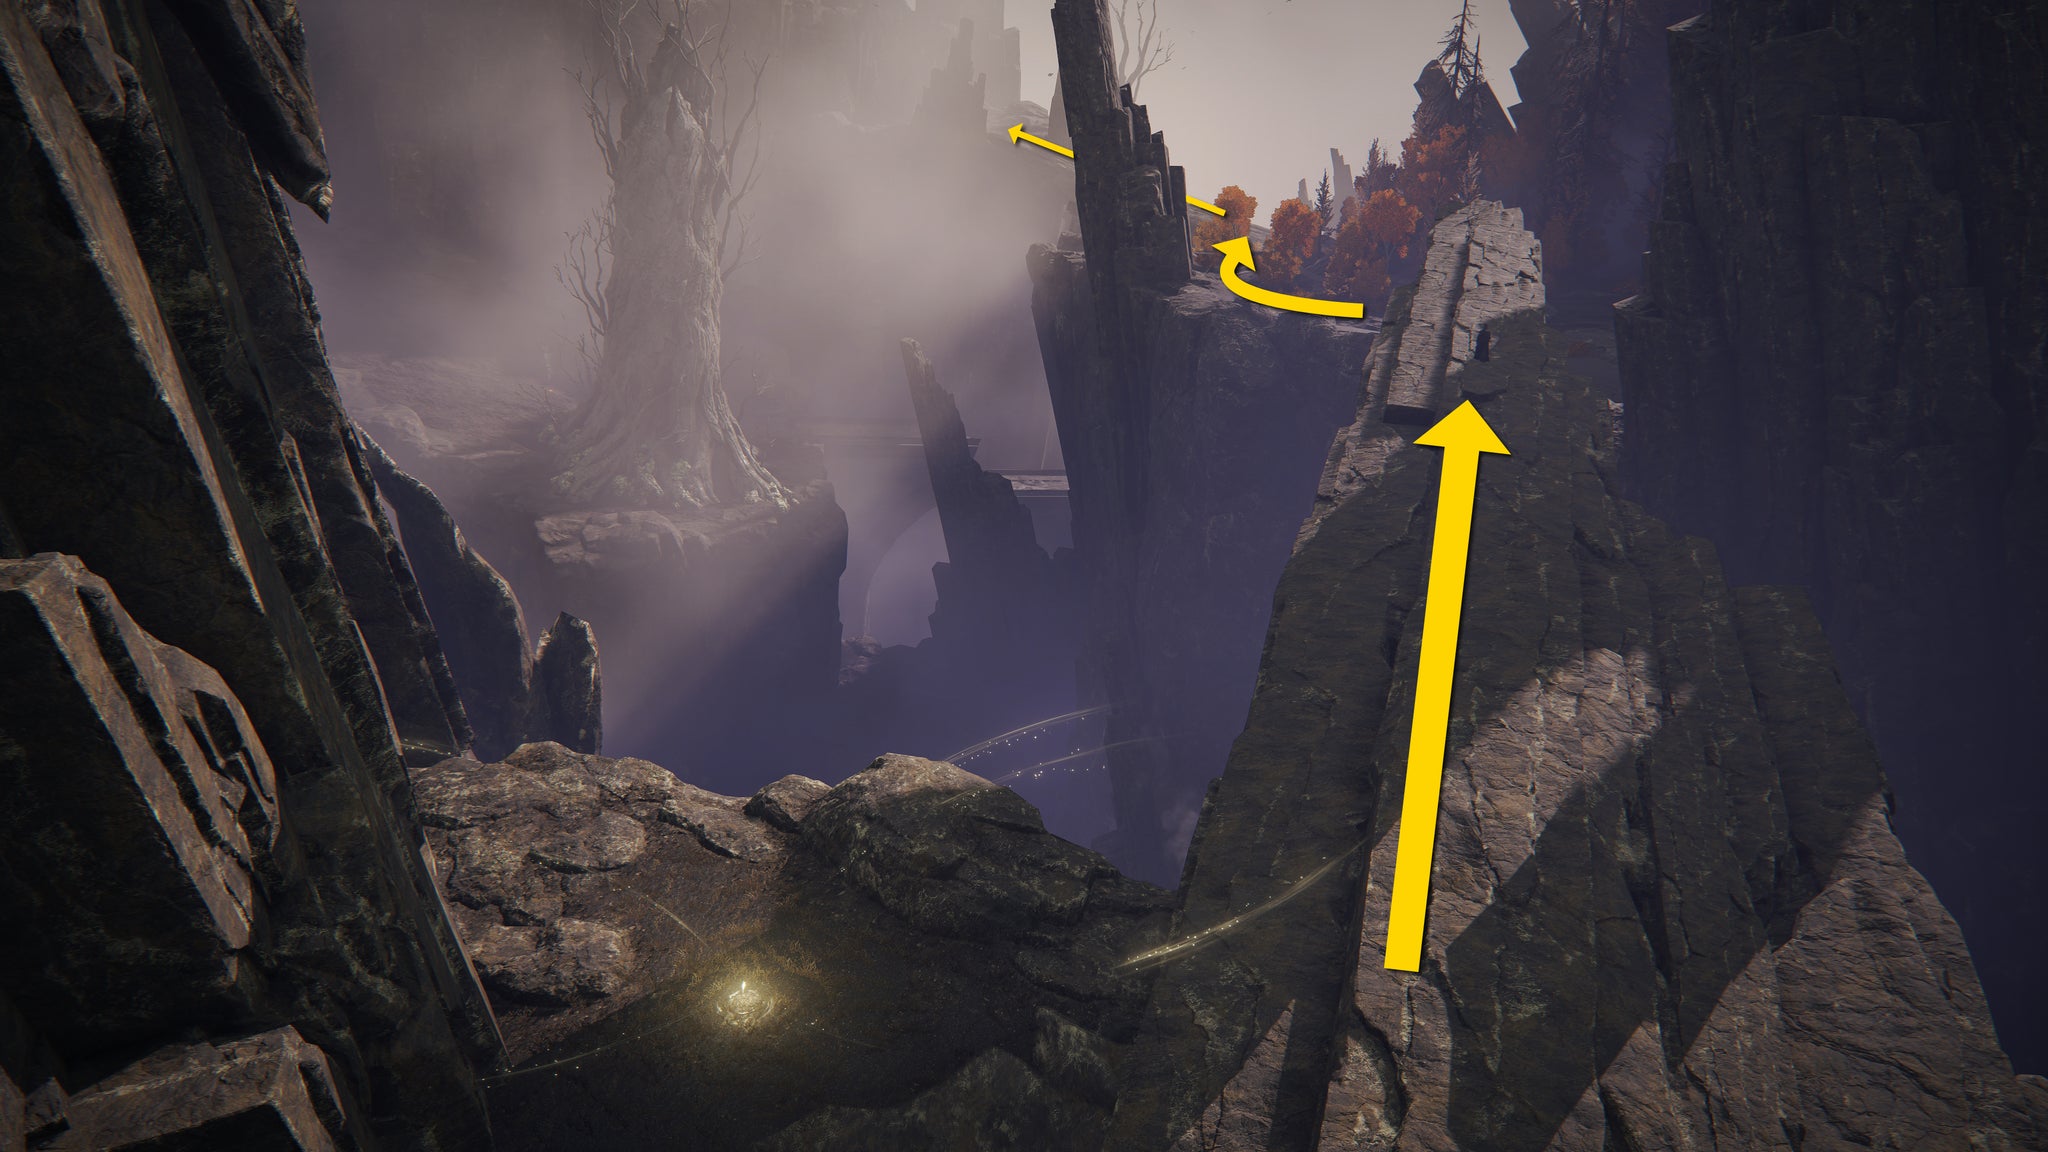
From the Prime Sorcerer Azul Site Of Grace, go up the rocky slope and follow the path, turning left at the tower. |Image credit:Rock Paper Shotgun/Bandai Namco
From this point, Paths 3 and 4 are the same. Defeat or bypass the Grafted Scion and climb any ladder you see, then turn left and cross the wooden bridge to the west. From the Ninth Mt. Gelmir Campsite Site Of Grace, head up into the Full-Grown Fallingstar Beast Site Of Grace and jump off the rocky outcrop on the west side. After that, you can follow the path directly to the front entrance of Volcano Manor.
That’s every single method of getting to Volcano Manor in Elden Ring laid out for you to choose between. You’d best prepare yourself ahead of time, because Volcano Manor can be pretty tricky. Read our guides on the best weapons , best builds , best armor sets , and best spells in Elden Ring to make sure you’re well-equipped for the trials ahead!


Elden Ring
PS4 , PS5 , Xbox One , Xbox Series X/S , PC
Rock Paper Shotgun is better when you sign in
Sign in and join us on our journey to discover strange and compelling PC games.

All 75 Arc Raiders Blueprints and where to get them
These areas have the highest chance of giving you Blueprints

Image credit:Rock Paper Shotgun/Embark Studios

Looking for more Arc Raiders Blueprints? It’s a special day when you find a Blueprint, as they’re among the most valuable items in Arc Raiders. If you find a Blueprint that you haven’t already found, then you must make sure you hold onto it at all costs, because Blueprints are the key to one of the most important and powerful systems of meta-progression in the game.
This guide aims to be the very best guide on Blueprints you can find, starting with a primer on what exactly they are and how they work in Arc Raiders, before delving into exactly where to get Blueprints and the very best farming spots for you to take in your search.
We’ll also go over how to get Blueprints from other unlikely activities, such as destroying Surveyors and completing specific quests. And you’ll also find the full list of all 75 Blueprints in Arc Raiders on this page (including the newest Blueprints added with the Cold Snap update , such as the Deadline Blueprint and Firework Box Blueprint), giving you all the information you need to expand your own crafting repertoire.
In this guide:
- What are Blueprints in Arc Raiders?
- Full Blueprint list: All crafting recipes
- Where to find Blueprints in Arc Raiders Blueprints obtained from quests Blueprints obtained from Trials Best Blueprint farming locations

What are Blueprints in Arc Raiders?
Blueprints in Arc Raiders are special items which, if you manage to extract with them, you can expend to permanently unlock a new crafting recipe in your Workshop. If you manage to extract from a raid with an Anvil Blueprint, for example, you can unlock the ability to craft your very own Anvil Pistol, as many times as you like (as long as you have the crafting materials).
To use a Blueprint, simply open your Inventory while in the lobby, then right-click on the Blueprint and click “Learn And Consume” . This will permanently unlock the recipe for that item in your Workshop. As of the Stella Montis update, there are allegedly 75 different Blueprints to unlock - although only 68 are confirmed to be in the game so far. You can see all the Blueprints you’ve found and unlocked by going to the Workshop menu, and hitting “R” to bring up the Blueprint screen.
It’s possible to find duplicates of past Blueprints you’ve already unlocked. If you find these, then you can either sell them, or - if you like to play with friends - you can take it into a match and gift it to your friend so they can unlock that recipe for themselves. Another option is to keep hold of them until the time comes to donate them to the Expedition.
Full Blueprint list: All crafting recipes
Below is the full list of all the Blueprints that are currently available to find in Arc Raiders, and the crafting recipe required for each item:
| Blueprint | Type | Recipe | Crafted At |
|---|---|---|---|
| Bettina | Weapon | 3x Advanced Mechanical Components 3x Heavy Gun Parts 3x Canister | Gunsmith 3 |
| Blue Light Stick | Quick Use | 3x Chemicals | Utility Station 1 |
| Aphelion | Weapon | 3x Magnetic Accelerator 3x Complex Gun Parts 1x Matriarch Reactor | Gunsmith 3 |
| Combat Mk. 3 (Flanking) | Augment | 2x Advanced Electrical Components 3x Processor | Gear Bench 3 |
| Combat Mk. 3 (Aggressive) | Augment | 2x Advanced Electrical Components 3x Processor | Gear Bench 3 |
| Complex Gun Parts | Material | 2x Light Gun Parts 2x Medium Gun Parts 2x Heavy Gun Parts | Refiner 3 |
| Fireworks Box | Quick Use | 1x Explosive Compound 3x Pop Trigger | Explosives Station 2 |
| Gas Mine | Mine | 4x Chemicals 2x Rubber Parts | Explosives Station 1 |
| Green Light Stick | Quick Use | 3x Chemicals | Utility Station 1 |
| Pulse Mine | Mine | 1x Crude Explosives 1x Wires | Explosives Station 1 |
| Seeker Grenade | Grenade | 1x Crude Explosives 2x ARC Alloy | Explosives Station 1 |
| Looting Mk. 3 (Survivor) | Augment | 2x Advanced Electrical Components 3x Processor | Gear Bench 3 |
| Angled Grip II | Mod | 2x Mechanical Components 3x Duct Tape | Gunsmith 2 |
| Angled Grip III | Mod | 2x Mod Components 5x Duct Tape | Gunsmith 3 |
| Hullcracker | Weapon | 1x Magnetic Accelerator 3x Heavy Gun Parts 1x Exodus Modules | Gunsmith 3 |
| Launcher Ammo | Ammo | 5x Metal Parts 1x Crude Explosives | Workbench 1 |
| Anvil | Weapon | 5x Mechanical Components 5x Simple Gun Parts | Gunsmith 2 |
| Anvil Splitter | Mod | 2x Mod Components 3x Processor | Gunsmith 3 |
| ??? | ??? | ??? | ??? |
| Barricade Kit | Quick Use | 1x Mechanical Components | Utility Station 2 |
| Blaze Grenade | Grenade | 1x Explosive Compound 2x Oil | Explosives Station 3 |
| Bobcat | Weapon | 3x Advanced Mechanical Components 3x Light Gun Parts | Gunsmith 3 |
| Osprey | Weapon | 2x Advanced Mechanical Components 3x Medium Gun Parts 7x Wires | Gunsmith 3 |
| Burletta | Weapon | 3x Mechanical Components 3x Simple Gun Parts | Gunsmith 1 |
| Compensator II | Mod | 2x Mechanical Components 4x Wires | Gunsmith 2 |
| Compensator III | Mod | 2x Mod Components 8x Wires | Gunsmith 3 |
| Defibrillator | Quick Use | 9x Plastic Parts 1x Moss | Medical Lab 2 |
| ??? | ??? | ??? | ??? |
| Equalizer | Weapon | 3x Magnetic Accelerator 3x Complex Gun Parts 1x Queen Reactor | Gunsmith 3 |
| Extended Barrel | Mod | 2x Mod Components 8x Wires | Gunsmith 3 |
| Extended Light Mag II | Mod | 2x Mechanical Components 3x Steel Spring | Gunsmith 2 |
| Extended Light Mag III | Mod | 2x Mod Components 5x Steel Spring | Gunsmith 3 |
| Extended Medium Mag II | Mod | 2x Mechanical Components 3x Steel Spring | Gunsmith 2 |
| Extended Medium Mag III | Mod | 2x Mod Components 5x Steel Spring | Gunsmith 3 |
| Extended Shotgun Mag II | Mod | 2x Mechanical Components 3x Steel Spring | Gunsmith 2 |
| Extended Shotgun Mag III | Mod | 2x Mod Components 5x Steel Spring | Gunsmith 3 |
| Remote Raider Flare | Quick Use | 2x Chemicals 4x Rubber Parts | Utility Station 1 |
| Heavy Gun Parts | Material | 4x Simple Gun Parts | Refiner 2 |
| Venator | Weapon | 2x Advanced Mechanical Components 3x Medium Gun Parts 5x Magnet | Gunsmith 3 |
| Il Toro | Weapon | 5x Mechanical Components 6x Simple Gun Parts | Gunsmith 1 |
| Jolt Mine | Mine | 1x Electrical Components 1x Battery | Explosives Station 2 |
| Explosive Mine | Mine | 1x Explosive Compound 1x Sensors | Explosives Station 3 |
| Jupiter | Weapon | 3x Magnetic Accelerator 3x Complex Gun Parts 1x Queen Reactor | Gunsmith 3 |
| Light Gun Parts | Material | 4x Simple Gun Parts | Refiner 2 |
| Lightweight Stock | Mod | 2x Mod Components 5x Duct Tape | Gunsmith 3 |
| Lure Grenade | Grenade | 1x Speaker Component 1x Electrical Components | Utility Station 2 |
| Medium Gun Parts | Material | 4x Simple Gun Parts | Refiner 2 |
| Torrente | Weapon | 2x Advanced Mechanical Components 3x Medium Gun Parts 6x Steel Spring | Gunsmith 3 |
| Muzzle Brake II | Mod | 2x Mechanical Components 4x Wires | Gunsmith 2 |
| Muzzle Brake III | Mod | 2x Mod Components 8x Wires | Gunsmith 3 |
| Padded Stock | Mod | 2x Mod Components 5x Duct Tape | Gunsmith 3 |
| Shotgun Choke II | Mod | 2x Mechanical Components 4x Wires | Gunsmith 2 |
| Shotgun Choke III | Mod | 2x Mod Components 8x Wires | Gunsmith 3 |
| Shotgun Silencer | Mod | 2x Mod Components 8x Wires | Gunsmith 3 |
| Showstopper | Grenade | 1x Advanced Electrical Components 1x Voltage Converter | Explosives Station 3 |
| Silencer I | Mod | 2x Mechanical Components 4x Wires | Gunsmith 2 |
| Silencer II | Mod | 2x Mod Components 8x Wires | Gunsmith 3 |
| Snap Hook | Quick Use | 2x Power Rod 3x Rope 1x Exodus Modules | Utility Station 3 |
| Stable Stock II | Mod | 2x Mechanical Components 3x Duct Tape | Gunsmith 2 |
| Stable Stock III | Mod | 2x Mod Components 5x Duct Tape | Gunsmith 3 |
| Tagging Grenade | Grenade | 1x Electrical Components 1x Sensors | Utility Station 3 |
| Tempest | Weapon | 3x Advanced Mechanical Components 3x Medium Gun Parts 3x Canister | Gunsmith 3 |
| Trigger Nade | Grenade | 2x Crude Explosives 1x Processor | Explosives Station 2 |
| Vertical Grip II | Mod | 2x Mechanical Components 3x Duct Tape | Gunsmith 2 |
| Vertical Grip III | Mod | 2x Mod Components 5x Duct Tape | Gunsmith 3 |
| Vita Shot | Quick Use | 2x Antiseptic 1x Syringe | Medical Lab 3 |
| Vita Spray | Quick Use | 3x Antiseptic 1x Canister | Medical Lab 3 |
| Vulcano | Weapon | 1x Magnetic Accelerator 3x Heavy Gun Parts 1x Exodus Modules | Gunsmith 3 |
| Wolfpack | Grenade | 2x Explosive Compound 2x Sensors | Explosives Station 3 |
| Red Light Stick | Quick Use | 3x Chemicals | Utility Station 1 |
| Smoke Grenade | Grenade | 14x Chemicals 1x Canister | Utility Station 2 |
| Deadline | Mine | 3x Explosive Compound 2x ARC Circuitry | Explosives Station 3 |
| Trailblazer | Grenade | 1x Explosive Compound 1x Synthesized Fuel | Explosives Station 3 |
| Tactical Mk. 3 (Defensive) | Augment | 2x Advanced Electrical Components 3x Processor | Gear Bench 3 |
| Tactical Mk. 3 (Healing) | Augment | 2x Advanced Electrical Components 3x Processor | Gear Bench 3 |
| Yellow Light Stick | Quick Use | 3x Chemicals | Utility Station 1 |
Note: The missing Blueprints in this list likely have not actually been added to the game at the time of writing, because none of the playerbase has managed to find any of them. As they are added to the game, I will update this page with the most relevant information so you know exactly how to get all 75 Arc Raiders Blueprints.
Where to find Blueprints in Arc Raiders
Below is a list of all containers, modifiers, and events which maximise your chances of finding Blueprints:
- Certain quests reward you with specific Blueprints .
- Completing Trials has a high chance of offering Blueprints as rewards.
- Surveyors have a decent chance of dropping Blueprints on death.
- High loot value areas tend to have a greater chance of spawning Blueprints.
- Night Raids and Storms may increase rare Blueprint spawn chances in containers.
- Containers with higher numbers of items may have a higher tendency to spawn Blueprints. As a result, Blue Gate (which has many “large” containers containing multiple items) may give you a higher chance of spawning Blueprints.
- Raider containers (Raider Caches, Weapon Boxes, Medical Bags, Grenade Tubes) have increased Blueprint drop rates. As a result, the Uncovered Caches event gives you a high chance of finding Blueprints.
- Security Lockers have a higher than average chance of containing Blueprints.
- Certain Blueprints only seem to spawn under specific circumstances: Tempest Blueprint only spawns during Night Raid events. Vulcano Blueprint only spawns during Hidden Bunker events. Jupiter and Equaliser Blueprints only spawn during Harvester events.

Raider Caches, Weapon Boxes, and other raider-oriented container types have a good chance of offering Blueprints. |Image credit:Rock Paper Shotgun/Embark Studios
Blueprints have a very low chance of spawning in any container in Arc Raiders, around 1-2% on average. However, there is a higher chance of finding Blueprints in particular container types. Specifically, you can find more Blueprints in Raider containers and security lockers.
Beyond this, if you’re looking for Blueprints you should focus on regions of the map which are marked as having particularly high-value loot. Areas such as the Control Tower in Dam Battlegrounds, the Arrival and Departure Buildings in Spaceport, and Pilgrim’s Peak in Blue Gate all have a better-than-average chance of spawning Blueprints somewhere amongst all their containers. Night Raids and Electromagnetic Storm events also increase the drop chances of certain Blueprints .
In addition to these containers, you can often loot Blueprints from destroyed Surveyors - the largest of the rolling ball ARC. Surveyors are more commonly found on the later maps - Spaceport and Blue Gate - and if one spawns in your match, you’ll likely see it by the blue laser beam that it casts into the sky while “surveying”.
Surveyors are quite well-armoured and will very speedily run away from you once it notices you, but if you can take one down then make sure you loot all its parts for a chance of obtaining certain unusual Blueprints.
Blueprints obtained from quests
One way in which you can get Blueprints is by completing certain quests for the vendors in Speranza. Some quests will reward you with a specific item Blueprint upon completion, so as long as you work through all the quests in Arc Raiders, you are guaranteed those Blueprints.
Here is the full list of all Blueprints you can get from quest rewards:
- Trigger Nade Blueprint: Rewarded after completing “Sparks Fly”.
- Lure Grenade Blueprint: Rewarded after completing “Greasing Her Palms”.
- Burletta Blueprint: Rewarded after completing “Industrial Espionage”.
- Hullcracker Blueprint (and Launcher Ammo Blueprint): Rewarded after completing “The Major’s Footlocker”.
Alas, that’s only 4 Blueprints out of a total of 75 to unlock, so for the vast majority you will need to find them yourself during a raid. If you’re intent on farming Blueprints, then it’s best to equip yourself with cheap gear in case you lose it, but don’t use a free loadout because then you won’t get a safe pocket to stash any new Blueprint you find. No pain in Arc Raiders is sharper than failing to extract with a new Blueprint you’ve been after for a dozen hours already.

One of the best ways to get Blueprints is by hitting three stars on all five Trials every week. |Image credit:Rock Paper Shotgun/Embark Studios
Blueprints obtained from Trials
One of the very best ways to get Blueprints is as rewards for completing Trials in Arc Raiders. Trials are unlocked from Level 15 onwards, and allow you to earn rewards by focusing on certain tasks over the course of several raids. For example, one Trial might task you with dealing damage to Hornets, while another might challenge you to loot Supply Drops.
Trials refresh on a weekly basis, with a new week bringing five new Trials. Each Trial can offer up to three rewards after passing certain score milestones, and it’s possible to receive very high level loot from these reward crates - including Blueprints. So if you want to unlock as many Blueprints as possible, you should make a point of completing as many Trials as possible each week.
Best Blueprint farming locations
The very best way to get Blueprints is to frequent specific areas of the maps which combine high-tier loot pools with the right types of containers to search. Here are my recommendations for where to find Blueprints on every map, so you can always keep the search going for new crafting recipes to unlock.

Image credit:Rock Paper Shotgun/Embark Studios
Dam Battlegrounds
The best places to farm Blueprints on Dam Battlegrounds are the Control Tower, Power Generation Complex, Ruby Residence, and Pale Apartments . The first two regions, despite only being marked on the map as mid-tier loot, contain a phenomenal number of containers to loot. The Control Tower can also contain a couple of high-tier Security Lockers - though of course, you’ll need to have unlocked the Security Breach skill at the end of the Survival tree.
There’s also a lot of reporting amongst the playerbase that the Residential areas in the top-left of the map - Pale Apartments and Ruby Residence - give you a comparatively strong chance of finding Blueprints. Considering their size, there’s a high density of containers to loot in both locations, and they also have the benefit of being fairly out of the way. So you’re more likely to have all the containers to yourself.
Buried City
The best Blueprint farming locations on Buried City are the Santa Maria Houses, Grandioso Apartments, Town Hall, and the various buildings of the New District . Grandioso Apartments has a lower number of containers than the rest, but a high chance of spawning weapon cases - which have good Blueprint drop rates. The others are high-tier loot areas, with plenty of lootable containers - including Security Lockers.
Spaceport
The best places to find Blueprints on Spaceport are the Arrival and Departure Buildings, as well as Control Tower A6 and the Launch Towers . All these areas are labelled as high-value loot regions, and many of them are also very handily connected to one another by the Spaceport wall, which you can use to quickly run from one area to the next. At the tops of most of these buildings you’ll find at least one Security Locker, so this is an excellent farming route for players looking to find Blueprints.
The downside to looting Blueprints on Spaceport is that all these areas are hotly contested, particularly in Duos and Squads. You’ll need to be very focused and fast in order to complete the full farming route.

Image credit:Rock Paper Shotgun/Embark Studios
Blue Gate
Blue Gate tends to have a good chance of dropping Blueprints, potentially because it generally has a high number of containers which can hold lots of items; so there’s a higher chance of a Blueprint spawning in each container. In my experience, the best Blueprint farming spots on Blue Gate are Pilgrim’s Peak, Raider’s Refuge, the Ancient Fort, and the Underground Complex beneath the Warehouse .
All of these areas contain a wealth of containers to loot. Raider’s Refuge has less to loot, but the majority of the containers in and around the Refuge are raider containers, which have a high chance of containing Blueprints - particularly during major events.
Stella Montis
On the whole, Stella Montis seems to have a very low drop rate for Blueprints (though a high chance of dropping other high-tier loot). If you do want to try farming Blueprints on this map, the best places to find Blueprints in Stella Montis are Medical Research, Assembly Workshop, and the Business Center . These areas have the highest density of containers to loot on the map.
In addition to this, the Western Tunnel has a few different Security Lockers to loot, so while there’s very little to loot elsewhere in this area of the map, it’s worth hitting those Security Lockers if you spawn there at the start of a match.
That wraps up this primer on how to get all the Blueprints in Arc Raiders as quickly as possible. With the Expedition system constantly resetting a large number of players’ Blueprints, it’s more important than ever to have the most up-to-date information on where to find all these Blueprints.
While you’re here, be sure to check out our Arc Raiders best guns tier list , as well as our primers on the best skills to unlock and all the different Field Depot locations on every map.


ARC Raiders
PS5 , Xbox Series X/S , PC
Rock Paper Shotgun is better when you sign in
Sign in and join us on our journey to discover strange and compelling PC games.
