Dragon’s Dogma 2 review: an action RPG anecdote generator
It’s like the first one, but better

Image credit:Rock Paper Shotgun/Capcom

- Developer: Capcom
- Publisher: Capcom
- Release: March 22nd 2024
- On: Windows
- From: Steam
- Price: £54/€65/$70
- Reviewed on: Intel Core i7-12700F, 16GB RAM, Nvidia RTX 3080, Windows 11
You know when you remember a game really fondly and instead of ageing alongside you, it becomes more modern in memory? The Dragon’s Dogma 2 experience is, essentially, how I remember its predecessor Dragon’s Dogma: Dark Arisen . To me, DD2 feels like a remaster of the first, except it looks nicer, is more expansive, and features some rejigs to things like your AI pals.
Not that any of this is a bad thing! In fact, DD2’s closeness to the original makes it just as much of a joy as the first, where your grand adventure isn’t only grander, it’s still at the whims of a world governed by chaotic physics and the passage of time. Quirks remain, for good and bad, but ultimately this is an RPG where you make travel plans and the game does it best to dash them. It never gets old.
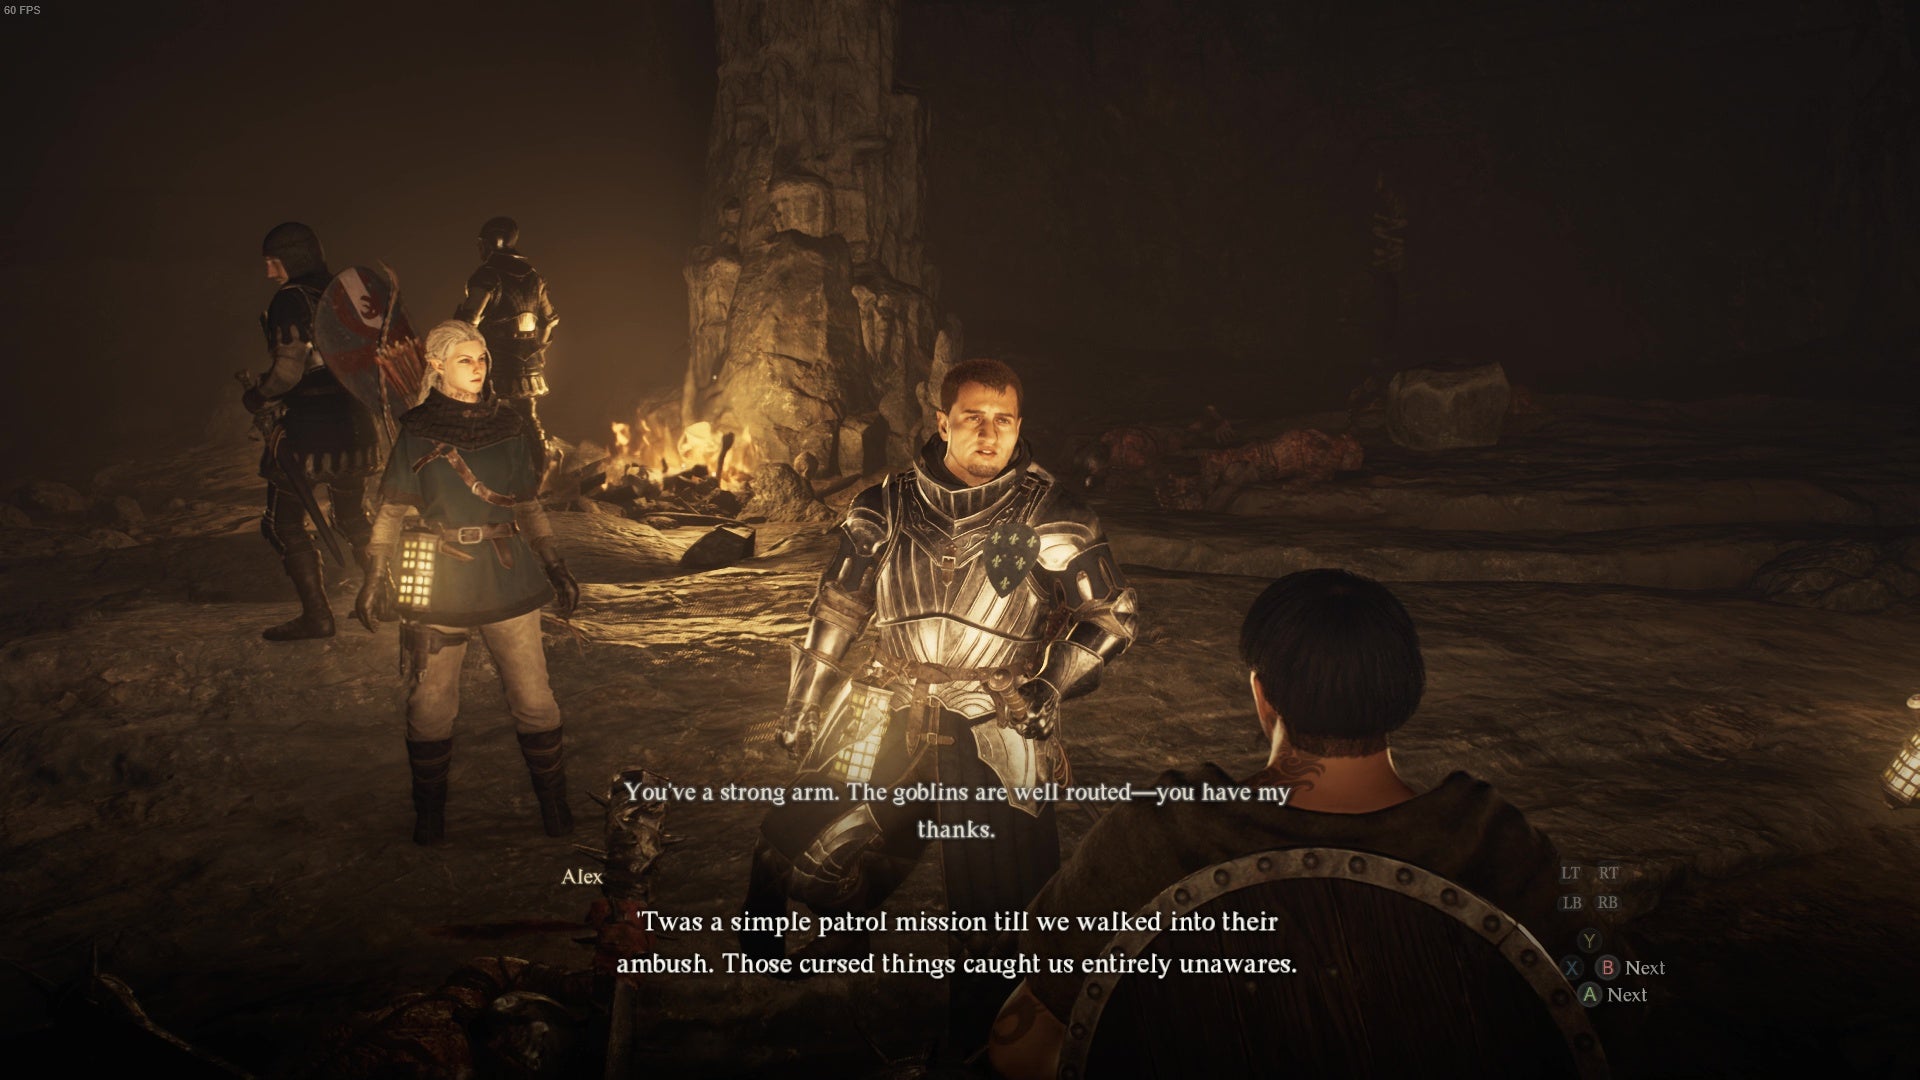
Image credit:Rock Paper Shotgun/Capcom
Set in a parallel universe, the story of Dragon’s Dogma 2 fulfils the pseudo-remaster criteria, too. Like before, you’re a regular Joe whose heart is plucked out by a godlike dragon, granting you semi-immortality, a long bout of amnesia, and the title of Arisen. But where DD was more about taking back your heart from the big bad, DD2 is more focused on how folks rule the land and your role within it all. For instance, you wake up from your draconic open heart surgery to find a fake Arisen has seized control of the pawn army, and a queen is very unhappy you’ve arrived to derail whatever plans they cooked up together.
All in all, I’m into the wider geopolitics of the fake Arisen plot, especially as you’ll encounter different factions like the Elves and the Beastren who all hold differing beliefs on what the Arisen’s awakening means for the world; the TLDR is that they aren’t all fans of your appearance. While I wouldn’t say the story grants you deep connections with characters, or that conversations hold the same weight as peak Game Of Thrones wine sips, I do think it does enough to keep you motoring forwards with a raised eyebrow.

I experienced quite a lot of frame drop in the busiest of cities and a quest bugged out on me early on. I also attempted DD2 on the Steam Deck with all settings on Low, but it turned out to be totally unplayable. I’m not fussed about the frame drops or the quest bug, as I’m sure they’ll be fixed quickly, but I’m a bit sad about its state on the Deck. Here’s hoping it gets verified one day, maybe? |Image credit:Rock Paper Shotgun/Capcom
And when it really comes down to it, dogma of the dragons or not, the story’s key players set you on a journey that genuinely feels like an adventure. DD2 eschews the convenience of anytime, anywhere fast travel for a system that’s reliant on you setting up your own makeshift network with Port Crystals and valuable Ferrystones. You can’t hammer along without a care in the world, oh no. Prolonged time on the road will slowly eat away at your maximum health, and nightfall means barely being able to see ahead of you. So, you need to make camp at regular intervals. Travel while the sun’s out. Keep your lantern oil topped up. Survey the landscape. Know when to run from a big ogre that’s just come bursting out of a forest with a literal tree in its fist.
Those light survival elements aren’t ever a faff, though, they’re more like manageable things you’ve got to be aware of before you depart. And they lend travel what I reckon is DD2’s greatest strength: a sense of responsibility. Whether you’re exploring grassy plains or, later, Battahl’s dusty crags, it captures the sense of being on a calculated foray into the unknown, where you’re running on the supplies in your packs and the confidence you’ll find somewhere to pitch up afterwards.
For the most part, exploration is driven by quests either given out by a primary person or folks who’ll wander up to you as you visit towns. Rarely will you ever seek them out, though, as it’s a bit like wading through an NPC lottery, where 90% of them will hit you with dismissive one-liners. Many of the quests you’re given by townsfolk are often like, “Can you find me this person who’s gone missing?”, and they’ll see you question some people before heading off to a predetermined area on the map (granted, you’ve got to search for yourself once you’ve reached the destination). The main story stuff is a bit more elaborate, where you sneak into royal grounds in the dead of night and attending a masquerade, for instance.
Again, what’s neat about these quests isn’t so much the task at hand, but how you’re able to reach their conclusions in interesting ways. If you take too long to find a missing lad and it might result in him succumbing to illness - but if you’ve got a Wakestone you might be able to revive him there and then! Or if not, you could visit the local morgue later and try again. And when you sneak into the masquerade, you might need a suitably fancy outfit to dupe the guards. You could visit a local shop, but fancy clobber might set you back thousands of gold you don’t have. But maybe those fancy looking houses might have the goods inside them…

Image credit:Rock Paper Shotgun/Capcom
Otherwise, if you’ve not got a quest on the go, you can feel little lost while out and about exploring the world in DD2, as you’re unlikely to encounter rich side stories from randos on the road. There are a lot of caves, little outposts, a town that’s a bit empty because you’ve clearly not progressed the main story enough yet, and beautiful bits where you might fight a big monster. For the most part, exploration for the sake of exploration is driven by a desire to crack open chests and beat everything that stands in your way senseless.
While this might sound a bit tedious, repetition is immediately forgiven when you’ve got a world that grants you such a sense of place. Sure, people’s faces and lip movements are a bit post-2018 Simon Cowell, but you’re regularly blown away by vistas that melt those silicone worries - like when the city of Vernworth rises up in the distance and reminds you of just how far you’ve come, or when you first make the descent into Battahl, as the terrain gradually reddens and the mountain path winds down into a bowl of jagged rocks and dust. Even the smallest details, like country paths that arch around farmers tending to their fields of wheat, are a lovely rendition of realism among what’s largely a very Capcom-ass video game.
By that I mean that DD2 has many Capcom-isms - besides the chests and obsession with healing herbs - where it contains very video gamey things that’ll compliment or derail those calculated travel plans. One being the return of the pawn system, where everyone creates an AI pal who they’ll travel alongside, and who is also popped into an online pool (the Rift) for others to recruit (offline players won’t be able to access this pool, but can recruit Capcom-official pawns).

There are player-made pawns and Capcom-made pawns, and you’ll find them roaming around as you explore if you can’t find a Rift to get to. Hop into a Rift and you can browse loads of player-created pawns, monthly leaderboards, and even set quests so when another person who’s recruited your pawn completes it, you’ll receive a bunch of pawn points (to spend on things like hiring pawns a higher level than you), and they’ll get rewarded in turn. |Image credit:Rock Paper Shotgun/Capcom
As you level up, you’ll regularly recruit up to two pawns, swapping them out as you outgrow them. What’s neat is the ability to send them back into the Rift with a parting gift for their owner, alongside a rating that’ll determine their place in a global leaderboard. I sent one back with some rotten meat once and I still feel bad about it.
Pawns can get a bit confused sometimes, but for the most part they’re programmed with just the right amount of intelligence, and are easy to command with button presses like “Go!” and “To me!”. On top of the strategic element of choosing a combination of pawns with vocations (classes) that suit your setup, their behaviours often delight. They can catch you if you’ve fallen from a great height, high-five after a battle, or lead you to a treasure they’d discovered previously while out exploring with their actual creator. There really isn’t anything else quite like it, and I cherish my pawn Bronco, with his friar tuck haircut and World Of Warcraft default human energy.
Other Capcom-isms mean a sort of physicality to combat and exploration, both adding slapstick to encounters and lending your adventures some extra grit. You’re able to grab barrels and fling them at foes, or grab goblins and fling them into pits. Heck, you can fling your own pawns if you’d like. There’s a lot of clambering onto things and leaping across gorges, or latching onto enemies and jabbing your sword into their eyes. What’s neat is the ability to destroy dams or bridges, sending Ogres toppling into water or a pack of hobgoblins into the abyss.

Image credit:Rock Paper Shotgun/Capcom
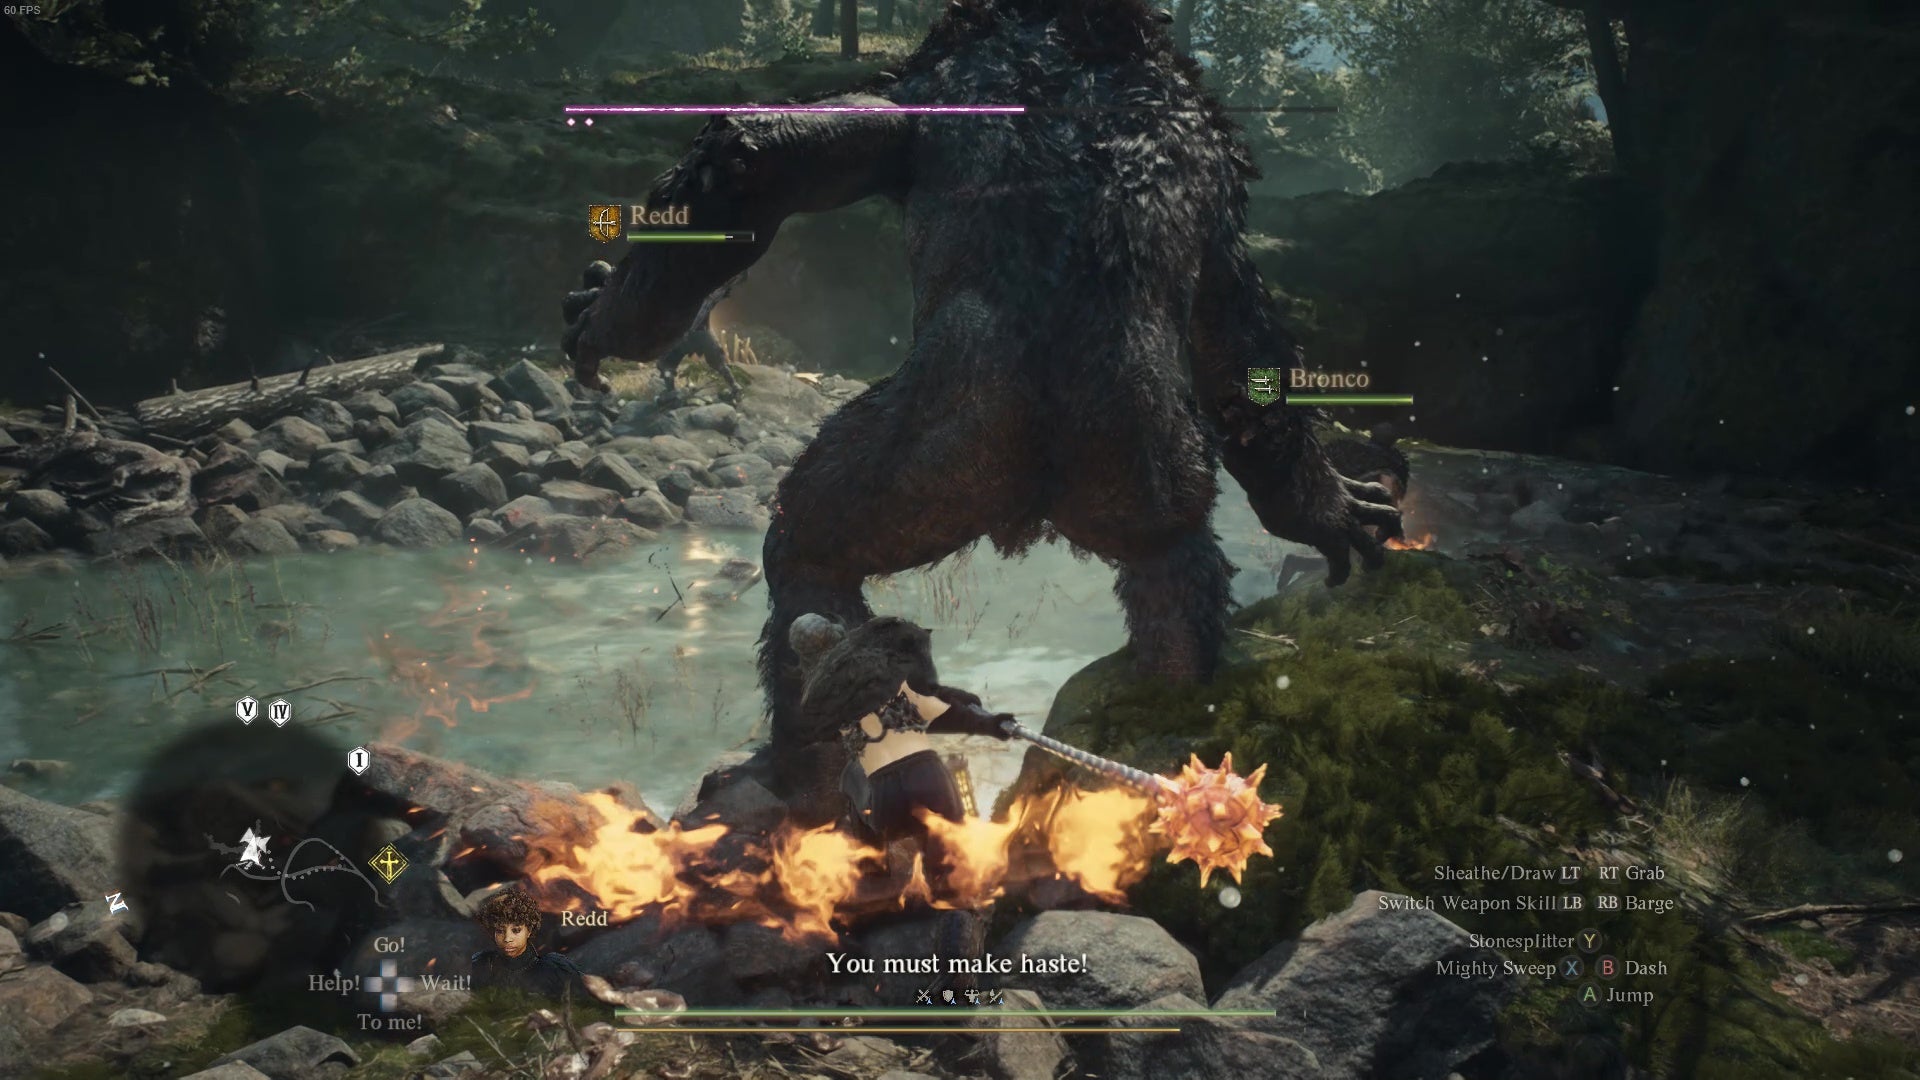
Image credit:Rock Paper Shotgun/Capcom
Early fights are perhaps a bit samey, though, with little room to breathe as you’re attacked by the gazillionth goblin or troll. Yet again , DD2 gets away with it because combat itself is weighty and approachable, and creates moments where you suddenly overachieve. I’ve mainly been playing as a warrior, which has strong echoes of Monster Hunter in its long wind-ups that unleash enormous blade arcs that can send even the densest Chimera crashing to the ground. I love how Bronco compliments me, with an ability that flings out a rope that pulls on monsters I’ve bashed off balance, felling them for an extra beatdown.
And much like the game’s unfussy survival elements, vocations are equally as easy to get to grips with as there’s no tricky button combos to memorise, but a wheel of easily executable attacks governed by your stamina and your ability to push a shoulder button (I wouldn’t play this on keyboard and mouse). Experimentation is encouraged, too, as the barrier to entry is low - advanced vocations are harder to unlock, mind - for vocation swaps and ability unlocks.
When Dragon’s Dogma 2 truly shines is when the hefty combat, your pawn pals, and your current travel plans all collide. Or rather, in my case, a griffin who I’d fought roughly an hour earlier splintered the Oxcart I was riding into pieces, and then we tussled until the sun set, totally throwing off my camping plans. Or that time when I wandered past some graves as night fell, only for a skeletal mage to erupt from the earth, rain down electric orbs, and throw my evening’s stroll into disarray. Somehow I found a way to survive.
“Finding a way” sums up Dragon’s Dogma 2 pretty nicely, I think. The game’s an anecdote generator, where all of its AI and combat and day-night-cycle systems coalesce into bouts of chaos that’ll test your improvisation skills but never your patience. And while it retains some of the original game’s aged quest design and open world repetition, they simply aren’t a problem at all, because the act of discovery is just so, so involved.
P.S. Bronco would love to go on adventures with you all. He’s very sweet and good at killing! Great at killing!
This review was based on a review build of the game provided by developers Capcom.
Find out how we conduct our reviews by reading our review policy .
Dragon’s Dogma 2
PS5 , Xbox Series X/S , PC
Rock Paper Shotgun is better when you sign in
Sign in and join us on our journey to discover strange and compelling PC games.

All 75 Arc Raiders Blueprints and where to get them
These areas have the highest chance of giving you Blueprints

Image credit:Rock Paper Shotgun/Embark Studios

Looking for more Arc Raiders Blueprints? It’s a special day when you find a Blueprint, as they’re among the most valuable items in Arc Raiders. If you find a Blueprint that you haven’t already found, then you must make sure you hold onto it at all costs, because Blueprints are the key to one of the most important and powerful systems of meta-progression in the game.
This guide aims to be the very best guide on Blueprints you can find, starting with a primer on what exactly they are and how they work in Arc Raiders, before delving into exactly where to get Blueprints and the very best farming spots for you to take in your search.
We’ll also go over how to get Blueprints from other unlikely activities, such as destroying Surveyors and completing specific quests. And you’ll also find the full list of all 75 Blueprints in Arc Raiders on this page (including the newest Blueprints added with the Cold Snap update , such as the Deadline Blueprint and Firework Box Blueprint), giving you all the information you need to expand your own crafting repertoire.
In this guide:
- What are Blueprints in Arc Raiders?
- Full Blueprint list: All crafting recipes
- Where to find Blueprints in Arc Raiders Blueprints obtained from quests Blueprints obtained from Trials Best Blueprint farming locations

What are Blueprints in Arc Raiders?
Blueprints in Arc Raiders are special items which, if you manage to extract with them, you can expend to permanently unlock a new crafting recipe in your Workshop. If you manage to extract from a raid with an Anvil Blueprint, for example, you can unlock the ability to craft your very own Anvil Pistol, as many times as you like (as long as you have the crafting materials).
To use a Blueprint, simply open your Inventory while in the lobby, then right-click on the Blueprint and click “Learn And Consume” . This will permanently unlock the recipe for that item in your Workshop. As of the Stella Montis update, there are allegedly 75 different Blueprints to unlock - although only 68 are confirmed to be in the game so far. You can see all the Blueprints you’ve found and unlocked by going to the Workshop menu, and hitting “R” to bring up the Blueprint screen.
It’s possible to find duplicates of past Blueprints you’ve already unlocked. If you find these, then you can either sell them, or - if you like to play with friends - you can take it into a match and gift it to your friend so they can unlock that recipe for themselves. Another option is to keep hold of them until the time comes to donate them to the Expedition.
Full Blueprint list: All crafting recipes
Below is the full list of all the Blueprints that are currently available to find in Arc Raiders, and the crafting recipe required for each item:
| Blueprint | Type | Recipe | Crafted At |
|---|---|---|---|
| Bettina | Weapon | 3x Advanced Mechanical Components 3x Heavy Gun Parts 3x Canister | Gunsmith 3 |
| Blue Light Stick | Quick Use | 3x Chemicals | Utility Station 1 |
| Aphelion | Weapon | 3x Magnetic Accelerator 3x Complex Gun Parts 1x Matriarch Reactor | Gunsmith 3 |
| Combat Mk. 3 (Flanking) | Augment | 2x Advanced Electrical Components 3x Processor | Gear Bench 3 |
| Combat Mk. 3 (Aggressive) | Augment | 2x Advanced Electrical Components 3x Processor | Gear Bench 3 |
| Complex Gun Parts | Material | 2x Light Gun Parts 2x Medium Gun Parts 2x Heavy Gun Parts | Refiner 3 |
| Fireworks Box | Quick Use | 1x Explosive Compound 3x Pop Trigger | Explosives Station 2 |
| Gas Mine | Mine | 4x Chemicals 2x Rubber Parts | Explosives Station 1 |
| Green Light Stick | Quick Use | 3x Chemicals | Utility Station 1 |
| Pulse Mine | Mine | 1x Crude Explosives 1x Wires | Explosives Station 1 |
| Seeker Grenade | Grenade | 1x Crude Explosives 2x ARC Alloy | Explosives Station 1 |
| Looting Mk. 3 (Survivor) | Augment | 2x Advanced Electrical Components 3x Processor | Gear Bench 3 |
| Angled Grip II | Mod | 2x Mechanical Components 3x Duct Tape | Gunsmith 2 |
| Angled Grip III | Mod | 2x Mod Components 5x Duct Tape | Gunsmith 3 |
| Hullcracker | Weapon | 1x Magnetic Accelerator 3x Heavy Gun Parts 1x Exodus Modules | Gunsmith 3 |
| Launcher Ammo | Ammo | 5x Metal Parts 1x Crude Explosives | Workbench 1 |
| Anvil | Weapon | 5x Mechanical Components 5x Simple Gun Parts | Gunsmith 2 |
| Anvil Splitter | Mod | 2x Mod Components 3x Processor | Gunsmith 3 |
| ??? | ??? | ??? | ??? |
| Barricade Kit | Quick Use | 1x Mechanical Components | Utility Station 2 |
| Blaze Grenade | Grenade | 1x Explosive Compound 2x Oil | Explosives Station 3 |
| Bobcat | Weapon | 3x Advanced Mechanical Components 3x Light Gun Parts | Gunsmith 3 |
| Osprey | Weapon | 2x Advanced Mechanical Components 3x Medium Gun Parts 7x Wires | Gunsmith 3 |
| Burletta | Weapon | 3x Mechanical Components 3x Simple Gun Parts | Gunsmith 1 |
| Compensator II | Mod | 2x Mechanical Components 4x Wires | Gunsmith 2 |
| Compensator III | Mod | 2x Mod Components 8x Wires | Gunsmith 3 |
| Defibrillator | Quick Use | 9x Plastic Parts 1x Moss | Medical Lab 2 |
| ??? | ??? | ??? | ??? |
| Equalizer | Weapon | 3x Magnetic Accelerator 3x Complex Gun Parts 1x Queen Reactor | Gunsmith 3 |
| Extended Barrel | Mod | 2x Mod Components 8x Wires | Gunsmith 3 |
| Extended Light Mag II | Mod | 2x Mechanical Components 3x Steel Spring | Gunsmith 2 |
| Extended Light Mag III | Mod | 2x Mod Components 5x Steel Spring | Gunsmith 3 |
| Extended Medium Mag II | Mod | 2x Mechanical Components 3x Steel Spring | Gunsmith 2 |
| Extended Medium Mag III | Mod | 2x Mod Components 5x Steel Spring | Gunsmith 3 |
| Extended Shotgun Mag II | Mod | 2x Mechanical Components 3x Steel Spring | Gunsmith 2 |
| Extended Shotgun Mag III | Mod | 2x Mod Components 5x Steel Spring | Gunsmith 3 |
| Remote Raider Flare | Quick Use | 2x Chemicals 4x Rubber Parts | Utility Station 1 |
| Heavy Gun Parts | Material | 4x Simple Gun Parts | Refiner 2 |
| Venator | Weapon | 2x Advanced Mechanical Components 3x Medium Gun Parts 5x Magnet | Gunsmith 3 |
| Il Toro | Weapon | 5x Mechanical Components 6x Simple Gun Parts | Gunsmith 1 |
| Jolt Mine | Mine | 1x Electrical Components 1x Battery | Explosives Station 2 |
| Explosive Mine | Mine | 1x Explosive Compound 1x Sensors | Explosives Station 3 |
| Jupiter | Weapon | 3x Magnetic Accelerator 3x Complex Gun Parts 1x Queen Reactor | Gunsmith 3 |
| Light Gun Parts | Material | 4x Simple Gun Parts | Refiner 2 |
| Lightweight Stock | Mod | 2x Mod Components 5x Duct Tape | Gunsmith 3 |
| Lure Grenade | Grenade | 1x Speaker Component 1x Electrical Components | Utility Station 2 |
| Medium Gun Parts | Material | 4x Simple Gun Parts | Refiner 2 |
| Torrente | Weapon | 2x Advanced Mechanical Components 3x Medium Gun Parts 6x Steel Spring | Gunsmith 3 |
| Muzzle Brake II | Mod | 2x Mechanical Components 4x Wires | Gunsmith 2 |
| Muzzle Brake III | Mod | 2x Mod Components 8x Wires | Gunsmith 3 |
| Padded Stock | Mod | 2x Mod Components 5x Duct Tape | Gunsmith 3 |
| Shotgun Choke II | Mod | 2x Mechanical Components 4x Wires | Gunsmith 2 |
| Shotgun Choke III | Mod | 2x Mod Components 8x Wires | Gunsmith 3 |
| Shotgun Silencer | Mod | 2x Mod Components 8x Wires | Gunsmith 3 |
| Showstopper | Grenade | 1x Advanced Electrical Components 1x Voltage Converter | Explosives Station 3 |
| Silencer I | Mod | 2x Mechanical Components 4x Wires | Gunsmith 2 |
| Silencer II | Mod | 2x Mod Components 8x Wires | Gunsmith 3 |
| Snap Hook | Quick Use | 2x Power Rod 3x Rope 1x Exodus Modules | Utility Station 3 |
| Stable Stock II | Mod | 2x Mechanical Components 3x Duct Tape | Gunsmith 2 |
| Stable Stock III | Mod | 2x Mod Components 5x Duct Tape | Gunsmith 3 |
| Tagging Grenade | Grenade | 1x Electrical Components 1x Sensors | Utility Station 3 |
| Tempest | Weapon | 3x Advanced Mechanical Components 3x Medium Gun Parts 3x Canister | Gunsmith 3 |
| Trigger Nade | Grenade | 2x Crude Explosives 1x Processor | Explosives Station 2 |
| Vertical Grip II | Mod | 2x Mechanical Components 3x Duct Tape | Gunsmith 2 |
| Vertical Grip III | Mod | 2x Mod Components 5x Duct Tape | Gunsmith 3 |
| Vita Shot | Quick Use | 2x Antiseptic 1x Syringe | Medical Lab 3 |
| Vita Spray | Quick Use | 3x Antiseptic 1x Canister | Medical Lab 3 |
| Vulcano | Weapon | 1x Magnetic Accelerator 3x Heavy Gun Parts 1x Exodus Modules | Gunsmith 3 |
| Wolfpack | Grenade | 2x Explosive Compound 2x Sensors | Explosives Station 3 |
| Red Light Stick | Quick Use | 3x Chemicals | Utility Station 1 |
| Smoke Grenade | Grenade | 14x Chemicals 1x Canister | Utility Station 2 |
| Deadline | Mine | 3x Explosive Compound 2x ARC Circuitry | Explosives Station 3 |
| Trailblazer | Grenade | 1x Explosive Compound 1x Synthesized Fuel | Explosives Station 3 |
| Tactical Mk. 3 (Defensive) | Augment | 2x Advanced Electrical Components 3x Processor | Gear Bench 3 |
| Tactical Mk. 3 (Healing) | Augment | 2x Advanced Electrical Components 3x Processor | Gear Bench 3 |
| Yellow Light Stick | Quick Use | 3x Chemicals | Utility Station 1 |
Note: The missing Blueprints in this list likely have not actually been added to the game at the time of writing, because none of the playerbase has managed to find any of them. As they are added to the game, I will update this page with the most relevant information so you know exactly how to get all 75 Arc Raiders Blueprints.
Where to find Blueprints in Arc Raiders
Below is a list of all containers, modifiers, and events which maximise your chances of finding Blueprints:
- Certain quests reward you with specific Blueprints .
- Completing Trials has a high chance of offering Blueprints as rewards.
- Surveyors have a decent chance of dropping Blueprints on death.
- High loot value areas tend to have a greater chance of spawning Blueprints.
- Night Raids and Storms may increase rare Blueprint spawn chances in containers.
- Containers with higher numbers of items may have a higher tendency to spawn Blueprints. As a result, Blue Gate (which has many “large” containers containing multiple items) may give you a higher chance of spawning Blueprints.
- Raider containers (Raider Caches, Weapon Boxes, Medical Bags, Grenade Tubes) have increased Blueprint drop rates. As a result, the Uncovered Caches event gives you a high chance of finding Blueprints.
- Security Lockers have a higher than average chance of containing Blueprints.
- Certain Blueprints only seem to spawn under specific circumstances: Tempest Blueprint only spawns during Night Raid events. Vulcano Blueprint only spawns during Hidden Bunker events. Jupiter and Equaliser Blueprints only spawn during Harvester events.

Raider Caches, Weapon Boxes, and other raider-oriented container types have a good chance of offering Blueprints. |Image credit:Rock Paper Shotgun/Embark Studios
Blueprints have a very low chance of spawning in any container in Arc Raiders, around 1-2% on average. However, there is a higher chance of finding Blueprints in particular container types. Specifically, you can find more Blueprints in Raider containers and security lockers.
Beyond this, if you’re looking for Blueprints you should focus on regions of the map which are marked as having particularly high-value loot. Areas such as the Control Tower in Dam Battlegrounds, the Arrival and Departure Buildings in Spaceport, and Pilgrim’s Peak in Blue Gate all have a better-than-average chance of spawning Blueprints somewhere amongst all their containers. Night Raids and Electromagnetic Storm events also increase the drop chances of certain Blueprints .
In addition to these containers, you can often loot Blueprints from destroyed Surveyors - the largest of the rolling ball ARC. Surveyors are more commonly found on the later maps - Spaceport and Blue Gate - and if one spawns in your match, you’ll likely see it by the blue laser beam that it casts into the sky while “surveying”.
Surveyors are quite well-armoured and will very speedily run away from you once it notices you, but if you can take one down then make sure you loot all its parts for a chance of obtaining certain unusual Blueprints.
Blueprints obtained from quests
One way in which you can get Blueprints is by completing certain quests for the vendors in Speranza. Some quests will reward you with a specific item Blueprint upon completion, so as long as you work through all the quests in Arc Raiders, you are guaranteed those Blueprints.
Here is the full list of all Blueprints you can get from quest rewards:
- Trigger Nade Blueprint: Rewarded after completing “Sparks Fly”.
- Lure Grenade Blueprint: Rewarded after completing “Greasing Her Palms”.
- Burletta Blueprint: Rewarded after completing “Industrial Espionage”.
- Hullcracker Blueprint (and Launcher Ammo Blueprint): Rewarded after completing “The Major’s Footlocker”.
Alas, that’s only 4 Blueprints out of a total of 75 to unlock, so for the vast majority you will need to find them yourself during a raid. If you’re intent on farming Blueprints, then it’s best to equip yourself with cheap gear in case you lose it, but don’t use a free loadout because then you won’t get a safe pocket to stash any new Blueprint you find. No pain in Arc Raiders is sharper than failing to extract with a new Blueprint you’ve been after for a dozen hours already.

One of the best ways to get Blueprints is by hitting three stars on all five Trials every week. |Image credit:Rock Paper Shotgun/Embark Studios
Blueprints obtained from Trials
One of the very best ways to get Blueprints is as rewards for completing Trials in Arc Raiders. Trials are unlocked from Level 15 onwards, and allow you to earn rewards by focusing on certain tasks over the course of several raids. For example, one Trial might task you with dealing damage to Hornets, while another might challenge you to loot Supply Drops.
Trials refresh on a weekly basis, with a new week bringing five new Trials. Each Trial can offer up to three rewards after passing certain score milestones, and it’s possible to receive very high level loot from these reward crates - including Blueprints. So if you want to unlock as many Blueprints as possible, you should make a point of completing as many Trials as possible each week.
Best Blueprint farming locations
The very best way to get Blueprints is to frequent specific areas of the maps which combine high-tier loot pools with the right types of containers to search. Here are my recommendations for where to find Blueprints on every map, so you can always keep the search going for new crafting recipes to unlock.

Image credit:Rock Paper Shotgun/Embark Studios
Dam Battlegrounds
The best places to farm Blueprints on Dam Battlegrounds are the Control Tower, Power Generation Complex, Ruby Residence, and Pale Apartments . The first two regions, despite only being marked on the map as mid-tier loot, contain a phenomenal number of containers to loot. The Control Tower can also contain a couple of high-tier Security Lockers - though of course, you’ll need to have unlocked the Security Breach skill at the end of the Survival tree.
There’s also a lot of reporting amongst the playerbase that the Residential areas in the top-left of the map - Pale Apartments and Ruby Residence - give you a comparatively strong chance of finding Blueprints. Considering their size, there’s a high density of containers to loot in both locations, and they also have the benefit of being fairly out of the way. So you’re more likely to have all the containers to yourself.
Buried City
The best Blueprint farming locations on Buried City are the Santa Maria Houses, Grandioso Apartments, Town Hall, and the various buildings of the New District . Grandioso Apartments has a lower number of containers than the rest, but a high chance of spawning weapon cases - which have good Blueprint drop rates. The others are high-tier loot areas, with plenty of lootable containers - including Security Lockers.
Spaceport
The best places to find Blueprints on Spaceport are the Arrival and Departure Buildings, as well as Control Tower A6 and the Launch Towers . All these areas are labelled as high-value loot regions, and many of them are also very handily connected to one another by the Spaceport wall, which you can use to quickly run from one area to the next. At the tops of most of these buildings you’ll find at least one Security Locker, so this is an excellent farming route for players looking to find Blueprints.
The downside to looting Blueprints on Spaceport is that all these areas are hotly contested, particularly in Duos and Squads. You’ll need to be very focused and fast in order to complete the full farming route.

Image credit:Rock Paper Shotgun/Embark Studios
Blue Gate
Blue Gate tends to have a good chance of dropping Blueprints, potentially because it generally has a high number of containers which can hold lots of items; so there’s a higher chance of a Blueprint spawning in each container. In my experience, the best Blueprint farming spots on Blue Gate are Pilgrim’s Peak, Raider’s Refuge, the Ancient Fort, and the Underground Complex beneath the Warehouse .
All of these areas contain a wealth of containers to loot. Raider’s Refuge has less to loot, but the majority of the containers in and around the Refuge are raider containers, which have a high chance of containing Blueprints - particularly during major events.
Stella Montis
On the whole, Stella Montis seems to have a very low drop rate for Blueprints (though a high chance of dropping other high-tier loot). If you do want to try farming Blueprints on this map, the best places to find Blueprints in Stella Montis are Medical Research, Assembly Workshop, and the Business Center . These areas have the highest density of containers to loot on the map.
In addition to this, the Western Tunnel has a few different Security Lockers to loot, so while there’s very little to loot elsewhere in this area of the map, it’s worth hitting those Security Lockers if you spawn there at the start of a match.
That wraps up this primer on how to get all the Blueprints in Arc Raiders as quickly as possible. With the Expedition system constantly resetting a large number of players’ Blueprints, it’s more important than ever to have the most up-to-date information on where to find all these Blueprints.
While you’re here, be sure to check out our Arc Raiders best guns tier list , as well as our primers on the best skills to unlock and all the different Field Depot locations on every map.

ARC Raiders
PS5 , Xbox Series X/S , PC
Rock Paper Shotgun is better when you sign in
Sign in and join us on our journey to discover strange and compelling PC games.
