Dragon Age: The Veilguard review: A reluctant RPG, but a compelling, heartfelt action adventure
You couldn’t make Dragon Age: Origins today! (because there’s been several sequels already)
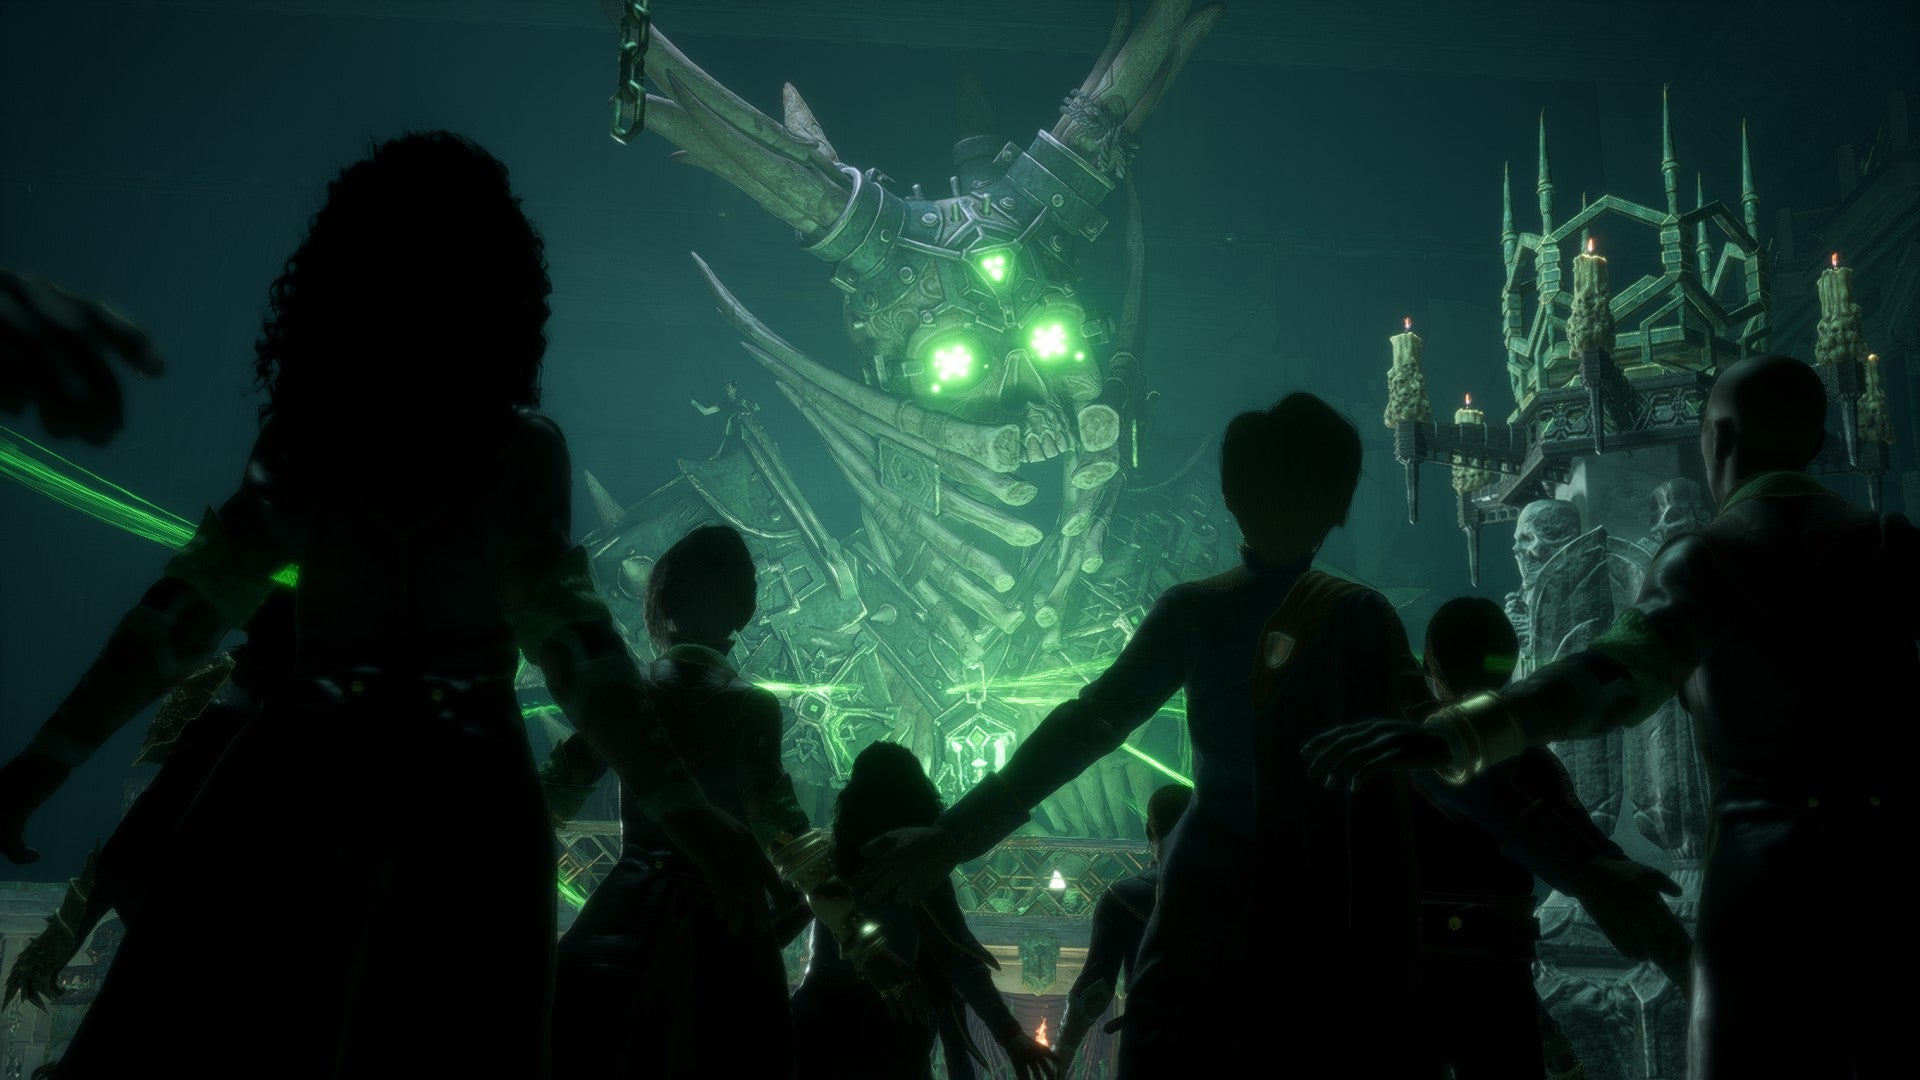
Image credit:Bioware/Rock Paper Shotgun

- Developer: Bioware
- Publisher: EA
- Release: October 31st, 2024
- On: Windows
- From: Steam / Epic Games Store
- Price: £50 /€60 /$60
- Reviewed on: Intel Core i5-12600K, 32GB RAM, Nvidia RTX 2070, Windows 10
If there’s one thing I’d like to get across about my time with Dragon Age: The Veilguard - perhaps a surprise given Bioware’s recent history, Anthem , and some of the early marketing for this game - it’s that in my 50 hour return to Thedas, I very rarely felt I was playing something cynical.
Occasionally puppyish in its eagerness? Sure. Adhering to trends, some so bafflingly quaint as actual ballista turret sections? Absolutely. If Veilguard can be called an RPG (“chatty action adventure” is where I’d land) it’s a reluctant one, even if some of that reluctance works in its favour.
A couple Bioware bangers aside, roleplaying and decisions feel limited - an understandable casualty in service of a cohesive mood and plot, though only in hindsight. A few, early choices (leave the bad man to die, or don’t) hinted toward options to play my character, Rook, as anything spicier than an occasionally conflicted boy scout. This was a lie - or else the remnants of an earlier, more ambitious build. I ended up liking Rook a great deal, but Thedas can feel small at times. Most choices are about the team, rather than the world. And even then, few are wider reaching than “support friend” or “support friend (sarcastic)”.

Image credit:Bioware/Rock Paper Shotgun
This all aside, there is such heart and enthusiasm at Veilguard’s core, and such effort taken to build up - over tens of hours - to the most spectacular, uniquely Bioware finale since the spectacular Bioware finale, that I rolled credits with no doubt that the folk behind Veilguard cared deeply about what they were making. I ended up caring too, even if it took me longer than I’d have liked.
That’s because almost everything Veilguard does - from characters to combat to exploration - only start to get interesting about eight hours in. The spaces you initially spend the most time in feel unmoored from the blood and dirt of Thedas. Your ethereal lighthouse base floats in a purplish void - the liminal, highest-of-high-fantasies antithesis to Inquisition’s frozen medieval Skyhold. Save the world? Sure thing, but it’s been a decade. Depending on which order you tackle quests, it can be a long while before you get a sense of the world you’re saving.
Multiple consequential, lore-dense plotlines that aren’t fully relevant until much later are introduced while you’re still getting your bearings. I begged for a single scene of someone noisily smashing a chicken leg and a pint in a dingy tavern. A basement of rats to kill, as a treat. Just something to ground me in the mundane sinew of Thedas rather than its fluffier concerns, hours before the game gave me genuine cause to feel invested.
That’s also how long it took me to get over how popular botox apparently is in Thedas these days. Faces are stiff, teeth are unnervingly white, and everyone you meet is just that little bit too filtered; too perfect. I don’t need an unending parade of ragged, wretched souls. Just, y’know, maybe a single person who looks like they’ve gone a day without mainlining moisturiser. Later on, Veilguard showed me captives excruciated by blood magic and blight-festered battlegrounds, dusky mediterranean markets and lavish, crumbling architecture. This is a world with wrinkles and stress lines, yet bizarrely inhabited by skincare influencers.

Image credit:Bioware/Rock Paper Shotgun
This is especially frustrating because DA’s secondary art styles are so incredible. The lean, rich arcana that show up for collectibles and some cutscenes here, and the fantasy art deco found in Veilguard’s sets, costumes, and architecture just feel so much more deliberate and defined than the character designs. Tesselated shapes woven into armour pieces. Ornate booze bottles lining the shelves of bars. Gothic chandeliers in ornate necropolises. It’s a rare and special thing to play an AAA game with environmental flourishes this consistent - and so equally tragic to see other elements so flattened, smoothed and saturated. And if blemishless uniformity is an issue for the people, you can imagine what it does to the darkspawn.

You can glamour armour based on what you’ve collected or bought. Many armour pieces are beautiful, intricate bits of fashion design, and every helmet looks stupid as fuck. |Image credit:Bioware/Rock Paper Shotgun
The character’s stiffness and nuclear-glow-ups also undermine some fantastic voice performances. You won’t be surprised, I’m guessing, to hear that Solas retains his place as the elven god of scene stealing whenever he pops up, silver tongued and soft lilted. His dialogue and revelations, especially, are a real highlight. Elven lore fans, you’re in for a treat. If you’re open minded, you might even find he makes some good poi…wait. Mum! He’s doing it again!
But I absolutely didn’t expect my favourite voice performance to end up being my Rook (masculine voice 1). This, and Rook’s writing, made for a character I was genuinely on board with. It’s something worth asking of any game with dialogue choices that only gesture at what’s actually spoken after: is there tension between me and my character? When I pick my prompt and they speak it, do I cringe and shout “no, that’s not what I meant!”? With Veilguard, it was mostly “yes. Yes. That is exactly what I would say here, were I cool and decisive and also a hot elf”. Aspirational roleplaying, another Bioware special.
Once I noticed Veilguard’s love of geometric flourishes, I started seeing them everywhere. |Image credit:Bioware/Rock Paper Shotgun
What’s definitely aspirational is the backflip-while-shooting-an-arrow dodge my rogue Rook simply would not stop delighting me with, even after I’d performed it half-a-hundred times. Combat here sits somewhere between the more measured slash, parry, and stagger of God Of War (2018), the prime-and-detonate team coordination of Mass Effect 3 , with some buff stacking and weakness exploitation that, again, feel more like concessions to RPGs than a convincing synthesis. Limp glory kills, ability cooldowns, and mighty supers complete the bingo card. It’s frequently satisfying, and it certainly makes the characters look cool, but it does feel like a pastiche of other, more confident systems. That said, it fits here in ways I don’t reckon another grudging shot at Inquisition’s “fine, have your tactical view, you decrepit Baldur’s Gate purists” would have.
It hits its stride about halfway through, then stumbles and eventually plods. I ended up lowering enemy health, since I’d seen every combination of foes in the game a dozen times and just wanted to get through fights quicker. There is, I dare say, a reason why combat like this is usually found in fifteen hour action games, not 50-100 hour natterthons. Parrying feels great, but fights are so visually noisy I’d often have to strain my eyes to pick out the Arkham/Spiderman ‘bonk incoming’ warnings in among the elemental crackles, ranged bonk incoming warnings, and big red “don’t fucking stand there, you muppet” circles.
That said, the classes are very distinct - or, at least, the fighter is from the rogue. Throw equipment effects in the mix, and there’s some varied buildcraft that becomes more relevant and interesting the higher the difficulty. I especially liked how no weapon or armour piece becomes useless, instead upgrading as you collect duplicates. You can’t sell them, but instead of ending up with a bag o’ jangly crap, you get differently useful loadout options. Overall, combat is engaging in flashy sprints - sometimes balletic in tandem with pause-to-listen soundtrack bangers - it just isn’t robust enough to last the marathon.

Image credit:Bioware/Rock Paper Shotgun
And a marathon it is, because combat’s also the main way you interact with the world. You’ve got environmental non-puzzles - locate the thing-zles, basically. You can have ambient conversations with townsfolk and vendors, some obligatory dog bothering, but I was itching for a card game or side activity like Inquisition’s throne room. The closest thing here is, uh, a combat arena. There are endless conversations that depict Rook hanging with the team, but nothing to facilitate you hanging out in Thedas. It can make the world feel utilitarian, almost laminated in its resistance to being touched and felt.
You want questlines? Companions, factions, and regions all have some, each contributing to the ending in some form. This is mostly through completion percentages (“faction strength”) rather than story decisions. Again, a utilitarian approach. Still, Mass Effect 2 wasn’t too dissimilar, and it is a very good ending. I also really appreciated the map design. Spaces are easy to navigate but also feel slightly confusing in a naturalistic sense, with areas that seem small opening up to multiple other paths and plateaus.
There is so much else that is impressive and charming about Veilguard. The absurdly elaborate and expensive finales that cap off companion questlines; lavish, unique areas rolled out for a visit or two then never again. How story moments of real threat and menace stopped me in my tracks, because it turned out that Bioware wasn’t disinterested in this stuff, just saving it for when it really counted. The fantastic prose and worldbuilding in the huge glossary, filled as you find notes and items.

Mom said it’s my turn to play Xbox. |Image credit:Bioware/Rock Paper Shotgun
Quite early on, during those hours where I still wasn’t sold on the game, and every note I took was a criticism, I had a conversation with dwarf scout Harding where she reminisced on her time with the Inquisition. She’d mention characters - Cassandra, Sera, Cole, Leliana - and all I could think about was how much I’d rather be spending time with them than a cast who, at that time, felt underdeveloped, uncharismatic, and uninteresting.
And, sure, some companions take longer to warm to than others. “I fix magical artefacts! It’s kind of my thing!” Please don’t tell me what your thing is, magic artefact elf lady - I will learn what your thing is by observing you doing that thing. But as I played on, I’d sometimes think back to that conversation, and I’d notice how much Veilguard’s crew had grown on me. I’m not sure if I’ll end up missing them the same way in whatever form Dragon Age takes next, but it’s a very pleasant surprise to even be considering it.
This review is based of a review code provided by the developer. I was going to cover romance but that developer is Bioware. You know how it works by now, I’m sure. (Taash, obviously.)
Find out how we conduct our reviews by reading our review policy .
Dragon Age: The Veilguard
PS5 , Xbox Series X/S , PC
Rock Paper Shotgun is better when you sign in
Sign in and join us on our journey to discover strange and compelling PC games.

All 75 Arc Raiders Blueprints and where to get them
These areas have the highest chance of giving you Blueprints

Image credit:Rock Paper Shotgun/Embark Studios

Looking for more Arc Raiders Blueprints? It’s a special day when you find a Blueprint, as they’re among the most valuable items in Arc Raiders. If you find a Blueprint that you haven’t already found, then you must make sure you hold onto it at all costs, because Blueprints are the key to one of the most important and powerful systems of meta-progression in the game.
This guide aims to be the very best guide on Blueprints you can find, starting with a primer on what exactly they are and how they work in Arc Raiders, before delving into exactly where to get Blueprints and the very best farming spots for you to take in your search.
We’ll also go over how to get Blueprints from other unlikely activities, such as destroying Surveyors and completing specific quests. And you’ll also find the full list of all 75 Blueprints in Arc Raiders on this page (including the newest Blueprints added with the Cold Snap update , such as the Deadline Blueprint and Firework Box Blueprint), giving you all the information you need to expand your own crafting repertoire.
In this guide:
- What are Blueprints in Arc Raiders?
- Full Blueprint list: All crafting recipes
- Where to find Blueprints in Arc Raiders Blueprints obtained from quests Blueprints obtained from Trials Best Blueprint farming locations

What are Blueprints in Arc Raiders?
Blueprints in Arc Raiders are special items which, if you manage to extract with them, you can expend to permanently unlock a new crafting recipe in your Workshop. If you manage to extract from a raid with an Anvil Blueprint, for example, you can unlock the ability to craft your very own Anvil Pistol, as many times as you like (as long as you have the crafting materials).
To use a Blueprint, simply open your Inventory while in the lobby, then right-click on the Blueprint and click “Learn And Consume” . This will permanently unlock the recipe for that item in your Workshop. As of the Stella Montis update, there are allegedly 75 different Blueprints to unlock - although only 68 are confirmed to be in the game so far. You can see all the Blueprints you’ve found and unlocked by going to the Workshop menu, and hitting “R” to bring up the Blueprint screen.
It’s possible to find duplicates of past Blueprints you’ve already unlocked. If you find these, then you can either sell them, or - if you like to play with friends - you can take it into a match and gift it to your friend so they can unlock that recipe for themselves. Another option is to keep hold of them until the time comes to donate them to the Expedition.
Full Blueprint list: All crafting recipes
Below is the full list of all the Blueprints that are currently available to find in Arc Raiders, and the crafting recipe required for each item:
| Blueprint | Type | Recipe | Crafted At |
|---|---|---|---|
| Bettina | Weapon | 3x Advanced Mechanical Components 3x Heavy Gun Parts 3x Canister | Gunsmith 3 |
| Blue Light Stick | Quick Use | 3x Chemicals | Utility Station 1 |
| Aphelion | Weapon | 3x Magnetic Accelerator 3x Complex Gun Parts 1x Matriarch Reactor | Gunsmith 3 |
| Combat Mk. 3 (Flanking) | Augment | 2x Advanced Electrical Components 3x Processor | Gear Bench 3 |
| Combat Mk. 3 (Aggressive) | Augment | 2x Advanced Electrical Components 3x Processor | Gear Bench 3 |
| Complex Gun Parts | Material | 2x Light Gun Parts 2x Medium Gun Parts 2x Heavy Gun Parts | Refiner 3 |
| Fireworks Box | Quick Use | 1x Explosive Compound 3x Pop Trigger | Explosives Station 2 |
| Gas Mine | Mine | 4x Chemicals 2x Rubber Parts | Explosives Station 1 |
| Green Light Stick | Quick Use | 3x Chemicals | Utility Station 1 |
| Pulse Mine | Mine | 1x Crude Explosives 1x Wires | Explosives Station 1 |
| Seeker Grenade | Grenade | 1x Crude Explosives 2x ARC Alloy | Explosives Station 1 |
| Looting Mk. 3 (Survivor) | Augment | 2x Advanced Electrical Components 3x Processor | Gear Bench 3 |
| Angled Grip II | Mod | 2x Mechanical Components 3x Duct Tape | Gunsmith 2 |
| Angled Grip III | Mod | 2x Mod Components 5x Duct Tape | Gunsmith 3 |
| Hullcracker | Weapon | 1x Magnetic Accelerator 3x Heavy Gun Parts 1x Exodus Modules | Gunsmith 3 |
| Launcher Ammo | Ammo | 5x Metal Parts 1x Crude Explosives | Workbench 1 |
| Anvil | Weapon | 5x Mechanical Components 5x Simple Gun Parts | Gunsmith 2 |
| Anvil Splitter | Mod | 2x Mod Components 3x Processor | Gunsmith 3 |
| ??? | ??? | ??? | ??? |
| Barricade Kit | Quick Use | 1x Mechanical Components | Utility Station 2 |
| Blaze Grenade | Grenade | 1x Explosive Compound 2x Oil | Explosives Station 3 |
| Bobcat | Weapon | 3x Advanced Mechanical Components 3x Light Gun Parts | Gunsmith 3 |
| Osprey | Weapon | 2x Advanced Mechanical Components 3x Medium Gun Parts 7x Wires | Gunsmith 3 |
| Burletta | Weapon | 3x Mechanical Components 3x Simple Gun Parts | Gunsmith 1 |
| Compensator II | Mod | 2x Mechanical Components 4x Wires | Gunsmith 2 |
| Compensator III | Mod | 2x Mod Components 8x Wires | Gunsmith 3 |
| Defibrillator | Quick Use | 9x Plastic Parts 1x Moss | Medical Lab 2 |
| ??? | ??? | ??? | ??? |
| Equalizer | Weapon | 3x Magnetic Accelerator 3x Complex Gun Parts 1x Queen Reactor | Gunsmith 3 |
| Extended Barrel | Mod | 2x Mod Components 8x Wires | Gunsmith 3 |
| Extended Light Mag II | Mod | 2x Mechanical Components 3x Steel Spring | Gunsmith 2 |
| Extended Light Mag III | Mod | 2x Mod Components 5x Steel Spring | Gunsmith 3 |
| Extended Medium Mag II | Mod | 2x Mechanical Components 3x Steel Spring | Gunsmith 2 |
| Extended Medium Mag III | Mod | 2x Mod Components 5x Steel Spring | Gunsmith 3 |
| Extended Shotgun Mag II | Mod | 2x Mechanical Components 3x Steel Spring | Gunsmith 2 |
| Extended Shotgun Mag III | Mod | 2x Mod Components 5x Steel Spring | Gunsmith 3 |
| Remote Raider Flare | Quick Use | 2x Chemicals 4x Rubber Parts | Utility Station 1 |
| Heavy Gun Parts | Material | 4x Simple Gun Parts | Refiner 2 |
| Venator | Weapon | 2x Advanced Mechanical Components 3x Medium Gun Parts 5x Magnet | Gunsmith 3 |
| Il Toro | Weapon | 5x Mechanical Components 6x Simple Gun Parts | Gunsmith 1 |
| Jolt Mine | Mine | 1x Electrical Components 1x Battery | Explosives Station 2 |
| Explosive Mine | Mine | 1x Explosive Compound 1x Sensors | Explosives Station 3 |
| Jupiter | Weapon | 3x Magnetic Accelerator 3x Complex Gun Parts 1x Queen Reactor | Gunsmith 3 |
| Light Gun Parts | Material | 4x Simple Gun Parts | Refiner 2 |
| Lightweight Stock | Mod | 2x Mod Components 5x Duct Tape | Gunsmith 3 |
| Lure Grenade | Grenade | 1x Speaker Component 1x Electrical Components | Utility Station 2 |
| Medium Gun Parts | Material | 4x Simple Gun Parts | Refiner 2 |
| Torrente | Weapon | 2x Advanced Mechanical Components 3x Medium Gun Parts 6x Steel Spring | Gunsmith 3 |
| Muzzle Brake II | Mod | 2x Mechanical Components 4x Wires | Gunsmith 2 |
| Muzzle Brake III | Mod | 2x Mod Components 8x Wires | Gunsmith 3 |
| Padded Stock | Mod | 2x Mod Components 5x Duct Tape | Gunsmith 3 |
| Shotgun Choke II | Mod | 2x Mechanical Components 4x Wires | Gunsmith 2 |
| Shotgun Choke III | Mod | 2x Mod Components 8x Wires | Gunsmith 3 |
| Shotgun Silencer | Mod | 2x Mod Components 8x Wires | Gunsmith 3 |
| Showstopper | Grenade | 1x Advanced Electrical Components 1x Voltage Converter | Explosives Station 3 |
| Silencer I | Mod | 2x Mechanical Components 4x Wires | Gunsmith 2 |
| Silencer II | Mod | 2x Mod Components 8x Wires | Gunsmith 3 |
| Snap Hook | Quick Use | 2x Power Rod 3x Rope 1x Exodus Modules | Utility Station 3 |
| Stable Stock II | Mod | 2x Mechanical Components 3x Duct Tape | Gunsmith 2 |
| Stable Stock III | Mod | 2x Mod Components 5x Duct Tape | Gunsmith 3 |
| Tagging Grenade | Grenade | 1x Electrical Components 1x Sensors | Utility Station 3 |
| Tempest | Weapon | 3x Advanced Mechanical Components 3x Medium Gun Parts 3x Canister | Gunsmith 3 |
| Trigger Nade | Grenade | 2x Crude Explosives 1x Processor | Explosives Station 2 |
| Vertical Grip II | Mod | 2x Mechanical Components 3x Duct Tape | Gunsmith 2 |
| Vertical Grip III | Mod | 2x Mod Components 5x Duct Tape | Gunsmith 3 |
| Vita Shot | Quick Use | 2x Antiseptic 1x Syringe | Medical Lab 3 |
| Vita Spray | Quick Use | 3x Antiseptic 1x Canister | Medical Lab 3 |
| Vulcano | Weapon | 1x Magnetic Accelerator 3x Heavy Gun Parts 1x Exodus Modules | Gunsmith 3 |
| Wolfpack | Grenade | 2x Explosive Compound 2x Sensors | Explosives Station 3 |
| Red Light Stick | Quick Use | 3x Chemicals | Utility Station 1 |
| Smoke Grenade | Grenade | 14x Chemicals 1x Canister | Utility Station 2 |
| Deadline | Mine | 3x Explosive Compound 2x ARC Circuitry | Explosives Station 3 |
| Trailblazer | Grenade | 1x Explosive Compound 1x Synthesized Fuel | Explosives Station 3 |
| Tactical Mk. 3 (Defensive) | Augment | 2x Advanced Electrical Components 3x Processor | Gear Bench 3 |
| Tactical Mk. 3 (Healing) | Augment | 2x Advanced Electrical Components 3x Processor | Gear Bench 3 |
| Yellow Light Stick | Quick Use | 3x Chemicals | Utility Station 1 |
Note: The missing Blueprints in this list likely have not actually been added to the game at the time of writing, because none of the playerbase has managed to find any of them. As they are added to the game, I will update this page with the most relevant information so you know exactly how to get all 75 Arc Raiders Blueprints.
Where to find Blueprints in Arc Raiders
Below is a list of all containers, modifiers, and events which maximise your chances of finding Blueprints:
- Certain quests reward you with specific Blueprints .
- Completing Trials has a high chance of offering Blueprints as rewards.
- Surveyors have a decent chance of dropping Blueprints on death.
- High loot value areas tend to have a greater chance of spawning Blueprints.
- Night Raids and Storms may increase rare Blueprint spawn chances in containers.
- Containers with higher numbers of items may have a higher tendency to spawn Blueprints. As a result, Blue Gate (which has many “large” containers containing multiple items) may give you a higher chance of spawning Blueprints.
- Raider containers (Raider Caches, Weapon Boxes, Medical Bags, Grenade Tubes) have increased Blueprint drop rates. As a result, the Uncovered Caches event gives you a high chance of finding Blueprints.
- Security Lockers have a higher than average chance of containing Blueprints.
- Certain Blueprints only seem to spawn under specific circumstances: Tempest Blueprint only spawns during Night Raid events. Vulcano Blueprint only spawns during Hidden Bunker events. Jupiter and Equaliser Blueprints only spawn during Harvester events.

Raider Caches, Weapon Boxes, and other raider-oriented container types have a good chance of offering Blueprints. |Image credit:Rock Paper Shotgun/Embark Studios
Blueprints have a very low chance of spawning in any container in Arc Raiders, around 1-2% on average. However, there is a higher chance of finding Blueprints in particular container types. Specifically, you can find more Blueprints in Raider containers and security lockers.
Beyond this, if you’re looking for Blueprints you should focus on regions of the map which are marked as having particularly high-value loot. Areas such as the Control Tower in Dam Battlegrounds, the Arrival and Departure Buildings in Spaceport, and Pilgrim’s Peak in Blue Gate all have a better-than-average chance of spawning Blueprints somewhere amongst all their containers. Night Raids and Electromagnetic Storm events also increase the drop chances of certain Blueprints .
In addition to these containers, you can often loot Blueprints from destroyed Surveyors - the largest of the rolling ball ARC. Surveyors are more commonly found on the later maps - Spaceport and Blue Gate - and if one spawns in your match, you’ll likely see it by the blue laser beam that it casts into the sky while “surveying”.
Surveyors are quite well-armoured and will very speedily run away from you once it notices you, but if you can take one down then make sure you loot all its parts for a chance of obtaining certain unusual Blueprints.
Blueprints obtained from quests
One way in which you can get Blueprints is by completing certain quests for the vendors in Speranza. Some quests will reward you with a specific item Blueprint upon completion, so as long as you work through all the quests in Arc Raiders, you are guaranteed those Blueprints.
Here is the full list of all Blueprints you can get from quest rewards:
- Trigger Nade Blueprint: Rewarded after completing “Sparks Fly”.
- Lure Grenade Blueprint: Rewarded after completing “Greasing Her Palms”.
- Burletta Blueprint: Rewarded after completing “Industrial Espionage”.
- Hullcracker Blueprint (and Launcher Ammo Blueprint): Rewarded after completing “The Major’s Footlocker”.
Alas, that’s only 4 Blueprints out of a total of 75 to unlock, so for the vast majority you will need to find them yourself during a raid. If you’re intent on farming Blueprints, then it’s best to equip yourself with cheap gear in case you lose it, but don’t use a free loadout because then you won’t get a safe pocket to stash any new Blueprint you find. No pain in Arc Raiders is sharper than failing to extract with a new Blueprint you’ve been after for a dozen hours already.

One of the best ways to get Blueprints is by hitting three stars on all five Trials every week. |Image credit:Rock Paper Shotgun/Embark Studios
Blueprints obtained from Trials
One of the very best ways to get Blueprints is as rewards for completing Trials in Arc Raiders. Trials are unlocked from Level 15 onwards, and allow you to earn rewards by focusing on certain tasks over the course of several raids. For example, one Trial might task you with dealing damage to Hornets, while another might challenge you to loot Supply Drops.
Trials refresh on a weekly basis, with a new week bringing five new Trials. Each Trial can offer up to three rewards after passing certain score milestones, and it’s possible to receive very high level loot from these reward crates - including Blueprints. So if you want to unlock as many Blueprints as possible, you should make a point of completing as many Trials as possible each week.
Best Blueprint farming locations
The very best way to get Blueprints is to frequent specific areas of the maps which combine high-tier loot pools with the right types of containers to search. Here are my recommendations for where to find Blueprints on every map, so you can always keep the search going for new crafting recipes to unlock.

Image credit:Rock Paper Shotgun/Embark Studios
Dam Battlegrounds
The best places to farm Blueprints on Dam Battlegrounds are the Control Tower, Power Generation Complex, Ruby Residence, and Pale Apartments . The first two regions, despite only being marked on the map as mid-tier loot, contain a phenomenal number of containers to loot. The Control Tower can also contain a couple of high-tier Security Lockers - though of course, you’ll need to have unlocked the Security Breach skill at the end of the Survival tree.
There’s also a lot of reporting amongst the playerbase that the Residential areas in the top-left of the map - Pale Apartments and Ruby Residence - give you a comparatively strong chance of finding Blueprints. Considering their size, there’s a high density of containers to loot in both locations, and they also have the benefit of being fairly out of the way. So you’re more likely to have all the containers to yourself.
Buried City
The best Blueprint farming locations on Buried City are the Santa Maria Houses, Grandioso Apartments, Town Hall, and the various buildings of the New District . Grandioso Apartments has a lower number of containers than the rest, but a high chance of spawning weapon cases - which have good Blueprint drop rates. The others are high-tier loot areas, with plenty of lootable containers - including Security Lockers.
Spaceport
The best places to find Blueprints on Spaceport are the Arrival and Departure Buildings, as well as Control Tower A6 and the Launch Towers . All these areas are labelled as high-value loot regions, and many of them are also very handily connected to one another by the Spaceport wall, which you can use to quickly run from one area to the next. At the tops of most of these buildings you’ll find at least one Security Locker, so this is an excellent farming route for players looking to find Blueprints.
The downside to looting Blueprints on Spaceport is that all these areas are hotly contested, particularly in Duos and Squads. You’ll need to be very focused and fast in order to complete the full farming route.

Image credit:Rock Paper Shotgun/Embark Studios
Blue Gate
Blue Gate tends to have a good chance of dropping Blueprints, potentially because it generally has a high number of containers which can hold lots of items; so there’s a higher chance of a Blueprint spawning in each container. In my experience, the best Blueprint farming spots on Blue Gate are Pilgrim’s Peak, Raider’s Refuge, the Ancient Fort, and the Underground Complex beneath the Warehouse .
All of these areas contain a wealth of containers to loot. Raider’s Refuge has less to loot, but the majority of the containers in and around the Refuge are raider containers, which have a high chance of containing Blueprints - particularly during major events.
Stella Montis
On the whole, Stella Montis seems to have a very low drop rate for Blueprints (though a high chance of dropping other high-tier loot). If you do want to try farming Blueprints on this map, the best places to find Blueprints in Stella Montis are Medical Research, Assembly Workshop, and the Business Center . These areas have the highest density of containers to loot on the map.
In addition to this, the Western Tunnel has a few different Security Lockers to loot, so while there’s very little to loot elsewhere in this area of the map, it’s worth hitting those Security Lockers if you spawn there at the start of a match.
That wraps up this primer on how to get all the Blueprints in Arc Raiders as quickly as possible. With the Expedition system constantly resetting a large number of players’ Blueprints, it’s more important than ever to have the most up-to-date information on where to find all these Blueprints.
While you’re here, be sure to check out our Arc Raiders best guns tier list , as well as our primers on the best skills to unlock and all the different Field Depot locations on every map.

ARC Raiders
PS5 , Xbox Series X/S , PC
Rock Paper Shotgun is better when you sign in
Sign in and join us on our journey to discover strange and compelling PC games.
