Dragon Age: The Veilguard on PC is the surprise AAA tech success of 2024
And you can make it go even faster with these settings tweaks
Image credit:Rock Paper Shotgun/Electronic Arts

There’s plenty that you could justifiably expect from a Bioware RPG : chats with mates, opportunities to get those mates horribly killed, surviving mates turning to the side then walking offscreen . But I don’t think anyone expected Dragon Age: The Veilguard to be, at least on a purely technical level, one of the smoothest-performing, settings-rich AAA PC releases of the year so far.
True, that’s partly thanks to the low standards set by an industry that’s increasingly happy to demand a luxury graphics card then immediately start stuttering all over it. But Veilguard does genuinely run well for the amount of visual fidelity it offers, with strong implementations of DLSS and FSR upscaling (plus DLSS 3 frame generation ) to help out. Even its ray tracing options are exceptionally flexible, allowing for these upgraded effects to only kick in when your PC has the performance headroom for them.
It’s not perfect – despite a good Steam Deck showing, very old and/or low-end rigs might still struggle during various points of your godslaying adventure. But it is the kind of game that will take full advantage of beefier hardware while being malleable enough, through its visual options, for weaker kit to get by. Here, we’ll take a quick look at how Dragon Age: The Veilguard performs on various setups, before studying its settings to see what optimisations can be made.

Image credit:Rock Paper Shotgun/Electronic Arts
Dragon Age: The Veilguard system requirements and PC performance
Some of Veilguard’s hardware demands might look scary in isolation, particular the Core i9 (!) at Recommended level and how most of the higher tiers want at least 10GB of VRAM. 100GB of SSD storage is no joke, too.
This is indeed a chunky game, install-wise, though I do believe those other requirements are on the pessimistic side. I performed most of my benchmarking on an RTX 4060, with a mere 8GB of video memory, and that ran the highest ray tracing effects without any stuttering. And despite my chosen testing patch, a stretch of the leafy Arlathan Forest, being one of the most demanding areas of the game.
Here’s the full list, in click-to-enlarge image form, because please God don’t make me type all this out.
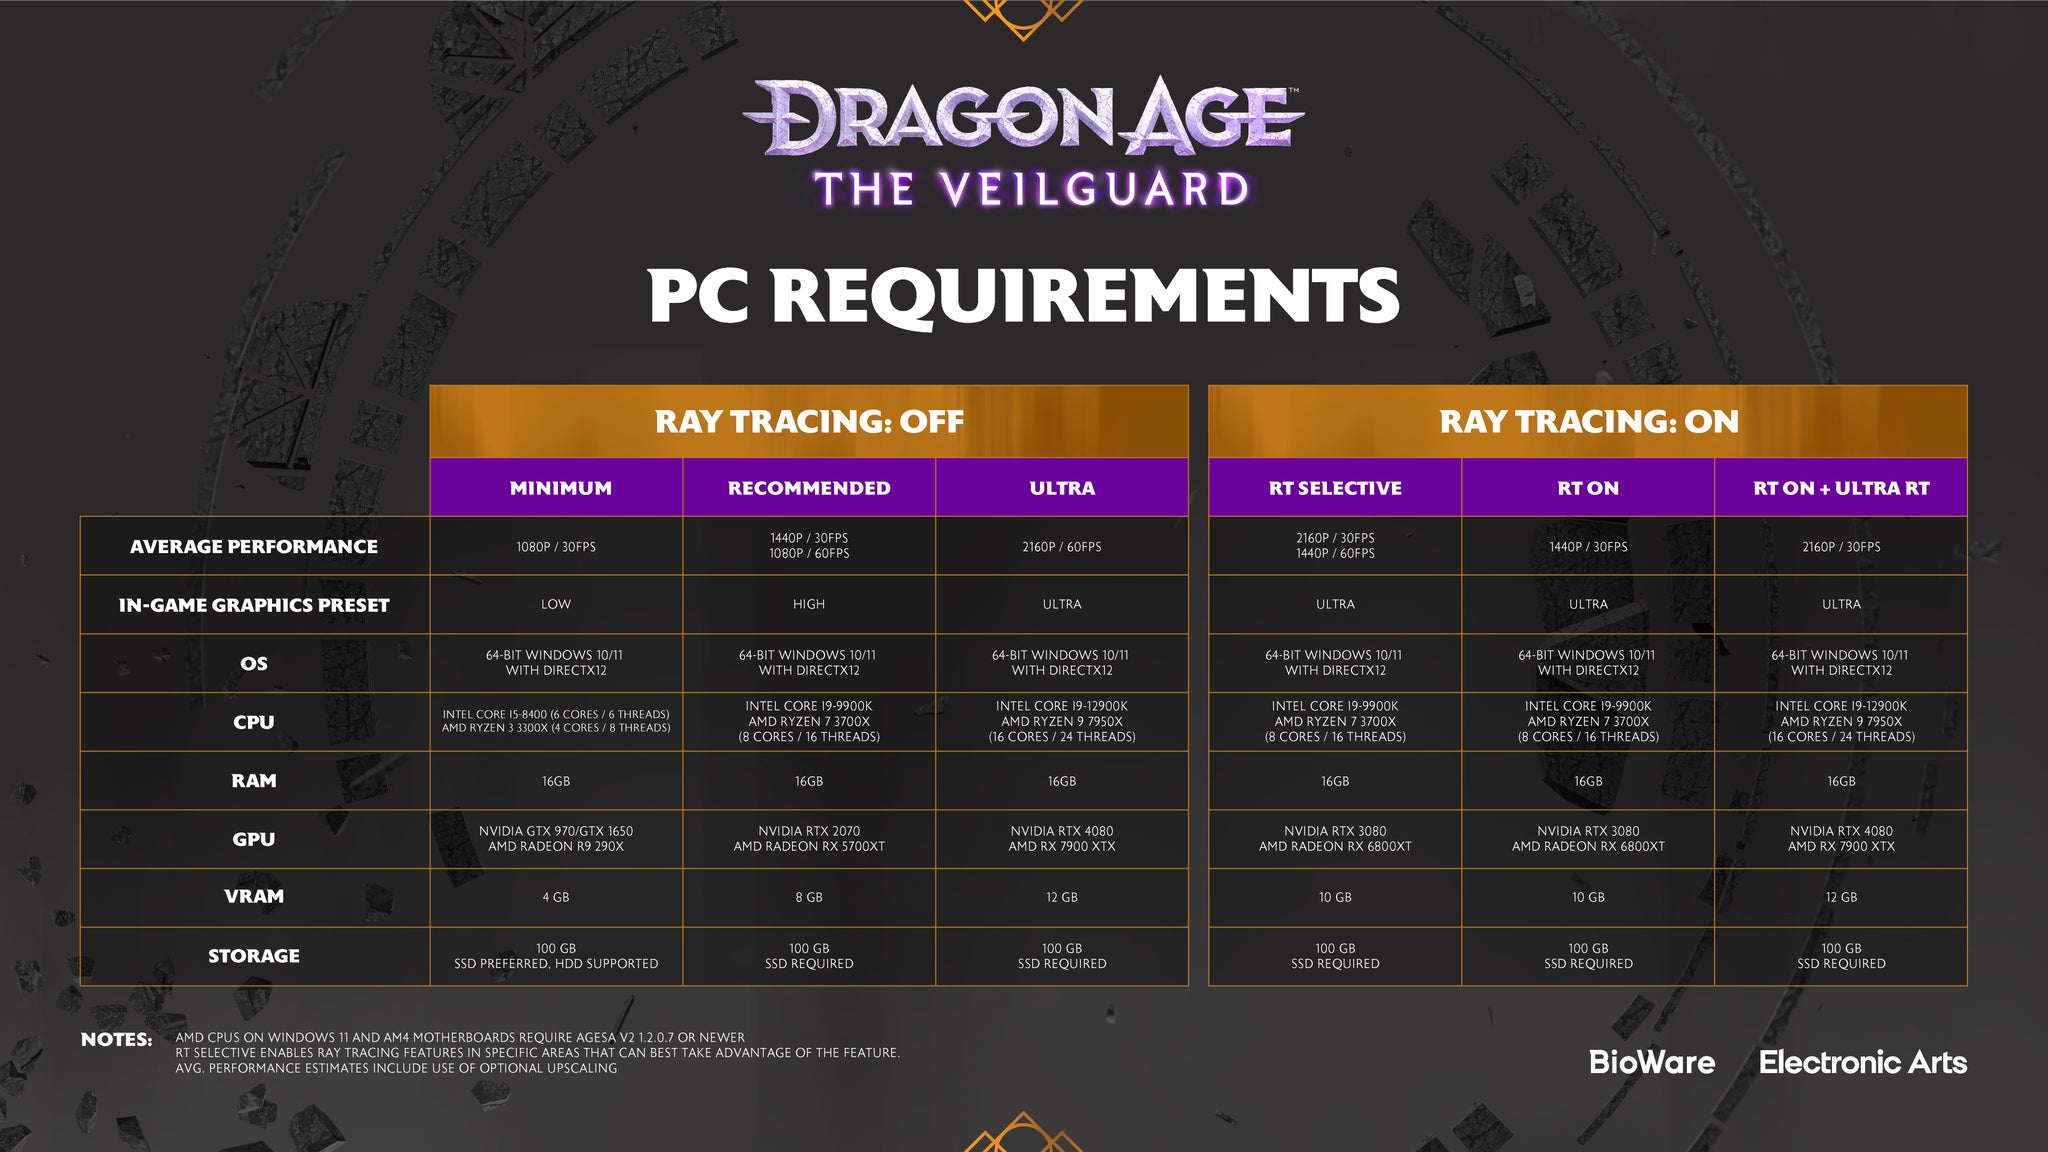
Image credit:EA
At the bottom of Veilguard’s lengthy GPU shopping list, the GTX 1650 is pretty spot-on for 1080p/30fps. The closest I had was a slightly less powerful GTX 1050 Ti, which with a combination of the Low preset, FSR on Performance mode, and Dynamic Resolution enabled, averaged 29fps. Which is merely adequate but remember, that’s in an especially horsepower-hungry area – I recorded the 1050 Ti averaged up to 50fps in lighter sections.
Speaking of FSR, it’s clear that these official specs are assuming that you’d use some flavour of upscaling. My RTX 3070 demonstrated this by only just making it to 59fps at 1080p Ultra, with native TAA on its High setting; the recommend specs list the older RTX 2070 for this performance level, so it’s presumably taking into account the boost from ditching TAA for DLSS instead.
This is fine. I’ve moaned in the past about games leaning too hard on upscalers for 1080p performance, but both DLSS and FSR’s sharpness has improved since then, and Veilguard takes to them without much quality loss at all. Assuming, that is, you’re using the literal Quality mode for each.
DLSS still looks better, mind, so don’t let it go to waste if you’re packing a compatible GeForce RTX card. Moving on to the newer RTX 4060 , that averaged 55fps at 1080p Ultra with TAA – not bad, but the 64fps it scored with DLSS on Quality is better. Nvidia’s tech also allows this 1080p-focused GPU a shot at 1440p, where still on Ultra, it produced a playable 49fps with Quality DLSS.

Image credit:Bioware/Rock Paper Shotgun
For slicker 1440p (or ultrawide , which Veilguard supports), aiming higher will pay off. The RTX 4070 Ti sailed to an easy 81fps with Ultra and Quality DLSS, and with those same settings, posted a fine 65fps at 4K as well. That’s in spite of the RPS test rig’s Core i5-11600K failing short of the ‘Ultra’ specs list, proving that you don’t actually need a Core i9 at this rez. Or an RTX 4080 , for that matter, though since I did have an RTX 4090 lying around, I tested that and got 82fps on Ultra/Quality DLSS.
Frame generation works great too. This is limited to DLSS 3, unfortunately, with no FSR 3 equivalent for non-RTX GPUs. But when it can be enabled, it probably should be, pushing the RTX 4060’s 1080p Ultra result from 55fps to 86fps. The RTX 4070 Ti could also climb from 65fps to 90fps at 4K, while the RTX 4090 hit 139fps. There were no visible errors or artefacts, to my eyes, and the input lag that DLSS 3 has such a bad rep for is marginal at best.
I’m also convinced that someone, somewhere, has put a few late nights into making Veilguard run on the Steam Deck. I haven’t spent as much time on this as on desktop, but despite having less graphical muscle than a GTX 1050 Ti, the Deck appears to perform slightly better: Low, FSR on Performance, and Dynamic Resolution are seemingly enough to secure a solid 30fps base in Veilguard’s most demanding moments. The UI also scales well on the 800p screen and it all controls fine, so that’s a Steam Deck Verified sticker well-earned.
Normally this is where the complaints about stuttering, or long load times, or broken textures would sit. But there’s none of that here –it’s just a solidly put-together game with some great PC features. Huh, almost feels weird to type.

Image credit:Rock Paper Shotgun/Electronic Arts
Dragon Age: The Veilguard best settings guide
Still, just because nothing is on fire don’t mean that you can’t improve on preset performance. And there’s no shortage of tools for it – not only is Veilguard generally higher-tech than Bioware’s last non-remake singleplayer effort, Mass Effect: Andromeda , but its graphics menu is flooded with about twice as many individual settings.
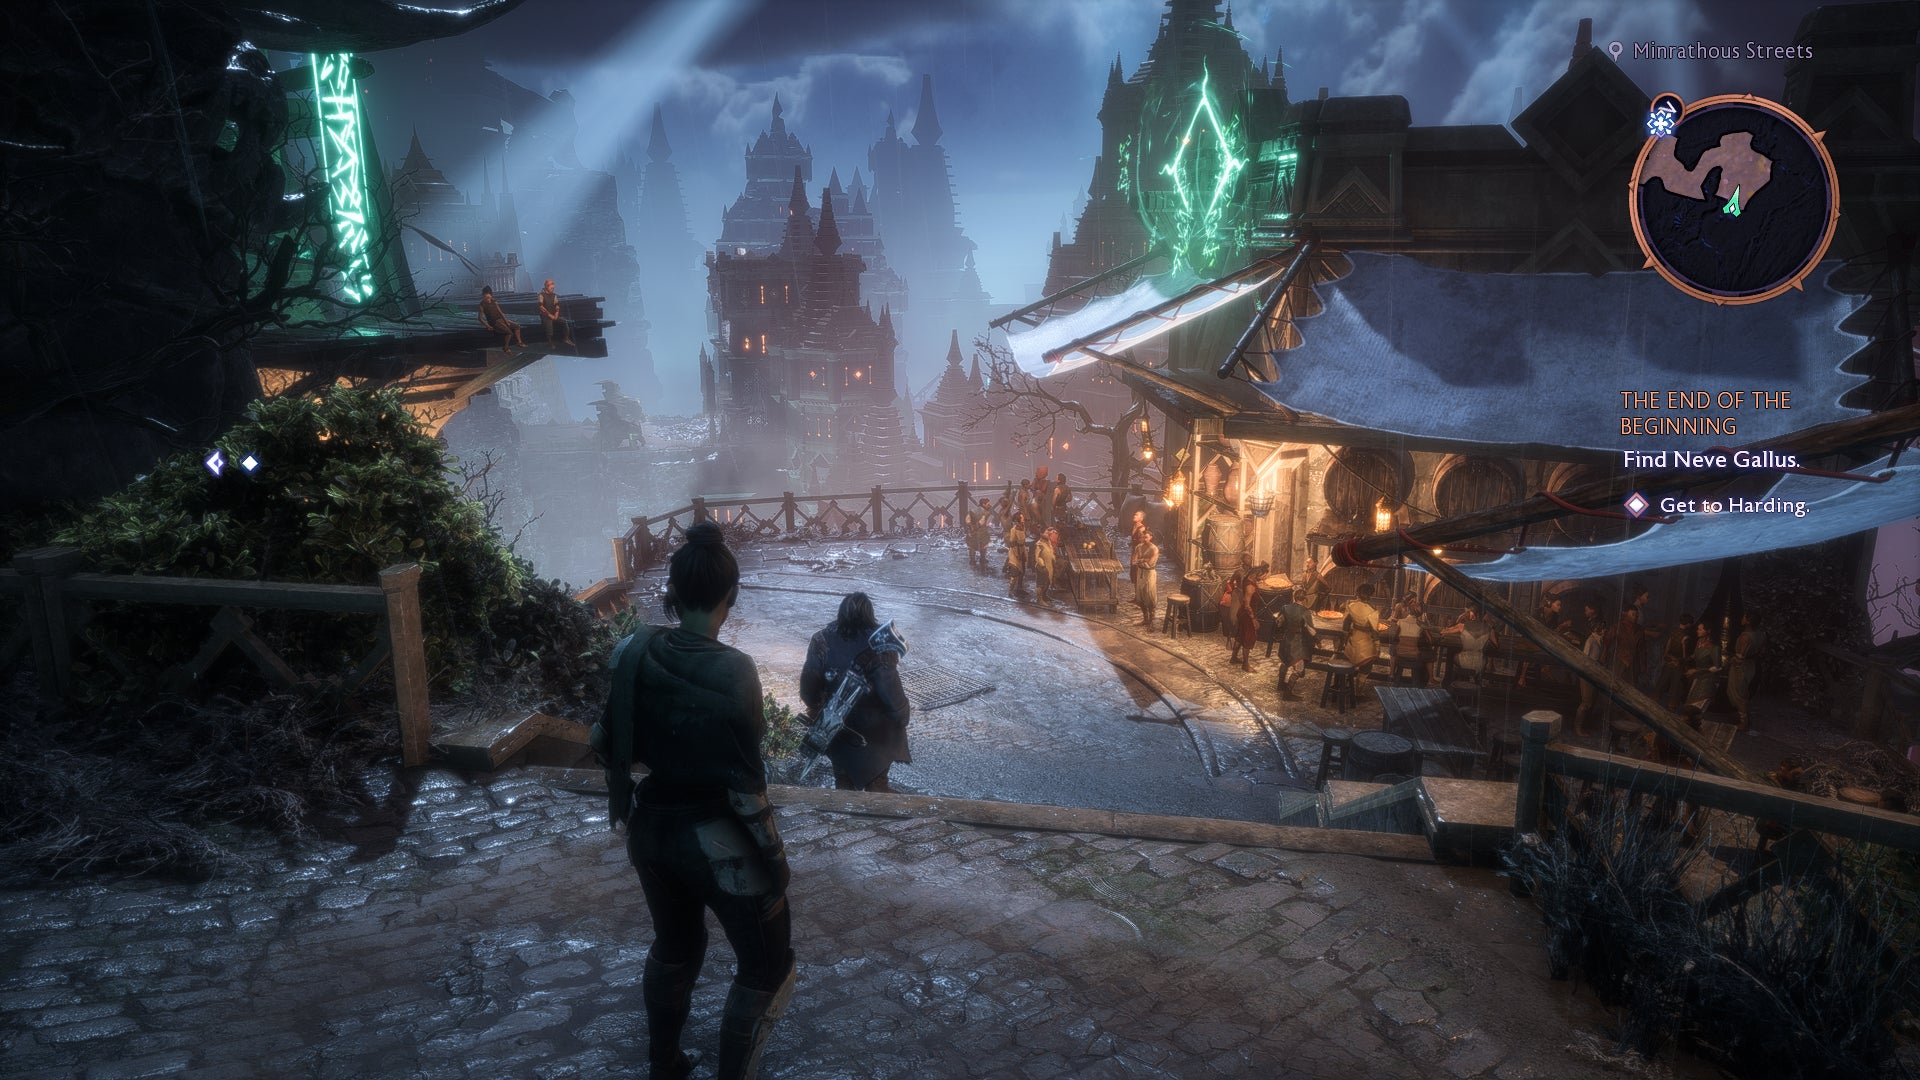
Here’s how each one affected the RTX 4060’s Ultra preset average of 55fps; any big boosts will point to a setting that’s worth lowering, while similar results suggest you can leave that setting on its higher levels without hurting framerates.
Upsample method/quality: Ignore XeSS here, as DLSS and FSR produce far better upscaling results. As per usual, DLSS is both faster and sharper, pumping up the RTX 4060 to 64fps on Quality mode, though FSR is fine for non-RTX graphics cards, scoring 61fps on its own Quality setting.
DLSS frame generation: You’ll need an RTX 40 series GPU to enable this, but if you can, do. There’s very little drawback and in tandem with DLSS on Quality, it got my RTX 4060 all the way up to 86fps.
Nvidia Reflex: Not really a graphics setting itself, but the On+Boost mode reduces input lag at no cost. It’s especially useful when you’ve got frame gen enabled, too.
Anti-aliasing: You only need to worry about this setting if you’re dead set on using native-resolution rendering; both DLSS and FSR upscalers override it. Should this apply to you, the default TAA High option remains the best; TAA Low isn’t really any faster, and surprisingly, the usually high-performing Nvidia DLAA actually cut performance down to 46fps.
Texture quality: Dropping from Ultra to Low textures produced a 58fps average, which isn’t nothing, but also isn’t worth the quality cut. Unless you’re really struggling to get 30fps, that is.
Texture filtering: With 56fps from the Low setting, this is one you should keep on Ultra regardless.
Lighting quality: I’d drop this one. The Low setting doesn’t look all that worse than Ultra, but did prod the RTX 4060 up to 60fps – a 9% improvement all by itself.
Contact shadow: Another 56fps result, or a mere 1fps increase, from disabling this setting. I’d keep it on.
Ambient occlusion: This setting overlaps with the ray-traced ambient occlusion option below, so if you enable the latter, this one is greyed out. Still, there’s not a huge amount to be gained from ditching the default, HBAO Full. HBAO is less detailed and only runs 2fps faster on the RTX 4060, while switching ambient occlusion off entirely also produced 57fps. You might as well just go with the best-looking option here.
Screen space reflections: Again, this gets locked in when you enable the ray-traced reflections option below. But disabling both ray tracing and screen space reflections didn’t improve performance for me at all, so leave this as-is.
Volumetric lighting: Another zero-benefit setting when dropping from Ultra to Low, so Ultra is fine.
Sky quality: Leave this on Ultra too, as Low got me an unchanged 55fps.
Ray-traced reflections: Veilguard takes an interesting approach here – while you can enable fully ray-traced reflections, which cut my RTX 4060’s performance to 46fps, you can also leave this on a “Selective” mode. This limits RT effects to very specific scenes, and even then, only displays them if the game detects that your PC can handle them. I could be tempted by the complete ray-traced package on a fatter GPU, but on something like an RTX 4060, I’d rather have the bonus frames, so Selective it is.
Ray-traced ambient occlusion: Assuming your PC supports ray tracing in the first place, keep this on Selective as well. It’s not actually as much of a resource hog as RT reflections, but having these on permanently cut the RTX 4060 performance to 52fps, which doesn’t seem necessary when standard AO does the job well enough.
Ultra ray tracing: Another one for the big bog GPUs only; this caused a performance dip to 49fps, and at sub-60fps I’d rather have the frames.
Level of detail: I’m gonna suggest dropping this down to Medium. Low is slightly faster, at 62fps to 59fps, but the pop-in effect – as distant objects had their rendering distances cut – was more distracting on Low.
Strand hair: Nvidia HairWorks, is that you? No it is not, but I still don’t recommend leaving this fancy follicles setting enabled when turning it off got me from 55fps to 60fps in an instant.
Terrain quality: This, on the other hand, can be left on Ultra. Even Low couldn’t shift the 55fps average up a single frame.
Terrain decoration quality: I got 56fps from Low, which isn’t really a compelling arguement to turn it down from Ultra.
Visual effects quality: Despite Veilguard’s love of belching out particle effects, you can leave this on Ultra without worry. Low didn’t help performance one jot, still averaging 55fps.
Depth of field: By default, this is set to only have the DoF effect kick in during cinematics. Changing it to Gameplay mode actually cut performance down to 52fps, so leave it be.
Vignette: Disabling this netted the RTX 4060 a single extra frame-per-second. I prefer leaving it on, partly because it keeps this new, more stylised Dragon Age looking… Bioware-ish, I suppose? They love their darkened corners, those guys.
Motion blur: Turning this off ticked performance up to 57fps. Only a tiny improvement, but motion blur serves little purpose, so yeah why not.
Post processing quality: Another unchanged 55fps, dropping from Ultra to Low.
Field of view: This is probably more of a taste thing than a performance thing, though be warned: when I extended the FoV from 100% to 130%, it cut performance down to 50fps. Consider shoring up the framerate with cuts/upscaling elsewhere before you start yanking the camera back.
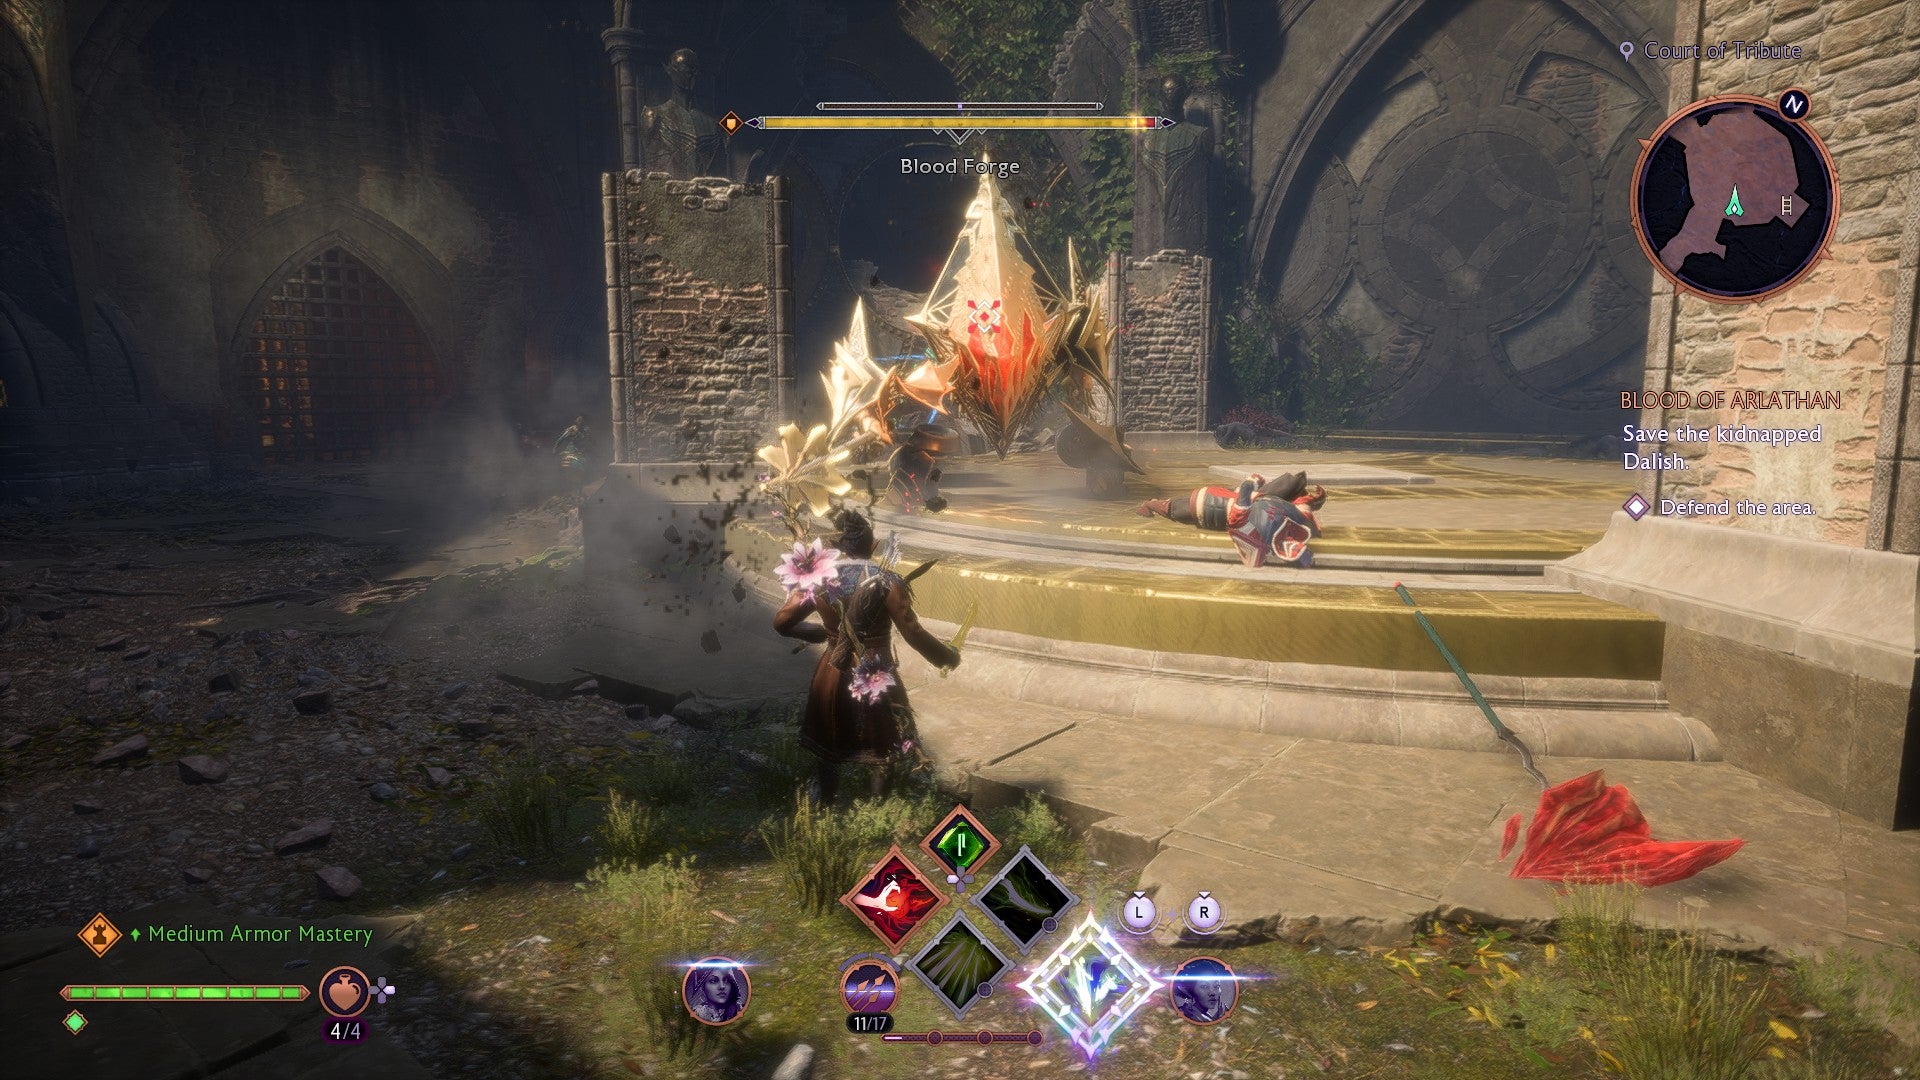
Image credit:Bioware/Rock Paper Shotgun
Since Veilguard doesn’t have any serious stuttering or similar problems to compensate for, I think you can be relatively ambitious in keeping most settings cranked up high. Besides, it’s still very possible to get a sizeable performance boost just from changing a handful of the available settings. Here’s what I’d suggest, for most PCs:
- Upsample method/quality: DLSS / AMD FSR on Quality
- DLSS frame generation: On (if supported)
- Nvidia Reflex: On+Boost
- Lighting quality: Low
- Level of detail: Medium
- Strand hair: Off
- Motion blur: Off
- Everything else: Ultra preset equivalent
On my RTX 4060, this sent the average framerate rocketing to 122fps, or 81fps without the frame generation. Either way, that’s visibly smoother running than the Ultra preset’s 55fps, and actually comes very close to the equivalent of the Medium preset, without nearly as many quality reductions.
For gear like the Steam Deck or very low-end graphics cards, you might need to be more bullish, possibly making additional cuts to ambient occlusion, texture quality, or upscaling quality. But the options are there, and even at rock-bottom settings, this is still a pretty handsome – and technically stable – game.


Dragon Age: The Veilguard
PS5 , Xbox Series X/S , PC
Rock Paper Shotgun is better when you sign in
Sign in and join us on our journey to discover strange and compelling PC games.

All 75 Arc Raiders Blueprints and where to get them
These areas have the highest chance of giving you Blueprints

Image credit:Rock Paper Shotgun/Embark Studios

Looking for more Arc Raiders Blueprints? It’s a special day when you find a Blueprint, as they’re among the most valuable items in Arc Raiders. If you find a Blueprint that you haven’t already found, then you must make sure you hold onto it at all costs, because Blueprints are the key to one of the most important and powerful systems of meta-progression in the game.
This guide aims to be the very best guide on Blueprints you can find, starting with a primer on what exactly they are and how they work in Arc Raiders, before delving into exactly where to get Blueprints and the very best farming spots for you to take in your search.
We’ll also go over how to get Blueprints from other unlikely activities, such as destroying Surveyors and completing specific quests. And you’ll also find the full list of all 75 Blueprints in Arc Raiders on this page (including the newest Blueprints added with the Cold Snap update , such as the Deadline Blueprint and Firework Box Blueprint), giving you all the information you need to expand your own crafting repertoire.
In this guide:
- What are Blueprints in Arc Raiders?
- Full Blueprint list: All crafting recipes
- Where to find Blueprints in Arc Raiders Blueprints obtained from quests Blueprints obtained from Trials Best Blueprint farming locations

What are Blueprints in Arc Raiders?
Blueprints in Arc Raiders are special items which, if you manage to extract with them, you can expend to permanently unlock a new crafting recipe in your Workshop. If you manage to extract from a raid with an Anvil Blueprint, for example, you can unlock the ability to craft your very own Anvil Pistol, as many times as you like (as long as you have the crafting materials).
To use a Blueprint, simply open your Inventory while in the lobby, then right-click on the Blueprint and click “Learn And Consume” . This will permanently unlock the recipe for that item in your Workshop. As of the Stella Montis update, there are allegedly 75 different Blueprints to unlock - although only 68 are confirmed to be in the game so far. You can see all the Blueprints you’ve found and unlocked by going to the Workshop menu, and hitting “R” to bring up the Blueprint screen.
It’s possible to find duplicates of past Blueprints you’ve already unlocked. If you find these, then you can either sell them, or - if you like to play with friends - you can take it into a match and gift it to your friend so they can unlock that recipe for themselves. Another option is to keep hold of them until the time comes to donate them to the Expedition.
Full Blueprint list: All crafting recipes
Below is the full list of all the Blueprints that are currently available to find in Arc Raiders, and the crafting recipe required for each item:
| Blueprint | Type | Recipe | Crafted At |
|---|---|---|---|
| Bettina | Weapon | 3x Advanced Mechanical Components 3x Heavy Gun Parts 3x Canister | Gunsmith 3 |
| Blue Light Stick | Quick Use | 3x Chemicals | Utility Station 1 |
| Aphelion | Weapon | 3x Magnetic Accelerator 3x Complex Gun Parts 1x Matriarch Reactor | Gunsmith 3 |
| Combat Mk. 3 (Flanking) | Augment | 2x Advanced Electrical Components 3x Processor | Gear Bench 3 |
| Combat Mk. 3 (Aggressive) | Augment | 2x Advanced Electrical Components 3x Processor | Gear Bench 3 |
| Complex Gun Parts | Material | 2x Light Gun Parts 2x Medium Gun Parts 2x Heavy Gun Parts | Refiner 3 |
| Fireworks Box | Quick Use | 1x Explosive Compound 3x Pop Trigger | Explosives Station 2 |
| Gas Mine | Mine | 4x Chemicals 2x Rubber Parts | Explosives Station 1 |
| Green Light Stick | Quick Use | 3x Chemicals | Utility Station 1 |
| Pulse Mine | Mine | 1x Crude Explosives 1x Wires | Explosives Station 1 |
| Seeker Grenade | Grenade | 1x Crude Explosives 2x ARC Alloy | Explosives Station 1 |
| Looting Mk. 3 (Survivor) | Augment | 2x Advanced Electrical Components 3x Processor | Gear Bench 3 |
| Angled Grip II | Mod | 2x Mechanical Components 3x Duct Tape | Gunsmith 2 |
| Angled Grip III | Mod | 2x Mod Components 5x Duct Tape | Gunsmith 3 |
| Hullcracker | Weapon | 1x Magnetic Accelerator 3x Heavy Gun Parts 1x Exodus Modules | Gunsmith 3 |
| Launcher Ammo | Ammo | 5x Metal Parts 1x Crude Explosives | Workbench 1 |
| Anvil | Weapon | 5x Mechanical Components 5x Simple Gun Parts | Gunsmith 2 |
| Anvil Splitter | Mod | 2x Mod Components 3x Processor | Gunsmith 3 |
| ??? | ??? | ??? | ??? |
| Barricade Kit | Quick Use | 1x Mechanical Components | Utility Station 2 |
| Blaze Grenade | Grenade | 1x Explosive Compound 2x Oil | Explosives Station 3 |
| Bobcat | Weapon | 3x Advanced Mechanical Components 3x Light Gun Parts | Gunsmith 3 |
| Osprey | Weapon | 2x Advanced Mechanical Components 3x Medium Gun Parts 7x Wires | Gunsmith 3 |
| Burletta | Weapon | 3x Mechanical Components 3x Simple Gun Parts | Gunsmith 1 |
| Compensator II | Mod | 2x Mechanical Components 4x Wires | Gunsmith 2 |
| Compensator III | Mod | 2x Mod Components 8x Wires | Gunsmith 3 |
| Defibrillator | Quick Use | 9x Plastic Parts 1x Moss | Medical Lab 2 |
| ??? | ??? | ??? | ??? |
| Equalizer | Weapon | 3x Magnetic Accelerator 3x Complex Gun Parts 1x Queen Reactor | Gunsmith 3 |
| Extended Barrel | Mod | 2x Mod Components 8x Wires | Gunsmith 3 |
| Extended Light Mag II | Mod | 2x Mechanical Components 3x Steel Spring | Gunsmith 2 |
| Extended Light Mag III | Mod | 2x Mod Components 5x Steel Spring | Gunsmith 3 |
| Extended Medium Mag II | Mod | 2x Mechanical Components 3x Steel Spring | Gunsmith 2 |
| Extended Medium Mag III | Mod | 2x Mod Components 5x Steel Spring | Gunsmith 3 |
| Extended Shotgun Mag II | Mod | 2x Mechanical Components 3x Steel Spring | Gunsmith 2 |
| Extended Shotgun Mag III | Mod | 2x Mod Components 5x Steel Spring | Gunsmith 3 |
| Remote Raider Flare | Quick Use | 2x Chemicals 4x Rubber Parts | Utility Station 1 |
| Heavy Gun Parts | Material | 4x Simple Gun Parts | Refiner 2 |
| Venator | Weapon | 2x Advanced Mechanical Components 3x Medium Gun Parts 5x Magnet | Gunsmith 3 |
| Il Toro | Weapon | 5x Mechanical Components 6x Simple Gun Parts | Gunsmith 1 |
| Jolt Mine | Mine | 1x Electrical Components 1x Battery | Explosives Station 2 |
| Explosive Mine | Mine | 1x Explosive Compound 1x Sensors | Explosives Station 3 |
| Jupiter | Weapon | 3x Magnetic Accelerator 3x Complex Gun Parts 1x Queen Reactor | Gunsmith 3 |
| Light Gun Parts | Material | 4x Simple Gun Parts | Refiner 2 |
| Lightweight Stock | Mod | 2x Mod Components 5x Duct Tape | Gunsmith 3 |
| Lure Grenade | Grenade | 1x Speaker Component 1x Electrical Components | Utility Station 2 |
| Medium Gun Parts | Material | 4x Simple Gun Parts | Refiner 2 |
| Torrente | Weapon | 2x Advanced Mechanical Components 3x Medium Gun Parts 6x Steel Spring | Gunsmith 3 |
| Muzzle Brake II | Mod | 2x Mechanical Components 4x Wires | Gunsmith 2 |
| Muzzle Brake III | Mod | 2x Mod Components 8x Wires | Gunsmith 3 |
| Padded Stock | Mod | 2x Mod Components 5x Duct Tape | Gunsmith 3 |
| Shotgun Choke II | Mod | 2x Mechanical Components 4x Wires | Gunsmith 2 |
| Shotgun Choke III | Mod | 2x Mod Components 8x Wires | Gunsmith 3 |
| Shotgun Silencer | Mod | 2x Mod Components 8x Wires | Gunsmith 3 |
| Showstopper | Grenade | 1x Advanced Electrical Components 1x Voltage Converter | Explosives Station 3 |
| Silencer I | Mod | 2x Mechanical Components 4x Wires | Gunsmith 2 |
| Silencer II | Mod | 2x Mod Components 8x Wires | Gunsmith 3 |
| Snap Hook | Quick Use | 2x Power Rod 3x Rope 1x Exodus Modules | Utility Station 3 |
| Stable Stock II | Mod | 2x Mechanical Components 3x Duct Tape | Gunsmith 2 |
| Stable Stock III | Mod | 2x Mod Components 5x Duct Tape | Gunsmith 3 |
| Tagging Grenade | Grenade | 1x Electrical Components 1x Sensors | Utility Station 3 |
| Tempest | Weapon | 3x Advanced Mechanical Components 3x Medium Gun Parts 3x Canister | Gunsmith 3 |
| Trigger Nade | Grenade | 2x Crude Explosives 1x Processor | Explosives Station 2 |
| Vertical Grip II | Mod | 2x Mechanical Components 3x Duct Tape | Gunsmith 2 |
| Vertical Grip III | Mod | 2x Mod Components 5x Duct Tape | Gunsmith 3 |
| Vita Shot | Quick Use | 2x Antiseptic 1x Syringe | Medical Lab 3 |
| Vita Spray | Quick Use | 3x Antiseptic 1x Canister | Medical Lab 3 |
| Vulcano | Weapon | 1x Magnetic Accelerator 3x Heavy Gun Parts 1x Exodus Modules | Gunsmith 3 |
| Wolfpack | Grenade | 2x Explosive Compound 2x Sensors | Explosives Station 3 |
| Red Light Stick | Quick Use | 3x Chemicals | Utility Station 1 |
| Smoke Grenade | Grenade | 14x Chemicals 1x Canister | Utility Station 2 |
| Deadline | Mine | 3x Explosive Compound 2x ARC Circuitry | Explosives Station 3 |
| Trailblazer | Grenade | 1x Explosive Compound 1x Synthesized Fuel | Explosives Station 3 |
| Tactical Mk. 3 (Defensive) | Augment | 2x Advanced Electrical Components 3x Processor | Gear Bench 3 |
| Tactical Mk. 3 (Healing) | Augment | 2x Advanced Electrical Components 3x Processor | Gear Bench 3 |
| Yellow Light Stick | Quick Use | 3x Chemicals | Utility Station 1 |
Note: The missing Blueprints in this list likely have not actually been added to the game at the time of writing, because none of the playerbase has managed to find any of them. As they are added to the game, I will update this page with the most relevant information so you know exactly how to get all 75 Arc Raiders Blueprints.
Where to find Blueprints in Arc Raiders
Below is a list of all containers, modifiers, and events which maximise your chances of finding Blueprints:
- Certain quests reward you with specific Blueprints .
- Completing Trials has a high chance of offering Blueprints as rewards.
- Surveyors have a decent chance of dropping Blueprints on death.
- High loot value areas tend to have a greater chance of spawning Blueprints.
- Night Raids and Storms may increase rare Blueprint spawn chances in containers.
- Containers with higher numbers of items may have a higher tendency to spawn Blueprints. As a result, Blue Gate (which has many “large” containers containing multiple items) may give you a higher chance of spawning Blueprints.
- Raider containers (Raider Caches, Weapon Boxes, Medical Bags, Grenade Tubes) have increased Blueprint drop rates. As a result, the Uncovered Caches event gives you a high chance of finding Blueprints.
- Security Lockers have a higher than average chance of containing Blueprints.
- Certain Blueprints only seem to spawn under specific circumstances: Tempest Blueprint only spawns during Night Raid events. Vulcano Blueprint only spawns during Hidden Bunker events. Jupiter and Equaliser Blueprints only spawn during Harvester events.

Raider Caches, Weapon Boxes, and other raider-oriented container types have a good chance of offering Blueprints. |Image credit:Rock Paper Shotgun/Embark Studios
Blueprints have a very low chance of spawning in any container in Arc Raiders, around 1-2% on average. However, there is a higher chance of finding Blueprints in particular container types. Specifically, you can find more Blueprints in Raider containers and security lockers.
Beyond this, if you’re looking for Blueprints you should focus on regions of the map which are marked as having particularly high-value loot. Areas such as the Control Tower in Dam Battlegrounds, the Arrival and Departure Buildings in Spaceport, and Pilgrim’s Peak in Blue Gate all have a better-than-average chance of spawning Blueprints somewhere amongst all their containers. Night Raids and Electromagnetic Storm events also increase the drop chances of certain Blueprints .
In addition to these containers, you can often loot Blueprints from destroyed Surveyors - the largest of the rolling ball ARC. Surveyors are more commonly found on the later maps - Spaceport and Blue Gate - and if one spawns in your match, you’ll likely see it by the blue laser beam that it casts into the sky while “surveying”.
Surveyors are quite well-armoured and will very speedily run away from you once it notices you, but if you can take one down then make sure you loot all its parts for a chance of obtaining certain unusual Blueprints.
Blueprints obtained from quests
One way in which you can get Blueprints is by completing certain quests for the vendors in Speranza. Some quests will reward you with a specific item Blueprint upon completion, so as long as you work through all the quests in Arc Raiders, you are guaranteed those Blueprints.
Here is the full list of all Blueprints you can get from quest rewards:
- Trigger Nade Blueprint: Rewarded after completing “Sparks Fly”.
- Lure Grenade Blueprint: Rewarded after completing “Greasing Her Palms”.
- Burletta Blueprint: Rewarded after completing “Industrial Espionage”.
- Hullcracker Blueprint (and Launcher Ammo Blueprint): Rewarded after completing “The Major’s Footlocker”.
Alas, that’s only 4 Blueprints out of a total of 75 to unlock, so for the vast majority you will need to find them yourself during a raid. If you’re intent on farming Blueprints, then it’s best to equip yourself with cheap gear in case you lose it, but don’t use a free loadout because then you won’t get a safe pocket to stash any new Blueprint you find. No pain in Arc Raiders is sharper than failing to extract with a new Blueprint you’ve been after for a dozen hours already.

One of the best ways to get Blueprints is by hitting three stars on all five Trials every week. |Image credit:Rock Paper Shotgun/Embark Studios
Blueprints obtained from Trials
One of the very best ways to get Blueprints is as rewards for completing Trials in Arc Raiders. Trials are unlocked from Level 15 onwards, and allow you to earn rewards by focusing on certain tasks over the course of several raids. For example, one Trial might task you with dealing damage to Hornets, while another might challenge you to loot Supply Drops.
Trials refresh on a weekly basis, with a new week bringing five new Trials. Each Trial can offer up to three rewards after passing certain score milestones, and it’s possible to receive very high level loot from these reward crates - including Blueprints. So if you want to unlock as many Blueprints as possible, you should make a point of completing as many Trials as possible each week.
Best Blueprint farming locations
The very best way to get Blueprints is to frequent specific areas of the maps which combine high-tier loot pools with the right types of containers to search. Here are my recommendations for where to find Blueprints on every map, so you can always keep the search going for new crafting recipes to unlock.

Image credit:Rock Paper Shotgun/Embark Studios
Dam Battlegrounds
The best places to farm Blueprints on Dam Battlegrounds are the Control Tower, Power Generation Complex, Ruby Residence, and Pale Apartments . The first two regions, despite only being marked on the map as mid-tier loot, contain a phenomenal number of containers to loot. The Control Tower can also contain a couple of high-tier Security Lockers - though of course, you’ll need to have unlocked the Security Breach skill at the end of the Survival tree.
There’s also a lot of reporting amongst the playerbase that the Residential areas in the top-left of the map - Pale Apartments and Ruby Residence - give you a comparatively strong chance of finding Blueprints. Considering their size, there’s a high density of containers to loot in both locations, and they also have the benefit of being fairly out of the way. So you’re more likely to have all the containers to yourself.
Buried City
The best Blueprint farming locations on Buried City are the Santa Maria Houses, Grandioso Apartments, Town Hall, and the various buildings of the New District . Grandioso Apartments has a lower number of containers than the rest, but a high chance of spawning weapon cases - which have good Blueprint drop rates. The others are high-tier loot areas, with plenty of lootable containers - including Security Lockers.
Spaceport
The best places to find Blueprints on Spaceport are the Arrival and Departure Buildings, as well as Control Tower A6 and the Launch Towers . All these areas are labelled as high-value loot regions, and many of them are also very handily connected to one another by the Spaceport wall, which you can use to quickly run from one area to the next. At the tops of most of these buildings you’ll find at least one Security Locker, so this is an excellent farming route for players looking to find Blueprints.
The downside to looting Blueprints on Spaceport is that all these areas are hotly contested, particularly in Duos and Squads. You’ll need to be very focused and fast in order to complete the full farming route.

Image credit:Rock Paper Shotgun/Embark Studios
Blue Gate
Blue Gate tends to have a good chance of dropping Blueprints, potentially because it generally has a high number of containers which can hold lots of items; so there’s a higher chance of a Blueprint spawning in each container. In my experience, the best Blueprint farming spots on Blue Gate are Pilgrim’s Peak, Raider’s Refuge, the Ancient Fort, and the Underground Complex beneath the Warehouse .
All of these areas contain a wealth of containers to loot. Raider’s Refuge has less to loot, but the majority of the containers in and around the Refuge are raider containers, which have a high chance of containing Blueprints - particularly during major events.
Stella Montis
On the whole, Stella Montis seems to have a very low drop rate for Blueprints (though a high chance of dropping other high-tier loot). If you do want to try farming Blueprints on this map, the best places to find Blueprints in Stella Montis are Medical Research, Assembly Workshop, and the Business Center . These areas have the highest density of containers to loot on the map.
In addition to this, the Western Tunnel has a few different Security Lockers to loot, so while there’s very little to loot elsewhere in this area of the map, it’s worth hitting those Security Lockers if you spawn there at the start of a match.
That wraps up this primer on how to get all the Blueprints in Arc Raiders as quickly as possible. With the Expedition system constantly resetting a large number of players’ Blueprints, it’s more important than ever to have the most up-to-date information on where to find all these Blueprints.
While you’re here, be sure to check out our Arc Raiders best guns tier list , as well as our primers on the best skills to unlock and all the different Field Depot locations on every map.


ARC Raiders
PS5 , Xbox Series X/S , PC
Rock Paper Shotgun is better when you sign in
Sign in and join us on our journey to discover strange and compelling PC games.
