Doom: The Dark Ages - All Village Of Khalim secrets (Chapter 1)
Uncover all 6 secret area locations hidden in Chapter 1

Image credit:Rock Paper Shotgun/Bethesda

Looking for all the secret areas in Chapter 1 of Doom: The Dark Ages? 2025’s new techno-medieval Doom campaign is divided into 22 chapters, with all players starting in the Village Of Khalim as they get to grips with the Slayer’s destructive powers once more. All of Doom’s chapters have various hidden secrets housing important collectibles and other goodies, and Chapter 1 is no exception, with 6 secret areas in total to discover.
We’ve spent hours carefully plotting the quickest path through the Village Of Khalim to find all 6 secrets within. In this guide, you can find a detailed map of all secret areas , as well as descriptions of each secret location, the solution to each puzzle, and the hidden rewards you’ll find inside each one. We’ve designed this walkthrough to be your ideal companion as you blitz through Chapter 1 of Doom: The Dark Ages at breakneck speed. So if you want to ensure you don’t miss a single thing, read on for everything you need to find all 6 secrets in Village Of Khalim .
| Find a different chapter’s secrets! |
|---|
| Previous: None |
| Click to show all chapters |
| Chapter 1 |
| Chapter 2 |
| Chapter 3 (no secrets) |
| Chapter 4 |
| Chapter 5 |
| Chapter 6 |
| Chapter 7 |
| Chapter 8 |
| Chapter 9 |
| Chapter 10 |
| Chapter 11 |
| Doom: The Dark Ages secrets walkthrough hub |
All Village Of Khalim secrets (Chapter 1)
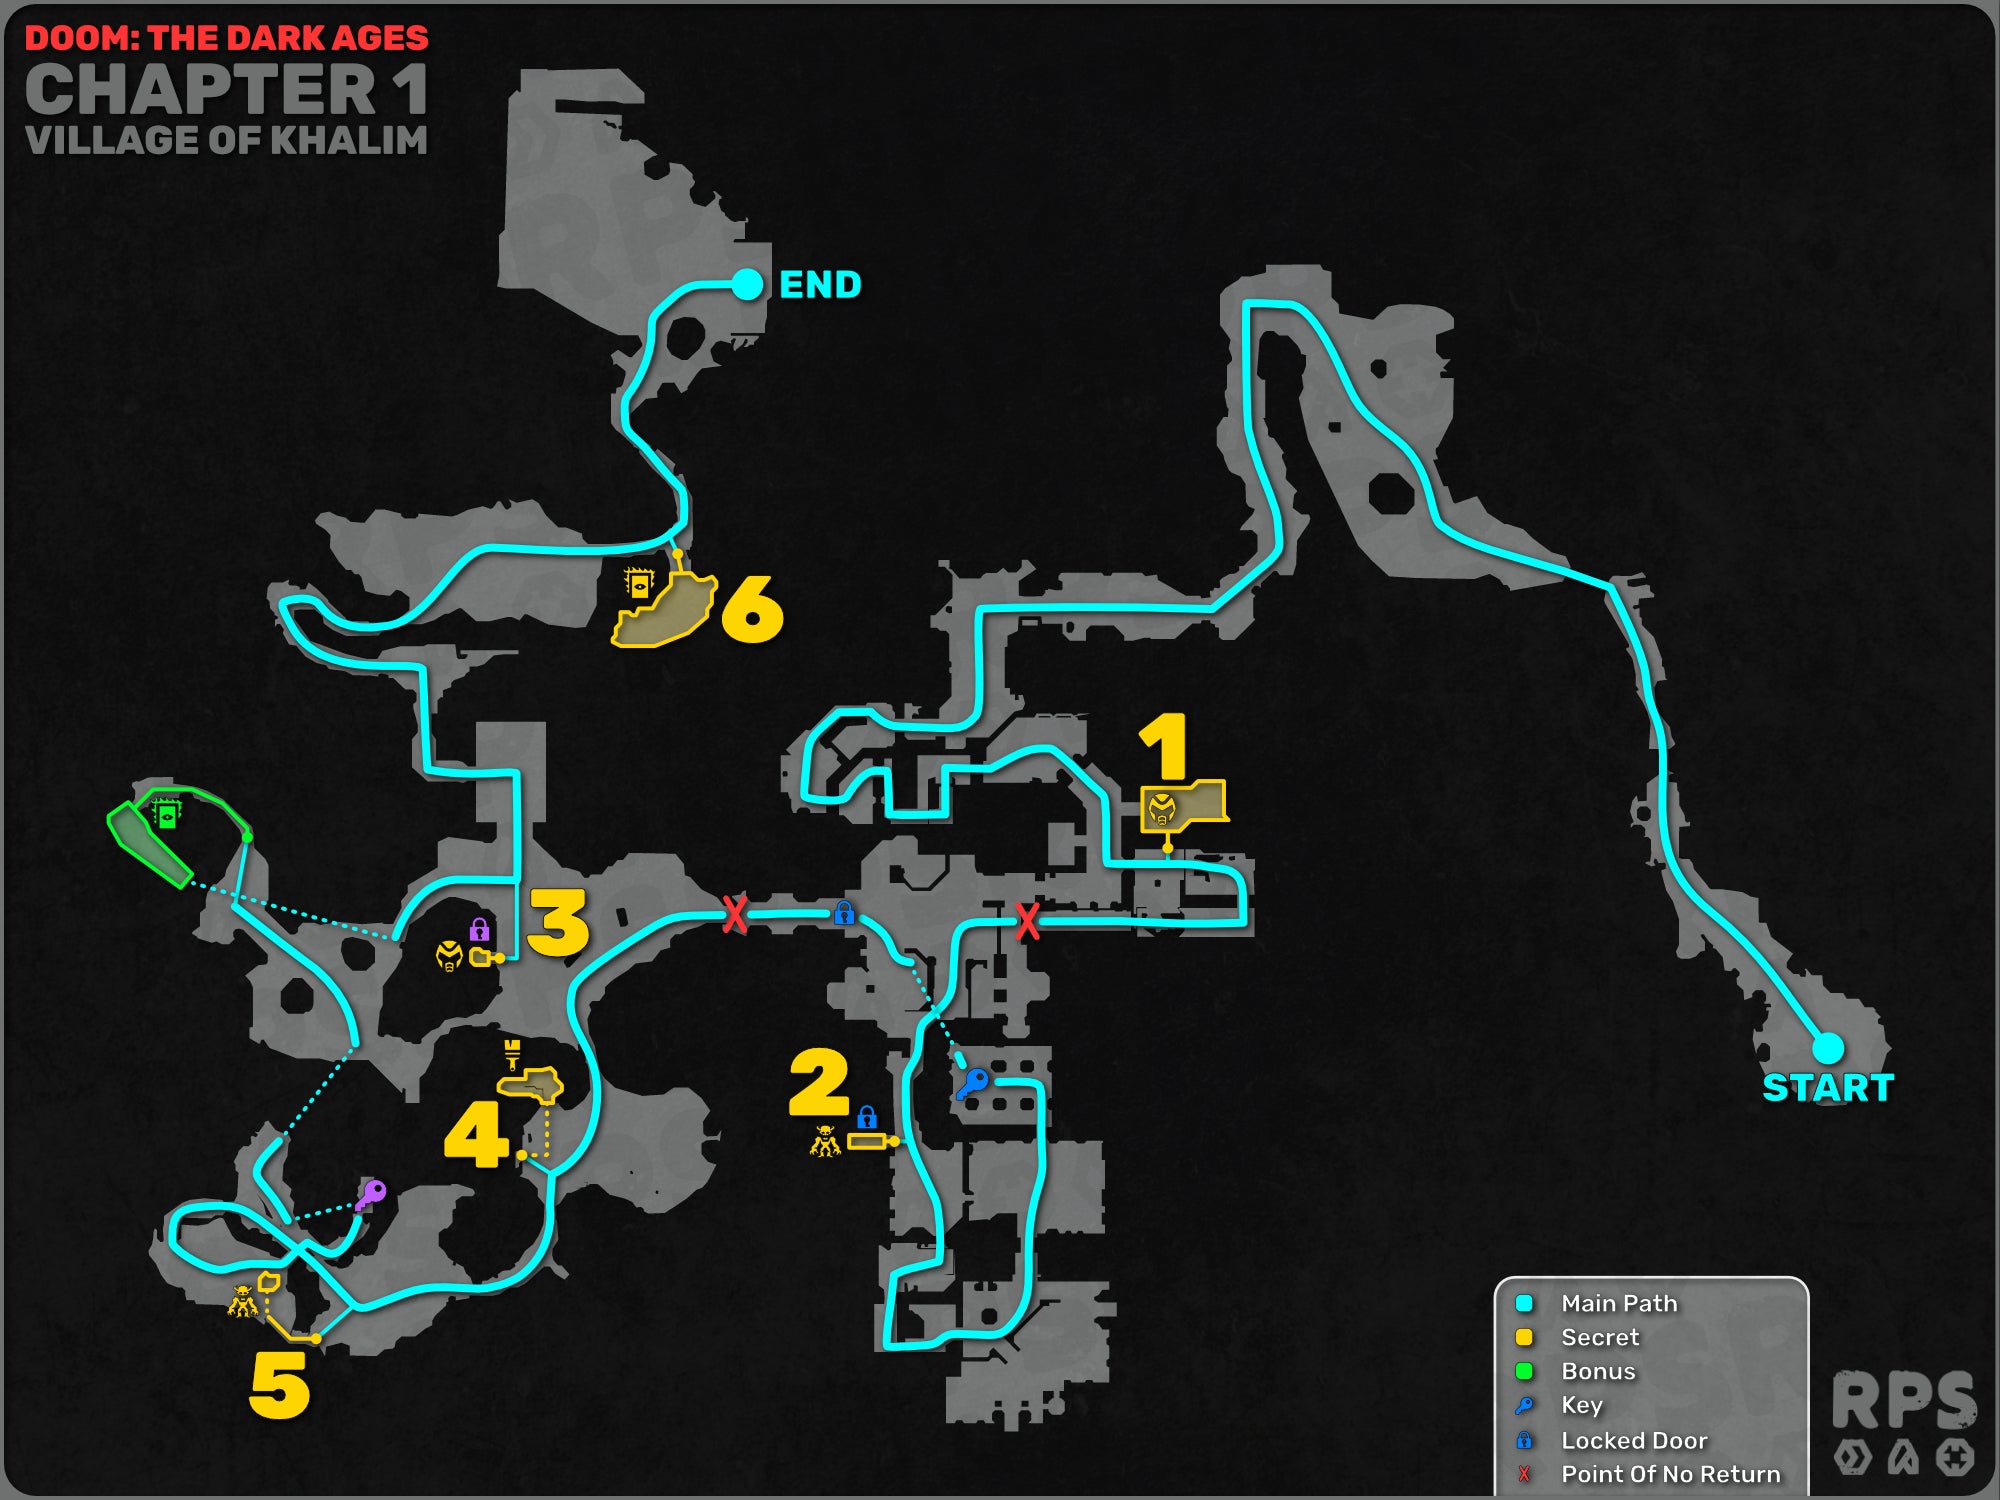
Click to view in full resolution.|Image credit:Rock Paper Shotgun/MapGenie
Here’s where you can find all 6 secrets in Village Of Khalim, the first chapter of Doom: The Dark Ages (as well as a bonus collectible area), and tick each of them off the list once you’ve discovered them:
| Secret | Location | Reward | Found? |
|---|---|---|---|
| Secret 1 | Breakable wall past Gauntlet unlock | Life Sigil | |
| “Point Of No Return” 1 | |||
| Secret 2 | Blue Key door | Imp Toy | |
| “Point Of No Return” 2 | |||
| Secret 3 | Secret Key door | Life Sigil | |
| Secret 4 | Hidden cave by locked gate | Nightmare skin (Shotgun) | |
| Secret 5 | Lower ledge near Shredder unlock | Soldier Toy | |
| Bonus 1 | On the ledge behind the far back Demonic Portal | Doom Slayer Codex | |
| Secret 6 | Up a climbable wall on the beach | Village Of Khalim Codex |
You can consult the map above for a simple step-by-step guide through the level where you can easily find all 6 secrets along the way. For more information on the location of each secret area and how to reach them, read on for a full walkthrough of all Chapter 1’s secrets.
Secret 1: Breakable wall past Gauntlet unlock (Life Sigil)
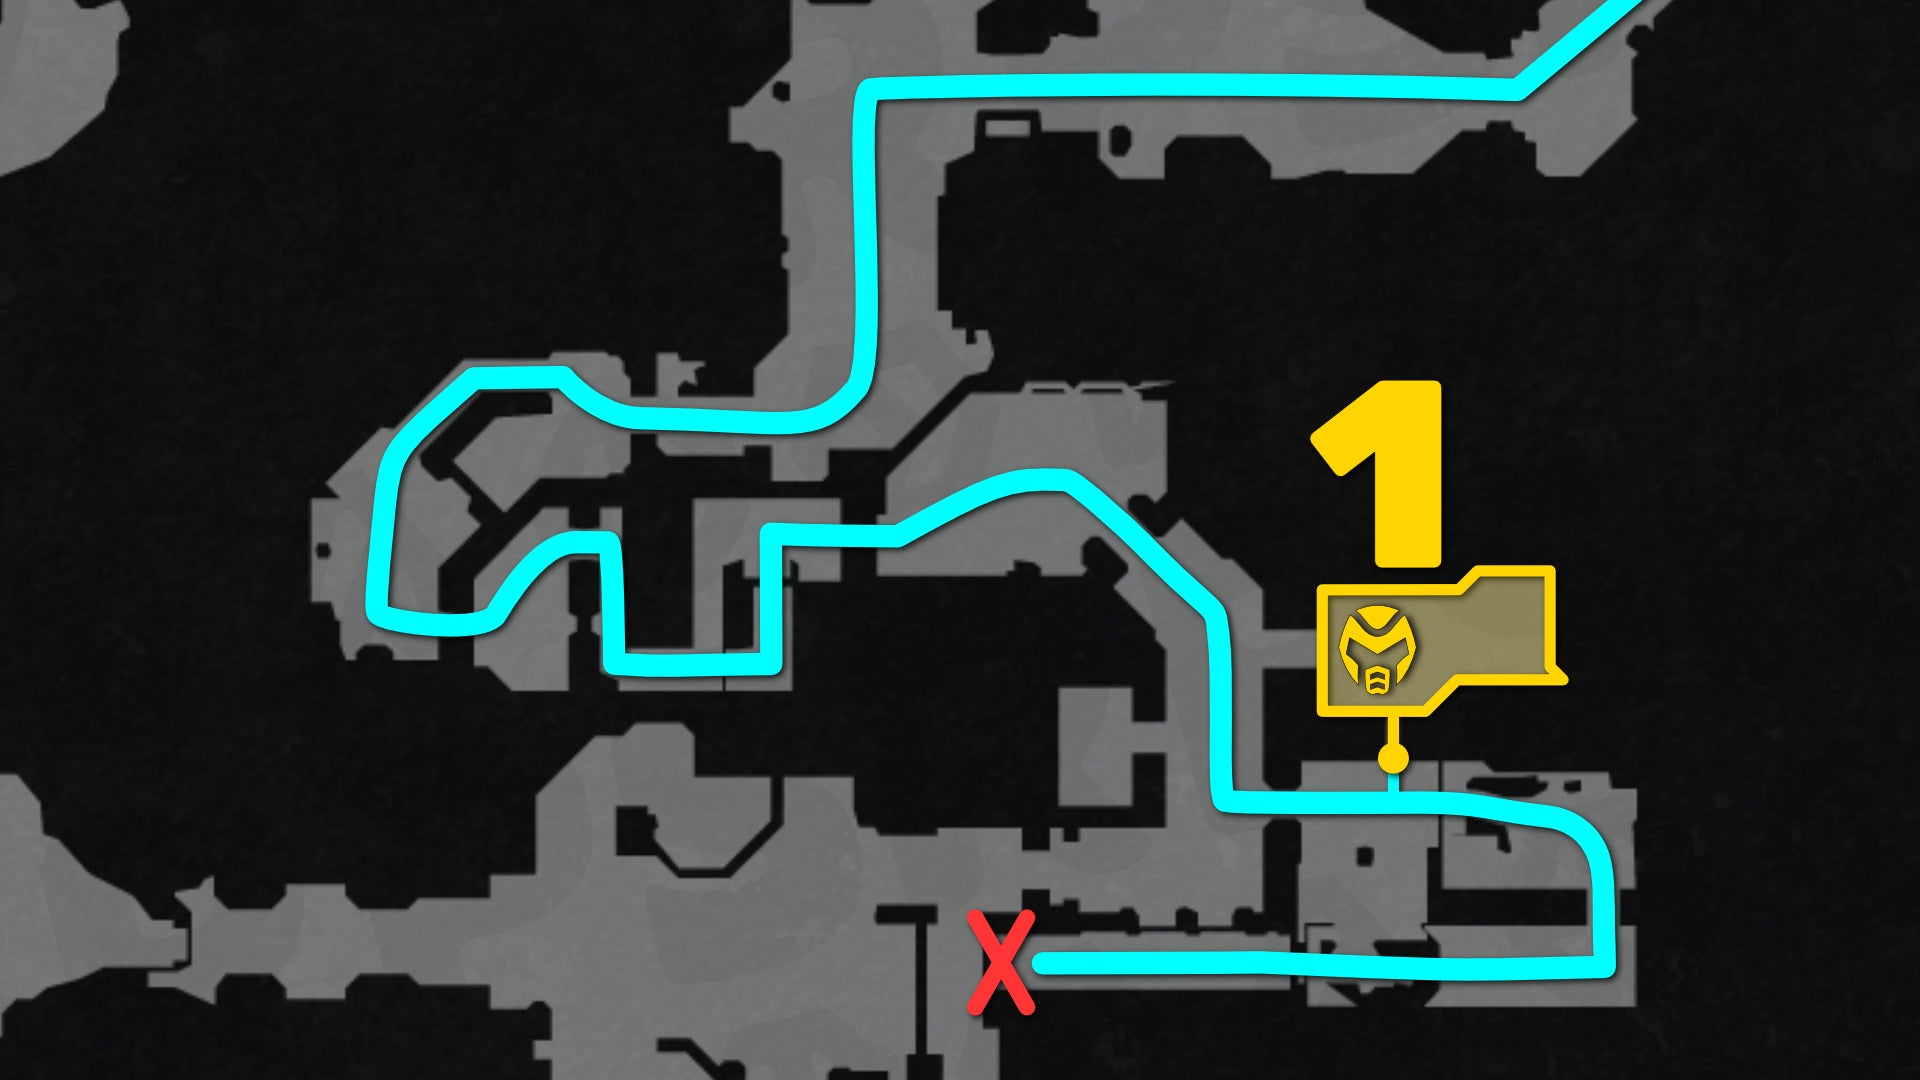
Image credit:Rock Paper Shotgun/MapGenie/Bethesda

Image credit:Rock Paper Shotgun/Bethesda

Image credit:Rock Paper Shotgun/Bethesda

Image credit:Rock Paper Shotgun/Bethesda

Image credit:Rock Paper Shotgun/Bethesda
- Location: In the burning room just beyond where you find the Power Gauntlet.
- Solution: Shield Charge through the breakable wall section.
- Reward: Life Sigil
To find this first secret, progress linearly through the chapter until you unlock the Power Gauntlet melee weapon (you can’t miss it). Proceed through the next doorway into a courtyard with four persistent “melee charge” Gauntlet pickups. Once you’ve killed the demons, head into the burning indoor room, and you’ll see a breakable wooden wall on your left.
Break through the wall with a Shield Charge: aim at it with RMB until you’re locked onto the wall and the reticle turns red; then click LMB to Shield Charge through into the secret area. In this secret area you’ll find your first Life Sigil, as well as an armor pickup.
Secret 2: Blue Key door (Toy)

Image credit:Rock Paper Shotgun/MapGenie/Bethesda

Image credit:Rock Paper Shotgun/Bethesda

Image credit:Rock Paper Shotgun/Bethesda

Image credit:Rock Paper Shotgun/Bethesda

Image credit:Rock Paper Shotgun/Bethesda
- Location: In the left-hand alleyway just after the first “Point Of No Return”.
- Solution: Collect the Blue Key from the nearby cultist room, then return to this door.
- Reward: “Imp” Toy
The next Chapter 1 secret is beyond the first “Point Of No Return”. Once you’ve jumped down and cleared the area of that initial wave of demons, you’ll see a large gate which you need the Blue Key to unlock. Follow the quest marker to the adjacent demon-filled alleyway on your left. In this alleyway, there’s another much smaller door barred by the Blue Key. This is the secret area. So all you need is to find the Blue Key, then return to this point!
The Blue Key can’t be missed; it’s just a little bit beyond where you are currently. Shield Charge through the breakable wall and follow this route through another wave of demons and a fight with a Pinky Rider. Climb the wall beyond the Pinky Rider into a room filled with praying cultists (who you can kill to get an achievement, by the way). The Blue Key is found at the end of this room.
Now you can retrace your steps and open the smaller of the two Blue Key doors to access the secret area beyond, and earn your first Demon Toy (an Imp) for your trouble!
Secret 3: Secret Key door (Life Sigil)
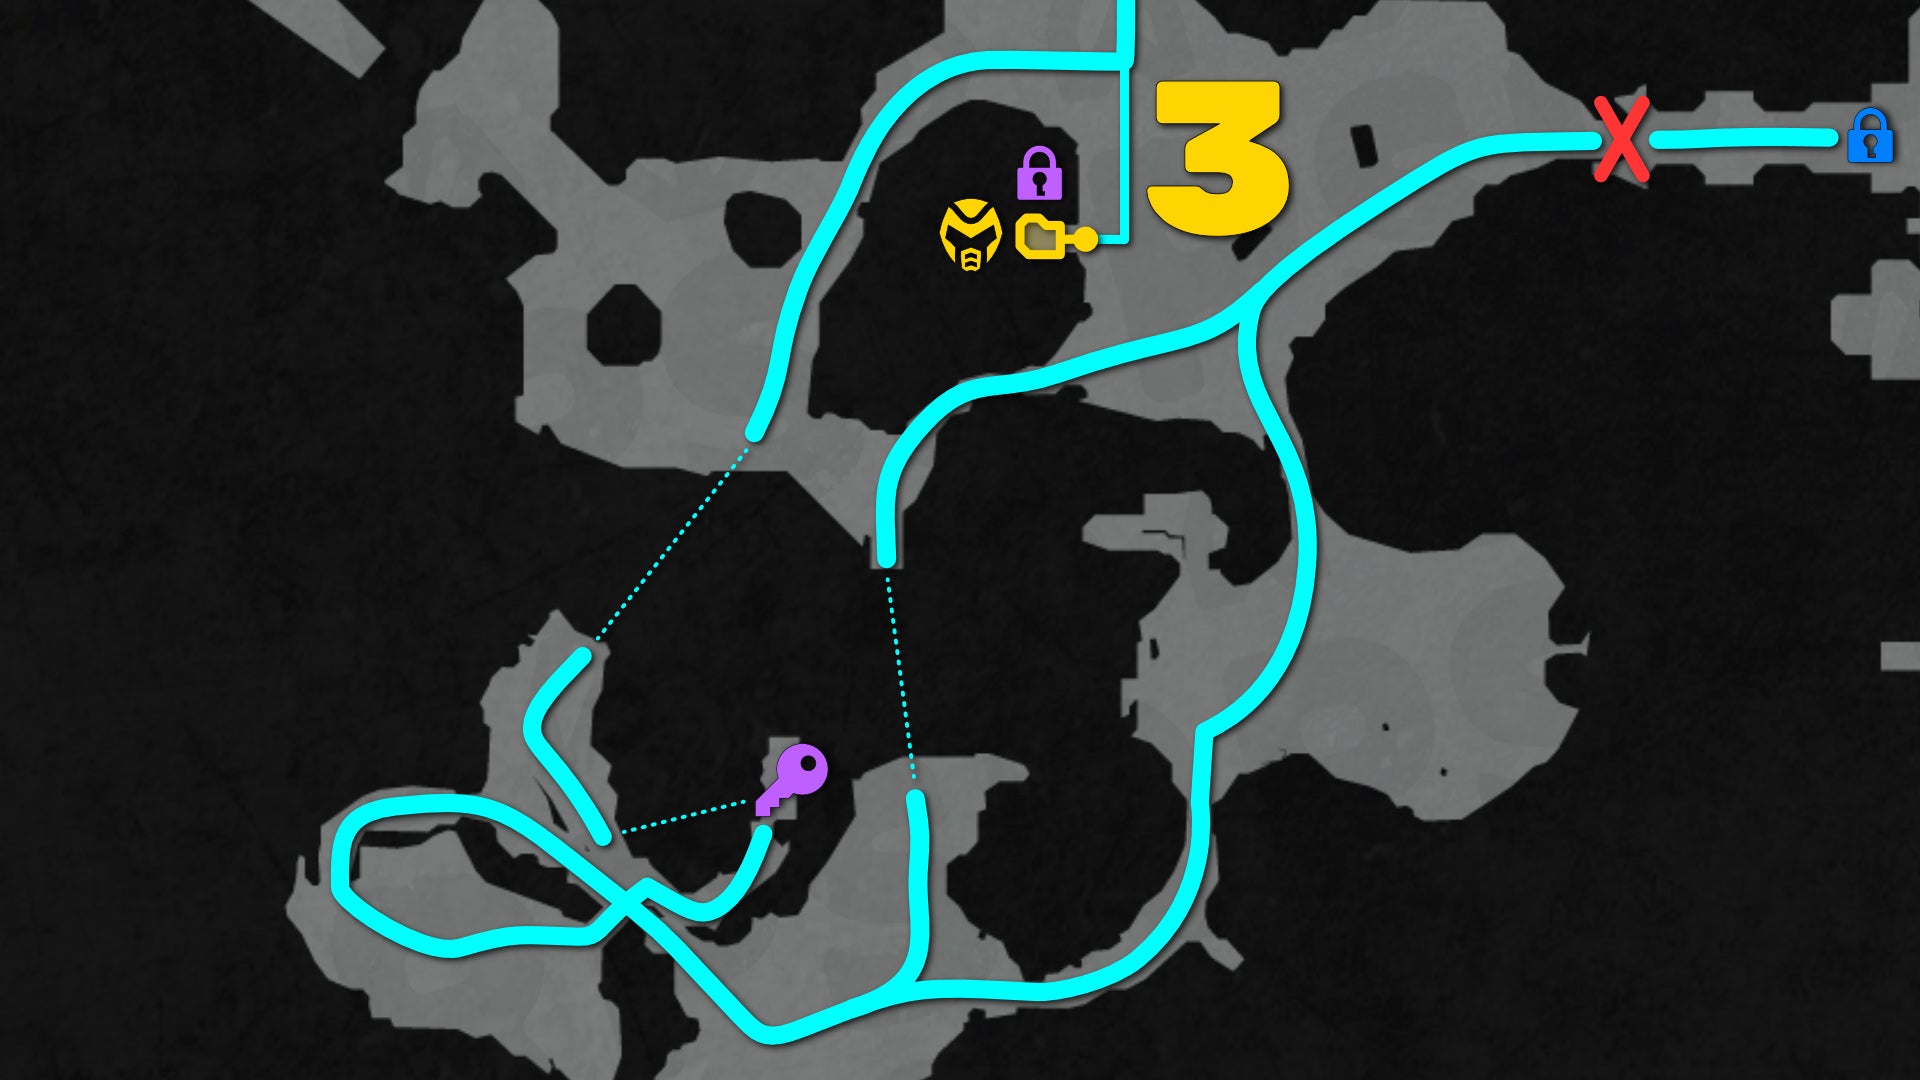
Image credit:Rock Paper Shotgun/MapGenie/Bethesda

Image credit:Rock Paper Shotgun/Bethesda

Image credit:Rock Paper Shotgun/Bethesda

Image credit:Rock Paper Shotgun/Bethesda

Image credit:Rock Paper Shotgun/Bethesda
- Location: Next to the first of the four Demonic Portals.
- Solution: Collect the Secret Key from the upper cliffs in the area beyond.
- Reward: Life Sigil
It’s pretty much impossible to miss this secret area, as it’s guarded by a door with a glowing purple seal indicating that you need to find the “Secret Key” first. The door in question is in the arena just beyond the Blue Key gate, next to the first of the four Demonic Portals you must destroy.
The Secret Key is atop the cliffs in the area beyond - you can access it either by taking the left-most path all the way around to the Shredder unlock, or walk down the path immediately left of the Secret Key door, and use the jump pad to reach that same area. From there, head up the cliff path and destroy the next Demonic Portal, then cross the wooden bridge and take the right-hand path to collect the Secret Key on the edge of the cliff.
Once you’ve done that, you can return to the Secret Key door to open it, and collect the Life Sigil housed within this secret area.
Secret 4: Hidden cave by locked gate (Skin)
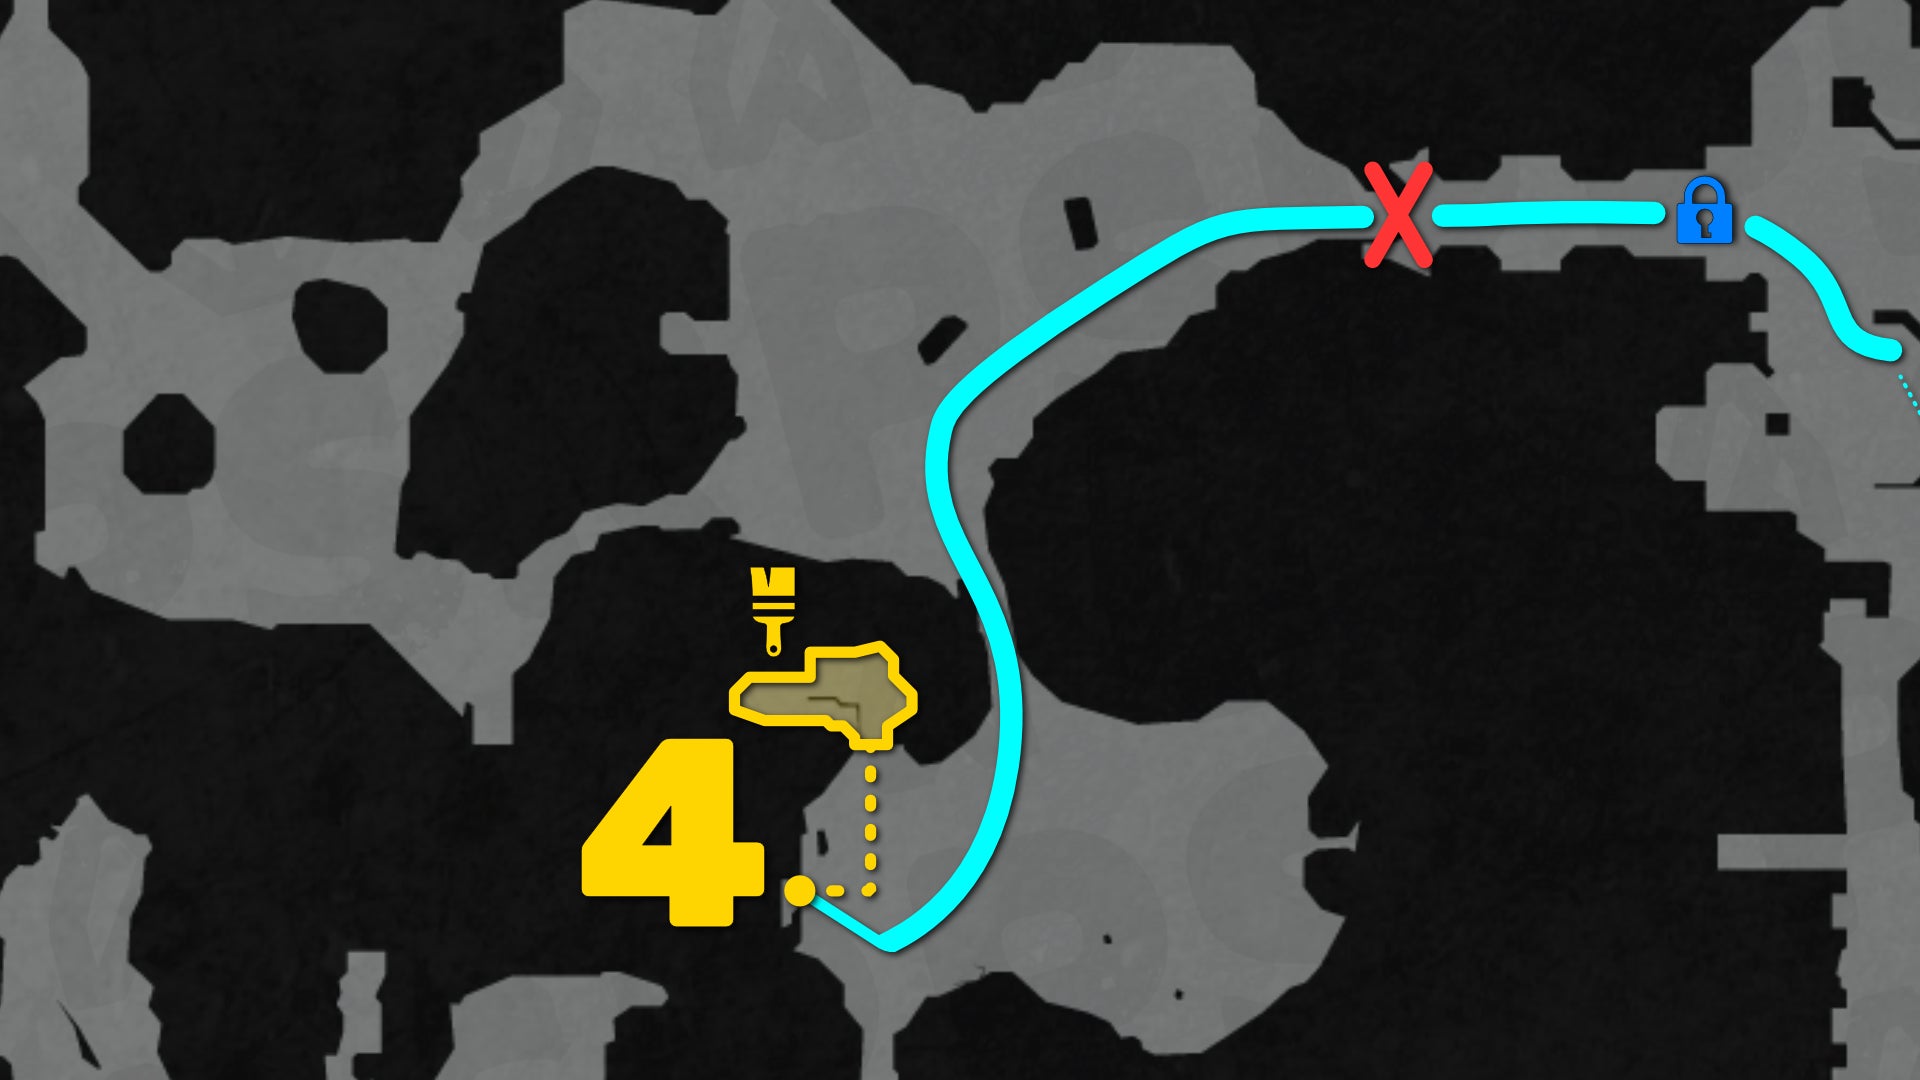
Image credit:Rock Paper Shotgun/MapGenie/Bethesda

Image credit:Rock Paper Shotgun/Bethesda

Image credit:Rock Paper Shotgun/Bethesda

Image credit:Rock Paper Shotgun/Bethesda

Image credit:Rock Paper Shotgun/Bethesda
- Location: By the locked gate in the left-hand Demonic Portal area.
- Solution: Drop off the cliff edge by the river, and grab the ledge below.
- Reward: “Nightmare” Skin for Combat Shotgun
To reach this secret, progress to the section of Chapter 1 where your task is to destroy the 4 Demonic Portals. The first is just beyond the Blue Key gate. After that, take the leftmost route and destroy the next Demonic Portal.
In this area, there’s a locked gate you can’t get through, with various goodies behind it. Next to this gate is a cliff edge that overlooks a river. Jump off the cliff edge but keep as close to the cliff wall as possible - there’s a ledge lower down which you can grab onto.
This ledge leads into the third secret area: a small cave littered with explosives, containing a collectible Skin for your Combat Shotgun. As you approach, the Toy will be locked off and a few demons will spawn, but you can kill them all with a single shot to any of the handily placed explosives.
After that, pick up your “Nightmare” Combat Shotgun Skin, and then use the bounce pad in the next room to reach the other side of that locked gate you saw earlier. Collect the various pickups if you wish, and approach the gate to unlock it and continue on your journey.
Secret 5: Lower ledge near Shredder unlock (Toy)
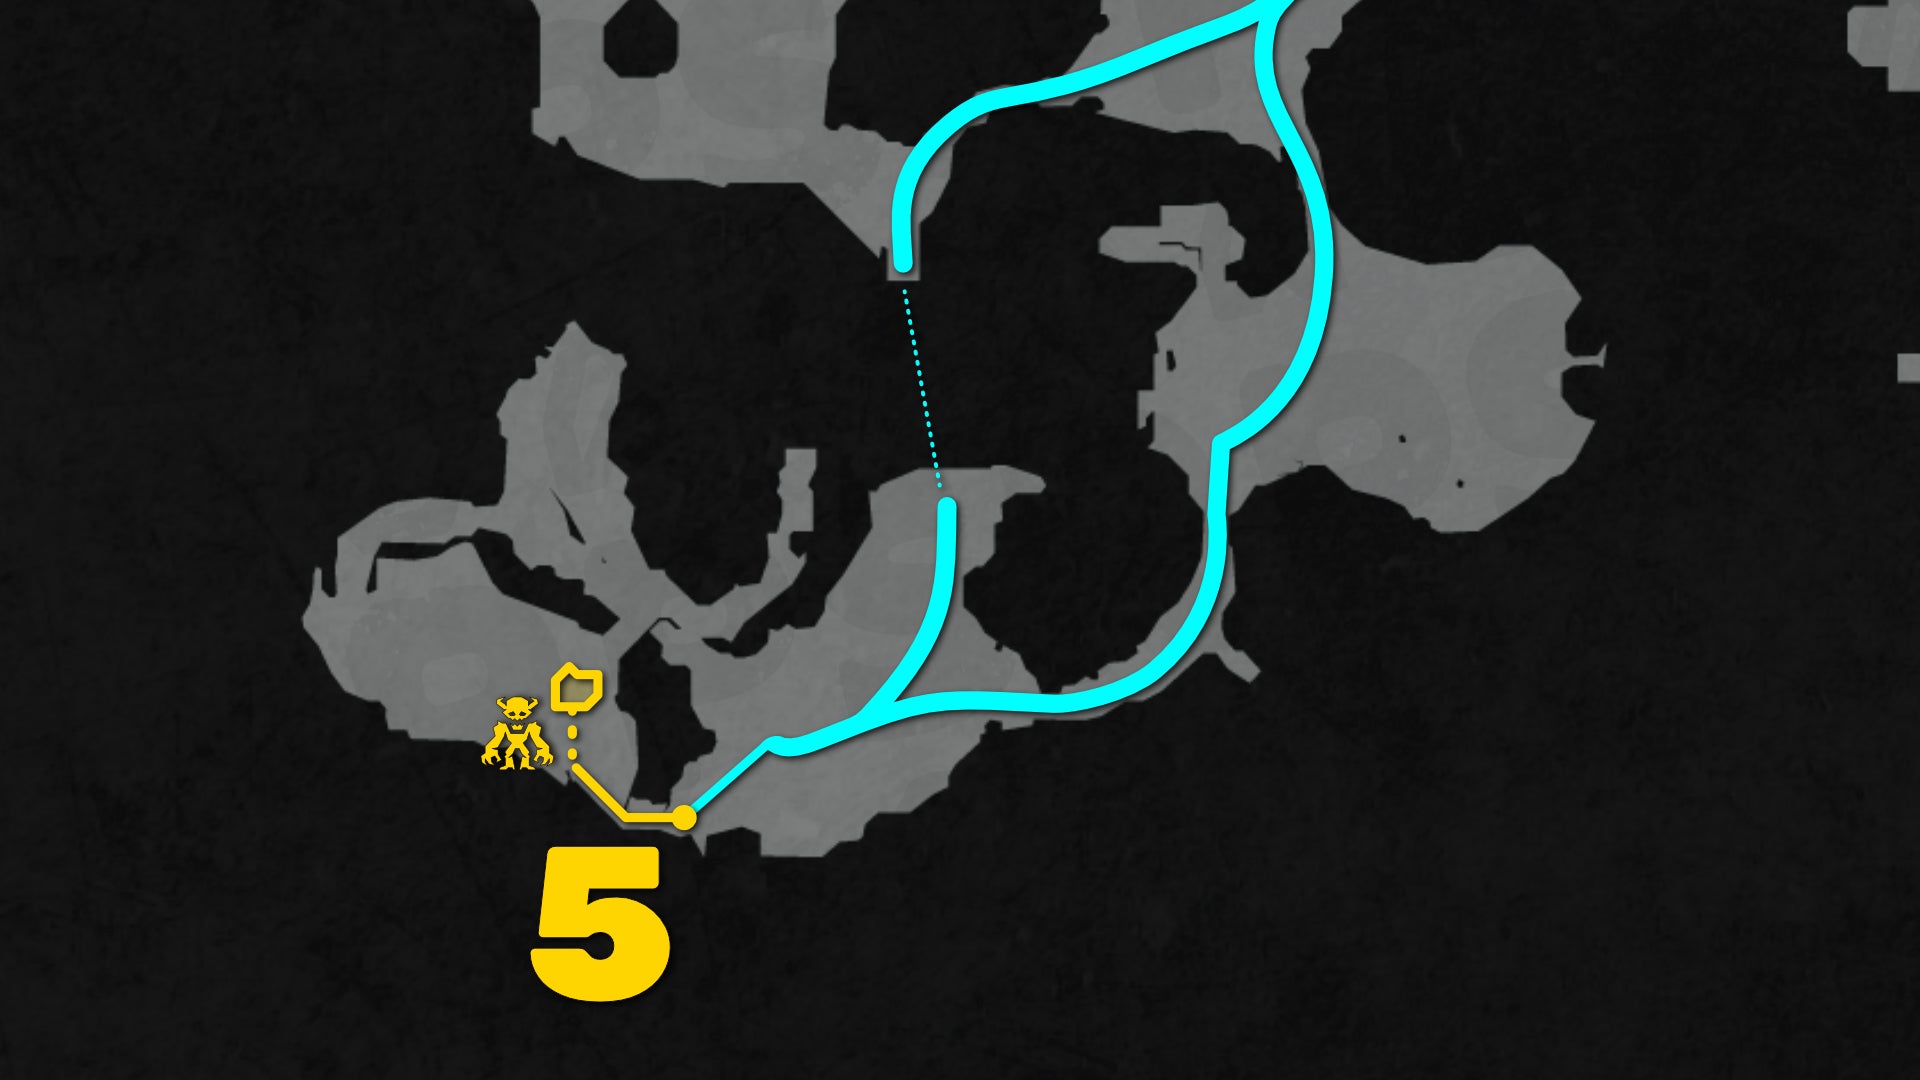
Image credit:Rock Paper Shotgun/MapGenie/Bethesda

Image credit:Rock Paper Shotgun/Bethesda

Image credit:Rock Paper Shotgun/Bethesda
- Location: In the third Demonic Portal area, where you unlock the Shredder weapon.
- Solution: Drop off the edge overlooking the water and follow the lower path.
- Reward: “Soldier” Toy
From the left-most of the four Demonic Portals, continue on into the adjoining corridor, which fills with Imps as you enter. Dispatch the Imps, then head into the next area to find your new weapon: the Rail Spike Shredder.
Kill the demons that appear after picking up the Shredder, and then return to the Shredder pickup point. Very nearby is a section of broken fence that separates you from the sea. Drop down here onto the ledge below, and follow the path around to the fifth secret area containing the “Soldier” Toy and various more ephemeral pickups.
Bonus: “Doom Slayer” Codex
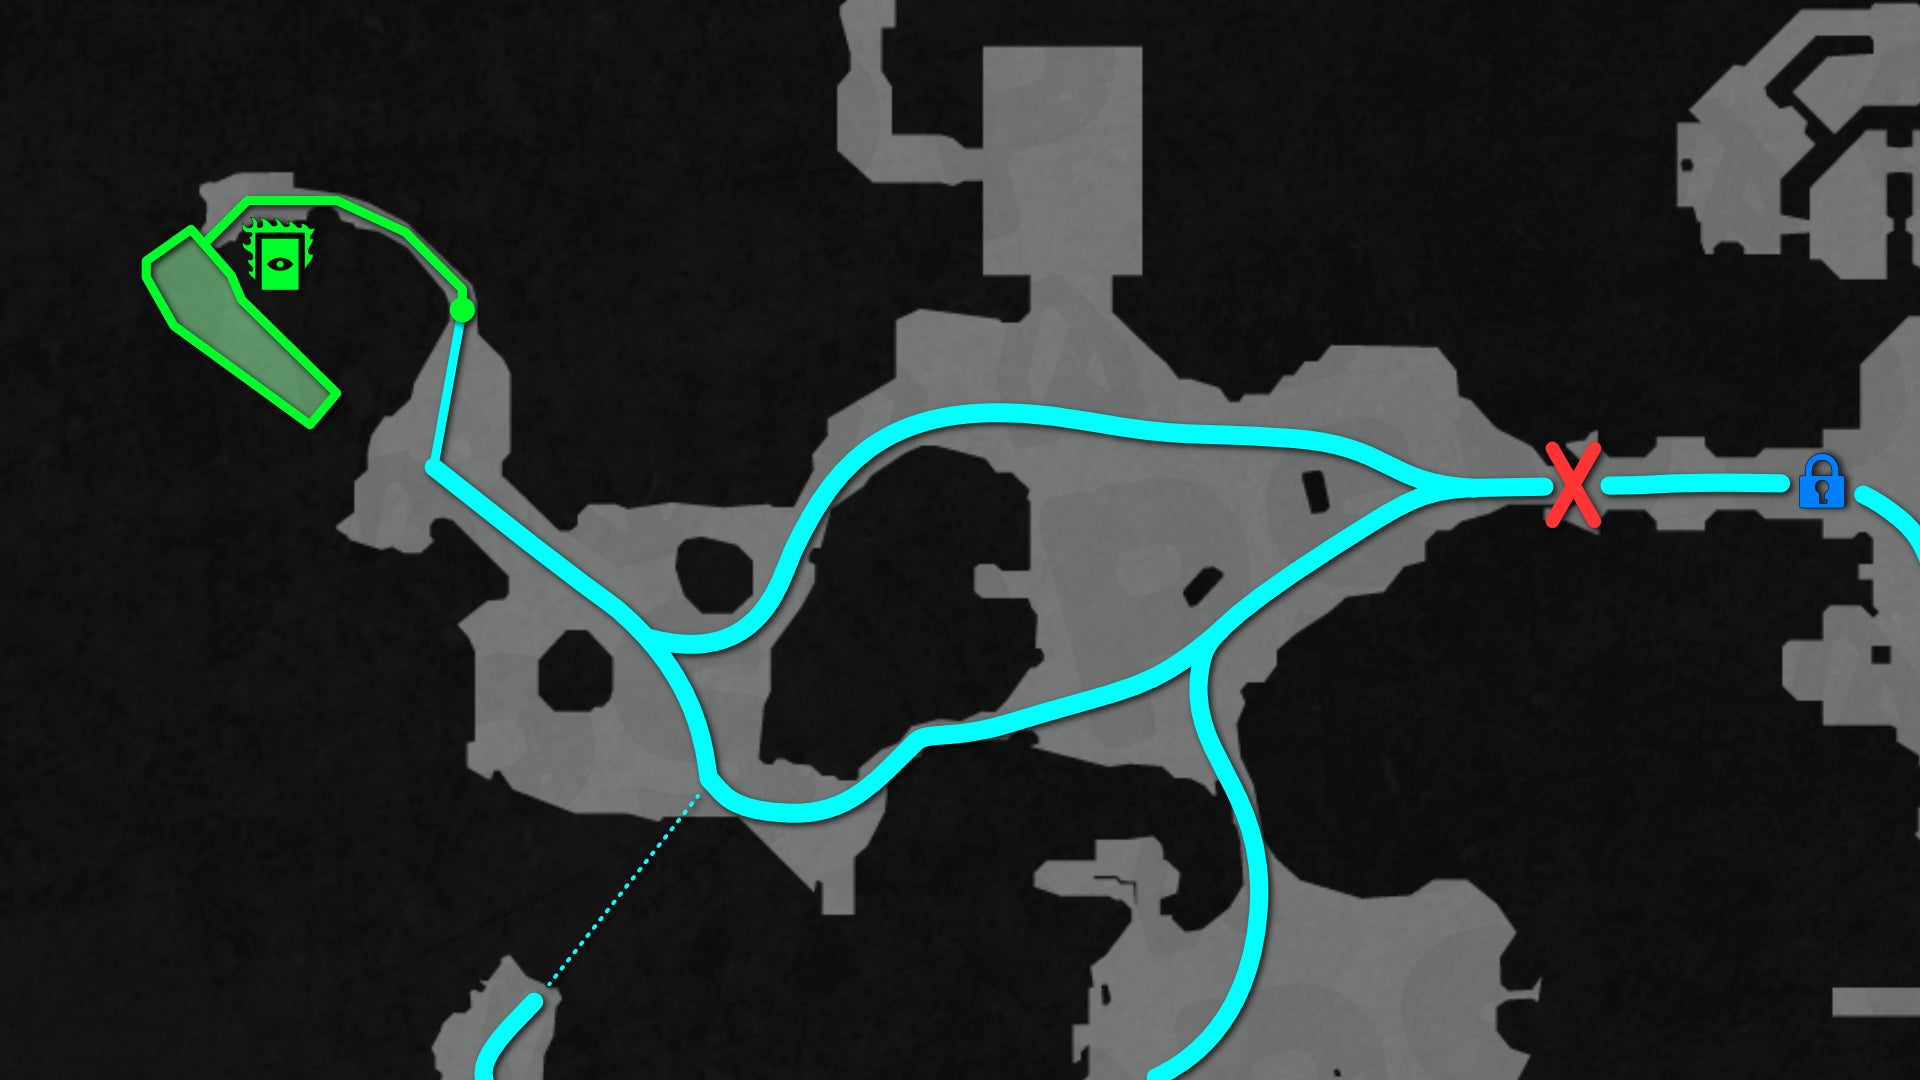
Image credit:Rock Paper Shotgun/MapGenie/Bethesda
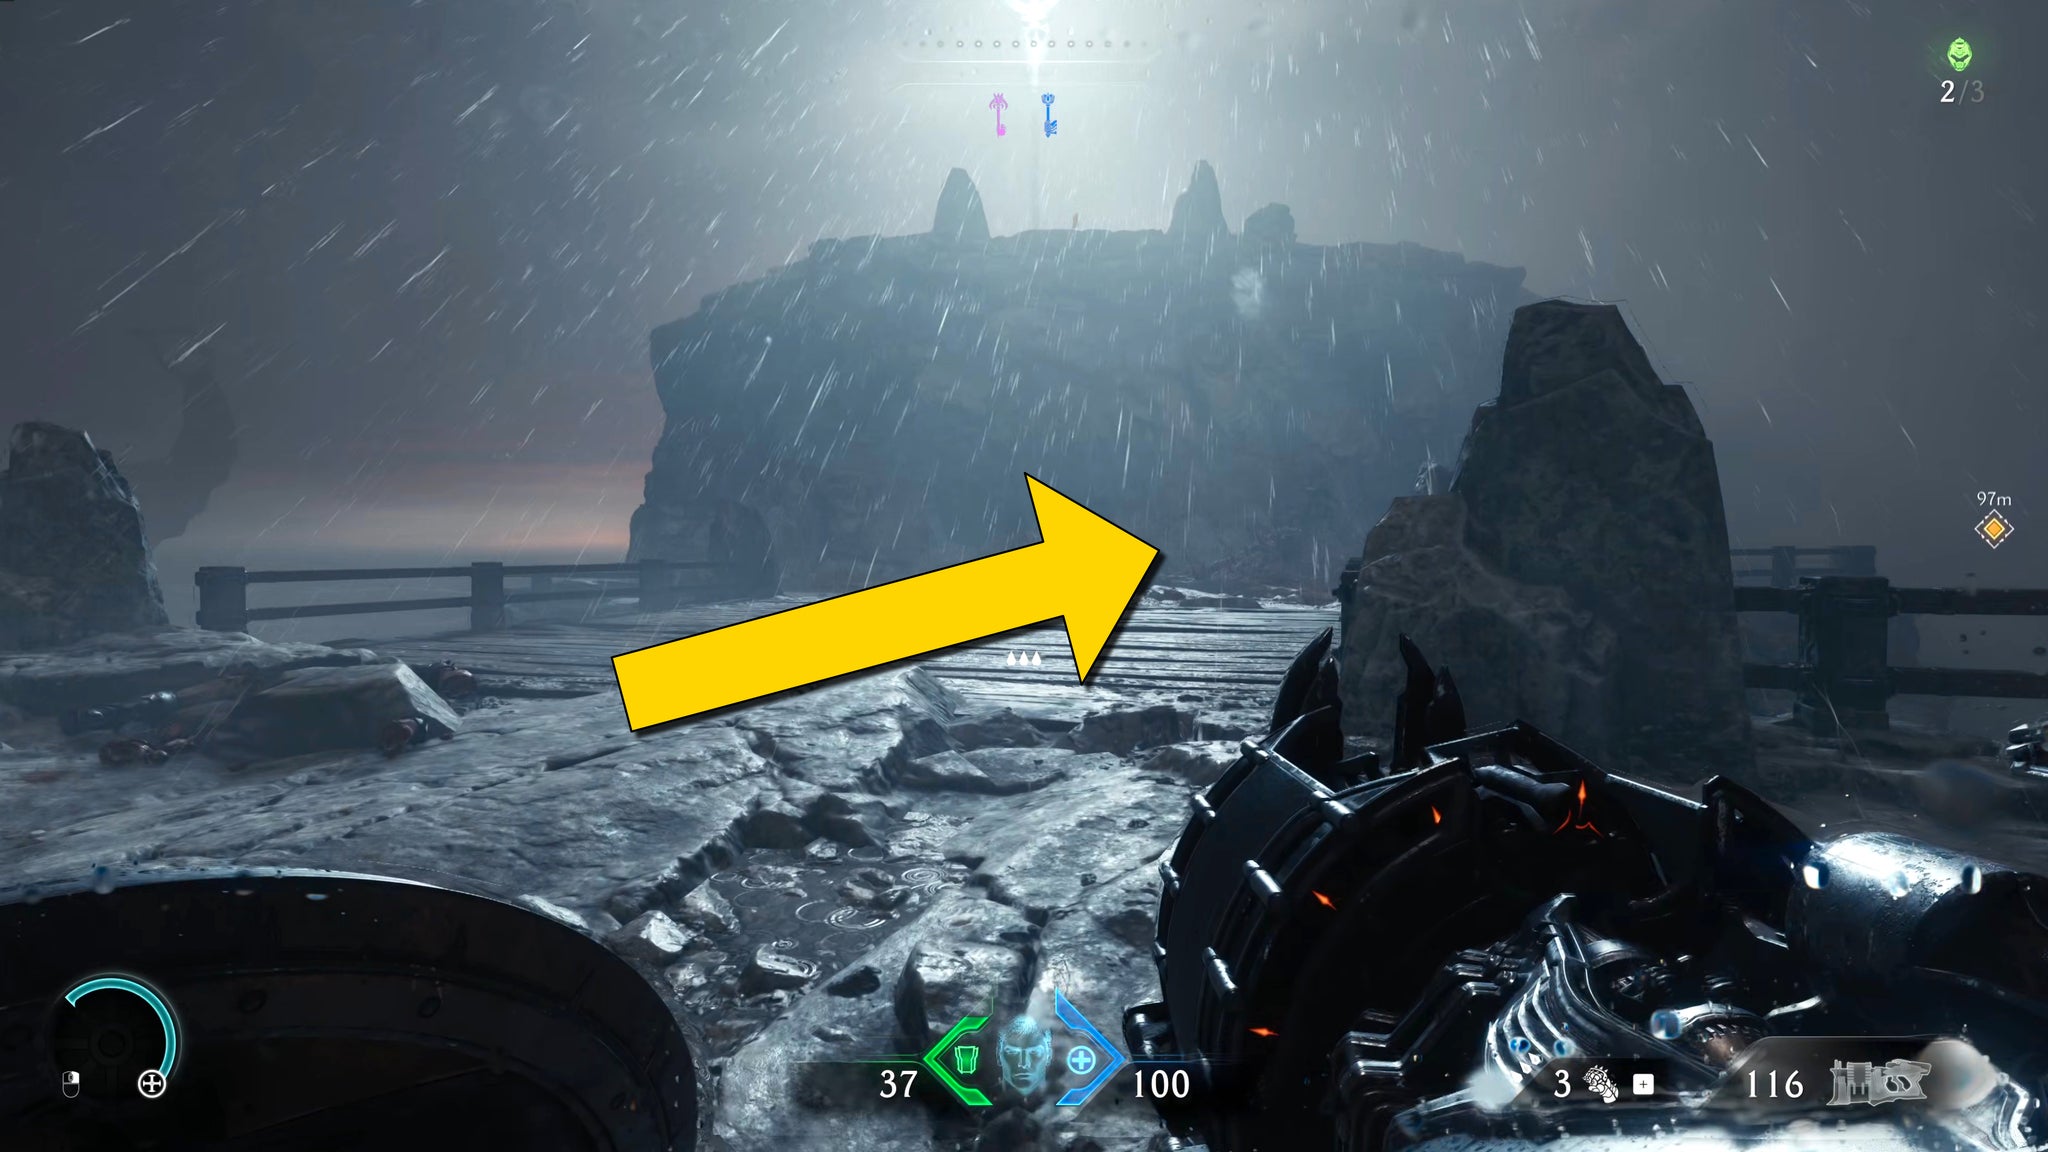
Image credit:Rock Paper Shotgun/Bethesda
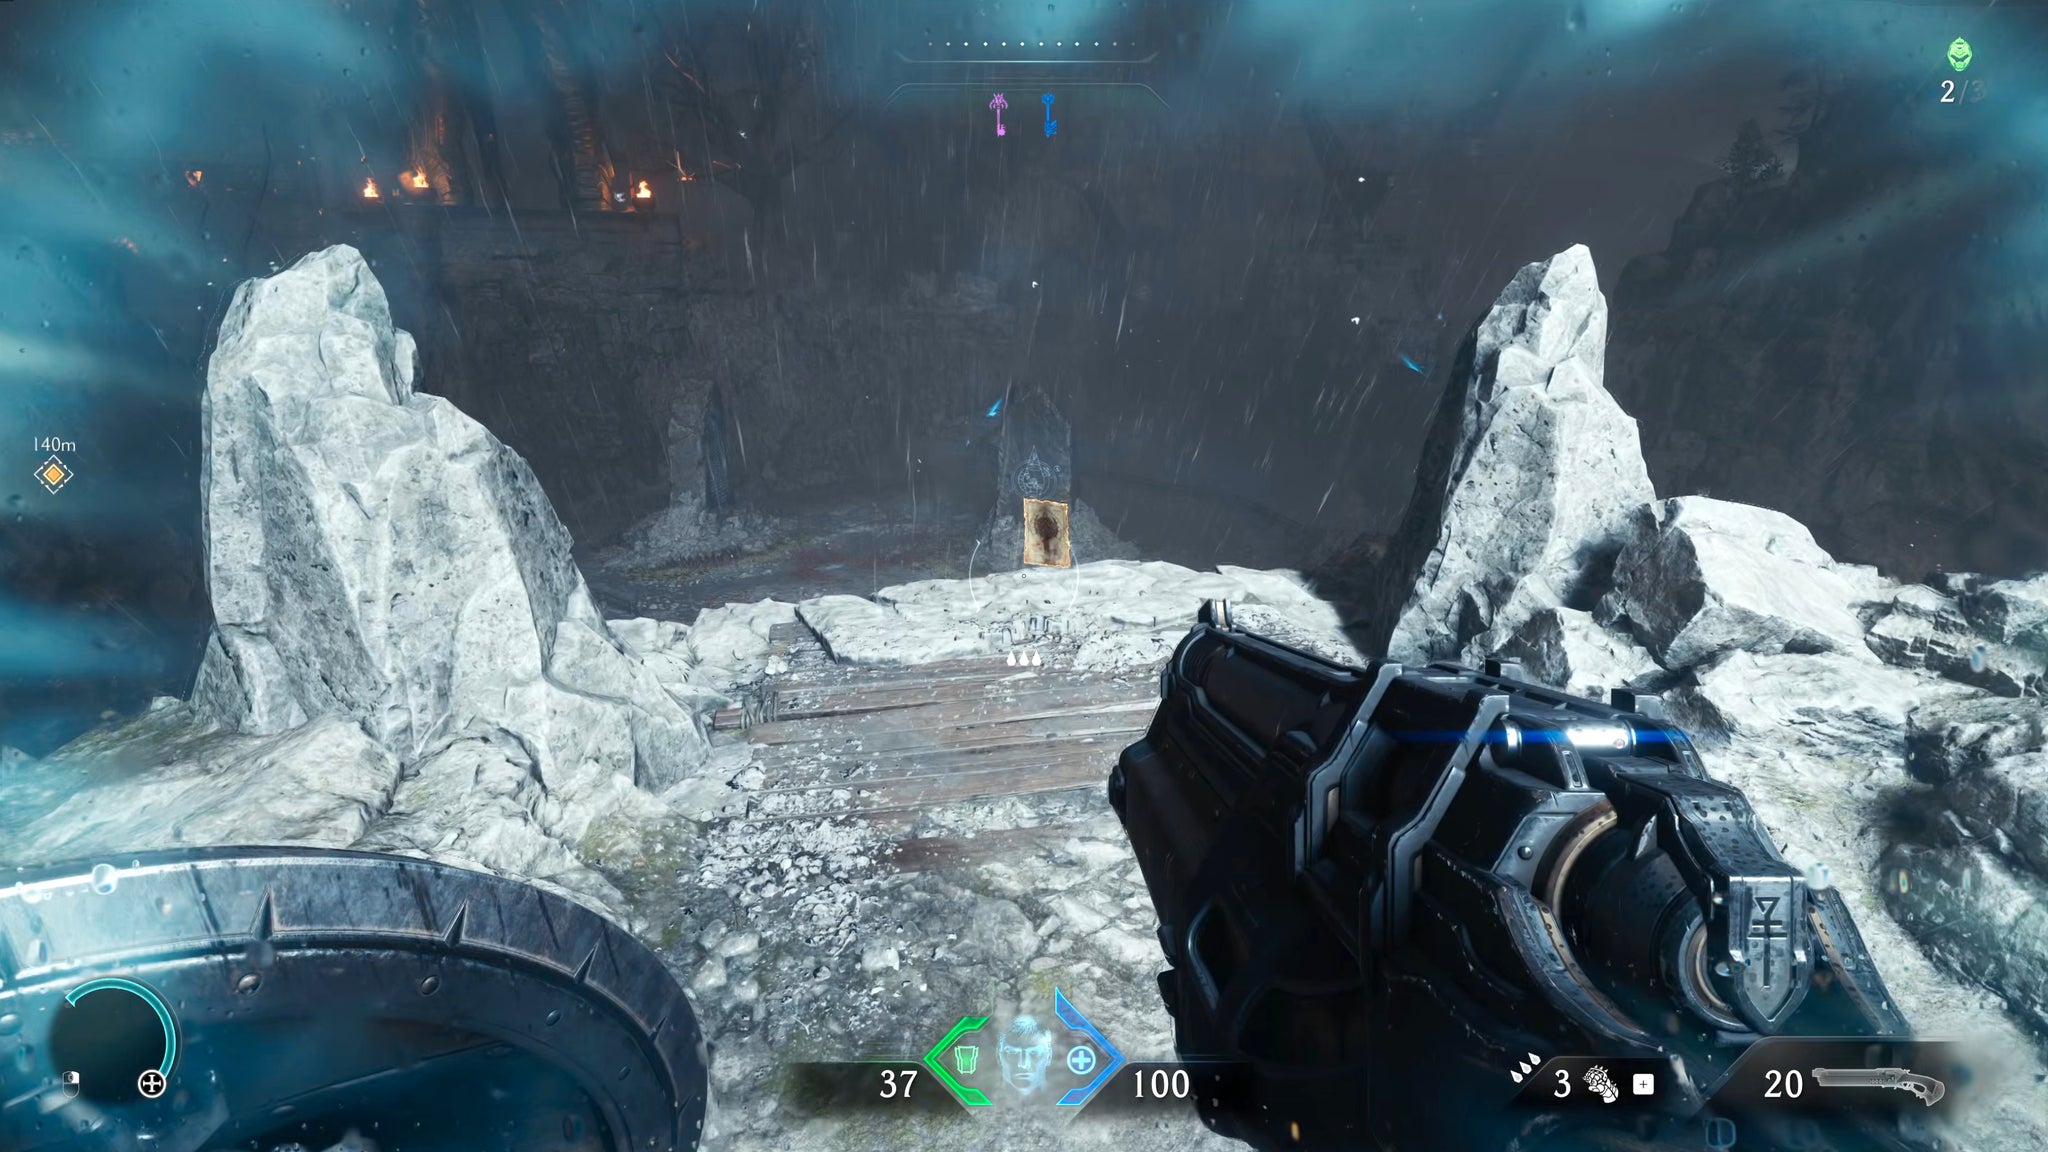
Image credit:Rock Paper Shotgun/Bethesda
- Location: On the ledge behind the far back Demonic Portal.
- Solution: Scale the climbable wall to the right of the Portal.
- Reward: “Doom Slayer” Codex
There’s one collectible which isn’t in any of Chapter 1’s “secret” areas. But while it isn’t technically a secret, we thought we should include it for any of you who don’t want to miss a thing in your playthrough of “Village Of Khalim”.
The Doom Slayer Codex is located behind the far back Demonic Portal - the one whose arena lies behind the first Demonic Portal and the Secret Key door. Once you’ve killed the demons in this area, simply head to the back of the arena and around the right-hand path. This path loops up to an overlook where you can collect the Doom Slayer Codex.
Secret 6: Up a climbable wall on the beach (Codex)
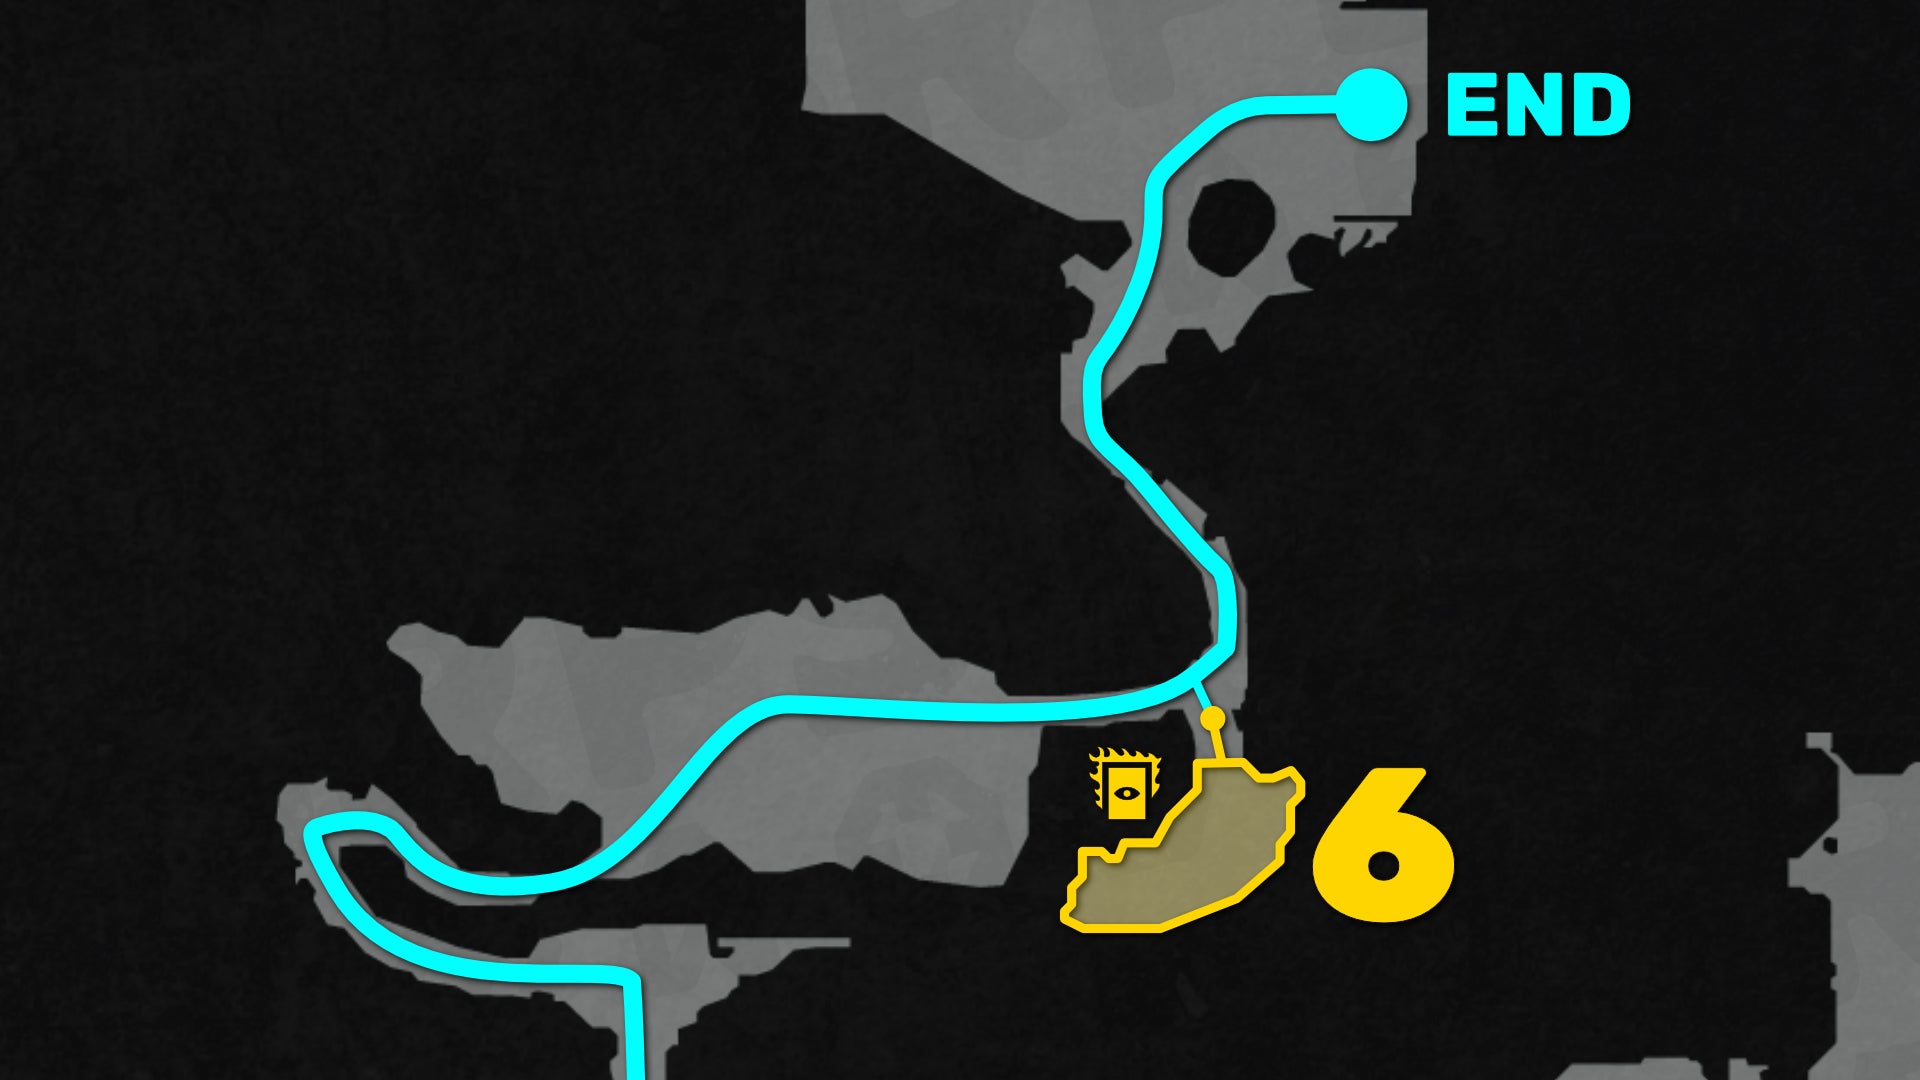
Image credit:Rock Paper Shotgun/MapGenie/Bethesda

Image credit:Rock Paper Shotgun/Bethesda

Image credit:Rock Paper Shotgun/Bethesda

Image credit:Rock Paper Shotgun/Bethesda

Image credit:Rock Paper Shotgun/Bethesda
- Location: Just beyond the beach battlefield near the end of Chapter 1.
- Solution: Scale the climbable wall on your right as you exit the area.
- Reward: “Village Of Khalim” Codex
The final secret area of Chapter 1 is quite easy to find. Progress through the chapter until you arrive on the beach, with the Titan and Dragon fighting in the distance. Drop down onto the beach and kill all the demons there.
As you exit the area through the line of green armour pickups, turn right instead of left and you’ll see a short climbable wall. Scale it to find the secret area, where you can pick up the “Village Of Khalim” Codex entry and round off all the secrets of Chapter 1.
That wraps up our walkthrough of all the secrets and secret areas in “Village Of Khalim”, Chapter 1 of Doom: The Dark Ages. If you’re looking to continue your blazing path of destruction through the campaign, then check out our next walkthrough of all the Chapter 2 secrets !

Doom: The Dark Ages
Video Game
Rock Paper Shotgun is better when you sign in
Sign in and join us on our journey to discover strange and compelling PC games.

All 75 Arc Raiders Blueprints and where to get them
These areas have the highest chance of giving you Blueprints

Image credit:Rock Paper Shotgun/Embark Studios

Looking for more Arc Raiders Blueprints? It’s a special day when you find a Blueprint, as they’re among the most valuable items in Arc Raiders. If you find a Blueprint that you haven’t already found, then you must make sure you hold onto it at all costs, because Blueprints are the key to one of the most important and powerful systems of meta-progression in the game.
This guide aims to be the very best guide on Blueprints you can find, starting with a primer on what exactly they are and how they work in Arc Raiders, before delving into exactly where to get Blueprints and the very best farming spots for you to take in your search.
We’ll also go over how to get Blueprints from other unlikely activities, such as destroying Surveyors and completing specific quests. And you’ll also find the full list of all 75 Blueprints in Arc Raiders on this page (including the newest Blueprints added with the Cold Snap update , such as the Deadline Blueprint and Firework Box Blueprint), giving you all the information you need to expand your own crafting repertoire.
In this guide:
- What are Blueprints in Arc Raiders?
- Full Blueprint list: All crafting recipes
- Where to find Blueprints in Arc Raiders Blueprints obtained from quests Blueprints obtained from Trials Best Blueprint farming locations

What are Blueprints in Arc Raiders?
Blueprints in Arc Raiders are special items which, if you manage to extract with them, you can expend to permanently unlock a new crafting recipe in your Workshop. If you manage to extract from a raid with an Anvil Blueprint, for example, you can unlock the ability to craft your very own Anvil Pistol, as many times as you like (as long as you have the crafting materials).
To use a Blueprint, simply open your Inventory while in the lobby, then right-click on the Blueprint and click “Learn And Consume” . This will permanently unlock the recipe for that item in your Workshop. As of the Stella Montis update, there are allegedly 75 different Blueprints to unlock - although only 68 are confirmed to be in the game so far. You can see all the Blueprints you’ve found and unlocked by going to the Workshop menu, and hitting “R” to bring up the Blueprint screen.
It’s possible to find duplicates of past Blueprints you’ve already unlocked. If you find these, then you can either sell them, or - if you like to play with friends - you can take it into a match and gift it to your friend so they can unlock that recipe for themselves. Another option is to keep hold of them until the time comes to donate them to the Expedition.
Full Blueprint list: All crafting recipes
Below is the full list of all the Blueprints that are currently available to find in Arc Raiders, and the crafting recipe required for each item:
| Blueprint | Type | Recipe | Crafted At |
|---|---|---|---|
| Bettina | Weapon | 3x Advanced Mechanical Components 3x Heavy Gun Parts 3x Canister | Gunsmith 3 |
| Blue Light Stick | Quick Use | 3x Chemicals | Utility Station 1 |
| Aphelion | Weapon | 3x Magnetic Accelerator 3x Complex Gun Parts 1x Matriarch Reactor | Gunsmith 3 |
| Combat Mk. 3 (Flanking) | Augment | 2x Advanced Electrical Components 3x Processor | Gear Bench 3 |
| Combat Mk. 3 (Aggressive) | Augment | 2x Advanced Electrical Components 3x Processor | Gear Bench 3 |
| Complex Gun Parts | Material | 2x Light Gun Parts 2x Medium Gun Parts 2x Heavy Gun Parts | Refiner 3 |
| Fireworks Box | Quick Use | 1x Explosive Compound 3x Pop Trigger | Explosives Station 2 |
| Gas Mine | Mine | 4x Chemicals 2x Rubber Parts | Explosives Station 1 |
| Green Light Stick | Quick Use | 3x Chemicals | Utility Station 1 |
| Pulse Mine | Mine | 1x Crude Explosives 1x Wires | Explosives Station 1 |
| Seeker Grenade | Grenade | 1x Crude Explosives 2x ARC Alloy | Explosives Station 1 |
| Looting Mk. 3 (Survivor) | Augment | 2x Advanced Electrical Components 3x Processor | Gear Bench 3 |
| Angled Grip II | Mod | 2x Mechanical Components 3x Duct Tape | Gunsmith 2 |
| Angled Grip III | Mod | 2x Mod Components 5x Duct Tape | Gunsmith 3 |
| Hullcracker | Weapon | 1x Magnetic Accelerator 3x Heavy Gun Parts 1x Exodus Modules | Gunsmith 3 |
| Launcher Ammo | Ammo | 5x Metal Parts 1x Crude Explosives | Workbench 1 |
| Anvil | Weapon | 5x Mechanical Components 5x Simple Gun Parts | Gunsmith 2 |
| Anvil Splitter | Mod | 2x Mod Components 3x Processor | Gunsmith 3 |
| ??? | ??? | ??? | ??? |
| Barricade Kit | Quick Use | 1x Mechanical Components | Utility Station 2 |
| Blaze Grenade | Grenade | 1x Explosive Compound 2x Oil | Explosives Station 3 |
| Bobcat | Weapon | 3x Advanced Mechanical Components 3x Light Gun Parts | Gunsmith 3 |
| Osprey | Weapon | 2x Advanced Mechanical Components 3x Medium Gun Parts 7x Wires | Gunsmith 3 |
| Burletta | Weapon | 3x Mechanical Components 3x Simple Gun Parts | Gunsmith 1 |
| Compensator II | Mod | 2x Mechanical Components 4x Wires | Gunsmith 2 |
| Compensator III | Mod | 2x Mod Components 8x Wires | Gunsmith 3 |
| Defibrillator | Quick Use | 9x Plastic Parts 1x Moss | Medical Lab 2 |
| ??? | ??? | ??? | ??? |
| Equalizer | Weapon | 3x Magnetic Accelerator 3x Complex Gun Parts 1x Queen Reactor | Gunsmith 3 |
| Extended Barrel | Mod | 2x Mod Components 8x Wires | Gunsmith 3 |
| Extended Light Mag II | Mod | 2x Mechanical Components 3x Steel Spring | Gunsmith 2 |
| Extended Light Mag III | Mod | 2x Mod Components 5x Steel Spring | Gunsmith 3 |
| Extended Medium Mag II | Mod | 2x Mechanical Components 3x Steel Spring | Gunsmith 2 |
| Extended Medium Mag III | Mod | 2x Mod Components 5x Steel Spring | Gunsmith 3 |
| Extended Shotgun Mag II | Mod | 2x Mechanical Components 3x Steel Spring | Gunsmith 2 |
| Extended Shotgun Mag III | Mod | 2x Mod Components 5x Steel Spring | Gunsmith 3 |
| Remote Raider Flare | Quick Use | 2x Chemicals 4x Rubber Parts | Utility Station 1 |
| Heavy Gun Parts | Material | 4x Simple Gun Parts | Refiner 2 |
| Venator | Weapon | 2x Advanced Mechanical Components 3x Medium Gun Parts 5x Magnet | Gunsmith 3 |
| Il Toro | Weapon | 5x Mechanical Components 6x Simple Gun Parts | Gunsmith 1 |
| Jolt Mine | Mine | 1x Electrical Components 1x Battery | Explosives Station 2 |
| Explosive Mine | Mine | 1x Explosive Compound 1x Sensors | Explosives Station 3 |
| Jupiter | Weapon | 3x Magnetic Accelerator 3x Complex Gun Parts 1x Queen Reactor | Gunsmith 3 |
| Light Gun Parts | Material | 4x Simple Gun Parts | Refiner 2 |
| Lightweight Stock | Mod | 2x Mod Components 5x Duct Tape | Gunsmith 3 |
| Lure Grenade | Grenade | 1x Speaker Component 1x Electrical Components | Utility Station 2 |
| Medium Gun Parts | Material | 4x Simple Gun Parts | Refiner 2 |
| Torrente | Weapon | 2x Advanced Mechanical Components 3x Medium Gun Parts 6x Steel Spring | Gunsmith 3 |
| Muzzle Brake II | Mod | 2x Mechanical Components 4x Wires | Gunsmith 2 |
| Muzzle Brake III | Mod | 2x Mod Components 8x Wires | Gunsmith 3 |
| Padded Stock | Mod | 2x Mod Components 5x Duct Tape | Gunsmith 3 |
| Shotgun Choke II | Mod | 2x Mechanical Components 4x Wires | Gunsmith 2 |
| Shotgun Choke III | Mod | 2x Mod Components 8x Wires | Gunsmith 3 |
| Shotgun Silencer | Mod | 2x Mod Components 8x Wires | Gunsmith 3 |
| Showstopper | Grenade | 1x Advanced Electrical Components 1x Voltage Converter | Explosives Station 3 |
| Silencer I | Mod | 2x Mechanical Components 4x Wires | Gunsmith 2 |
| Silencer II | Mod | 2x Mod Components 8x Wires | Gunsmith 3 |
| Snap Hook | Quick Use | 2x Power Rod 3x Rope 1x Exodus Modules | Utility Station 3 |
| Stable Stock II | Mod | 2x Mechanical Components 3x Duct Tape | Gunsmith 2 |
| Stable Stock III | Mod | 2x Mod Components 5x Duct Tape | Gunsmith 3 |
| Tagging Grenade | Grenade | 1x Electrical Components 1x Sensors | Utility Station 3 |
| Tempest | Weapon | 3x Advanced Mechanical Components 3x Medium Gun Parts 3x Canister | Gunsmith 3 |
| Trigger Nade | Grenade | 2x Crude Explosives 1x Processor | Explosives Station 2 |
| Vertical Grip II | Mod | 2x Mechanical Components 3x Duct Tape | Gunsmith 2 |
| Vertical Grip III | Mod | 2x Mod Components 5x Duct Tape | Gunsmith 3 |
| Vita Shot | Quick Use | 2x Antiseptic 1x Syringe | Medical Lab 3 |
| Vita Spray | Quick Use | 3x Antiseptic 1x Canister | Medical Lab 3 |
| Vulcano | Weapon | 1x Magnetic Accelerator 3x Heavy Gun Parts 1x Exodus Modules | Gunsmith 3 |
| Wolfpack | Grenade | 2x Explosive Compound 2x Sensors | Explosives Station 3 |
| Red Light Stick | Quick Use | 3x Chemicals | Utility Station 1 |
| Smoke Grenade | Grenade | 14x Chemicals 1x Canister | Utility Station 2 |
| Deadline | Mine | 3x Explosive Compound 2x ARC Circuitry | Explosives Station 3 |
| Trailblazer | Grenade | 1x Explosive Compound 1x Synthesized Fuel | Explosives Station 3 |
| Tactical Mk. 3 (Defensive) | Augment | 2x Advanced Electrical Components 3x Processor | Gear Bench 3 |
| Tactical Mk. 3 (Healing) | Augment | 2x Advanced Electrical Components 3x Processor | Gear Bench 3 |
| Yellow Light Stick | Quick Use | 3x Chemicals | Utility Station 1 |
Note: The missing Blueprints in this list likely have not actually been added to the game at the time of writing, because none of the playerbase has managed to find any of them. As they are added to the game, I will update this page with the most relevant information so you know exactly how to get all 75 Arc Raiders Blueprints.
Where to find Blueprints in Arc Raiders
Below is a list of all containers, modifiers, and events which maximise your chances of finding Blueprints:
- Certain quests reward you with specific Blueprints .
- Completing Trials has a high chance of offering Blueprints as rewards.
- Surveyors have a decent chance of dropping Blueprints on death.
- High loot value areas tend to have a greater chance of spawning Blueprints.
- Night Raids and Storms may increase rare Blueprint spawn chances in containers.
- Containers with higher numbers of items may have a higher tendency to spawn Blueprints. As a result, Blue Gate (which has many “large” containers containing multiple items) may give you a higher chance of spawning Blueprints.
- Raider containers (Raider Caches, Weapon Boxes, Medical Bags, Grenade Tubes) have increased Blueprint drop rates. As a result, the Uncovered Caches event gives you a high chance of finding Blueprints.
- Security Lockers have a higher than average chance of containing Blueprints.
- Certain Blueprints only seem to spawn under specific circumstances: Tempest Blueprint only spawns during Night Raid events. Vulcano Blueprint only spawns during Hidden Bunker events. Jupiter and Equaliser Blueprints only spawn during Harvester events.

Raider Caches, Weapon Boxes, and other raider-oriented container types have a good chance of offering Blueprints. |Image credit:Rock Paper Shotgun/Embark Studios
Blueprints have a very low chance of spawning in any container in Arc Raiders, around 1-2% on average. However, there is a higher chance of finding Blueprints in particular container types. Specifically, you can find more Blueprints in Raider containers and security lockers.
Beyond this, if you’re looking for Blueprints you should focus on regions of the map which are marked as having particularly high-value loot. Areas such as the Control Tower in Dam Battlegrounds, the Arrival and Departure Buildings in Spaceport, and Pilgrim’s Peak in Blue Gate all have a better-than-average chance of spawning Blueprints somewhere amongst all their containers. Night Raids and Electromagnetic Storm events also increase the drop chances of certain Blueprints .
In addition to these containers, you can often loot Blueprints from destroyed Surveyors - the largest of the rolling ball ARC. Surveyors are more commonly found on the later maps - Spaceport and Blue Gate - and if one spawns in your match, you’ll likely see it by the blue laser beam that it casts into the sky while “surveying”.
Surveyors are quite well-armoured and will very speedily run away from you once it notices you, but if you can take one down then make sure you loot all its parts for a chance of obtaining certain unusual Blueprints.
Blueprints obtained from quests
One way in which you can get Blueprints is by completing certain quests for the vendors in Speranza. Some quests will reward you with a specific item Blueprint upon completion, so as long as you work through all the quests in Arc Raiders, you are guaranteed those Blueprints.
Here is the full list of all Blueprints you can get from quest rewards:
- Trigger Nade Blueprint: Rewarded after completing “Sparks Fly”.
- Lure Grenade Blueprint: Rewarded after completing “Greasing Her Palms”.
- Burletta Blueprint: Rewarded after completing “Industrial Espionage”.
- Hullcracker Blueprint (and Launcher Ammo Blueprint): Rewarded after completing “The Major’s Footlocker”.
Alas, that’s only 4 Blueprints out of a total of 75 to unlock, so for the vast majority you will need to find them yourself during a raid. If you’re intent on farming Blueprints, then it’s best to equip yourself with cheap gear in case you lose it, but don’t use a free loadout because then you won’t get a safe pocket to stash any new Blueprint you find. No pain in Arc Raiders is sharper than failing to extract with a new Blueprint you’ve been after for a dozen hours already.

One of the best ways to get Blueprints is by hitting three stars on all five Trials every week. |Image credit:Rock Paper Shotgun/Embark Studios
Blueprints obtained from Trials
One of the very best ways to get Blueprints is as rewards for completing Trials in Arc Raiders. Trials are unlocked from Level 15 onwards, and allow you to earn rewards by focusing on certain tasks over the course of several raids. For example, one Trial might task you with dealing damage to Hornets, while another might challenge you to loot Supply Drops.
Trials refresh on a weekly basis, with a new week bringing five new Trials. Each Trial can offer up to three rewards after passing certain score milestones, and it’s possible to receive very high level loot from these reward crates - including Blueprints. So if you want to unlock as many Blueprints as possible, you should make a point of completing as many Trials as possible each week.
Best Blueprint farming locations
The very best way to get Blueprints is to frequent specific areas of the maps which combine high-tier loot pools with the right types of containers to search. Here are my recommendations for where to find Blueprints on every map, so you can always keep the search going for new crafting recipes to unlock.

Image credit:Rock Paper Shotgun/Embark Studios
Dam Battlegrounds
The best places to farm Blueprints on Dam Battlegrounds are the Control Tower, Power Generation Complex, Ruby Residence, and Pale Apartments . The first two regions, despite only being marked on the map as mid-tier loot, contain a phenomenal number of containers to loot. The Control Tower can also contain a couple of high-tier Security Lockers - though of course, you’ll need to have unlocked the Security Breach skill at the end of the Survival tree.
There’s also a lot of reporting amongst the playerbase that the Residential areas in the top-left of the map - Pale Apartments and Ruby Residence - give you a comparatively strong chance of finding Blueprints. Considering their size, there’s a high density of containers to loot in both locations, and they also have the benefit of being fairly out of the way. So you’re more likely to have all the containers to yourself.
Buried City
The best Blueprint farming locations on Buried City are the Santa Maria Houses, Grandioso Apartments, Town Hall, and the various buildings of the New District . Grandioso Apartments has a lower number of containers than the rest, but a high chance of spawning weapon cases - which have good Blueprint drop rates. The others are high-tier loot areas, with plenty of lootable containers - including Security Lockers.
Spaceport
The best places to find Blueprints on Spaceport are the Arrival and Departure Buildings, as well as Control Tower A6 and the Launch Towers . All these areas are labelled as high-value loot regions, and many of them are also very handily connected to one another by the Spaceport wall, which you can use to quickly run from one area to the next. At the tops of most of these buildings you’ll find at least one Security Locker, so this is an excellent farming route for players looking to find Blueprints.
The downside to looting Blueprints on Spaceport is that all these areas are hotly contested, particularly in Duos and Squads. You’ll need to be very focused and fast in order to complete the full farming route.

Image credit:Rock Paper Shotgun/Embark Studios
Blue Gate
Blue Gate tends to have a good chance of dropping Blueprints, potentially because it generally has a high number of containers which can hold lots of items; so there’s a higher chance of a Blueprint spawning in each container. In my experience, the best Blueprint farming spots on Blue Gate are Pilgrim’s Peak, Raider’s Refuge, the Ancient Fort, and the Underground Complex beneath the Warehouse .
All of these areas contain a wealth of containers to loot. Raider’s Refuge has less to loot, but the majority of the containers in and around the Refuge are raider containers, which have a high chance of containing Blueprints - particularly during major events.
Stella Montis
On the whole, Stella Montis seems to have a very low drop rate for Blueprints (though a high chance of dropping other high-tier loot). If you do want to try farming Blueprints on this map, the best places to find Blueprints in Stella Montis are Medical Research, Assembly Workshop, and the Business Center . These areas have the highest density of containers to loot on the map.
In addition to this, the Western Tunnel has a few different Security Lockers to loot, so while there’s very little to loot elsewhere in this area of the map, it’s worth hitting those Security Lockers if you spawn there at the start of a match.
That wraps up this primer on how to get all the Blueprints in Arc Raiders as quickly as possible. With the Expedition system constantly resetting a large number of players’ Blueprints, it’s more important than ever to have the most up-to-date information on where to find all these Blueprints.
While you’re here, be sure to check out our Arc Raiders best guns tier list , as well as our primers on the best skills to unlock and all the different Field Depot locations on every map.


ARC Raiders
PS5 , Xbox Series X/S , PC
Rock Paper Shotgun is better when you sign in
Sign in and join us on our journey to discover strange and compelling PC games.
