Cyber Knights: Flashpoint review
Obscuromancer

Image credit:Rock Paper Shotgun/Trese Brothers

Don’t let its initial cyber-posturing and sheer amount of systems intimidate you. Cyber Knights: Flashpoint is wider than it is oppressively deep, while still being rich enough to offer up some excellently tense and entertaining stealth tactics
- Developer: Trese Brothers
- Publisher: Trese Brothers
- Release: Out now
- On: Windows, macOS, Linux
- From: Steam
- Price: £25 /€29 /$30
- Reviewed on: Intel Core i5-12600K, 32GB RAM, Nvidia RTX 4060 Ti, Windows 11
Cyber Knights: Flashpoint has some excellent nonsense scenario writing propping up mission design. In one early excursion, you remote activate ‘defector tech’ to convert an enemy agent over to your side, then have a turn to neutralise the neuro-toxin killswitch in their brain with injectors. The game is awash with this sort of campy, techy gangslang. My absolute favourite of these so far is ‘chumbo’ - apparently a much stupider, funnier, and therefore much better version of 2077’s ‘choomba’.
Similarly, Cyber Knights’ script is pure cyberpunk American cheese singles; reliably tropey and enjoyably naff. And yet, I have spent the last week or so popcorn-bucket-deep in the game’s drama. There’s little as gripping as a good heist; the planning and personalities and stakes, the fated fumbles and slick improvisations. And, once it gets going, CK:F’s grip is augmented . Hour one: “lol, chumbo”. Hour three: “We’ve been made, chumbos! Go loud!”.
Part ganger management sim, part cyberpunk underworld-navigating RPG , and part stealth-tactics heist ’em up, the thing Cyber Knights is best at is making me personally feel very cool. I went to rinse off a spoon yesterday but apparently forgot that spoons are curved and spray water in a powerful arc if you hold them under a tap. I do not need a power fantasy. A hyper-competency fantasy suits me just fine.

Image credit:Rock Paper Shotgun/Trese Brothers
That said, its sheer breadth of linked and fleshed-out ideas can feel surveillance-state oppressive at first, as if hidden cameras are watching for signs of discomfort or confusion on your face so the corpogov can file you in their database of big dumb chumps. You’ll often find strategy games with an easy hook obscuring hidden crunch, but this is sort of the opposite - proudly flashing its bitty and tangled grognard bonafides before revealing itself to be quite a smooth, intuitive ride, just one that revisited the cutting room floor after hours and shoved every idea it could find into its massive techwear pockets. It’s in making all those ideas relevant contributors to its tactical theatre that CK:F really shines.
No Ship of Theseus references so far either, thank Gibson. CK:F’s answer is implicit, anyway: remove the parts, the whole just isn’t the same, so let’s cover a scav mission in action. In the final turn, my sword-wielding Knight J.C ‘Dental’ Floss will find herself pinned down by a shotgunner’s overwatch cone, before remembering she packed a syringe of evasion juice, slamming it, then dancing gracefully to the evac elevator. But we start out without a soul aware of our presence, calling in fixer favours and spending a few spare action points on abilities to disable cameras and laser sensors. We move between safes, lifting blueprints and valuable programs. We distract the guards we can with thrown lures. We take out the ones we can’t with silenced pistols and swords.

Image credit:Rock Paper Shotgun/Trese Brothers
The management layer feeds into the RPG layer feeds into the tactics layer and loops back. We extract once we’ve loaded up on loot. Once we return to base, the loot goes in cold storage to be sold to fixers for cash or favours. If someone likes us a lot, they might set us up with missions or new recruits. We customise those recruit’s backstories through detailed (if long-winded) conversations, defining personal baggage like errant siblings or debts that surface later as optional missions. Helping a black market contact out might mean better gear is available to buy, or we can synthesise our own from the blueprints we stole once we build fabricators.
Or we might want to invest in counter-intel or medical facilities instead if we got sloppy on the last mission, got people wounded or stressed or brought down heat, resulting in negative traits and recovery time and headhunter mercs interrupting us on missions. And this sounds overwhelming but it all flows naturally. Before we know it, we’re back in the field.
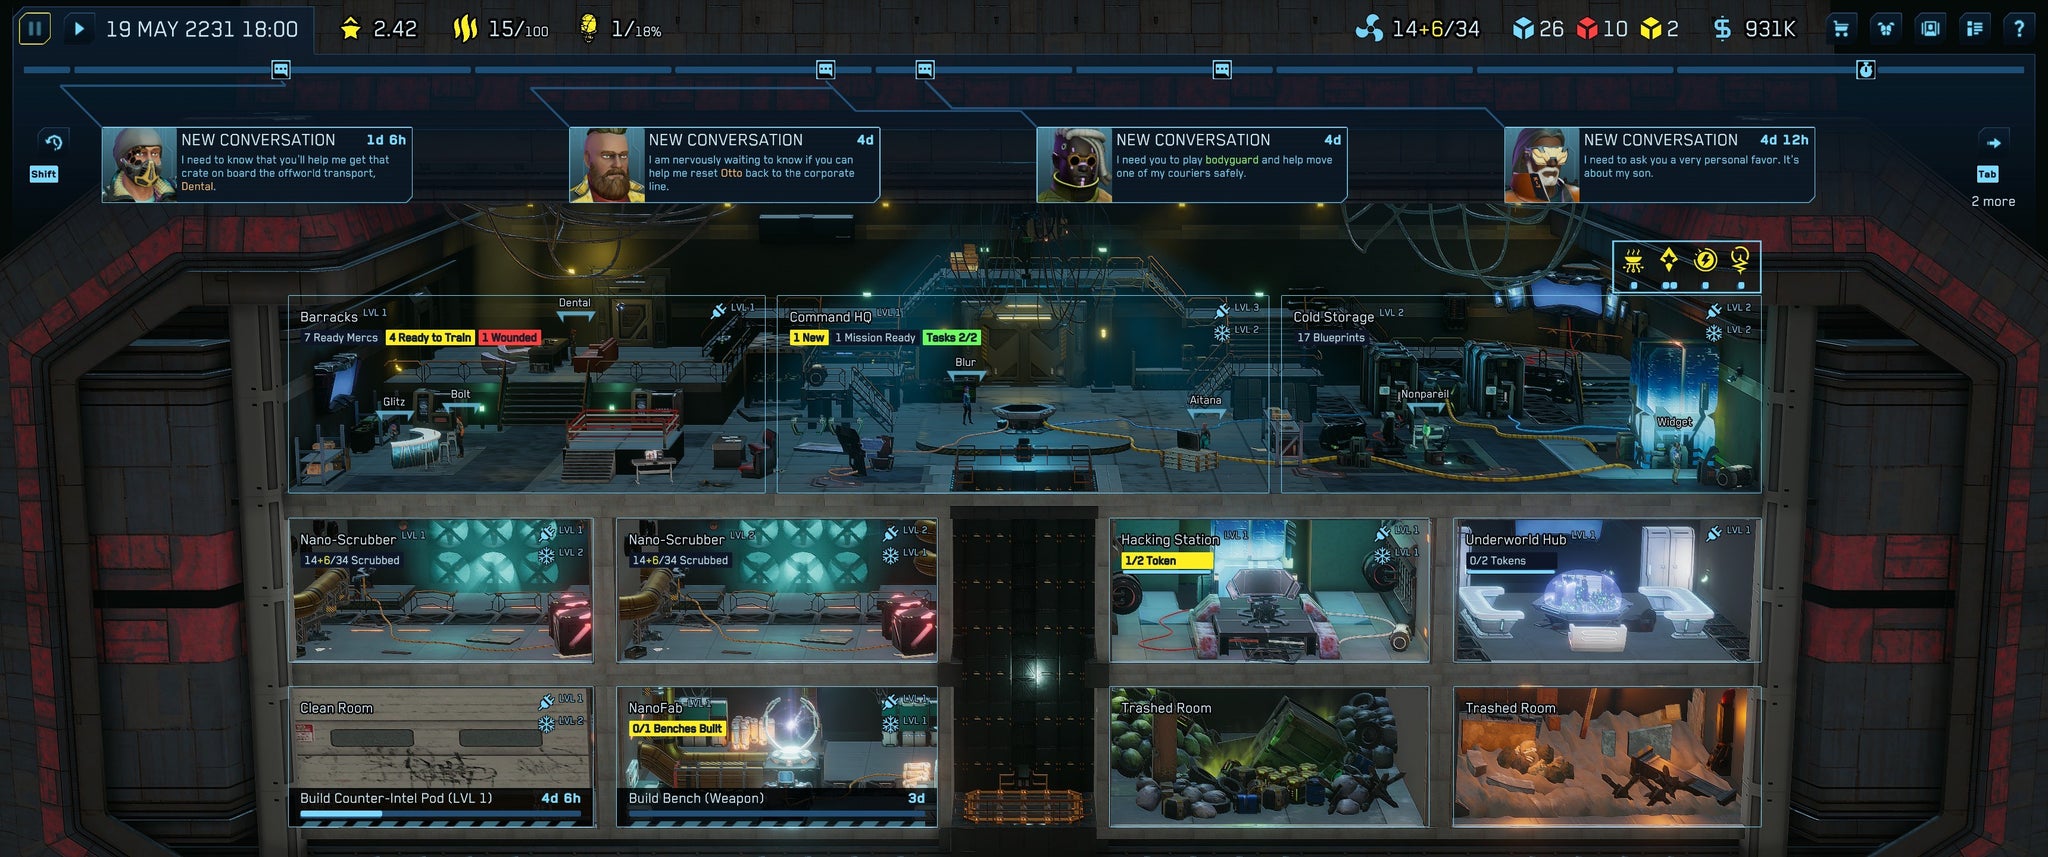
Image credit:Rock Paper Shotgun/Trese Brothers
CK:F works on an initiative system, with a turn gallery keeping you up to speed, but you can opt to delay a merc’s turn as many times as you want, knocking 10 initiative off each time until they’re reduced below that number. On the simpler end, this lets you do things like kick turns off with the specific ability you need, or keep your gunnier chumbos in reserve if things go the way of the pear, or just wait to see what the guards do first, providing you’re safely hidden and have preferably used some tracking tech to predict movement routes. On the more involved end, you can use it to pull guards apart and pick them off one by one, or set up lovely kill combos.
But this stuff really comes to life in how well it drives home that these turns you might be engineering for fifteen minutes apiece are really playing out in seconds for the characters. Your gangers might look like mismatched techno club casualties, but they can execute like disciplined surgi-bastards. This extends to the stealth. When you slip up, guards are alerted to your presence independently of each other, meaning you can react, eliminate suspicious threats, and slip back into the shadows. I once had Dental lope through grenade smoke and pick off stragglers with her sword. I’m not actually positive this did much but, again, it did make me feel very good at my pretend cyber job.

Image credit:Rock Paper Shotgun/Trese Brothers
They won’t rush to set off any sort of map-wide alarm, either. Yellow pips on an alert tracker mark temporary danger, and it’s mightily satisfying to clear that bar by taking out problems before they turn blue as permanent ticks toward reinforcements at the end of a turn. But this can also make stealth feels a little fuzzy and esoteric. You’re always reliably informed whether you’ll be spotted or heard, either by guards or security devices, but I still haven’t quite nailed down what feels like some hidden variables toward alerts spreading to other guards on the map. I murder seven dudes. Trip a motion detector. Get seen by two cameras. Reinforcements show up, wander around for bit. “Glitches again. Must be monday”.
In fairness, this might have had something something to do with the hacking I’d just done. This is the second version of the hacking tutorial the Trese Brothers have added, and it still gave me an anxiety attack followed by a shorter, more intense anxiety attack followed by what I’m sure was permanent psychosomatic cranial damage. I eventually looked up an older tutorial on the Brothers’ YouTube channel which was much better. This should be in the game. It’s cyberpunk. Just do a Max Headroom thing with a vocoder, it’ll be fun.
Anyway, the very basic gist here is that you spend AP to move between nodes and use memory to load and deploy programs: scan for threats, counter security measures, etc. Again, it’s actually quite intuitive, and if you don’t fancy it you can either skip the hacking missions or just vastly reduce the difficulty with perks and syringes full of hacking juice (referred to in-game by trained hackers as “hacking juice”). It’s not bad as a standalone palette cleanser and I appreciate a cyberpunk game actually attempting to dig into this stuff rather than just relegating it to a minigame. It also feeds into the fantasy nicely with how it folds back into the turn order, so your hacker can get caught or shot in realspace while they’re hacking, or you can designate a lookout while the rest of your team is off doing other things for some nice cinematic moments.
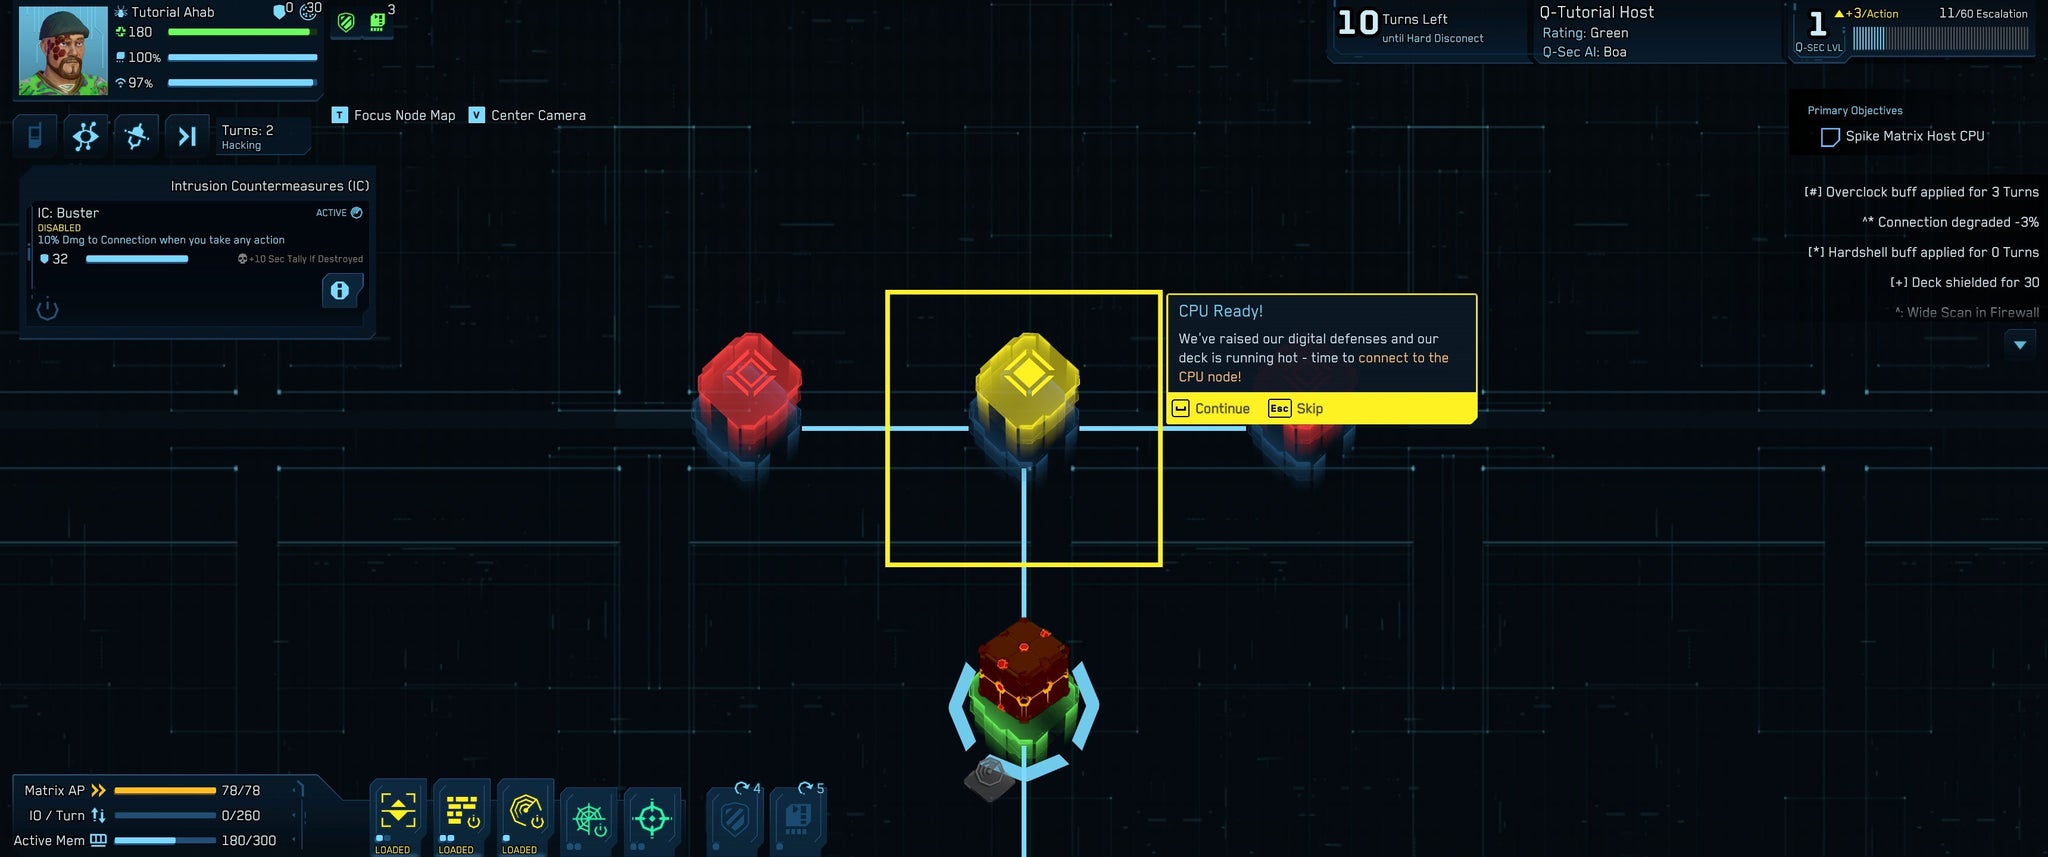
Image credit:Rock Paper Shotgun/Trese Brothers
Right, review’s getting massive. Lots to cover, so here’s a quickfire round of spare bits I wanted to mention. Stealth is both encouraged and fun but so is violence, and there’s plenty of good abilities for going loud, too, like the gunslinger class you can arm with two revolvers then set to a unique overwatch where they go all cowboy Biff Tannen. The actual planning stage of the heists isn’t as deep as I’d hope for given the detail elsewhere, it’s really just a case of setting up fixer buffs, like temporarily disabling reinforcements or security cameras. Maybe choosing entry points or splitting your team up would break the mission design but it would suit the fantasy nicely. There’s also very little explanation of what stats actually do when you’re building your characters at the start (“too many decisions, too little context”, as Sin put it .)
But it does level out reasonably sharpish. And this isn’t me saying “it gets good after twelve thousand years”. It’s good from the beginning, it just takes a few hours to get a sense for the shoal of systems being spoon-catapulted at your face like soggy peas from a fussy toddler, or like water at my own face when I forget how spoons work. I’d hate for anyone to miss out because it seemed like obnoxious work to learn, basically, because the leather jacket’s a rental and the middle finger tats are temporary and it’s actually pretty easy going, just ambitious and detailed.

Image credit:Rock Paper Shotgun/Trese Brothers
And I guess the last thing to mention is the game’s styling of itself as an RPG feels very much character sheet crunch and class led, not so much storytelling. Dialogue choices are about revealing worldbuilding or accepting missions. There’s a sense of your gang gradually building up a history and trajectory, if not your customised Cyber Knight as an individual. And it definitely pulls off the XCOM and Battle Brothers thing of making you very afraid when your favourite idiot has three overwatch cones trained on them.
This isn’t a criticism as much an attempt at elucidating what you’re getting here, and perhaps an acknowledgement that cyberpunk as a genre probably once held some aspirations to be a bit more insightful and incisive than whatever very fun but ultimately slightly goofy and perpetually unsurprising pastiche we end up with in many cases, even if you can hardly blame it for abandoning attempted prescience when we live in a state of ketamine-droopy tech mogul grins proudly announcing their investments in the The Torment Nexus v2.1.6. Making you feel cool probably isn’t the most important thing a cyberpunk game can do. Nonetheless, CK:F is pretty great at it.
Find out how we conduct our reviews by reading our review policy .
Cyber Knights: Flashpoint
PC
Rock Paper Shotgun is better when you sign in
Sign in and join us on our journey to discover strange and compelling PC games.

All 75 Arc Raiders Blueprints and where to get them
These areas have the highest chance of giving you Blueprints

Image credit:Rock Paper Shotgun/Embark Studios

Looking for more Arc Raiders Blueprints? It’s a special day when you find a Blueprint, as they’re among the most valuable items in Arc Raiders. If you find a Blueprint that you haven’t already found, then you must make sure you hold onto it at all costs, because Blueprints are the key to one of the most important and powerful systems of meta-progression in the game.
This guide aims to be the very best guide on Blueprints you can find, starting with a primer on what exactly they are and how they work in Arc Raiders, before delving into exactly where to get Blueprints and the very best farming spots for you to take in your search.
We’ll also go over how to get Blueprints from other unlikely activities, such as destroying Surveyors and completing specific quests. And you’ll also find the full list of all 75 Blueprints in Arc Raiders on this page (including the newest Blueprints added with the Cold Snap update , such as the Deadline Blueprint and Firework Box Blueprint), giving you all the information you need to expand your own crafting repertoire.
In this guide:
- What are Blueprints in Arc Raiders?
- Full Blueprint list: All crafting recipes
- Where to find Blueprints in Arc Raiders Blueprints obtained from quests Blueprints obtained from Trials Best Blueprint farming locations

What are Blueprints in Arc Raiders?
Blueprints in Arc Raiders are special items which, if you manage to extract with them, you can expend to permanently unlock a new crafting recipe in your Workshop. If you manage to extract from a raid with an Anvil Blueprint, for example, you can unlock the ability to craft your very own Anvil Pistol, as many times as you like (as long as you have the crafting materials).
To use a Blueprint, simply open your Inventory while in the lobby, then right-click on the Blueprint and click “Learn And Consume” . This will permanently unlock the recipe for that item in your Workshop. As of the Stella Montis update, there are allegedly 75 different Blueprints to unlock - although only 68 are confirmed to be in the game so far. You can see all the Blueprints you’ve found and unlocked by going to the Workshop menu, and hitting “R” to bring up the Blueprint screen.
It’s possible to find duplicates of past Blueprints you’ve already unlocked. If you find these, then you can either sell them, or - if you like to play with friends - you can take it into a match and gift it to your friend so they can unlock that recipe for themselves. Another option is to keep hold of them until the time comes to donate them to the Expedition.
Full Blueprint list: All crafting recipes
Below is the full list of all the Blueprints that are currently available to find in Arc Raiders, and the crafting recipe required for each item:
| Blueprint | Type | Recipe | Crafted At |
|---|---|---|---|
| Bettina | Weapon | 3x Advanced Mechanical Components 3x Heavy Gun Parts 3x Canister | Gunsmith 3 |
| Blue Light Stick | Quick Use | 3x Chemicals | Utility Station 1 |
| Aphelion | Weapon | 3x Magnetic Accelerator 3x Complex Gun Parts 1x Matriarch Reactor | Gunsmith 3 |
| Combat Mk. 3 (Flanking) | Augment | 2x Advanced Electrical Components 3x Processor | Gear Bench 3 |
| Combat Mk. 3 (Aggressive) | Augment | 2x Advanced Electrical Components 3x Processor | Gear Bench 3 |
| Complex Gun Parts | Material | 2x Light Gun Parts 2x Medium Gun Parts 2x Heavy Gun Parts | Refiner 3 |
| Fireworks Box | Quick Use | 1x Explosive Compound 3x Pop Trigger | Explosives Station 2 |
| Gas Mine | Mine | 4x Chemicals 2x Rubber Parts | Explosives Station 1 |
| Green Light Stick | Quick Use | 3x Chemicals | Utility Station 1 |
| Pulse Mine | Mine | 1x Crude Explosives 1x Wires | Explosives Station 1 |
| Seeker Grenade | Grenade | 1x Crude Explosives 2x ARC Alloy | Explosives Station 1 |
| Looting Mk. 3 (Survivor) | Augment | 2x Advanced Electrical Components 3x Processor | Gear Bench 3 |
| Angled Grip II | Mod | 2x Mechanical Components 3x Duct Tape | Gunsmith 2 |
| Angled Grip III | Mod | 2x Mod Components 5x Duct Tape | Gunsmith 3 |
| Hullcracker | Weapon | 1x Magnetic Accelerator 3x Heavy Gun Parts 1x Exodus Modules | Gunsmith 3 |
| Launcher Ammo | Ammo | 5x Metal Parts 1x Crude Explosives | Workbench 1 |
| Anvil | Weapon | 5x Mechanical Components 5x Simple Gun Parts | Gunsmith 2 |
| Anvil Splitter | Mod | 2x Mod Components 3x Processor | Gunsmith 3 |
| ??? | ??? | ??? | ??? |
| Barricade Kit | Quick Use | 1x Mechanical Components | Utility Station 2 |
| Blaze Grenade | Grenade | 1x Explosive Compound 2x Oil | Explosives Station 3 |
| Bobcat | Weapon | 3x Advanced Mechanical Components 3x Light Gun Parts | Gunsmith 3 |
| Osprey | Weapon | 2x Advanced Mechanical Components 3x Medium Gun Parts 7x Wires | Gunsmith 3 |
| Burletta | Weapon | 3x Mechanical Components 3x Simple Gun Parts | Gunsmith 1 |
| Compensator II | Mod | 2x Mechanical Components 4x Wires | Gunsmith 2 |
| Compensator III | Mod | 2x Mod Components 8x Wires | Gunsmith 3 |
| Defibrillator | Quick Use | 9x Plastic Parts 1x Moss | Medical Lab 2 |
| ??? | ??? | ??? | ??? |
| Equalizer | Weapon | 3x Magnetic Accelerator 3x Complex Gun Parts 1x Queen Reactor | Gunsmith 3 |
| Extended Barrel | Mod | 2x Mod Components 8x Wires | Gunsmith 3 |
| Extended Light Mag II | Mod | 2x Mechanical Components 3x Steel Spring | Gunsmith 2 |
| Extended Light Mag III | Mod | 2x Mod Components 5x Steel Spring | Gunsmith 3 |
| Extended Medium Mag II | Mod | 2x Mechanical Components 3x Steel Spring | Gunsmith 2 |
| Extended Medium Mag III | Mod | 2x Mod Components 5x Steel Spring | Gunsmith 3 |
| Extended Shotgun Mag II | Mod | 2x Mechanical Components 3x Steel Spring | Gunsmith 2 |
| Extended Shotgun Mag III | Mod | 2x Mod Components 5x Steel Spring | Gunsmith 3 |
| Remote Raider Flare | Quick Use | 2x Chemicals 4x Rubber Parts | Utility Station 1 |
| Heavy Gun Parts | Material | 4x Simple Gun Parts | Refiner 2 |
| Venator | Weapon | 2x Advanced Mechanical Components 3x Medium Gun Parts 5x Magnet | Gunsmith 3 |
| Il Toro | Weapon | 5x Mechanical Components 6x Simple Gun Parts | Gunsmith 1 |
| Jolt Mine | Mine | 1x Electrical Components 1x Battery | Explosives Station 2 |
| Explosive Mine | Mine | 1x Explosive Compound 1x Sensors | Explosives Station 3 |
| Jupiter | Weapon | 3x Magnetic Accelerator 3x Complex Gun Parts 1x Queen Reactor | Gunsmith 3 |
| Light Gun Parts | Material | 4x Simple Gun Parts | Refiner 2 |
| Lightweight Stock | Mod | 2x Mod Components 5x Duct Tape | Gunsmith 3 |
| Lure Grenade | Grenade | 1x Speaker Component 1x Electrical Components | Utility Station 2 |
| Medium Gun Parts | Material | 4x Simple Gun Parts | Refiner 2 |
| Torrente | Weapon | 2x Advanced Mechanical Components 3x Medium Gun Parts 6x Steel Spring | Gunsmith 3 |
| Muzzle Brake II | Mod | 2x Mechanical Components 4x Wires | Gunsmith 2 |
| Muzzle Brake III | Mod | 2x Mod Components 8x Wires | Gunsmith 3 |
| Padded Stock | Mod | 2x Mod Components 5x Duct Tape | Gunsmith 3 |
| Shotgun Choke II | Mod | 2x Mechanical Components 4x Wires | Gunsmith 2 |
| Shotgun Choke III | Mod | 2x Mod Components 8x Wires | Gunsmith 3 |
| Shotgun Silencer | Mod | 2x Mod Components 8x Wires | Gunsmith 3 |
| Showstopper | Grenade | 1x Advanced Electrical Components 1x Voltage Converter | Explosives Station 3 |
| Silencer I | Mod | 2x Mechanical Components 4x Wires | Gunsmith 2 |
| Silencer II | Mod | 2x Mod Components 8x Wires | Gunsmith 3 |
| Snap Hook | Quick Use | 2x Power Rod 3x Rope 1x Exodus Modules | Utility Station 3 |
| Stable Stock II | Mod | 2x Mechanical Components 3x Duct Tape | Gunsmith 2 |
| Stable Stock III | Mod | 2x Mod Components 5x Duct Tape | Gunsmith 3 |
| Tagging Grenade | Grenade | 1x Electrical Components 1x Sensors | Utility Station 3 |
| Tempest | Weapon | 3x Advanced Mechanical Components 3x Medium Gun Parts 3x Canister | Gunsmith 3 |
| Trigger Nade | Grenade | 2x Crude Explosives 1x Processor | Explosives Station 2 |
| Vertical Grip II | Mod | 2x Mechanical Components 3x Duct Tape | Gunsmith 2 |
| Vertical Grip III | Mod | 2x Mod Components 5x Duct Tape | Gunsmith 3 |
| Vita Shot | Quick Use | 2x Antiseptic 1x Syringe | Medical Lab 3 |
| Vita Spray | Quick Use | 3x Antiseptic 1x Canister | Medical Lab 3 |
| Vulcano | Weapon | 1x Magnetic Accelerator 3x Heavy Gun Parts 1x Exodus Modules | Gunsmith 3 |
| Wolfpack | Grenade | 2x Explosive Compound 2x Sensors | Explosives Station 3 |
| Red Light Stick | Quick Use | 3x Chemicals | Utility Station 1 |
| Smoke Grenade | Grenade | 14x Chemicals 1x Canister | Utility Station 2 |
| Deadline | Mine | 3x Explosive Compound 2x ARC Circuitry | Explosives Station 3 |
| Trailblazer | Grenade | 1x Explosive Compound 1x Synthesized Fuel | Explosives Station 3 |
| Tactical Mk. 3 (Defensive) | Augment | 2x Advanced Electrical Components 3x Processor | Gear Bench 3 |
| Tactical Mk. 3 (Healing) | Augment | 2x Advanced Electrical Components 3x Processor | Gear Bench 3 |
| Yellow Light Stick | Quick Use | 3x Chemicals | Utility Station 1 |
Note: The missing Blueprints in this list likely have not actually been added to the game at the time of writing, because none of the playerbase has managed to find any of them. As they are added to the game, I will update this page with the most relevant information so you know exactly how to get all 75 Arc Raiders Blueprints.
Where to find Blueprints in Arc Raiders
Below is a list of all containers, modifiers, and events which maximise your chances of finding Blueprints:
- Certain quests reward you with specific Blueprints .
- Completing Trials has a high chance of offering Blueprints as rewards.
- Surveyors have a decent chance of dropping Blueprints on death.
- High loot value areas tend to have a greater chance of spawning Blueprints.
- Night Raids and Storms may increase rare Blueprint spawn chances in containers.
- Containers with higher numbers of items may have a higher tendency to spawn Blueprints. As a result, Blue Gate (which has many “large” containers containing multiple items) may give you a higher chance of spawning Blueprints.
- Raider containers (Raider Caches, Weapon Boxes, Medical Bags, Grenade Tubes) have increased Blueprint drop rates. As a result, the Uncovered Caches event gives you a high chance of finding Blueprints.
- Security Lockers have a higher than average chance of containing Blueprints.
- Certain Blueprints only seem to spawn under specific circumstances: Tempest Blueprint only spawns during Night Raid events. Vulcano Blueprint only spawns during Hidden Bunker events. Jupiter and Equaliser Blueprints only spawn during Harvester events.

Raider Caches, Weapon Boxes, and other raider-oriented container types have a good chance of offering Blueprints. |Image credit:Rock Paper Shotgun/Embark Studios
Blueprints have a very low chance of spawning in any container in Arc Raiders, around 1-2% on average. However, there is a higher chance of finding Blueprints in particular container types. Specifically, you can find more Blueprints in Raider containers and security lockers.
Beyond this, if you’re looking for Blueprints you should focus on regions of the map which are marked as having particularly high-value loot. Areas such as the Control Tower in Dam Battlegrounds, the Arrival and Departure Buildings in Spaceport, and Pilgrim’s Peak in Blue Gate all have a better-than-average chance of spawning Blueprints somewhere amongst all their containers. Night Raids and Electromagnetic Storm events also increase the drop chances of certain Blueprints .
In addition to these containers, you can often loot Blueprints from destroyed Surveyors - the largest of the rolling ball ARC. Surveyors are more commonly found on the later maps - Spaceport and Blue Gate - and if one spawns in your match, you’ll likely see it by the blue laser beam that it casts into the sky while “surveying”.
Surveyors are quite well-armoured and will very speedily run away from you once it notices you, but if you can take one down then make sure you loot all its parts for a chance of obtaining certain unusual Blueprints.
Blueprints obtained from quests
One way in which you can get Blueprints is by completing certain quests for the vendors in Speranza. Some quests will reward you with a specific item Blueprint upon completion, so as long as you work through all the quests in Arc Raiders, you are guaranteed those Blueprints.
Here is the full list of all Blueprints you can get from quest rewards:
- Trigger Nade Blueprint: Rewarded after completing “Sparks Fly”.
- Lure Grenade Blueprint: Rewarded after completing “Greasing Her Palms”.
- Burletta Blueprint: Rewarded after completing “Industrial Espionage”.
- Hullcracker Blueprint (and Launcher Ammo Blueprint): Rewarded after completing “The Major’s Footlocker”.
Alas, that’s only 4 Blueprints out of a total of 75 to unlock, so for the vast majority you will need to find them yourself during a raid. If you’re intent on farming Blueprints, then it’s best to equip yourself with cheap gear in case you lose it, but don’t use a free loadout because then you won’t get a safe pocket to stash any new Blueprint you find. No pain in Arc Raiders is sharper than failing to extract with a new Blueprint you’ve been after for a dozen hours already.

One of the best ways to get Blueprints is by hitting three stars on all five Trials every week. |Image credit:Rock Paper Shotgun/Embark Studios
Blueprints obtained from Trials
One of the very best ways to get Blueprints is as rewards for completing Trials in Arc Raiders. Trials are unlocked from Level 15 onwards, and allow you to earn rewards by focusing on certain tasks over the course of several raids. For example, one Trial might task you with dealing damage to Hornets, while another might challenge you to loot Supply Drops.
Trials refresh on a weekly basis, with a new week bringing five new Trials. Each Trial can offer up to three rewards after passing certain score milestones, and it’s possible to receive very high level loot from these reward crates - including Blueprints. So if you want to unlock as many Blueprints as possible, you should make a point of completing as many Trials as possible each week.
Best Blueprint farming locations
The very best way to get Blueprints is to frequent specific areas of the maps which combine high-tier loot pools with the right types of containers to search. Here are my recommendations for where to find Blueprints on every map, so you can always keep the search going for new crafting recipes to unlock.

Image credit:Rock Paper Shotgun/Embark Studios
Dam Battlegrounds
The best places to farm Blueprints on Dam Battlegrounds are the Control Tower, Power Generation Complex, Ruby Residence, and Pale Apartments . The first two regions, despite only being marked on the map as mid-tier loot, contain a phenomenal number of containers to loot. The Control Tower can also contain a couple of high-tier Security Lockers - though of course, you’ll need to have unlocked the Security Breach skill at the end of the Survival tree.
There’s also a lot of reporting amongst the playerbase that the Residential areas in the top-left of the map - Pale Apartments and Ruby Residence - give you a comparatively strong chance of finding Blueprints. Considering their size, there’s a high density of containers to loot in both locations, and they also have the benefit of being fairly out of the way. So you’re more likely to have all the containers to yourself.
Buried City
The best Blueprint farming locations on Buried City are the Santa Maria Houses, Grandioso Apartments, Town Hall, and the various buildings of the New District . Grandioso Apartments has a lower number of containers than the rest, but a high chance of spawning weapon cases - which have good Blueprint drop rates. The others are high-tier loot areas, with plenty of lootable containers - including Security Lockers.
Spaceport
The best places to find Blueprints on Spaceport are the Arrival and Departure Buildings, as well as Control Tower A6 and the Launch Towers . All these areas are labelled as high-value loot regions, and many of them are also very handily connected to one another by the Spaceport wall, which you can use to quickly run from one area to the next. At the tops of most of these buildings you’ll find at least one Security Locker, so this is an excellent farming route for players looking to find Blueprints.
The downside to looting Blueprints on Spaceport is that all these areas are hotly contested, particularly in Duos and Squads. You’ll need to be very focused and fast in order to complete the full farming route.

Image credit:Rock Paper Shotgun/Embark Studios
Blue Gate
Blue Gate tends to have a good chance of dropping Blueprints, potentially because it generally has a high number of containers which can hold lots of items; so there’s a higher chance of a Blueprint spawning in each container. In my experience, the best Blueprint farming spots on Blue Gate are Pilgrim’s Peak, Raider’s Refuge, the Ancient Fort, and the Underground Complex beneath the Warehouse .
All of these areas contain a wealth of containers to loot. Raider’s Refuge has less to loot, but the majority of the containers in and around the Refuge are raider containers, which have a high chance of containing Blueprints - particularly during major events.
Stella Montis
On the whole, Stella Montis seems to have a very low drop rate for Blueprints (though a high chance of dropping other high-tier loot). If you do want to try farming Blueprints on this map, the best places to find Blueprints in Stella Montis are Medical Research, Assembly Workshop, and the Business Center . These areas have the highest density of containers to loot on the map.
In addition to this, the Western Tunnel has a few different Security Lockers to loot, so while there’s very little to loot elsewhere in this area of the map, it’s worth hitting those Security Lockers if you spawn there at the start of a match.
That wraps up this primer on how to get all the Blueprints in Arc Raiders as quickly as possible. With the Expedition system constantly resetting a large number of players’ Blueprints, it’s more important than ever to have the most up-to-date information on where to find all these Blueprints.
While you’re here, be sure to check out our Arc Raiders best guns tier list , as well as our primers on the best skills to unlock and all the different Field Depot locations on every map.

ARC Raiders
PS5 , Xbox Series X/S , PC
Rock Paper Shotgun is better when you sign in
Sign in and join us on our journey to discover strange and compelling PC games.
