Blue Prince review
The house always wins
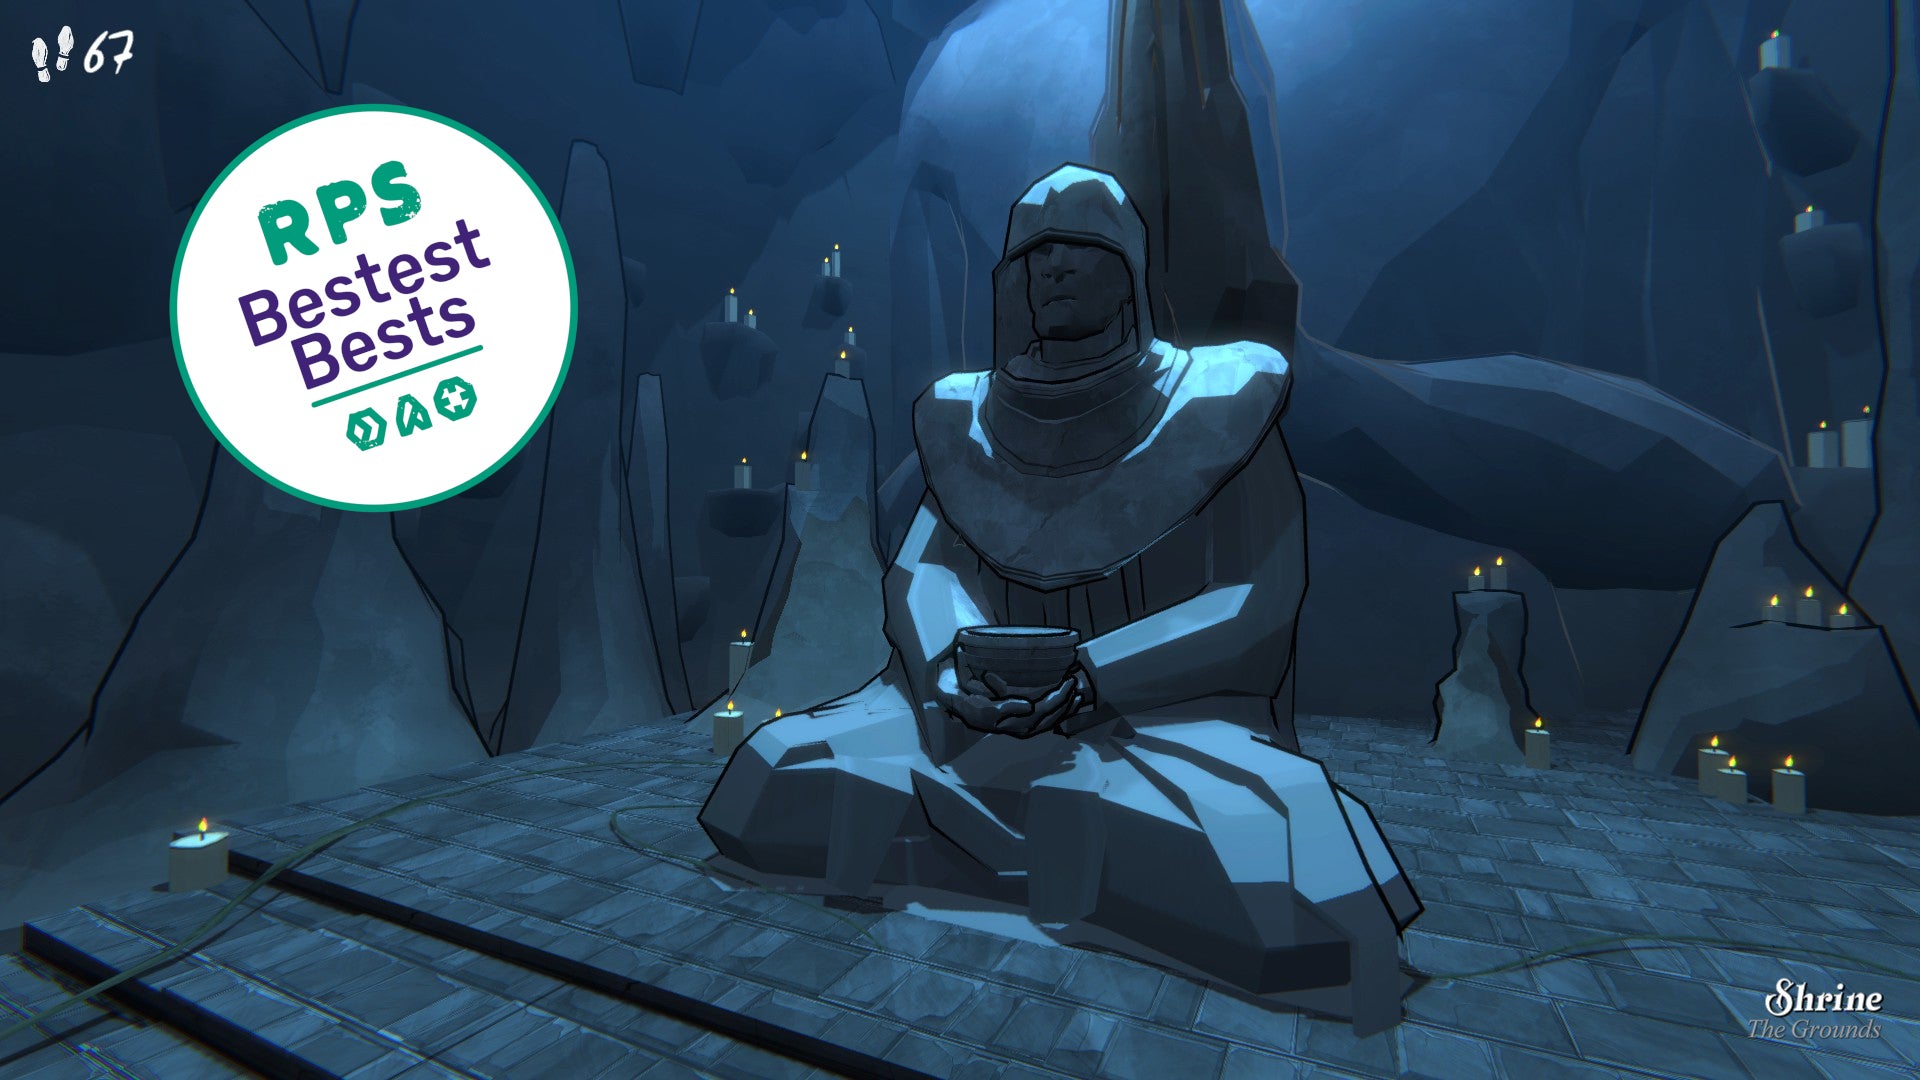
Image credit:Raw Fury / Rock Paper Shotgun

- Developer: Dogubomb
- Publisher: Raw Fury
- Release: April 10th 2025
- On: Windows
- From: Steam , Microsoft
- Price: £24.99, $29.99, €29.99
- Reviewed on: Intel Core-i7 12700F, 16GB RAM, Nvidia RTX 3060, Windows 11
There are at least hundreds, probably thousands, and possibly tens of thousands of potential houses in first-person labyrinth puzzler Blue Prince . I am genuinely tempted to review them all, but I am not a realtor and Graham’s kneecaps inflate when a review strays above 2000 words, so I’ll settle for describing just four. The first is the house you discover. It waits eternally behind doors that give you a choice of three, semi-randomised rooms when you reach for the handle, each “drafted” on a 9-by-5 grid map that is blank save for the opening foyer and the antechamber skulking at the far end. Every time you enter the house, the layout wipes itself clean and must be filled in again.
You’re here because you’ve inherited this restless, eldritch manor from your uncle, an eccentric blueblood whose many closets (as and when you draft them) are littered with skeletons of all kinds. Your uncle’s will contains a few provisos, however: to be legally recognised as heir, you need to find the house’s 46th room, an architectural impossibility according to the map, and you need to do so within a single day measured by the number of “steps” your character can take before keeling over in exhaustion. You get 50 steps to begin with, and most rooms consume a single step every time you enter.

The opening days of Blue Prince consist, naturally, of the enchantment of entering rooms for the first time, each a cosy and disquieting warren of chesspiece ornaments, cheery memos, odd machines, and free-associative paintings. In the Den, a fire crackles in the grate and huge art deco wallclocks look down upon a table displaying a single jewel. There is a tipped-over candlestick behind one of the sofas; I’m still not sure whether that’s a naturalistic flourish, or a hint. In the Bunkroom, ripe with the decades-old reek of boys festering to be men, there’s an ancient games console, possibly an Atari VCS, and a lonely hamster, trundling away at a wheel. What happens to the hamster when the Bunkroom isn’t on the floorplan?
All these spaces immediately fascinate, however humble. Even the walk-in closets are portentous. The warm, heavily shadowed graphic novel art direction is innately mysterious - it’s both calming to inhabit, and delicately haunted by the work of comic artist Mike Mignola . There’s a horror game pallor to the whole thing, though the more appropriate moodboard connection is Gone Home . You look back through the open doors of successive rooms after a few moments, and it’s hard not to shudder: all that… space behind you, all those blindspots, half-knowingly accrued. Some rooms skew monstrous: the L-shaped Pantry is a dowdier PT , and I never entered the enormous, multiple-level Boiler Room without dread.
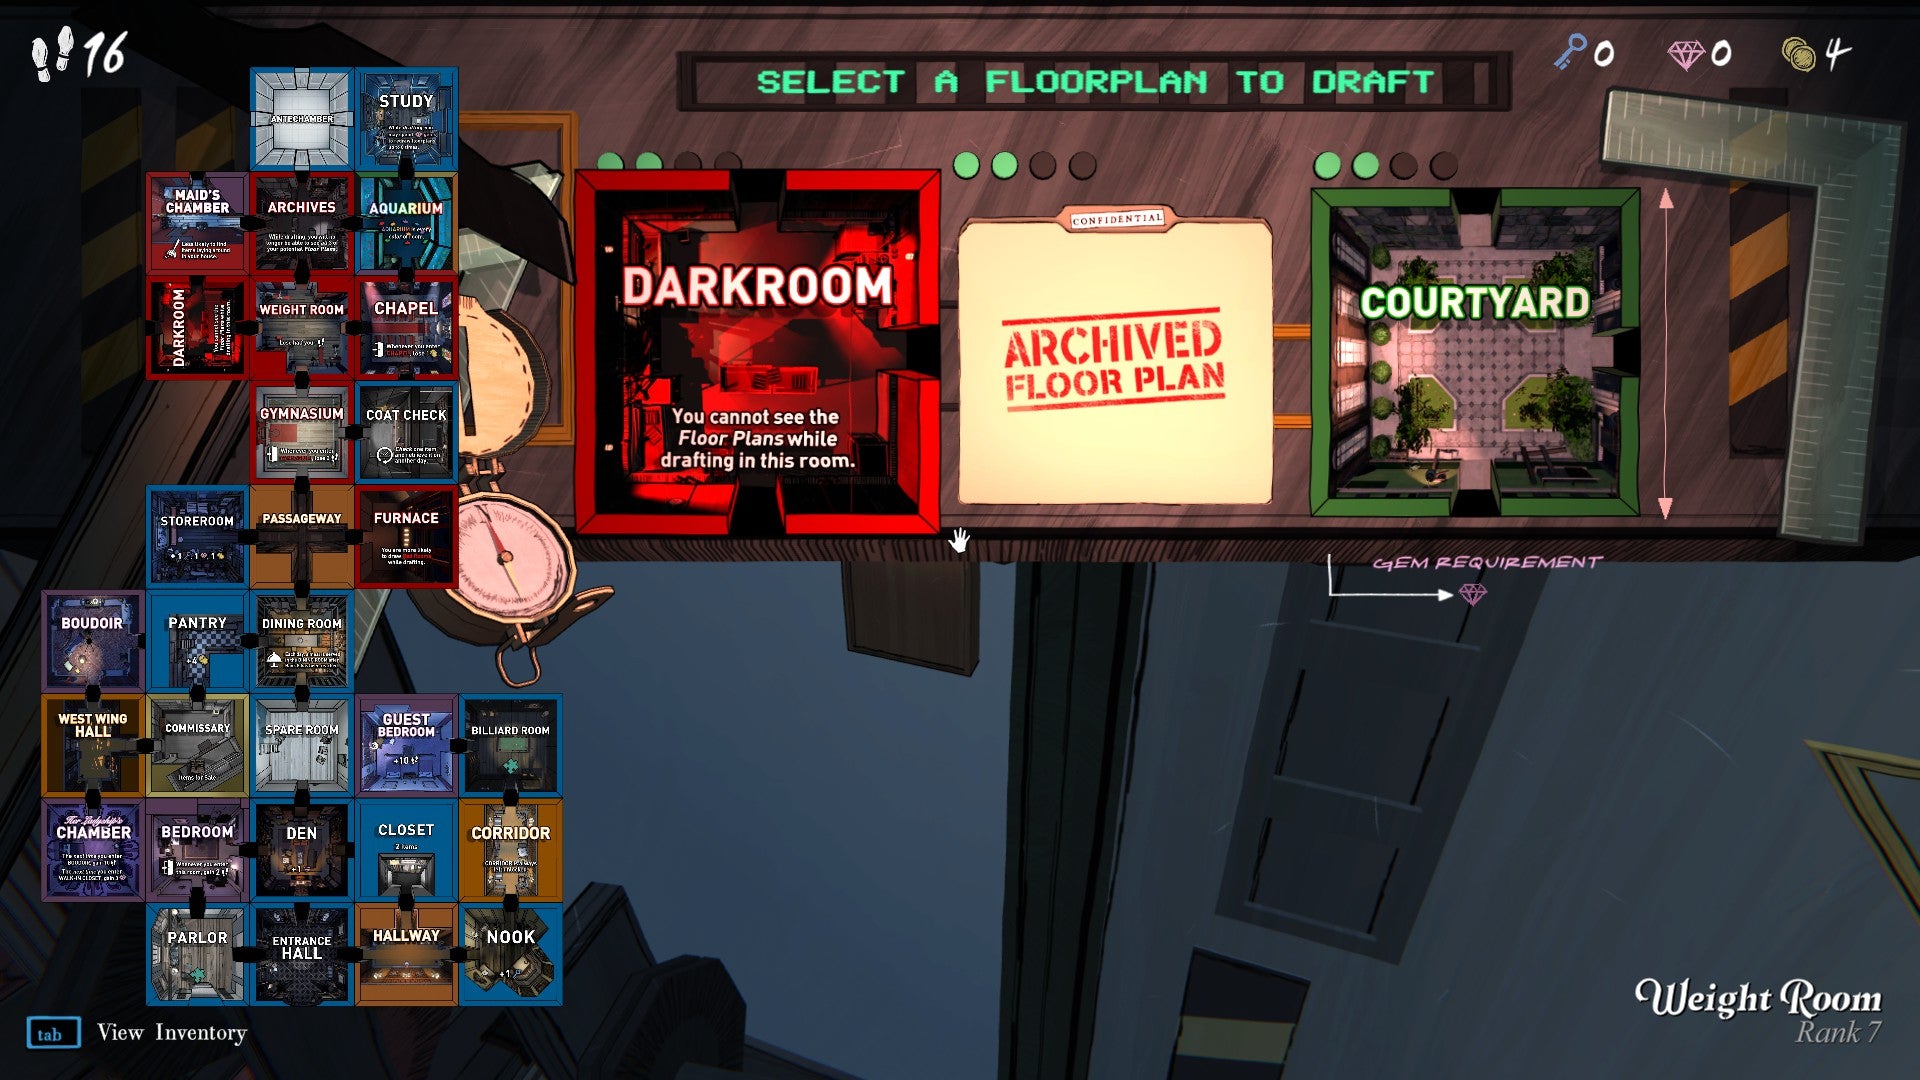
Image credit:Raw Fury
The house you discover in Blue Prince is complicated by the house that doesn’t want to be discovered - the unspoken shapeshifter you have to outwit, to outmanoeuvre. This obstructiveness begins, of course, with the unpredictable dealing of rooms when you try to open a door. Each room has a different number of exits, and there’s no guarantee they’ll line up cleanly with the existing layout, resulting in crude tectonic interjections with boarded-up alcoves. Opening the door to a grid square along the exterior wall is always a heart-in-mouth process. But sometimes, it’s useful to draft a dead end such as Her Ladyship’s Chamber: each room can only be played once, and you’ll want to save those with two or more exits for the middle of the property, so that you can branch out comfortably and circle back to any unfilled squares.
As you go, you also discover ways of predicting and weighting the drafting pool, with certain rooms more likely to appear at certain latitudes, and mechanisms within rooms that let you stave off certain possibilities - or which add new, more exotic rooms to the pool. You’ll often, but not always, want to avoid the Red Rooms, both for the Hitchcockian associations and because they hinder and sabotage you. The Weights Room exhausts you and halves your steps when deployed. The Dark Room obscures the rooms you’re drafting when you try to push beyond it, at least till you find and reset the breaker.
Each room also forms part of a shockingly elaborate resource management element, which is densely entangled with the act of laying out routes. For the fancier room types, you’ll need to collect gems; running out of them before you’ve cracked the third or fourth row of squares is one of Blue Prince’s sophomore fumbles. Wasting your steps by, say, backtracking unnecessarily is another, but they can be replenished by various means - primarily, finding food and drafting bedrooms, with certain orderings and combinations allowing you to all but earn back every last footfall towards what might have otherwise been the end of a run.
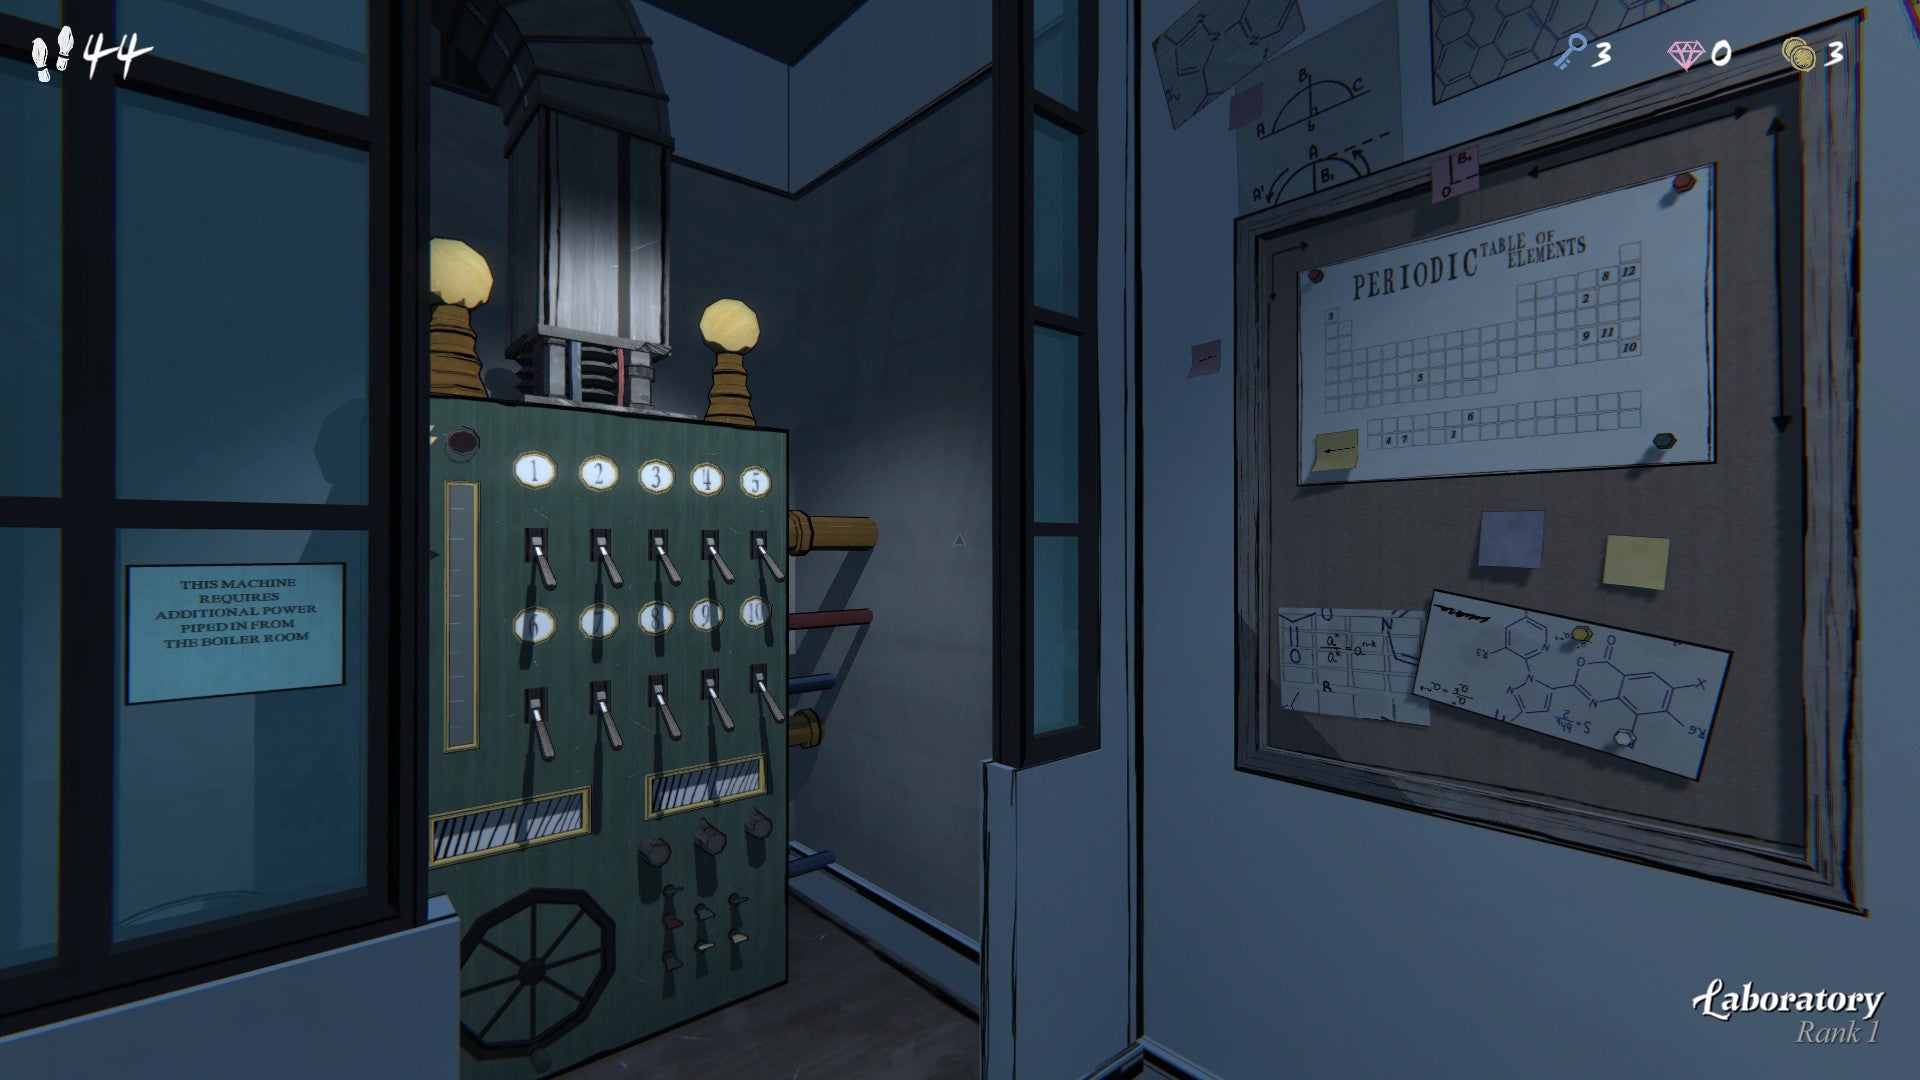
Image credit:Raw Fury
There are also keys of many kinds, some of which open one room, and keycards you may find you don’t need, if you can subvert the electronics. There are dropped coins, and rooms in which you can spend them, and rooms that steal them from you. And there are handheld tools, like magnifying glasses and books of coupons, that either hot-wire the individual challenges and overall randomisation in your favour, or are needed to obtain certain clues.
Some of the resources are gathered by completing smaller puzzles inside rooms. The Parlor offers a choice of labelled treasure boxes, at least one of which is lying to you, and there’s a dartboard conundrum elsewhere that hinges on deciphering colours. These lobe-scratchers can seem dry, perhaps an acquired taste next to the delight of assembling your own maze, perhaps a bit too redolent of the Cluedo-ass bullshit artistry satirised in Knives Out: A Glass Onion. But they are not repetitive: complete a puzzle and you’ll find another, typically more challenging variation the next time you draft that room. They’re also consistent with the overarching logic of the manor, or rather, with the overarching obsessions that dictate the choice of motifs. Which brings us to the third kind of house in Blue Prince, the house that you solve.
Solving Blue Prince involves the recognition that a lot of the objects you might have, which initially read simply as props, actually have purpose, and that a lot of the puzzle symbolism has a shadowy narrative agency. The metaphors are also cogs in a plot, without losing their charm as metaphors. There is a wide world beyond the manor, and there were people who once lived here. The staff, for one, who are rendered in stained glass in the Chapel, and who wish you good luck over email when you eventually discover the password for the terminal in the Security Room. Your uncle is, again, a complex character, seeking absolution from beyond the grave. The pieces and, above all, the colours, gradually settle into place much as they do in Outer Wilds - a possible influence that only dawned on me once I’d unlocked the Observatory, which adds a star to the sky every time it’s drafted, producing a new constellation that bestows a different buff.
<img loading=“lazy” src=“https://assetsio.gnwcdn.com/20250323164745_1.jpg?width=2048&height=2048&fit=bounds&quality=85&format=jpg&auto=webp" onerror=“this.onerror=null;this.src=‘https://blogger.googleusercontent.com/img/a/AVvXsEhe7F7TRXHtjiKvHb5vS7DmnxvpHiDyoYyYvm1nHB3Qp2_w3BnM6A2eq4v7FYxCC9bfZt3a9vIMtAYEKUiaDQbHMg-ViyGmRIj39MLp0bGFfgfYw1Dc9q_H-T0wiTm3l0Uq42dETrN9eC8aGJ9_IORZsxST1AcLR7np1koOfcc7tnHa4S8Mwz_xD9d0=s16000';" alt=“A close-up of a postcard for a town called Reddington, with the letters “RED” seen through a magnifying glass, from the game Blue Prince - 6”>
Image credit:Raw Fury
To reach the bottom of that mystery you have to put everything you’ve learned to the test. You have to draft specific combinations of rooms, do specific things, bring specific items, calibrate the architecture in specific ways. When I previewed Blue Prince at GDC in 2024, Dogubomb founder Tonda Ros told me that it’s possible to complete Blue Prince in a single run, if you figure out certain things instantly and are very lucky. You will need a hell of a lot of luck. More likely, it will take you tens of hours.
There’s scope for frustration, once your objectives solidify. The game’s randomisation can lead to a feeling of being cheated: sometimes, you’re inches from a breakthrough and the game drops a Lavatory on you like some kind of Sherlockian Warner Bros cartoon. But Dogubomb do a great job of minimising that risk - firstly, by introducing permanent progression elements, with pivotal house and more incremental room upgrades that make certain approaches easier as your ambitions increase. And secondly, by teeing up a bunch of larger conundrums to unravel at any time, so that if you get stuck in one respect you can use the run to investigate something else. In general, I came away from failure with the grudging thought that if I’d made certain choices earlier, stacked the deck a little more craftily, I could have gone all the way.
I also confess that I often lost sight of my aim because I was having fun cultivating the game’s sense of place - stringing together rooms to support different forms of exploration, and to send particular ludonarrative energies coursing through the contours of the grid. This being the fourth house in Blue Prince, the one implicit throughout. It’s a house you build houses with, a house that opens portals to a Bachelardian tradition of houses in video games and other artworks. Resident Evil’s Umbrella Mansion, where every doorway flaps open into uncreated darkness. Last year’s sweatiest post-panopticon, The Crush House , where every room is pierced by sightlines. The Binding of Isaac ’s cellar.

Image credit:Raw Fury
I would have liked Dogubomb to have made a touch more of this. When you end the day in Blue Prince, the game scores and categorises what you’ve created: a two or three rank affair with a lot of patios and greenhouses might get called a “Rustic Cottage”, while a vast pile of Red Rooms including a Gym, Pool and Weights Room is a “Scarlet Athletics Center”. It’s the one aspect of Blue Prince I find humdrum: surely, Ros could have come up with more poetic descriptors than these, descriptors worthy of player-woven layouts that, say, hinge on reading of soil types and radiation levels, or Silent Hill-grade jumbles of sealed doors that stock the foyer with treasure for every two gems you spend. Still, that’s poking at scrapes in the woodwork. If you hadn’t gotten the message by now, Blue Prince is a marvel.
Find out how we conduct our reviews by reading our review policy .
Blue Prince
PC
Rock Paper Shotgun is better when you sign in
Sign in and join us on our journey to discover strange and compelling PC games.

All 75 Arc Raiders Blueprints and where to get them
These areas have the highest chance of giving you Blueprints

Image credit:Rock Paper Shotgun/Embark Studios

Looking for more Arc Raiders Blueprints? It’s a special day when you find a Blueprint, as they’re among the most valuable items in Arc Raiders. If you find a Blueprint that you haven’t already found, then you must make sure you hold onto it at all costs, because Blueprints are the key to one of the most important and powerful systems of meta-progression in the game.
This guide aims to be the very best guide on Blueprints you can find, starting with a primer on what exactly they are and how they work in Arc Raiders, before delving into exactly where to get Blueprints and the very best farming spots for you to take in your search.
We’ll also go over how to get Blueprints from other unlikely activities, such as destroying Surveyors and completing specific quests. And you’ll also find the full list of all 75 Blueprints in Arc Raiders on this page (including the newest Blueprints added with the Cold Snap update , such as the Deadline Blueprint and Firework Box Blueprint), giving you all the information you need to expand your own crafting repertoire.
In this guide:
- What are Blueprints in Arc Raiders?
- Full Blueprint list: All crafting recipes
- Where to find Blueprints in Arc Raiders Blueprints obtained from quests Blueprints obtained from Trials Best Blueprint farming locations

What are Blueprints in Arc Raiders?
Blueprints in Arc Raiders are special items which, if you manage to extract with them, you can expend to permanently unlock a new crafting recipe in your Workshop. If you manage to extract from a raid with an Anvil Blueprint, for example, you can unlock the ability to craft your very own Anvil Pistol, as many times as you like (as long as you have the crafting materials).
To use a Blueprint, simply open your Inventory while in the lobby, then right-click on the Blueprint and click “Learn And Consume” . This will permanently unlock the recipe for that item in your Workshop. As of the Stella Montis update, there are allegedly 75 different Blueprints to unlock - although only 68 are confirmed to be in the game so far. You can see all the Blueprints you’ve found and unlocked by going to the Workshop menu, and hitting “R” to bring up the Blueprint screen.
It’s possible to find duplicates of past Blueprints you’ve already unlocked. If you find these, then you can either sell them, or - if you like to play with friends - you can take it into a match and gift it to your friend so they can unlock that recipe for themselves. Another option is to keep hold of them until the time comes to donate them to the Expedition.
Full Blueprint list: All crafting recipes
Below is the full list of all the Blueprints that are currently available to find in Arc Raiders, and the crafting recipe required for each item:
| Blueprint | Type | Recipe | Crafted At |
|---|---|---|---|
| Bettina | Weapon | 3x Advanced Mechanical Components 3x Heavy Gun Parts 3x Canister | Gunsmith 3 |
| Blue Light Stick | Quick Use | 3x Chemicals | Utility Station 1 |
| Aphelion | Weapon | 3x Magnetic Accelerator 3x Complex Gun Parts 1x Matriarch Reactor | Gunsmith 3 |
| Combat Mk. 3 (Flanking) | Augment | 2x Advanced Electrical Components 3x Processor | Gear Bench 3 |
| Combat Mk. 3 (Aggressive) | Augment | 2x Advanced Electrical Components 3x Processor | Gear Bench 3 |
| Complex Gun Parts | Material | 2x Light Gun Parts 2x Medium Gun Parts 2x Heavy Gun Parts | Refiner 3 |
| Fireworks Box | Quick Use | 1x Explosive Compound 3x Pop Trigger | Explosives Station 2 |
| Gas Mine | Mine | 4x Chemicals 2x Rubber Parts | Explosives Station 1 |
| Green Light Stick | Quick Use | 3x Chemicals | Utility Station 1 |
| Pulse Mine | Mine | 1x Crude Explosives 1x Wires | Explosives Station 1 |
| Seeker Grenade | Grenade | 1x Crude Explosives 2x ARC Alloy | Explosives Station 1 |
| Looting Mk. 3 (Survivor) | Augment | 2x Advanced Electrical Components 3x Processor | Gear Bench 3 |
| Angled Grip II | Mod | 2x Mechanical Components 3x Duct Tape | Gunsmith 2 |
| Angled Grip III | Mod | 2x Mod Components 5x Duct Tape | Gunsmith 3 |
| Hullcracker | Weapon | 1x Magnetic Accelerator 3x Heavy Gun Parts 1x Exodus Modules | Gunsmith 3 |
| Launcher Ammo | Ammo | 5x Metal Parts 1x Crude Explosives | Workbench 1 |
| Anvil | Weapon | 5x Mechanical Components 5x Simple Gun Parts | Gunsmith 2 |
| Anvil Splitter | Mod | 2x Mod Components 3x Processor | Gunsmith 3 |
| ??? | ??? | ??? | ??? |
| Barricade Kit | Quick Use | 1x Mechanical Components | Utility Station 2 |
| Blaze Grenade | Grenade | 1x Explosive Compound 2x Oil | Explosives Station 3 |
| Bobcat | Weapon | 3x Advanced Mechanical Components 3x Light Gun Parts | Gunsmith 3 |
| Osprey | Weapon | 2x Advanced Mechanical Components 3x Medium Gun Parts 7x Wires | Gunsmith 3 |
| Burletta | Weapon | 3x Mechanical Components 3x Simple Gun Parts | Gunsmith 1 |
| Compensator II | Mod | 2x Mechanical Components 4x Wires | Gunsmith 2 |
| Compensator III | Mod | 2x Mod Components 8x Wires | Gunsmith 3 |
| Defibrillator | Quick Use | 9x Plastic Parts 1x Moss | Medical Lab 2 |
| ??? | ??? | ??? | ??? |
| Equalizer | Weapon | 3x Magnetic Accelerator 3x Complex Gun Parts 1x Queen Reactor | Gunsmith 3 |
| Extended Barrel | Mod | 2x Mod Components 8x Wires | Gunsmith 3 |
| Extended Light Mag II | Mod | 2x Mechanical Components 3x Steel Spring | Gunsmith 2 |
| Extended Light Mag III | Mod | 2x Mod Components 5x Steel Spring | Gunsmith 3 |
| Extended Medium Mag II | Mod | 2x Mechanical Components 3x Steel Spring | Gunsmith 2 |
| Extended Medium Mag III | Mod | 2x Mod Components 5x Steel Spring | Gunsmith 3 |
| Extended Shotgun Mag II | Mod | 2x Mechanical Components 3x Steel Spring | Gunsmith 2 |
| Extended Shotgun Mag III | Mod | 2x Mod Components 5x Steel Spring | Gunsmith 3 |
| Remote Raider Flare | Quick Use | 2x Chemicals 4x Rubber Parts | Utility Station 1 |
| Heavy Gun Parts | Material | 4x Simple Gun Parts | Refiner 2 |
| Venator | Weapon | 2x Advanced Mechanical Components 3x Medium Gun Parts 5x Magnet | Gunsmith 3 |
| Il Toro | Weapon | 5x Mechanical Components 6x Simple Gun Parts | Gunsmith 1 |
| Jolt Mine | Mine | 1x Electrical Components 1x Battery | Explosives Station 2 |
| Explosive Mine | Mine | 1x Explosive Compound 1x Sensors | Explosives Station 3 |
| Jupiter | Weapon | 3x Magnetic Accelerator 3x Complex Gun Parts 1x Queen Reactor | Gunsmith 3 |
| Light Gun Parts | Material | 4x Simple Gun Parts | Refiner 2 |
| Lightweight Stock | Mod | 2x Mod Components 5x Duct Tape | Gunsmith 3 |
| Lure Grenade | Grenade | 1x Speaker Component 1x Electrical Components | Utility Station 2 |
| Medium Gun Parts | Material | 4x Simple Gun Parts | Refiner 2 |
| Torrente | Weapon | 2x Advanced Mechanical Components 3x Medium Gun Parts 6x Steel Spring | Gunsmith 3 |
| Muzzle Brake II | Mod | 2x Mechanical Components 4x Wires | Gunsmith 2 |
| Muzzle Brake III | Mod | 2x Mod Components 8x Wires | Gunsmith 3 |
| Padded Stock | Mod | 2x Mod Components 5x Duct Tape | Gunsmith 3 |
| Shotgun Choke II | Mod | 2x Mechanical Components 4x Wires | Gunsmith 2 |
| Shotgun Choke III | Mod | 2x Mod Components 8x Wires | Gunsmith 3 |
| Shotgun Silencer | Mod | 2x Mod Components 8x Wires | Gunsmith 3 |
| Showstopper | Grenade | 1x Advanced Electrical Components 1x Voltage Converter | Explosives Station 3 |
| Silencer I | Mod | 2x Mechanical Components 4x Wires | Gunsmith 2 |
| Silencer II | Mod | 2x Mod Components 8x Wires | Gunsmith 3 |
| Snap Hook | Quick Use | 2x Power Rod 3x Rope 1x Exodus Modules | Utility Station 3 |
| Stable Stock II | Mod | 2x Mechanical Components 3x Duct Tape | Gunsmith 2 |
| Stable Stock III | Mod | 2x Mod Components 5x Duct Tape | Gunsmith 3 |
| Tagging Grenade | Grenade | 1x Electrical Components 1x Sensors | Utility Station 3 |
| Tempest | Weapon | 3x Advanced Mechanical Components 3x Medium Gun Parts 3x Canister | Gunsmith 3 |
| Trigger Nade | Grenade | 2x Crude Explosives 1x Processor | Explosives Station 2 |
| Vertical Grip II | Mod | 2x Mechanical Components 3x Duct Tape | Gunsmith 2 |
| Vertical Grip III | Mod | 2x Mod Components 5x Duct Tape | Gunsmith 3 |
| Vita Shot | Quick Use | 2x Antiseptic 1x Syringe | Medical Lab 3 |
| Vita Spray | Quick Use | 3x Antiseptic 1x Canister | Medical Lab 3 |
| Vulcano | Weapon | 1x Magnetic Accelerator 3x Heavy Gun Parts 1x Exodus Modules | Gunsmith 3 |
| Wolfpack | Grenade | 2x Explosive Compound 2x Sensors | Explosives Station 3 |
| Red Light Stick | Quick Use | 3x Chemicals | Utility Station 1 |
| Smoke Grenade | Grenade | 14x Chemicals 1x Canister | Utility Station 2 |
| Deadline | Mine | 3x Explosive Compound 2x ARC Circuitry | Explosives Station 3 |
| Trailblazer | Grenade | 1x Explosive Compound 1x Synthesized Fuel | Explosives Station 3 |
| Tactical Mk. 3 (Defensive) | Augment | 2x Advanced Electrical Components 3x Processor | Gear Bench 3 |
| Tactical Mk. 3 (Healing) | Augment | 2x Advanced Electrical Components 3x Processor | Gear Bench 3 |
| Yellow Light Stick | Quick Use | 3x Chemicals | Utility Station 1 |
Note: The missing Blueprints in this list likely have not actually been added to the game at the time of writing, because none of the playerbase has managed to find any of them. As they are added to the game, I will update this page with the most relevant information so you know exactly how to get all 75 Arc Raiders Blueprints.
Where to find Blueprints in Arc Raiders
Below is a list of all containers, modifiers, and events which maximise your chances of finding Blueprints:
- Certain quests reward you with specific Blueprints .
- Completing Trials has a high chance of offering Blueprints as rewards.
- Surveyors have a decent chance of dropping Blueprints on death.
- High loot value areas tend to have a greater chance of spawning Blueprints.
- Night Raids and Storms may increase rare Blueprint spawn chances in containers.
- Containers with higher numbers of items may have a higher tendency to spawn Blueprints. As a result, Blue Gate (which has many “large” containers containing multiple items) may give you a higher chance of spawning Blueprints.
- Raider containers (Raider Caches, Weapon Boxes, Medical Bags, Grenade Tubes) have increased Blueprint drop rates. As a result, the Uncovered Caches event gives you a high chance of finding Blueprints.
- Security Lockers have a higher than average chance of containing Blueprints.
- Certain Blueprints only seem to spawn under specific circumstances: Tempest Blueprint only spawns during Night Raid events. Vulcano Blueprint only spawns during Hidden Bunker events. Jupiter and Equaliser Blueprints only spawn during Harvester events.

Raider Caches, Weapon Boxes, and other raider-oriented container types have a good chance of offering Blueprints. |Image credit:Rock Paper Shotgun/Embark Studios
Blueprints have a very low chance of spawning in any container in Arc Raiders, around 1-2% on average. However, there is a higher chance of finding Blueprints in particular container types. Specifically, you can find more Blueprints in Raider containers and security lockers.
Beyond this, if you’re looking for Blueprints you should focus on regions of the map which are marked as having particularly high-value loot. Areas such as the Control Tower in Dam Battlegrounds, the Arrival and Departure Buildings in Spaceport, and Pilgrim’s Peak in Blue Gate all have a better-than-average chance of spawning Blueprints somewhere amongst all their containers. Night Raids and Electromagnetic Storm events also increase the drop chances of certain Blueprints .
In addition to these containers, you can often loot Blueprints from destroyed Surveyors - the largest of the rolling ball ARC. Surveyors are more commonly found on the later maps - Spaceport and Blue Gate - and if one spawns in your match, you’ll likely see it by the blue laser beam that it casts into the sky while “surveying”.
Surveyors are quite well-armoured and will very speedily run away from you once it notices you, but if you can take one down then make sure you loot all its parts for a chance of obtaining certain unusual Blueprints.
Blueprints obtained from quests
One way in which you can get Blueprints is by completing certain quests for the vendors in Speranza. Some quests will reward you with a specific item Blueprint upon completion, so as long as you work through all the quests in Arc Raiders, you are guaranteed those Blueprints.
Here is the full list of all Blueprints you can get from quest rewards:
- Trigger Nade Blueprint: Rewarded after completing “Sparks Fly”.
- Lure Grenade Blueprint: Rewarded after completing “Greasing Her Palms”.
- Burletta Blueprint: Rewarded after completing “Industrial Espionage”.
- Hullcracker Blueprint (and Launcher Ammo Blueprint): Rewarded after completing “The Major’s Footlocker”.
Alas, that’s only 4 Blueprints out of a total of 75 to unlock, so for the vast majority you will need to find them yourself during a raid. If you’re intent on farming Blueprints, then it’s best to equip yourself with cheap gear in case you lose it, but don’t use a free loadout because then you won’t get a safe pocket to stash any new Blueprint you find. No pain in Arc Raiders is sharper than failing to extract with a new Blueprint you’ve been after for a dozen hours already.

One of the best ways to get Blueprints is by hitting three stars on all five Trials every week. |Image credit:Rock Paper Shotgun/Embark Studios
Blueprints obtained from Trials
One of the very best ways to get Blueprints is as rewards for completing Trials in Arc Raiders. Trials are unlocked from Level 15 onwards, and allow you to earn rewards by focusing on certain tasks over the course of several raids. For example, one Trial might task you with dealing damage to Hornets, while another might challenge you to loot Supply Drops.
Trials refresh on a weekly basis, with a new week bringing five new Trials. Each Trial can offer up to three rewards after passing certain score milestones, and it’s possible to receive very high level loot from these reward crates - including Blueprints. So if you want to unlock as many Blueprints as possible, you should make a point of completing as many Trials as possible each week.
Best Blueprint farming locations
The very best way to get Blueprints is to frequent specific areas of the maps which combine high-tier loot pools with the right types of containers to search. Here are my recommendations for where to find Blueprints on every map, so you can always keep the search going for new crafting recipes to unlock.

Image credit:Rock Paper Shotgun/Embark Studios
Dam Battlegrounds
The best places to farm Blueprints on Dam Battlegrounds are the Control Tower, Power Generation Complex, Ruby Residence, and Pale Apartments . The first two regions, despite only being marked on the map as mid-tier loot, contain a phenomenal number of containers to loot. The Control Tower can also contain a couple of high-tier Security Lockers - though of course, you’ll need to have unlocked the Security Breach skill at the end of the Survival tree.
There’s also a lot of reporting amongst the playerbase that the Residential areas in the top-left of the map - Pale Apartments and Ruby Residence - give you a comparatively strong chance of finding Blueprints. Considering their size, there’s a high density of containers to loot in both locations, and they also have the benefit of being fairly out of the way. So you’re more likely to have all the containers to yourself.
Buried City
The best Blueprint farming locations on Buried City are the Santa Maria Houses, Grandioso Apartments, Town Hall, and the various buildings of the New District . Grandioso Apartments has a lower number of containers than the rest, but a high chance of spawning weapon cases - which have good Blueprint drop rates. The others are high-tier loot areas, with plenty of lootable containers - including Security Lockers.
Spaceport
The best places to find Blueprints on Spaceport are the Arrival and Departure Buildings, as well as Control Tower A6 and the Launch Towers . All these areas are labelled as high-value loot regions, and many of them are also very handily connected to one another by the Spaceport wall, which you can use to quickly run from one area to the next. At the tops of most of these buildings you’ll find at least one Security Locker, so this is an excellent farming route for players looking to find Blueprints.
The downside to looting Blueprints on Spaceport is that all these areas are hotly contested, particularly in Duos and Squads. You’ll need to be very focused and fast in order to complete the full farming route.

Image credit:Rock Paper Shotgun/Embark Studios
Blue Gate
Blue Gate tends to have a good chance of dropping Blueprints, potentially because it generally has a high number of containers which can hold lots of items; so there’s a higher chance of a Blueprint spawning in each container. In my experience, the best Blueprint farming spots on Blue Gate are Pilgrim’s Peak, Raider’s Refuge, the Ancient Fort, and the Underground Complex beneath the Warehouse .
All of these areas contain a wealth of containers to loot. Raider’s Refuge has less to loot, but the majority of the containers in and around the Refuge are raider containers, which have a high chance of containing Blueprints - particularly during major events.
Stella Montis
On the whole, Stella Montis seems to have a very low drop rate for Blueprints (though a high chance of dropping other high-tier loot). If you do want to try farming Blueprints on this map, the best places to find Blueprints in Stella Montis are Medical Research, Assembly Workshop, and the Business Center . These areas have the highest density of containers to loot on the map.
In addition to this, the Western Tunnel has a few different Security Lockers to loot, so while there’s very little to loot elsewhere in this area of the map, it’s worth hitting those Security Lockers if you spawn there at the start of a match.
That wraps up this primer on how to get all the Blueprints in Arc Raiders as quickly as possible. With the Expedition system constantly resetting a large number of players’ Blueprints, it’s more important than ever to have the most up-to-date information on where to find all these Blueprints.
While you’re here, be sure to check out our Arc Raiders best guns tier list , as well as our primers on the best skills to unlock and all the different Field Depot locations on every map.

ARC Raiders
PS5 , Xbox Series X/S , PC
Rock Paper Shotgun is better when you sign in
Sign in and join us on our journey to discover strange and compelling PC games.
