Battlefield 6 weapons list: Here’s every gun in the game
The full list of all the weapons in Battlefield 6
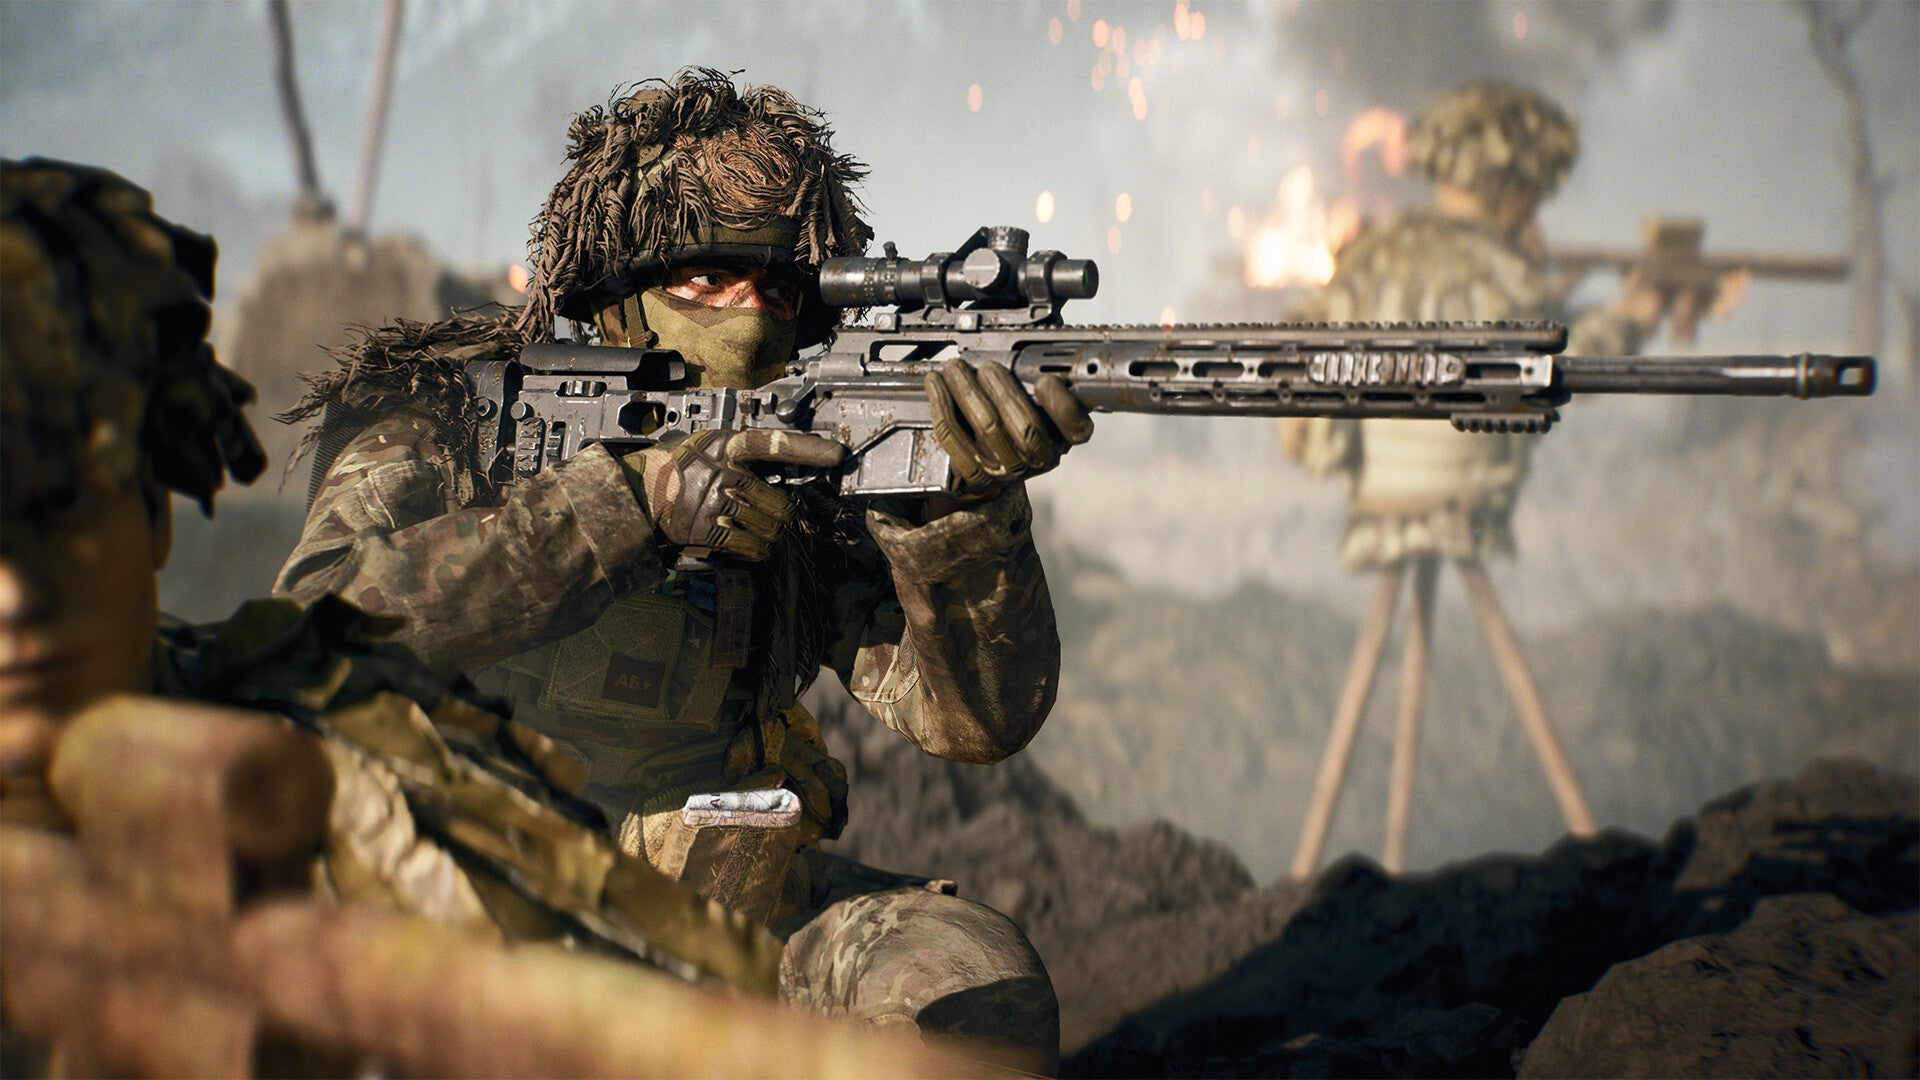
Image credit:EA

Want to know all the weapons in Battlefield 6? We’ve compiled a comprehensive list of all 45 guns in Battlefield 6, broken down by weapon class. You’ll find all the Assault Rifles, Carbines, SMGs, LMGs, DMRs, Snipers, Shotguns and Pistols on this list, with some information about each of them. Make sure you also read our guide to unlocking every weapon in Battlefield 6 .
In this guide:
- Assault Rifles
- Carbines
- SMGs
- LMGs
- DMRs
- Snipers
- Shotguns
- Pistols
Assault Rifles

Image credit:Rock Paper Shotgun/EA
B36A4 (aka the G36) : A versatile rifle with medium damage, a slightly above-average fire rate, and good handling. One of the stronger Assault Rifles.
SOR-556 MK2 : One of the slowest-firing Assault Rifles, but makes up for it with excellent precision. You’ll want to slap a magnified scope on this and use it at medium-to-long ranges.
AK4D : A “battle rifle”: its fire rate is sluggish, its kick is nasty and its magazine only holds 20 rounds, but it deals 33 damage, tied for the most of any of the Assault Rifles. Made for longer-range fights.
TR-7 : The TR-7 bullpup rifle deals 33 damage, which is a lot, and fires pretty fast, but it’s hard to control and only has 20 bullets per magazine. Designed for close-range fights.
KORD 6P67 : The fastest firing of the Assault Rifles, with low recoil for ranged fights and a 30-round magazine. The drawback – a big one – is it only deals 20 damage per shot, lower than all the other Assault Rifles, making it a five-hit kill to the body up close.
NVO-228E : One of the best guns in the game, dealing 33 damage per shot from its 30-round magazine. Its fire rate is slightly below average, and you’ll need attachments to control its recoil, but once you do it’s a mid-range powerhouse.
L85A3 : A steady long-range rifle designed for accuracy. It has the same 25 damage, 30-round magazine combo as a lot of the other Assault Rifles, with a slower fire rate than most, but more precision.
Carbines
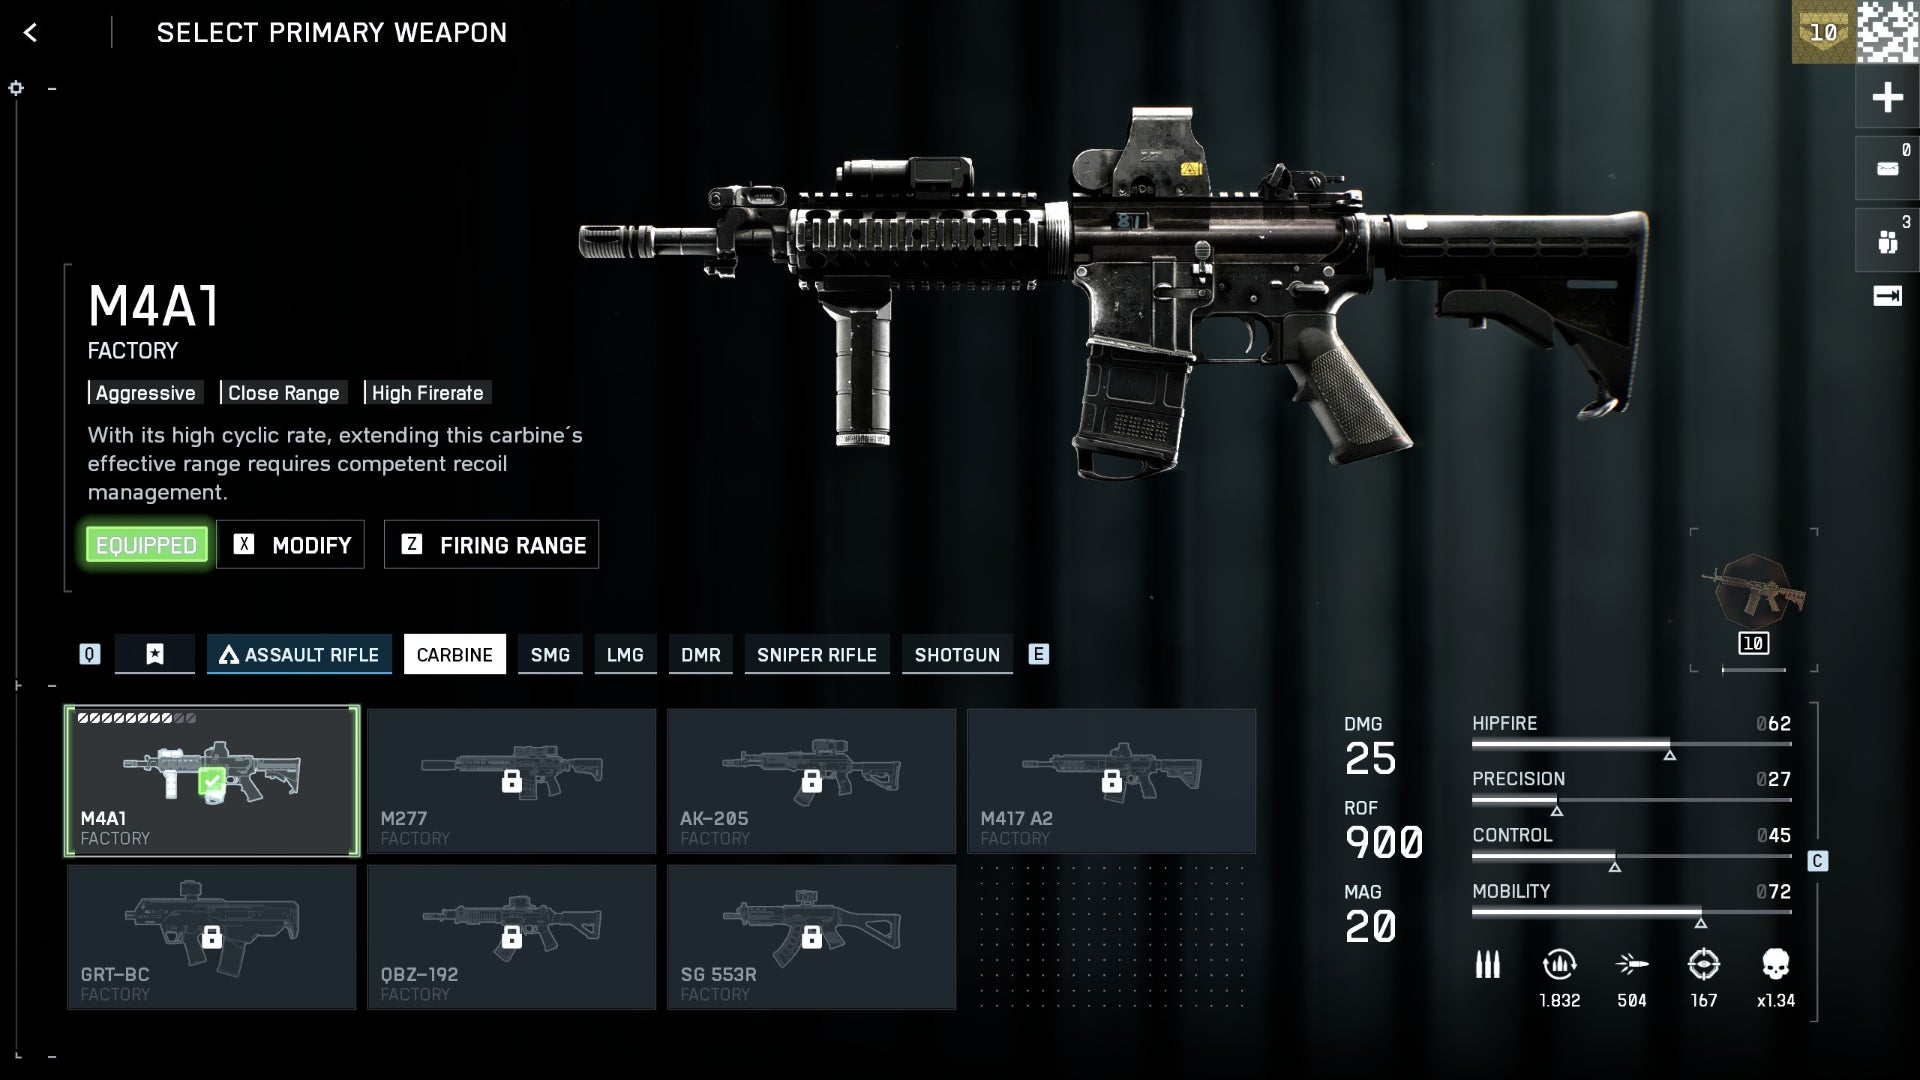
Image credit:Rock Paper Shotgun/EA
M4A1 : A fast-firing Carbine with exceptional hipfire that deals 25 damage per shot. You’ll need attachments to compensate for the recoil but once you have them, it’s one of the best all-round weapons in the game. To truly make it shine, read our guide on the best M4A1 loadout in Battlefield 6 .
M277 : Fires slower than the M4A1, and only has 20 bullets per magazine, but its higher muzzle velocity makes it more suited to ranged fights. Equipped with a variable zoom scope by default.
AK 205 : One of the most accurate weapons in the game. It has so little recoil that you can spray it even at long ranges, and it’s also the fastest to reload of the Carbines, along with having the highest muzzle velocity. The only negative is that it deals 20 damage per bullet, the lowest of any Carbine.
M417 A2 : Hits incredibly hard at 33 damage per bullet, meaning it can three-shot enemies. The downsides are a slower fire rate and a smaller magazine. You’ll also need attachments to control its recoil at mid-range.
GRT-BC : The second-fastest fire rate of any Carbine, behind the M4A1. Its hipfire is worse, but it makes up for it with slightly better precision and handling. The longer reload time of 2.5 seconds isn’t ideal, though.
QBZ-192 : It’s the second most accurate of the Carbines, although it’s a fair way behind the AK-205. Its above-average fire rate and fast muzzle velocity make it an excellent mid-range weapon, although it has the slowest reload of all the Carbines.
SG 553R : It has a middle-of-the-pack fire rate and punchy recoil, but it deals 33 damage per bullet in its 30-round magazine, making it one of the best Carbines in the game.
SMGs
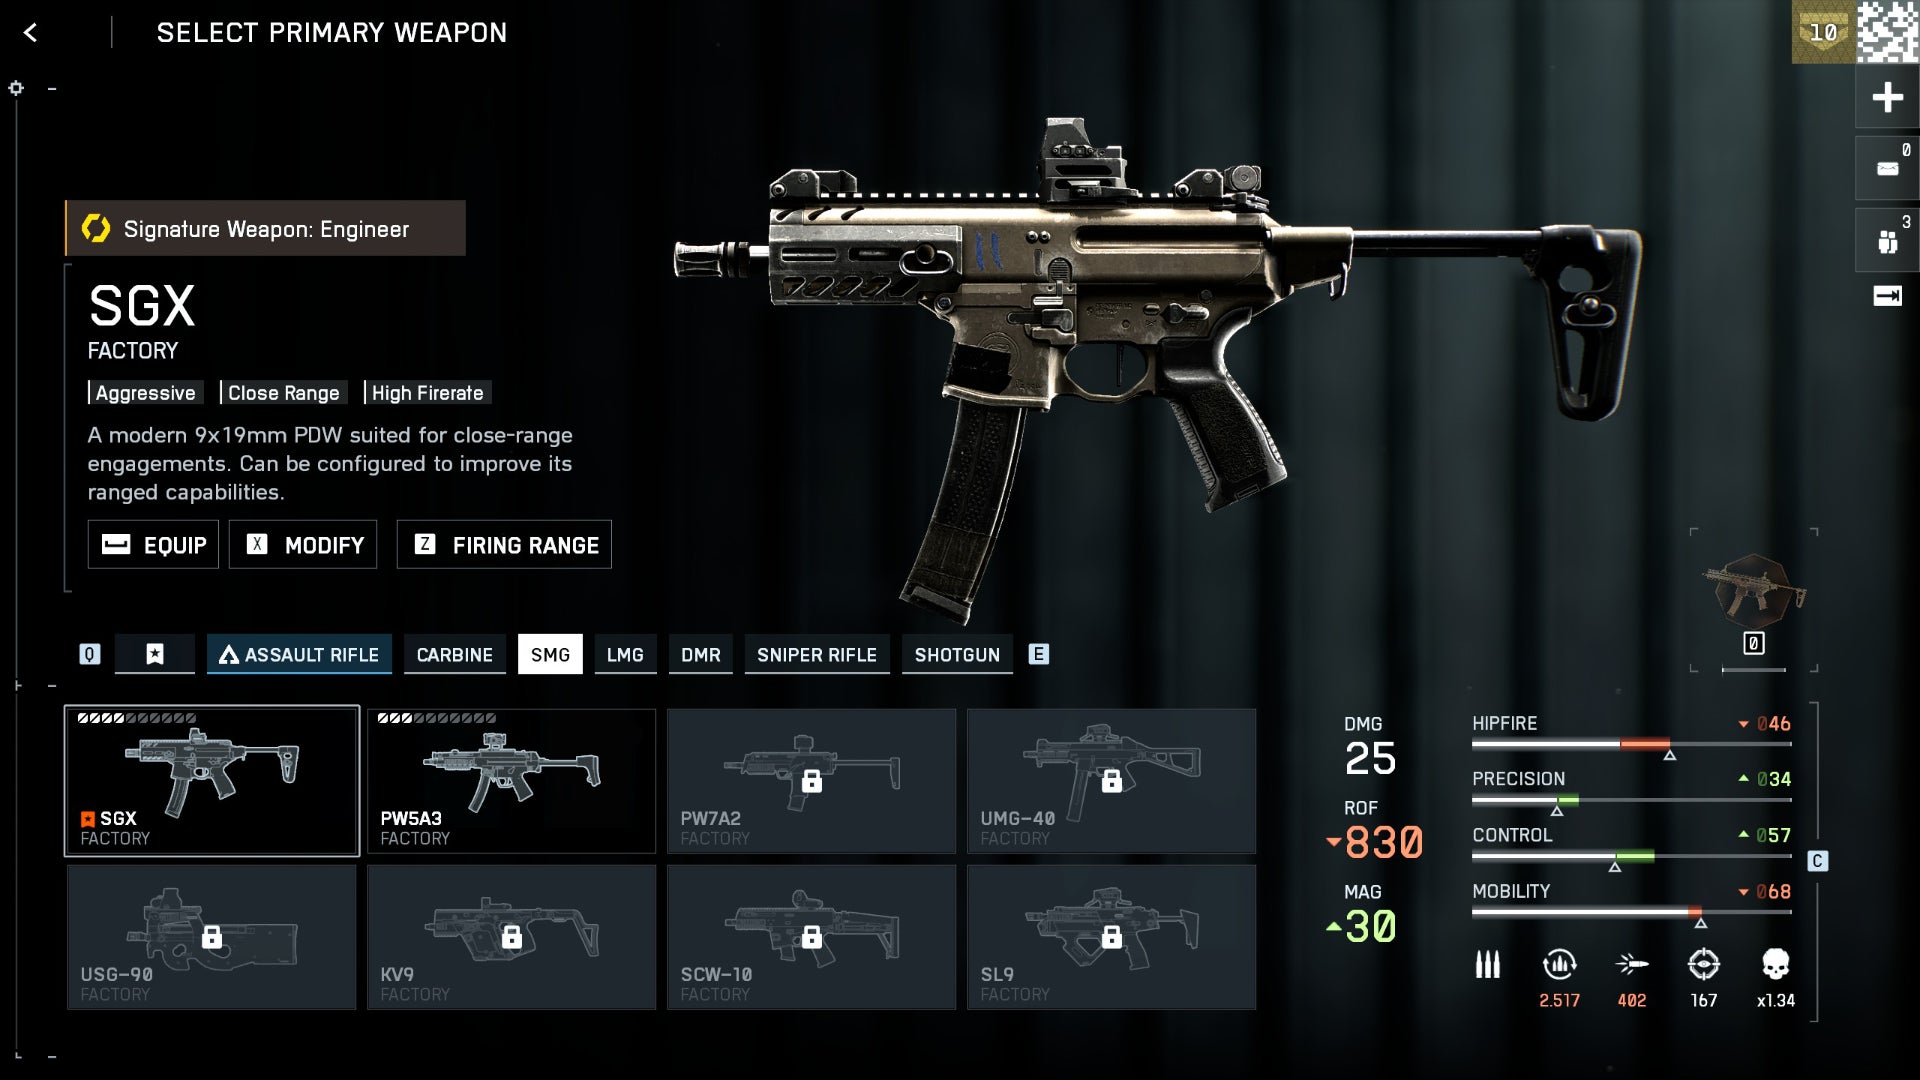
Image credit:Rock Paper Shotgun/EA
SGX : An all-rounder SMG with a high firerate, medium damage, strong hipfire, and above-average precision. You’ll need attachments to help it beyond close ranges, so read our guide for the best SGX loadout .
PW5A3 : A slightly lower fire rate than average for an SMG but it’s more precise than most, which means it’s suited for mid-range fights.
PW7A2 : A rapid-fire weapon with a quick reload and decent accuracy for mid-range fights, although you’ll want attachments to help dampen the recoil. Its big drawback is it only deals 16 damage per shot, lower than any other SMG.
UMG-40 : A slow-firing accurate SMG: it’ll be outgunned up close but that precision makes it ideal for medium-range firefights.
USG-90 (aka the P90) : Its recoil is wild and it only deals 20 damage per shot, but the compromise is a 50-round magazine and a high rate of fire. Can shred groups of enemies close up.
KV9 : Its absurdly high rate of fire, combined with 25 damage, means it’ll beat pretty much any weapon up close, but you’ll burn through the magazine fast: it only has 17 bullets.
SCW-10 : The only 33-damage SMG in the game, and it has an above-average fire rate. The two catches are heavy recoil and a miniscule 15-round magazine. You’ll want to use all your loadout points to get more bullets.
SL9 : Stands out from the pack because its precision and control are so much higher than any other SMG, which means it performs admirably at mid-range. It fires slowly, however, so won’t win many fights up close.
LMGs
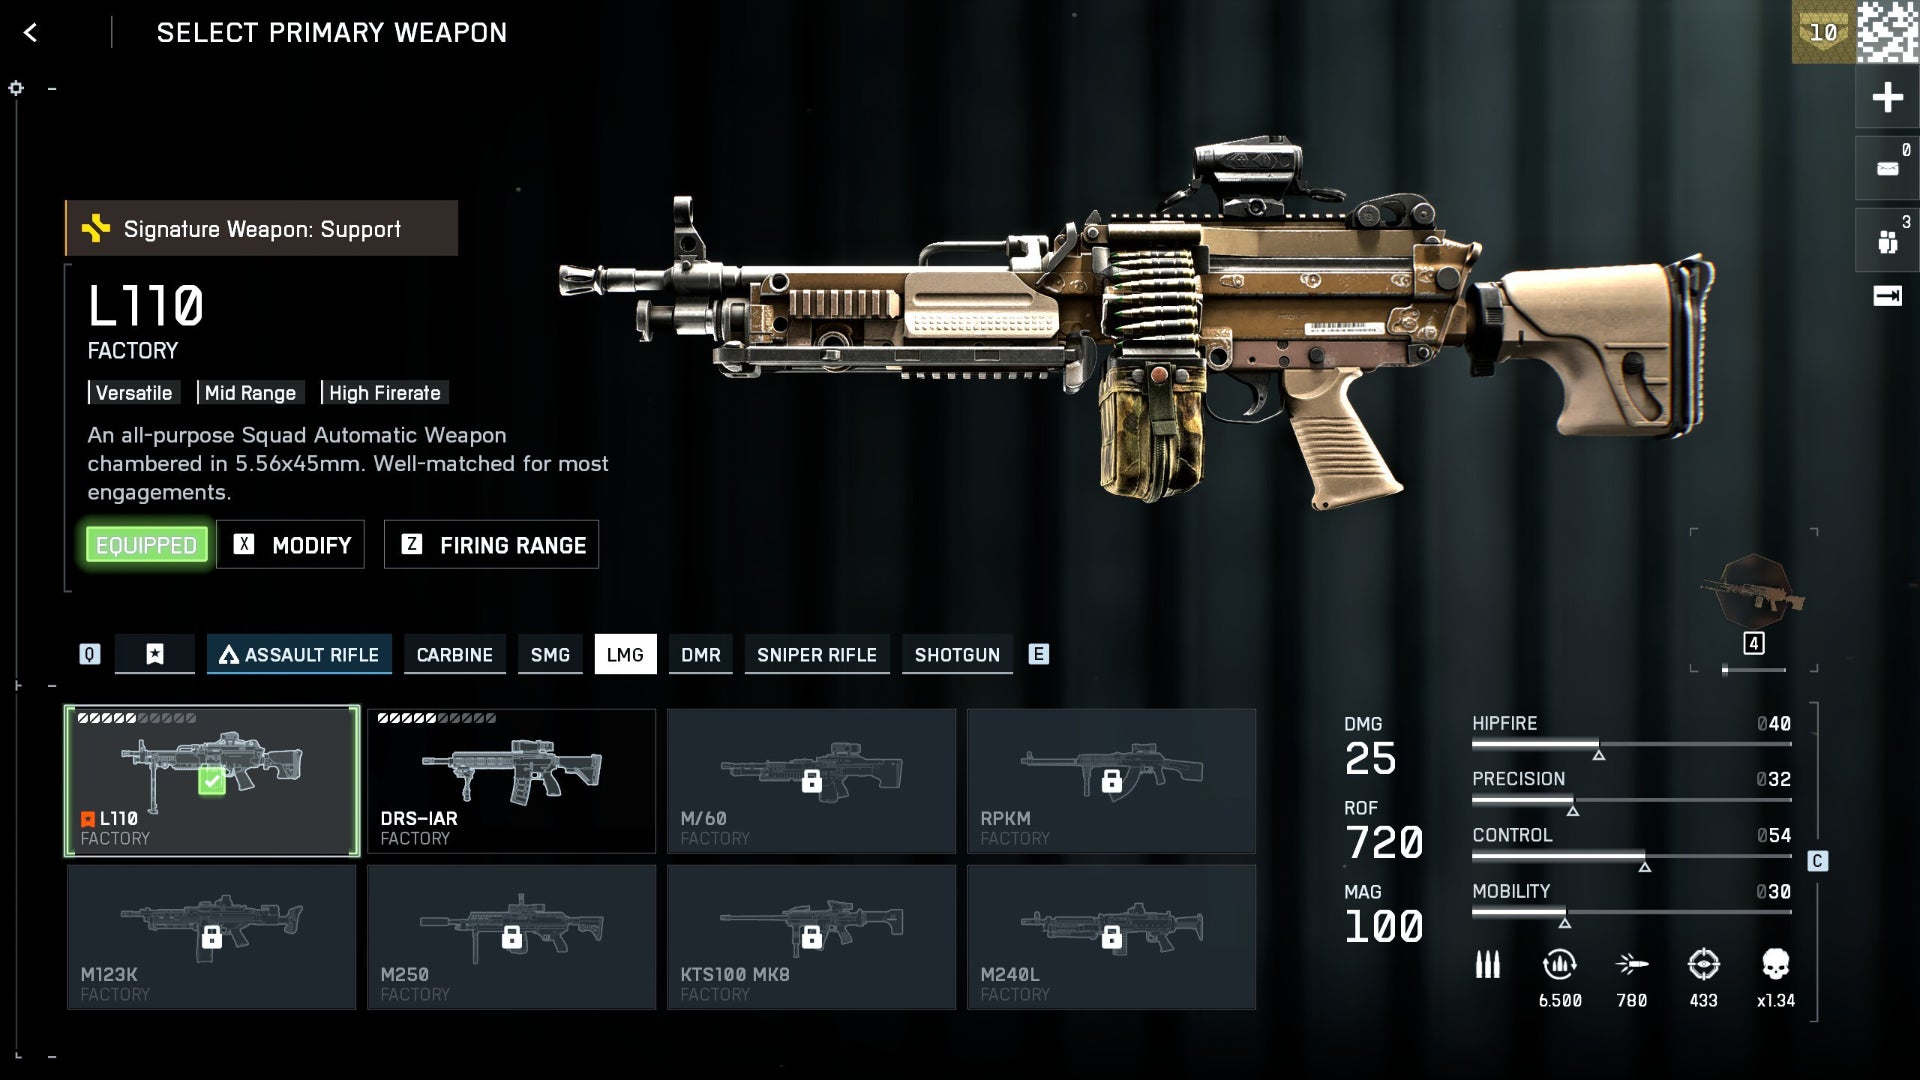
Image credit:Rock Paper Shotgun/EA
L110 : A real all-rounder: its 100-bullet magazine (one of three LMGs with that larger mag) and high fire rate means it can put a lot of damage down range without needing to reload, and it’s slightly more accurate than average for an LMG.
DRS-IAR : Its relatively high mobility, high fire rate and its 30-round magazine make it feel more like an Assault Rifle than an LMG. Accuracy and recoil are middle of the pack, so you’ll want attachments that make it easier to handle.
M/60 : A slow-firing LMG that deals 33 damage per shot. That steady fire rate makes the recoil easier to control, and the 100-round mags will make you a menace in drawn-out fights.
RPKM : An accurate LMG that deals 33 damage at the cost of a smaller 40-round magazine and a slower fire rate.
M123K : The fastest-firing LMG, and it has 100 rounds in its magazine. It has heavy recoil, so it’s more suited for close-quarters fights and holding down tight chokepoints than mid-range encounters.
M250 : Its slow fire rate and decent accuracy suits longer ranges. Its 50-round mag is, proportionately, the slowest per-bullet reload among the LMGs.
KTS100 MK8 : The 60-round KTS’s accuracy and recoil outshines every other LMG, and it has the fastest muzzle velocity, which is great for longer-range fights. It also has the joint-lowest fire rate, along with the M/60, so it’s liable to be outgunned in a straight 1v1.
M240L : Offsets its low fire rate with higher damage at 33 per bullet and a 50-round mag. Its accuracy is nothing special, but the lower fire rate helps you control the recoil.
DMRs

Image credit:Rock Paper Shotgun/EA
M39 EMR : The prototypical, versatile DMR: deals an accurate 40 damage per shot and has a 1.5x headshot damage bonus, but fires very slowly. Its 20-round magazine is the largest of the DMRs.
LMR27 : Only deals 27 damage per bullet, akin to an Assault Rifle, and doesn’t have the 1.5x headshot multiplier of the other DMRs, although it is the fastest-firing. You get 10 bullets per magazine and it takes more than 3 seconds to reload.
SVK-8.6 : Somewhere between a DMR and a Sniper Rifle, this DMR deals 66 damage per shot but fires very slowly.
SVDM : Another classic DMR that’s very similar to the M39. Accurate, 40 damage per shot, and relatively slow firing (although faster than the M39). The drawback is you only get 10 shots per magazine.
Sniper Rifles

Image credit:Rock Paper Shotgun/EA
M2010 ESR : The starting Sniper Rifle is what you’d expect: high muzzle velocity, 100 damage per shot, and it’s incredibly accurate. It has, marginally, the fastest fire rate of the snipers but the smallest magazine at only five bullets.
SV-98 : Still deals 100 damage, but the reduced muzzle velocity will make it harder to land shots at really long ranges. It’s the most mobile of the snipers, and the fastest to reload.
PSR : Its ultra-fast muzzle velocity is designed for extreme ranges. It fires slower than the M2010, but has double the number of bullets per magazine.
Shotguns
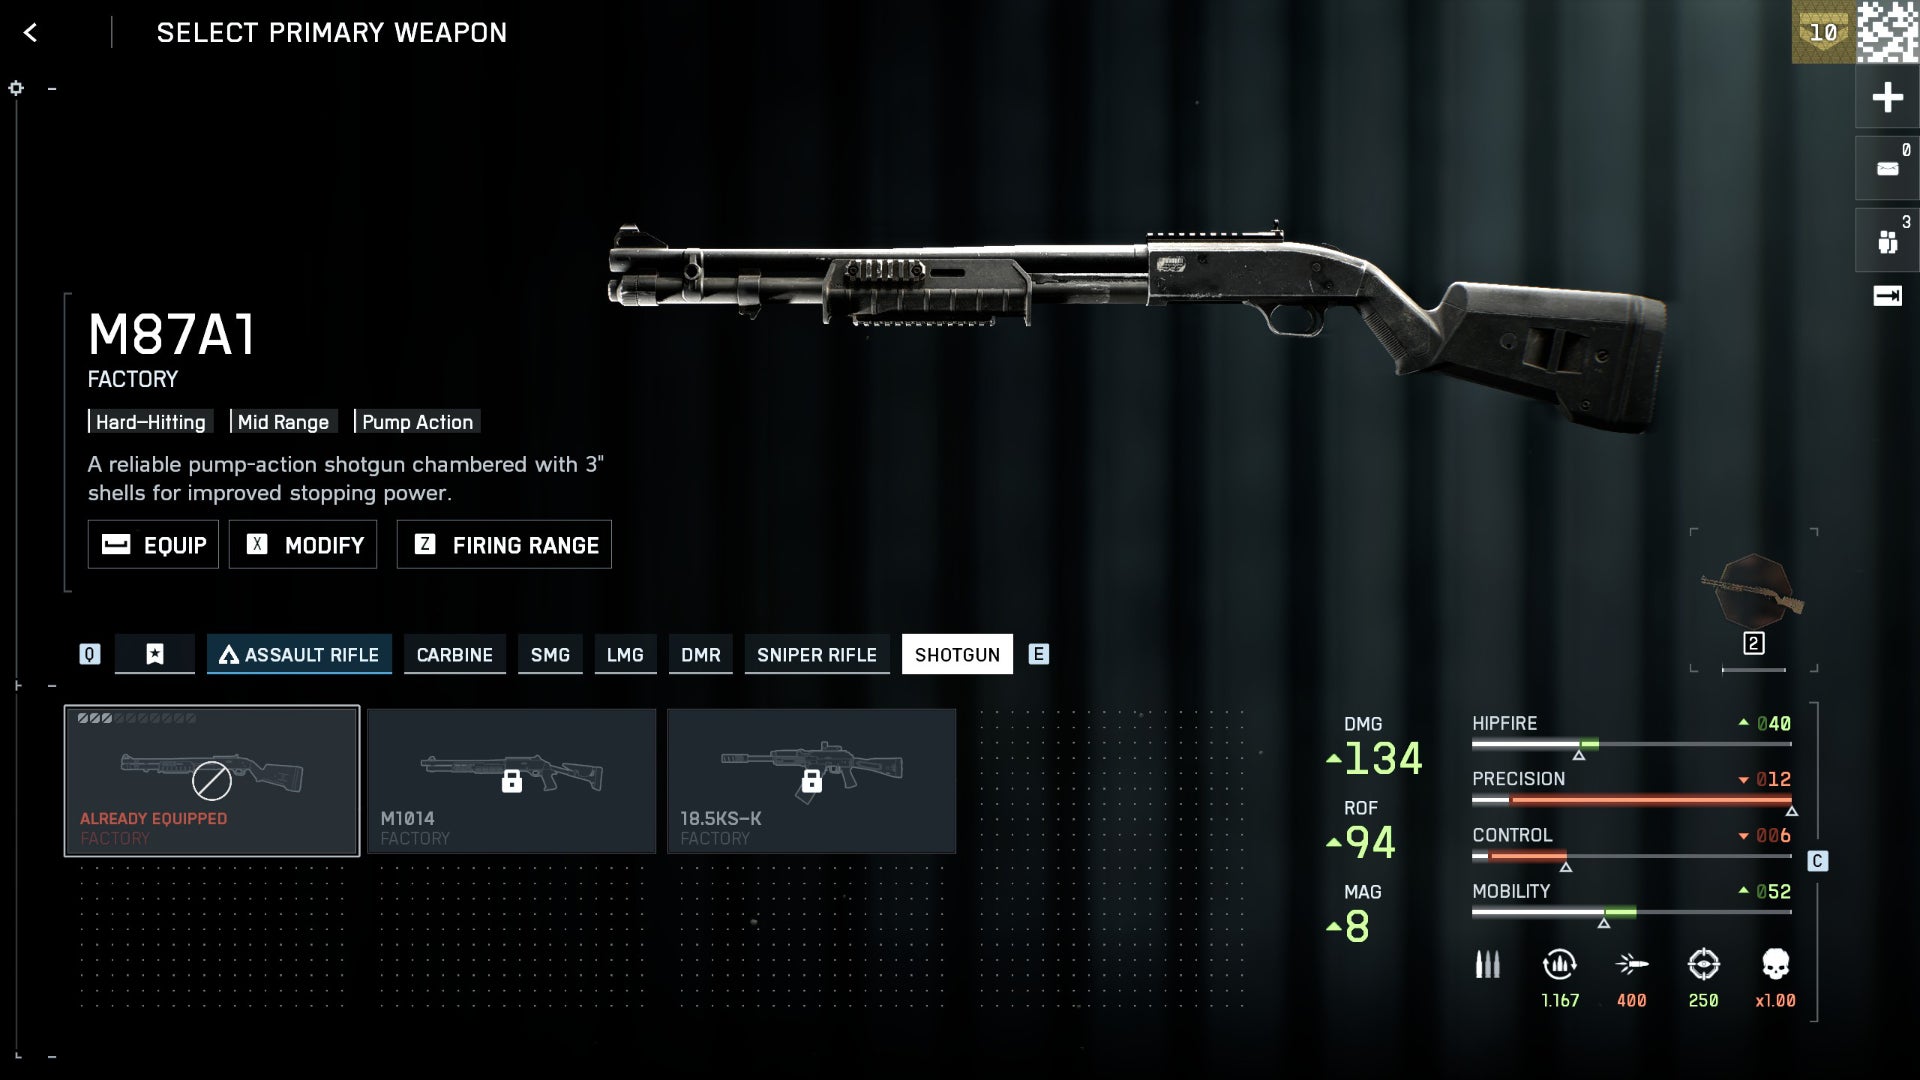
Image credit:Rock Paper Shotgun/EA
M87A1 : One of the best guns in the game. This pump action shotgun can deal 134 damage per shot, but it fires slowly, so you’ll need to time your peeks.
M1014 : Fires faster than the M87A1 but hits less hard, although it can still deal 115 damage per shot. It only has seven rounds in its magazine, one less than the M87A1.
18.5KS-K : The lowest damage of all the shotguns, but the fastest fire rate. Can put down a whole room of enemies.
Pistols (Secondary Weapons)
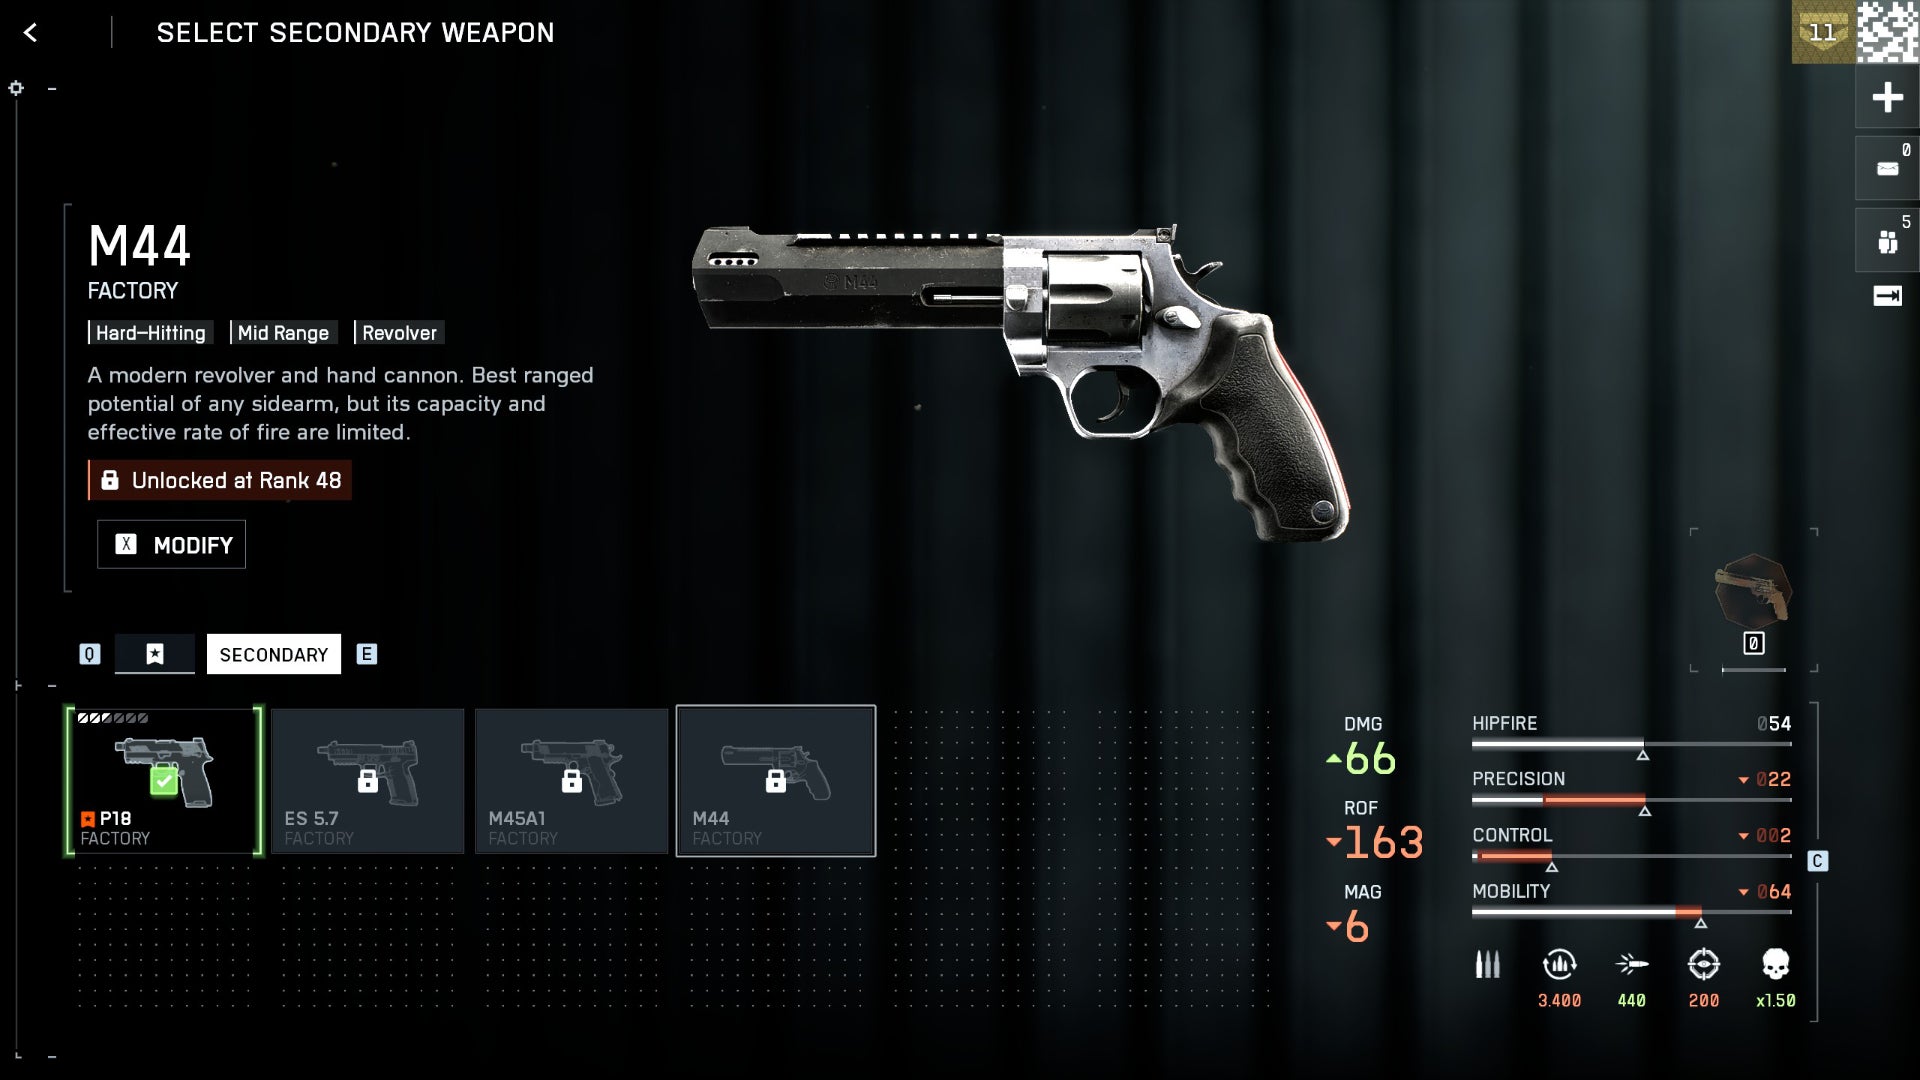
Image credit:Rock Paper Shotgun/EA
P18 : A versatile medium-damage pistol with good accuracy and recoil for close-range fights.
ES 5.7 : More of a mid-range pistol, with a higher muzzle velocity and recoil that’s easier to control. It has the largest magazine of any pistol, at 20 bullets, but the lowest damage at 20 per shot.
M45A1 : It has a tiny mag, but deals 33 damage per shot: you’ll want to whip it out to finish off enemies at close range when your primary weapon runs out.
M44 : Basically a .44 Magnum. It fires very slowly but deals a whopping 66 damage per shot, and is the only pistol with a 1.5x headshot multiplier.


Battlefield 6
PS5 , Xbox Series X/S , PC
Rock Paper Shotgun is better when you sign in
Sign in and join us on our journey to discover strange and compelling PC games.

All 75 Arc Raiders Blueprints and where to get them
These areas have the highest chance of giving you Blueprints

Image credit:Rock Paper Shotgun/Embark Studios

Looking for more Arc Raiders Blueprints? It’s a special day when you find a Blueprint, as they’re among the most valuable items in Arc Raiders. If you find a Blueprint that you haven’t already found, then you must make sure you hold onto it at all costs, because Blueprints are the key to one of the most important and powerful systems of meta-progression in the game.
This guide aims to be the very best guide on Blueprints you can find, starting with a primer on what exactly they are and how they work in Arc Raiders, before delving into exactly where to get Blueprints and the very best farming spots for you to take in your search.
We’ll also go over how to get Blueprints from other unlikely activities, such as destroying Surveyors and completing specific quests. And you’ll also find the full list of all 75 Blueprints in Arc Raiders on this page (including the newest Blueprints added with the Cold Snap update , such as the Deadline Blueprint and Firework Box Blueprint), giving you all the information you need to expand your own crafting repertoire.
In this guide:
- What are Blueprints in Arc Raiders?
- Full Blueprint list: All crafting recipes
- Where to find Blueprints in Arc Raiders Blueprints obtained from quests Blueprints obtained from Trials Best Blueprint farming locations

What are Blueprints in Arc Raiders?
Blueprints in Arc Raiders are special items which, if you manage to extract with them, you can expend to permanently unlock a new crafting recipe in your Workshop. If you manage to extract from a raid with an Anvil Blueprint, for example, you can unlock the ability to craft your very own Anvil Pistol, as many times as you like (as long as you have the crafting materials).
To use a Blueprint, simply open your Inventory while in the lobby, then right-click on the Blueprint and click “Learn And Consume” . This will permanently unlock the recipe for that item in your Workshop. As of the Stella Montis update, there are allegedly 75 different Blueprints to unlock - although only 68 are confirmed to be in the game so far. You can see all the Blueprints you’ve found and unlocked by going to the Workshop menu, and hitting “R” to bring up the Blueprint screen.
It’s possible to find duplicates of past Blueprints you’ve already unlocked. If you find these, then you can either sell them, or - if you like to play with friends - you can take it into a match and gift it to your friend so they can unlock that recipe for themselves. Another option is to keep hold of them until the time comes to donate them to the Expedition.
Full Blueprint list: All crafting recipes
Below is the full list of all the Blueprints that are currently available to find in Arc Raiders, and the crafting recipe required for each item:
| Blueprint | Type | Recipe | Crafted At |
|---|---|---|---|
| Bettina | Weapon | 3x Advanced Mechanical Components 3x Heavy Gun Parts 3x Canister | Gunsmith 3 |
| Blue Light Stick | Quick Use | 3x Chemicals | Utility Station 1 |
| Aphelion | Weapon | 3x Magnetic Accelerator 3x Complex Gun Parts 1x Matriarch Reactor | Gunsmith 3 |
| Combat Mk. 3 (Flanking) | Augment | 2x Advanced Electrical Components 3x Processor | Gear Bench 3 |
| Combat Mk. 3 (Aggressive) | Augment | 2x Advanced Electrical Components 3x Processor | Gear Bench 3 |
| Complex Gun Parts | Material | 2x Light Gun Parts 2x Medium Gun Parts 2x Heavy Gun Parts | Refiner 3 |
| Fireworks Box | Quick Use | 1x Explosive Compound 3x Pop Trigger | Explosives Station 2 |
| Gas Mine | Mine | 4x Chemicals 2x Rubber Parts | Explosives Station 1 |
| Green Light Stick | Quick Use | 3x Chemicals | Utility Station 1 |
| Pulse Mine | Mine | 1x Crude Explosives 1x Wires | Explosives Station 1 |
| Seeker Grenade | Grenade | 1x Crude Explosives 2x ARC Alloy | Explosives Station 1 |
| Looting Mk. 3 (Survivor) | Augment | 2x Advanced Electrical Components 3x Processor | Gear Bench 3 |
| Angled Grip II | Mod | 2x Mechanical Components 3x Duct Tape | Gunsmith 2 |
| Angled Grip III | Mod | 2x Mod Components 5x Duct Tape | Gunsmith 3 |
| Hullcracker | Weapon | 1x Magnetic Accelerator 3x Heavy Gun Parts 1x Exodus Modules | Gunsmith 3 |
| Launcher Ammo | Ammo | 5x Metal Parts 1x Crude Explosives | Workbench 1 |
| Anvil | Weapon | 5x Mechanical Components 5x Simple Gun Parts | Gunsmith 2 |
| Anvil Splitter | Mod | 2x Mod Components 3x Processor | Gunsmith 3 |
| ??? | ??? | ??? | ??? |
| Barricade Kit | Quick Use | 1x Mechanical Components | Utility Station 2 |
| Blaze Grenade | Grenade | 1x Explosive Compound 2x Oil | Explosives Station 3 |
| Bobcat | Weapon | 3x Advanced Mechanical Components 3x Light Gun Parts | Gunsmith 3 |
| Osprey | Weapon | 2x Advanced Mechanical Components 3x Medium Gun Parts 7x Wires | Gunsmith 3 |
| Burletta | Weapon | 3x Mechanical Components 3x Simple Gun Parts | Gunsmith 1 |
| Compensator II | Mod | 2x Mechanical Components 4x Wires | Gunsmith 2 |
| Compensator III | Mod | 2x Mod Components 8x Wires | Gunsmith 3 |
| Defibrillator | Quick Use | 9x Plastic Parts 1x Moss | Medical Lab 2 |
| ??? | ??? | ??? | ??? |
| Equalizer | Weapon | 3x Magnetic Accelerator 3x Complex Gun Parts 1x Queen Reactor | Gunsmith 3 |
| Extended Barrel | Mod | 2x Mod Components 8x Wires | Gunsmith 3 |
| Extended Light Mag II | Mod | 2x Mechanical Components 3x Steel Spring | Gunsmith 2 |
| Extended Light Mag III | Mod | 2x Mod Components 5x Steel Spring | Gunsmith 3 |
| Extended Medium Mag II | Mod | 2x Mechanical Components 3x Steel Spring | Gunsmith 2 |
| Extended Medium Mag III | Mod | 2x Mod Components 5x Steel Spring | Gunsmith 3 |
| Extended Shotgun Mag II | Mod | 2x Mechanical Components 3x Steel Spring | Gunsmith 2 |
| Extended Shotgun Mag III | Mod | 2x Mod Components 5x Steel Spring | Gunsmith 3 |
| Remote Raider Flare | Quick Use | 2x Chemicals 4x Rubber Parts | Utility Station 1 |
| Heavy Gun Parts | Material | 4x Simple Gun Parts | Refiner 2 |
| Venator | Weapon | 2x Advanced Mechanical Components 3x Medium Gun Parts 5x Magnet | Gunsmith 3 |
| Il Toro | Weapon | 5x Mechanical Components 6x Simple Gun Parts | Gunsmith 1 |
| Jolt Mine | Mine | 1x Electrical Components 1x Battery | Explosives Station 2 |
| Explosive Mine | Mine | 1x Explosive Compound 1x Sensors | Explosives Station 3 |
| Jupiter | Weapon | 3x Magnetic Accelerator 3x Complex Gun Parts 1x Queen Reactor | Gunsmith 3 |
| Light Gun Parts | Material | 4x Simple Gun Parts | Refiner 2 |
| Lightweight Stock | Mod | 2x Mod Components 5x Duct Tape | Gunsmith 3 |
| Lure Grenade | Grenade | 1x Speaker Component 1x Electrical Components | Utility Station 2 |
| Medium Gun Parts | Material | 4x Simple Gun Parts | Refiner 2 |
| Torrente | Weapon | 2x Advanced Mechanical Components 3x Medium Gun Parts 6x Steel Spring | Gunsmith 3 |
| Muzzle Brake II | Mod | 2x Mechanical Components 4x Wires | Gunsmith 2 |
| Muzzle Brake III | Mod | 2x Mod Components 8x Wires | Gunsmith 3 |
| Padded Stock | Mod | 2x Mod Components 5x Duct Tape | Gunsmith 3 |
| Shotgun Choke II | Mod | 2x Mechanical Components 4x Wires | Gunsmith 2 |
| Shotgun Choke III | Mod | 2x Mod Components 8x Wires | Gunsmith 3 |
| Shotgun Silencer | Mod | 2x Mod Components 8x Wires | Gunsmith 3 |
| Showstopper | Grenade | 1x Advanced Electrical Components 1x Voltage Converter | Explosives Station 3 |
| Silencer I | Mod | 2x Mechanical Components 4x Wires | Gunsmith 2 |
| Silencer II | Mod | 2x Mod Components 8x Wires | Gunsmith 3 |
| Snap Hook | Quick Use | 2x Power Rod 3x Rope 1x Exodus Modules | Utility Station 3 |
| Stable Stock II | Mod | 2x Mechanical Components 3x Duct Tape | Gunsmith 2 |
| Stable Stock III | Mod | 2x Mod Components 5x Duct Tape | Gunsmith 3 |
| Tagging Grenade | Grenade | 1x Electrical Components 1x Sensors | Utility Station 3 |
| Tempest | Weapon | 3x Advanced Mechanical Components 3x Medium Gun Parts 3x Canister | Gunsmith 3 |
| Trigger Nade | Grenade | 2x Crude Explosives 1x Processor | Explosives Station 2 |
| Vertical Grip II | Mod | 2x Mechanical Components 3x Duct Tape | Gunsmith 2 |
| Vertical Grip III | Mod | 2x Mod Components 5x Duct Tape | Gunsmith 3 |
| Vita Shot | Quick Use | 2x Antiseptic 1x Syringe | Medical Lab 3 |
| Vita Spray | Quick Use | 3x Antiseptic 1x Canister | Medical Lab 3 |
| Vulcano | Weapon | 1x Magnetic Accelerator 3x Heavy Gun Parts 1x Exodus Modules | Gunsmith 3 |
| Wolfpack | Grenade | 2x Explosive Compound 2x Sensors | Explosives Station 3 |
| Red Light Stick | Quick Use | 3x Chemicals | Utility Station 1 |
| Smoke Grenade | Grenade | 14x Chemicals 1x Canister | Utility Station 2 |
| Deadline | Mine | 3x Explosive Compound 2x ARC Circuitry | Explosives Station 3 |
| Trailblazer | Grenade | 1x Explosive Compound 1x Synthesized Fuel | Explosives Station 3 |
| Tactical Mk. 3 (Defensive) | Augment | 2x Advanced Electrical Components 3x Processor | Gear Bench 3 |
| Tactical Mk. 3 (Healing) | Augment | 2x Advanced Electrical Components 3x Processor | Gear Bench 3 |
| Yellow Light Stick | Quick Use | 3x Chemicals | Utility Station 1 |
Note: The missing Blueprints in this list likely have not actually been added to the game at the time of writing, because none of the playerbase has managed to find any of them. As they are added to the game, I will update this page with the most relevant information so you know exactly how to get all 75 Arc Raiders Blueprints.
Where to find Blueprints in Arc Raiders
Below is a list of all containers, modifiers, and events which maximise your chances of finding Blueprints:
- Certain quests reward you with specific Blueprints .
- Completing Trials has a high chance of offering Blueprints as rewards.
- Surveyors have a decent chance of dropping Blueprints on death.
- High loot value areas tend to have a greater chance of spawning Blueprints.
- Night Raids and Storms may increase rare Blueprint spawn chances in containers.
- Containers with higher numbers of items may have a higher tendency to spawn Blueprints. As a result, Blue Gate (which has many “large” containers containing multiple items) may give you a higher chance of spawning Blueprints.
- Raider containers (Raider Caches, Weapon Boxes, Medical Bags, Grenade Tubes) have increased Blueprint drop rates. As a result, the Uncovered Caches event gives you a high chance of finding Blueprints.
- Security Lockers have a higher than average chance of containing Blueprints.
- Certain Blueprints only seem to spawn under specific circumstances: Tempest Blueprint only spawns during Night Raid events. Vulcano Blueprint only spawns during Hidden Bunker events. Jupiter and Equaliser Blueprints only spawn during Harvester events.

Raider Caches, Weapon Boxes, and other raider-oriented container types have a good chance of offering Blueprints. |Image credit:Rock Paper Shotgun/Embark Studios
Blueprints have a very low chance of spawning in any container in Arc Raiders, around 1-2% on average. However, there is a higher chance of finding Blueprints in particular container types. Specifically, you can find more Blueprints in Raider containers and security lockers.
Beyond this, if you’re looking for Blueprints you should focus on regions of the map which are marked as having particularly high-value loot. Areas such as the Control Tower in Dam Battlegrounds, the Arrival and Departure Buildings in Spaceport, and Pilgrim’s Peak in Blue Gate all have a better-than-average chance of spawning Blueprints somewhere amongst all their containers. Night Raids and Electromagnetic Storm events also increase the drop chances of certain Blueprints .
In addition to these containers, you can often loot Blueprints from destroyed Surveyors - the largest of the rolling ball ARC. Surveyors are more commonly found on the later maps - Spaceport and Blue Gate - and if one spawns in your match, you’ll likely see it by the blue laser beam that it casts into the sky while “surveying”.
Surveyors are quite well-armoured and will very speedily run away from you once it notices you, but if you can take one down then make sure you loot all its parts for a chance of obtaining certain unusual Blueprints.
Blueprints obtained from quests
One way in which you can get Blueprints is by completing certain quests for the vendors in Speranza. Some quests will reward you with a specific item Blueprint upon completion, so as long as you work through all the quests in Arc Raiders, you are guaranteed those Blueprints.
Here is the full list of all Blueprints you can get from quest rewards:
- Trigger Nade Blueprint: Rewarded after completing “Sparks Fly”.
- Lure Grenade Blueprint: Rewarded after completing “Greasing Her Palms”.
- Burletta Blueprint: Rewarded after completing “Industrial Espionage”.
- Hullcracker Blueprint (and Launcher Ammo Blueprint): Rewarded after completing “The Major’s Footlocker”.
Alas, that’s only 4 Blueprints out of a total of 75 to unlock, so for the vast majority you will need to find them yourself during a raid. If you’re intent on farming Blueprints, then it’s best to equip yourself with cheap gear in case you lose it, but don’t use a free loadout because then you won’t get a safe pocket to stash any new Blueprint you find. No pain in Arc Raiders is sharper than failing to extract with a new Blueprint you’ve been after for a dozen hours already.

One of the best ways to get Blueprints is by hitting three stars on all five Trials every week. |Image credit:Rock Paper Shotgun/Embark Studios
Blueprints obtained from Trials
One of the very best ways to get Blueprints is as rewards for completing Trials in Arc Raiders. Trials are unlocked from Level 15 onwards, and allow you to earn rewards by focusing on certain tasks over the course of several raids. For example, one Trial might task you with dealing damage to Hornets, while another might challenge you to loot Supply Drops.
Trials refresh on a weekly basis, with a new week bringing five new Trials. Each Trial can offer up to three rewards after passing certain score milestones, and it’s possible to receive very high level loot from these reward crates - including Blueprints. So if you want to unlock as many Blueprints as possible, you should make a point of completing as many Trials as possible each week.
Best Blueprint farming locations
The very best way to get Blueprints is to frequent specific areas of the maps which combine high-tier loot pools with the right types of containers to search. Here are my recommendations for where to find Blueprints on every map, so you can always keep the search going for new crafting recipes to unlock.

Image credit:Rock Paper Shotgun/Embark Studios
Dam Battlegrounds
The best places to farm Blueprints on Dam Battlegrounds are the Control Tower, Power Generation Complex, Ruby Residence, and Pale Apartments . The first two regions, despite only being marked on the map as mid-tier loot, contain a phenomenal number of containers to loot. The Control Tower can also contain a couple of high-tier Security Lockers - though of course, you’ll need to have unlocked the Security Breach skill at the end of the Survival tree.
There’s also a lot of reporting amongst the playerbase that the Residential areas in the top-left of the map - Pale Apartments and Ruby Residence - give you a comparatively strong chance of finding Blueprints. Considering their size, there’s a high density of containers to loot in both locations, and they also have the benefit of being fairly out of the way. So you’re more likely to have all the containers to yourself.
Buried City
The best Blueprint farming locations on Buried City are the Santa Maria Houses, Grandioso Apartments, Town Hall, and the various buildings of the New District . Grandioso Apartments has a lower number of containers than the rest, but a high chance of spawning weapon cases - which have good Blueprint drop rates. The others are high-tier loot areas, with plenty of lootable containers - including Security Lockers.
Spaceport
The best places to find Blueprints on Spaceport are the Arrival and Departure Buildings, as well as Control Tower A6 and the Launch Towers . All these areas are labelled as high-value loot regions, and many of them are also very handily connected to one another by the Spaceport wall, which you can use to quickly run from one area to the next. At the tops of most of these buildings you’ll find at least one Security Locker, so this is an excellent farming route for players looking to find Blueprints.
The downside to looting Blueprints on Spaceport is that all these areas are hotly contested, particularly in Duos and Squads. You’ll need to be very focused and fast in order to complete the full farming route.

Image credit:Rock Paper Shotgun/Embark Studios
Blue Gate
Blue Gate tends to have a good chance of dropping Blueprints, potentially because it generally has a high number of containers which can hold lots of items; so there’s a higher chance of a Blueprint spawning in each container. In my experience, the best Blueprint farming spots on Blue Gate are Pilgrim’s Peak, Raider’s Refuge, the Ancient Fort, and the Underground Complex beneath the Warehouse .
All of these areas contain a wealth of containers to loot. Raider’s Refuge has less to loot, but the majority of the containers in and around the Refuge are raider containers, which have a high chance of containing Blueprints - particularly during major events.
Stella Montis
On the whole, Stella Montis seems to have a very low drop rate for Blueprints (though a high chance of dropping other high-tier loot). If you do want to try farming Blueprints on this map, the best places to find Blueprints in Stella Montis are Medical Research, Assembly Workshop, and the Business Center . These areas have the highest density of containers to loot on the map.
In addition to this, the Western Tunnel has a few different Security Lockers to loot, so while there’s very little to loot elsewhere in this area of the map, it’s worth hitting those Security Lockers if you spawn there at the start of a match.
That wraps up this primer on how to get all the Blueprints in Arc Raiders as quickly as possible. With the Expedition system constantly resetting a large number of players’ Blueprints, it’s more important than ever to have the most up-to-date information on where to find all these Blueprints.
While you’re here, be sure to check out our Arc Raiders best guns tier list , as well as our primers on the best skills to unlock and all the different Field Depot locations on every map.


ARC Raiders
PS5 , Xbox Series X/S , PC
Rock Paper Shotgun is better when you sign in
Sign in and join us on our journey to discover strange and compelling PC games.
