Ansbach questline guide - Elden Ring: Shadow Of The Erdtree
Here’s our full walkthrough of Ansbach’s quest in Shadow Of The Erdtree
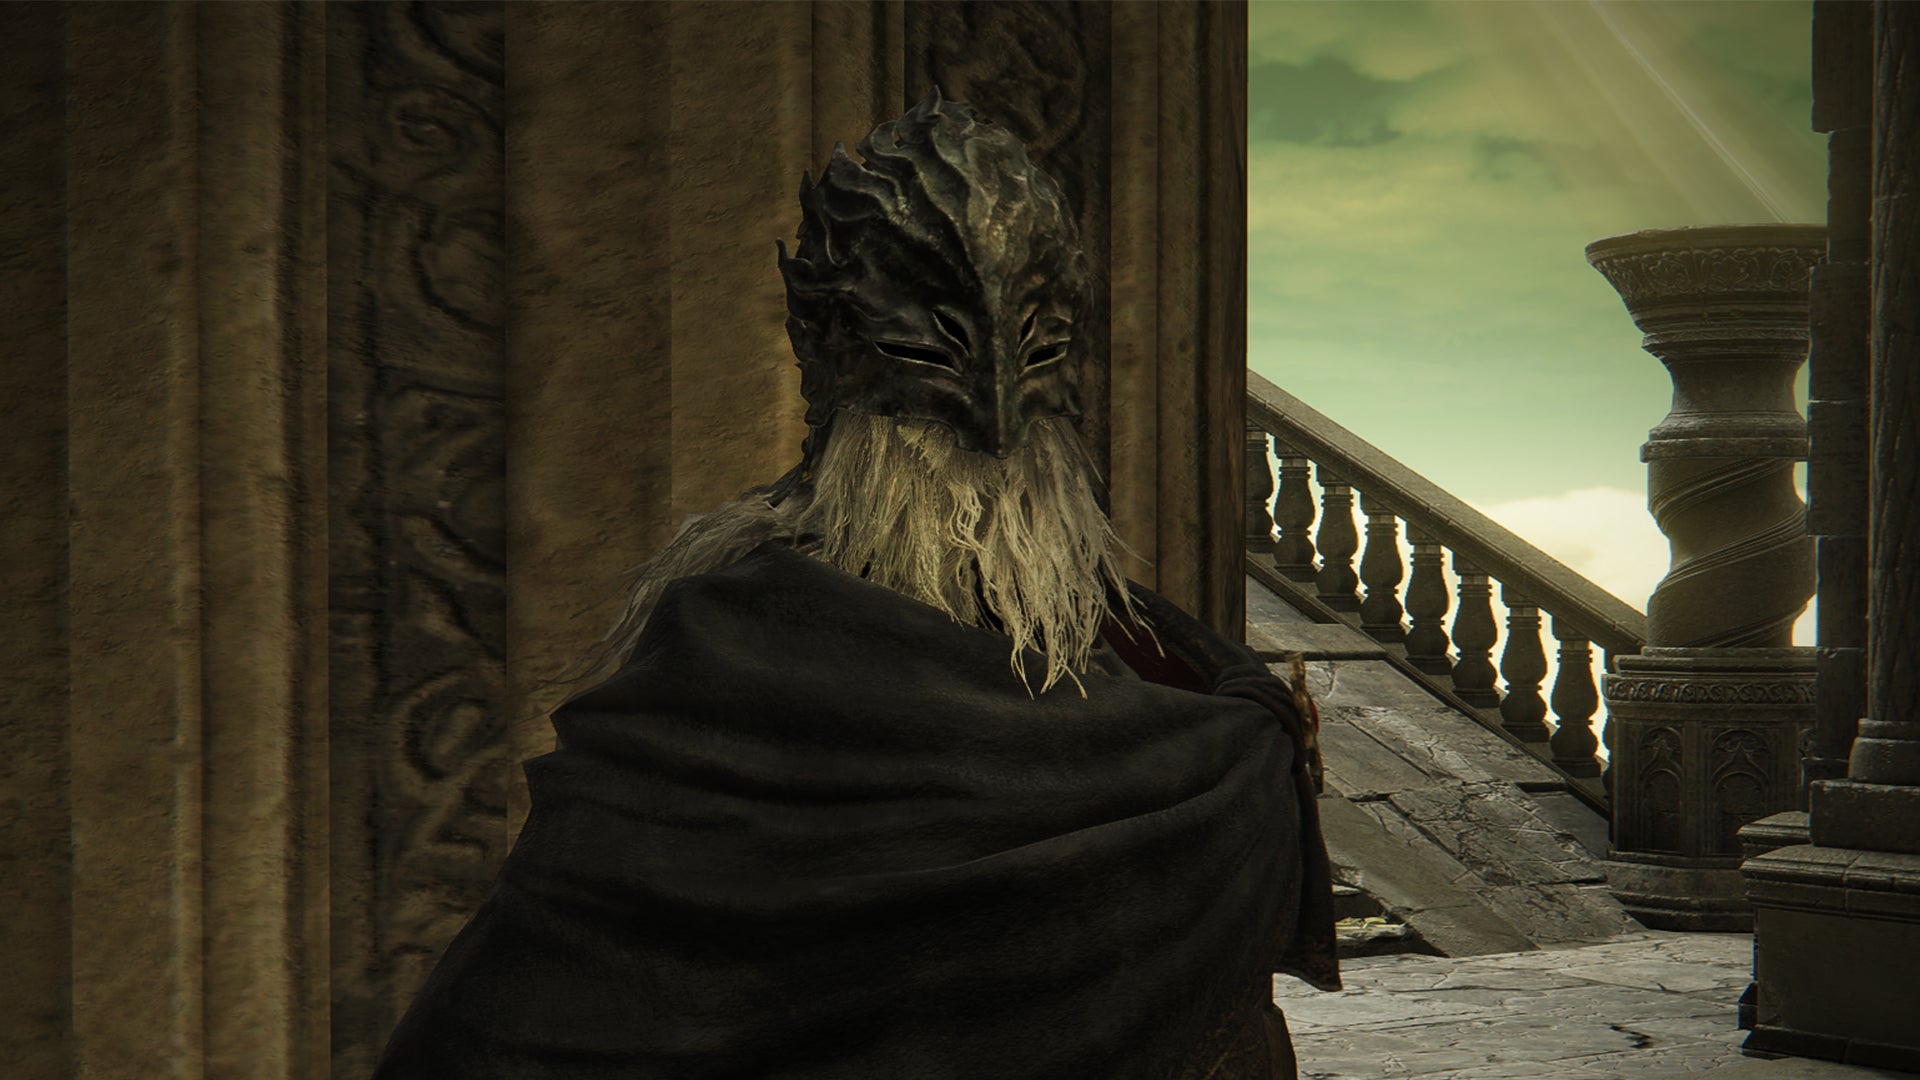
Image credit:Rock Paper Shotgun/Bandai Namco

Looking for a full rundown of Ansbach’s questline in Elden Ring: Shadow Of The Erdtree? Ansbach has an involved NPC questline that involves a few different characters in Shadow Of The Erdtree . As a retired follower of Mohg, his relationship with Miquella and staunch followers like Leda is somewhat complex and well worth a delve into.
Below we’ve gathered a thorough list of all Ansbach questline steps along with a closer look at important choices, consequences, and rewards like the Golden Lion Shield, Retaliatory Crossed-Tree Talisman, Ansbach’s Longbow and more so you can get the best result possible out of the quest. We’ve also listed key locations of things like the Crosses and Secret Rite Scroll so you’re geared up to take on the full quest.
Ansbach quest steps
Below is an overview of all the steps you need to take to complete the Ansbach questline in Shadow Of the Erdtree. For more information on each step, scroll down to each section.
- (Optional) Speak to Hornsent at the Three-Path Cross and obtain the Crosses Map.
- Meet Ansbach at the Main Gate Cross Site Of Grace in the Gravesite Plain.
- (Optional) Discover Miquella’s Crosses at Belurat, Scaduview and the Cerulean Coast and report back to Ansbach for additional dialogue.
- Advance to the Shadow Keep in Scadu Altus to break Miquella’s charm.
- Return to speak to Ansbach at the Main Gate Cross.
- (Optional) Speak to Freyja at the Three-Path Cross Site Of Grace.
- Continue through the Shadow Keep and meet Ansbach again in the Specimen Storehouse (1st floor).
- Advance through the Specimen Storehouse, collecting the Secret Rite Scroll from the 4th floor.
- (Optional) Speak to Freyja on the 7th floor and report back to Ansbach.
- Return the Scroll to Ansbach.
- (Optional) Either give Ansbach’s letter to Freyja or wait until Ansbach’s questline concludes (see below for both outcomes).
- Progress Leda’s questline until you have chosen between Thiollier and Hornsent.
- Return to Ansbach’s room and choose to assist either him or Leda (see below for all outcomes).
- Either his quest concludes here or you have the option to summon Ansbach for two Enir-Ilim fights.
Where to find Ansbach in Elden Ring

Until Miquella’s charm is broken, Ansbach will be located at the Main Gate Cross Site Of Grace. |Image credit:Rock Paper Shotgun/Bandai Namco
When you first meet Ansbach in Shadow Of The Erdtree, he will be standing near Moore at the Main Gate Cross Site Of Grace, outside Belurat Tower Settlement in the Gravesite Plain.
Here, he will introduce himself as a retired soldier and ex-follower of Mohg. He will also offer more information about the Land of Shadow and his fellow companion, Moore who acquires goods for Leda’s people (followers of Miquella).
You can also gain extra tidbits of lore from Ansbach about Miquella and his purpose within the Land of Shadow. To do this, speak to the Hornsent at the Three-Path Cross and obtain the Crosses Map. Then, return to Ansbach who will inform you that he knows of 3 more Crosses to find, as well as the ones on the map. Each time you discover one of these Crosses, Ansbach will come closer to learning the truth.
Cross locations

These three Crosses will give you more dialogue from Ansbach upon discovery. |Image credit:Rock Paper Shotgun/Bandai Namco
The first Cross is located within Belurat, Tower Settlement . Located just before the Stagefront Site of Grace. After discovering it and returning to Ansbach, choose the “Speak of the cross at the tower” dialogue option for the following information:
“As suspected, Kindly Miquella has visited the lands which hold the tower. And appears intent on wholly dispossessing himself of his flesh. He must be seeking entrance to the tower of shadow.”
The next Cross is located at the Scaduview Cross Site Of Grace in Scadu Altus. This is on top of a cliff overlooking the Ghostflame Dragon below. To access the area, you must jump up a sealed Spiritspring (located directly east of the route out of the Fort of Reprimand). After discovering it and returning to Ansbach, choose the “Speak of the cross where the eye was abandoned” dialogue option for the following information:
“I can hardly believe it, he’s divested himself of his very eye…Tender Miquella’s eye is no mere morsel of flesh. It is a vessel of soaring grace. Proof of his Empyrean lineage. I wonder, does Miquella the Kind intend to sever his very birthright? His fate as a child of the Erdtree?”
Upon speaking to him again (once you have discovered at least two Crosses), he will continue:
“Righteous Tarnished. I have reasoned through my findings. Concerning Kind Miquella’s intentions - why he is here. The full picture is yet to coalesce, but we do know that he is bound for the tower of shadow. And that is where he intends to rise to true godhood…The tower of shadow houses a divine gateway. A well-kept secret, it was, but…The gateway was once the birthplace of a god. A god we know all too well.”
The third and final Cross for this part of the quest is located within the Cerulean Coast , directly south along the pathway from the Cerulean Coast Site Of Grace. After discovering it and returning to Ansbach, choose the “Speak of the cross at the coast” dialogue option for the following information:
“To think there was a cross left in such a faraway place…And the deep-purple water lilies would be blooming there. This can only mean Kindly Miquella has divested himself even of that…His adoring other self, his blossom of slumber.”
It is worth noting that you can discover these crosses in any order and get each piece of dialogue from Ansbach. To advance Ansbach’s quest and that of the other NPCs in the Land of Shadow beyond this moment, you must break Miquella’s charm . Make sure you find the above Crosses before doing so if you want this dialogue however, because afterwards Ansbach will move location .
How to break Miquella’s charm
To break Miquella’s charm, you need to travel to one of the following three locations for the first time:
- The Shadow Keep.
- The Rauh Base.
- Eastern Scadu Altus (beyond Bonny Village).
Once you have, you’ll be met with the sound of shattering glass and the following words:
Somewhere, a great rune has broken… And so too has a powerful charm.
We have a full explainer on what " A great rune has broken " means but essentially, it signifies that you have advanced the main story, the NPCs in the Land of Shadow have retained their memories and independence and the seal that previously prevented you from entering the Stone Coffin Fissure has been removed.
Before advancing through the Shadow Keep dungeon, return to Ansbach . Now that he has regained his independence he will express the desire to figure out Miquella’s true intentions and will move to The Shadow Keep to investigate. He sheds some light on how he was charmed by Miquella in the first place and says:
… Once, in an attempt to free Lord Mohg from his enchantment, I challenged Tender Miquella, only to have my own heart rather artfully stolen. I knew not how weak I was. I believed that with sufficient mastery, even an Empyrean would be within reach of my blade. I could not have been more mistaken…Miquella the Kind is a monster…
Make sure you catch up with the other NPCs after breaking the charm too. In particular, speak to Freyja at the Three-Path Cross Site Of Grace as she will interlock with this quest in the future.
Be warned: Once you defeat the boss within the Shadow Keep and use Messmer’s fire on the Sealing Tree beyond the Church of the Bud , most NPCs on the map will disappear.
Where to find Ansbach and Freyja in The Shadow Keep
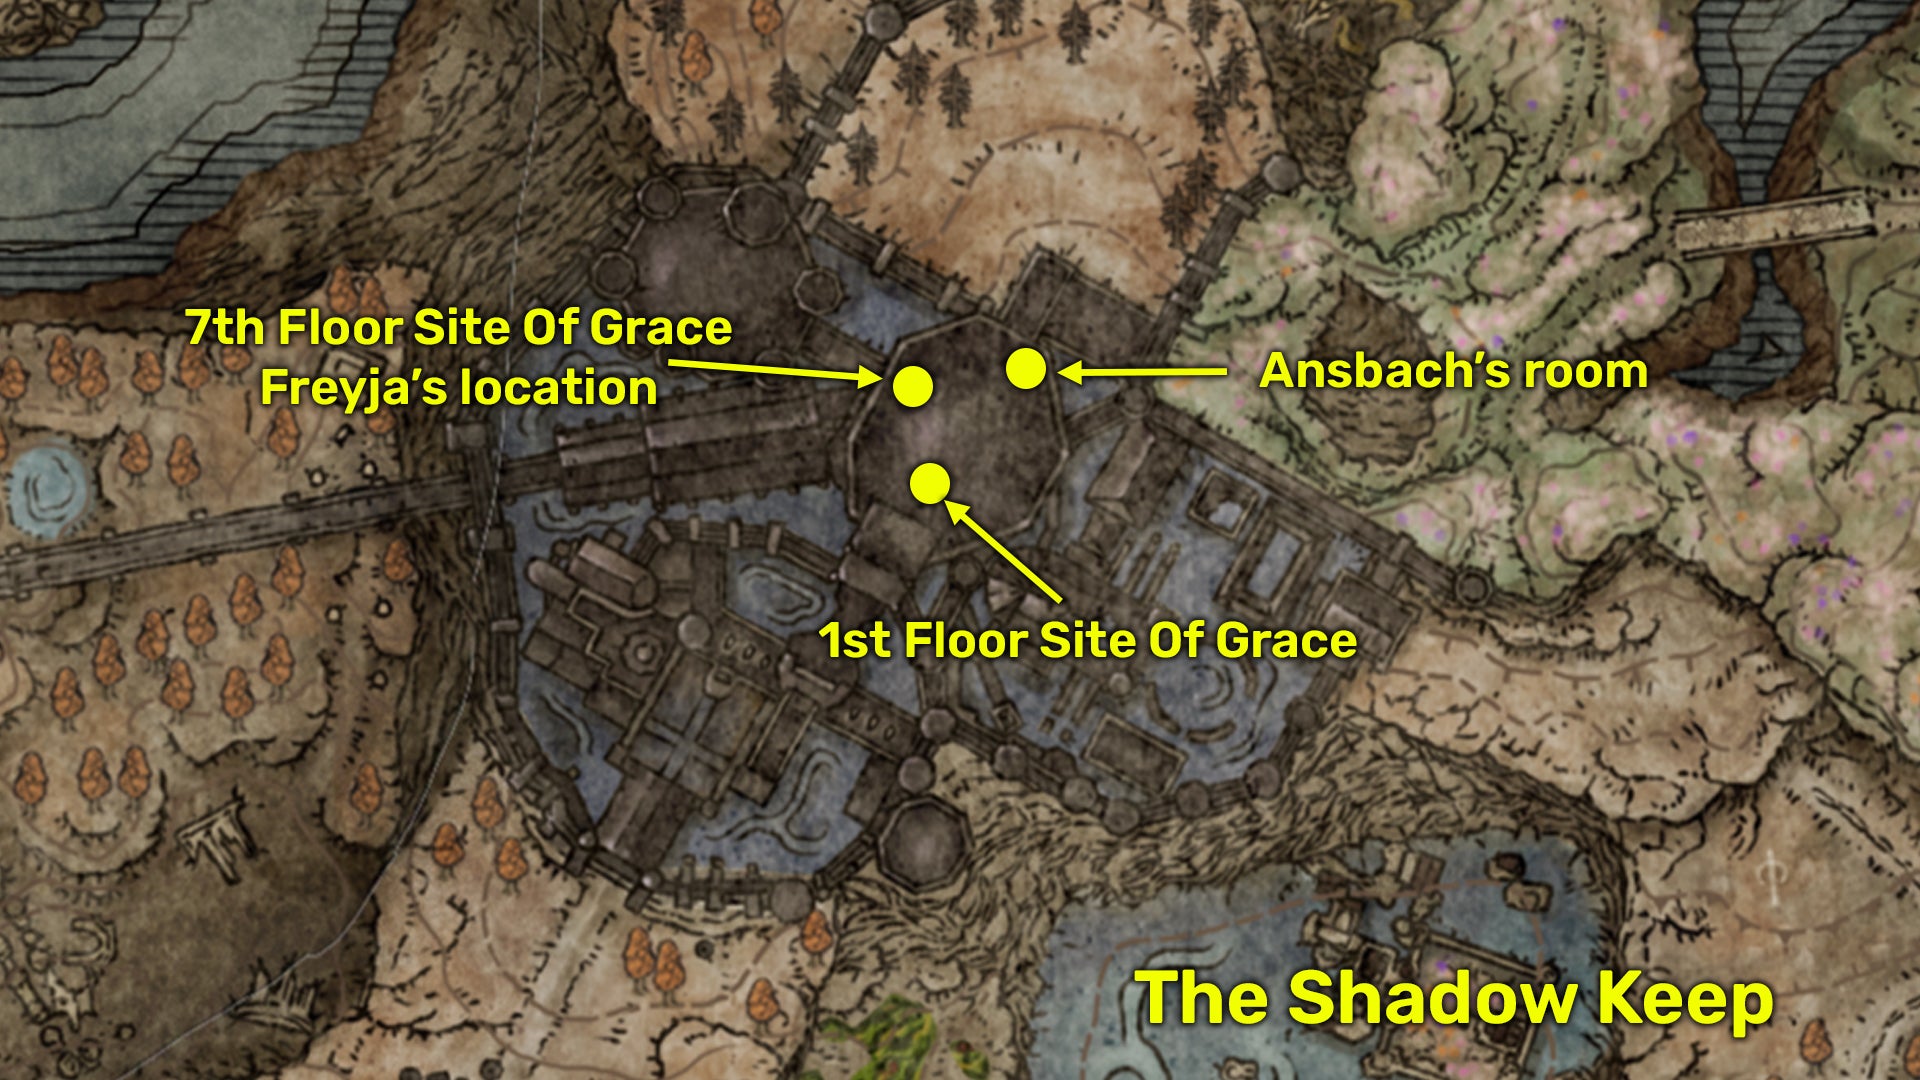
Here are the key locations in the Shadow Keep. |Image credit:Rock Paper Shotgun/Bandai Namco
At this point in the quest, you will next find Ansbach in a room adjacent to the First Floor Site Of Grace within the Specimen Storehouse in the Shadow Keep.
From the First Floor Site Of Grace, travel left around the specimen statue (avoiding the hiding Vulgar Militiamen in the process). Continue forward, then take the stairs upwards and avoid the Shades throwing fireballs. Turn left at the bookcases and then make a right inside the first doorway you see. This is where Ansbach awaits with a mission to figure out what has happened to Mohg’s remains.
As you explore more of the Shadow Keep and make your way up to the top of the Specimen Storehouse, you’ll also encounter Redmane Freyja at the Seventh Floor Site Of Grace. Here, she will say a mixture of dialogue, both to herself and the Tarnished:
By my lord will I ever make sense of this jumble? Truly, I should have asked Ansbach to impart his knowledge when I had the chance.
Naturally, this may be a tad confusing as reporting back to Ansbach doesn’t seem to move the story along. It seems in her quest to find out more about Radahn and her role, she has uncovered a tablet but cannot determine its meaning.
To progress both her and Ansbach’s quests from here, you must locate the Secret Rite Scroll . Essentially, this holds the information that both Ansbach and Freyja seek in regard to the fates of their lords, Radahn and Mohg .
Note: Make sure you speak to Freyja and report her presence in the keep to Ansbach before giving him the Secret Rite Scroll, as he will disappear from the area shortly afterwards.
Where to find the Secret Rite Scroll

Here is the exact location of the Secret Rite Scroll in Shadow Of The Erdtree. |Image credit:Rock Paper Shotgun/Bandai Namco
The Secret Rite Scroll can be found on the 4th floor of the Specimen Storehouse by following these steps:
- From the Storehouse Fourth Floor Site Of Grace, move forward and turn left at the balcony.
- Continue up two flights of stairs.
- Turn left and take the stairs downwards. Take a right into a room overlooking more specimens.
- Inside this room, loot the scroll from the desk located at the back-right corner.
Once you find the Secret Rite Scroll, return it to Ansbach to reveal more about Mohg and Miquella’s plans. Whilst you’re on the 4th Floor, you can also find another of Miquella’s Crosses, a Scadutree Fragment and a message from Ansbach called the ’ Storehouse Cross Message ‘. It says that the Church District has been flooded and there is no clear route to get there from the Storehouse. This alludes to the upper loft areas of the Storehouse, inaccessible until you drain the water. See our Church District walkthrough for more information.
Warning: Story spoilers from here on out.
Should you give the letter to Freyja?
Essentially, Miquella has stolen Mohg’s body and plans to use it to resurrect Radahn. Ansbach is understandably upset about the misuse of his former master’s body and tells you to pass on a letter to Freyja to make her aware of the situation. From here you have two options:
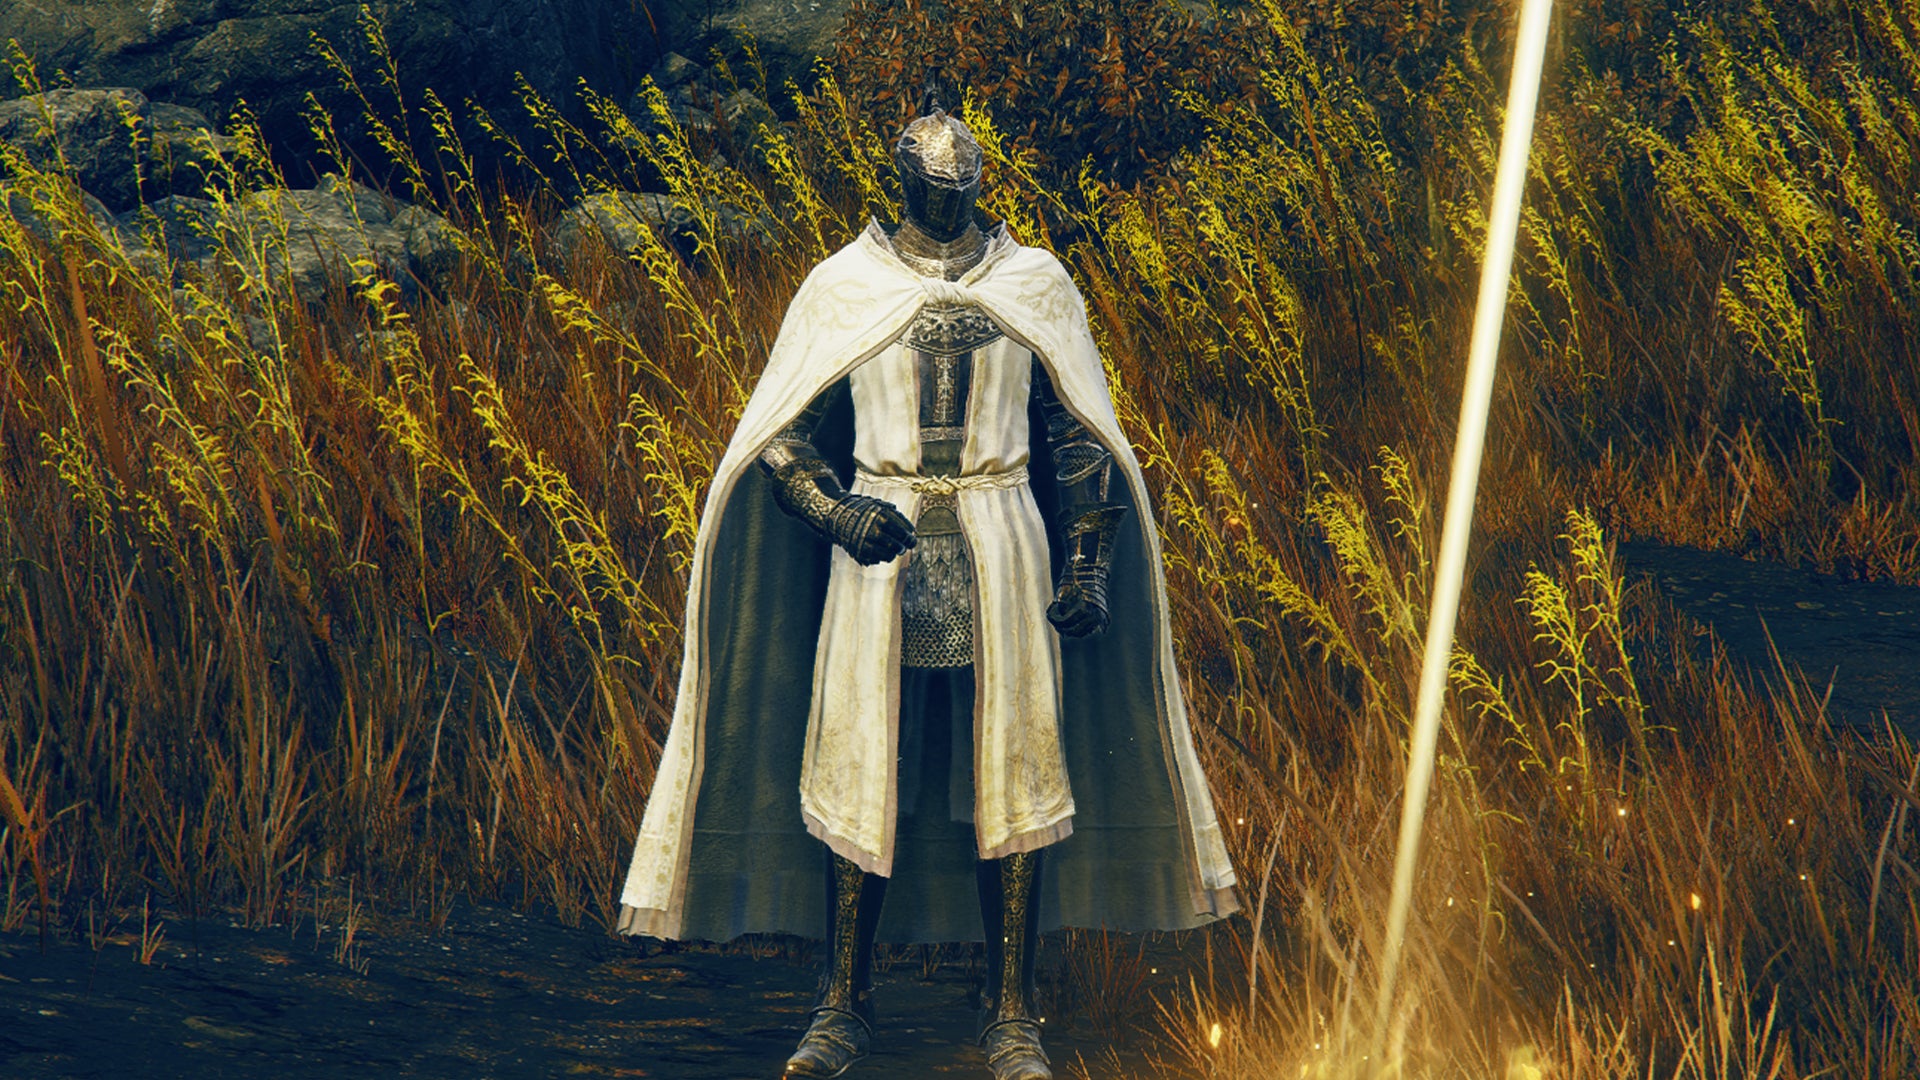
- Give the letter to Freyja: Surprisingly, Freyja isn’t angry about the ritual and instead sees Radahn’s return as a glorious thing, no matter the way in which it happens. Giving Freyja the letter before resolving Anbach’s questline will result in her appearing in the Enir-Ilim fight later on. Ultimately, this means you’ll face her, kill her and take her armor and greatsword afterwards.
- Don’t give the letter to Freyja: If you choose to wait and don’t give her the letter, you will save her from the Enir-Ilim fight and avoid fighting her. After advancing through the main story she will eventually disappear from the Shadow Keep and you’ll be able to pick up her shield from the 7th floor Site of Grace.
Whichever option you choose, Freyja will give you the Golden Lion Shield . Now, rest at a Site Of Grace and speak to Leda at the Highroad Cross Site Of Grace in Scadu Altus. Note: To continue from here, you need to have progressed Leda’s questline enough to have made a choice between Thiollier and Hornsent .
Leda or Ansbach? All quest outcomes
Needle Knight Leda’s questline will intersect with Ansbach’s. During this, you will need to choose between them. |Image credit:Rock Paper Shotgun/Bandai Namco
It transpires that Leda is set on getting rid of Ansbach, fearing that he will strike against Miquella. Return to Ansbach’s room in the Specimen Storehouse and you’ll see a red and gold summon sign where he once was. You can choose to help either Ansbach or Leda but both choices will have consequences.
Assist Ansbach:
If you choose to assist Ansbach, Leda will die (for now) and you’ll recieve the following:
- Leda’s Rune (worth 40,000 Runes).
- Ansbach’s Longbow.
- Ansbach summon for two future fights in Enir-Ilim.
- Obsidian Lamina (if summoned for last fight).
- Furious Blade of Ansbach (if summoned for last fight).
Assist Leda:
If you choose to assist Leda, you’ll recieve the following:
- Retaliatory Crossed-Tree Talisman (enhances attacks executed after rolling or backstepping).
- Sanguine Noble Nataan summon for the Enir-Ilim Cleansing Chamber Anteroom fight.
- Wise Man’s Mask, Ansbach’s Attire, Ansbach’s Manchettes, Ansbach’s Boots, Ansbach’s Longbow.
In my opinion, it is better to assist Ansbach as you should get his armor and gear anyway if you summon him for the last fight of the DLC (although, depending on your choices you may have to choose between summoning him or Thiollier to assist). You’ll get his invaluable help against arguably the hardest boss in Elden Ring as well as the Obsidian Lamina Reaper (with Dexterity Scaling C and 55 passive Bleed buildup damage) as well as the Furious Blade of Ansbach Incantation . Of course, this is at the end of the DLC, so may not be much of an incentive unless you’re looking to delve into new game plus. Additionally, Leda will turn on you no matter what choices you make, as soon as you enter Enir-Ilim. But of course, the choice is always yours.
Where to find Ansbach in Enir-Ilim
Now you’ve chosen between Ansbach and Leda, there’s nothing more to do in this questline other than progress to the final region, Enir-Ilim. This means you need to defeat Messmer at the Shadow Keep and use his fire on the Sealing Tree, beyond the Church of the Bud (in the Ancient Ruins of Rauh).
As soon as you do, most of the NPCs will disappear off the map and you’ll be instantly transported into Enir-Ilim. From here, make your way through the region until you get to the Cleansing Chamber Anteroom. This is where Leda will appear and summon her allies.
This can be an extremely tough fight, but you should have at least one summon available to help (this will be Ansbach if you sided with him in the above choice).
Defeat Leda and her gang and get prepared to face the last boss of the DLC. Before advancing, if Ansbach was summoned he’ll be waiting for you at the foot of the Divine Gate stairs. Ansbach will express that he knows it was the Tarnished that killed Mohg but does not hold it against them as it was a fair fight. He will also go one further and offer his assistance against the last boss, Miquella himself .
If you summon Ansbach for the fight, you’ll be able to loot the arena afterwards for his armor, Obsidian Lamina, and the Furious Blade of Ansbach Incantation. Alternatively, if you have Thiollier as a summon option, you can get Thiollier’s gear and Thiollier’s Hidden Needle after the fight.
Ansbach questline rewards

Perhaps the greatest reward of Ansbach’s sidequest is the help he can provide in the final boss fight as an optional summon. |Image credit:Rock Paper Shotgun/Bandai Namco
The following quest rewards are what you can expect to gain from Ansbach’s questline providing you make the stipulated choices:
- Golden Lion Shield: Give Ansbach’s letter to Freyja, or return to Freyja’s spot at the 7th Floor Specimen Storehouse Site Of Grace after the Enir-Ilim fight against Leda.
- Freyja’s Greatsword and armor set: Gained if you give Ansbach’s letter to Freyja before progressing to Enir-Ilim and she joins the Cleansing Chamber Anteroom fight.
- Leda’s Rune: Worth 40,000 Runes. Gained after siding with Ansbach against Leda in The Shadow Keep.
- Ansbach’s Longbow: Gained after siding with Ansbach against Leda in The Shadow Keep.
- Retaliatory Crossed-Tree Talisman: Gained after siding with Leda against Ansbach in The Shadow Keep.
- Sanguine Noble Nataan summon: Summonable in the Cleansing Chamber Anteroom fight if you sided with Leda throughout her quest.
- Ansbach summon: (Both in the Cleansing Chamber Anteroom fight and the last boss fight of the DLC). Gained after siding with Ansbach against Leda in The Shadow Keep.
- Wise Man’s Mask, Ansbach’s Attire, Ansbach’s Manchettes, Ansbach’s Boots, Anbach’s Longbow: Gained after siding with Leda against Ansbach in The Shadow Keep or retrieved from Ansbach’s body after the final boss fight.
- Obsidian Lamina, Furious Blade of Ansbach: Retrieved from Ansbach’s body after the final boss fight (must side with him against Leda).
That rounds up our guide on the Ansbach questline in Elden Ring: Shadow Of The Erdtree. For more Elden Ring tips and tricks , check out our best weapons , best armor , Talismans , builds or boss locations guides.
Elden Ring
PS4 , PS5 , Xbox One , Xbox Series X/S , PC
Rock Paper Shotgun is better when you sign in
Sign in and join us on our journey to discover strange and compelling PC games.

All 75 Arc Raiders Blueprints and where to get them
These areas have the highest chance of giving you Blueprints

Image credit:Rock Paper Shotgun/Embark Studios

Looking for more Arc Raiders Blueprints? It’s a special day when you find a Blueprint, as they’re among the most valuable items in Arc Raiders. If you find a Blueprint that you haven’t already found, then you must make sure you hold onto it at all costs, because Blueprints are the key to one of the most important and powerful systems of meta-progression in the game.
This guide aims to be the very best guide on Blueprints you can find, starting with a primer on what exactly they are and how they work in Arc Raiders, before delving into exactly where to get Blueprints and the very best farming spots for you to take in your search.
We’ll also go over how to get Blueprints from other unlikely activities, such as destroying Surveyors and completing specific quests. And you’ll also find the full list of all 75 Blueprints in Arc Raiders on this page (including the newest Blueprints added with the Cold Snap update , such as the Deadline Blueprint and Firework Box Blueprint), giving you all the information you need to expand your own crafting repertoire.
In this guide:
- What are Blueprints in Arc Raiders?
- Full Blueprint list: All crafting recipes
- Where to find Blueprints in Arc Raiders Blueprints obtained from quests Blueprints obtained from Trials Best Blueprint farming locations

What are Blueprints in Arc Raiders?
Blueprints in Arc Raiders are special items which, if you manage to extract with them, you can expend to permanently unlock a new crafting recipe in your Workshop. If you manage to extract from a raid with an Anvil Blueprint, for example, you can unlock the ability to craft your very own Anvil Pistol, as many times as you like (as long as you have the crafting materials).
To use a Blueprint, simply open your Inventory while in the lobby, then right-click on the Blueprint and click “Learn And Consume” . This will permanently unlock the recipe for that item in your Workshop. As of the Stella Montis update, there are allegedly 75 different Blueprints to unlock - although only 68 are confirmed to be in the game so far. You can see all the Blueprints you’ve found and unlocked by going to the Workshop menu, and hitting “R” to bring up the Blueprint screen.
It’s possible to find duplicates of past Blueprints you’ve already unlocked. If you find these, then you can either sell them, or - if you like to play with friends - you can take it into a match and gift it to your friend so they can unlock that recipe for themselves. Another option is to keep hold of them until the time comes to donate them to the Expedition.
Full Blueprint list: All crafting recipes
Below is the full list of all the Blueprints that are currently available to find in Arc Raiders, and the crafting recipe required for each item:
| Blueprint | Type | Recipe | Crafted At |
|---|---|---|---|
| Bettina | Weapon | 3x Advanced Mechanical Components 3x Heavy Gun Parts 3x Canister | Gunsmith 3 |
| Blue Light Stick | Quick Use | 3x Chemicals | Utility Station 1 |
| Aphelion | Weapon | 3x Magnetic Accelerator 3x Complex Gun Parts 1x Matriarch Reactor | Gunsmith 3 |
| Combat Mk. 3 (Flanking) | Augment | 2x Advanced Electrical Components 3x Processor | Gear Bench 3 |
| Combat Mk. 3 (Aggressive) | Augment | 2x Advanced Electrical Components 3x Processor | Gear Bench 3 |
| Complex Gun Parts | Material | 2x Light Gun Parts 2x Medium Gun Parts 2x Heavy Gun Parts | Refiner 3 |
| Fireworks Box | Quick Use | 1x Explosive Compound 3x Pop Trigger | Explosives Station 2 |
| Gas Mine | Mine | 4x Chemicals 2x Rubber Parts | Explosives Station 1 |
| Green Light Stick | Quick Use | 3x Chemicals | Utility Station 1 |
| Pulse Mine | Mine | 1x Crude Explosives 1x Wires | Explosives Station 1 |
| Seeker Grenade | Grenade | 1x Crude Explosives 2x ARC Alloy | Explosives Station 1 |
| Looting Mk. 3 (Survivor) | Augment | 2x Advanced Electrical Components 3x Processor | Gear Bench 3 |
| Angled Grip II | Mod | 2x Mechanical Components 3x Duct Tape | Gunsmith 2 |
| Angled Grip III | Mod | 2x Mod Components 5x Duct Tape | Gunsmith 3 |
| Hullcracker | Weapon | 1x Magnetic Accelerator 3x Heavy Gun Parts 1x Exodus Modules | Gunsmith 3 |
| Launcher Ammo | Ammo | 5x Metal Parts 1x Crude Explosives | Workbench 1 |
| Anvil | Weapon | 5x Mechanical Components 5x Simple Gun Parts | Gunsmith 2 |
| Anvil Splitter | Mod | 2x Mod Components 3x Processor | Gunsmith 3 |
| ??? | ??? | ??? | ??? |
| Barricade Kit | Quick Use | 1x Mechanical Components | Utility Station 2 |
| Blaze Grenade | Grenade | 1x Explosive Compound 2x Oil | Explosives Station 3 |
| Bobcat | Weapon | 3x Advanced Mechanical Components 3x Light Gun Parts | Gunsmith 3 |
| Osprey | Weapon | 2x Advanced Mechanical Components 3x Medium Gun Parts 7x Wires | Gunsmith 3 |
| Burletta | Weapon | 3x Mechanical Components 3x Simple Gun Parts | Gunsmith 1 |
| Compensator II | Mod | 2x Mechanical Components 4x Wires | Gunsmith 2 |
| Compensator III | Mod | 2x Mod Components 8x Wires | Gunsmith 3 |
| Defibrillator | Quick Use | 9x Plastic Parts 1x Moss | Medical Lab 2 |
| ??? | ??? | ??? | ??? |
| Equalizer | Weapon | 3x Magnetic Accelerator 3x Complex Gun Parts 1x Queen Reactor | Gunsmith 3 |
| Extended Barrel | Mod | 2x Mod Components 8x Wires | Gunsmith 3 |
| Extended Light Mag II | Mod | 2x Mechanical Components 3x Steel Spring | Gunsmith 2 |
| Extended Light Mag III | Mod | 2x Mod Components 5x Steel Spring | Gunsmith 3 |
| Extended Medium Mag II | Mod | 2x Mechanical Components 3x Steel Spring | Gunsmith 2 |
| Extended Medium Mag III | Mod | 2x Mod Components 5x Steel Spring | Gunsmith 3 |
| Extended Shotgun Mag II | Mod | 2x Mechanical Components 3x Steel Spring | Gunsmith 2 |
| Extended Shotgun Mag III | Mod | 2x Mod Components 5x Steel Spring | Gunsmith 3 |
| Remote Raider Flare | Quick Use | 2x Chemicals 4x Rubber Parts | Utility Station 1 |
| Heavy Gun Parts | Material | 4x Simple Gun Parts | Refiner 2 |
| Venator | Weapon | 2x Advanced Mechanical Components 3x Medium Gun Parts 5x Magnet | Gunsmith 3 |
| Il Toro | Weapon | 5x Mechanical Components 6x Simple Gun Parts | Gunsmith 1 |
| Jolt Mine | Mine | 1x Electrical Components 1x Battery | Explosives Station 2 |
| Explosive Mine | Mine | 1x Explosive Compound 1x Sensors | Explosives Station 3 |
| Jupiter | Weapon | 3x Magnetic Accelerator 3x Complex Gun Parts 1x Queen Reactor | Gunsmith 3 |
| Light Gun Parts | Material | 4x Simple Gun Parts | Refiner 2 |
| Lightweight Stock | Mod | 2x Mod Components 5x Duct Tape | Gunsmith 3 |
| Lure Grenade | Grenade | 1x Speaker Component 1x Electrical Components | Utility Station 2 |
| Medium Gun Parts | Material | 4x Simple Gun Parts | Refiner 2 |
| Torrente | Weapon | 2x Advanced Mechanical Components 3x Medium Gun Parts 6x Steel Spring | Gunsmith 3 |
| Muzzle Brake II | Mod | 2x Mechanical Components 4x Wires | Gunsmith 2 |
| Muzzle Brake III | Mod | 2x Mod Components 8x Wires | Gunsmith 3 |
| Padded Stock | Mod | 2x Mod Components 5x Duct Tape | Gunsmith 3 |
| Shotgun Choke II | Mod | 2x Mechanical Components 4x Wires | Gunsmith 2 |
| Shotgun Choke III | Mod | 2x Mod Components 8x Wires | Gunsmith 3 |
| Shotgun Silencer | Mod | 2x Mod Components 8x Wires | Gunsmith 3 |
| Showstopper | Grenade | 1x Advanced Electrical Components 1x Voltage Converter | Explosives Station 3 |
| Silencer I | Mod | 2x Mechanical Components 4x Wires | Gunsmith 2 |
| Silencer II | Mod | 2x Mod Components 8x Wires | Gunsmith 3 |
| Snap Hook | Quick Use | 2x Power Rod 3x Rope 1x Exodus Modules | Utility Station 3 |
| Stable Stock II | Mod | 2x Mechanical Components 3x Duct Tape | Gunsmith 2 |
| Stable Stock III | Mod | 2x Mod Components 5x Duct Tape | Gunsmith 3 |
| Tagging Grenade | Grenade | 1x Electrical Components 1x Sensors | Utility Station 3 |
| Tempest | Weapon | 3x Advanced Mechanical Components 3x Medium Gun Parts 3x Canister | Gunsmith 3 |
| Trigger Nade | Grenade | 2x Crude Explosives 1x Processor | Explosives Station 2 |
| Vertical Grip II | Mod | 2x Mechanical Components 3x Duct Tape | Gunsmith 2 |
| Vertical Grip III | Mod | 2x Mod Components 5x Duct Tape | Gunsmith 3 |
| Vita Shot | Quick Use | 2x Antiseptic 1x Syringe | Medical Lab 3 |
| Vita Spray | Quick Use | 3x Antiseptic 1x Canister | Medical Lab 3 |
| Vulcano | Weapon | 1x Magnetic Accelerator 3x Heavy Gun Parts 1x Exodus Modules | Gunsmith 3 |
| Wolfpack | Grenade | 2x Explosive Compound 2x Sensors | Explosives Station 3 |
| Red Light Stick | Quick Use | 3x Chemicals | Utility Station 1 |
| Smoke Grenade | Grenade | 14x Chemicals 1x Canister | Utility Station 2 |
| Deadline | Mine | 3x Explosive Compound 2x ARC Circuitry | Explosives Station 3 |
| Trailblazer | Grenade | 1x Explosive Compound 1x Synthesized Fuel | Explosives Station 3 |
| Tactical Mk. 3 (Defensive) | Augment | 2x Advanced Electrical Components 3x Processor | Gear Bench 3 |
| Tactical Mk. 3 (Healing) | Augment | 2x Advanced Electrical Components 3x Processor | Gear Bench 3 |
| Yellow Light Stick | Quick Use | 3x Chemicals | Utility Station 1 |
Note: The missing Blueprints in this list likely have not actually been added to the game at the time of writing, because none of the playerbase has managed to find any of them. As they are added to the game, I will update this page with the most relevant information so you know exactly how to get all 75 Arc Raiders Blueprints.
Where to find Blueprints in Arc Raiders
Below is a list of all containers, modifiers, and events which maximise your chances of finding Blueprints:
- Certain quests reward you with specific Blueprints .
- Completing Trials has a high chance of offering Blueprints as rewards.
- Surveyors have a decent chance of dropping Blueprints on death.
- High loot value areas tend to have a greater chance of spawning Blueprints.
- Night Raids and Storms may increase rare Blueprint spawn chances in containers.
- Containers with higher numbers of items may have a higher tendency to spawn Blueprints. As a result, Blue Gate (which has many “large” containers containing multiple items) may give you a higher chance of spawning Blueprints.
- Raider containers (Raider Caches, Weapon Boxes, Medical Bags, Grenade Tubes) have increased Blueprint drop rates. As a result, the Uncovered Caches event gives you a high chance of finding Blueprints.
- Security Lockers have a higher than average chance of containing Blueprints.
- Certain Blueprints only seem to spawn under specific circumstances: Tempest Blueprint only spawns during Night Raid events. Vulcano Blueprint only spawns during Hidden Bunker events. Jupiter and Equaliser Blueprints only spawn during Harvester events.

Raider Caches, Weapon Boxes, and other raider-oriented container types have a good chance of offering Blueprints. |Image credit:Rock Paper Shotgun/Embark Studios
Blueprints have a very low chance of spawning in any container in Arc Raiders, around 1-2% on average. However, there is a higher chance of finding Blueprints in particular container types. Specifically, you can find more Blueprints in Raider containers and security lockers.
Beyond this, if you’re looking for Blueprints you should focus on regions of the map which are marked as having particularly high-value loot. Areas such as the Control Tower in Dam Battlegrounds, the Arrival and Departure Buildings in Spaceport, and Pilgrim’s Peak in Blue Gate all have a better-than-average chance of spawning Blueprints somewhere amongst all their containers. Night Raids and Electromagnetic Storm events also increase the drop chances of certain Blueprints .
In addition to these containers, you can often loot Blueprints from destroyed Surveyors - the largest of the rolling ball ARC. Surveyors are more commonly found on the later maps - Spaceport and Blue Gate - and if one spawns in your match, you’ll likely see it by the blue laser beam that it casts into the sky while “surveying”.
Surveyors are quite well-armoured and will very speedily run away from you once it notices you, but if you can take one down then make sure you loot all its parts for a chance of obtaining certain unusual Blueprints.
Blueprints obtained from quests
One way in which you can get Blueprints is by completing certain quests for the vendors in Speranza. Some quests will reward you with a specific item Blueprint upon completion, so as long as you work through all the quests in Arc Raiders, you are guaranteed those Blueprints.
Here is the full list of all Blueprints you can get from quest rewards:
- Trigger Nade Blueprint: Rewarded after completing “Sparks Fly”.
- Lure Grenade Blueprint: Rewarded after completing “Greasing Her Palms”.
- Burletta Blueprint: Rewarded after completing “Industrial Espionage”.
- Hullcracker Blueprint (and Launcher Ammo Blueprint): Rewarded after completing “The Major’s Footlocker”.
Alas, that’s only 4 Blueprints out of a total of 75 to unlock, so for the vast majority you will need to find them yourself during a raid. If you’re intent on farming Blueprints, then it’s best to equip yourself with cheap gear in case you lose it, but don’t use a free loadout because then you won’t get a safe pocket to stash any new Blueprint you find. No pain in Arc Raiders is sharper than failing to extract with a new Blueprint you’ve been after for a dozen hours already.

One of the best ways to get Blueprints is by hitting three stars on all five Trials every week. |Image credit:Rock Paper Shotgun/Embark Studios
Blueprints obtained from Trials
One of the very best ways to get Blueprints is as rewards for completing Trials in Arc Raiders. Trials are unlocked from Level 15 onwards, and allow you to earn rewards by focusing on certain tasks over the course of several raids. For example, one Trial might task you with dealing damage to Hornets, while another might challenge you to loot Supply Drops.
Trials refresh on a weekly basis, with a new week bringing five new Trials. Each Trial can offer up to three rewards after passing certain score milestones, and it’s possible to receive very high level loot from these reward crates - including Blueprints. So if you want to unlock as many Blueprints as possible, you should make a point of completing as many Trials as possible each week.
Best Blueprint farming locations
The very best way to get Blueprints is to frequent specific areas of the maps which combine high-tier loot pools with the right types of containers to search. Here are my recommendations for where to find Blueprints on every map, so you can always keep the search going for new crafting recipes to unlock.

Image credit:Rock Paper Shotgun/Embark Studios
Dam Battlegrounds
The best places to farm Blueprints on Dam Battlegrounds are the Control Tower, Power Generation Complex, Ruby Residence, and Pale Apartments . The first two regions, despite only being marked on the map as mid-tier loot, contain a phenomenal number of containers to loot. The Control Tower can also contain a couple of high-tier Security Lockers - though of course, you’ll need to have unlocked the Security Breach skill at the end of the Survival tree.
There’s also a lot of reporting amongst the playerbase that the Residential areas in the top-left of the map - Pale Apartments and Ruby Residence - give you a comparatively strong chance of finding Blueprints. Considering their size, there’s a high density of containers to loot in both locations, and they also have the benefit of being fairly out of the way. So you’re more likely to have all the containers to yourself.
Buried City
The best Blueprint farming locations on Buried City are the Santa Maria Houses, Grandioso Apartments, Town Hall, and the various buildings of the New District . Grandioso Apartments has a lower number of containers than the rest, but a high chance of spawning weapon cases - which have good Blueprint drop rates. The others are high-tier loot areas, with plenty of lootable containers - including Security Lockers.
Spaceport
The best places to find Blueprints on Spaceport are the Arrival and Departure Buildings, as well as Control Tower A6 and the Launch Towers . All these areas are labelled as high-value loot regions, and many of them are also very handily connected to one another by the Spaceport wall, which you can use to quickly run from one area to the next. At the tops of most of these buildings you’ll find at least one Security Locker, so this is an excellent farming route for players looking to find Blueprints.
The downside to looting Blueprints on Spaceport is that all these areas are hotly contested, particularly in Duos and Squads. You’ll need to be very focused and fast in order to complete the full farming route.

Image credit:Rock Paper Shotgun/Embark Studios
Blue Gate
Blue Gate tends to have a good chance of dropping Blueprints, potentially because it generally has a high number of containers which can hold lots of items; so there’s a higher chance of a Blueprint spawning in each container. In my experience, the best Blueprint farming spots on Blue Gate are Pilgrim’s Peak, Raider’s Refuge, the Ancient Fort, and the Underground Complex beneath the Warehouse .
All of these areas contain a wealth of containers to loot. Raider’s Refuge has less to loot, but the majority of the containers in and around the Refuge are raider containers, which have a high chance of containing Blueprints - particularly during major events.
Stella Montis
On the whole, Stella Montis seems to have a very low drop rate for Blueprints (though a high chance of dropping other high-tier loot). If you do want to try farming Blueprints on this map, the best places to find Blueprints in Stella Montis are Medical Research, Assembly Workshop, and the Business Center . These areas have the highest density of containers to loot on the map.
In addition to this, the Western Tunnel has a few different Security Lockers to loot, so while there’s very little to loot elsewhere in this area of the map, it’s worth hitting those Security Lockers if you spawn there at the start of a match.
That wraps up this primer on how to get all the Blueprints in Arc Raiders as quickly as possible. With the Expedition system constantly resetting a large number of players’ Blueprints, it’s more important than ever to have the most up-to-date information on where to find all these Blueprints.
While you’re here, be sure to check out our Arc Raiders best guns tier list , as well as our primers on the best skills to unlock and all the different Field Depot locations on every map.

ARC Raiders
PS5 , Xbox Series X/S , PC
Rock Paper Shotgun is better when you sign in
Sign in and join us on our journey to discover strange and compelling PC games.
