Anger Foot review: Two kicks forward, one kick back
Soles-like

Image credit:Rock Paper Shotgun/Free Lives

- Developer: Free Lives
- Publisher: Devolver Digital
- Release: July 11th, 2024
- On: Windows, macOS, Linux
- From: Steam , GOG
- Price: TBC
- Reviewed on: Intel Core i5-8600K, 16GB RAM, Nvidia RTX 2070, Windows 10
You ever do that thing on a fairground ride or rollercoaster where you sort of pull your neck and face back in preparation for extreme motion? Welcome to kick-exalting FPS Anger Foot . Violence is brutal and cartoonish. Slight mistakes kill you instantly. The soundtrack slaps. There’s an easy Devolver labelmate orientation point here, but if Hotline Miami was a cocktail of chemical euphoria and gut guilt, like realising you’ve accidentally pocketed someone’s lighter at a festival, Anger Foot is doing whippits out of balloon animals then having a great time rhythmically headbutting a portaloo for a few hours. Similarly, it’s also a bit of a masochistic ordeal to put yourself through. But, man. What a buzz.
The smallest unit of condensed Anger Foot is the act of booting a door flying, braining the pipe-wielding lizard on the other side, bolting through the bereaved doorframe, turning left, then eating a bullet in the back from the pistol goon lurking off to the right. Restart. Boot door. Boot pistol goon. Hoover up his pistol - five shots, make ‘em count - boot the next door. The next layer of the beat kicks in and despite every fibre of your conscious being screaming at you to play cautiously, the bass flicks your lizard brain into override. You spray and kick wildly, strafing like a mad crab. More goons. Pistol’s dry. Lob it for a stun. Jump. Kick. Strafe. Shoot. Kick. Kick.
Kick.
May as well kick again, just to be safe. You can hold the kick key down for a never-ending chain if you want. Lurking behind a door frame and booting a procession of goons as they rampage through is a premiere strategy. It’s cowardly, of course. But if Anger Foot taught me one thing, it’s to take advantages where I can find them. It often feels like playing poker, me and the game raising each other surging stacks of cheeky bullshit. And my god, does this game wallow in cheeky bullshit. Don’t ask if there’s a goon behind you. There is. When you die, the room of goons start dancing. You don’t win in Anger Foot. It doesn’t kill you. You dunk on each other.

Image credit:Rock Paper Shotgun/Free Lives
More on this soon. The question I imagine you’ll want answering about Anger Foot - the same one I had - is whether there’s enough variation on a theme here (kicking is a theme now) to justify itself as a full game, or whether you can basically get the full experience in the demo. The short answer is a resounding “yup”. Anger Foot does falter when it pushes restrictively punishing encounters that all but crush any room for improvisation, but it’s also generously committed to sticking new toys in hands and on feet, every few stages. Those stages are weaved with a dungeoneers eye for novel surprises, and populated with a regularly expanding enemy roster of hyper-bastard chess pieces, running off rulesets rather than reactions. One enemy throws live snakes at you from a bucket. Another is an armoured bear with a minigun. You’ll encounter old goons in fresh new configurations of artisan cheeky bullshit right up to the final stages, and new goons make their debut until about halfway through the final map.
There’s four of those maps in total, each run by a different gang. The pollution gang hang out in the sewers with knife-wielding tentacles that pop up from pools of painful green goop. The business gang populate a glitzy high-rise, etcetera. Emphasis on the etcetera, because the running joke here is that no-one could be arsed to come up for names for the gangs (or interesting themes, honestly.) The game takes this veneer of low effort and runs with it, while actually putting a load of effort into everything from how different the ten or so weapons feel from each other to the tiny boss icon next the health bar that grimaces when they’re taking damage. This scans, pre-ripped jeans and Punk IPA being the Devolver experience (I said this first, Nathan Brown . I have proof ). I know you care, Free Lives. You can’t pretend you don’t.

Image credit:Rock Paper Shotgun/Free Lives
You definitely care about replayability. Each stage (63) takes between one and three minutes. You get a big gold star - you big clever sausage - just for beating each one, but there are also two optional challenge objectives apiece. ‘Feet only’ is a common one, as are time limits, and wearing a specific pair of shoes. There are 23 pairs in total. You unlock one for every five stars, plus a bonus pair for each of the four bosses you boot to death.
Spoke the one-footed man: half of these shoes feel pointless.
Don’t get me wrong, I’m glad they exist. It’s hard to complain about desert boots that activate big head mode, or a double jump. It’s harder to complain about one-time resurrection sandals, and the shocked animation for each goon when you rise from the dead for another crack is wonderful. I’m much less sold on the usefulness of trainers that unleash a “flurry of kicks” when you jump, locking you in place in the air for just enough time to get you killed three times over. Or the “throws are deadly but bullets only stun” Stilettos. I get five bullets a pistol and one throw. I’d ask why I’d ever wear these but I know why - it’s specifically for some of those challenge stars. Basically, what should have been a prezzie-opening joy each time I got a new pair felt like a coin flip on whether they’d be practical. I’m well into my thirties now. Practical shoes are how I like to party.
Even some of the more interesting ones - Slide kickers, dashers - should be instantly fun, but the default difficulty (there are easier options) is so demanding of economic movement that it discourages experimentation. Something for your second or third run, then. Anger Foot took me about 12 hours - sometimes replaying stages as I went to unlock stars - and, if you wanted a quick verdict, I do want to play more of it. I appreciate the funky shoes for their variety, I just don’t see most of them being useful for your first go around. You’re going to spend most of it feeling too backed into a corner to really let loose.
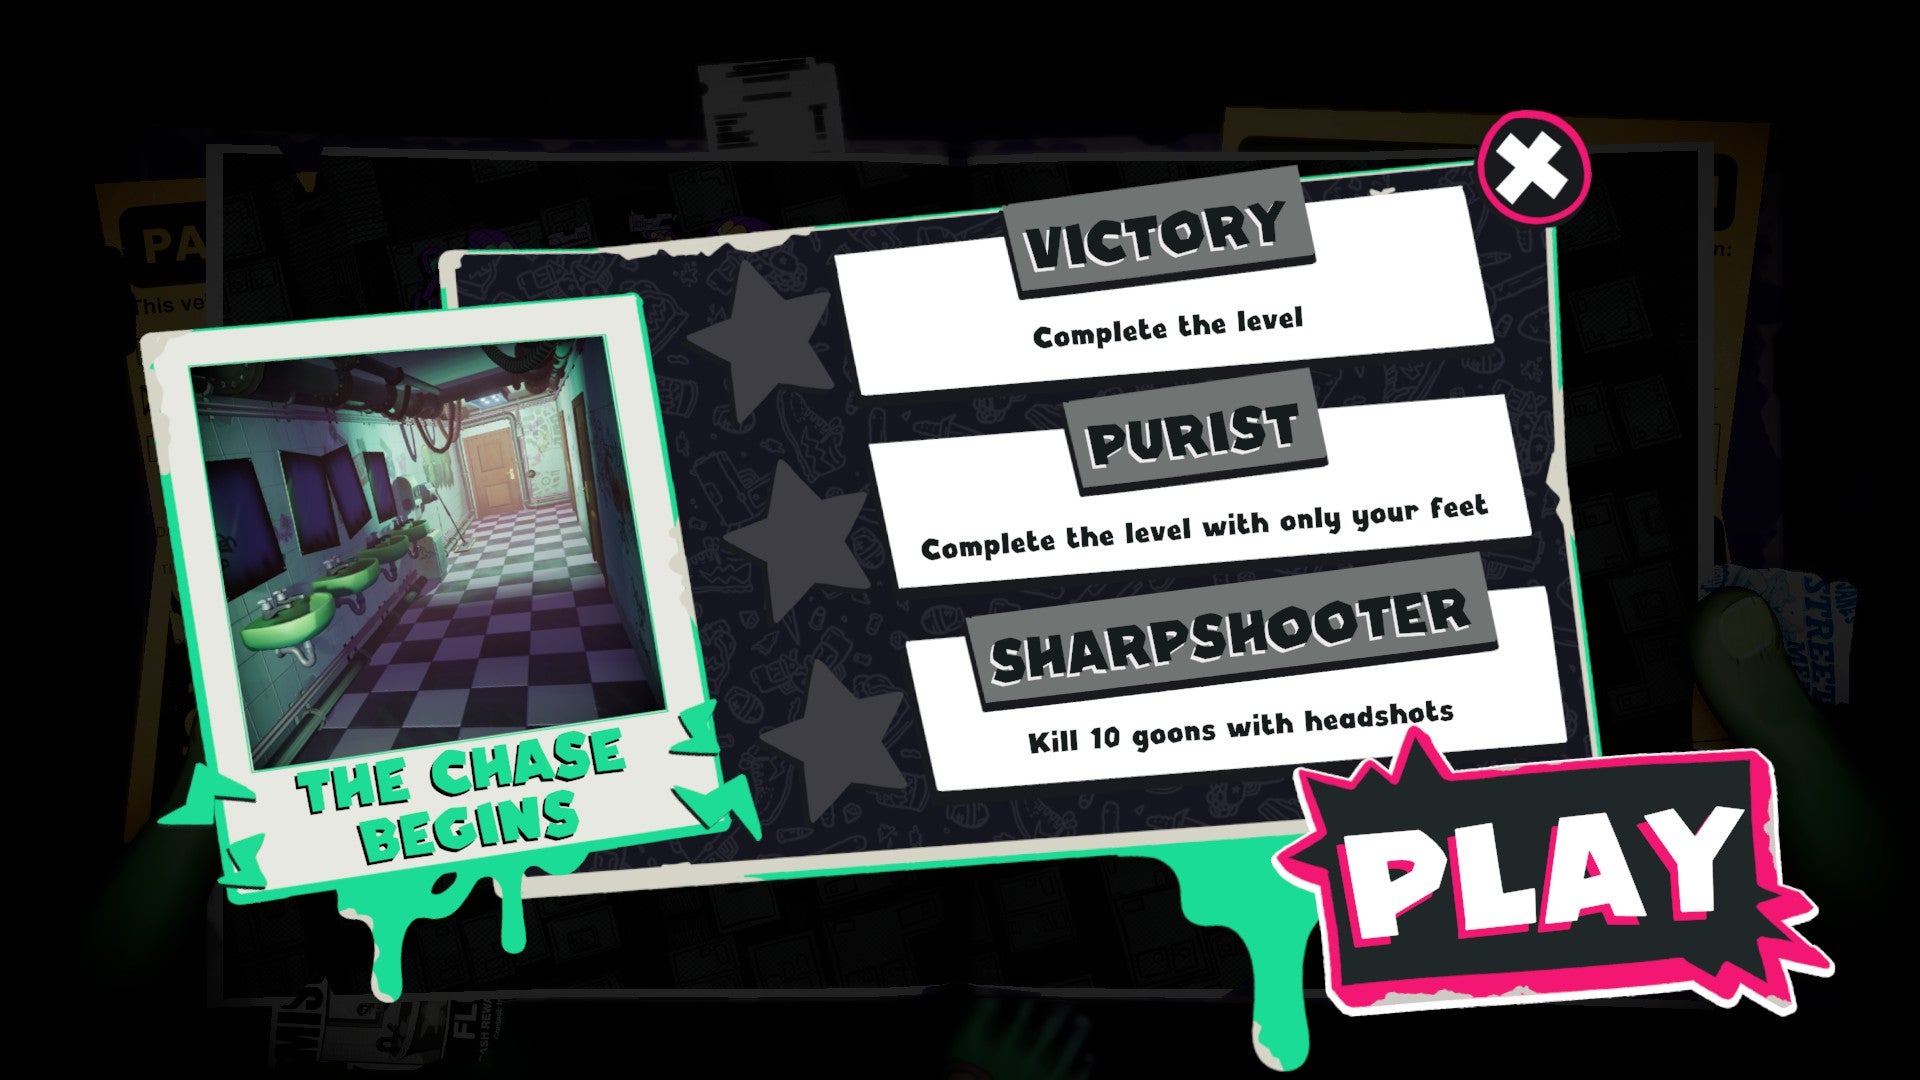
Image credit:Rock Paper Shotgun/Free Lives
Herein lies the tension: a disempowerment ruleset wearing a fresh pair of power fantasies. Spoke the punter at the piss-bucket juggling show: I do not envy this balancing act. By goofing up the Hotline Miami formula - a game in which you played a ruthless and efficient killer, as distinct from a cartoon badbutt - Free Lives have set themselves a bit of a conundrum. The speed and intensity and sheer exhilarating busyness of these stages mean that a minute of progress feels like a marathon. As such, it is never not bodily frustrating to eat shit at any point in a stage past the first few rooms. Hotline Miami remedied this in minor and major ways. Checkpoints were one, as was the extra visibility granted by the isometric viewpoint. But I think the biggest culprit here is actually the most subtle.
It takes 3 seconds in Anger Foot between dying and the ‘restart’ key prompt to appear. Hotline Miami takes 1 second. I’ve done the brain-math, and 3 seconds is just enough time to realise you’re dead and get annoyed about it, while Hotline Miami’s single second barely registers before you’re thrown back in and having another crack without even realising it. This one feature is, far and above, Hotline Miami’s greatest trick, and Anger Foot is still clipping its toenails by the time Jacket swings the bat again. It might be a loading thing, but if it’s so the goons can dance at you: that is funny precisely once . Alright. Once for each goon. They do different dances.

Image credit:Rock Paper Shotgun/Free Lives
Still, Anger Foot gets its most important balancing act right. Ten different weapons, doled out regularly, all distinctly powerful and useful, and that kick never becomes even close to redundant. Sure, doors are always fun to boot, and need booting besides. You can also shoot and kick at the same time, violent multitasking being a solid gold videogame promise. Those pinkies have utility, too. Booting grenades back at goons, or hoofing explosive barrels. It’s a high concept based on a joke that’s funny for about seven seconds, spun out into a game jam project that took seven days. Novelty, fundamentals that are solid besides the ones I’ve picked on, great level design, and some spiffy physics keeps it all fresh for a good deal more than seven hours. Also, you’ve heard that soundtrack, right?
I consider this a kind of grimly hilarious manifestation in the vein of an Alan Moorish act of chaotic development magick, minus the part where the art actually has anything of substance to say about literally anything. That’s fine! Substance isn’t always necessary. Those doors were substantial, and you saw what happened to them, didn’t you? Sometimes what Anger Foot does offer is worse than nothing, mind. The concept for the final boss (‘unholy corpulence’) is effectively “lol, fat.” You’re funnier than that, mates. I know you are because I’ve just played your game. He keeps trying to knock you into a pool of molten cheese, but this is weak sauce.
Elsewhere, the bosses make for good puzzles, and it’s never not fun to kick a helicopter to bits. And, while I moaned about the game’s tendency to demand script-following over improv, there are times where it goes all Neon White , with level chunks choreographed to send you hurtling through playable set-pieces - chunks of massively enjoyable rollercoaster-y force-fed fun, like a string of rooms and doors where you boot a dozen goons to death in seconds. Actually, most of the punchlines here involve booting goons to death, But hell, that’s what I signed up for.
Find out how we conduct our reviews by reading our review policy .

Anger Foot
PC
Rock Paper Shotgun is better when you sign in
Sign in and join us on our journey to discover strange and compelling PC games.

All 75 Arc Raiders Blueprints and where to get them
These areas have the highest chance of giving you Blueprints

Image credit:Rock Paper Shotgun/Embark Studios

Looking for more Arc Raiders Blueprints? It’s a special day when you find a Blueprint, as they’re among the most valuable items in Arc Raiders. If you find a Blueprint that you haven’t already found, then you must make sure you hold onto it at all costs, because Blueprints are the key to one of the most important and powerful systems of meta-progression in the game.
This guide aims to be the very best guide on Blueprints you can find, starting with a primer on what exactly they are and how they work in Arc Raiders, before delving into exactly where to get Blueprints and the very best farming spots for you to take in your search.
We’ll also go over how to get Blueprints from other unlikely activities, such as destroying Surveyors and completing specific quests. And you’ll also find the full list of all 75 Blueprints in Arc Raiders on this page (including the newest Blueprints added with the Cold Snap update , such as the Deadline Blueprint and Firework Box Blueprint), giving you all the information you need to expand your own crafting repertoire.
In this guide:
- What are Blueprints in Arc Raiders?
- Full Blueprint list: All crafting recipes
- Where to find Blueprints in Arc Raiders Blueprints obtained from quests Blueprints obtained from Trials Best Blueprint farming locations

What are Blueprints in Arc Raiders?
Blueprints in Arc Raiders are special items which, if you manage to extract with them, you can expend to permanently unlock a new crafting recipe in your Workshop. If you manage to extract from a raid with an Anvil Blueprint, for example, you can unlock the ability to craft your very own Anvil Pistol, as many times as you like (as long as you have the crafting materials).
To use a Blueprint, simply open your Inventory while in the lobby, then right-click on the Blueprint and click “Learn And Consume” . This will permanently unlock the recipe for that item in your Workshop. As of the Stella Montis update, there are allegedly 75 different Blueprints to unlock - although only 68 are confirmed to be in the game so far. You can see all the Blueprints you’ve found and unlocked by going to the Workshop menu, and hitting “R” to bring up the Blueprint screen.
It’s possible to find duplicates of past Blueprints you’ve already unlocked. If you find these, then you can either sell them, or - if you like to play with friends - you can take it into a match and gift it to your friend so they can unlock that recipe for themselves. Another option is to keep hold of them until the time comes to donate them to the Expedition.
Full Blueprint list: All crafting recipes
Below is the full list of all the Blueprints that are currently available to find in Arc Raiders, and the crafting recipe required for each item:
| Blueprint | Type | Recipe | Crafted At |
|---|---|---|---|
| Bettina | Weapon | 3x Advanced Mechanical Components 3x Heavy Gun Parts 3x Canister | Gunsmith 3 |
| Blue Light Stick | Quick Use | 3x Chemicals | Utility Station 1 |
| Aphelion | Weapon | 3x Magnetic Accelerator 3x Complex Gun Parts 1x Matriarch Reactor | Gunsmith 3 |
| Combat Mk. 3 (Flanking) | Augment | 2x Advanced Electrical Components 3x Processor | Gear Bench 3 |
| Combat Mk. 3 (Aggressive) | Augment | 2x Advanced Electrical Components 3x Processor | Gear Bench 3 |
| Complex Gun Parts | Material | 2x Light Gun Parts 2x Medium Gun Parts 2x Heavy Gun Parts | Refiner 3 |
| Fireworks Box | Quick Use | 1x Explosive Compound 3x Pop Trigger | Explosives Station 2 |
| Gas Mine | Mine | 4x Chemicals 2x Rubber Parts | Explosives Station 1 |
| Green Light Stick | Quick Use | 3x Chemicals | Utility Station 1 |
| Pulse Mine | Mine | 1x Crude Explosives 1x Wires | Explosives Station 1 |
| Seeker Grenade | Grenade | 1x Crude Explosives 2x ARC Alloy | Explosives Station 1 |
| Looting Mk. 3 (Survivor) | Augment | 2x Advanced Electrical Components 3x Processor | Gear Bench 3 |
| Angled Grip II | Mod | 2x Mechanical Components 3x Duct Tape | Gunsmith 2 |
| Angled Grip III | Mod | 2x Mod Components 5x Duct Tape | Gunsmith 3 |
| Hullcracker | Weapon | 1x Magnetic Accelerator 3x Heavy Gun Parts 1x Exodus Modules | Gunsmith 3 |
| Launcher Ammo | Ammo | 5x Metal Parts 1x Crude Explosives | Workbench 1 |
| Anvil | Weapon | 5x Mechanical Components 5x Simple Gun Parts | Gunsmith 2 |
| Anvil Splitter | Mod | 2x Mod Components 3x Processor | Gunsmith 3 |
| ??? | ??? | ??? | ??? |
| Barricade Kit | Quick Use | 1x Mechanical Components | Utility Station 2 |
| Blaze Grenade | Grenade | 1x Explosive Compound 2x Oil | Explosives Station 3 |
| Bobcat | Weapon | 3x Advanced Mechanical Components 3x Light Gun Parts | Gunsmith 3 |
| Osprey | Weapon | 2x Advanced Mechanical Components 3x Medium Gun Parts 7x Wires | Gunsmith 3 |
| Burletta | Weapon | 3x Mechanical Components 3x Simple Gun Parts | Gunsmith 1 |
| Compensator II | Mod | 2x Mechanical Components 4x Wires | Gunsmith 2 |
| Compensator III | Mod | 2x Mod Components 8x Wires | Gunsmith 3 |
| Defibrillator | Quick Use | 9x Plastic Parts 1x Moss | Medical Lab 2 |
| ??? | ??? | ??? | ??? |
| Equalizer | Weapon | 3x Magnetic Accelerator 3x Complex Gun Parts 1x Queen Reactor | Gunsmith 3 |
| Extended Barrel | Mod | 2x Mod Components 8x Wires | Gunsmith 3 |
| Extended Light Mag II | Mod | 2x Mechanical Components 3x Steel Spring | Gunsmith 2 |
| Extended Light Mag III | Mod | 2x Mod Components 5x Steel Spring | Gunsmith 3 |
| Extended Medium Mag II | Mod | 2x Mechanical Components 3x Steel Spring | Gunsmith 2 |
| Extended Medium Mag III | Mod | 2x Mod Components 5x Steel Spring | Gunsmith 3 |
| Extended Shotgun Mag II | Mod | 2x Mechanical Components 3x Steel Spring | Gunsmith 2 |
| Extended Shotgun Mag III | Mod | 2x Mod Components 5x Steel Spring | Gunsmith 3 |
| Remote Raider Flare | Quick Use | 2x Chemicals 4x Rubber Parts | Utility Station 1 |
| Heavy Gun Parts | Material | 4x Simple Gun Parts | Refiner 2 |
| Venator | Weapon | 2x Advanced Mechanical Components 3x Medium Gun Parts 5x Magnet | Gunsmith 3 |
| Il Toro | Weapon | 5x Mechanical Components 6x Simple Gun Parts | Gunsmith 1 |
| Jolt Mine | Mine | 1x Electrical Components 1x Battery | Explosives Station 2 |
| Explosive Mine | Mine | 1x Explosive Compound 1x Sensors | Explosives Station 3 |
| Jupiter | Weapon | 3x Magnetic Accelerator 3x Complex Gun Parts 1x Queen Reactor | Gunsmith 3 |
| Light Gun Parts | Material | 4x Simple Gun Parts | Refiner 2 |
| Lightweight Stock | Mod | 2x Mod Components 5x Duct Tape | Gunsmith 3 |
| Lure Grenade | Grenade | 1x Speaker Component 1x Electrical Components | Utility Station 2 |
| Medium Gun Parts | Material | 4x Simple Gun Parts | Refiner 2 |
| Torrente | Weapon | 2x Advanced Mechanical Components 3x Medium Gun Parts 6x Steel Spring | Gunsmith 3 |
| Muzzle Brake II | Mod | 2x Mechanical Components 4x Wires | Gunsmith 2 |
| Muzzle Brake III | Mod | 2x Mod Components 8x Wires | Gunsmith 3 |
| Padded Stock | Mod | 2x Mod Components 5x Duct Tape | Gunsmith 3 |
| Shotgun Choke II | Mod | 2x Mechanical Components 4x Wires | Gunsmith 2 |
| Shotgun Choke III | Mod | 2x Mod Components 8x Wires | Gunsmith 3 |
| Shotgun Silencer | Mod | 2x Mod Components 8x Wires | Gunsmith 3 |
| Showstopper | Grenade | 1x Advanced Electrical Components 1x Voltage Converter | Explosives Station 3 |
| Silencer I | Mod | 2x Mechanical Components 4x Wires | Gunsmith 2 |
| Silencer II | Mod | 2x Mod Components 8x Wires | Gunsmith 3 |
| Snap Hook | Quick Use | 2x Power Rod 3x Rope 1x Exodus Modules | Utility Station 3 |
| Stable Stock II | Mod | 2x Mechanical Components 3x Duct Tape | Gunsmith 2 |
| Stable Stock III | Mod | 2x Mod Components 5x Duct Tape | Gunsmith 3 |
| Tagging Grenade | Grenade | 1x Electrical Components 1x Sensors | Utility Station 3 |
| Tempest | Weapon | 3x Advanced Mechanical Components 3x Medium Gun Parts 3x Canister | Gunsmith 3 |
| Trigger Nade | Grenade | 2x Crude Explosives 1x Processor | Explosives Station 2 |
| Vertical Grip II | Mod | 2x Mechanical Components 3x Duct Tape | Gunsmith 2 |
| Vertical Grip III | Mod | 2x Mod Components 5x Duct Tape | Gunsmith 3 |
| Vita Shot | Quick Use | 2x Antiseptic 1x Syringe | Medical Lab 3 |
| Vita Spray | Quick Use | 3x Antiseptic 1x Canister | Medical Lab 3 |
| Vulcano | Weapon | 1x Magnetic Accelerator 3x Heavy Gun Parts 1x Exodus Modules | Gunsmith 3 |
| Wolfpack | Grenade | 2x Explosive Compound 2x Sensors | Explosives Station 3 |
| Red Light Stick | Quick Use | 3x Chemicals | Utility Station 1 |
| Smoke Grenade | Grenade | 14x Chemicals 1x Canister | Utility Station 2 |
| Deadline | Mine | 3x Explosive Compound 2x ARC Circuitry | Explosives Station 3 |
| Trailblazer | Grenade | 1x Explosive Compound 1x Synthesized Fuel | Explosives Station 3 |
| Tactical Mk. 3 (Defensive) | Augment | 2x Advanced Electrical Components 3x Processor | Gear Bench 3 |
| Tactical Mk. 3 (Healing) | Augment | 2x Advanced Electrical Components 3x Processor | Gear Bench 3 |
| Yellow Light Stick | Quick Use | 3x Chemicals | Utility Station 1 |
Note: The missing Blueprints in this list likely have not actually been added to the game at the time of writing, because none of the playerbase has managed to find any of them. As they are added to the game, I will update this page with the most relevant information so you know exactly how to get all 75 Arc Raiders Blueprints.
Where to find Blueprints in Arc Raiders
Below is a list of all containers, modifiers, and events which maximise your chances of finding Blueprints:
- Certain quests reward you with specific Blueprints .
- Completing Trials has a high chance of offering Blueprints as rewards.
- Surveyors have a decent chance of dropping Blueprints on death.
- High loot value areas tend to have a greater chance of spawning Blueprints.
- Night Raids and Storms may increase rare Blueprint spawn chances in containers.
- Containers with higher numbers of items may have a higher tendency to spawn Blueprints. As a result, Blue Gate (which has many “large” containers containing multiple items) may give you a higher chance of spawning Blueprints.
- Raider containers (Raider Caches, Weapon Boxes, Medical Bags, Grenade Tubes) have increased Blueprint drop rates. As a result, the Uncovered Caches event gives you a high chance of finding Blueprints.
- Security Lockers have a higher than average chance of containing Blueprints.
- Certain Blueprints only seem to spawn under specific circumstances: Tempest Blueprint only spawns during Night Raid events. Vulcano Blueprint only spawns during Hidden Bunker events. Jupiter and Equaliser Blueprints only spawn during Harvester events.

Raider Caches, Weapon Boxes, and other raider-oriented container types have a good chance of offering Blueprints. |Image credit:Rock Paper Shotgun/Embark Studios
Blueprints have a very low chance of spawning in any container in Arc Raiders, around 1-2% on average. However, there is a higher chance of finding Blueprints in particular container types. Specifically, you can find more Blueprints in Raider containers and security lockers.
Beyond this, if you’re looking for Blueprints you should focus on regions of the map which are marked as having particularly high-value loot. Areas such as the Control Tower in Dam Battlegrounds, the Arrival and Departure Buildings in Spaceport, and Pilgrim’s Peak in Blue Gate all have a better-than-average chance of spawning Blueprints somewhere amongst all their containers. Night Raids and Electromagnetic Storm events also increase the drop chances of certain Blueprints .
In addition to these containers, you can often loot Blueprints from destroyed Surveyors - the largest of the rolling ball ARC. Surveyors are more commonly found on the later maps - Spaceport and Blue Gate - and if one spawns in your match, you’ll likely see it by the blue laser beam that it casts into the sky while “surveying”.
Surveyors are quite well-armoured and will very speedily run away from you once it notices you, but if you can take one down then make sure you loot all its parts for a chance of obtaining certain unusual Blueprints.
Blueprints obtained from quests
One way in which you can get Blueprints is by completing certain quests for the vendors in Speranza. Some quests will reward you with a specific item Blueprint upon completion, so as long as you work through all the quests in Arc Raiders, you are guaranteed those Blueprints.
Here is the full list of all Blueprints you can get from quest rewards:
- Trigger Nade Blueprint: Rewarded after completing “Sparks Fly”.
- Lure Grenade Blueprint: Rewarded after completing “Greasing Her Palms”.
- Burletta Blueprint: Rewarded after completing “Industrial Espionage”.
- Hullcracker Blueprint (and Launcher Ammo Blueprint): Rewarded after completing “The Major’s Footlocker”.
Alas, that’s only 4 Blueprints out of a total of 75 to unlock, so for the vast majority you will need to find them yourself during a raid. If you’re intent on farming Blueprints, then it’s best to equip yourself with cheap gear in case you lose it, but don’t use a free loadout because then you won’t get a safe pocket to stash any new Blueprint you find. No pain in Arc Raiders is sharper than failing to extract with a new Blueprint you’ve been after for a dozen hours already.

One of the best ways to get Blueprints is by hitting three stars on all five Trials every week. |Image credit:Rock Paper Shotgun/Embark Studios
Blueprints obtained from Trials
One of the very best ways to get Blueprints is as rewards for completing Trials in Arc Raiders. Trials are unlocked from Level 15 onwards, and allow you to earn rewards by focusing on certain tasks over the course of several raids. For example, one Trial might task you with dealing damage to Hornets, while another might challenge you to loot Supply Drops.
Trials refresh on a weekly basis, with a new week bringing five new Trials. Each Trial can offer up to three rewards after passing certain score milestones, and it’s possible to receive very high level loot from these reward crates - including Blueprints. So if you want to unlock as many Blueprints as possible, you should make a point of completing as many Trials as possible each week.
Best Blueprint farming locations
The very best way to get Blueprints is to frequent specific areas of the maps which combine high-tier loot pools with the right types of containers to search. Here are my recommendations for where to find Blueprints on every map, so you can always keep the search going for new crafting recipes to unlock.

Image credit:Rock Paper Shotgun/Embark Studios
Dam Battlegrounds
The best places to farm Blueprints on Dam Battlegrounds are the Control Tower, Power Generation Complex, Ruby Residence, and Pale Apartments . The first two regions, despite only being marked on the map as mid-tier loot, contain a phenomenal number of containers to loot. The Control Tower can also contain a couple of high-tier Security Lockers - though of course, you’ll need to have unlocked the Security Breach skill at the end of the Survival tree.
There’s also a lot of reporting amongst the playerbase that the Residential areas in the top-left of the map - Pale Apartments and Ruby Residence - give you a comparatively strong chance of finding Blueprints. Considering their size, there’s a high density of containers to loot in both locations, and they also have the benefit of being fairly out of the way. So you’re more likely to have all the containers to yourself.
Buried City
The best Blueprint farming locations on Buried City are the Santa Maria Houses, Grandioso Apartments, Town Hall, and the various buildings of the New District . Grandioso Apartments has a lower number of containers than the rest, but a high chance of spawning weapon cases - which have good Blueprint drop rates. The others are high-tier loot areas, with plenty of lootable containers - including Security Lockers.
Spaceport
The best places to find Blueprints on Spaceport are the Arrival and Departure Buildings, as well as Control Tower A6 and the Launch Towers . All these areas are labelled as high-value loot regions, and many of them are also very handily connected to one another by the Spaceport wall, which you can use to quickly run from one area to the next. At the tops of most of these buildings you’ll find at least one Security Locker, so this is an excellent farming route for players looking to find Blueprints.
The downside to looting Blueprints on Spaceport is that all these areas are hotly contested, particularly in Duos and Squads. You’ll need to be very focused and fast in order to complete the full farming route.

Image credit:Rock Paper Shotgun/Embark Studios
Blue Gate
Blue Gate tends to have a good chance of dropping Blueprints, potentially because it generally has a high number of containers which can hold lots of items; so there’s a higher chance of a Blueprint spawning in each container. In my experience, the best Blueprint farming spots on Blue Gate are Pilgrim’s Peak, Raider’s Refuge, the Ancient Fort, and the Underground Complex beneath the Warehouse .
All of these areas contain a wealth of containers to loot. Raider’s Refuge has less to loot, but the majority of the containers in and around the Refuge are raider containers, which have a high chance of containing Blueprints - particularly during major events.
Stella Montis
On the whole, Stella Montis seems to have a very low drop rate for Blueprints (though a high chance of dropping other high-tier loot). If you do want to try farming Blueprints on this map, the best places to find Blueprints in Stella Montis are Medical Research, Assembly Workshop, and the Business Center . These areas have the highest density of containers to loot on the map.
In addition to this, the Western Tunnel has a few different Security Lockers to loot, so while there’s very little to loot elsewhere in this area of the map, it’s worth hitting those Security Lockers if you spawn there at the start of a match.
That wraps up this primer on how to get all the Blueprints in Arc Raiders as quickly as possible. With the Expedition system constantly resetting a large number of players’ Blueprints, it’s more important than ever to have the most up-to-date information on where to find all these Blueprints.
While you’re here, be sure to check out our Arc Raiders best guns tier list , as well as our primers on the best skills to unlock and all the different Field Depot locations on every map.

ARC Raiders
PS5 , Xbox Series X/S , PC
Rock Paper Shotgun is better when you sign in
Sign in and join us on our journey to discover strange and compelling PC games.
