All Trainers and Trainer locations in Oblivion Remastered
Find every Skill Trainer in Oblivion, from Basic to Master Trainers
Image credit:Bethesda/Virtuos

Looking for Trainers in The Elder Scrolls IV: Oblivion Remastered? There are many ways to increase your skills in Oblivion, but the fastest method is by paying a Trainer. There are more than 100 Trainers in Oblivion, with three to seven Trainers for each of the 21 skills. Pay them some gold, and they’ll instantly boost the skill by one level.
Beware that the Trainer mustn’t just teach the skill you’re looking for, but also teach it at the right level , ranging from basic to master. While using a Trainer is easy enough, locating the right person for the job can be incredibly time-consuming. To help you out, here’s every Trainer location in Oblivion Remastered, separated by skill type and including their mastery level.

How to use Trainers in Oblivion
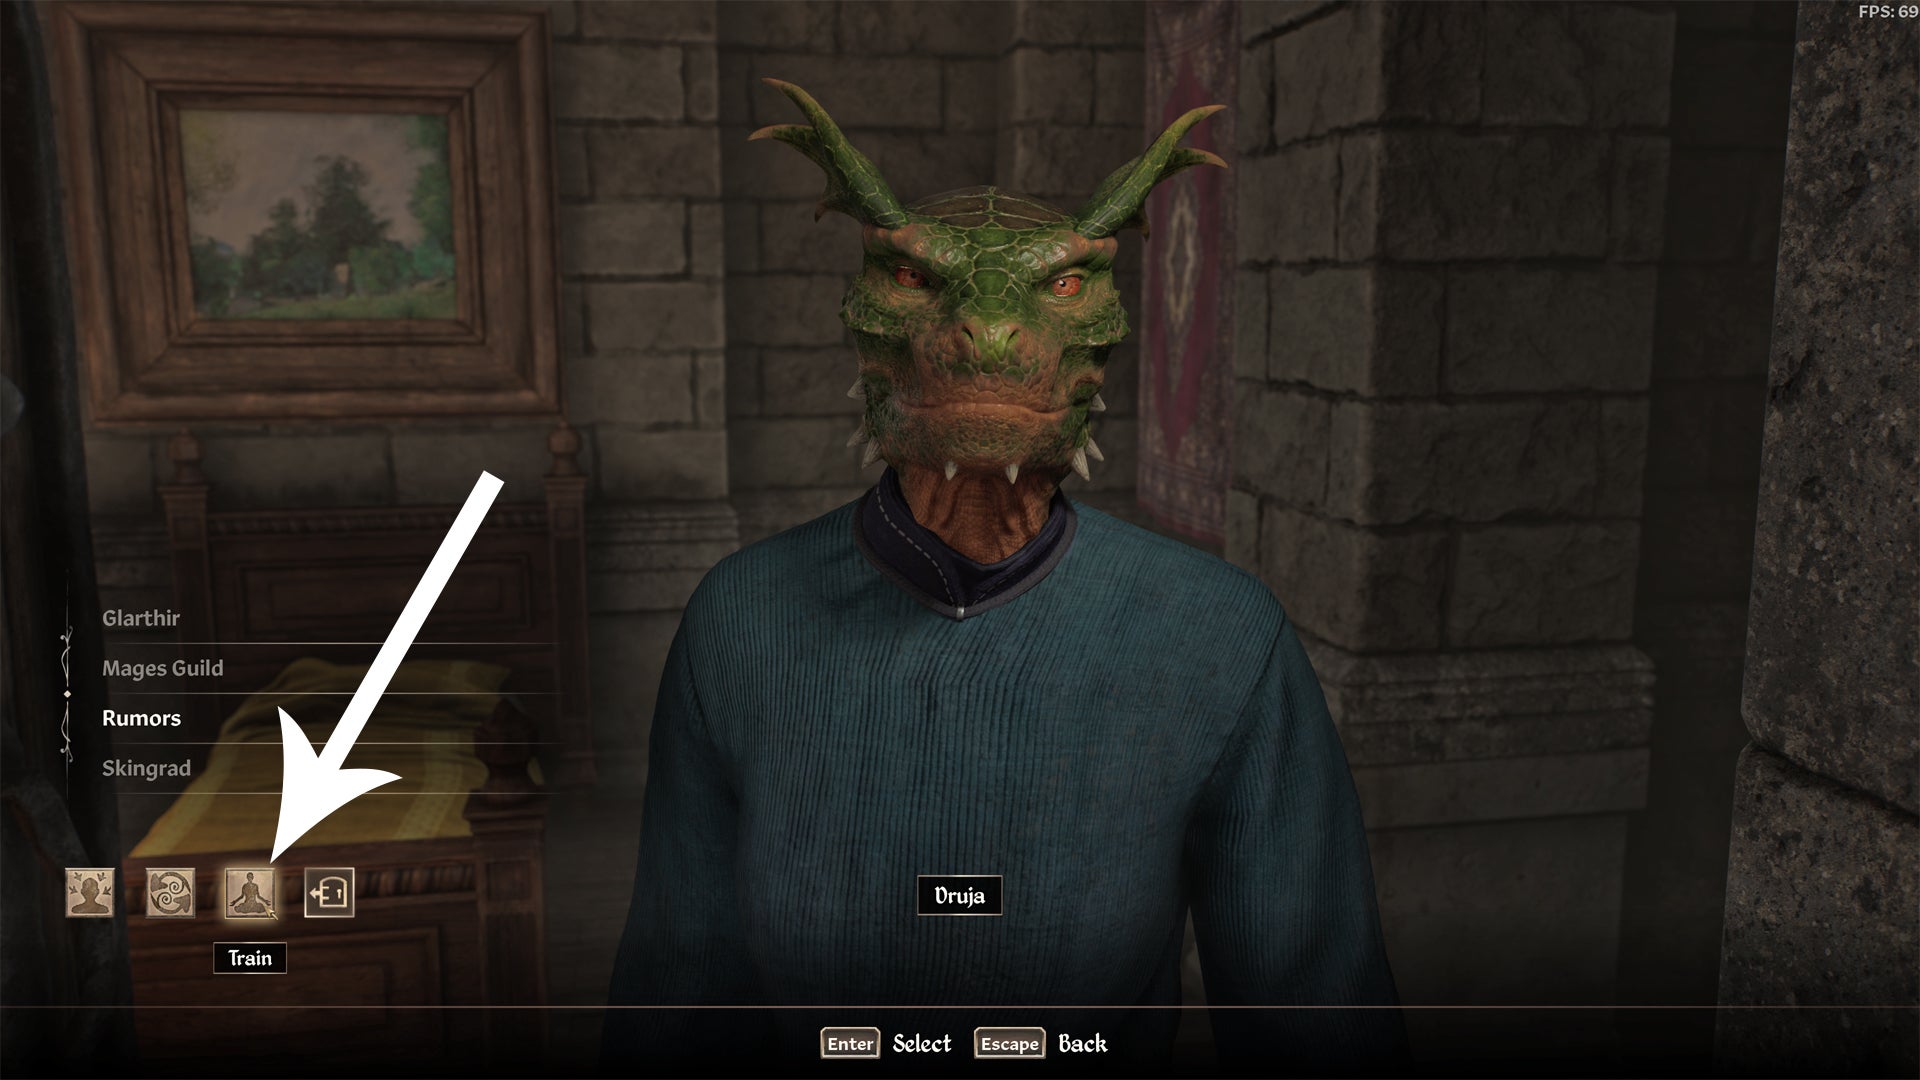
Find a Trainer to exchange money for instant skill boosts. |Image credit:Bethesda/Virtuos
Training your skills is quite straightforward, as you can usually walk up to a Trainer, click the ’train’ button in the lower left, and purchase the skill upgrade, but there are a few caveats to watch out for. First of all, you can only train five times per level . For example, if you are currently level 1, you can train Restoration two times, Sneak three times, and nothing else until you reach level 2.
Secondly, training isn’t free: you must pay 10x your current skill level to train one level. Let’s say your current restoration level is 32; training this skill will therefore cost 320 gold. With that in mind, training neglected skills from Oblivion’s midgame to endgame is relatively cheap.
Note that training costs are calculated after any enhancement effects, so you may want to unequip items and make sure any skill-boosting spells have worn off before you start training. This also means you can exploit the training mechanic by using magic (especially custom spells) to drain your own skills - got a temporary restoration skill of 0? Now you can train for free !
All Trainers in Oblivion
Most Trainers are found in chapels, inns, shops, and guild halls in and around Cyrodill’s major towns. Keep in mind that the majority of Oblivion NPCs aren’t stationary; we’ve included the Trainers’ most common locations, but if they aren’t there, you may have to wait a few hours. This map shows every Trainer location in Oblivion:
If you’re looking for Trainers teaching a specific skill, the location maps below will show you the options. Take note of the Trainer’s level and be sure to pick one that fits your current ability:
- Basic Trainer (small dot): Trains skills up to level 40.
- Advanced Trainer (large dot): Trains skills up to level 70.
- Master Trainer (star): Trains skills above level 70.
Beware that you need to complete a small quest to unlock a Master-level Trainer . To obtain the quest, reach level 70 in that skill and speak with an Advanced Trainer.
Acrobatics Trainer locations

Every Acrobatics Trainer in Oblivion Remastered. |Image credit:Bethesda/Virtuos
- Ida Vlinorman (basic): Elven Gardens District in the Imperial City.
- Quill-Weave (basic): Anvil, at her house.
- Ganredhel (advanced: Cheydinhal, at her house.
- Tsrava (advanced): Leyawiin, J’Bari’s house.
- Torbern (master): Aerin’s Camp.
Alchemy Trainer locations
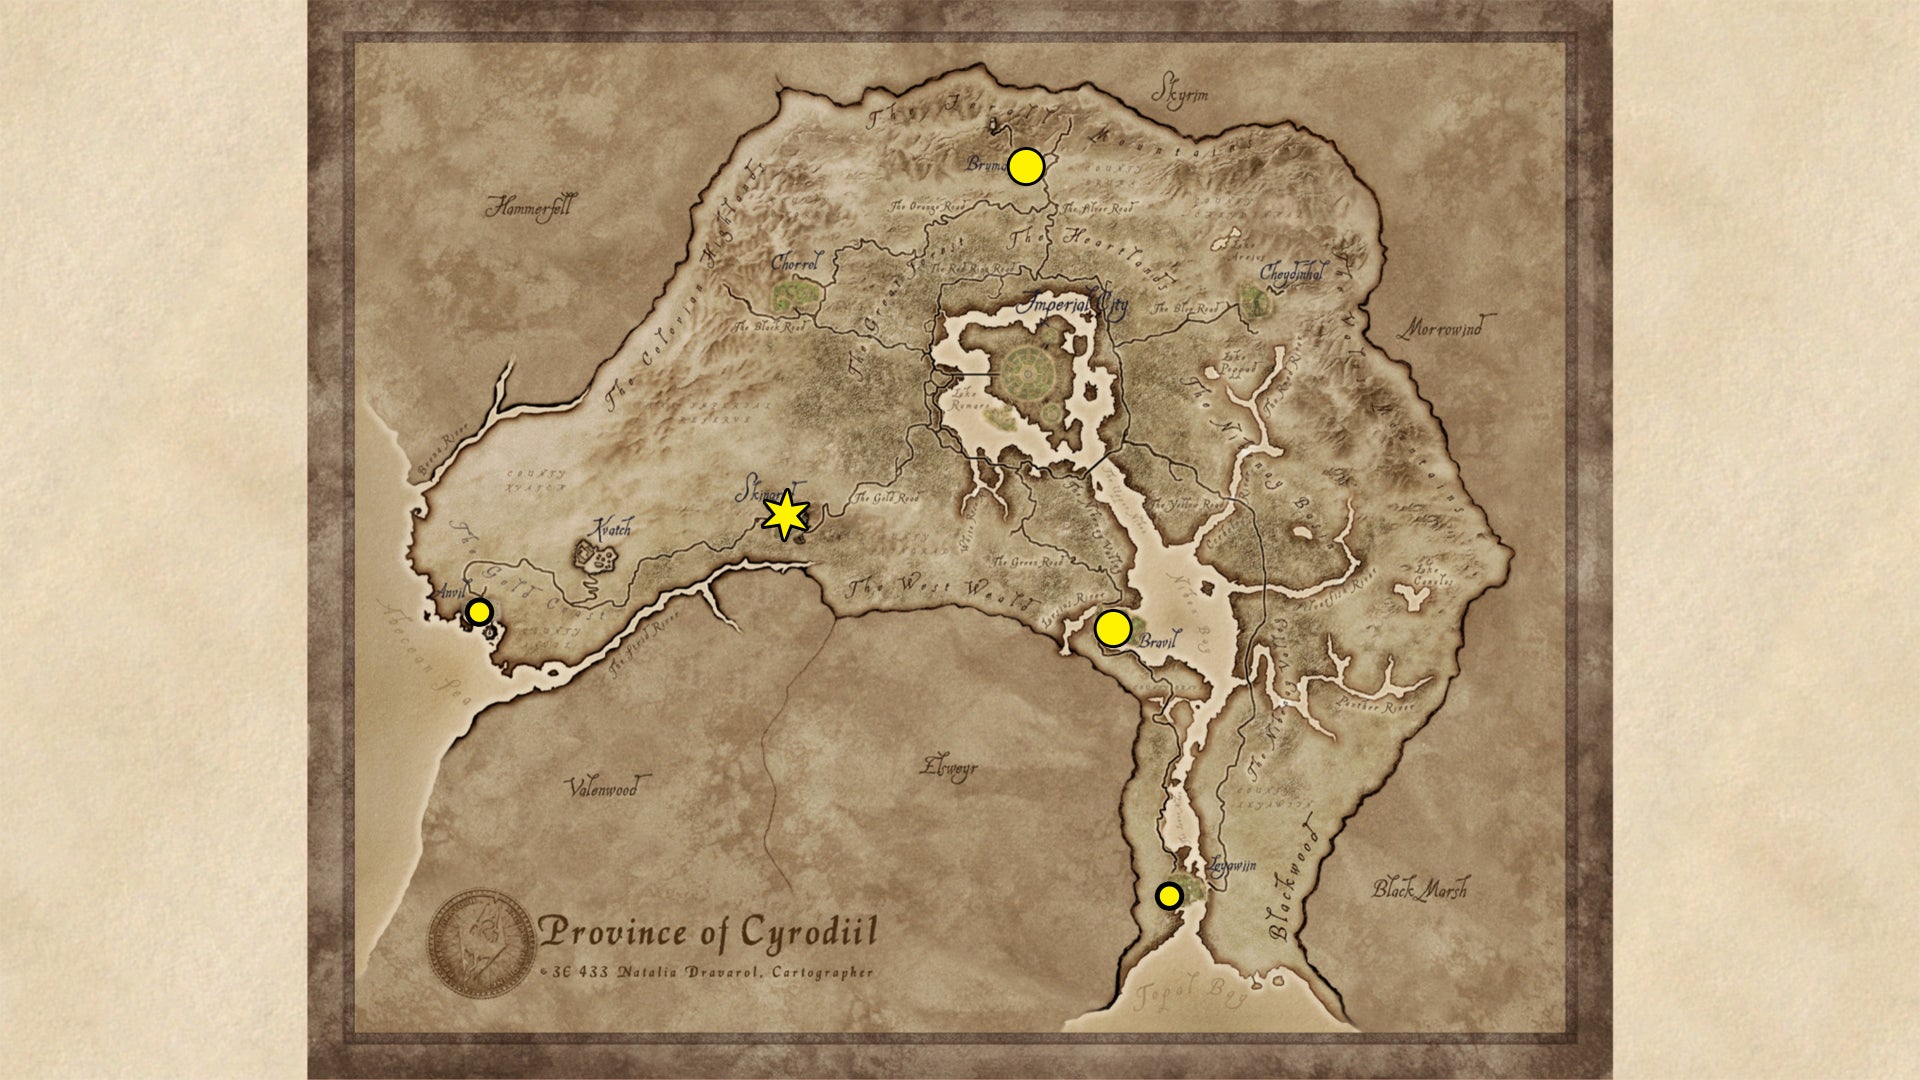
Every Alchemy Trainer in Oblivion Remastered. |Image credit:Bethesda/Virtuos
- Felen Relas (basic): Anvil, Mages Guild.
- S’drassa (basic): Leyawiin, Mages Guild.
- Ardaline (advanced): Bravil, Mages Guild.
- Brotch Calus (advanced): Bruma, at his house or Olav’s Tap and Tack.
- Sinderion (master): Skingrad, West Weald Inn, in the cellar.
Alteration Trainer locations
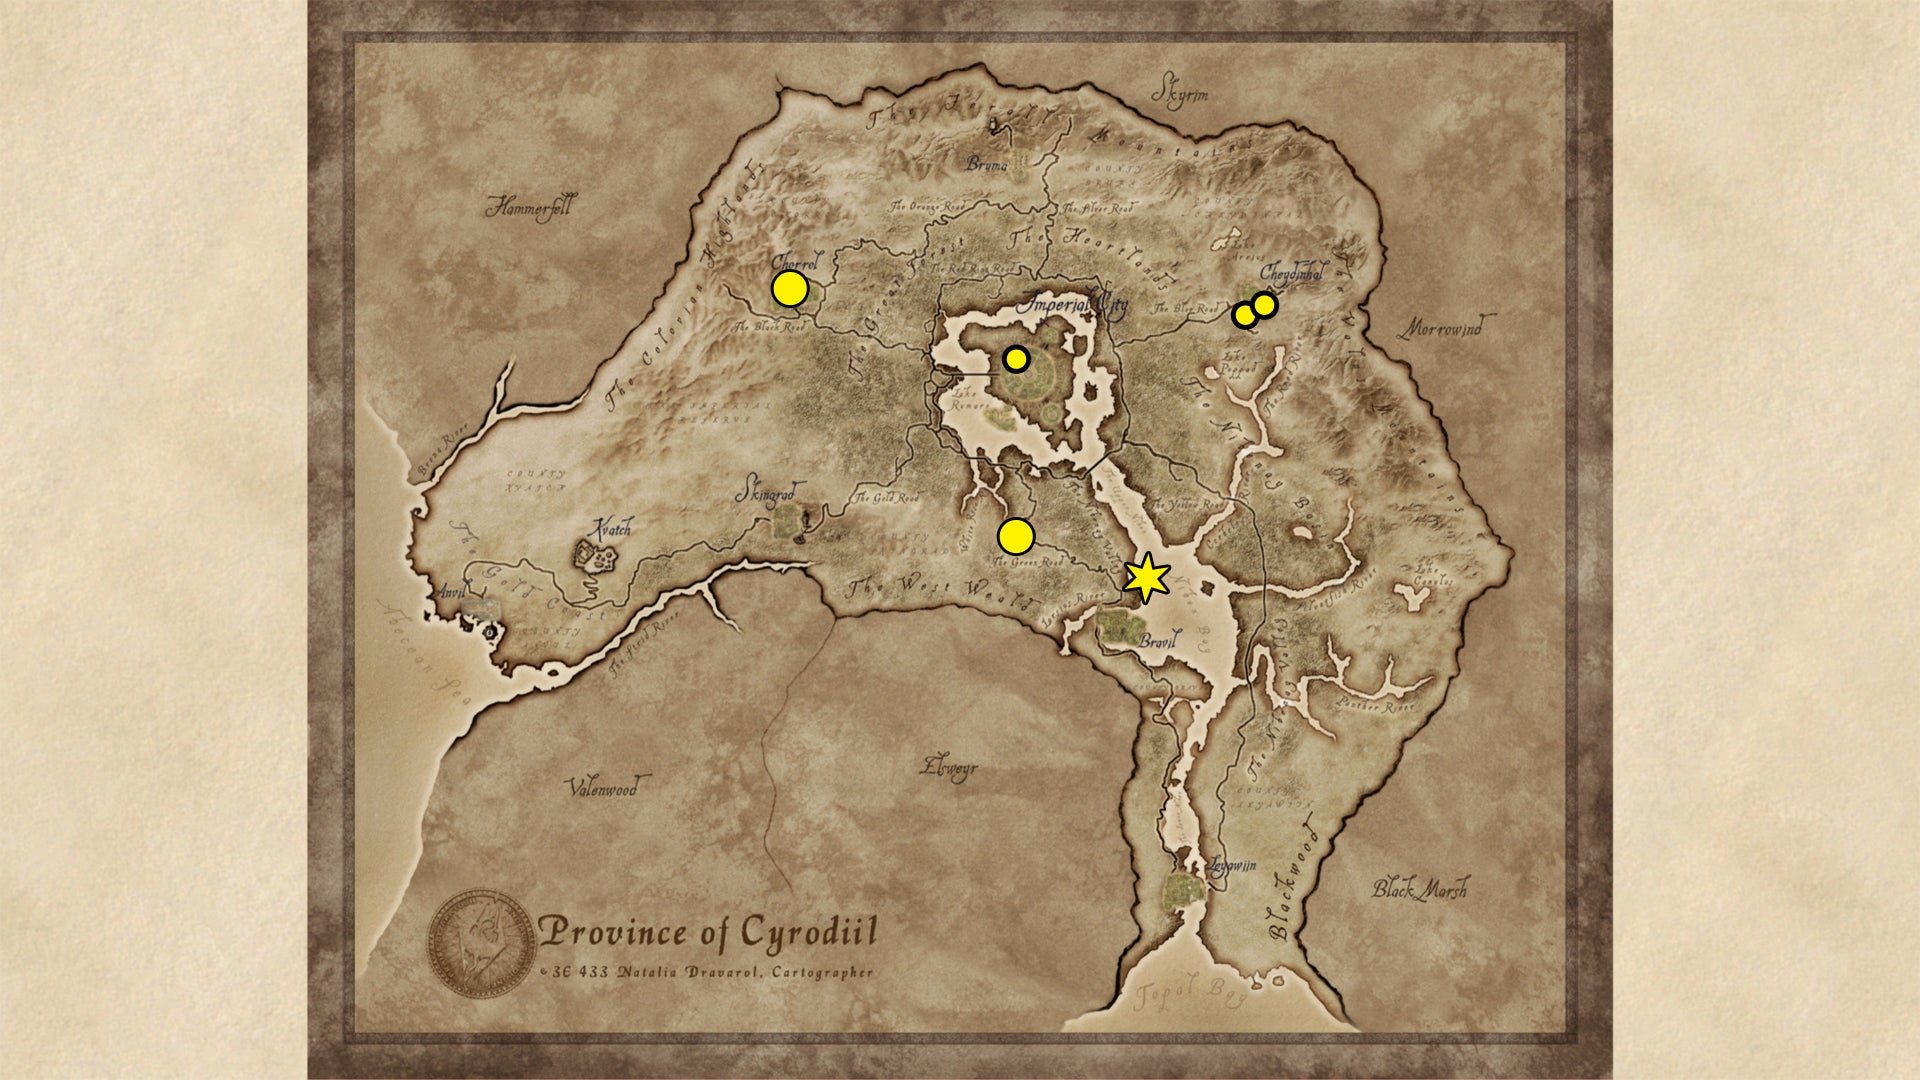
Every Alteration Trainer in Oblivion Remastered. |Image credit:Bethesda/Virtuos
- Deetsa n (basic): Cheydinhal, Mages Guild.
- Dovyn Aren (basic): Imperial City, Elven Gardens District.
- Hil the Tall (basic): Cheydinhal, Great Chapel of Arkay. Used to teach Illusion in the original game, may be replaced by Esbern upon death.
- Abhuki (advanced): Faregyl Inn.
- Athragar (advanced): Chorrol, Mages Guild.
- Tooth-in-the-Sea (master): Niben Bay, in the water north of Bravil.
Armorer Trainer locations

Every Armorer Trainer in Oblivion Remastered. |Image credit:Bethesda/Virtuos
- Eitar (basic): Leyawiin, The Dividing Line shop.
- Tadrose Helas (basic): Bravil, Fighters Guild.
- Rasheda (advanced): Chorrol, Fire and Steel shop.
- Rohssan (advanced): Imperial City Market District, A Fighting Chance shop.
- Gin-Wulm (master): Imperial City Market District (The Best Defense shop) or Elven Gardens District.
Athletics Trainer locations
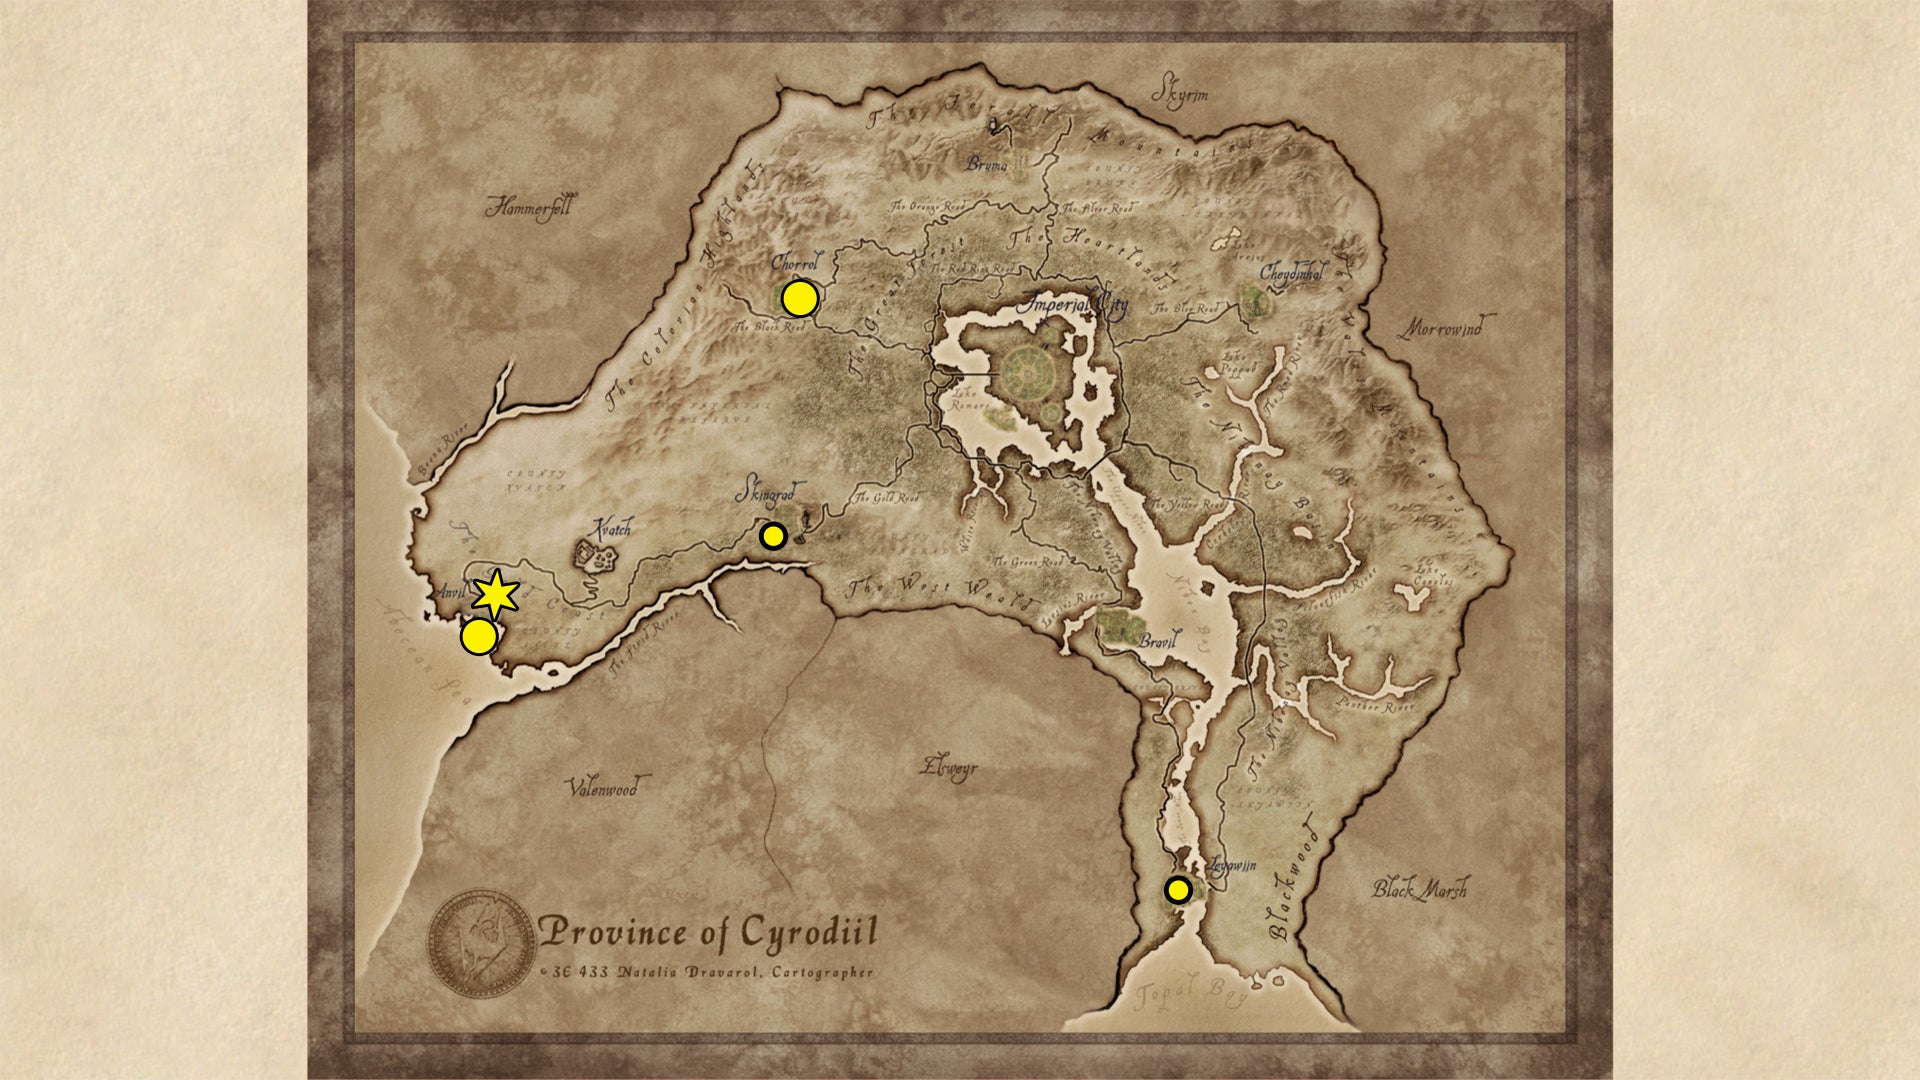
Every Athletics Trainer in Oblivion Remastered. |Image credit:Bethesda/Virtuos
- Mahei (basic): Leyawiin. He roams around (may visit the Chapel of Zenithar) until he comes home in the evening. He sometimes goes to the Castle instead.
- Uuras the Shepherd (basic): Skingrad, at his home during the night and outside the city walls in the southwest during the day (herding sheep).
- Hauls-Ropes-Faster (advanced): Anvil, the docks. He sleeps at the Fo’c’sle during the day and roams the docks at night.
- Honditar (advanced): Chorrol, roams the city center (large tree) during the day.
- Rusia Bradus (master): Anvil, Silgor Bradus’ House. It’s locked, but she leaves at 4 PM.
Blade Trainer locations
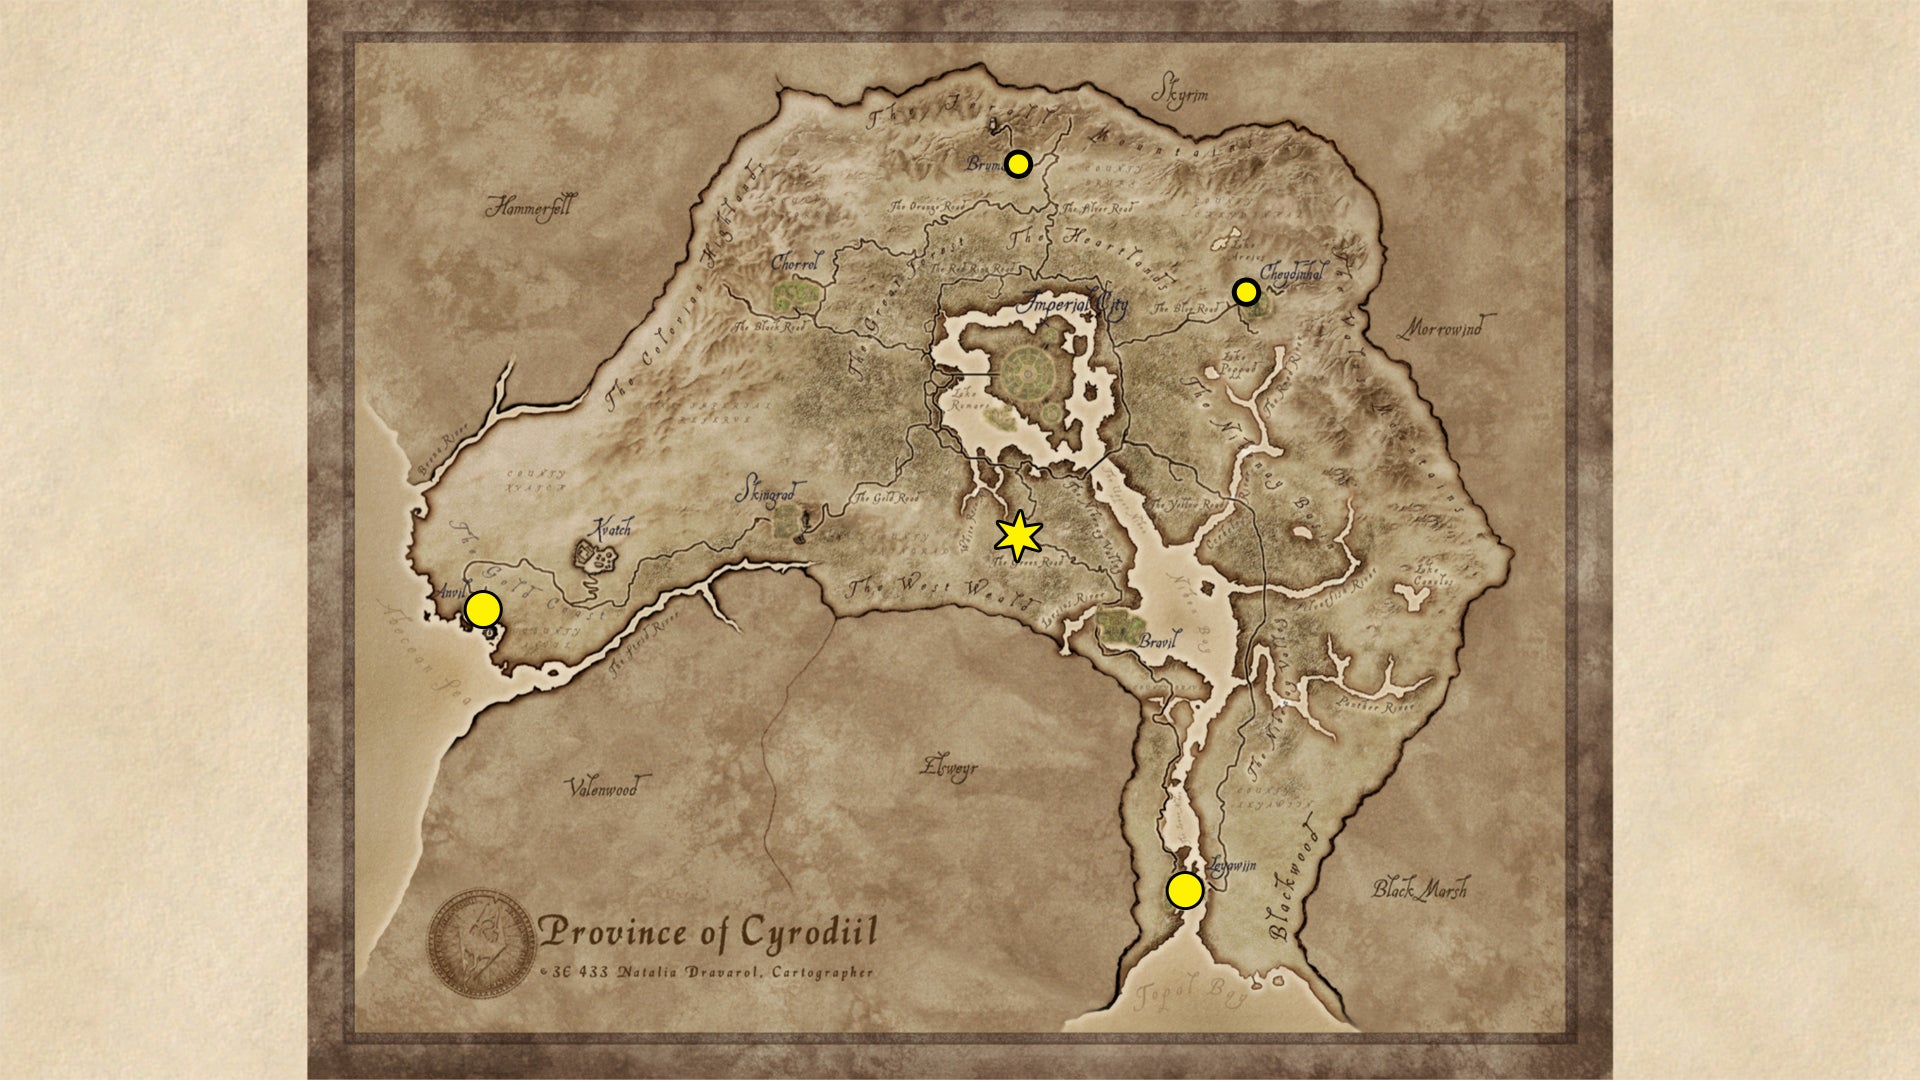
Every Blade Trainer in Oblivion Remastered. |Image credit:Bethesda/Virtuos
- Naspia Cosma (basic): Castle Cheydinhal.
- Right-Wind (basic): Bruma, Fighters Guild.
- Rhano (advanced): Anvil, Fighters Guild.
- Sherina (advanced): Leyawiin, Fighters Guild.
- Alix Lencolia (master): Faregyl Inn.
Block Trainer locations

Every Block Trainer in Oblivion Remastered. |Image credit:Bethesda/Virtuos
- Fadus Calidius (basic): Skingrad, Fighters Guild.
- Huurwen (basic): Anvil, Fighters Guild.
- Ambroise Canne (advanced): Skingrad, at his house or near the Surilie Brothers’ house.
- Lum gro-Baroth (advanced): Chorrol, Fighters Guild.
- Andragil (master): Bravil, at her home.
Blunt Trainer locations
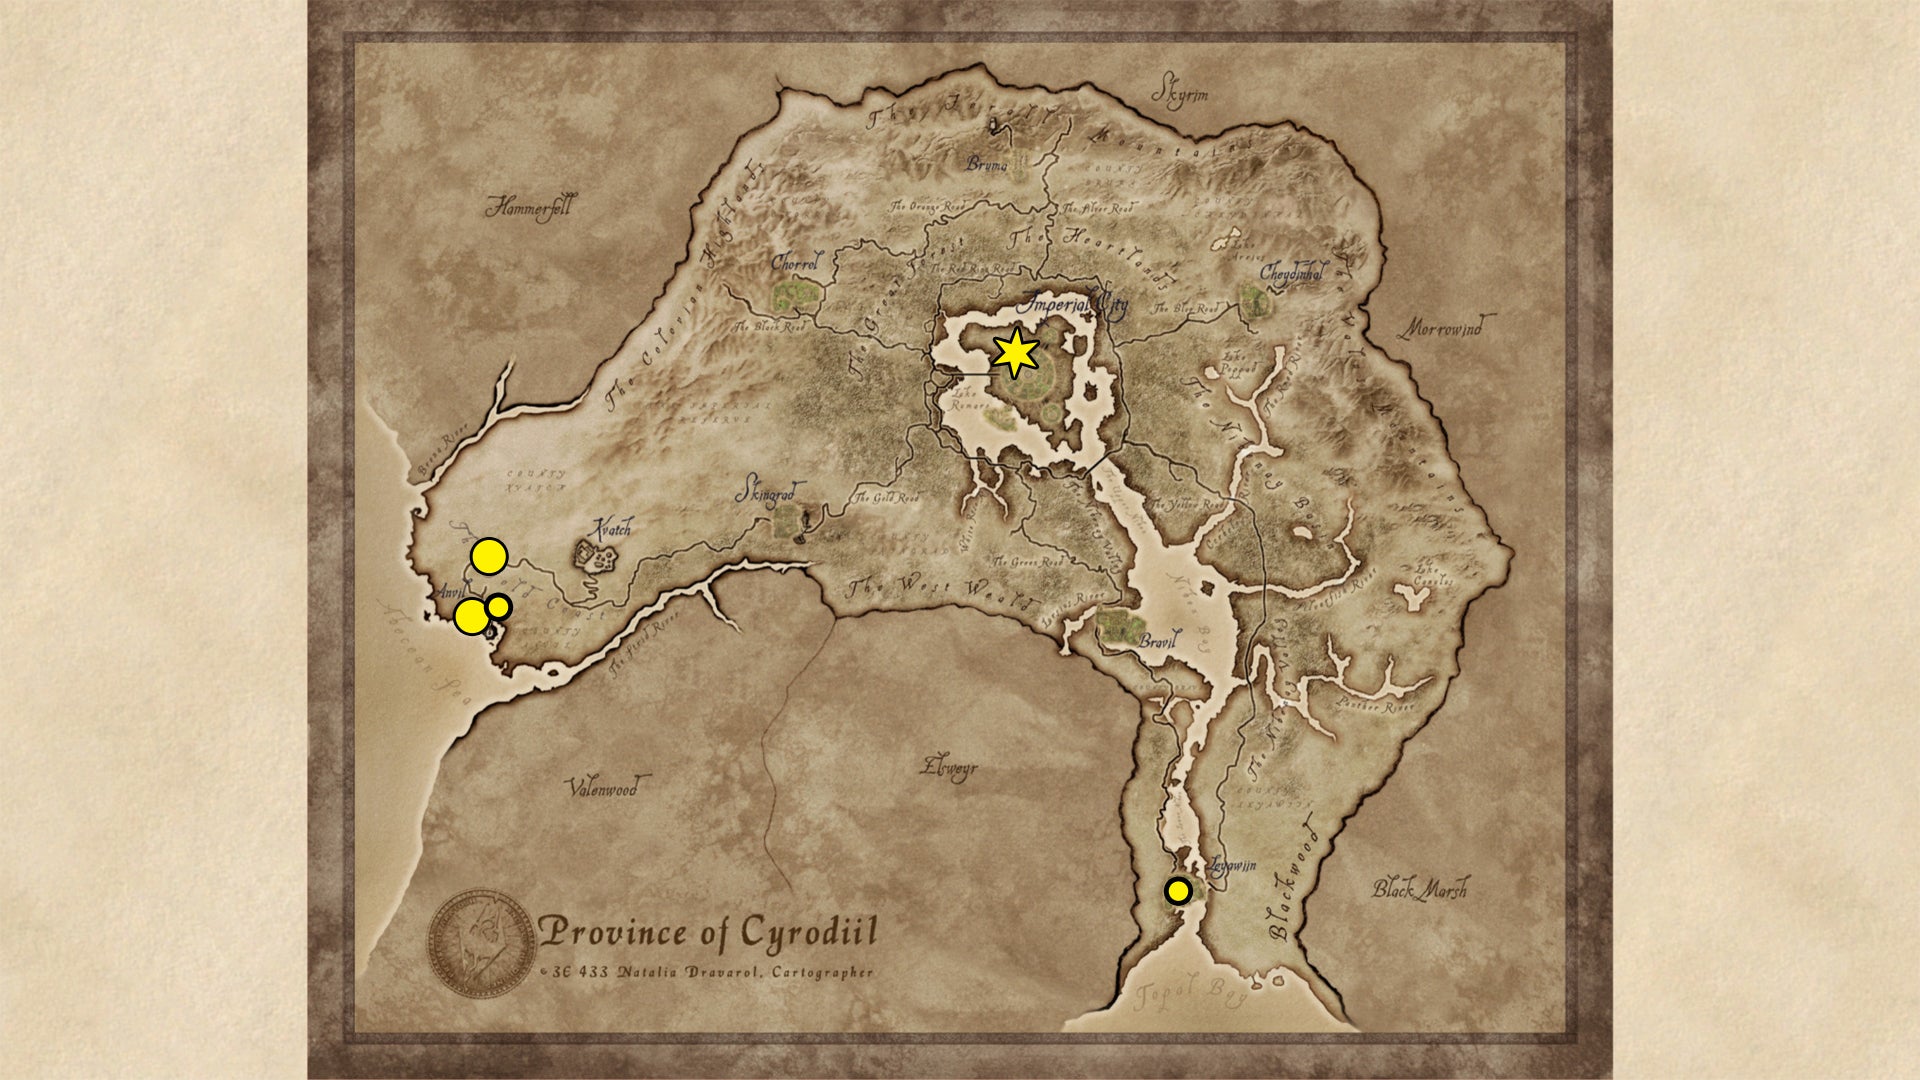
Every Blunt Trainer in Oblivion Remastered. |Image credit:Bethesda/Virtuos
- Bugak gro-Bol (basic): Leyawiin, Southern Books shop.
- Vigdis (basic): Anvil, Fighters Guild.
- Azzan (advanced): Anvil, Fighters Guild.
- Christophe Marane (advanced): Brina Cross Inn.
- Irene Metrick (master): Imperial City, Elven Gardens District.
Conjuration Trainer locations
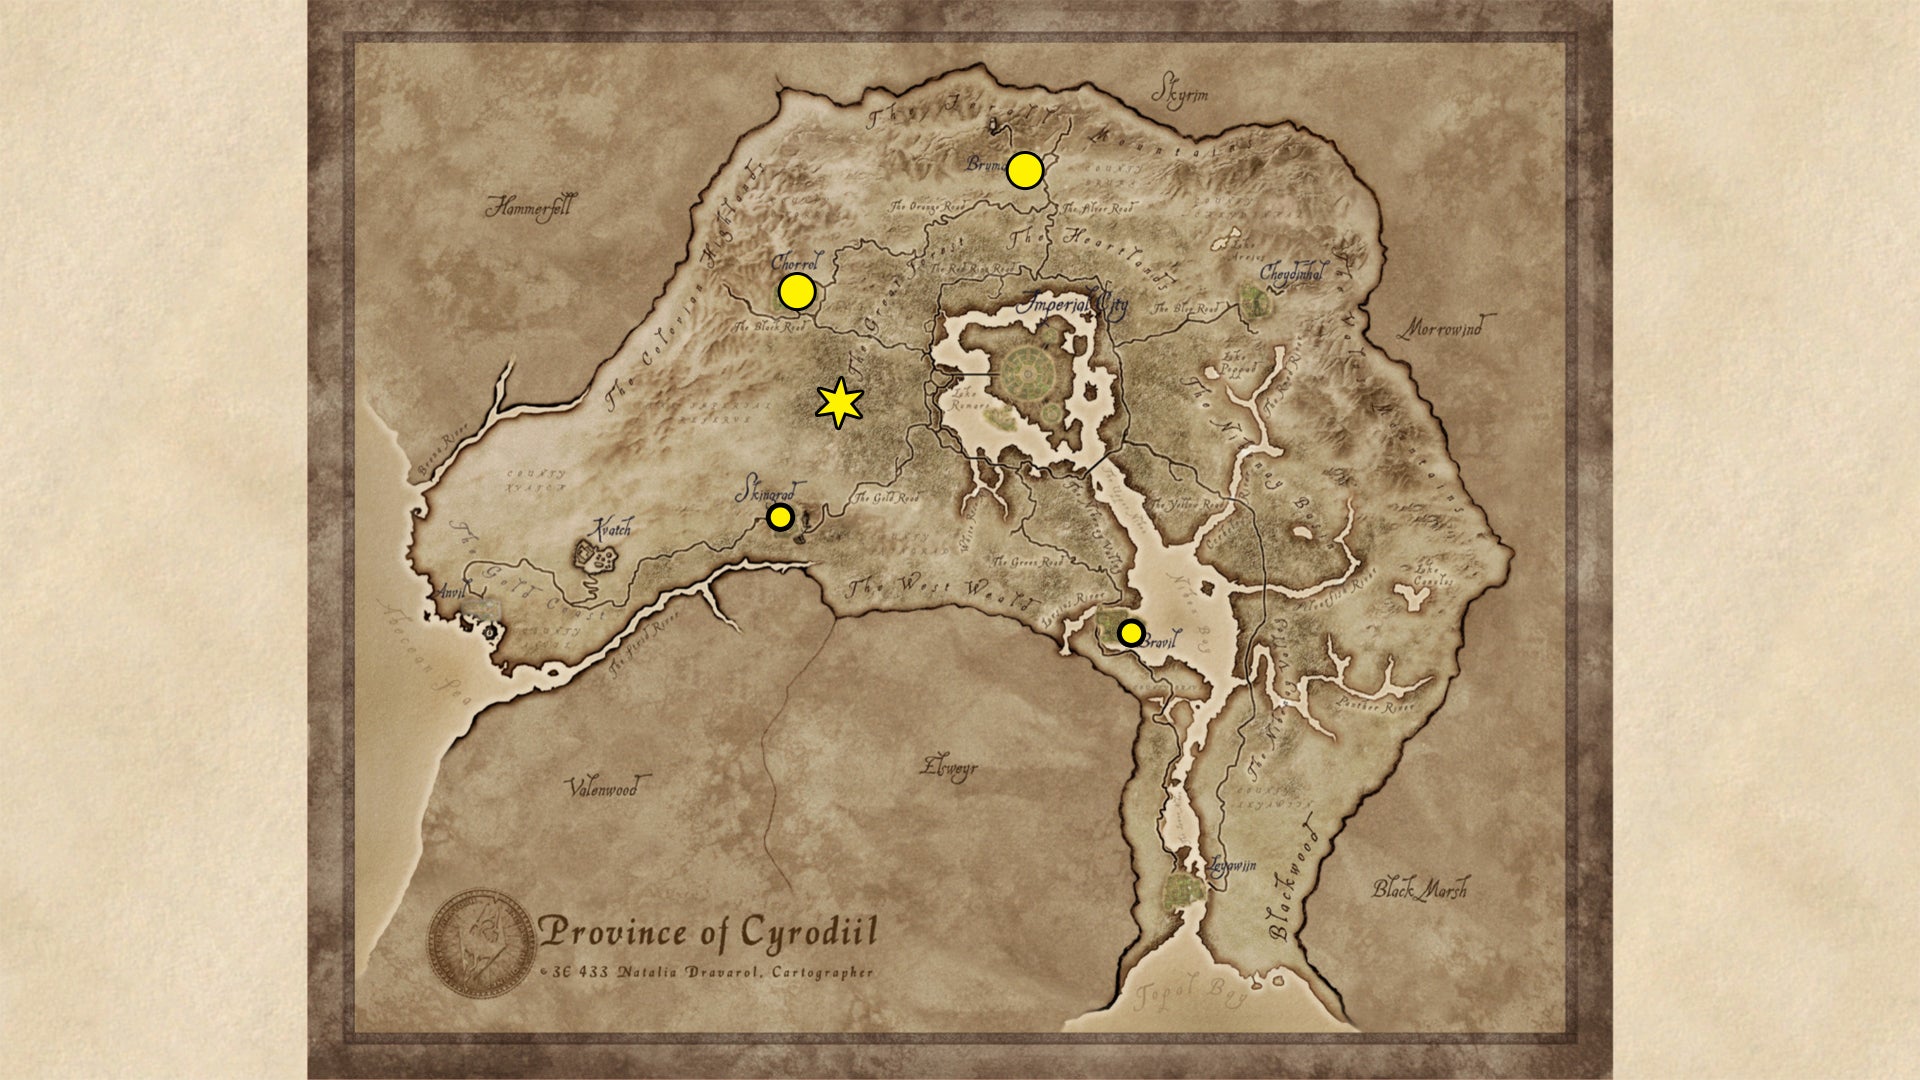
Every Conjuration Trainer in Oblivion Remastered. |Image credit:Bethesda/Virtuos
- Fathis Aren (basic): Castle Bravil, he only visits the Mages Guild in the afternoon.
- Sulinus Vassinus (basic): Skingrad, Mages Guild.
- Alberic Litte (advanced): Chorrol, Mages Guild.
- Arentus Falvius (advanced): Bruma, Great Chapel of Talos.
- Olyn Seran (master): Molag Bal’s Deadric Shrine.
Destruction Trainer locations
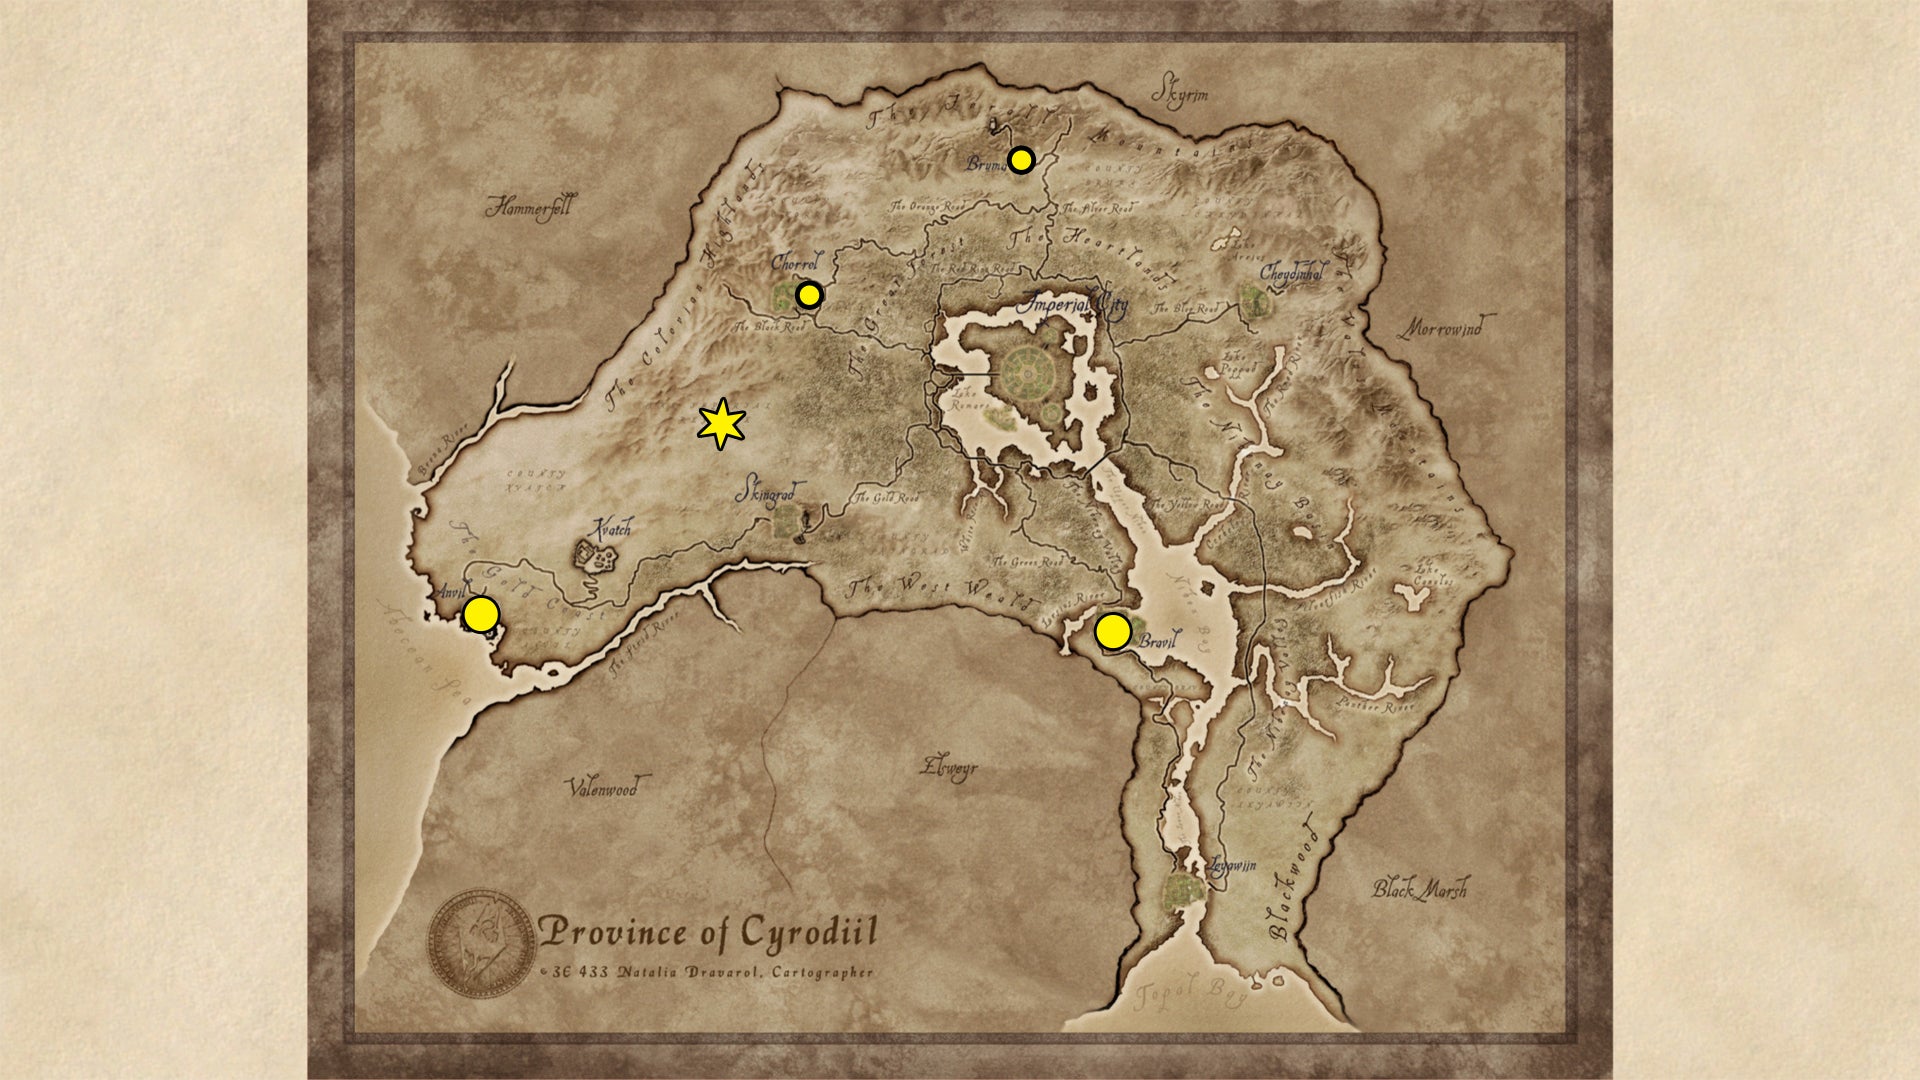
Every Destruction Trainer in Oblivion Remastered. |Image credit:Bethesda/Virtuos
- Chanel (basic): Castle Chorrol. You must do the Canvas the Castle quest first.
- J’skar (basic): Bruma, Mages Guild.
- Delphine Jend (advanced): Bravil, Mages Guild.
- Marc Gulitte (advanced): Anvil, Mages Guild.
- Bralsa Andaren (master): At night, find her sleeping northwest of Fort Dirich, at the Wayshrine of Kynareth. She’ll be hunting deer during the day, but she may wander far into the wilds and won’t train you while she’s busy.
Hand-to-hand Trainer locations
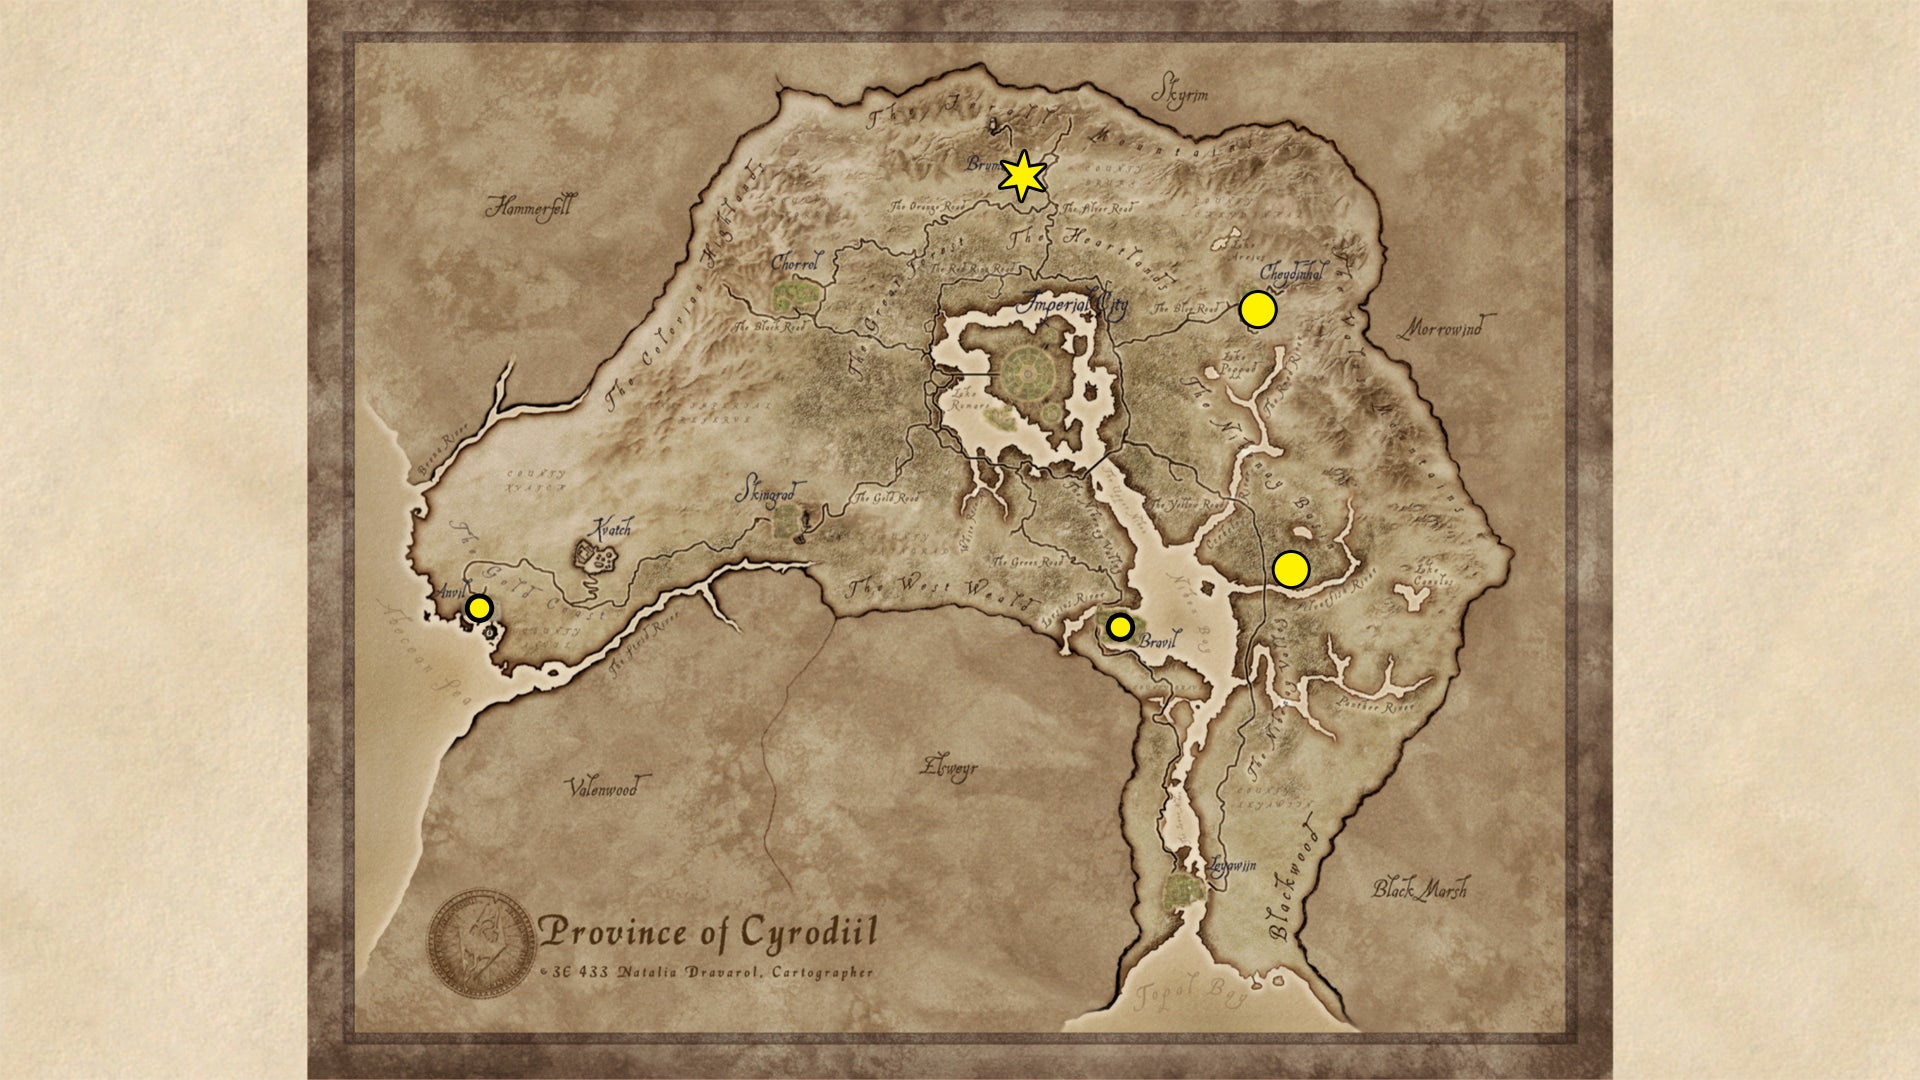
Every Hand-to-Hand Trainer in Oblivion Remastered. |Image credit:Bethesda/Virtuos
- Nahsi (basic): Bravil, Fighters Guild.
- Rufrius Vinicius (basic): Anvil, Fighters Guild.
- Davela Hlaren (advanced): Imperial Bridge Inn.
- Ra’qanar (advanced): Castle Cheydinhal.
- Helvius Cecia (master): Bruma, at his house.
Heavy Armor Trainer locations

Every Heavy Armor Trainer in Oblivion Remastered. |Image credit:Bethesda/Virtuos
- Brodras (basic): Leyawiin, Fighters Guild.
- Bumph gra-Gash (basic): Bruma, Fighters Guild.
- Varnado (advanced): Imperial City Market District, The Best Defense shop.
- Pranal (master): Roxey Inn.
Illusion Trainer locations
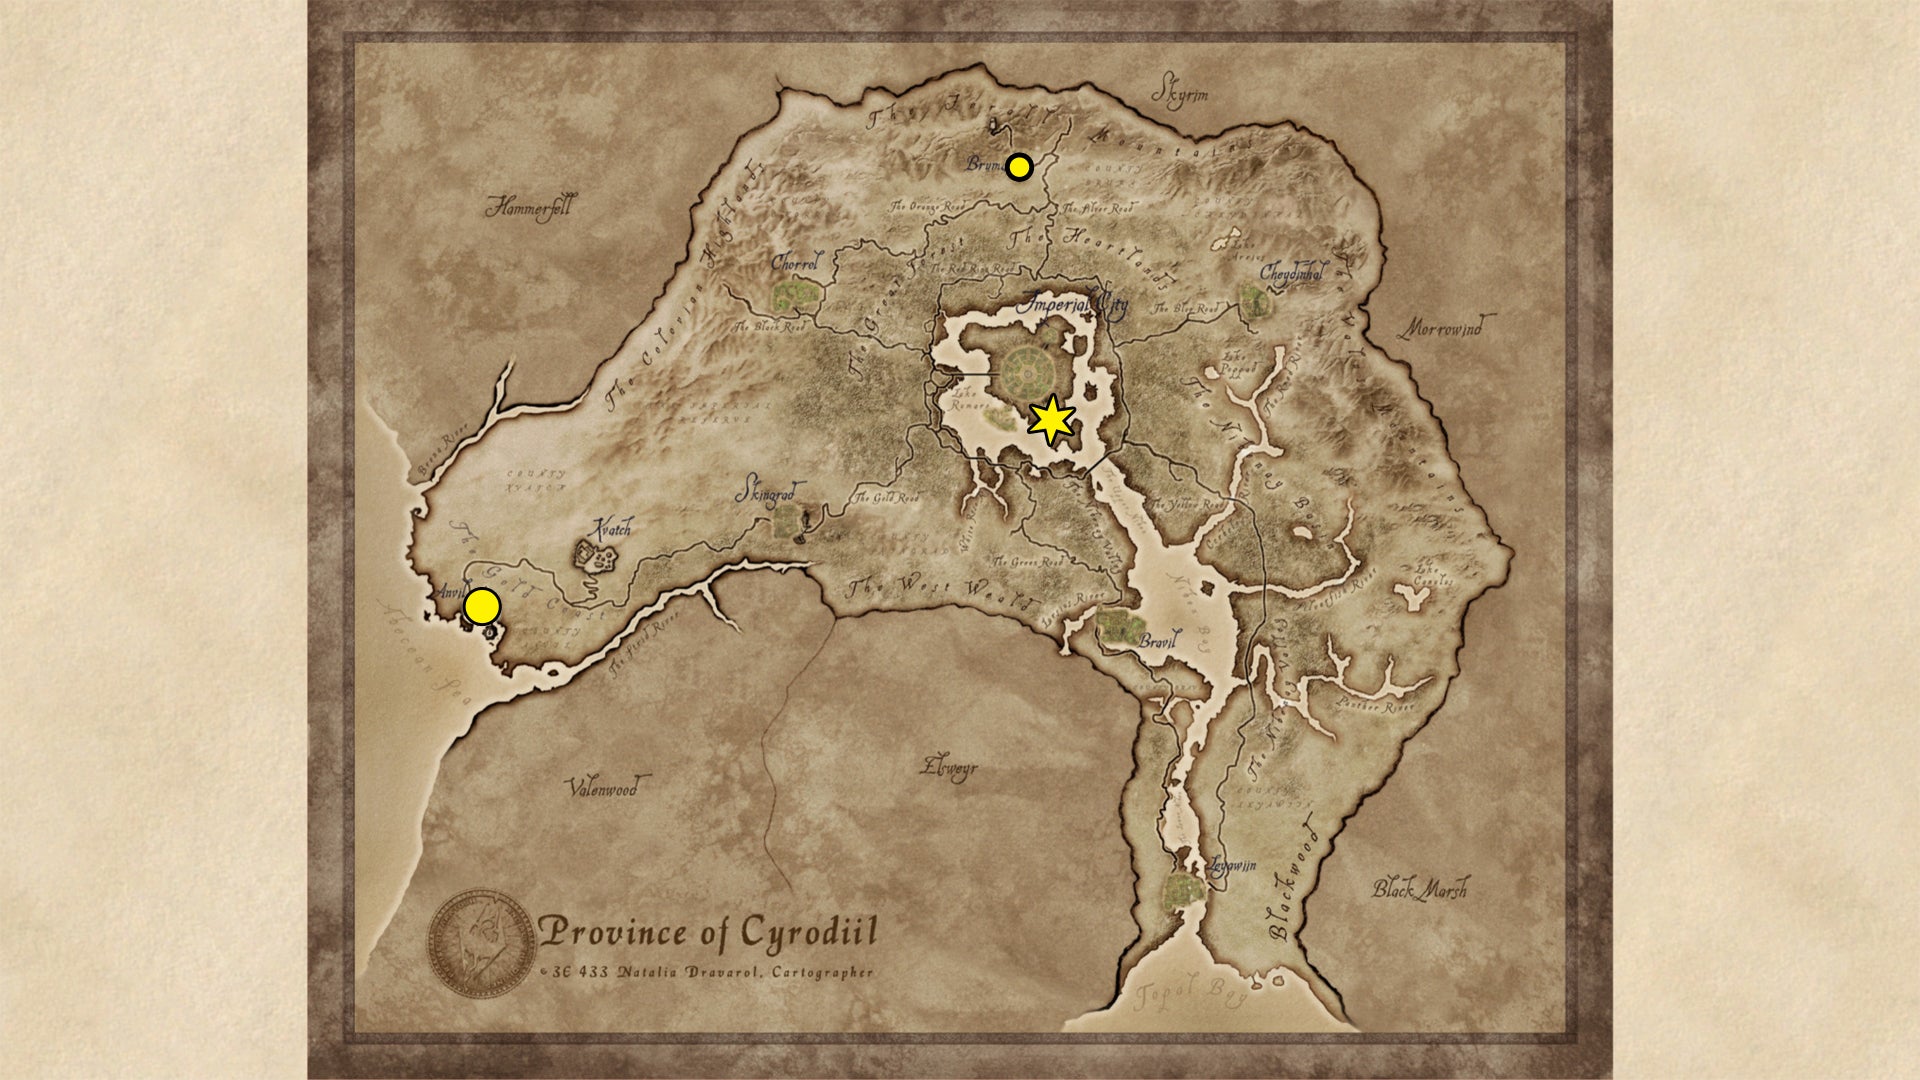
Every Illusion Trainer in Oblivion Remastered. |Image credit:Bethesda/Virtuos
- Jantus Brolus (basic): Bruma, Istrius Brolus’ house.
- Carahil (advanced): Anvil, Mages Guild.
- Martina Floria (master): Imperial City, the Arcane University.
Light Armor Trainer locations

Every Light Armor Trainer in Oblivion Remastered. |Image credit:Bethesda/Virtuos
- Dul gro-Shug (basic): Imperial City, Elven Gardens District.
- Olfand (basic): Bruma, Nord Winds shop.
- Ahdarji (advanced): Leyawiin, at her house in the east.
- Luciana Galena (advanced): Bravil, usually at the Lonely Suitor Lodge in the south, otherwise at her house.
- J’bari (master): Leyawiin, at his house in the east.
Marksman Trainer locations

Every Marksman Trainer in Oblivion Remastered. |Image credit:Bethesda/Virtuos
- Edla Dark-Heart (basic): Bruma, usually at Regner’s house.
- Shameer (basic): Skingrad, at his house or Tamika’s vineyards west of the city, where he works during the day.
- Melliwin (advanced): Dunbarrow Cove, south of Anvil.
- Pinarus Inventius (advanced): Anvil, either at his house or just outside the town gates in the north (in the afternoon).
- Reman Broder (advanced): Skingrad, at his house in early morning and late evening. He works in the vineyards west of town during the day, but won’t train you while working.
- Alawen (master): Troll Candle Camp.
Mercantile Trainer locations
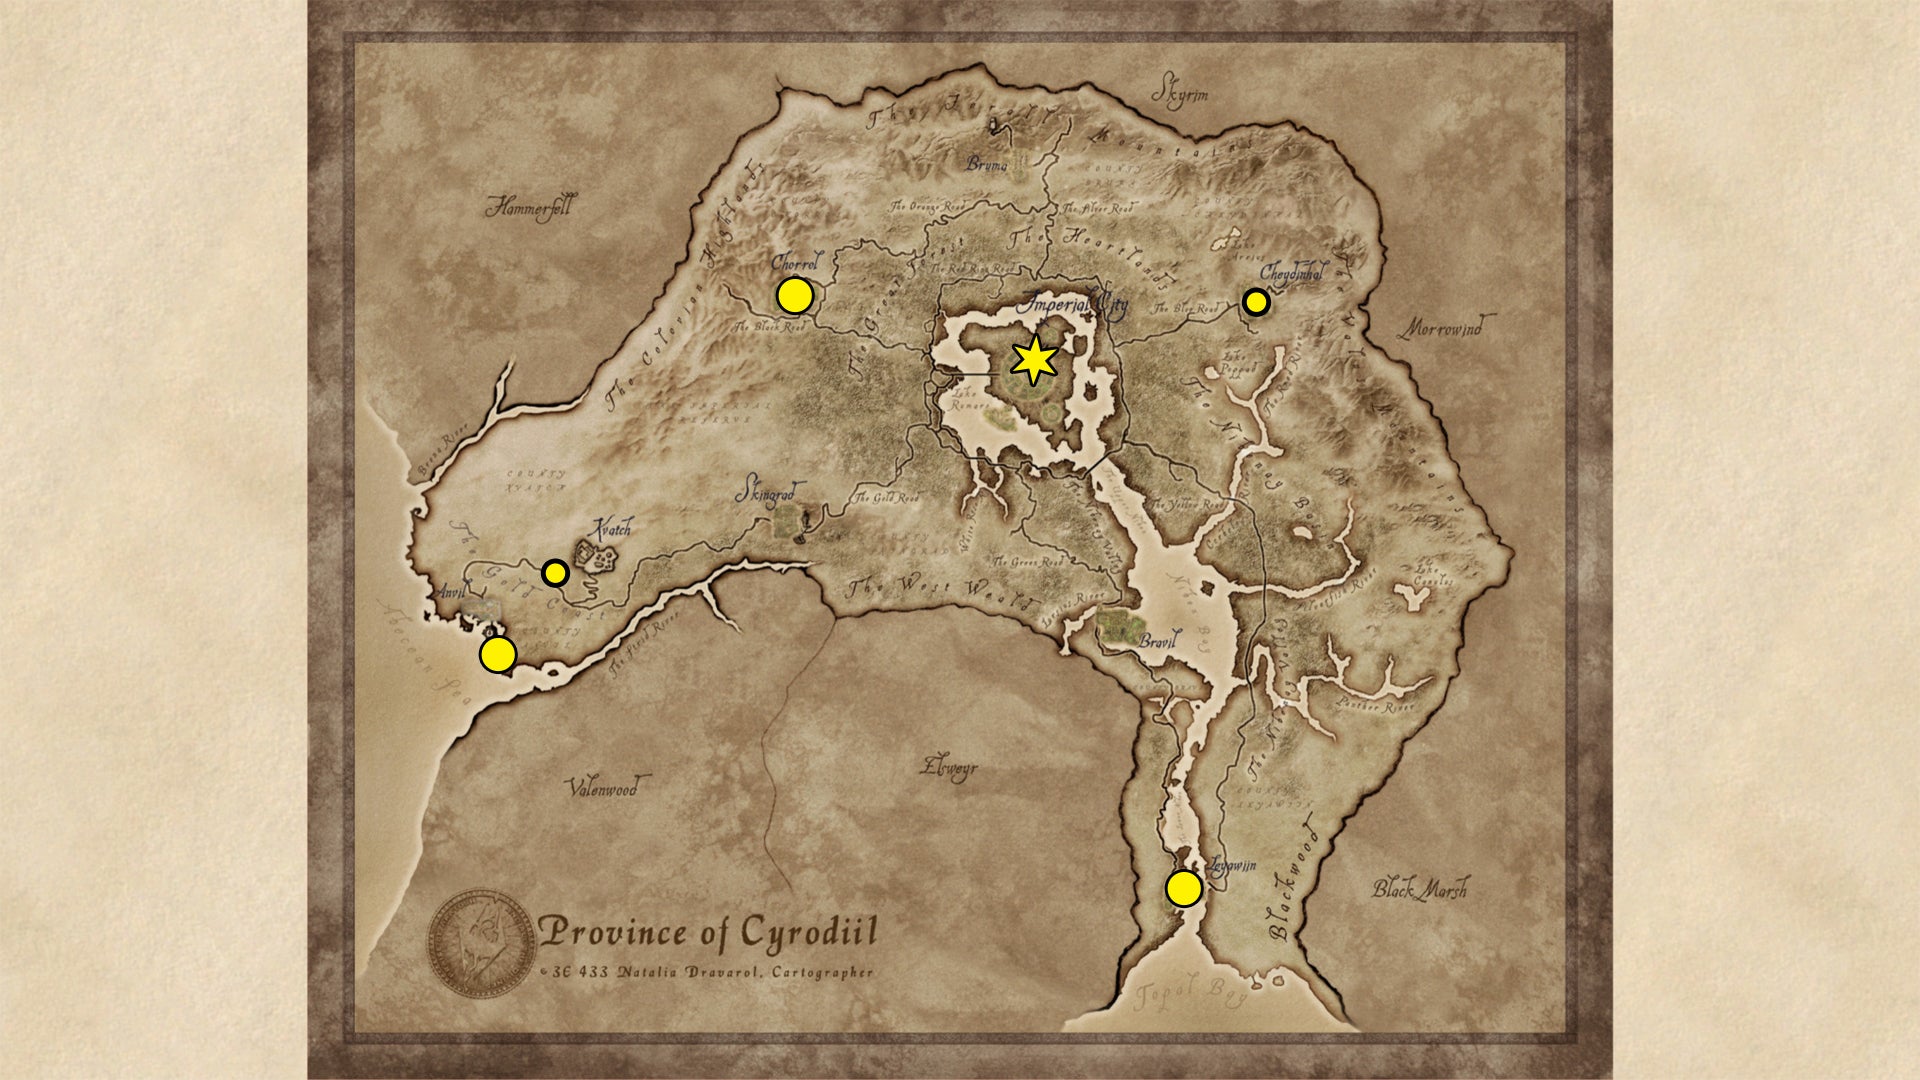
Every Mercantile Trainer in Oblivion Remastered. |Image credit:Bethesda/Virtuos
- Foroch (basic): Gottshaw Inn, southwest of Kvatch.
- Mach-Na (basic): Cheydinhal, Mach-Na’s Books shop.
- Khafiz (advanced): Dunbarrow Cove, south of Anvil.
- Margarte (advanced): Leyawiin, at her house.
- Seed-Neeus (advanced): Chorrol, Northern Goods and Trade shop.
- Palonirya (master): Imperial City Market District, the Divine Elegance shop.
Mysticism Trainer locations
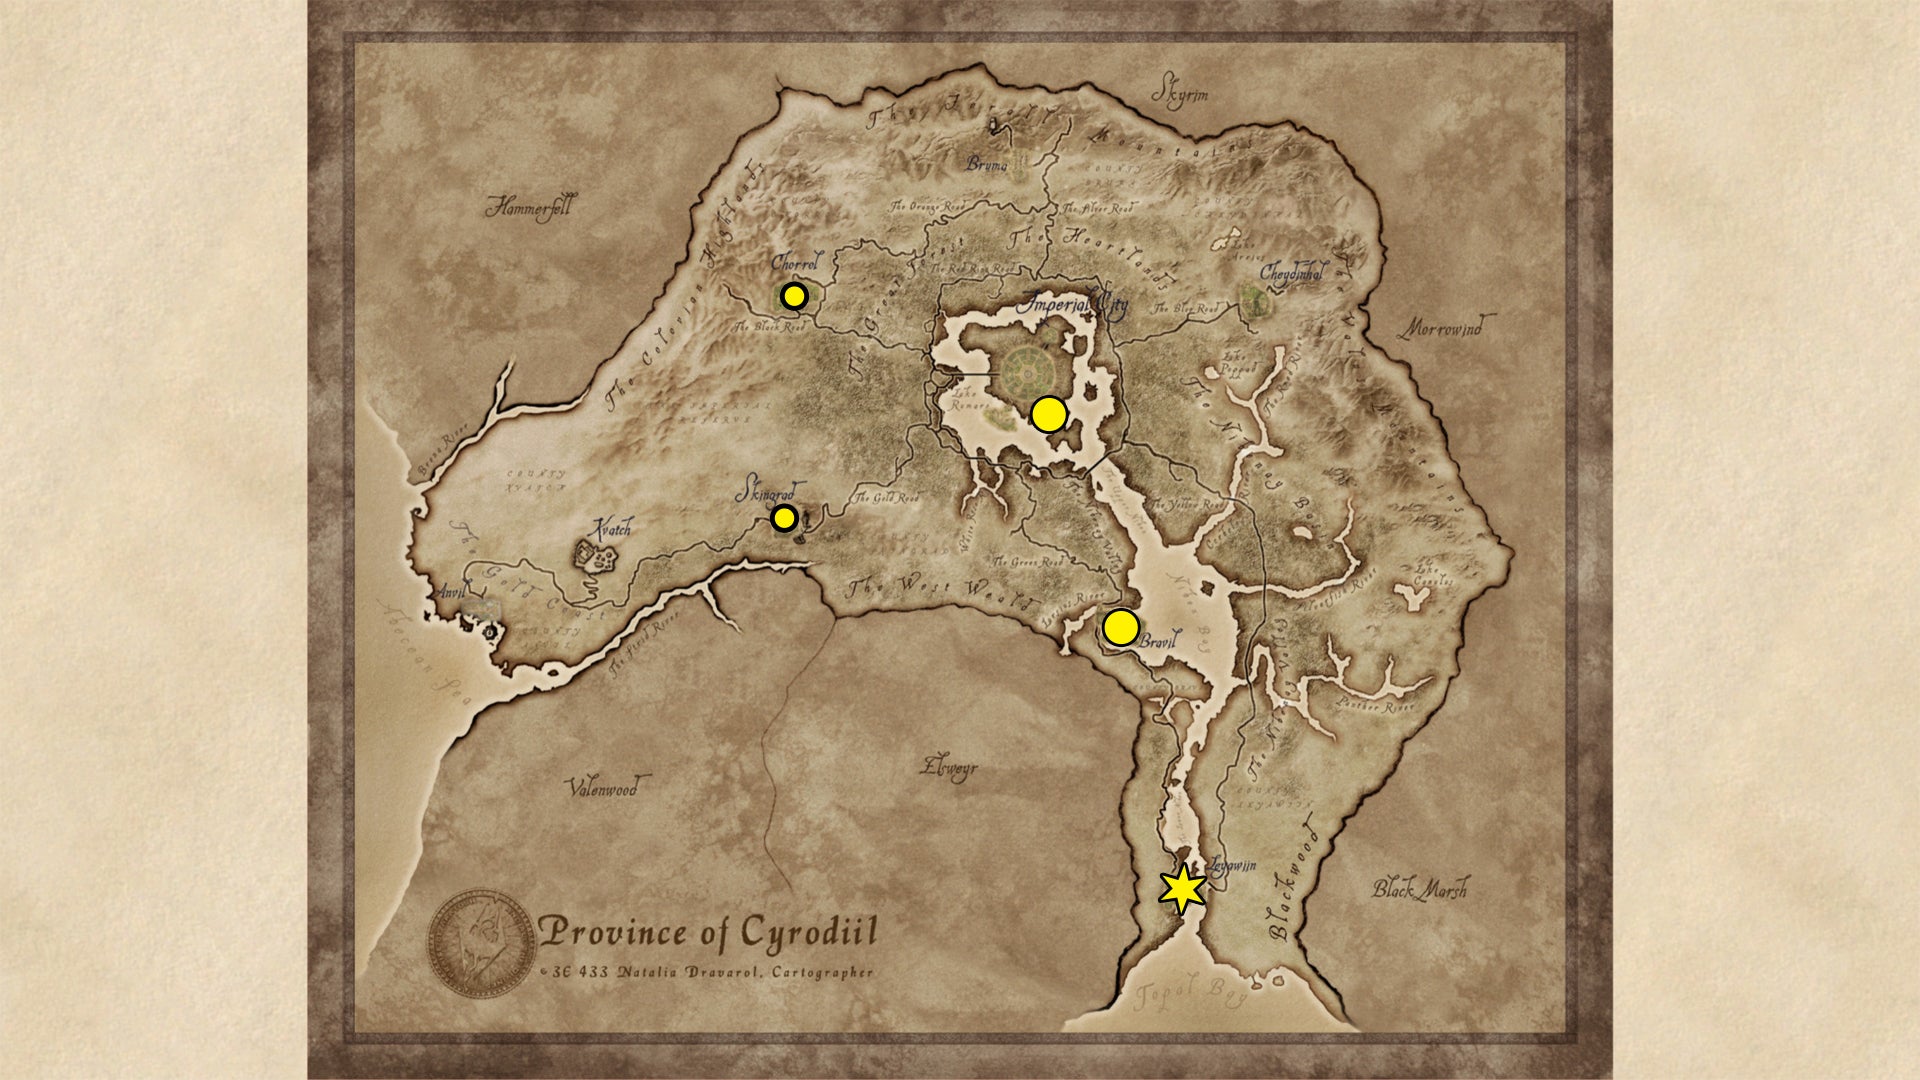
Every Mysticism Trainer in Oblivion Remastered. |Image credit:Bethesda/Virtuos
- Angalmo (basic): Chorrol, Mages Guild.
- Druja (basic): Skingrad, Mages Guild.
- Boderi Farano (advanced): Imperial City, at the Arcane University in the Mystic Archives.
- Ita Rienus (advanced): Bravil, Mages Guild.
- Dagail (master): Leyawiin, Mages Guild.
Restoration Trainer locations
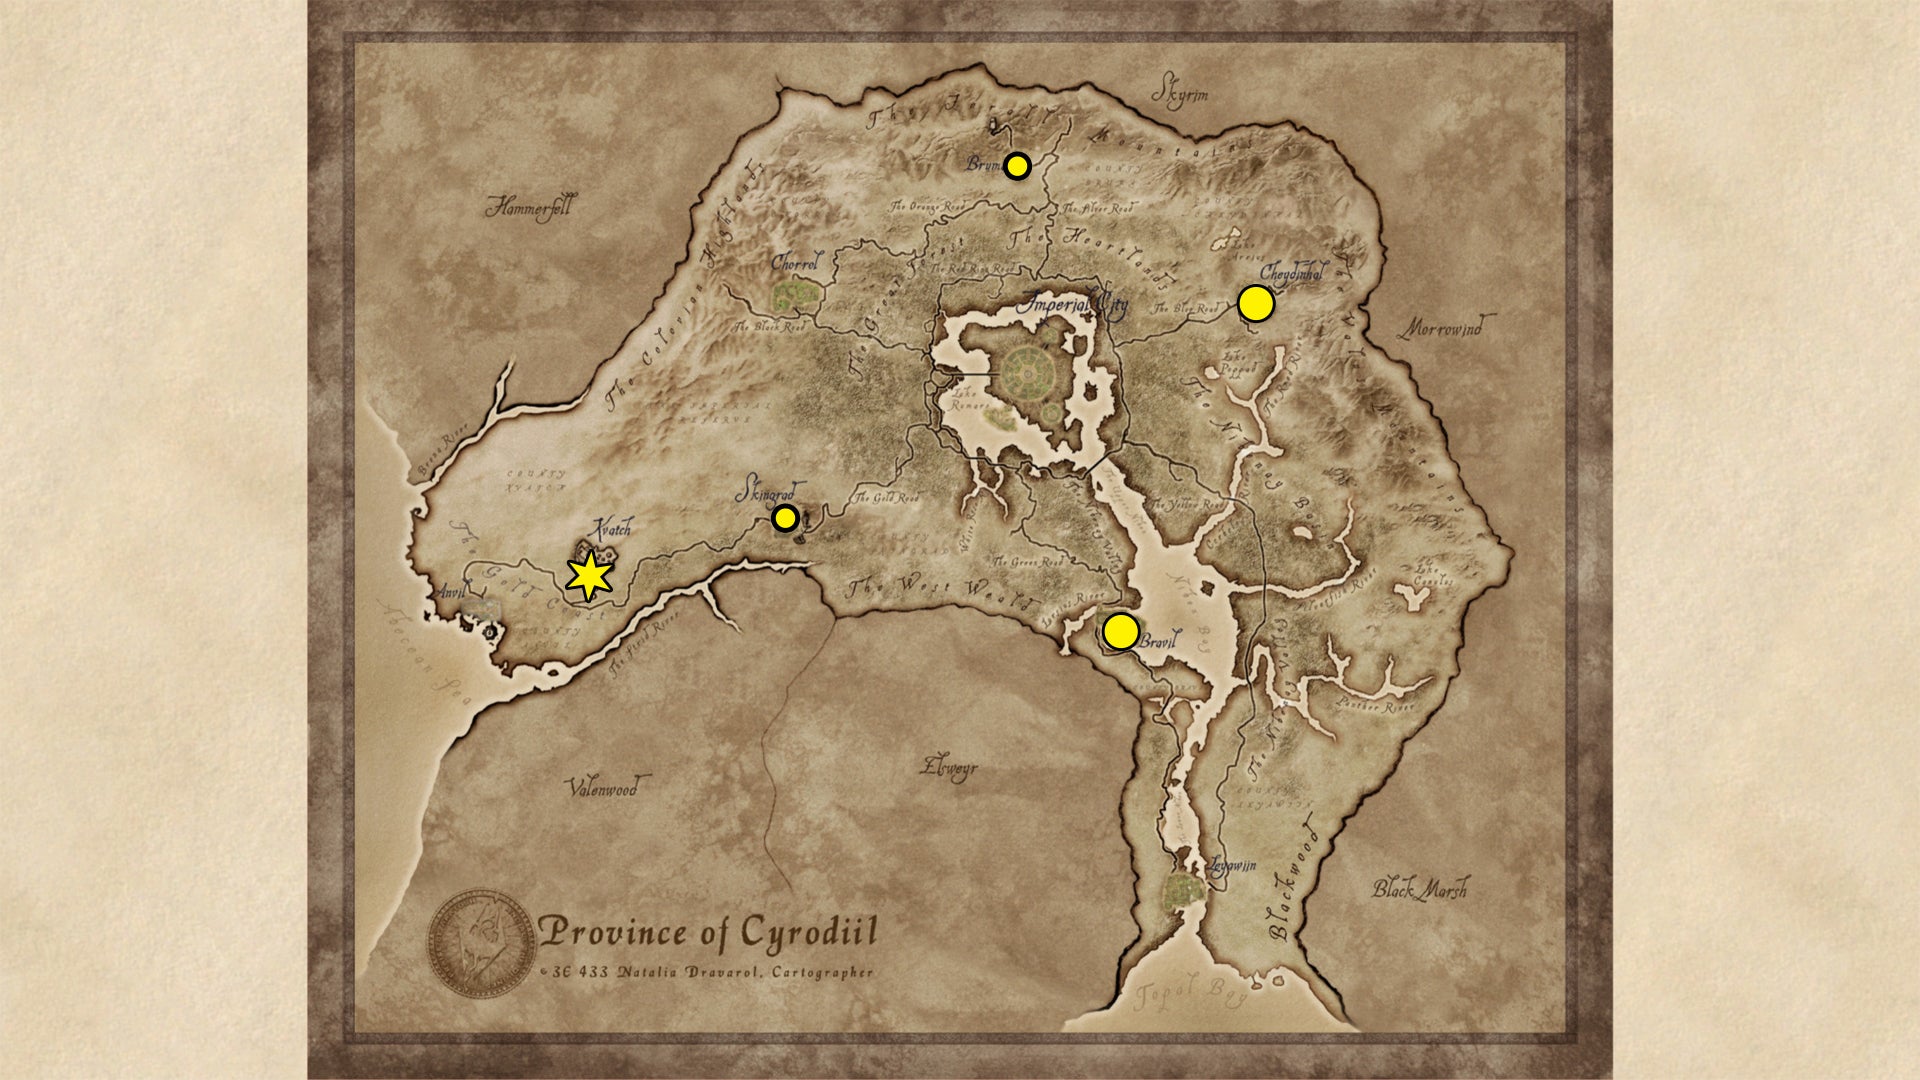
Every Restoration Trainer in Oblivion Remastered. |Image credit:Bethesda/Virtuos
- Cirroc (basic): Bruma, Great Chapel of Talos.
- Marie Palielle (basic): Skingrad, Great Chapel of Julianos.
- Marz (advanced): Bravil, Great Chapel of Mara. Will be replaced by Beem-Kiurz following one of the Knights of the Nine quests.
- Ohtesse (advanced): Cheydinhal, Great Chapel of Arkay. Will be replaced by Kinther following one of the Knights of the Nine quests.
- Oleta (master): Kvatch, Chapel of Akatosh. After completing the quest Breaking the Siege of Kvatch, Oleta is at the refugee camp south of Kvatch.
Security Trainer locations
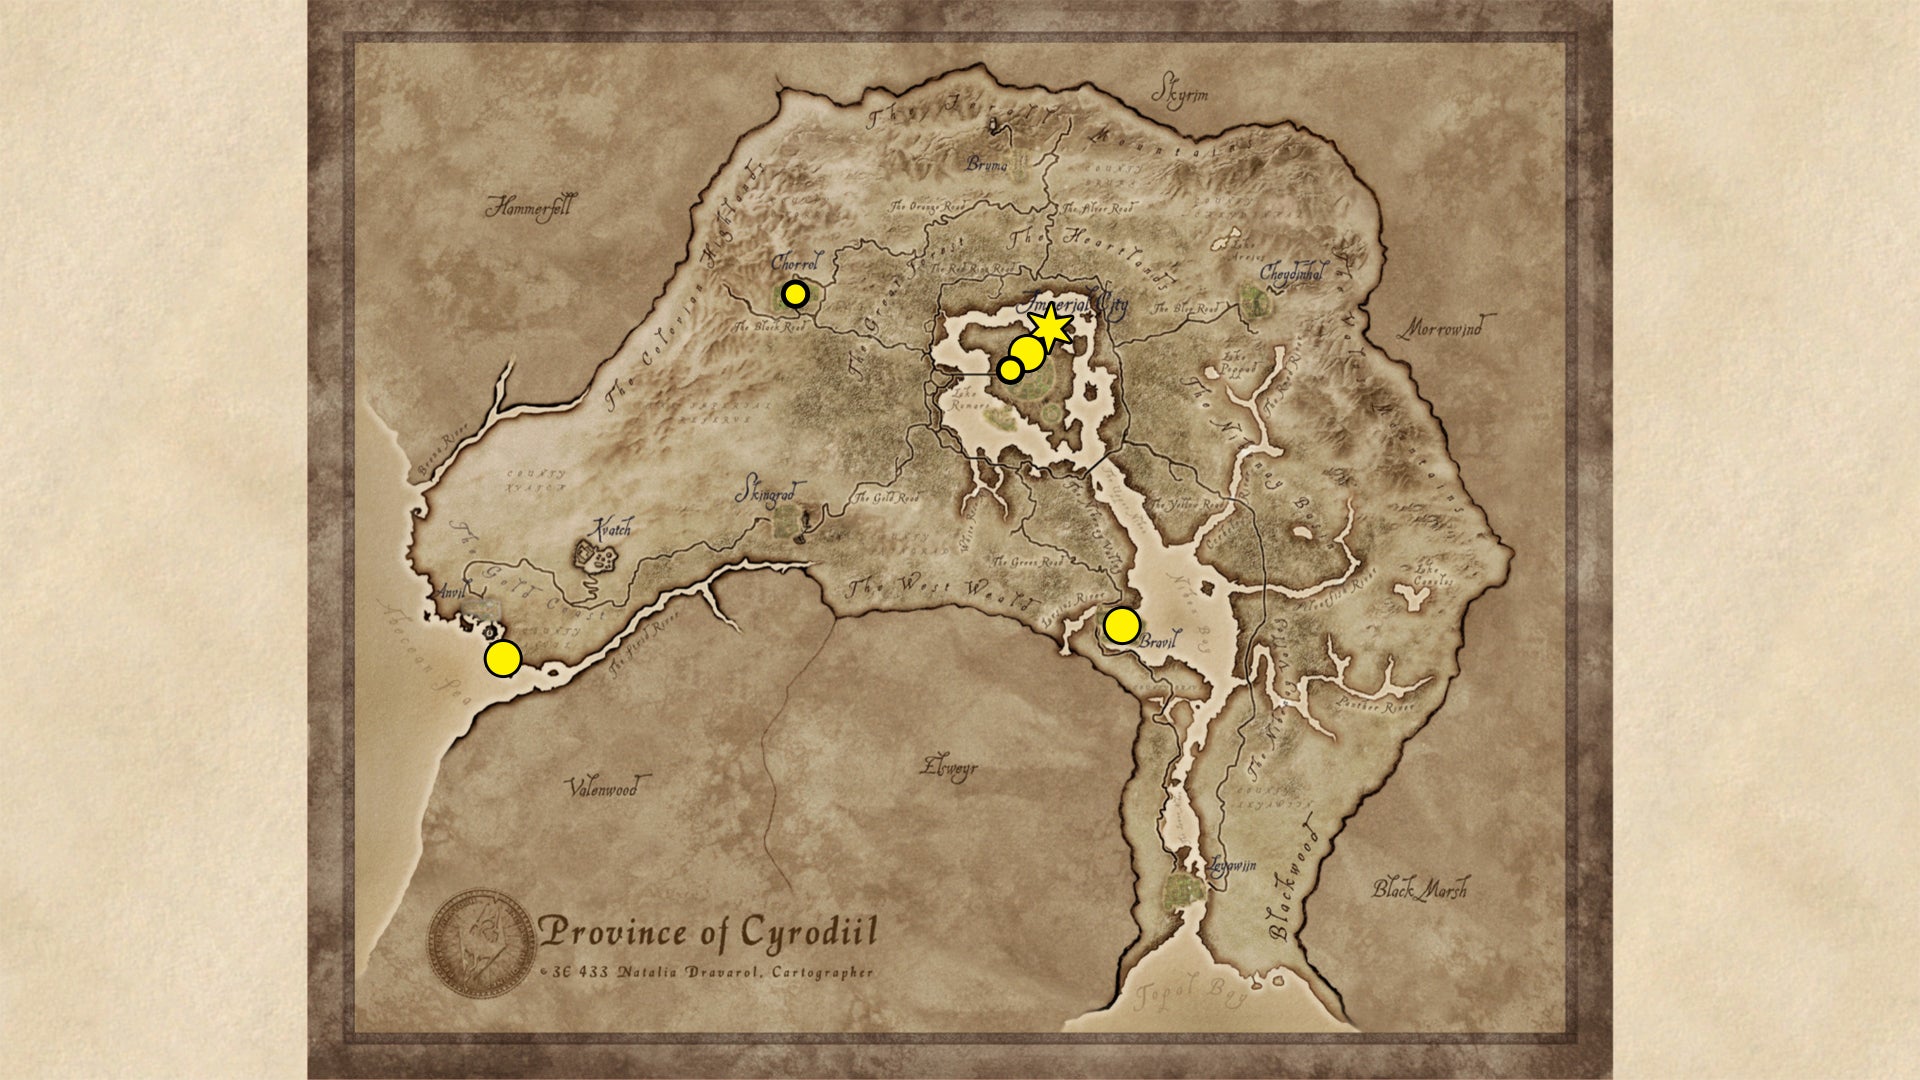
Every Security Trainer in Oblivion Remastered. |Image credit:Bethesda/Virtuos
- Malintus Ancrus (basic): Chorrol, at his house.
- Samuel Bantien (basic): Imperial City, Green Emperor Way. He’s only there on weekday afternoons, spending most of the remaining time at his house in Talos Plaza District, but he doesn’t offer training at home.
- Dro’shanji (advanced): Bravil, at his home.
- Mandil (advanced): Imperial City Elven Gardens District, Othrelos’ house. Will only leave in the afternoon.
- Tahm Blackwell (advanced): Dunbarrow Cove, south of Anvil.
- J’baana (master): Imperial City Prison, in a tent behind the prison tower (outside). As the iron gates adjacent to the main entrance are locked and can’t be lockpicked, you must go through the prison and lockpick the wooden bastion door to reach J’baana.
Sneak Trainer locations
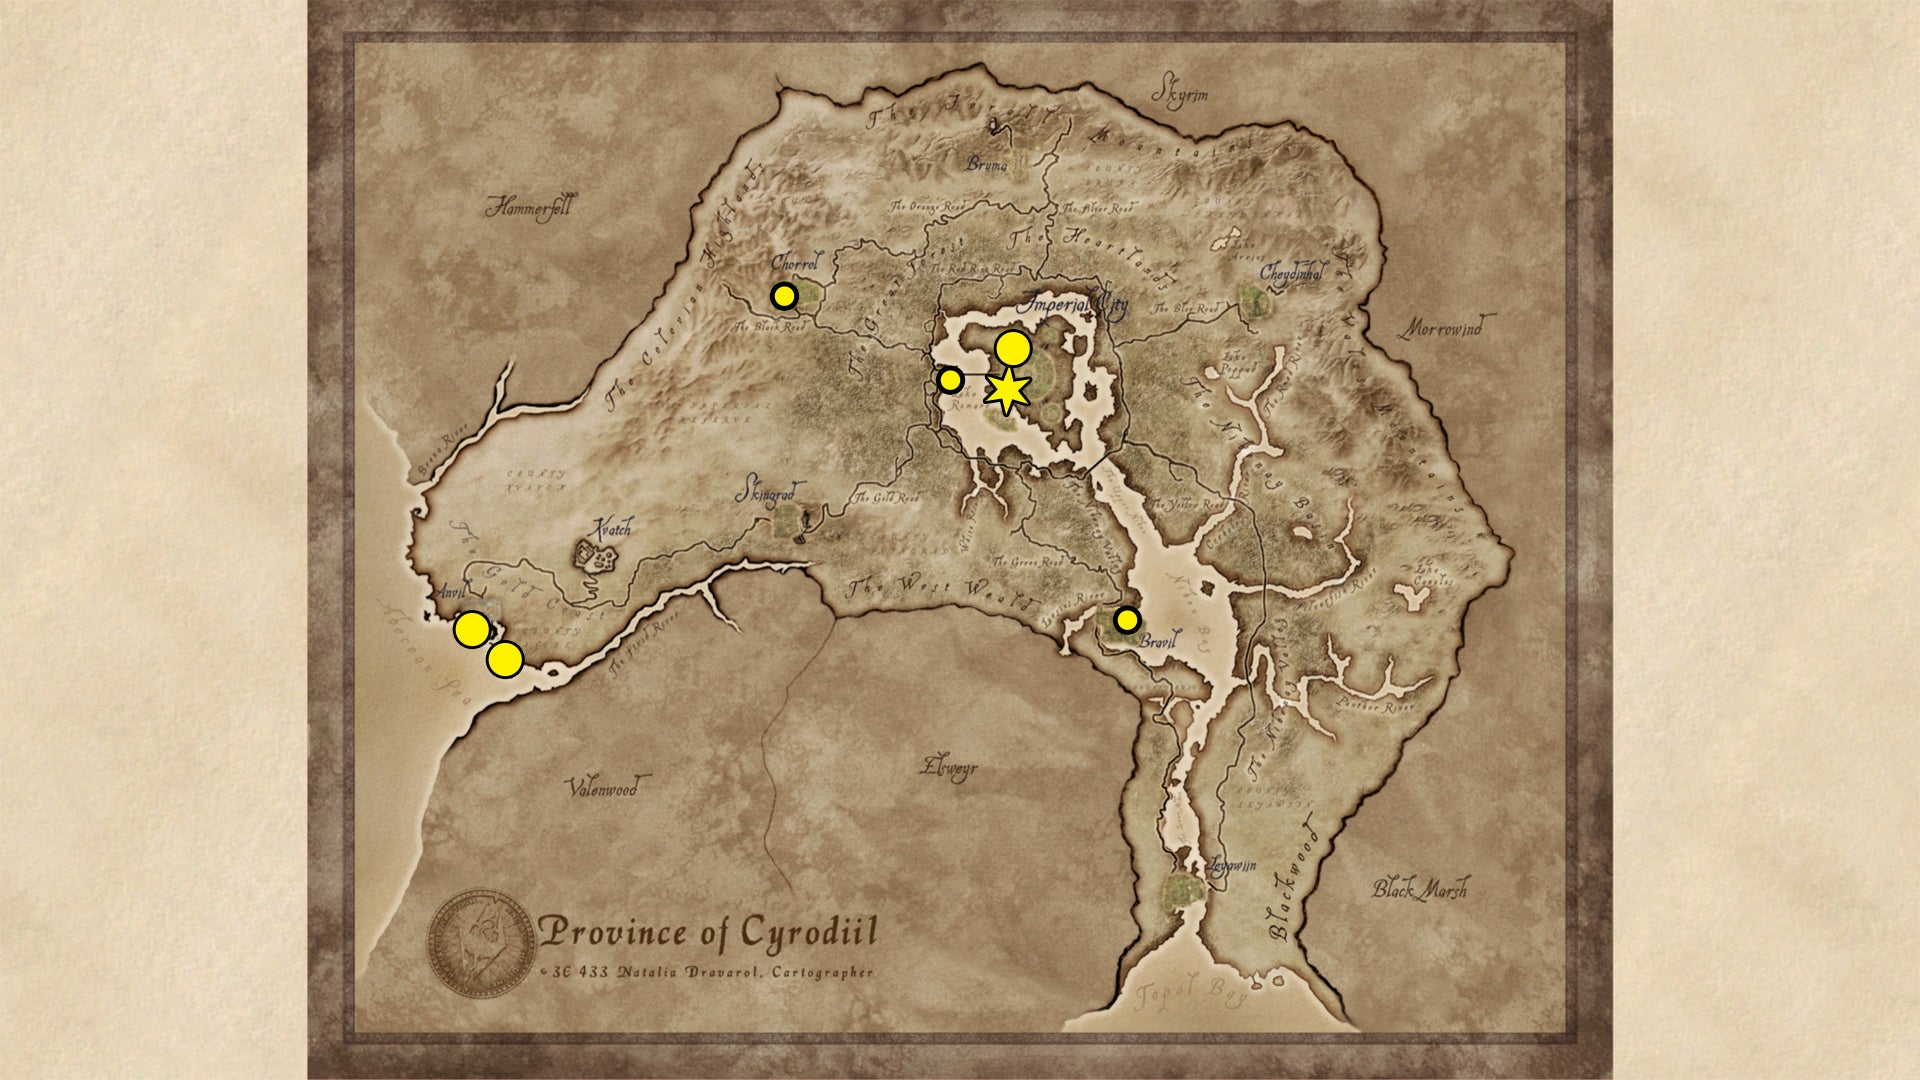
Every Sneak Trainer in Oblivion Remastered. |Image credit:Bethesda/Virtuos
- City-Swimmer (basic): Bravil, at her house (top floor, near the northern city gate). She also roams northern Bravil during the day.
- Glistel (basic): Chorrol, Malintus Ancrus’ house.
- Rowley Eardwulf (basic): Wawnet Inn.
- Kovan Kren (advanced): Dunbarrow Cove, south of Anvil.
- Mirabelle Monet (advanced): Anvil, the docks. She’ll likely be inside Fo’c’s’le boarding house.
- Othrelos (advanced): Imperial City Elven Gardens District.
- Marana Rian (master): Imperial City Temple District.
Speechcraft Trainer locations
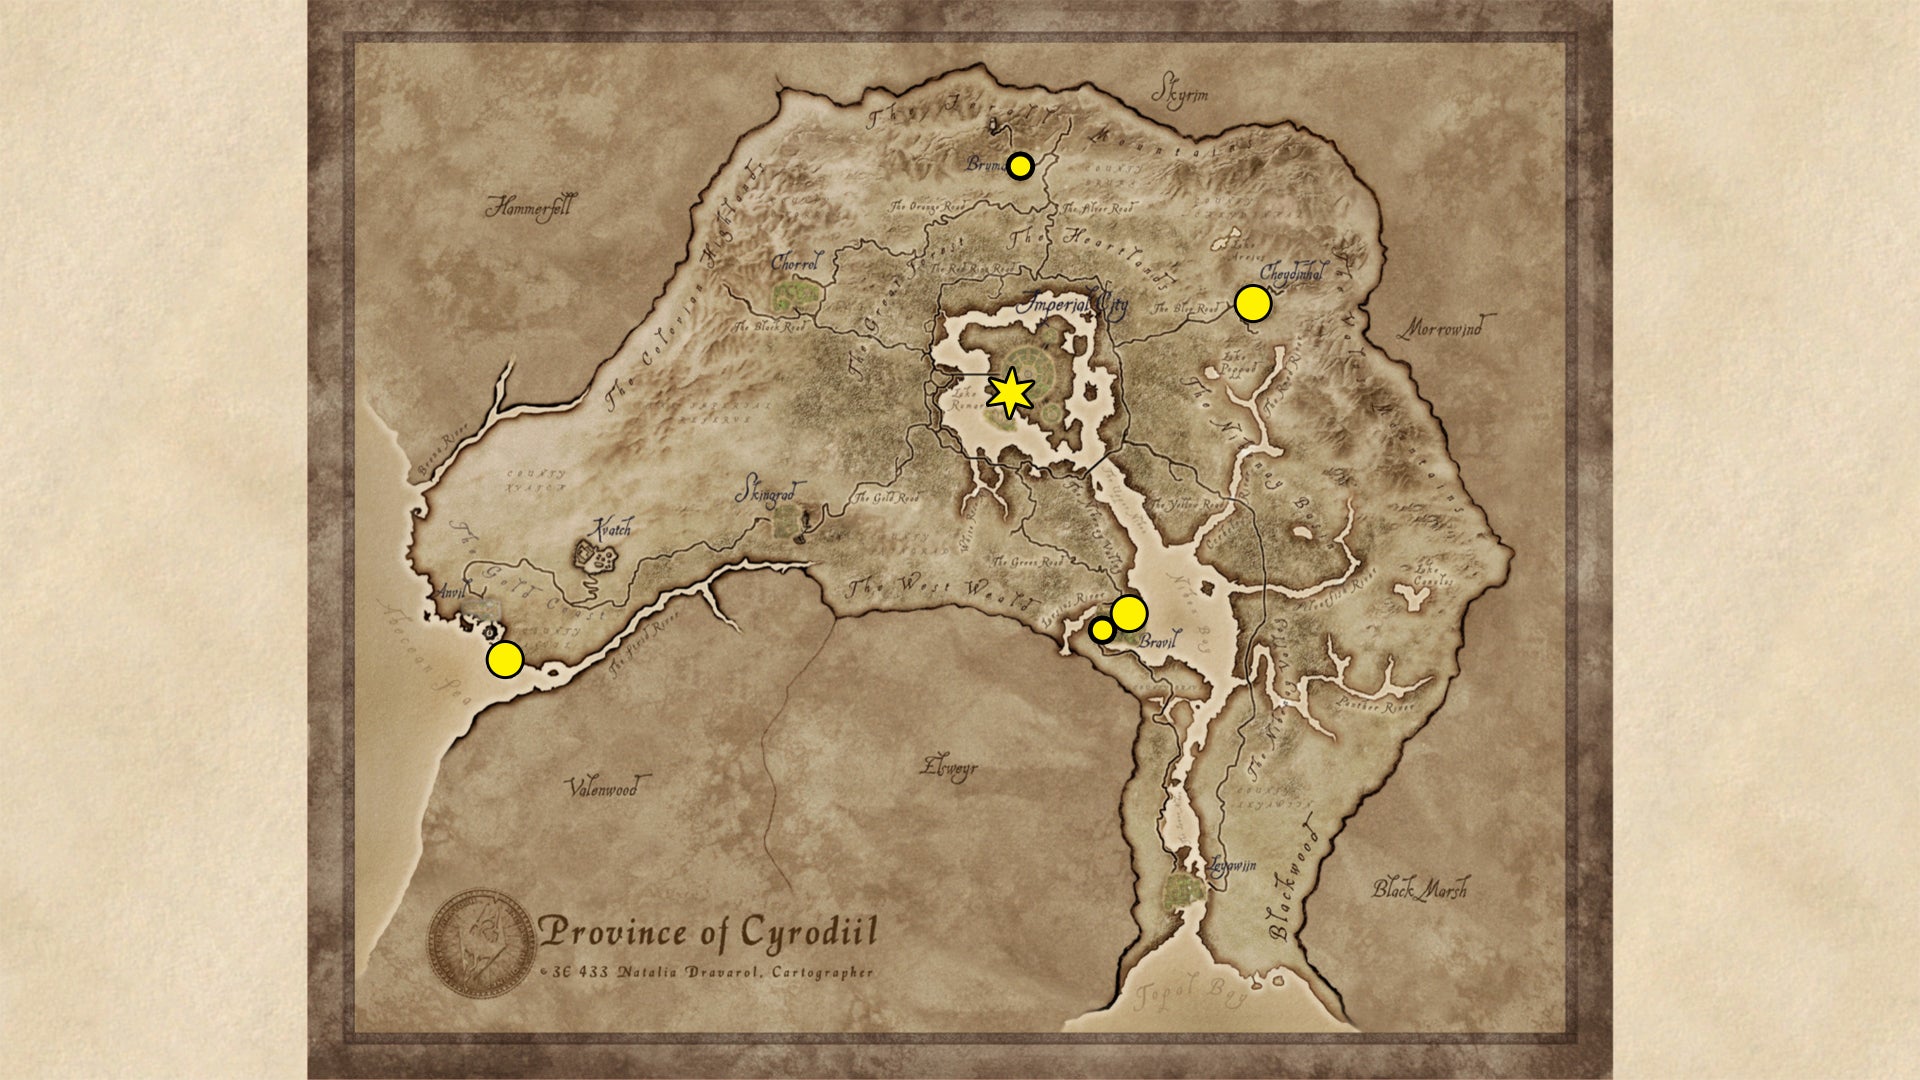
Every Speechcraft Trainer in Oblivion Remastered. |Image credit:Bethesda/Virtuos
- Alga (basic): Bruma, Honmund’s house.
- Uravasa Othrelas (basic): Bravil, Great Chapel of Mara. Will be replaced by Eris Senim after the events of Knights of the Nine.
- Gruiand Garrana (advanced): Cheydinhal, Great Chapel of Arkay. May be replaced by Inius Colus during Knights of the Nine.
- Jak Silver (advanced): Dunbarrow Cove, south of Anvil.
- Varon Vamori (advanced): Bravil, at his house. He’s only home in the early morning and evening.
- Tandilwe (master): Imperial City Temple District, Temple of the One.
And that’s every Trainer and Trainer location in The Elder Scrolls IV: Oblivion Remastered. Be sure to grab the extra skills boosts and use them to complete Daedric Quests , close Oblivion Gates , or - since it will happen sooner or later - escape jail .

The Elder Scrolls IV: Oblivion
PS3 , Xbox 360 , PC

The Elder Scrolls IV: Oblivion Remastered
PS5 , Xbox Series X/S , PC
Rock Paper Shotgun is better when you sign in
Sign in and join us on our journey to discover strange and compelling PC games.

All 75 Arc Raiders Blueprints and where to get them
These areas have the highest chance of giving you Blueprints

Image credit:Rock Paper Shotgun/Embark Studios

Looking for more Arc Raiders Blueprints? It’s a special day when you find a Blueprint, as they’re among the most valuable items in Arc Raiders. If you find a Blueprint that you haven’t already found, then you must make sure you hold onto it at all costs, because Blueprints are the key to one of the most important and powerful systems of meta-progression in the game.
This guide aims to be the very best guide on Blueprints you can find, starting with a primer on what exactly they are and how they work in Arc Raiders, before delving into exactly where to get Blueprints and the very best farming spots for you to take in your search.
We’ll also go over how to get Blueprints from other unlikely activities, such as destroying Surveyors and completing specific quests. And you’ll also find the full list of all 75 Blueprints in Arc Raiders on this page (including the newest Blueprints added with the Cold Snap update , such as the Deadline Blueprint and Firework Box Blueprint), giving you all the information you need to expand your own crafting repertoire.
In this guide:
- What are Blueprints in Arc Raiders?
- Full Blueprint list: All crafting recipes
- Where to find Blueprints in Arc Raiders Blueprints obtained from quests Blueprints obtained from Trials Best Blueprint farming locations

What are Blueprints in Arc Raiders?
Blueprints in Arc Raiders are special items which, if you manage to extract with them, you can expend to permanently unlock a new crafting recipe in your Workshop. If you manage to extract from a raid with an Anvil Blueprint, for example, you can unlock the ability to craft your very own Anvil Pistol, as many times as you like (as long as you have the crafting materials).
To use a Blueprint, simply open your Inventory while in the lobby, then right-click on the Blueprint and click “Learn And Consume” . This will permanently unlock the recipe for that item in your Workshop. As of the Stella Montis update, there are allegedly 75 different Blueprints to unlock - although only 68 are confirmed to be in the game so far. You can see all the Blueprints you’ve found and unlocked by going to the Workshop menu, and hitting “R” to bring up the Blueprint screen.
It’s possible to find duplicates of past Blueprints you’ve already unlocked. If you find these, then you can either sell them, or - if you like to play with friends - you can take it into a match and gift it to your friend so they can unlock that recipe for themselves. Another option is to keep hold of them until the time comes to donate them to the Expedition.
Full Blueprint list: All crafting recipes
Below is the full list of all the Blueprints that are currently available to find in Arc Raiders, and the crafting recipe required for each item:
| Blueprint | Type | Recipe | Crafted At |
|---|---|---|---|
| Bettina | Weapon | 3x Advanced Mechanical Components 3x Heavy Gun Parts 3x Canister | Gunsmith 3 |
| Blue Light Stick | Quick Use | 3x Chemicals | Utility Station 1 |
| Aphelion | Weapon | 3x Magnetic Accelerator 3x Complex Gun Parts 1x Matriarch Reactor | Gunsmith 3 |
| Combat Mk. 3 (Flanking) | Augment | 2x Advanced Electrical Components 3x Processor | Gear Bench 3 |
| Combat Mk. 3 (Aggressive) | Augment | 2x Advanced Electrical Components 3x Processor | Gear Bench 3 |
| Complex Gun Parts | Material | 2x Light Gun Parts 2x Medium Gun Parts 2x Heavy Gun Parts | Refiner 3 |
| Fireworks Box | Quick Use | 1x Explosive Compound 3x Pop Trigger | Explosives Station 2 |
| Gas Mine | Mine | 4x Chemicals 2x Rubber Parts | Explosives Station 1 |
| Green Light Stick | Quick Use | 3x Chemicals | Utility Station 1 |
| Pulse Mine | Mine | 1x Crude Explosives 1x Wires | Explosives Station 1 |
| Seeker Grenade | Grenade | 1x Crude Explosives 2x ARC Alloy | Explosives Station 1 |
| Looting Mk. 3 (Survivor) | Augment | 2x Advanced Electrical Components 3x Processor | Gear Bench 3 |
| Angled Grip II | Mod | 2x Mechanical Components 3x Duct Tape | Gunsmith 2 |
| Angled Grip III | Mod | 2x Mod Components 5x Duct Tape | Gunsmith 3 |
| Hullcracker | Weapon | 1x Magnetic Accelerator 3x Heavy Gun Parts 1x Exodus Modules | Gunsmith 3 |
| Launcher Ammo | Ammo | 5x Metal Parts 1x Crude Explosives | Workbench 1 |
| Anvil | Weapon | 5x Mechanical Components 5x Simple Gun Parts | Gunsmith 2 |
| Anvil Splitter | Mod | 2x Mod Components 3x Processor | Gunsmith 3 |
| ??? | ??? | ??? | ??? |
| Barricade Kit | Quick Use | 1x Mechanical Components | Utility Station 2 |
| Blaze Grenade | Grenade | 1x Explosive Compound 2x Oil | Explosives Station 3 |
| Bobcat | Weapon | 3x Advanced Mechanical Components 3x Light Gun Parts | Gunsmith 3 |
| Osprey | Weapon | 2x Advanced Mechanical Components 3x Medium Gun Parts 7x Wires | Gunsmith 3 |
| Burletta | Weapon | 3x Mechanical Components 3x Simple Gun Parts | Gunsmith 1 |
| Compensator II | Mod | 2x Mechanical Components 4x Wires | Gunsmith 2 |
| Compensator III | Mod | 2x Mod Components 8x Wires | Gunsmith 3 |
| Defibrillator | Quick Use | 9x Plastic Parts 1x Moss | Medical Lab 2 |
| ??? | ??? | ??? | ??? |
| Equalizer | Weapon | 3x Magnetic Accelerator 3x Complex Gun Parts 1x Queen Reactor | Gunsmith 3 |
| Extended Barrel | Mod | 2x Mod Components 8x Wires | Gunsmith 3 |
| Extended Light Mag II | Mod | 2x Mechanical Components 3x Steel Spring | Gunsmith 2 |
| Extended Light Mag III | Mod | 2x Mod Components 5x Steel Spring | Gunsmith 3 |
| Extended Medium Mag II | Mod | 2x Mechanical Components 3x Steel Spring | Gunsmith 2 |
| Extended Medium Mag III | Mod | 2x Mod Components 5x Steel Spring | Gunsmith 3 |
| Extended Shotgun Mag II | Mod | 2x Mechanical Components 3x Steel Spring | Gunsmith 2 |
| Extended Shotgun Mag III | Mod | 2x Mod Components 5x Steel Spring | Gunsmith 3 |
| Remote Raider Flare | Quick Use | 2x Chemicals 4x Rubber Parts | Utility Station 1 |
| Heavy Gun Parts | Material | 4x Simple Gun Parts | Refiner 2 |
| Venator | Weapon | 2x Advanced Mechanical Components 3x Medium Gun Parts 5x Magnet | Gunsmith 3 |
| Il Toro | Weapon | 5x Mechanical Components 6x Simple Gun Parts | Gunsmith 1 |
| Jolt Mine | Mine | 1x Electrical Components 1x Battery | Explosives Station 2 |
| Explosive Mine | Mine | 1x Explosive Compound 1x Sensors | Explosives Station 3 |
| Jupiter | Weapon | 3x Magnetic Accelerator 3x Complex Gun Parts 1x Queen Reactor | Gunsmith 3 |
| Light Gun Parts | Material | 4x Simple Gun Parts | Refiner 2 |
| Lightweight Stock | Mod | 2x Mod Components 5x Duct Tape | Gunsmith 3 |
| Lure Grenade | Grenade | 1x Speaker Component 1x Electrical Components | Utility Station 2 |
| Medium Gun Parts | Material | 4x Simple Gun Parts | Refiner 2 |
| Torrente | Weapon | 2x Advanced Mechanical Components 3x Medium Gun Parts 6x Steel Spring | Gunsmith 3 |
| Muzzle Brake II | Mod | 2x Mechanical Components 4x Wires | Gunsmith 2 |
| Muzzle Brake III | Mod | 2x Mod Components 8x Wires | Gunsmith 3 |
| Padded Stock | Mod | 2x Mod Components 5x Duct Tape | Gunsmith 3 |
| Shotgun Choke II | Mod | 2x Mechanical Components 4x Wires | Gunsmith 2 |
| Shotgun Choke III | Mod | 2x Mod Components 8x Wires | Gunsmith 3 |
| Shotgun Silencer | Mod | 2x Mod Components 8x Wires | Gunsmith 3 |
| Showstopper | Grenade | 1x Advanced Electrical Components 1x Voltage Converter | Explosives Station 3 |
| Silencer I | Mod | 2x Mechanical Components 4x Wires | Gunsmith 2 |
| Silencer II | Mod | 2x Mod Components 8x Wires | Gunsmith 3 |
| Snap Hook | Quick Use | 2x Power Rod 3x Rope 1x Exodus Modules | Utility Station 3 |
| Stable Stock II | Mod | 2x Mechanical Components 3x Duct Tape | Gunsmith 2 |
| Stable Stock III | Mod | 2x Mod Components 5x Duct Tape | Gunsmith 3 |
| Tagging Grenade | Grenade | 1x Electrical Components 1x Sensors | Utility Station 3 |
| Tempest | Weapon | 3x Advanced Mechanical Components 3x Medium Gun Parts 3x Canister | Gunsmith 3 |
| Trigger Nade | Grenade | 2x Crude Explosives 1x Processor | Explosives Station 2 |
| Vertical Grip II | Mod | 2x Mechanical Components 3x Duct Tape | Gunsmith 2 |
| Vertical Grip III | Mod | 2x Mod Components 5x Duct Tape | Gunsmith 3 |
| Vita Shot | Quick Use | 2x Antiseptic 1x Syringe | Medical Lab 3 |
| Vita Spray | Quick Use | 3x Antiseptic 1x Canister | Medical Lab 3 |
| Vulcano | Weapon | 1x Magnetic Accelerator 3x Heavy Gun Parts 1x Exodus Modules | Gunsmith 3 |
| Wolfpack | Grenade | 2x Explosive Compound 2x Sensors | Explosives Station 3 |
| Red Light Stick | Quick Use | 3x Chemicals | Utility Station 1 |
| Smoke Grenade | Grenade | 14x Chemicals 1x Canister | Utility Station 2 |
| Deadline | Mine | 3x Explosive Compound 2x ARC Circuitry | Explosives Station 3 |
| Trailblazer | Grenade | 1x Explosive Compound 1x Synthesized Fuel | Explosives Station 3 |
| Tactical Mk. 3 (Defensive) | Augment | 2x Advanced Electrical Components 3x Processor | Gear Bench 3 |
| Tactical Mk. 3 (Healing) | Augment | 2x Advanced Electrical Components 3x Processor | Gear Bench 3 |
| Yellow Light Stick | Quick Use | 3x Chemicals | Utility Station 1 |
Note: The missing Blueprints in this list likely have not actually been added to the game at the time of writing, because none of the playerbase has managed to find any of them. As they are added to the game, I will update this page with the most relevant information so you know exactly how to get all 75 Arc Raiders Blueprints.
Where to find Blueprints in Arc Raiders
Below is a list of all containers, modifiers, and events which maximise your chances of finding Blueprints:
- Certain quests reward you with specific Blueprints .
- Completing Trials has a high chance of offering Blueprints as rewards.
- Surveyors have a decent chance of dropping Blueprints on death.
- High loot value areas tend to have a greater chance of spawning Blueprints.
- Night Raids and Storms may increase rare Blueprint spawn chances in containers.
- Containers with higher numbers of items may have a higher tendency to spawn Blueprints. As a result, Blue Gate (which has many “large” containers containing multiple items) may give you a higher chance of spawning Blueprints.
- Raider containers (Raider Caches, Weapon Boxes, Medical Bags, Grenade Tubes) have increased Blueprint drop rates. As a result, the Uncovered Caches event gives you a high chance of finding Blueprints.
- Security Lockers have a higher than average chance of containing Blueprints.
- Certain Blueprints only seem to spawn under specific circumstances: Tempest Blueprint only spawns during Night Raid events. Vulcano Blueprint only spawns during Hidden Bunker events. Jupiter and Equaliser Blueprints only spawn during Harvester events.

Raider Caches, Weapon Boxes, and other raider-oriented container types have a good chance of offering Blueprints. |Image credit:Rock Paper Shotgun/Embark Studios
Blueprints have a very low chance of spawning in any container in Arc Raiders, around 1-2% on average. However, there is a higher chance of finding Blueprints in particular container types. Specifically, you can find more Blueprints in Raider containers and security lockers.
Beyond this, if you’re looking for Blueprints you should focus on regions of the map which are marked as having particularly high-value loot. Areas such as the Control Tower in Dam Battlegrounds, the Arrival and Departure Buildings in Spaceport, and Pilgrim’s Peak in Blue Gate all have a better-than-average chance of spawning Blueprints somewhere amongst all their containers. Night Raids and Electromagnetic Storm events also increase the drop chances of certain Blueprints .
In addition to these containers, you can often loot Blueprints from destroyed Surveyors - the largest of the rolling ball ARC. Surveyors are more commonly found on the later maps - Spaceport and Blue Gate - and if one spawns in your match, you’ll likely see it by the blue laser beam that it casts into the sky while “surveying”.
Surveyors are quite well-armoured and will very speedily run away from you once it notices you, but if you can take one down then make sure you loot all its parts for a chance of obtaining certain unusual Blueprints.
Blueprints obtained from quests
One way in which you can get Blueprints is by completing certain quests for the vendors in Speranza. Some quests will reward you with a specific item Blueprint upon completion, so as long as you work through all the quests in Arc Raiders, you are guaranteed those Blueprints.
Here is the full list of all Blueprints you can get from quest rewards:
- Trigger Nade Blueprint: Rewarded after completing “Sparks Fly”.
- Lure Grenade Blueprint: Rewarded after completing “Greasing Her Palms”.
- Burletta Blueprint: Rewarded after completing “Industrial Espionage”.
- Hullcracker Blueprint (and Launcher Ammo Blueprint): Rewarded after completing “The Major’s Footlocker”.
Alas, that’s only 4 Blueprints out of a total of 75 to unlock, so for the vast majority you will need to find them yourself during a raid. If you’re intent on farming Blueprints, then it’s best to equip yourself with cheap gear in case you lose it, but don’t use a free loadout because then you won’t get a safe pocket to stash any new Blueprint you find. No pain in Arc Raiders is sharper than failing to extract with a new Blueprint you’ve been after for a dozen hours already.

One of the best ways to get Blueprints is by hitting three stars on all five Trials every week. |Image credit:Rock Paper Shotgun/Embark Studios
Blueprints obtained from Trials
One of the very best ways to get Blueprints is as rewards for completing Trials in Arc Raiders. Trials are unlocked from Level 15 onwards, and allow you to earn rewards by focusing on certain tasks over the course of several raids. For example, one Trial might task you with dealing damage to Hornets, while another might challenge you to loot Supply Drops.
Trials refresh on a weekly basis, with a new week bringing five new Trials. Each Trial can offer up to three rewards after passing certain score milestones, and it’s possible to receive very high level loot from these reward crates - including Blueprints. So if you want to unlock as many Blueprints as possible, you should make a point of completing as many Trials as possible each week.
Best Blueprint farming locations
The very best way to get Blueprints is to frequent specific areas of the maps which combine high-tier loot pools with the right types of containers to search. Here are my recommendations for where to find Blueprints on every map, so you can always keep the search going for new crafting recipes to unlock.

Image credit:Rock Paper Shotgun/Embark Studios
Dam Battlegrounds
The best places to farm Blueprints on Dam Battlegrounds are the Control Tower, Power Generation Complex, Ruby Residence, and Pale Apartments . The first two regions, despite only being marked on the map as mid-tier loot, contain a phenomenal number of containers to loot. The Control Tower can also contain a couple of high-tier Security Lockers - though of course, you’ll need to have unlocked the Security Breach skill at the end of the Survival tree.
There’s also a lot of reporting amongst the playerbase that the Residential areas in the top-left of the map - Pale Apartments and Ruby Residence - give you a comparatively strong chance of finding Blueprints. Considering their size, there’s a high density of containers to loot in both locations, and they also have the benefit of being fairly out of the way. So you’re more likely to have all the containers to yourself.
Buried City
The best Blueprint farming locations on Buried City are the Santa Maria Houses, Grandioso Apartments, Town Hall, and the various buildings of the New District . Grandioso Apartments has a lower number of containers than the rest, but a high chance of spawning weapon cases - which have good Blueprint drop rates. The others are high-tier loot areas, with plenty of lootable containers - including Security Lockers.
Spaceport
The best places to find Blueprints on Spaceport are the Arrival and Departure Buildings, as well as Control Tower A6 and the Launch Towers . All these areas are labelled as high-value loot regions, and many of them are also very handily connected to one another by the Spaceport wall, which you can use to quickly run from one area to the next. At the tops of most of these buildings you’ll find at least one Security Locker, so this is an excellent farming route for players looking to find Blueprints.
The downside to looting Blueprints on Spaceport is that all these areas are hotly contested, particularly in Duos and Squads. You’ll need to be very focused and fast in order to complete the full farming route.

Image credit:Rock Paper Shotgun/Embark Studios
Blue Gate
Blue Gate tends to have a good chance of dropping Blueprints, potentially because it generally has a high number of containers which can hold lots of items; so there’s a higher chance of a Blueprint spawning in each container. In my experience, the best Blueprint farming spots on Blue Gate are Pilgrim’s Peak, Raider’s Refuge, the Ancient Fort, and the Underground Complex beneath the Warehouse .
All of these areas contain a wealth of containers to loot. Raider’s Refuge has less to loot, but the majority of the containers in and around the Refuge are raider containers, which have a high chance of containing Blueprints - particularly during major events.
Stella Montis
On the whole, Stella Montis seems to have a very low drop rate for Blueprints (though a high chance of dropping other high-tier loot). If you do want to try farming Blueprints on this map, the best places to find Blueprints in Stella Montis are Medical Research, Assembly Workshop, and the Business Center . These areas have the highest density of containers to loot on the map.
In addition to this, the Western Tunnel has a few different Security Lockers to loot, so while there’s very little to loot elsewhere in this area of the map, it’s worth hitting those Security Lockers if you spawn there at the start of a match.
That wraps up this primer on how to get all the Blueprints in Arc Raiders as quickly as possible. With the Expedition system constantly resetting a large number of players’ Blueprints, it’s more important than ever to have the most up-to-date information on where to find all these Blueprints.
While you’re here, be sure to check out our Arc Raiders best guns tier list , as well as our primers on the best skills to unlock and all the different Field Depot locations on every map.


ARC Raiders
PS5 , Xbox Series X/S , PC
Rock Paper Shotgun is better when you sign in
Sign in and join us on our journey to discover strange and compelling PC games.
