All Star Wars Outlaws Experts: Locations and abilities
Here are all Expert locations needed to learn new skills in Star Wars Outlaws

Image credit:Rock Paper Shotgun/Ubisoft

Looking for all Star Wars Outlaws Expert locations? There are a total of 9 Experts in Star Wars Outlaws who are special individuals that can teach Kay Vess new skills or improve existing ones like ‘Slicing’ (hacking into terminals) using blasters, upgrading the Speeder and more.
To locate these Experts (accessible via the ‘Abilities’ tab in the main menu), you’ll need to pick up hints and gather intel from various sources. If you’re eager to upgrade Kay’s skills as quickly as possible we have listed all the Star Wars Outlaws Expert locations below, plus a full rundown of how to recruit them and all their skill abilities.
All Star Wars Outlaws Expert locations and abilities
There are a total of 9 Experts in Star Wars Outlaws. Here are all Expert names, locations and the skills they offer once unlocked. We also have a walkthrough on how to find each expert below in a rough recommended order.
| Expert | Location | Skills |
|---|---|---|
| The Bartender | Canto Bight | Cantina Brawling: Kay can perform melee attacks. Lockpicking: Unlocks the lockpicking minigame. Fast-Talk: Kay can distract alerted enemies for a short time. Keep Talking: Broadens the range of the Fast-Talk ability. Armored Undershirt: Increases Kay’s maximum health. I Know Someone: Unlocks the ability to fulfill personal requests for merchants. |
| The Mechanic | Toshara | Speed Boost: Unlocks the Speeder boost engine. Speeder Jump: Allows the ability to perform a short jump with the Speeder. Treasure Hunter: Highlights nearby containers via Nix vision. Smoke Bomb: Unlocks the ability to use Smoke Bombs for greater stealth. Scoundrel’s Pouch: Increase the amount of Bacta Vials and grenades Kay can carry by one. Outlaws’ Pouch: Increases Bacta Vial and grenade carry capacity by one more. (Requires Scoundrel’s Pouch). |
| The Slicer | Toshara | Slicing Kit: Unlcoks the ability to hack into things without terminals. Sneak Shot: Sneak attacks with the blaster deals extra damage. Concussive Smoke: Upgrades regular Smoke Bombs. Leaves enemies staggered for 2 seconds. Sneaky Trap: Allows Nix to trap alarm panels and stun enemies that trigger them. Lightfooted: Reduces the noise Kay makes while walking and sprinting. It also halves the enemy detection distance. Slice Kit Upgrade: Increases the amount of energy for the Slicing Kit by two. |
| The Mercenary | Kijimi | Can I Try That? Kay can now use high tier Imperial weaponry. I Like This Thing: Increases the pickup weapon ammunition by 25%. Feelers Out: Doubles the distance Nix can detect and enemies. Sharpshooting: Increases the adrenaline generated by headshots. Loop Maneuver: Unlocks the ability to perform a 180 degree turn in the Trailblazer. Top Roll Maneuver: Unlocks the ability to perform a 360 degree roll in the Trailblazer. |
| The Gunslinger | Tatooine | Adrenaline Rush Mastery: Increases the maximum number of targets in Adrenaline Rush by two and lets Kay mark objects. Powered Recharge: Provides a small amount of adrenaline after performing a perfect cooling. Speeder Shot: Adrenaline Rush will automatically target enemies while using the Speeder. Resilient: Increases Kay’s maximum health by one. The More: Adds one more target to Adrenaline Rush. The Better: Kay can mark elite enemies twice in Adrenaline Rush for an instant kill. |
| The Hotfixer | Tatooine | Laser Turret: Repairs the Trailblazer’s turret. Improved Grenade: Increases the radius and damage of grenades by 50%. Enhanced Bacta Injector: Increases the health gained from using Bacta Vials. Magnetic Dice: Unlocks a new cheating mechanic in Sabacc during the Imposter phase. Cheeky Explosion: Unlocks a new Nix command. He can now trigger grenades attached to guards. M’Gasha: Decreases merchant prices and increases sell prices by 10%. |
| The Scavenger | Akiva | Hydorepulsor: Allows the Speeder to cross water. Electro-Shock Prod: Allows Kay to perform takedowns on ‘Elite’ enemies. Ion Smoke Bomb: Smoke Bombs can now deal ion damage which temporarily disables devices and disrupts droids. Assisted Scavenging: Nix will occasionally find extra materials and valuables when looting. Scavenger’s Footwear: Increases Kay’s movement speed when crouching. Survivor: Increases Kay’s maximum health by one. |
| The High Roller | Akiva | Plan A: Allows Kay to double draw in Sabacc. Plan B: Provides the materials needed to craft the Heavy Blaster Module. Roll Maneuver: Unlocks a strafing dodge for the Trailblazer. Shoot First: The blaster will deal extra damage when first drawn in combat. Ask Later: Any hip-fire shot will grant adrenaline for a small amount of time when first drawn in combat. Just Improvise: Gain adrenaline after a Fast-Talk or arrest sequence. |
| The Veteran | Akiva | Decryption Module Allows Kay to decrypt Separatist Datadiscs. Improvise: Increases Kay’s maximum health by one. Adapt: Increases health restored by Bacta Vials. Overcome: Can regenerate at an increased speed after suffering explosive damage. Nix Commando: Nix will attack one more enemy when commanded. Slice Kit Upgrade: Increases Slice Kit energy by two. |
The Bartender location

You’ll get access to the ‘Bartender’ Expert first in Star Wars Outlaws. |Image credit:Rock Paper Shotgun/Ubisoft
Starting with an easy one, you’ll meet ‘The Bartender’ almost straight away when beginning Star Wars Outlaws. The Bartender is Bram , owner of the local bar in Canto Bight, Cantonica .
Bram specialises in melee skills . I recommend unlocking these as soon as possible in your playthrough. In particular, the ‘Fast-Talk’ skill can allow you to distract enemies for a short period of time when caught sneaking, earning you a chance to act before alarms are sounded. The ‘I Know Someone’ skill is also a great one to keep an eye on, and you can unlock it pretty quickly once you discover the world of Toshara.
This skill allows you to fulfil personal requests for merchants, earning you more credits and building your reputation as you go.
The Mechanic location
Speeder upgrades will vastly improve your on-world traversal experience. |Image credit:Rock Paper Shotgun/Ubisoft
The Mechanic specialises in Speeder upgrades . To find out their location, you must follow these steps:
- Progress through the main story until you finish the ‘Underworld’ and ‘New Tricks’ quests. This will take you to Jaunta’s Hope, where Danka will reveal that there is both a ‘mechanic’ and ‘slicer’ expert on Toshara.
- Speak to the bartender at Jaunta’s Hope. They will reveal that someone who knows The Mechanic (named Selo ) is located in a windfishing settlement called Kadua.
- Travel to Kadua at the far west of Mirogana Valley, outside of Mirogana city.
- Speak to the two mechanics in the area and they will direct you to a cliff northeast of Jaunta’s Hope where Selo has set up shop.
- Once you reach Selo she will give you the coordinates for a wind farm west of the Boulder Forest. Travel there to steal the component she needs to upgrade the Speeder.
How to get the Speeder component
- Once you’ve reached the coordinates, place the magnetic disruptors on the terminal outside and run into the vent.
- Follow the passage around until you get to a large drop, the trick here is to use your Speeder to make the jump down (you can call your Speeder to you with the Y key on PC).
- Once you enter the industrial chamber with twin fans, send Nix to press the button beyond the barrier, which will then lower it.
- Travel through the vent into another fan room. Run past the fans on the walkway when they temporarily stop.
- Drop down a level, then use the stun setting on your Blaster to shoot the power node in front of you.
- Climb across the yellow fan grates and piping on the wall until you’re at the next walkway.
- Climb up the yellow pipe to the right, then make your way towards the fan - timing it so you don’t get hit when it turns on.
- Jump down two consecutive pipe holes, then squeeze through the opening.
- Wait until the walls recede then walk across the walkway to the next set of fans.
- Shoot two more power nodes then grapple across to the next section.
- Make your way across more piping and watch out for more bursting walls.
- You’ll need to climb up the pipes beyond this walkway and then use these protruding walls as platforms to hop across.
- Once done, make your way up to the next vent.
- Extract the accelerator from the main computer, then grapple your way out to the large fans which are now immobile.
- Return to Selo, she will upgrade your Speeder with a speed boost and you’ll be able to unlock more skills from her via the ‘Abilities’ menu.
The Slicer location
Completing the quest to recruit Aila will get you a new and improvedSlicing Kit.Image credit:Rock Paper Shotgun/Ubisoft
As with The Mechanic above, to start the quest to find The Slicer you must first make decent progress through the main questline. Once you complete the ‘Underworld’ and ’ New Tricks ’ quests and gather the smugger’s cache for Danka near Jaunta’s Hope, she will tell you about the two Experts. To find the location of The Slicer you must follow these steps:
- Travel to the map marker indicated by Danka, inside Makal’s Gambling Parlor in Mirogana.
- The two people who have the intel are by one of the exits, lean on the bar to overhear their conversation.
- This will give you the name of The Slicer - Aila Bren - and her contact’s location on the landing bay in the Crimson Dawn district of Mirogana.
- You’ll be able to enter the district freely if you have a good reputation with the syndicate. Pass through the beaded archway guarded by two soldiers via the kitchen to the north of the market district in Mirogana.
- Otherwise, you’ll have to sneak in via the vent located around the corner, in the red steamy maintenance room (this will take you to the kitchen storeroom).
- Inside the district you’ll need to make your way to the landing pad to speak to the contact. This area is restricted so you’ll need to sneak to the centre but once there, you should be able to speak to him without alerting the guards.
- Upon speaking to him and Aila, she will give you coordinates and ask you to bring her an Imperial Code Sequencer.
- Travel to the coordinates within the northwest of the Southern Falls region on Toshara. Be careful if you’re wanted as it is within Galactic Empire boundaries.
- The Code Sequencer is on a technician. You’ll need to steal it from them using Nix. The person you’re looking for is in a grey uniform and can be tagged using the binoculars feature.
- Once you have it, travel to Aila’s coordinates. She will be located within the same region but further to the southeast.
- Make your way to the parking garage within the compound - there is a route via the nearby cliff to the right of the main entrance which will take you over the top of the compound.
- Once inside, speak to Aila and exit via the vent to her left, install the sequencer onto the turret on the roof.
- Make your way to the main tower, taking advantage of the now distracted Stormtroopers.
- Within the tower, access the main computer then escape the compound.
- Meet Aila’s contact at Makal’s back at Mirogana.
Now you’ll be able to unlock more of The Slicer’s skills such as smoke bombs, quieter running when sneaking, sneak shots and more. You’ll also be able to hack or ‘slice’ with devices without terminals now.
The Mercenary location

It’s worth recruiting The Mercenary for the ‘Loop Maneuver’ skill that allows better movement with the Trailblazer in space. |Image credit:Rock Paper Shotgun/Ubisoft
To find ‘The Mercenary’ you need to complete ’ The Wreck ’ main quest and thus unlock Hyperspace travel. Then, travel to Kijimi and follow these steps:
- Travel northwest from the Kijimi Spaceport to the Domak Refectory bar.
- Speak to the bartender here, who will direct you to someone called ‘Rooster’ who is an Expert in big guns.
- Speak to Rooster, who is sitting at a table opposite the jukebox. It seems the Empire blew up her ship and she had to drop her guns.
- Now, head back to the Trailblazer and set a route for outside the Kijimi Orbit.
- Travel south within the asteroid field to Pilot’s End.
- As you advance, head towards the centre of the asteroid belt and interact with the floating yellow crate.
- The beacon within will signal that the weapons are on the move and are somewhere on Tatooine.
- Use the Hyperdrive to travel to Tatooine.
- Once landed, travel to the map marker in the South Jundland Wastes to meet Rooster.
- Speak to Rooster who plans on blowing up the convoy transporting her guns.
- Pick up the Z-6 Rotary Cannon and shoot anywhere in the distance.
- Shoot the Stormtroopers on the convoy.
- Defeat the reinforcements.
- Speak to Rooster to complete the quest.
The Gunslinger location
Consider The Gunslinger if you want to improve your Adrenaline ability. |Image credit:Rock Paper Shotgun/Ubisoft
The Gunslinger quest becomes available after you complete ’ The Heavy ’ main questline on Tatooine . After this, ND-5 will inform Kay that the bartender in the Mos Eisley Cantina may have intel. From the bar, follow these steps:
- Speak to the bartender, who directs you to Shepp who is standing near the band in the same room.
- Shepp informs you that the fastest gunslinger in Mos Eisley may be a pirate that used to run with the Hutt Cartel, she directs you to them (in the southern hills) for more information.
- Travel to the map marker in the Hutt Cartel Storehouse (northwest of Wayfar).
- Once you’re at the base, pick up the datapad in the southern building. The datapad will be inside, to the right of the doorway.
- It transpires that the gunslinger you’re after is Quint, the sheriff from Wayfar.
- Traver to Wayfar and speak to Quint. She will be in the cells to the east.
- Do some target practice with Quint.
- Follow Quint to the barricades.
- Defend Wayfar by shooting the Hutts.
- Run to the Water Station and shoot the incoming enemies there.
- Once they’re all gone speak to Quint.
- Go into adrenaline mode, mark Urda and his gang, then shoot to complete the quest.
The Hotfixer location

if you enjoy Sabacc, The Hotfixer’s ‘Magnetic Dice’ skill is worth picking up for a new cheating mechanic. |Image credit:Rock Paper Shotgun/Ubisoft
The Hotfixer quest also starts in Tatooine . You’ll need to complete the ‘Partners’ and ’ Jabba’s Favour ’ main quests to unlock the intel for this quest from ND-5. Once you have completed these, follow these steps to unlock The Hotfixer Expert:
- Travel to the quest marker in Mos Eisley (Scavenger’s Draw).
- Speak to one of the workers in the area, who will direct you to the Jawas. No one else will risk the job with the Empire’s presence on Tatooine.
- Travel to the map marker located within the Bestine Junkyard west of the Desert Valley.
- Speak to the green-robed Technician working on the vehicle. She’ll direct you to the last location where the Jawa’s caravan was spotted.
- Travel to this marker, located in the South Jundland Wastes.
- Once you’re at the map marker, follow the higher path and continue upwards on the Speeder. The Jawa Sandcrawler will be above.
- Speak to the Jawa working on the droid. She will agree to install the turret if you give her a Sarlaac Tooth.
- Travel to the Sarlaac Pit map marker in the Western Dune Sea.
- At the map marker, head towards the cluster of rocks where the pirates are waiting.
- Defeat the pirates and enter the pit, which is also the Sarlaac’s mouth.
- Shimmy through the crack in the wall next to the crate.
- Continue along the path and over the grapple point.
- As you near a dead end, use your blaster (ion mode) to shoot the rocks out of the way.
- Drop down below and pick up the tooth from the metal scrap.
- Climb up the yellow-pained ledges to the southwest.
- Scale up the ledges and work your way around, jumping where necessary.
- Continue west, then up more walls.
- Grapple across to the next ledge, then walk across the skiff.
- Exit the cave through the shimmy hole.
- Chase after the thief on your Speeder.
- Ignore other hostiles in the area and use your Speeder boost. The thief will lead you to a compound.
- Continue forward, enter the compound and pick up the tooth from the thief’s Speeder.
- Head back to the Jawas and give them the tooth to complete the quest.
The Scavenger location

You’ll need to recruit The Scavenger to continue with the main quest on Akiva. |Image credit:Rock Paper Shotgun/Ubisoft
To get the intel needed to start The Scavenger quest, you’ll first need to complete ’ The Droidsmith ’ main questline on Akiva . After which, Kay will be pointed in the direction of Temmin . You’ll need to recruit Temmin to unlock the ability to use the Speeder across the water and continue the main questline. As such, follow these steps:
- Head over to the Map marker in Sashin Village, east of the Karaba Foothills.
- In the centre of town, eavesdrop on the two women by the large baskets.
- Speak to them to get Temmin’s Workshop location.
- Head to the new map marker west of Mount Selasa.
- Defeat the enemies outside.
- Speak to Temmin. He will inform you that to make the hydro repulsor upgrade permanent, he will need some Durasteel Struts. He will also inform you that you can get some from a nearby ship.
- Travel to the next map marker, using your kitted-out Speeder to make the journey across the lake.
- Once you’ve travelled downstream you’ll see a raised platform. Drive across it with your Speeder and you’ll land in the central body of the lake.
- From here, travel southwest to the next island that has a Speeder ramp. Use it and the next one to get across to the island you’re looking for.
- This will lead you to a restricted area where Surat’s shuttle is.
- Get off your Speeder and make your way down and inside the little island (head towards the lights and the noise of people chatting).
- Sneak or fight your way past the thugs and enter the shimmy spot ahead.
- As the shuttle prepares for takeoff call your Speeder to you and follow it from land.
- Follow along the lake, then take the main road, ignoring the gangs as you go.
- Once you pass through a cave ahead, you’ll be instructed to stay off the water and ND-5 will mark on your map where the shuttle is headed.
- Travel to the map marker, this will lead you to a landing pad in Pyke territory.
- Sneak past the Pykes and approach the shuttle.
- Once there, loot the crate in front of it for the Durasteel Struts.
- Return to Temmin at the Myrra Spaceport to complete the quest.
The High Roller location
Now, here’s a familiar face. |Image credit:Rock Paper Shotgun/Ubisoft
As the name would suggest, the High Roller quest involves a high-stakes opponent at the Sabacc Parlor in Myrra, Akiva . To get the location of the parlor and recruit the High Roller Expert on Akiva, follow these steps:
- Travel to The Alcazar bar in Myrra City.
- Right of the main doorway, by the tables on the raised platform, are two people. Eavesdrop on their conversation to reveal more about the parlor’s location.
- Head back outside and continue toward the new map marker (Satrap’s Promenade).
- Walk inside the bar with red lights outside.
- Go through the door near the jukebox.
- Head downstairs and either try bribing or using your contacts to get past the bouncer.
- Once inside, watch the cutscene.
- Head back to the Trailblazer and set a course for Kijimi.
- At Kijimi, head towards the Crimson Dawn card table in their district. You will have to sneak into the district if you have a ‘poor’ reputation with the gang, but regardless of your reputation, you won’t be hassled once you’re inside the cardroom.
- Win the Sabacc game to get Lando’s Token back for him.
- Return to the Trailblazer and travel to Akiva’s orbit.
- Shoot or outfly the Imperial troops.
- Land on Akiva.
- Meet Lando at the quest marker (southeast of the Karaba Foothills).
- Speak to the associate.
- Help defeat the Imperials.
- Speak to Lando to complete the quest.
The Veteran location
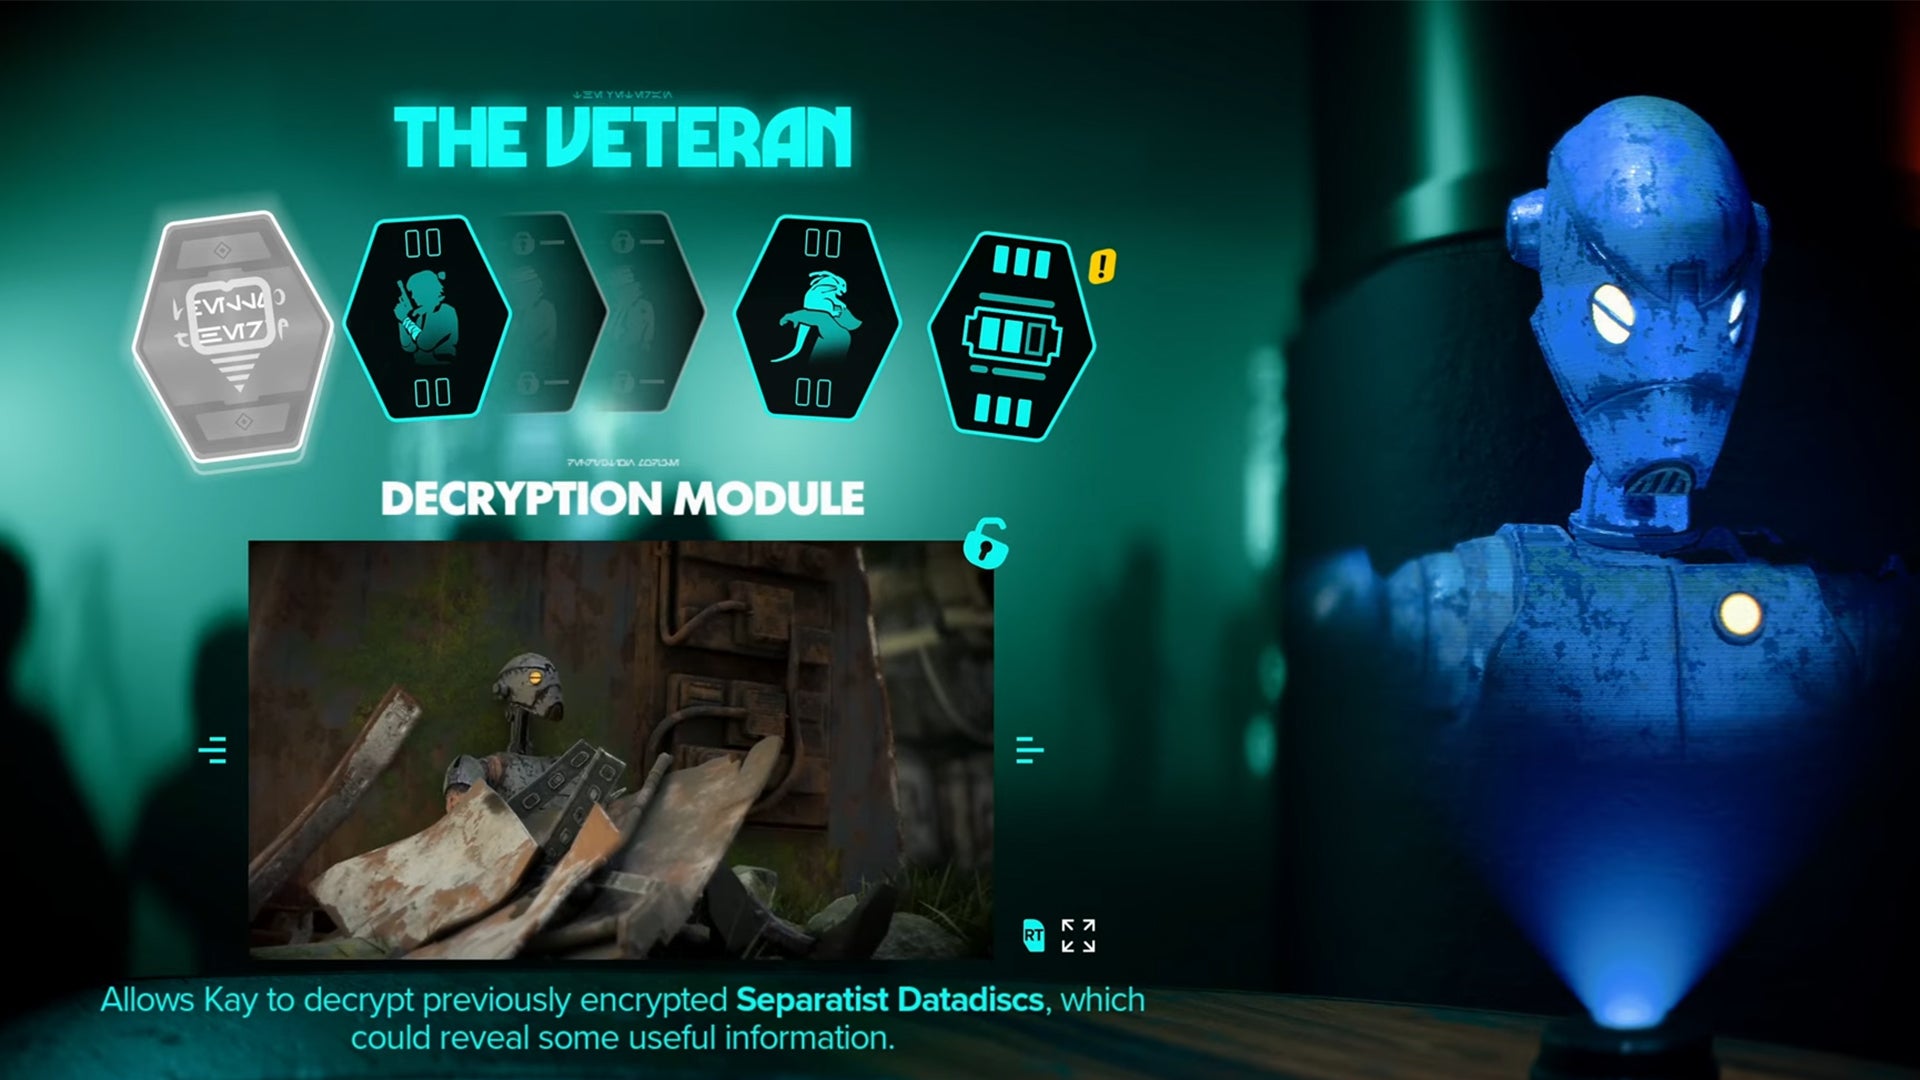
Not all yellow crates contain CIS Transmissions, some contain other loot. As a rule, always pick up any crates you see in space. |Image credit:Rock Paper Shotgun/Ubisoft
To recruit ‘The Veteran’ combat droid MT-7, you’ll need to first collect encrypted clone war data discs (called CIS Transmissions ) from the various yellow crates in space . You may have seen these yellow crates drifting in different orbits. There are many to collect, but acquiring at least five of them will unlock the next part of this quest. ND-5 will give you coordinates for a transmission signal on Akiva . After that, follow these steps to recruit The Veteran:
- Travel to the landing bay called the ‘Abandoned Hideout’ on Akiva.
- Head down the base, then on top of one of the old crates. There will be a hole in the wall to the west that you need to head towards. Use the various yellow pipes to help you.
- Once through the hole, use the stun mode on your blaster to shoot the nodule by the door.
- Looking out of the hole, shoot the second power node (attached via the yellow striped power line).
- Go through the door and pick up the datapad beyond.
- Go to the next map marker in Myrra Valley, slightly south of where you currently are.
- Once at the map marker, go through the cave.
- Continue forward and up a yellow climbing rock to the east.
- Folow the ledge around and pick up the datapad from the deactivated droid.
- Exit the cave and continue to the next map marker, south within the Karaba Foothills.
- At the marker spot, go inside the cave mouth and climb up the yellow cliff walls.
- Once above, use the grapple point to get to the next yellow wall.
- Pick up the next datapad on an outstretched droid arm.
- Grapple and work your way down.
- Head back to the Trailblazer and launch it into orbit.
- Fly to the next marker in Trapper’s Field towards the orange glowing CIS Satellite.
- Search for five jammers nearby and destroy them with the Trailblazer’s guns. The jammers look identical to the CIS Satellite.
- Defeat the pirates.
- Return to the Abandoned Hideout bay on Akiva.
- Speak to MT-7 to complete the quest.
That rounds up our guide on all Expert locations in Star Wars Outlaws. For more Star Wars Outlaws tips and tricks, check out our guide to the best Trailblazer upgrades and give your ship a fighting chance when exploring the galaxy. If you’re strapped for cash, be sure to also check out our guide to making Credits fast .
Star Wars Outlaws
PS5 , Xbox Series X/S , PC
Rock Paper Shotgun is better when you sign in
Sign in and join us on our journey to discover strange and compelling PC games.

All 75 Arc Raiders Blueprints and where to get them
These areas have the highest chance of giving you Blueprints

Image credit:Rock Paper Shotgun/Embark Studios

Looking for more Arc Raiders Blueprints? It’s a special day when you find a Blueprint, as they’re among the most valuable items in Arc Raiders. If you find a Blueprint that you haven’t already found, then you must make sure you hold onto it at all costs, because Blueprints are the key to one of the most important and powerful systems of meta-progression in the game.
This guide aims to be the very best guide on Blueprints you can find, starting with a primer on what exactly they are and how they work in Arc Raiders, before delving into exactly where to get Blueprints and the very best farming spots for you to take in your search.
We’ll also go over how to get Blueprints from other unlikely activities, such as destroying Surveyors and completing specific quests. And you’ll also find the full list of all 75 Blueprints in Arc Raiders on this page (including the newest Blueprints added with the Cold Snap update , such as the Deadline Blueprint and Firework Box Blueprint), giving you all the information you need to expand your own crafting repertoire.
In this guide:
- What are Blueprints in Arc Raiders?
- Full Blueprint list: All crafting recipes
- Where to find Blueprints in Arc Raiders Blueprints obtained from quests Blueprints obtained from Trials Best Blueprint farming locations

What are Blueprints in Arc Raiders?
Blueprints in Arc Raiders are special items which, if you manage to extract with them, you can expend to permanently unlock a new crafting recipe in your Workshop. If you manage to extract from a raid with an Anvil Blueprint, for example, you can unlock the ability to craft your very own Anvil Pistol, as many times as you like (as long as you have the crafting materials).
To use a Blueprint, simply open your Inventory while in the lobby, then right-click on the Blueprint and click “Learn And Consume” . This will permanently unlock the recipe for that item in your Workshop. As of the Stella Montis update, there are allegedly 75 different Blueprints to unlock - although only 68 are confirmed to be in the game so far. You can see all the Blueprints you’ve found and unlocked by going to the Workshop menu, and hitting “R” to bring up the Blueprint screen.
It’s possible to find duplicates of past Blueprints you’ve already unlocked. If you find these, then you can either sell them, or - if you like to play with friends - you can take it into a match and gift it to your friend so they can unlock that recipe for themselves. Another option is to keep hold of them until the time comes to donate them to the Expedition.
Full Blueprint list: All crafting recipes
Below is the full list of all the Blueprints that are currently available to find in Arc Raiders, and the crafting recipe required for each item:
| Blueprint | Type | Recipe | Crafted At |
|---|---|---|---|
| Bettina | Weapon | 3x Advanced Mechanical Components 3x Heavy Gun Parts 3x Canister | Gunsmith 3 |
| Blue Light Stick | Quick Use | 3x Chemicals | Utility Station 1 |
| Aphelion | Weapon | 3x Magnetic Accelerator 3x Complex Gun Parts 1x Matriarch Reactor | Gunsmith 3 |
| Combat Mk. 3 (Flanking) | Augment | 2x Advanced Electrical Components 3x Processor | Gear Bench 3 |
| Combat Mk. 3 (Aggressive) | Augment | 2x Advanced Electrical Components 3x Processor | Gear Bench 3 |
| Complex Gun Parts | Material | 2x Light Gun Parts 2x Medium Gun Parts 2x Heavy Gun Parts | Refiner 3 |
| Fireworks Box | Quick Use | 1x Explosive Compound 3x Pop Trigger | Explosives Station 2 |
| Gas Mine | Mine | 4x Chemicals 2x Rubber Parts | Explosives Station 1 |
| Green Light Stick | Quick Use | 3x Chemicals | Utility Station 1 |
| Pulse Mine | Mine | 1x Crude Explosives 1x Wires | Explosives Station 1 |
| Seeker Grenade | Grenade | 1x Crude Explosives 2x ARC Alloy | Explosives Station 1 |
| Looting Mk. 3 (Survivor) | Augment | 2x Advanced Electrical Components 3x Processor | Gear Bench 3 |
| Angled Grip II | Mod | 2x Mechanical Components 3x Duct Tape | Gunsmith 2 |
| Angled Grip III | Mod | 2x Mod Components 5x Duct Tape | Gunsmith 3 |
| Hullcracker | Weapon | 1x Magnetic Accelerator 3x Heavy Gun Parts 1x Exodus Modules | Gunsmith 3 |
| Launcher Ammo | Ammo | 5x Metal Parts 1x Crude Explosives | Workbench 1 |
| Anvil | Weapon | 5x Mechanical Components 5x Simple Gun Parts | Gunsmith 2 |
| Anvil Splitter | Mod | 2x Mod Components 3x Processor | Gunsmith 3 |
| ??? | ??? | ??? | ??? |
| Barricade Kit | Quick Use | 1x Mechanical Components | Utility Station 2 |
| Blaze Grenade | Grenade | 1x Explosive Compound 2x Oil | Explosives Station 3 |
| Bobcat | Weapon | 3x Advanced Mechanical Components 3x Light Gun Parts | Gunsmith 3 |
| Osprey | Weapon | 2x Advanced Mechanical Components 3x Medium Gun Parts 7x Wires | Gunsmith 3 |
| Burletta | Weapon | 3x Mechanical Components 3x Simple Gun Parts | Gunsmith 1 |
| Compensator II | Mod | 2x Mechanical Components 4x Wires | Gunsmith 2 |
| Compensator III | Mod | 2x Mod Components 8x Wires | Gunsmith 3 |
| Defibrillator | Quick Use | 9x Plastic Parts 1x Moss | Medical Lab 2 |
| ??? | ??? | ??? | ??? |
| Equalizer | Weapon | 3x Magnetic Accelerator 3x Complex Gun Parts 1x Queen Reactor | Gunsmith 3 |
| Extended Barrel | Mod | 2x Mod Components 8x Wires | Gunsmith 3 |
| Extended Light Mag II | Mod | 2x Mechanical Components 3x Steel Spring | Gunsmith 2 |
| Extended Light Mag III | Mod | 2x Mod Components 5x Steel Spring | Gunsmith 3 |
| Extended Medium Mag II | Mod | 2x Mechanical Components 3x Steel Spring | Gunsmith 2 |
| Extended Medium Mag III | Mod | 2x Mod Components 5x Steel Spring | Gunsmith 3 |
| Extended Shotgun Mag II | Mod | 2x Mechanical Components 3x Steel Spring | Gunsmith 2 |
| Extended Shotgun Mag III | Mod | 2x Mod Components 5x Steel Spring | Gunsmith 3 |
| Remote Raider Flare | Quick Use | 2x Chemicals 4x Rubber Parts | Utility Station 1 |
| Heavy Gun Parts | Material | 4x Simple Gun Parts | Refiner 2 |
| Venator | Weapon | 2x Advanced Mechanical Components 3x Medium Gun Parts 5x Magnet | Gunsmith 3 |
| Il Toro | Weapon | 5x Mechanical Components 6x Simple Gun Parts | Gunsmith 1 |
| Jolt Mine | Mine | 1x Electrical Components 1x Battery | Explosives Station 2 |
| Explosive Mine | Mine | 1x Explosive Compound 1x Sensors | Explosives Station 3 |
| Jupiter | Weapon | 3x Magnetic Accelerator 3x Complex Gun Parts 1x Queen Reactor | Gunsmith 3 |
| Light Gun Parts | Material | 4x Simple Gun Parts | Refiner 2 |
| Lightweight Stock | Mod | 2x Mod Components 5x Duct Tape | Gunsmith 3 |
| Lure Grenade | Grenade | 1x Speaker Component 1x Electrical Components | Utility Station 2 |
| Medium Gun Parts | Material | 4x Simple Gun Parts | Refiner 2 |
| Torrente | Weapon | 2x Advanced Mechanical Components 3x Medium Gun Parts 6x Steel Spring | Gunsmith 3 |
| Muzzle Brake II | Mod | 2x Mechanical Components 4x Wires | Gunsmith 2 |
| Muzzle Brake III | Mod | 2x Mod Components 8x Wires | Gunsmith 3 |
| Padded Stock | Mod | 2x Mod Components 5x Duct Tape | Gunsmith 3 |
| Shotgun Choke II | Mod | 2x Mechanical Components 4x Wires | Gunsmith 2 |
| Shotgun Choke III | Mod | 2x Mod Components 8x Wires | Gunsmith 3 |
| Shotgun Silencer | Mod | 2x Mod Components 8x Wires | Gunsmith 3 |
| Showstopper | Grenade | 1x Advanced Electrical Components 1x Voltage Converter | Explosives Station 3 |
| Silencer I | Mod | 2x Mechanical Components 4x Wires | Gunsmith 2 |
| Silencer II | Mod | 2x Mod Components 8x Wires | Gunsmith 3 |
| Snap Hook | Quick Use | 2x Power Rod 3x Rope 1x Exodus Modules | Utility Station 3 |
| Stable Stock II | Mod | 2x Mechanical Components 3x Duct Tape | Gunsmith 2 |
| Stable Stock III | Mod | 2x Mod Components 5x Duct Tape | Gunsmith 3 |
| Tagging Grenade | Grenade | 1x Electrical Components 1x Sensors | Utility Station 3 |
| Tempest | Weapon | 3x Advanced Mechanical Components 3x Medium Gun Parts 3x Canister | Gunsmith 3 |
| Trigger Nade | Grenade | 2x Crude Explosives 1x Processor | Explosives Station 2 |
| Vertical Grip II | Mod | 2x Mechanical Components 3x Duct Tape | Gunsmith 2 |
| Vertical Grip III | Mod | 2x Mod Components 5x Duct Tape | Gunsmith 3 |
| Vita Shot | Quick Use | 2x Antiseptic 1x Syringe | Medical Lab 3 |
| Vita Spray | Quick Use | 3x Antiseptic 1x Canister | Medical Lab 3 |
| Vulcano | Weapon | 1x Magnetic Accelerator 3x Heavy Gun Parts 1x Exodus Modules | Gunsmith 3 |
| Wolfpack | Grenade | 2x Explosive Compound 2x Sensors | Explosives Station 3 |
| Red Light Stick | Quick Use | 3x Chemicals | Utility Station 1 |
| Smoke Grenade | Grenade | 14x Chemicals 1x Canister | Utility Station 2 |
| Deadline | Mine | 3x Explosive Compound 2x ARC Circuitry | Explosives Station 3 |
| Trailblazer | Grenade | 1x Explosive Compound 1x Synthesized Fuel | Explosives Station 3 |
| Tactical Mk. 3 (Defensive) | Augment | 2x Advanced Electrical Components 3x Processor | Gear Bench 3 |
| Tactical Mk. 3 (Healing) | Augment | 2x Advanced Electrical Components 3x Processor | Gear Bench 3 |
| Yellow Light Stick | Quick Use | 3x Chemicals | Utility Station 1 |
Note: The missing Blueprints in this list likely have not actually been added to the game at the time of writing, because none of the playerbase has managed to find any of them. As they are added to the game, I will update this page with the most relevant information so you know exactly how to get all 75 Arc Raiders Blueprints.
Where to find Blueprints in Arc Raiders
Below is a list of all containers, modifiers, and events which maximise your chances of finding Blueprints:
- Certain quests reward you with specific Blueprints .
- Completing Trials has a high chance of offering Blueprints as rewards.
- Surveyors have a decent chance of dropping Blueprints on death.
- High loot value areas tend to have a greater chance of spawning Blueprints.
- Night Raids and Storms may increase rare Blueprint spawn chances in containers.
- Containers with higher numbers of items may have a higher tendency to spawn Blueprints. As a result, Blue Gate (which has many “large” containers containing multiple items) may give you a higher chance of spawning Blueprints.
- Raider containers (Raider Caches, Weapon Boxes, Medical Bags, Grenade Tubes) have increased Blueprint drop rates. As a result, the Uncovered Caches event gives you a high chance of finding Blueprints.
- Security Lockers have a higher than average chance of containing Blueprints.
- Certain Blueprints only seem to spawn under specific circumstances: Tempest Blueprint only spawns during Night Raid events. Vulcano Blueprint only spawns during Hidden Bunker events. Jupiter and Equaliser Blueprints only spawn during Harvester events.

Raider Caches, Weapon Boxes, and other raider-oriented container types have a good chance of offering Blueprints. |Image credit:Rock Paper Shotgun/Embark Studios
Blueprints have a very low chance of spawning in any container in Arc Raiders, around 1-2% on average. However, there is a higher chance of finding Blueprints in particular container types. Specifically, you can find more Blueprints in Raider containers and security lockers.
Beyond this, if you’re looking for Blueprints you should focus on regions of the map which are marked as having particularly high-value loot. Areas such as the Control Tower in Dam Battlegrounds, the Arrival and Departure Buildings in Spaceport, and Pilgrim’s Peak in Blue Gate all have a better-than-average chance of spawning Blueprints somewhere amongst all their containers. Night Raids and Electromagnetic Storm events also increase the drop chances of certain Blueprints .
In addition to these containers, you can often loot Blueprints from destroyed Surveyors - the largest of the rolling ball ARC. Surveyors are more commonly found on the later maps - Spaceport and Blue Gate - and if one spawns in your match, you’ll likely see it by the blue laser beam that it casts into the sky while “surveying”.
Surveyors are quite well-armoured and will very speedily run away from you once it notices you, but if you can take one down then make sure you loot all its parts for a chance of obtaining certain unusual Blueprints.
Blueprints obtained from quests
One way in which you can get Blueprints is by completing certain quests for the vendors in Speranza. Some quests will reward you with a specific item Blueprint upon completion, so as long as you work through all the quests in Arc Raiders, you are guaranteed those Blueprints.
Here is the full list of all Blueprints you can get from quest rewards:
- Trigger Nade Blueprint: Rewarded after completing “Sparks Fly”.
- Lure Grenade Blueprint: Rewarded after completing “Greasing Her Palms”.
- Burletta Blueprint: Rewarded after completing “Industrial Espionage”.
- Hullcracker Blueprint (and Launcher Ammo Blueprint): Rewarded after completing “The Major’s Footlocker”.
Alas, that’s only 4 Blueprints out of a total of 75 to unlock, so for the vast majority you will need to find them yourself during a raid. If you’re intent on farming Blueprints, then it’s best to equip yourself with cheap gear in case you lose it, but don’t use a free loadout because then you won’t get a safe pocket to stash any new Blueprint you find. No pain in Arc Raiders is sharper than failing to extract with a new Blueprint you’ve been after for a dozen hours already.

One of the best ways to get Blueprints is by hitting three stars on all five Trials every week. |Image credit:Rock Paper Shotgun/Embark Studios
Blueprints obtained from Trials
One of the very best ways to get Blueprints is as rewards for completing Trials in Arc Raiders. Trials are unlocked from Level 15 onwards, and allow you to earn rewards by focusing on certain tasks over the course of several raids. For example, one Trial might task you with dealing damage to Hornets, while another might challenge you to loot Supply Drops.
Trials refresh on a weekly basis, with a new week bringing five new Trials. Each Trial can offer up to three rewards after passing certain score milestones, and it’s possible to receive very high level loot from these reward crates - including Blueprints. So if you want to unlock as many Blueprints as possible, you should make a point of completing as many Trials as possible each week.
Best Blueprint farming locations
The very best way to get Blueprints is to frequent specific areas of the maps which combine high-tier loot pools with the right types of containers to search. Here are my recommendations for where to find Blueprints on every map, so you can always keep the search going for new crafting recipes to unlock.

Image credit:Rock Paper Shotgun/Embark Studios
Dam Battlegrounds
The best places to farm Blueprints on Dam Battlegrounds are the Control Tower, Power Generation Complex, Ruby Residence, and Pale Apartments . The first two regions, despite only being marked on the map as mid-tier loot, contain a phenomenal number of containers to loot. The Control Tower can also contain a couple of high-tier Security Lockers - though of course, you’ll need to have unlocked the Security Breach skill at the end of the Survival tree.
There’s also a lot of reporting amongst the playerbase that the Residential areas in the top-left of the map - Pale Apartments and Ruby Residence - give you a comparatively strong chance of finding Blueprints. Considering their size, there’s a high density of containers to loot in both locations, and they also have the benefit of being fairly out of the way. So you’re more likely to have all the containers to yourself.
Buried City
The best Blueprint farming locations on Buried City are the Santa Maria Houses, Grandioso Apartments, Town Hall, and the various buildings of the New District . Grandioso Apartments has a lower number of containers than the rest, but a high chance of spawning weapon cases - which have good Blueprint drop rates. The others are high-tier loot areas, with plenty of lootable containers - including Security Lockers.
Spaceport
The best places to find Blueprints on Spaceport are the Arrival and Departure Buildings, as well as Control Tower A6 and the Launch Towers . All these areas are labelled as high-value loot regions, and many of them are also very handily connected to one another by the Spaceport wall, which you can use to quickly run from one area to the next. At the tops of most of these buildings you’ll find at least one Security Locker, so this is an excellent farming route for players looking to find Blueprints.
The downside to looting Blueprints on Spaceport is that all these areas are hotly contested, particularly in Duos and Squads. You’ll need to be very focused and fast in order to complete the full farming route.

Image credit:Rock Paper Shotgun/Embark Studios
Blue Gate
Blue Gate tends to have a good chance of dropping Blueprints, potentially because it generally has a high number of containers which can hold lots of items; so there’s a higher chance of a Blueprint spawning in each container. In my experience, the best Blueprint farming spots on Blue Gate are Pilgrim’s Peak, Raider’s Refuge, the Ancient Fort, and the Underground Complex beneath the Warehouse .
All of these areas contain a wealth of containers to loot. Raider’s Refuge has less to loot, but the majority of the containers in and around the Refuge are raider containers, which have a high chance of containing Blueprints - particularly during major events.
Stella Montis
On the whole, Stella Montis seems to have a very low drop rate for Blueprints (though a high chance of dropping other high-tier loot). If you do want to try farming Blueprints on this map, the best places to find Blueprints in Stella Montis are Medical Research, Assembly Workshop, and the Business Center . These areas have the highest density of containers to loot on the map.
In addition to this, the Western Tunnel has a few different Security Lockers to loot, so while there’s very little to loot elsewhere in this area of the map, it’s worth hitting those Security Lockers if you spawn there at the start of a match.
That wraps up this primer on how to get all the Blueprints in Arc Raiders as quickly as possible. With the Expedition system constantly resetting a large number of players’ Blueprints, it’s more important than ever to have the most up-to-date information on where to find all these Blueprints.
While you’re here, be sure to check out our Arc Raiders best guns tier list , as well as our primers on the best skills to unlock and all the different Field Depot locations on every map.

ARC Raiders
PS5 , Xbox Series X/S , PC
Rock Paper Shotgun is better when you sign in
Sign in and join us on our journey to discover strange and compelling PC games.
