All Sphinx riddle solutions in Dragon’s Dogma 2
Here are all ten Sphinx riddle solutions in Dragon’s Dogma 2

Image credit:Rock Paper Shotgun/Capcom.

Looking for the solutions to all Sphinx riddles in Dragon’s Dogma 2? The Sphinx is an enigmatic beast that, true to her presence in Greek Mythology, will offer the Arisen ten riddles that they must solve for prizes in Dragon’s Dogma 2 .
These riddles are challenging but offer great rewards. In particular, the Eternal Wakestone (that can revive several NPC in an area and offer a good solution to a Dragonsplague attack) and the Unmaking Arrow which will instantly kill all but the toughest of foes.
Join us as we go through each riddle solution, where to find the Sphinx, and all ‘A Game of Wits’ rewards.

This highlight reel shows off all the incredible adventures awaiting the new Arisen of Dragon’s Dogma 2.Watch on YouTube
In this guide:
- Things to take with you before starting the quest
- Where to find the Sphinx (first location)
- The Riddle of Eyes
- The Riddle of Madness
- The Riddle of Wisdom
- The Riddle of Conviction
- The Riddle of Rumination
- Where to find the Sphinx (second location)
- The Riddle of Differentiation
- The Riddle of Futility
- The Riddle of Recollection
- The Riddle of Contest
- How to defeat the Sphinx
Things to take with you before starting the quest
There are a total of ten Sphinx riddles in Dragon’s Dogma 2 , some of which will require specific items. We’ve listed these to save you some time and make fulfilling the riddles a little easier.
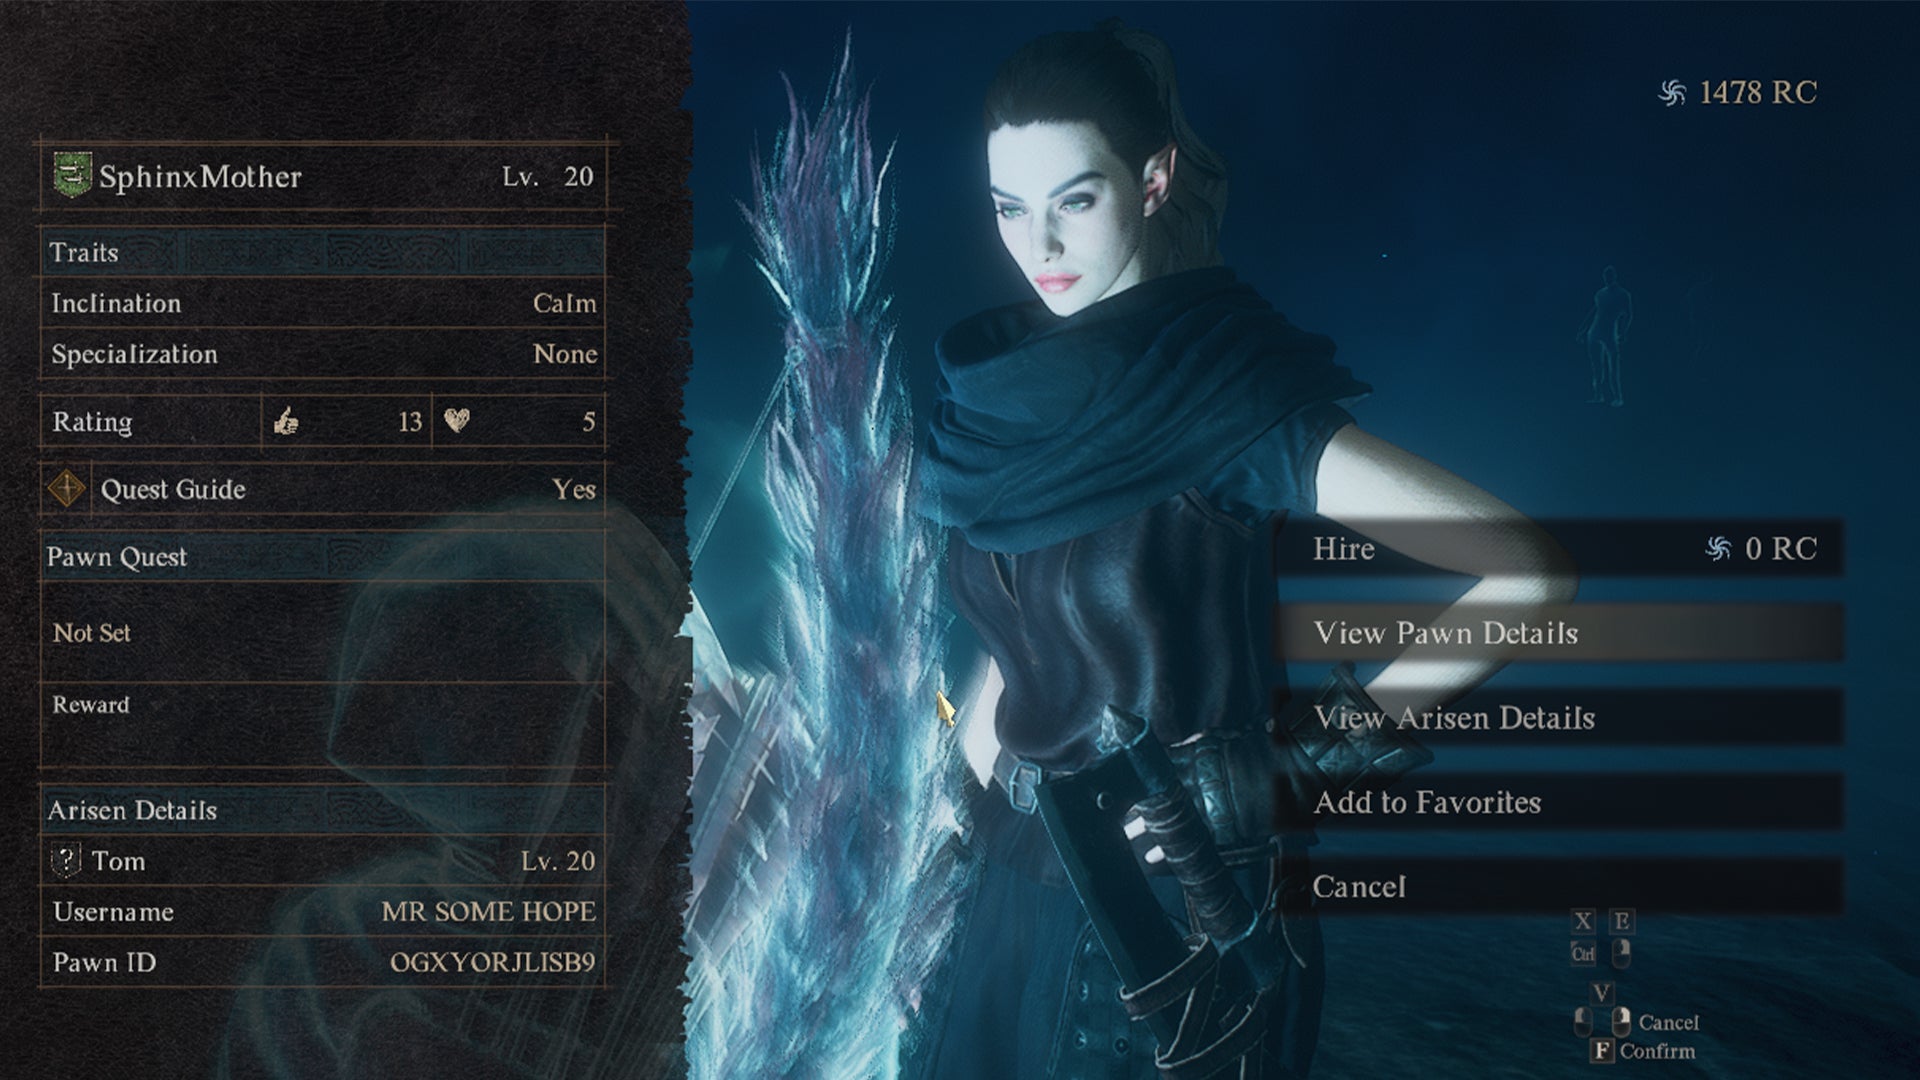
You can select ‘View Pawn Details’ before hiring them to check their Moniker. |Image credit:Rock Paper Shotgun/Capcom.
We recommend bringing the following items before starting ‘A Game of Wits’:
- Several Ferrystones, at least 5.
- At least one Portcrystal.
- A Pawn with ‘SphinxMother’, ‘SphinxFather’ or ‘SphinxParent’ as their Moniker. The easiest way to recruit such a Pawn is by visiting a Riftstone of Fellowship. There is one such Riftstone south of Scared Arbor and another north of Checkpoint Rest town. See our Riftstone locations guide for specific map markers. Make sure their Moniker, not just their name is set to this.
- Have the Archer or Magick Archer vocation equipped for riddles 7-10.
- Remember the location of the first Seeker Token you ever picked up. If you don’t remember, there is a handy mod that will pinpoint the area on your map for you.
- A Camping Kit for the journey.
Where to find the Sphinx (first location)
To start the ‘A Game of Wits’ quest, you’ll need to first locate the Sphinx. She is located at the Mountain Shrine in western Vermund, past the Misty Marshes .

The Abandoned Home is a good starting point when setting out to find the Sphinx. |Image credit:Rock Paper Shotgun/Capcom.
To get there, go through the Misty Marshes. The area will obscure your map view but as a rule of thumb, travel inwards to the centre of the Marshes until you reach the ’ Abandoned Home ’ marked on the map above.
Here, there will be an abandoned village filled with undead as well as a Riftstone, campsite, and a Ferrystone stashed in a chest within one of the homes. There are also several Seeker’s Tokens and another Ferrystone within a chest along the surrounding cliffs if you feel like exploring.
Clear the area of enemies and rest if needed. Then travel directly north, past the campfire until you hit a cliff edge. Climb the cliff until the air clears and you see a large opening between two cliffs.

When the mist starts to clear from the cliff, you’ll know you’re going in the right diection.
Now you’ll be on the Guerco Mountain Road. Follow this road left and upwards towards the Mountain Shrine until you see a clearing with a campsite and pillars in the distance. There will be several harpies in the area so take care as you advance towards the next campsite we’ve marked on the map.
From this campsite, walk towards the pillars - this is the Mountain Shrine. Remember to leave a Portcrystal here so you can travel to and fro as needed. As you advance towards the Sphinx, agree to its game of wits. Don’t attack it now, or you won’t be able to unlock the chests.
The Riddle of Eyes
Although you can technically ask for the riddles in any order, we’ve listed them in the order they appeared for us. The first of the Sphinx’s riddles in Dragon’s Dogma 2 is the Riddle of Eyes .
During this riddle, you will be tasked to ‘Venture through yonder door, and retrieve that which is of greatest value.’
In essence, you must go through the door to the left of the shrine steps and retrieve the Sealing Phial . Although you can explore the full ruins and gain loot from the various Goblins, Hobgoblins and Ogre patrolling the area, the chest you’re looking for is actually right above the entrance .

The chest containing the Sealing Vial is above the ruins entrance. |Image credit:Rock Paper Shotgun/Capcom.
Climb up to the platform using the stones to the left of the doorway and loot the chest for the phial.
The reward for this completed riddle is a Wakestone . Plus, you’ll get to keep the Sealing Phial which is a one-use item that can capture NPCs . When released from the vial, it will break.
The Riddle of Madness
For this riddle, the Sphinx in Dragon’s Dogma 2 requests that you ‘bring forth your most beloved to me, that I might gauge the depth of your insanity.’
The solution is to bring an NPC or Pawn that you have a high affinity with and place them on the pedestal in front of the Sphinx.

Your Main Pawn will usually be a great candidate for this riddle. |Image credit:Rock Paper Shotgun/Capcom.
Players have reported that the easiest way to complete this riddle is to bring your Main Pawn , whom you should have a fairly high affinity with if you’ve been adventuring for a while, (as long as they haven’t died too many times). See our guide to raising your Main Pawn’s affinity if you’re not sure you have a good relationship or not.
You can also transport an NPC to the shrine if you use the Sealing Phial on them or if you pick them up and then use a Ferrystone to travel to the Portcrystal you placed there. You can tell if you have reached max affinity with a Pawn or NPC if they have blushing cheeks when speaking to you.
The reward for this riddle is a Portcrystal .
The Riddle of Wisdom

There are usually plenty of Sphinx Parent Pawns in the Rift thanks to helpful players. |Image credit:Rock Paper Shotgun/Capcom.
The parameters for the Riddle of Wisdom are ‘I am a lost child; for kinship do I yearn. So bring to me my “Parent”, that I might better learn.
The trick for this riddle is to present the Sphinx with a Pawn that has the ‘SphinxParent’ Moniker . Or, either the ‘SphinxMother’ or ‘SphinxFather’ Moniker. You can recruit such Pawns at a Grand Riftstone or a Riftstone of Fellowship (detailed within our Riftstone locations guide).
The reward for this riddle is 1,200 RC (Rift Crystals).
The Riddle of Conviction

Don’t let the Sphinx scare you. Whichever item you sacrifice, you’ll get it back plus one extra. |Image credit:Rock Paper Shotgun/Capcom.
The Riddle of Conviction in Dragon’s Dogma 2 is: ‘Grant to me what you most prize, and thence elude your ponderous demise.’ In short, the Sphinx will ask you to sacrifice a prized possession to solve the riddle.
This is something of a trick, however, as you won’t lose the item despite the game telling you that you will several times. This is to test your conviction. Feel free to give something valuable like a Portcrystal or Wakestone - you’ll soon get it back plus you’ll get an extra one as a reward.
We gave the Sphinx a Portcrystal and got two back for our efforts. After all, it’s a rare but extremely useful method of fast travel in the game.
The Riddle of Rumination
The Riddle of Rumination is the 5th given by the Sphinx in Dragon’s Dogma 2 and tasks you with revisiting the location where you picked up your first Seeker’s Token . In its place will be a Finder’s Token , which you must pick up and bring back to the Sphinx within 7 in-game days .
There are several Seeker Tokens on the path from the Borderwatch Outpost to Melve (listed below). One of them will usually be the player’s first token, as it is the first major journey your Arisen will undertake from the opening cutscene. If you can’t remember where your first was, we recommend checking one of these locations.
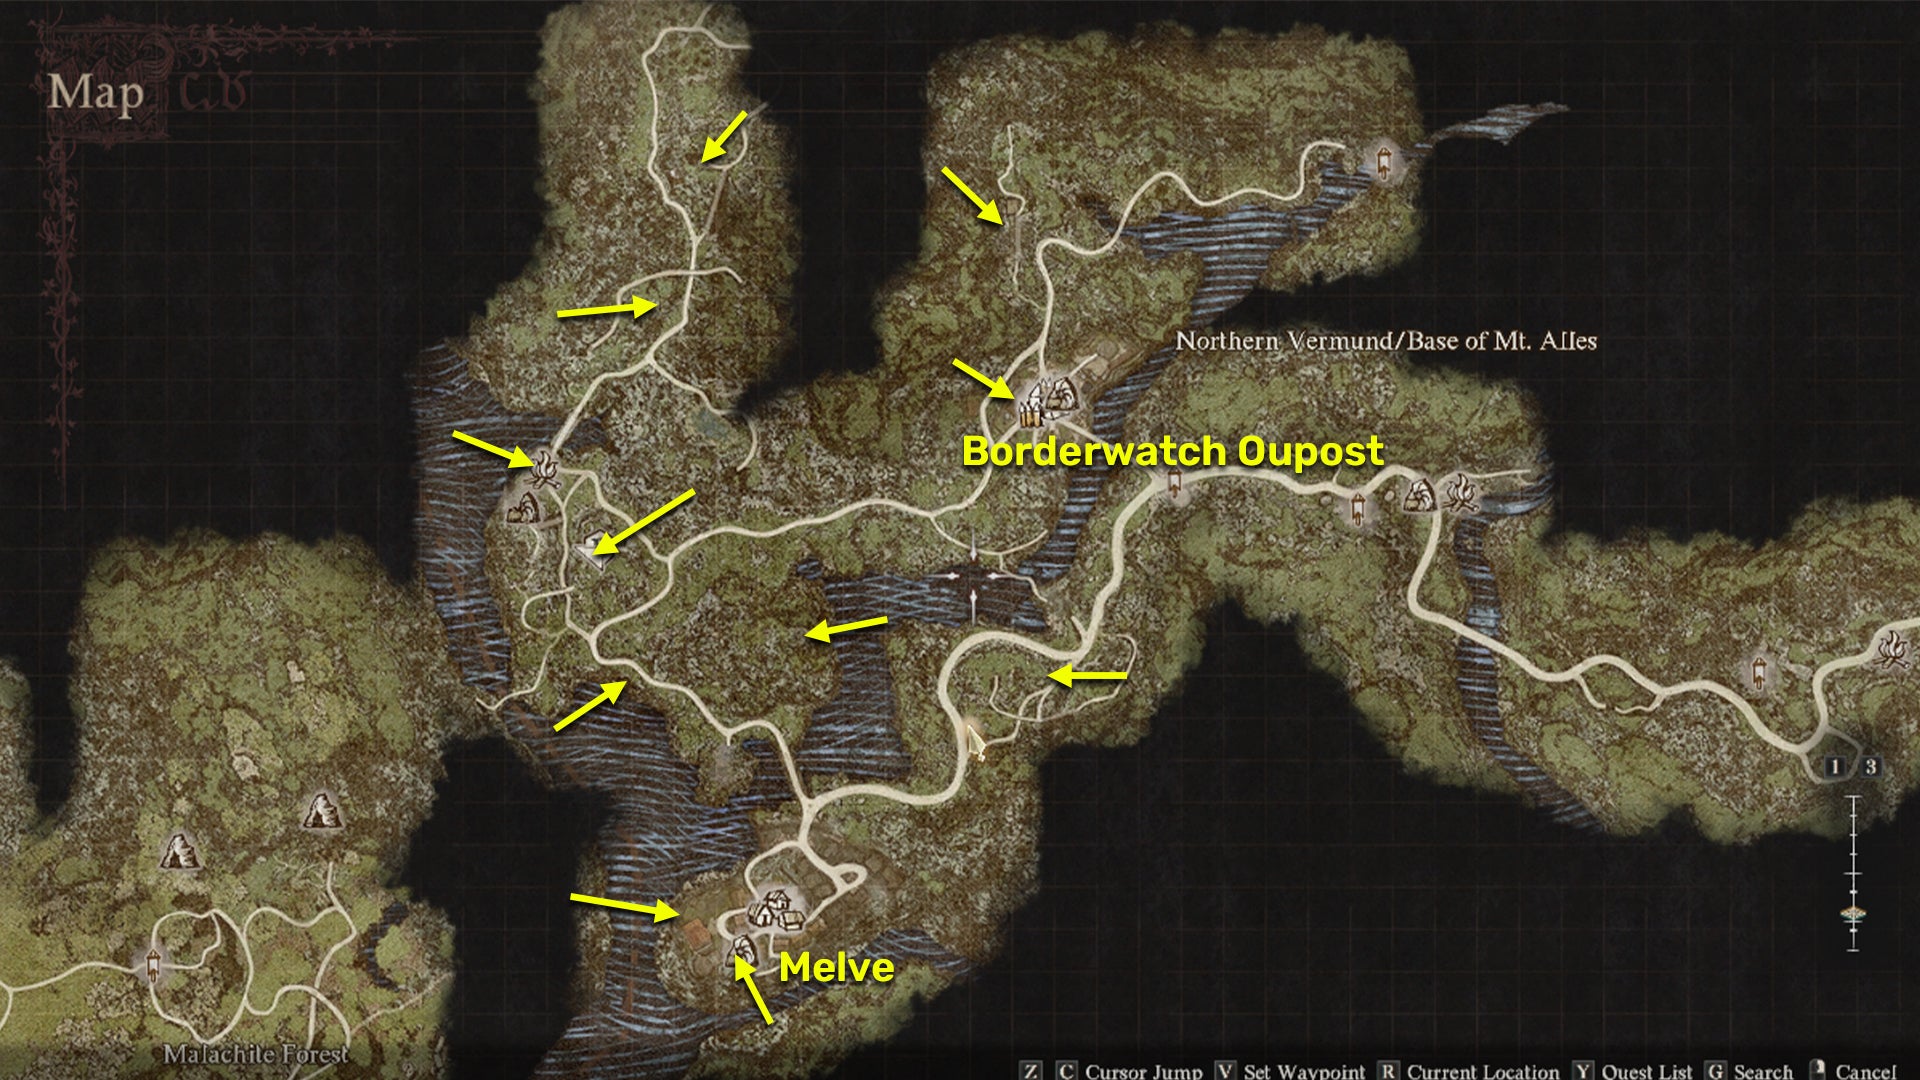
These are all the Seeker’s Tokens from the Borderwatch Outpost to Melve. |Image credit:Rock Paper Shotgun/Capcom.
There is also a handy mod called the ’ Riddle of Rumination Marker ’ which will mark on your map where the Finder’s Token is.
Once you bring the Finder’s Token back to the Sphinx, your reward will be 3 Ferrystones .
Remember to pick up your Portcrystal before handing in the Finder’s Token as the Sphinx will change location after this.
Where to find the Sphinx (second location)
After solving the 5th riddle in Dragon’s Dogma 2, the Sphinx will fly off to a second location. You’ll have to travel here to get the next five riddles and the ultimate prize.
You can try to grab ahold of her back as she flies away to travel there with her. Or, if you missed this moment, see below for the second Sphinx map location.
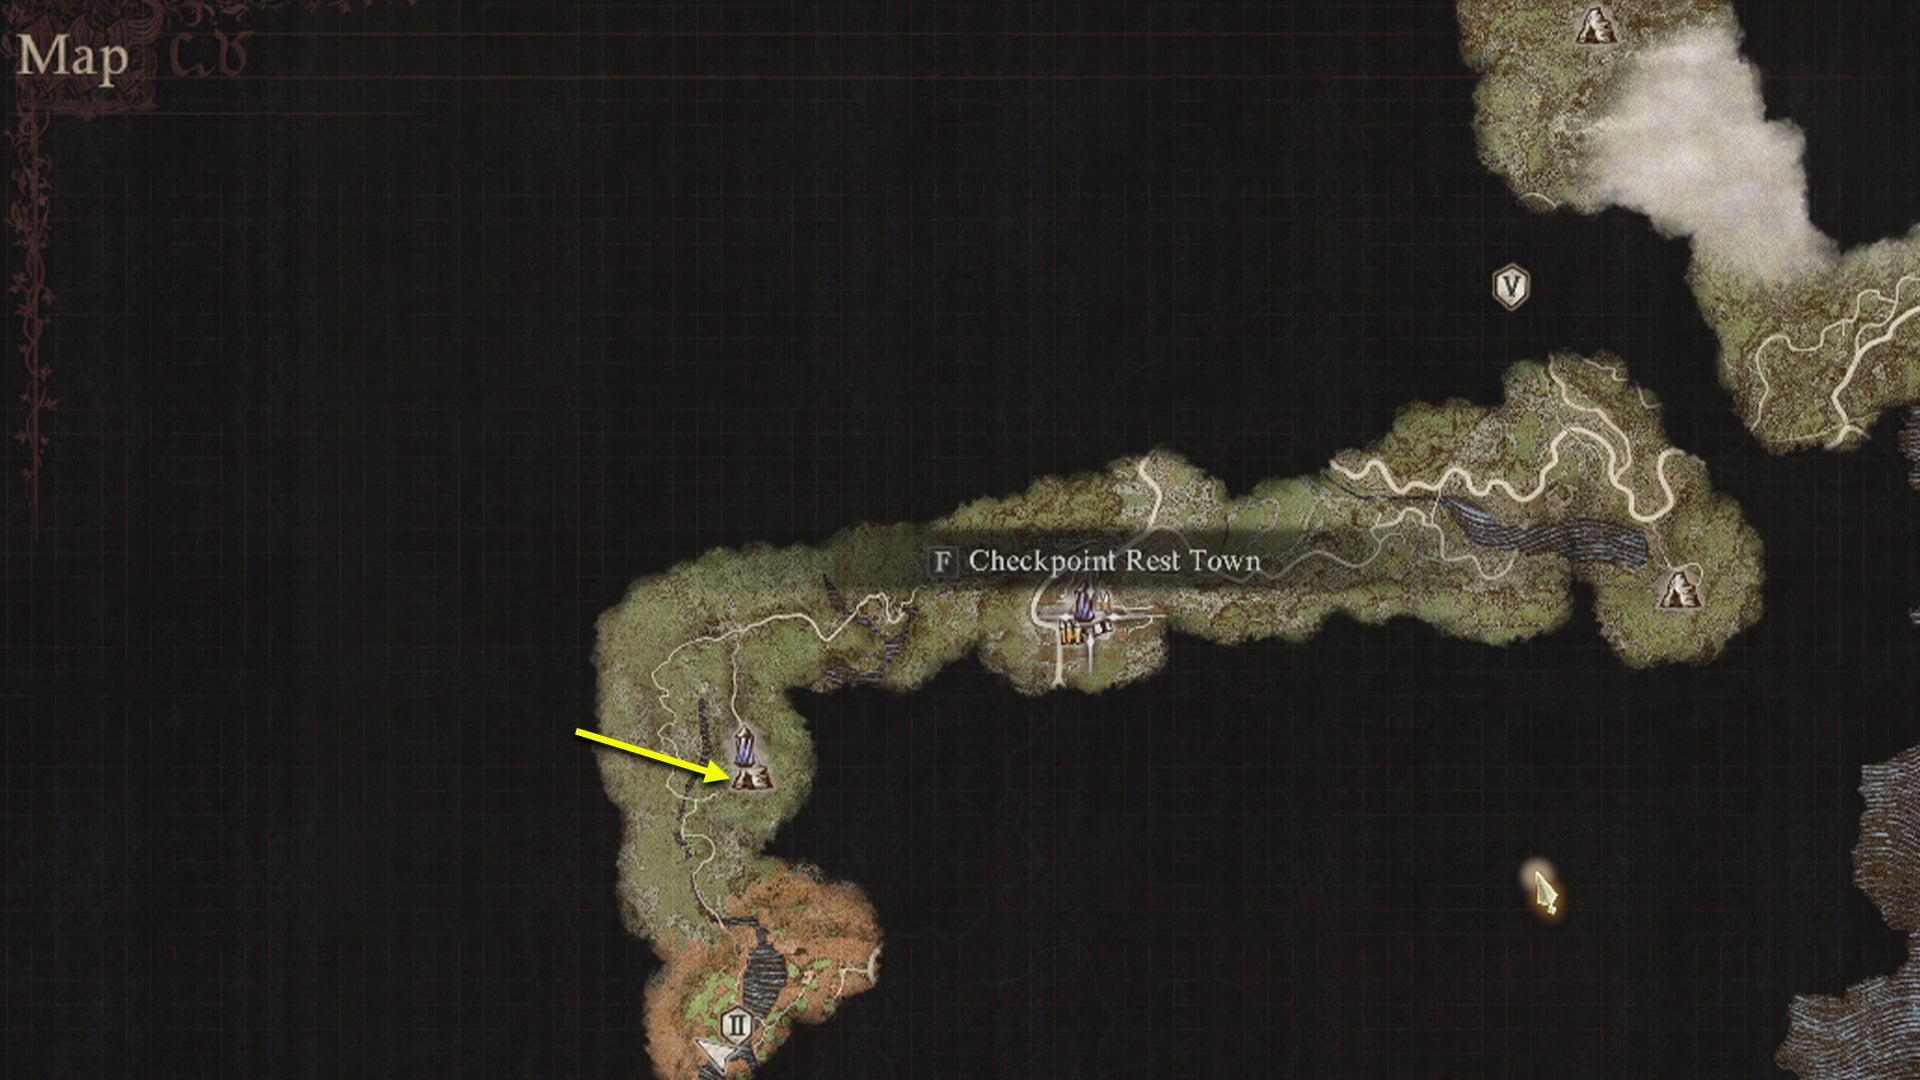
If you haven’t unlocked travel to Battahl yet, we have a secret way listed below. |Image credit:Rock Paper Shotgun/Capcom.
The Sphinx will be located at the Frontier Shrine , accessible via Checkpoint Rest Town . Follow these steps to find the Sphinx at her second home (and also for a secret way into Battahl if you haven’t gained access to the region yet):
- From Checkpoint Rest Town, climb underneath the main bridge into the town.
- Follow the river directly west until it leads to a cave.
- Go through the cave and watch out for Saurians.
- Within the cave, climb on top of the rocks on the right side to get to the upper ledge .
- Continue and walk across the fallen tree bridge.
- Climb upwards and go across a wooden bridge.
- Continue the path around and through a shallow cave opening.
- Now, head south towards a large pillar , blocking the route forward.
- You can shoot the barrels next to the pillar to clear the way forward - be careful of a patroling Chimera in the area.
- From the large pillar, continue south down the winding path.
- Go past more broken pillars and Sphinx statues until you enter a large open area where the Sphinx is waiting.
- Place a Portcrystal here for ease of access.
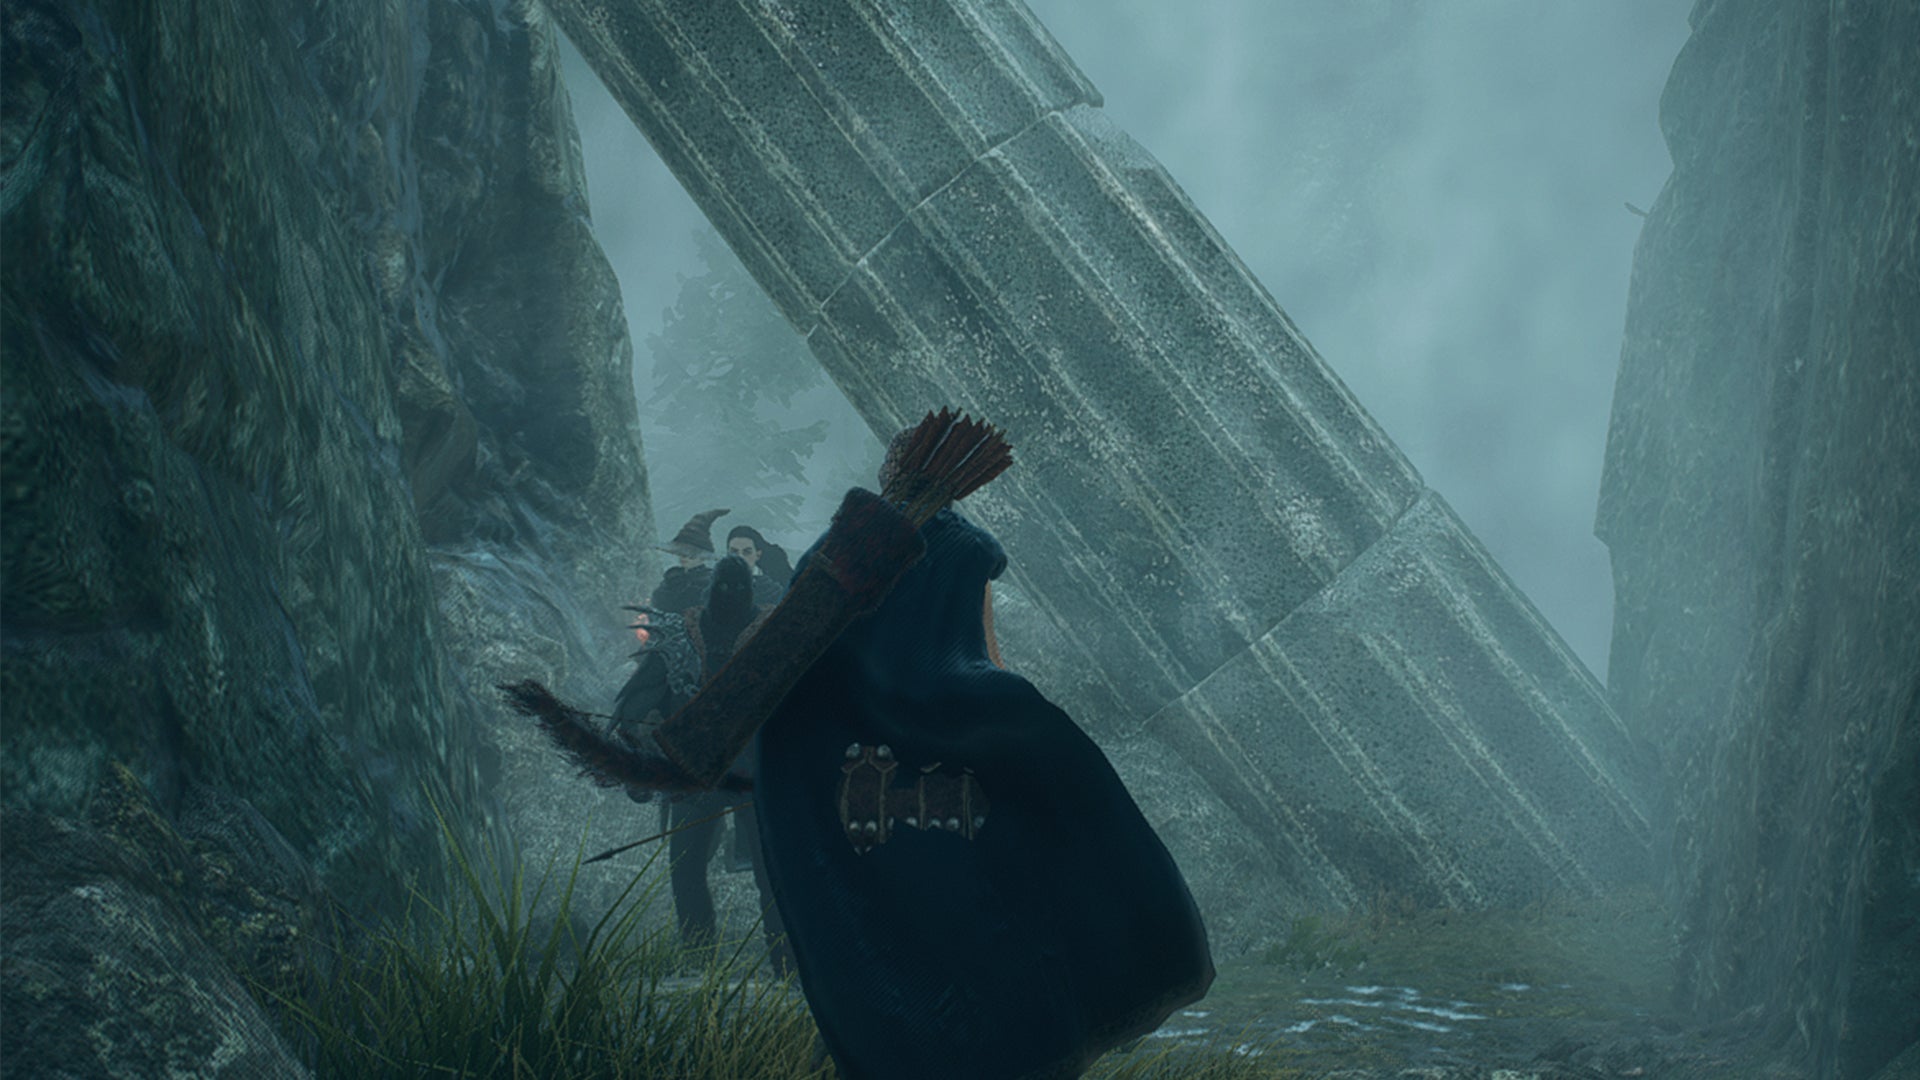
If in doubt, follow the Grecian architecture. |Image credit:Rock Paper Shotgun/Capcom.
Finding the Sphinx again will solve the ‘Riddle of Reunion’ and reward you with 100,000 gold .
The Riddle of Differentiation
You may receive the next 5 riddles in any order but we’ve listed them in the order we completed them. Note that the 6th riddle, the ‘Riddle of Reunion’, will be completed upon finding the Sphinx’s second location.
The Riddle of Differentiation requires you to find and bring a specific NPC to the Sphinx. You can do so by carrying them and travelling with a Ferrystone or by using the Sealing Phial from Riddle One.
The trick is that there are two NPCs of a very similar appearance. You must bring the right one to the Sphinx. She will show you a hologram of the one she wishes.

Dante and Vergil live on opposite sides of Checkpoint Rest Town. |Image credit:Rock Paper Shotgun/Capcom.
You’ll either have to bring her Dante or Vergil . Dante is located on the Vermund side of Checkpoint Rest Town and Vergil is located on the Battahl side of the town.
The main difference between the two is hair texture, length and which way their fringes sit. Dante has slightly shorter, straight hair with a fringe across his left eye whereas Vergil has longer, wavy hair with a fringe across his right eye .
When you have collected the correct brother, place them before the Sphinx and collect the Whimsical Daydream - a weapon designed for the Trickster Vocation .
The Riddle of Futility
The journey from the Frontier Shrine to Bakbattahl is fraught with danger. |Image credit:Rock Paper Shotgun/Capcom.
This next riddle in Dragon’s Dogma 2 is a bit tricky. The Sphinx will task you with delivering a fragile amphora to Ser Maurits in Bakbattahl. The trick is, it will break fairly easily before you get there. As such, we suggest bringing Ser Maurits to the shrine instead.
You’ll usually find him loitering next to the Mural Byway in northern Bakbattahl. Either pick him up and travel with a Ferrystone or use the Sealing Phial to teleport him to the Shrine. Then present him with the amphora.
As a reward, you’ll receive the Eternal Bond ring which can increase the wearer’s ability to raise affinity or can be given as a gift to get a big lump sum of affinity with a chosen NPC.
The Riddle of Recollection
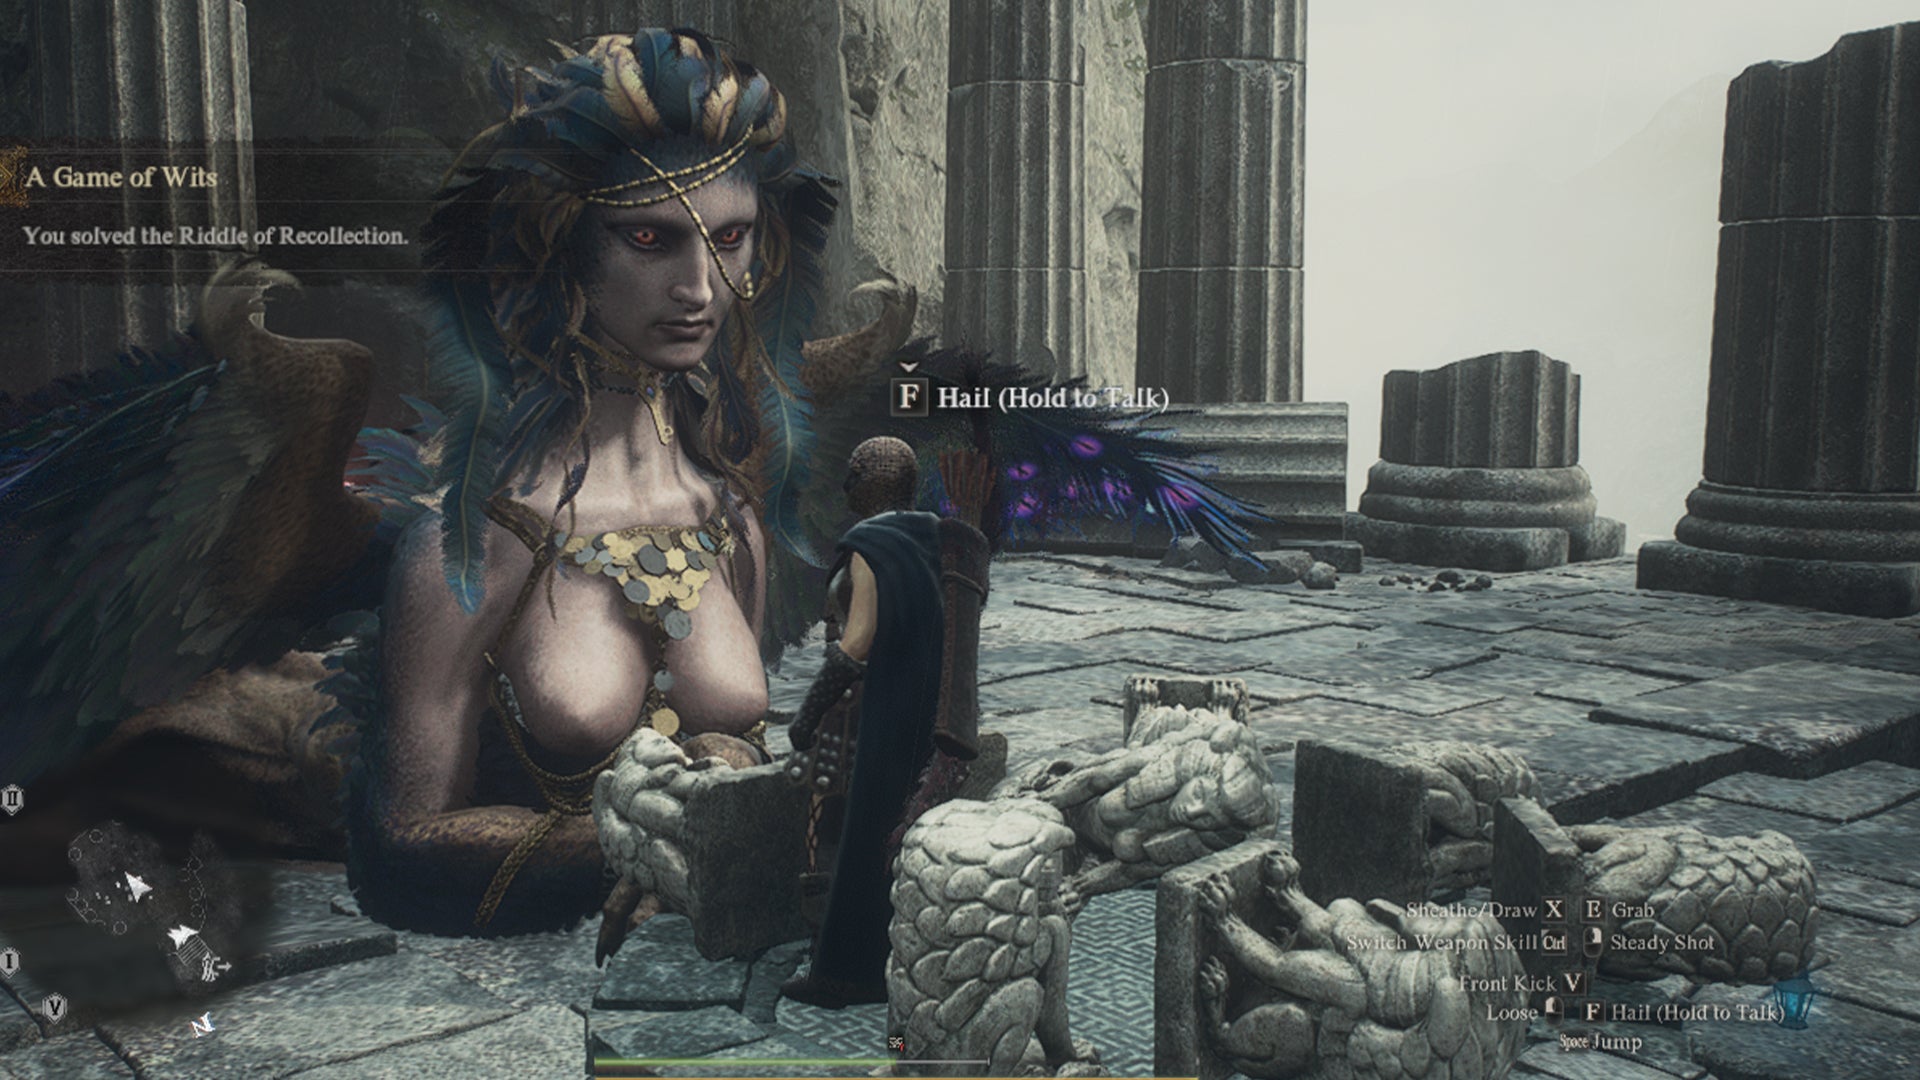
The trickiest part of this riddle is getting all of the statues to fit on the plinth. |Image credit:Rock Paper Shotgun/Capcom.
This time, the Sphinx will ask you a relatively straightforward question - how many riddles have you answered thus far? Remember to include the Riddle of Reunion (solved upon reuniting with the Sphinx).
An easy way to remember is to count the chests that no longer have a pink seal behind the Sphinx and add 5 (from the previous set of riddles). Once you have the number, carry the same amount of statues and put them onto the plinth in front of the Sphinx. The statues are to the right of her.
Upon completing the Riddle of Recollection, you’ll be granted the Unmaking Arrow . This is a powerful arrow capable of one-shot killing most enemies.
The Riddle of Contest
Now, the Sphinx wants to test your mettle in combat by conjuring up a foe for you to kill. You must, however, wear the Ring of Derision when doing so. This will weaken all of your attacks.
Of course, you can slowly whittle away at your enemy’s health bar or, if you’d rather save yourself some time, you can try to daze your opponent and then pick them up and throw them off a high ledge. Another option is to lead them from the arena and allow your Pawns to whale on him.

Consider dropping your foe from a high ledge for an easy win. |Image credit:Rock Paper Shotgun/Capcom.
Once you’ve killed your opponent, you may want to use a Ferrystone to rest somewhere before gearing up to fight the Sphinx herself. Also, remember to take off the Ring of Derision!
Speak to the Sphinx for your tenth reward, which should be a Ring of Ambition (this boosts the experience gained from defeating foes). She will then bid you farewell. You’ll need to engage her in combat fairly quickly to get the key for the last and largest chest.
How to defeat the Sphinx
If you’re after the last and greatest riddle reward in Dragon’s Dogma 2, you’ll need to defeat the Sphinx in battle.
As you finish up your last riddle, the Sphinx will start to fly away. Make sure you attack her first to initiate combat.
The Sphinx has powerful magick attacks that can release elemental AOEs and teleport her across the arena. Make sure you have a mage on hand to heal the party or plenty of Roborant.
Many players have simply used the Unmaking Arrow to finish her off. The optimal time to do so is when she is at half health as this will instantly kill her.
You cannot use the arrow until you have whittled her down by at least one of her health bars. When ready, go into your inventory and select the option to equip it. Of course, you can only wield the weapon if you have one of the Archer vocations active.

The Sphinx is a formidable foe but can be defeated by normal means if you’d rather save your Unmaking Arrow for a different fight. |Image credit:Rock Paper Shotgun/Capcom.
Use the arrow wisely as it is a one-use item and the game will immediately save upon use, meaning you only have one shot to do it and cannot reload a past save.
Once defeated, she will drop several bags of gold and the Key of Sagacity . Use this to open the largest chest and you’ll receive an Eternal Wakestone for your efforts.
Despite the name, this particular Wakestone is also a one-use item but can revive many NPCs at once, in a radius. This means you can save it for the unlucky occasion of a Dragonsplague attack wiping out a village.
Before leaving, remember to retrieve your Portcrystal .
That rounds off our guide to competing all Sphinx riddles in Dragon’s Dogma 2. For more Dragon’s Dogma 2 tips and tricks , see our guides for making the perfect Sorcerer build , Mystic Spearhand build , Fighter build and more.


Dragon’s Dogma 2
PS5 , Xbox Series X/S , PC
Rock Paper Shotgun is better when you sign in
Sign in and join us on our journey to discover strange and compelling PC games.

All 75 Arc Raiders Blueprints and where to get them
These areas have the highest chance of giving you Blueprints

Image credit:Rock Paper Shotgun/Embark Studios

Looking for more Arc Raiders Blueprints? It’s a special day when you find a Blueprint, as they’re among the most valuable items in Arc Raiders. If you find a Blueprint that you haven’t already found, then you must make sure you hold onto it at all costs, because Blueprints are the key to one of the most important and powerful systems of meta-progression in the game.
This guide aims to be the very best guide on Blueprints you can find, starting with a primer on what exactly they are and how they work in Arc Raiders, before delving into exactly where to get Blueprints and the very best farming spots for you to take in your search.
We’ll also go over how to get Blueprints from other unlikely activities, such as destroying Surveyors and completing specific quests. And you’ll also find the full list of all 75 Blueprints in Arc Raiders on this page (including the newest Blueprints added with the Cold Snap update , such as the Deadline Blueprint and Firework Box Blueprint), giving you all the information you need to expand your own crafting repertoire.
In this guide:
- What are Blueprints in Arc Raiders?
- Full Blueprint list: All crafting recipes
- Where to find Blueprints in Arc Raiders Blueprints obtained from quests Blueprints obtained from Trials Best Blueprint farming locations

What are Blueprints in Arc Raiders?
Blueprints in Arc Raiders are special items which, if you manage to extract with them, you can expend to permanently unlock a new crafting recipe in your Workshop. If you manage to extract from a raid with an Anvil Blueprint, for example, you can unlock the ability to craft your very own Anvil Pistol, as many times as you like (as long as you have the crafting materials).
To use a Blueprint, simply open your Inventory while in the lobby, then right-click on the Blueprint and click “Learn And Consume” . This will permanently unlock the recipe for that item in your Workshop. As of the Stella Montis update, there are allegedly 75 different Blueprints to unlock - although only 68 are confirmed to be in the game so far. You can see all the Blueprints you’ve found and unlocked by going to the Workshop menu, and hitting “R” to bring up the Blueprint screen.
It’s possible to find duplicates of past Blueprints you’ve already unlocked. If you find these, then you can either sell them, or - if you like to play with friends - you can take it into a match and gift it to your friend so they can unlock that recipe for themselves. Another option is to keep hold of them until the time comes to donate them to the Expedition.
Full Blueprint list: All crafting recipes
Below is the full list of all the Blueprints that are currently available to find in Arc Raiders, and the crafting recipe required for each item:
| Blueprint | Type | Recipe | Crafted At |
|---|---|---|---|
| Bettina | Weapon | 3x Advanced Mechanical Components 3x Heavy Gun Parts 3x Canister | Gunsmith 3 |
| Blue Light Stick | Quick Use | 3x Chemicals | Utility Station 1 |
| Aphelion | Weapon | 3x Magnetic Accelerator 3x Complex Gun Parts 1x Matriarch Reactor | Gunsmith 3 |
| Combat Mk. 3 (Flanking) | Augment | 2x Advanced Electrical Components 3x Processor | Gear Bench 3 |
| Combat Mk. 3 (Aggressive) | Augment | 2x Advanced Electrical Components 3x Processor | Gear Bench 3 |
| Complex Gun Parts | Material | 2x Light Gun Parts 2x Medium Gun Parts 2x Heavy Gun Parts | Refiner 3 |
| Fireworks Box | Quick Use | 1x Explosive Compound 3x Pop Trigger | Explosives Station 2 |
| Gas Mine | Mine | 4x Chemicals 2x Rubber Parts | Explosives Station 1 |
| Green Light Stick | Quick Use | 3x Chemicals | Utility Station 1 |
| Pulse Mine | Mine | 1x Crude Explosives 1x Wires | Explosives Station 1 |
| Seeker Grenade | Grenade | 1x Crude Explosives 2x ARC Alloy | Explosives Station 1 |
| Looting Mk. 3 (Survivor) | Augment | 2x Advanced Electrical Components 3x Processor | Gear Bench 3 |
| Angled Grip II | Mod | 2x Mechanical Components 3x Duct Tape | Gunsmith 2 |
| Angled Grip III | Mod | 2x Mod Components 5x Duct Tape | Gunsmith 3 |
| Hullcracker | Weapon | 1x Magnetic Accelerator 3x Heavy Gun Parts 1x Exodus Modules | Gunsmith 3 |
| Launcher Ammo | Ammo | 5x Metal Parts 1x Crude Explosives | Workbench 1 |
| Anvil | Weapon | 5x Mechanical Components 5x Simple Gun Parts | Gunsmith 2 |
| Anvil Splitter | Mod | 2x Mod Components 3x Processor | Gunsmith 3 |
| ??? | ??? | ??? | ??? |
| Barricade Kit | Quick Use | 1x Mechanical Components | Utility Station 2 |
| Blaze Grenade | Grenade | 1x Explosive Compound 2x Oil | Explosives Station 3 |
| Bobcat | Weapon | 3x Advanced Mechanical Components 3x Light Gun Parts | Gunsmith 3 |
| Osprey | Weapon | 2x Advanced Mechanical Components 3x Medium Gun Parts 7x Wires | Gunsmith 3 |
| Burletta | Weapon | 3x Mechanical Components 3x Simple Gun Parts | Gunsmith 1 |
| Compensator II | Mod | 2x Mechanical Components 4x Wires | Gunsmith 2 |
| Compensator III | Mod | 2x Mod Components 8x Wires | Gunsmith 3 |
| Defibrillator | Quick Use | 9x Plastic Parts 1x Moss | Medical Lab 2 |
| ??? | ??? | ??? | ??? |
| Equalizer | Weapon | 3x Magnetic Accelerator 3x Complex Gun Parts 1x Queen Reactor | Gunsmith 3 |
| Extended Barrel | Mod | 2x Mod Components 8x Wires | Gunsmith 3 |
| Extended Light Mag II | Mod | 2x Mechanical Components 3x Steel Spring | Gunsmith 2 |
| Extended Light Mag III | Mod | 2x Mod Components 5x Steel Spring | Gunsmith 3 |
| Extended Medium Mag II | Mod | 2x Mechanical Components 3x Steel Spring | Gunsmith 2 |
| Extended Medium Mag III | Mod | 2x Mod Components 5x Steel Spring | Gunsmith 3 |
| Extended Shotgun Mag II | Mod | 2x Mechanical Components 3x Steel Spring | Gunsmith 2 |
| Extended Shotgun Mag III | Mod | 2x Mod Components 5x Steel Spring | Gunsmith 3 |
| Remote Raider Flare | Quick Use | 2x Chemicals 4x Rubber Parts | Utility Station 1 |
| Heavy Gun Parts | Material | 4x Simple Gun Parts | Refiner 2 |
| Venator | Weapon | 2x Advanced Mechanical Components 3x Medium Gun Parts 5x Magnet | Gunsmith 3 |
| Il Toro | Weapon | 5x Mechanical Components 6x Simple Gun Parts | Gunsmith 1 |
| Jolt Mine | Mine | 1x Electrical Components 1x Battery | Explosives Station 2 |
| Explosive Mine | Mine | 1x Explosive Compound 1x Sensors | Explosives Station 3 |
| Jupiter | Weapon | 3x Magnetic Accelerator 3x Complex Gun Parts 1x Queen Reactor | Gunsmith 3 |
| Light Gun Parts | Material | 4x Simple Gun Parts | Refiner 2 |
| Lightweight Stock | Mod | 2x Mod Components 5x Duct Tape | Gunsmith 3 |
| Lure Grenade | Grenade | 1x Speaker Component 1x Electrical Components | Utility Station 2 |
| Medium Gun Parts | Material | 4x Simple Gun Parts | Refiner 2 |
| Torrente | Weapon | 2x Advanced Mechanical Components 3x Medium Gun Parts 6x Steel Spring | Gunsmith 3 |
| Muzzle Brake II | Mod | 2x Mechanical Components 4x Wires | Gunsmith 2 |
| Muzzle Brake III | Mod | 2x Mod Components 8x Wires | Gunsmith 3 |
| Padded Stock | Mod | 2x Mod Components 5x Duct Tape | Gunsmith 3 |
| Shotgun Choke II | Mod | 2x Mechanical Components 4x Wires | Gunsmith 2 |
| Shotgun Choke III | Mod | 2x Mod Components 8x Wires | Gunsmith 3 |
| Shotgun Silencer | Mod | 2x Mod Components 8x Wires | Gunsmith 3 |
| Showstopper | Grenade | 1x Advanced Electrical Components 1x Voltage Converter | Explosives Station 3 |
| Silencer I | Mod | 2x Mechanical Components 4x Wires | Gunsmith 2 |
| Silencer II | Mod | 2x Mod Components 8x Wires | Gunsmith 3 |
| Snap Hook | Quick Use | 2x Power Rod 3x Rope 1x Exodus Modules | Utility Station 3 |
| Stable Stock II | Mod | 2x Mechanical Components 3x Duct Tape | Gunsmith 2 |
| Stable Stock III | Mod | 2x Mod Components 5x Duct Tape | Gunsmith 3 |
| Tagging Grenade | Grenade | 1x Electrical Components 1x Sensors | Utility Station 3 |
| Tempest | Weapon | 3x Advanced Mechanical Components 3x Medium Gun Parts 3x Canister | Gunsmith 3 |
| Trigger Nade | Grenade | 2x Crude Explosives 1x Processor | Explosives Station 2 |
| Vertical Grip II | Mod | 2x Mechanical Components 3x Duct Tape | Gunsmith 2 |
| Vertical Grip III | Mod | 2x Mod Components 5x Duct Tape | Gunsmith 3 |
| Vita Shot | Quick Use | 2x Antiseptic 1x Syringe | Medical Lab 3 |
| Vita Spray | Quick Use | 3x Antiseptic 1x Canister | Medical Lab 3 |
| Vulcano | Weapon | 1x Magnetic Accelerator 3x Heavy Gun Parts 1x Exodus Modules | Gunsmith 3 |
| Wolfpack | Grenade | 2x Explosive Compound 2x Sensors | Explosives Station 3 |
| Red Light Stick | Quick Use | 3x Chemicals | Utility Station 1 |
| Smoke Grenade | Grenade | 14x Chemicals 1x Canister | Utility Station 2 |
| Deadline | Mine | 3x Explosive Compound 2x ARC Circuitry | Explosives Station 3 |
| Trailblazer | Grenade | 1x Explosive Compound 1x Synthesized Fuel | Explosives Station 3 |
| Tactical Mk. 3 (Defensive) | Augment | 2x Advanced Electrical Components 3x Processor | Gear Bench 3 |
| Tactical Mk. 3 (Healing) | Augment | 2x Advanced Electrical Components 3x Processor | Gear Bench 3 |
| Yellow Light Stick | Quick Use | 3x Chemicals | Utility Station 1 |
Note: The missing Blueprints in this list likely have not actually been added to the game at the time of writing, because none of the playerbase has managed to find any of them. As they are added to the game, I will update this page with the most relevant information so you know exactly how to get all 75 Arc Raiders Blueprints.
Where to find Blueprints in Arc Raiders
Below is a list of all containers, modifiers, and events which maximise your chances of finding Blueprints:
- Certain quests reward you with specific Blueprints .
- Completing Trials has a high chance of offering Blueprints as rewards.
- Surveyors have a decent chance of dropping Blueprints on death.
- High loot value areas tend to have a greater chance of spawning Blueprints.
- Night Raids and Storms may increase rare Blueprint spawn chances in containers.
- Containers with higher numbers of items may have a higher tendency to spawn Blueprints. As a result, Blue Gate (which has many “large” containers containing multiple items) may give you a higher chance of spawning Blueprints.
- Raider containers (Raider Caches, Weapon Boxes, Medical Bags, Grenade Tubes) have increased Blueprint drop rates. As a result, the Uncovered Caches event gives you a high chance of finding Blueprints.
- Security Lockers have a higher than average chance of containing Blueprints.
- Certain Blueprints only seem to spawn under specific circumstances: Tempest Blueprint only spawns during Night Raid events. Vulcano Blueprint only spawns during Hidden Bunker events. Jupiter and Equaliser Blueprints only spawn during Harvester events.

Raider Caches, Weapon Boxes, and other raider-oriented container types have a good chance of offering Blueprints. |Image credit:Rock Paper Shotgun/Embark Studios
Blueprints have a very low chance of spawning in any container in Arc Raiders, around 1-2% on average. However, there is a higher chance of finding Blueprints in particular container types. Specifically, you can find more Blueprints in Raider containers and security lockers.
Beyond this, if you’re looking for Blueprints you should focus on regions of the map which are marked as having particularly high-value loot. Areas such as the Control Tower in Dam Battlegrounds, the Arrival and Departure Buildings in Spaceport, and Pilgrim’s Peak in Blue Gate all have a better-than-average chance of spawning Blueprints somewhere amongst all their containers. Night Raids and Electromagnetic Storm events also increase the drop chances of certain Blueprints .
In addition to these containers, you can often loot Blueprints from destroyed Surveyors - the largest of the rolling ball ARC. Surveyors are more commonly found on the later maps - Spaceport and Blue Gate - and if one spawns in your match, you’ll likely see it by the blue laser beam that it casts into the sky while “surveying”.
Surveyors are quite well-armoured and will very speedily run away from you once it notices you, but if you can take one down then make sure you loot all its parts for a chance of obtaining certain unusual Blueprints.
Blueprints obtained from quests
One way in which you can get Blueprints is by completing certain quests for the vendors in Speranza. Some quests will reward you with a specific item Blueprint upon completion, so as long as you work through all the quests in Arc Raiders, you are guaranteed those Blueprints.
Here is the full list of all Blueprints you can get from quest rewards:
- Trigger Nade Blueprint: Rewarded after completing “Sparks Fly”.
- Lure Grenade Blueprint: Rewarded after completing “Greasing Her Palms”.
- Burletta Blueprint: Rewarded after completing “Industrial Espionage”.
- Hullcracker Blueprint (and Launcher Ammo Blueprint): Rewarded after completing “The Major’s Footlocker”.
Alas, that’s only 4 Blueprints out of a total of 75 to unlock, so for the vast majority you will need to find them yourself during a raid. If you’re intent on farming Blueprints, then it’s best to equip yourself with cheap gear in case you lose it, but don’t use a free loadout because then you won’t get a safe pocket to stash any new Blueprint you find. No pain in Arc Raiders is sharper than failing to extract with a new Blueprint you’ve been after for a dozen hours already.

One of the best ways to get Blueprints is by hitting three stars on all five Trials every week. |Image credit:Rock Paper Shotgun/Embark Studios
Blueprints obtained from Trials
One of the very best ways to get Blueprints is as rewards for completing Trials in Arc Raiders. Trials are unlocked from Level 15 onwards, and allow you to earn rewards by focusing on certain tasks over the course of several raids. For example, one Trial might task you with dealing damage to Hornets, while another might challenge you to loot Supply Drops.
Trials refresh on a weekly basis, with a new week bringing five new Trials. Each Trial can offer up to three rewards after passing certain score milestones, and it’s possible to receive very high level loot from these reward crates - including Blueprints. So if you want to unlock as many Blueprints as possible, you should make a point of completing as many Trials as possible each week.
Best Blueprint farming locations
The very best way to get Blueprints is to frequent specific areas of the maps which combine high-tier loot pools with the right types of containers to search. Here are my recommendations for where to find Blueprints on every map, so you can always keep the search going for new crafting recipes to unlock.

Image credit:Rock Paper Shotgun/Embark Studios
Dam Battlegrounds
The best places to farm Blueprints on Dam Battlegrounds are the Control Tower, Power Generation Complex, Ruby Residence, and Pale Apartments . The first two regions, despite only being marked on the map as mid-tier loot, contain a phenomenal number of containers to loot. The Control Tower can also contain a couple of high-tier Security Lockers - though of course, you’ll need to have unlocked the Security Breach skill at the end of the Survival tree.
There’s also a lot of reporting amongst the playerbase that the Residential areas in the top-left of the map - Pale Apartments and Ruby Residence - give you a comparatively strong chance of finding Blueprints. Considering their size, there’s a high density of containers to loot in both locations, and they also have the benefit of being fairly out of the way. So you’re more likely to have all the containers to yourself.
Buried City
The best Blueprint farming locations on Buried City are the Santa Maria Houses, Grandioso Apartments, Town Hall, and the various buildings of the New District . Grandioso Apartments has a lower number of containers than the rest, but a high chance of spawning weapon cases - which have good Blueprint drop rates. The others are high-tier loot areas, with plenty of lootable containers - including Security Lockers.
Spaceport
The best places to find Blueprints on Spaceport are the Arrival and Departure Buildings, as well as Control Tower A6 and the Launch Towers . All these areas are labelled as high-value loot regions, and many of them are also very handily connected to one another by the Spaceport wall, which you can use to quickly run from one area to the next. At the tops of most of these buildings you’ll find at least one Security Locker, so this is an excellent farming route for players looking to find Blueprints.
The downside to looting Blueprints on Spaceport is that all these areas are hotly contested, particularly in Duos and Squads. You’ll need to be very focused and fast in order to complete the full farming route.

Image credit:Rock Paper Shotgun/Embark Studios
Blue Gate
Blue Gate tends to have a good chance of dropping Blueprints, potentially because it generally has a high number of containers which can hold lots of items; so there’s a higher chance of a Blueprint spawning in each container. In my experience, the best Blueprint farming spots on Blue Gate are Pilgrim’s Peak, Raider’s Refuge, the Ancient Fort, and the Underground Complex beneath the Warehouse .
All of these areas contain a wealth of containers to loot. Raider’s Refuge has less to loot, but the majority of the containers in and around the Refuge are raider containers, which have a high chance of containing Blueprints - particularly during major events.
Stella Montis
On the whole, Stella Montis seems to have a very low drop rate for Blueprints (though a high chance of dropping other high-tier loot). If you do want to try farming Blueprints on this map, the best places to find Blueprints in Stella Montis are Medical Research, Assembly Workshop, and the Business Center . These areas have the highest density of containers to loot on the map.
In addition to this, the Western Tunnel has a few different Security Lockers to loot, so while there’s very little to loot elsewhere in this area of the map, it’s worth hitting those Security Lockers if you spawn there at the start of a match.
That wraps up this primer on how to get all the Blueprints in Arc Raiders as quickly as possible. With the Expedition system constantly resetting a large number of players’ Blueprints, it’s more important than ever to have the most up-to-date information on where to find all these Blueprints.
While you’re here, be sure to check out our Arc Raiders best guns tier list , as well as our primers on the best skills to unlock and all the different Field Depot locations on every map.


ARC Raiders
PS5 , Xbox Series X/S , PC
Rock Paper Shotgun is better when you sign in
Sign in and join us on our journey to discover strange and compelling PC games.
