All new Talismans in Elden Ring: Shadow Of The Erdtree
Here are all the new Elden Ring DLC Talismans and how to get them

Image credit:Rock Paper Shotgun/Bandai Namco

Looking for all of the new Talismans in Shadow Of The Erdtree? Elden Ring ’s DLC, Shadow Of The Erdtree , adds a wide variety of Talismans to the already robust collection in the base game, letting you boost your Tarnished’s loadout for all of the challenges that the Shadow Realm has to offer. In total, there are 39 new Talismans that will do everything from upping your damage output to enhancing your attacks if you maintain the same stance.
In this guide, we’ve pieced together images of each Talisman, their effects, as well as intel on their locations. Read on, and we’ll explain what you need to do and where you need to go to obtain all of the new Talismans in Elden Ring: Shadow of the Erdtree.
Aged One’s Exultation
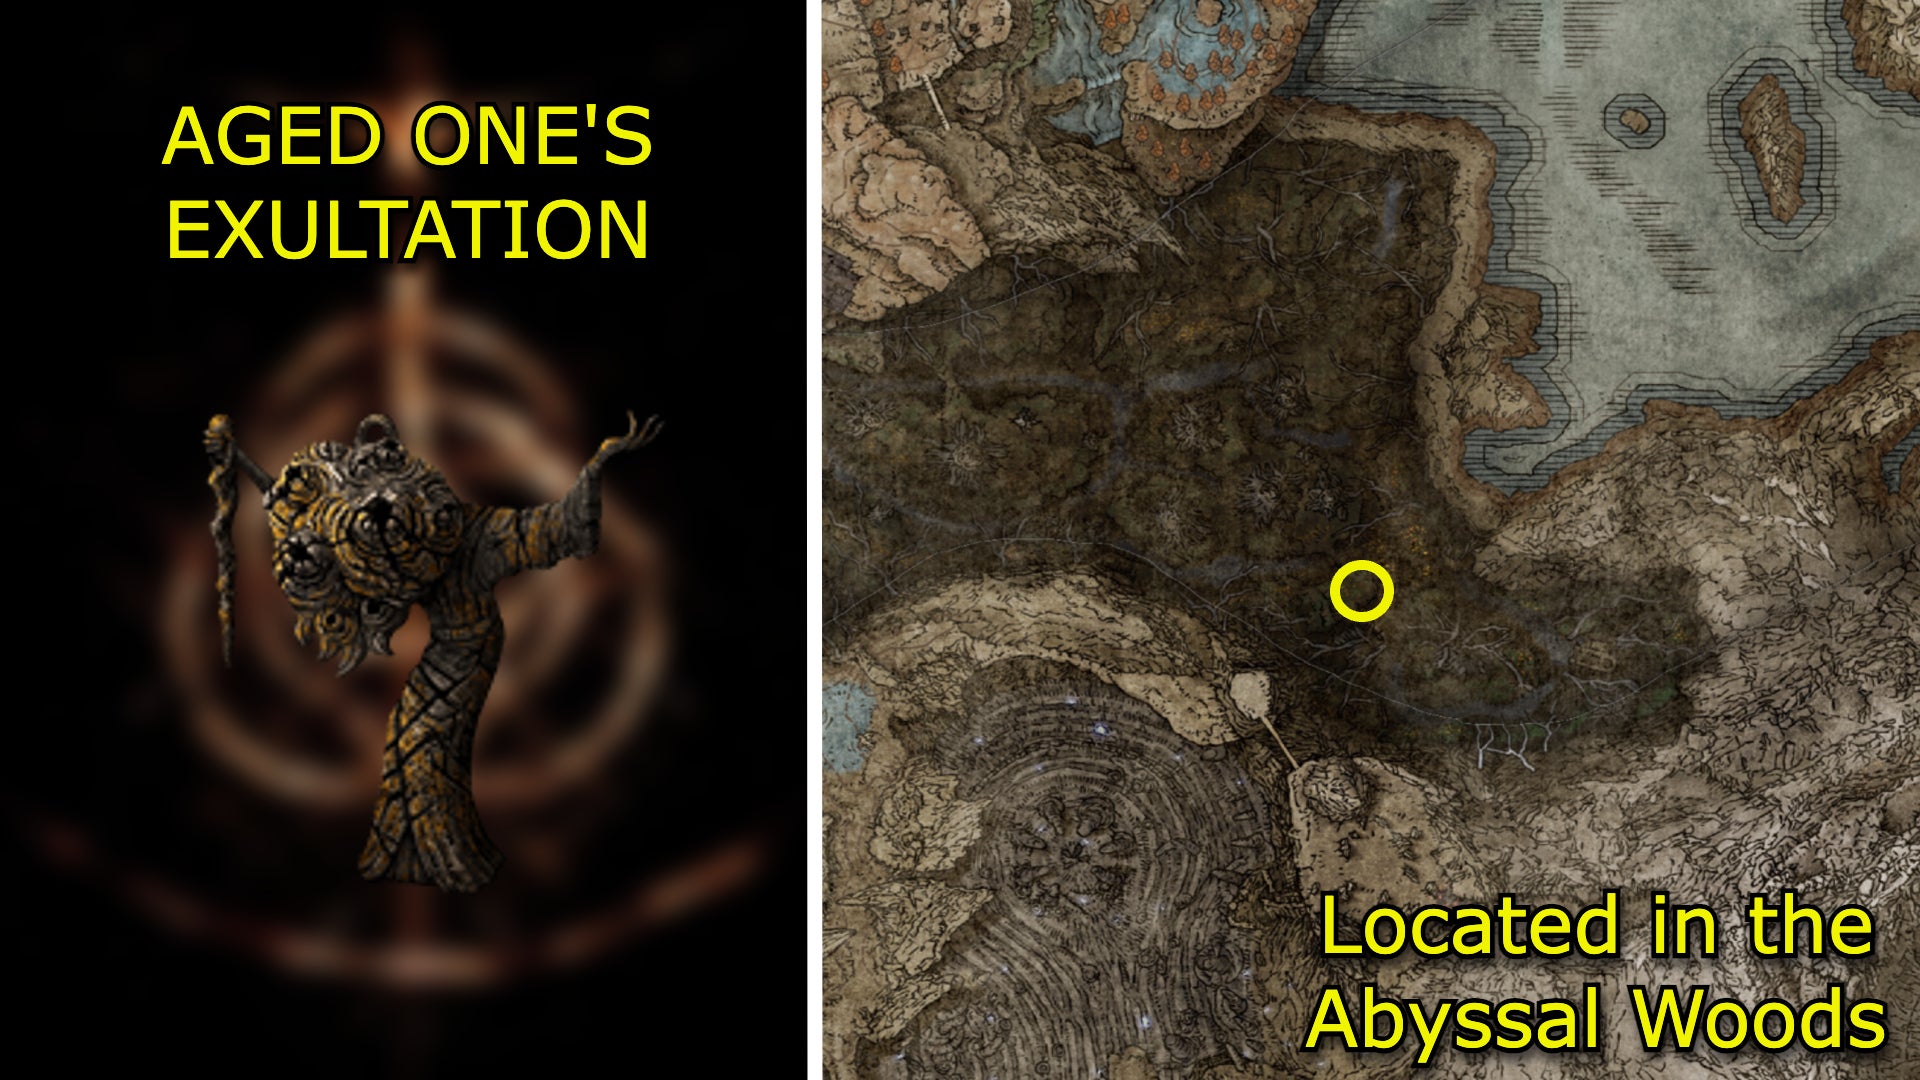
Image credit:Rock Paper Shotgun/Bandai Namco
Effect
Madness in the vicinity increases attack power.
How to get Aged One’s Exultation
To get the Aged One’s Exultation, go to the Abyssal Woods and head south of the Woodland Trail Site of Grace towards the Abandoned Church. You’ll eventually encounter one of the multi-eyed enemies known as the Aging Untouchable. Kill it by parrying its grab attack to make it vulnerable; it drops the Aged One’s Exultation as a reward.
Ailment Talisman

Image credit:Rock Paper Shotgun/Bandai Namco
Effect
Raises resistance to the last ailment suffered.
How to get Ailment Talisman
You can find the Ailment Talisman on a corpse in the Abandoned Ailing Village . Go northeast of the Greatbridge, North Site of Grace, and look to the broken bridge that overlooks the river.
Arrow’s Soaring Sting Talisman

Image credit:Rock Paper Shotgun/Bandai Namco
Effect
Increases the effective range of bows and raises attack power of arrows and bolts.
How to get Arrow’s Soaring Sting Talisman
Head to the top of Fog Rift Fort until you’re in front of the tower stairs guarded by Black Knight Garrew (a mini boss knight with a huge mace). Defeat Garrow, veer west of the tower entrance and follow the wooden stairs and ladders that lead to the top of the tower. A chest with the Talisman will be there.
Beloved Stardust

Image credit:Rock Paper Shotgun/Bandai Namco
Effect
Shortens casting speed for sorcery and incantations by the utmost, but increases damage taken.
How to get Beloved Stardust
Carry out Ymir’s questline and sound the hanging bell at the Finger Ruins of Rhia . Speak to Ymir after sounding the bell and he’ll give you the Beloved Stardust.
Blade of Mercy Talisman

Image credit:Rock Paper Shotgun/Bandai Namco
Effect
Raises attack power after each critical hit.
How to get Blade of Mercy Talisman
The Blade of Mercy Talisman is located atop a building slightly southwest of the Scorched Ruins Site of Grace. You need to use Torrent’s double jump to hop to the top of the building - start on the platforms covered by maroon drapes on the western edge of the structure and keep going until you reach a set of doors. A chest with the Talisman is inside.
Blessed Blue Dew Talisman
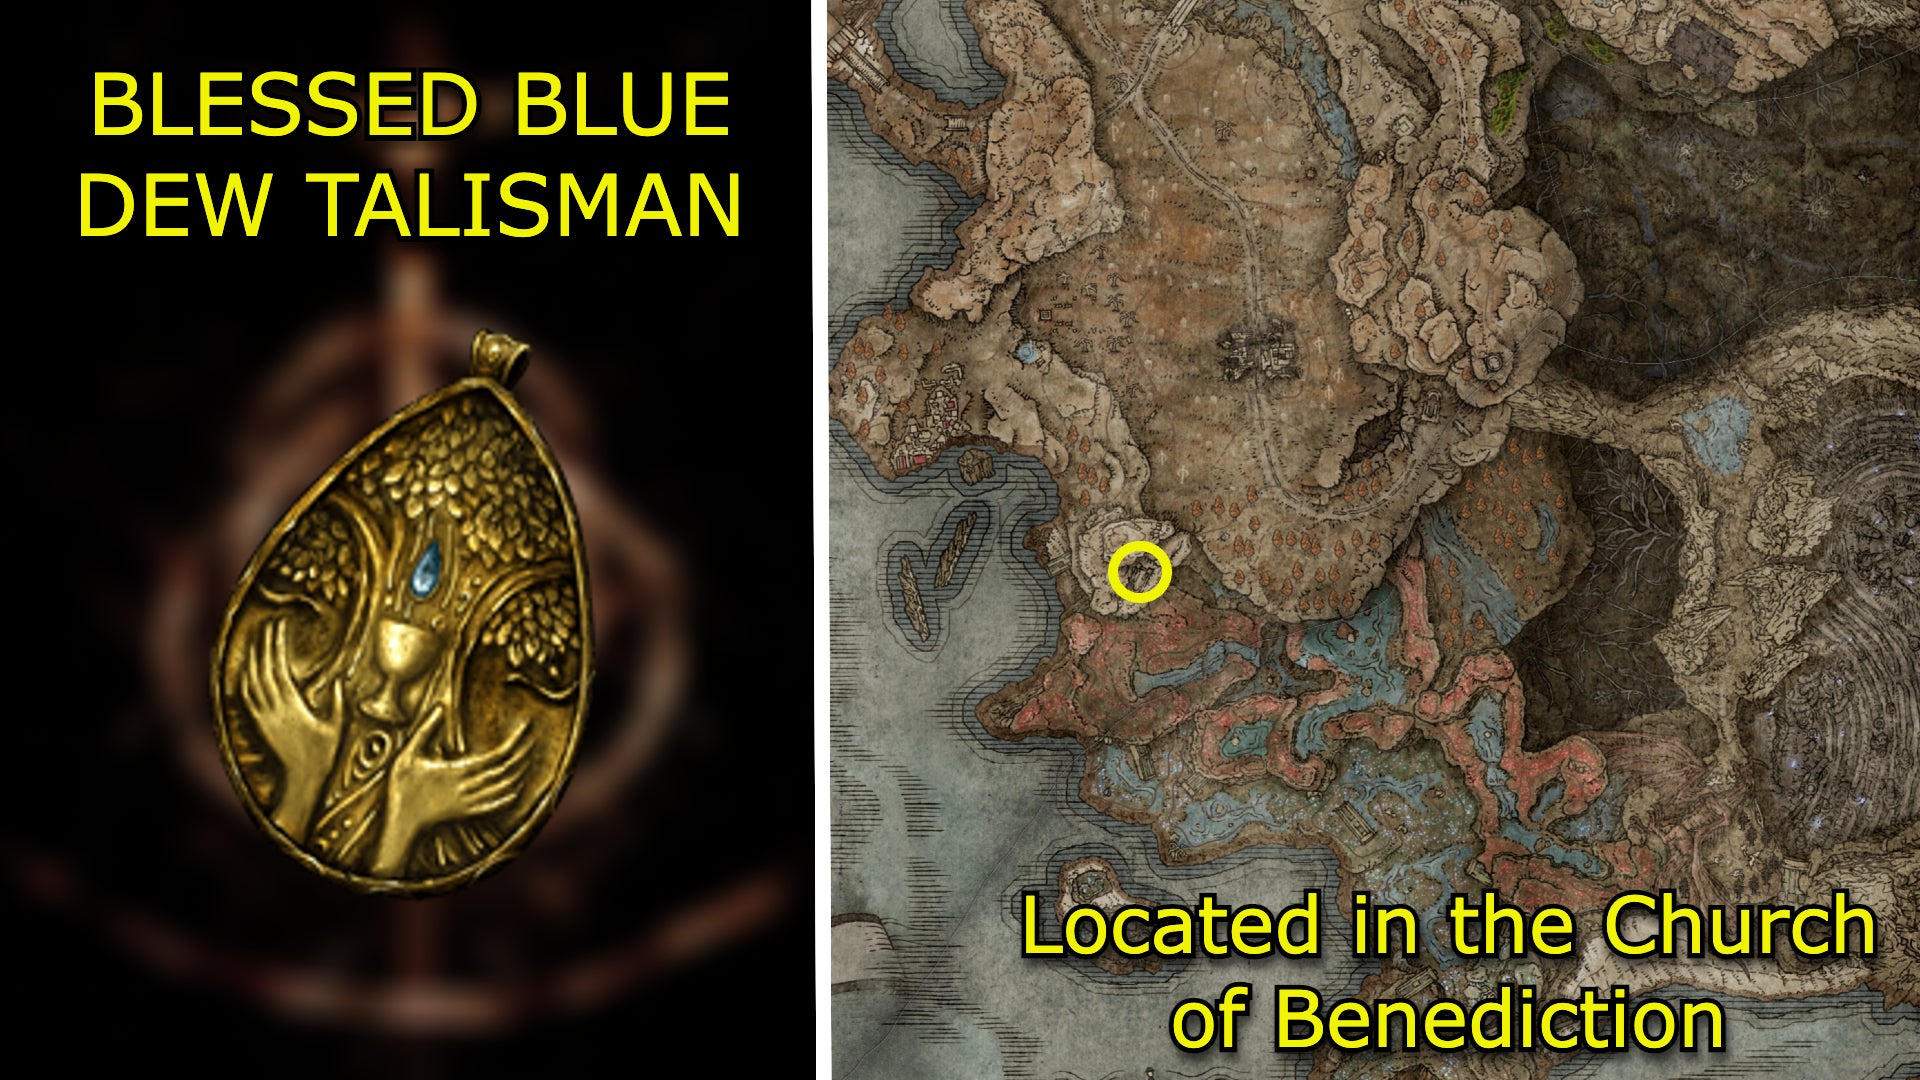
Image credit:Rock Paper Shotgun/Bandai Namco
Effect
Slowly restores FP.
How to get Blessed Blue Dew Talisman
You’ll find the Blessed Blue Dew Talisman by a statue of Marika in the Church of Benediction , which is in the southwest of Gravesite Plain .
Boltdrake Talisman +3
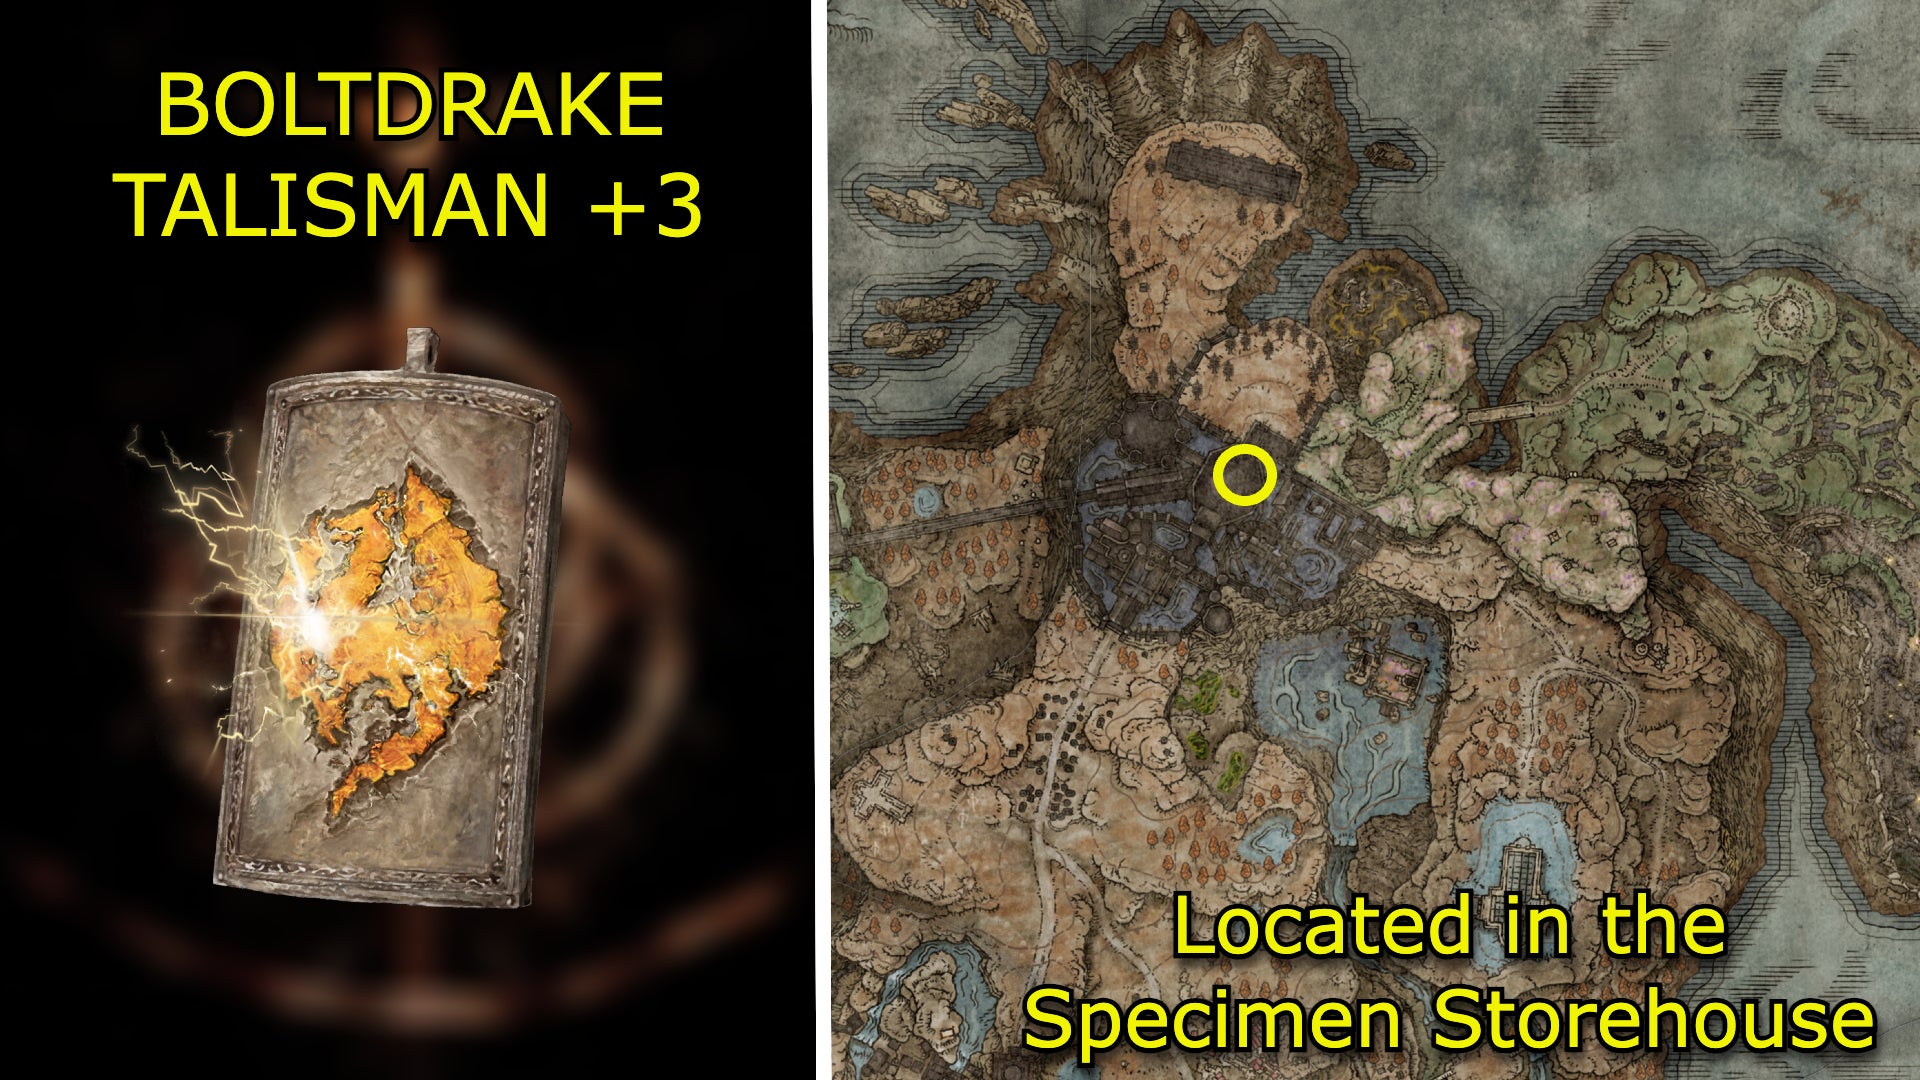
Image credit:Rock Paper Shotgun/Bandai Namco
Effect
Boosts lightning damage negation by the utmost.
How to get Boltdrake Talisman +3
You can find the Boltdrake Talisman +3 on a corpse in a room to the east of the Storehouse, First Floor Site of Grace in the Shadow Keep . Look for narrow gap within the various tall piles of books. Jump through this gap, and you’ll find the Talisman.
Cerulean Amber Medallion +3
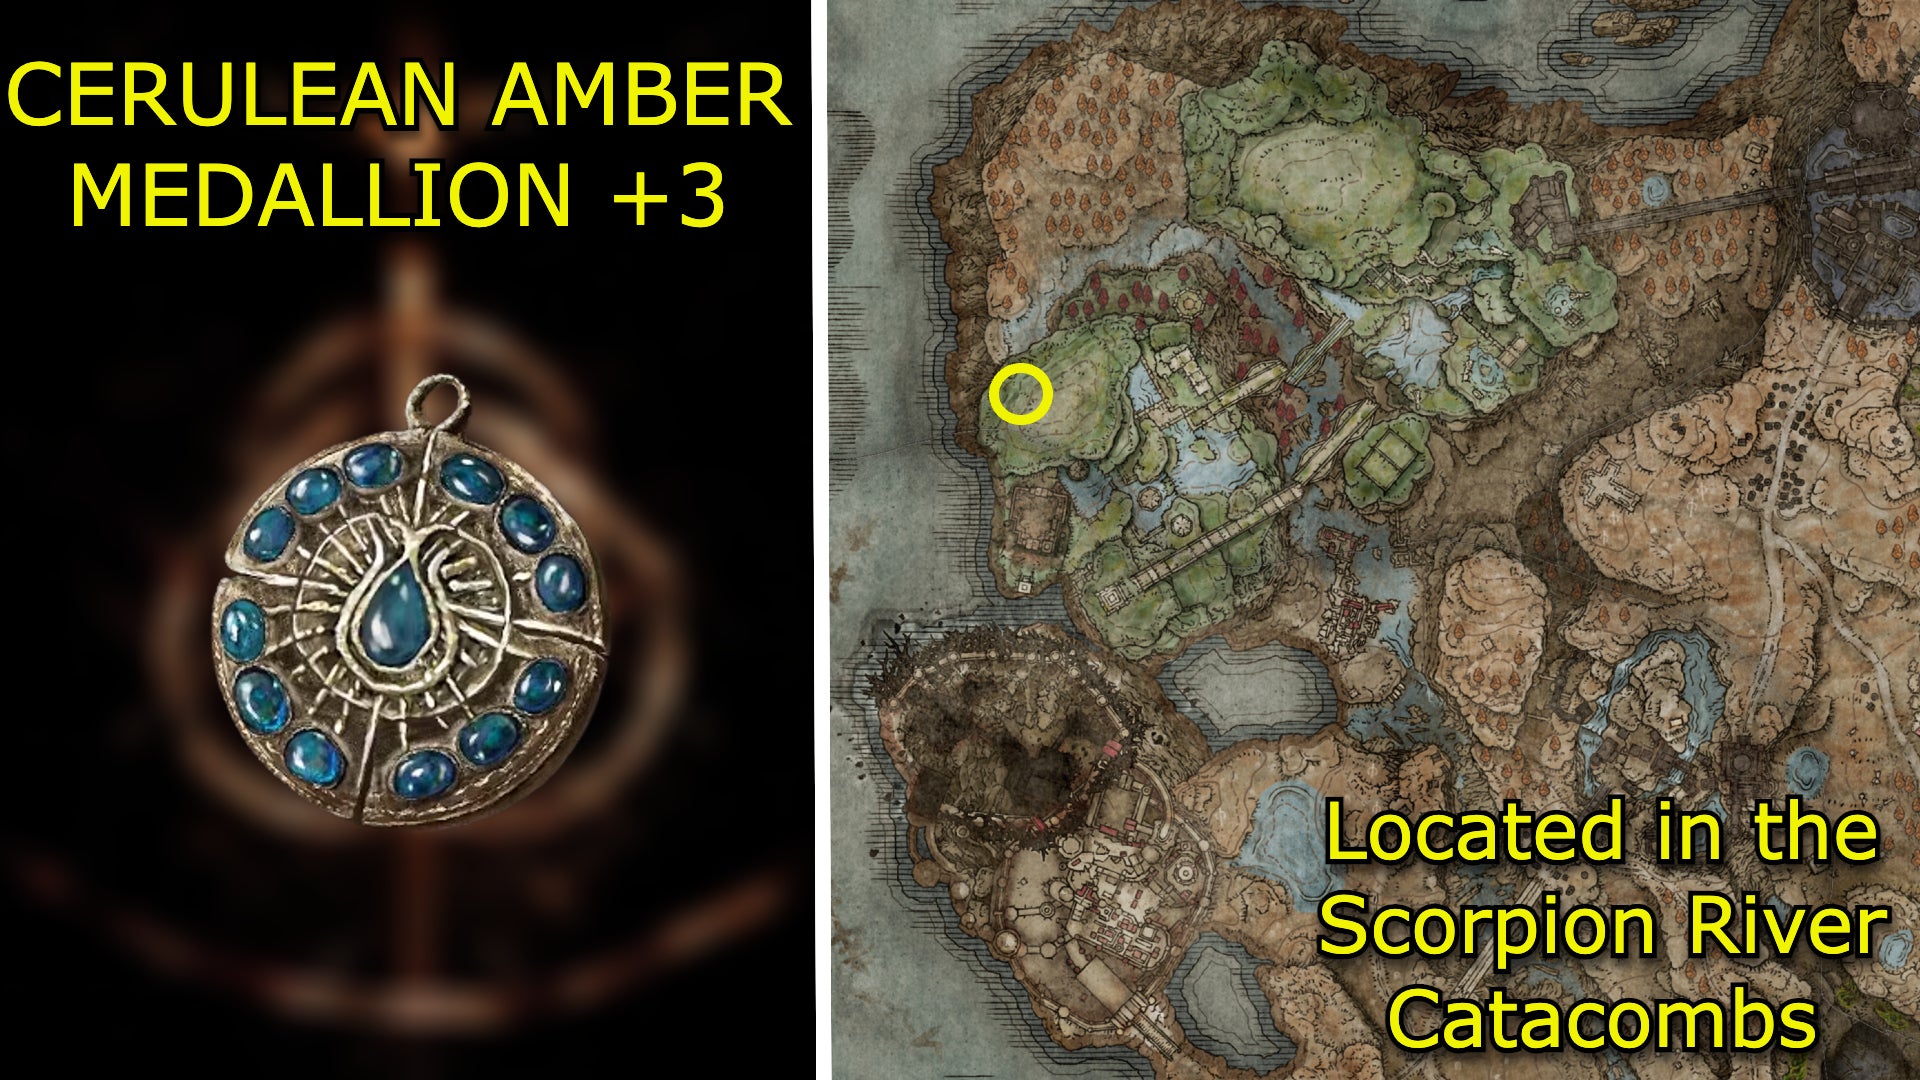
Image credit:Rock Paper Shotgun/Bandai Namco
Effect
Boosts maximum FP by the utmost.
How to get Cerulean Amber Medallion +3
You get the Cerulean Amber Medallion +3 as a reward for defeating the Death Knight boss in the Scorpion River Catacombs .
Cerulean Seed Talisman +1
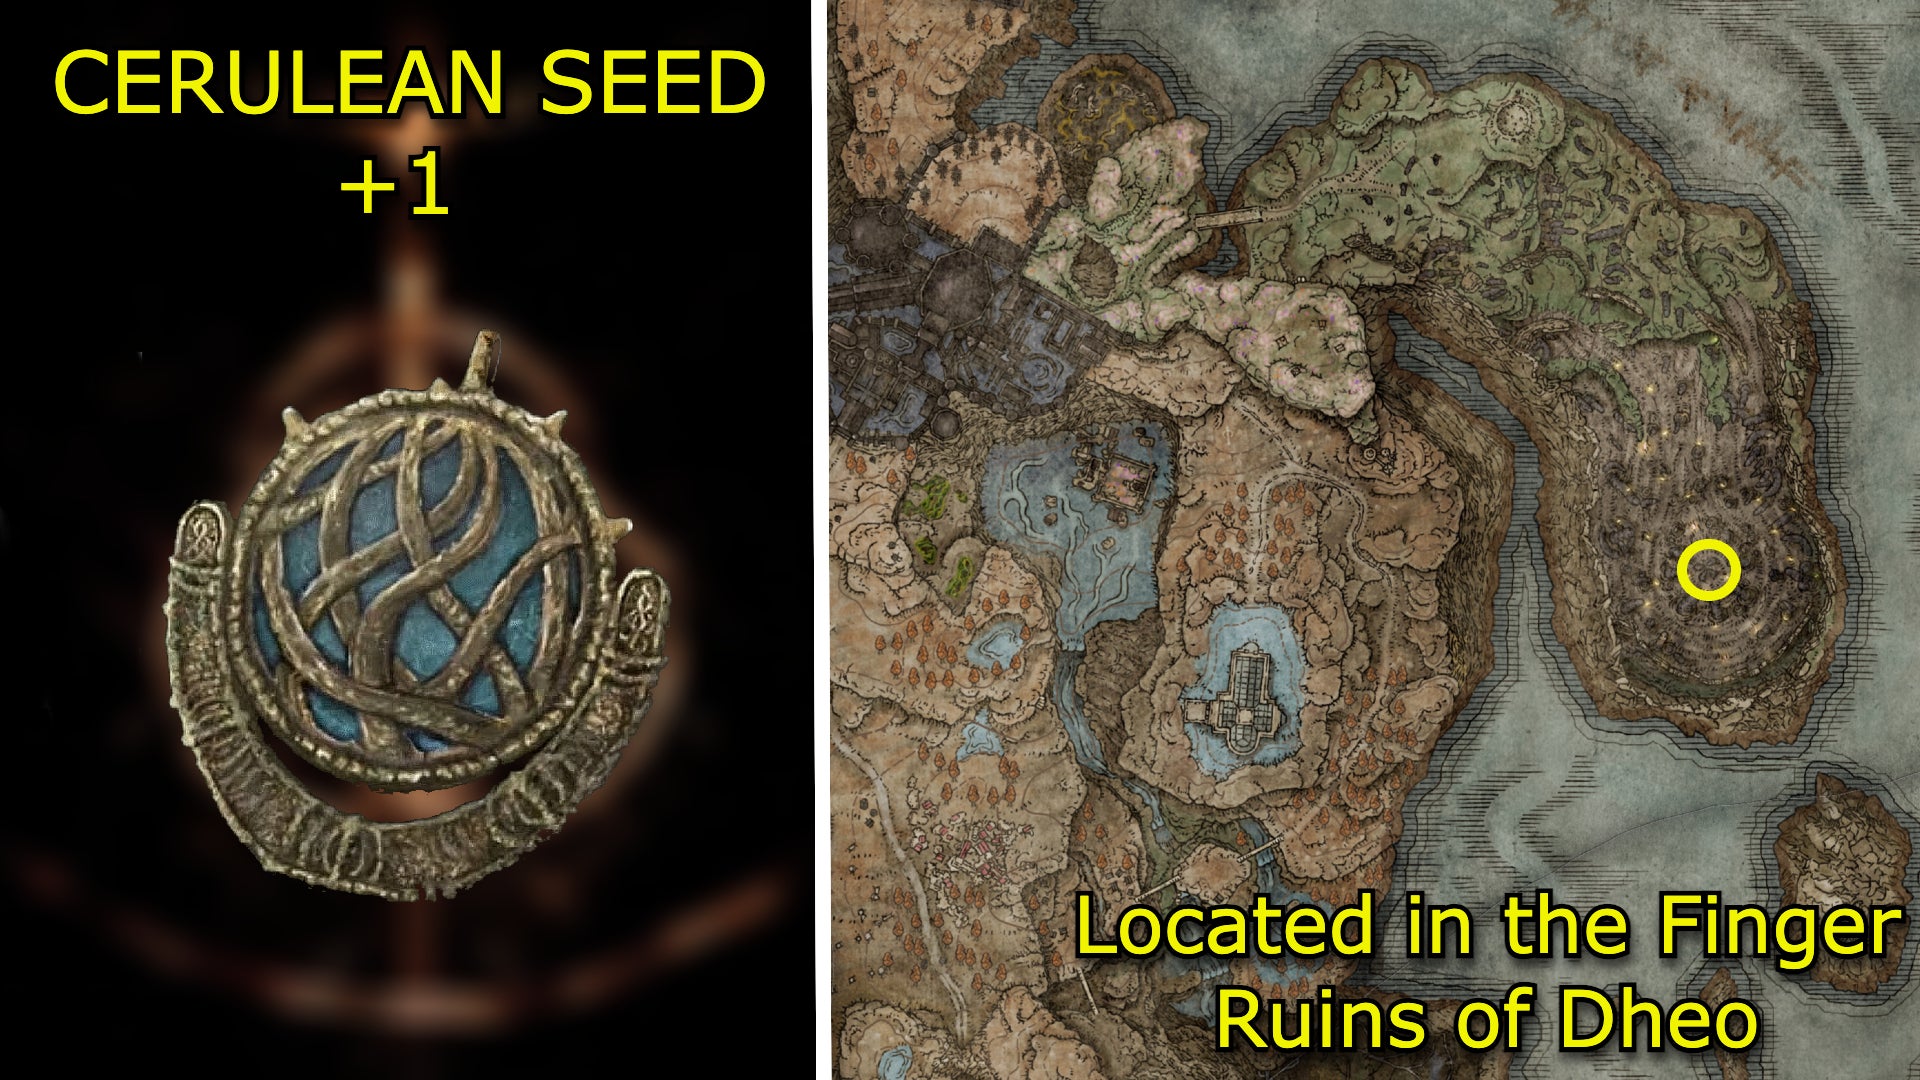
Image credit:Rock Paper Shotgun/Bandai Namco
Effect
Greatly boosts FP restoration from Flask of Cerulean Tears.
How to get Cerulean Seed Talisman +1
Carry out Ymir’s questline and sound the hanging bell at the Finger Ruins of Dheo . You’ll obtain the Cerulean Seed Talisman +1.
Clarifying Horn Charm +2
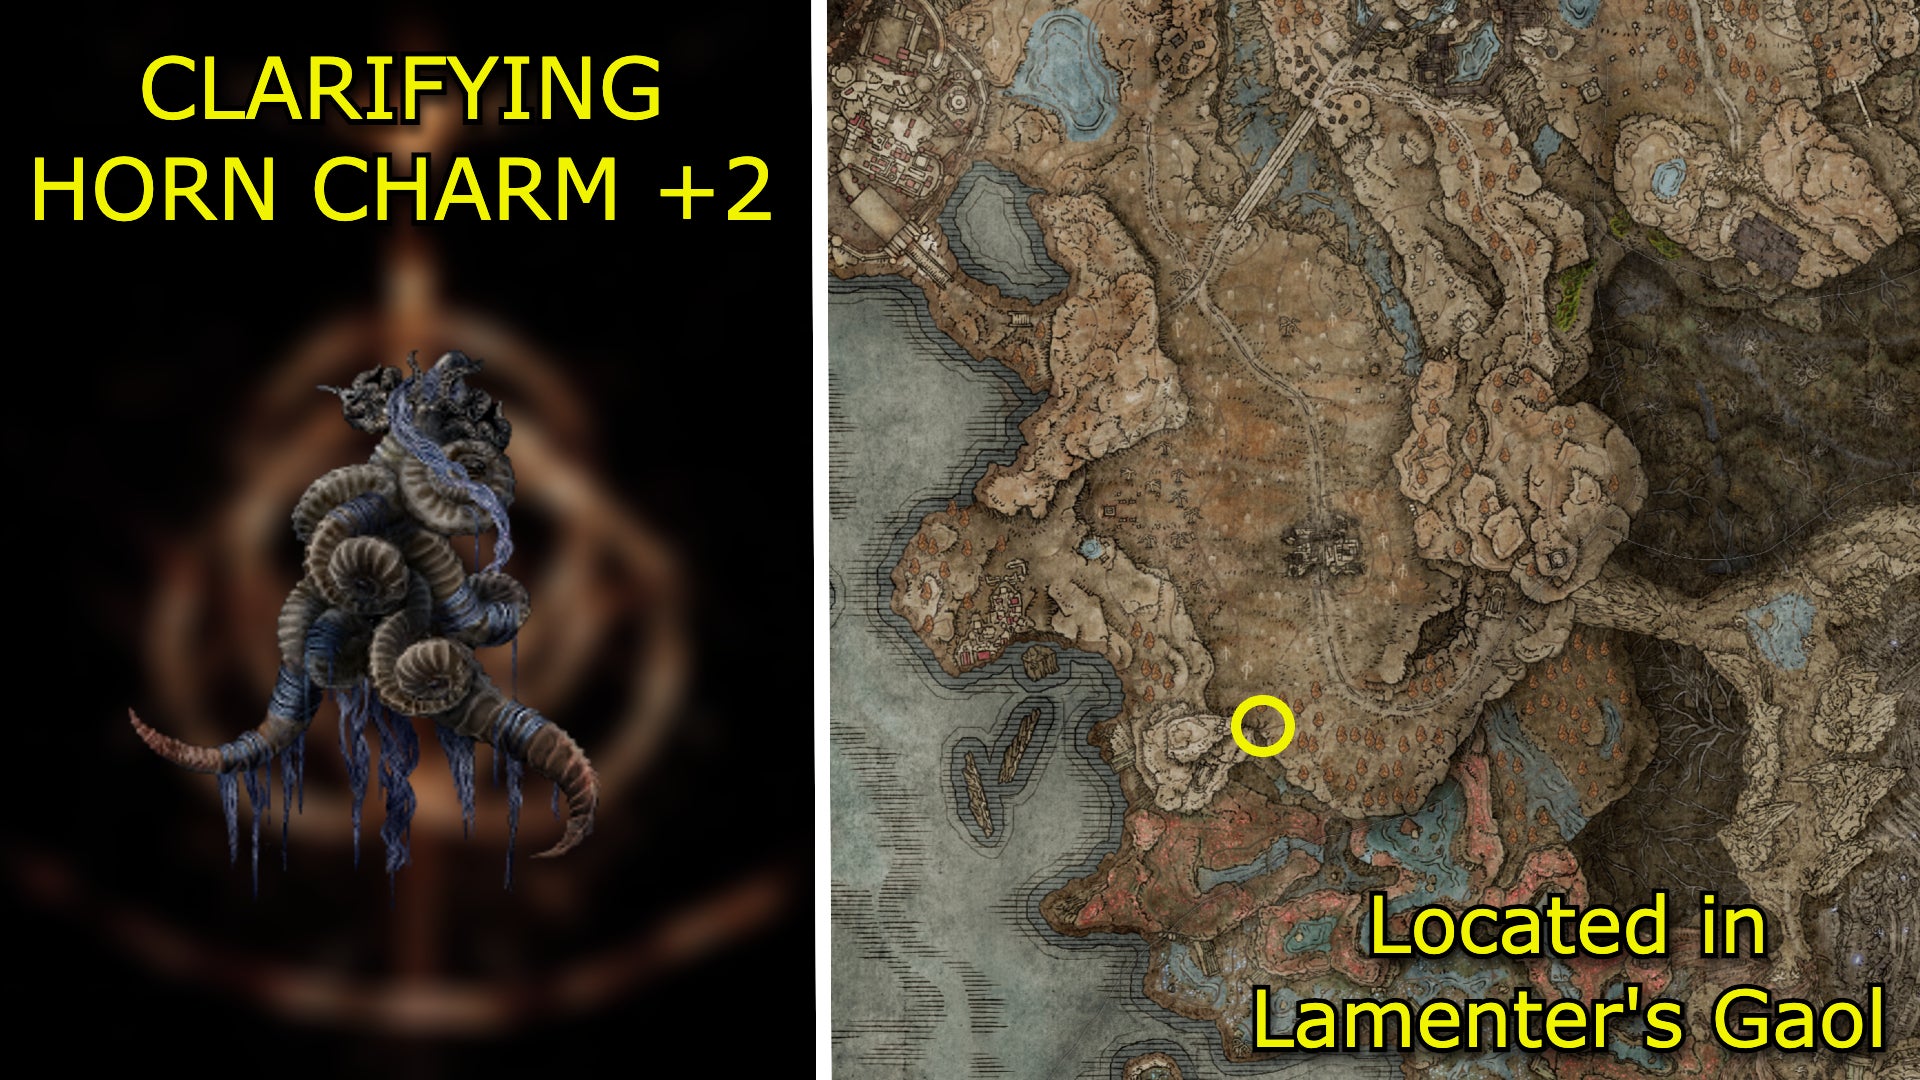
Image credit:Rock Paper Shotgun/Bandai Namco
Effect
Vastly raises focus.
How to get Clarifying Horn Charm +2
Found in the rat-infested passageways beneath Lamenter’s Gaol . From the Lamenter’s Gaol Site of Grace, follow the pathway, veer left at the locked gate, then go right right before you reach the open chamber to acquire the Gaol Upper Level Key. Go back to the locked gate, open it, and descend the ladder. Enter the wide room, fall down the hole on your left, and follow the passageway past the rats to get the Talisman.
Crimson Amber Medallion +3

Image credit:Rock Paper Shotgun/Bandai Namco
Effect
Boosts maximum HP by the utmost.
How to get Crimson Amber Medallion +3
You get the Cerulean Amber Medallion +3 as a reward for defeating the Death Knight boss in the Fog Rift Catacombs .
Crimson Seed Talisman +1

Image credit:Rock Paper Shotgun/Bandai Namco
Effect
Greatly boosts HP restoration from Flask of Crimson Tears.
How to get Crimson Seed Talisman +1
Carry out Ymir’s questline and sound the hanging bell at the Finger Ruins of Rhia . You’ll obtain the Cerulean Seed Talisman +1.
Crusade Insignia

Image credit:Rock Paper Shotgun/Bandai Namco
Effect
Raises attack power after defeating an enemy.
How to get Crusade Insignia
You get the Crusade Insignia as a reward for defeating Fire Knight Queelign in the Church of Crusade , which is located northwest of the Highroad Cross Site of Grace.
Dried Bouquet

Image credit:Rock Paper Shotgun/Bandai Namco
Effect
Raises attack power when summoned spirit dies.
How to get Dried Bouquet
You can find Dried Bouquet on a corpse by an altar not far from the Small Private Altar Site of Grace in Belurat, Tower Settlement . Exit the room, go up the stairs, and veer left up the next set of stairs and then right. Circle the structure until you see a passage on your right that leads to a room with a ladder. Climb upwards, go up the stairs, and veer left until you see several pieces of fallen rubble. A hidden tunnel is behind the rubble that leads into a series of rooms that finally end in the altar with the Talisman.
Enraged Divine Beast

Image credit:Rock Paper Shotgun/Bandai Namco
Effect
Raises potency of storms.
How to get Enraged Divine Beast
You get the Enraged Divine Beast after defeating the Divine Beast Dancing Lion, boss of Belurat, Tower Settlement . Go to Enia at the Rountable Hold and trade the Remembrance of the Dancing Lion to receive the Talisman.
Fine Crucible Feather Talisman
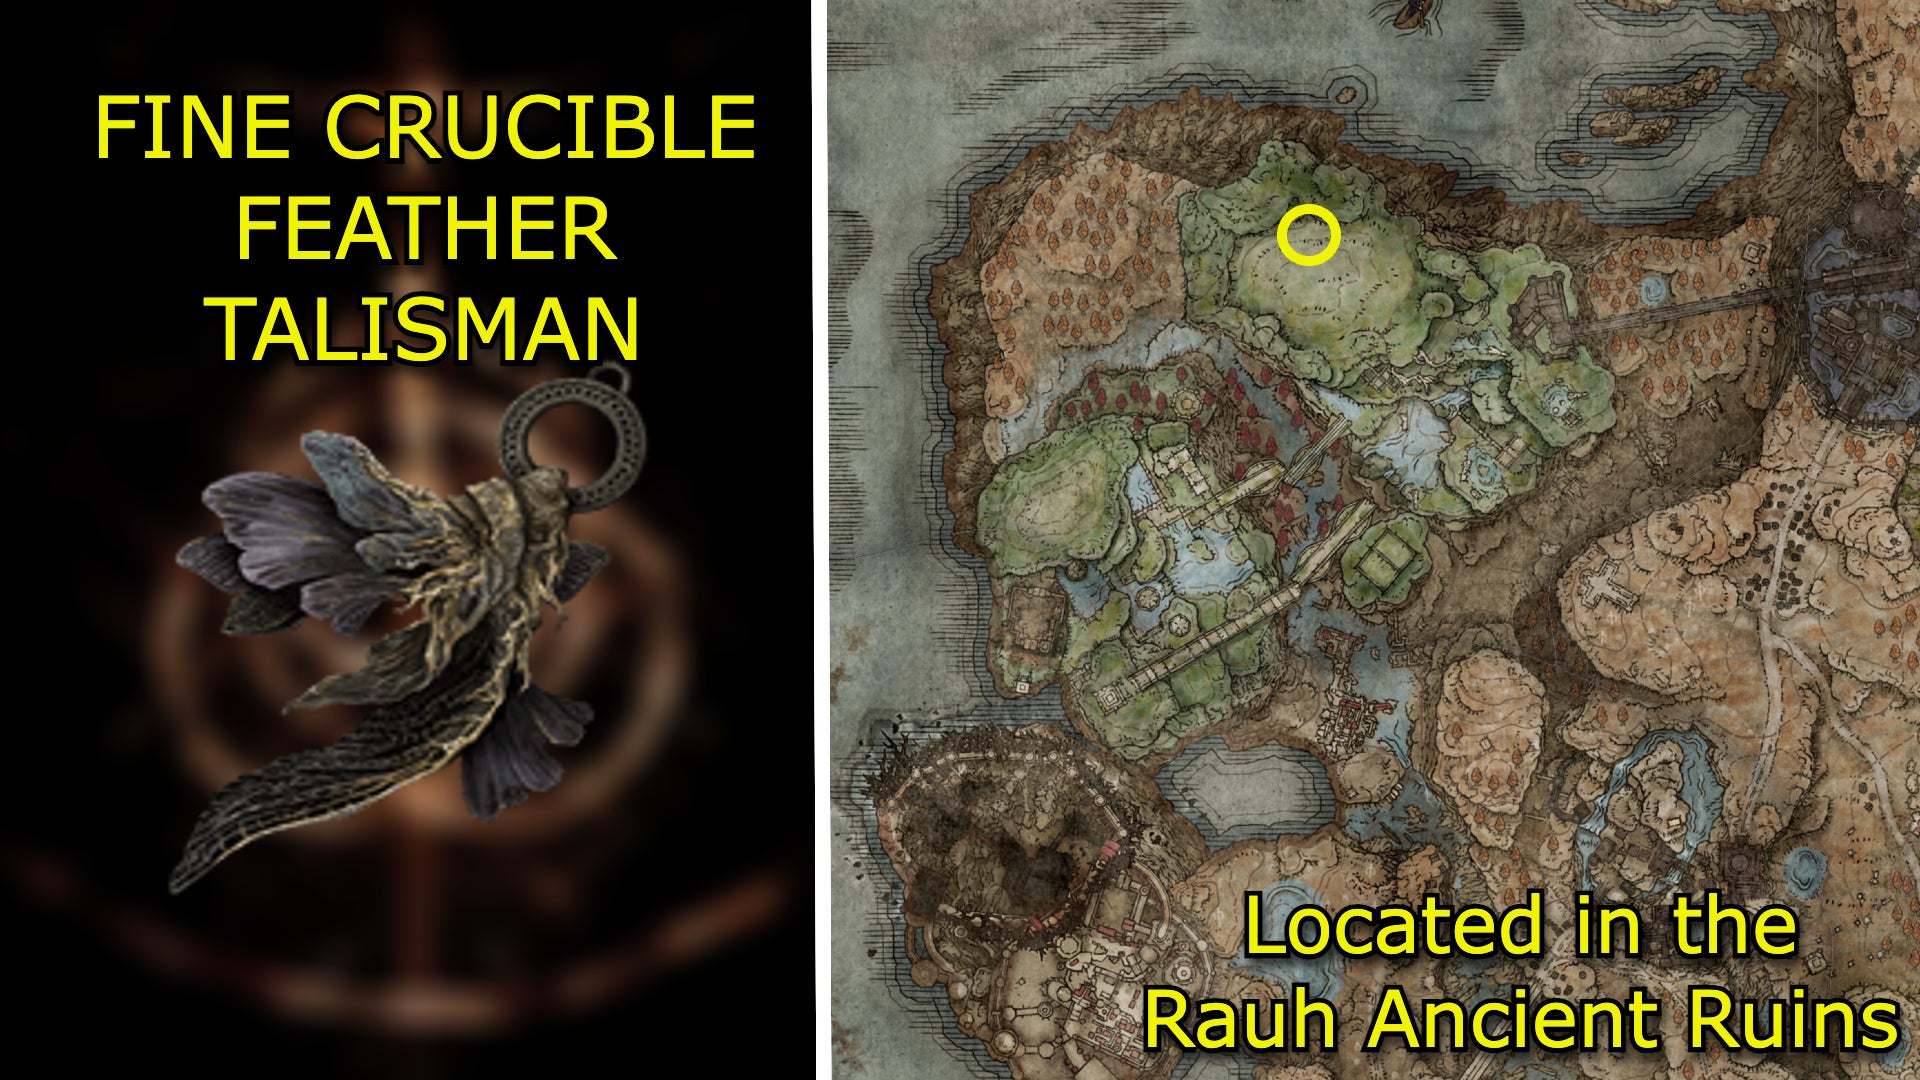
Image credit:Rock Paper Shotgun/Bandai Namco
Effect
Improves backsteps but increases damage taken.
How to get Fine Crucible Feather Talisman
You can find the Fine Crucible Feather Talisman on the corpse located on the tree branches in the Ancient Ruins of Rauh . From the Viaduct Minor Tower Site of Grace, ride Torrent down the ledges of the large crevasse in front of you. Veer northeast into the pillar-lined passageway and then west until you reach a pit with a Spiritspring that takes you down to a lower level. Head north past the next Spiritspring and then east. You’ll be in a room with two large branches; climb up the accessible branch and jump to the other one on your left to find the Talisman.
Flamedrake Talisman +3
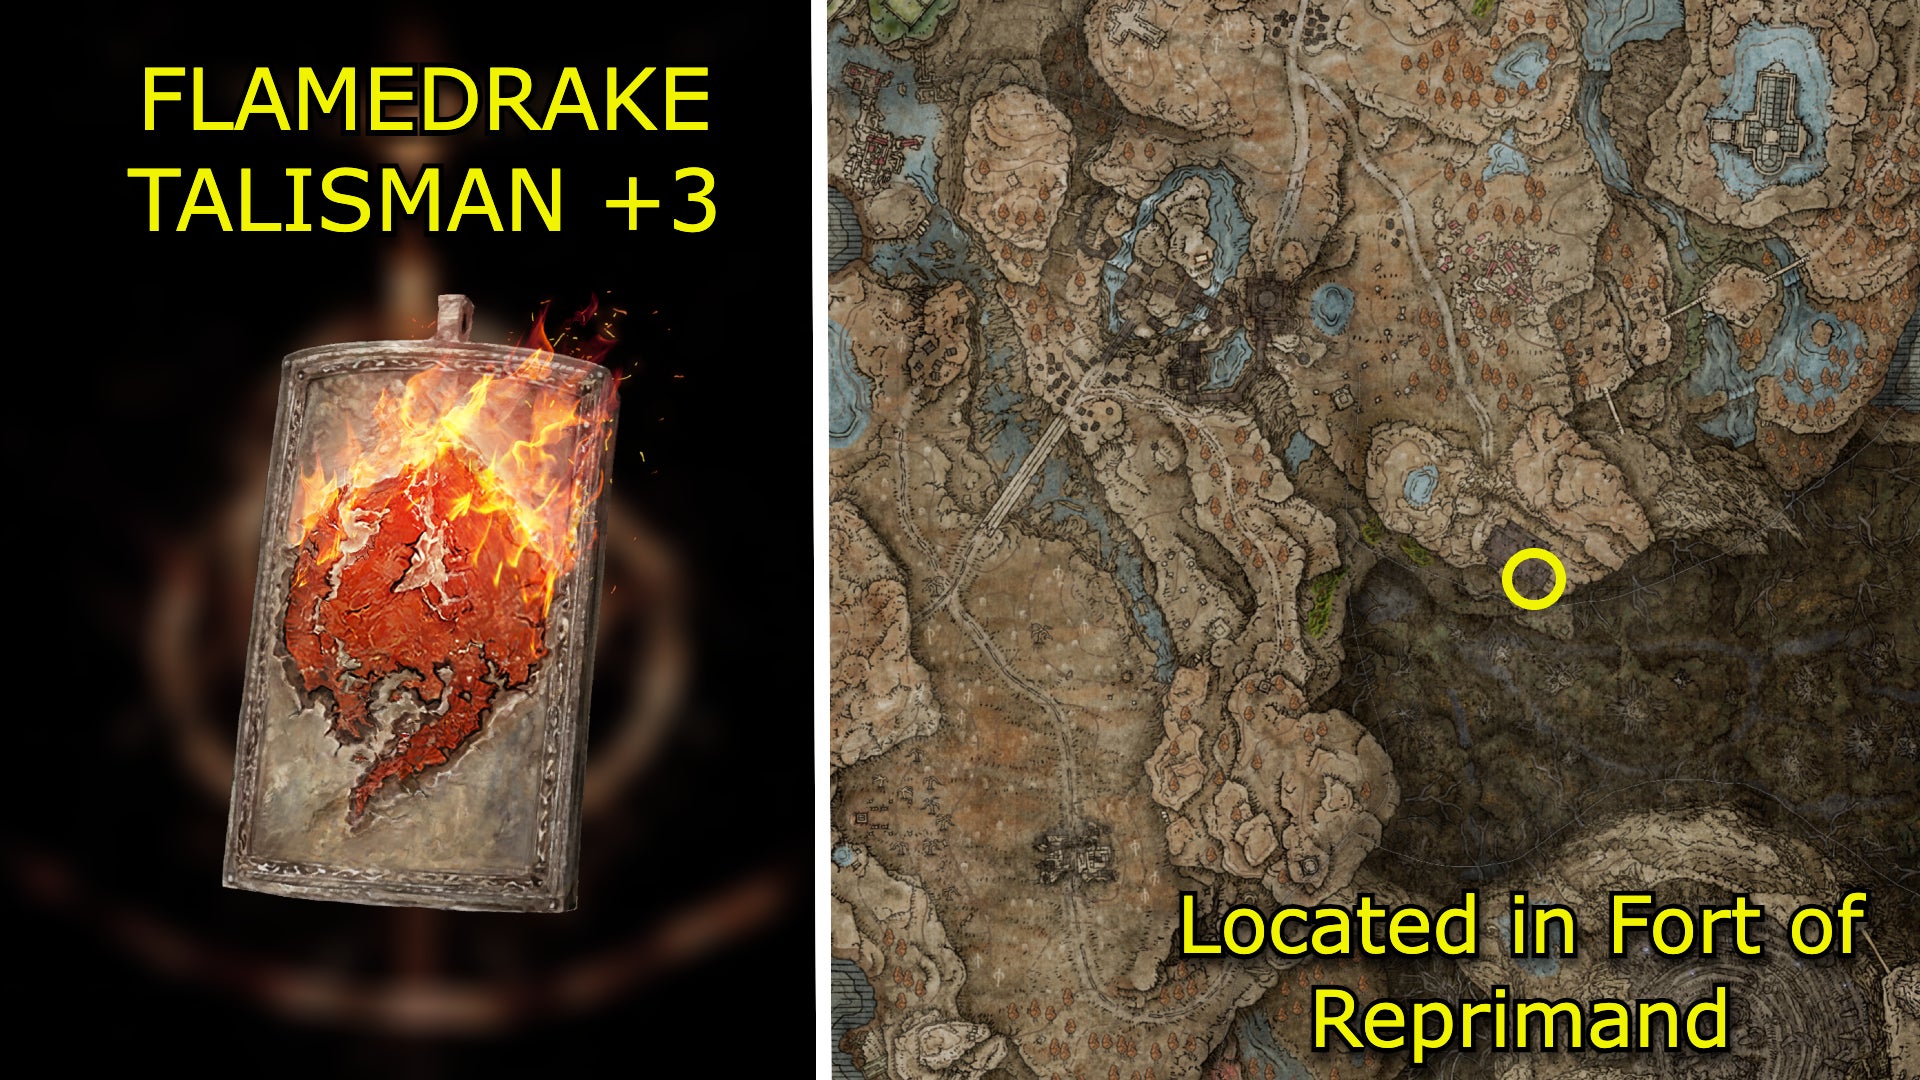
Image credit:Rock Paper Shotgun/Bandai Namco
Effect
Boosts fire damage negation by the utmost.
How to get Flamedrake Talisman +3
The Flamedrake Talisman +3 is in the Fort of Reprimand . From the Fort of Reprimand Site of Grace, go down the stairs into a hallway that’s full of cages. Go to the left to find a platform that you can use to jump over several of the cages, leading to a back part of the room that holds a chest with the Talisman inside.
Golden Braid
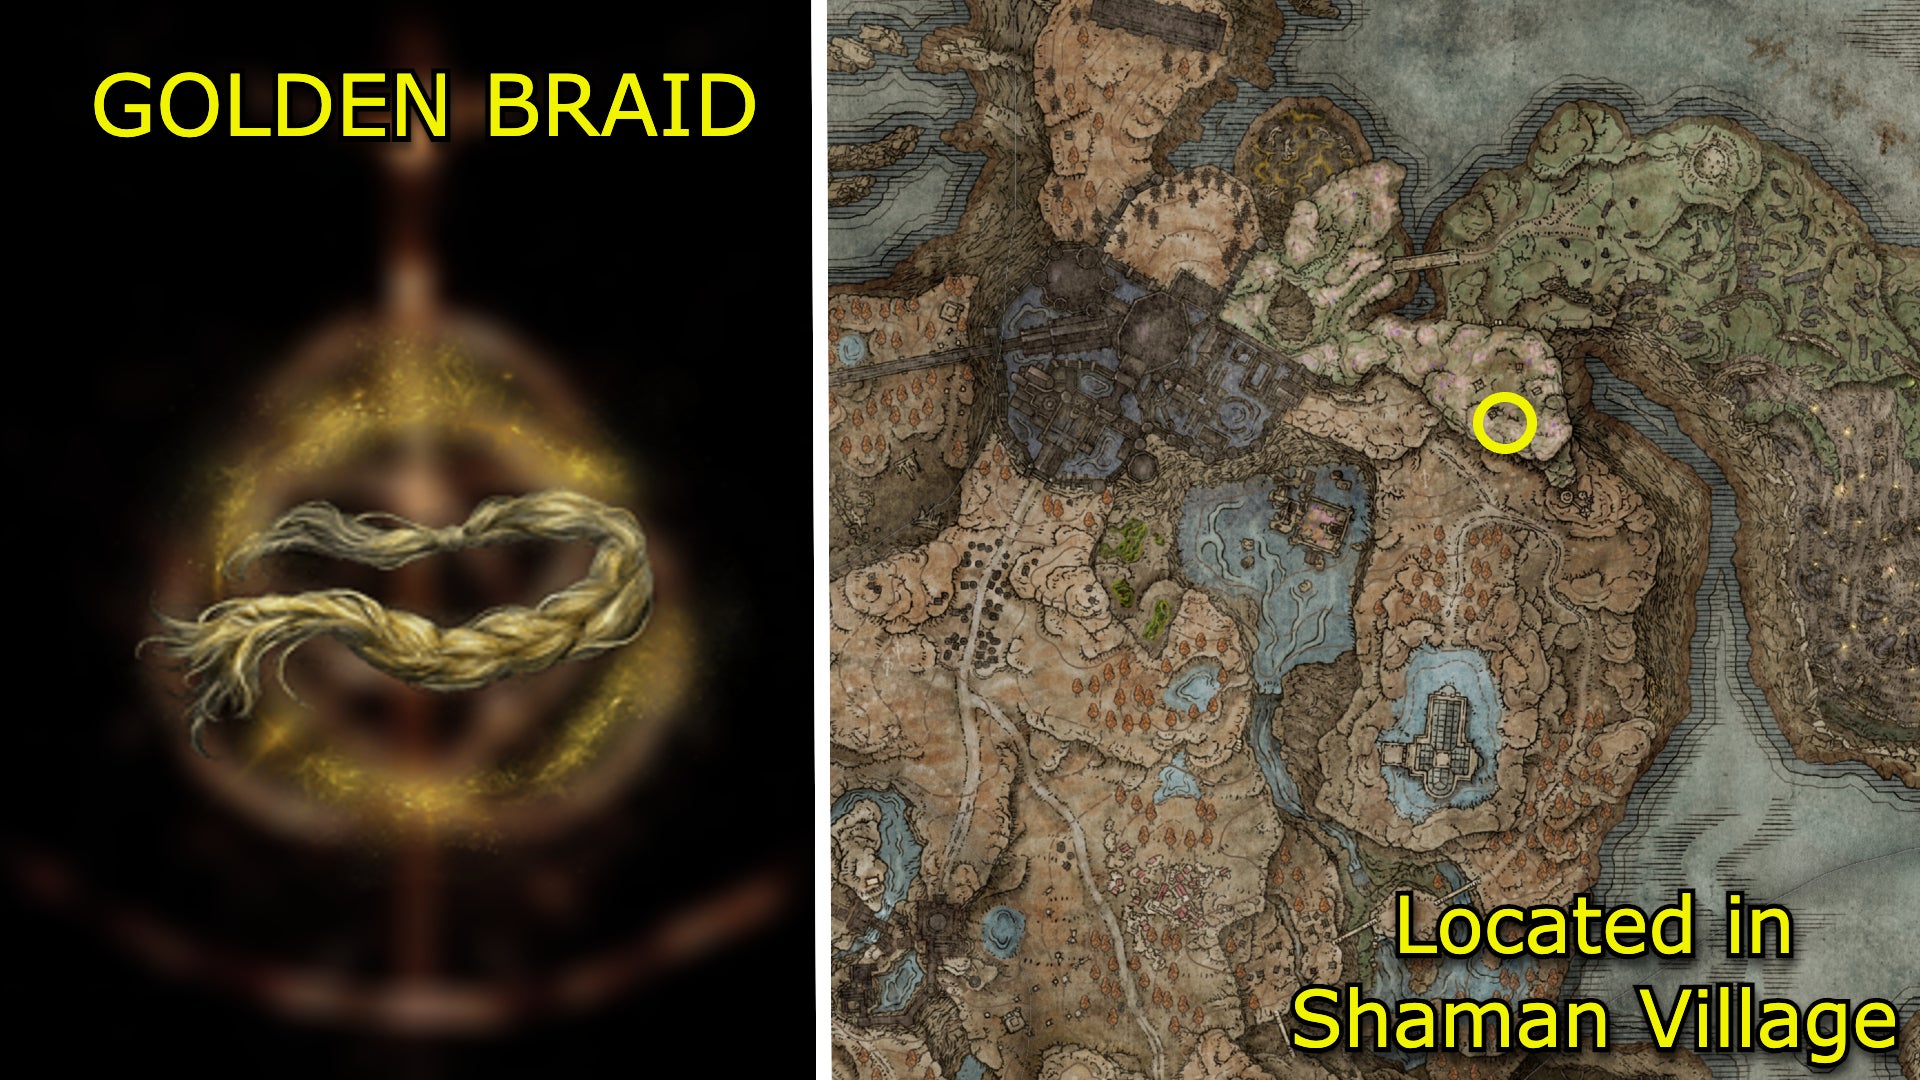
Image credit:Rock Paper Shotgun/Bandai Namco
Effect
Boosts holy damage negation by the utmost.
How to get Golden Braid
The Golden Braid is in the Shaman Village , southeast of the Hinterland Site of Grace. Go to the far stretches of the village until you see a large tree with a slightly hollowed out section. A corpse is lying there, bearing the Talisman.
Immunizing Horn Charm +2

Image credit:Rock Paper Shotgun/Bandai Namco
Effect
Vastly raises immunity.
How to get Immunizing Horn Charm +2
The Immunizing Horn Charm +2 is dropped by an Ulcerated Tree Spirit in the southeastern section of the Well of Depths , which is a lower sewer level of Belurat, Tower Settlement only accessible if you find the Wall of Depths Key.
Lacerating Crossed-Tree

Image credit:Rock Paper Shotgun/Bandai Namco
Effect
Enhances dash attacks.
How to get Lacerating Crossed-Tree
Mottled Necklace +2
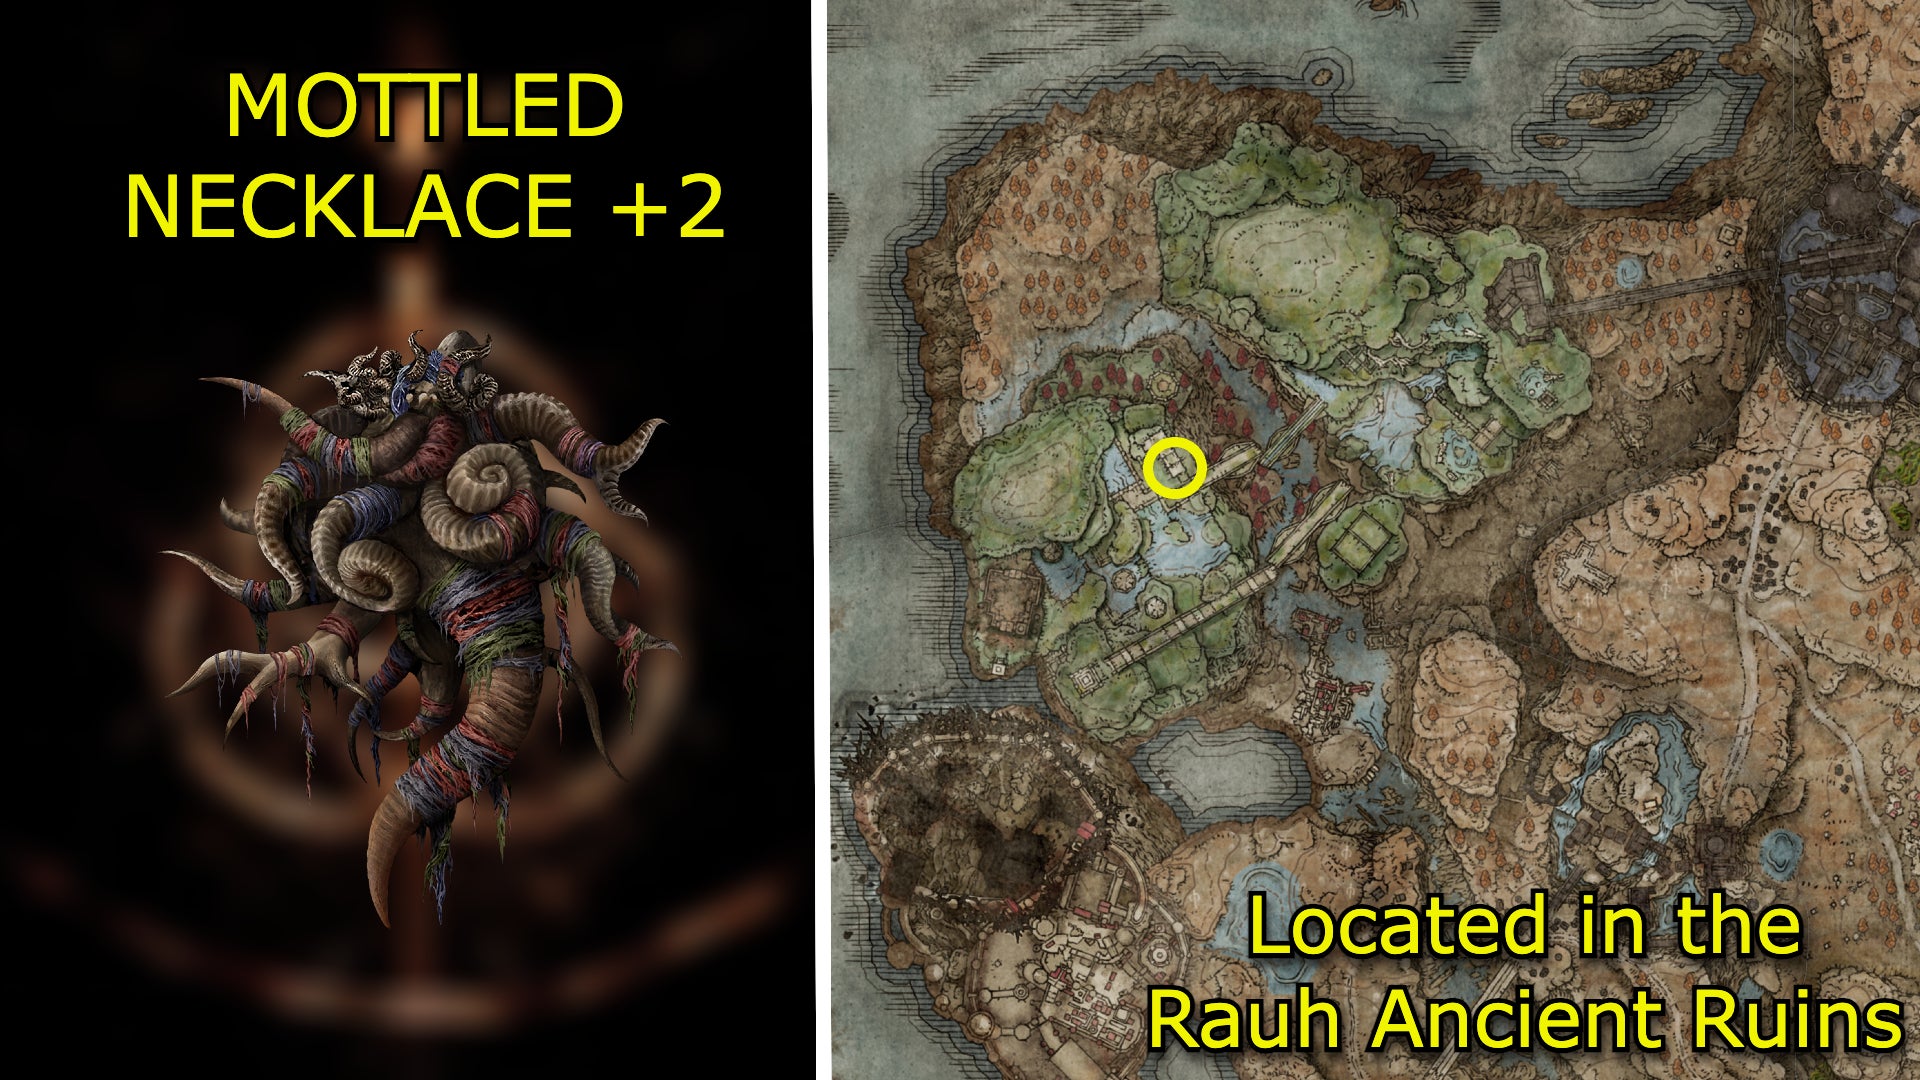
Image credit:Rock Paper Shotgun/Bandai Namco
Effect
Vastly raises robustness, immunity, and focus.
How to get Mottled Necklace +2
From the Rauh Ancient Ruins, West Site of Grace, go through the pillar-lined ruins north of you, up the stairs, right, and then left until you come to a lift that takes you up. From here, go north until you reach a swamp; ride over the rocks bordering the swamp’s north until you come to a cliff overlooking a large portion of the ruins. Smash the seal to unlock a Spiritspring, then use Torrent to jump downwards back into the swamp. Use the new Spiritspring to propel yourself upwards to a new stretch of ruins; the Talisman is located in a chest at the top.
Outer God Heirloom
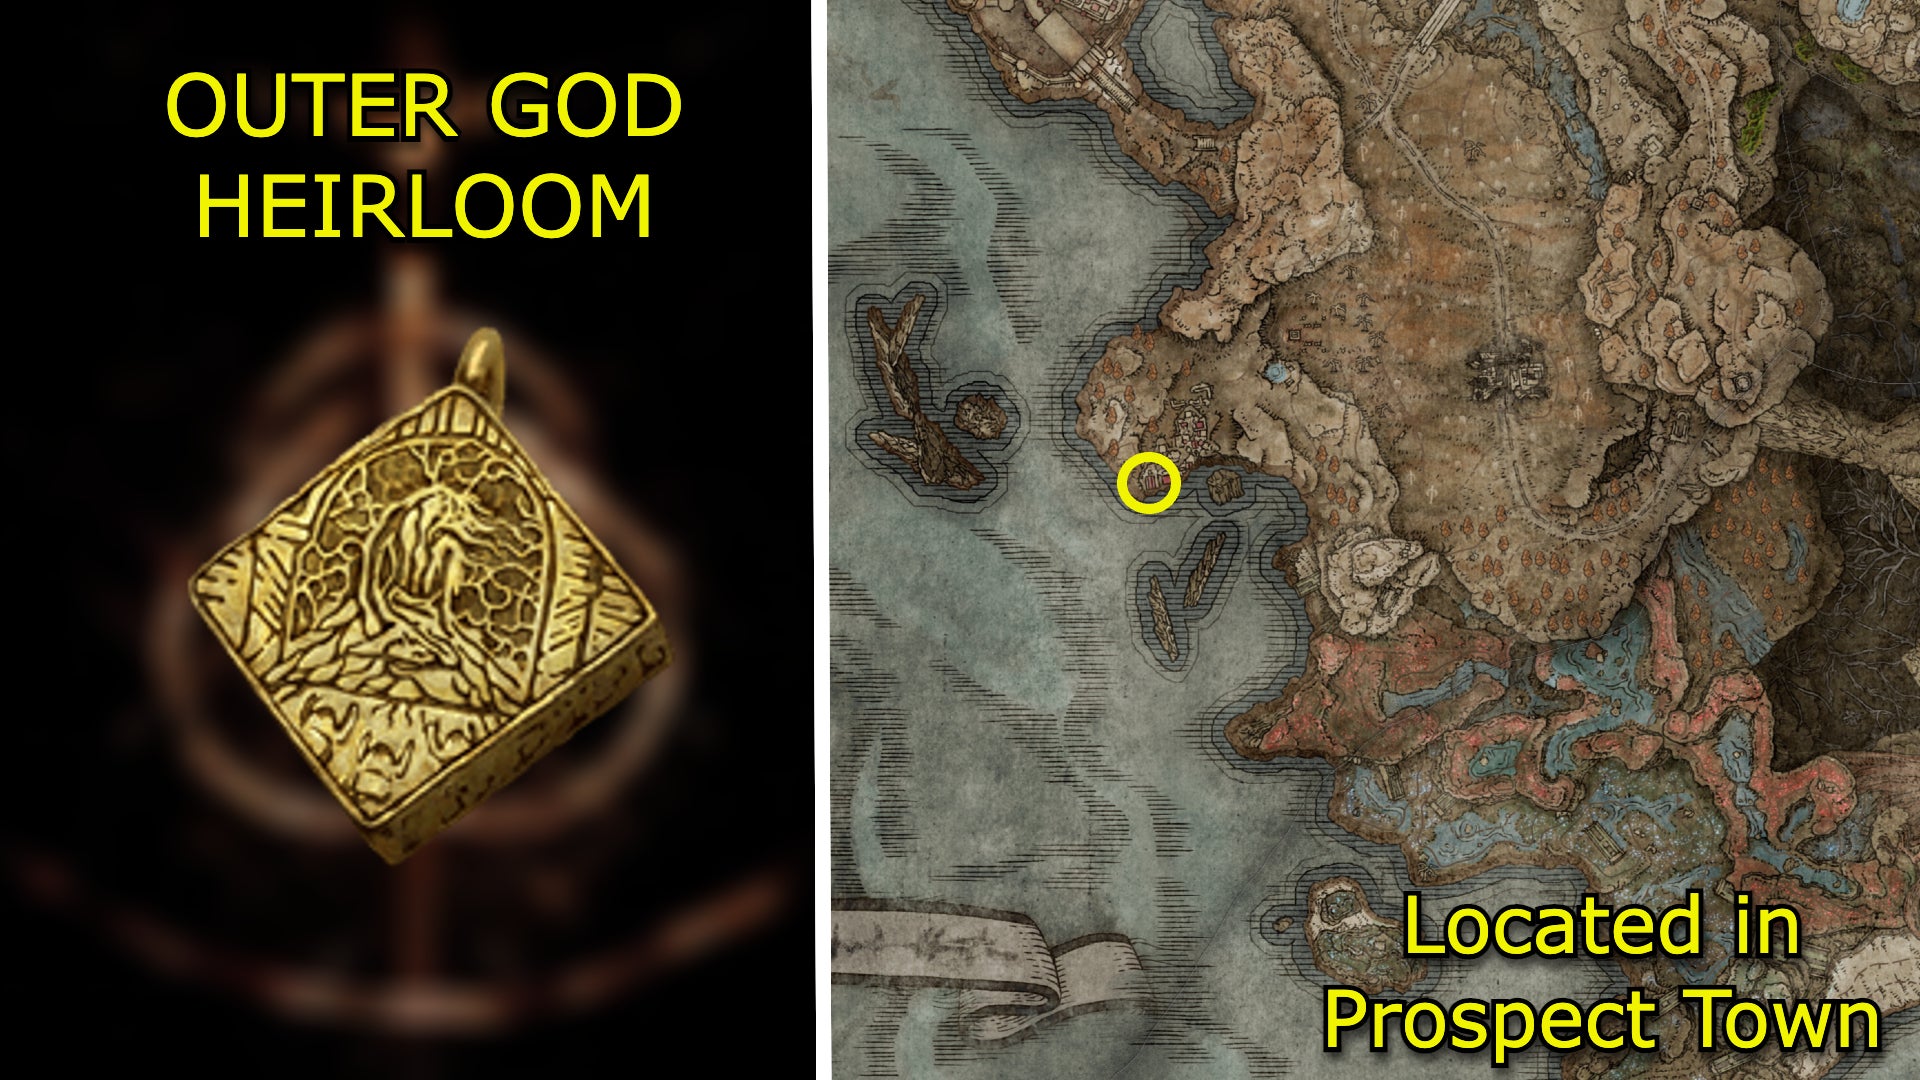
Image credit:Rock Paper Shotgun/Bandai Namco
Effect
Raises arcane.
How to get Outer God Heirloom
The Outer God Heirloom is found in Prospect Town inside a chest in a small church-like building. Use Torrent to scale the stairs and draped pillars that lead to the very top of town.
Pearl Shield Talisman
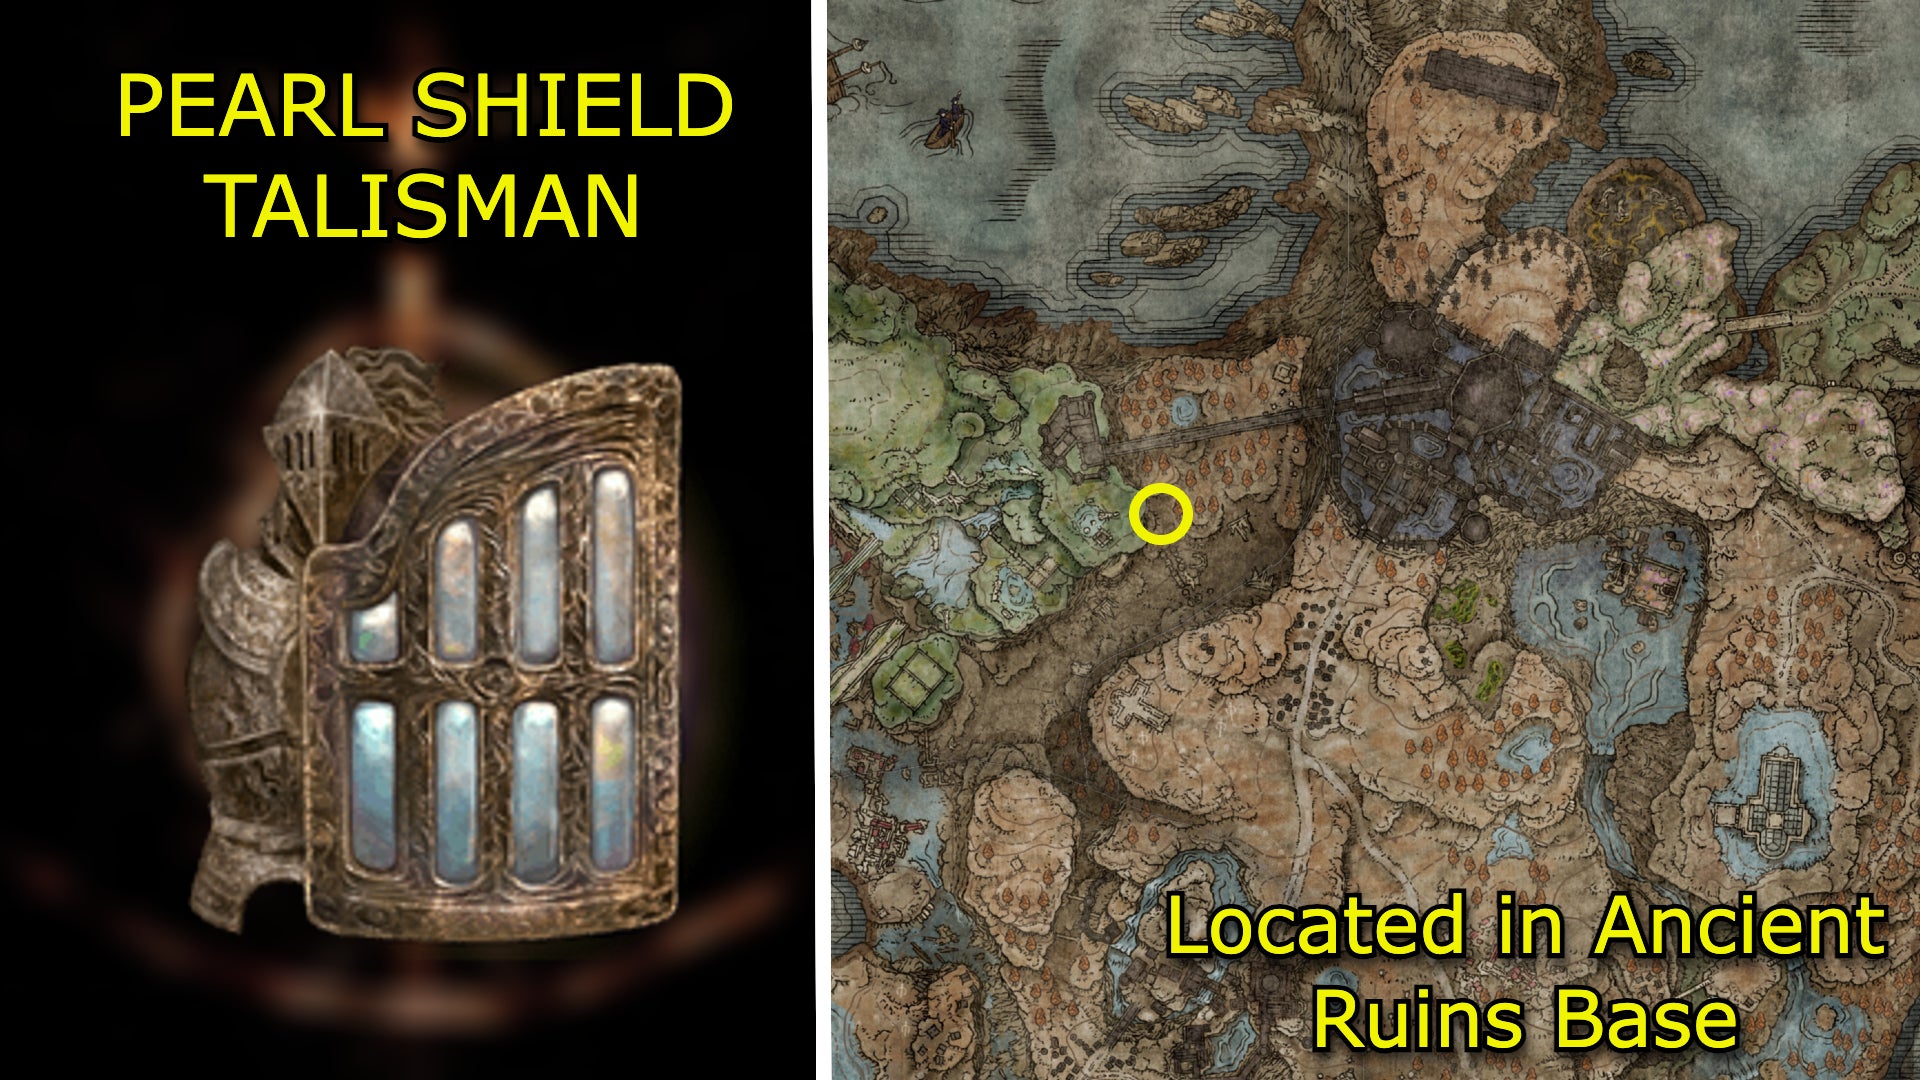
Image credit:Rock Paper Shotgun/Bandai Namco
Effect
Boosts all non-physical damage negation while guarding.
How to get Pearl Shield Talisman
The Pearl Shield Talisman is in a chest near the Ancient Ruins Base Site of Grace. Go northwest until you come across a tent with a bonfire; the chest with the Talisman is located behind some boxes within the tent.
Pearldrake Talisman +3
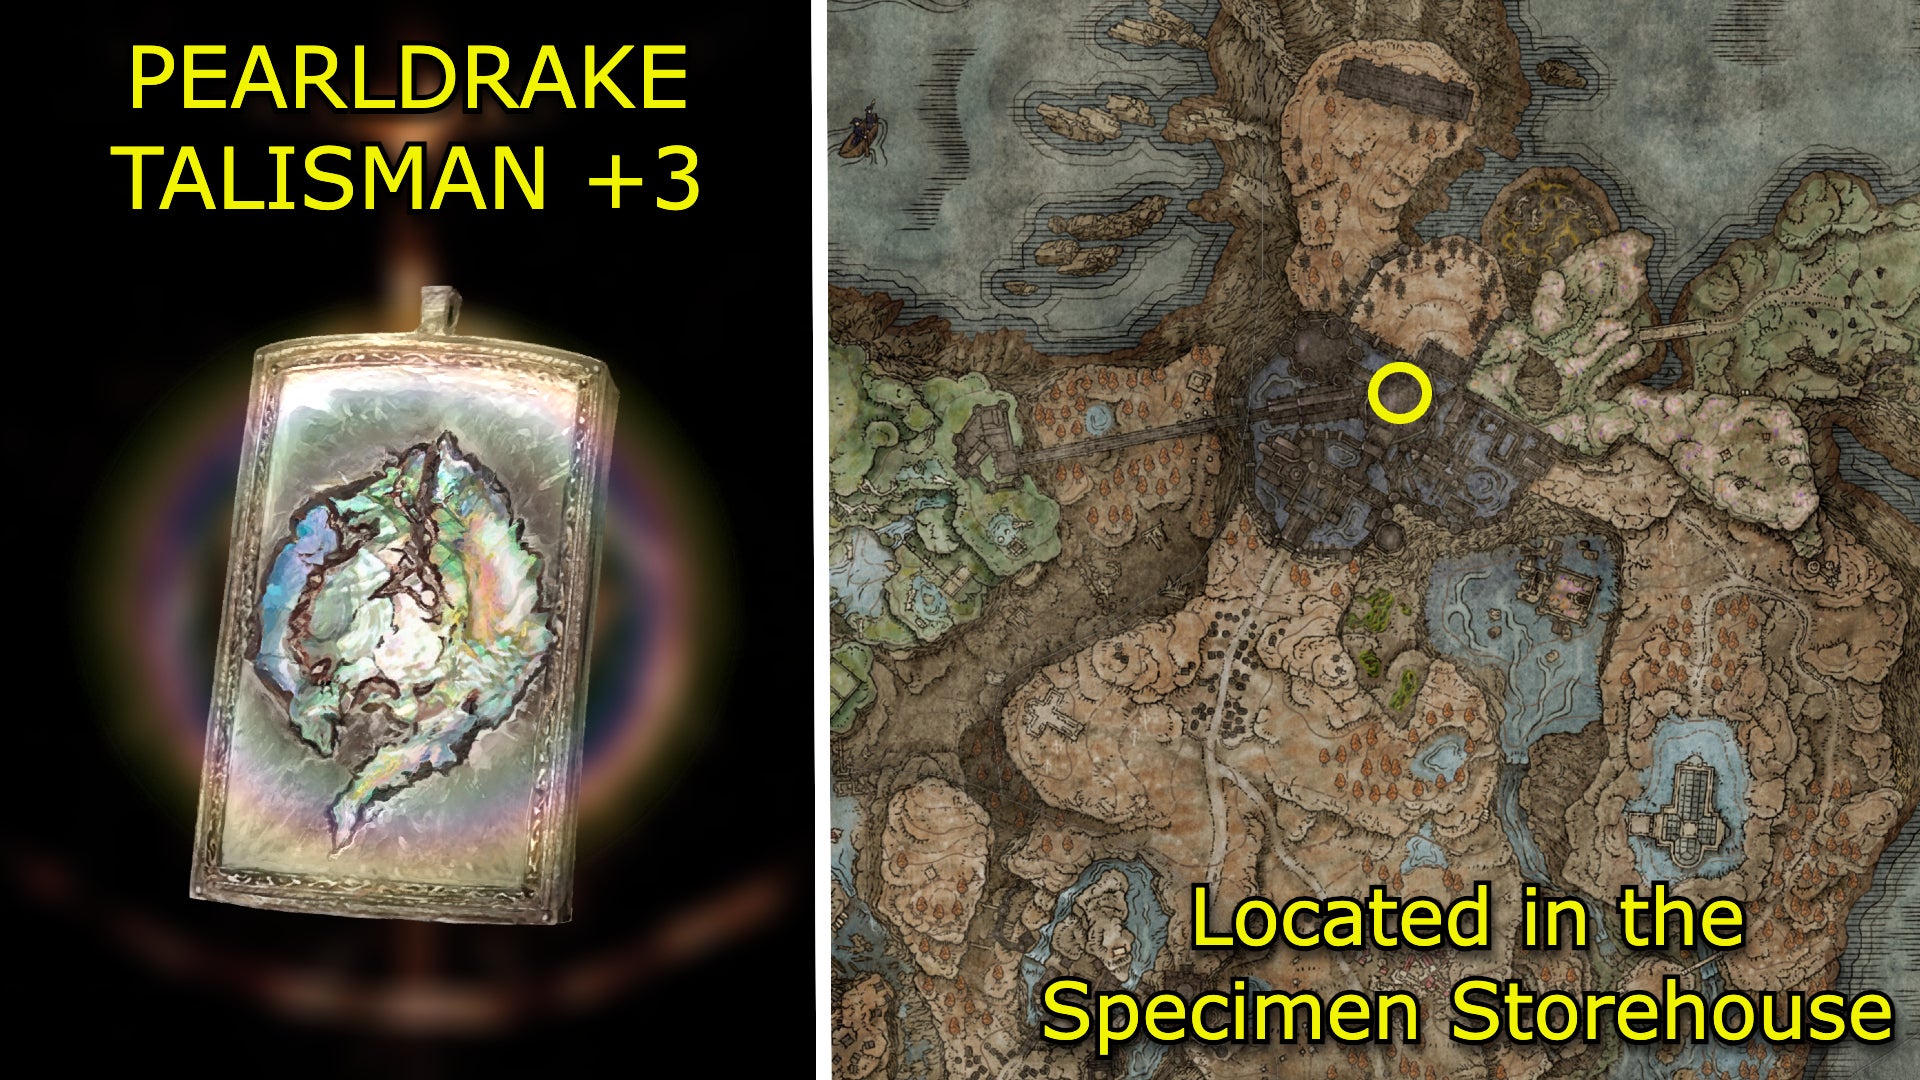
Image credit:Rock Paper Shotgun/Bandai Namco
Effect
Boosts non-physical damage negation by the utmost.
How to get Pearldrake Talisman +3
The Pearldrake Talisman +3 is found on the giant hanging statue in the Specimen Storehouse of the Shadow Keep . You’ll first need to pull the lever on the storehouse’s seventh floor to move the statue; following this, go to the Storehouse, First Floor Site of Grace and climb all the stairs until you’re level with the statue’s head. The Talisman can be found there.
Rellana’s Cameo
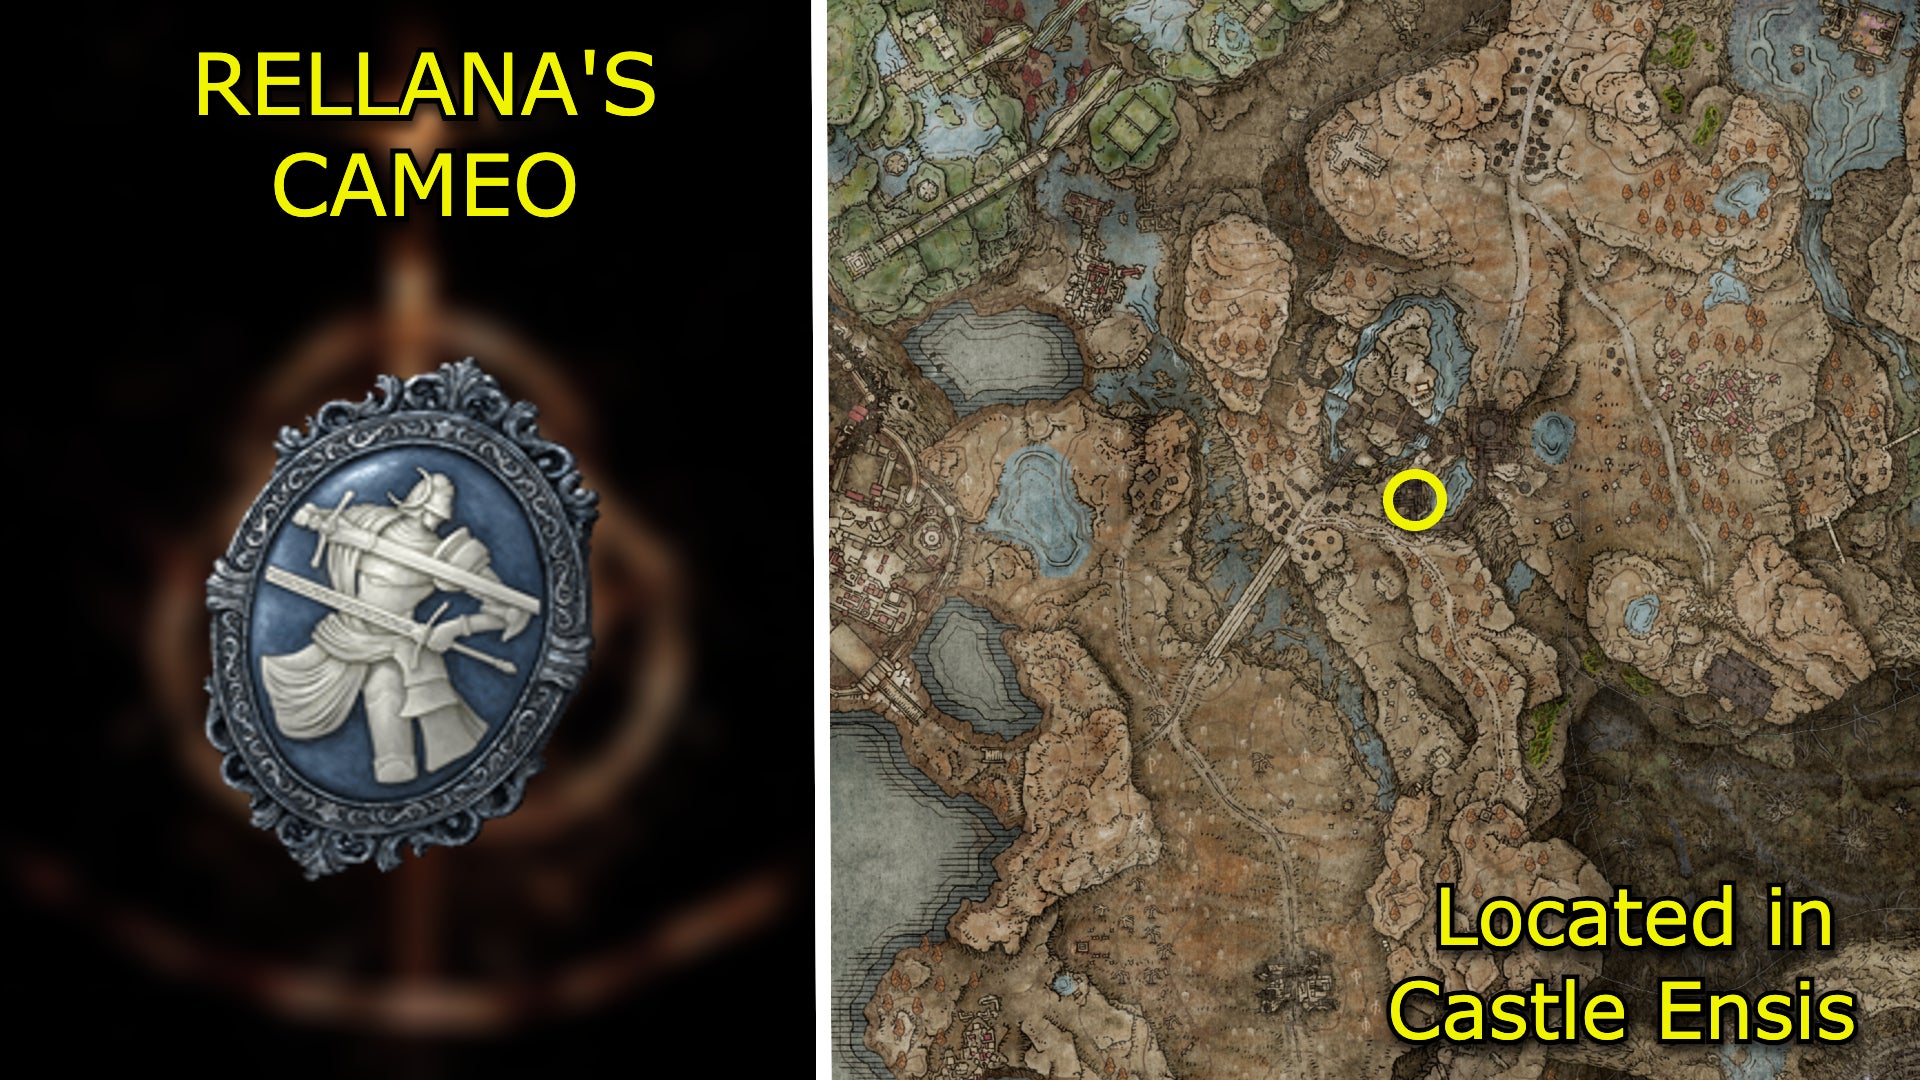
Image credit:Rock Paper Shotgun/Bandai Namco
Effect
Enhances attacks executed after maintaining the same stance for a while.
How to get Rellana’s Cameo
Rellana’s Cameo is found in a church of Castle Ensis guarded by Moonrithyl, Carian Knight. You’ll naturally come upon Moonrithyl and this church as you clear out the castle.
Retaliatory Crossed-Tree

Image credit:Rock Paper Shotgun/Bandai Namco
Effect
Enhances attacks executed after rolling or backstepping.
How to get Retaliatory Crossed-Tree
Sharpshot Talisman

Image credit:Rock Paper Shotgun/Bandai Namco
Effect
Boosts attack power of precision-aimed shots.
How to get Sharpshot Talisman
The Sharpshot Talisman is on a corpse in Albinauric’s Shack at the very rear end of the Shadow Keep . From the Scaduview Site of Grace, go northwest and you’ll eventually come across the destroyed shack with the Talisman inside.
Shattered Stone Talisman
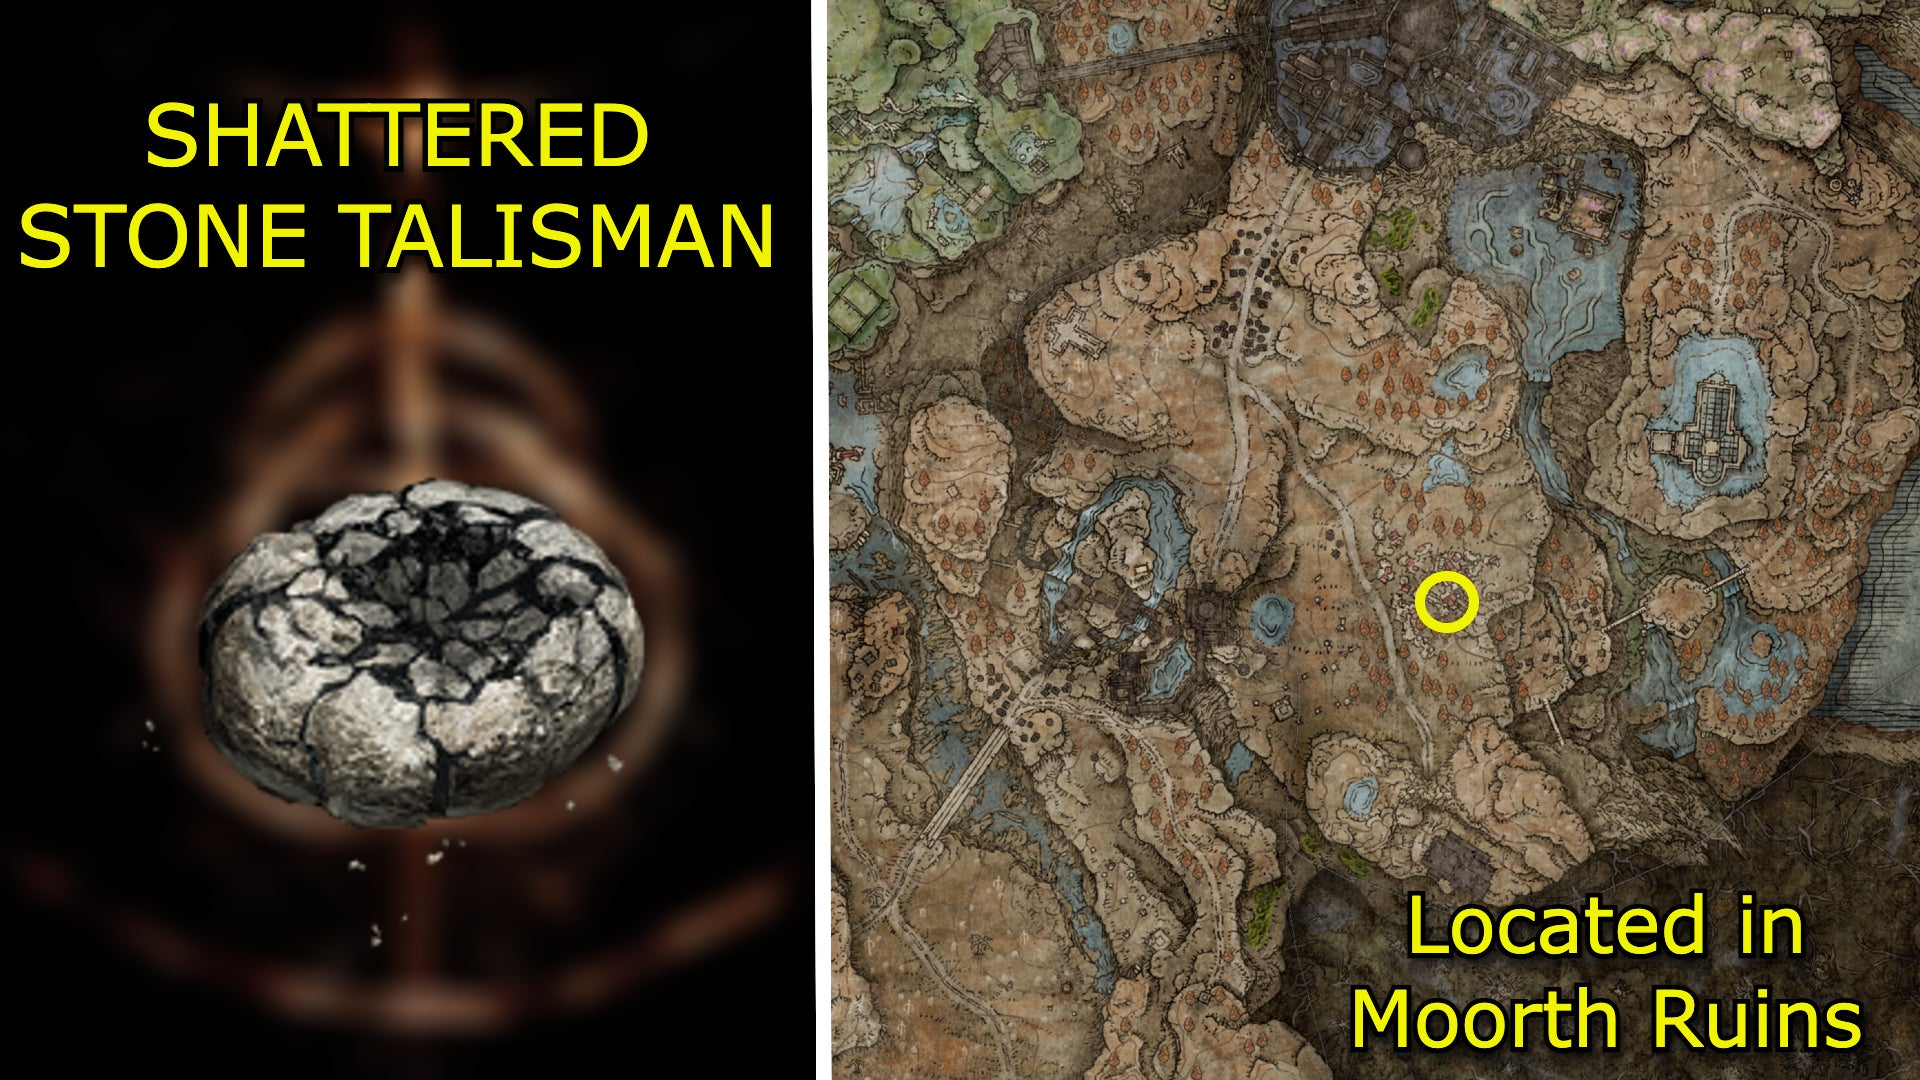
Image credit:Rock Paper Shotgun/Bandai Namco
Effect
Raises potency of kicking and stomping skills.
How to get Shattered Stone Talisman
Go to Moorth Ruins ; you’ll find the Shattered Stone Talisman on a corpse located on a ledge overlooking the massive sinkhole.
Smithing Talisman
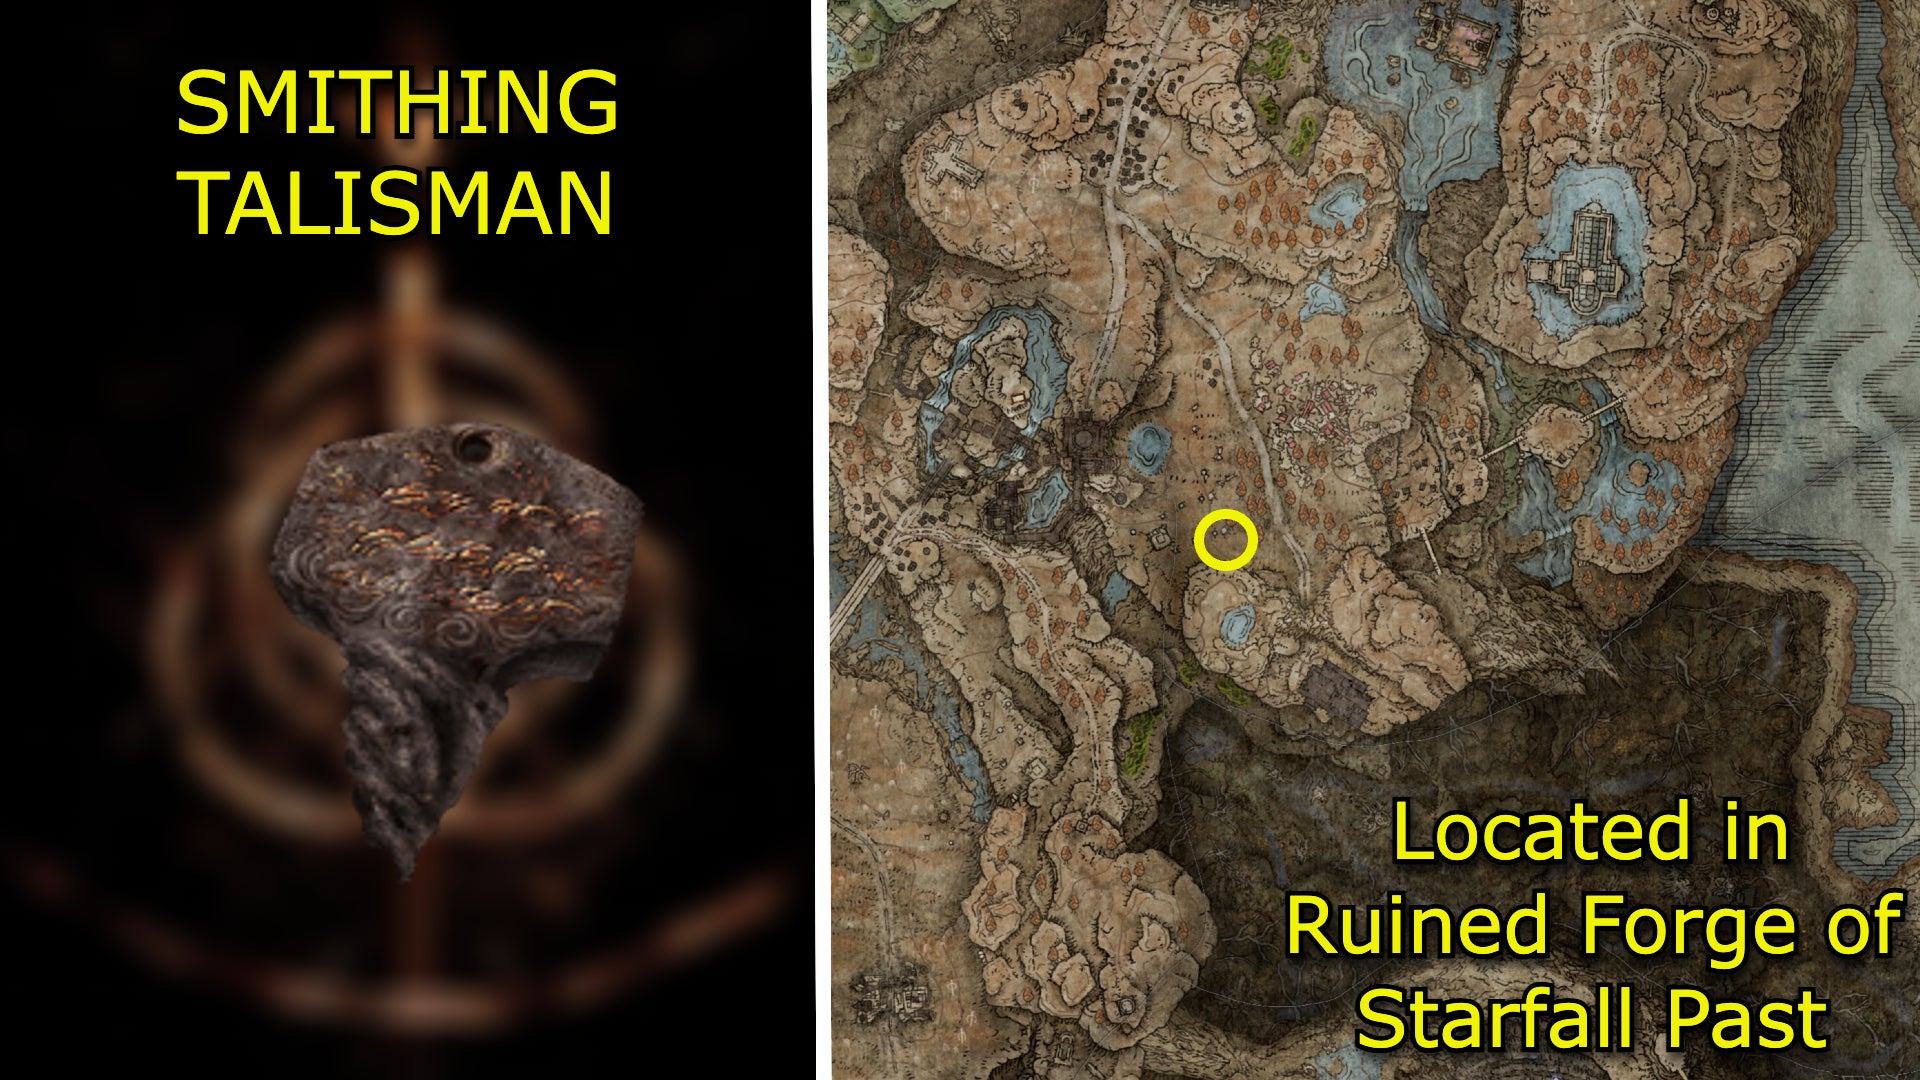
Image credit:Rock Paper Shotgun/Bandai Namco
Effect
Enhances weapon-throwing attacks.
How to get Smithing Talisman
The Smithing Talisman is on a corpse in the Ruined Forge of Starfall Past . From the entrance’s Site of Grace, pull the lever in the first room and then enter the unlocked area. Take the eastern passageway until you see a ladder on your right. This ladder takes you to a lava-filled room; go past the room and you’ll find the Talisman on a corpse to your left.
Spelldrake Talisman +3
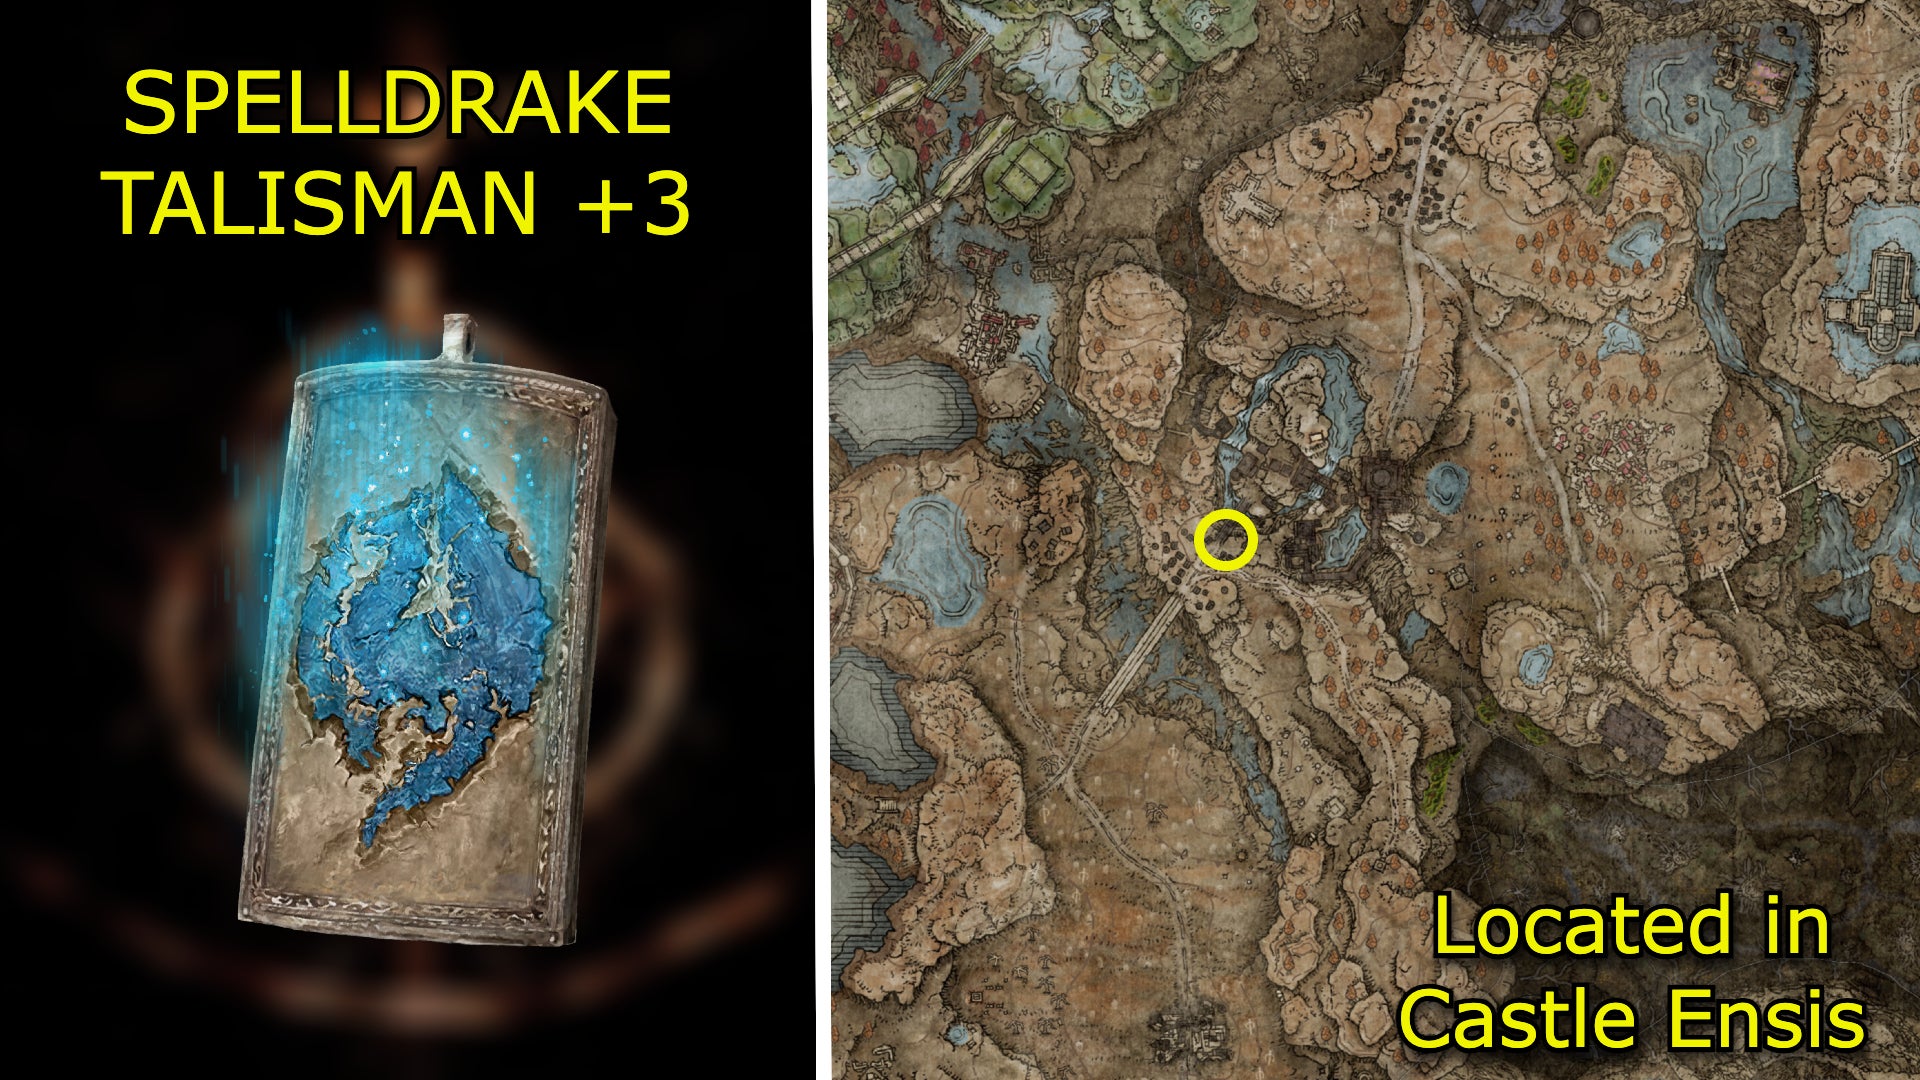
Image credit:Rock Paper Shotgun/Bandai Namco
Effect
Boosts magic damage negation by the utmost.
How to get Spelldrake Talisman +3
The Spelldrake Talisman +3 is on a corpse by the Castle Front Site of Grace. Go north from the Site of Grace and before you hit the bridge that leads to Castle Ensis , jump off the eastern cliffside and land on a ledge. This ledge leads east and takes you to a hidden storeroom with the Talisman.
St. Trina’s Smile
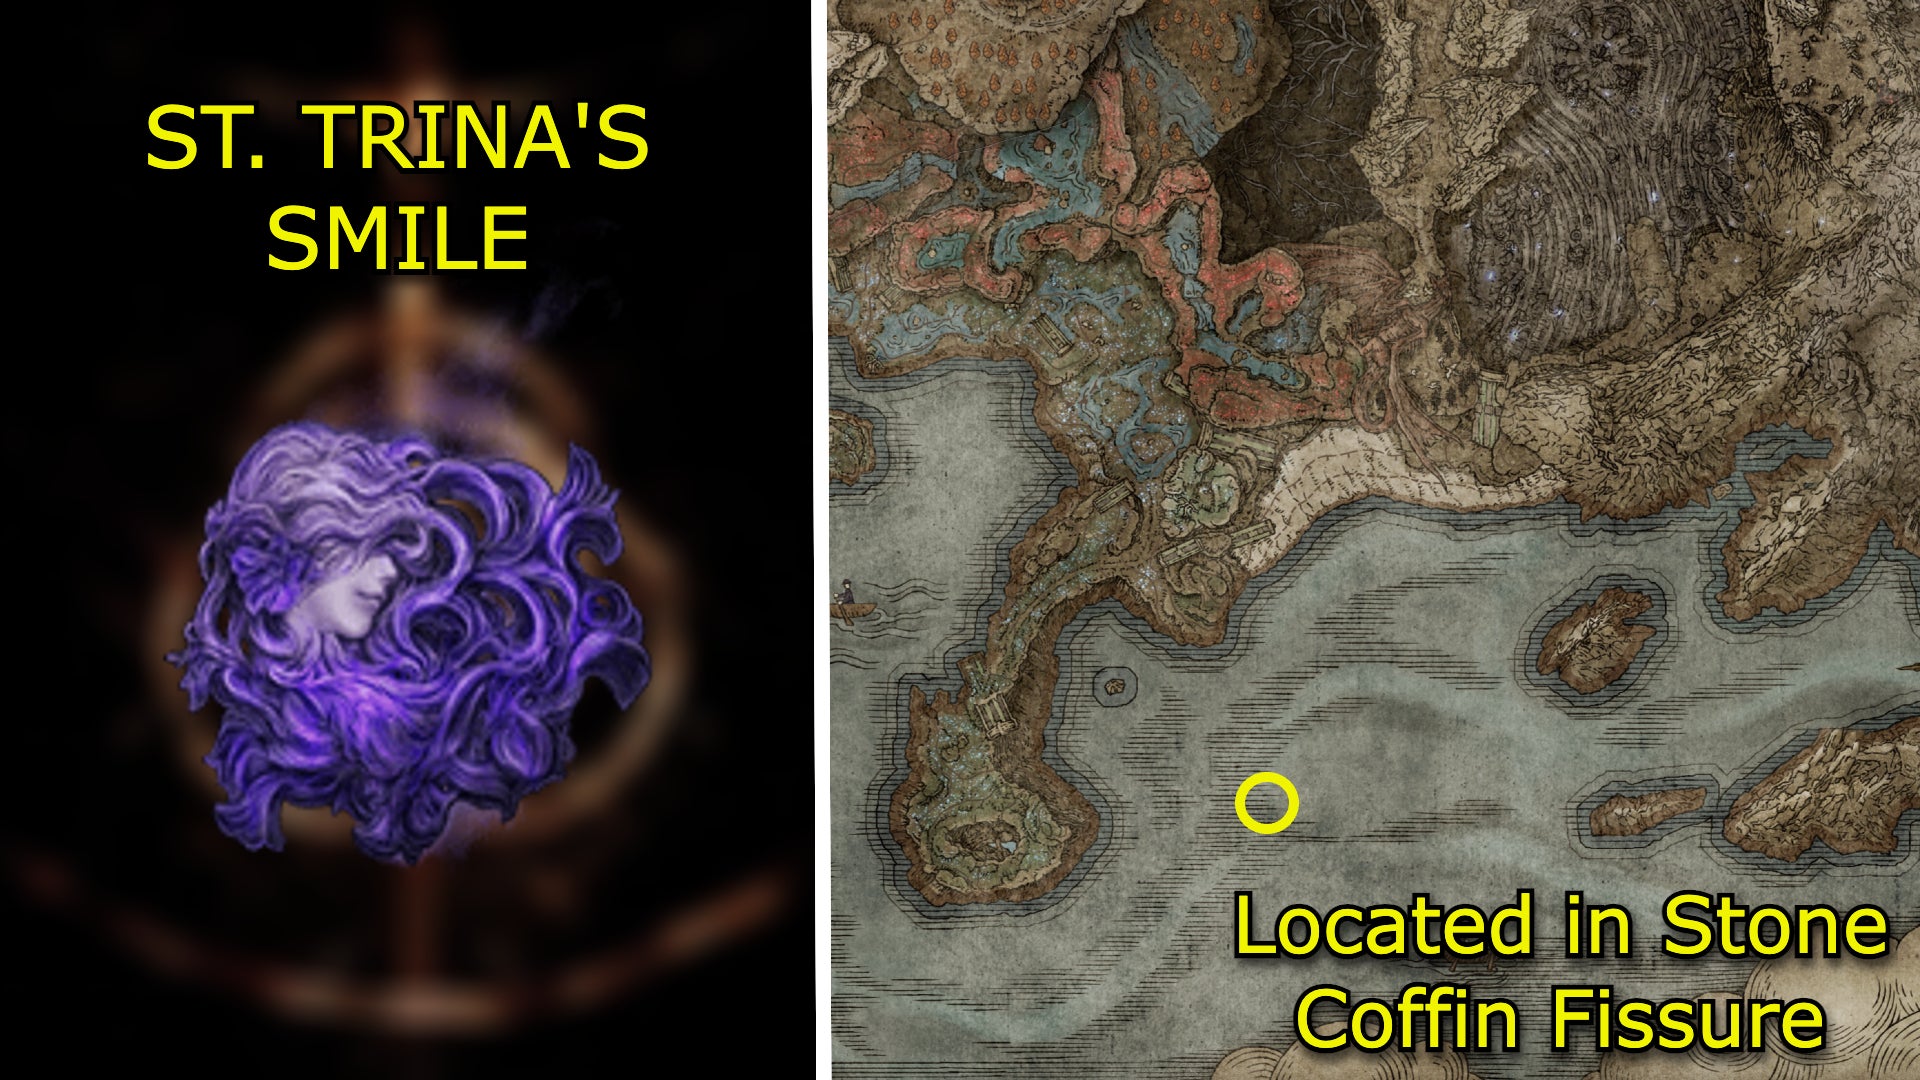
Image credit:Rock Paper Shotgun/Bandai Namco
Effect
Sleep in the vicinity increases attack power.
How to get St. Trina’s Smile
Complete Thiollier’s questline and then return to St. Trina in the Stone Coffin Fissure to receive St. Trina’s Smile.
Stalwart Horn Charm +2

Image credit:Rock Paper Shotgun/Bandai Namco
Effect
Vastly raises robustness.
How to get Stalwart Horn Charm +2
The Stalwart Horn Charm +2 is in Bonny Gaol . Navigate through the rat-filled caves beneath Bonny Gaol until you find a ladder that leads up into the gaol proper. A corpse with the Talisman lies at the top.
Talisman of All Crucibles
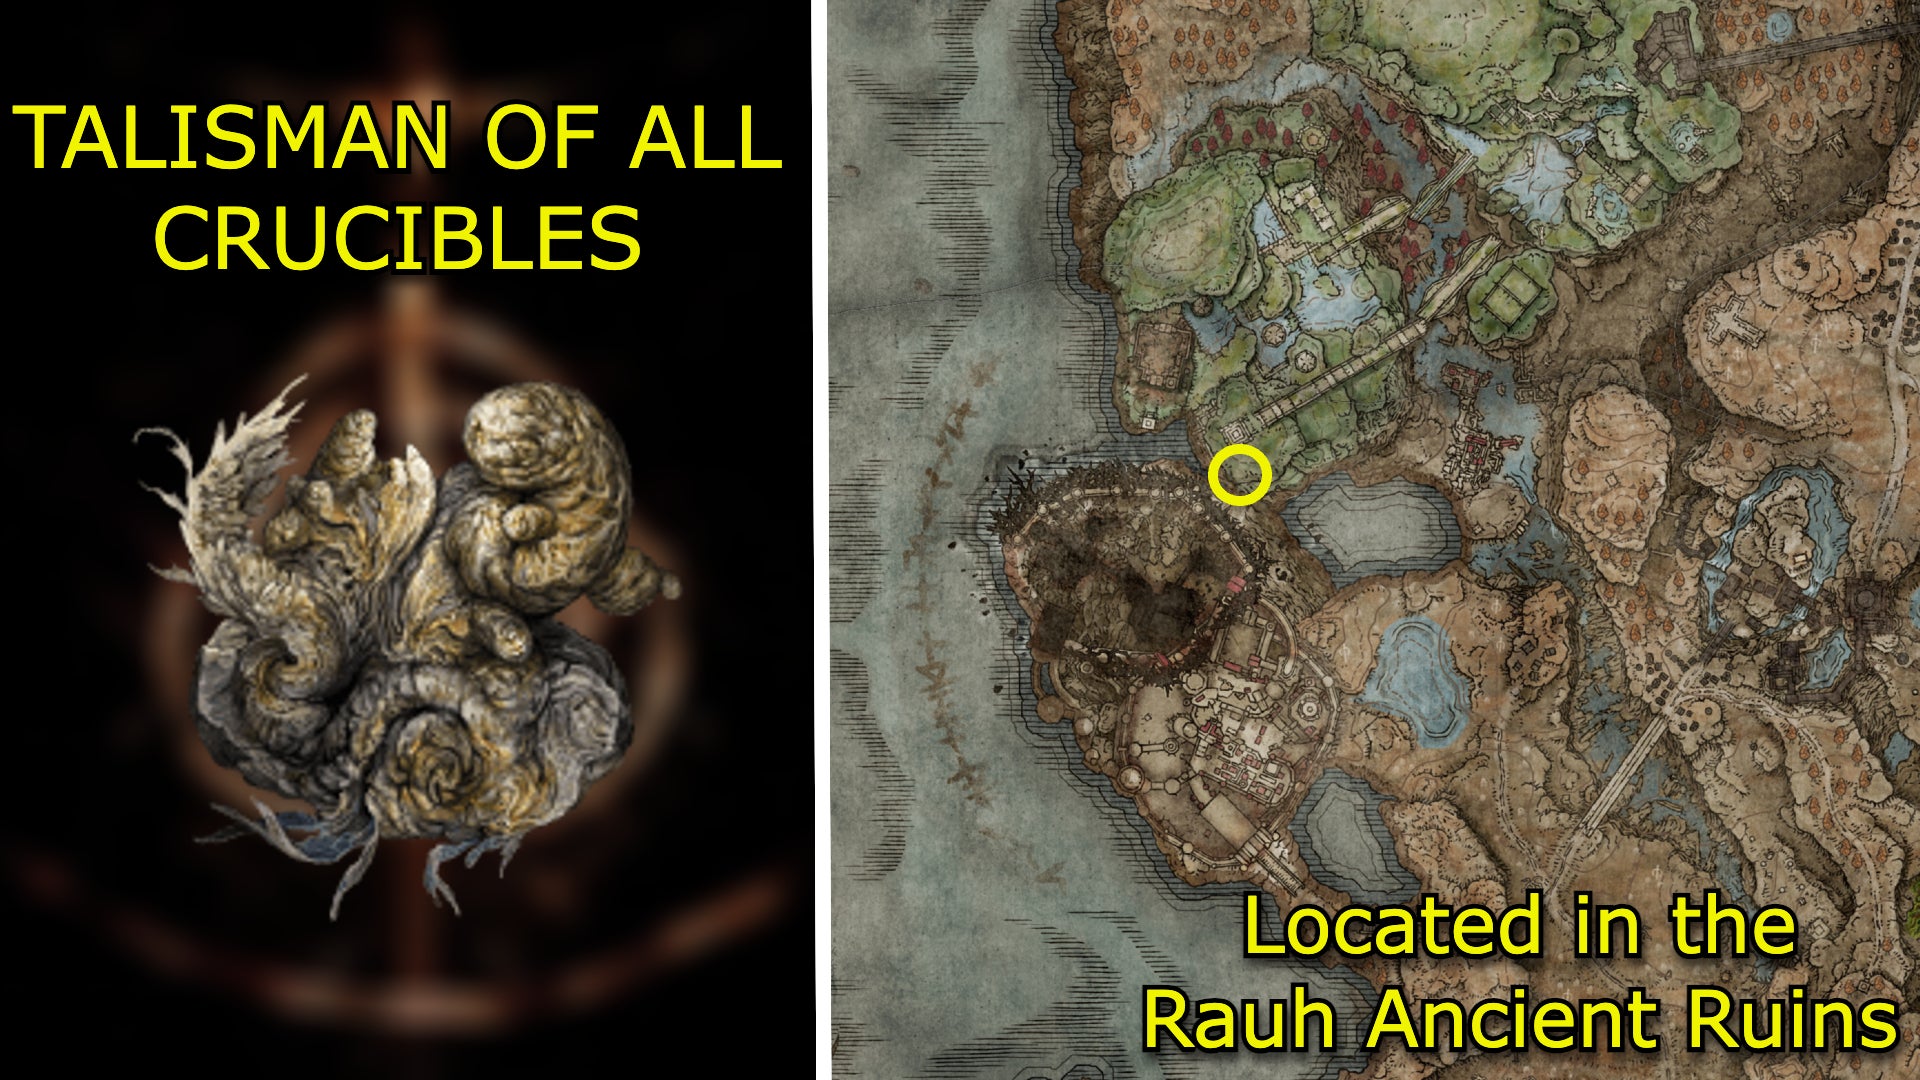
Image credit:Rock Paper Shotgun/Bandai Namco
Effect
Grants effects of all crucible Talismans.
How to get Talisman of All Crucibles
From the Rauh Ancient Ruins, West Site of Grace, enter the pillar-lined ruins north of you, head up the stairs, and veer west until you reach the lift that takes you to the upper level. Then turn left and you’ll see a cliffside overlooking several fragmented bridge-like platforms. Jump onto the left platform and follow it until you eventually come into a hole in the wall. Jump into the hole, and a chest with the Talisman is inside.
Talisman of Lord’s Bestowal
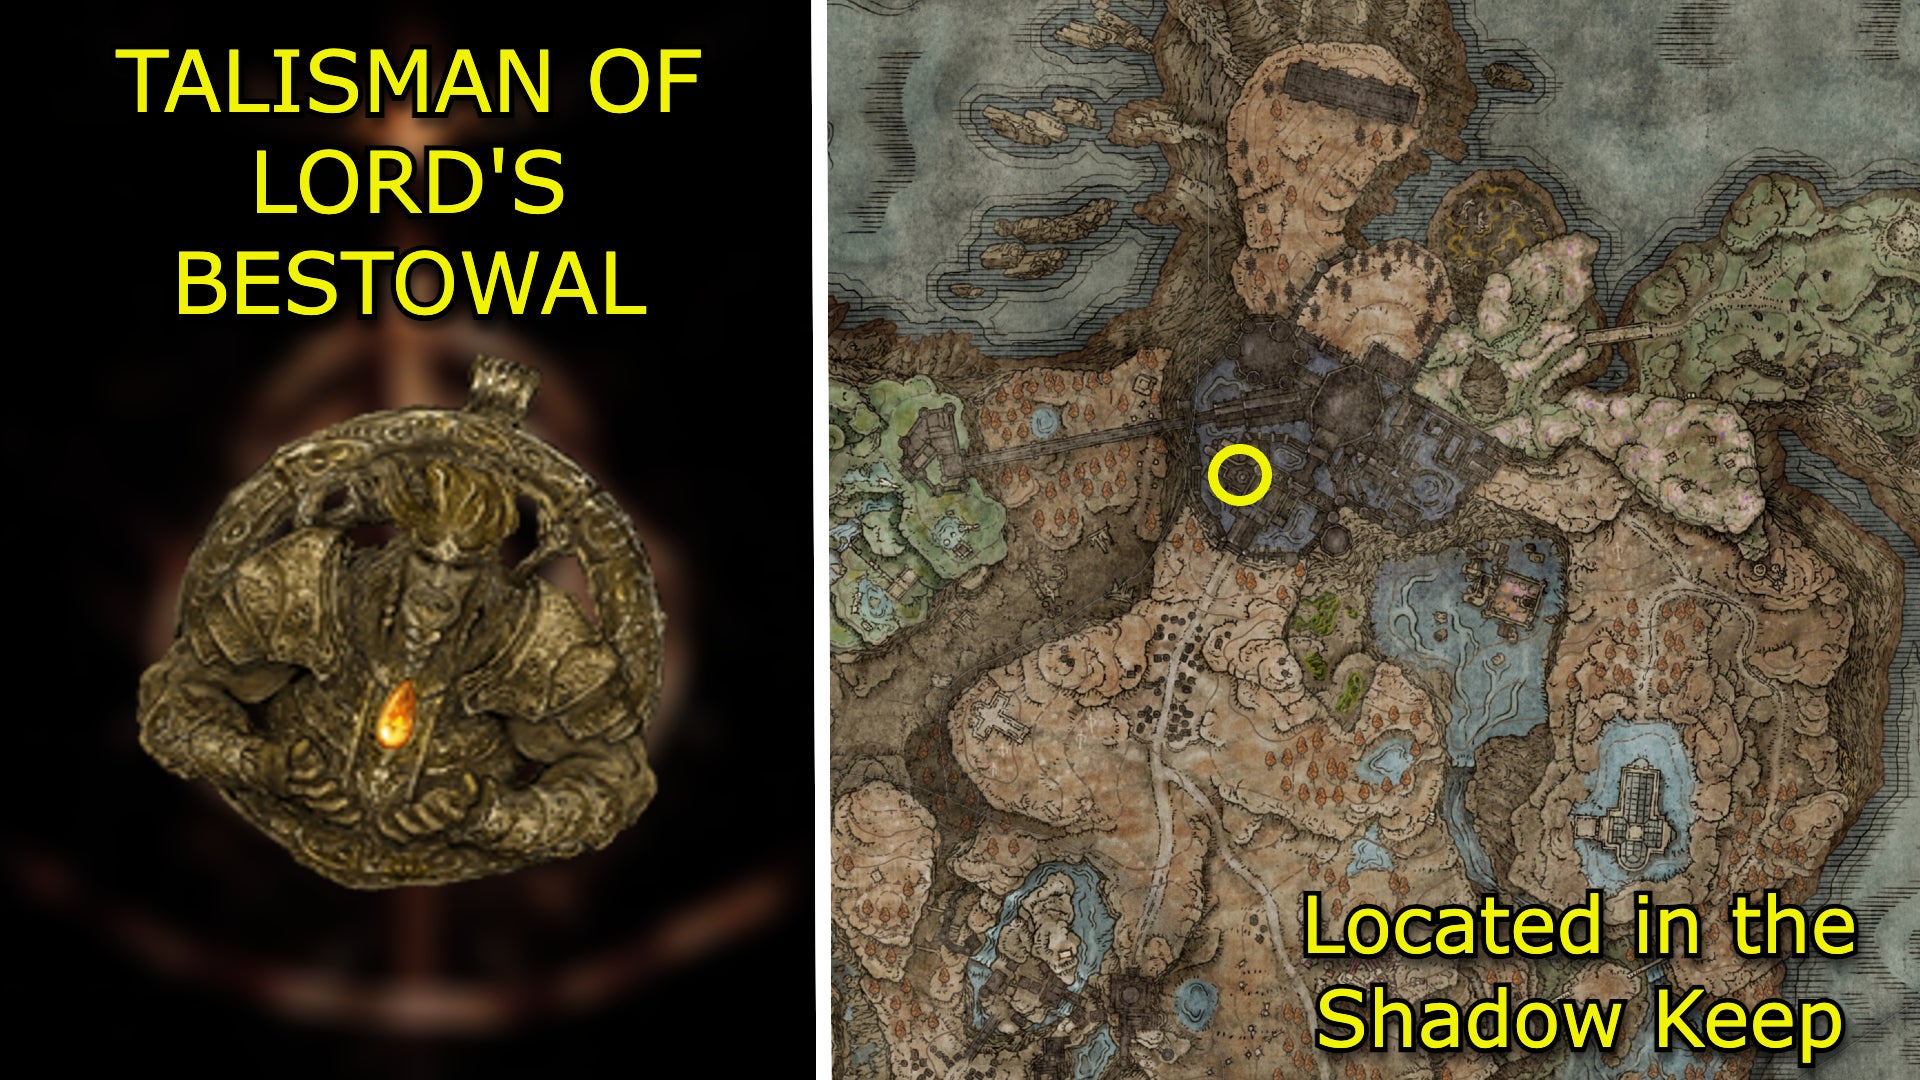
Image credit:Rock Paper Shotgun/Bandai Namco
Effect
Increases poise after using a flask of tears.
How to get Talisman of Lord’s Bestowal
From the Main Gate Plaze Site of Grace in the Shadow Keep , head westwards until you reach the wooden stairs going up into a room decked out with chandeliers. Exit the chandelier room via the left doorway and you’ll be on a bridge; hop off the right side of the bridge and you’ll land by a golden tree. A corpse holds the Talisman nearby.
Talisman of the Dread

Image credit:Rock Paper Shotgun/Bandai Namco
Effect
Raises potency of magma.
How to get Talisman of the Dread
The Talisman of the Dread is on a corpse in Elder’s Hovel . To get to Elder’s Hovel, head north from the Pillar Path Cross Site of Grace. Stay close to the eastern cliffs and follow the pathway down until you reach a swampy region. Travel through the swamp southeast and you’ll eventually come upon a shack with the corpse inside.
Two-Handed Sword Talisman
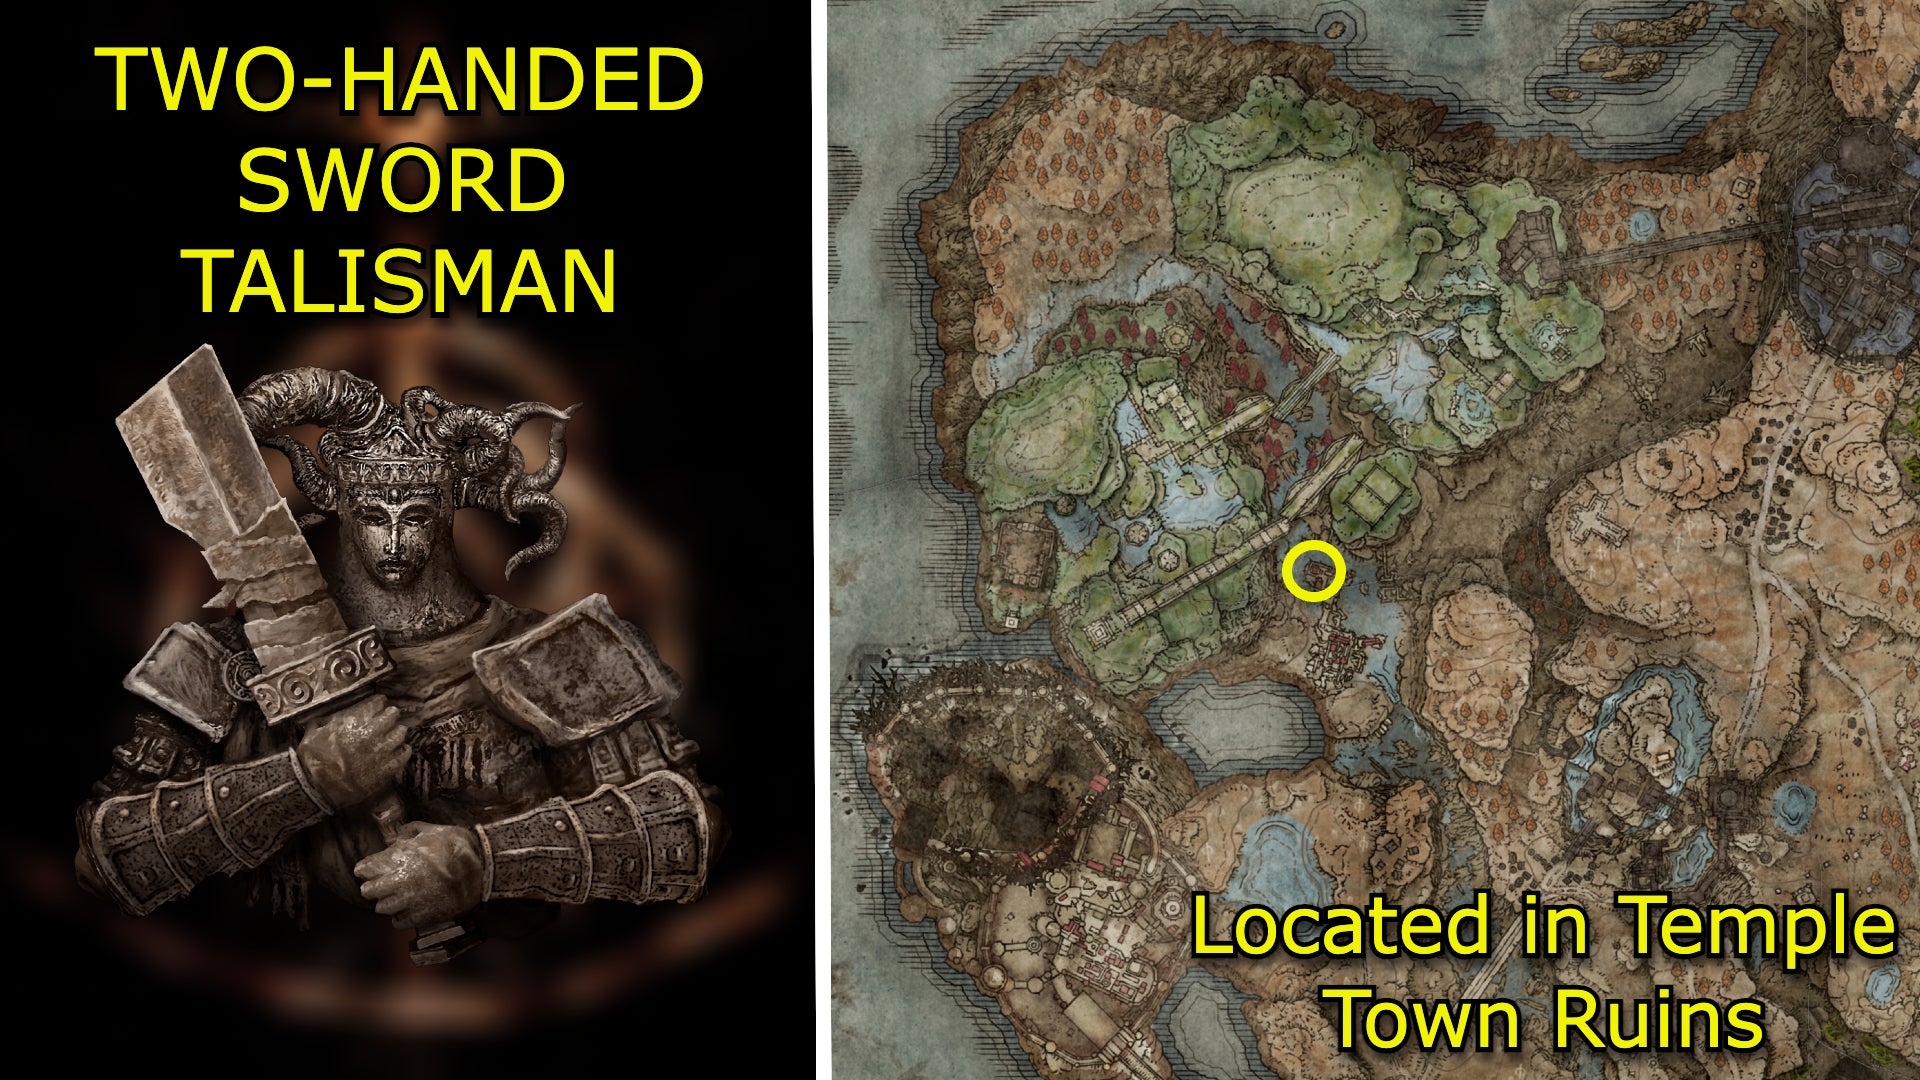
Image credit:Rock Paper Shotgun/Bandai Namco
Effect
Enhances attacks with two-handed weapons.
How to get Two-Handed Sword Talisman
The Two-Handed Sword Talisman is hidden within a chest in a room in Temple Town Ruins . You’l need to use Torrent to hop up on the ruined pillars and drape-lined walkways until you make it to a small room in the highest structure in the ruins. The Horned Warrior is nearby, so if you’ve already fought him, just continue up the stairs to find the room with the chest.
Two-Headed Turtle Talisman
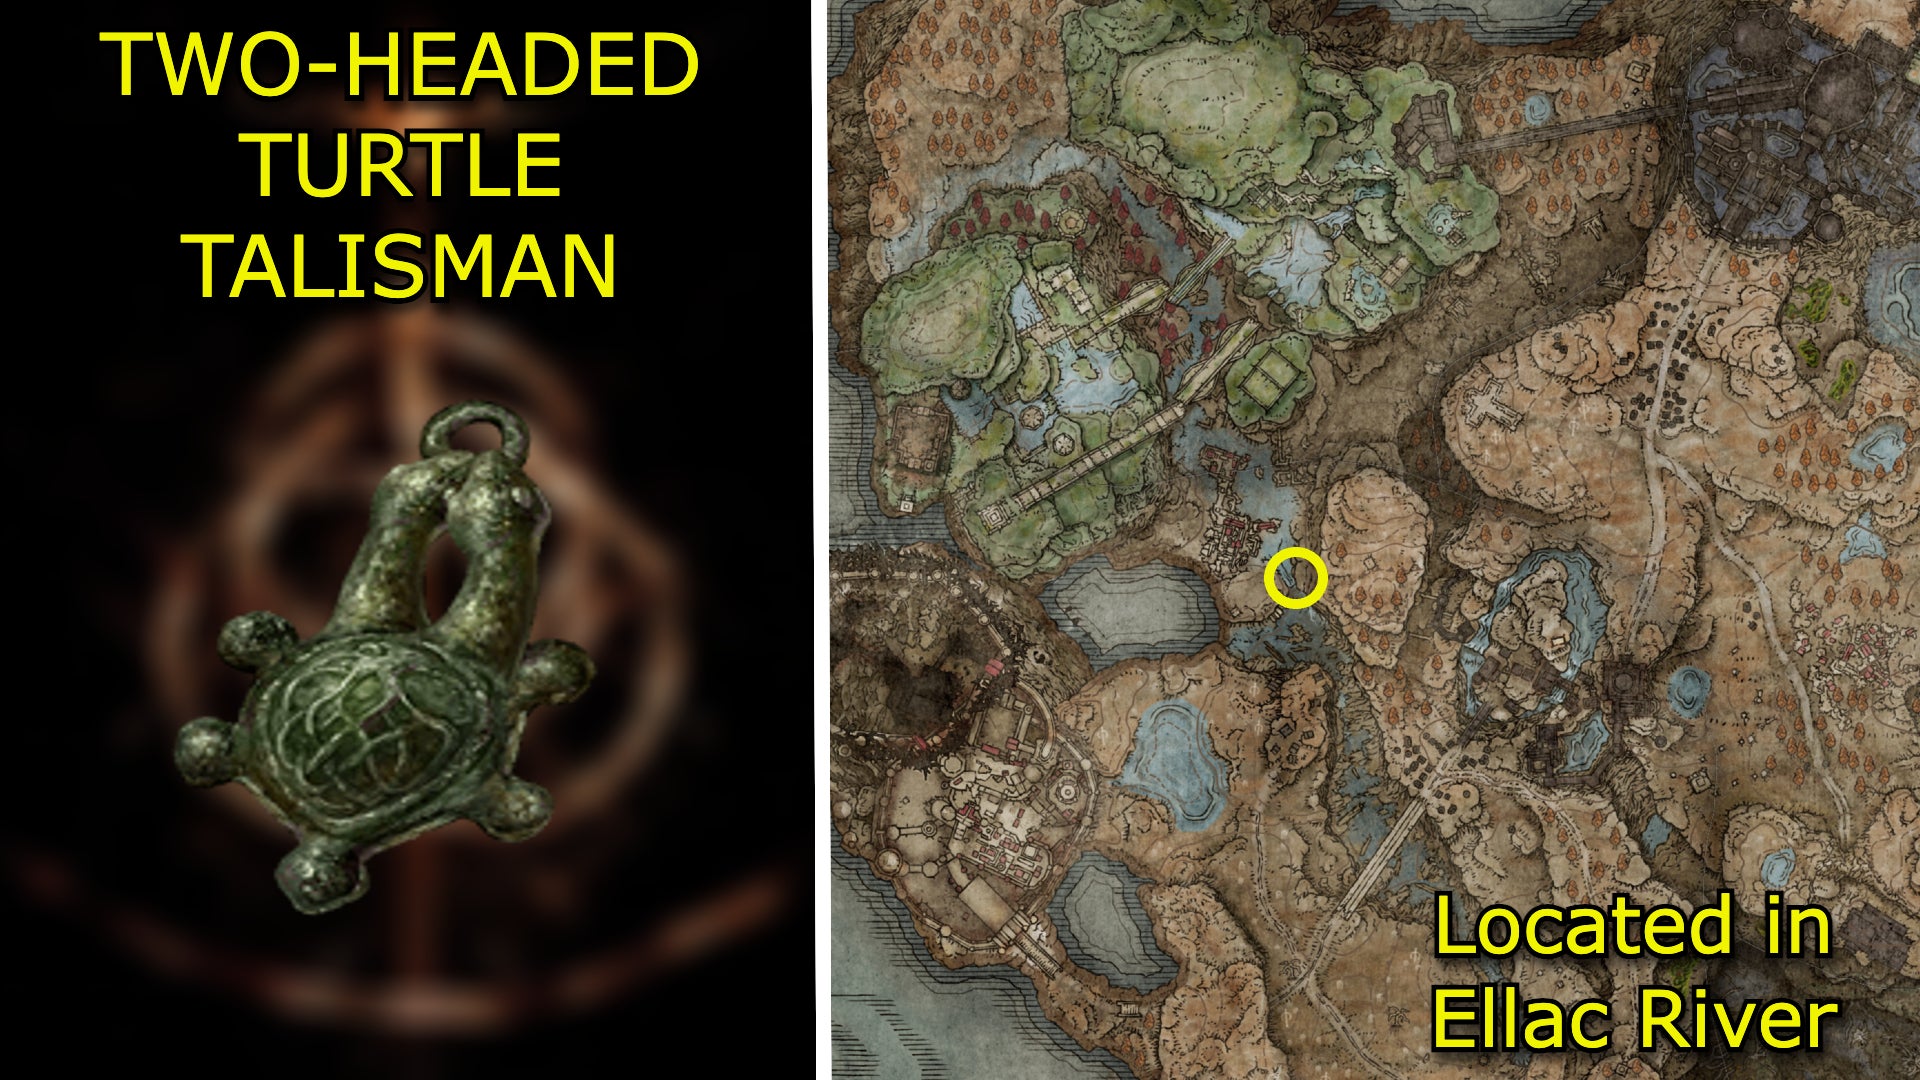
Image credit:Rock Paper Shotgun/Bandai Namco
Effect
Greatly raises stamina recovery speed.
How to get Two-Headed Turtle Talisman
The Two-Headed Turtle Talisman is located near the Ellac River Cave Site of Grace, inside a cave past a waterfall guarded by a giant crab. Go northwest from the Site of Grace and you’ll find it.
Verdigris Discus
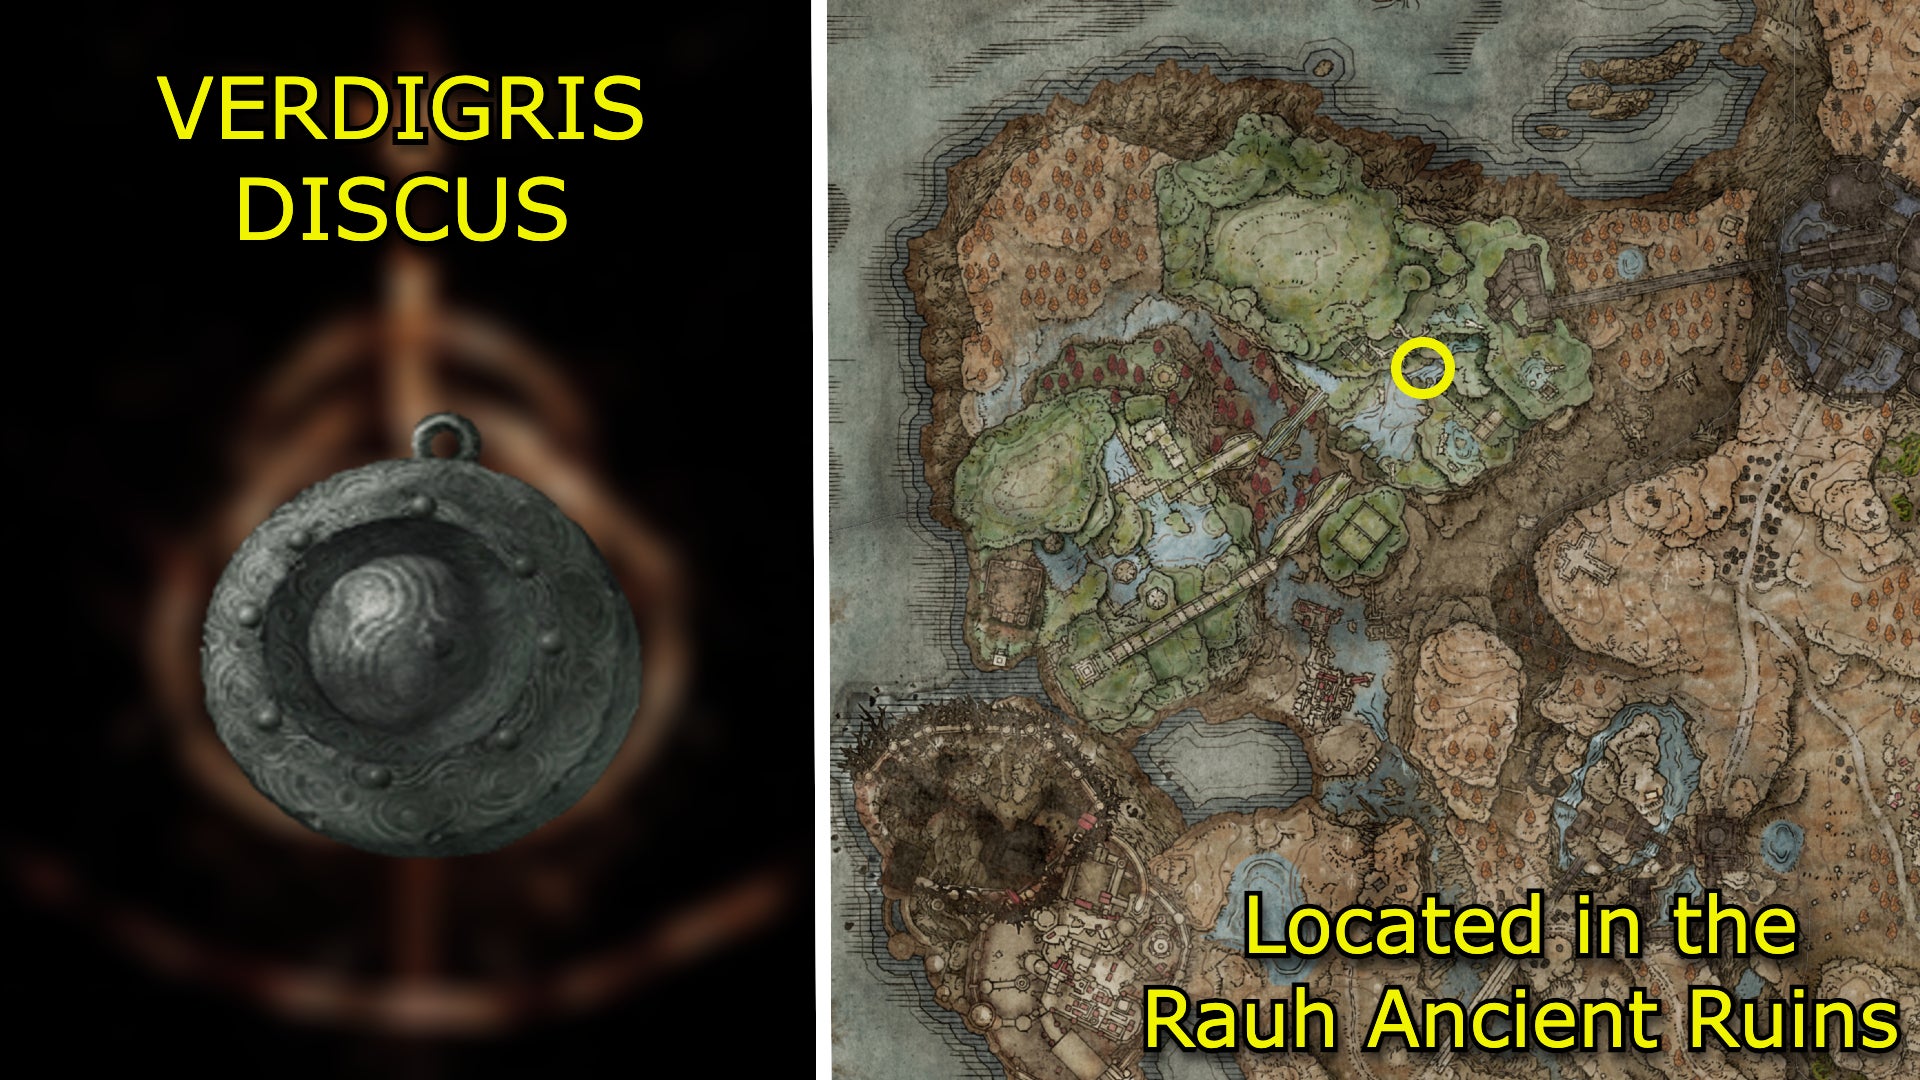
Image credit:Rock Paper Shotgun/Bandai Namco
Effect
Raises defense with higher equipment load.
How to get Verdigris Discus
The Verdigris Discus is located near the base of a statue behind the waterfalls in the Ancient Ruins of Rauh . After using the Imbued Sword Key to teleport to the ruins, head up the slope and keep going north to run into the waterfalls.
Viridian Amber Medallion +3
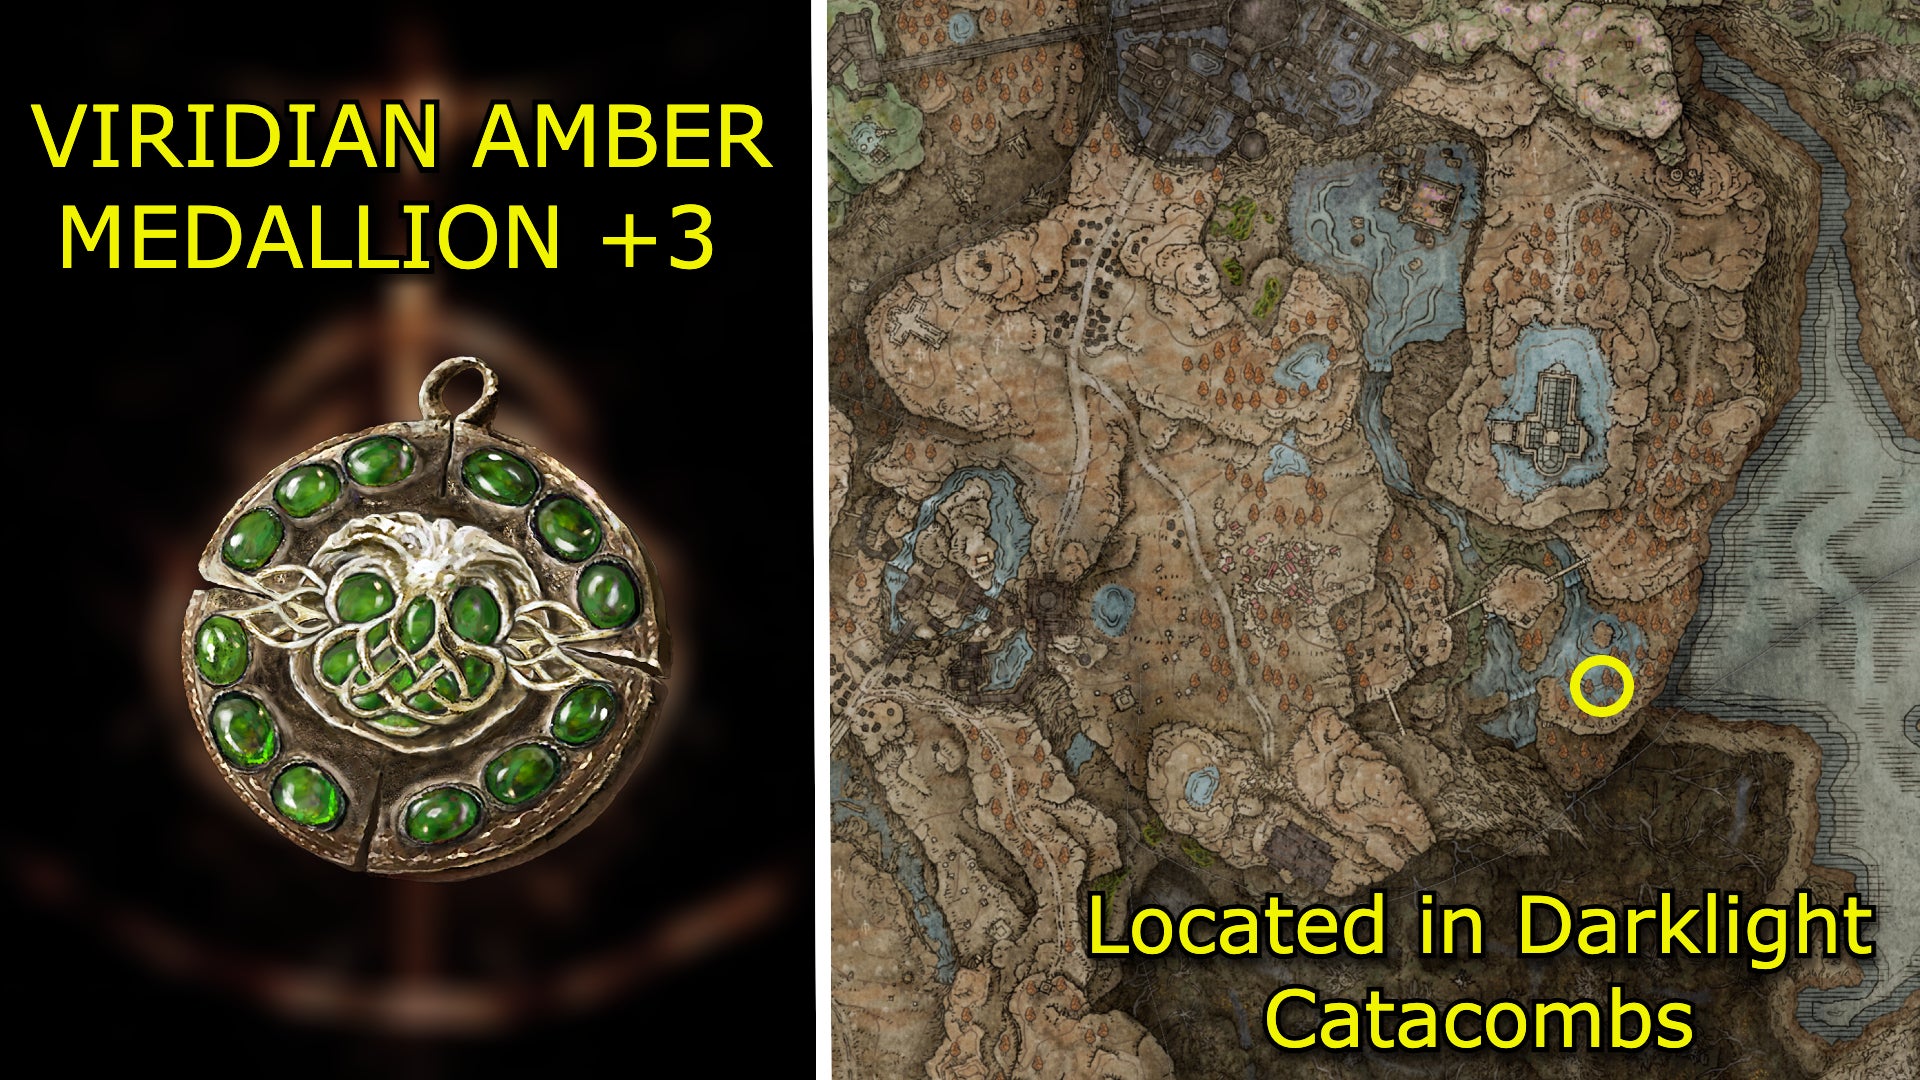
Image credit:Rock Paper Shotgun/Bandai Namco
Effect
Boosts maximum stamina by the utmost.
How to get Viridian Amber Medallion +3
The Viridian Amber Medallion +3 is in Darklight Catacombs , hidden within a chest. After pulling the first lever to illuminate a chasmous stretch of the dungeon, you’l eventually emerge in a room overlooking the chasm. Jump down from the railing onto a narrow ledge, and navigate this ledge until you reach the room with the chest.
That’s all of the new Talismans we’ve found in Elden Ring’s Shadow Of The Erdtree DLC. If you’re interested in other equipment, check out our guide for all 103 weapons and all new armor in Shadow of the Erdtree. We also have a rundown on all Scadutree Fragment locations to help you level up in the Lands of Shadow, as well as a comprehensive list of all bosses in Shadow of the Erdtree .


Elden Ring
PS4 , PS5 , Xbox One , Xbox Series X/S , PC
Rock Paper Shotgun is better when you sign in
Sign in and join us on our journey to discover strange and compelling PC games.

All 75 Arc Raiders Blueprints and where to get them
These areas have the highest chance of giving you Blueprints

Image credit:Rock Paper Shotgun/Embark Studios

Looking for more Arc Raiders Blueprints? It’s a special day when you find a Blueprint, as they’re among the most valuable items in Arc Raiders. If you find a Blueprint that you haven’t already found, then you must make sure you hold onto it at all costs, because Blueprints are the key to one of the most important and powerful systems of meta-progression in the game.
This guide aims to be the very best guide on Blueprints you can find, starting with a primer on what exactly they are and how they work in Arc Raiders, before delving into exactly where to get Blueprints and the very best farming spots for you to take in your search.
We’ll also go over how to get Blueprints from other unlikely activities, such as destroying Surveyors and completing specific quests. And you’ll also find the full list of all 75 Blueprints in Arc Raiders on this page (including the newest Blueprints added with the Cold Snap update , such as the Deadline Blueprint and Firework Box Blueprint), giving you all the information you need to expand your own crafting repertoire.
In this guide:
- What are Blueprints in Arc Raiders?
- Full Blueprint list: All crafting recipes
- Where to find Blueprints in Arc Raiders Blueprints obtained from quests Blueprints obtained from Trials Best Blueprint farming locations

What are Blueprints in Arc Raiders?
Blueprints in Arc Raiders are special items which, if you manage to extract with them, you can expend to permanently unlock a new crafting recipe in your Workshop. If you manage to extract from a raid with an Anvil Blueprint, for example, you can unlock the ability to craft your very own Anvil Pistol, as many times as you like (as long as you have the crafting materials).
To use a Blueprint, simply open your Inventory while in the lobby, then right-click on the Blueprint and click “Learn And Consume” . This will permanently unlock the recipe for that item in your Workshop. As of the Stella Montis update, there are allegedly 75 different Blueprints to unlock - although only 68 are confirmed to be in the game so far. You can see all the Blueprints you’ve found and unlocked by going to the Workshop menu, and hitting “R” to bring up the Blueprint screen.
It’s possible to find duplicates of past Blueprints you’ve already unlocked. If you find these, then you can either sell them, or - if you like to play with friends - you can take it into a match and gift it to your friend so they can unlock that recipe for themselves. Another option is to keep hold of them until the time comes to donate them to the Expedition.
Full Blueprint list: All crafting recipes
Below is the full list of all the Blueprints that are currently available to find in Arc Raiders, and the crafting recipe required for each item:
| Blueprint | Type | Recipe | Crafted At |
|---|---|---|---|
| Bettina | Weapon | 3x Advanced Mechanical Components 3x Heavy Gun Parts 3x Canister | Gunsmith 3 |
| Blue Light Stick | Quick Use | 3x Chemicals | Utility Station 1 |
| Aphelion | Weapon | 3x Magnetic Accelerator 3x Complex Gun Parts 1x Matriarch Reactor | Gunsmith 3 |
| Combat Mk. 3 (Flanking) | Augment | 2x Advanced Electrical Components 3x Processor | Gear Bench 3 |
| Combat Mk. 3 (Aggressive) | Augment | 2x Advanced Electrical Components 3x Processor | Gear Bench 3 |
| Complex Gun Parts | Material | 2x Light Gun Parts 2x Medium Gun Parts 2x Heavy Gun Parts | Refiner 3 |
| Fireworks Box | Quick Use | 1x Explosive Compound 3x Pop Trigger | Explosives Station 2 |
| Gas Mine | Mine | 4x Chemicals 2x Rubber Parts | Explosives Station 1 |
| Green Light Stick | Quick Use | 3x Chemicals | Utility Station 1 |
| Pulse Mine | Mine | 1x Crude Explosives 1x Wires | Explosives Station 1 |
| Seeker Grenade | Grenade | 1x Crude Explosives 2x ARC Alloy | Explosives Station 1 |
| Looting Mk. 3 (Survivor) | Augment | 2x Advanced Electrical Components 3x Processor | Gear Bench 3 |
| Angled Grip II | Mod | 2x Mechanical Components 3x Duct Tape | Gunsmith 2 |
| Angled Grip III | Mod | 2x Mod Components 5x Duct Tape | Gunsmith 3 |
| Hullcracker | Weapon | 1x Magnetic Accelerator 3x Heavy Gun Parts 1x Exodus Modules | Gunsmith 3 |
| Launcher Ammo | Ammo | 5x Metal Parts 1x Crude Explosives | Workbench 1 |
| Anvil | Weapon | 5x Mechanical Components 5x Simple Gun Parts | Gunsmith 2 |
| Anvil Splitter | Mod | 2x Mod Components 3x Processor | Gunsmith 3 |
| ??? | ??? | ??? | ??? |
| Barricade Kit | Quick Use | 1x Mechanical Components | Utility Station 2 |
| Blaze Grenade | Grenade | 1x Explosive Compound 2x Oil | Explosives Station 3 |
| Bobcat | Weapon | 3x Advanced Mechanical Components 3x Light Gun Parts | Gunsmith 3 |
| Osprey | Weapon | 2x Advanced Mechanical Components 3x Medium Gun Parts 7x Wires | Gunsmith 3 |
| Burletta | Weapon | 3x Mechanical Components 3x Simple Gun Parts | Gunsmith 1 |
| Compensator II | Mod | 2x Mechanical Components 4x Wires | Gunsmith 2 |
| Compensator III | Mod | 2x Mod Components 8x Wires | Gunsmith 3 |
| Defibrillator | Quick Use | 9x Plastic Parts 1x Moss | Medical Lab 2 |
| ??? | ??? | ??? | ??? |
| Equalizer | Weapon | 3x Magnetic Accelerator 3x Complex Gun Parts 1x Queen Reactor | Gunsmith 3 |
| Extended Barrel | Mod | 2x Mod Components 8x Wires | Gunsmith 3 |
| Extended Light Mag II | Mod | 2x Mechanical Components 3x Steel Spring | Gunsmith 2 |
| Extended Light Mag III | Mod | 2x Mod Components 5x Steel Spring | Gunsmith 3 |
| Extended Medium Mag II | Mod | 2x Mechanical Components 3x Steel Spring | Gunsmith 2 |
| Extended Medium Mag III | Mod | 2x Mod Components 5x Steel Spring | Gunsmith 3 |
| Extended Shotgun Mag II | Mod | 2x Mechanical Components 3x Steel Spring | Gunsmith 2 |
| Extended Shotgun Mag III | Mod | 2x Mod Components 5x Steel Spring | Gunsmith 3 |
| Remote Raider Flare | Quick Use | 2x Chemicals 4x Rubber Parts | Utility Station 1 |
| Heavy Gun Parts | Material | 4x Simple Gun Parts | Refiner 2 |
| Venator | Weapon | 2x Advanced Mechanical Components 3x Medium Gun Parts 5x Magnet | Gunsmith 3 |
| Il Toro | Weapon | 5x Mechanical Components 6x Simple Gun Parts | Gunsmith 1 |
| Jolt Mine | Mine | 1x Electrical Components 1x Battery | Explosives Station 2 |
| Explosive Mine | Mine | 1x Explosive Compound 1x Sensors | Explosives Station 3 |
| Jupiter | Weapon | 3x Magnetic Accelerator 3x Complex Gun Parts 1x Queen Reactor | Gunsmith 3 |
| Light Gun Parts | Material | 4x Simple Gun Parts | Refiner 2 |
| Lightweight Stock | Mod | 2x Mod Components 5x Duct Tape | Gunsmith 3 |
| Lure Grenade | Grenade | 1x Speaker Component 1x Electrical Components | Utility Station 2 |
| Medium Gun Parts | Material | 4x Simple Gun Parts | Refiner 2 |
| Torrente | Weapon | 2x Advanced Mechanical Components 3x Medium Gun Parts 6x Steel Spring | Gunsmith 3 |
| Muzzle Brake II | Mod | 2x Mechanical Components 4x Wires | Gunsmith 2 |
| Muzzle Brake III | Mod | 2x Mod Components 8x Wires | Gunsmith 3 |
| Padded Stock | Mod | 2x Mod Components 5x Duct Tape | Gunsmith 3 |
| Shotgun Choke II | Mod | 2x Mechanical Components 4x Wires | Gunsmith 2 |
| Shotgun Choke III | Mod | 2x Mod Components 8x Wires | Gunsmith 3 |
| Shotgun Silencer | Mod | 2x Mod Components 8x Wires | Gunsmith 3 |
| Showstopper | Grenade | 1x Advanced Electrical Components 1x Voltage Converter | Explosives Station 3 |
| Silencer I | Mod | 2x Mechanical Components 4x Wires | Gunsmith 2 |
| Silencer II | Mod | 2x Mod Components 8x Wires | Gunsmith 3 |
| Snap Hook | Quick Use | 2x Power Rod 3x Rope 1x Exodus Modules | Utility Station 3 |
| Stable Stock II | Mod | 2x Mechanical Components 3x Duct Tape | Gunsmith 2 |
| Stable Stock III | Mod | 2x Mod Components 5x Duct Tape | Gunsmith 3 |
| Tagging Grenade | Grenade | 1x Electrical Components 1x Sensors | Utility Station 3 |
| Tempest | Weapon | 3x Advanced Mechanical Components 3x Medium Gun Parts 3x Canister | Gunsmith 3 |
| Trigger Nade | Grenade | 2x Crude Explosives 1x Processor | Explosives Station 2 |
| Vertical Grip II | Mod | 2x Mechanical Components 3x Duct Tape | Gunsmith 2 |
| Vertical Grip III | Mod | 2x Mod Components 5x Duct Tape | Gunsmith 3 |
| Vita Shot | Quick Use | 2x Antiseptic 1x Syringe | Medical Lab 3 |
| Vita Spray | Quick Use | 3x Antiseptic 1x Canister | Medical Lab 3 |
| Vulcano | Weapon | 1x Magnetic Accelerator 3x Heavy Gun Parts 1x Exodus Modules | Gunsmith 3 |
| Wolfpack | Grenade | 2x Explosive Compound 2x Sensors | Explosives Station 3 |
| Red Light Stick | Quick Use | 3x Chemicals | Utility Station 1 |
| Smoke Grenade | Grenade | 14x Chemicals 1x Canister | Utility Station 2 |
| Deadline | Mine | 3x Explosive Compound 2x ARC Circuitry | Explosives Station 3 |
| Trailblazer | Grenade | 1x Explosive Compound 1x Synthesized Fuel | Explosives Station 3 |
| Tactical Mk. 3 (Defensive) | Augment | 2x Advanced Electrical Components 3x Processor | Gear Bench 3 |
| Tactical Mk. 3 (Healing) | Augment | 2x Advanced Electrical Components 3x Processor | Gear Bench 3 |
| Yellow Light Stick | Quick Use | 3x Chemicals | Utility Station 1 |
Note: The missing Blueprints in this list likely have not actually been added to the game at the time of writing, because none of the playerbase has managed to find any of them. As they are added to the game, I will update this page with the most relevant information so you know exactly how to get all 75 Arc Raiders Blueprints.
Where to find Blueprints in Arc Raiders
Below is a list of all containers, modifiers, and events which maximise your chances of finding Blueprints:
- Certain quests reward you with specific Blueprints .
- Completing Trials has a high chance of offering Blueprints as rewards.
- Surveyors have a decent chance of dropping Blueprints on death.
- High loot value areas tend to have a greater chance of spawning Blueprints.
- Night Raids and Storms may increase rare Blueprint spawn chances in containers.
- Containers with higher numbers of items may have a higher tendency to spawn Blueprints. As a result, Blue Gate (which has many “large” containers containing multiple items) may give you a higher chance of spawning Blueprints.
- Raider containers (Raider Caches, Weapon Boxes, Medical Bags, Grenade Tubes) have increased Blueprint drop rates. As a result, the Uncovered Caches event gives you a high chance of finding Blueprints.
- Security Lockers have a higher than average chance of containing Blueprints.
- Certain Blueprints only seem to spawn under specific circumstances: Tempest Blueprint only spawns during Night Raid events. Vulcano Blueprint only spawns during Hidden Bunker events. Jupiter and Equaliser Blueprints only spawn during Harvester events.

Raider Caches, Weapon Boxes, and other raider-oriented container types have a good chance of offering Blueprints. |Image credit:Rock Paper Shotgun/Embark Studios
Blueprints have a very low chance of spawning in any container in Arc Raiders, around 1-2% on average. However, there is a higher chance of finding Blueprints in particular container types. Specifically, you can find more Blueprints in Raider containers and security lockers.
Beyond this, if you’re looking for Blueprints you should focus on regions of the map which are marked as having particularly high-value loot. Areas such as the Control Tower in Dam Battlegrounds, the Arrival and Departure Buildings in Spaceport, and Pilgrim’s Peak in Blue Gate all have a better-than-average chance of spawning Blueprints somewhere amongst all their containers. Night Raids and Electromagnetic Storm events also increase the drop chances of certain Blueprints .
In addition to these containers, you can often loot Blueprints from destroyed Surveyors - the largest of the rolling ball ARC. Surveyors are more commonly found on the later maps - Spaceport and Blue Gate - and if one spawns in your match, you’ll likely see it by the blue laser beam that it casts into the sky while “surveying”.
Surveyors are quite well-armoured and will very speedily run away from you once it notices you, but if you can take one down then make sure you loot all its parts for a chance of obtaining certain unusual Blueprints.
Blueprints obtained from quests
One way in which you can get Blueprints is by completing certain quests for the vendors in Speranza. Some quests will reward you with a specific item Blueprint upon completion, so as long as you work through all the quests in Arc Raiders, you are guaranteed those Blueprints.
Here is the full list of all Blueprints you can get from quest rewards:
- Trigger Nade Blueprint: Rewarded after completing “Sparks Fly”.
- Lure Grenade Blueprint: Rewarded after completing “Greasing Her Palms”.
- Burletta Blueprint: Rewarded after completing “Industrial Espionage”.
- Hullcracker Blueprint (and Launcher Ammo Blueprint): Rewarded after completing “The Major’s Footlocker”.
Alas, that’s only 4 Blueprints out of a total of 75 to unlock, so for the vast majority you will need to find them yourself during a raid. If you’re intent on farming Blueprints, then it’s best to equip yourself with cheap gear in case you lose it, but don’t use a free loadout because then you won’t get a safe pocket to stash any new Blueprint you find. No pain in Arc Raiders is sharper than failing to extract with a new Blueprint you’ve been after for a dozen hours already.

One of the best ways to get Blueprints is by hitting three stars on all five Trials every week. |Image credit:Rock Paper Shotgun/Embark Studios
Blueprints obtained from Trials
One of the very best ways to get Blueprints is as rewards for completing Trials in Arc Raiders. Trials are unlocked from Level 15 onwards, and allow you to earn rewards by focusing on certain tasks over the course of several raids. For example, one Trial might task you with dealing damage to Hornets, while another might challenge you to loot Supply Drops.
Trials refresh on a weekly basis, with a new week bringing five new Trials. Each Trial can offer up to three rewards after passing certain score milestones, and it’s possible to receive very high level loot from these reward crates - including Blueprints. So if you want to unlock as many Blueprints as possible, you should make a point of completing as many Trials as possible each week.
Best Blueprint farming locations
The very best way to get Blueprints is to frequent specific areas of the maps which combine high-tier loot pools with the right types of containers to search. Here are my recommendations for where to find Blueprints on every map, so you can always keep the search going for new crafting recipes to unlock.

Image credit:Rock Paper Shotgun/Embark Studios
Dam Battlegrounds
The best places to farm Blueprints on Dam Battlegrounds are the Control Tower, Power Generation Complex, Ruby Residence, and Pale Apartments . The first two regions, despite only being marked on the map as mid-tier loot, contain a phenomenal number of containers to loot. The Control Tower can also contain a couple of high-tier Security Lockers - though of course, you’ll need to have unlocked the Security Breach skill at the end of the Survival tree.
There’s also a lot of reporting amongst the playerbase that the Residential areas in the top-left of the map - Pale Apartments and Ruby Residence - give you a comparatively strong chance of finding Blueprints. Considering their size, there’s a high density of containers to loot in both locations, and they also have the benefit of being fairly out of the way. So you’re more likely to have all the containers to yourself.
Buried City
The best Blueprint farming locations on Buried City are the Santa Maria Houses, Grandioso Apartments, Town Hall, and the various buildings of the New District . Grandioso Apartments has a lower number of containers than the rest, but a high chance of spawning weapon cases - which have good Blueprint drop rates. The others are high-tier loot areas, with plenty of lootable containers - including Security Lockers.
Spaceport
The best places to find Blueprints on Spaceport are the Arrival and Departure Buildings, as well as Control Tower A6 and the Launch Towers . All these areas are labelled as high-value loot regions, and many of them are also very handily connected to one another by the Spaceport wall, which you can use to quickly run from one area to the next. At the tops of most of these buildings you’ll find at least one Security Locker, so this is an excellent farming route for players looking to find Blueprints.
The downside to looting Blueprints on Spaceport is that all these areas are hotly contested, particularly in Duos and Squads. You’ll need to be very focused and fast in order to complete the full farming route.

Image credit:Rock Paper Shotgun/Embark Studios
Blue Gate
Blue Gate tends to have a good chance of dropping Blueprints, potentially because it generally has a high number of containers which can hold lots of items; so there’s a higher chance of a Blueprint spawning in each container. In my experience, the best Blueprint farming spots on Blue Gate are Pilgrim’s Peak, Raider’s Refuge, the Ancient Fort, and the Underground Complex beneath the Warehouse .
All of these areas contain a wealth of containers to loot. Raider’s Refuge has less to loot, but the majority of the containers in and around the Refuge are raider containers, which have a high chance of containing Blueprints - particularly during major events.
Stella Montis
On the whole, Stella Montis seems to have a very low drop rate for Blueprints (though a high chance of dropping other high-tier loot). If you do want to try farming Blueprints on this map, the best places to find Blueprints in Stella Montis are Medical Research, Assembly Workshop, and the Business Center . These areas have the highest density of containers to loot on the map.
In addition to this, the Western Tunnel has a few different Security Lockers to loot, so while there’s very little to loot elsewhere in this area of the map, it’s worth hitting those Security Lockers if you spawn there at the start of a match.
That wraps up this primer on how to get all the Blueprints in Arc Raiders as quickly as possible. With the Expedition system constantly resetting a large number of players’ Blueprints, it’s more important than ever to have the most up-to-date information on where to find all these Blueprints.
While you’re here, be sure to check out our Arc Raiders best guns tier list , as well as our primers on the best skills to unlock and all the different Field Depot locations on every map.


ARC Raiders
PS5 , Xbox Series X/S , PC
Rock Paper Shotgun is better when you sign in
Sign in and join us on our journey to discover strange and compelling PC games.
