All dungeon locations in Elden Ring: Shadow Of The Erdtree
Here is how to get to each and every dungeon in Shadow Of The Erdtree

Image credit:Rock Paper Shotgun/Bandai Namco

Looking for all dungeon locations in Elden Ring: Shadow Of The Erdtree? Like in the Elden Ring base game, Shadow Of The Erdtree offers optional dungeons for players to complete in return for unique rewards like weapons , Spirit Ashes and more.
Shadow Of The Erdtree has 15 optional dungeons in total with different optional bosses. This includes four Nameless Mausoleums scattered across the Land of Shadow. For a rundown of each dungeon location and the steps needed to get there, read on.
All Dungeons in Shadow Of The Erdtree DLC
The following map, courtesy of our friends at MapGenie , depicts all 15 dungeon locations in the Shadow Of The Erdtree DLC. Below, we’ve gone into further detail on each dungeon, with key rewards highlighted as well as instructions on how to get to the area it is located in.
We’ve also created a static map below where we’ve listed the dungeons in rough order of location difficulty, as a guide to help you as you progress.
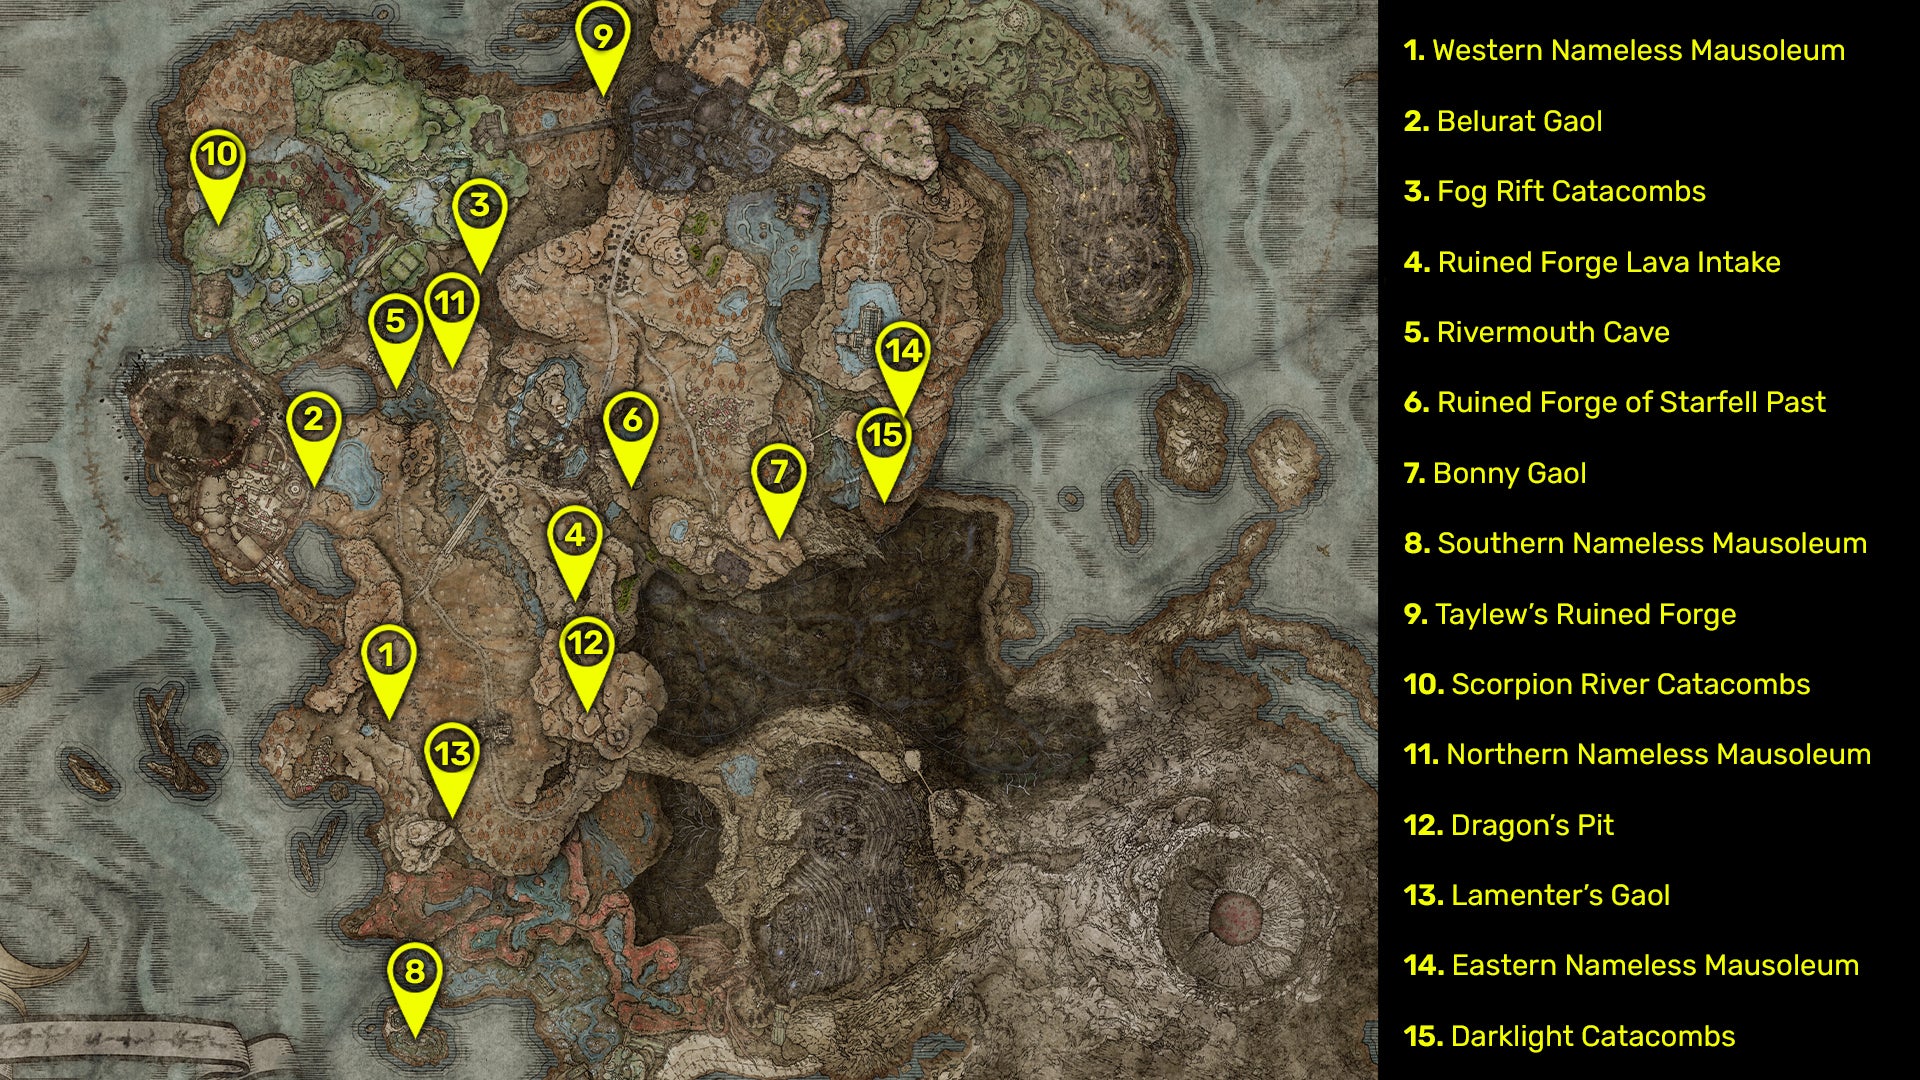
Here are all 15 dungeon locations in Shadow Of The Erdtree. |Image credit:Rock Paper Shotgun/Bandai Namco
1. Western Nameless Mausoleum

Although this dungeon can be accessed right away, the Blackgaol Knight can be a tricky boss. |Image credit:Rock Paper Shotgun/Bandai Namco
- Boss: Blackgaol Knight.
- Boss reward: Solitude Armor set, Greasword of Solitude, 70,000 Runes.
The Western Nameless Mausoleum is located within the starting Gravesite Plain area, northwest of the Scorched Ruins (the first major structure you’re likely to come across). As such, it can be accessed as soon as you enter the DLC.
Like the other Mausoleums on this list, you can go straight in to fight the boss without any dungeon puzzles or additional enemies. It also doesn’t have its own Site Of Grace nor the ability for you to summon a Spirit Ash, but it does have a Statue of Marika nearby as a respawn point. If the boss within, the Blackgaol Knight, is giving you trouble, remember that he is strong against Sleep and Madness effects but weak against Lightning damage. He can also be parried, which leaves him open to a huge critical hit chance.
See our guide to beating the Blackgaol Knight for more tips and tricks.
2. Belurat Gaol

Belurat Gaol is full of Shadow men and Living Jars. |Image credit:Rock Paper Shotgun/Bandai Namco
- Key items: Greater Potentate’s Cookbook (11), Greatjar Helm.
- Boss: Demi-Human Swordmaster Onze.
- Boss reward: Demi-Human Swordsman Yosh Spirit Ashes, 80,000 Runes.
The next dungeon you’re likely to encounter on this list is the Belurat Gaol, located on the outskirts of the Belurat, Tower Settlement (the first major legacy dungeon of the DLC).
To access the gaol, travel across the northwestern road from the Three-Path Cross Site Of Grace. Once you reach the Greatbridge, North Site Of Grace, travel directly west across the lake. You’ll know you’re near the cave opening when you pass hundreds of broken cages littering the grass nearby. Look out for the Ghostflame Dragon boss patrolling the area and guarding the Great Katana nearby. We have a full walkthrough of the Belurat Gaol if you need help getting to the boss.
The boss of this dungeon is a Demi-Human that should be fairly easy to take on. Onze is weak against Slash, Fire, Poison and Scarlet Rot build-up. Once defeated, he will drop the Demi-Human Swordsman Yosh Spirit Ashes and 80,000 Runes.
3. Fog Rift Catacombs
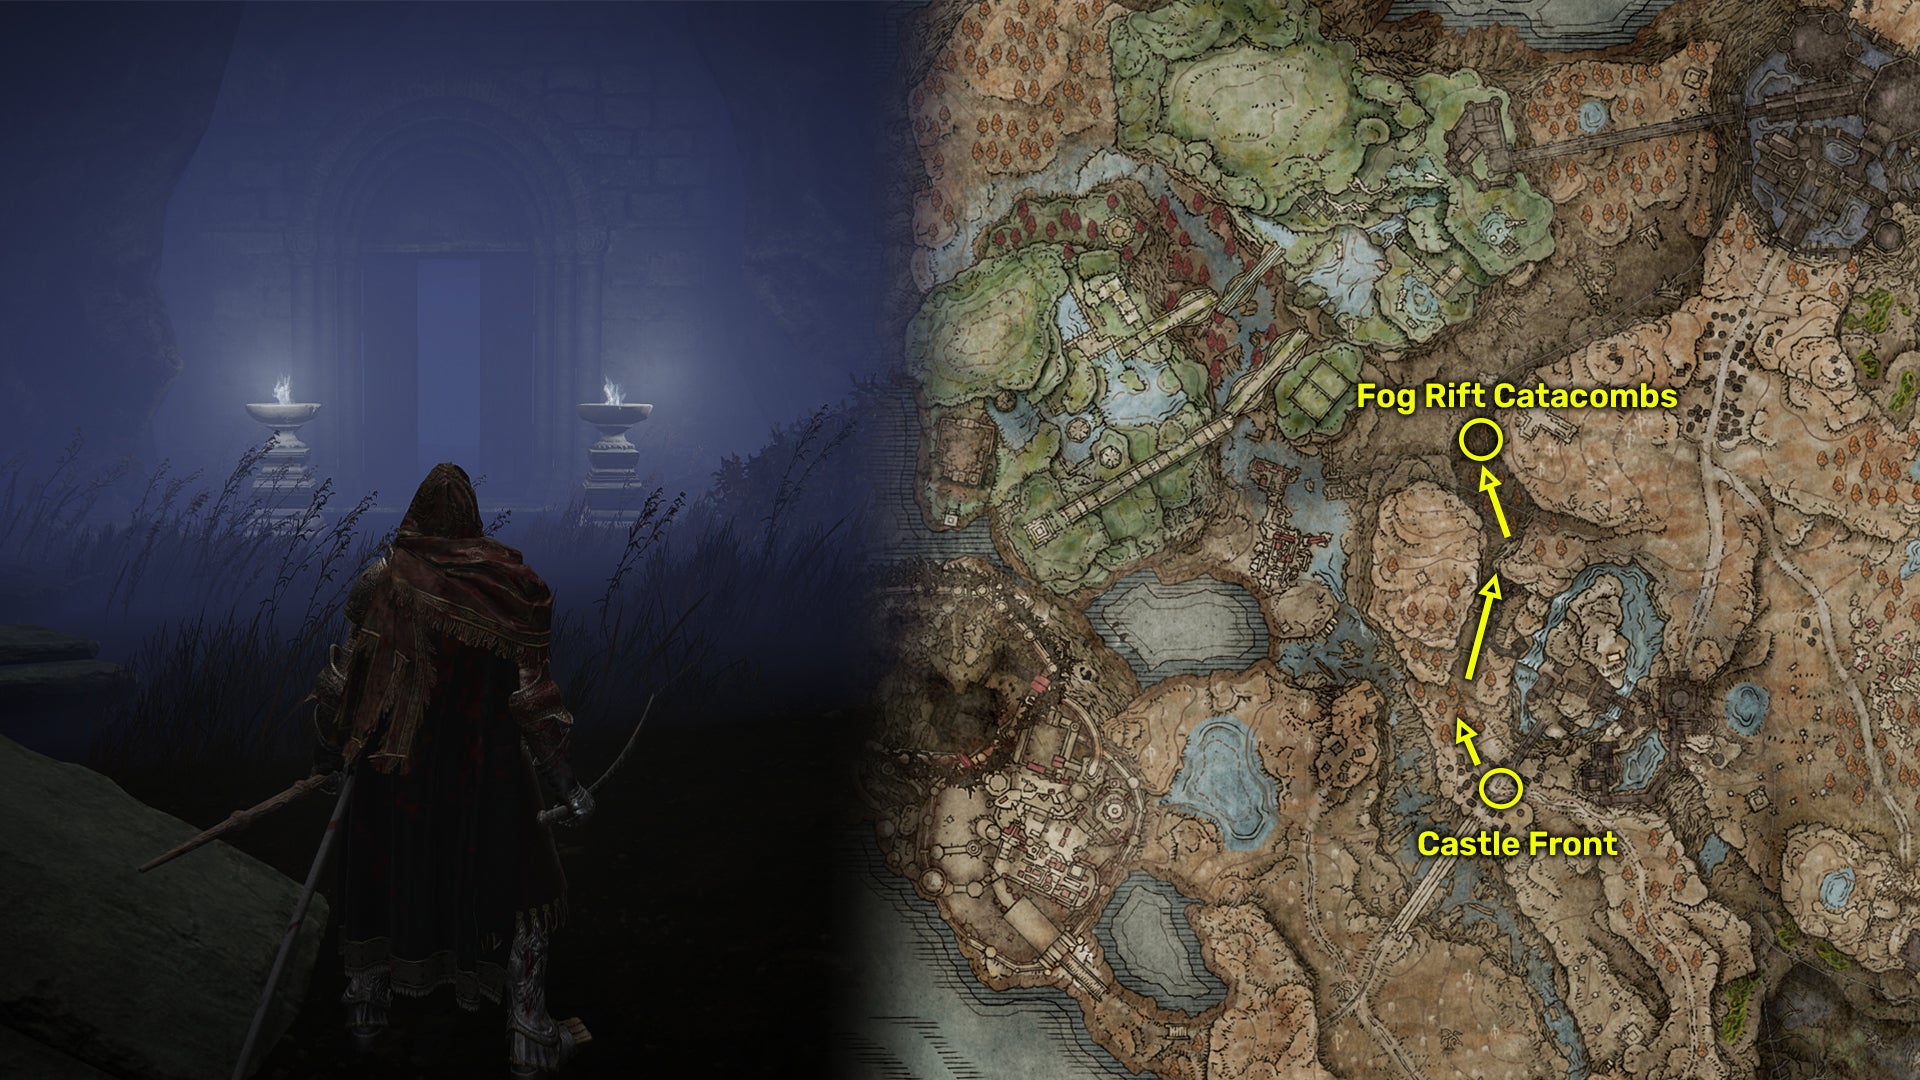
The Fog Rift Catacombs are full of Fanged Imps, so be careful of Bleed buildup damage. |Image credit:Rock Paper Shotgun/Bandai Namco
- Key items: Black Knight Commander Andreas, Ancient Dragon Knight’s Cookbook (1), Stone-Sheathed Sword.
- Boss: Death Knight.
- Boss reward: Death Knight’s Twin Axes, Crimson Amber Medallion +3, 110,000 Runes.
The Fog Rift Catacombs are also fairly easy to locate early on in a Shadow Of The Erdtree playthrough. From outside Castle Ensis at the Castle Front Site Or Grace, travel slightly north (or left of the main stairs) and drop down to the valley below.
Continue up the path north, past the large scaffolding housing several Messmer Soldiers. It will start to get foggy, but if you follow the path and use the gravestones to guide you, you’ll eventually come to the dungeon entrance highlighted by two torches. Watch out for the Imp enemies who are hiding within the fog.
Inside the dungeon, you’ll need to work your way down and do a bit of light platforming across spiked trap ceilings to reach the boss, the Death Knight. We have a full walkthrough of the Fog Rift Catacombs for more information on taking the dungeon and its boss on. Essentially, the Death Knight is weak to Holy damage and almost completely immune to blood loss buildup.
4. Ruined Forge Lava Intake

To get to this dungeon, you can run past most of the enemies by the entrance. They’ll take care of each other to save you the hassle. |Image credit:Rock Paper Shotgun/Bandai Namco
- Key items: Greater Potentate’s Cookbook (13), Smithscript Dagger.
- Dungeon reward: Anvil Hammer, Ancient Dragon Smithing Stone.
To get to the Ruined Forge Lava Intake, take the main eastern road from the Castle Front Site Of Grace outside Castle Ensis. When the path curves uphill, walk downhill to the south instead. Travel along the valley, past the Messmer Soldier’s barriers and along the dirt path around the trolls battling the rest of the soldiers.
You’ll see a wall up ahead with several large torches. Head inside the hole in the wall to access the dungeon. Inside, you’ll need to work your way through the dungeon and reach the lever to raise the large main pipe. There is no end boss here, but several tough Golem Smith enemies.
Your rewards will be on an altar to the side of the pipe. For more information, see our Ruined Forge Lava Intake walkthrough.
5. Rivermouth Cave
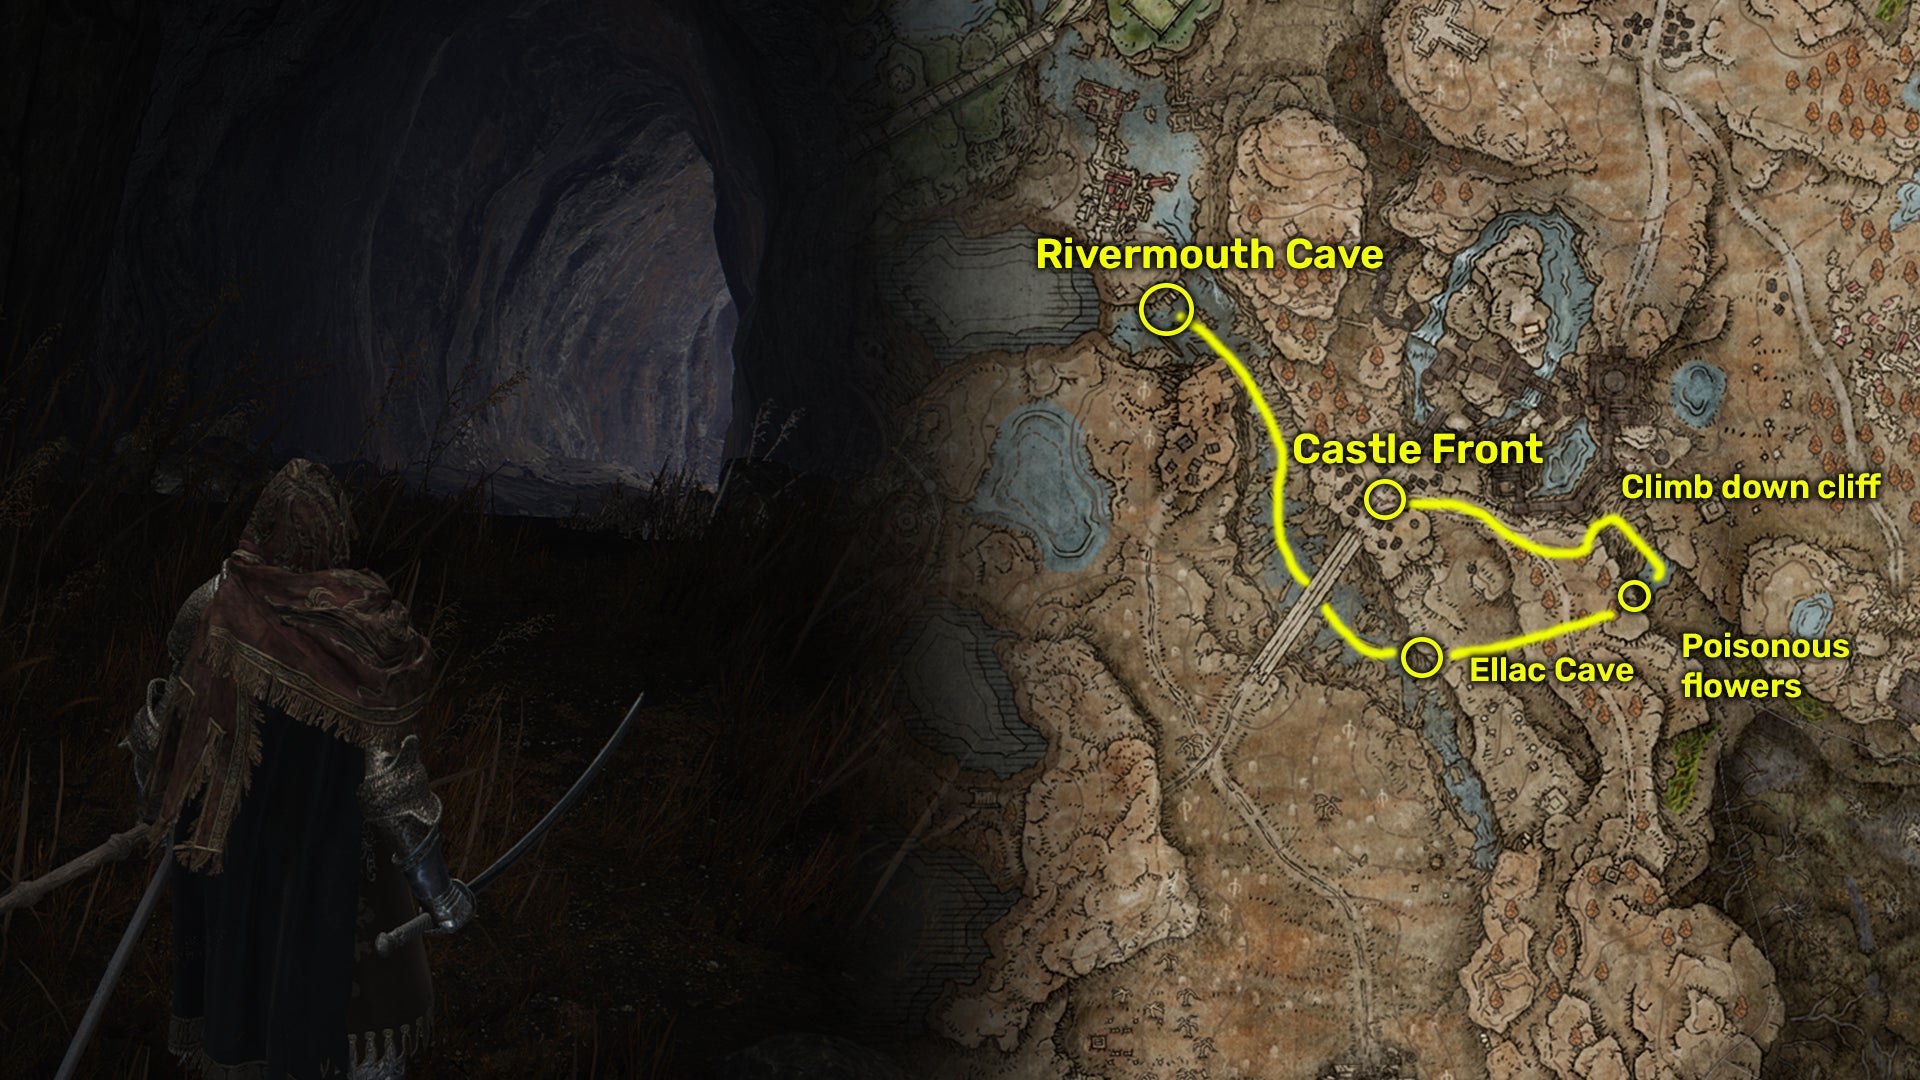
Climb behind the wolf’s den to access the hidden subterranean level of this cave. |Image credit:Rock Paper Shotgun/Bandai Namco
- Boss: Chief Bloodfiend.
- Boss reward: 80,000 Runes, Bloodfiend Hexer’s Ashes.
The Rivermouth Cave is initially a wolf’s den that, when descended into, leads into a subterranean cavern full of worshipping Bloodfiends. To get to the Rivermouth Cave, you must travel from Castle Ensis to the lake below .
Take the eastern road from the Castle Front Site Of Grace and approach the cliffside where there will be a Messmer Soldier looking out on the view. Platform down the cliffside here, using the rocks as support.
When you’re at the base of the cliff, head through the cave opening guarded by the large poisonous pink flower. Follow the cave through to discover the Ellac River Cave Site Of Grace. Exit the cave and head northwest under the Ellac Greatbridge (look out for the Ulcerated Tree Spirit boss).
Follow the water and keep heading northwest past the many flies. The cave will be up ahead. Inside is a fairly straightforward and short dungeon where you will face the Chief Bloodfiend boss. He is strong against Blood loss and Fire but weak against Frost, Scarlet Rot, Poison and Slash attacks.
6. Ruined Forge of Starfell Past
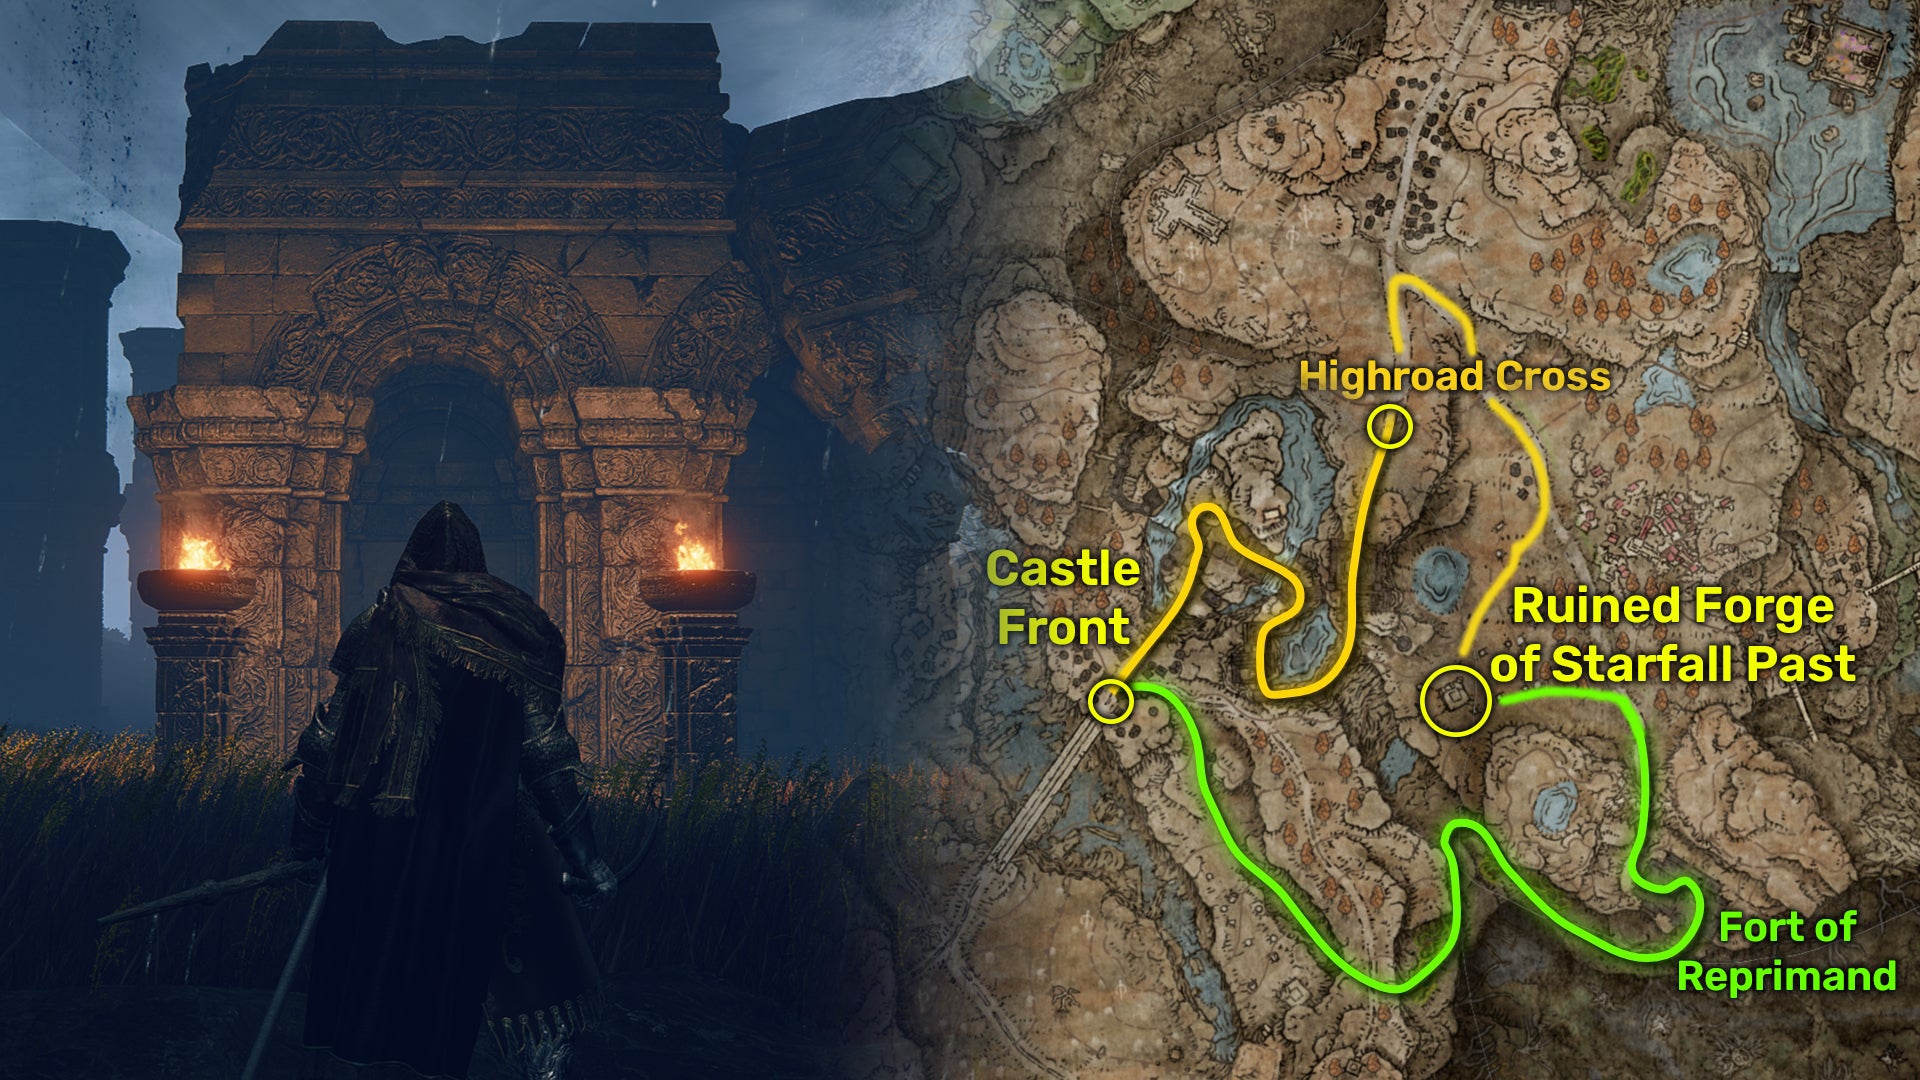
Scadu Altus can be accessed either by Castle Ensis or via the Fort of Reprimand. |Image credit:Rock Paper Shotgun/Bandai Namco
- Key items: Smithscript Spear, Smithscript Cirque, Smithing Talisman.
- Dungeon reward: Ancient Meteoric Ore Greatsword, Ancient Dragon Smithing Stone.
The Ruined Forge of Starfell Past is located within Scadu Altus, southwest along the main road from the Highroad Cross Site Of Grace. To access the dungeon and the Scadu Altus region in general, you need to either complete your way through Castle Ensis and defeat the boss therein or take the route from the Fort of Reprimand southeast from the castle (ride up both Spiritsprings from the eastern path).
As it is another Forge, there is no end boss to this dungeon, but it will be littered with Golem Smiths. The key aim of this dungeon is to locate the various levers which will raise the doors in the dungeon. Once you have raised the door in the main room, take an immediate right and use the hidden lever to raise it again. Jump on top of the door as it starts to ascend and it will take you to the platform where the altar and dungeon rewards lie.
7. Bonny Gaol

Travel underneath Moorth Ruins to discover Bonny Village and the secrets therein. |Image credit:Rock Paper Shotgun/Bandai Namco
- Key items: Night armor set, Shield of Night, Stalwart Horn Charm +2.
- Boss: Curseblade Labirith.
- Boss reward: 100,000 Runes, Curseblade Meera Spirit Ashes.
Bonny Gaol is located across a bridge to the south of Bonny Village . From the Bonny Village Site Of Grace, travel down to the south and go across the wooden greatbridge. Continue forward past the empty cages that mark the entrance into the gaol (watch out for the giant scorpions guarding outside).
If you have yet to access Bonny Village, you must go through the Moorth Ruins in Scadu Altus and follow them around until you encounter a ladder. Going up the ladder will result in you exiting via the Bonny Village well. From here, you can access the eastern region of Scadu Altus, the church District and the Cathedral of Manus Metyr.
Inside Bonny Gaol you’ll encounter more Living Jar enemies and the Curseblade Labirith boss. This boss is fast but not too difficult to take down if you remember he is weak against Slash attacks and Sleep buildup. See our Bonny Gaol walkthrough for more tips and tricks about this dungeon.
8. Southern Nameless Mausoleum
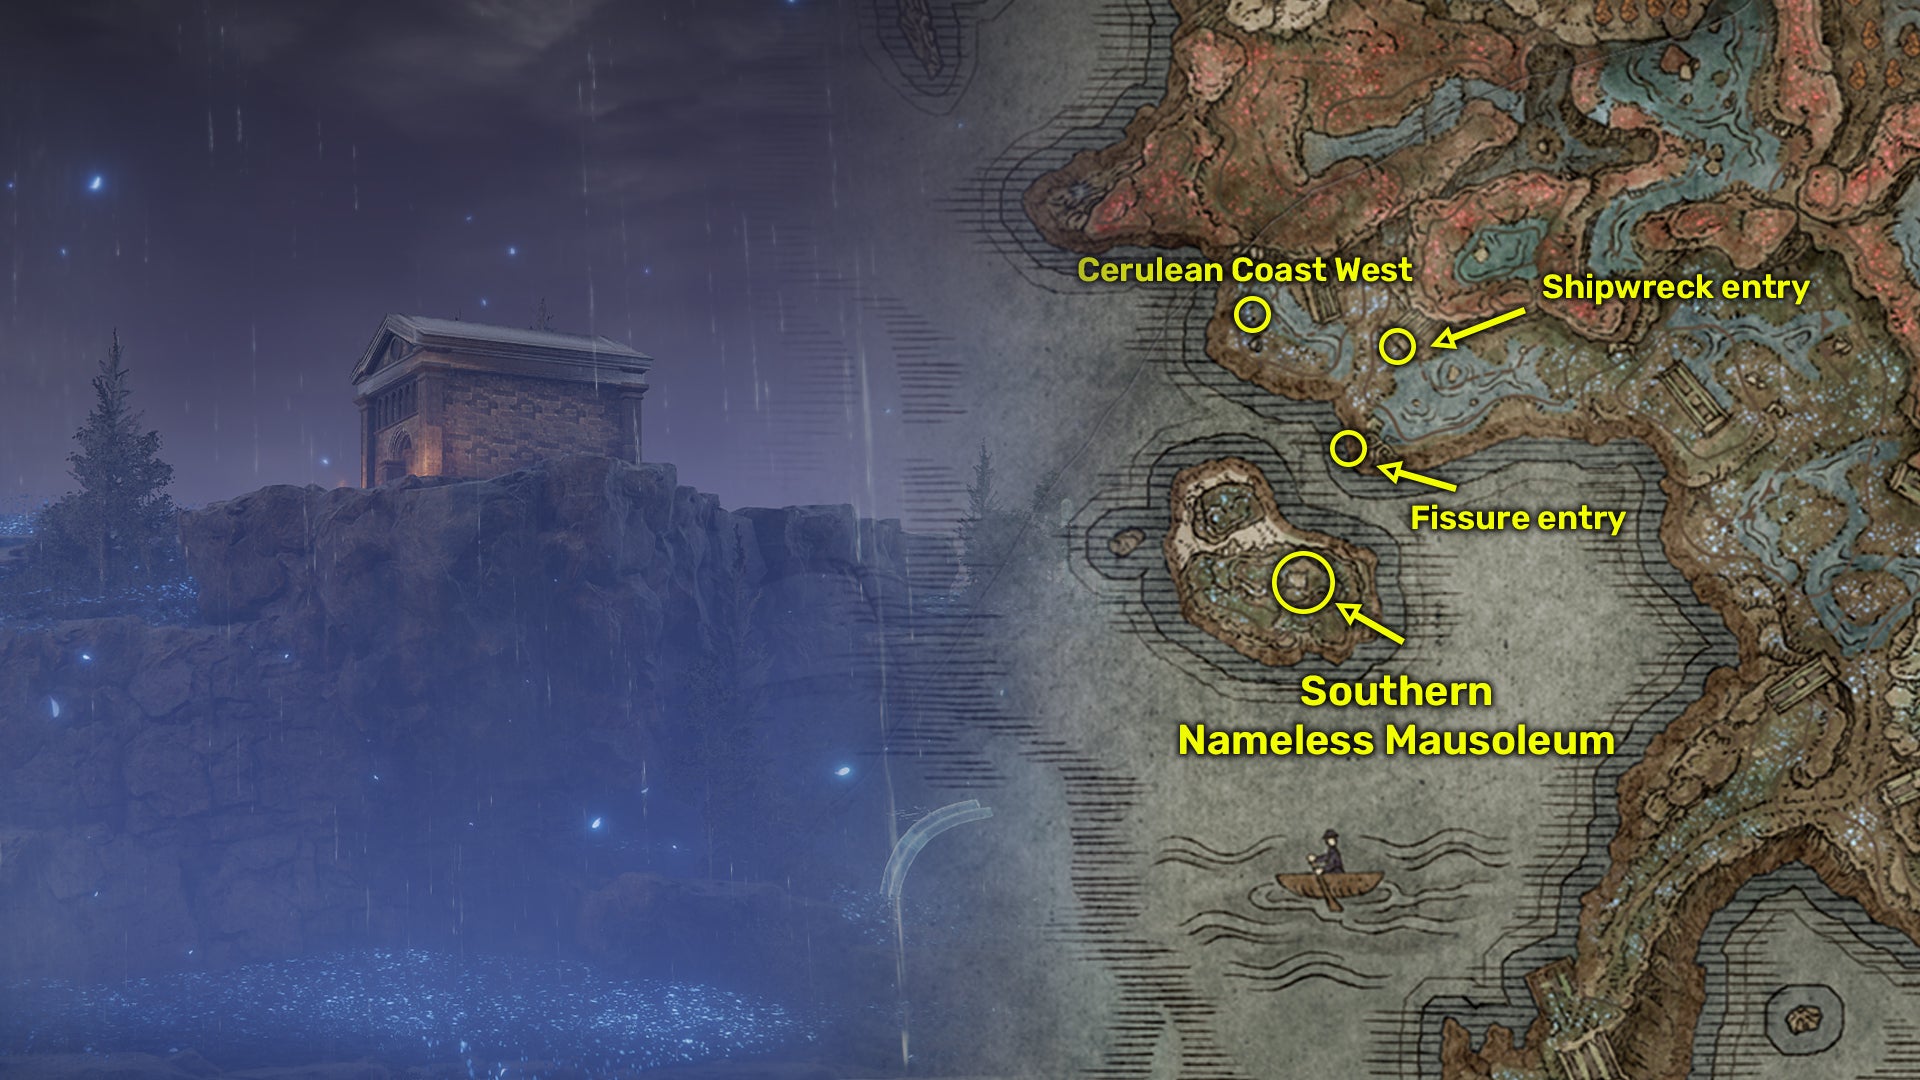
The route to this Mausoleum will take you across the idyllic Cerulean Coast. |Image credit:Rock Paper Shotgun/Bandai Namco
- Boss: Dancer of Ranah.
- Boss reward: 80,000 Runes, Dancing Blade of Ranah, Dancer’s armor set.
The next Nameless Mausoleum to visit on this list is located on the island off the western Cerulean Coast . To access the area, you’ll need to enter a hidden passage which will take you underground and onto the island.
From the Cerulean Coast West Site Of Grace, travel south and follow the coastline around. You’ll see a bunch of Shadow enemies praying and crying over a funeral mound of headstones. Walk off the cliff edge opposite them to the level below. Here, there will be a fissure in the ground that you can platform down.
Once you’re at the bottom of the fissure, make your way through the cave southwest. Upon exiting the cave, you’ll be on the island where the Southern Nameless Mausoleum is located. You can also access this cave and the entryway into the island via a cave opposite a large shipwreck east of the Cerulean Coast West Site Of Grace.
As with the other Mausoleums, you won’t be able to summon a Spirit Ash once inside. The boss is the Dancer of Ranah, who is exceptionally quick, but vulnerable to Strike and Pierce damage and can be parried for a potential critical hit.
9. Taylew’s Ruined Forge

The Ancient Ruins of Rauh and Rauh Base are the same region, split by an upper and lower section. |Image credit:Rock Paper Shotgun/Bandai Namco
- Key items: Smithscript Axe, Smithscript Greathammer, Smithscript Shield, Ancient Dragon Smithing Stone x2, Taylew the Golem Smith Spirit Ash.
Taylew’s Ruined Forge is located at the Rauh Base , almost directly north of the Ancient Ruins Base Site of Grace . You’ll know you’re in the right place when you see a bunch of demi-humans mining outside of a large structure with lit torches.
To get to Rauh Base, you need to enter a secret cave in Scadu Altus. From Moorth Ruins, travel northeast towards a bunch of glowing worms in a pool. Travel past these and a statue of Marika to a cave opening. Go through the cave and you should find yourself in a poisonous pond decorated with numerous Gravebirds.
From here, go past the Gravebirds and travel around the water northeast until you come to a cliff edge. Continue forwards and you’ll be at Rauh Base. Now, travel forwards to discover the Ancient Ruins Base Site Of Grace.
We have a full walkthrough of Taylew’s Ruined Forge here, but essentially, you need to access the hidden Altar of the Forge by pulling levers and raising the main pipe.
10. Scorpion River Catacombs

As the name would suggest, look out for the Scorpions guarding the entrance of this dungeon. |Image credit:Rock Paper Shotgun/Bandai Namco
- Key items: Lizard Greatsword, Knight’s Lightning Spear, Black Knight Captain Huw Spirit Ashes, Ancient Dragon Knight’s Cookbook (2).
- Boss: Death Knight.
- Boss reward: 130,000 Runes, Death Knight’s Longhaft Axe, Cerulean Amber Medallion +3.
The Scorpion River Catacombs are located within the northwest region of Rauh Base . See our above entry on how to access the Rauh Base region. From the Ancient Ruins Base Site of Grace, travel directly southwest past the various armoured giants, the Map Fragment pillar, and into the Temple Town Ruins . This is a structure populated by Shadows and water.
From the Temple Town Ruins Site Of Grace, simply follow the river north and around. Take caution as you pass the Kindred Of Rot enemies and the flying scorpions. Eventually, you will start to see stone coffins and various Vulgar Militiamen. Complete the journey around the lake and you’ll come to the dungeon entrance.
Inside the Scorpion River Catacombs, you’ll need to fight yet another Death Knight. This one is much like the last and will drop the Death Knight’s Longhaft Axe and Cerulean Amber Medallion +3. The main danger of these catacombs is the various Basilisk enemies that inflict Death Blight (which can instantly kill). We recommend stocking up on Rejuvenating Boluses to combat this unless you have access to the Order Healing or Law of Regression Incantations.
11. Northern Nameless Mausoleum
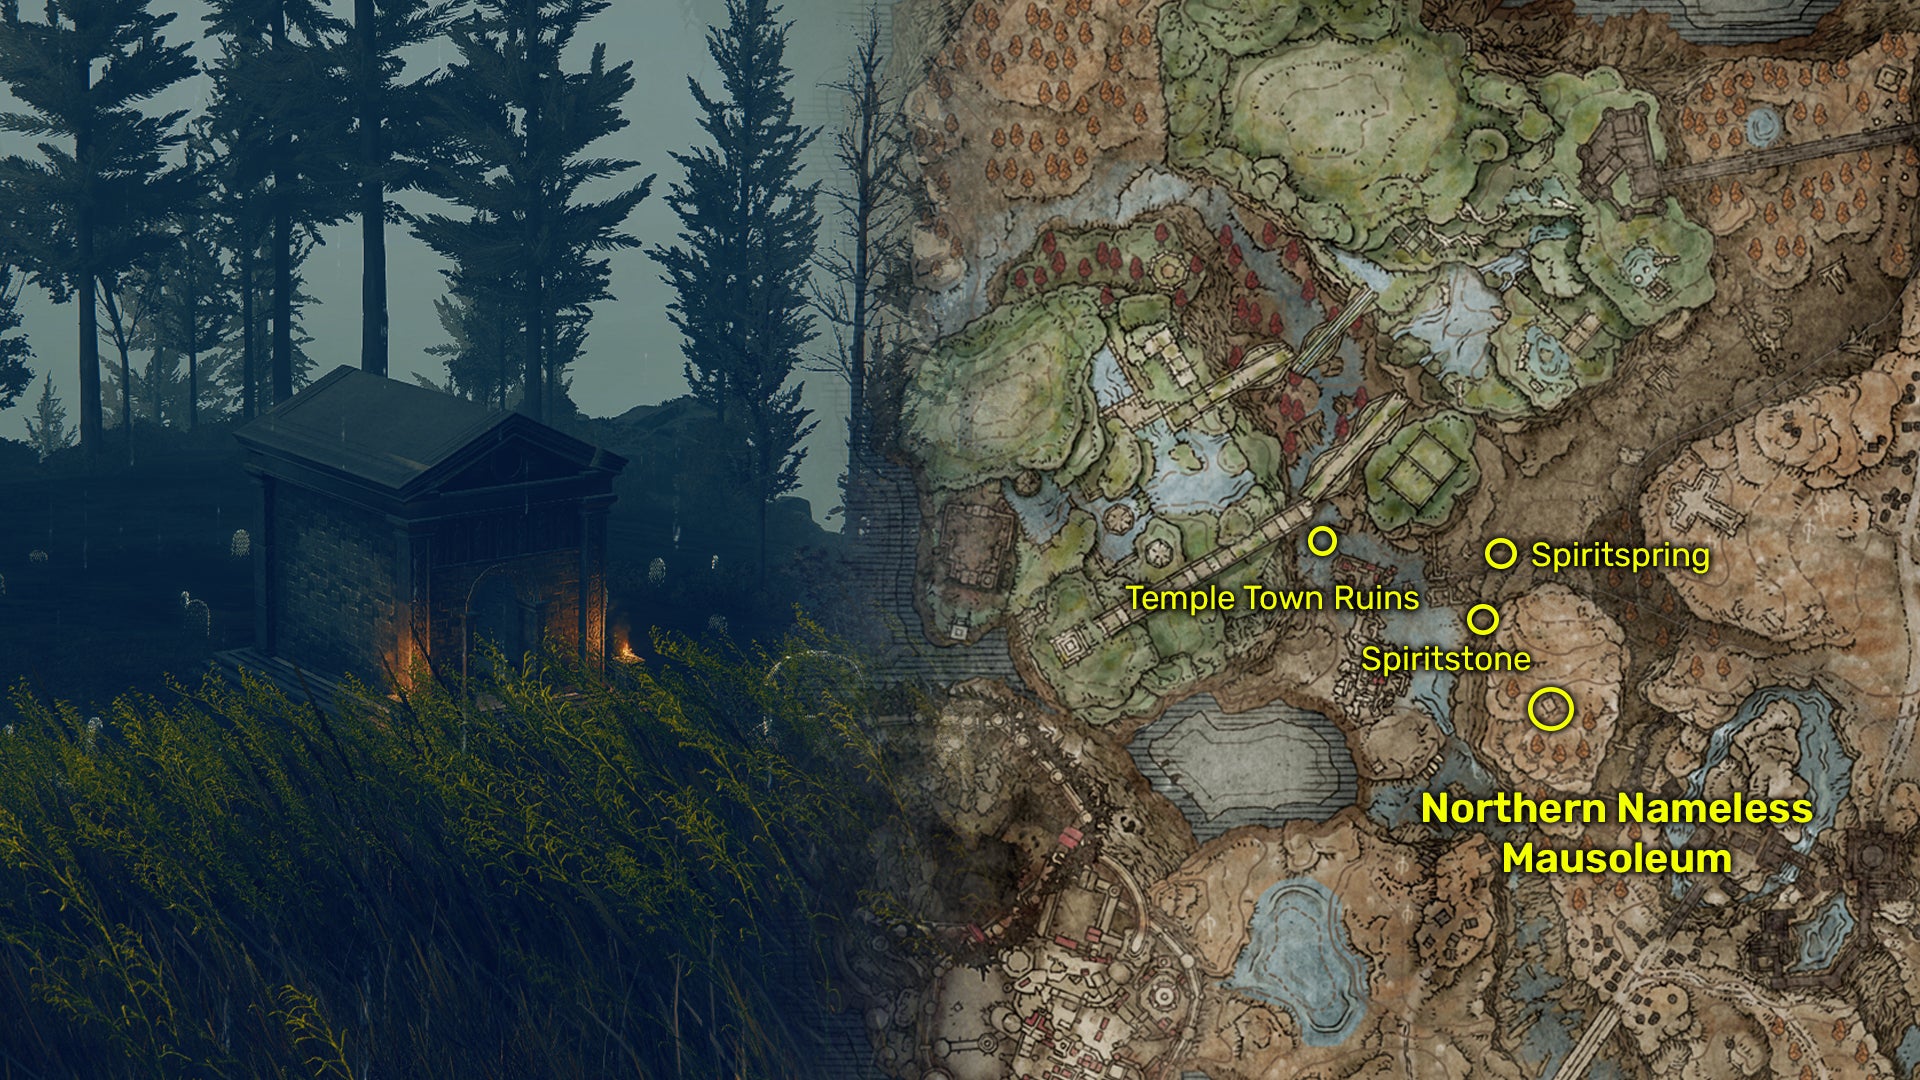
You’ll need to travel up two Spiritsprings to get to the Northern Nameless Mausoleum. |Image credit:Rock Paper Shotgun/Bandai Namco
- Boss: Red Bear.
- Boss reward: 80,000 Runes, Red Bear’s Claw, Iron Rivet armor set.
Whilst we’re at Rauh Base, now is the perfect time to visit the Northern Nameless Mausoleum. This Mausoleum is located on a high platform above Rauh Base , accessible via two consecutive Spiritsprings (one of which is sealed).
From the Temple Town Ruins in Rauh Base, travel directly east to the nearby cliffside. Here, you will find a locked Spiritspring. To unlock it you need to attack the Spiritstone indicated on the map. Once the stone is broken, you’ll be free to ride two Spiritsprings one after another to the platform above.
Inside the Mausoleum, you’ll face Red Bear who is exceptionally fast and can deal Bleed buildup damage. Although strong against Holy, Bleed and Frost he is vulnerable to Lightning damage.
12. Dragon’s Pit
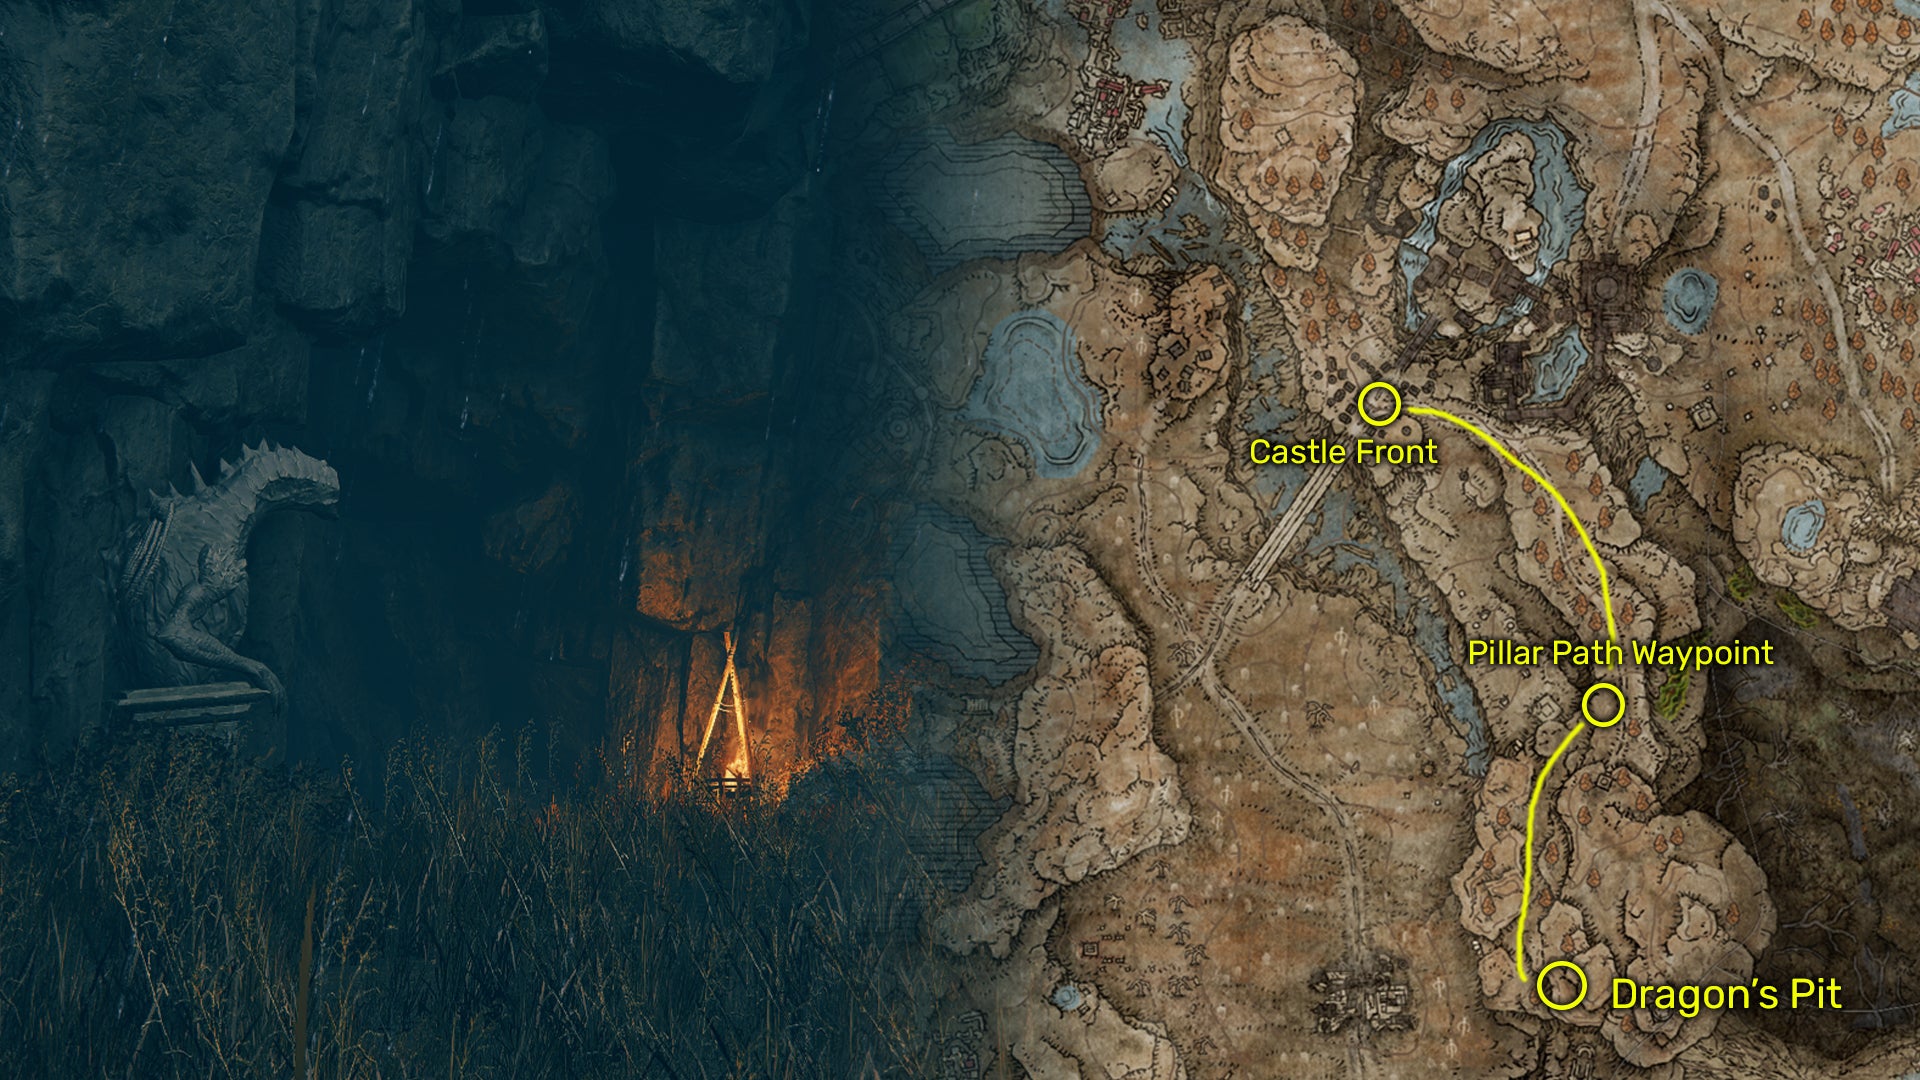
The Dragon’s Pit is the gateway into the Jagged Peak region. |Image credit:Rock Paper Shotgun/Bandai Namco
- Key items: Dragon Heart, Ancient Dragon Smithing Stone x1.
- Boss: Ancient Dragon-Man.
- Boss reward: 130,000 Runes, Dragon-Hunter’s Great Katana.
Although the Dragon’s Pit can be accessed fairly quickly, it is usually best left until later in your DLC playthrough as it effectively acts as the gateway into the Jagged Peak region. This is a high-level area bustling with Dragons and Drakes.
You’ll need to visit this region, however, if you’re looking to complete Igon and the Dragon Communion Priestess’ questlines . To access the Dragon’s Pit, simply take the southeastern road from the Castle Front Site Of Grace outside Castle Ensis in the Gravesite Plain.
Travel along this main road until you come across the Pillar Path Waypoint Site Of Grace (this is also where you will meet Igon if you haven’t already). Instead of continuing up the main road to the Gravebirds, travel westwards along the dirt path (you should be able to see the forge ruins in the distance). Continue up this dirt path all the way around and you’ll come to the dungeon entrance, indicated by a broken dragon statue and fire.
On this road, you’ll also encounter the invasion form of the Ancient Dragon-Man. You’ll need to defeat this as well as the real thing at the end of this dungeon. See our Dragon’s Pit walkthrough for more information.
13. Lamenter’s Gaol

Lamenter’s Gaol isn’t too far from Charo’s Hidden Grave. |Image credit:Rock Paper Shotgun/Bandai Namco
- Key items: Call of Tibia, Prattling Pate ‘Lamentation’, Clarifying Horn Charm +2, Lamenting Visage.
- Boss: Lamenter.
- Boss reward: 160,000 Runes, Lamenter’s Mask.
Although the Lamenter’s Gaol is within the Gravesite Plain, it is only accessible via Charo’s Hidden Grave . This, in turn, is only accessible by travelling through the Dragon’s Pit and into the Jagged Peak.
From the first Jagged Peak Site Of Grace outside the Dragon’s Pit exit, travel along the southern road to the Grand Altar of Dragon Communion. Essentially, you need to climb across the body of the giant dead dragon to gain access to the Hidden Grave region. Aim to cross his foot and ankle southwest; this will take you to a ledge. Jump from this ledge and you’ll end up in a grove filled with red flowers and ponds.
From the Charo’s Hidden Grave Site Of Grace, travel forward northwest (watching out for the Death Rite Bird boss) and follow the river west. Drop down two waterfalls and you’ll receive the message that you’re now in the Gravesite Plain. Continue forward, past the scattered cages that mark the dungeons entrance.
Inside Lamenter’s Gaol, you’ll need to make your way down the dungeon to face the Lamenter boss. He isn’t too dangerous, but does have the power to summon multiple copies of himself, which can be tricky. Once you locate the true Lamenter, he is weak against Lightning and Physical damage and strong against Holy, Fire and Magic.
14. Eastern Nameless Mausoleum
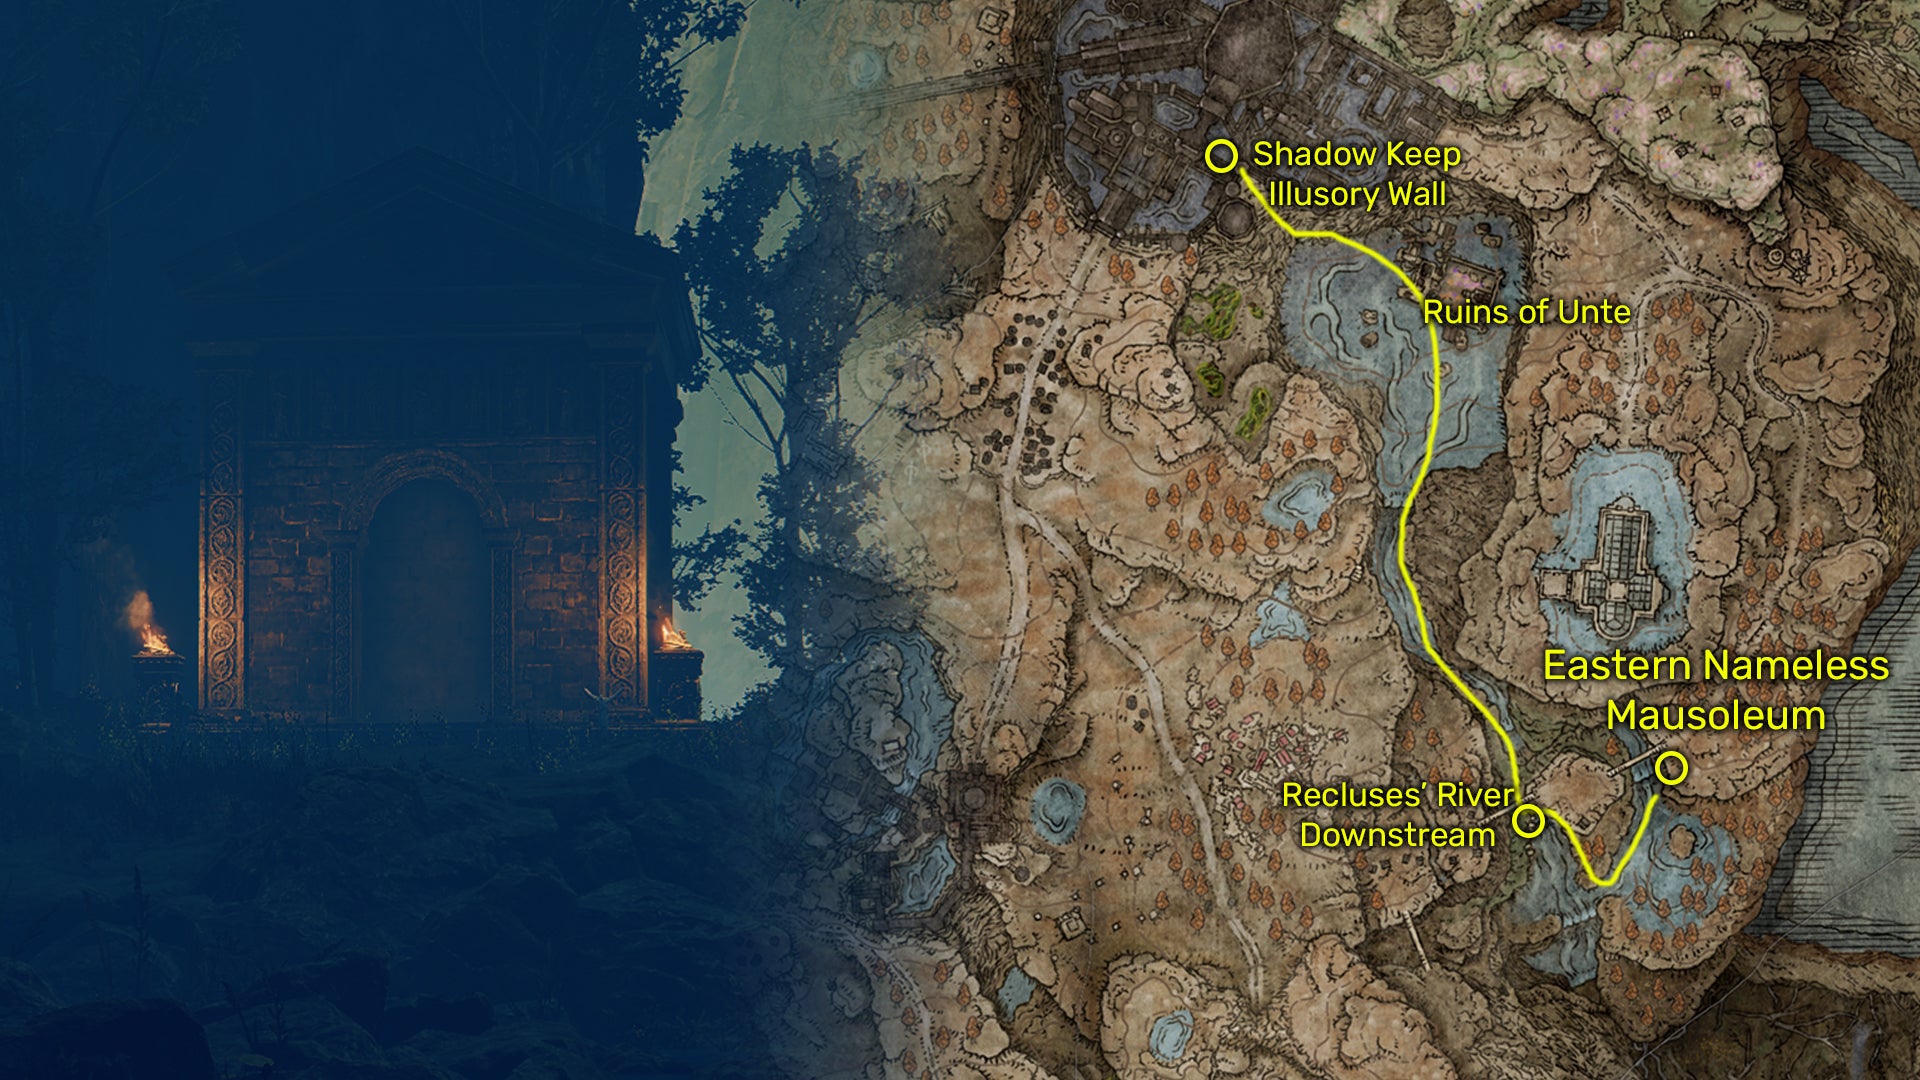
Rakshasa’s Great Katana is worth the trip to the Eastern Nameless Mausoleum. |Image credit:Rock Paper Shotgun/Bandai Namco
- Boss: Rakshasa.
- Boss reward: Rakshasa’s armor set, Rakshasa’s Great Katana, 90,000 Runes.
The Eastern Nameless Mausoleum can only be accessed by travelling through the secret Shadow Keep Passage to the Ruins of Unte . Located east of the Recluses’ River Downstream Site Of Grace and north of the Darklight Catacombs, this region of Shadow Of The Erdtree is called ’the depths’.
If you have yet to discover this region, you must travel to The Shadow Keep in Scadu Altus and advance through the area until you reach the grand staircase foyer area that leads to the large Specimen Storehouse lift. Take the ladder right of the staircase to the lower water level of the keep.
From here, enter the archway concealed by a waterfall and hit the wall to the right of the red painting to reveal a hidden passage. Within here, climb inside the stone coffin to be taken to the depths below. Now, follow the river down until you pass both the Ruins of Unte and discover the Recluses’ River Downstream Site Of Grace.
From this Site Of Grace, walk east to the cliff edge and you’ll see a bunch of stone platforms. Climb down until you hit the waterfall below. Instead of continuing down the stone platforms, turn north and follow the river around until you see the Mausoleum.
Inside the Mausoleum, Rakshasa awaits. He is especially vulnerable after a parry and against Lightning damage. Once defeated, you’ll get one of the best katanas in the DLC, Rakshasa’s Great Katana.
15. Darklight Catacombs

The only way to get to the Abyssal Woods is through the Darklight Catacombs. |Image credit:Rock Paper Shotgun/Bandai Namco
- Key items: Bigmouth Imp Ashes, Death Knight armor set, Viridian Amber Medallion +3.
- Boss: Jori, Elder Inquisitor.
- Boss reward: 260,000 Runes, Barbed Staff-Spear.
The Darklight Catacombs are also located in the depths . From the Recluses’ River Downstream Site Of Grace travel down the stone platforms over the eastern cliffedge. This time, take them all the way down past the waterfall and onto the lower level. Walk towards the next waterfall to the southeast and you’ll see another row of platforms. Take these down and then walk directly east. There will be a few Vulgar Militiamen to watch out for but if you follow the two blue lights you should get to the dungeon entrance.
The key thing to understand about the Darklight Catacombs is that you must light four torches (via four separate levers) to restore power to the area and advance to the boss. The boss in question is Jori, Elder Inquisitor who can be a bit tricky due to his inclination of summoning more enemies to the battle. Try to take him out quickly and remember he is weak against Slash and Fire damage.
Crucially, after completing the Darklight Catacombs, you’ll gain entry into a secret region in the Land of Shadow, the Abyssal Woods. See our full rundown of the Darklight Catacombs and the Abyssal Woods for more information.
That rounds up our guide on all dungeon locations in Elden Ring: Shadow Of The Erdtree. For more Elden Ring tips and tricks , check out our guide to the best early weapons in Shadow Of The Erdtree to get you started. Or, if you’re further along in the DLC, see our best weapons guide that goes through the best of the bunch. Be sure to also check out our Map Fragment locations guide to help you access and uncover every region in the DLC and see our boss locations guide so you won’t miss a single one.


Elden Ring
PS4 , PS5 , Xbox One , Xbox Series X/S , PC
Rock Paper Shotgun is better when you sign in
Sign in and join us on our journey to discover strange and compelling PC games.

All 75 Arc Raiders Blueprints and where to get them
These areas have the highest chance of giving you Blueprints

Image credit:Rock Paper Shotgun/Embark Studios

Looking for more Arc Raiders Blueprints? It’s a special day when you find a Blueprint, as they’re among the most valuable items in Arc Raiders. If you find a Blueprint that you haven’t already found, then you must make sure you hold onto it at all costs, because Blueprints are the key to one of the most important and powerful systems of meta-progression in the game.
This guide aims to be the very best guide on Blueprints you can find, starting with a primer on what exactly they are and how they work in Arc Raiders, before delving into exactly where to get Blueprints and the very best farming spots for you to take in your search.
We’ll also go over how to get Blueprints from other unlikely activities, such as destroying Surveyors and completing specific quests. And you’ll also find the full list of all 75 Blueprints in Arc Raiders on this page (including the newest Blueprints added with the Cold Snap update , such as the Deadline Blueprint and Firework Box Blueprint), giving you all the information you need to expand your own crafting repertoire.
In this guide:
- What are Blueprints in Arc Raiders?
- Full Blueprint list: All crafting recipes
- Where to find Blueprints in Arc Raiders Blueprints obtained from quests Blueprints obtained from Trials Best Blueprint farming locations

What are Blueprints in Arc Raiders?
Blueprints in Arc Raiders are special items which, if you manage to extract with them, you can expend to permanently unlock a new crafting recipe in your Workshop. If you manage to extract from a raid with an Anvil Blueprint, for example, you can unlock the ability to craft your very own Anvil Pistol, as many times as you like (as long as you have the crafting materials).
To use a Blueprint, simply open your Inventory while in the lobby, then right-click on the Blueprint and click “Learn And Consume” . This will permanently unlock the recipe for that item in your Workshop. As of the Stella Montis update, there are allegedly 75 different Blueprints to unlock - although only 68 are confirmed to be in the game so far. You can see all the Blueprints you’ve found and unlocked by going to the Workshop menu, and hitting “R” to bring up the Blueprint screen.
It’s possible to find duplicates of past Blueprints you’ve already unlocked. If you find these, then you can either sell them, or - if you like to play with friends - you can take it into a match and gift it to your friend so they can unlock that recipe for themselves. Another option is to keep hold of them until the time comes to donate them to the Expedition.
Full Blueprint list: All crafting recipes
Below is the full list of all the Blueprints that are currently available to find in Arc Raiders, and the crafting recipe required for each item:
| Blueprint | Type | Recipe | Crafted At |
|---|---|---|---|
| Bettina | Weapon | 3x Advanced Mechanical Components 3x Heavy Gun Parts 3x Canister | Gunsmith 3 |
| Blue Light Stick | Quick Use | 3x Chemicals | Utility Station 1 |
| Aphelion | Weapon | 3x Magnetic Accelerator 3x Complex Gun Parts 1x Matriarch Reactor | Gunsmith 3 |
| Combat Mk. 3 (Flanking) | Augment | 2x Advanced Electrical Components 3x Processor | Gear Bench 3 |
| Combat Mk. 3 (Aggressive) | Augment | 2x Advanced Electrical Components 3x Processor | Gear Bench 3 |
| Complex Gun Parts | Material | 2x Light Gun Parts 2x Medium Gun Parts 2x Heavy Gun Parts | Refiner 3 |
| Fireworks Box | Quick Use | 1x Explosive Compound 3x Pop Trigger | Explosives Station 2 |
| Gas Mine | Mine | 4x Chemicals 2x Rubber Parts | Explosives Station 1 |
| Green Light Stick | Quick Use | 3x Chemicals | Utility Station 1 |
| Pulse Mine | Mine | 1x Crude Explosives 1x Wires | Explosives Station 1 |
| Seeker Grenade | Grenade | 1x Crude Explosives 2x ARC Alloy | Explosives Station 1 |
| Looting Mk. 3 (Survivor) | Augment | 2x Advanced Electrical Components 3x Processor | Gear Bench 3 |
| Angled Grip II | Mod | 2x Mechanical Components 3x Duct Tape | Gunsmith 2 |
| Angled Grip III | Mod | 2x Mod Components 5x Duct Tape | Gunsmith 3 |
| Hullcracker | Weapon | 1x Magnetic Accelerator 3x Heavy Gun Parts 1x Exodus Modules | Gunsmith 3 |
| Launcher Ammo | Ammo | 5x Metal Parts 1x Crude Explosives | Workbench 1 |
| Anvil | Weapon | 5x Mechanical Components 5x Simple Gun Parts | Gunsmith 2 |
| Anvil Splitter | Mod | 2x Mod Components 3x Processor | Gunsmith 3 |
| ??? | ??? | ??? | ??? |
| Barricade Kit | Quick Use | 1x Mechanical Components | Utility Station 2 |
| Blaze Grenade | Grenade | 1x Explosive Compound 2x Oil | Explosives Station 3 |
| Bobcat | Weapon | 3x Advanced Mechanical Components 3x Light Gun Parts | Gunsmith 3 |
| Osprey | Weapon | 2x Advanced Mechanical Components 3x Medium Gun Parts 7x Wires | Gunsmith 3 |
| Burletta | Weapon | 3x Mechanical Components 3x Simple Gun Parts | Gunsmith 1 |
| Compensator II | Mod | 2x Mechanical Components 4x Wires | Gunsmith 2 |
| Compensator III | Mod | 2x Mod Components 8x Wires | Gunsmith 3 |
| Defibrillator | Quick Use | 9x Plastic Parts 1x Moss | Medical Lab 2 |
| ??? | ??? | ??? | ??? |
| Equalizer | Weapon | 3x Magnetic Accelerator 3x Complex Gun Parts 1x Queen Reactor | Gunsmith 3 |
| Extended Barrel | Mod | 2x Mod Components 8x Wires | Gunsmith 3 |
| Extended Light Mag II | Mod | 2x Mechanical Components 3x Steel Spring | Gunsmith 2 |
| Extended Light Mag III | Mod | 2x Mod Components 5x Steel Spring | Gunsmith 3 |
| Extended Medium Mag II | Mod | 2x Mechanical Components 3x Steel Spring | Gunsmith 2 |
| Extended Medium Mag III | Mod | 2x Mod Components 5x Steel Spring | Gunsmith 3 |
| Extended Shotgun Mag II | Mod | 2x Mechanical Components 3x Steel Spring | Gunsmith 2 |
| Extended Shotgun Mag III | Mod | 2x Mod Components 5x Steel Spring | Gunsmith 3 |
| Remote Raider Flare | Quick Use | 2x Chemicals 4x Rubber Parts | Utility Station 1 |
| Heavy Gun Parts | Material | 4x Simple Gun Parts | Refiner 2 |
| Venator | Weapon | 2x Advanced Mechanical Components 3x Medium Gun Parts 5x Magnet | Gunsmith 3 |
| Il Toro | Weapon | 5x Mechanical Components 6x Simple Gun Parts | Gunsmith 1 |
| Jolt Mine | Mine | 1x Electrical Components 1x Battery | Explosives Station 2 |
| Explosive Mine | Mine | 1x Explosive Compound 1x Sensors | Explosives Station 3 |
| Jupiter | Weapon | 3x Magnetic Accelerator 3x Complex Gun Parts 1x Queen Reactor | Gunsmith 3 |
| Light Gun Parts | Material | 4x Simple Gun Parts | Refiner 2 |
| Lightweight Stock | Mod | 2x Mod Components 5x Duct Tape | Gunsmith 3 |
| Lure Grenade | Grenade | 1x Speaker Component 1x Electrical Components | Utility Station 2 |
| Medium Gun Parts | Material | 4x Simple Gun Parts | Refiner 2 |
| Torrente | Weapon | 2x Advanced Mechanical Components 3x Medium Gun Parts 6x Steel Spring | Gunsmith 3 |
| Muzzle Brake II | Mod | 2x Mechanical Components 4x Wires | Gunsmith 2 |
| Muzzle Brake III | Mod | 2x Mod Components 8x Wires | Gunsmith 3 |
| Padded Stock | Mod | 2x Mod Components 5x Duct Tape | Gunsmith 3 |
| Shotgun Choke II | Mod | 2x Mechanical Components 4x Wires | Gunsmith 2 |
| Shotgun Choke III | Mod | 2x Mod Components 8x Wires | Gunsmith 3 |
| Shotgun Silencer | Mod | 2x Mod Components 8x Wires | Gunsmith 3 |
| Showstopper | Grenade | 1x Advanced Electrical Components 1x Voltage Converter | Explosives Station 3 |
| Silencer I | Mod | 2x Mechanical Components 4x Wires | Gunsmith 2 |
| Silencer II | Mod | 2x Mod Components 8x Wires | Gunsmith 3 |
| Snap Hook | Quick Use | 2x Power Rod 3x Rope 1x Exodus Modules | Utility Station 3 |
| Stable Stock II | Mod | 2x Mechanical Components 3x Duct Tape | Gunsmith 2 |
| Stable Stock III | Mod | 2x Mod Components 5x Duct Tape | Gunsmith 3 |
| Tagging Grenade | Grenade | 1x Electrical Components 1x Sensors | Utility Station 3 |
| Tempest | Weapon | 3x Advanced Mechanical Components 3x Medium Gun Parts 3x Canister | Gunsmith 3 |
| Trigger Nade | Grenade | 2x Crude Explosives 1x Processor | Explosives Station 2 |
| Vertical Grip II | Mod | 2x Mechanical Components 3x Duct Tape | Gunsmith 2 |
| Vertical Grip III | Mod | 2x Mod Components 5x Duct Tape | Gunsmith 3 |
| Vita Shot | Quick Use | 2x Antiseptic 1x Syringe | Medical Lab 3 |
| Vita Spray | Quick Use | 3x Antiseptic 1x Canister | Medical Lab 3 |
| Vulcano | Weapon | 1x Magnetic Accelerator 3x Heavy Gun Parts 1x Exodus Modules | Gunsmith 3 |
| Wolfpack | Grenade | 2x Explosive Compound 2x Sensors | Explosives Station 3 |
| Red Light Stick | Quick Use | 3x Chemicals | Utility Station 1 |
| Smoke Grenade | Grenade | 14x Chemicals 1x Canister | Utility Station 2 |
| Deadline | Mine | 3x Explosive Compound 2x ARC Circuitry | Explosives Station 3 |
| Trailblazer | Grenade | 1x Explosive Compound 1x Synthesized Fuel | Explosives Station 3 |
| Tactical Mk. 3 (Defensive) | Augment | 2x Advanced Electrical Components 3x Processor | Gear Bench 3 |
| Tactical Mk. 3 (Healing) | Augment | 2x Advanced Electrical Components 3x Processor | Gear Bench 3 |
| Yellow Light Stick | Quick Use | 3x Chemicals | Utility Station 1 |
Note: The missing Blueprints in this list likely have not actually been added to the game at the time of writing, because none of the playerbase has managed to find any of them. As they are added to the game, I will update this page with the most relevant information so you know exactly how to get all 75 Arc Raiders Blueprints.
Where to find Blueprints in Arc Raiders
Below is a list of all containers, modifiers, and events which maximise your chances of finding Blueprints:
- Certain quests reward you with specific Blueprints .
- Completing Trials has a high chance of offering Blueprints as rewards.
- Surveyors have a decent chance of dropping Blueprints on death.
- High loot value areas tend to have a greater chance of spawning Blueprints.
- Night Raids and Storms may increase rare Blueprint spawn chances in containers.
- Containers with higher numbers of items may have a higher tendency to spawn Blueprints. As a result, Blue Gate (which has many “large” containers containing multiple items) may give you a higher chance of spawning Blueprints.
- Raider containers (Raider Caches, Weapon Boxes, Medical Bags, Grenade Tubes) have increased Blueprint drop rates. As a result, the Uncovered Caches event gives you a high chance of finding Blueprints.
- Security Lockers have a higher than average chance of containing Blueprints.
- Certain Blueprints only seem to spawn under specific circumstances: Tempest Blueprint only spawns during Night Raid events. Vulcano Blueprint only spawns during Hidden Bunker events. Jupiter and Equaliser Blueprints only spawn during Harvester events.

Raider Caches, Weapon Boxes, and other raider-oriented container types have a good chance of offering Blueprints. |Image credit:Rock Paper Shotgun/Embark Studios
Blueprints have a very low chance of spawning in any container in Arc Raiders, around 1-2% on average. However, there is a higher chance of finding Blueprints in particular container types. Specifically, you can find more Blueprints in Raider containers and security lockers.
Beyond this, if you’re looking for Blueprints you should focus on regions of the map which are marked as having particularly high-value loot. Areas such as the Control Tower in Dam Battlegrounds, the Arrival and Departure Buildings in Spaceport, and Pilgrim’s Peak in Blue Gate all have a better-than-average chance of spawning Blueprints somewhere amongst all their containers. Night Raids and Electromagnetic Storm events also increase the drop chances of certain Blueprints .
In addition to these containers, you can often loot Blueprints from destroyed Surveyors - the largest of the rolling ball ARC. Surveyors are more commonly found on the later maps - Spaceport and Blue Gate - and if one spawns in your match, you’ll likely see it by the blue laser beam that it casts into the sky while “surveying”.
Surveyors are quite well-armoured and will very speedily run away from you once it notices you, but if you can take one down then make sure you loot all its parts for a chance of obtaining certain unusual Blueprints.
Blueprints obtained from quests
One way in which you can get Blueprints is by completing certain quests for the vendors in Speranza. Some quests will reward you with a specific item Blueprint upon completion, so as long as you work through all the quests in Arc Raiders, you are guaranteed those Blueprints.
Here is the full list of all Blueprints you can get from quest rewards:
- Trigger Nade Blueprint: Rewarded after completing “Sparks Fly”.
- Lure Grenade Blueprint: Rewarded after completing “Greasing Her Palms”.
- Burletta Blueprint: Rewarded after completing “Industrial Espionage”.
- Hullcracker Blueprint (and Launcher Ammo Blueprint): Rewarded after completing “The Major’s Footlocker”.
Alas, that’s only 4 Blueprints out of a total of 75 to unlock, so for the vast majority you will need to find them yourself during a raid. If you’re intent on farming Blueprints, then it’s best to equip yourself with cheap gear in case you lose it, but don’t use a free loadout because then you won’t get a safe pocket to stash any new Blueprint you find. No pain in Arc Raiders is sharper than failing to extract with a new Blueprint you’ve been after for a dozen hours already.

One of the best ways to get Blueprints is by hitting three stars on all five Trials every week. |Image credit:Rock Paper Shotgun/Embark Studios
Blueprints obtained from Trials
One of the very best ways to get Blueprints is as rewards for completing Trials in Arc Raiders. Trials are unlocked from Level 15 onwards, and allow you to earn rewards by focusing on certain tasks over the course of several raids. For example, one Trial might task you with dealing damage to Hornets, while another might challenge you to loot Supply Drops.
Trials refresh on a weekly basis, with a new week bringing five new Trials. Each Trial can offer up to three rewards after passing certain score milestones, and it’s possible to receive very high level loot from these reward crates - including Blueprints. So if you want to unlock as many Blueprints as possible, you should make a point of completing as many Trials as possible each week.
Best Blueprint farming locations
The very best way to get Blueprints is to frequent specific areas of the maps which combine high-tier loot pools with the right types of containers to search. Here are my recommendations for where to find Blueprints on every map, so you can always keep the search going for new crafting recipes to unlock.

Image credit:Rock Paper Shotgun/Embark Studios
Dam Battlegrounds
The best places to farm Blueprints on Dam Battlegrounds are the Control Tower, Power Generation Complex, Ruby Residence, and Pale Apartments . The first two regions, despite only being marked on the map as mid-tier loot, contain a phenomenal number of containers to loot. The Control Tower can also contain a couple of high-tier Security Lockers - though of course, you’ll need to have unlocked the Security Breach skill at the end of the Survival tree.
There’s also a lot of reporting amongst the playerbase that the Residential areas in the top-left of the map - Pale Apartments and Ruby Residence - give you a comparatively strong chance of finding Blueprints. Considering their size, there’s a high density of containers to loot in both locations, and they also have the benefit of being fairly out of the way. So you’re more likely to have all the containers to yourself.
Buried City
The best Blueprint farming locations on Buried City are the Santa Maria Houses, Grandioso Apartments, Town Hall, and the various buildings of the New District . Grandioso Apartments has a lower number of containers than the rest, but a high chance of spawning weapon cases - which have good Blueprint drop rates. The others are high-tier loot areas, with plenty of lootable containers - including Security Lockers.
Spaceport
The best places to find Blueprints on Spaceport are the Arrival and Departure Buildings, as well as Control Tower A6 and the Launch Towers . All these areas are labelled as high-value loot regions, and many of them are also very handily connected to one another by the Spaceport wall, which you can use to quickly run from one area to the next. At the tops of most of these buildings you’ll find at least one Security Locker, so this is an excellent farming route for players looking to find Blueprints.
The downside to looting Blueprints on Spaceport is that all these areas are hotly contested, particularly in Duos and Squads. You’ll need to be very focused and fast in order to complete the full farming route.

Image credit:Rock Paper Shotgun/Embark Studios
Blue Gate
Blue Gate tends to have a good chance of dropping Blueprints, potentially because it generally has a high number of containers which can hold lots of items; so there’s a higher chance of a Blueprint spawning in each container. In my experience, the best Blueprint farming spots on Blue Gate are Pilgrim’s Peak, Raider’s Refuge, the Ancient Fort, and the Underground Complex beneath the Warehouse .
All of these areas contain a wealth of containers to loot. Raider’s Refuge has less to loot, but the majority of the containers in and around the Refuge are raider containers, which have a high chance of containing Blueprints - particularly during major events.
Stella Montis
On the whole, Stella Montis seems to have a very low drop rate for Blueprints (though a high chance of dropping other high-tier loot). If you do want to try farming Blueprints on this map, the best places to find Blueprints in Stella Montis are Medical Research, Assembly Workshop, and the Business Center . These areas have the highest density of containers to loot on the map.
In addition to this, the Western Tunnel has a few different Security Lockers to loot, so while there’s very little to loot elsewhere in this area of the map, it’s worth hitting those Security Lockers if you spawn there at the start of a match.
That wraps up this primer on how to get all the Blueprints in Arc Raiders as quickly as possible. With the Expedition system constantly resetting a large number of players’ Blueprints, it’s more important than ever to have the most up-to-date information on where to find all these Blueprints.
While you’re here, be sure to check out our Arc Raiders best guns tier list , as well as our primers on the best skills to unlock and all the different Field Depot locations on every map.


ARC Raiders
PS5 , Xbox Series X/S , PC
Rock Paper Shotgun is better when you sign in
Sign in and join us on our journey to discover strange and compelling PC games.
