All Daedric Quests in Oblivion Remastered and how to start them
Every Daedric Shrine location, Daedric Quest, and required offering in Oblivion

Image credit:Bethesda/Virtuos

Looking to start the Daedric Quests in The Elder Scrolls IV: Oblivion Remastered? The quests offered by the Daedric Princes are among the most interesting ones in Oblivion, but they’re fairly difficult to find, as each of them is tied to a Daedric Shrine hidden in the wilds. Once you locate a Shrine, you must reach a leveling threshold and offer specific valuables before the Daedric Prince belonging to that Shrine will speak with you.
As it’s quite a hassle to figure this out on your own, this guide will show you how to find every Daedric Shrine location in The Elder Scrolls IV: Oblivion and how to complete every Daedric Quest.

How to start a Daedric Quest

Find 15 of these statues to start every Daedric Shrine Quest in Oblivion. |Image credit:Bethesda/Virtuos
Although Daedric Quests come with different requirements (including level requirements) and are found in different locations, they follow the same pattern: you must find the Daedric Shrine, offer some materials, speak with the Daedric Prince, and accept the Daedric Quest tied to that shrine. Oblivion has a total of 15 Daedric Shrines and thus 15 Daedric Quests .
Although the offerings vary per shrine, they’re usually easy to come by. A far bigger challenge is to find every Daedric Shrine, as some of them are hidden deep within Cyrodiil’s wilderness. We’ve listed their locations below, along with a brief explanation of how to complete every Daedric Quest, but keep the following in mind: Firstly, Daedric Princes aren’t the nicest creatures in Oblivion, which means you may have to commit heinous crimes to complete their quests - it’s up to you whether you wish to do so. Secondly, Daedric Quests are easily failed, so we highly recommend saving your game directly after obtaining the quest, before you follow the Daeric Prince’s instructions.
Here are all of the Daedric Quests:
- Azura’s Quest
- Sheogorath’s Quest
- Namira’s Quest
- Vaermina’s Quest
- Sanguine’s Quest
- Peryite’s Quest
- Nocturnal’s Quest
- Malacath’s Quest
- Meridia’s Quest
- Mephala’s Quest
- Hircine’s Quest
- Molag Bal’s Quest
- Clavicus Vile’s Quest
- Boethia’s Quest
- Hermaeus Mora’s Quest
Azura’s Quest
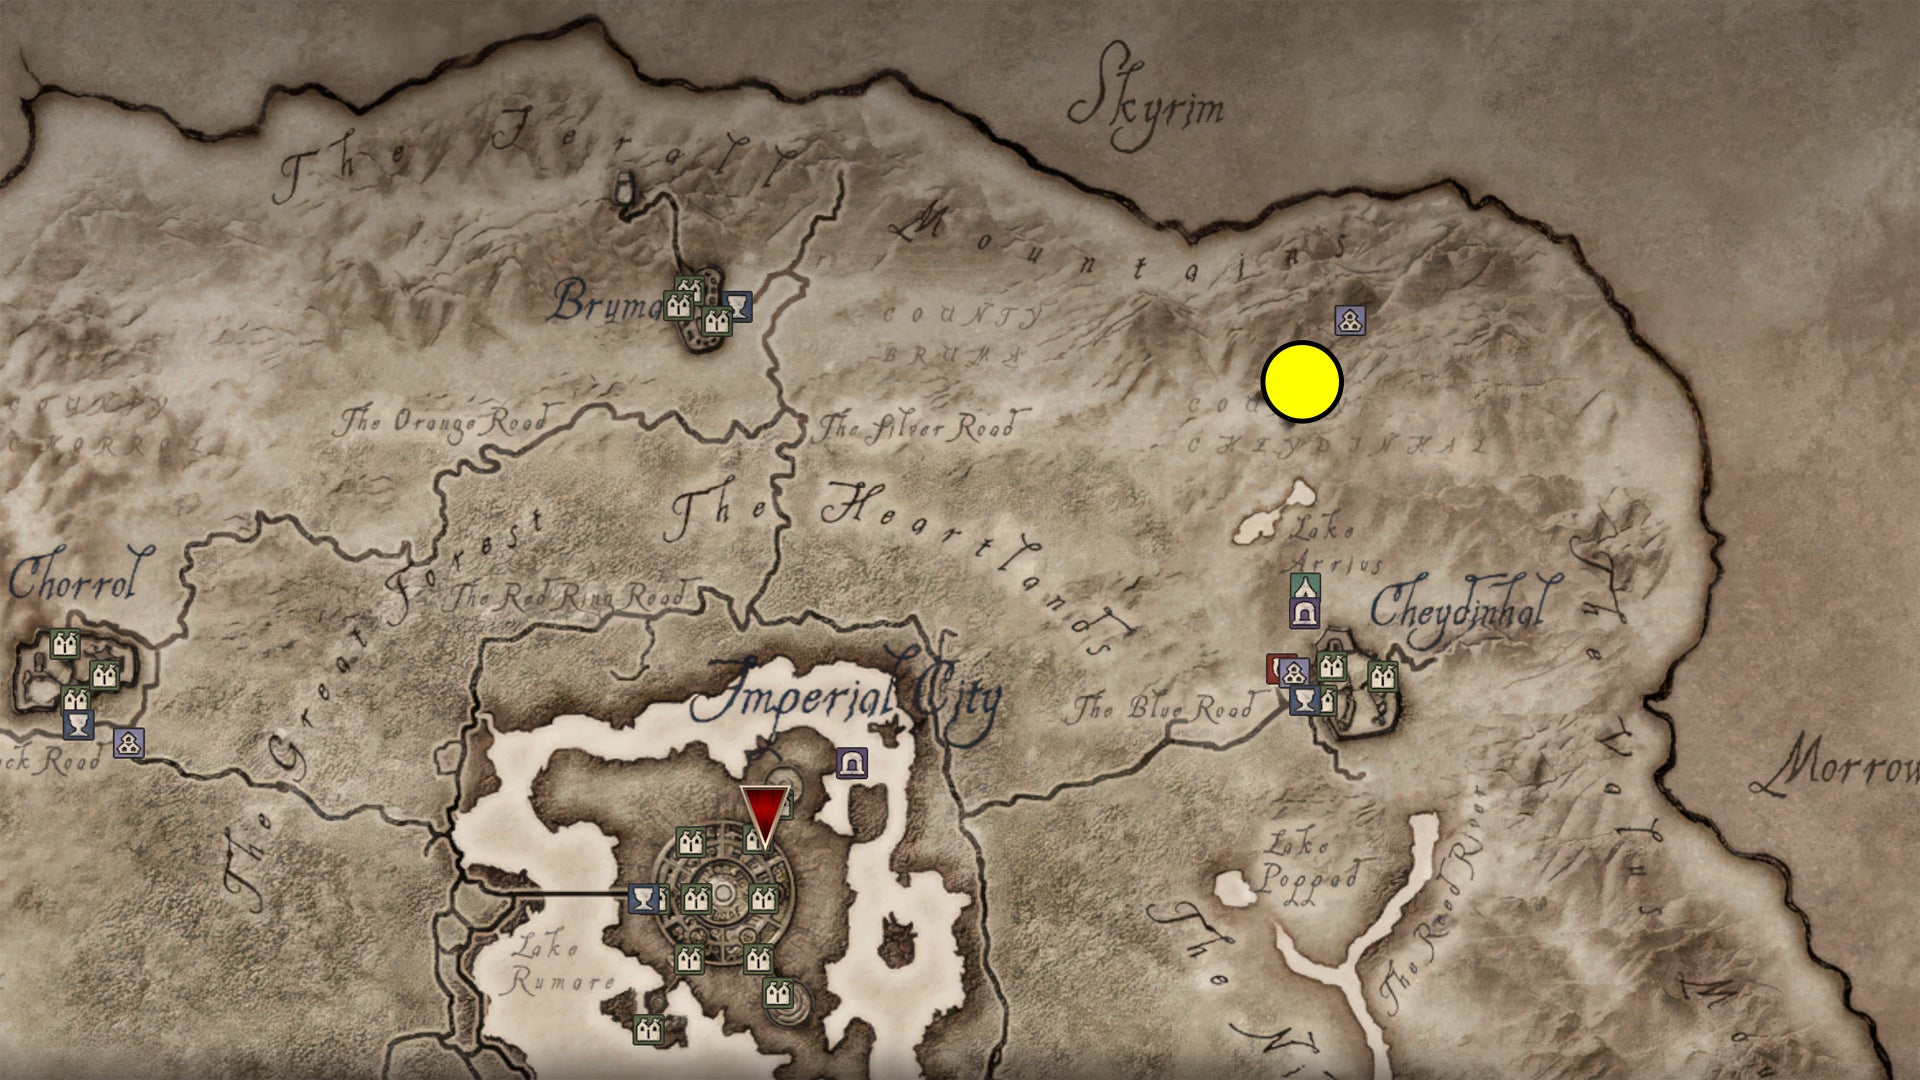
Azura’s Shrine location. |Image credit:Bethesda/Virtuos
- Reward : Azura’s Star
- Minimum level : 2
- Requirements : Offer Glow Dust.
This Daedric Shrine is located in the northeastern mountains of Cyrodiil. Travel north from Cheydinhal, then continue northwest once you come across Lord Rugdumph’s Estate. You must offer Glow Dust, which is dropped by Will-o-the-Wisp enemies, the sparkly ghosts that typically spawn in caves and in the wilds (mostly the southern part of the map). That said, it’s easier to buy Glow Dust from a shop, such as The Main Ingredient and The Gilded Carafe in the Imperial City Market District. Be sure to make your offer at dusk or dawn.
To complete Azura’s Quest, go to the Gutted Mine directly southwest of the Shrine and slay the five vampires inside. Return to Azura’s Shrine to receive your reward.
Sheogorath’s Quest

Sheogorath’s Shrine location. |Image credit:Bethesda/Virtuos
- Reward : Wabbajack
- Minimum level : 2
- Requirements : Offer lettuce, yarn, and a lesser soul gem.
Located in the southern part of the map, about halfway between the cities of Bravin and Leyawiin, you’ll find Sheogorath’s Shrine. It’s in the woods on the western river bank, not far from the bridge. Although you need three offerings, they’re relatively easy to obtain: yarn is a common loot item (just search a few chests and barrels), while lettuce is sold by merchants (innkeepers in particular) and found on many farms. Lesser Soul Gems are often dropped by mages but also sold by vendors, specifically ones that sell magical spells and alchemy ingredients.
To complete Sheogorath’s Quest, go to the town of Borderwatch south of the Shrine, and speak with the dark-robed shaman called Ri’Bassa. After you’ve questioned him about the K’sharra Prophecy, head to the local inn and steal Olroy Cheese from the display, then cook it in the pot just outside the inn. After the rat incident, collect rat poison and put it in the sheep trough (south of the inn). Return to the center of Border Watch when prompted, and return to the Daedric Shrine to obtain your reward.
Namira’s Quest
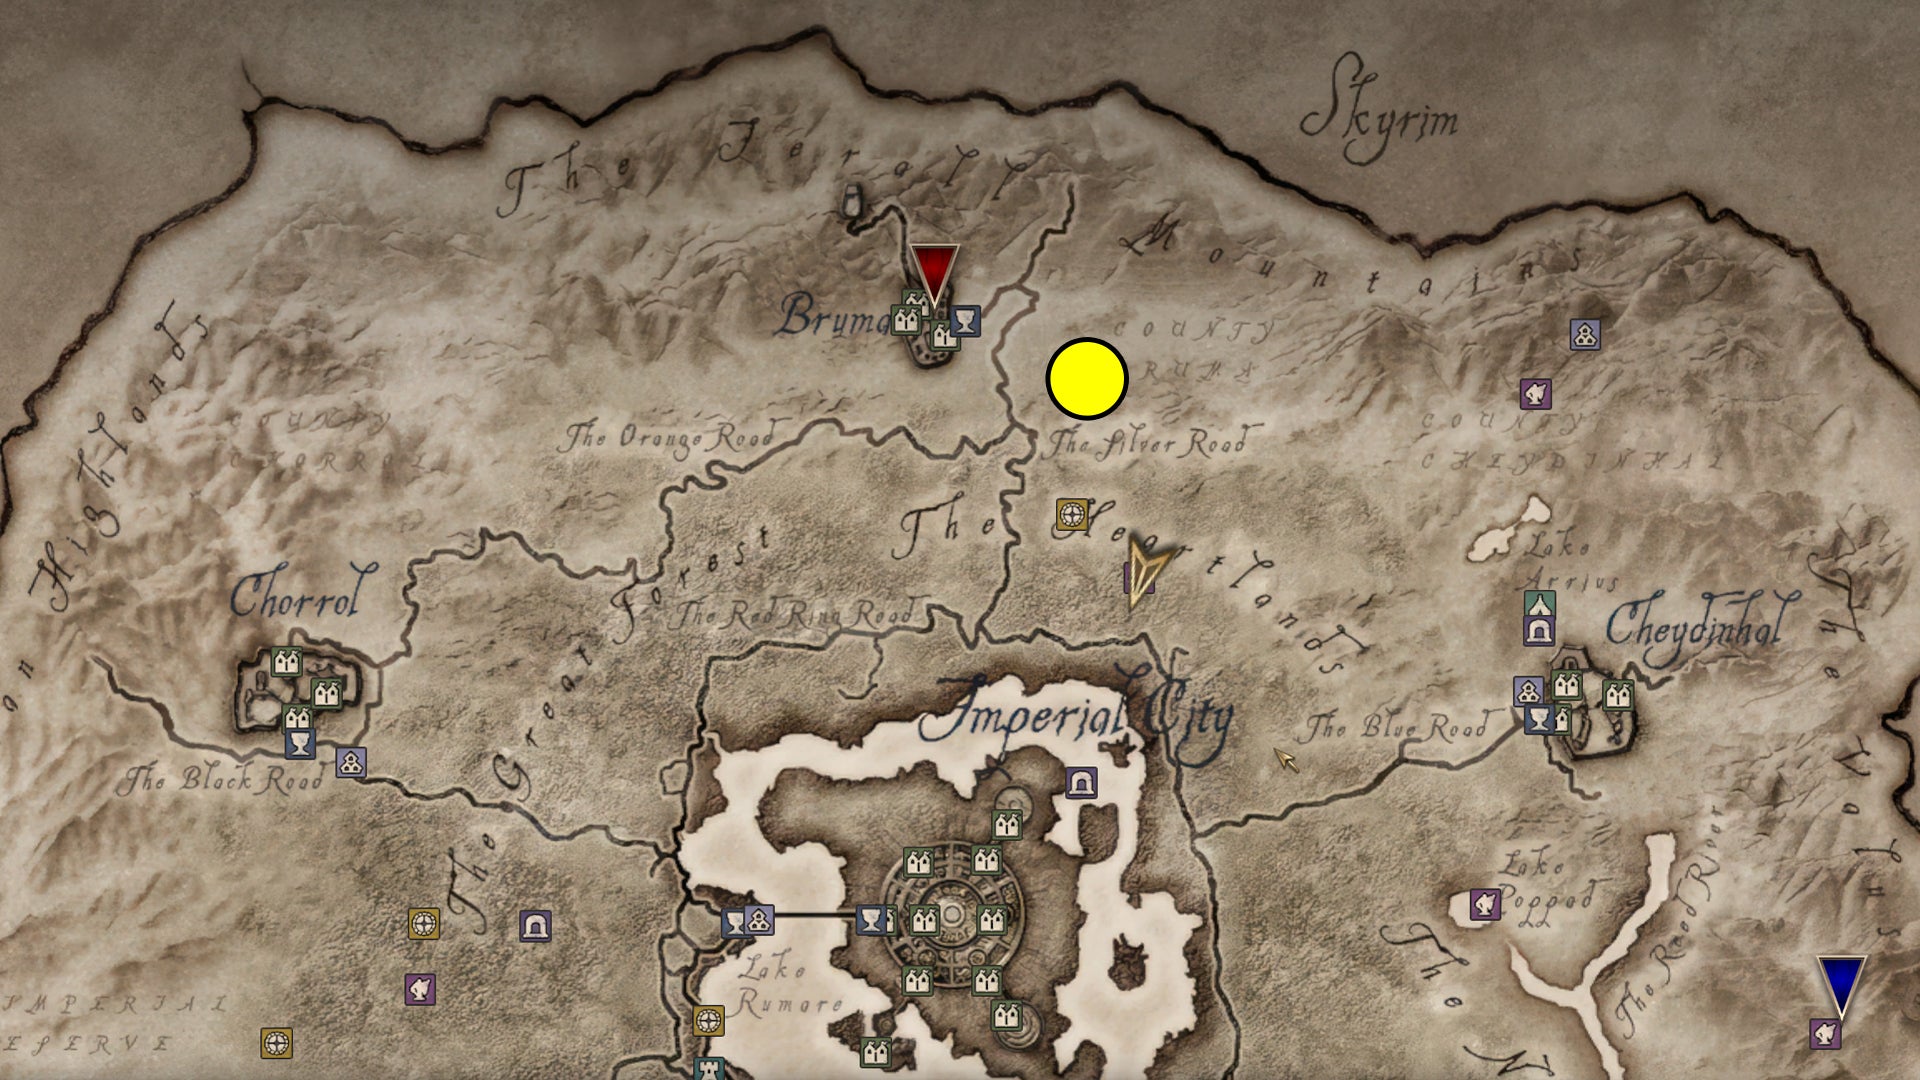
Namira’s Shrine location. |Image credit:Bethesda/Virtuos
- Reward : Ring of Namira
- Minimum level : 5
- Requirements : Your Personality Attribute is 20 or less.
Namira’s Shrine is in the northern part of the map, east of Bruma. While you don’t need to make an offering to the Shrine, you must become ‘unattractive’ to worship Namira. In practical terms, your Personality must be 20 or lower. Since you’re probably way too attractive, there are two ways to easily (and temporarily!) lower your personality: drink Cheap Wine (innkeepers often sell it) or use a custom Drain Personality spell using the ‘drain attribute’ effect.
To complete Namira’s Quest, go to the Ayleid Ruin called Anga, directly south of the Daedric Shrine. Cast the Alteration spell you’ve been given, Namira’s Shroud, on the four priests of Arkay (do not fight them yourself). Return to Namira’s Shrine when the task is done.
Vaermina’s Quest

Vaermina’s Shrine location. |Image credit:Bethesda/Virtuos
- Reward : Skull of Corruption
- Minimum level : 5
- Requirements : Offer a Black Soul Gem.
Vaermina’s Shrine stands right next to Lake Poppad, southwest of Cheydinhal. Vaermina’s Quest is easy to find but difficult to start, as you need a pretty rare item: a Black Soul Gem. They’re occasionally dropped by necromancers, but you can also turn a Grand Soul Gem into a Black Soul Gem by taking it to a trough on the ‘Day of Revenant Shade’. On this day, which happens once every eight days, a purple beam will mark the altars. Place a Grand Soul Gem on the altar and use a Soul Trap spell on it to turn it into a Black Soul Gem.
To complete Vaermina’s Quest, head south to Arkved’s Tower and clear this massive dungeon. Upon reaching the Death Chamber, grab Vaermina’s Orb from the table and leave. Return to Vaermina to receive the Skull of Corruption.
Sanguine’s Quest
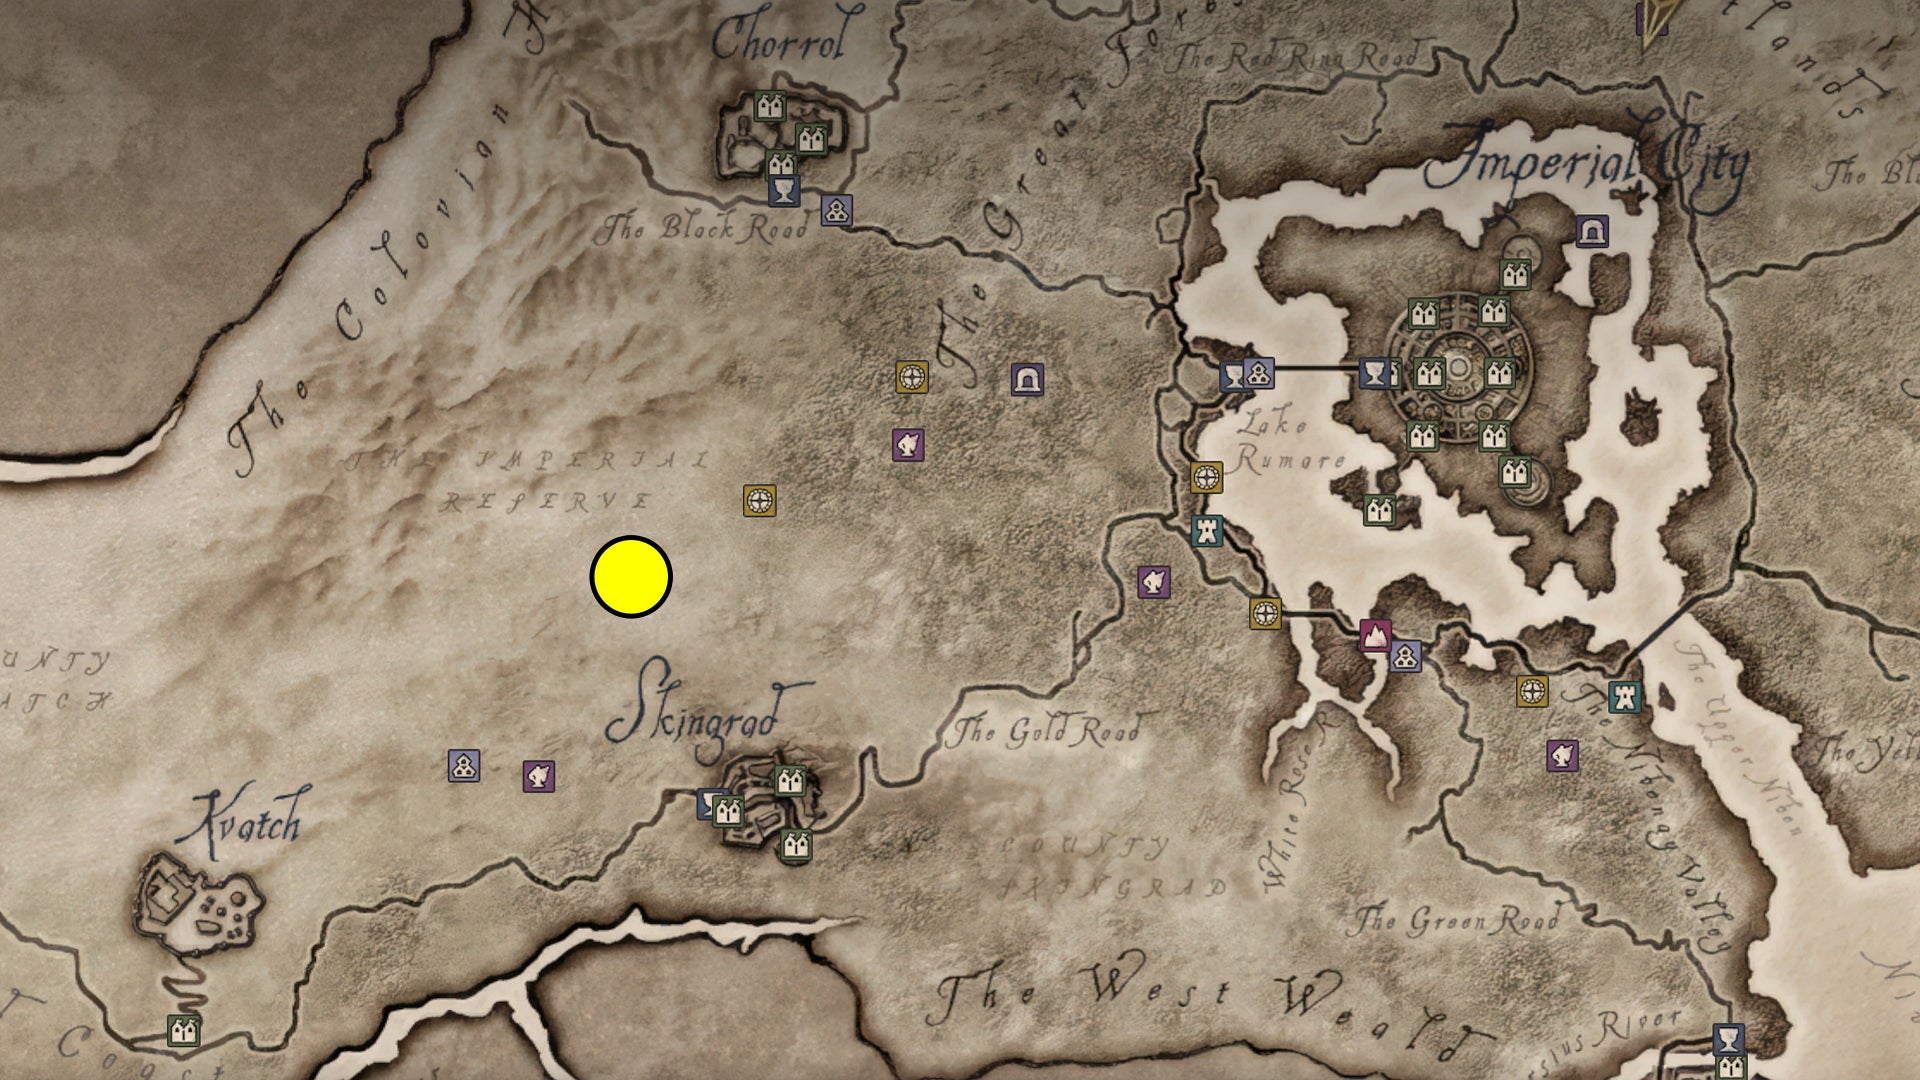
Sanguine’s Shrine location. |Image credit:Bethesda/Virtuos
- Reward : Sanguine Rose
- Minimum level : 8
- Requirements : Offer Cyrodilic Brandy.
Sanguine’s Shrine is quite far west of the Imperial City but not too far north of Skingrad. It’s situated in the forest area southeast of Fort Dirich and southwest of Elenglynn. Be sure to bring a bottle of Cyrodilic Brandy as an offering - it’s sold by various vendors (try The Main Ingredient in the Imperial City), but you may also be able to loot it from nobles’ houses.
To complete Sanguine’s Quest, enter Castle Leyawiin (southernmost part of the map) in the evening to join a dinner party and cast the Stark Reality spell you’ve been given. Inside the castle, walk towards the throne and then turn right - be sure to wear noble’s clothes so the guard will let you enter (and/or raise his disposition through persuasion), and ensure that all dinner party guests (five in total) are there before you cast the spell. You’ll lose all your items and get marked as a criminal immediately after, so be prepared to go to jail or make a run for it - to Sanguine’s Shrine, preferably, so you can reclaim your items and get your reward. If you don’t have them yet, you can steal noble’s clothes from a noble’s house or buy a set from ‘Divine Elegance’ in the Imperial Market District.
Peryite’s Quest
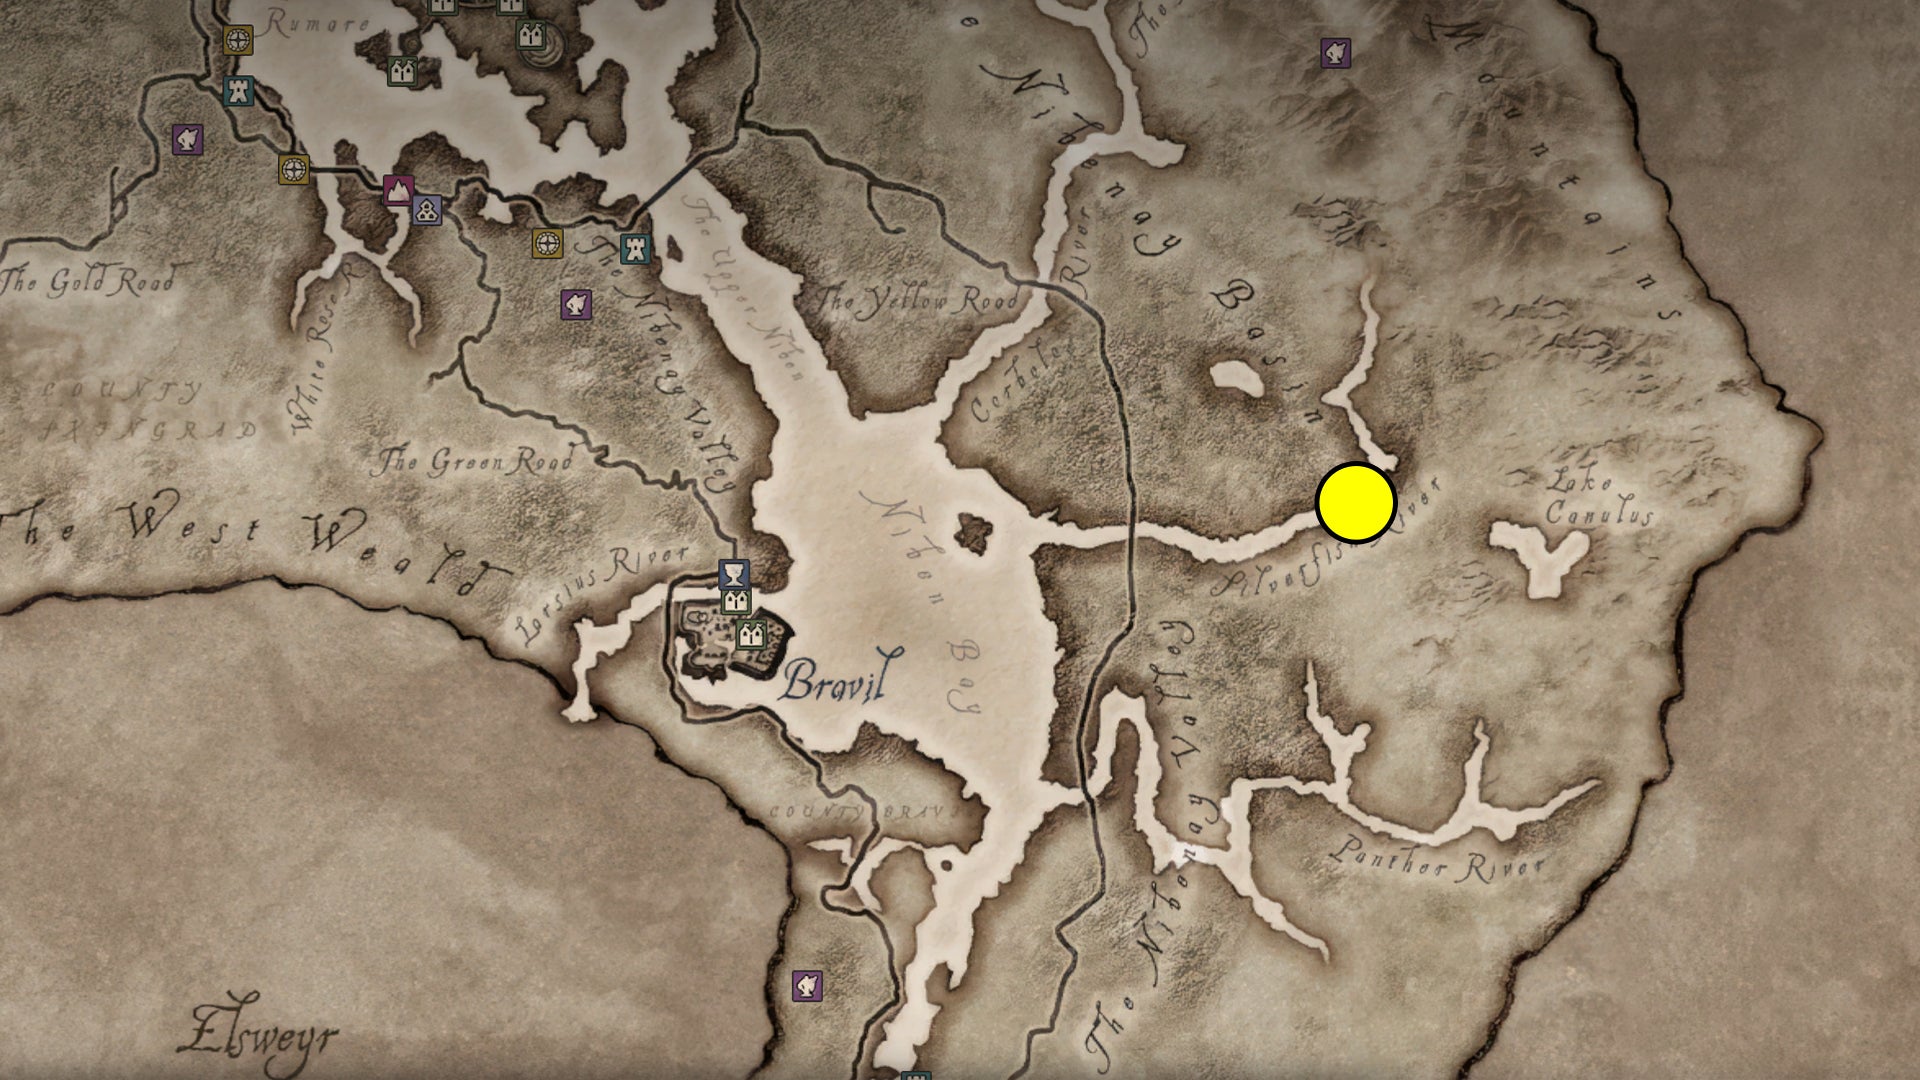
Peryite’s Shrine location. |Image credit:Bethesda/Virtuos
- Reward : Spell Breaker
- Minimum level : 10
- Requirements : N/A
Peryite’s Shrine is on the eastern side of the map, northwest of Lake Canulus and next to the Silverfish River. Unlike previous Daedric Quests, you don’t need to offer anything; just speak with the altar to start Peryite’s Quest.
To complete this Daedric Quest, agree to travel to Oblivion and find the five lost souls. Be prepared to face plenty of enemies trying to hinder your search. Peryite will bring you back once you’ve found the last soul and reward you with the Spellbreaker.
Nocturnal’s Quest
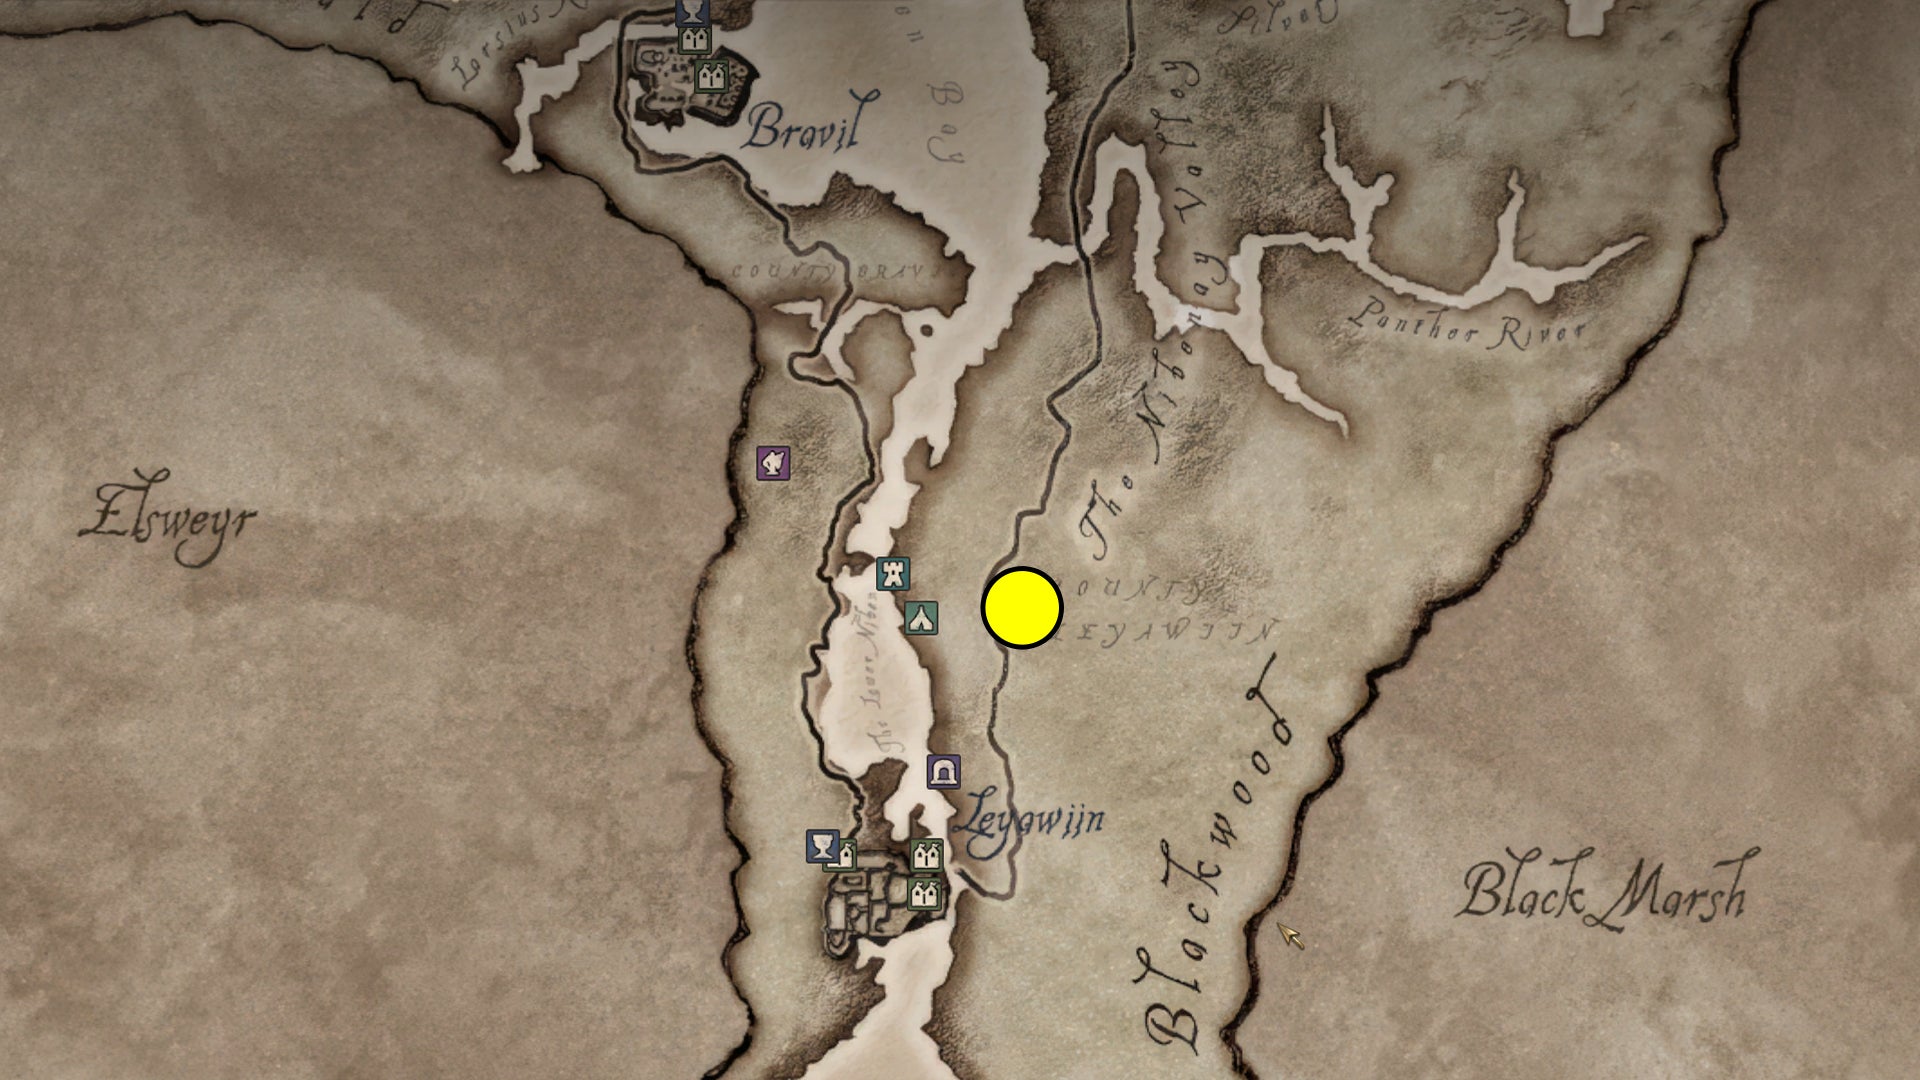
Nocturnal’s Shrine location. |Image credit:Bethesda/Virtuos
- Reward : Skeleton Key
- Minimum level : 10
- Requirements : N/A
Nocturnal ’s Daedric Shrine is quite far south, though not as far as Leyawiin, on the east side of the river. It’s next to a small lake east of Fort Redman. Again, you don’t need to offer anything.
Nocturnal wants you to go to Leyawiin and recover the Eye of Nocturnal. Ask around and the locals will point you to two Argonians, who won’t admit to thievery when you question them. Make sure you’re hidden before you eavesdrop on their conversation, then head to Tidewater Cave south of Leyawiin, on the eastern river bank, where you’ll find the Eye. Nocturnal will give you the Skeleton Key as a reward.
Malacath’s Quest
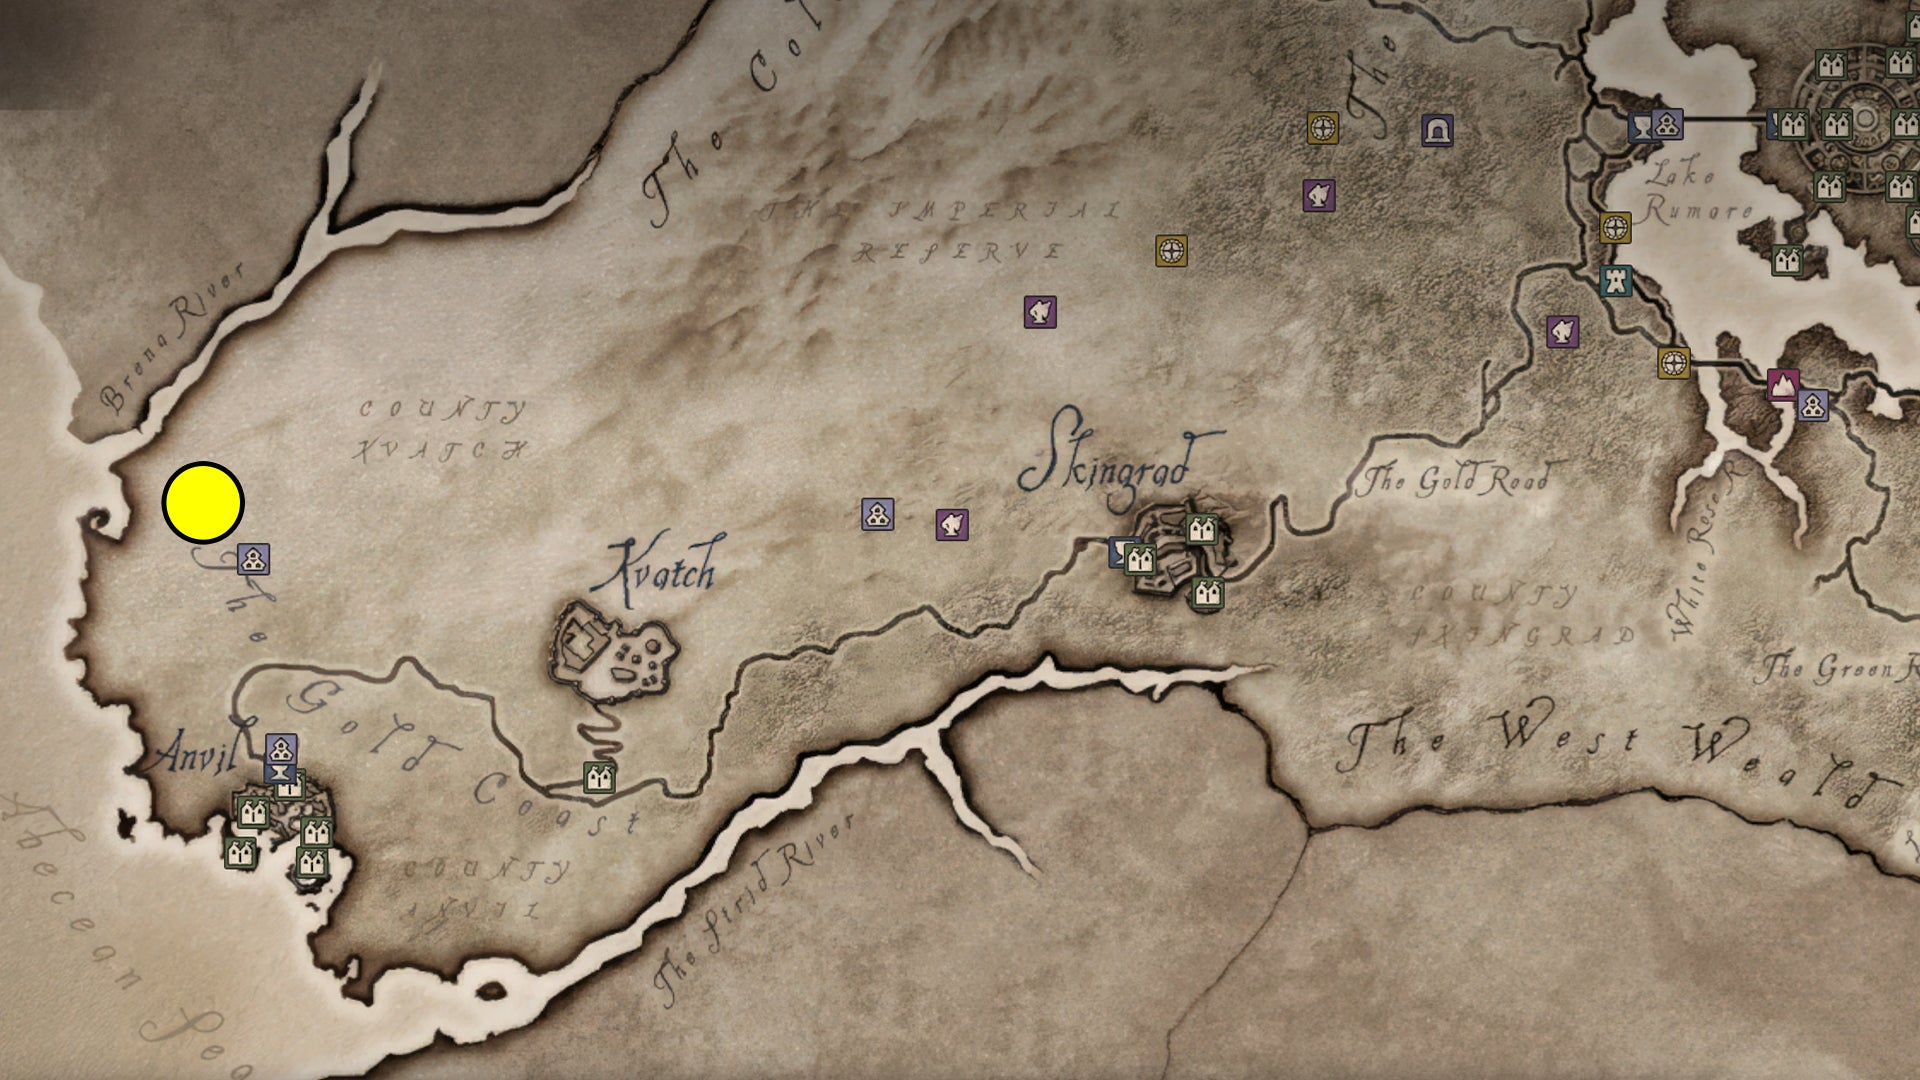
Malacath’s Shrine location. |Image credit:Bethesda/Virtuos
- Reward : Volendrung
- Minimum level : 10
- Requirements : Offer troll fat.
Malacath’s Shrine is in the westernmost corner of the map, north of Anvil and just northwest of Lord Drad’s Estate. The offering, troll fat, is dropped by trolls upon defeat but can also be bought from alchemy vendors.
This Daedric Prince wants you to liberate some ogre slaves. Head southeast to Lord Drad’s Estate and speak with him or his wife to learn the location of the slaves, which is the nearby Bleak Mine. Head inside, open two cells, and return to Malacath’s Shrine. Note that this quest can fail if the guards slaughter the ogres, and you may also experience some trouble getting past the ogres once they start fighting. Best to hurry up and leave before that happens.
Meridia’s Quest

Meridia’s Shrine location. |Image credit:Bethesda/Virtuos
- Reward : Ring of Khajiiti
- Minimum level : 10
- Requirements : Offer bonemeal, ectoplasm, or mort flesh.
Meridia’s Shrine is far west of the Imperial City, north of the road between Skingrad and Kvatch. To start Meridia’s Quest, you must offer ’the remains of her enemies’ to the Daedric Shrine, meaning drops from undead creatures, including bonemeal, ectoplasm, and mort flesh. You can simply buy one of these items from an alchemy vendor (try ‘The Gilded Carafe’ or ‘The Main Ingredient’ in the Imperial City Market District) or defeat undead enemies such as ghosts, skeletons, zombies, and wraiths. They’re often found roaming in dungeons and graveyards. To be clear, you only need to offer one such loot drop from an undead fiend, so one offering of bonemeal would suffice.
This Daedric Quest is quite straightforward; go to the Howling Cave in the woods east of Skingrad and defeat the necromancers inside. Return to Meridia’s Shrine afterwards to receive the Ring of Khajiiti.
Mephala’s Quest
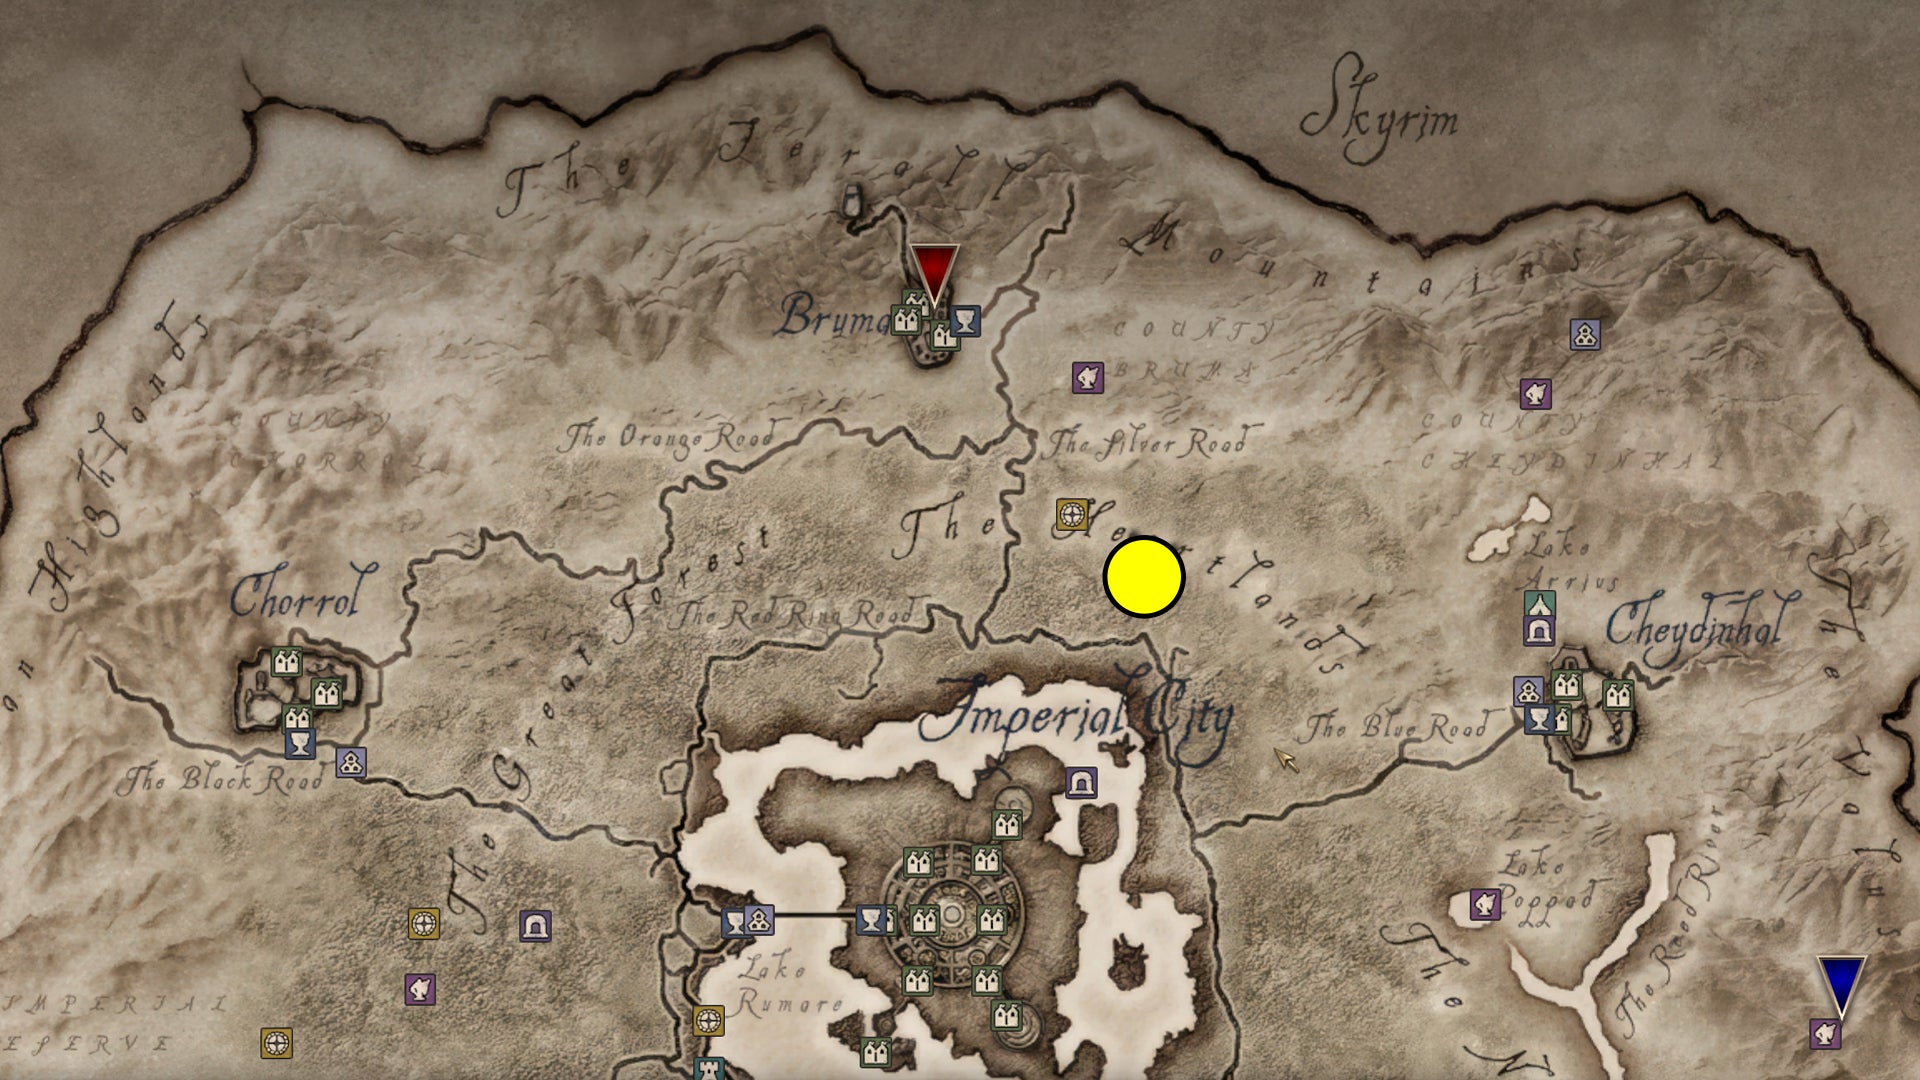
Mephala’s Shrine location. |Image credit:Bethesda/Virtuos
- Reward : Ebony Blade
- Minimum level : 15
- Requirements : Offer a nightshade plant.
Mephala’s Shrine is located northeast of the Imperial City, in the forest not far north of the main road. Bring a nightshade plant as an offering - it’s quite common in the wilds around Skingrad, but you can also buy some from a vendor. Both ‘The Gilded Carafe’ and ‘The Main Ingredient’ in the Imperial City Market District usually sell it. You can only make this offering between midnight and dawn.
To complete Mephala’s Quest, travel west to the small town of Bleaker’s Way (across the road) and ask the locals for information on their town. Your next task is to break into Nivan Dalvilu’s and Hrol Ulfgar’s houses to steal the Dalvilu Ceremonial Dagger (on the table to the right) and the Ulfgar Family Ring (on a table upstairs), respectively. Beware that the quest will fail if you get caught, so it’s wise to save your game beforehand! Next, you must murder both Nivan and Hrol and plant false evidence on their bodies (the Ulfgar Family Ring on Nivan’s body and the Ceremonial Dagger on Ulfgar’s body). Speak to any local and ask them about both men afterwards, then return to the Daedric Shrine to collect the Ebony Blade.
Hircine’s Quest

Hircine’s Shrine location. |Image credit:Bethesda/Virtuos
- Reward : Saviour’s Hide
- Minimum level : 17
- Requirements : Offer a wolf pelt or bear pelt.
Hircine’s Shrine is not far south of the Imperial City, in the woods west of the river (north of Bravil). You must offer a wolf or bear pelt, which are dropped by - you guessed it - wolves and bears. Both animals are commonly found in Cyrodiil’s wilds, but you might target wolves rather than bears as they’re usually easier to defeat. Pelts are also sold by general goods shops like the ‘Three Brothers Trade Goods’ and ‘Jensine’s Good as New Merchandise’ in the Imperial City Market District.
To complete Hircine’s Quest, travel south to Harcane Grove and kill the unicorn. Beware that the unicorn is guarded by three sturdy minotaurs, so it’s strongly advised to take them down first (isolated, if possible). Alternatively, you can kidnap the unicorn by mounting it like a regular horse and riding to an isolated spot, a fair distance away from the minotaurs. To avoid fighting the unicorn altogether, you can ride it off a cliff so it may die from fall damage. Either way, collect the unicorn’s horn and bring it back to Hircine’s Daedric Shrine to receive Saviour’s Hide light armour.
Molag Bal’s Quest

Molag Bal’s Shrine location. |Image credit:Bethesda/Virtuos
- Reward : Mace of Molag Bal
- Minimum level : 17
- Requirements : Offer a lion’s pelt.
Molag Bal’s Shrine is in the thick forest west of the Imperial City, about halfway between Chorrol and Skingrad. Again, you must offer an animal pelt, but this time from a lion. Mountain lions spawn everywhere in Cyrodiil, but you can also buy a lion pelt from a general goods vendor, such as ‘Three Brothers Trade Goods’ and ‘Jensine’s Good as New Merchandise’ in the Imperial City Market District.
To complete Molag Bal’s Daedric Quest, head to Brindle Home southwest of the Daedric Shrine where you must bait a man called Melus Petilius into killing you. As the locals will tell you, Melus visits his wife’s grave at 10 AM. Be sure to drop the Cursed Mace (given by Molag) on the grave, attack Melus, and let him kill you with Molag’s weapon. Avoid wearing reflective armour or bringing followers, as you must not kill Melus before he kills you. Upon death, you’ll respawn at Molag Bal’s Daedric Shrine. As yet another happy Daedric Prince, he’ll reward you with the Mace of Molag Bal.
Clavicus Vile’s Quest

Clavicus Vile’s Shrine location. |Image credit:Bethesda/Virtuos
- Reward : Masque of Clavicus Vile or Umbra Sword
- Minimum level : 20
- Requirements : Offer 500 gold.
Clavicus Vile’s Shrine is located southwest of the Imperial City, not far from Lake Rumare. To speak with this Daedric Prince, you must offer 500 gold.
At the start Clavicus Vile’s Quest, follow the road east to Pell’s Gate. Although Clavicus asked you to retrieve a sword containing the soul of Umbra, his companion will beg you not to do so. You can ignore this advice for now and ask the locals in Pell’s Gate for information. An NPC called Irroke the Wide will point you to the Ayleid Ruin of Vindasel (follow the road west and cross the two bridges). Here you can either fight Umbra or leave peacefully, but the choice between giving or keeping Umbra’s sword remains open even if you kill her. Return to Clavicus Vile’s Daedric Shrine and make your decision: if you give the sword, you’ll receive the Masque of Clavicus Vile (heavy headgear), but if you don’t, you can keep Umbra’s Sword.
Boethia’s Quest

Boethia’s Shrine location. |Image credit:Bethesda/Virtuos
- Reward : Goldbrand
- Minimum level : 20
- Requirements : Offer a Daedra Heart.
Boethia’s Shrine is found far east of the Imperial City, on the edge of the map between Fort Naso and Fort Facian (roughly the same vertical position as the Arcane University). It’s pretty high up the mountain, though not at the very top. You must offer a Daedra Heart, which is dropped by Dremora and Xivilai enemies. You can also visit an alchemy shop to purchase a Daedra Heart, such as ‘The Gilded Carafe’ and ‘The Main Ingredient’ in the Imperial City Market District.
To complete Boethia’s Quest, step through the blue portal and join the Tournament of the Ten Bloods. Defeat a total of nine opponents (one for every race in Oblivion except your own) to complete this Daedric Quest and receive Goldbrand, an enchanted sword. Don’t forget to loot the tournament opponents too!
Hermaeus Mora’s Quest

Hermaeus Mora’s Shrine location. |Image credit:Bethesda/Virtuos
- Reward : Oghma Infinium
- Minimum level : 20
- Requirements : Must have completed all other Daedric Quests and started Blood of the Daedra.
Hermaeus Mora’s Shrine is located in the far mountains northwest of the Imperial City. This is probably the hardest Daedric Shrine location to find, as it’s on top of the snowy mountains. Starting from Bruma, go west and cross the wooden hanging bridges to reach it. To start the final Daedric Quest, you must have completed all other Daedric Quests in Oblivion, so 14 in total. It doesn’t matter which choice you made in Clavicus Vile’s Quest, as long as you’ve finished it. On top of that, you must’ve started the main quest called Blood of the Daedra.
Once you meet the requirements, head to the Daedric Shrine to receive Hermaeus Mora’s Quest: you must capture a soul from each of the 10 races in Oblivion. To do this, Hermaeus Mora will give you a special Soul Gem and Soul Trap spell to use. Be sure to cast this quest-exclusive spell on your victims before you kill them - a regular Soul Trap spell won’t work! You’re free to soul-trap any NPC, including innocent ones, but you can also decide to target ’evil’ members of each race, such as vampires and bandits. With 10 souls collected, return to Hermaeus Mora’s Daedric Shrine to receive the Oghma Infinium book, which will grant you a permanent stat boost.
And that’s how to complete every Daedric Quest in The Elder Scrolls IV: Oblivion Remastered. If you’re looking for another interesting adventure, perhaps you should jump through an Oblivion Gate , explore the Shivering Isles , or, why not, try to contract vampirism .

The Elder Scrolls IV: Oblivion
PS3 , Xbox 360 , PC
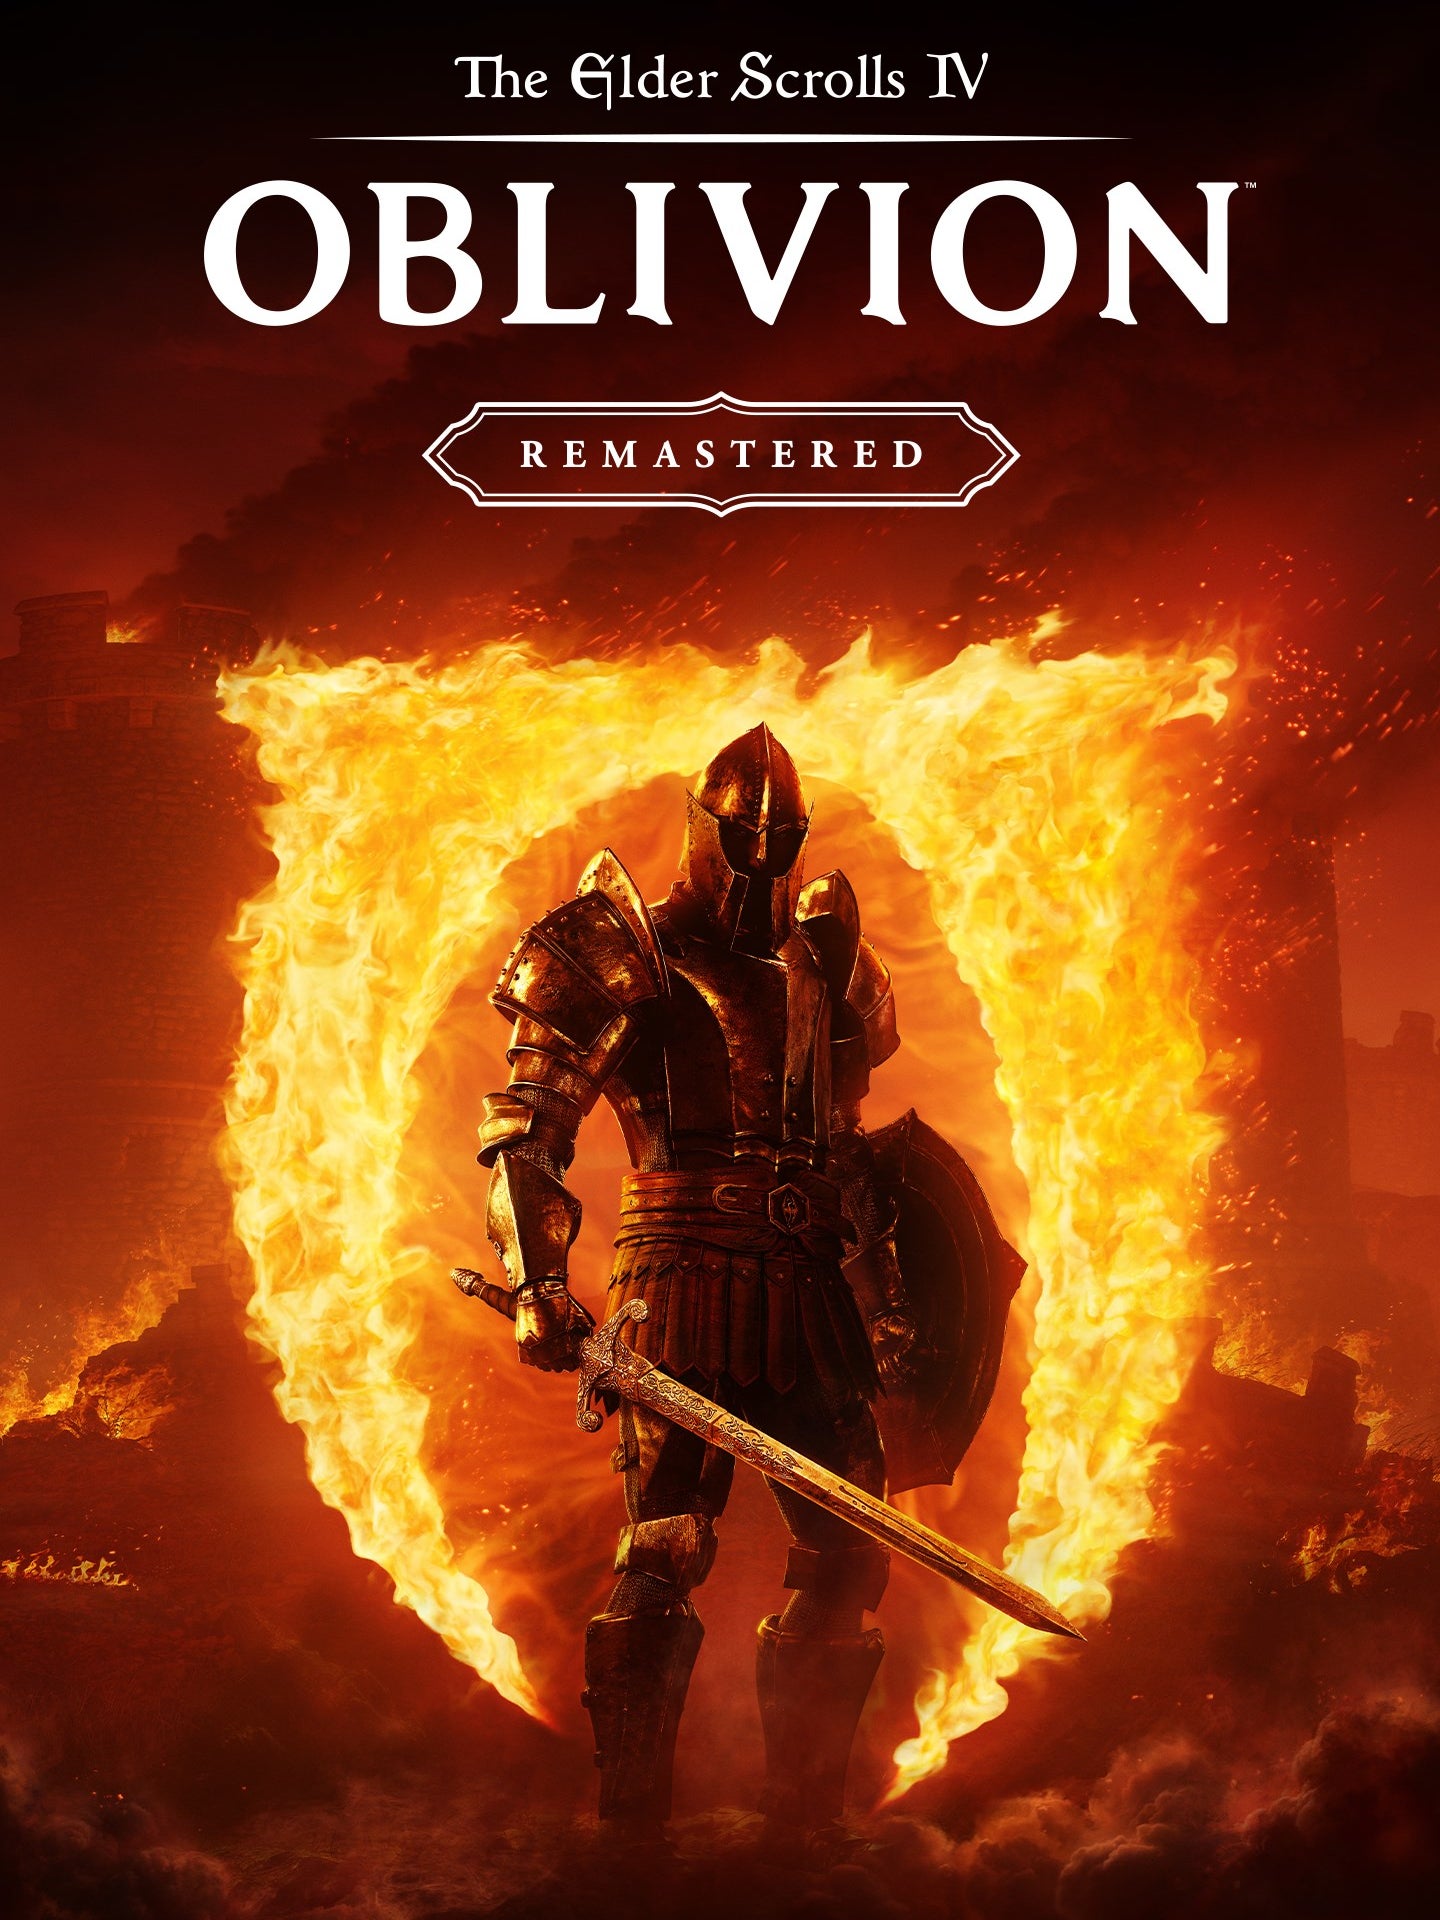
The Elder Scrolls IV: Oblivion Remastered
PS5 , Xbox Series X/S , PC
Rock Paper Shotgun is better when you sign in
Sign in and join us on our journey to discover strange and compelling PC games.

All 75 Arc Raiders Blueprints and where to get them
These areas have the highest chance of giving you Blueprints

Image credit:Rock Paper Shotgun/Embark Studios

Looking for more Arc Raiders Blueprints? It’s a special day when you find a Blueprint, as they’re among the most valuable items in Arc Raiders. If you find a Blueprint that you haven’t already found, then you must make sure you hold onto it at all costs, because Blueprints are the key to one of the most important and powerful systems of meta-progression in the game.
This guide aims to be the very best guide on Blueprints you can find, starting with a primer on what exactly they are and how they work in Arc Raiders, before delving into exactly where to get Blueprints and the very best farming spots for you to take in your search.
We’ll also go over how to get Blueprints from other unlikely activities, such as destroying Surveyors and completing specific quests. And you’ll also find the full list of all 75 Blueprints in Arc Raiders on this page (including the newest Blueprints added with the Cold Snap update , such as the Deadline Blueprint and Firework Box Blueprint), giving you all the information you need to expand your own crafting repertoire.
In this guide:
- What are Blueprints in Arc Raiders?
- Full Blueprint list: All crafting recipes
- Where to find Blueprints in Arc Raiders Blueprints obtained from quests Blueprints obtained from Trials Best Blueprint farming locations

What are Blueprints in Arc Raiders?
Blueprints in Arc Raiders are special items which, if you manage to extract with them, you can expend to permanently unlock a new crafting recipe in your Workshop. If you manage to extract from a raid with an Anvil Blueprint, for example, you can unlock the ability to craft your very own Anvil Pistol, as many times as you like (as long as you have the crafting materials).
To use a Blueprint, simply open your Inventory while in the lobby, then right-click on the Blueprint and click “Learn And Consume” . This will permanently unlock the recipe for that item in your Workshop. As of the Stella Montis update, there are allegedly 75 different Blueprints to unlock - although only 68 are confirmed to be in the game so far. You can see all the Blueprints you’ve found and unlocked by going to the Workshop menu, and hitting “R” to bring up the Blueprint screen.
It’s possible to find duplicates of past Blueprints you’ve already unlocked. If you find these, then you can either sell them, or - if you like to play with friends - you can take it into a match and gift it to your friend so they can unlock that recipe for themselves. Another option is to keep hold of them until the time comes to donate them to the Expedition.
Full Blueprint list: All crafting recipes
Below is the full list of all the Blueprints that are currently available to find in Arc Raiders, and the crafting recipe required for each item:
| Blueprint | Type | Recipe | Crafted At |
|---|---|---|---|
| Bettina | Weapon | 3x Advanced Mechanical Components 3x Heavy Gun Parts 3x Canister | Gunsmith 3 |
| Blue Light Stick | Quick Use | 3x Chemicals | Utility Station 1 |
| Aphelion | Weapon | 3x Magnetic Accelerator 3x Complex Gun Parts 1x Matriarch Reactor | Gunsmith 3 |
| Combat Mk. 3 (Flanking) | Augment | 2x Advanced Electrical Components 3x Processor | Gear Bench 3 |
| Combat Mk. 3 (Aggressive) | Augment | 2x Advanced Electrical Components 3x Processor | Gear Bench 3 |
| Complex Gun Parts | Material | 2x Light Gun Parts 2x Medium Gun Parts 2x Heavy Gun Parts | Refiner 3 |
| Fireworks Box | Quick Use | 1x Explosive Compound 3x Pop Trigger | Explosives Station 2 |
| Gas Mine | Mine | 4x Chemicals 2x Rubber Parts | Explosives Station 1 |
| Green Light Stick | Quick Use | 3x Chemicals | Utility Station 1 |
| Pulse Mine | Mine | 1x Crude Explosives 1x Wires | Explosives Station 1 |
| Seeker Grenade | Grenade | 1x Crude Explosives 2x ARC Alloy | Explosives Station 1 |
| Looting Mk. 3 (Survivor) | Augment | 2x Advanced Electrical Components 3x Processor | Gear Bench 3 |
| Angled Grip II | Mod | 2x Mechanical Components 3x Duct Tape | Gunsmith 2 |
| Angled Grip III | Mod | 2x Mod Components 5x Duct Tape | Gunsmith 3 |
| Hullcracker | Weapon | 1x Magnetic Accelerator 3x Heavy Gun Parts 1x Exodus Modules | Gunsmith 3 |
| Launcher Ammo | Ammo | 5x Metal Parts 1x Crude Explosives | Workbench 1 |
| Anvil | Weapon | 5x Mechanical Components 5x Simple Gun Parts | Gunsmith 2 |
| Anvil Splitter | Mod | 2x Mod Components 3x Processor | Gunsmith 3 |
| ??? | ??? | ??? | ??? |
| Barricade Kit | Quick Use | 1x Mechanical Components | Utility Station 2 |
| Blaze Grenade | Grenade | 1x Explosive Compound 2x Oil | Explosives Station 3 |
| Bobcat | Weapon | 3x Advanced Mechanical Components 3x Light Gun Parts | Gunsmith 3 |
| Osprey | Weapon | 2x Advanced Mechanical Components 3x Medium Gun Parts 7x Wires | Gunsmith 3 |
| Burletta | Weapon | 3x Mechanical Components 3x Simple Gun Parts | Gunsmith 1 |
| Compensator II | Mod | 2x Mechanical Components 4x Wires | Gunsmith 2 |
| Compensator III | Mod | 2x Mod Components 8x Wires | Gunsmith 3 |
| Defibrillator | Quick Use | 9x Plastic Parts 1x Moss | Medical Lab 2 |
| ??? | ??? | ??? | ??? |
| Equalizer | Weapon | 3x Magnetic Accelerator 3x Complex Gun Parts 1x Queen Reactor | Gunsmith 3 |
| Extended Barrel | Mod | 2x Mod Components 8x Wires | Gunsmith 3 |
| Extended Light Mag II | Mod | 2x Mechanical Components 3x Steel Spring | Gunsmith 2 |
| Extended Light Mag III | Mod | 2x Mod Components 5x Steel Spring | Gunsmith 3 |
| Extended Medium Mag II | Mod | 2x Mechanical Components 3x Steel Spring | Gunsmith 2 |
| Extended Medium Mag III | Mod | 2x Mod Components 5x Steel Spring | Gunsmith 3 |
| Extended Shotgun Mag II | Mod | 2x Mechanical Components 3x Steel Spring | Gunsmith 2 |
| Extended Shotgun Mag III | Mod | 2x Mod Components 5x Steel Spring | Gunsmith 3 |
| Remote Raider Flare | Quick Use | 2x Chemicals 4x Rubber Parts | Utility Station 1 |
| Heavy Gun Parts | Material | 4x Simple Gun Parts | Refiner 2 |
| Venator | Weapon | 2x Advanced Mechanical Components 3x Medium Gun Parts 5x Magnet | Gunsmith 3 |
| Il Toro | Weapon | 5x Mechanical Components 6x Simple Gun Parts | Gunsmith 1 |
| Jolt Mine | Mine | 1x Electrical Components 1x Battery | Explosives Station 2 |
| Explosive Mine | Mine | 1x Explosive Compound 1x Sensors | Explosives Station 3 |
| Jupiter | Weapon | 3x Magnetic Accelerator 3x Complex Gun Parts 1x Queen Reactor | Gunsmith 3 |
| Light Gun Parts | Material | 4x Simple Gun Parts | Refiner 2 |
| Lightweight Stock | Mod | 2x Mod Components 5x Duct Tape | Gunsmith 3 |
| Lure Grenade | Grenade | 1x Speaker Component 1x Electrical Components | Utility Station 2 |
| Medium Gun Parts | Material | 4x Simple Gun Parts | Refiner 2 |
| Torrente | Weapon | 2x Advanced Mechanical Components 3x Medium Gun Parts 6x Steel Spring | Gunsmith 3 |
| Muzzle Brake II | Mod | 2x Mechanical Components 4x Wires | Gunsmith 2 |
| Muzzle Brake III | Mod | 2x Mod Components 8x Wires | Gunsmith 3 |
| Padded Stock | Mod | 2x Mod Components 5x Duct Tape | Gunsmith 3 |
| Shotgun Choke II | Mod | 2x Mechanical Components 4x Wires | Gunsmith 2 |
| Shotgun Choke III | Mod | 2x Mod Components 8x Wires | Gunsmith 3 |
| Shotgun Silencer | Mod | 2x Mod Components 8x Wires | Gunsmith 3 |
| Showstopper | Grenade | 1x Advanced Electrical Components 1x Voltage Converter | Explosives Station 3 |
| Silencer I | Mod | 2x Mechanical Components 4x Wires | Gunsmith 2 |
| Silencer II | Mod | 2x Mod Components 8x Wires | Gunsmith 3 |
| Snap Hook | Quick Use | 2x Power Rod 3x Rope 1x Exodus Modules | Utility Station 3 |
| Stable Stock II | Mod | 2x Mechanical Components 3x Duct Tape | Gunsmith 2 |
| Stable Stock III | Mod | 2x Mod Components 5x Duct Tape | Gunsmith 3 |
| Tagging Grenade | Grenade | 1x Electrical Components 1x Sensors | Utility Station 3 |
| Tempest | Weapon | 3x Advanced Mechanical Components 3x Medium Gun Parts 3x Canister | Gunsmith 3 |
| Trigger Nade | Grenade | 2x Crude Explosives 1x Processor | Explosives Station 2 |
| Vertical Grip II | Mod | 2x Mechanical Components 3x Duct Tape | Gunsmith 2 |
| Vertical Grip III | Mod | 2x Mod Components 5x Duct Tape | Gunsmith 3 |
| Vita Shot | Quick Use | 2x Antiseptic 1x Syringe | Medical Lab 3 |
| Vita Spray | Quick Use | 3x Antiseptic 1x Canister | Medical Lab 3 |
| Vulcano | Weapon | 1x Magnetic Accelerator 3x Heavy Gun Parts 1x Exodus Modules | Gunsmith 3 |
| Wolfpack | Grenade | 2x Explosive Compound 2x Sensors | Explosives Station 3 |
| Red Light Stick | Quick Use | 3x Chemicals | Utility Station 1 |
| Smoke Grenade | Grenade | 14x Chemicals 1x Canister | Utility Station 2 |
| Deadline | Mine | 3x Explosive Compound 2x ARC Circuitry | Explosives Station 3 |
| Trailblazer | Grenade | 1x Explosive Compound 1x Synthesized Fuel | Explosives Station 3 |
| Tactical Mk. 3 (Defensive) | Augment | 2x Advanced Electrical Components 3x Processor | Gear Bench 3 |
| Tactical Mk. 3 (Healing) | Augment | 2x Advanced Electrical Components 3x Processor | Gear Bench 3 |
| Yellow Light Stick | Quick Use | 3x Chemicals | Utility Station 1 |
Note: The missing Blueprints in this list likely have not actually been added to the game at the time of writing, because none of the playerbase has managed to find any of them. As they are added to the game, I will update this page with the most relevant information so you know exactly how to get all 75 Arc Raiders Blueprints.
Where to find Blueprints in Arc Raiders
Below is a list of all containers, modifiers, and events which maximise your chances of finding Blueprints:
- Certain quests reward you with specific Blueprints .
- Completing Trials has a high chance of offering Blueprints as rewards.
- Surveyors have a decent chance of dropping Blueprints on death.
- High loot value areas tend to have a greater chance of spawning Blueprints.
- Night Raids and Storms may increase rare Blueprint spawn chances in containers.
- Containers with higher numbers of items may have a higher tendency to spawn Blueprints. As a result, Blue Gate (which has many “large” containers containing multiple items) may give you a higher chance of spawning Blueprints.
- Raider containers (Raider Caches, Weapon Boxes, Medical Bags, Grenade Tubes) have increased Blueprint drop rates. As a result, the Uncovered Caches event gives you a high chance of finding Blueprints.
- Security Lockers have a higher than average chance of containing Blueprints.
- Certain Blueprints only seem to spawn under specific circumstances: Tempest Blueprint only spawns during Night Raid events. Vulcano Blueprint only spawns during Hidden Bunker events. Jupiter and Equaliser Blueprints only spawn during Harvester events.

Raider Caches, Weapon Boxes, and other raider-oriented container types have a good chance of offering Blueprints. |Image credit:Rock Paper Shotgun/Embark Studios
Blueprints have a very low chance of spawning in any container in Arc Raiders, around 1-2% on average. However, there is a higher chance of finding Blueprints in particular container types. Specifically, you can find more Blueprints in Raider containers and security lockers.
Beyond this, if you’re looking for Blueprints you should focus on regions of the map which are marked as having particularly high-value loot. Areas such as the Control Tower in Dam Battlegrounds, the Arrival and Departure Buildings in Spaceport, and Pilgrim’s Peak in Blue Gate all have a better-than-average chance of spawning Blueprints somewhere amongst all their containers. Night Raids and Electromagnetic Storm events also increase the drop chances of certain Blueprints .
In addition to these containers, you can often loot Blueprints from destroyed Surveyors - the largest of the rolling ball ARC. Surveyors are more commonly found on the later maps - Spaceport and Blue Gate - and if one spawns in your match, you’ll likely see it by the blue laser beam that it casts into the sky while “surveying”.
Surveyors are quite well-armoured and will very speedily run away from you once it notices you, but if you can take one down then make sure you loot all its parts for a chance of obtaining certain unusual Blueprints.
Blueprints obtained from quests
One way in which you can get Blueprints is by completing certain quests for the vendors in Speranza. Some quests will reward you with a specific item Blueprint upon completion, so as long as you work through all the quests in Arc Raiders, you are guaranteed those Blueprints.
Here is the full list of all Blueprints you can get from quest rewards:
- Trigger Nade Blueprint: Rewarded after completing “Sparks Fly”.
- Lure Grenade Blueprint: Rewarded after completing “Greasing Her Palms”.
- Burletta Blueprint: Rewarded after completing “Industrial Espionage”.
- Hullcracker Blueprint (and Launcher Ammo Blueprint): Rewarded after completing “The Major’s Footlocker”.
Alas, that’s only 4 Blueprints out of a total of 75 to unlock, so for the vast majority you will need to find them yourself during a raid. If you’re intent on farming Blueprints, then it’s best to equip yourself with cheap gear in case you lose it, but don’t use a free loadout because then you won’t get a safe pocket to stash any new Blueprint you find. No pain in Arc Raiders is sharper than failing to extract with a new Blueprint you’ve been after for a dozen hours already.

One of the best ways to get Blueprints is by hitting three stars on all five Trials every week. |Image credit:Rock Paper Shotgun/Embark Studios
Blueprints obtained from Trials
One of the very best ways to get Blueprints is as rewards for completing Trials in Arc Raiders. Trials are unlocked from Level 15 onwards, and allow you to earn rewards by focusing on certain tasks over the course of several raids. For example, one Trial might task you with dealing damage to Hornets, while another might challenge you to loot Supply Drops.
Trials refresh on a weekly basis, with a new week bringing five new Trials. Each Trial can offer up to three rewards after passing certain score milestones, and it’s possible to receive very high level loot from these reward crates - including Blueprints. So if you want to unlock as many Blueprints as possible, you should make a point of completing as many Trials as possible each week.
Best Blueprint farming locations
The very best way to get Blueprints is to frequent specific areas of the maps which combine high-tier loot pools with the right types of containers to search. Here are my recommendations for where to find Blueprints on every map, so you can always keep the search going for new crafting recipes to unlock.

Image credit:Rock Paper Shotgun/Embark Studios
Dam Battlegrounds
The best places to farm Blueprints on Dam Battlegrounds are the Control Tower, Power Generation Complex, Ruby Residence, and Pale Apartments . The first two regions, despite only being marked on the map as mid-tier loot, contain a phenomenal number of containers to loot. The Control Tower can also contain a couple of high-tier Security Lockers - though of course, you’ll need to have unlocked the Security Breach skill at the end of the Survival tree.
There’s also a lot of reporting amongst the playerbase that the Residential areas in the top-left of the map - Pale Apartments and Ruby Residence - give you a comparatively strong chance of finding Blueprints. Considering their size, there’s a high density of containers to loot in both locations, and they also have the benefit of being fairly out of the way. So you’re more likely to have all the containers to yourself.
Buried City
The best Blueprint farming locations on Buried City are the Santa Maria Houses, Grandioso Apartments, Town Hall, and the various buildings of the New District . Grandioso Apartments has a lower number of containers than the rest, but a high chance of spawning weapon cases - which have good Blueprint drop rates. The others are high-tier loot areas, with plenty of lootable containers - including Security Lockers.
Spaceport
The best places to find Blueprints on Spaceport are the Arrival and Departure Buildings, as well as Control Tower A6 and the Launch Towers . All these areas are labelled as high-value loot regions, and many of them are also very handily connected to one another by the Spaceport wall, which you can use to quickly run from one area to the next. At the tops of most of these buildings you’ll find at least one Security Locker, so this is an excellent farming route for players looking to find Blueprints.
The downside to looting Blueprints on Spaceport is that all these areas are hotly contested, particularly in Duos and Squads. You’ll need to be very focused and fast in order to complete the full farming route.

Image credit:Rock Paper Shotgun/Embark Studios
Blue Gate
Blue Gate tends to have a good chance of dropping Blueprints, potentially because it generally has a high number of containers which can hold lots of items; so there’s a higher chance of a Blueprint spawning in each container. In my experience, the best Blueprint farming spots on Blue Gate are Pilgrim’s Peak, Raider’s Refuge, the Ancient Fort, and the Underground Complex beneath the Warehouse .
All of these areas contain a wealth of containers to loot. Raider’s Refuge has less to loot, but the majority of the containers in and around the Refuge are raider containers, which have a high chance of containing Blueprints - particularly during major events.
Stella Montis
On the whole, Stella Montis seems to have a very low drop rate for Blueprints (though a high chance of dropping other high-tier loot). If you do want to try farming Blueprints on this map, the best places to find Blueprints in Stella Montis are Medical Research, Assembly Workshop, and the Business Center . These areas have the highest density of containers to loot on the map.
In addition to this, the Western Tunnel has a few different Security Lockers to loot, so while there’s very little to loot elsewhere in this area of the map, it’s worth hitting those Security Lockers if you spawn there at the start of a match.
That wraps up this primer on how to get all the Blueprints in Arc Raiders as quickly as possible. With the Expedition system constantly resetting a large number of players’ Blueprints, it’s more important than ever to have the most up-to-date information on where to find all these Blueprints.
While you’re here, be sure to check out our Arc Raiders best guns tier list , as well as our primers on the best skills to unlock and all the different Field Depot locations on every map.


ARC Raiders
PS5 , Xbox Series X/S , PC
Rock Paper Shotgun is better when you sign in
Sign in and join us on our journey to discover strange and compelling PC games.
