All Cross locations in Elden Ring Shadow Of The Erdtree
Where to find all of Miquella’s Crosses in the Elden Ring DLC

Image credit:Rock Paper Shotgun/Bandai Namco

Looking for the Miquella’s Cross locations in Shadow Of The Erdtree? The Shadow Realm map is home to 13 Crosses that function as landmarks and sources of Scadutree Fragments (one per cross). Miquella’s Crosses are typically found near Sites Of Grace and are often close to important NPCs or hidden areas.
This Elden Ring guide will show you where to find every Miquella’s Cross location in Shadow Of The Erdtree .
All Miquella’s Cross locations
Here’s an overview of every Miquella’s Cross location on the Shadow Of The Erdtree map. It’s best to unlock the regional map before you start looking for a Cross in that area.
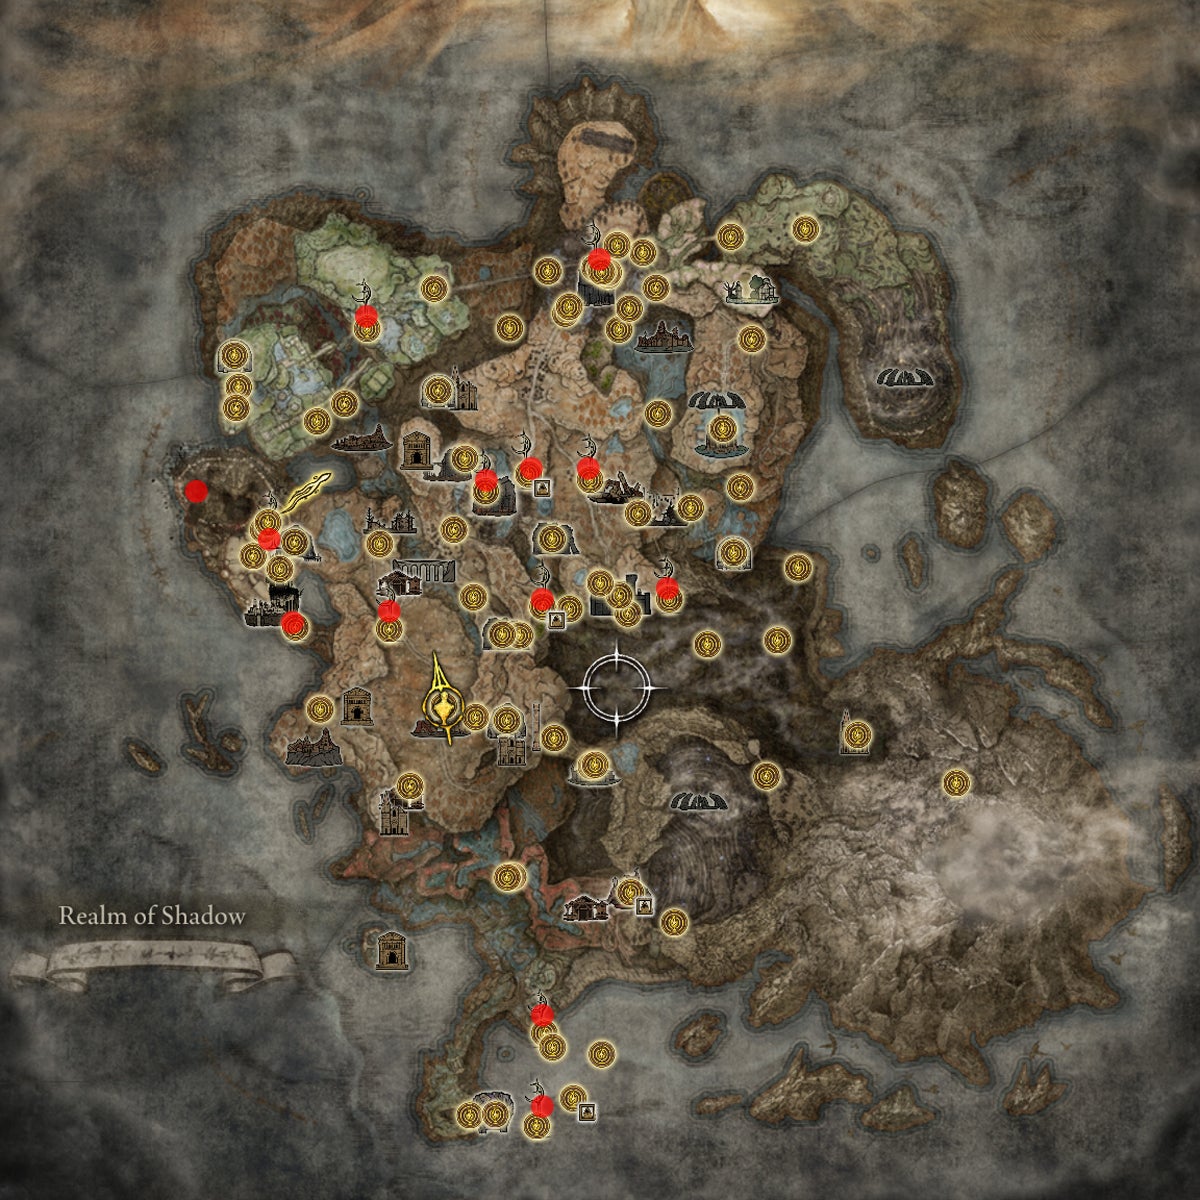
Every Miquella’s Cross location on the Shadow Realm map. |Image credit:Rock Paper Shotgun/Bandai Namco
Starting with the ones near Gravesite Plain, here’s where to find every Miquella’s Cross in each Shadow Realm region .
Three-Path Cross location
The first Cross is easy to spot; ride north through the Gravesite Plain (starting area) and keep following the road north of the Scorched Ruins until you see the Three-Path Cross Site Of Grace ahead of you. The Miquella’s Cross is right next to it.

Miquella’s Cross in the middle of Gravesite Plain. |Image credit:Rock Paper Shotgun/Bandai Namco
Belurat Main Gate Cross location
Next to the ‘Main Gate Cross’ Site Of Grace. Starting from the Three-Path Cross Site Of Grace in the Gravesite Plain region, follow the road west, leading through the massive stone gateway towards the Belurat fortress. In front of the staircase leading up to the castle gates, you’ll find the Cross.
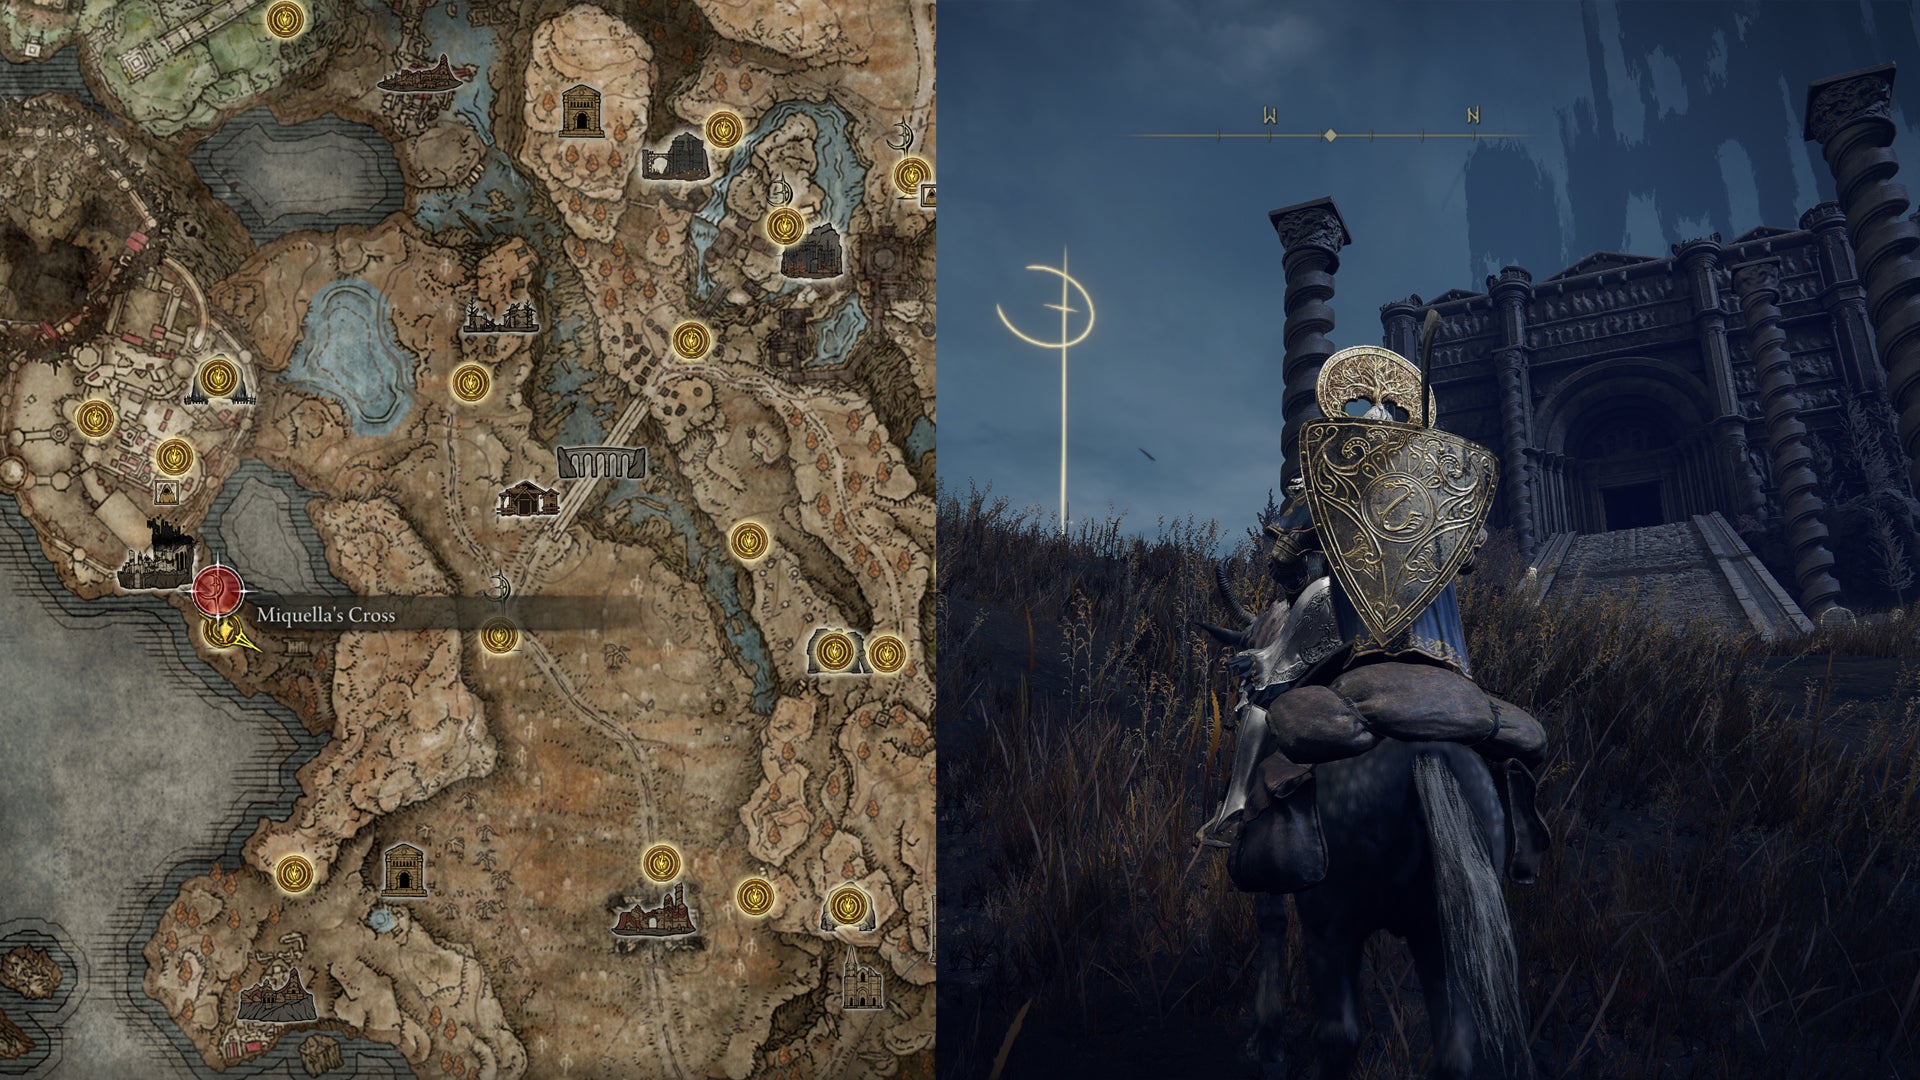
Miquella’s Cross in front of the Belurat fortress. |Image credit:Rock Paper Shotgun/Bandai Namco
Belurat Cross location
Unlike the previous two, this Elden Ring Cross location is very easy to miss. Enter Belurat (the entrance is behind the previous Cross location) and follow the main route to the ‘Small Private Altar’ Site Of Grace. From there, take the exit in the northwest and go right, then cross the rooftops to the left. When you see the yellow sewer ahead of you, follow its course to the left, then enter the building on your right (at the top of the waterfall). Climb the ladder and go right, to the rooftop area with the large birds, and make sure you’re on the same level as the nearest bird.
Instead of crossing these rooftops, go left and approach the massive tower - a bunch of tiny scorpions will ambush you here. Do not enter the tower, but jump up the rubble to your right (see picture below) and enter the small storeroom behind the stones. Defeat the insect enemies; Miquella’s Cross is waiting behind them, on the other end of the room.
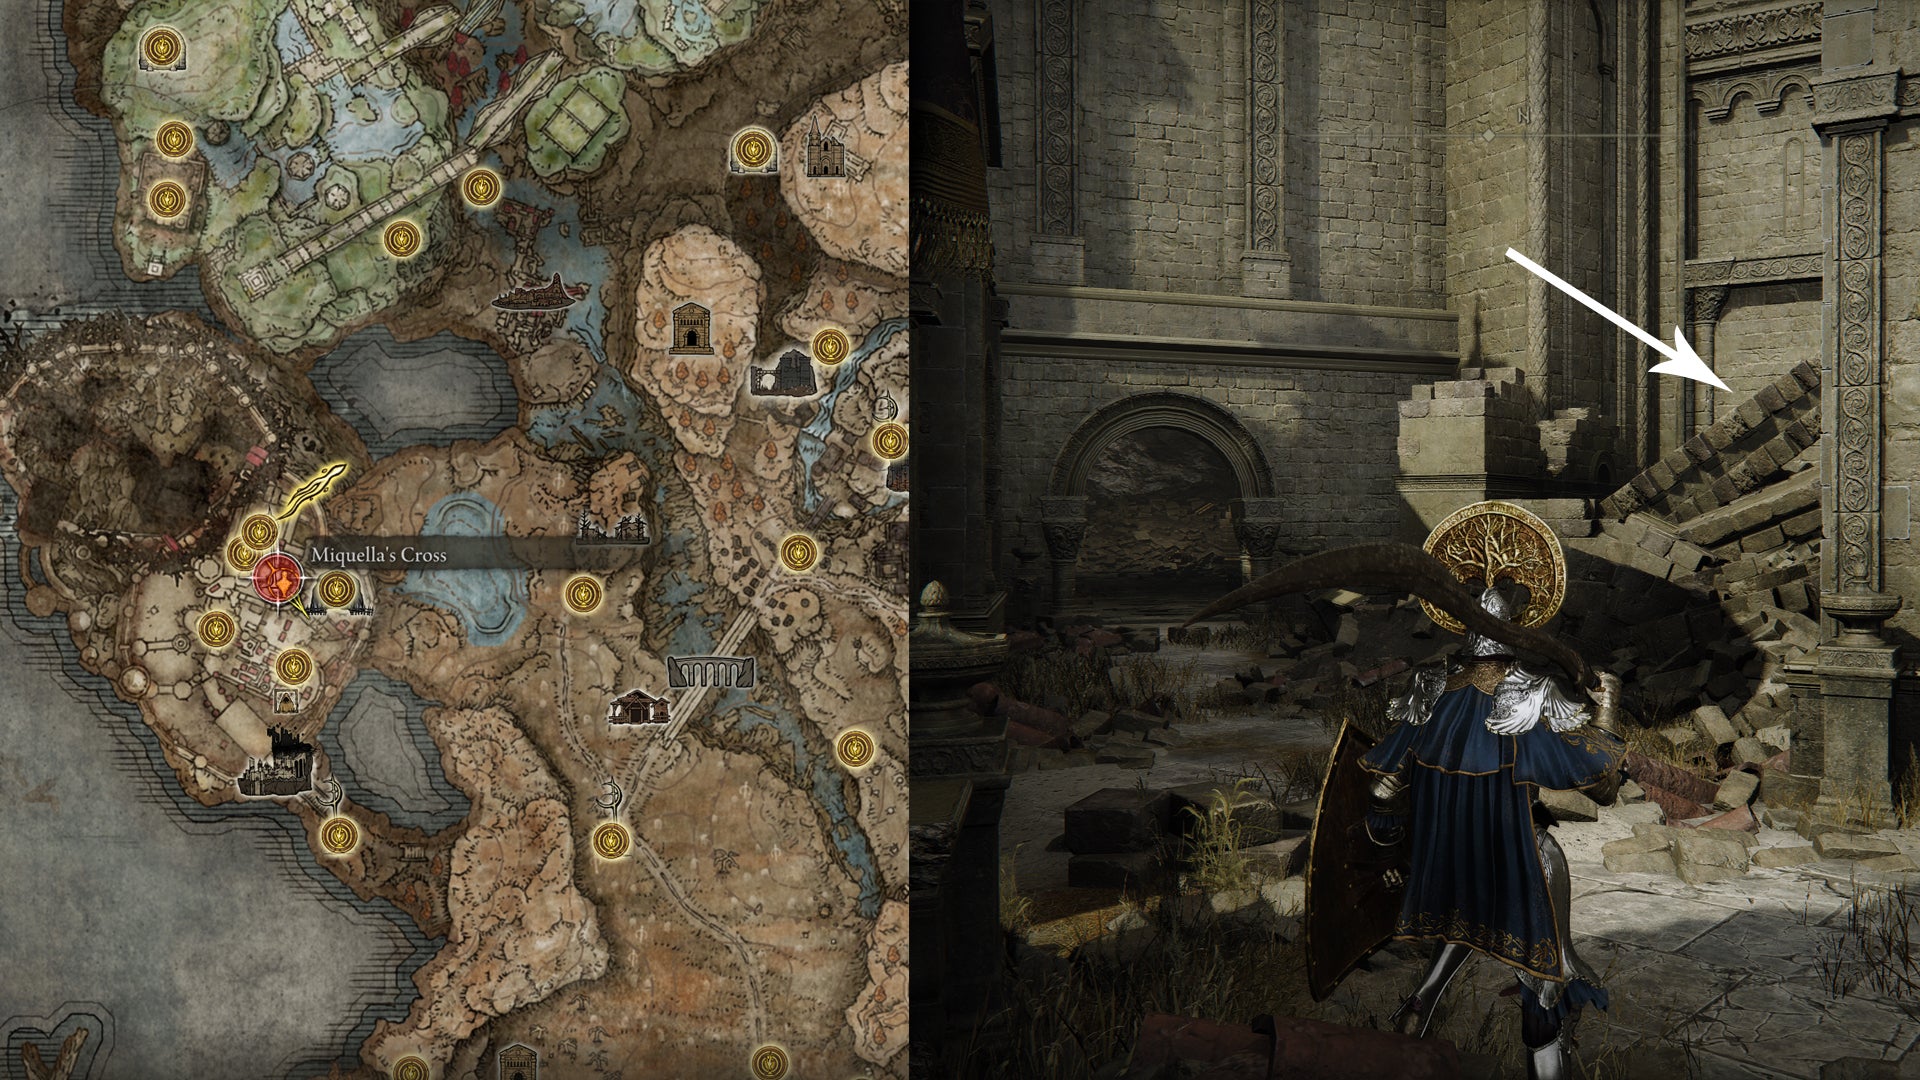
Find the secret storeroom behind the rubble. |Image credit:Rock Paper Shotgun/Bandai Namco
Pillar Path Cross location
It’s next to the Pillar Path Cross Site Of Grace, on a high cliff south of Castle Ensis. You don’t need to clear the castle to reach this area; just cross Ellac Greatbridge to Castle Front, then turn right and follow the road southeast. After a while, the road will split in two; you must keep left to reach Miquella’s Cross.
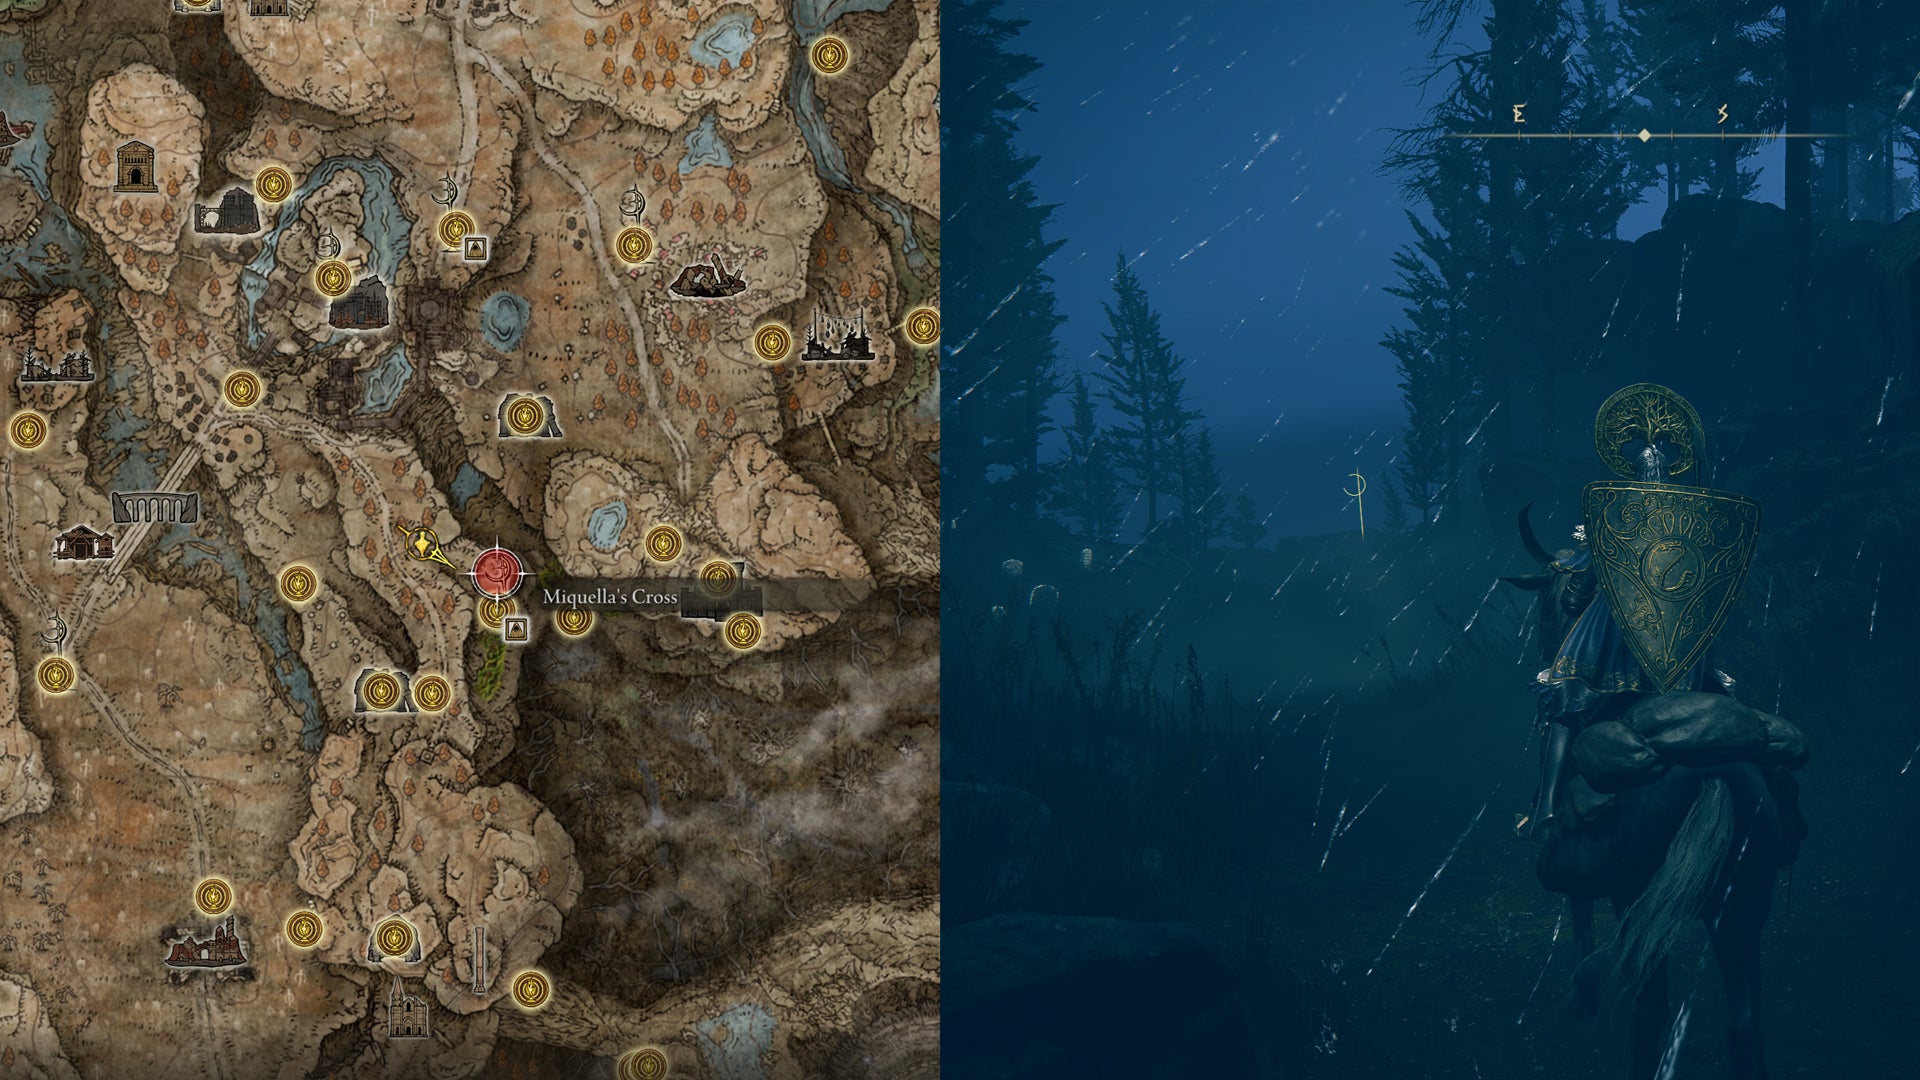
Ride to Pillar Path on the higher cliffs. |Image credit:Rock Paper Shotgun/Bandai Namco
Cerulean Coast Cross location
This Cross is found in the southern part of the Shadow Realm, next to the Cerulean Coast Site Of Grace. To get there, follow the road southeast of Castle Front (Castle Ensis) until you see a cliff’s edge on your left (behind some enemies), and drop down those cliffs. Stick to your left as you make your way through the gorge. You will ride past Ellac River Cave and Ellac River Downstream, eventually leading you to the Cerulean Coast Site Of Grace. For more details, take a look at our guide on how to reach the Cerulean Coast .
From there, ride south past the Ghostflame Dragon. When you reach the coastline, turn left to find Miquella’s Cross.
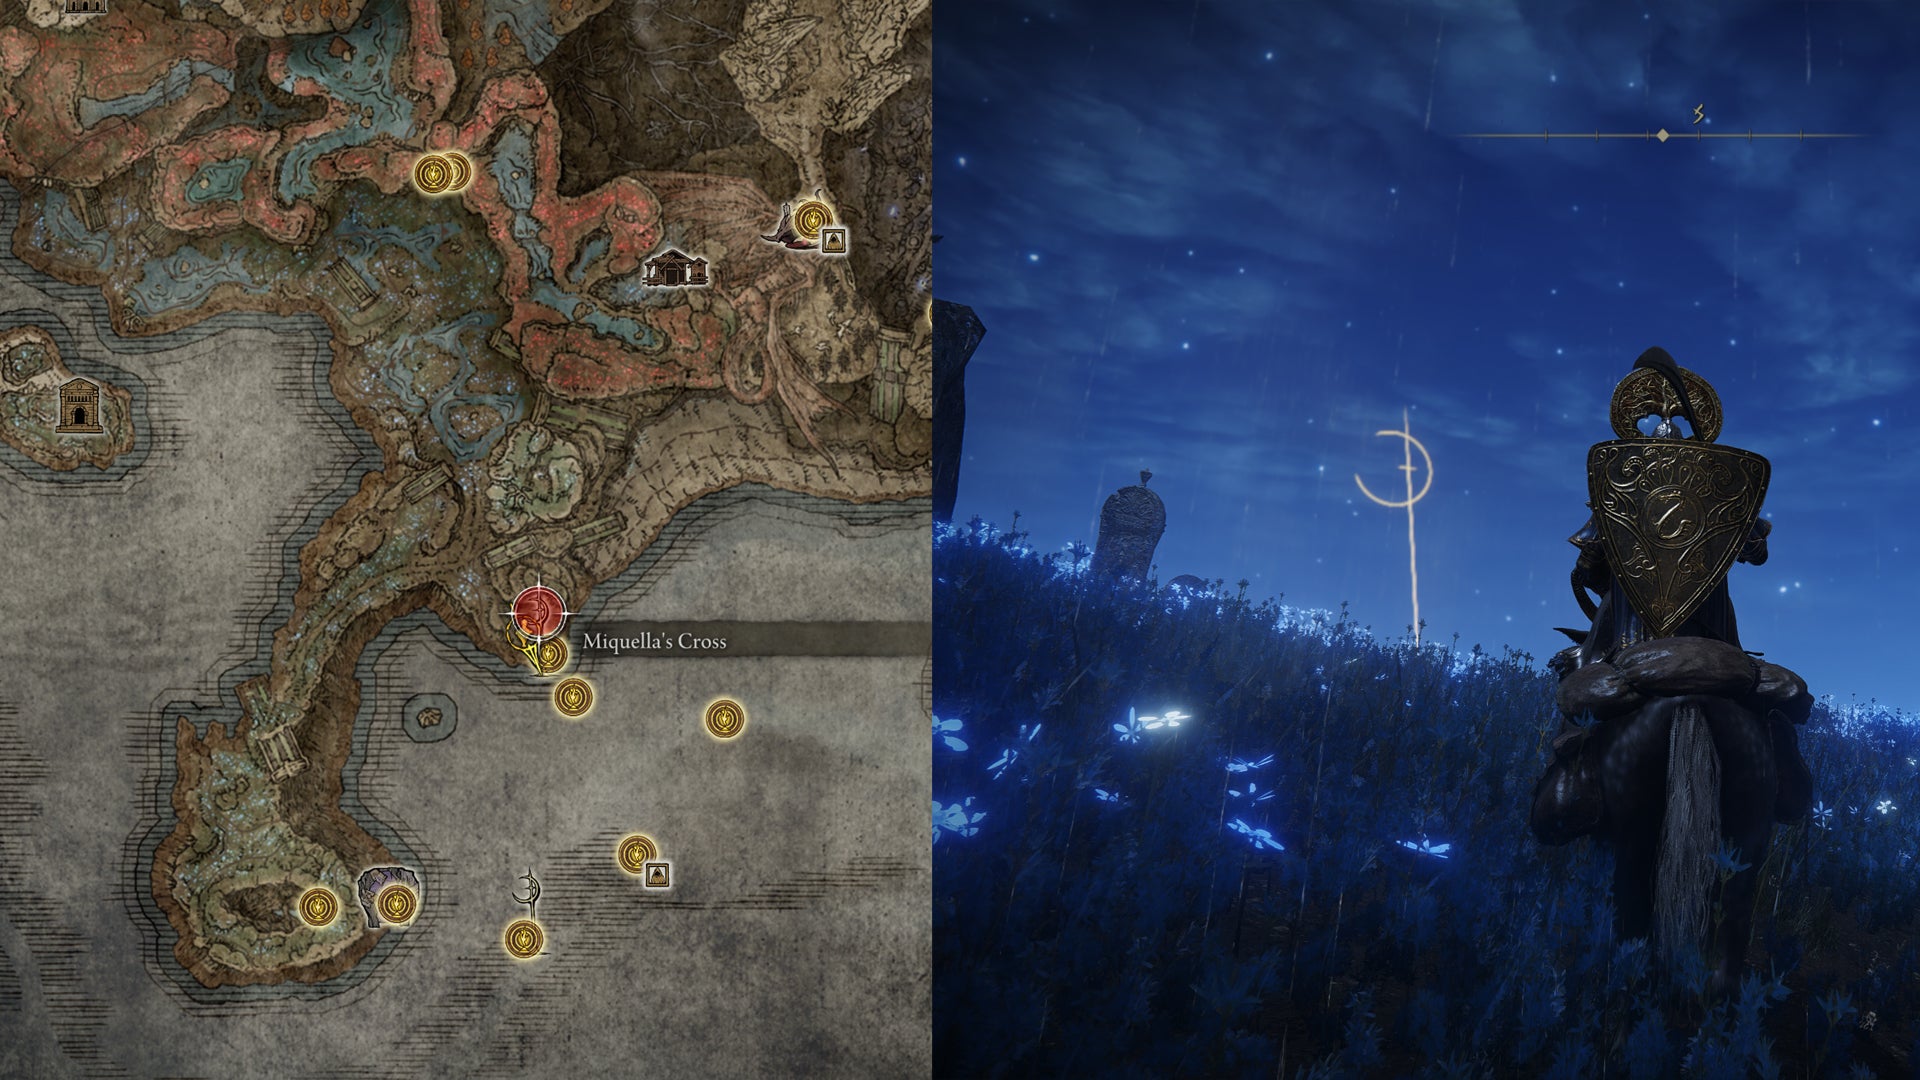
Miquella’s Cross on the Cerulean Coast. |Image credit:Rock Paper Shotgun/Bandai Namco
Fissure Cross location
It’s next to the Fissure Cross Site Of Grace. No, you don’t need a boat for this one; ride as far south as you can, then drop down the massive crater to reach Stone Coffin Fissure . Follow the path through this underground realm for a little while (carefully drop down to the lower area) until you see the Fissure Cross ahead of you.
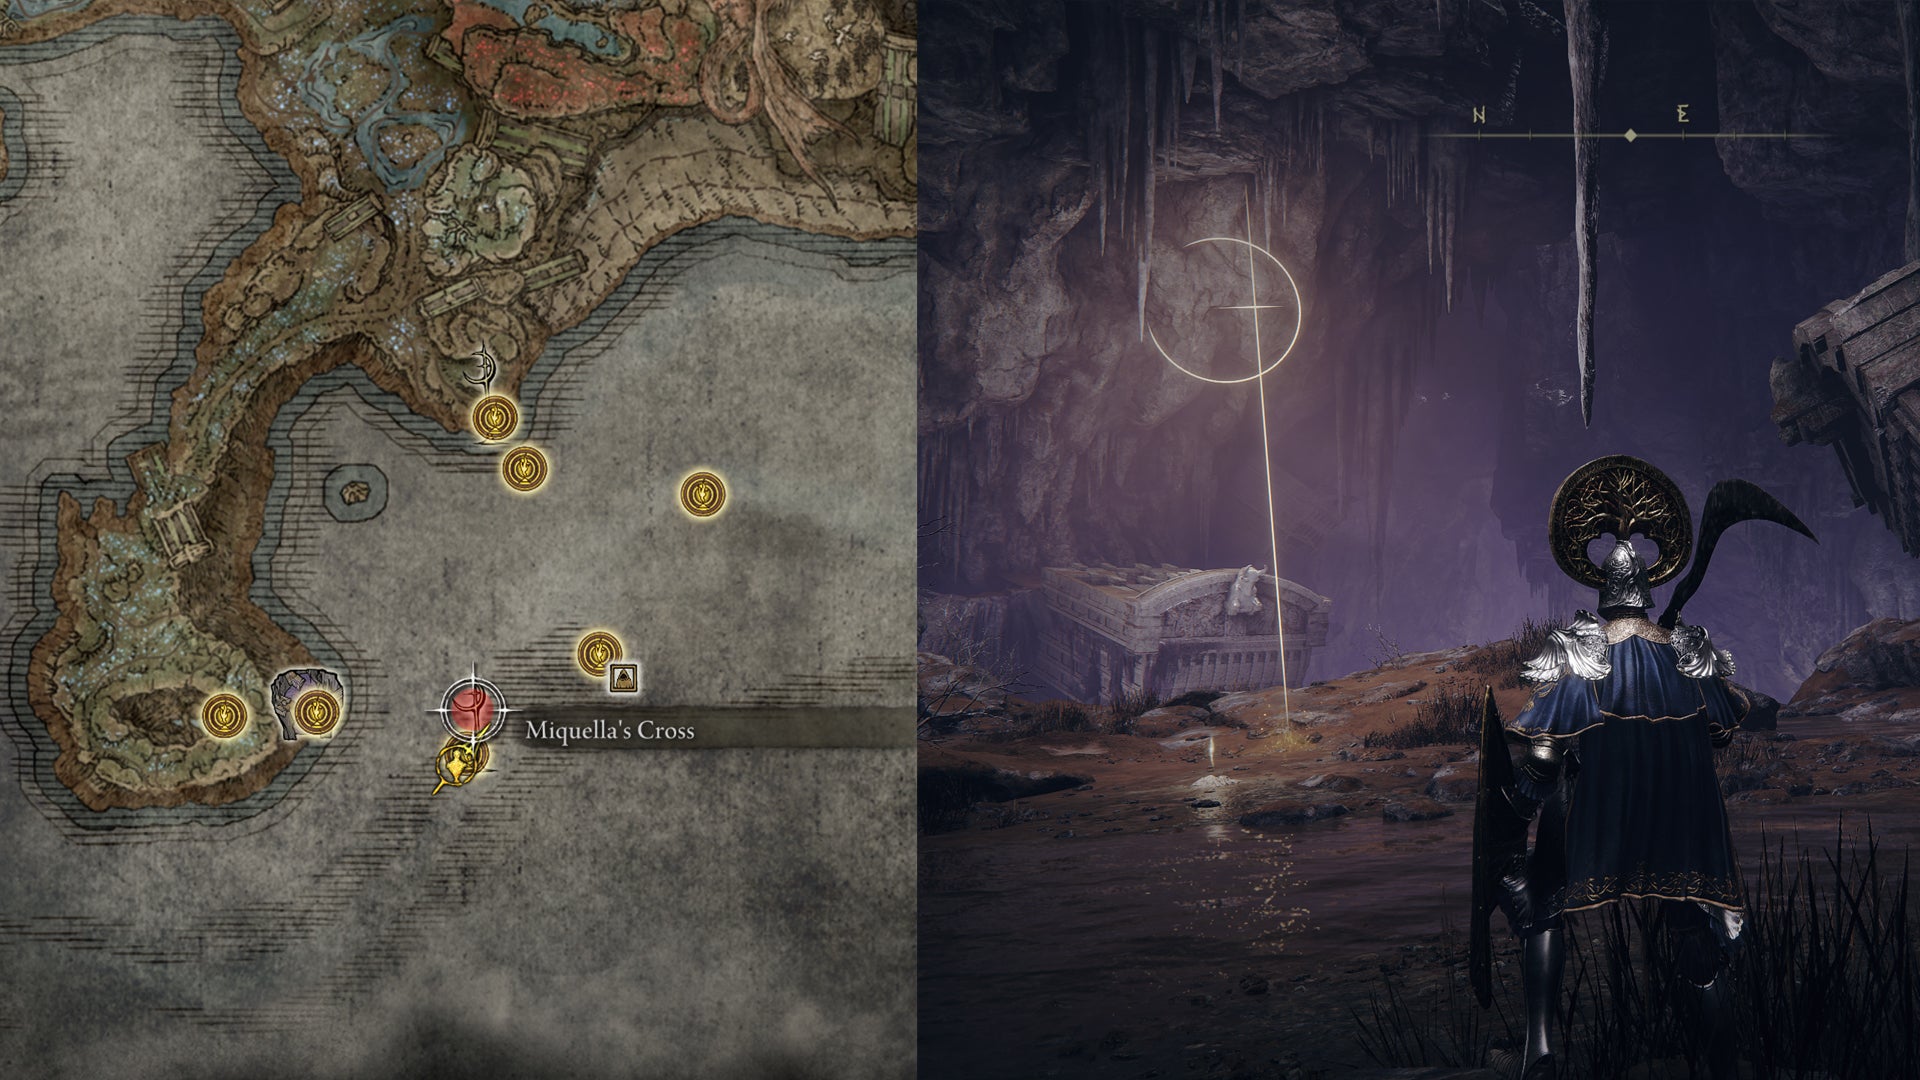
The Fissure Cross is in a well-hidden, underground area. |Image credit:Rock Paper Shotgun/Bandai Namco
Castle Ensis Cross location
Next to the Castle Ensis Checkpoint Site Of Grace, in the middle of the castle. Enter the castle from the southwest (after crossing Ellac Greatbridge), and take the large staircase on the left before passing through the cave opening. On the other side, you’ll find a grassy slope guarded by a knight; the Cross is at the top of this slope.
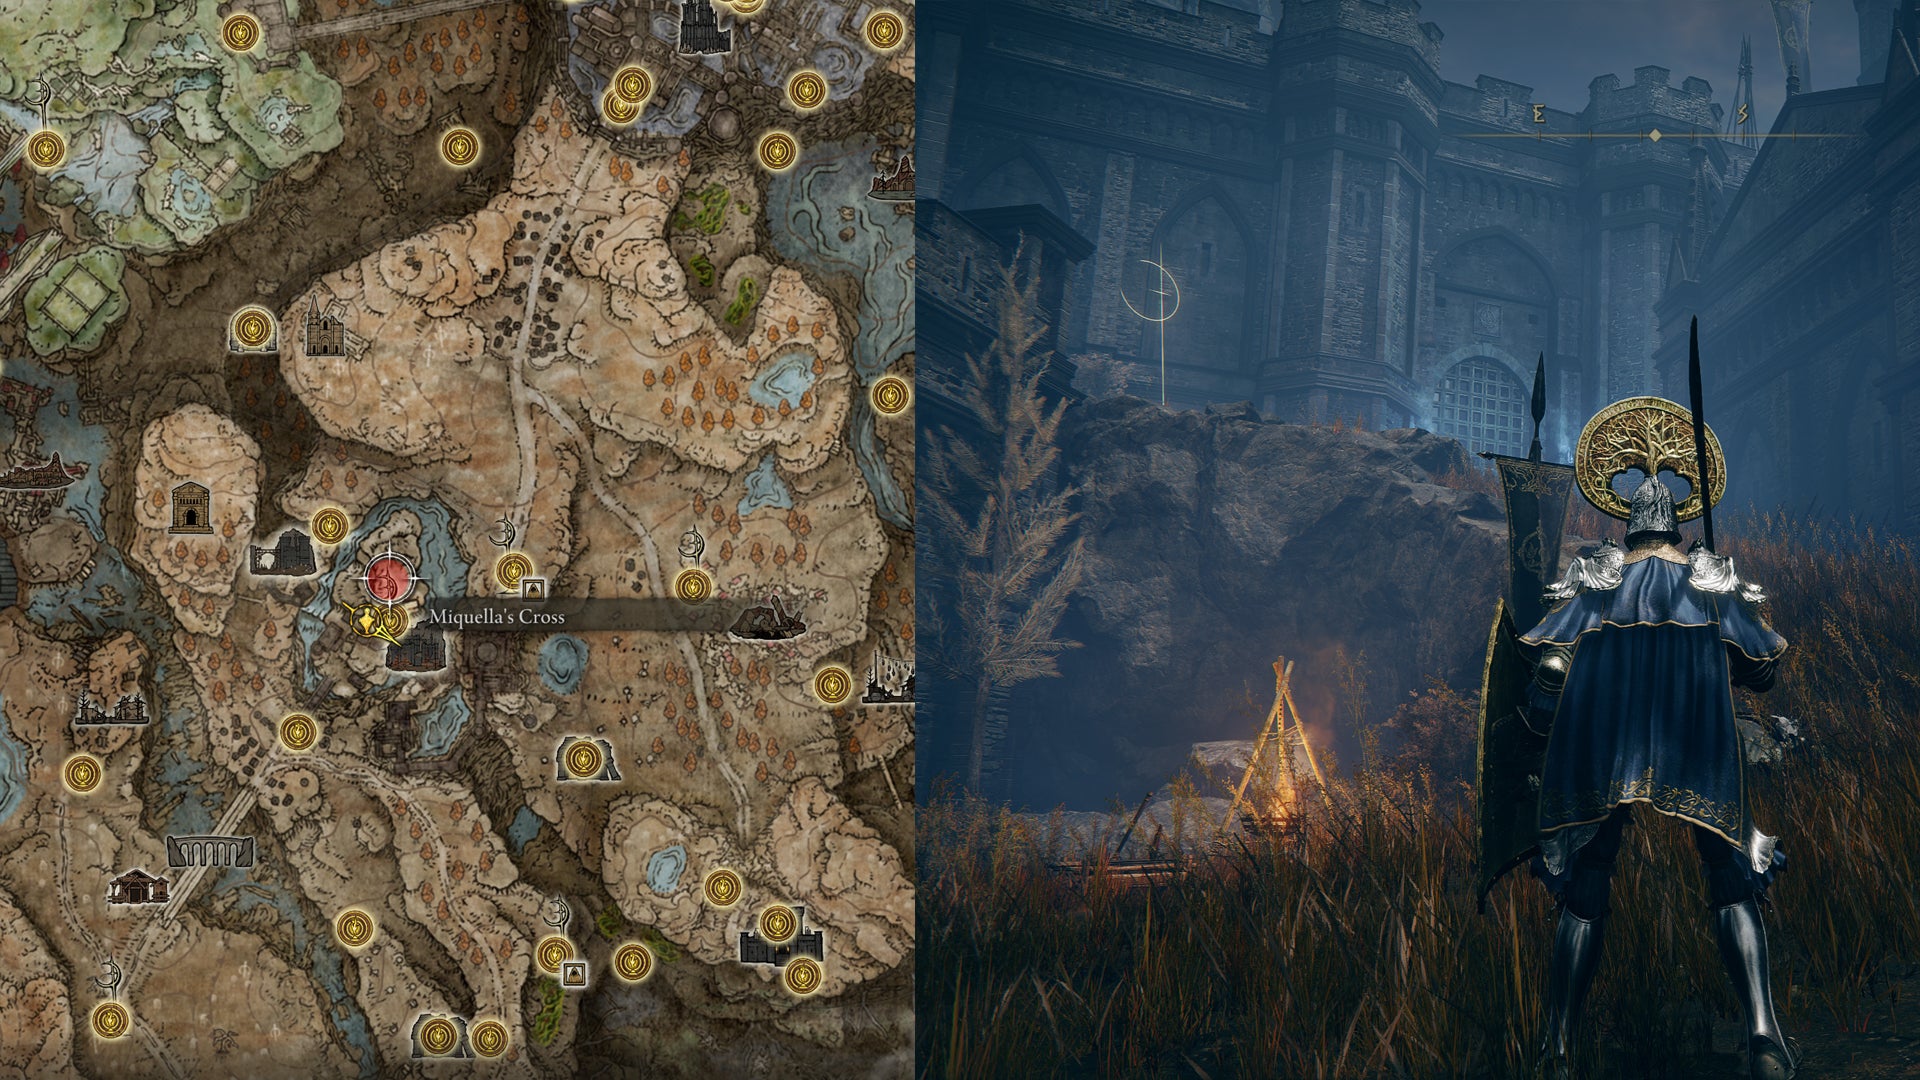
There’s a Cross in the middle of Castle Ensis. |Image credit:Rock Paper Shotgun/Bandai Namco
Highroad Cross location
Behind Castle Ensis, next to the Highroad Cross Site Of Grace. It’s very easy to spot when you leave Rellana the Twin Moon Knight’s boss arena. If you don’t want to fight Rellana, you can take the path through the gorge south of Castle Ensis (same path used to reach the Cerulean Coast ) and use the wind current to get to Fort Reprimand instead. From there, ride north and make a U-turn to the left to find the Highroad Cross.
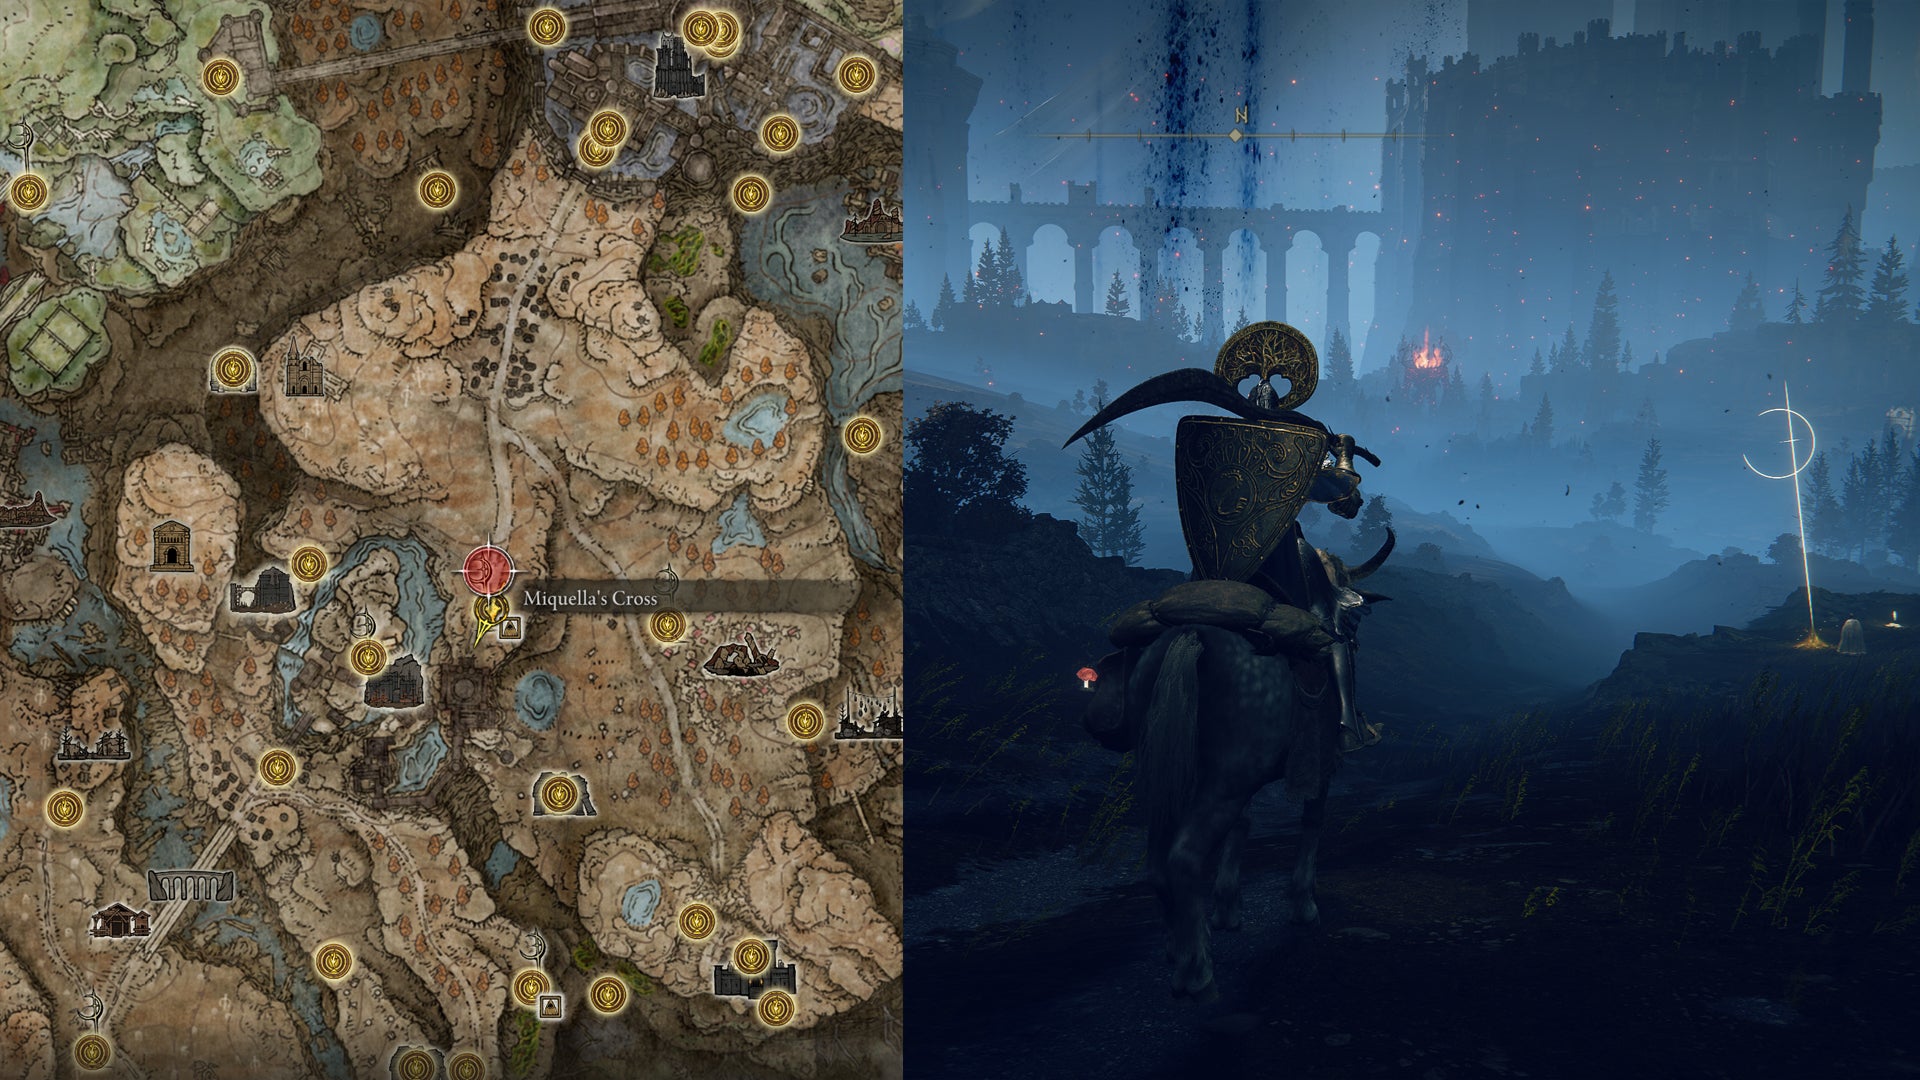
The next one’s just north of Castle Ensis. |Image credit:Rock Paper Shotgun/Bandai Namco
Moorth Ruins Cross location
Next to the Moorth Ruins Site Of Grace, the abandoned village east of Castle Ensis. This Cross location is easy to spot if you just follow the road north of Fort Reprimand. It’s also a short ride away from the previous location, the Highroad Cross.
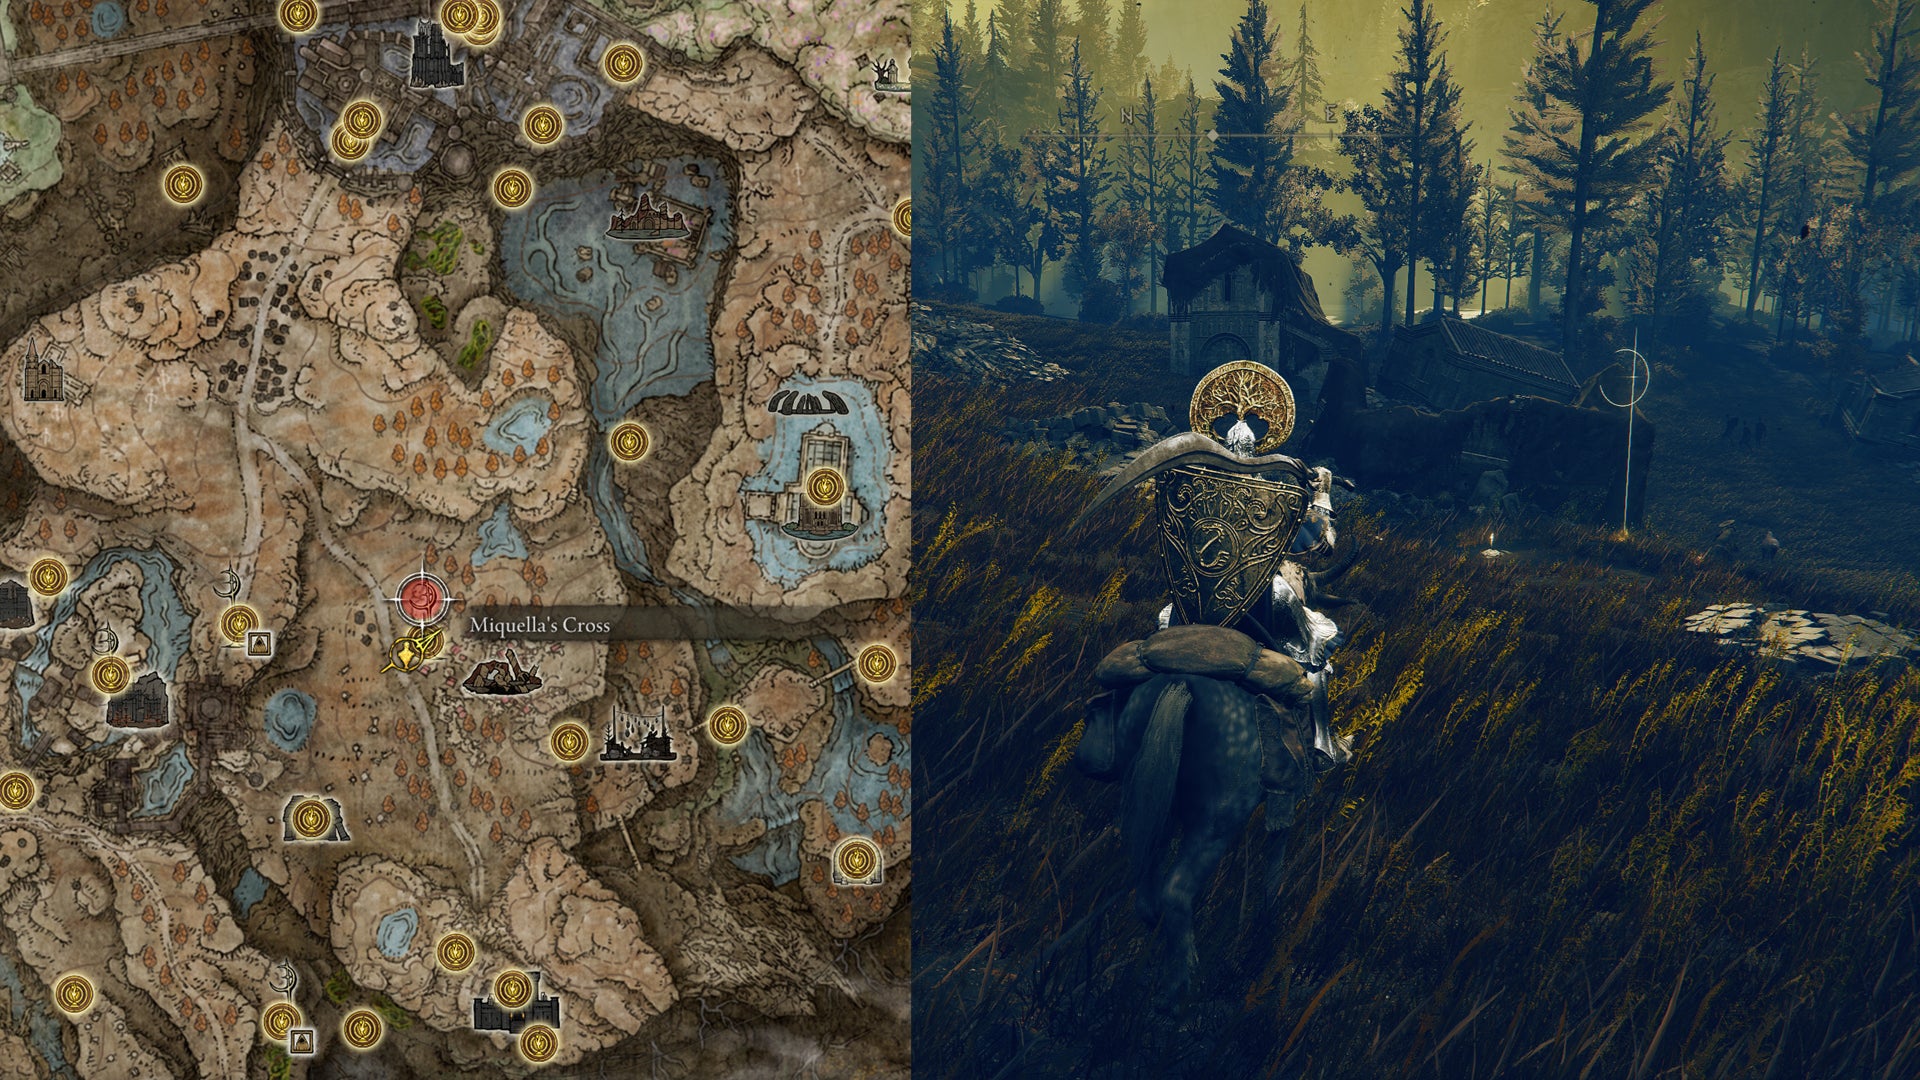
The Moorth Ruins Cross. |Image credit:Rock Paper Shotgun/Bandai Namco
Scaduview Cross location
This Miquella’s Cross is near the Scaduview Site Of Grace, on the high cliffs east of Fort Reprimand. There’s no need to clear the Fort. If you ride towards the Fort from the north, you must go to the narrow ledge on the left before passing through the cave opening. There’s a small pile of ‘spirit’ stones at the edge of this cliff; hit them to unlock a nearby wind current, which will take you to the higher cliffs. Once there, ride south until you see the Cross ahead of you.
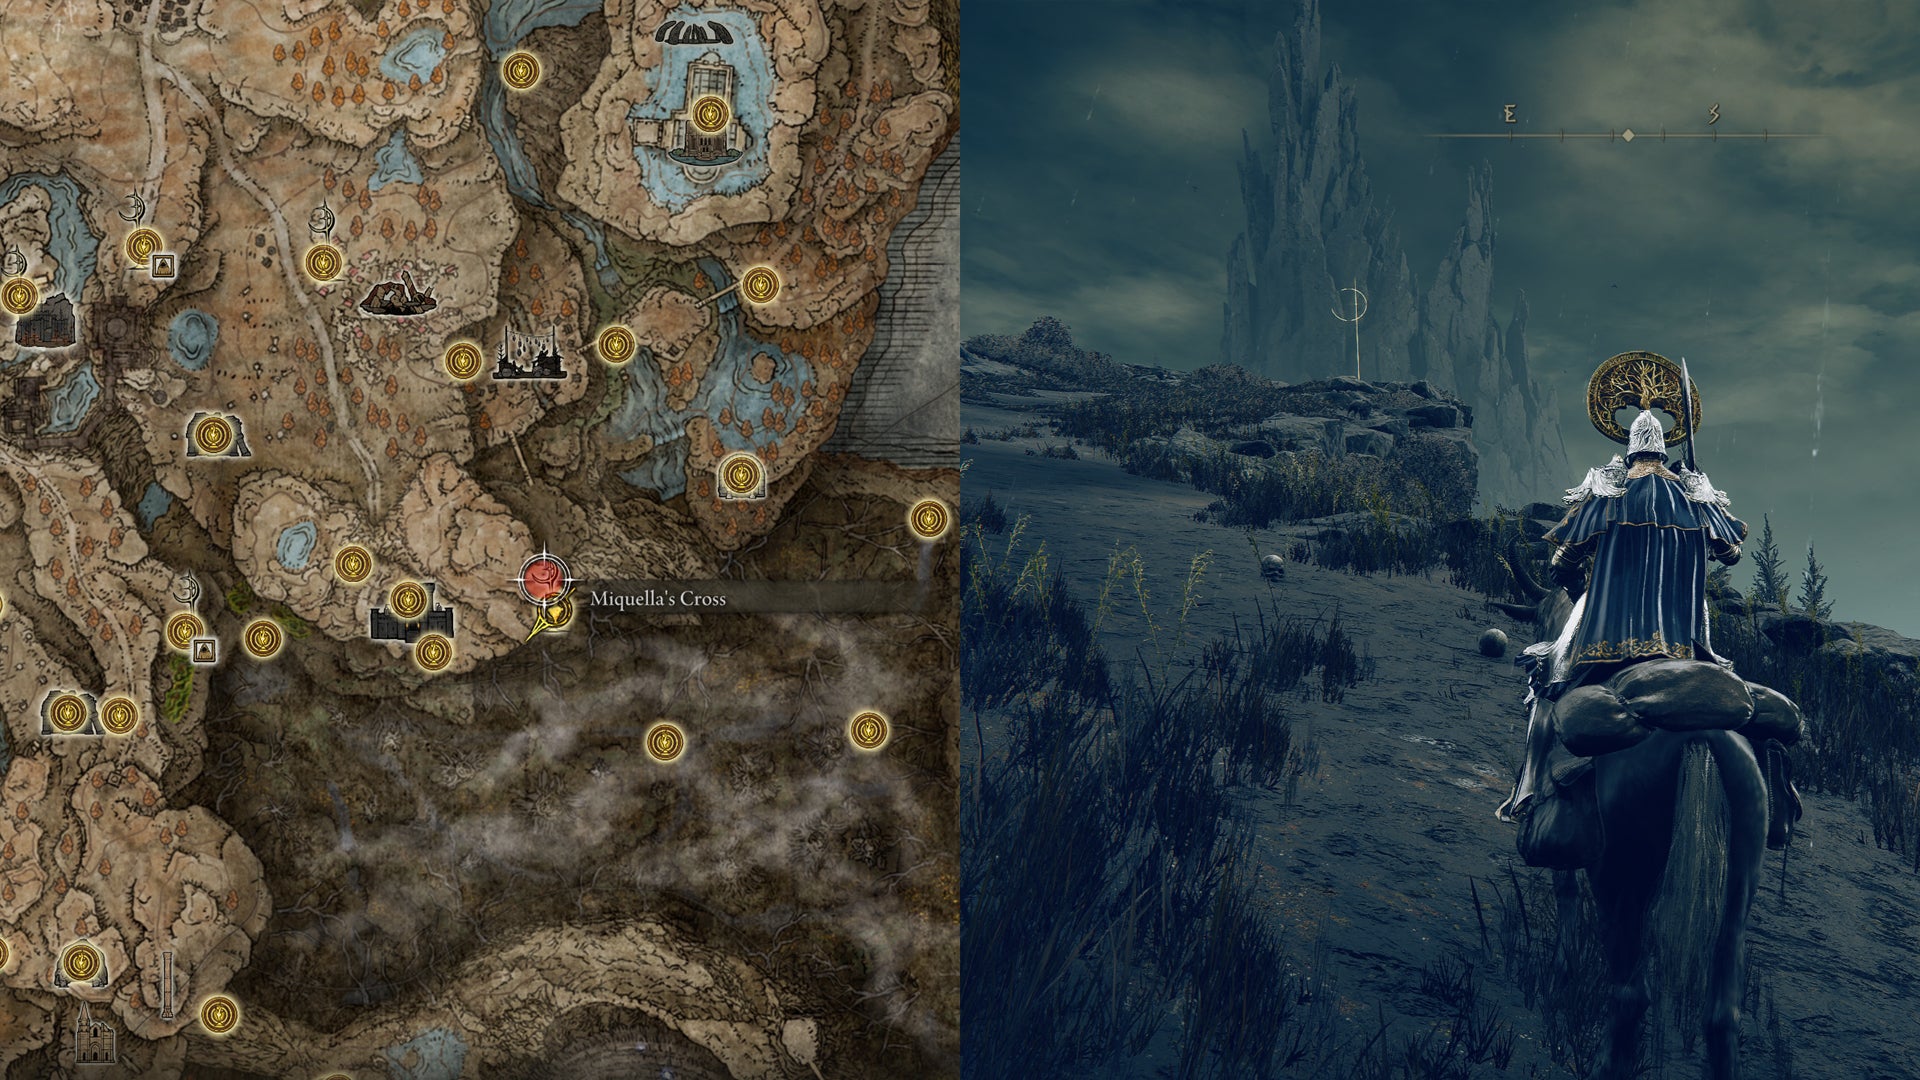
Ride to the top of the cliffs. |Image credit:Rock Paper Shotgun/Bandai Namco
Shadow Keep Cross location
This one’s inside the Shadow Keep, the large castle in the northeastern part of the Shadow Realm. It’s right next to the ‘Storehouse, Fourth Floor’ Site Of Grace. If you haven’t unlocked it yet, enter the Shadow Keep through the Main Gate and fight your way through the castle until you reach the Storehouse, First Floor. This is a central part of the castle and one of the largest areas, so don’t be afraid to miss it. From there, go to the other side of the room and take the stairs to the wooden balcony. See the huge statue hanging from the ceiling? Jump on it to reach the fourth floor and the Miquella’s Cross location.
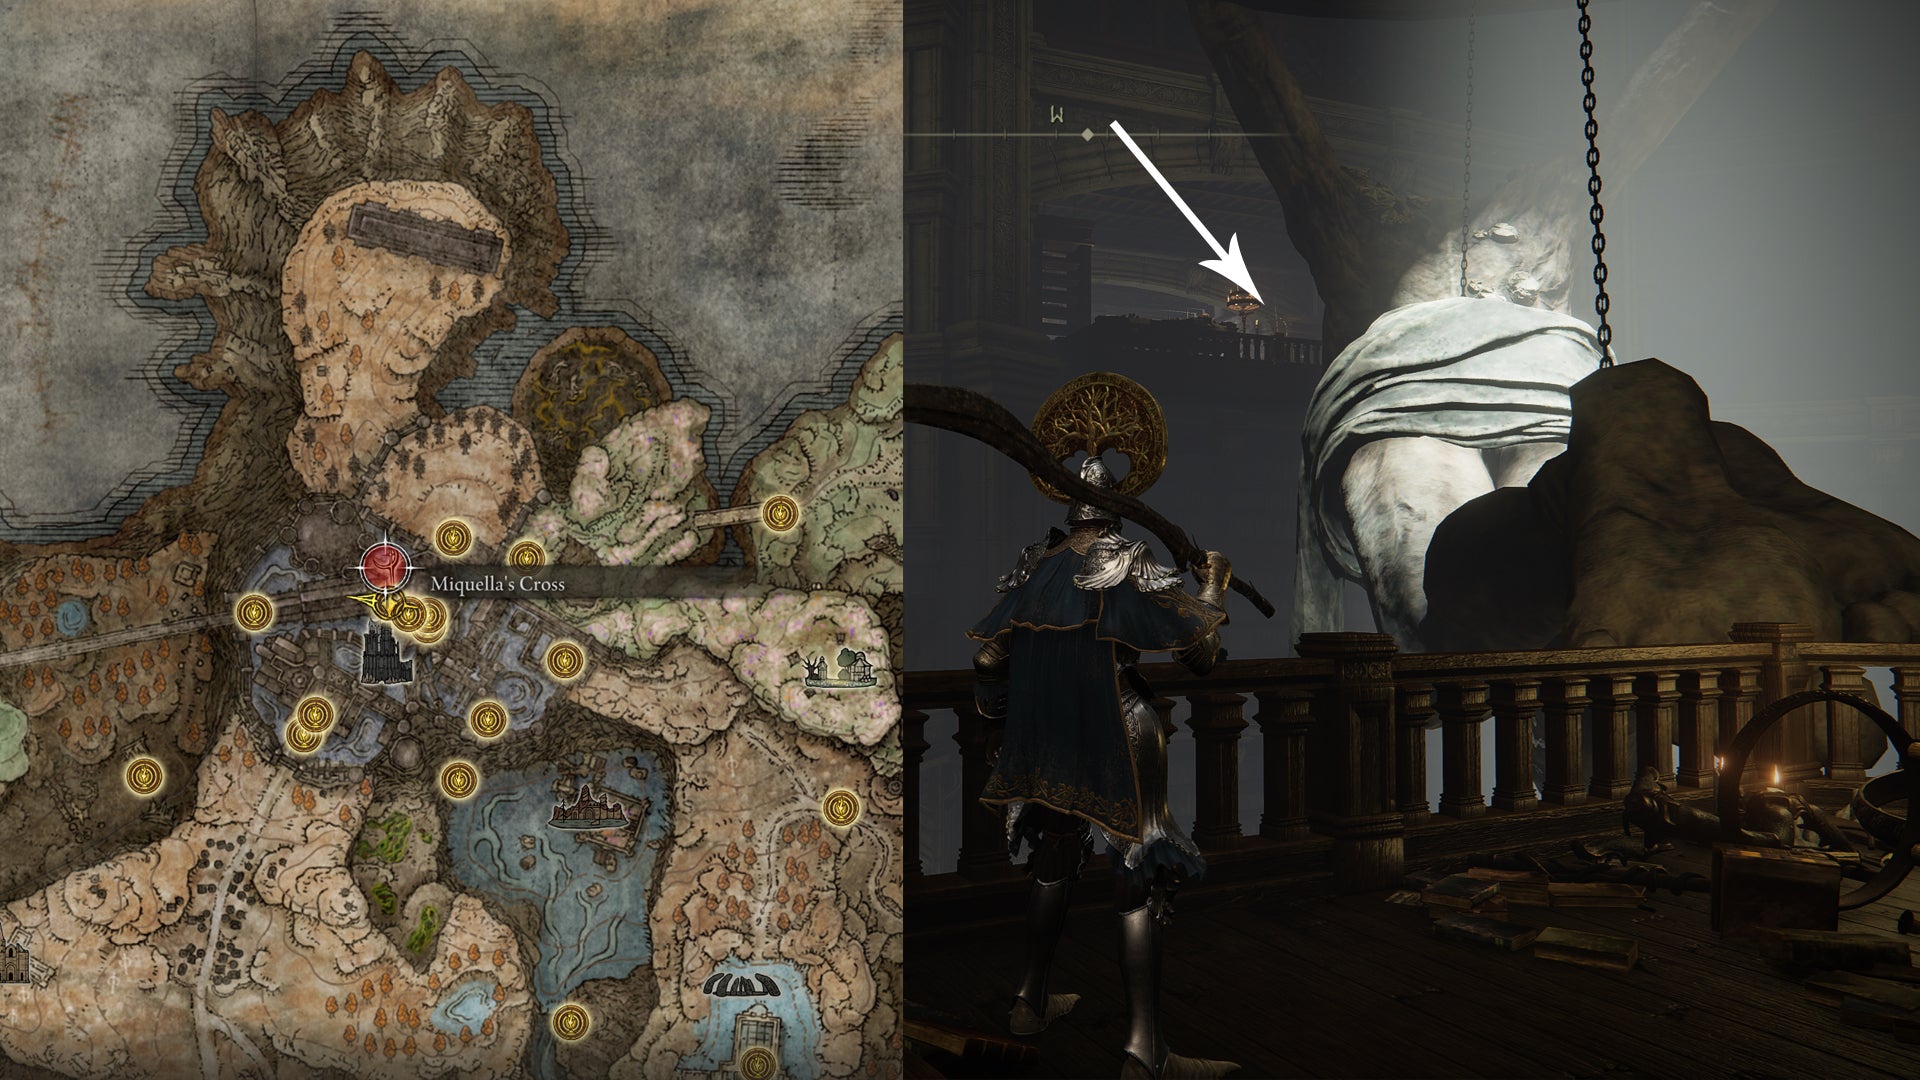
Run across the statue to reach the Cross. |Image credit:Rock Paper Shotgun/Bandai Namco
Rauh Ancient Ruins Cross location
This Cross is found on the northwestern part of the map, next to the Rauh Ancient Ruins Site Of Grace. To reach this area, leave the Shadow Keep through the West Rampart exit and ride west to Viaduct Minor Tower. Leave the tower, then ride through the large ruins a bit further west. Keep descending until you reach the lower slopes, where you’ll find Miquella’s Cross.
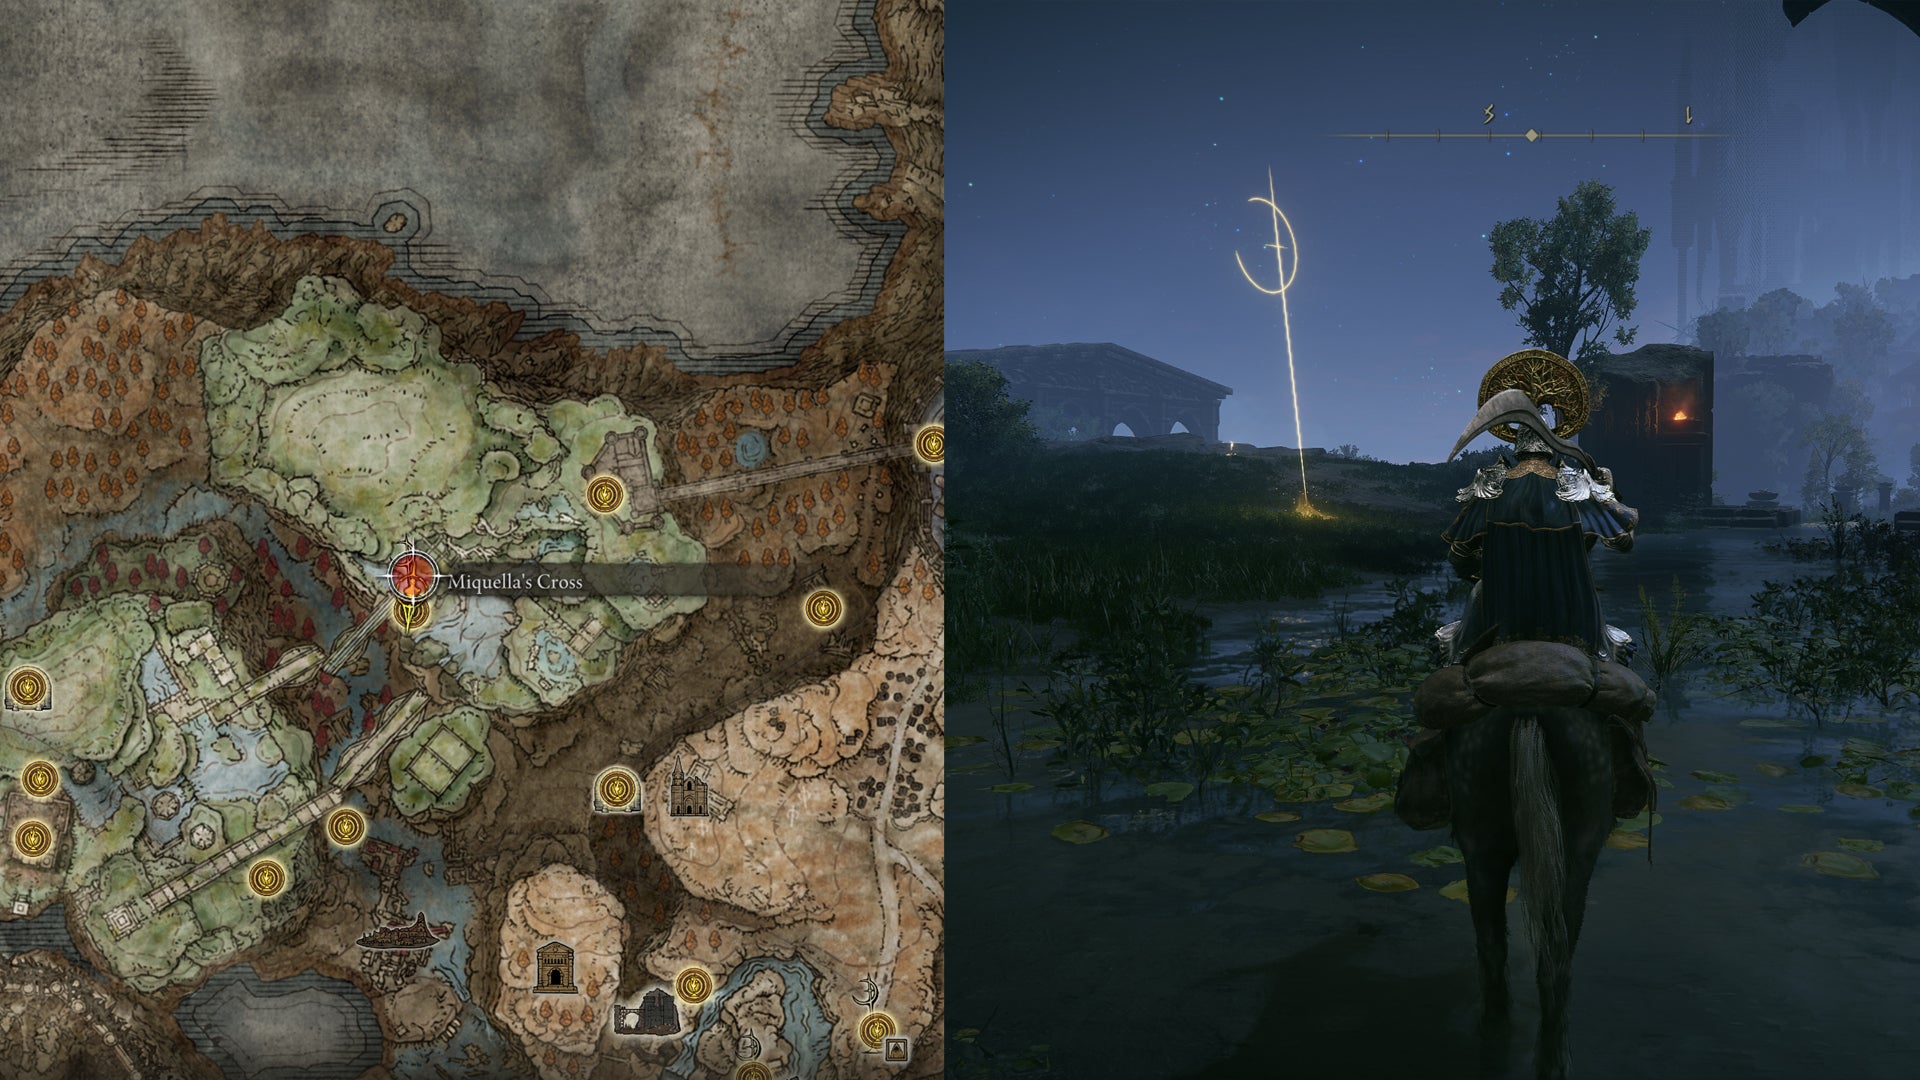
Head to the lower plains southwest of Viaduct minor Tower. |Image credit:Rock Paper Shotgun/Bandai Namco
Spiral Rise Cross location
The final Miquella’s Cross location is halfway up the Tower Of Shadow in Enir-Ilim, next to the Spiral Rise Site Of Grace. You can only reach this Cross after you’ve burned the Sealing Tree - which means you must’ve cleared most of the DLC’s content. There are several steps involved, which our guide on how to get to Enir-Ilim explains in more detail, but in short, here’s what you must do:
- Defeat Messmer The Impaler at the Shadow Keep (location 1 on the map below).
- Defeat Romina at the Church Of The Bud (location 2).
- Burn the Sealing Tree behind the Church.
You’ll then be transported to Enir-Ilim: Outer Wall, from where you must walk to the Spiral Rise in the southwest (location 3).
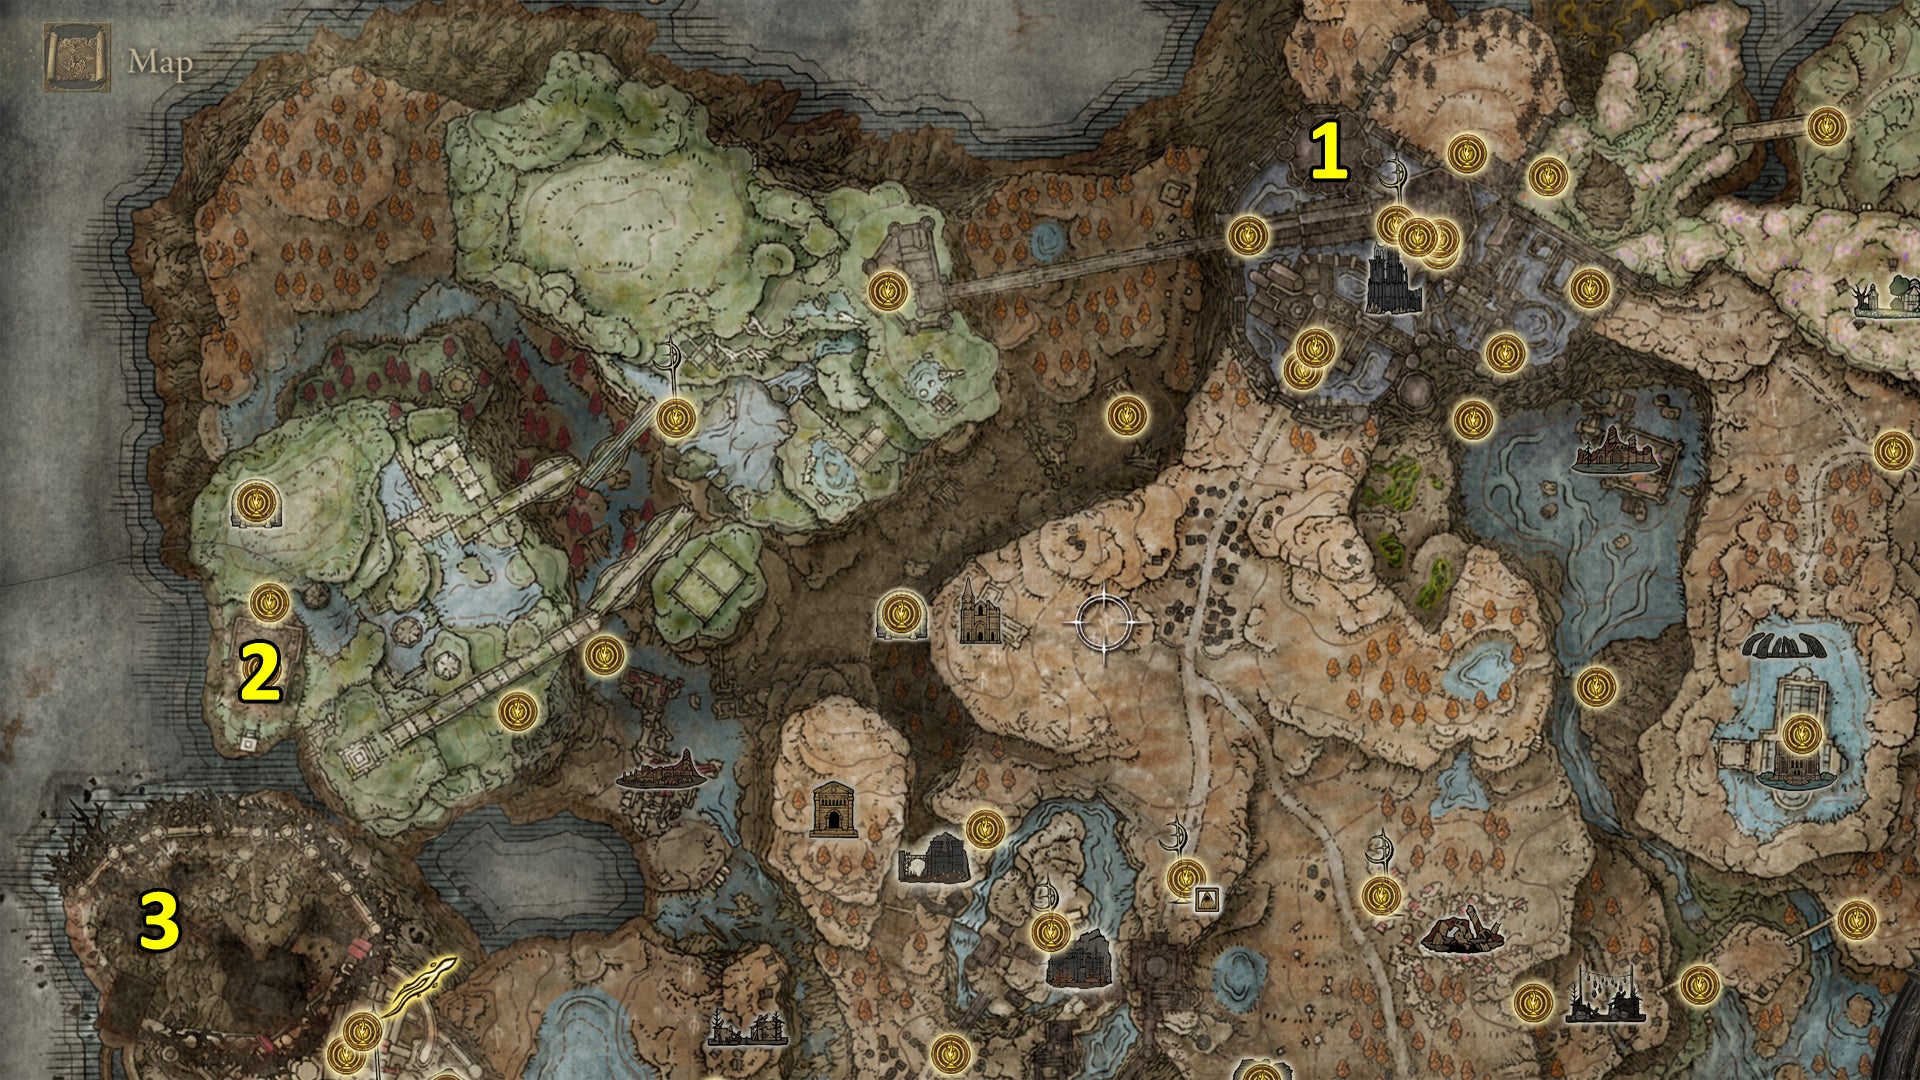
Visit each location to unlock the Spiral Rise Site Of Grace. |Image credit:Rock Paper Shotgun/Bandai Namco
And that’s how to find every Miquella’s Cross location in Shadow Of The Erdtree. You may want to look for some Revered Spirit Ash locations next, or take a look at our full Elden Ring walkthrough to find your next destination. We can also point you to the Elden Ring boss locations , but you might want to get the best builds and best armor sets first.


Elden Ring
PS4 , PS5 , Xbox One , Xbox Series X/S , PC
Rock Paper Shotgun is better when you sign in
Sign in and join us on our journey to discover strange and compelling PC games.

All 75 Arc Raiders Blueprints and where to get them
These areas have the highest chance of giving you Blueprints

Image credit:Rock Paper Shotgun/Embark Studios

Looking for more Arc Raiders Blueprints? It’s a special day when you find a Blueprint, as they’re among the most valuable items in Arc Raiders. If you find a Blueprint that you haven’t already found, then you must make sure you hold onto it at all costs, because Blueprints are the key to one of the most important and powerful systems of meta-progression in the game.
This guide aims to be the very best guide on Blueprints you can find, starting with a primer on what exactly they are and how they work in Arc Raiders, before delving into exactly where to get Blueprints and the very best farming spots for you to take in your search.
We’ll also go over how to get Blueprints from other unlikely activities, such as destroying Surveyors and completing specific quests. And you’ll also find the full list of all 75 Blueprints in Arc Raiders on this page (including the newest Blueprints added with the Cold Snap update , such as the Deadline Blueprint and Firework Box Blueprint), giving you all the information you need to expand your own crafting repertoire.
In this guide:
- What are Blueprints in Arc Raiders?
- Full Blueprint list: All crafting recipes
- Where to find Blueprints in Arc Raiders Blueprints obtained from quests Blueprints obtained from Trials Best Blueprint farming locations

What are Blueprints in Arc Raiders?
Blueprints in Arc Raiders are special items which, if you manage to extract with them, you can expend to permanently unlock a new crafting recipe in your Workshop. If you manage to extract from a raid with an Anvil Blueprint, for example, you can unlock the ability to craft your very own Anvil Pistol, as many times as you like (as long as you have the crafting materials).
To use a Blueprint, simply open your Inventory while in the lobby, then right-click on the Blueprint and click “Learn And Consume” . This will permanently unlock the recipe for that item in your Workshop. As of the Stella Montis update, there are allegedly 75 different Blueprints to unlock - although only 68 are confirmed to be in the game so far. You can see all the Blueprints you’ve found and unlocked by going to the Workshop menu, and hitting “R” to bring up the Blueprint screen.
It’s possible to find duplicates of past Blueprints you’ve already unlocked. If you find these, then you can either sell them, or - if you like to play with friends - you can take it into a match and gift it to your friend so they can unlock that recipe for themselves. Another option is to keep hold of them until the time comes to donate them to the Expedition.
Full Blueprint list: All crafting recipes
Below is the full list of all the Blueprints that are currently available to find in Arc Raiders, and the crafting recipe required for each item:
| Blueprint | Type | Recipe | Crafted At |
|---|---|---|---|
| Bettina | Weapon | 3x Advanced Mechanical Components 3x Heavy Gun Parts 3x Canister | Gunsmith 3 |
| Blue Light Stick | Quick Use | 3x Chemicals | Utility Station 1 |
| Aphelion | Weapon | 3x Magnetic Accelerator 3x Complex Gun Parts 1x Matriarch Reactor | Gunsmith 3 |
| Combat Mk. 3 (Flanking) | Augment | 2x Advanced Electrical Components 3x Processor | Gear Bench 3 |
| Combat Mk. 3 (Aggressive) | Augment | 2x Advanced Electrical Components 3x Processor | Gear Bench 3 |
| Complex Gun Parts | Material | 2x Light Gun Parts 2x Medium Gun Parts 2x Heavy Gun Parts | Refiner 3 |
| Fireworks Box | Quick Use | 1x Explosive Compound 3x Pop Trigger | Explosives Station 2 |
| Gas Mine | Mine | 4x Chemicals 2x Rubber Parts | Explosives Station 1 |
| Green Light Stick | Quick Use | 3x Chemicals | Utility Station 1 |
| Pulse Mine | Mine | 1x Crude Explosives 1x Wires | Explosives Station 1 |
| Seeker Grenade | Grenade | 1x Crude Explosives 2x ARC Alloy | Explosives Station 1 |
| Looting Mk. 3 (Survivor) | Augment | 2x Advanced Electrical Components 3x Processor | Gear Bench 3 |
| Angled Grip II | Mod | 2x Mechanical Components 3x Duct Tape | Gunsmith 2 |
| Angled Grip III | Mod | 2x Mod Components 5x Duct Tape | Gunsmith 3 |
| Hullcracker | Weapon | 1x Magnetic Accelerator 3x Heavy Gun Parts 1x Exodus Modules | Gunsmith 3 |
| Launcher Ammo | Ammo | 5x Metal Parts 1x Crude Explosives | Workbench 1 |
| Anvil | Weapon | 5x Mechanical Components 5x Simple Gun Parts | Gunsmith 2 |
| Anvil Splitter | Mod | 2x Mod Components 3x Processor | Gunsmith 3 |
| ??? | ??? | ??? | ??? |
| Barricade Kit | Quick Use | 1x Mechanical Components | Utility Station 2 |
| Blaze Grenade | Grenade | 1x Explosive Compound 2x Oil | Explosives Station 3 |
| Bobcat | Weapon | 3x Advanced Mechanical Components 3x Light Gun Parts | Gunsmith 3 |
| Osprey | Weapon | 2x Advanced Mechanical Components 3x Medium Gun Parts 7x Wires | Gunsmith 3 |
| Burletta | Weapon | 3x Mechanical Components 3x Simple Gun Parts | Gunsmith 1 |
| Compensator II | Mod | 2x Mechanical Components 4x Wires | Gunsmith 2 |
| Compensator III | Mod | 2x Mod Components 8x Wires | Gunsmith 3 |
| Defibrillator | Quick Use | 9x Plastic Parts 1x Moss | Medical Lab 2 |
| ??? | ??? | ??? | ??? |
| Equalizer | Weapon | 3x Magnetic Accelerator 3x Complex Gun Parts 1x Queen Reactor | Gunsmith 3 |
| Extended Barrel | Mod | 2x Mod Components 8x Wires | Gunsmith 3 |
| Extended Light Mag II | Mod | 2x Mechanical Components 3x Steel Spring | Gunsmith 2 |
| Extended Light Mag III | Mod | 2x Mod Components 5x Steel Spring | Gunsmith 3 |
| Extended Medium Mag II | Mod | 2x Mechanical Components 3x Steel Spring | Gunsmith 2 |
| Extended Medium Mag III | Mod | 2x Mod Components 5x Steel Spring | Gunsmith 3 |
| Extended Shotgun Mag II | Mod | 2x Mechanical Components 3x Steel Spring | Gunsmith 2 |
| Extended Shotgun Mag III | Mod | 2x Mod Components 5x Steel Spring | Gunsmith 3 |
| Remote Raider Flare | Quick Use | 2x Chemicals 4x Rubber Parts | Utility Station 1 |
| Heavy Gun Parts | Material | 4x Simple Gun Parts | Refiner 2 |
| Venator | Weapon | 2x Advanced Mechanical Components 3x Medium Gun Parts 5x Magnet | Gunsmith 3 |
| Il Toro | Weapon | 5x Mechanical Components 6x Simple Gun Parts | Gunsmith 1 |
| Jolt Mine | Mine | 1x Electrical Components 1x Battery | Explosives Station 2 |
| Explosive Mine | Mine | 1x Explosive Compound 1x Sensors | Explosives Station 3 |
| Jupiter | Weapon | 3x Magnetic Accelerator 3x Complex Gun Parts 1x Queen Reactor | Gunsmith 3 |
| Light Gun Parts | Material | 4x Simple Gun Parts | Refiner 2 |
| Lightweight Stock | Mod | 2x Mod Components 5x Duct Tape | Gunsmith 3 |
| Lure Grenade | Grenade | 1x Speaker Component 1x Electrical Components | Utility Station 2 |
| Medium Gun Parts | Material | 4x Simple Gun Parts | Refiner 2 |
| Torrente | Weapon | 2x Advanced Mechanical Components 3x Medium Gun Parts 6x Steel Spring | Gunsmith 3 |
| Muzzle Brake II | Mod | 2x Mechanical Components 4x Wires | Gunsmith 2 |
| Muzzle Brake III | Mod | 2x Mod Components 8x Wires | Gunsmith 3 |
| Padded Stock | Mod | 2x Mod Components 5x Duct Tape | Gunsmith 3 |
| Shotgun Choke II | Mod | 2x Mechanical Components 4x Wires | Gunsmith 2 |
| Shotgun Choke III | Mod | 2x Mod Components 8x Wires | Gunsmith 3 |
| Shotgun Silencer | Mod | 2x Mod Components 8x Wires | Gunsmith 3 |
| Showstopper | Grenade | 1x Advanced Electrical Components 1x Voltage Converter | Explosives Station 3 |
| Silencer I | Mod | 2x Mechanical Components 4x Wires | Gunsmith 2 |
| Silencer II | Mod | 2x Mod Components 8x Wires | Gunsmith 3 |
| Snap Hook | Quick Use | 2x Power Rod 3x Rope 1x Exodus Modules | Utility Station 3 |
| Stable Stock II | Mod | 2x Mechanical Components 3x Duct Tape | Gunsmith 2 |
| Stable Stock III | Mod | 2x Mod Components 5x Duct Tape | Gunsmith 3 |
| Tagging Grenade | Grenade | 1x Electrical Components 1x Sensors | Utility Station 3 |
| Tempest | Weapon | 3x Advanced Mechanical Components 3x Medium Gun Parts 3x Canister | Gunsmith 3 |
| Trigger Nade | Grenade | 2x Crude Explosives 1x Processor | Explosives Station 2 |
| Vertical Grip II | Mod | 2x Mechanical Components 3x Duct Tape | Gunsmith 2 |
| Vertical Grip III | Mod | 2x Mod Components 5x Duct Tape | Gunsmith 3 |
| Vita Shot | Quick Use | 2x Antiseptic 1x Syringe | Medical Lab 3 |
| Vita Spray | Quick Use | 3x Antiseptic 1x Canister | Medical Lab 3 |
| Vulcano | Weapon | 1x Magnetic Accelerator 3x Heavy Gun Parts 1x Exodus Modules | Gunsmith 3 |
| Wolfpack | Grenade | 2x Explosive Compound 2x Sensors | Explosives Station 3 |
| Red Light Stick | Quick Use | 3x Chemicals | Utility Station 1 |
| Smoke Grenade | Grenade | 14x Chemicals 1x Canister | Utility Station 2 |
| Deadline | Mine | 3x Explosive Compound 2x ARC Circuitry | Explosives Station 3 |
| Trailblazer | Grenade | 1x Explosive Compound 1x Synthesized Fuel | Explosives Station 3 |
| Tactical Mk. 3 (Defensive) | Augment | 2x Advanced Electrical Components 3x Processor | Gear Bench 3 |
| Tactical Mk. 3 (Healing) | Augment | 2x Advanced Electrical Components 3x Processor | Gear Bench 3 |
| Yellow Light Stick | Quick Use | 3x Chemicals | Utility Station 1 |
Note: The missing Blueprints in this list likely have not actually been added to the game at the time of writing, because none of the playerbase has managed to find any of them. As they are added to the game, I will update this page with the most relevant information so you know exactly how to get all 75 Arc Raiders Blueprints.
Where to find Blueprints in Arc Raiders
Below is a list of all containers, modifiers, and events which maximise your chances of finding Blueprints:
- Certain quests reward you with specific Blueprints .
- Completing Trials has a high chance of offering Blueprints as rewards.
- Surveyors have a decent chance of dropping Blueprints on death.
- High loot value areas tend to have a greater chance of spawning Blueprints.
- Night Raids and Storms may increase rare Blueprint spawn chances in containers.
- Containers with higher numbers of items may have a higher tendency to spawn Blueprints. As a result, Blue Gate (which has many “large” containers containing multiple items) may give you a higher chance of spawning Blueprints.
- Raider containers (Raider Caches, Weapon Boxes, Medical Bags, Grenade Tubes) have increased Blueprint drop rates. As a result, the Uncovered Caches event gives you a high chance of finding Blueprints.
- Security Lockers have a higher than average chance of containing Blueprints.
- Certain Blueprints only seem to spawn under specific circumstances: Tempest Blueprint only spawns during Night Raid events. Vulcano Blueprint only spawns during Hidden Bunker events. Jupiter and Equaliser Blueprints only spawn during Harvester events.

Raider Caches, Weapon Boxes, and other raider-oriented container types have a good chance of offering Blueprints. |Image credit:Rock Paper Shotgun/Embark Studios
Blueprints have a very low chance of spawning in any container in Arc Raiders, around 1-2% on average. However, there is a higher chance of finding Blueprints in particular container types. Specifically, you can find more Blueprints in Raider containers and security lockers.
Beyond this, if you’re looking for Blueprints you should focus on regions of the map which are marked as having particularly high-value loot. Areas such as the Control Tower in Dam Battlegrounds, the Arrival and Departure Buildings in Spaceport, and Pilgrim’s Peak in Blue Gate all have a better-than-average chance of spawning Blueprints somewhere amongst all their containers. Night Raids and Electromagnetic Storm events also increase the drop chances of certain Blueprints .
In addition to these containers, you can often loot Blueprints from destroyed Surveyors - the largest of the rolling ball ARC. Surveyors are more commonly found on the later maps - Spaceport and Blue Gate - and if one spawns in your match, you’ll likely see it by the blue laser beam that it casts into the sky while “surveying”.
Surveyors are quite well-armoured and will very speedily run away from you once it notices you, but if you can take one down then make sure you loot all its parts for a chance of obtaining certain unusual Blueprints.
Blueprints obtained from quests
One way in which you can get Blueprints is by completing certain quests for the vendors in Speranza. Some quests will reward you with a specific item Blueprint upon completion, so as long as you work through all the quests in Arc Raiders, you are guaranteed those Blueprints.
Here is the full list of all Blueprints you can get from quest rewards:
- Trigger Nade Blueprint: Rewarded after completing “Sparks Fly”.
- Lure Grenade Blueprint: Rewarded after completing “Greasing Her Palms”.
- Burletta Blueprint: Rewarded after completing “Industrial Espionage”.
- Hullcracker Blueprint (and Launcher Ammo Blueprint): Rewarded after completing “The Major’s Footlocker”.
Alas, that’s only 4 Blueprints out of a total of 75 to unlock, so for the vast majority you will need to find them yourself during a raid. If you’re intent on farming Blueprints, then it’s best to equip yourself with cheap gear in case you lose it, but don’t use a free loadout because then you won’t get a safe pocket to stash any new Blueprint you find. No pain in Arc Raiders is sharper than failing to extract with a new Blueprint you’ve been after for a dozen hours already.

One of the best ways to get Blueprints is by hitting three stars on all five Trials every week. |Image credit:Rock Paper Shotgun/Embark Studios
Blueprints obtained from Trials
One of the very best ways to get Blueprints is as rewards for completing Trials in Arc Raiders. Trials are unlocked from Level 15 onwards, and allow you to earn rewards by focusing on certain tasks over the course of several raids. For example, one Trial might task you with dealing damage to Hornets, while another might challenge you to loot Supply Drops.
Trials refresh on a weekly basis, with a new week bringing five new Trials. Each Trial can offer up to three rewards after passing certain score milestones, and it’s possible to receive very high level loot from these reward crates - including Blueprints. So if you want to unlock as many Blueprints as possible, you should make a point of completing as many Trials as possible each week.
Best Blueprint farming locations
The very best way to get Blueprints is to frequent specific areas of the maps which combine high-tier loot pools with the right types of containers to search. Here are my recommendations for where to find Blueprints on every map, so you can always keep the search going for new crafting recipes to unlock.

Image credit:Rock Paper Shotgun/Embark Studios
Dam Battlegrounds
The best places to farm Blueprints on Dam Battlegrounds are the Control Tower, Power Generation Complex, Ruby Residence, and Pale Apartments . The first two regions, despite only being marked on the map as mid-tier loot, contain a phenomenal number of containers to loot. The Control Tower can also contain a couple of high-tier Security Lockers - though of course, you’ll need to have unlocked the Security Breach skill at the end of the Survival tree.
There’s also a lot of reporting amongst the playerbase that the Residential areas in the top-left of the map - Pale Apartments and Ruby Residence - give you a comparatively strong chance of finding Blueprints. Considering their size, there’s a high density of containers to loot in both locations, and they also have the benefit of being fairly out of the way. So you’re more likely to have all the containers to yourself.
Buried City
The best Blueprint farming locations on Buried City are the Santa Maria Houses, Grandioso Apartments, Town Hall, and the various buildings of the New District . Grandioso Apartments has a lower number of containers than the rest, but a high chance of spawning weapon cases - which have good Blueprint drop rates. The others are high-tier loot areas, with plenty of lootable containers - including Security Lockers.
Spaceport
The best places to find Blueprints on Spaceport are the Arrival and Departure Buildings, as well as Control Tower A6 and the Launch Towers . All these areas are labelled as high-value loot regions, and many of them are also very handily connected to one another by the Spaceport wall, which you can use to quickly run from one area to the next. At the tops of most of these buildings you’ll find at least one Security Locker, so this is an excellent farming route for players looking to find Blueprints.
The downside to looting Blueprints on Spaceport is that all these areas are hotly contested, particularly in Duos and Squads. You’ll need to be very focused and fast in order to complete the full farming route.

Image credit:Rock Paper Shotgun/Embark Studios
Blue Gate
Blue Gate tends to have a good chance of dropping Blueprints, potentially because it generally has a high number of containers which can hold lots of items; so there’s a higher chance of a Blueprint spawning in each container. In my experience, the best Blueprint farming spots on Blue Gate are Pilgrim’s Peak, Raider’s Refuge, the Ancient Fort, and the Underground Complex beneath the Warehouse .
All of these areas contain a wealth of containers to loot. Raider’s Refuge has less to loot, but the majority of the containers in and around the Refuge are raider containers, which have a high chance of containing Blueprints - particularly during major events.
Stella Montis
On the whole, Stella Montis seems to have a very low drop rate for Blueprints (though a high chance of dropping other high-tier loot). If you do want to try farming Blueprints on this map, the best places to find Blueprints in Stella Montis are Medical Research, Assembly Workshop, and the Business Center . These areas have the highest density of containers to loot on the map.
In addition to this, the Western Tunnel has a few different Security Lockers to loot, so while there’s very little to loot elsewhere in this area of the map, it’s worth hitting those Security Lockers if you spawn there at the start of a match.
That wraps up this primer on how to get all the Blueprints in Arc Raiders as quickly as possible. With the Expedition system constantly resetting a large number of players’ Blueprints, it’s more important than ever to have the most up-to-date information on where to find all these Blueprints.
While you’re here, be sure to check out our Arc Raiders best guns tier list , as well as our primers on the best skills to unlock and all the different Field Depot locations on every map.


ARC Raiders
PS5 , Xbox Series X/S , PC
Rock Paper Shotgun is better when you sign in
Sign in and join us on our journey to discover strange and compelling PC games.
