All Black Myth Wukong Meditation Spots
Relax, enjoy the view, and grab free Sparks from these Meditation Spots

Image credit:Rock Paper Shotgun/Game Science

Want to find every Black Myth: Wukong Meditation Spot? The world of Black Myth: Wukong is full of danger, so it’s a nice respite to stumble upon a beautiful Meditation Spot every now and then. Interacting with a Meditation Spot is rewarded with a short cutscene showing the scenery along with free Sparks, which are skill points that can be spent on ability and spell upgrades in the Self-Advance menu. Besides meditation, you only get Sparks by levelling up, so they’re a valuable resource.
Best not to miss out on those extra Sparks, right? In this guide, we’ll help you find every Meditation Spot in Black Myth: Wukong.
In this guide:
- Meditation Spots in Chapter 1
- Meditation Spots in Chapter 2
- Meditation Spots in Chapter 3
- Meditation Spots in Chapter 4
- Meditation Spots in Chapter 5
Meditation Spots in Chapter 1
There are three Meditation Spots in total in Chapter 1 of Black Myth: Wukong, the Black Wind Mountain region. Open your Journal and choose ‘Meditation Spots’ to see which ones you’re still missing and use the location guide below to find them. Tip: unlock every Keeper’s Shrine in this region first, as it will make your hunt for meditation locations much easier!
The Arbor, Forest of Wolves
Starting from the “Outside the Forest” Shrine in the Forest of Wolves, take the downwards path through the cave. The Meditation Spot is in a straight line ahead of you.
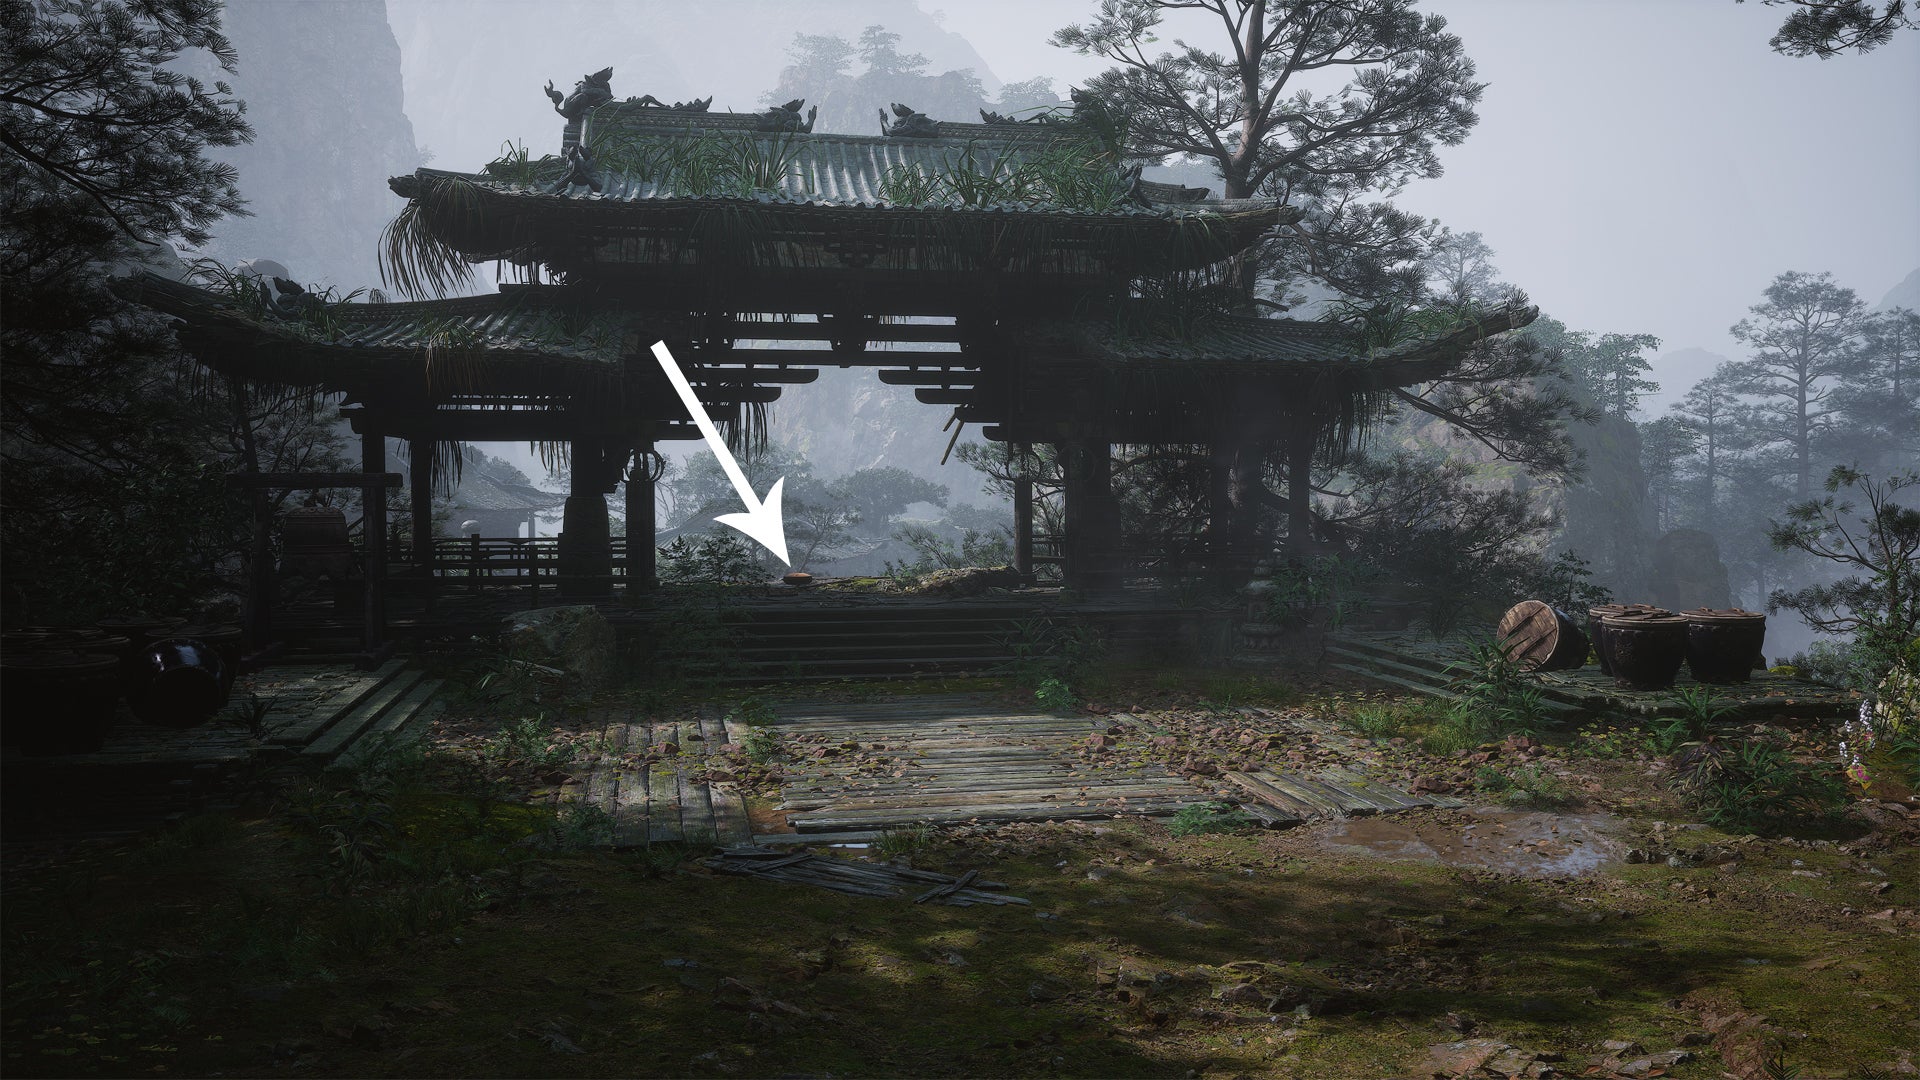
The very first Meditation Spot in Black Myth Wukong. |Image credit:Rock Paper Shotgun/Game Science
The Cavern, Bamboo Grove
Go to the “Back Hills” Shrine at the start of the Bamboo Grove and take the downward path. Stick to the left, effectively making a U-turn, and enter the cavern. In front of you, next to a talking horse NPC, you’ll find the Meditation Spot.

It’s inside the cave with the talking horse. |Image credit:Rock Paper Shotgun/Game Science
The Cliff, Black Wind Cave
Travel to the “Marsh of White Mist” Shrine in the Bamboo Grove and walk down the path with the wooden platforms. Don’t go left or right; just go straight down to the shallow lake. Beware that the seemingly peaceful lake is home to the Whiteclad Noble boss, so be prepared for a fight if this is your first visit! Once the Whiteclad Noble is defeated, walk through the temple-like cave and onto the wooden balcony straight ahead, where you’ll find the Meditation Spot.
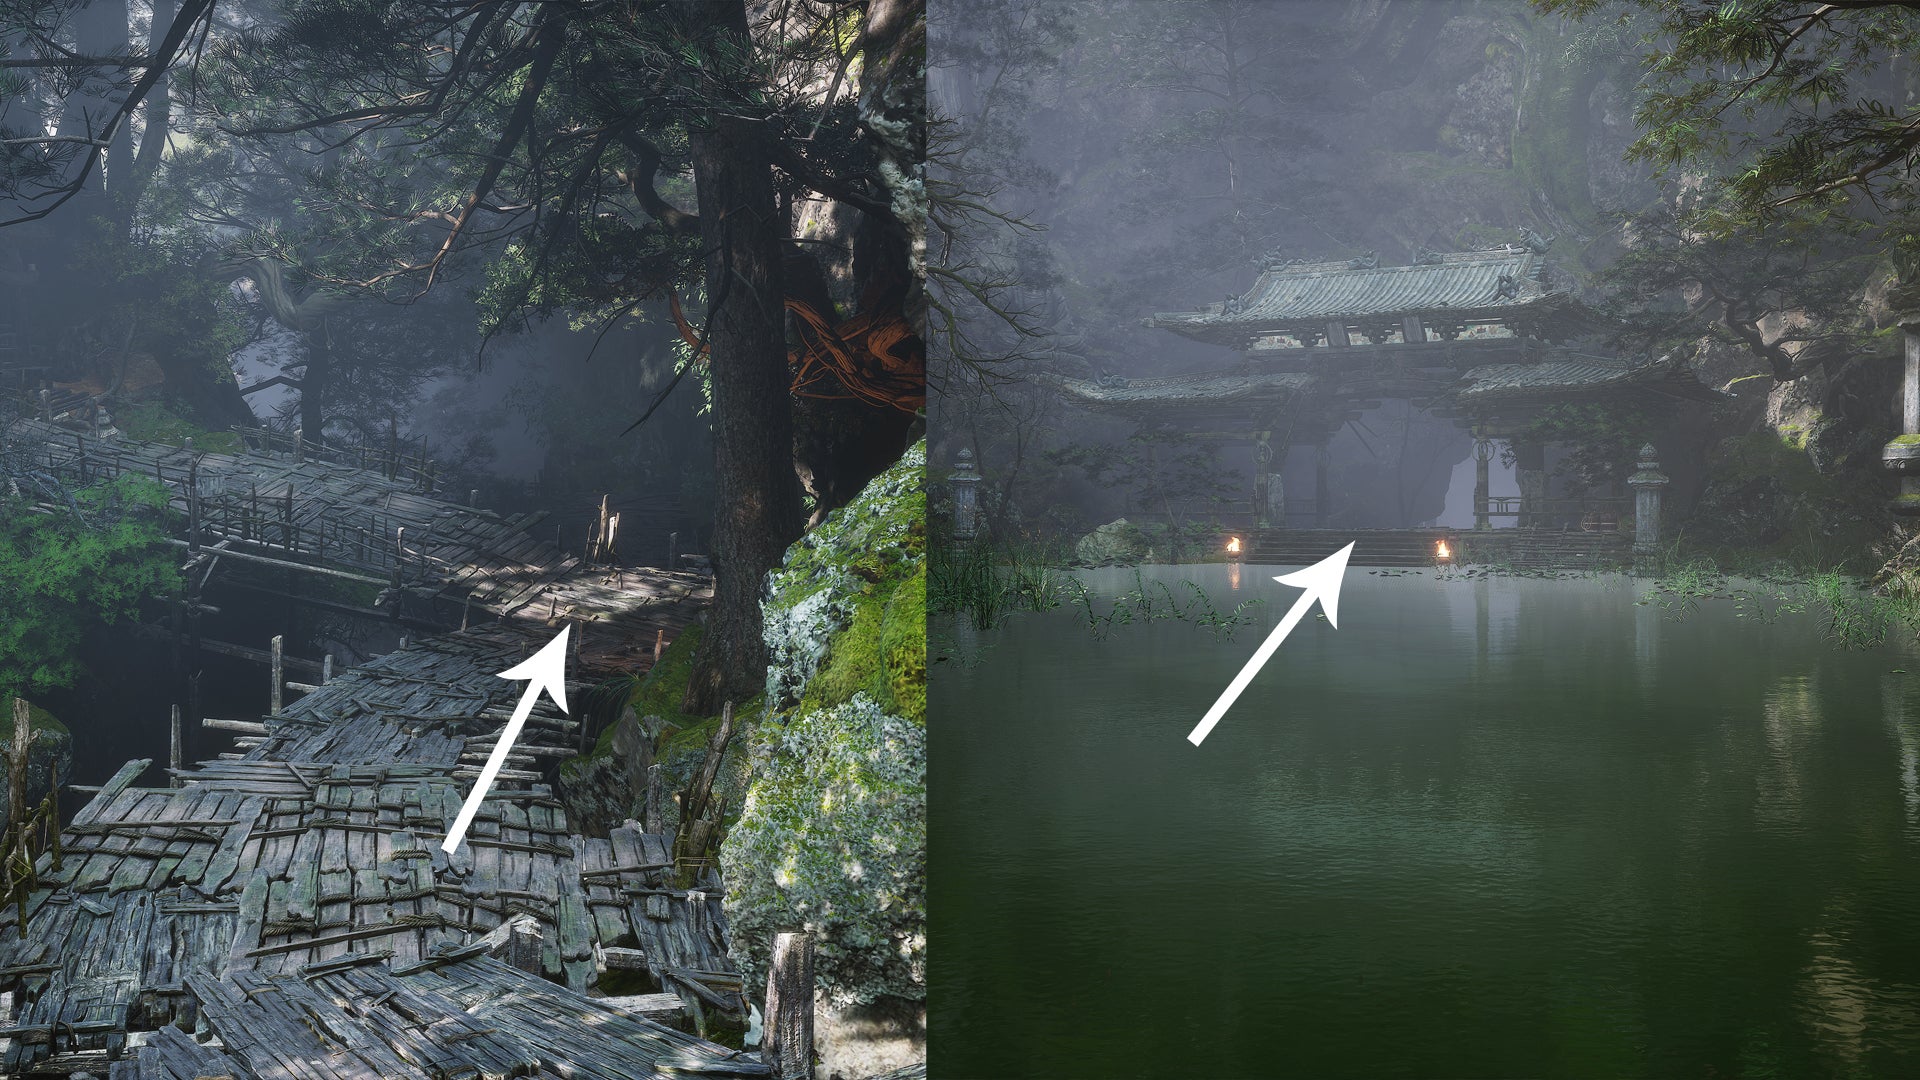
Walk down and cross the Whiteclad Noble’s pond. |Image credit:Rock Paper Shotgun/Game Science
Meditation Spots in Chapter 2
With a total of six Meditation Spots in Chapter 2 of Black Myth: Wukong, the second part of the game involves a lot of meditation - and double the amount of free Sparks compared to Chapter 1. Here’s where to find all of the Yellow Wind Ridge Meditation Spots.
The Altar, Sandgate Village
Start from the “Village Entrance” Shrine in Sandgate Village, which is right at the start of this chapter. Walk onto the small bridge next to the Shrine, but drop down to the right before you reach the other side. Pass through the cave and immediately turn left (don’t drop further down) to find a small shrine with a Meditation Spot.
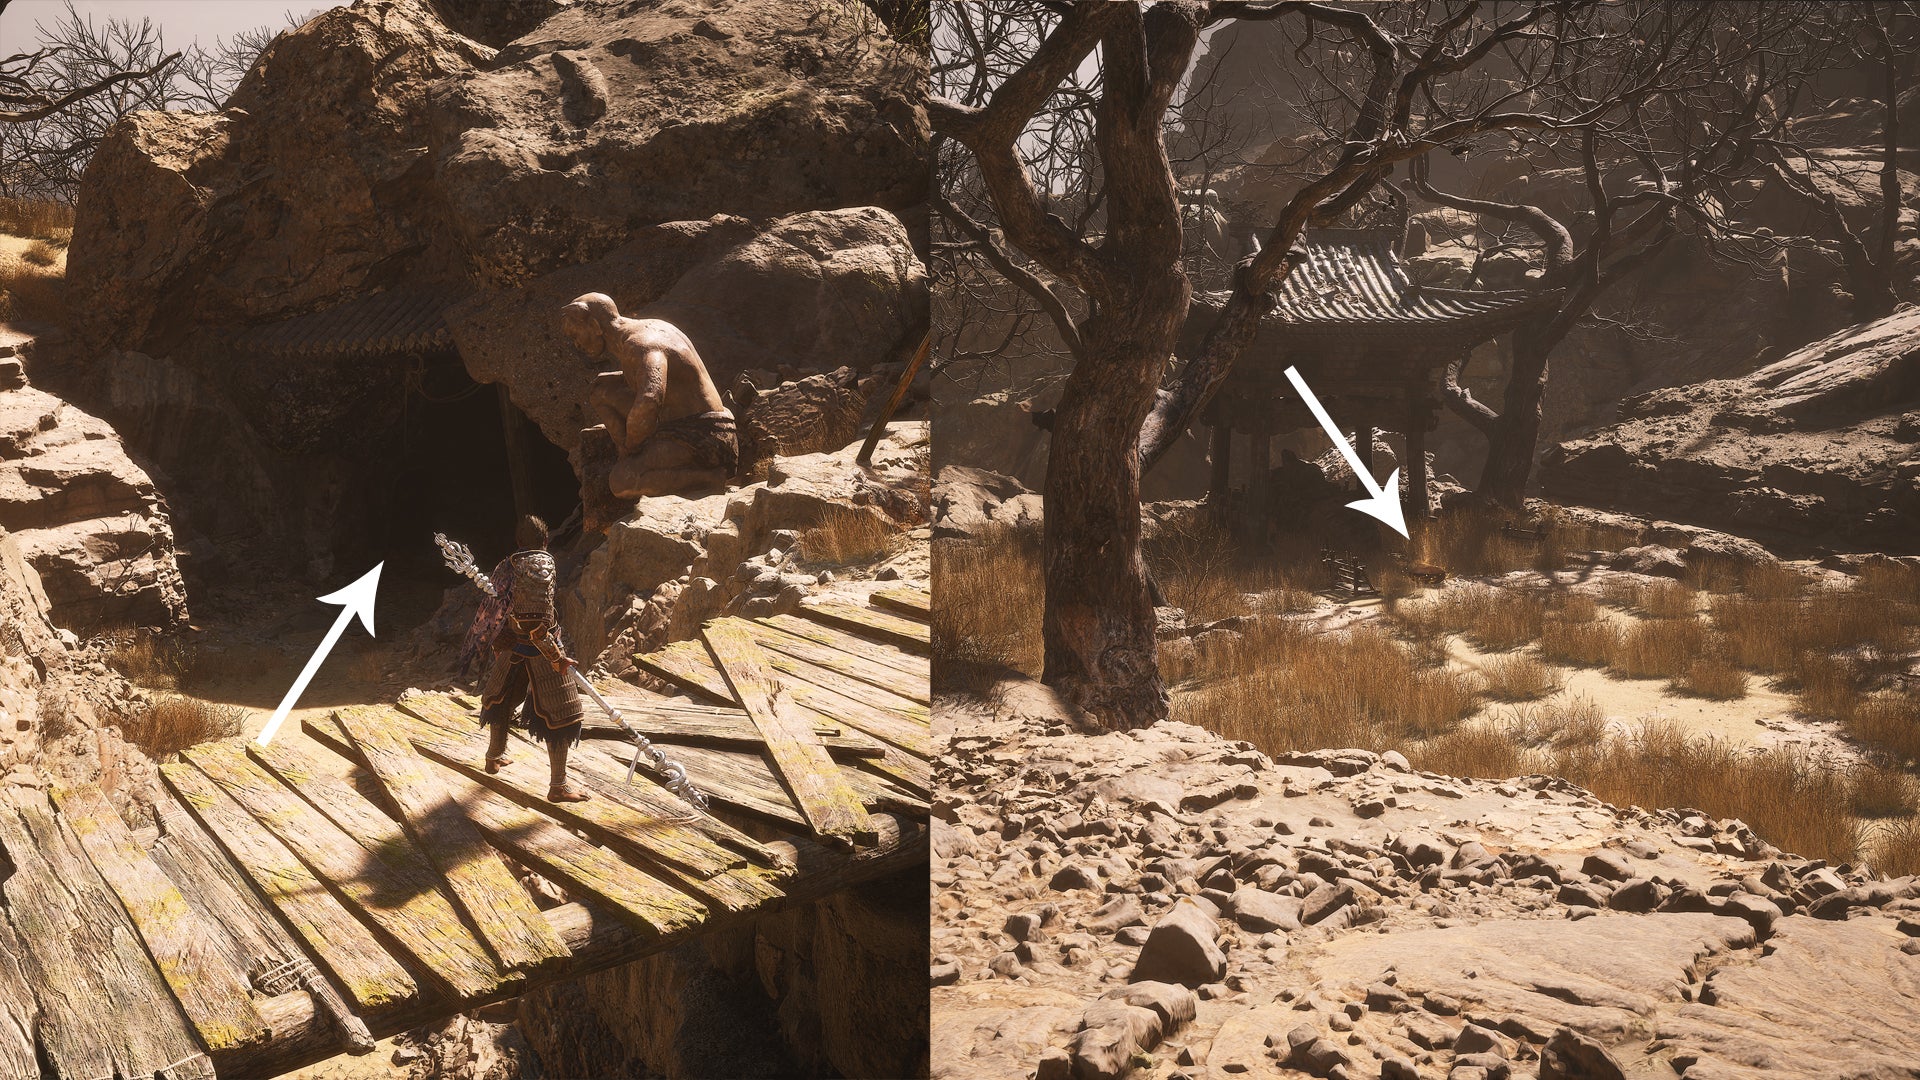
Following the cave passage, take a sharp turn left. |Image credit:Rock Paper Shotgun/Game Science
The Ravine, Rock Clash Platform
Start from the “Rock Clash Platform” Shrine, which is next to the Stone Vanguard boss arena in the Fright Cliff region. Instead of heading into the arena, take the path alongside the old buildings to find the Meditation Spot straight ahead.
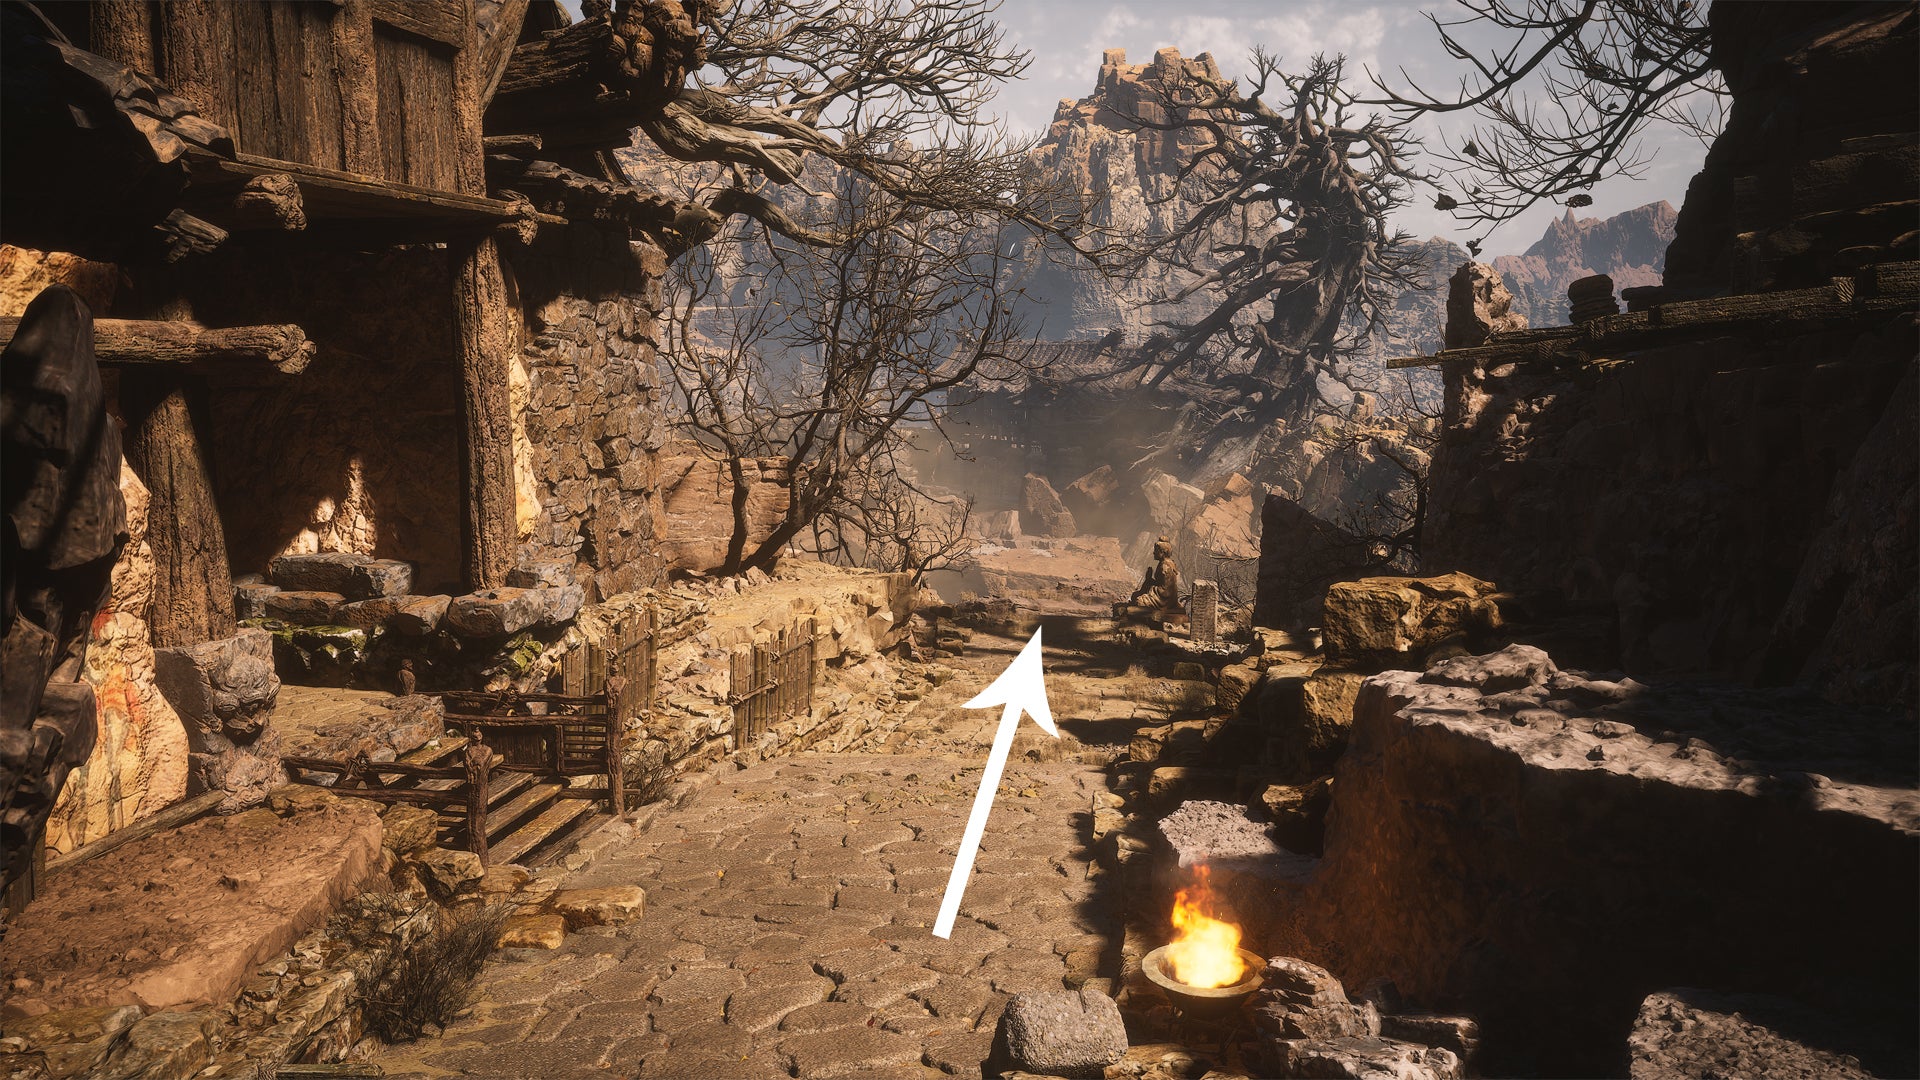
It’s a short walk from the Rock Clash Platform Shrine. |Image credit:Rock Paper Shotgun/Game Science
The Deadwood, Rockrest Flat
To find this meditation location, you must travel to the “Rockrest Flat” Shrine in the Fright Cliff area, which is very close to the Stone Vanguard boss arena. Walk around the rock formation behind the Shrine and follow the path leading to the drunken boar NPC . You’ll find the Meditation Spot behind the swine, next to a large tree.
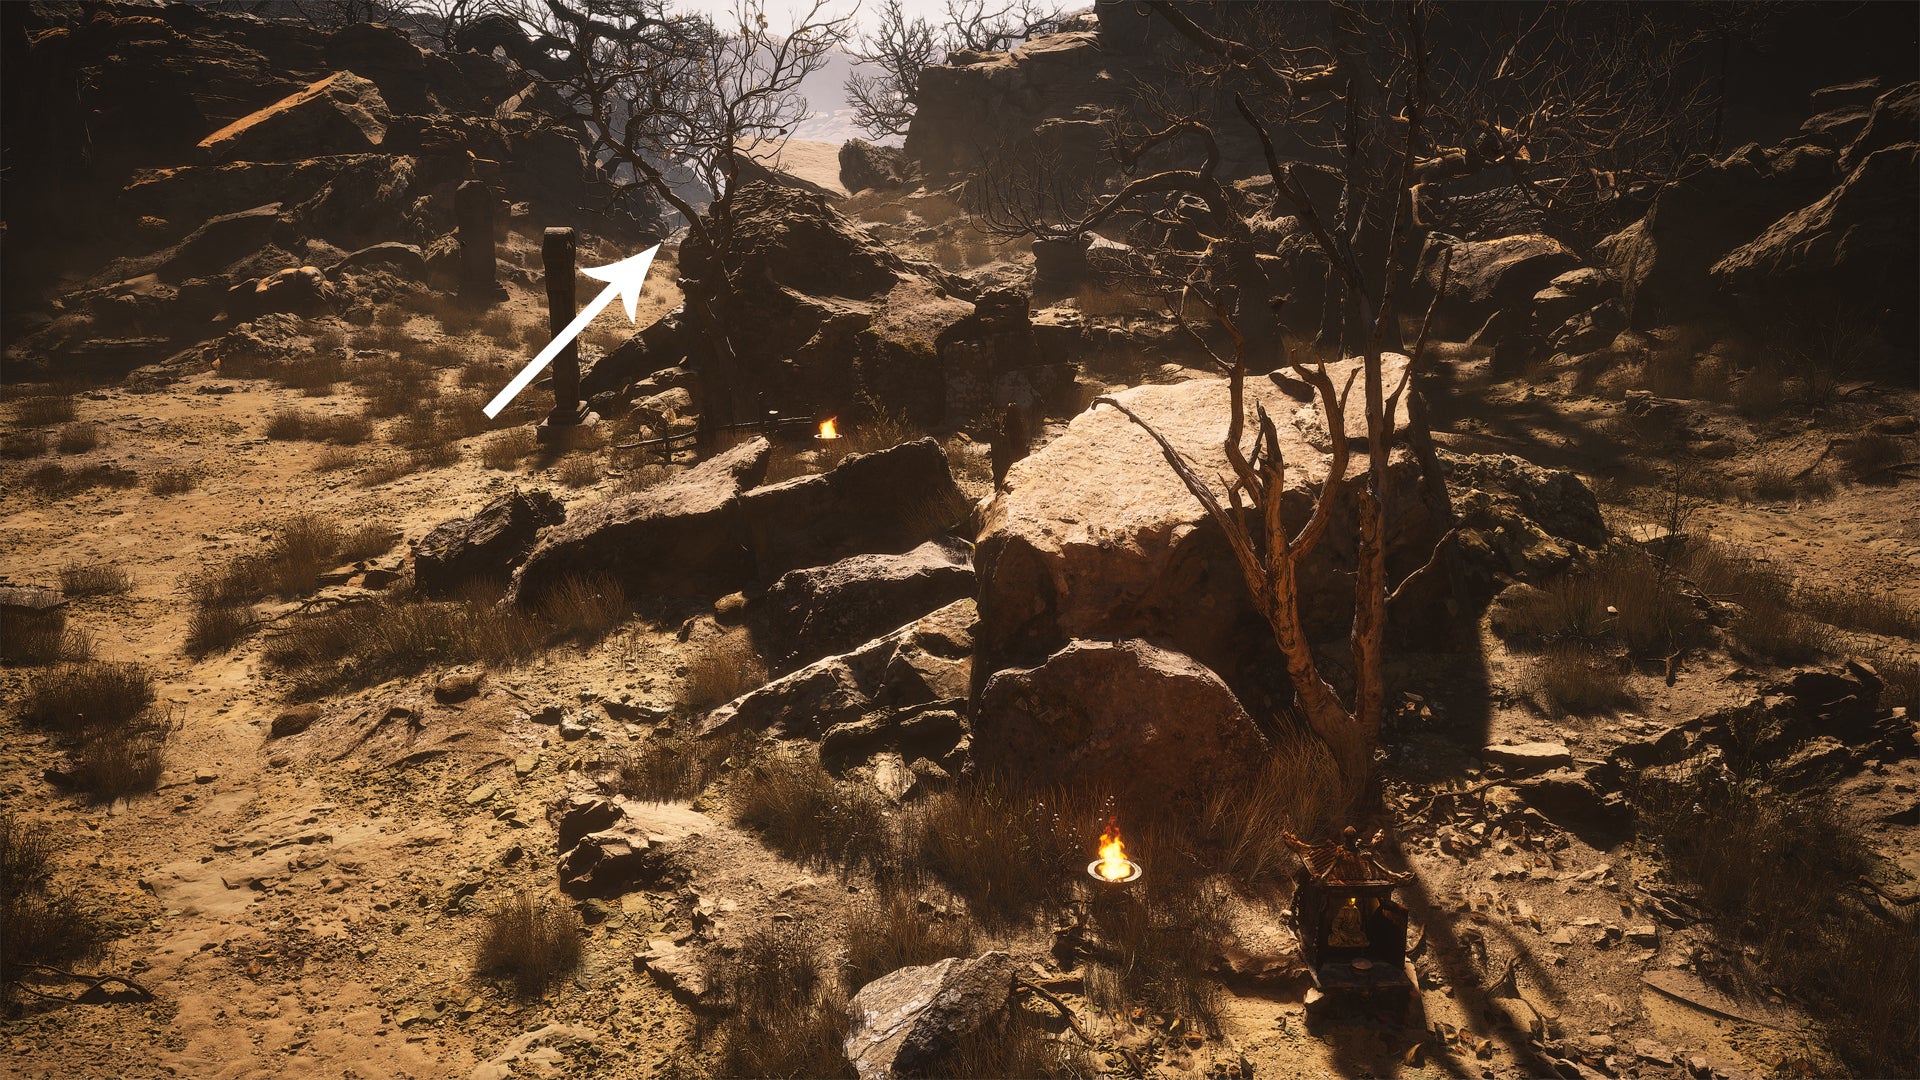
See the shrine at the bottom right? Walk around the rocks behind it and take the path into the valley. |Image credit:Rock Paper Shotgun/Game Science
The Sculpture, Crouching Tiger Temple
Head to the “Temple Entrance” Shrine at the Crouching Tiger Temple and enter the building. Just before you reach the top of the staircase, turn left to find the Meditation Spot.
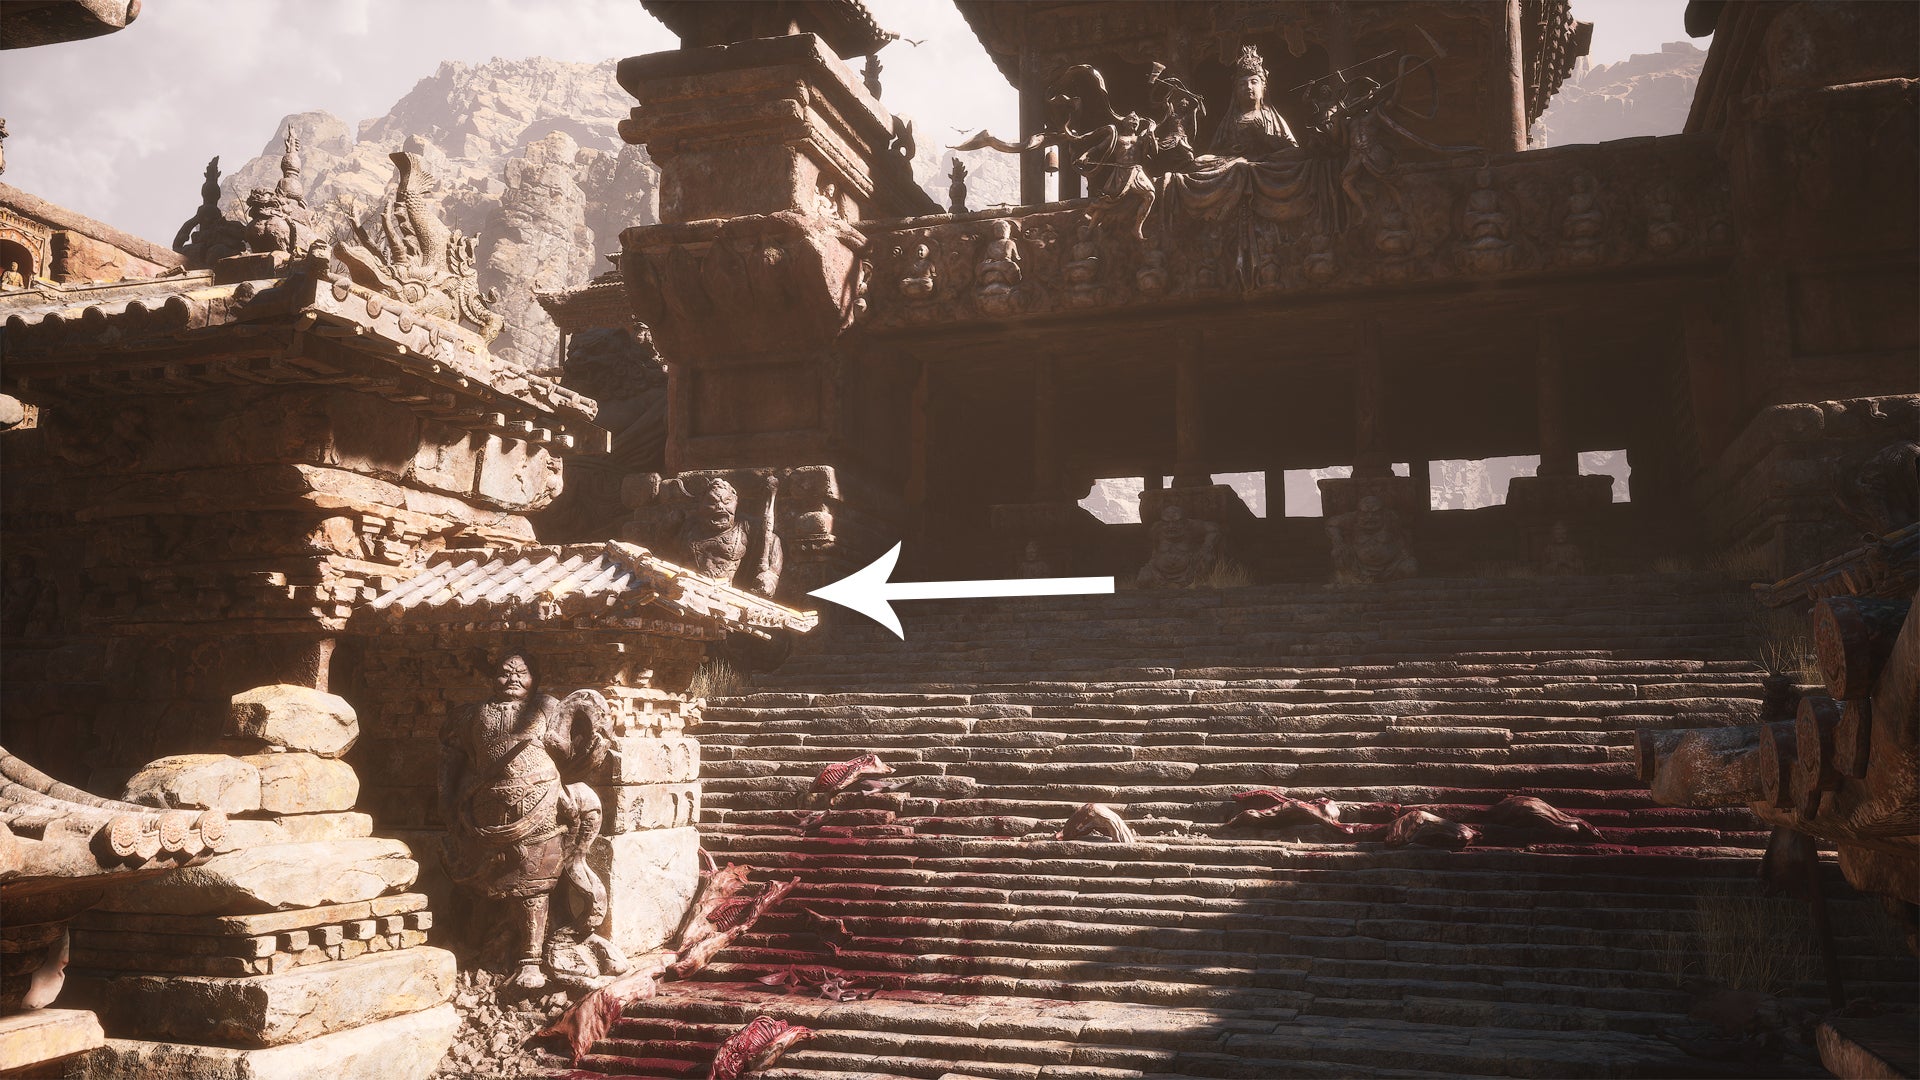
Take a left turn before you reach the highest part of the Crouching Tiger Temple. |Image credit:Rock Paper Shotgun/Game Science
The Grotto, Yellow Wind Formation
You can start from the “Cellar” Shrine below the Crouching Tiger Temple and walk down into the valley, or you can go to the “Windseal Gate” Shrine in Yellow Wind Formation and pass through the large gate behind the Shrine. Whichever you choose (it’s roughly the same distance), walk down the sandy road and take the path with the large shrine gate. The Meditation Spot is just a short walk ahead.
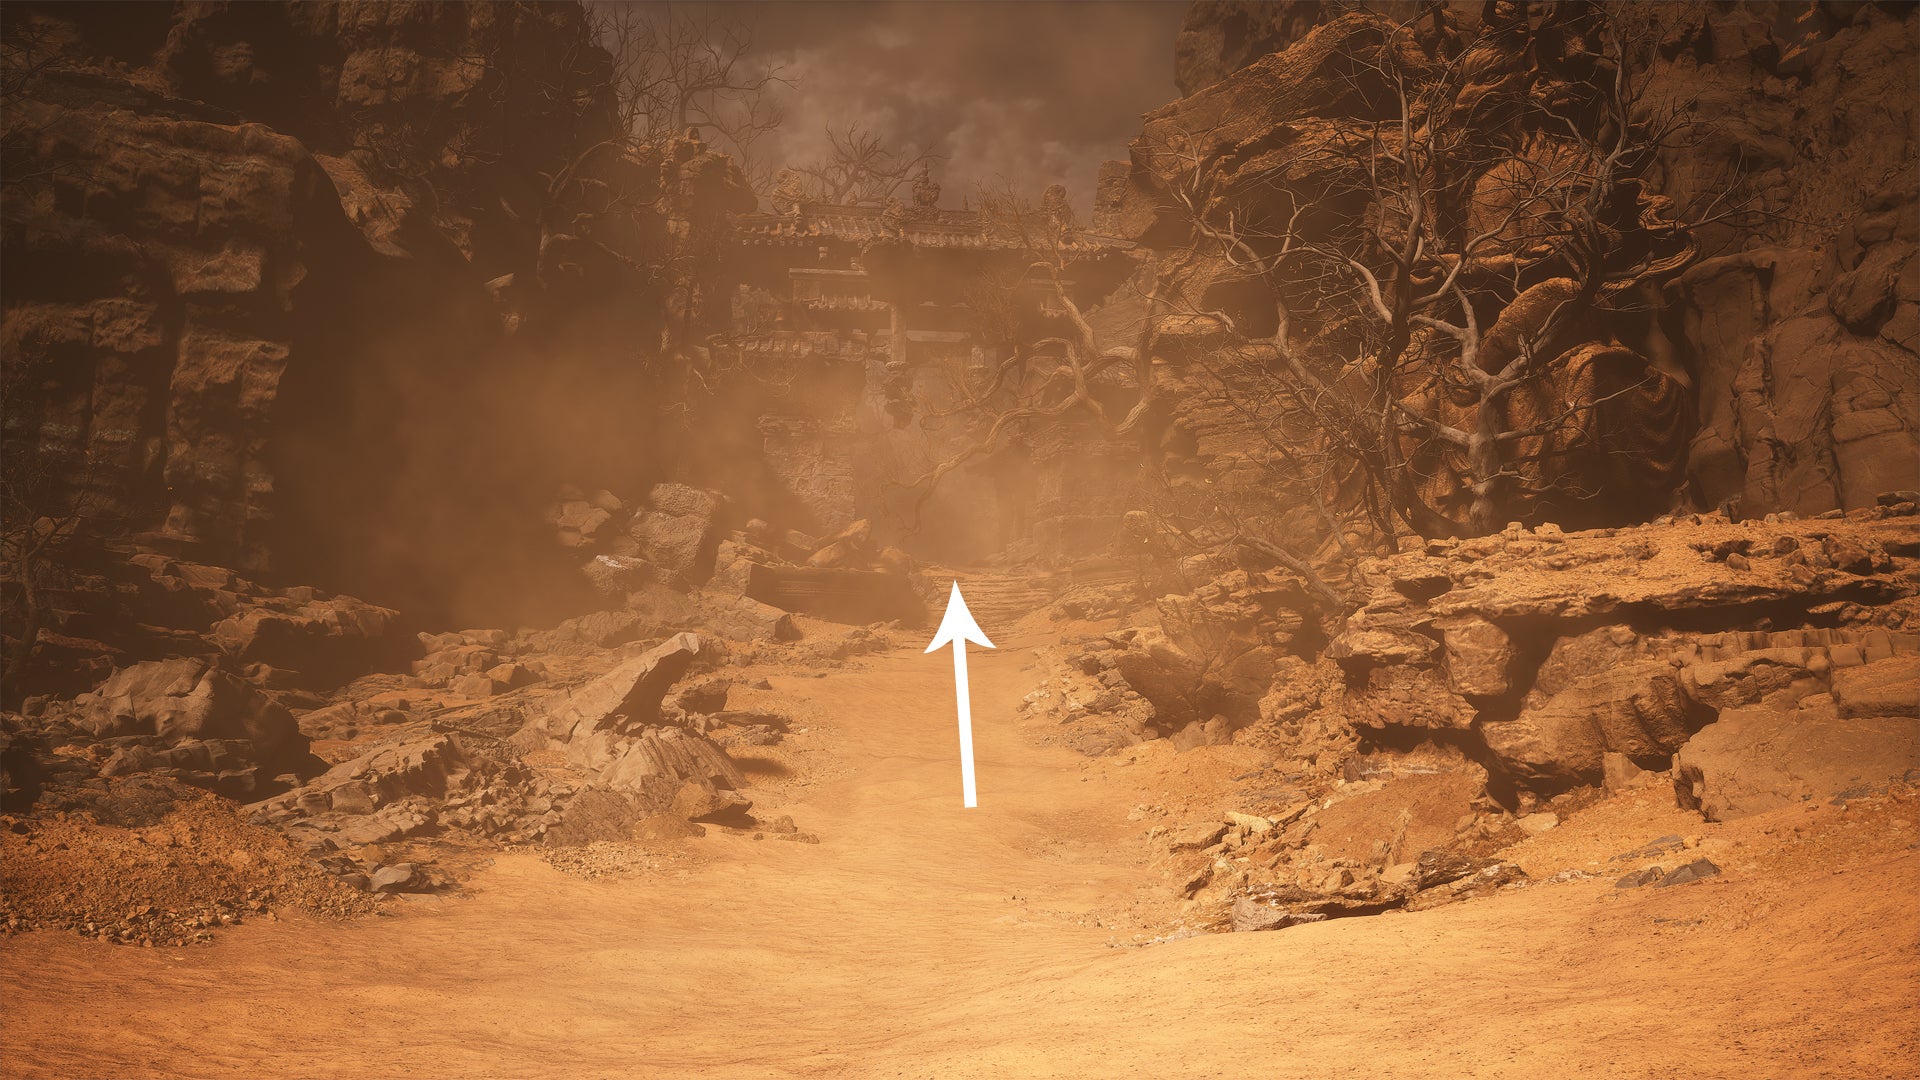
Pass through this shrine gate at the bottom of the valley. |Image credit:Rock Paper Shotgun/Game Science
The Rock, Sandgate Bound
This Meditation Spot is near the “Sandgate Bound” Shrine, which is located in a hidden region called the Kingdom of Sahali . If you haven’t unlocked it yet, you must seek out the drunken boar by Rockrest Flat and complete his sidequest. In short, give the boar a Sobering Stone at Rockrest Flat, obtain Jade Lotus and give it to the swine at the Crouching Tiger Temple, and defeat the First Prince of the Flowing Sands. Go back to Rockrest Flat and fight the boar, who bears the actual name of the Yellow-Robed Squire, then follow him into the Kingdom of Sahali.
From the Sandgate Bound Shrine, don’t descend into the valley but walk to the nearby rock formation, which is on the same level. Just keep the valley with the massive Buddha statue and pagoda on your right-hand side, and you’ll find the Meditation Spot a bit further ahead, on the edge of the cliff overlooking the valley.
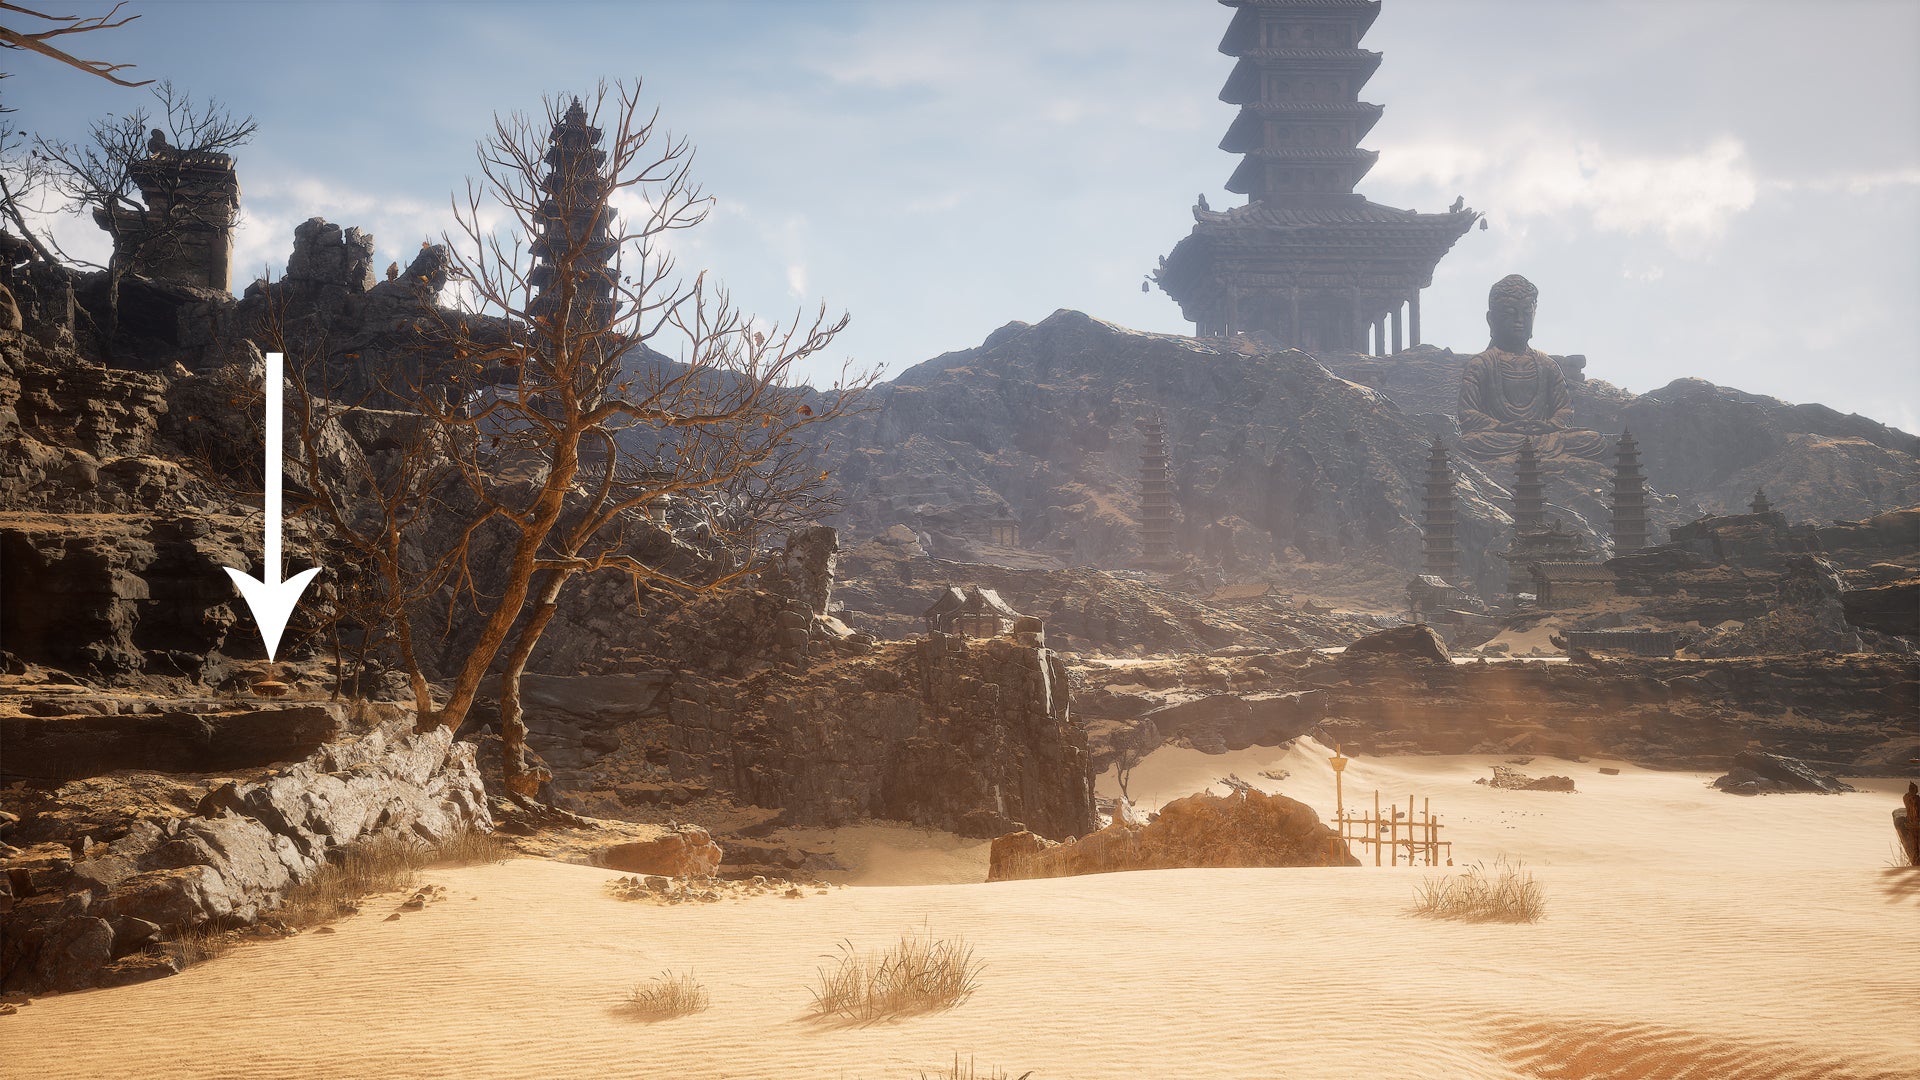
This Meditation Spot offers a great view of the hidden Kingdom of Sahali. |Image credit:Rock Paper Shotgun/Game Science
Meditation Spots in Chapter 3
There are five meditation spots in Chapter 3 of Black Myth Wukong, which means you can have a total of 14 extra Sparks by the end of this Chapter. Here’s where to find all meditation spots in The New West.
The Shade, Mirrormere
Start from the “Mirrormere” Shrine on the Snowhill Path and walk towards the lake. The Shade meditation spot is next to the large tree.

At the lake, left of the tree. |Image credit:Rock Paper Shotgun/Game Science
The Bottom, Pagoda Realm
From the “Outside the Wheel” Shrine in the Pagoda Realm, head upstairs into the dark cave (you might want to grab the Luojia Fragrant Vine here) and follow the snowy path for a while. When you see the offering table on your right, smash the bamboo fence behind it and follow the path to the petrified monks. The Bottom meditation spot is behind them.

Smash the fence to find this hidden meditation corner. |Image credit:Rock Paper Shotgun/Game Science
The Statue, Precept Corridor
This meditation spot is right next to the “Precept Corridor” Shrine in Bitter Lake. Just walk down the snowy path for a bit (instead of crossing the hanging bridge) and you’ll see the meditation spot on the left, in front of a large Buddha. While they shouldn’t give you much trouble, beware that the two petrified monks will attack you.

It’s very close to the Precept Corridor Shrine. |Image credit:Rock Paper Shotgun/Game Science
The Track, Mindfulness Cliff
Start from the “Mindfulness Cliff” Shrine in the Valley of Ecstasy and take the path upwards. Enter the small opening in the wall (instead of climbing to the higher area on your right) and follow the main path for a while. Just go straight ahead; past the monks, through the large cave with a Buddha on each side, and up the snowy stairs. When you see the square with the two laughing Buddhas, you’ve found the meditation spot: it’s behind them on the right.
Beware that you must fight the Non-White boss here if this is your first visit to this area!

Enter the cave and follow the path to the laughing Buddhas. |Image credit:Rock Paper Shotgun/Game Science
The Hall, New Thunderclap Temple
From the “Mahavira Hall” Shrine in the New Thunderclap Temple, go downstairs and enter the large building on your left. The meditation cushion is easy to spot in the middle of the room, but you must defeat the Non-Pure boss before you can use it.

The Non-Pure boss won’t let you meditate without a fight. |Image credit:Rock Paper Shotgun/Game Science
Meditation Spots in Chapter 4
Chapter 4 of Black Myth Wukong, the Webbed Hollow region, has a total of six meditation spots. If you find them all, you can have up to 20 extra Sparks by the end of this Chapter.
The Carvings, Pool of Shattered Jade
This meditation spot is conveniently located right next to the “Pool of Shattered Jade” Shrine. In case you haven’t found this Shrine yet; you must take the stairs behind the Upper Hollow Shrine, then drop down until you reach the area far below and follow the path for a while. Have a look at our Keeper’s Shrine location guide for more details.

It’s next to the Pool of Shattered Jade Shrine. |Image credit:Rock Paper Shotgun/Game Science
The Tree, Middle of the Hollow
You’ll find this meditation spot opposite the “Middle Hollow” Shrine. If you haven’t been there yet, follow the path behind The Verdure Bridge and walk past the houses. The Middle Hollow and its meditation spot are in a slightly greener corner illuminated by a few flames.

Look for the lights near the Middle Hollow Shrine. |Image credit:Rock Paper Shotgun/Game Science
Cave Depths, Lower Hollow
Starting from the “Lower Hollow” Shrine, pass through the cocoons and investigate the wall on your left. See the narrow opening with a dim light shining through? Go through there and walk upstairs to find the Cave Depths meditation spot.

Go through the gap. |Image credit:Rock Paper Shotgun/Game Science
The Height, Forest of Ferocity
Start from the “Forest of Ferocity” Shrine in the Temple of the Yellow Flowers area. Follow the path on the right side behind the Shrine for a short while (guarded by the green lizard-like enemy) and you’ll see the meditation spot on the edge of a cliff.

Take this path behind the Forest of Ferocity Shrine. |Image credit:Rock Paper Shotgun/Game Science
The Pines, Temple of Yellow Flowers
From the “Temple Entrance” Shrine at the Temple of Yellow Flowers, pass through the gate and go up the steep, narrow staircase. Inside the temple complex, enter the building on your right. You’ll find the meditation spot in the courtyard on the left side, just behind two yellow-robed enemies and a large tree.

Look behind the yellow-robed monks in the Temple of Yellow Flowers courtyard. |Image credit:Rock Paper Shotgun/Game Science
The Ledge, Purple Cloud Mountain
This meditation spot is found at the start of the Purple Cloud Mountain secret area. To reach this area, defeat the Venom Daoist boss at the Court of Illumination and interact with the painted wall after the fight has ended. From the first Shrine, “Valley of Blooms”, cross the bridge and turn right. There’s a large shrine gate with a green lizard-like enemy in front of you, but instead of passing through, walk up the hill to the left. You’ll find The Ledge meditation spot at the top.
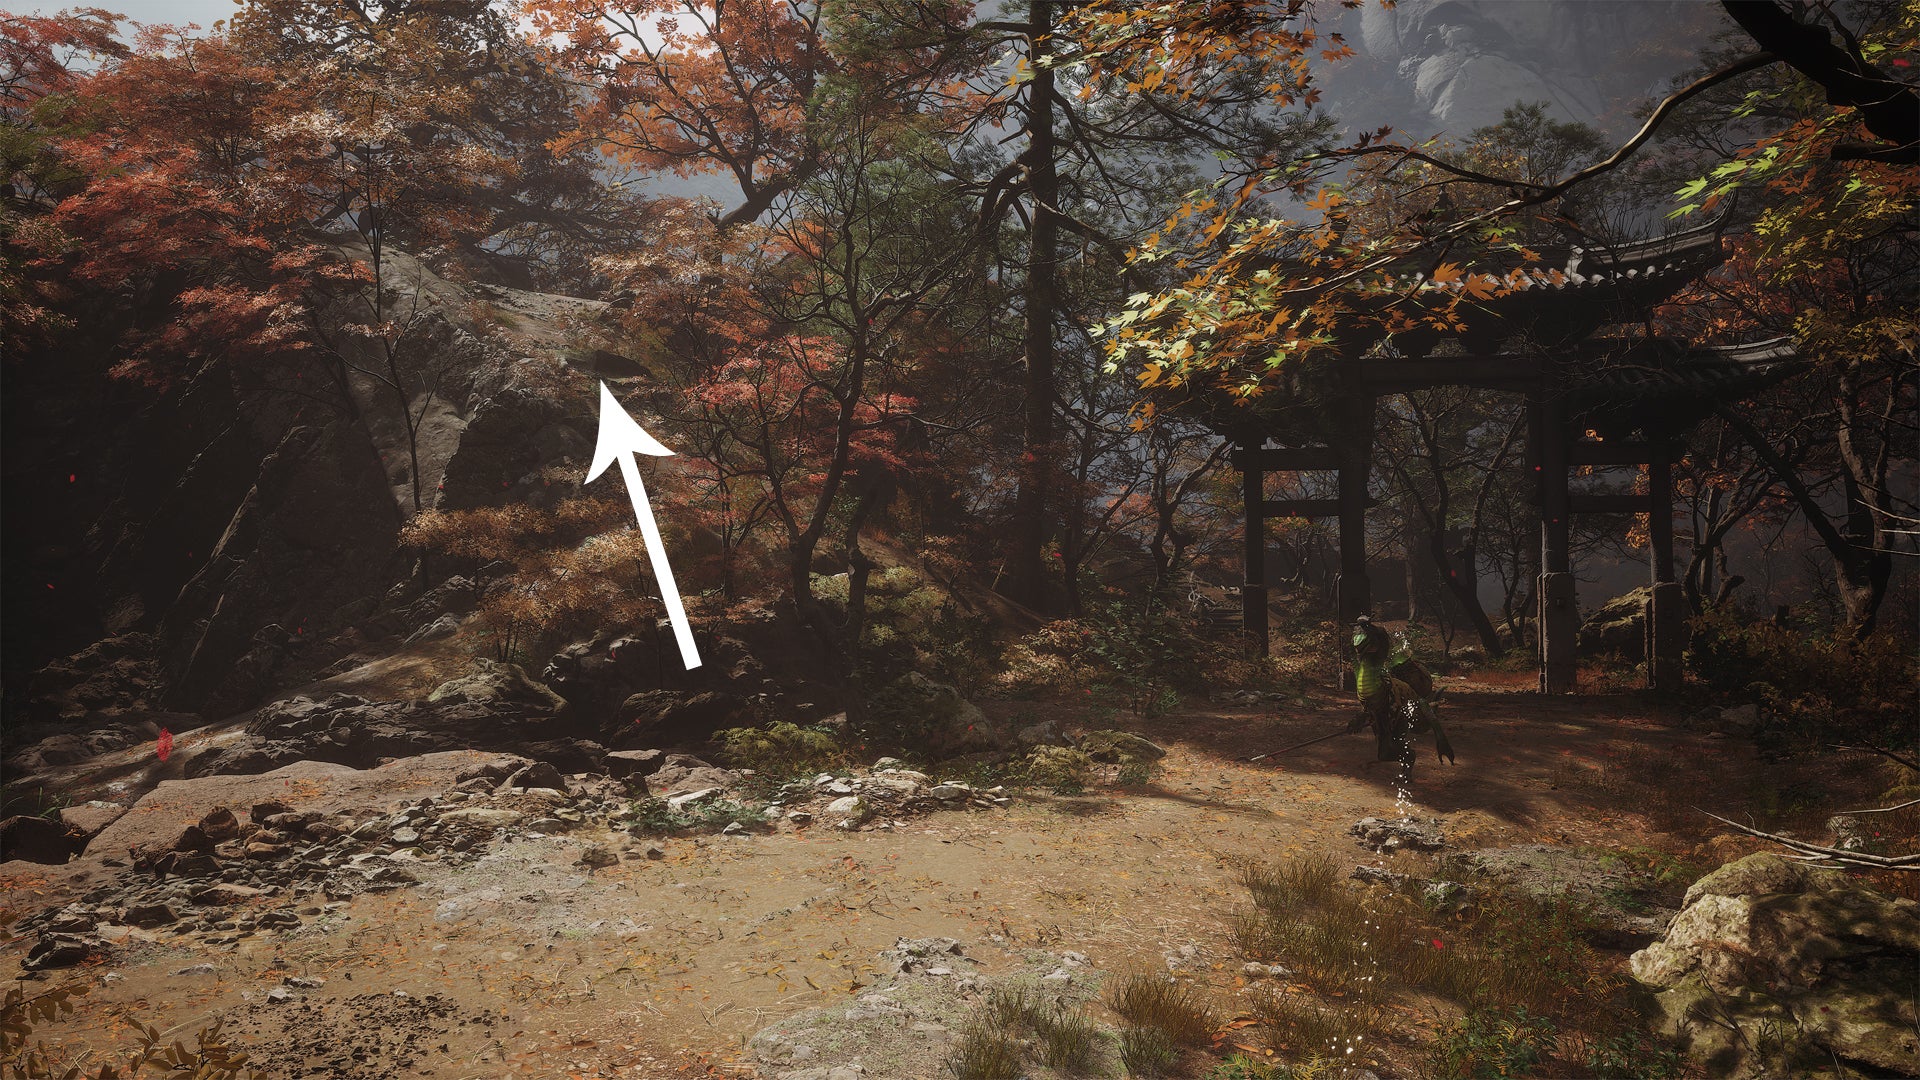
Climb to the top of the hill. |Image credit:Rock Paper Shotgun/Game Science
Meditation Spots in Chapter 5
There are four meditation spots in Black Myth Wukong’s Chapter 5. Once you’ve made your way through this ashen region and collected them all, including the meditation locations from previous Chapters, you’ll have a total of 24 extra Sparks.
The Relief, Camp of Seasons
From the “Camp of Seasons” Shrine (at the start of the Chapter, directly after the village with the warmongering enemies), cross the hanging bridge and follow the main path through the cave system and across a wooden bridge. Immediately after crossing this bridge, turn right and walk up the stairs; the meditation spot is at the top of the platform.
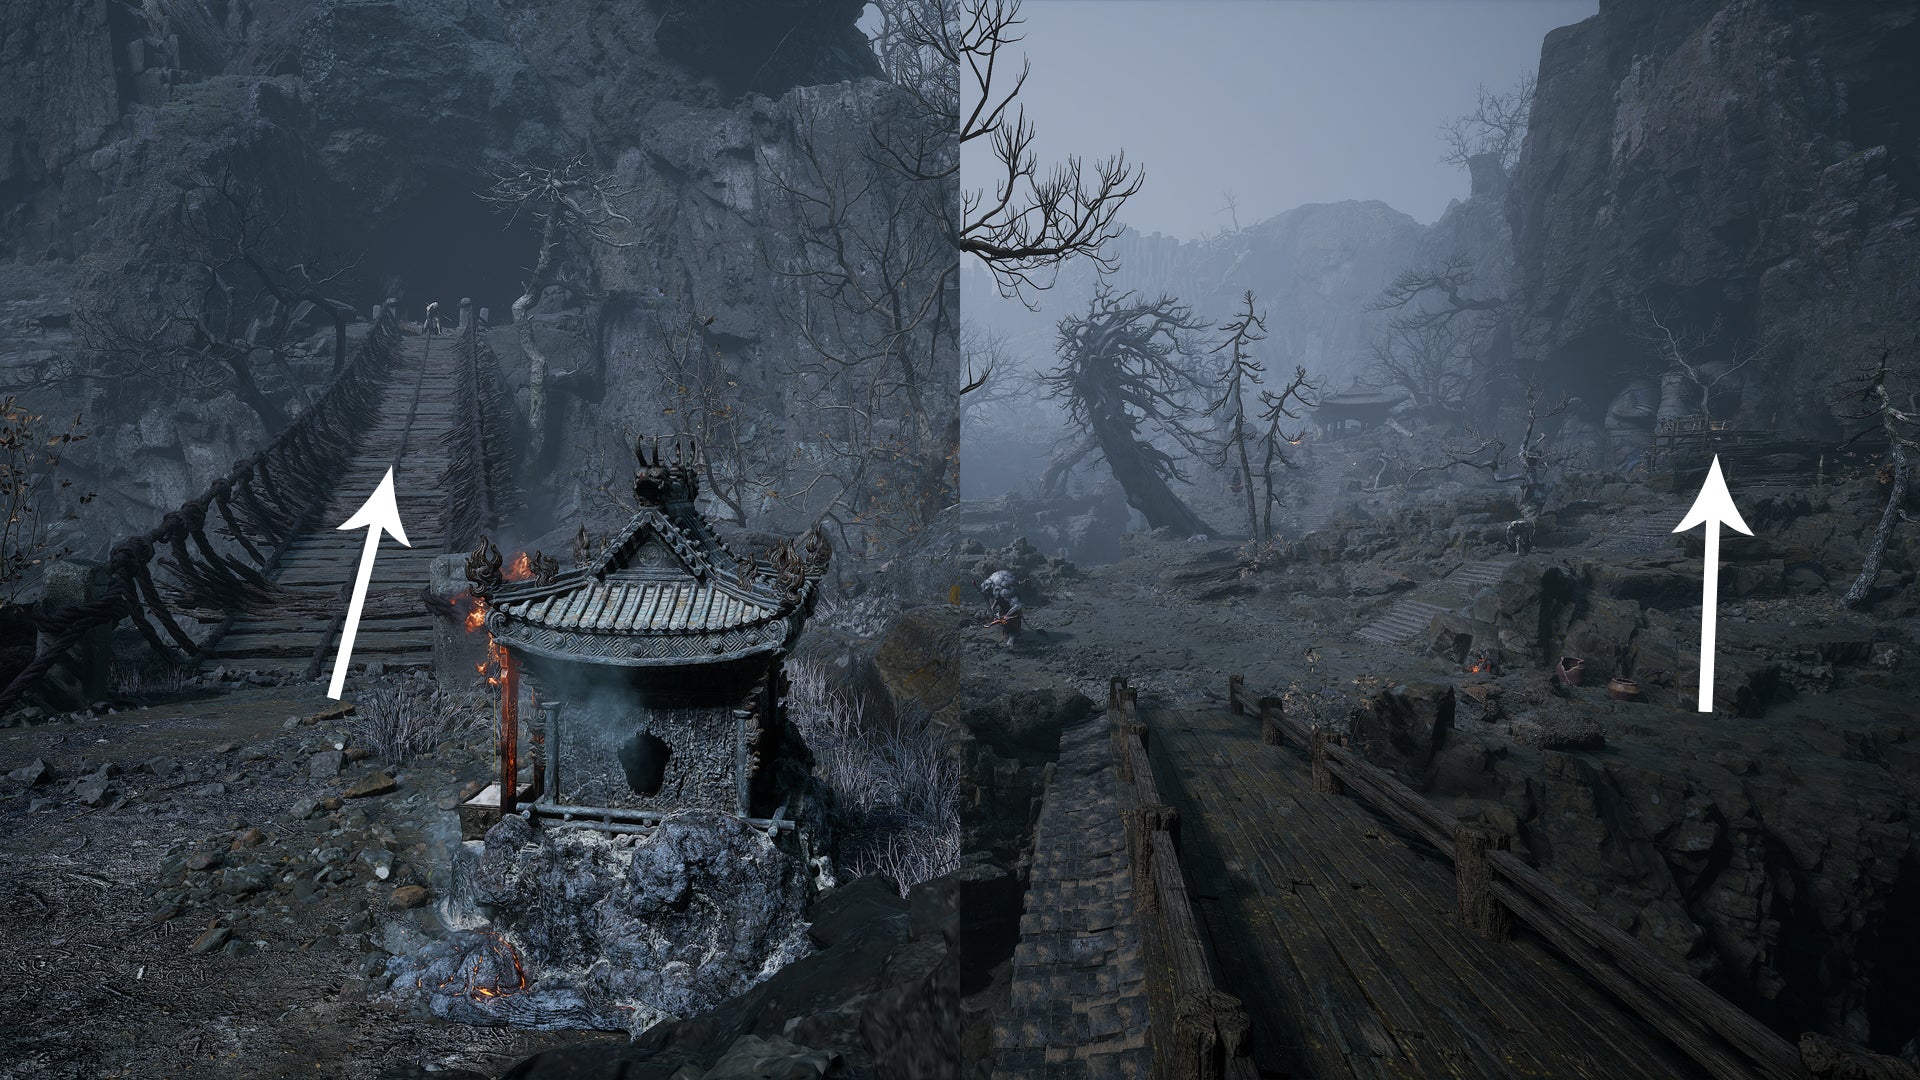
Cross both bridges to find the meditation spot. |Image credit:Rock Paper Shotgun/Game Science
The Buddha, The Emerald Hall
Start from “The Emerald Hall” Shrine in the Furnace Hall and walk up the stairs; the Keeper of Flaming Mountains boss arena will be on your right, but there’s another path on the left. Take the path on the left to find the meditation spot in front of a Buddha statue.

Take a walk on the left side of the Emerald Hall. |Image credit:Rock Paper Shotgun/Game Science
The Crag, Ashen Pass III
This meditation spot is right next to the " Ashen Pass III" Shrine in the Field of Fire. Facing the Shrine, turn right and walk around the rocks to find it.

It’s behind the pile of rubble. |Image credit:Rock Paper Shotgun/Game Science
The Screen, Purge Pit
This meditation spot is located in the secret Bishui Cave area. To unlock it, you must follow the “bull questline” which involves speaking to the bull NPC in the war-torn village (Camp of Seasons) and defeating the fire-breathing carts. After completing Chapter 5, return to Ashen Pass III and follow the path back until you find a new pathway on your left, which leads to the “Cooling Slope” Shrine and the Rusty-Gold Cart boss fight. After defeating this boss, the Bishui Cave will open.
Once you’ve found the first Shrine in Bishui Cave, “Purge Pit”, turn your back to the Shrine and take the path on your right, which leads to the meditation spot. You can already see it from the Shrine location.

You can see this meditation spot from the Purge Pit Shrine. |Image credit:Rock Paper Shotgun/Game Science
Chapter 6 Meditation Spots? Wondering why you can’t find any meditation spots in Chapter 6? That’s because there aren’t any. To make sure you’ve gathered as many extra Sparks as you can, open your Journal and check if you’ve found all 24 meditation spots hidden from Chapter 1 to Chapter 5.
That’s every Black Myth: Wukong Meditation Spot. Once you’ve found them all, you might want to check if you’ve found every boss in this expansive action RPG. If you’re looking for other ways to upgrade your Destined One, take a look at our guides on unlocking more curio slots and upgrading your armor .


Black Myth: Wukong
PS5 , PC
Rock Paper Shotgun is better when you sign in
Sign in and join us on our journey to discover strange and compelling PC games.

All 75 Arc Raiders Blueprints and where to get them
These areas have the highest chance of giving you Blueprints

Image credit:Rock Paper Shotgun/Embark Studios

Looking for more Arc Raiders Blueprints? It’s a special day when you find a Blueprint, as they’re among the most valuable items in Arc Raiders. If you find a Blueprint that you haven’t already found, then you must make sure you hold onto it at all costs, because Blueprints are the key to one of the most important and powerful systems of meta-progression in the game.
This guide aims to be the very best guide on Blueprints you can find, starting with a primer on what exactly they are and how they work in Arc Raiders, before delving into exactly where to get Blueprints and the very best farming spots for you to take in your search.
We’ll also go over how to get Blueprints from other unlikely activities, such as destroying Surveyors and completing specific quests. And you’ll also find the full list of all 75 Blueprints in Arc Raiders on this page (including the newest Blueprints added with the Cold Snap update , such as the Deadline Blueprint and Firework Box Blueprint), giving you all the information you need to expand your own crafting repertoire.
In this guide:
- What are Blueprints in Arc Raiders?
- Full Blueprint list: All crafting recipes
- Where to find Blueprints in Arc Raiders Blueprints obtained from quests Blueprints obtained from Trials Best Blueprint farming locations

What are Blueprints in Arc Raiders?
Blueprints in Arc Raiders are special items which, if you manage to extract with them, you can expend to permanently unlock a new crafting recipe in your Workshop. If you manage to extract from a raid with an Anvil Blueprint, for example, you can unlock the ability to craft your very own Anvil Pistol, as many times as you like (as long as you have the crafting materials).
To use a Blueprint, simply open your Inventory while in the lobby, then right-click on the Blueprint and click “Learn And Consume” . This will permanently unlock the recipe for that item in your Workshop. As of the Stella Montis update, there are allegedly 75 different Blueprints to unlock - although only 68 are confirmed to be in the game so far. You can see all the Blueprints you’ve found and unlocked by going to the Workshop menu, and hitting “R” to bring up the Blueprint screen.
It’s possible to find duplicates of past Blueprints you’ve already unlocked. If you find these, then you can either sell them, or - if you like to play with friends - you can take it into a match and gift it to your friend so they can unlock that recipe for themselves. Another option is to keep hold of them until the time comes to donate them to the Expedition.
Full Blueprint list: All crafting recipes
Below is the full list of all the Blueprints that are currently available to find in Arc Raiders, and the crafting recipe required for each item:
| Blueprint | Type | Recipe | Crafted At |
|---|---|---|---|
| Bettina | Weapon | 3x Advanced Mechanical Components 3x Heavy Gun Parts 3x Canister | Gunsmith 3 |
| Blue Light Stick | Quick Use | 3x Chemicals | Utility Station 1 |
| Aphelion | Weapon | 3x Magnetic Accelerator 3x Complex Gun Parts 1x Matriarch Reactor | Gunsmith 3 |
| Combat Mk. 3 (Flanking) | Augment | 2x Advanced Electrical Components 3x Processor | Gear Bench 3 |
| Combat Mk. 3 (Aggressive) | Augment | 2x Advanced Electrical Components 3x Processor | Gear Bench 3 |
| Complex Gun Parts | Material | 2x Light Gun Parts 2x Medium Gun Parts 2x Heavy Gun Parts | Refiner 3 |
| Fireworks Box | Quick Use | 1x Explosive Compound 3x Pop Trigger | Explosives Station 2 |
| Gas Mine | Mine | 4x Chemicals 2x Rubber Parts | Explosives Station 1 |
| Green Light Stick | Quick Use | 3x Chemicals | Utility Station 1 |
| Pulse Mine | Mine | 1x Crude Explosives 1x Wires | Explosives Station 1 |
| Seeker Grenade | Grenade | 1x Crude Explosives 2x ARC Alloy | Explosives Station 1 |
| Looting Mk. 3 (Survivor) | Augment | 2x Advanced Electrical Components 3x Processor | Gear Bench 3 |
| Angled Grip II | Mod | 2x Mechanical Components 3x Duct Tape | Gunsmith 2 |
| Angled Grip III | Mod | 2x Mod Components 5x Duct Tape | Gunsmith 3 |
| Hullcracker | Weapon | 1x Magnetic Accelerator 3x Heavy Gun Parts 1x Exodus Modules | Gunsmith 3 |
| Launcher Ammo | Ammo | 5x Metal Parts 1x Crude Explosives | Workbench 1 |
| Anvil | Weapon | 5x Mechanical Components 5x Simple Gun Parts | Gunsmith 2 |
| Anvil Splitter | Mod | 2x Mod Components 3x Processor | Gunsmith 3 |
| ??? | ??? | ??? | ??? |
| Barricade Kit | Quick Use | 1x Mechanical Components | Utility Station 2 |
| Blaze Grenade | Grenade | 1x Explosive Compound 2x Oil | Explosives Station 3 |
| Bobcat | Weapon | 3x Advanced Mechanical Components 3x Light Gun Parts | Gunsmith 3 |
| Osprey | Weapon | 2x Advanced Mechanical Components 3x Medium Gun Parts 7x Wires | Gunsmith 3 |
| Burletta | Weapon | 3x Mechanical Components 3x Simple Gun Parts | Gunsmith 1 |
| Compensator II | Mod | 2x Mechanical Components 4x Wires | Gunsmith 2 |
| Compensator III | Mod | 2x Mod Components 8x Wires | Gunsmith 3 |
| Defibrillator | Quick Use | 9x Plastic Parts 1x Moss | Medical Lab 2 |
| ??? | ??? | ??? | ??? |
| Equalizer | Weapon | 3x Magnetic Accelerator 3x Complex Gun Parts 1x Queen Reactor | Gunsmith 3 |
| Extended Barrel | Mod | 2x Mod Components 8x Wires | Gunsmith 3 |
| Extended Light Mag II | Mod | 2x Mechanical Components 3x Steel Spring | Gunsmith 2 |
| Extended Light Mag III | Mod | 2x Mod Components 5x Steel Spring | Gunsmith 3 |
| Extended Medium Mag II | Mod | 2x Mechanical Components 3x Steel Spring | Gunsmith 2 |
| Extended Medium Mag III | Mod | 2x Mod Components 5x Steel Spring | Gunsmith 3 |
| Extended Shotgun Mag II | Mod | 2x Mechanical Components 3x Steel Spring | Gunsmith 2 |
| Extended Shotgun Mag III | Mod | 2x Mod Components 5x Steel Spring | Gunsmith 3 |
| Remote Raider Flare | Quick Use | 2x Chemicals 4x Rubber Parts | Utility Station 1 |
| Heavy Gun Parts | Material | 4x Simple Gun Parts | Refiner 2 |
| Venator | Weapon | 2x Advanced Mechanical Components 3x Medium Gun Parts 5x Magnet | Gunsmith 3 |
| Il Toro | Weapon | 5x Mechanical Components 6x Simple Gun Parts | Gunsmith 1 |
| Jolt Mine | Mine | 1x Electrical Components 1x Battery | Explosives Station 2 |
| Explosive Mine | Mine | 1x Explosive Compound 1x Sensors | Explosives Station 3 |
| Jupiter | Weapon | 3x Magnetic Accelerator 3x Complex Gun Parts 1x Queen Reactor | Gunsmith 3 |
| Light Gun Parts | Material | 4x Simple Gun Parts | Refiner 2 |
| Lightweight Stock | Mod | 2x Mod Components 5x Duct Tape | Gunsmith 3 |
| Lure Grenade | Grenade | 1x Speaker Component 1x Electrical Components | Utility Station 2 |
| Medium Gun Parts | Material | 4x Simple Gun Parts | Refiner 2 |
| Torrente | Weapon | 2x Advanced Mechanical Components 3x Medium Gun Parts 6x Steel Spring | Gunsmith 3 |
| Muzzle Brake II | Mod | 2x Mechanical Components 4x Wires | Gunsmith 2 |
| Muzzle Brake III | Mod | 2x Mod Components 8x Wires | Gunsmith 3 |
| Padded Stock | Mod | 2x Mod Components 5x Duct Tape | Gunsmith 3 |
| Shotgun Choke II | Mod | 2x Mechanical Components 4x Wires | Gunsmith 2 |
| Shotgun Choke III | Mod | 2x Mod Components 8x Wires | Gunsmith 3 |
| Shotgun Silencer | Mod | 2x Mod Components 8x Wires | Gunsmith 3 |
| Showstopper | Grenade | 1x Advanced Electrical Components 1x Voltage Converter | Explosives Station 3 |
| Silencer I | Mod | 2x Mechanical Components 4x Wires | Gunsmith 2 |
| Silencer II | Mod | 2x Mod Components 8x Wires | Gunsmith 3 |
| Snap Hook | Quick Use | 2x Power Rod 3x Rope 1x Exodus Modules | Utility Station 3 |
| Stable Stock II | Mod | 2x Mechanical Components 3x Duct Tape | Gunsmith 2 |
| Stable Stock III | Mod | 2x Mod Components 5x Duct Tape | Gunsmith 3 |
| Tagging Grenade | Grenade | 1x Electrical Components 1x Sensors | Utility Station 3 |
| Tempest | Weapon | 3x Advanced Mechanical Components 3x Medium Gun Parts 3x Canister | Gunsmith 3 |
| Trigger Nade | Grenade | 2x Crude Explosives 1x Processor | Explosives Station 2 |
| Vertical Grip II | Mod | 2x Mechanical Components 3x Duct Tape | Gunsmith 2 |
| Vertical Grip III | Mod | 2x Mod Components 5x Duct Tape | Gunsmith 3 |
| Vita Shot | Quick Use | 2x Antiseptic 1x Syringe | Medical Lab 3 |
| Vita Spray | Quick Use | 3x Antiseptic 1x Canister | Medical Lab 3 |
| Vulcano | Weapon | 1x Magnetic Accelerator 3x Heavy Gun Parts 1x Exodus Modules | Gunsmith 3 |
| Wolfpack | Grenade | 2x Explosive Compound 2x Sensors | Explosives Station 3 |
| Red Light Stick | Quick Use | 3x Chemicals | Utility Station 1 |
| Smoke Grenade | Grenade | 14x Chemicals 1x Canister | Utility Station 2 |
| Deadline | Mine | 3x Explosive Compound 2x ARC Circuitry | Explosives Station 3 |
| Trailblazer | Grenade | 1x Explosive Compound 1x Synthesized Fuel | Explosives Station 3 |
| Tactical Mk. 3 (Defensive) | Augment | 2x Advanced Electrical Components 3x Processor | Gear Bench 3 |
| Tactical Mk. 3 (Healing) | Augment | 2x Advanced Electrical Components 3x Processor | Gear Bench 3 |
| Yellow Light Stick | Quick Use | 3x Chemicals | Utility Station 1 |
Note: The missing Blueprints in this list likely have not actually been added to the game at the time of writing, because none of the playerbase has managed to find any of them. As they are added to the game, I will update this page with the most relevant information so you know exactly how to get all 75 Arc Raiders Blueprints.
Where to find Blueprints in Arc Raiders
Below is a list of all containers, modifiers, and events which maximise your chances of finding Blueprints:
- Certain quests reward you with specific Blueprints .
- Completing Trials has a high chance of offering Blueprints as rewards.
- Surveyors have a decent chance of dropping Blueprints on death.
- High loot value areas tend to have a greater chance of spawning Blueprints.
- Night Raids and Storms may increase rare Blueprint spawn chances in containers.
- Containers with higher numbers of items may have a higher tendency to spawn Blueprints. As a result, Blue Gate (which has many “large” containers containing multiple items) may give you a higher chance of spawning Blueprints.
- Raider containers (Raider Caches, Weapon Boxes, Medical Bags, Grenade Tubes) have increased Blueprint drop rates. As a result, the Uncovered Caches event gives you a high chance of finding Blueprints.
- Security Lockers have a higher than average chance of containing Blueprints.
- Certain Blueprints only seem to spawn under specific circumstances: Tempest Blueprint only spawns during Night Raid events. Vulcano Blueprint only spawns during Hidden Bunker events. Jupiter and Equaliser Blueprints only spawn during Harvester events.

Raider Caches, Weapon Boxes, and other raider-oriented container types have a good chance of offering Blueprints. |Image credit:Rock Paper Shotgun/Embark Studios
Blueprints have a very low chance of spawning in any container in Arc Raiders, around 1-2% on average. However, there is a higher chance of finding Blueprints in particular container types. Specifically, you can find more Blueprints in Raider containers and security lockers.
Beyond this, if you’re looking for Blueprints you should focus on regions of the map which are marked as having particularly high-value loot. Areas such as the Control Tower in Dam Battlegrounds, the Arrival and Departure Buildings in Spaceport, and Pilgrim’s Peak in Blue Gate all have a better-than-average chance of spawning Blueprints somewhere amongst all their containers. Night Raids and Electromagnetic Storm events also increase the drop chances of certain Blueprints .
In addition to these containers, you can often loot Blueprints from destroyed Surveyors - the largest of the rolling ball ARC. Surveyors are more commonly found on the later maps - Spaceport and Blue Gate - and if one spawns in your match, you’ll likely see it by the blue laser beam that it casts into the sky while “surveying”.
Surveyors are quite well-armoured and will very speedily run away from you once it notices you, but if you can take one down then make sure you loot all its parts for a chance of obtaining certain unusual Blueprints.
Blueprints obtained from quests
One way in which you can get Blueprints is by completing certain quests for the vendors in Speranza. Some quests will reward you with a specific item Blueprint upon completion, so as long as you work through all the quests in Arc Raiders, you are guaranteed those Blueprints.
Here is the full list of all Blueprints you can get from quest rewards:
- Trigger Nade Blueprint: Rewarded after completing “Sparks Fly”.
- Lure Grenade Blueprint: Rewarded after completing “Greasing Her Palms”.
- Burletta Blueprint: Rewarded after completing “Industrial Espionage”.
- Hullcracker Blueprint (and Launcher Ammo Blueprint): Rewarded after completing “The Major’s Footlocker”.
Alas, that’s only 4 Blueprints out of a total of 75 to unlock, so for the vast majority you will need to find them yourself during a raid. If you’re intent on farming Blueprints, then it’s best to equip yourself with cheap gear in case you lose it, but don’t use a free loadout because then you won’t get a safe pocket to stash any new Blueprint you find. No pain in Arc Raiders is sharper than failing to extract with a new Blueprint you’ve been after for a dozen hours already.

One of the best ways to get Blueprints is by hitting three stars on all five Trials every week. |Image credit:Rock Paper Shotgun/Embark Studios
Blueprints obtained from Trials
One of the very best ways to get Blueprints is as rewards for completing Trials in Arc Raiders. Trials are unlocked from Level 15 onwards, and allow you to earn rewards by focusing on certain tasks over the course of several raids. For example, one Trial might task you with dealing damage to Hornets, while another might challenge you to loot Supply Drops.
Trials refresh on a weekly basis, with a new week bringing five new Trials. Each Trial can offer up to three rewards after passing certain score milestones, and it’s possible to receive very high level loot from these reward crates - including Blueprints. So if you want to unlock as many Blueprints as possible, you should make a point of completing as many Trials as possible each week.
Best Blueprint farming locations
The very best way to get Blueprints is to frequent specific areas of the maps which combine high-tier loot pools with the right types of containers to search. Here are my recommendations for where to find Blueprints on every map, so you can always keep the search going for new crafting recipes to unlock.

Image credit:Rock Paper Shotgun/Embark Studios
Dam Battlegrounds
The best places to farm Blueprints on Dam Battlegrounds are the Control Tower, Power Generation Complex, Ruby Residence, and Pale Apartments . The first two regions, despite only being marked on the map as mid-tier loot, contain a phenomenal number of containers to loot. The Control Tower can also contain a couple of high-tier Security Lockers - though of course, you’ll need to have unlocked the Security Breach skill at the end of the Survival tree.
There’s also a lot of reporting amongst the playerbase that the Residential areas in the top-left of the map - Pale Apartments and Ruby Residence - give you a comparatively strong chance of finding Blueprints. Considering their size, there’s a high density of containers to loot in both locations, and they also have the benefit of being fairly out of the way. So you’re more likely to have all the containers to yourself.
Buried City
The best Blueprint farming locations on Buried City are the Santa Maria Houses, Grandioso Apartments, Town Hall, and the various buildings of the New District . Grandioso Apartments has a lower number of containers than the rest, but a high chance of spawning weapon cases - which have good Blueprint drop rates. The others are high-tier loot areas, with plenty of lootable containers - including Security Lockers.
Spaceport
The best places to find Blueprints on Spaceport are the Arrival and Departure Buildings, as well as Control Tower A6 and the Launch Towers . All these areas are labelled as high-value loot regions, and many of them are also very handily connected to one another by the Spaceport wall, which you can use to quickly run from one area to the next. At the tops of most of these buildings you’ll find at least one Security Locker, so this is an excellent farming route for players looking to find Blueprints.
The downside to looting Blueprints on Spaceport is that all these areas are hotly contested, particularly in Duos and Squads. You’ll need to be very focused and fast in order to complete the full farming route.

Image credit:Rock Paper Shotgun/Embark Studios
Blue Gate
Blue Gate tends to have a good chance of dropping Blueprints, potentially because it generally has a high number of containers which can hold lots of items; so there’s a higher chance of a Blueprint spawning in each container. In my experience, the best Blueprint farming spots on Blue Gate are Pilgrim’s Peak, Raider’s Refuge, the Ancient Fort, and the Underground Complex beneath the Warehouse .
All of these areas contain a wealth of containers to loot. Raider’s Refuge has less to loot, but the majority of the containers in and around the Refuge are raider containers, which have a high chance of containing Blueprints - particularly during major events.
Stella Montis
On the whole, Stella Montis seems to have a very low drop rate for Blueprints (though a high chance of dropping other high-tier loot). If you do want to try farming Blueprints on this map, the best places to find Blueprints in Stella Montis are Medical Research, Assembly Workshop, and the Business Center . These areas have the highest density of containers to loot on the map.
In addition to this, the Western Tunnel has a few different Security Lockers to loot, so while there’s very little to loot elsewhere in this area of the map, it’s worth hitting those Security Lockers if you spawn there at the start of a match.
That wraps up this primer on how to get all the Blueprints in Arc Raiders as quickly as possible. With the Expedition system constantly resetting a large number of players’ Blueprints, it’s more important than ever to have the most up-to-date information on where to find all these Blueprints.
While you’re here, be sure to check out our Arc Raiders best guns tier list , as well as our primers on the best skills to unlock and all the different Field Depot locations on every map.


ARC Raiders
PS5 , Xbox Series X/S , PC
Rock Paper Shotgun is better when you sign in
Sign in and join us on our journey to discover strange and compelling PC games.
