All 48 Hollow Knight Silksong bosses in order
Find and beat all of Hollow Knight Silksong’s bosses with this guide

Image credit:Rock Paper Shotgun/Team Cherry

Looking for a full list of all of Hollow Knight: Silksong’s bosses in order? Hornet’s quest in Hollow Knight: Silksong will see her face a whole mess of insectoid beasties in a kingdom ruled by silk and song, and many of these bosses are just as challenging as their forebears in the original Hollow Knight. Vanquishing these bosses is also only part of the challenge in this tricky Metroidvania sequel - you’ll have to find several of them first in the huge world of Pharloom.
This guide provides a full list of all Hollow Knight: Silksong mandatory and optional bosses , giving you a quick rundown of the order to fight them, their locations, and how to pierce them with the fury of Hornet’s Nail.

All Hollow Knight Silksong bosses
The table below lists all 48 Hollow Knight: Silksong bosses in order. Click the name of the boss to read a strategy on how to beat them, as well as how to reach their location. We’ve also detailed in the table whether each boss is mandatory or optional.
| Order | Boss Name | Location | Act | Type |
|---|---|---|---|---|
| 1 | Moss Mother | Moss Grotto: In the Ruined Chapel at the top of Moss Grotto. | Act 1 | Required |
| 2 | Bell Beast | The Marrow: In the Marrow Bellway, free with Silk Spear. | Act 1 | Optional |
| 3 | Lace | Deep Docks: On the path from Deep Docks to Far Fields. | Act 1 | Optional |
| 4 | Fourth Chorus | Far Fields: In the lava arena after getting Drifter’s Cloak. | Act 1 | Required |
| 5 | Savage Beastfly | Hunter’s March: At the end of the Chapel Of The Beast. | Act 1 | Optional |
| 6 | Sister Splinter | Shellwood: Near the very top of Shellwood. | Act 1 | Required |
| 7 | Skull Tyrant (1/2) | The Marrow: In secret area only accessible with Cling Grip. | Act 1 | Optional |
| 8 | Skull Tyrant (2/2) | Bone Bottom: Attacks Bone Bottom after defeating Skull Tyrant (1/2). | Act 1 | Optional |
| 9 | Moorwing | Greymoor: East of Bellhart (Act 1), or outside Bellway (Act 2)¹. | Act 1 | Optional |
| 10 | Widow | Bellhart: Above Bellhart, accessible via Shellwood top path. | Act 1 | Required |
| 11 | Moss Mother Duo | Weavenest Atla: Far west edge of Weavenest Atla. | Act 1 | Optional |
| 12 | Savage Beastfly 2 | Far Fields: Fourth Chorus arena, part of Grand Hunt quest in Bellhart. | Act 1 | Optional |
| 13 | Great Conchflies | Blasted Steps: On the western path below the Bellway. | Act 1 | Optional |
| 14 | Last Judge | Blasted Steps: Top-right of Blasted Steps, by the Grand Gate. | Act 1 | Required |
| 15 | Phantom | Exhaust Organ: Top of the Exhaust Organ, accessible after The Mist. | Act 1 | Required |
| 16 | Cogwork Dancers | Cogwork Core: In the arena separating east from west Choral Chambers. | Act 2 | Required |
| 17 | Trobbio | Whispering Vaults: On The Stage in southwest Whispering Vaults. | Act 2 | Optional |
| 18 | Garmond And Zaza | Songclave: Accessible via Whispering Vaults after multiple meetings. | Act 2 | Optional |
| 19 | Forebrothers Signis and Gron | Deep Docks: South Deep Docks, only accessible with Clawline. | Act 2 | Required² |
| 20 | The Unravelled | Whiteward: Bottom of Whiteward, requires Surgeon’s Key (and Clawline). | Act 2 | Optional |
| 21 | Disgraced Chef Lugoli | Sinner’s Road: Use Faydown Cloak at end of Sinner’s Road’s bottom path. | Act 2 | Optional |
| 22 | Father Of The Flame | Wisp Thicket: Far west of Wisp Thicket (needs Faydown Cloak). | Act 2 | Optional |
| 23 | Groal The Great | Bilewater: Outside Bilehaven at the top of Bilewater. | Act 2 | Optional |
| 24 | Voltvyrm | Sands Of Karak: Inside Voltnest at the top of Sands Of Karak. | Act 2 | Optional |
| 25 | Raging Conchfly | Sands Of Karak: Outside Coral Tower, top-left of Sands Of Karak. | Act 2 | Optional |
| 26 | First Sinner | The Slab: Beyond the bottom-most Heretic door. | Act 2 | Optional |
| 27 | Broodmother | The Slab: Top-left of The Slab, part of Grand Hunt quest in Songclave. | Act 2 | Optional |
| 28 | Second Sentinel | High Halls: Part of Final Audience Wish in Songclave, after activating Second Sentinel with all three Cogheart Pieces. | Act 2 | Optional |
| 29 | Shakra | Greymoor: Ring bell east of Bellhart after completing Shakra’s Wish. | Act 2 | Optional |
| 30 | Lace 2 | The Cradle: Automatically starts the moment you reach The Cradle. | Act 2 | Required |
| 31 | Grand Mother Silk | The Cradle: Can be challenged at the top of The Cradle. | Act 2 | Required |
| 32 | Bell Eater | Choral Chambers: Found in the Grand Bellway after trying to summon the Bell Beast. | Act 3 | Optional |
| 33 | Moss Mother Miniboss | Moss Grotto: Near the bottom of Moss Grotto. | Act 3 | Optional |
| 34 | Lost Garmond | Blasted Steps: Where Lumble The Lucky was, part of Hero’s Call Wish. | Act 3 | Optional |
| 35 | Crawfather | Greymoor: Unlock the Craw Door using Craw Summons in Craw Lake. Craw! | Act 3 | Optional |
| 36 | Plasmified Zango | Wormways: Lower left-most room in Wormways, through a breakable wall. | Act 3 | Optional |
| 37 | Watcher At The Edge | Sands Of Karak: Above the Sands Of Karak entrance (requires Silk Soar). | Act 3 | Optional |
| 38 | Palestag | Verdania: Near top of Lost Verdania (requires Elegy Of The Deep). | Act 3 | Optional |
| 39 | Clover Dancers | Verdania: Near top of Lost Verdania (requires Elegy Of The Deep). | Act 3 | Optional |
| 40 | Gurr The Outcast | Far Fields: At bottom of upper section of Far Fields, part of The Hidden Hunter Wish. | Act 3 | Optional |
| 41 | Tormented Trobbio | Whispering Vaults: On The Stage (requires you to have previously defeated Trobbio). | Act 3 | Optional |
| 42 | Pinstress | Mount Fay: On platform some distance above the halfway Bench. | Act 3 | Optional |
| 43 | Shrine Guardian Seth | Shellwood: In section only accessible via Grand Gate (using Silk Soar). | Act 3 | Required |
| 44 | Nyleth | Shellwood: Beyond Shrine Guardian Seth (requires Elegy Of The Deep). | Act 3 | Required |
| 45 | Skarrsinger Karmelita | Far Fields: At top of the upper section of Far Fields (requires Elegy Of The Deep). | Act 3 | Required |
| 46 | Crust King Khann | Sands Of Karak: Inside Coral Tower in top-left Sands Of Karak (requires Elegy Of The Deep). | Act 3 | Required |
| 47 | Summoned Saviour | Moss Grotto: Past Bonegrave, far west of Moss Grotto (Steel Soul Mode only, part of A Vassal Lost Wish). | Act 3 | Optional |
| 48 | Lost Lace | The Abyss: At the bottom of The Abyss. | Act 3 | Required |
¹ If you travel to Greymoor via the Flea Caravan before facing the Moorwing, the Caravan will take its spot, and you can only then fight the Moorwing in Act 2, where it will spawn in the room next to the Greymoor Bellway.
² Defeating Forebrothers Signis and Gron is not required in order to reach the game end-credits at the end of Act 2, but it is required to reach the Abyss, which is key to completing Act 3.
Moss Mother
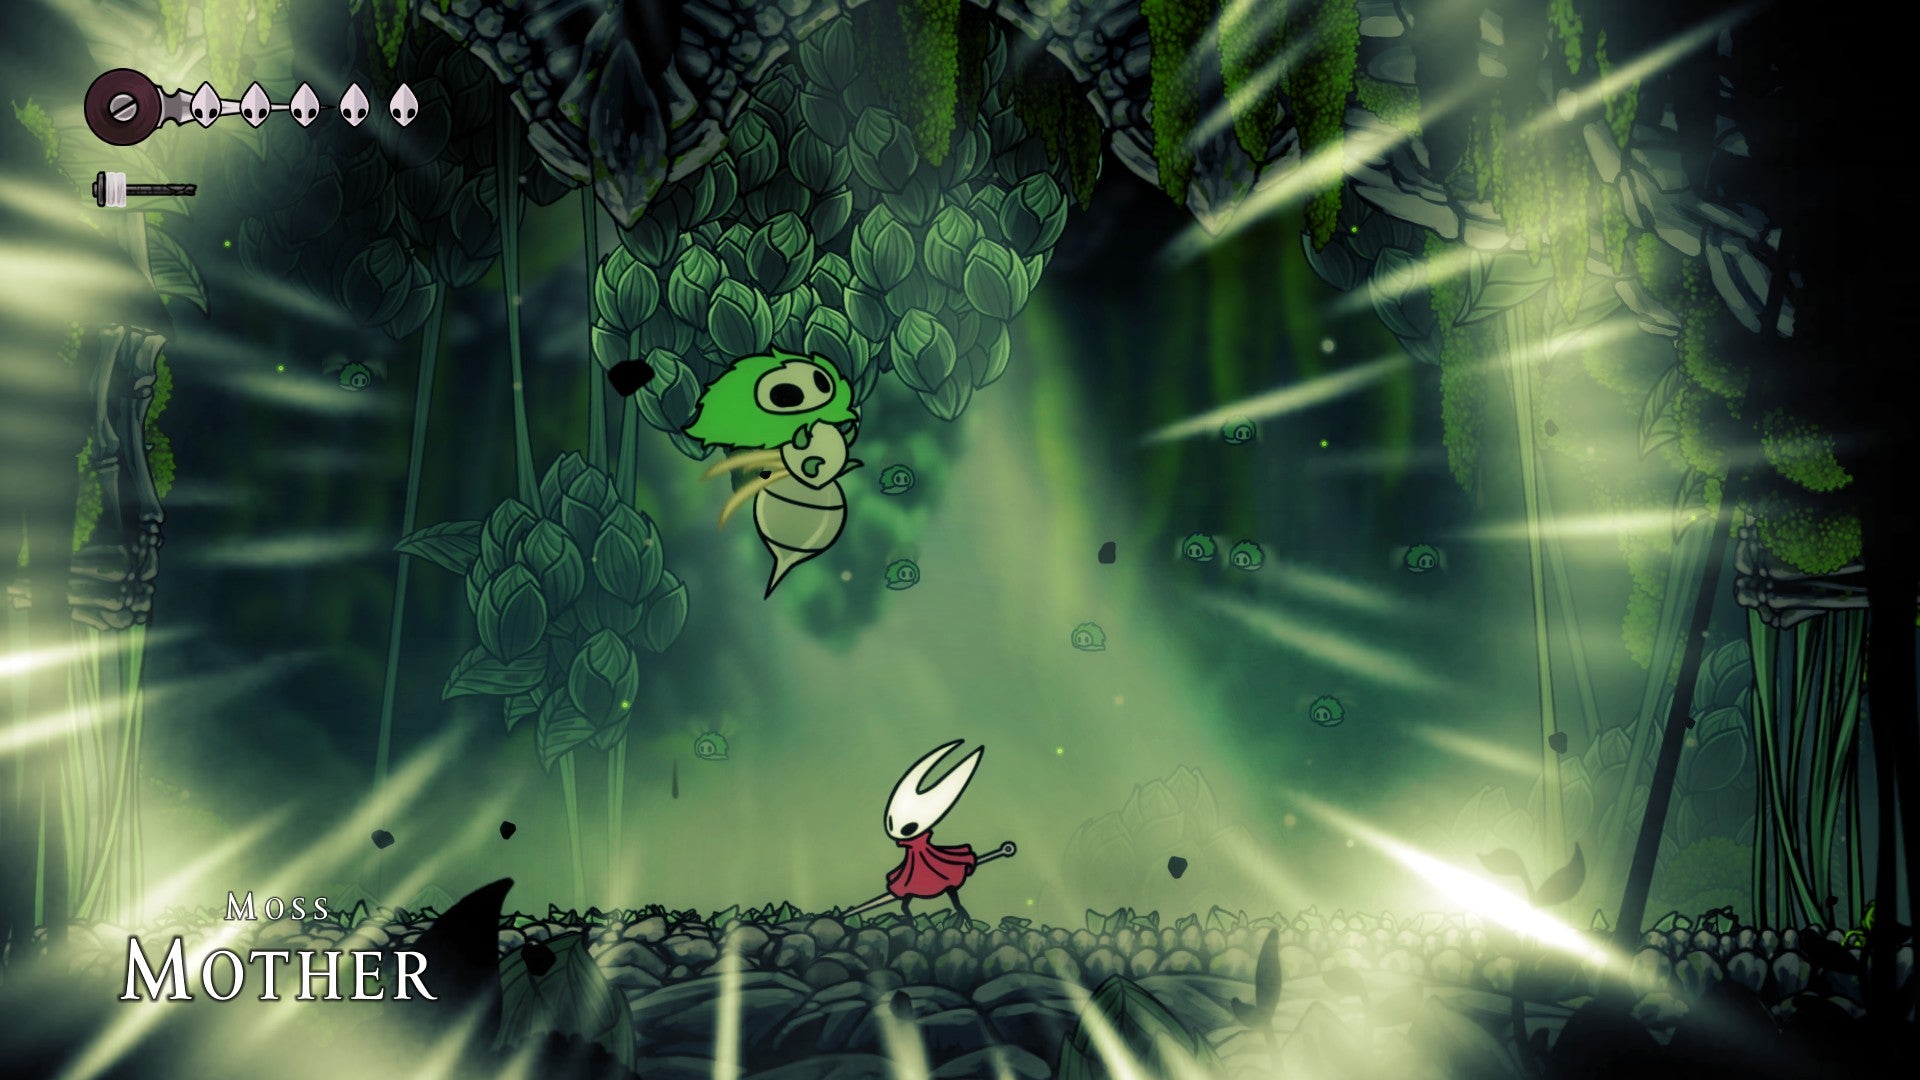
The first boss! She’s not too hard, and thankfully there’s a Bench right under her. |Image credit:Rock Paper Shotgun/Team Cherry
Location: The Ruined Chapel area of Moss Grotto. Go above the only Bench in the chapel and cut the moss covering the doorway to find Moss Mother’s arena.
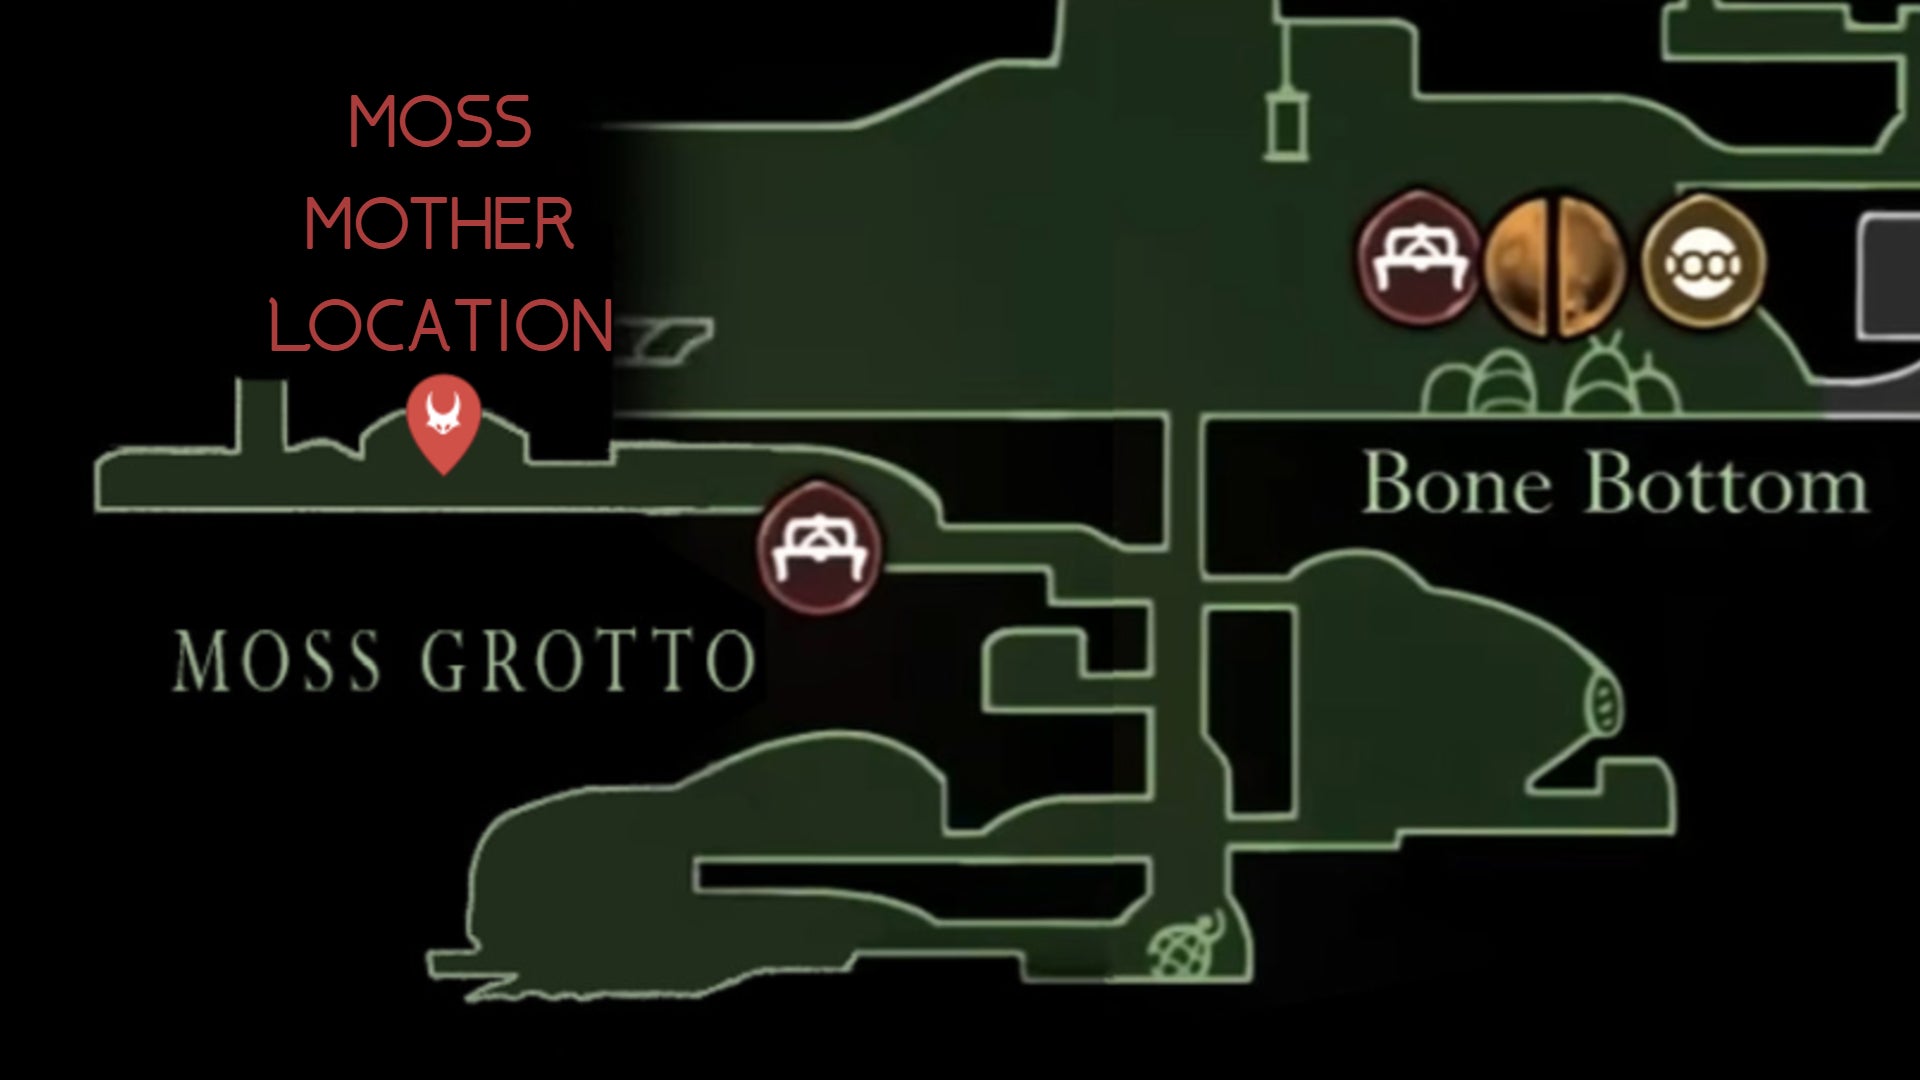
Image credit:Rock Paper Shotgun/MapGenie/Team Cherry
How to beat: Moss Mother is a boss who serves as a tutorial of sorts and isn’t too hard. Start by monitoring her floating movements from one side of the room to the other, and be careful when she does a dive bomb. She’ll also slam into the ceiling to dislodge rock chunks or summon Moss Grubs, so watch out for falling debris from the ceiling as well as any small green bugs that get in your way. If you’re low on health, be sure to Bind!
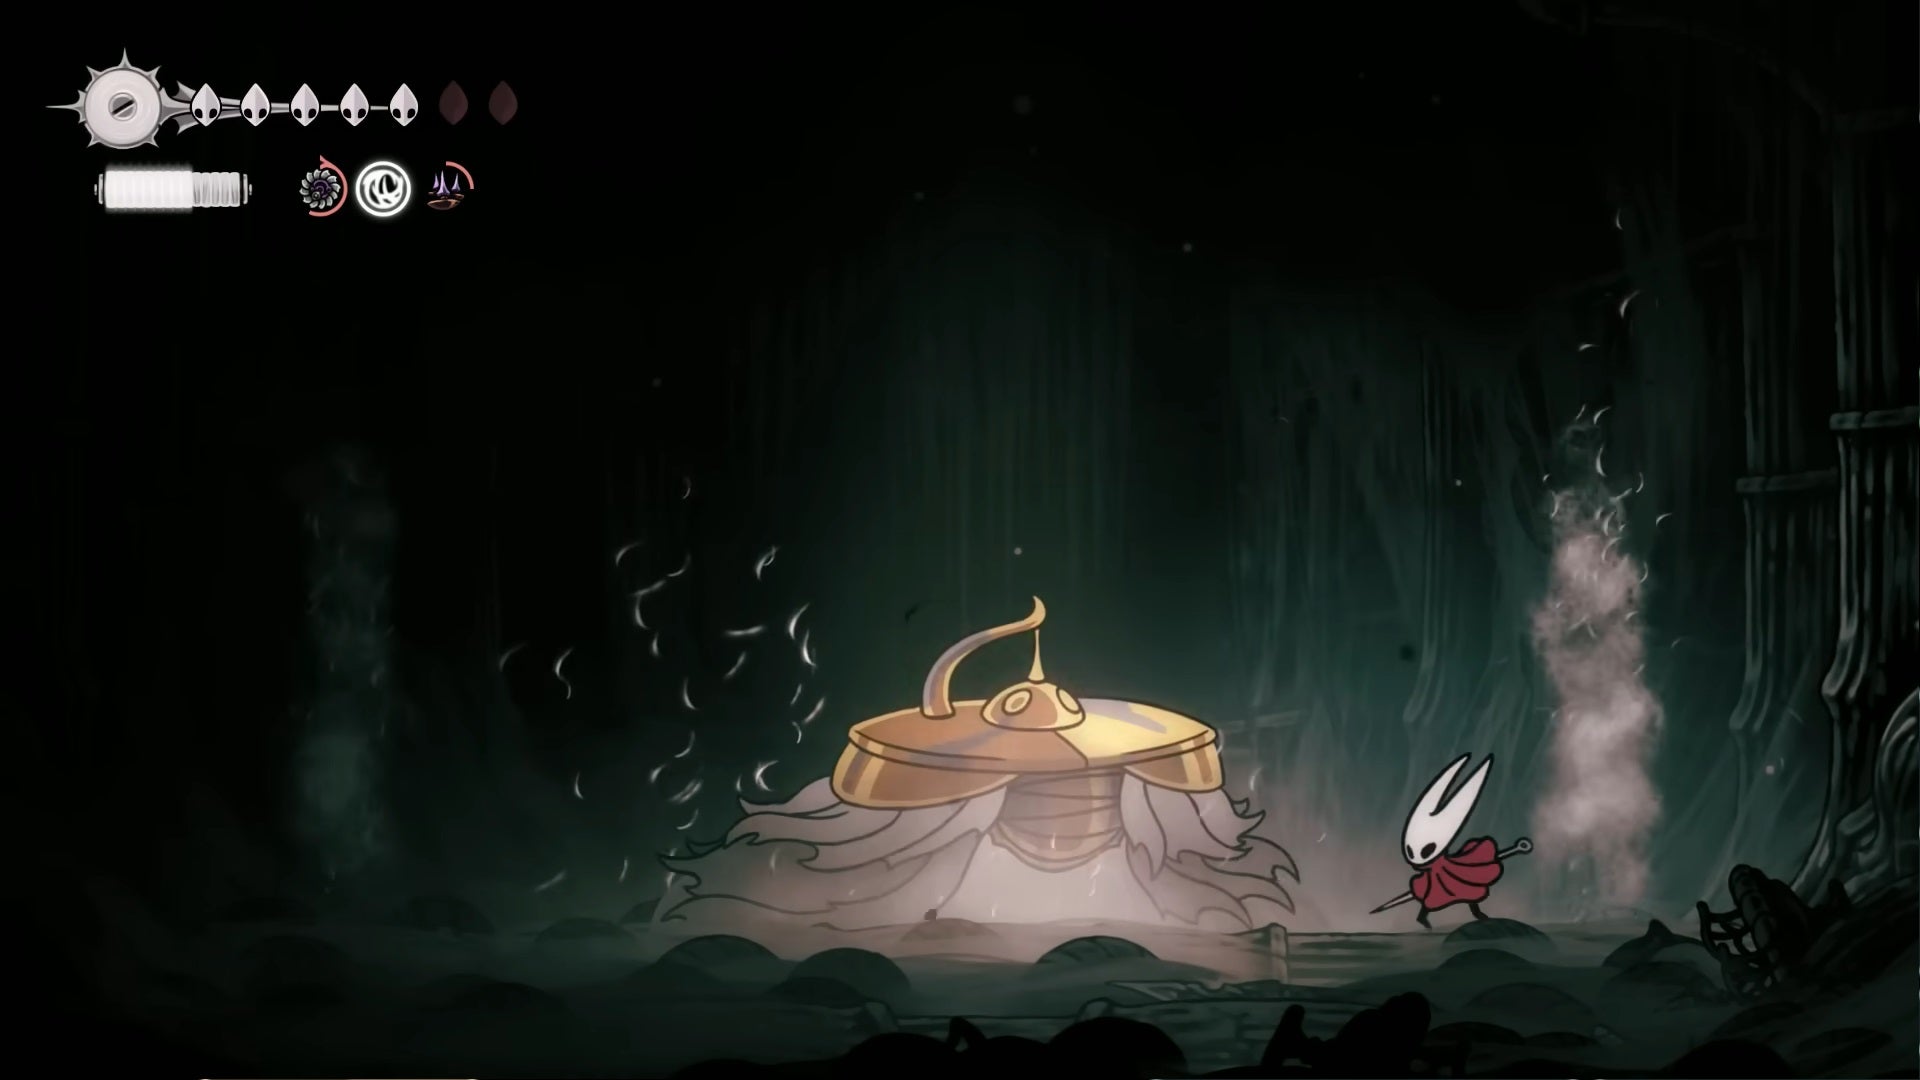
Bell Beast

Better get used to jumping over Bell Beast. |Image credit:Rock Paper Shotgun/Team Cherry
Location: The Marrow, near the entrance. The Bell Beast is actually stuck in a silk trap; once you acquire the Silkspear upgrade in Mosshome you can break the strands holding it captive and fight it.

Image credit:Rock Paper Shotgun/MapGenie/Team Cherry
How to beat: Bell Beast is the fast travel steed of Silksong. You’ll need to bash some sense into it with your Nail before you can ride it though, and this fight is a nice chance to practice both your Silkspear throw, dodging, and the art of the Pogo.
The Bell Beast alternates between a few attacks, starting with a forwards dash, which is easy to jump over or Pogo off of its back. When it comes to a stop, slash it in the rump a few times. Sometimes, the Bell Beast will also jump over you - run towards where it first popped out of the ground to avoid being hit. Finally, when the Bell Beast erupts from the earth with two large bells, move to the side or jump to avoid them. That’s all you need to worry about until halfway through the fight, when the Bell Beast summons falling bells from the ceiling to shake things up.
Lace
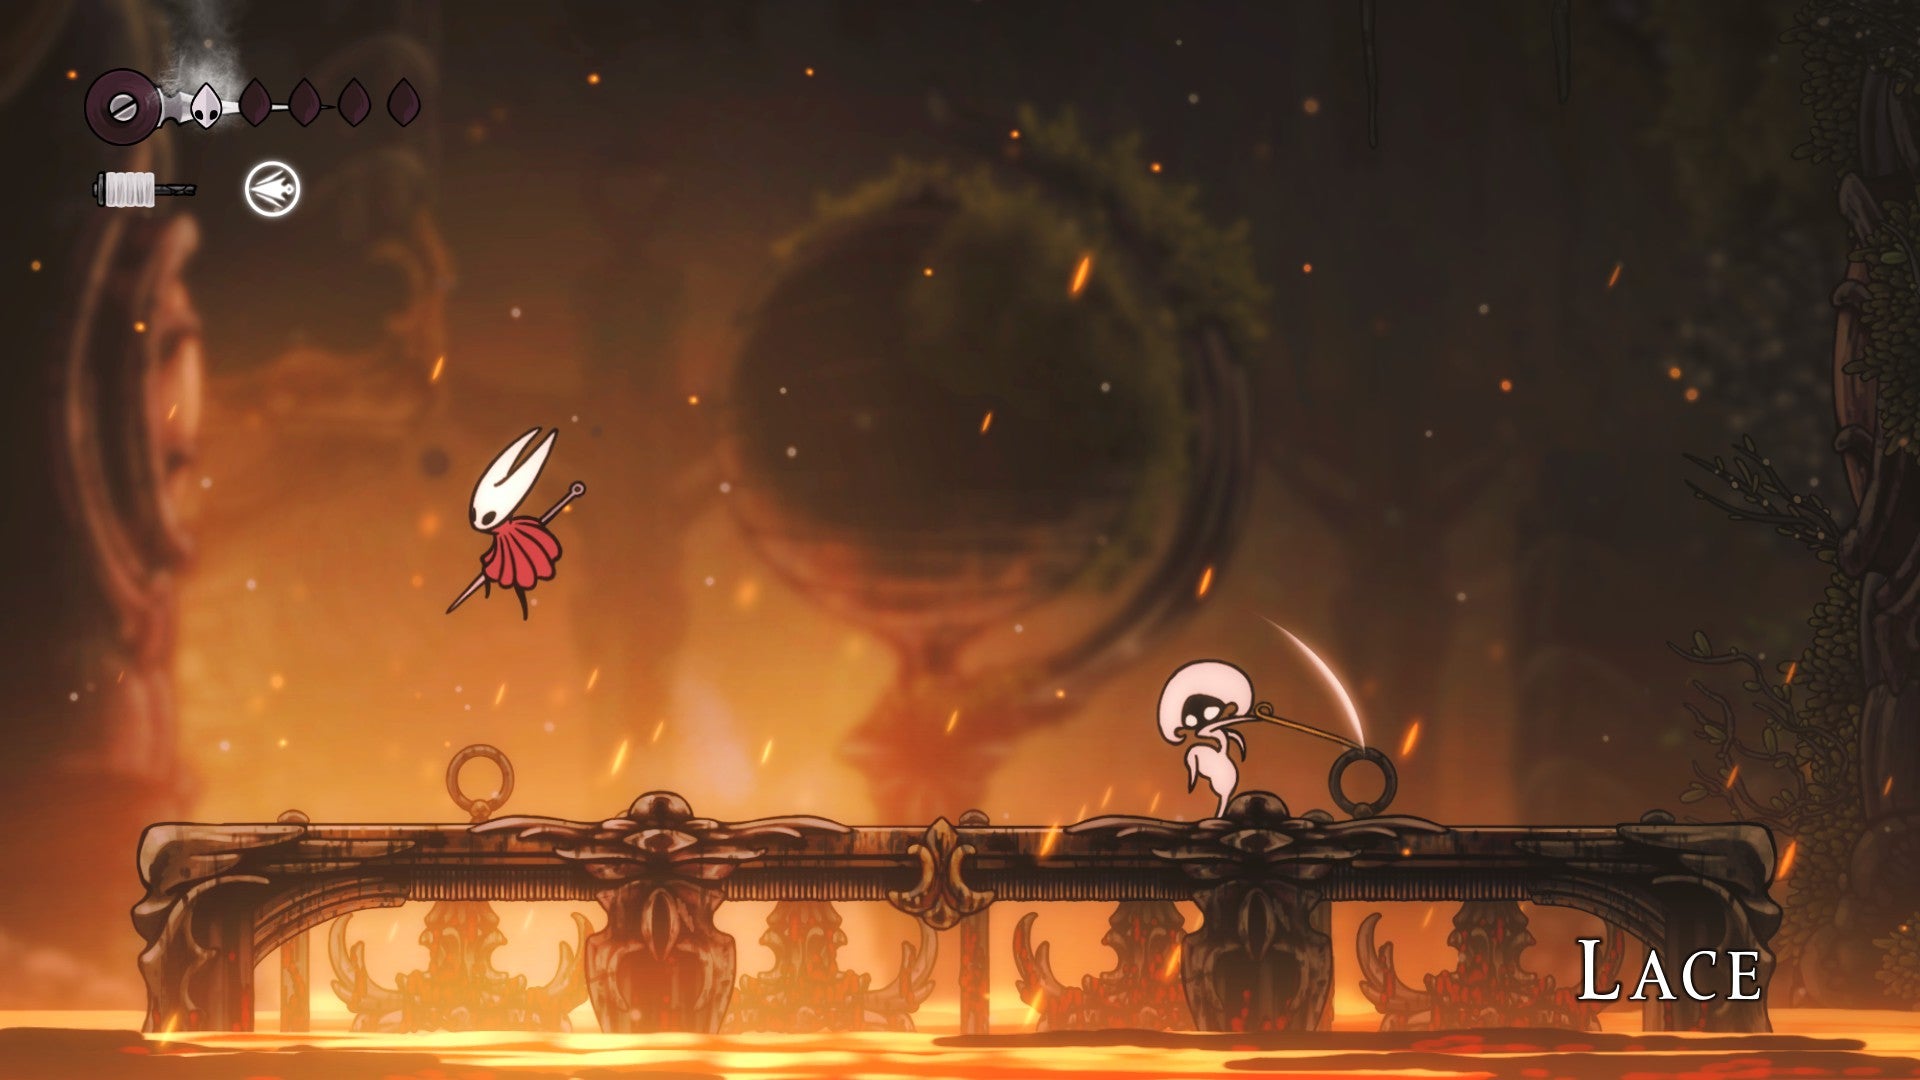
If Lace kills you, she does an obnoxious “O-HO-HO~” anime laugh. Charming! |Image credit:Rock Paper Shotgun/Team Cherry
Location: Deep Docks, across a locked gate to your right. You’ll hear her singing through the gate, but you need to get the Swift Step ability first to dash across and face her.

Image credit:Rock Paper Shotgun/MapGenie/Team Cherry
How to beat: Lace is a fun recurring boss throughout Hollow Knight: Silksong and reminiscent of what Hornet was in the original game. You can avoid the majority of her flurries, dashes, and slash strikes by jump-dashing over her to attack from the other side, or Pogo-ing off of her head. The best time to hit her is after she unleashes one of her moves, since there will always be a slight delay before she attacks again.
Halfway through the fight, Lace will telegraph a large circle on the arena - stand clear of this, as she’ll teleport there and unleash a flurry of zig-zag strikes. Once she’s done, retailiate! You can even knock her off the platform into the lava if you’re fast enough and good at positioning her on the edge…alas, she hops back into action in an instant.
Fourth Chorus
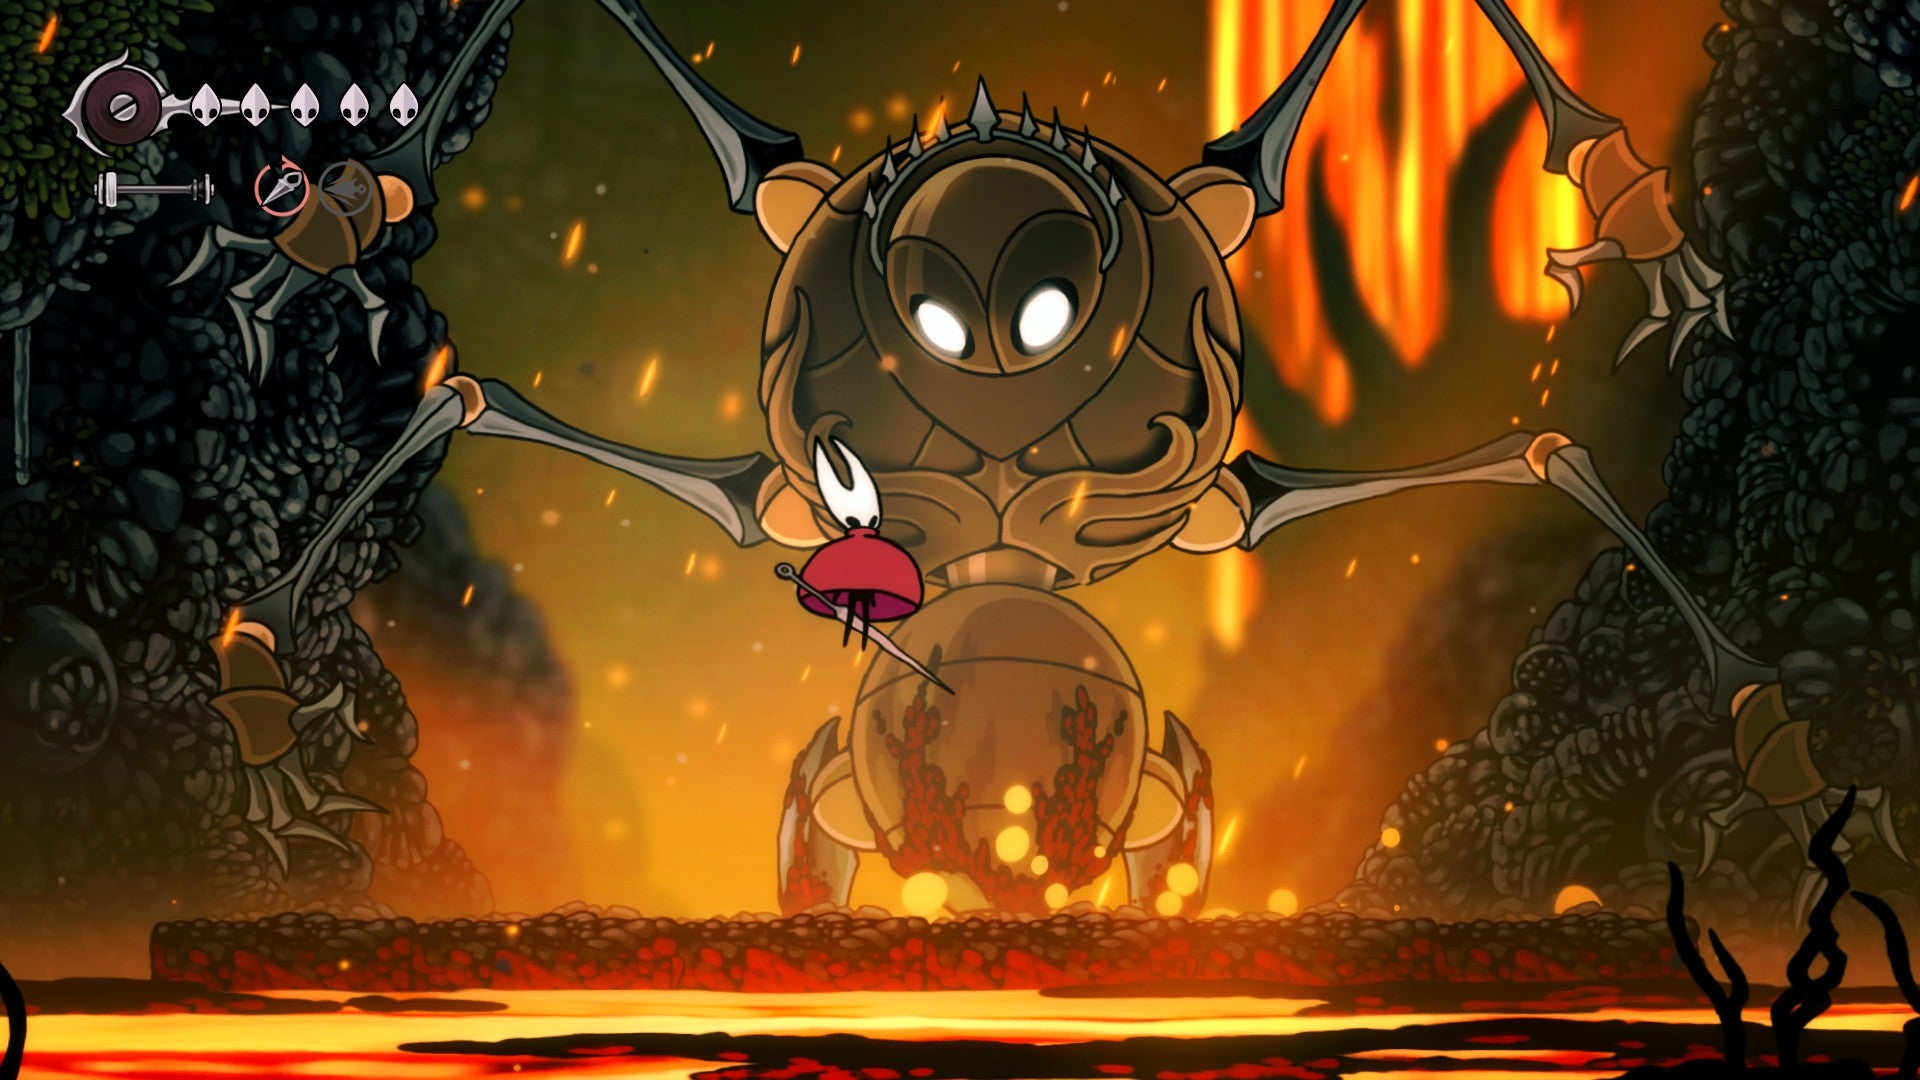
Get ready to use your new Drifter’s Cloak! |Image credit:Rock Paper Shotgun/Team Cherry
Location: Far Fields. You’ll pass by this robotic corpse in the screen in front of the Seamstress’ building, but it’ll only come alive after you complete her quest and unlock the Drifter’s Cloak .
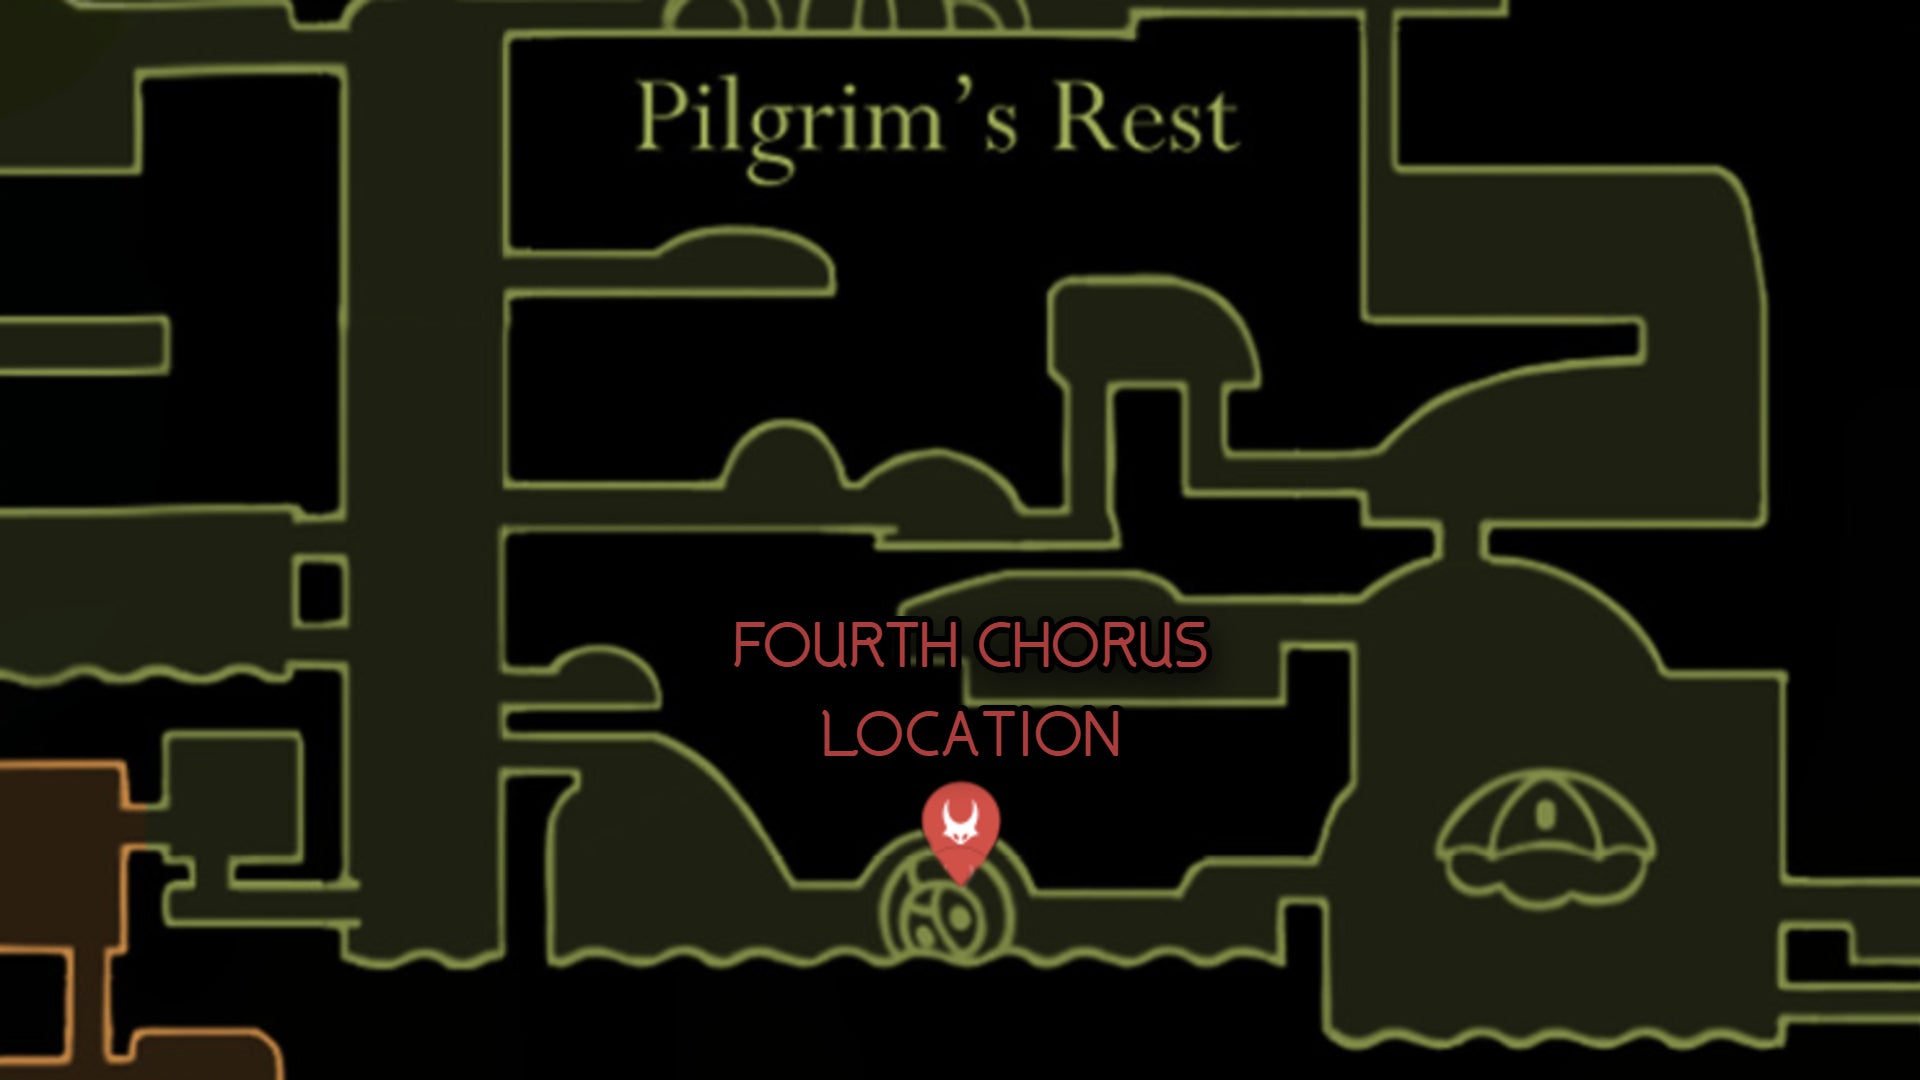
Image credit:Rock Paper Shotgun/MapGenie/Team Cherry
How to beat: The key to this fight is paying attention to Fourth Chorus’ limbs. If it attacks with its top limbs, the platform that you’re standing on will fall apart, and if it attacks with its lower limbs, you’ll need to jump and float over the attack with the Drifter’s Cloak. As you do so, slash at its head as much as possible. This can be tricky if you’ve equipped the Crest of Wanderer , which decreases your weapon range.
Eventually, the Fourth Chrous starts making lava boulders fall, and the platform that you’re standing on will become very small indeed. When wind currents open up on either side of the Fourth Chorus, ride them up to break the orange rocks in the ceiling - this will bring down a boulder that finally wrecks this irksome boss.
Savage Beastfly
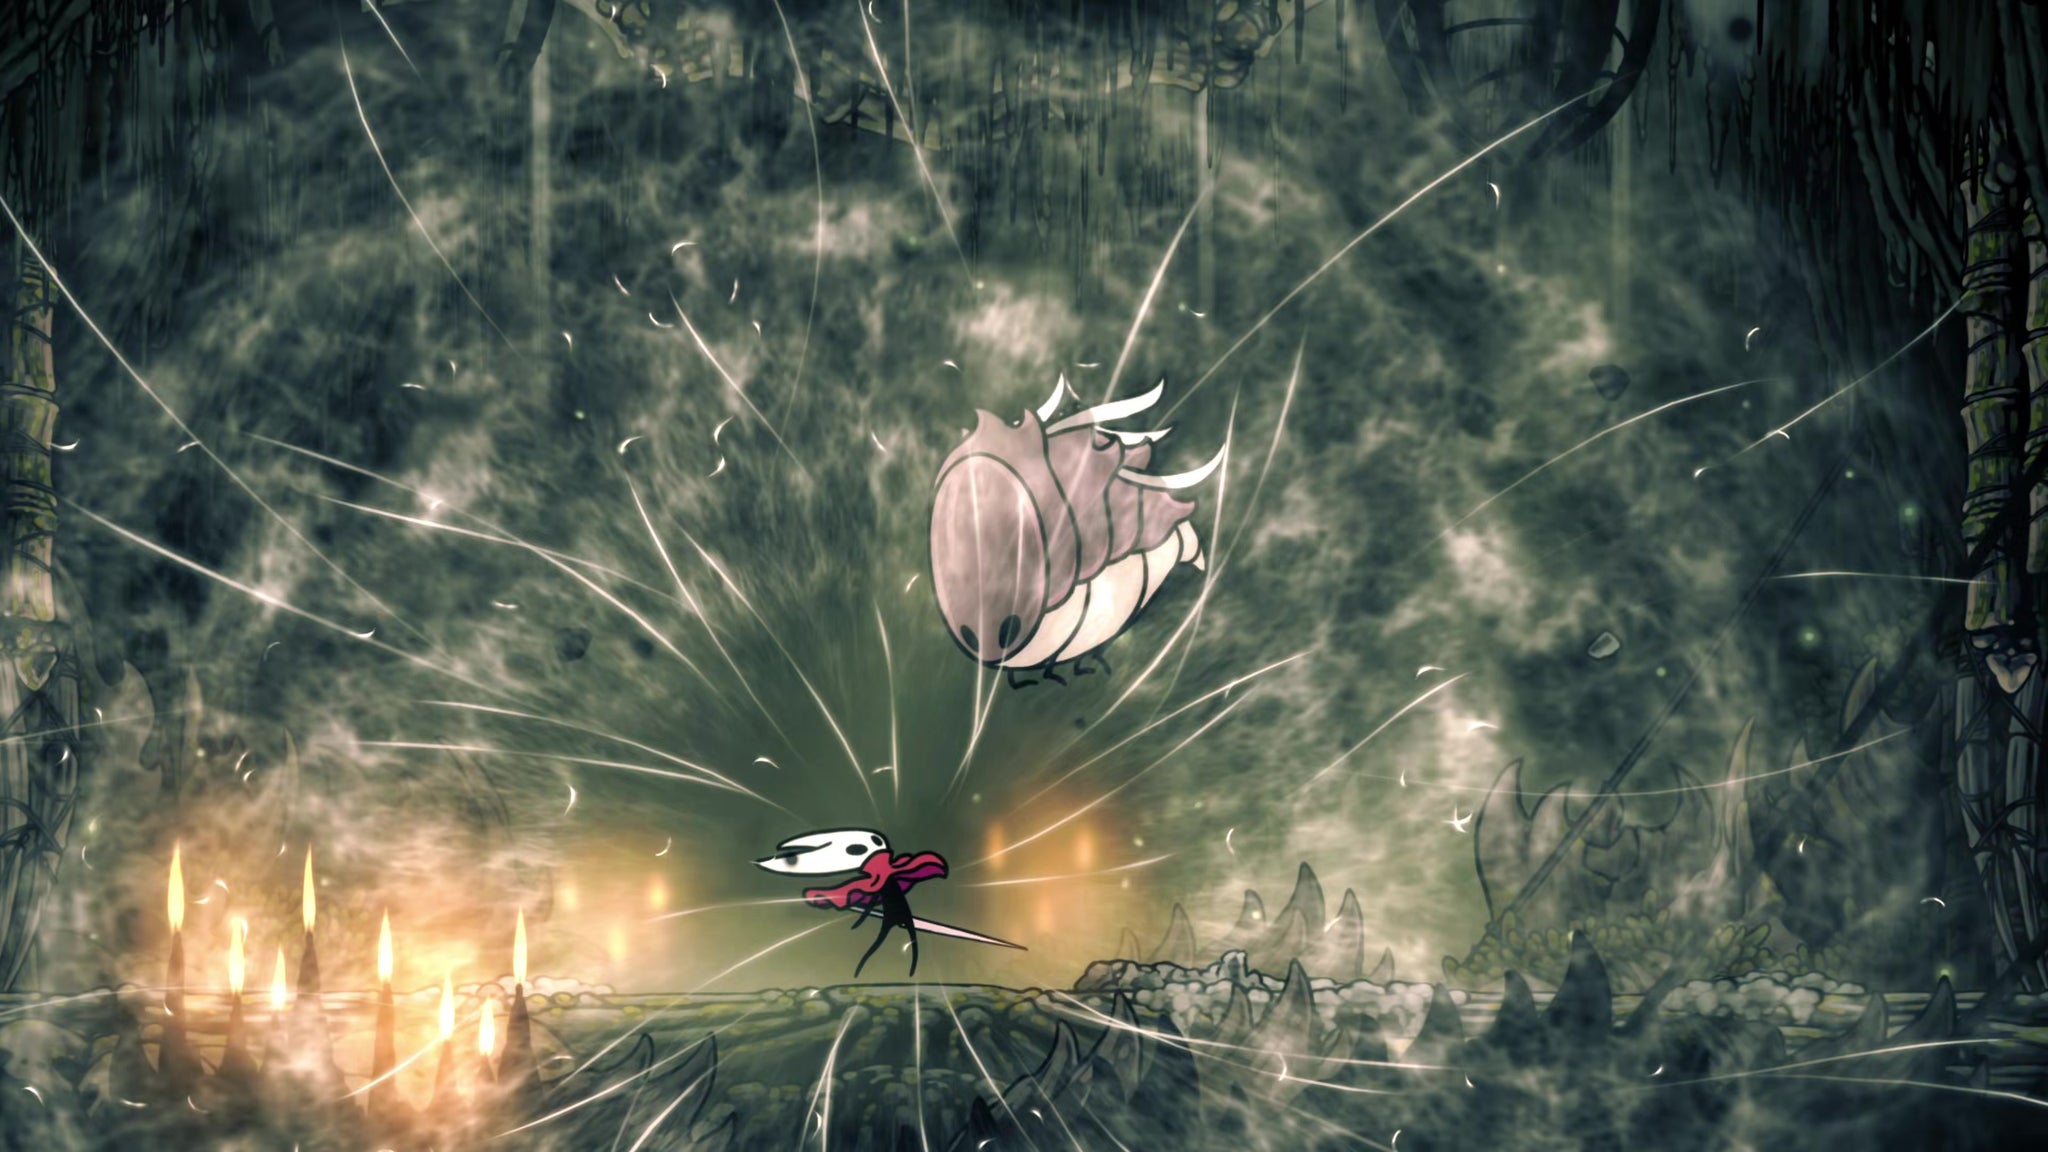
The Savage Beastfly hits very hard on its own, but just wait until it summons reinforcements. |Image credit:Rock Paper Shotgun/Team Cherry
Location: Hunter’s March, in the Chapel of the Beast. You’ll need to ride the air currents upwards, Pogo off of a series of red flowers, and float between spike walls in an infuriating parkour stretch until you unlock a shortcut lever and a gate that leads to this optional bosses’ arena.
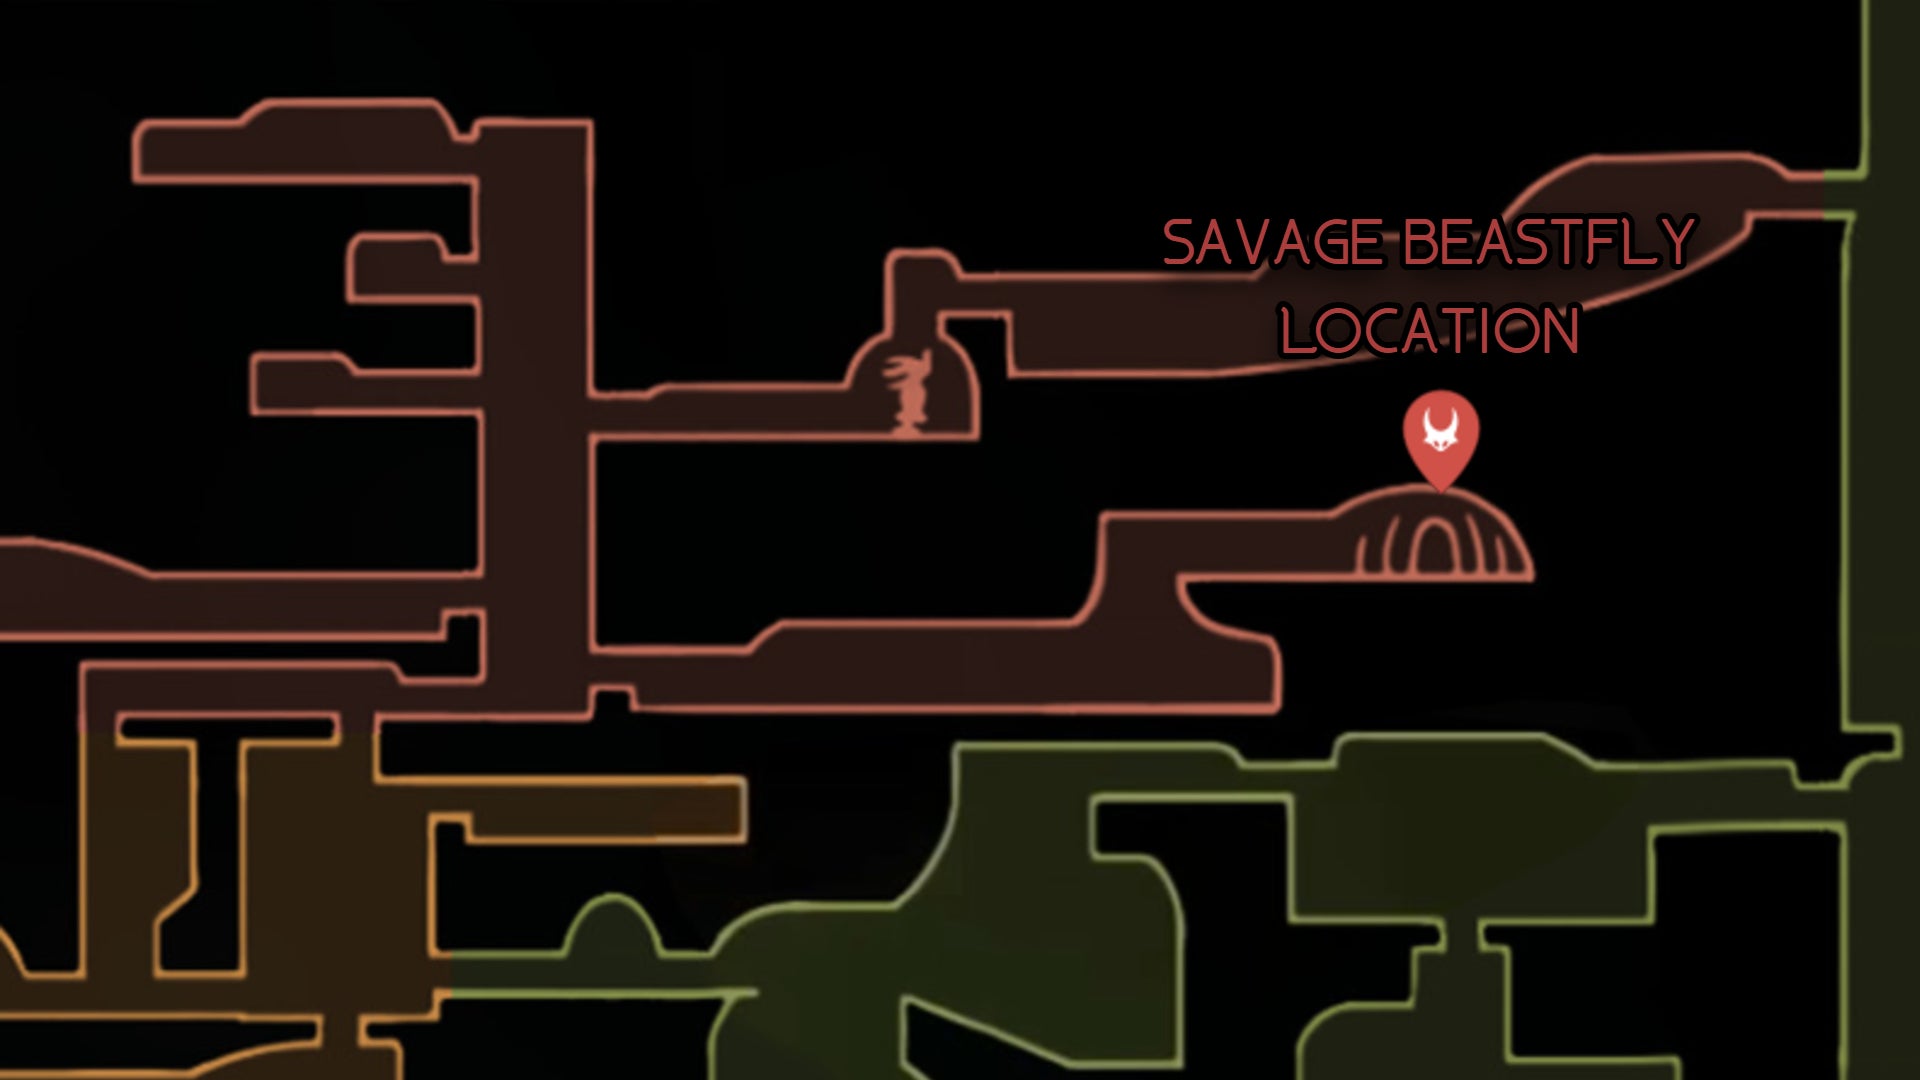
Image credit:Rock Paper Shotgun/MapGenie/Team Cherry
How to beat: Savage Beastfly starts the fight with both horizontal and vertical charges across the screen. Jump and slash, and whenever it finishes a horizontal charge and hits a wall, get in close to commit to three swift strikes. If you’ve got the Crest of Wanderer, the faster attack rate will come in handy.
While this is straightforward enough, once Savage Beastfly calls in allies, the fight gets super annoying. Luckily, you can get the Savage Beastfly to attack its companions by lining them up with its vertical charge, which will take some trial and error but is far better than wearing yourself out fighting all of these bugs one-on-one. The reward for all this pain is the Beast Crest, which gives Hornet a nice slash attack and turns her Bind into a lifesteal.
Sister Splinter

Dodge those claws when they turn white, and beware Sister Splinter’s minions. |Image credit:Rock Paper Shotgun/Team Cherry
Location: Shellwood, to the right of the central elevator. Follow the path up the ledges in the following room, Pogo over some spikes, and you’ll be at Sister Splinter’s room.

Image credit:Rock Paper Shotgun/MapGenie/Team Cherry
How to beat: Sister Splinter is not terribly hard on her own, but the minions that she summons can be tricky. Defeat her by slashing upwards at her head, and be careful when her claws turn white, as that’s the indication of an upcoming attack. She’ll also summon vines that descend from the ceiling and make the arena quite crowded. Stand out of range of these as they come down and clear them away with swift Nail strikes.
When Sister Splinter tags in her minions, kill them as soon as possible or bait them into the direction of her claw attacks. As long as you keep yourself from getting overwhelmed by these additional foes, the fight isn’t too bad.
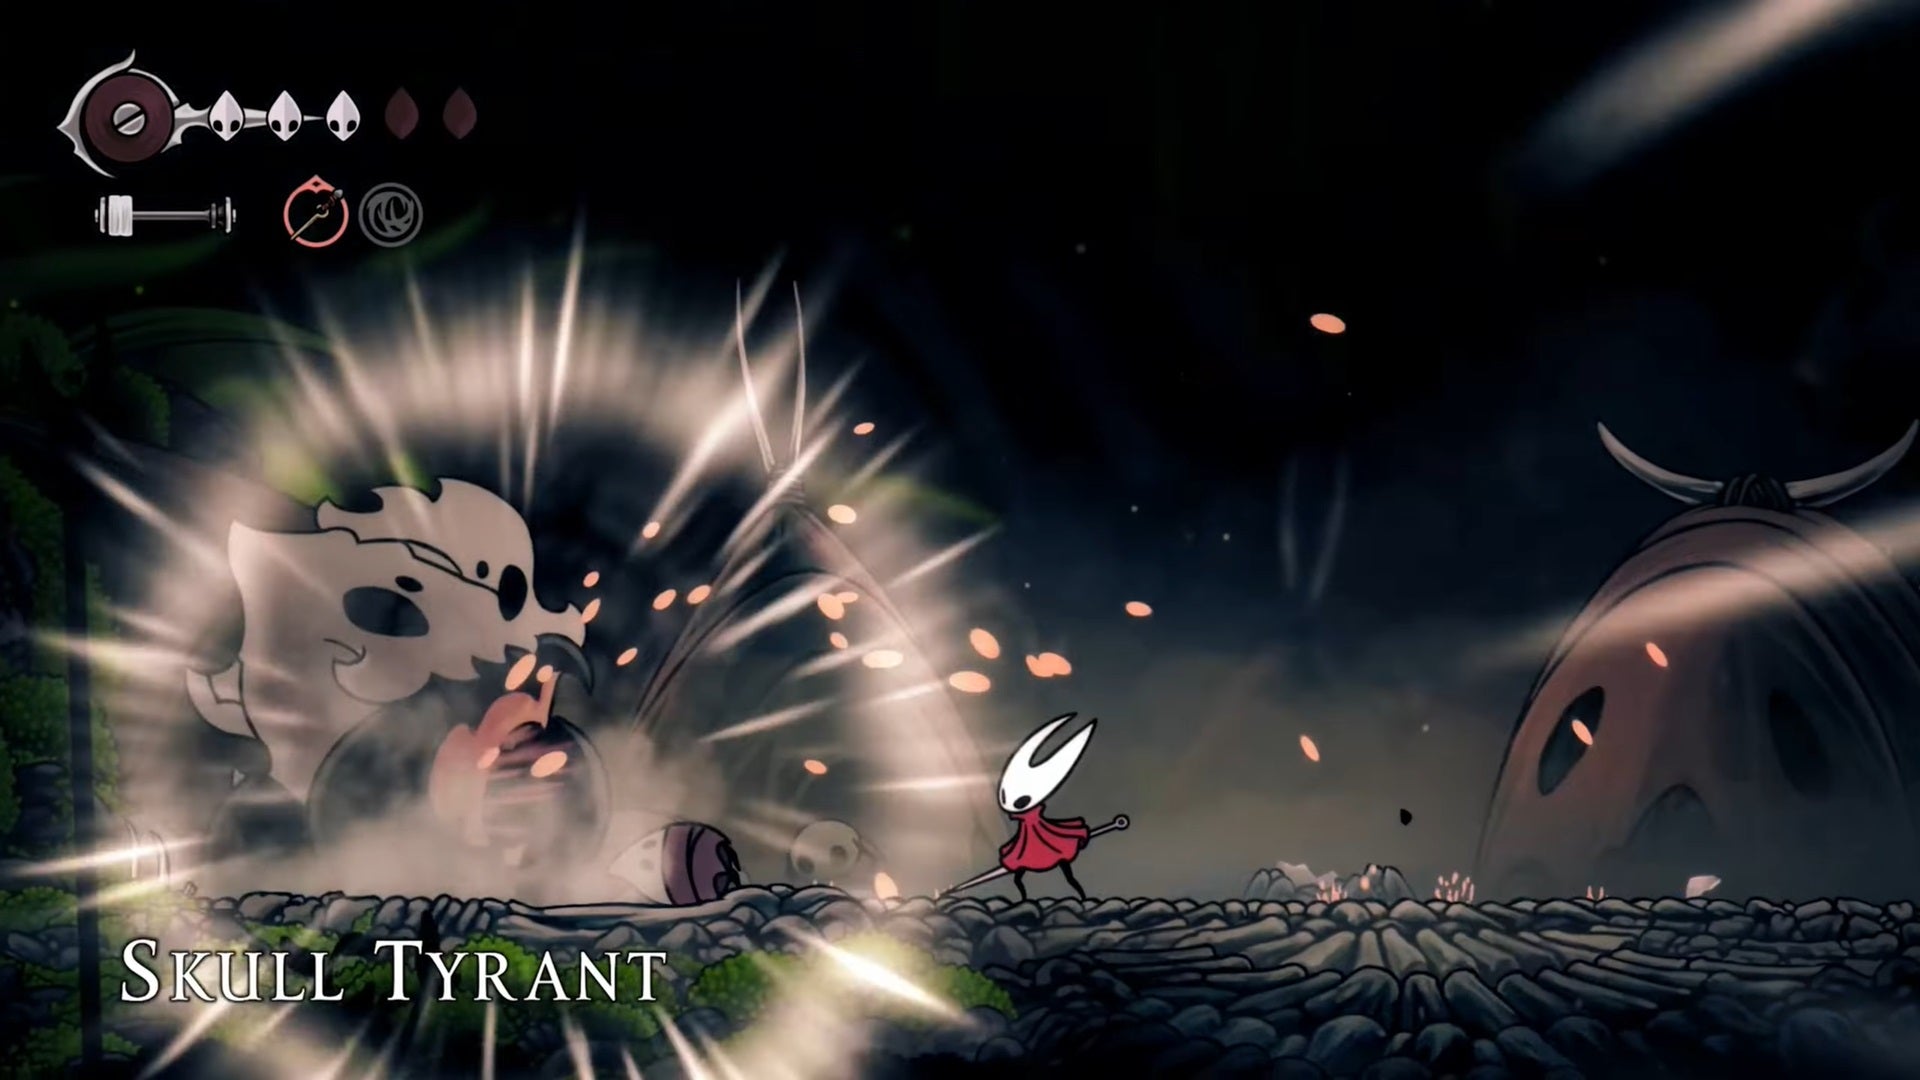
Skull Tyrant

Big and intimidating it may be, but the Skull Tyrant’s tactics are not complicated. |Image credit:Rock Paper Shotgun/Team Cherry
Location: The Marrow, west of the Bench in the same room as the Fleamaster’s traveling caravan. The Skull Tyrant will only appear if you’ve accepted the Terrible Tyrant hunting quest from the Bone Bottom Wishwall - see our walkthrough on how to do that. Also, you’ll need the Cling Grip skill from Shellwood to access this stretch of The Marrow.
Image credit:Rock Paper Shotgun/Team Cherry
How to beat: The Skull Tyrant has three main moves - if it starts running, it’s about to charge, so jump over it and get in a Pogo slash or two. When it starts to wiggle, back up or get ready to dash under it as it jumps. If it roars, look above you and beware raining boulders. Not too tough, and once the fight is won, you’ll get the Crown Fragment as a reward for your trouble.
Skull Tyrant 2
The Skull Tyrant’s back for revenge! And this time cute little bugs are in the crosshairs! |Image credit:Rock Paper Shotgun/Team Cherry
Location: Moss Grotto, smack dab in the middle of Bone Bottom. This boss fight only triggers as a sneak attack when you turn in your Crown Fragment after defeating the first Skull Tyrant , listed above. Leave and re-enter the area if it doesn’t spawn.
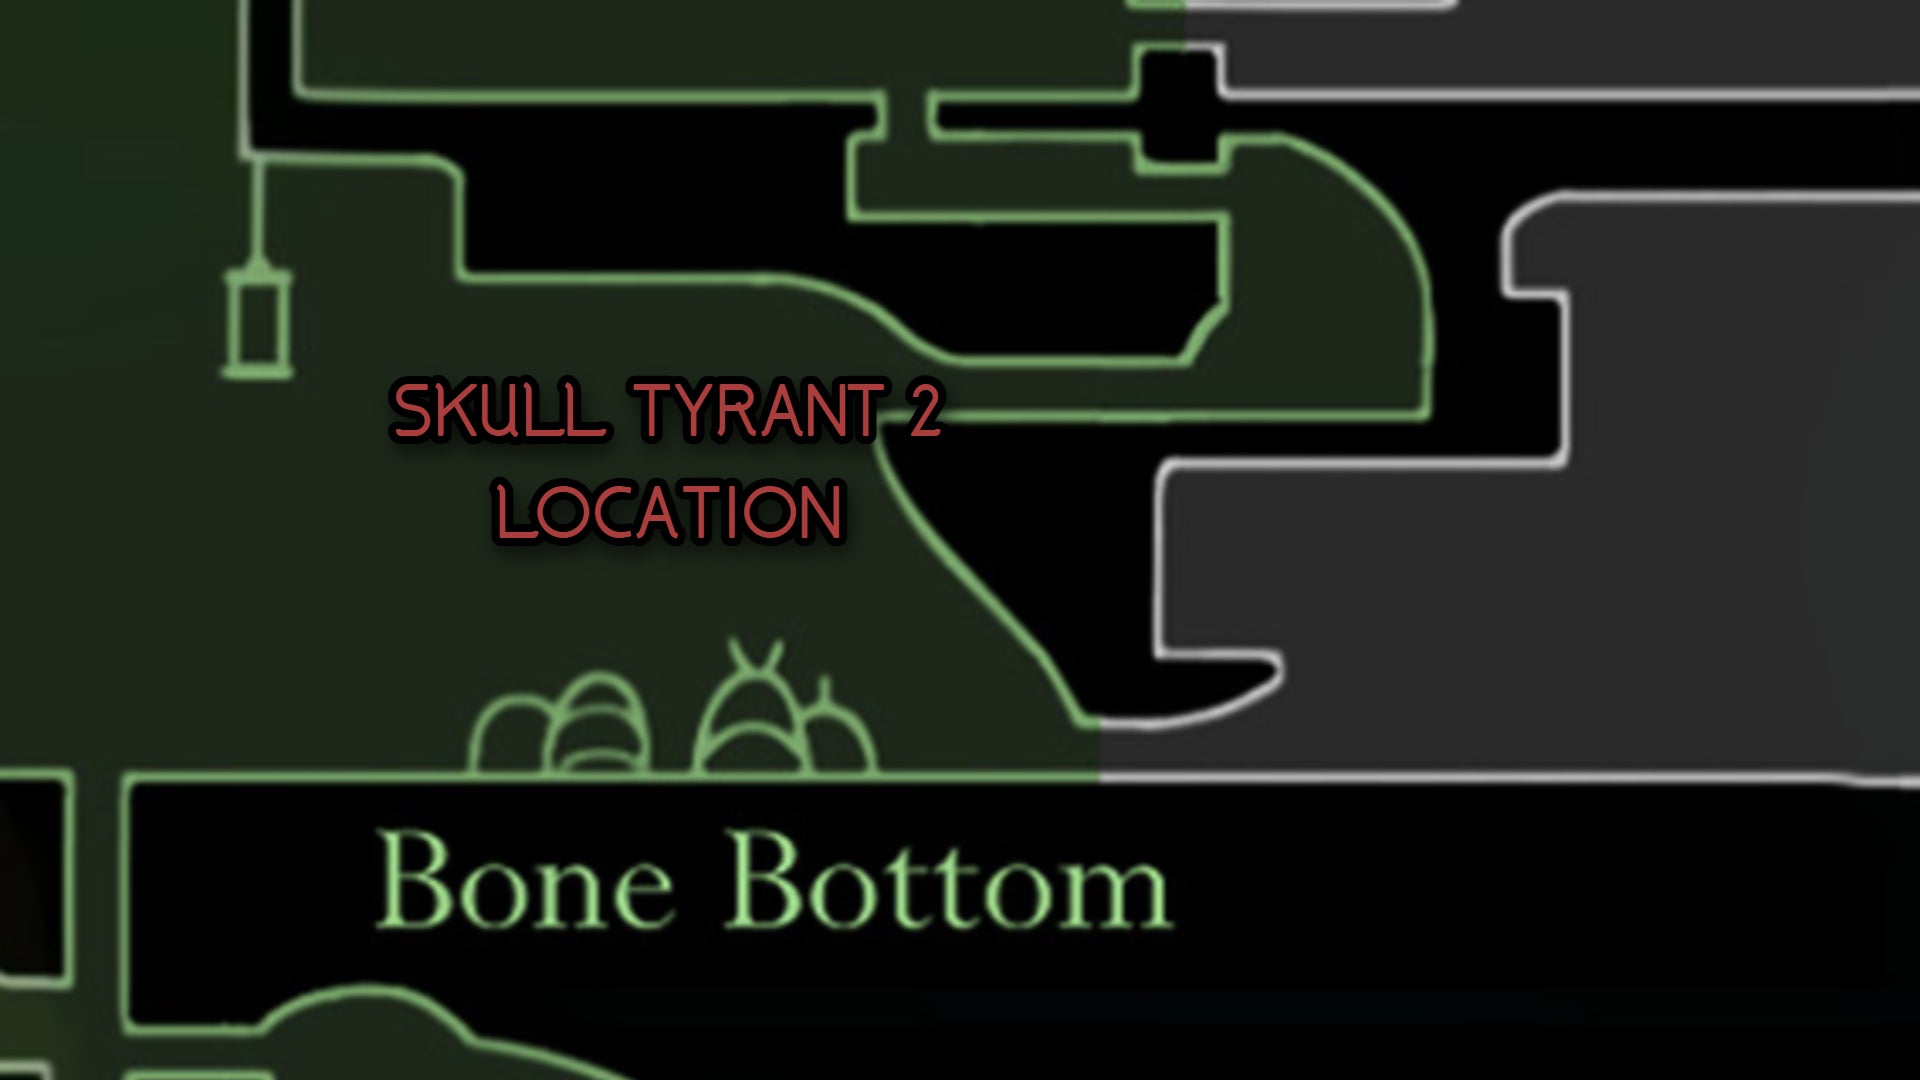
Image credit:Rock Paper Shotgun/Team Cherry
How to beat: Follow the same tactics that you used when defeating the other Skull Tyrant. The most horrifying thing about this fight is the poor casualty who gets caught in the middle of the Skull Tyrant’s ambush…
Moorwing
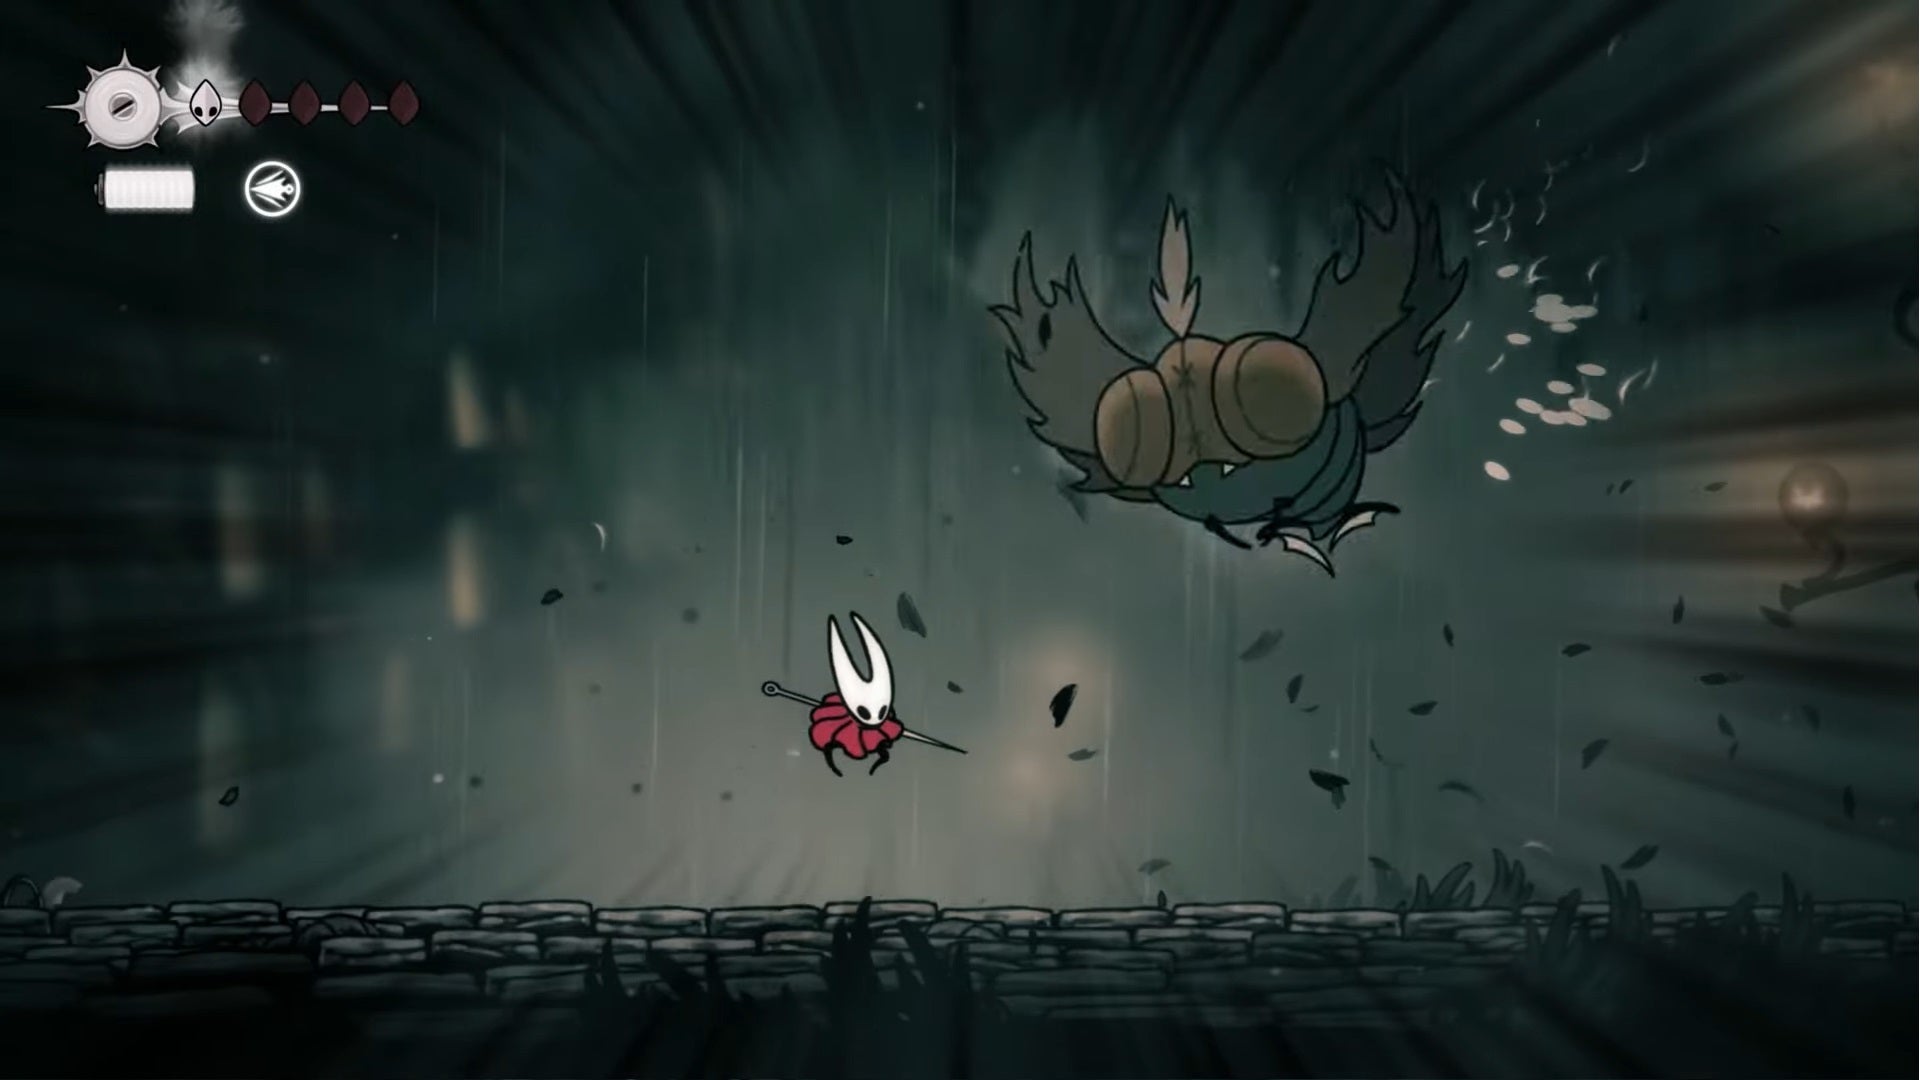
A real punishing boss, Moorwing is. Which is why you should search for all of those cute lost Fleas! |Image credit:Rock Paper Shotgun/Team Cherry
Location: Greymoor, though where you run into Moorwing depends on whether you’ve completed the Lost Fleas quest or not. If you fail to find all 5 Fleas, then Moorwing appears on the left outskirts of Greymoor. If you do finish the quest, then the Flea Caravan will be there, and Moorwing instead spawns outside the Bellway Entrance of Greymoor once you reach Act 2 of Silksong.

Image credit:Rock Paper Shotgun/MapGenie/Team Cherry
How to beat: Moorwing can be a very devastating boss, especially since many Silksong players run into this big fly early in their travels without completing the Lost Fleas quest. Moorwing’s attacks include downwards slashes with its legs, dive charges across the floor, and firing off claws that roll along the ground, go up into the air, and orbit around Moorwing.
There’s a lot to keep track of during this combat, especially once those claws start careening towards you. But you have options at your disposal. If you’re fighting Moorwing on the left outskirts of Greymoor, you can cheese your way through the fight by running to the right and riding the air stream with the Drifter’s Cloak, landing on the wooden platforms above the arena. Run to the left side of the platforms above Moorwing and you’re untouchable - you can safely stay in one place and repeatedly do downward slashes to attack through the platform until victory is yours. If you’ve also encountered Garmond and Zaza and have yet to beat Moorwing, you can request that they aid you in the fight.
Widow

Keep a close eye on the silk strands that appear above you, as those indicate the path of incoming bells. |Image credit:Rock Paper Shotgun/Team Cherry
Location: Shellwood, right above Bellhart. You’ll need to enter the upper bellveins from the left side, then head all the way to the right and drop into the hole. Keep going downwards until you reach the boss arena.

Image credit:Rock Paper Shotgun/Team Cherry
How to beat: Widow is very much a pain, though like all bosses in Silksong, her telegraphs are learnable. Pay careful attention to the strands of silk that appear on screen, as these will show you the direction of her incoming bell attacks. The diagonals are the hardest to avoid, as the bells will often bounce along the room. Widow will also occasionally charge at you, launch diagonal dives from the upper corners of the room, and scurry across the ground, creating spikes as she moves in your direction. You’ll need to time your jumps carefully and use your Drifter’s Cloak to avoid the spikes.
Halfway through the fight, it seems like you’ve beaten Widow - but no, she comes back for her final form! Now she’ll send even more bells bounding across the battlefield while repeating all of her old attacks. It’s highly recommended that you use the Plasmium Phial in the short interval before she starts her second phase in order to give yourself three temporary Masks. Good luck - she’s certainly a challenge.
Moss Mother Duo

Double the Moss Mothers, double the fun. |Image credit:Rock Paper Shotgun/Team Cherry
Location: Weavenest Atla, at the very far western end of the region. You need the Needolin to advance to this area.
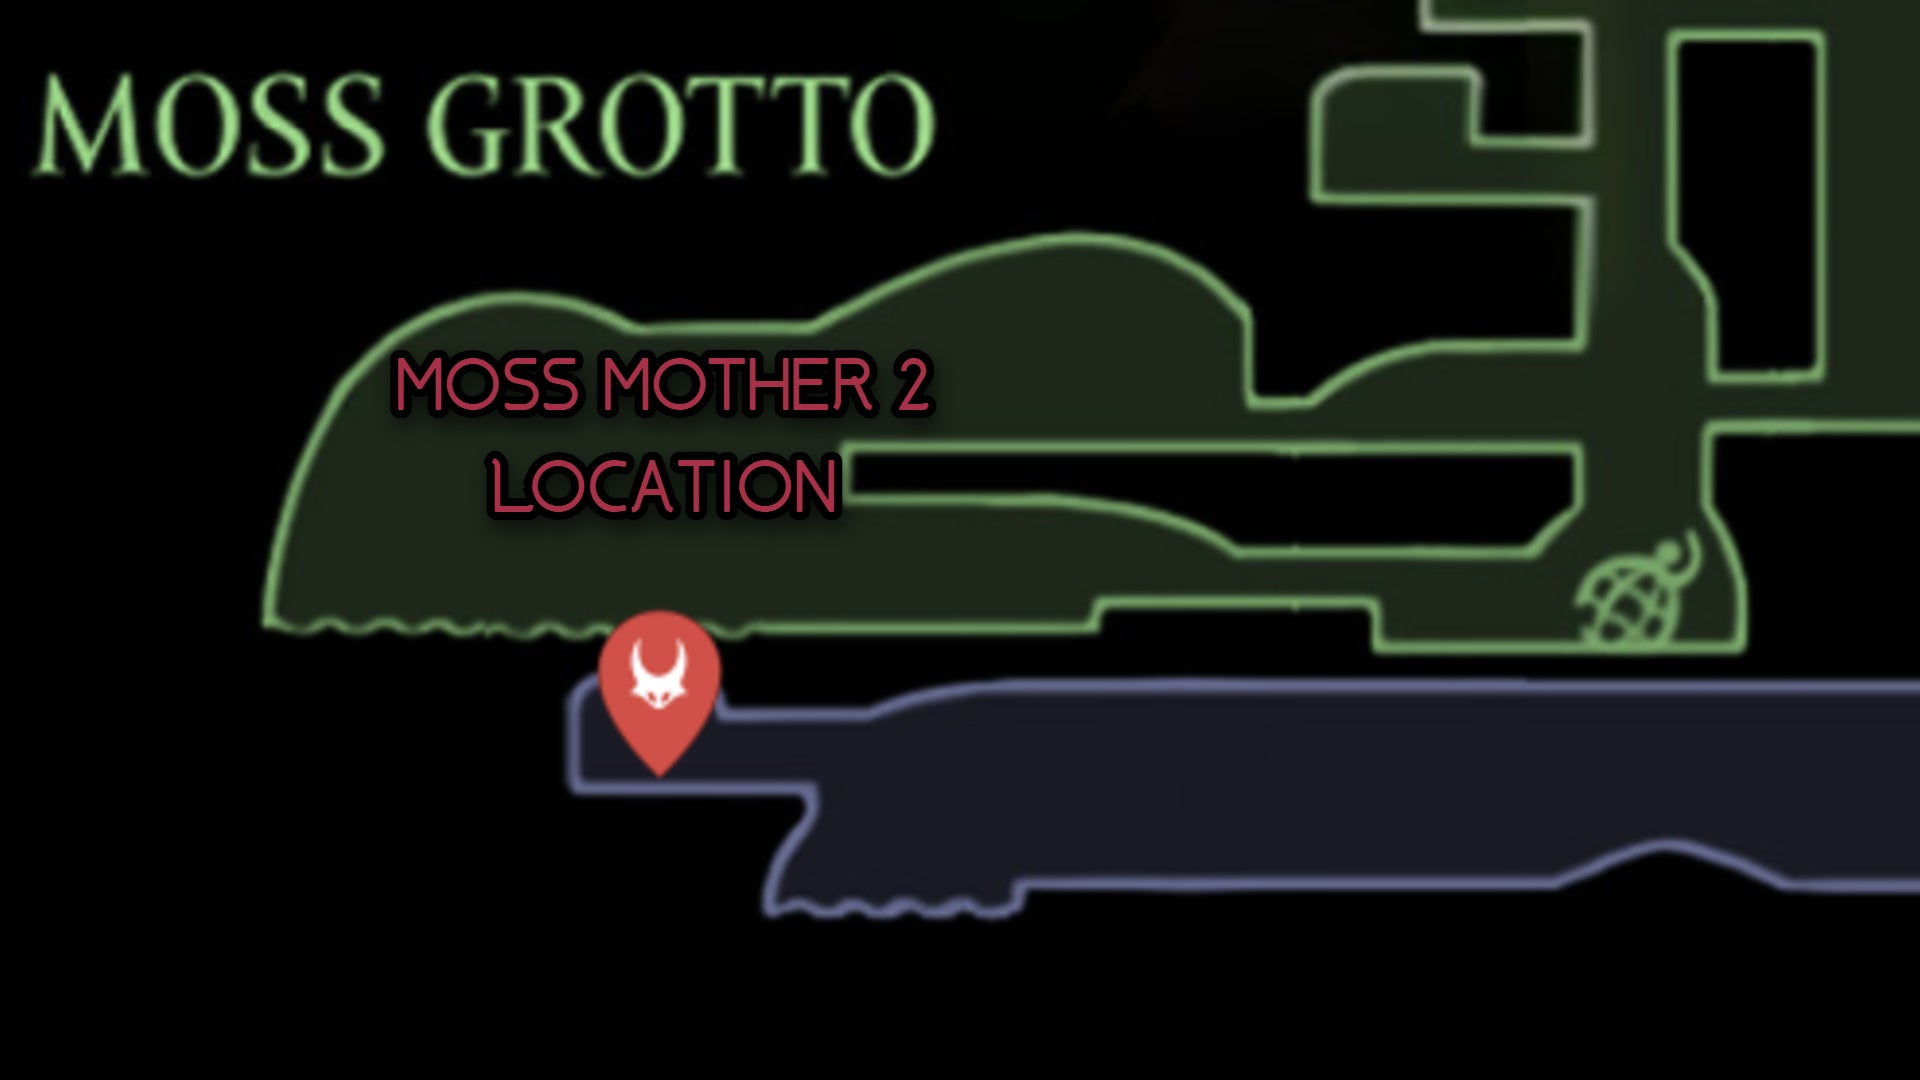
Image credit:Rock Paper Shotgun/MapGenie/Team Cherry
How to beat: The first Moss Mother you fought way back when wasn’t too hard, and this encounter starts off much the same. But then a second Moss Mother will appear, which ups the ante considerably. Still, as long as you focus your efforts on dispatching one of the Moss Mothers at a time, you should be done with this fight before too long. Upon victory, you’ll get the Weavelight, a worthwhile Tool which increases the speed of your Silk regeneration.
Savage Beastfly 2

The Savage Beastfly returns, and brings some really annoying friends with it this time around. |Image credit:Rock Paper Shotgun/Team Cherry
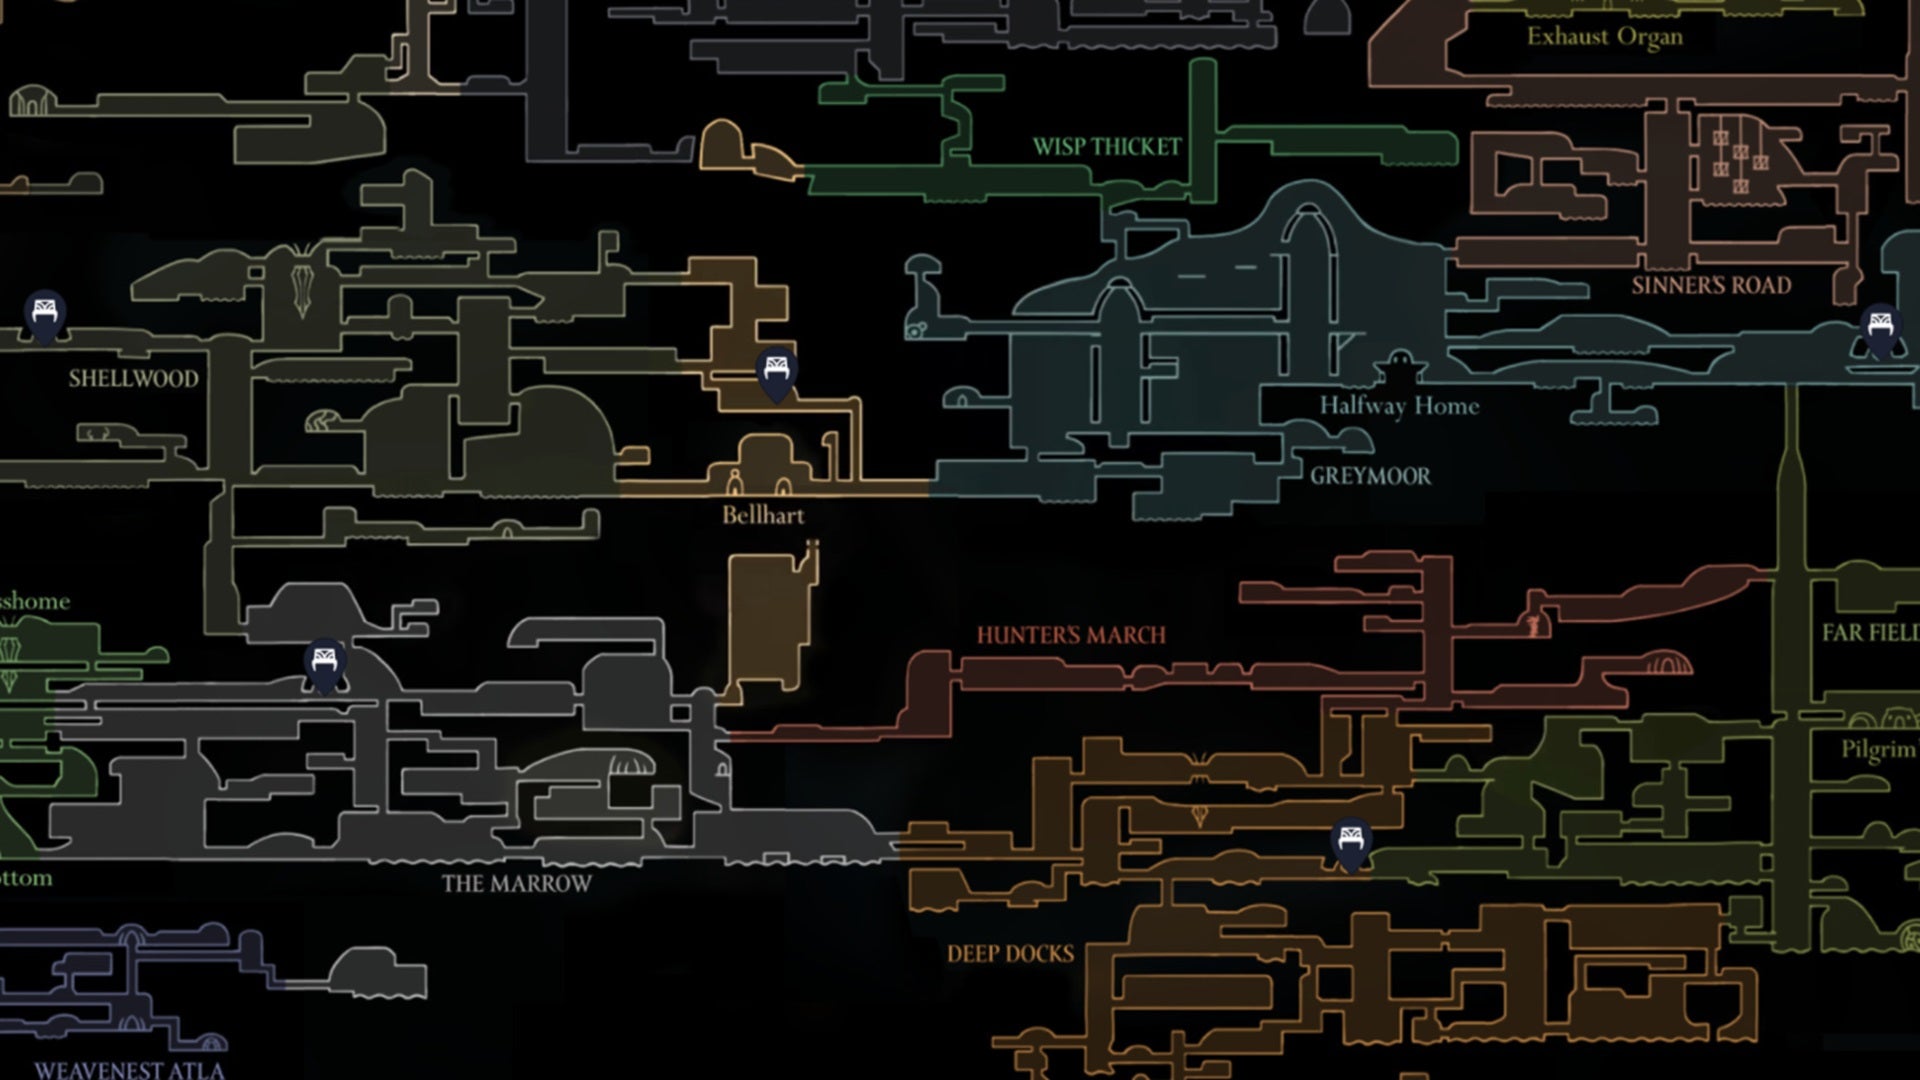
Location: Far Fields, in the same room where you fought the Fourth Chorus. This iteration of the Savage Beastfly is optional and you’ll only fight it to complete the Grand Hunt quest in Bellhart. See our walkthrough for more details.
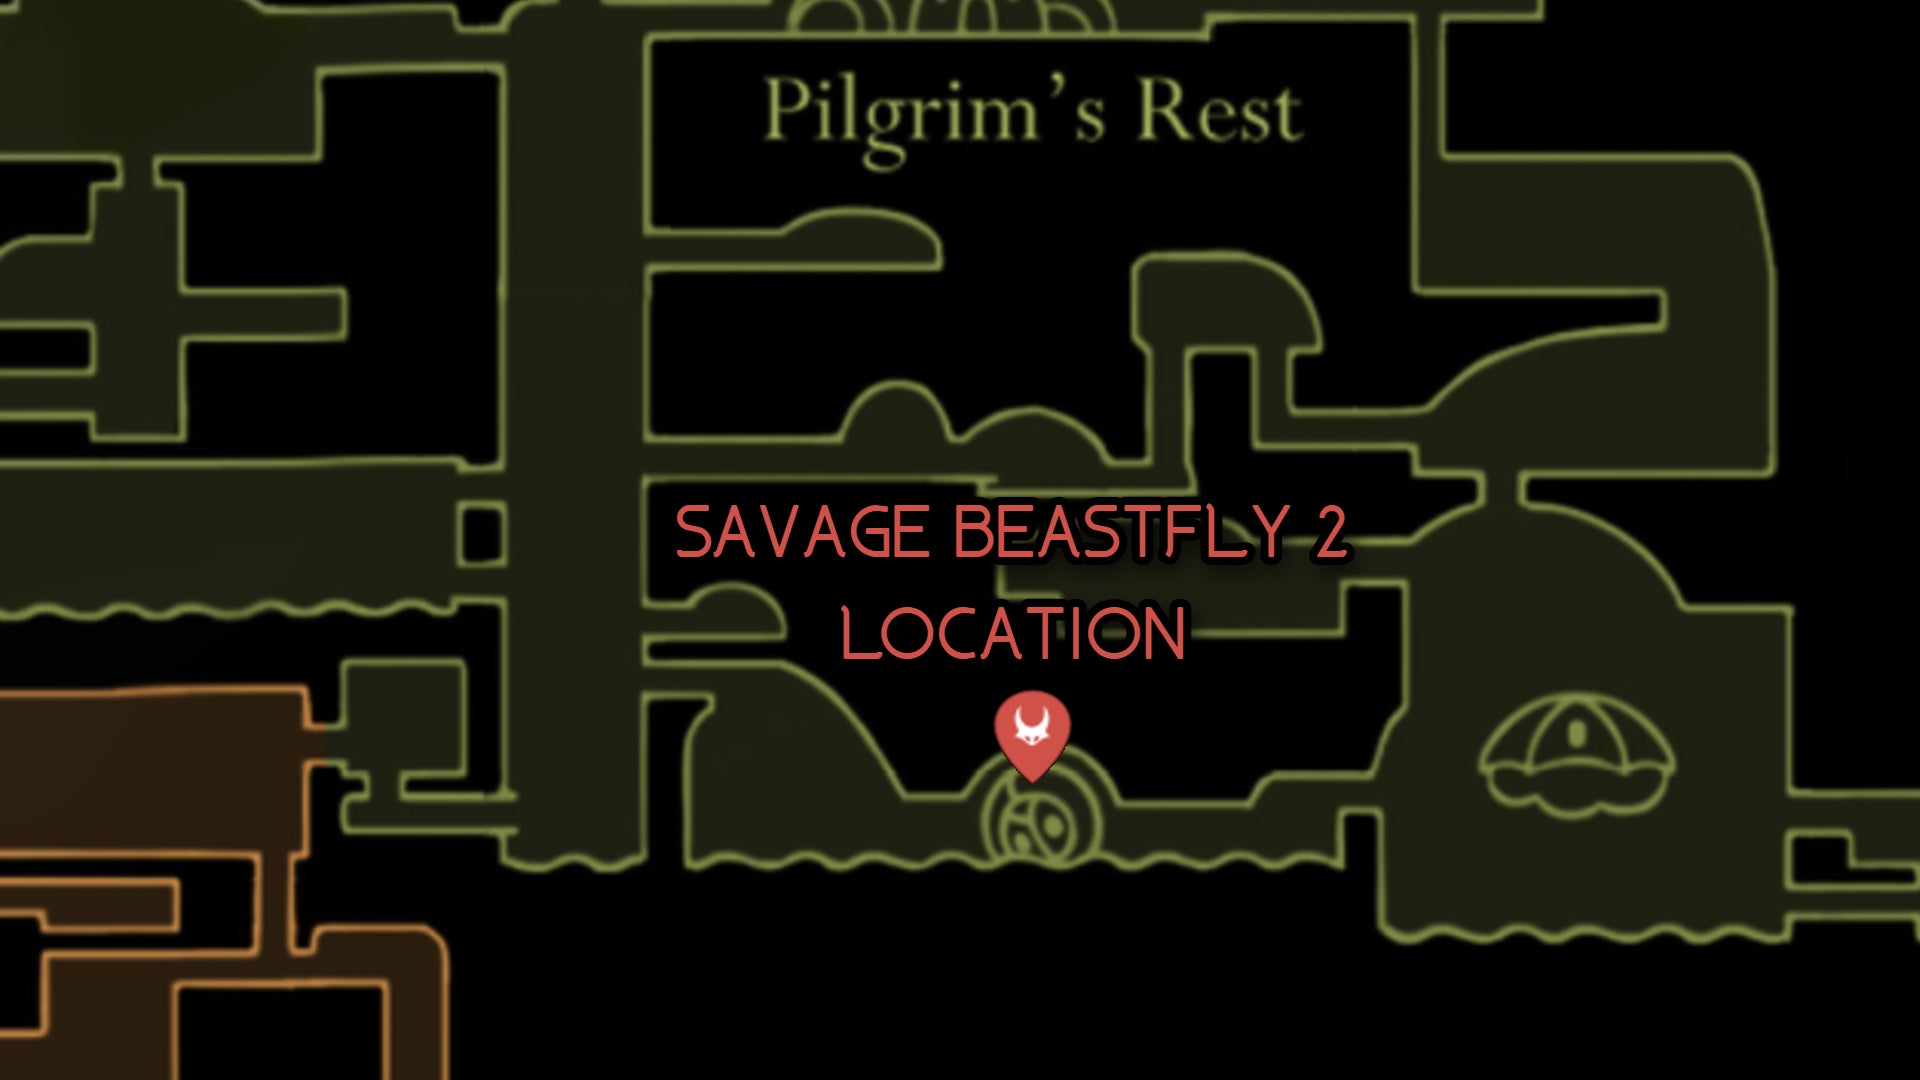
Image credit:Rock Paper Shotgun/MapGenie/Team Cherry
How to beat: The tactics that you used against the first Savage Beastfly still apply here, but this fight is made tougher by the floor, which will frequently be destroyed by attacks. Combine all of the dodges and jumps that you learned while fighting the Fourth Chorus to emerge victorious, and watch out for the flying enemies known as Tarmites that spawn during the battle. They fire explosive projectiles and can make the fight much harder than it needs to be, so dispatch them quickly with projectiles, the Silkspear, or upward slash jumps with your Nail before continuing your assault on the boss.
Great Conchflies

Two Conchflies are not, in fact, better than one. |Image credit:Rock Paper Shotgun/Team Cherry
Location: The Blasted Steps, to the right of the room that holds the Pinstress’ house. Go down the shaft with the hanging cages and stick to the left until you reach a hallway that’s guarded by Driznits, those little red flying enemies which bounce spikes diagonally. Run past them to find the boss room.

Image credit:Rock Paper Shotgun/MapGenie/Team Cherry
How to beat: One Conchfly wouldn’t be very difficult, but two are troublesome. This fight requires patience and skilled dodging, as the Conchflies will drill in and out of the ground and ceiling, coming at you horizontally and vertically. At times, one of them will also act like a Driznit and shoot a spike that bounces off of the walls. When it does so, you’re better off staying on the ground than jumping in the air, which will likely cause you to be hit.
Thankfully, this isn’t a situation where you need to beat both Conchflies; they share the same health bar, so simply hack away at whichever is on screen. Eventually you’ll win and the other Conchfly will flee.
Last Judge

All these flames plus a really long boss runback make the Last Judge a proper pain. |Image credit:Rock Paper Shotgun/Team Cherry
Location: The Blasted Steps, beyond the Grand Gate. You need to have completed the Grand Gate quest and rung the large bells that are connected to Benches in The Marrow, Deep Docks, Shellwood, Bellhart, and Greymoor in order to access the boss arena. If you’ve been following our super detailed walkthrough (you should!) then you’ve already rung these; if not refer to the map below to see their locations.

Image credit:Rock Paper Shotgun/MapGenie/Team Cherry
Zoom in on this image to get a close look at all of the bells you need to ring to open the Grand Gate and face the Last Judge. |Image credit:Rock Paper Shotgun/MapGenie/Team Cherry
How to beat: The Last Judge is brutal until you recognise her tells. She wields a ball and chain to deliver a downward jump slam, a ranged ball throw that can hit you on the return, and a circular spin. The jump slam is easy enough to avoid, since she goes into the air. Whenever the Judge slightly angles her body and places a foot back, she’s about to do the ranged ball throw, so either dash backwards to avoid it or move forwards to get close enough to deliver a few hits (but definitely jump to avoid the returning ball). Whenever the Judge does a mini-spin with her ball and chain, she’s about to deliver the bigger spin, so back up.
This fight unfortunately has two phases, and the Judge’s attacks will become augmented with flames in the second phase. The circular spin is the biggest change here, as it unleashes arcs of fire that slowly inch towards you. The Judge will also charge in your direction, leaving behind fire streams on the ground, so jump over her and use your Drifter’s Cloak!
As we’ve pointed out in our walkthrough section on the Last Judge , dying prompts a frustratingly long runback from the last Bench, making this battle even more irksome. We recommend at least 4 Mask Shards, equipping the Fractured Mask , the Plasmium Phial , and perhaps the Pollip Pouch that you can get in Shellwood . Load up on extra projectile Tools, which work well against the Judge’s second phase!
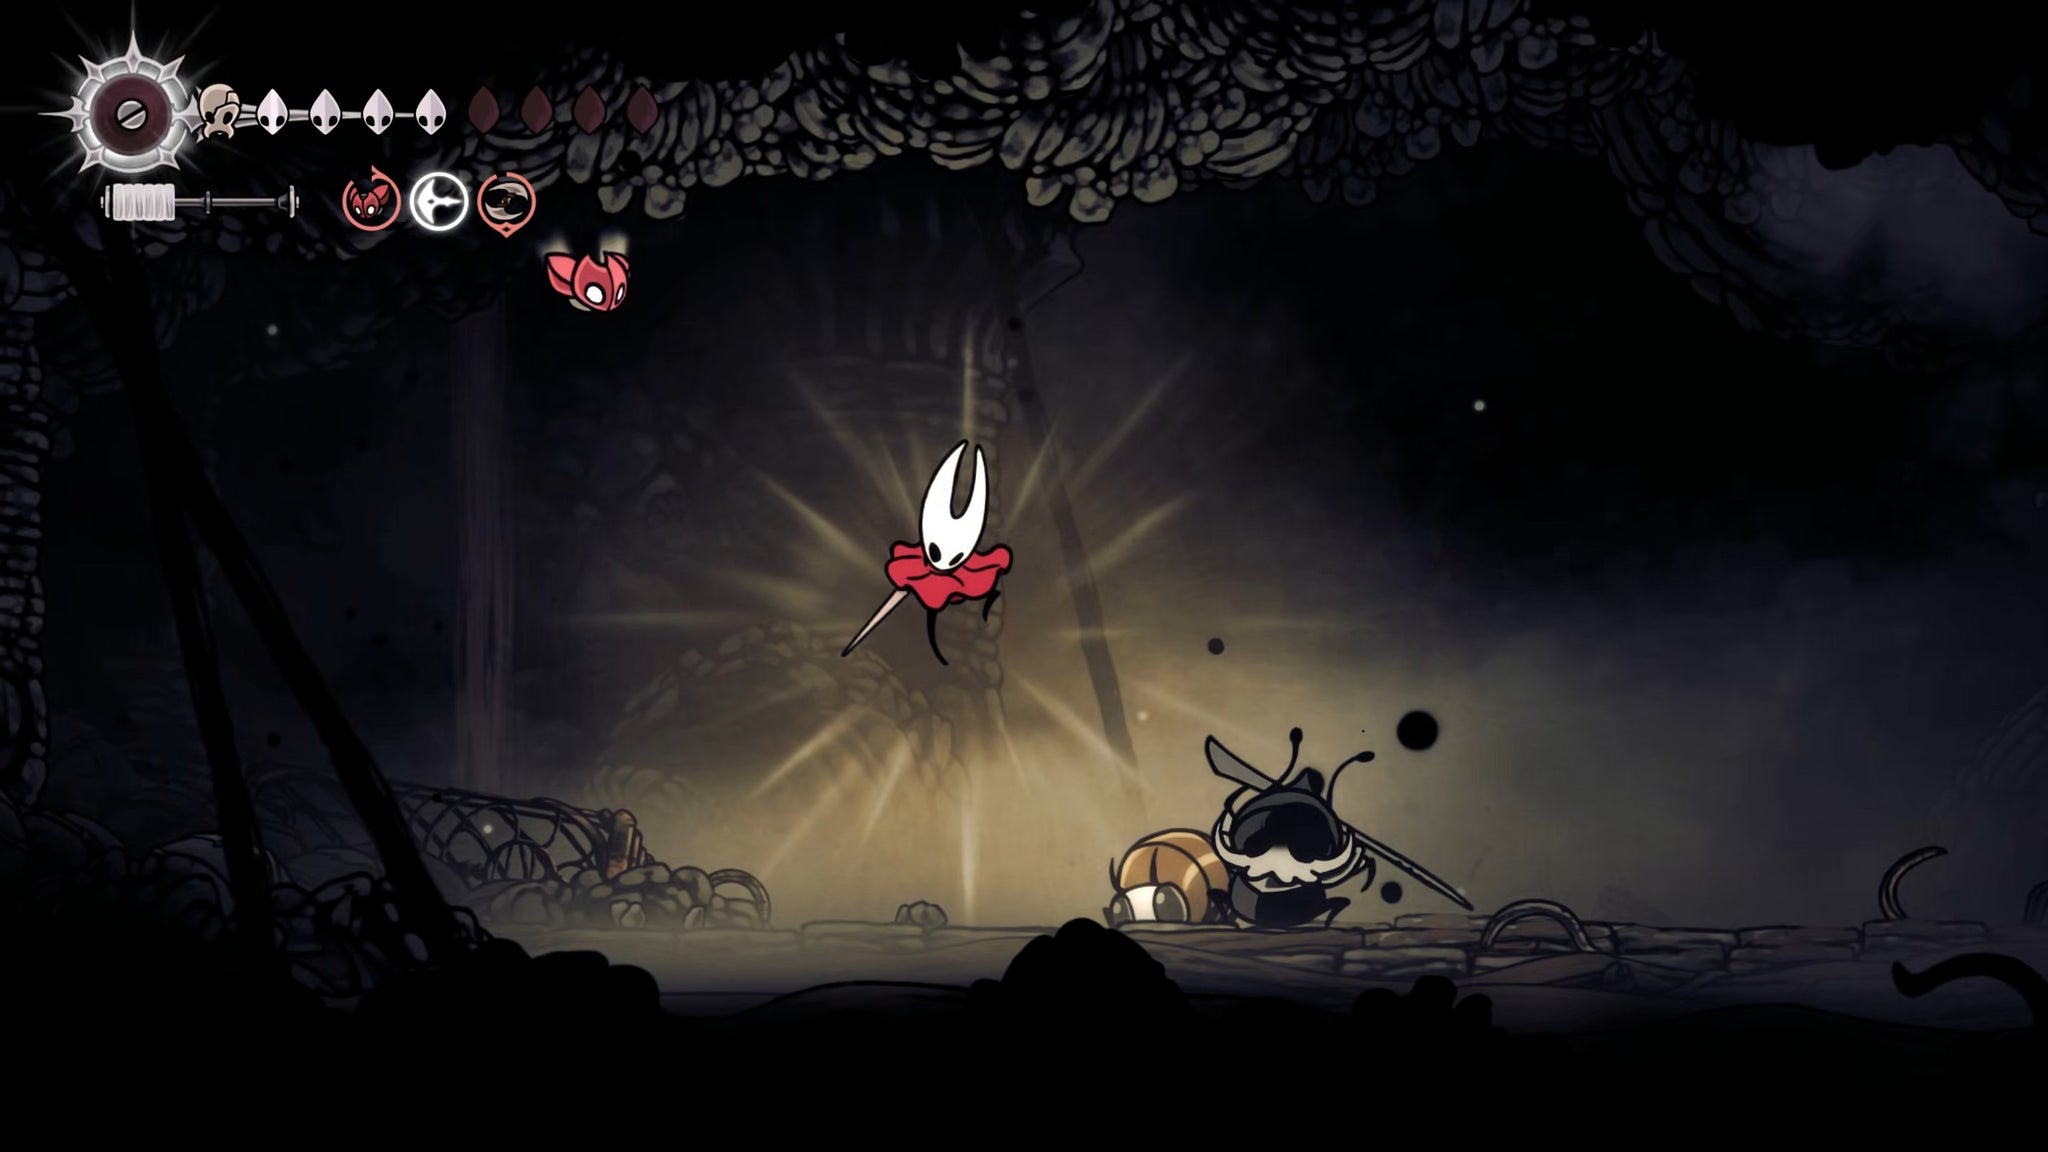
Phantom
A surprise Phantom of the Opera-style boss who gives you the parry ability?! Let’s go! |Image credit:Rock Paper Shotgun/Team Cherry
Location: Bilewater, in a hard-to-access area called the Exhaust Organ. To reach the Exhaust Organ, you’ll first need to traverse the maze-like rooms of The Mist. (See our guide on how to get through The Mist for tips.) Once you’ve entered the Exhaust Organ, you can find a much-needed Bench to the northwest above your entrance point. Then you should wall jump your way to the top while avoiding the exhaust streams, cut down the elevator mechanism to create a shortcut, and then head to an upper left room to meet Phantom.

Image credit:Rock Paper Shotgun/MapGenie/Team Cherry
How to beat: Phantom’s a great fight, plus the organ music in the background makes this feel like a boss right out of Castlevania! Overall, you should approach Phantom in the same way you did Lace, using your double jump and downward slash to attack her from above while jumping to avoid her throw attacks and charges. She’s small, fast, and deflects your strikes regularly, but luckily she only deals one Mask of damage unless you get hit by her counter.
Halfway through the fight, Lace will start disappearing. She telegraphs the next place she’ll reappear with a flash of light, so immediately get out of the way, and perhaps use the opportunity to Bind. You can also Bind when she flies into the air and prepares to throw her weapon diagonally down at you - just dodge this and heal while she recovers. With some trial and error, the fight will end in a spectacular display of clashes, and you’ll get the awesome Cross Stitch skill, which lets you parry!
Cogwork Dancers
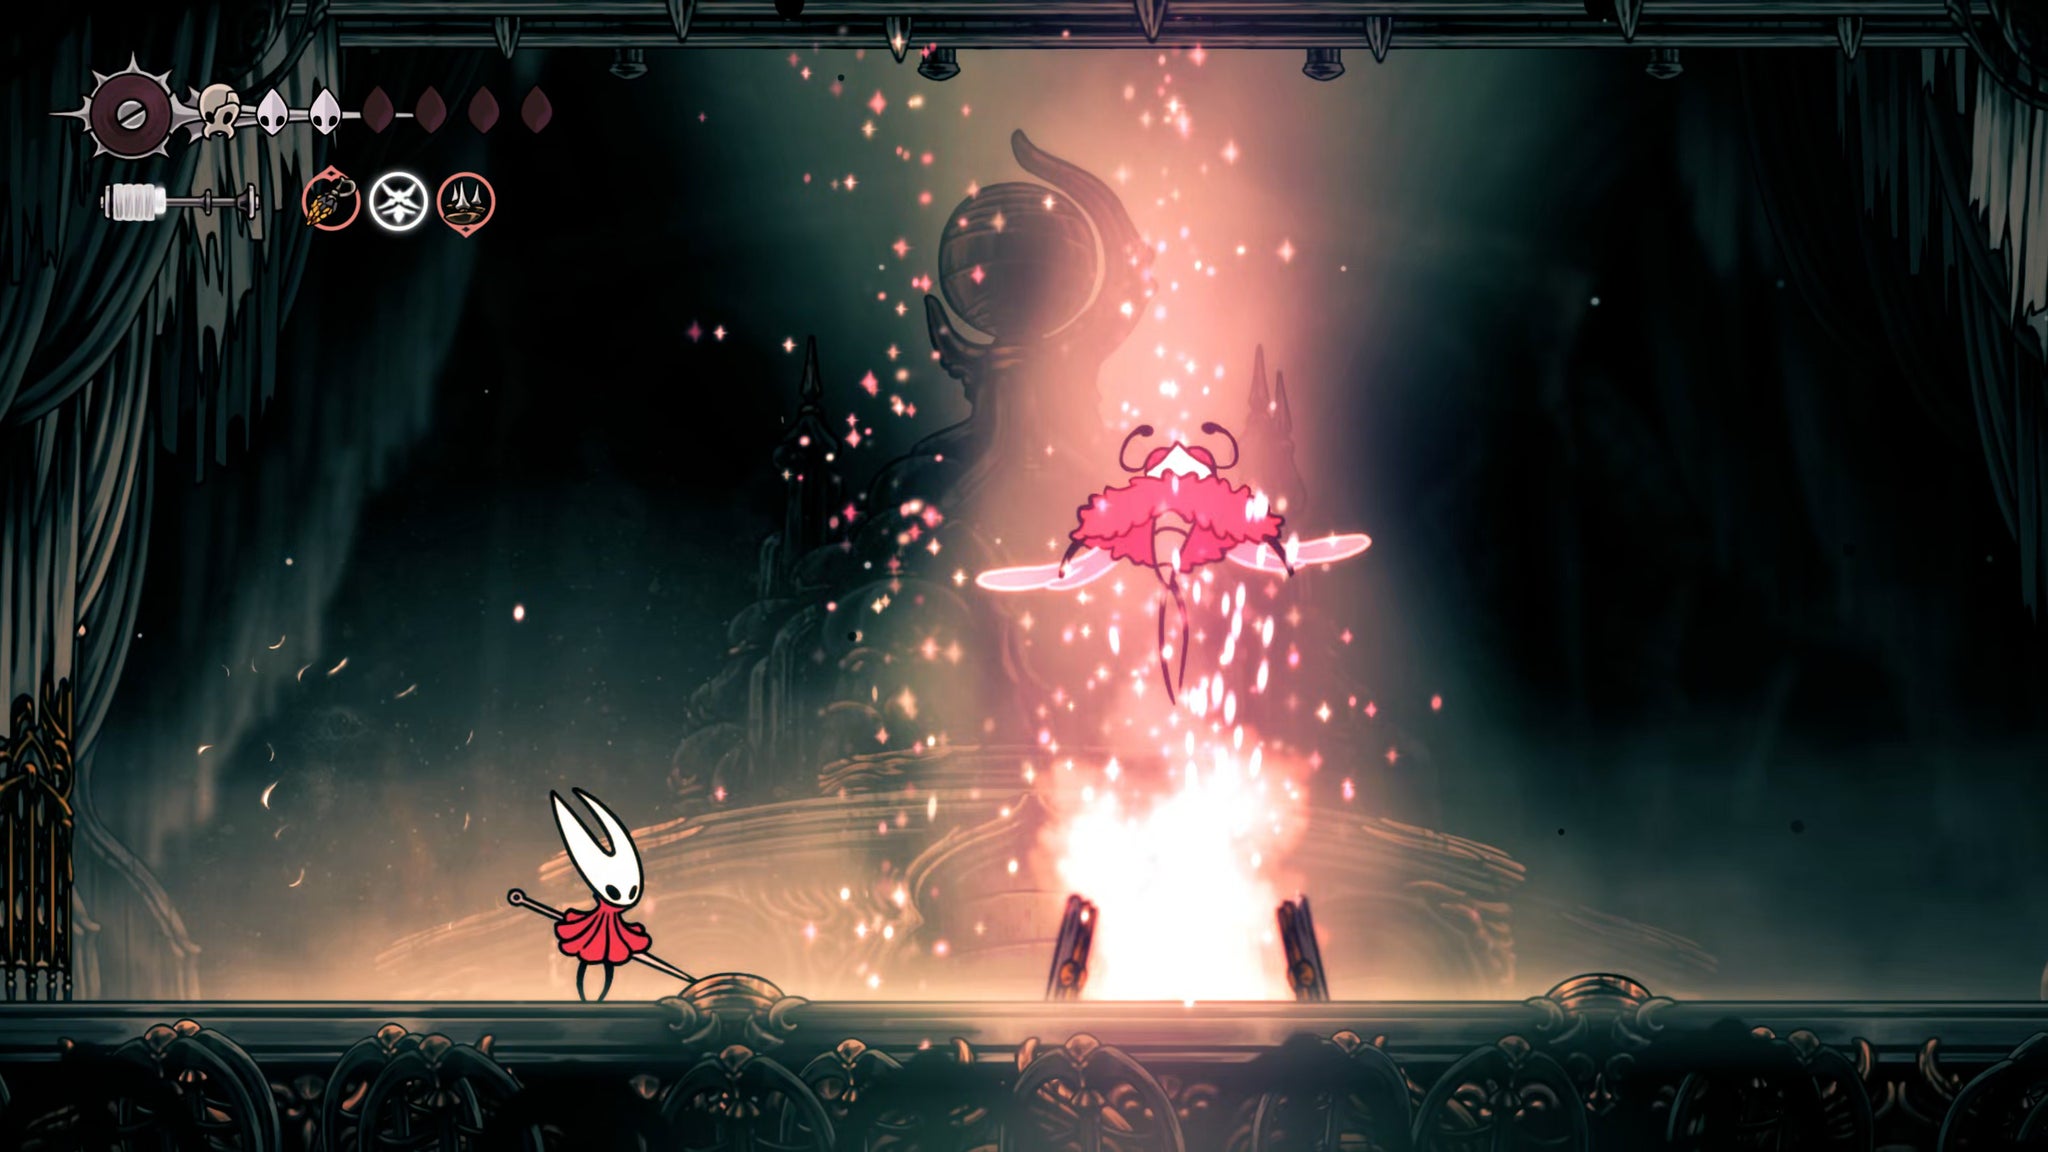
Three’s a crowd in this dance, unfortunately. |Image credit:Rock Paper Shotgun/Team Cherry
Location: Cogwork Core, in the main central shaft that intersects with Choral Chambers. The boss arena is preceded by a room with two tall foes called Grand Reeds - it’s recommended that you just jump over them instead of fighting.
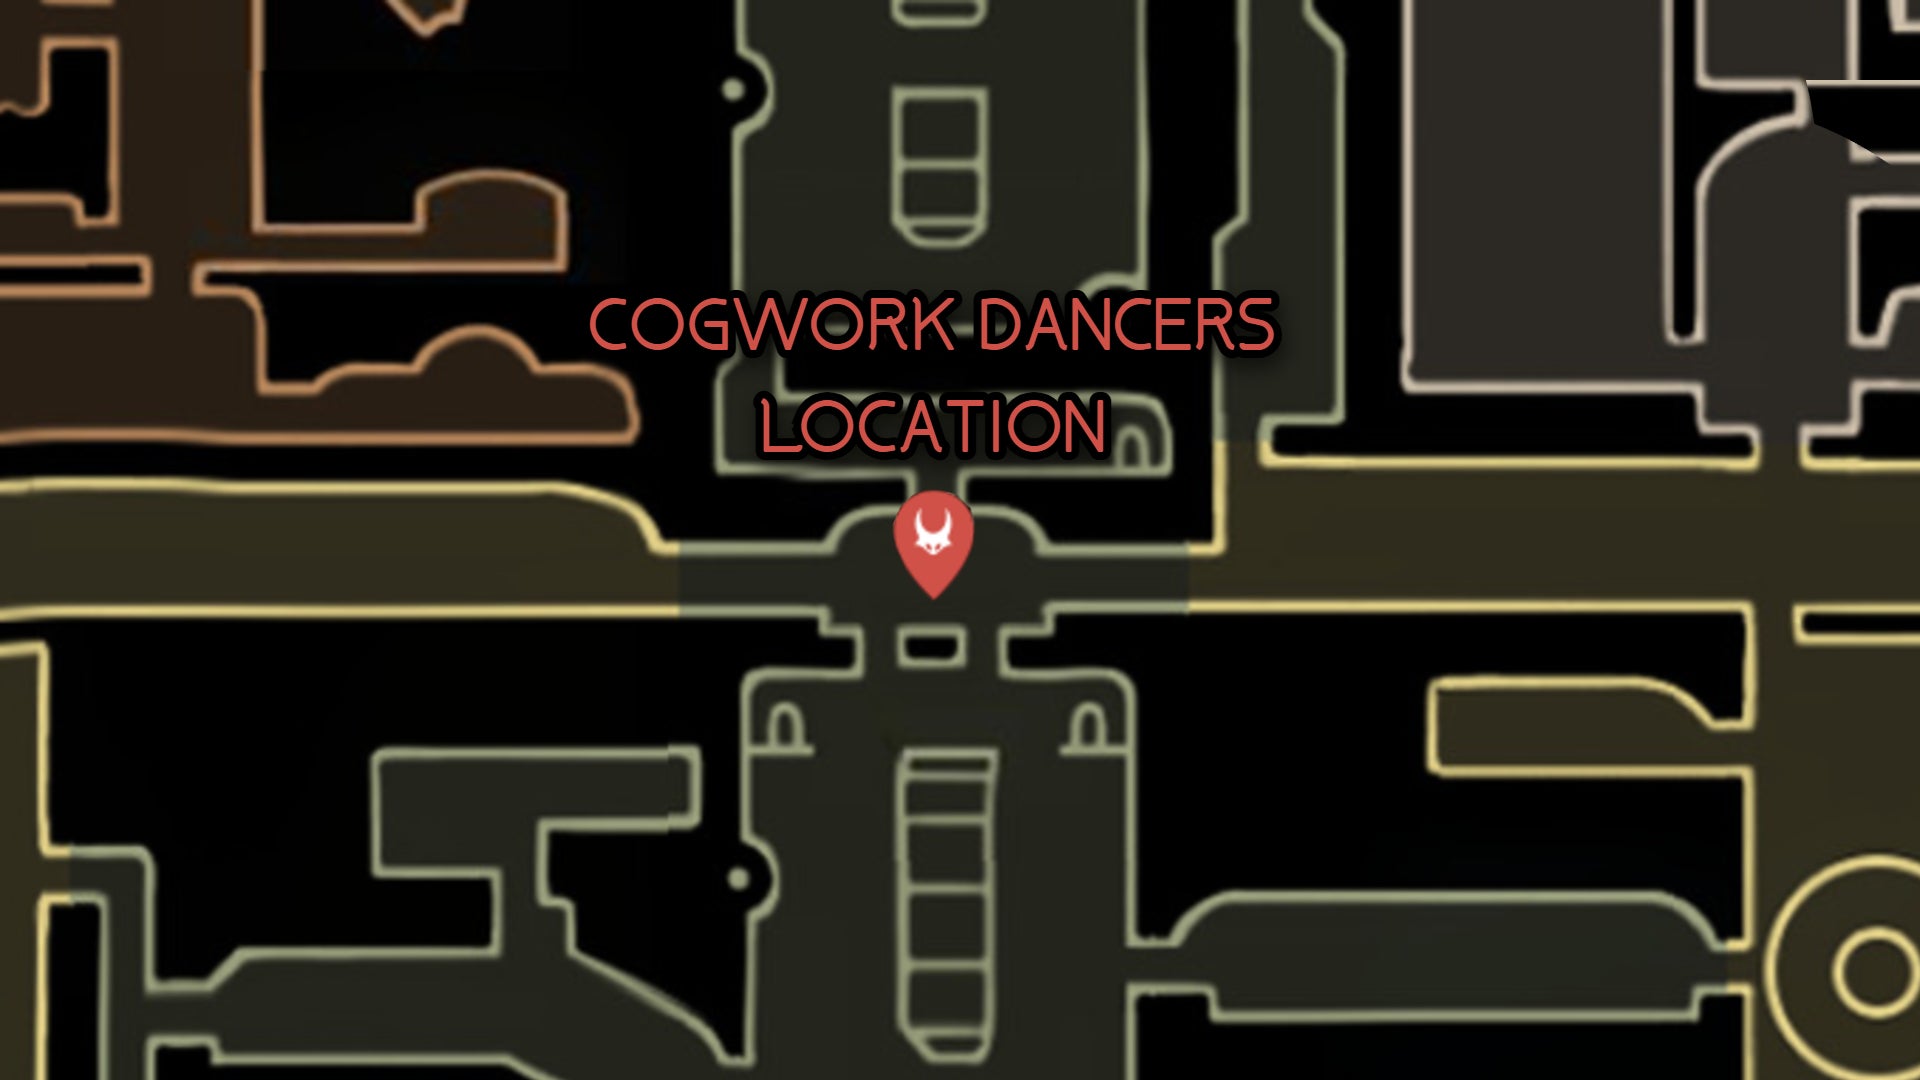
Image credit:Rock Paper Shotgun/MapGenie/Team Cherry
How to beat: This is a creative and engaging fight - or rather, a delicate dance. The Cogwork Dancers act simultaneously and will always telegraph their next movements via a strand of white that ends in an area-of-effect swipe. Sometimes, they’ll come together in the center of the screen to unleash a large array of slashes.
Treat this battle like the deliberate waltz that it is. Dodge out of the way, get your attacks in, and survive three phases. This is easier said than done, as the Cogwork Dancers’ patterns become faster with each phase as the tempo that they dance to increases. To make this fight easier, you may want to rely on Tools like Tacks, which you can scatter across the ground to poke at the Dancers as they swoosh past. Sting Shards also work well, as long as you’re fast at anticipating where the Cogwork Dancers are going to appear, as are projectiles like the Curveclaw or Silkshot .
Once the three phases are over and you’ve defeated one Cogwork Dancer, there’s a brief final phase where the remaining dancer tries to complete their movements solo. It’s a bit sad and barely counts as a phase, so get your final hits in and finish things.
Trobbio
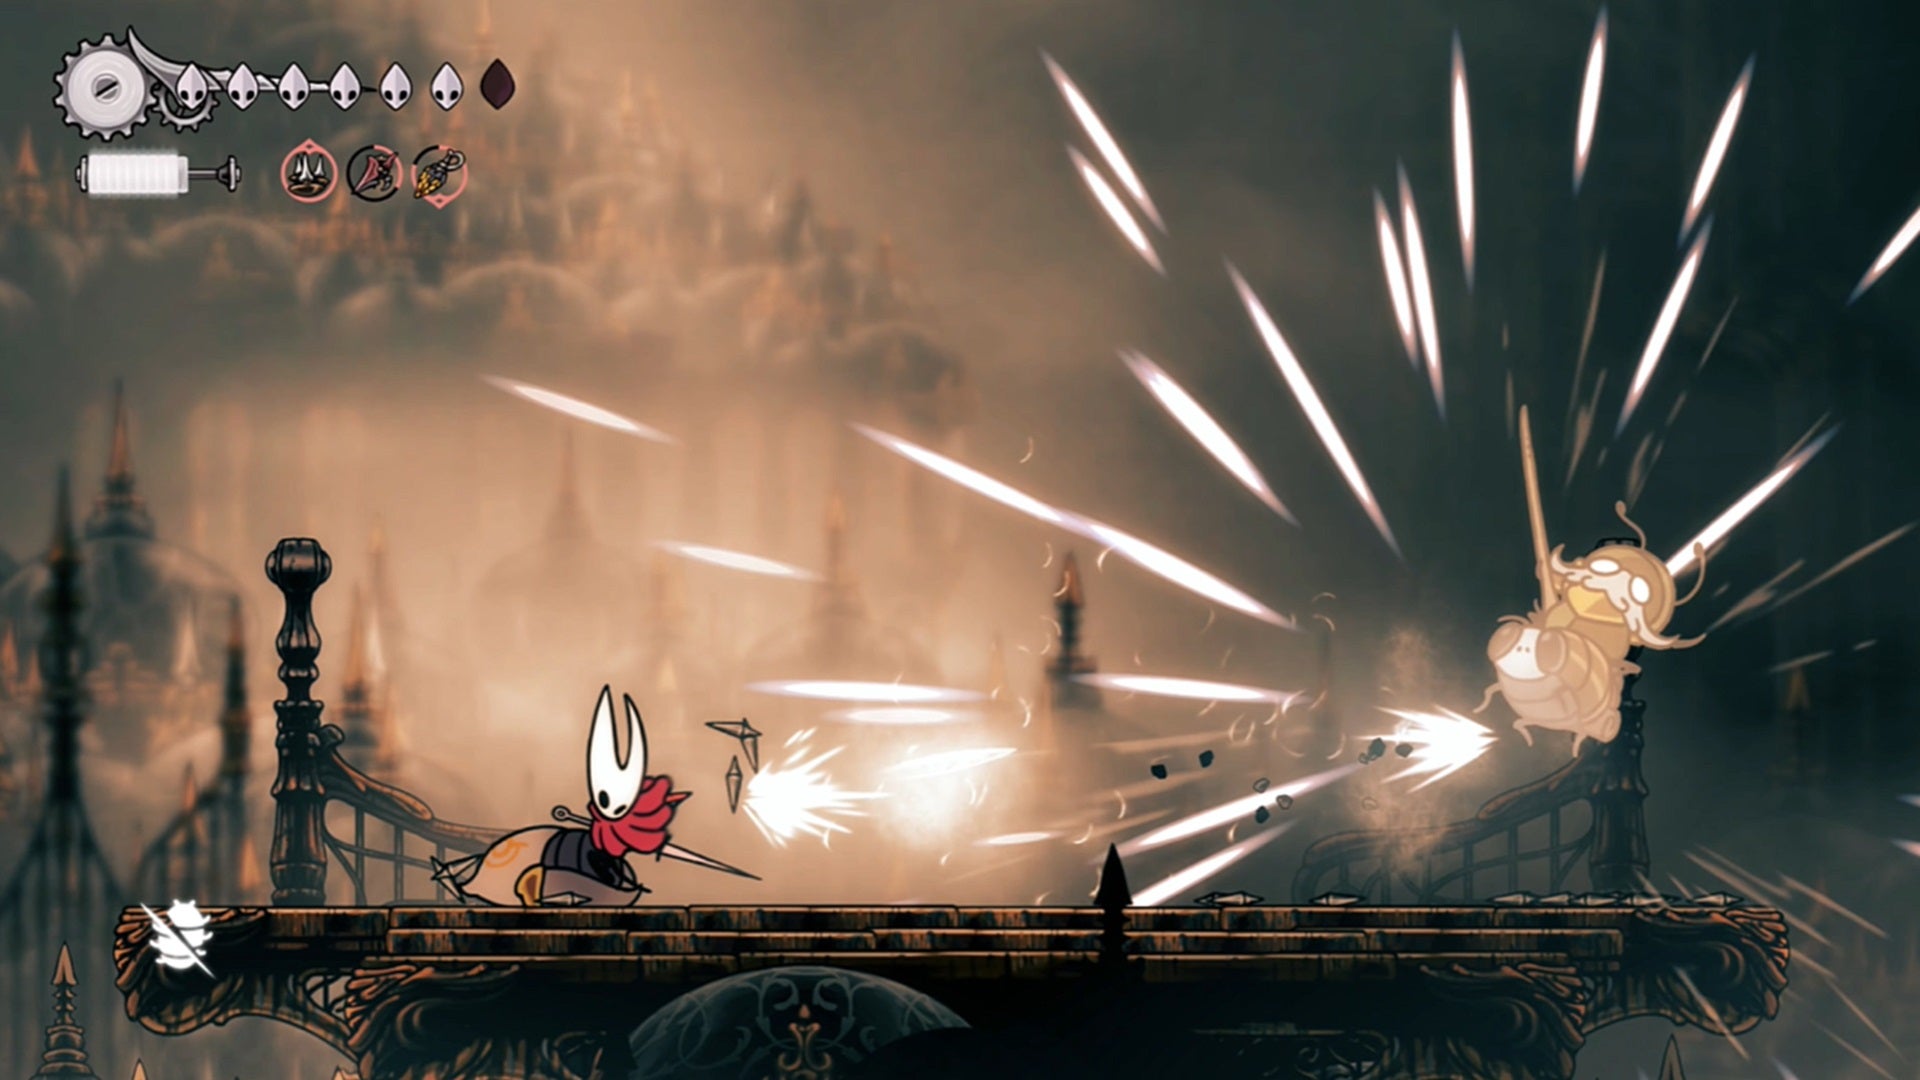
Clearly a theatre bug, this Trobbio fellow. |Image credit:Rock Paper Shotgun/Team Cherry
Location: The Whispering Vaults, in the big central area known as The Stage. There’s a Bench right under Trobbio’s arena in the Grand Bellway - in the room where you can see an image of Trobbio in the background, hit the lever to open a leftwards shortcut into the Choral Chambers. This allows you to drop down into the Grand Bellway and rest up before tackling the boss.
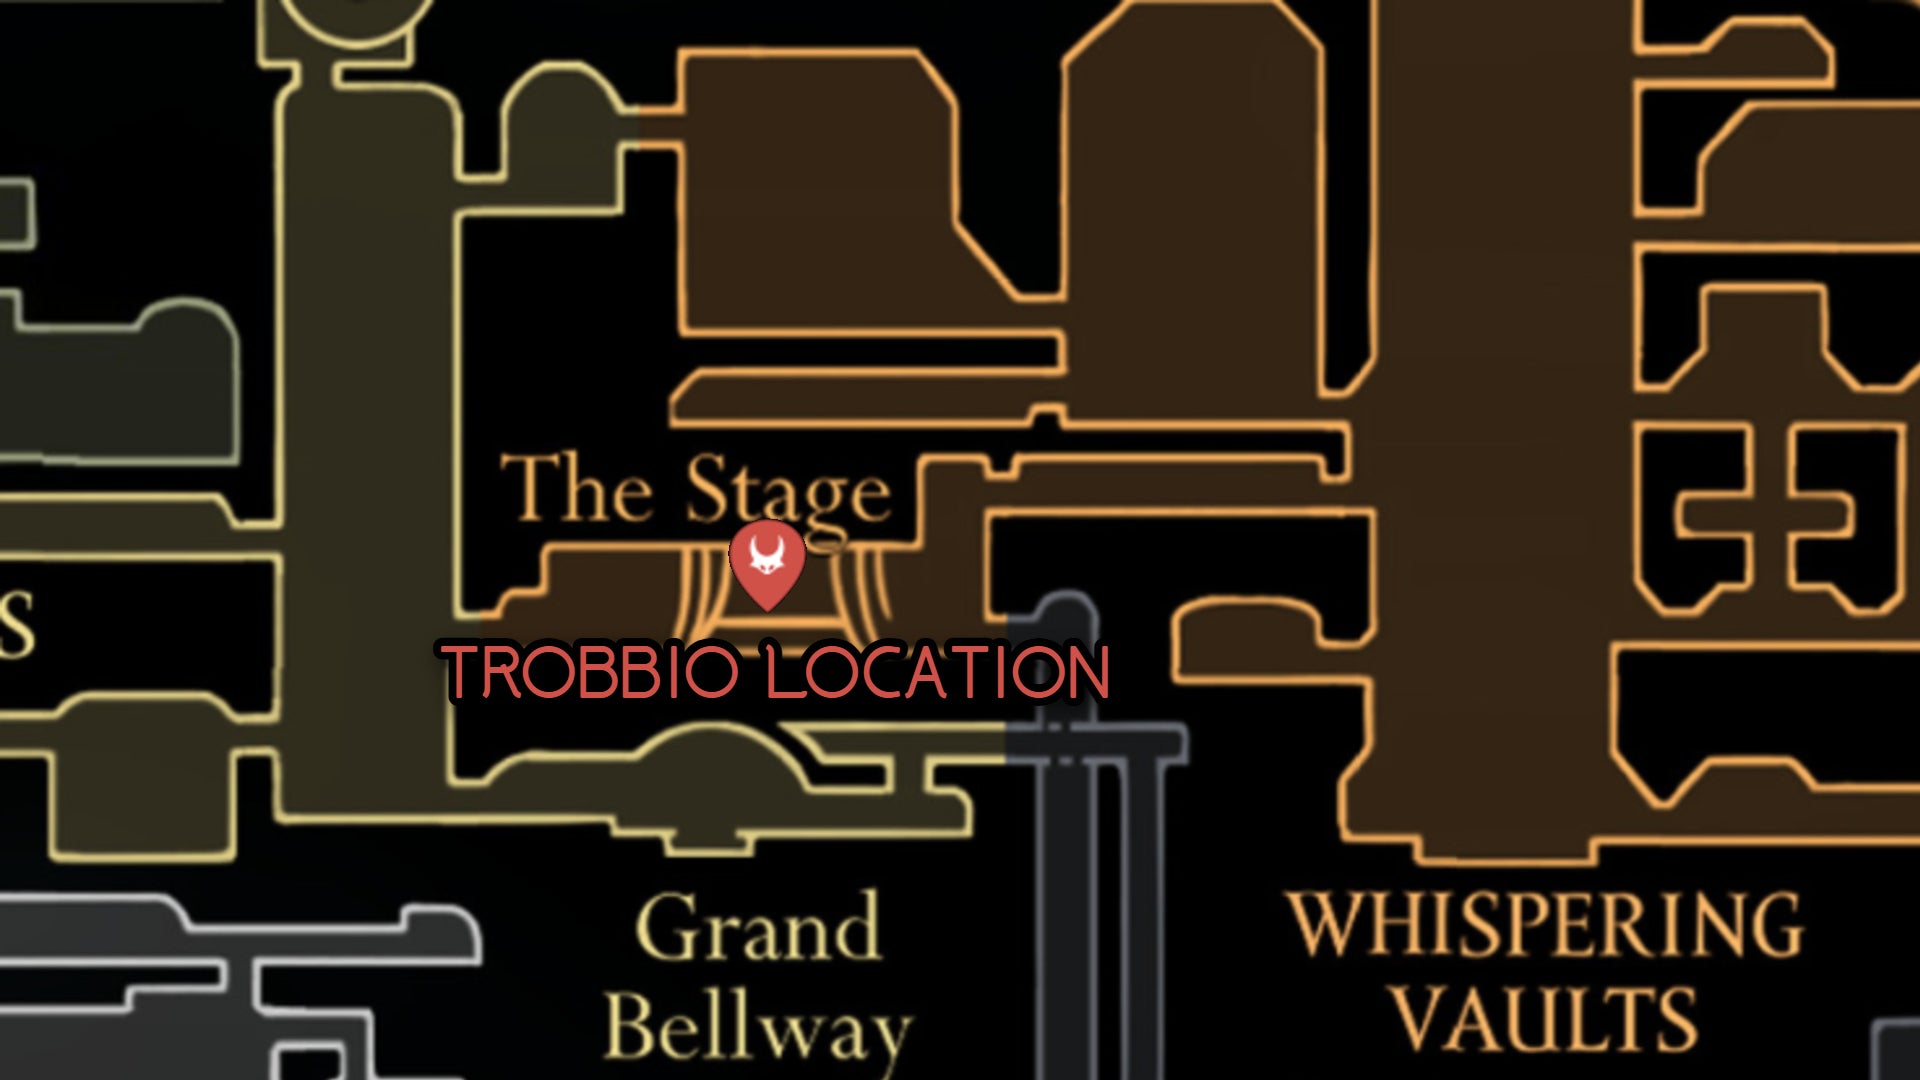
Image credit:Rock Paper Shotgun/MapGenie/Team Cherry
How to beat: Trobbio is certainly a flamboyent fellow, but by this point you’ve fought bosses who are tougher. He’ll toss out balls that bounce across the stage and create cross-shaped smoke streams that you need to avoid, and he’ll also chuck fireworks with regularity, which aren’t too hard to dodge. His most unpredictable attack is when he turns himself into a tornado and spins like a top, since he’ll always launch two mini-tornados at the end of the move that are occasionally hard to predict.
In the second phase of this battle, Trobbio starts shooting smoke streams up from the stage floor. Once again, these are easily avoidable, but it’s very possible to get sloppy here as he won’t let up with any of his other attacks. Keep the dodging up and get your strikes in whenever possible. Before too long, Trobbio will die in an appropriately dramatic manner.
Garmond and Zaza
Garmond wanted to fight me, eh? Little did this old bug know that I was packing the Silkshot… |Image credit:Rock Paper Shotgun/Team Cherry
Location: Songclave, in the northeastern corner of the Choral Chambers. However, you can only unlock the duel with these two if you’ve encountered them multiple times throughout the Choral Chambers. See this section of our walkthrough for all the places you need to go.
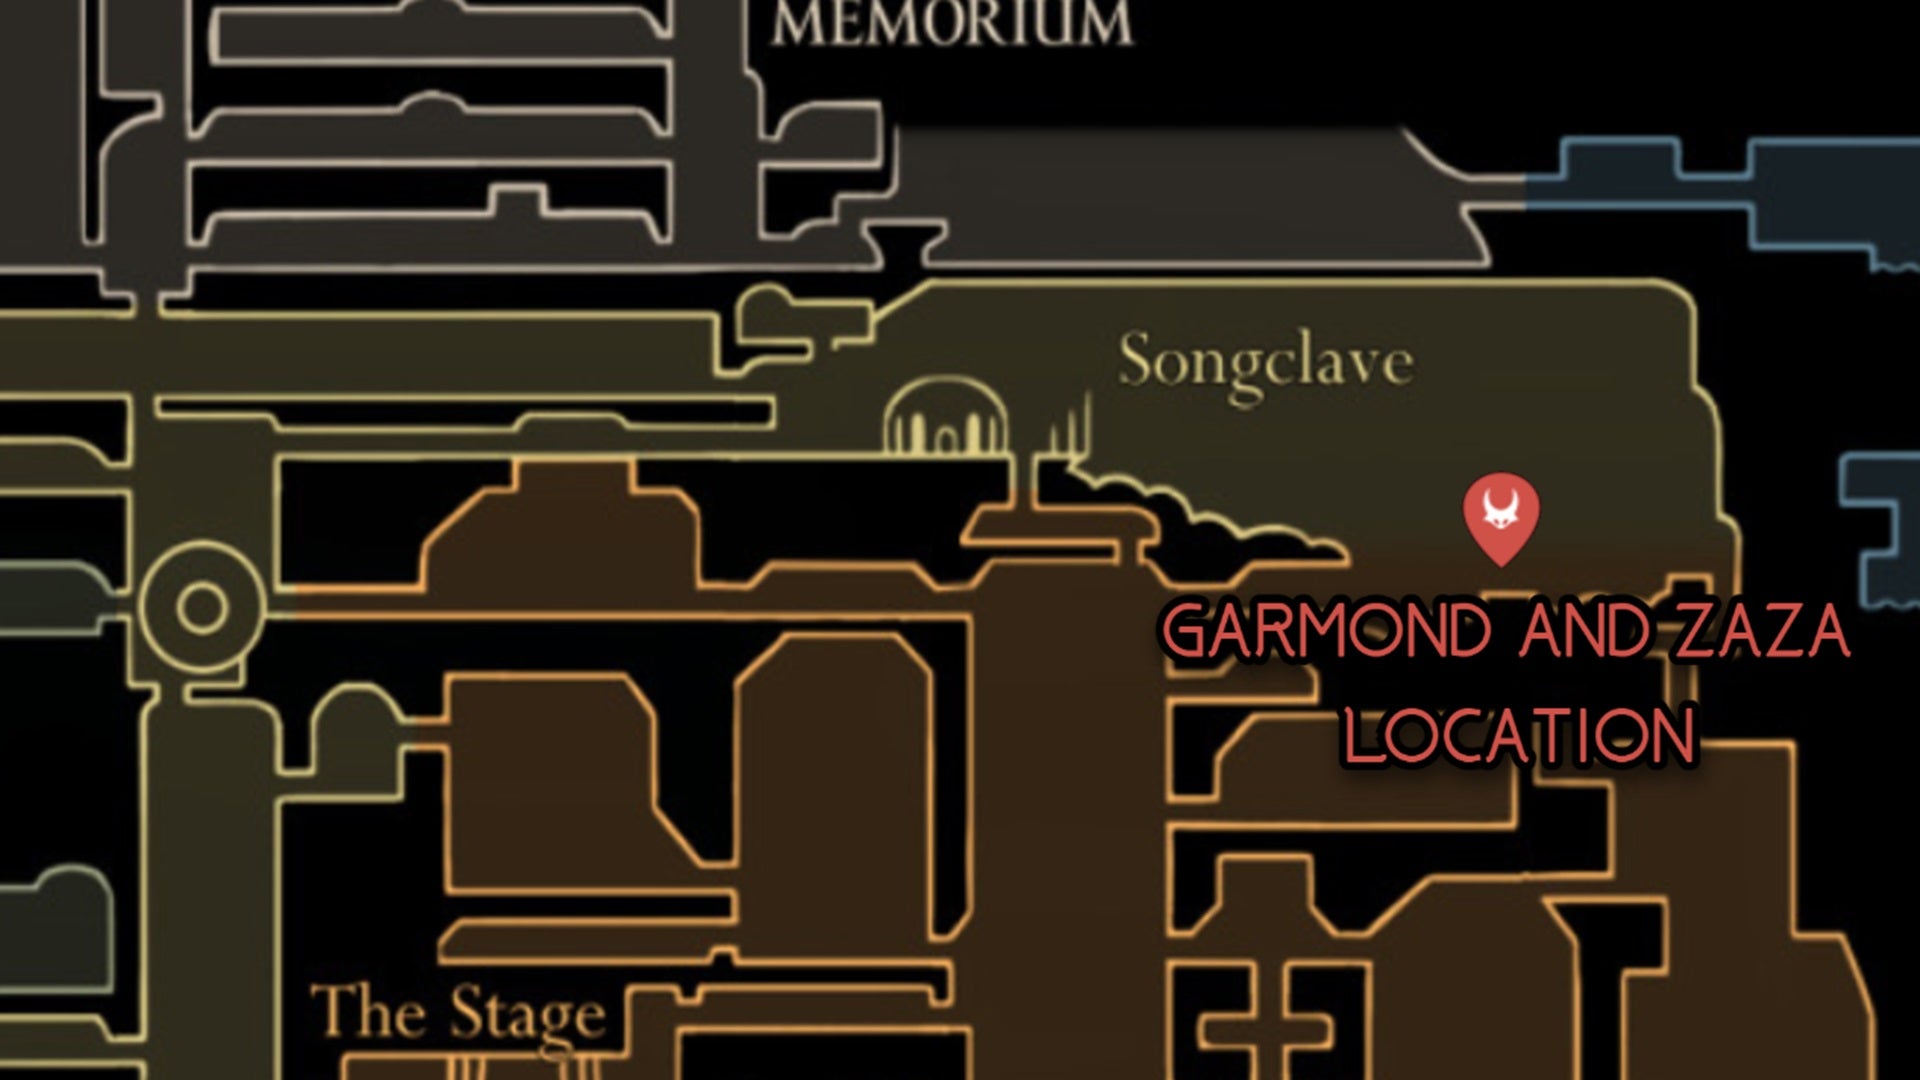
Image credit:Rock Paper Shotgun/Team Cherry
How to beat: This is a friendly sparring match, and it’s more of a fun time than a real challenge. Garmond and Zaza charge at you and are easily knocked off the edge of the platform, and sometimes they’ll hop into the air to deliver a downwards strike. Most of the time, Garmond will wave his lance around in frenzied directions like the Don Quixote wannabe he is. As long as you’re not directly next to him this is easily avoidable.
Forebrothers Signis and Gron

Two against one is unfair, but these bros aren’t so bad in the grand scheme of Silksong bosses. |Image credit:Rock Paper Shotgun/Team Cherry
Location: Deep Docks, in the lower level of the region. These two are only accessible after you purchase Jubilana’s Simple Key and use it to unlock a door beneath Forge Daughter, and you’d best have the Clawline as well. Refer to this section of our walkthrough to figure out where to go!
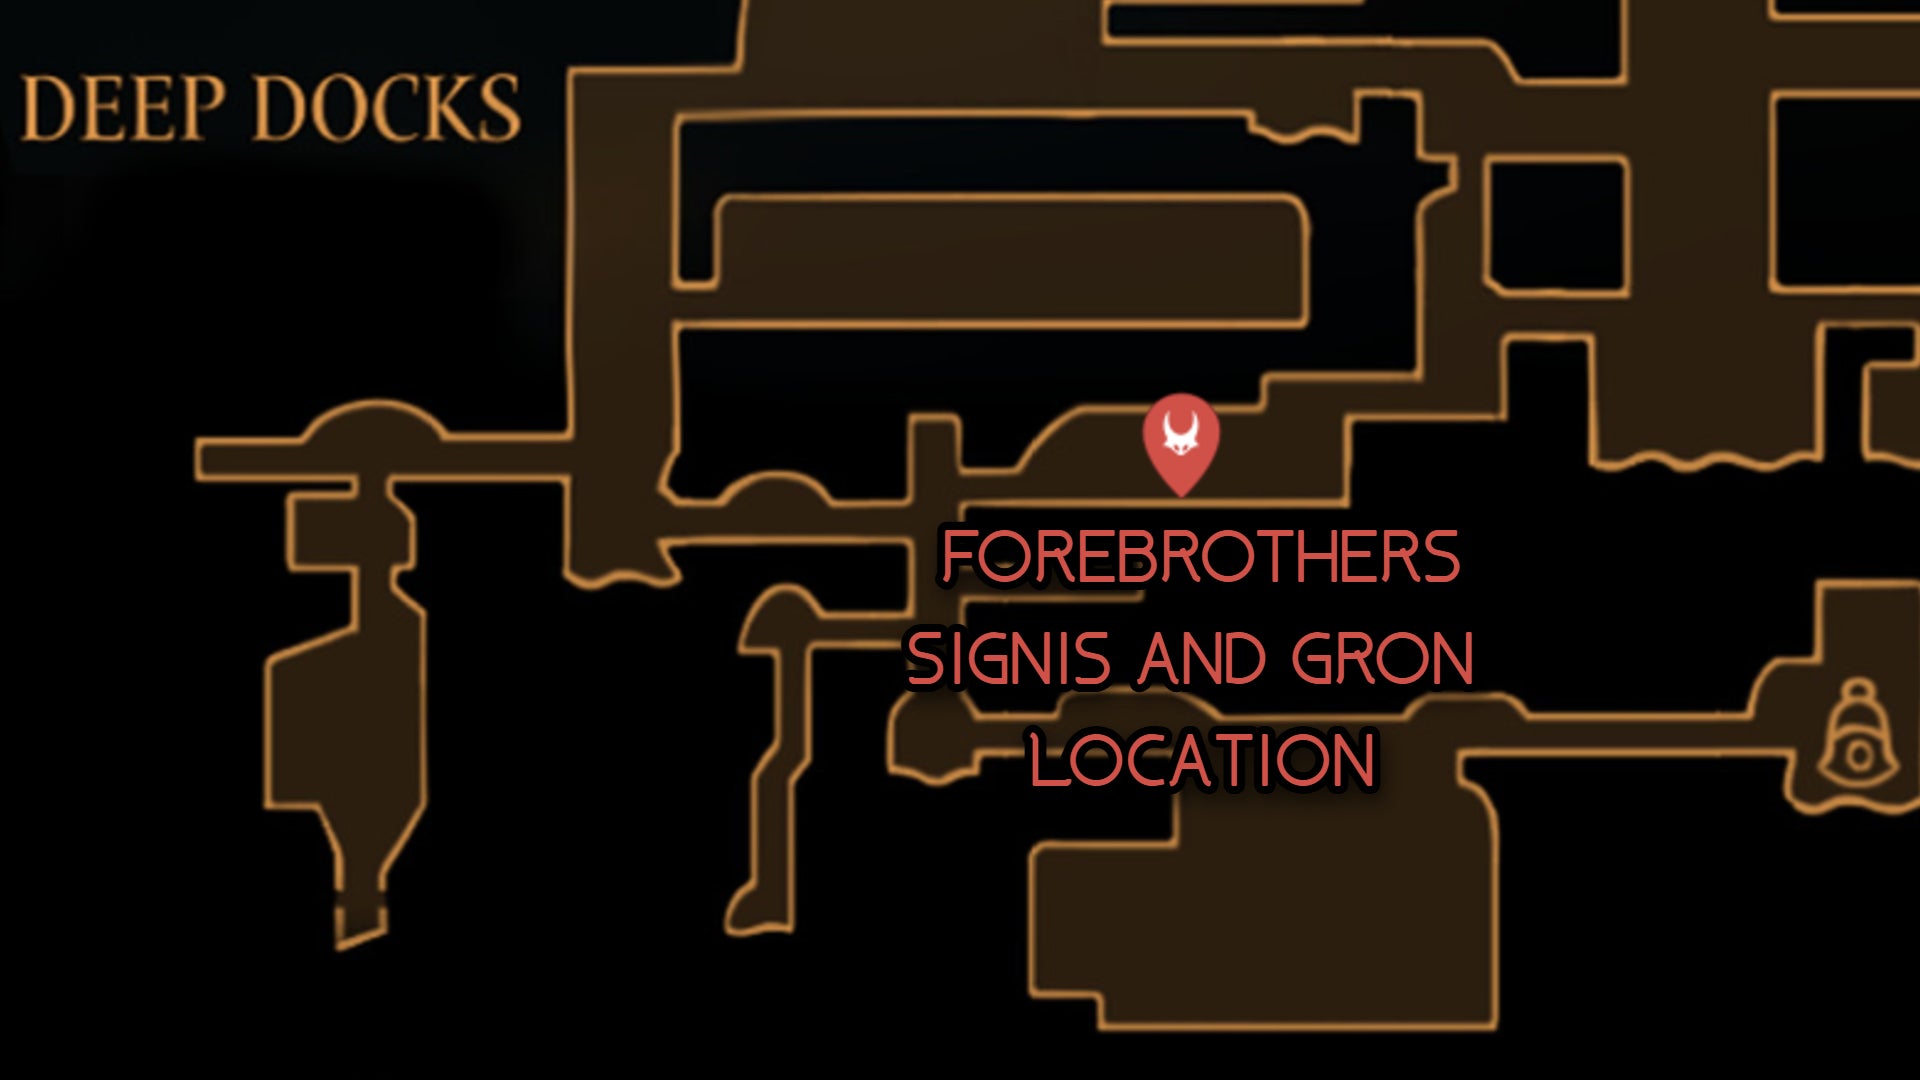
Image credit:Rock Paper Shotgun/MapGenie/Team Cherry
How to beat: These guys tag-team you with some fairly predictable tells. Signis spins his staff and flings it outwards before following up with a series of staff swings. All easily avoidable, and you can usually get a few strikes in after jumping over the staff. The additional minions that spawn during this stretch of the fight make it harder than it actually is.
Eventually, Gron appears and starts doing jump attacks. He’ll leap into the air and fling his spear or crash down onto the ground with it. Beware of the spear when it’s in the ground or when Gron lands on it, as it’ll unleash a small area-of-effect explosion. The Magma Bell, which reduces flame and magma damage, comes in handy here - as does focusing your fire on Signis so you can make the battle a 1v1 affair.
The Unravelled
Lots going on in this fight, so don’t get distracted and forget to dodge the Unravelled’s charge attacks. |Image credit:Rock Paper Shotgun/Team Cherry
Location: Whiteward, at the very bottom of the region near the intersection with the Underworks. You’ll need the Clawline and the Surgeon’s Key (which can be found on the body of an enemy that drops from a Clawline hook) to open this boss arena - see our walkthrough for the full details!

Image credit:Rock Paper Shotgun/MapGenie/Team Cherry
How to beat: The Unravelled spawns after a bunch of other enemies, so your first order of business is maintaining your health against them. Stay under the Dreg Husk and slash upwards, and watch out for the bouncing movements of the Dregwheel. Once you’ve dispatched them, the Unravelled will appear and start charging at you. Its other main attack is spitting out projectiles, which can either go high or low.
This battle is considerably more doable with Faydown Cloak’s double jump . Whenever the Unravelled appears from the ground, hit it once and then dash backwards and get ready to double jump over the projectiles or incoming charge.
Eventually, the Unravelled will summon minions and create spears that pop out of the ground and ceiling. Watch for the telltale glint of the spears, and keep moving as much as possible. I recommend scattering the arena with Tacks or Sting Shards, as this stretch of the fight is extremely chaotic, and a few stray hits in a row will wreck all of your Masks easily. If you’ve got the Injector Band to speed up your heals or the Silkshot handy, be sure to use ’em!
Disgraced Chef Lugoli
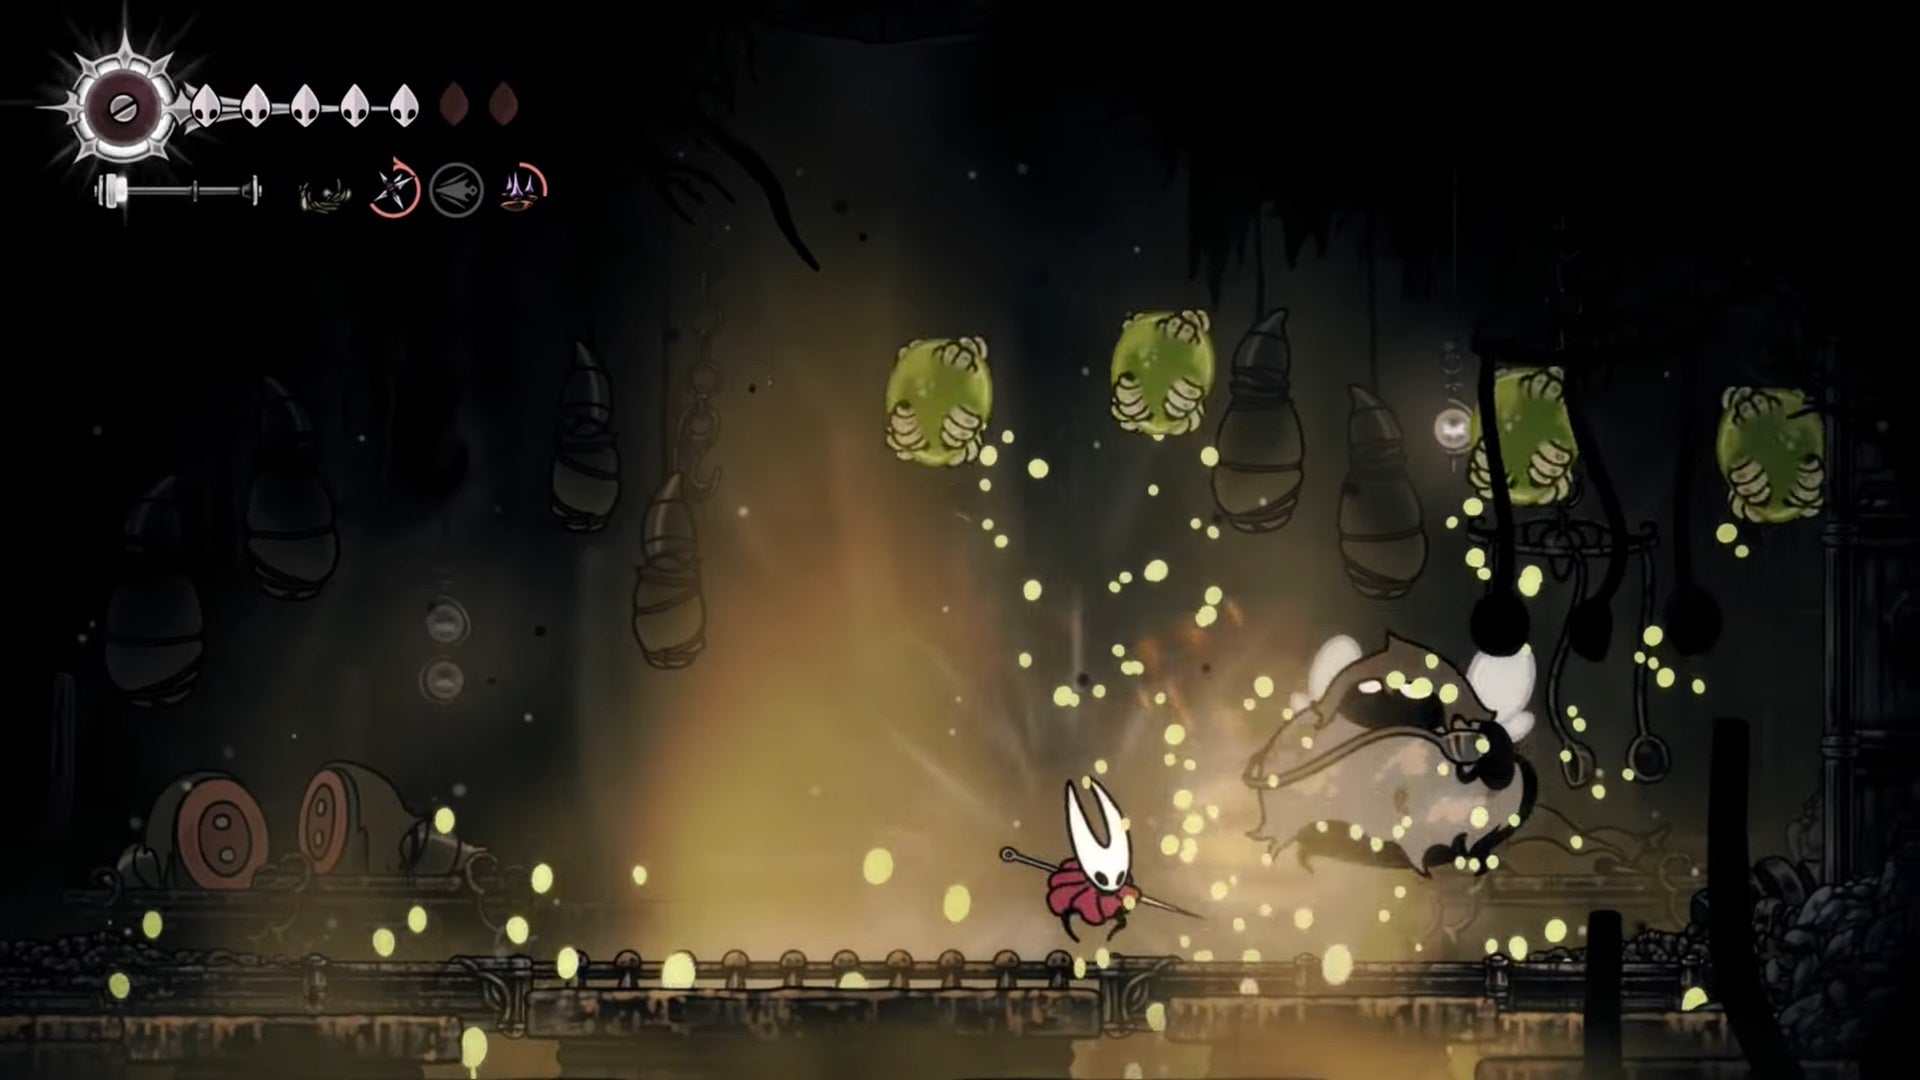
Image credit:Rock Paper Shotgun/Team Cherry
Location: Sinner’s Road, at the very bottom level. Progress until you reach a part of the map that shows a shaft leading straight upwards; use the Faydown Cloak’s double jump to reach the wall and then climb to the top. There’s a lever above you that can unlock a shortcut back into the main stretch of Sinner’s Road, to the right is a gong that you can ring to start the fight.
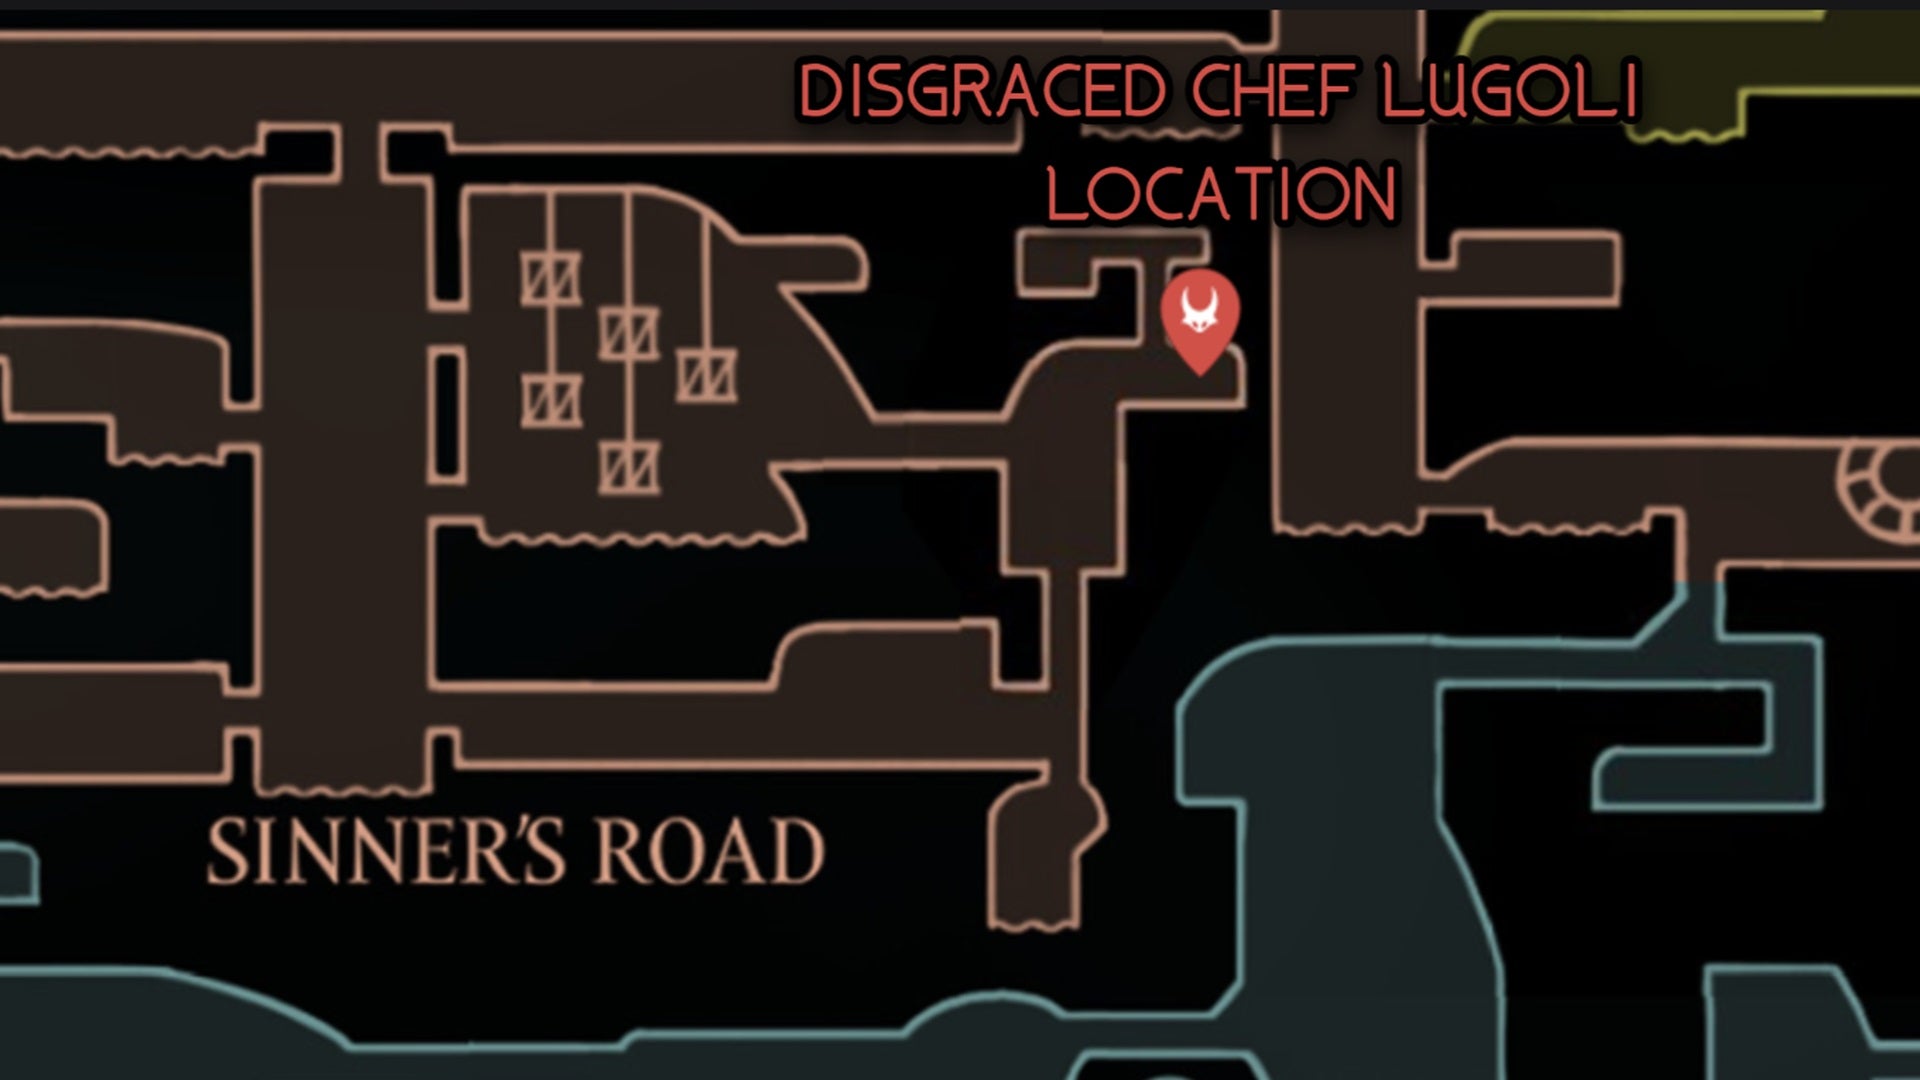
Image credit:Rock Paper Shotgun/MapGenie/Team Cherry
How to beat: Disgraced Chef Lugoli sics two minor Roachserver enemies on you before appearing from the ceiling to unleash green blobs that will infect you upon contact and absorb all your Silk, preventing you from healing. Luckily, aside from a butt slam, the green blobs are the only major move this guy has to be worried about. Beat him up with your strongest Tools and be patient, carefully avoiding the trajectory of the green stuff each time it comes up in the air.
Father Of The Flame

This big fella - who really reminds me of the Furnace Golems from Shadow of the Erdtree - requires lots of Pogo-ing. |Image credit:Rock Paper Shotgun/Team Cherry
Location: Wisp Thicket, in the far west of the region. From the Bench, go left two rooms, jumping over all the spikes, Burning Bugs, and Wisp Lanterns. You need to Pogo up a few red bulbs to reach the boss room.
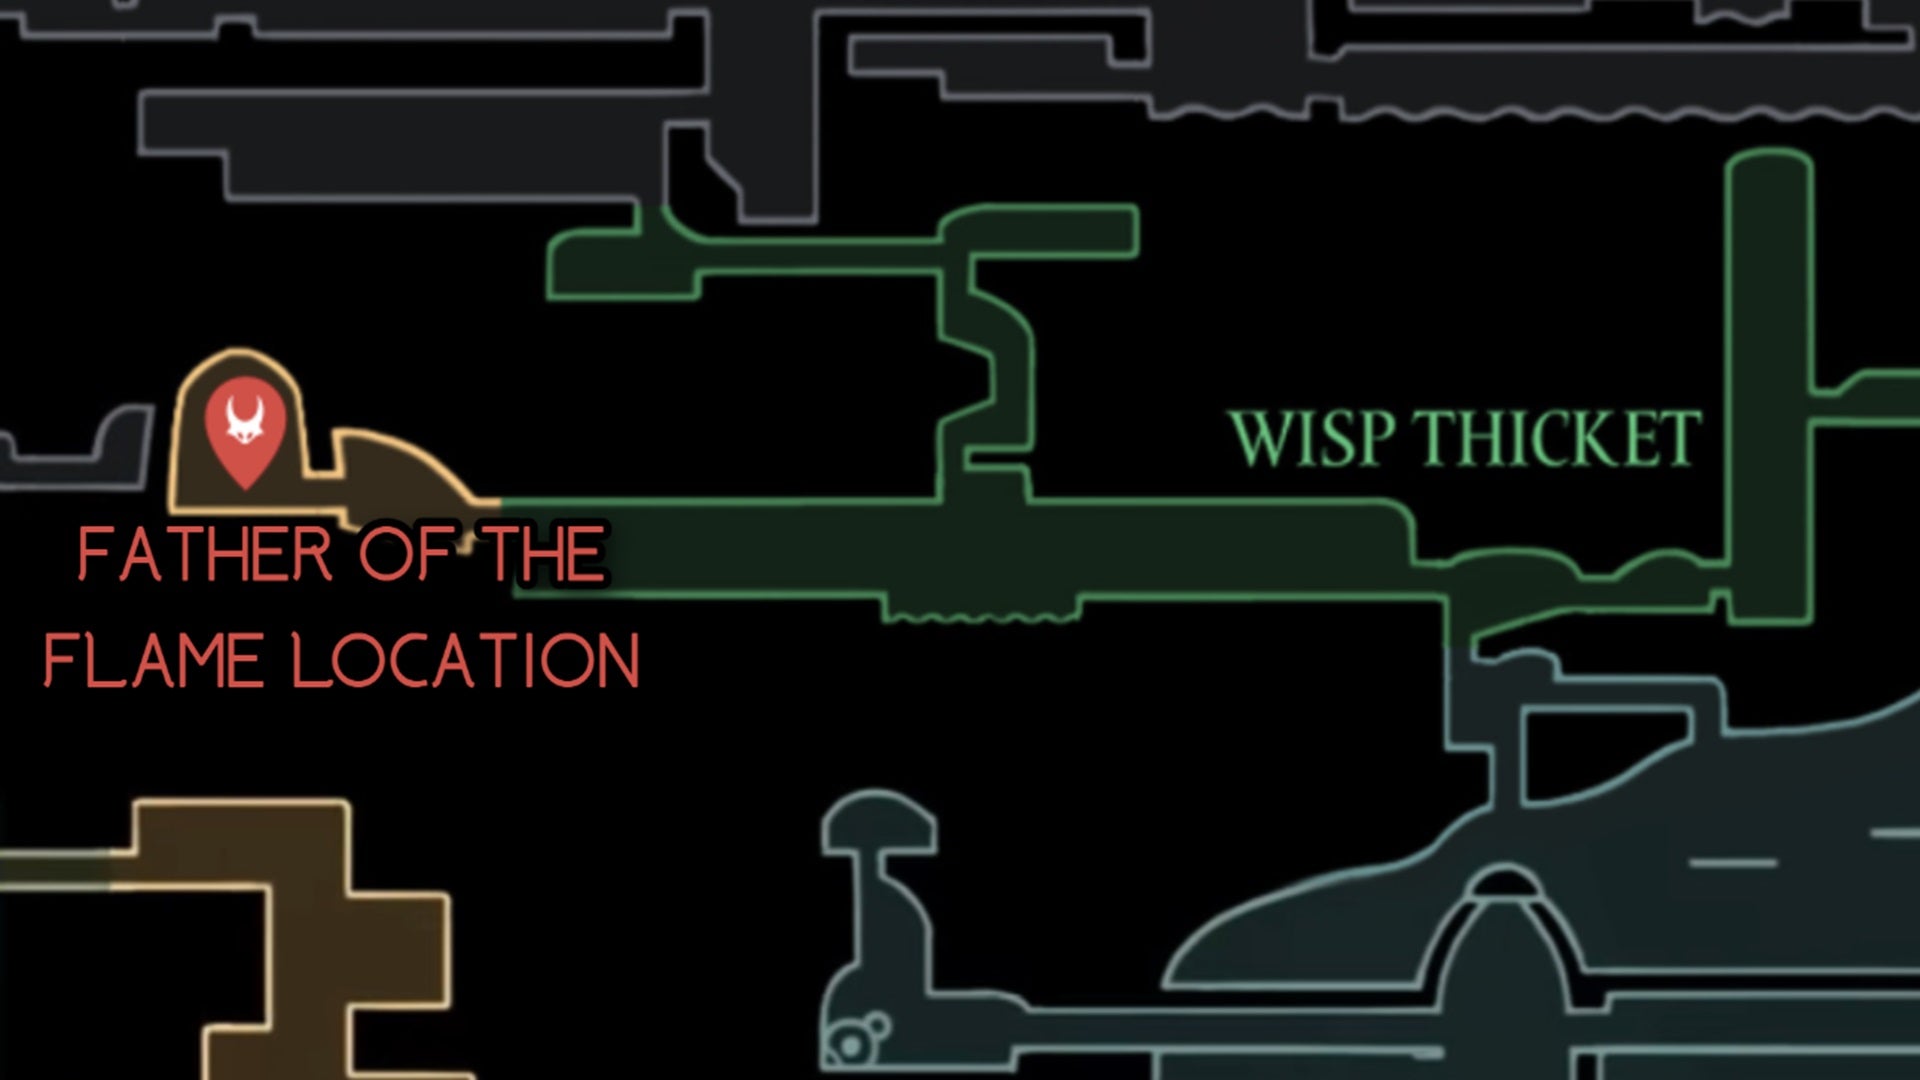
Image credit:Rock Paper Shotgun/MapGenie/Team Cherry
How to beat: This big Wicker Man-esque boss is all about Pogo tactics. You can only register a hit on Father Of The Flame if you attack the four fire lanterns attached on his arms - there will be two on the left and two on the right, and you’ve got to Pogo on the red bulbs to reach each arm. As you Pogo, Father Of The Flame summons Wisps that will shoot projectiles at you.
Take out the top arms first to make your life easier, since taking out the bottom arms gives you one less Pogo bulb to reach the top. If you know what you’re doing, you can repeatedly Pogo on an arm over and over again to dispatch it relatively quickly. The Delver’s Drill also works wonders for making short work of each arm.
When the arms are down, Father Of The Flame’s chest opens to spew out fire in a multitude of directions. But at least you can directly attack him now, and if you’re especially nimble, you can risk it all by repeatedly Pogo-ing off of the top of the chest. If you’ve got Voltvessels, they also work really well here for unleashing a column of energy that hits the Father’s chest directly. The Magma Bell is also handy for reducing fire damage overall during this battle.
Groal The Great

If you’re feeling daring, let Groal suck you into his mouth. Gross, yes, but you can poke away at his insides from within. |Image credit:Rock Paper Shotgun/Team Cherry
Location: Bilewater, in the northwestern area known as Bilehaven, which mostly consists of a single house. Reaching Groal The Great requires that you survive a grueling gauntlet of foes beforehand, and you’ll have to repeat this arena fight if you die. It absolutely sucks (like most of Bilewater), but Ollie’s got the full details on navigating this unpleasant trial over in our walkthrough !
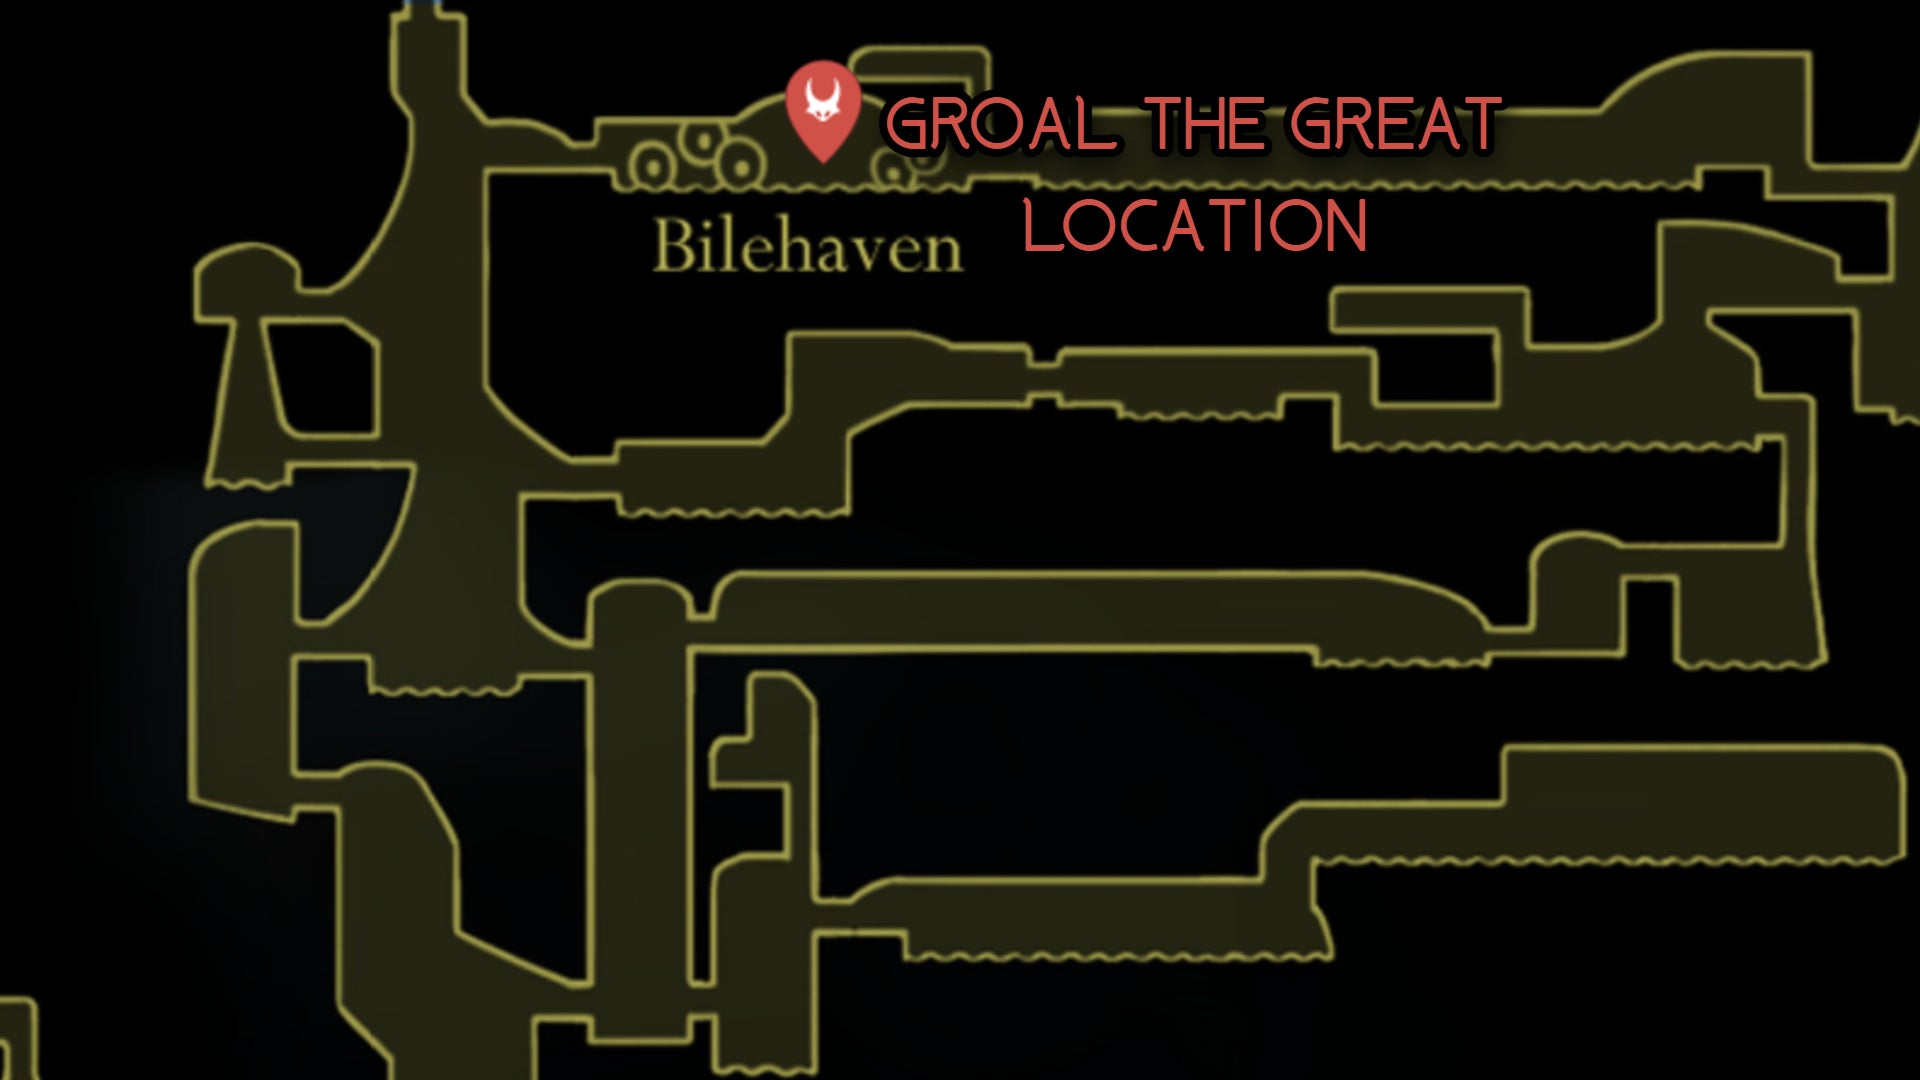
Image credit:Rock Paper Shotgun/Team Cherry
How to beat: Once Groal The Great actually appears, he’s not too terrible. This frog-like behemoth jumps into the water and comes back up, making him susceptible to repeated Pogo strikes, and he’ll also shoot acid balls at you and attempt to suck you into his mouth. If he succeeds on the latter, you can actually get a fair number of hits while you’re inside him, but you’ll want to heal yourself immediately when he spits you out. The best Tool for this fight is anything infused with venom via the Pollip Pouch - slap Groal with some poison Cogflies and he’ll take lots of damage.
Once the fight’s halfway over, Groal summons minions, and the spiked pendulum that you previously faced during the arena gauntlet also comes into play. More stuff for you to dodge, great! The nastiest new attack that Groal has here is telegraphed by his eyes glowing white, after which he’ll belch out three Silk projectiles.
If you’re ever having trouble during this fight, you can cheese Groal a bit by turtling in the lower right side of the arena, under the platform connected to the door. Yes, you’ll be stuck in the maggot-infested water, but none of Groal’s attacks will be able to touch you, and his projectiles will all bounce off of the ledge above you. This method takes forever, as you’ll have to rely on occasional hit-and-run strikes to bring him down, but it does work.
Voltvyrm

Hit those gross looking tubes and watch out for the shining purple lights. Easy, right? |Image credit:Rock Paper Shotgun/Team Cherry
Location: The Sands Of Karak, in a hidden northern section called Voltnest. The entrance to Voltnest is hidden in the ceiling, so wall jump upwards until you come to a hidden room illuminated by glowing purple rocks, also known as Voltridian. Enter here, progress through the corridor full of electric obstacles, and get ready to face Voltvyrm.
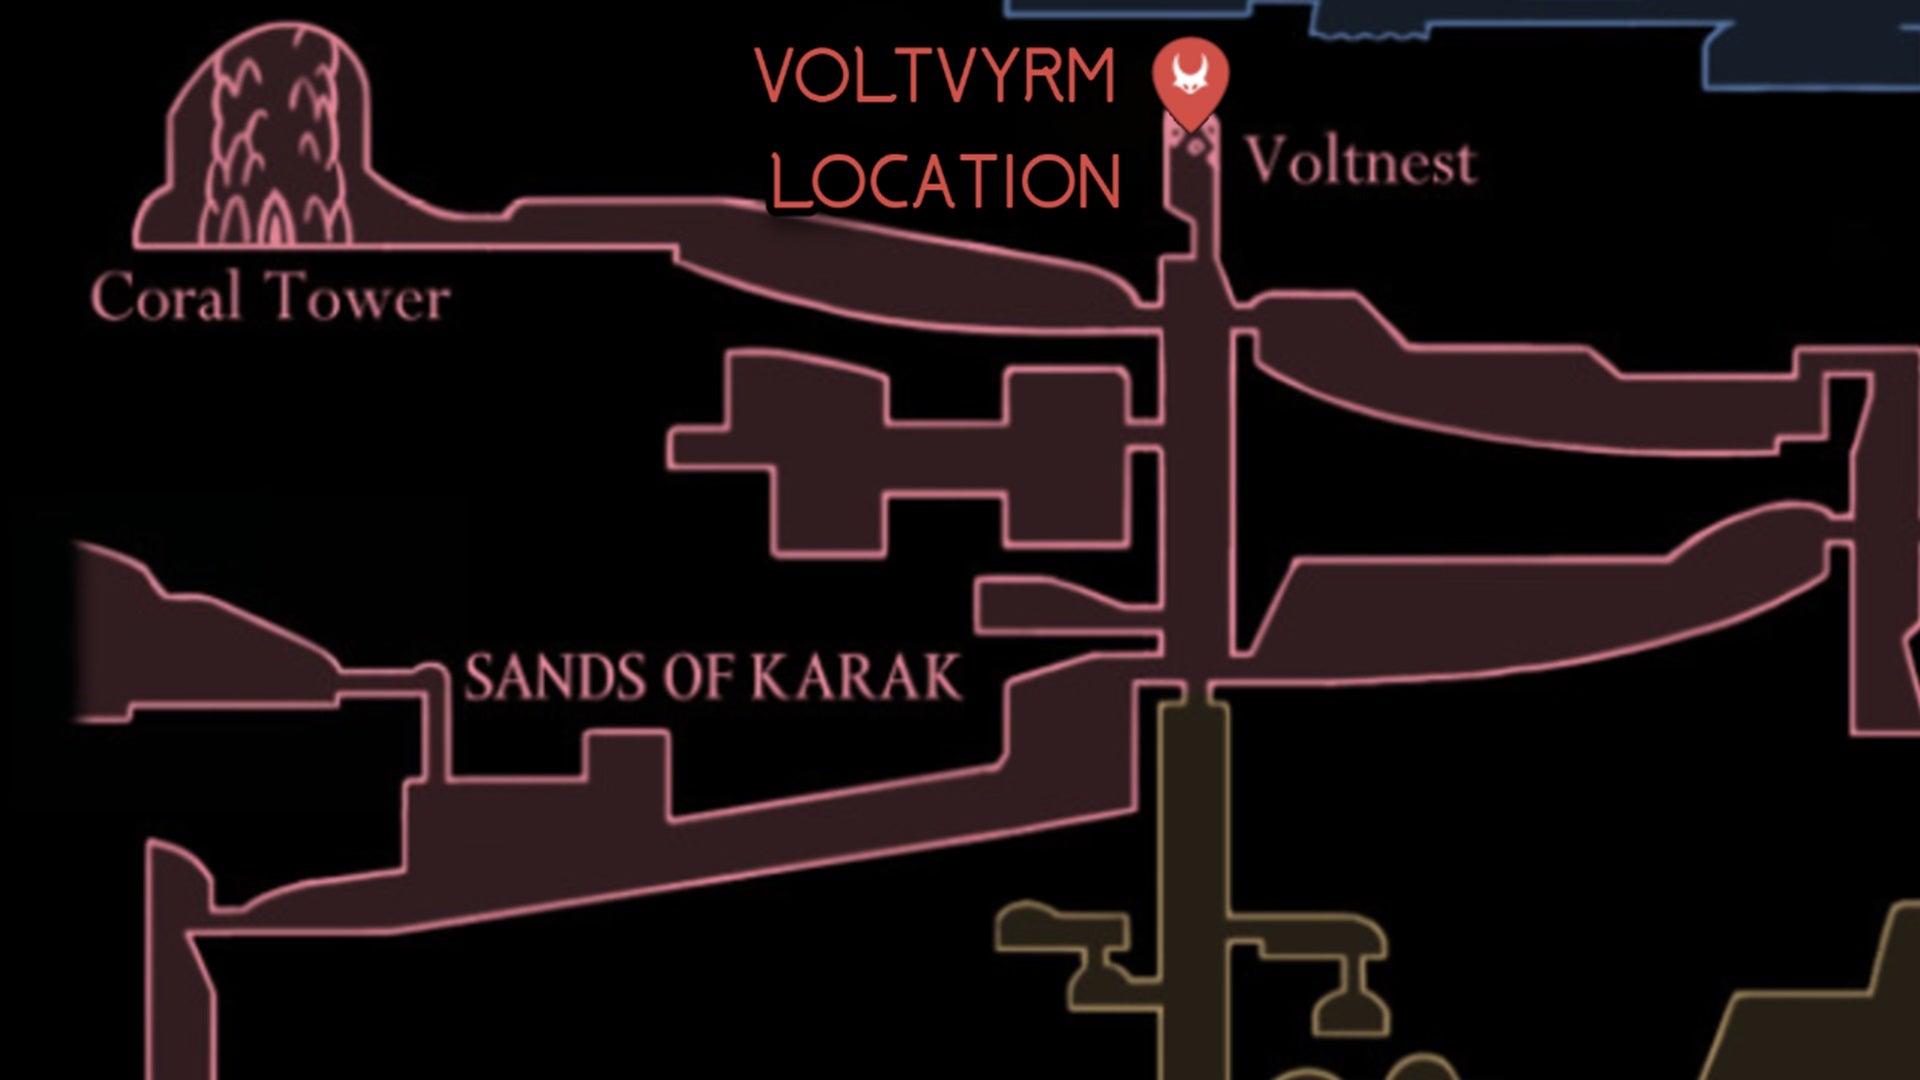
Image credit:Rock Paper Shotgun/Team Cherry
How to beat: There are only two attacks to worry about here - vertical electric columns and smaller electric orbs that scatter across the arena in various configurations. So it’s not a very hard fight, especially compared to your recent opponents, but it is possible to be overwhelmed by all of the electricity. Keep stepping out of the way, and aim your slashes upwards to squash Voltvyrm relatively quickly. The Flintslate is excellent for dealing extra damage and ending things as quickly as possible.
Raging Conchfly

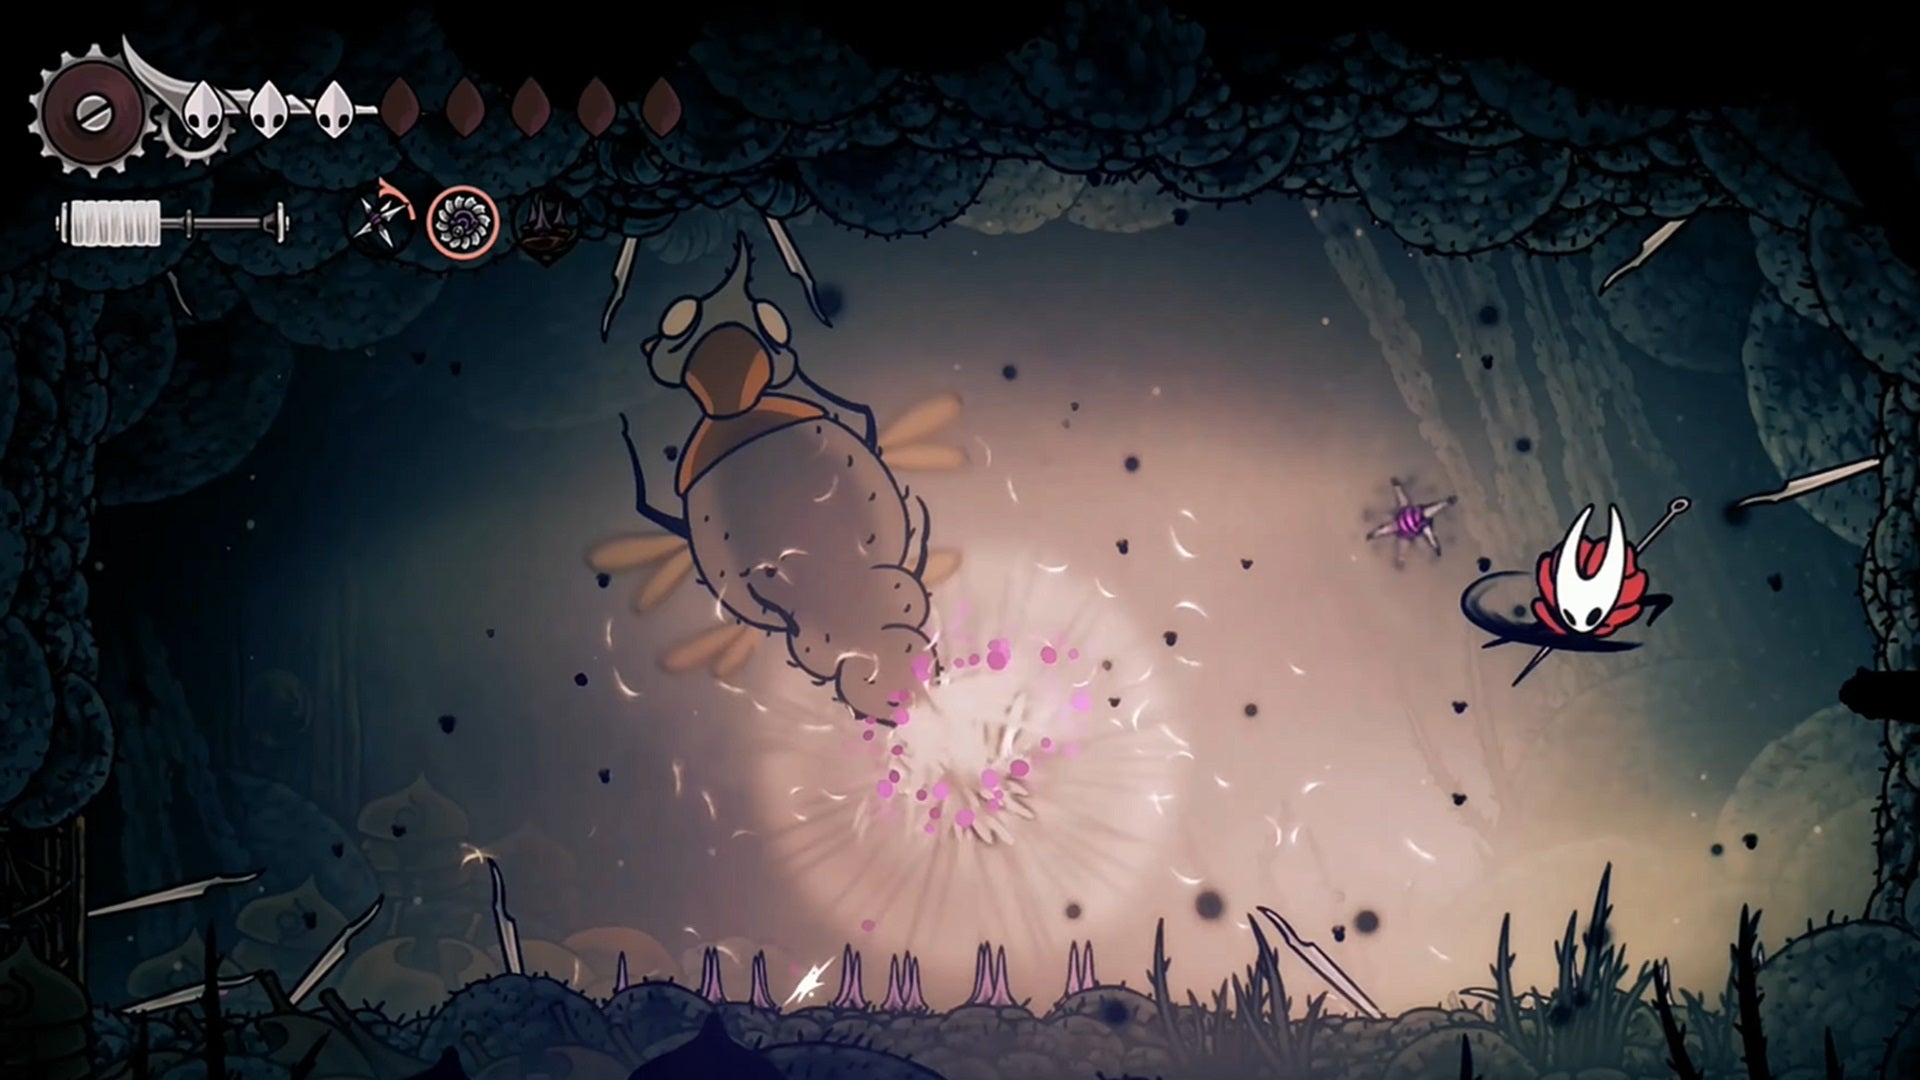
Out for revenge after the death of its partner, this one is. |Image credit:Rock Paper Shotgun/Team Cherry
Location: The Sands of Karak, in the upper east outside of Coral Tower. From the Voltnest entrance where you battle Voltvyrm, just exit to the left and hop across the platforms in the following room.
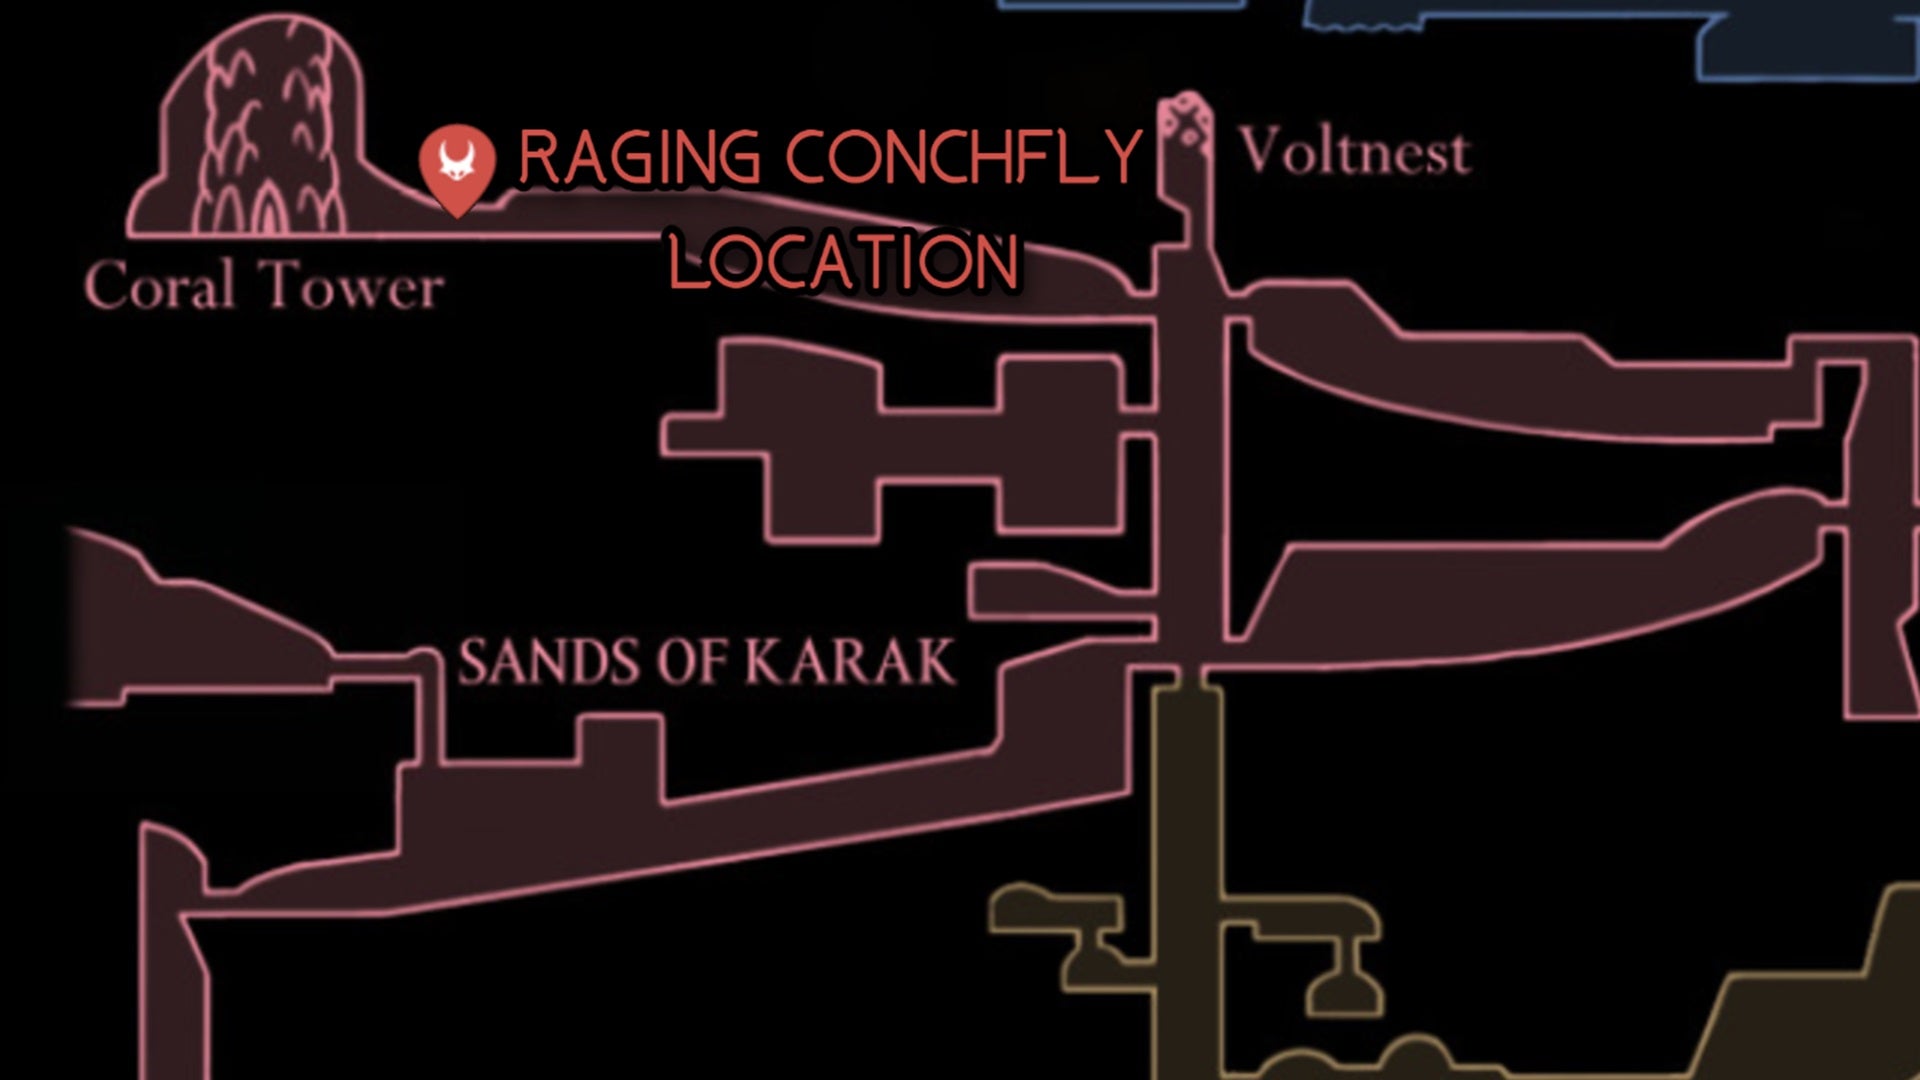
Image credit:Rock Paper Shotgun/Team Cherry
How to beat: Remember fighting the original duo of Conchflies way back when? One of them escaped, and now we know where that fly scurried off to. This solo Conchfly is much faster than it was before, and will fire bouncing projectiles and charge horizontally across the room. It’ll also summon smaller Conchflies, which either appear from the floors and ceilings or also charge at you horizontally. It’s easy to become disorientated by all the stuff on screen, but the Conchfly doesn’t have much health. Use the Flintslate, Silkshot, and your strongest Tools to put this raging bug out of its misery permanently.
First Sinner

She’s got her own Bind! When you see First Sinner doing this, attack or else this lengthy battle will take even longer. |Image credit:Rock Paper Shotgun/Team Cherry
Location: The Slab, in the cell past the bottom-most Heretic door. You want to drop all the way down the central vertical shaft of the Slab to reach this door; within it is a monument that you can Bind at. Doing so will summon the First Sinner to fight you.
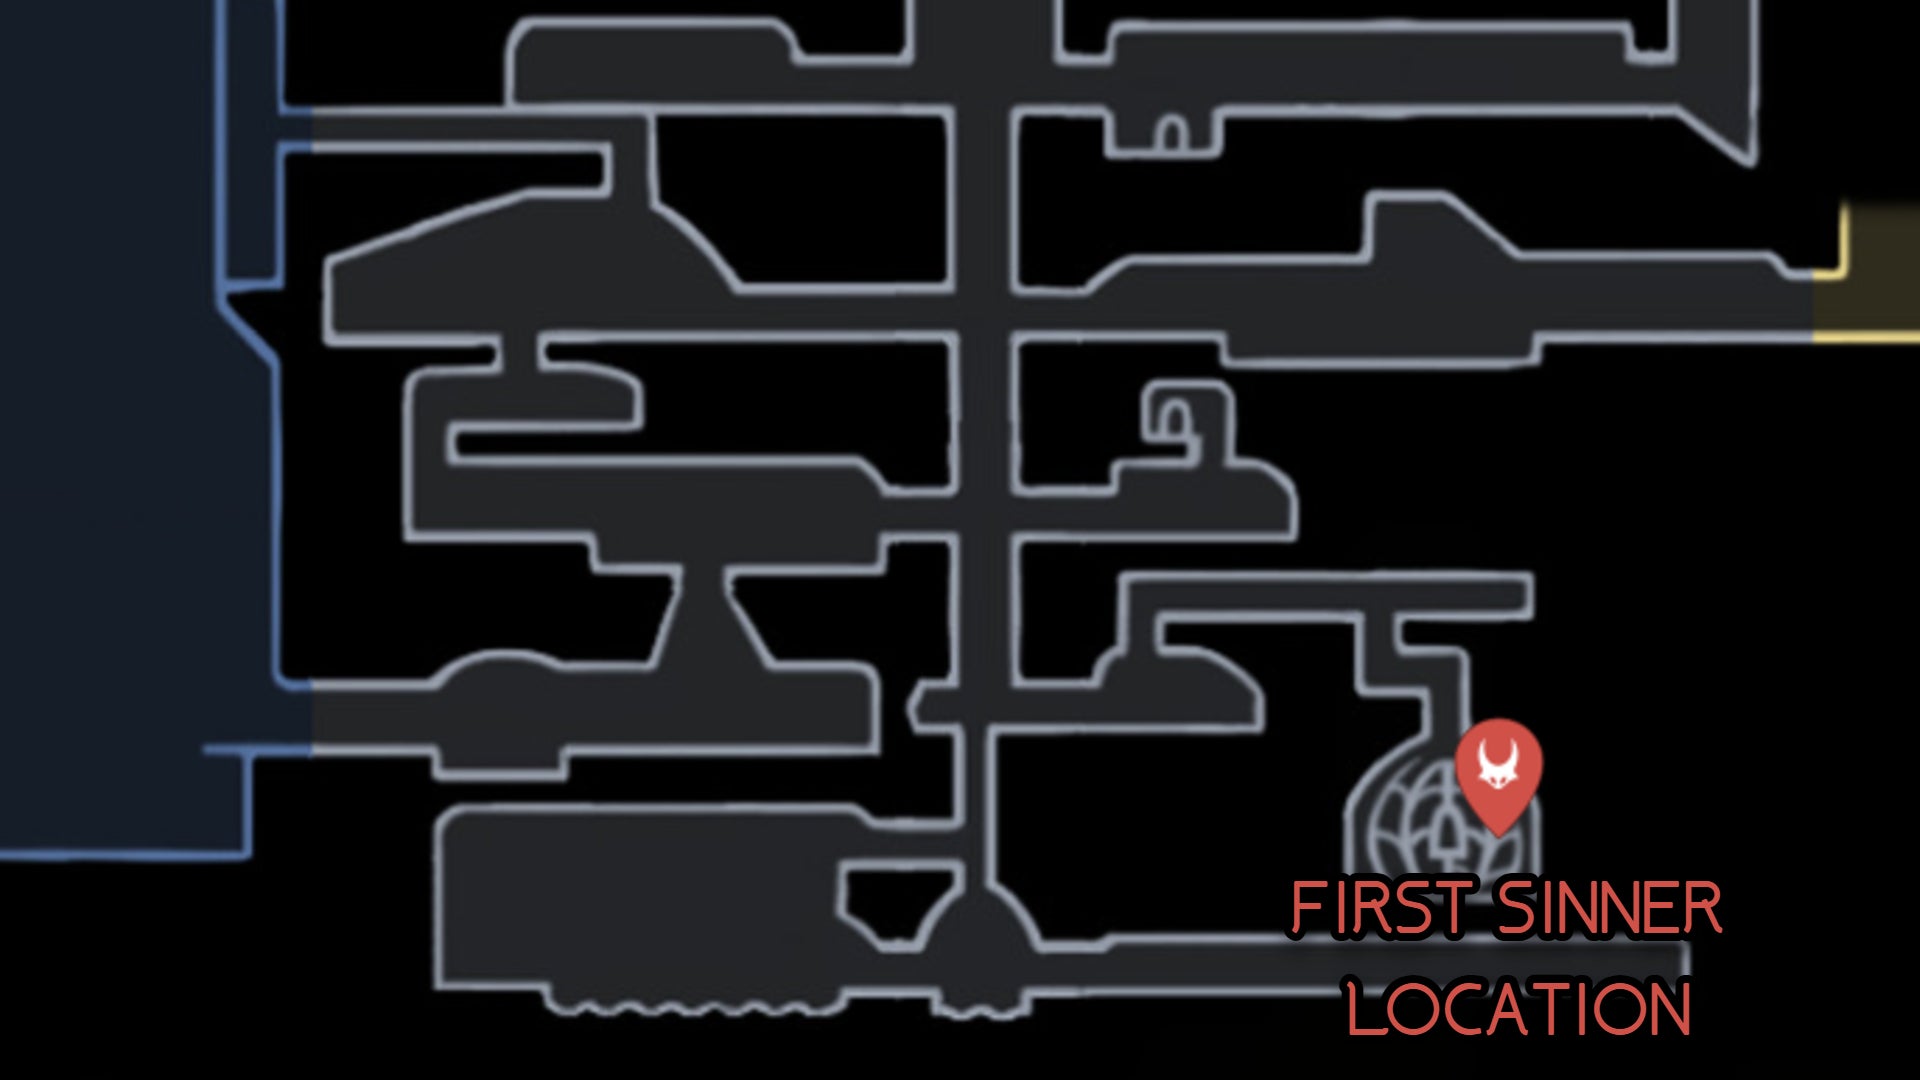
Image credit:Rock Paper Shotgun/Team Cherry
How to beat: This is a tricky, long fight that requires you to be very aggressive, but at least there’s no runback, since you’ll start at First Sinner’s cell if you fail. Anyway, First Sinner kicks things off by teleporting back and forth across the battlefield and unleashing needles that telegraph their travel path with a strand of silk. As you’re kept busy dodging these projectiles, you’ll have to contend with First Sinner lunging and diving at you with claw slashes.
This fight is a battle of attrition made even worse by the fact that First Sinner has a healing ability similar to Hornet’s Bind. When you see silk strands surround her, attack First Sinner immediately to cancel the heal. If you take some damage in the process, so be it. (FYI, First Sinner’s needle attacks only deal 1 Mask worth of damage, so it’s better to get hit with those.)
The second strage of the fight begins when First Sinner teleports to the centre of the screen and makes balls of Silk explode all about her. She’ll repeat this move numerous times along with faster versions of all of her old attacks. Try scattering Tacks across the floor during this phase to deal additional damage, and if you’ve got the Flintslate, use it while she’s stunned for additional lethality. First Sinner’s speed and heals are a major pain, but you can do it!
Broodmother
The walls are too tight here, making this battle worse than it has to be. |Image credit:Rock Paper Shotgun/Team Cherry
Location: The Slab, in the top west stretch only a short distance left of the uppermost Bench in the region. Broodmother only appears as the culimation of The Wailing Mother quest, which can be accepted in Songclave.

Image credit:Rock Paper Shotgun/MapGenie/Team Cherry
How to beat: This can be a very frustrating fight, as facing the Broodmother first requires you to survive three waves of enemies. Once she finally appears, you can expect her to dash across the screen, occasionally summon Broodling mobs, and slam herself on the ground in a massive belly flop. She can also immobolise you whenever she spits out a pellet of brown gunk, so dodge that stuff as soon as you see it.
The true challenge here comes from the confined nature of the boss room, which makes it far too easy to get repeatedly caught in all of Broodmother’s attacks. You can use this small space (and Broodmother’s belly flop, which leaves her vulnerable on the ground for a bit) to your advantage by littering the floor with Tacks or Cogwork Wheels. Alternately, take the high ground and wall jump repeatedly against the ceiling in the left or right corners while spamming Broodmother with poison Cogflies. No shame in cheesing a fight like this and saving yourself a world of annoyance!
Second Sentinel

Never linger in the centre of the battlefield for too long, lest the Second Sentinel slice you with this X-shaped attack. |Image credit:Rock Paper Shotgun/Team Cherry
Location: The High Halls, in the Forum. The Second Sentinel will only appear if you’ve collected all three Cogheart Pieces in the Citadel, combined them into a single Coghart, and accepted the Final Audience Wish. Check out this segment of our walkthrough for tips on how to do this.
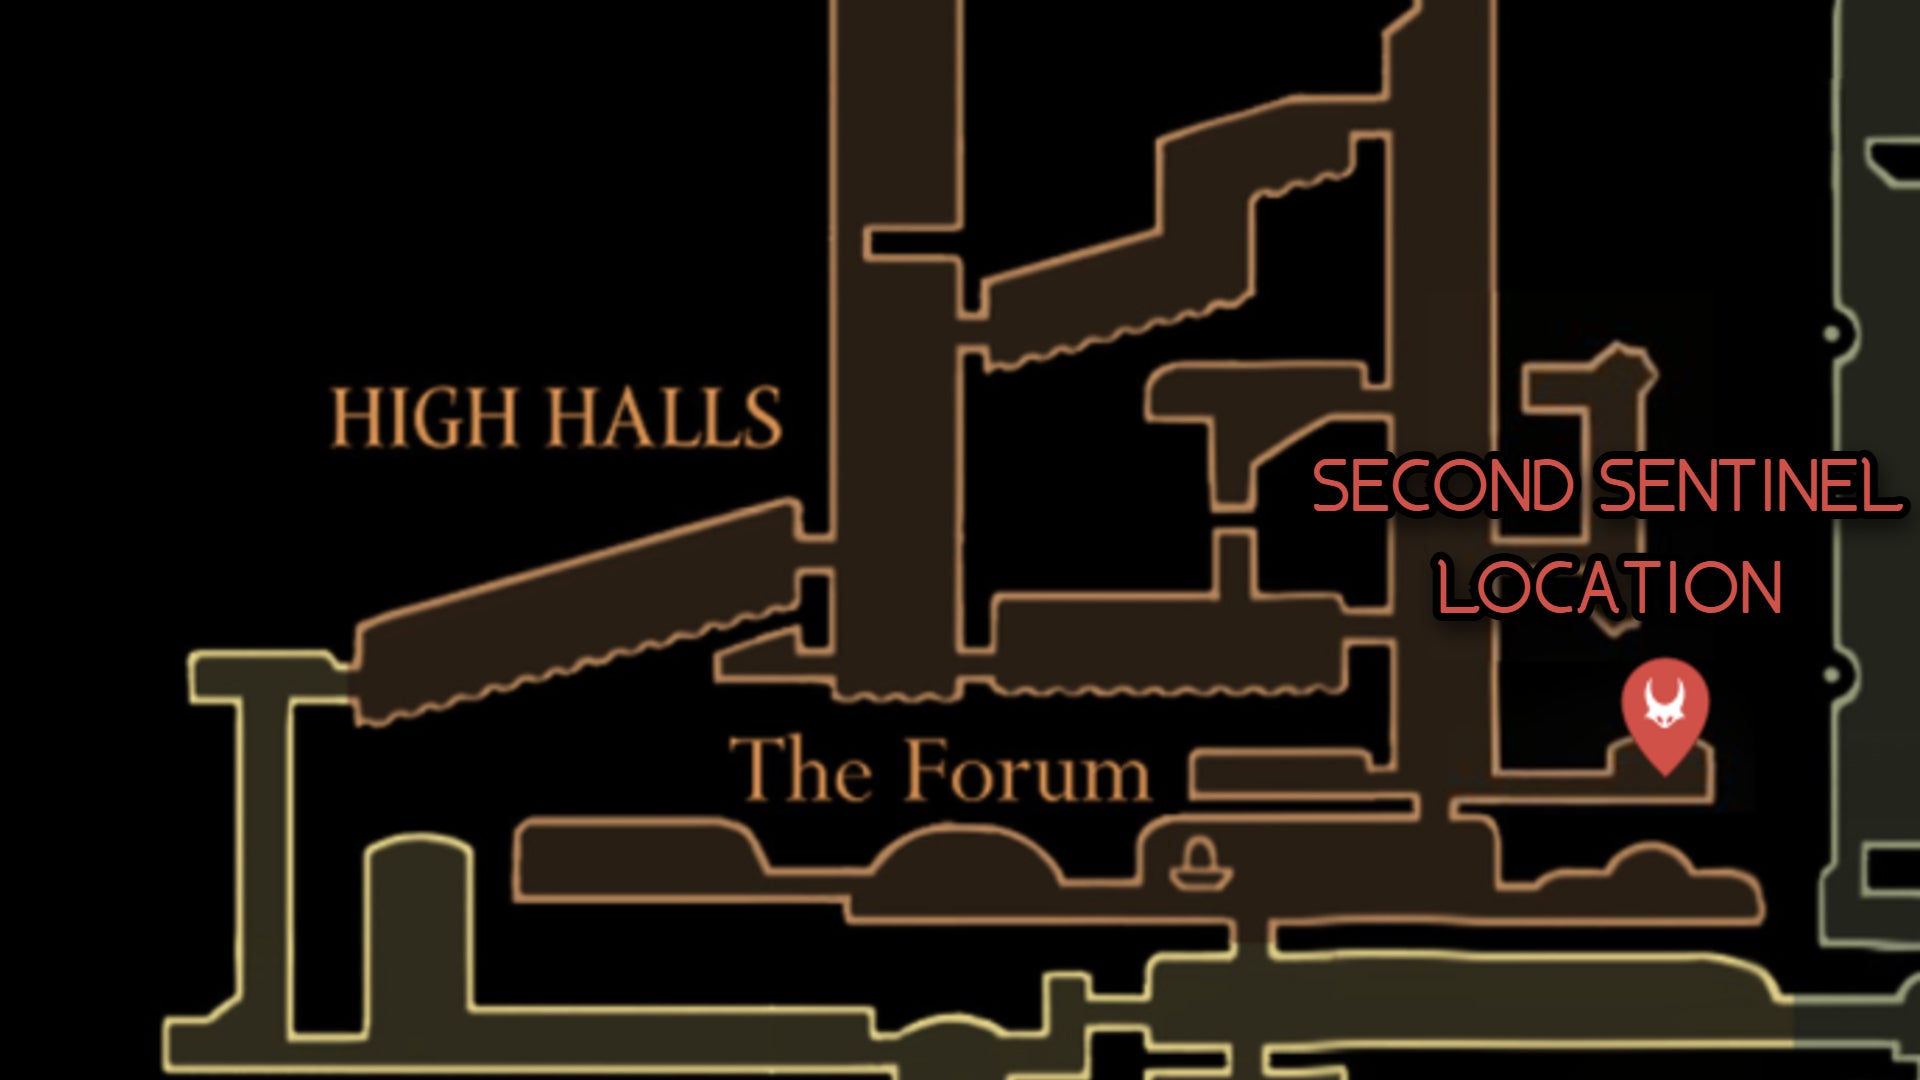
Image credit:Rock Paper Shotgun/MapGenie/Team Cherry
How to beat: This is another one of those fun 1v1 matches in the same vein as Lace or Phantom. The Second Sentinel is speedy with flurries, counters, and blocks, and it also unleashes huge X-shaped strikes that take up most of the screen. The best way to avoid getting hit is to keep a distance of about half of the arena’s width, and don’t get too greedy with your Pogo attacks, as the Second Sentinel can jump up and punish you very easily. Take care to find openings where you can dash in and get a few hits of your own before backing away, and you’ll beat the Second Sentinel before long.
Shakra
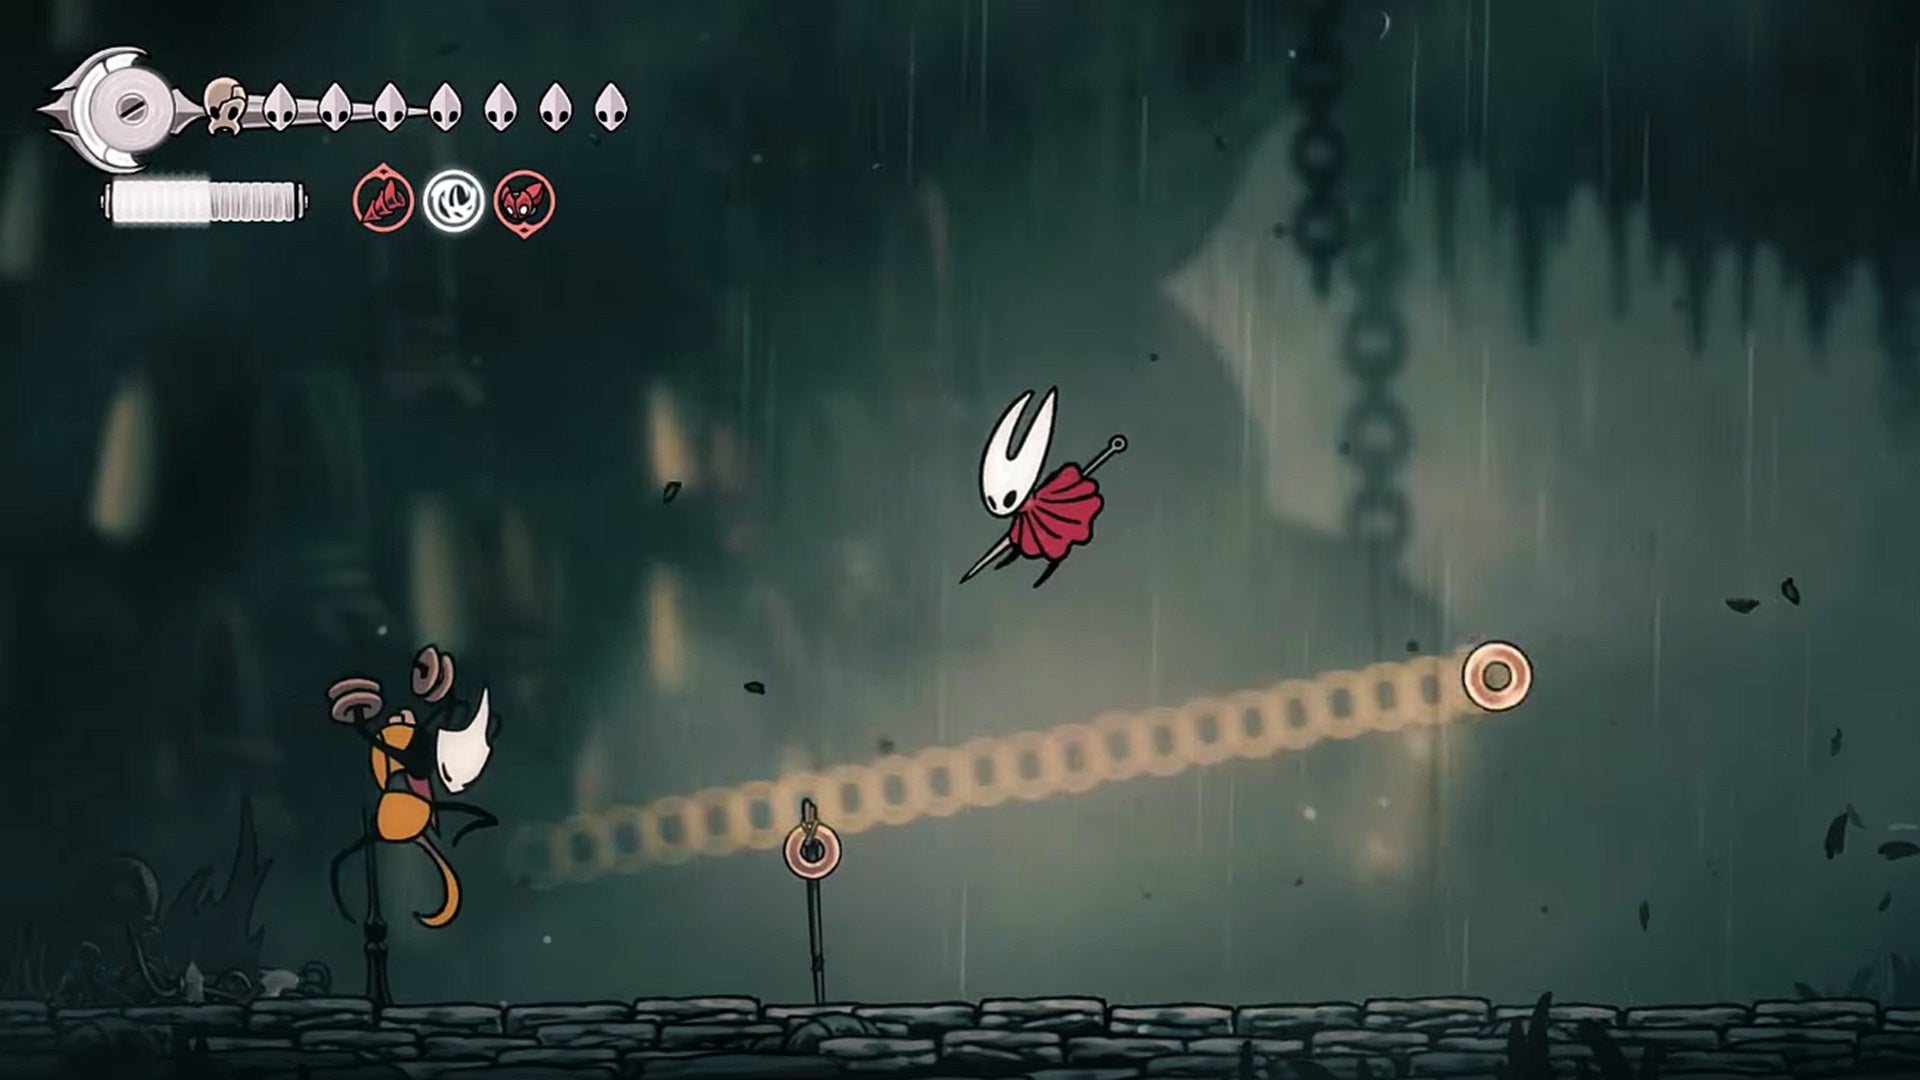
Time to put your combat skills to the test against a friend! |Image credit:Rock Paper Shotgun/Team Cherry
Location: Greymoor, east of Bellhart where the Flea Caravan (or Moorwing) previously set up shop. If you’ve completed the Trail’s End quest, you’ll see one of Shakra’s throwing rings on a stick. Hit it to summon her.
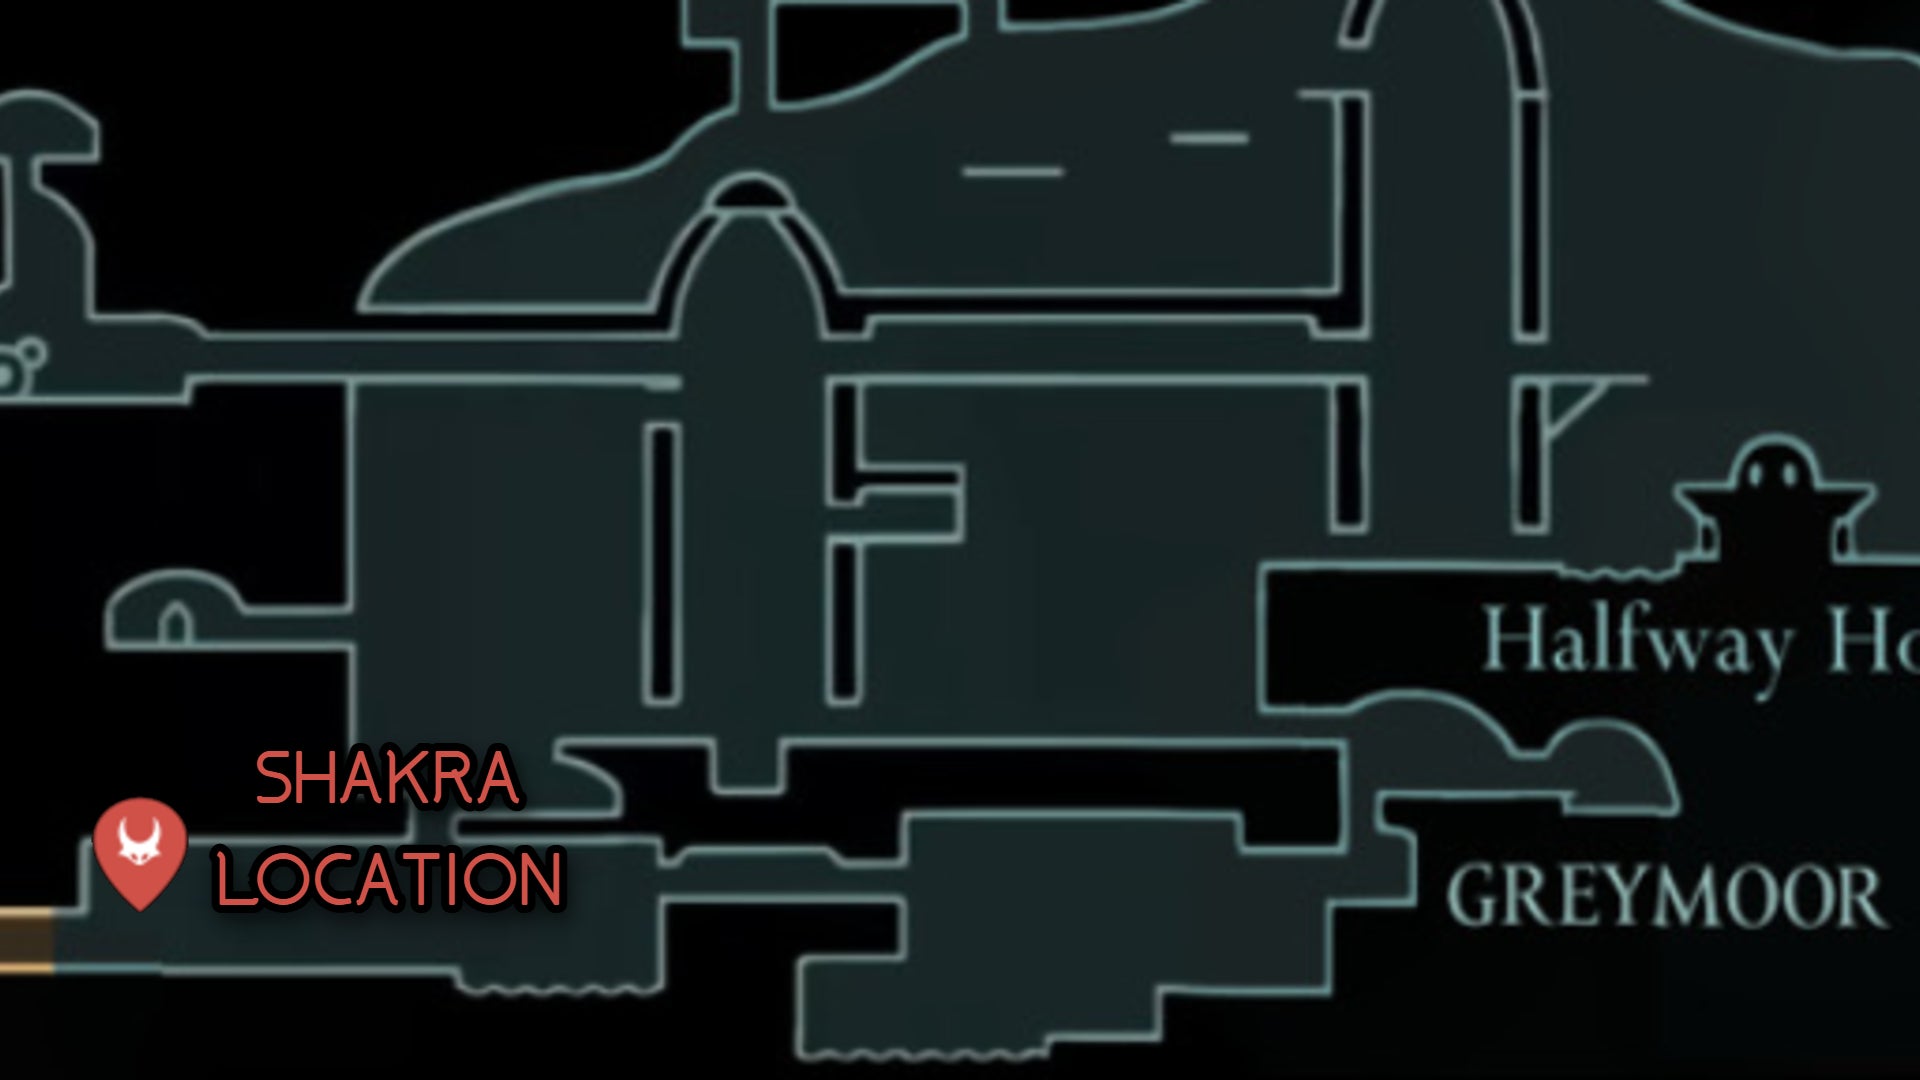
Image credit:Rock Paper Shotgun/MapGenie/Team Cherry
How to beat: After running into Shakra so many times over the course of Silksong’s Act 1 and 2, finally we get to challenge our friendly map-making comrade to a sparring match! Shakra’s certainly a hardier opponent than the likes of Garmond and Zaza, but she’s still not too hard. Her speed is formidable, and the throwing rings that she barricades you with are numerous. You can, however, hit them at the right moment to reduce all damage. Other than that, it’s just a matter of dashing in for occasional hits and avoiding her downward strike.
Lace

Lace still does her “O-HO-HO~” anime laugh, and this time it signifies the different phases of the battle. |Image credit:Rock Paper Shotgun/Team Cherry
Location: The Cradle. No need to search - you’ll run into Lace immediately once you reach The Cradle.

Image credit:Rock Paper Shotgun/MapGenie/Team Cherry
How to beat: The time has come for a rematch with Lace - this time in a dramatic field of white flowers! Her tactics are similar to the ones you surmounted in Deep Docks long ago, but she feels a bit faster and can now launch an aeriel counter to your Pogo attacks, teleporting into the air and slashing diagonally downwards in your general direction. It’s not too hard to avoid this once you’re used to it, and if you managed to keep pace with Lace the first time around, you’re more than capable of taking her on now.
As the fight progresses, Lace will turn up the difficulty slider by creating AoE explosions behind her as she dashes through the air. She’ll also telegraph a bunch of slashes with a sparkle of light, a la Phantom, and if you get careless with your dodges it’s pretty easy to fall off of the arena platform. But unlike the fight in Deep Docks, you can wall jump and double jump now, so try to manoeuvre your way to safety to avoid taking extra damage.
Grand Mother Silk
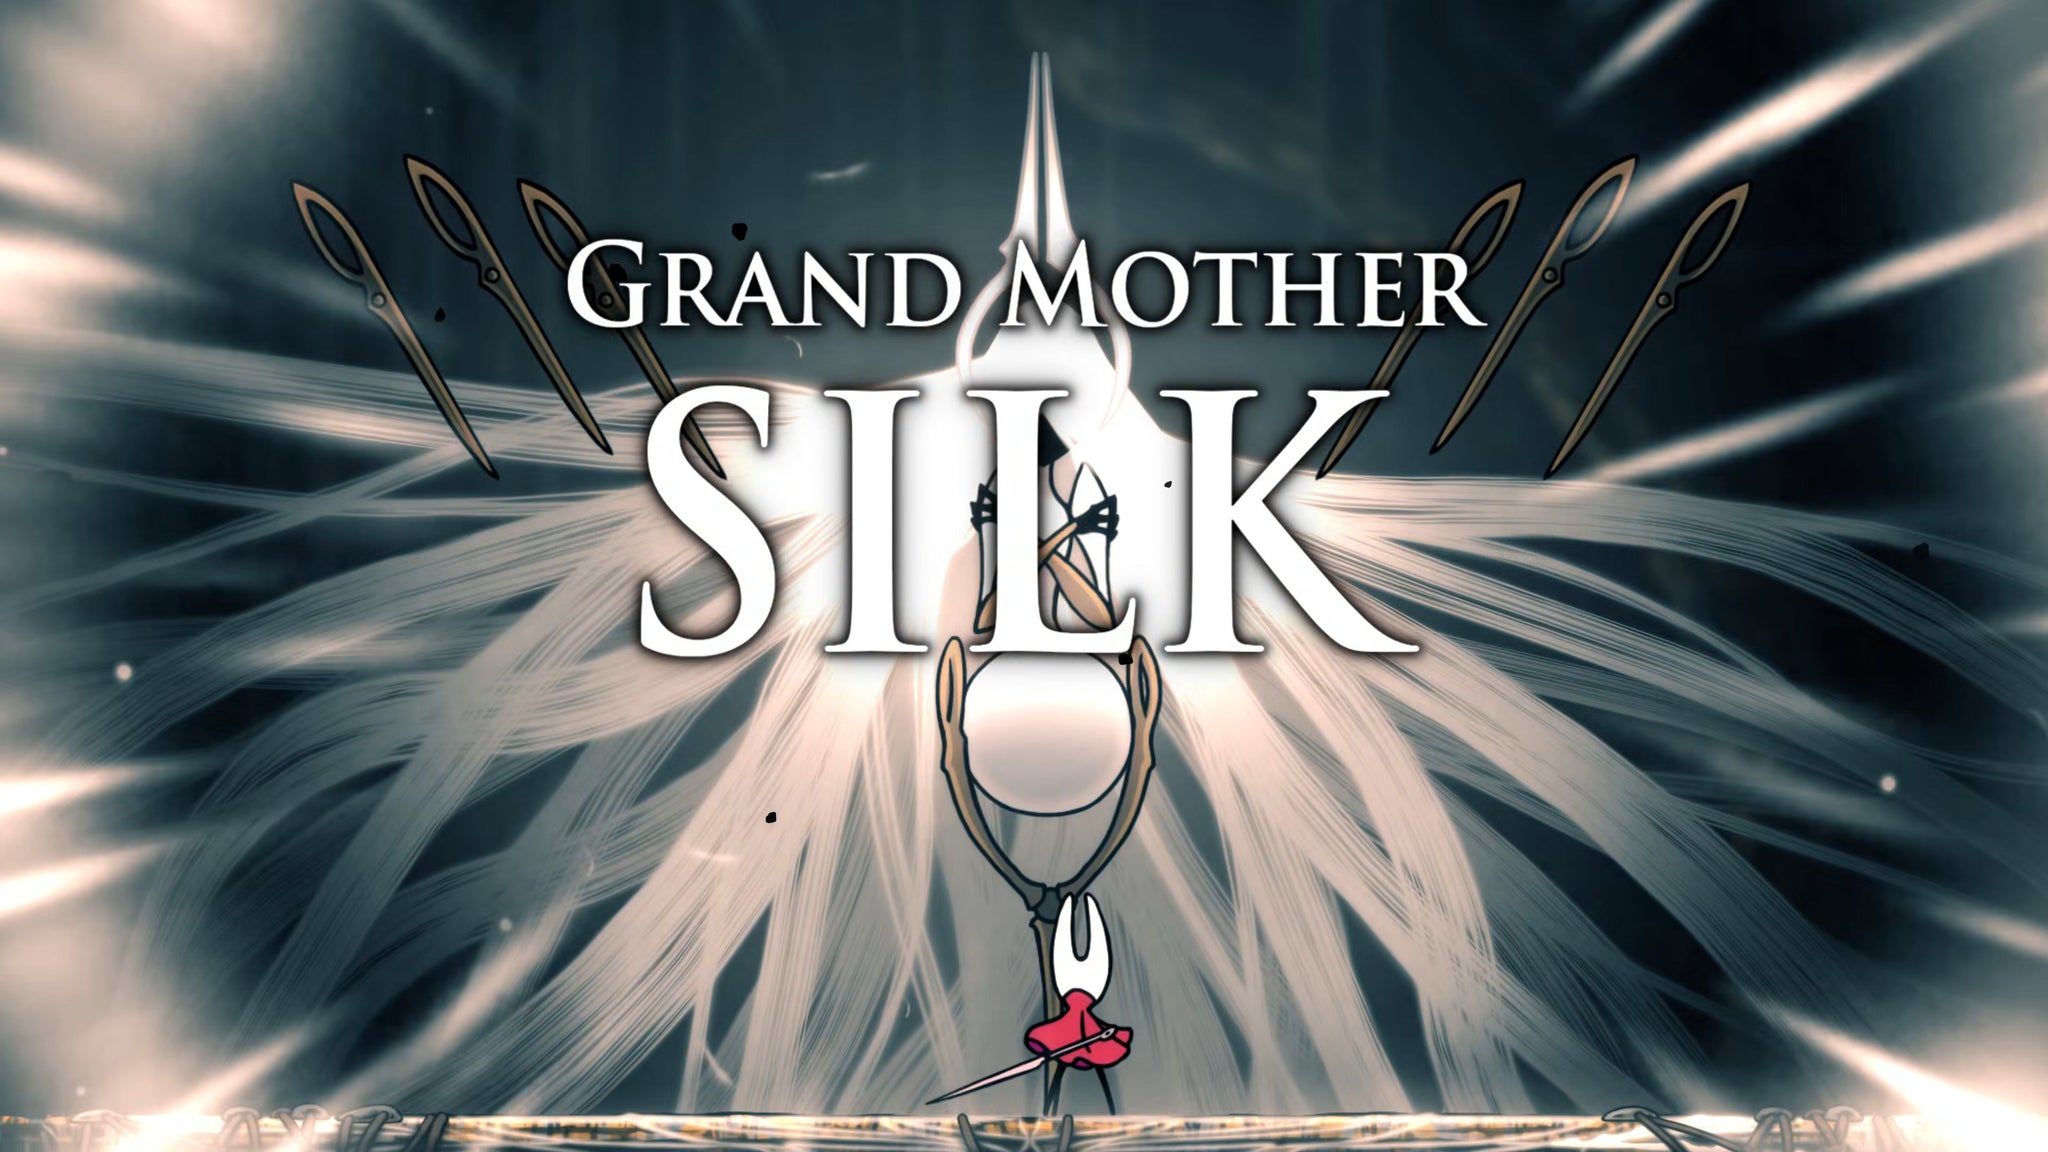
Wow! This seems like it’s the final boss battle of Silksong…but it actually isn’t. |Image credit:Rock Paper Shotgun/Team Cherry
Location: The Cradle, at the very top. There’s a lot of tricky platforming involved here, but there’s only one place where Grand Mother Silk can be, so you shouldn’t have trouble locating her. However, before the battle begins, it’s worth looking up how to unlock Act 3 of Silksong.
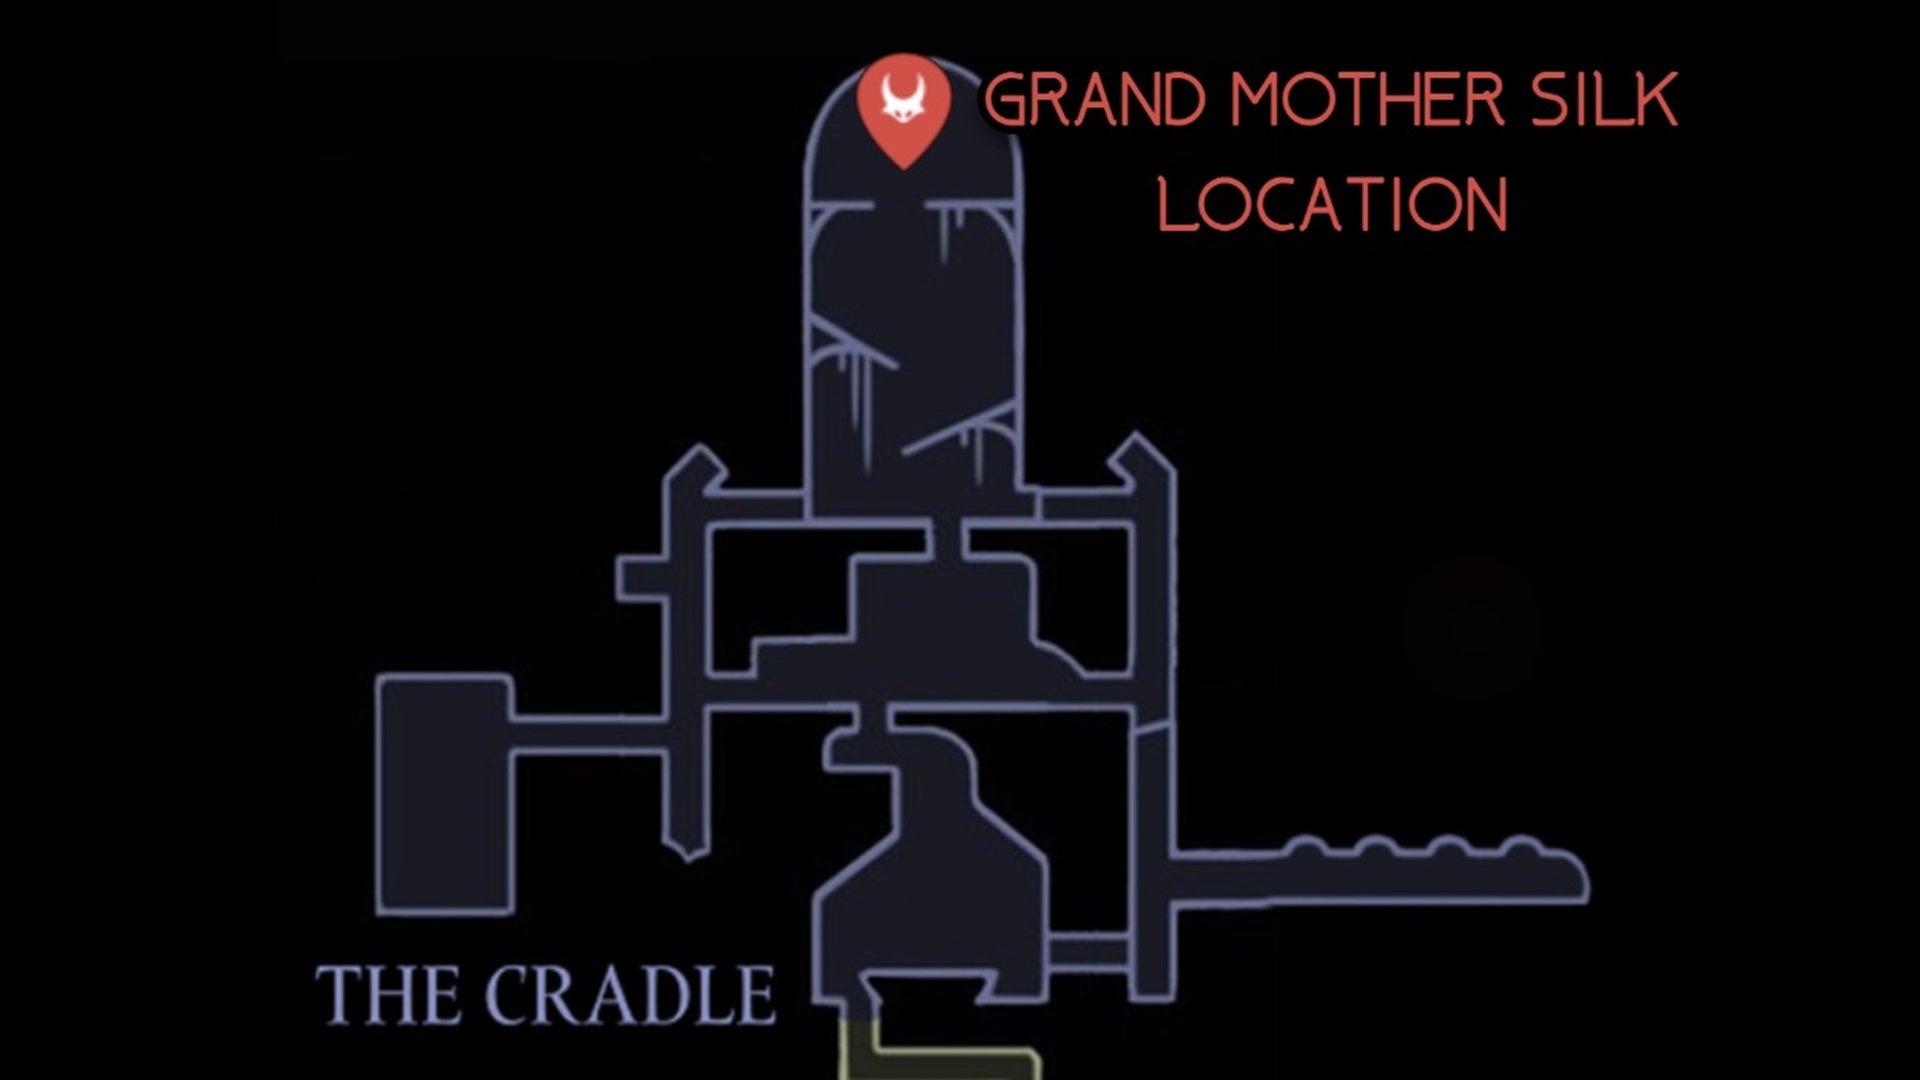
Image credit:Rock Paper Shotgun/MapGenie/Team Cherry
How to beat: Grand Mother Silk’s definitely an epic boss, and there’s just so much stuff that you need to dodge during this fight. Her primary attacks involve very long needles that hover above you and can come down in vertical, diagonal, or horizontal patterns. Try to stay under her abdomen as much as possible and get your attacks in as you avoid the flying needles, which is certainly easier said than done.
In addition to the needles, Grand Mother Silk can create a silk web across the arena - find a safe place that isn’t touching the web, or risk suffering a whopping 3 Masks of damage. Every now and then, she’ll also unleash claw attacks that sweep across the platform you’re standing on. It’s not hard to jump over this, as there’s a fairly obvious audio cue, but the main difficulty is jumping while also keeping an eye on the needles above.
Once the second phase of the fight begins, Grand Mother Silk begins disappearing for a brief time, during which rocks will collapse from the ceiling. If that wasn’t enough, she also summons spikes to rise up from the ground - luckily you can Pogo off of these to avoid damage, but with all of the stuff flying across the screen, it’s awfully easy to feel confined during this battle.
It’s a toughie, but at least Grand Mother Silk isn’t hard to hit. Pull out all your big guns, and once Hornet shoves her needle into Grandmother Silk, you’ll be presented with the option to either Bind or play your Needolin (as long as you’ve followed our guide on unlocking Act 3). Use the Needolin to see how this story truly unfolds!
Bell Eater
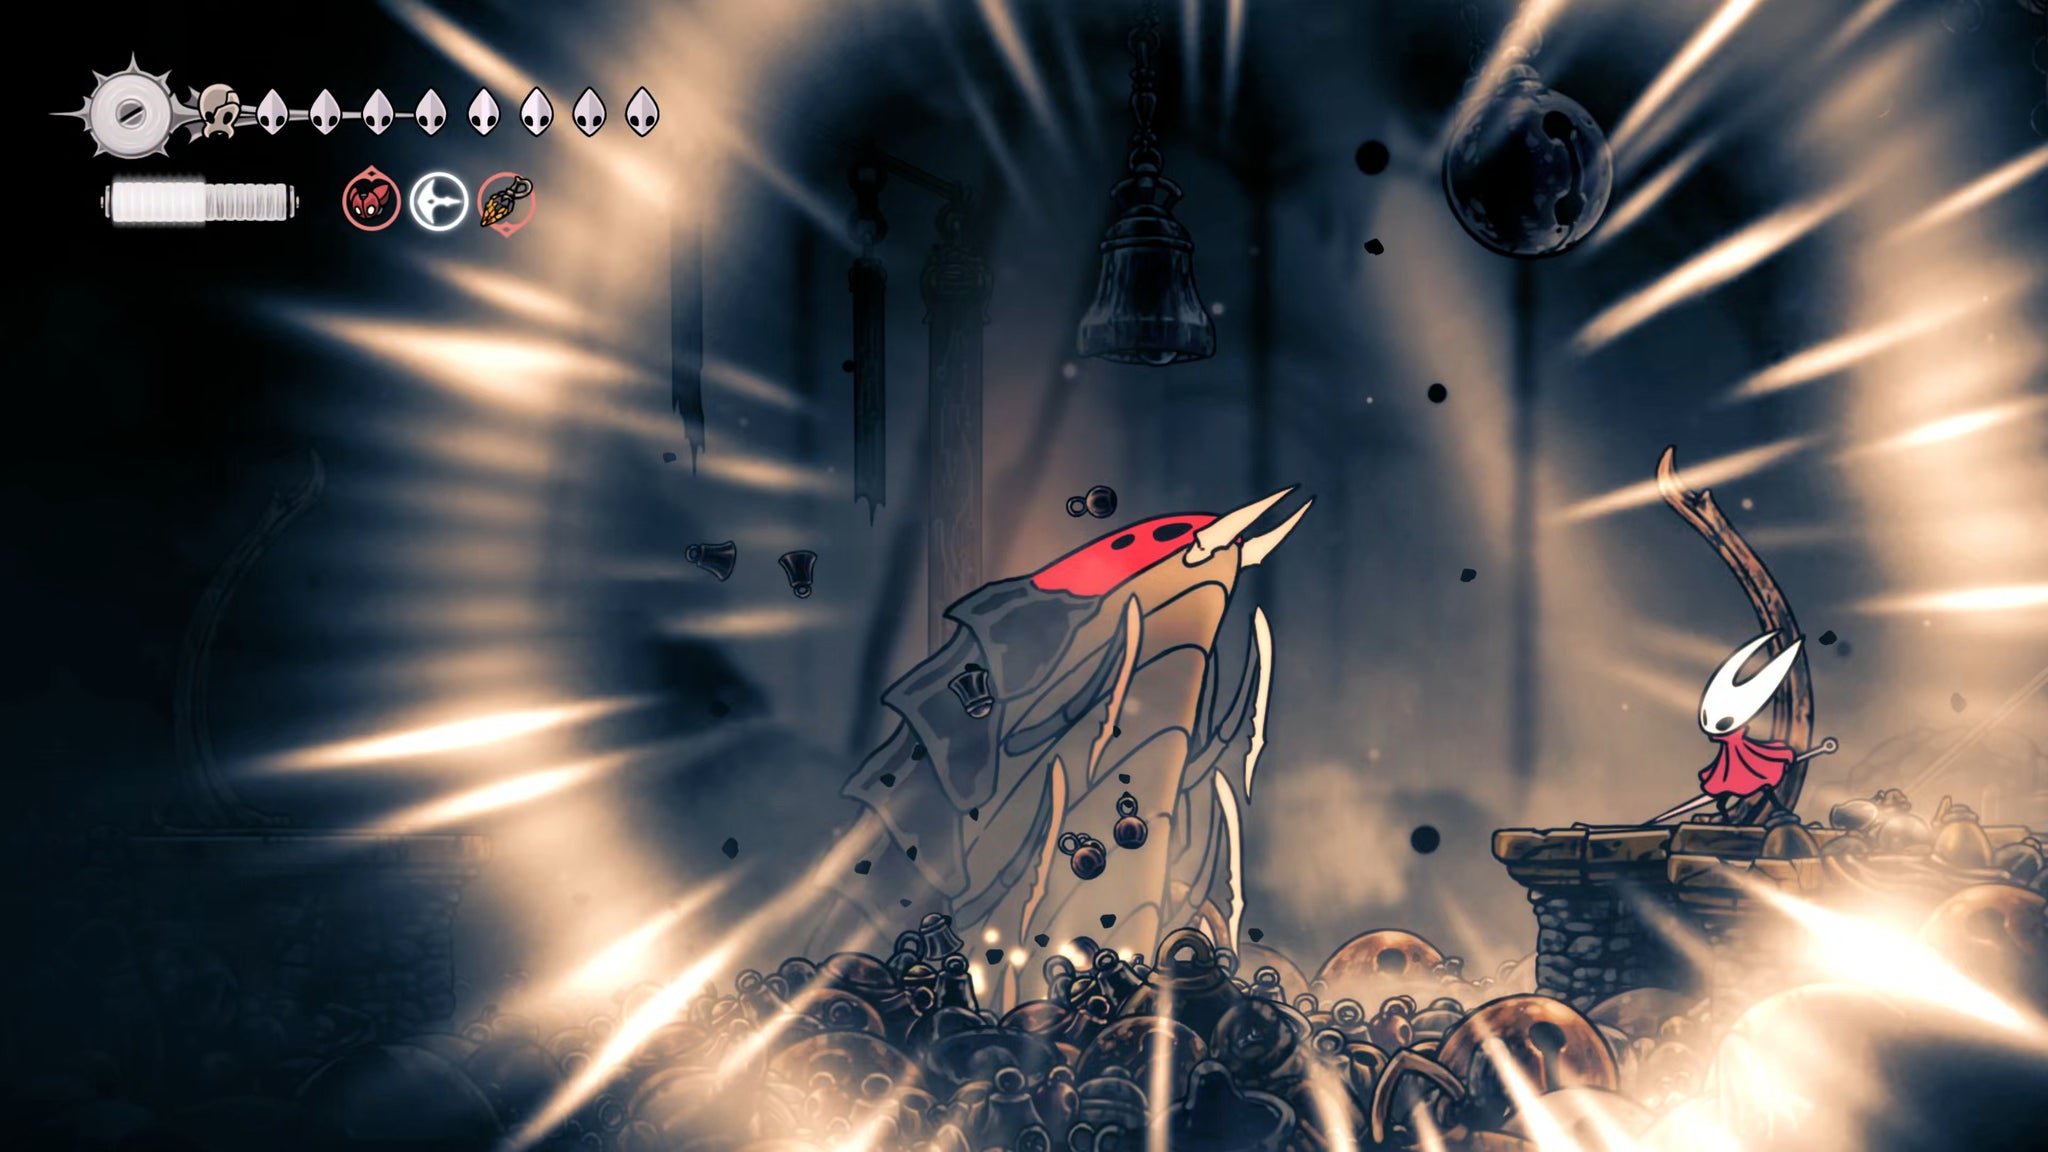
What’ve you done with the Bell Beast, you vile imposter! |Image credit:Rock Paper Shotgun/Team Cherry
Location: Choral Chambers, in the Grand Bellway after you try to summon the Bell Beast for the first time in Act 3. The Belleater will appear instead, creating a hole in the ground that you can jump down.
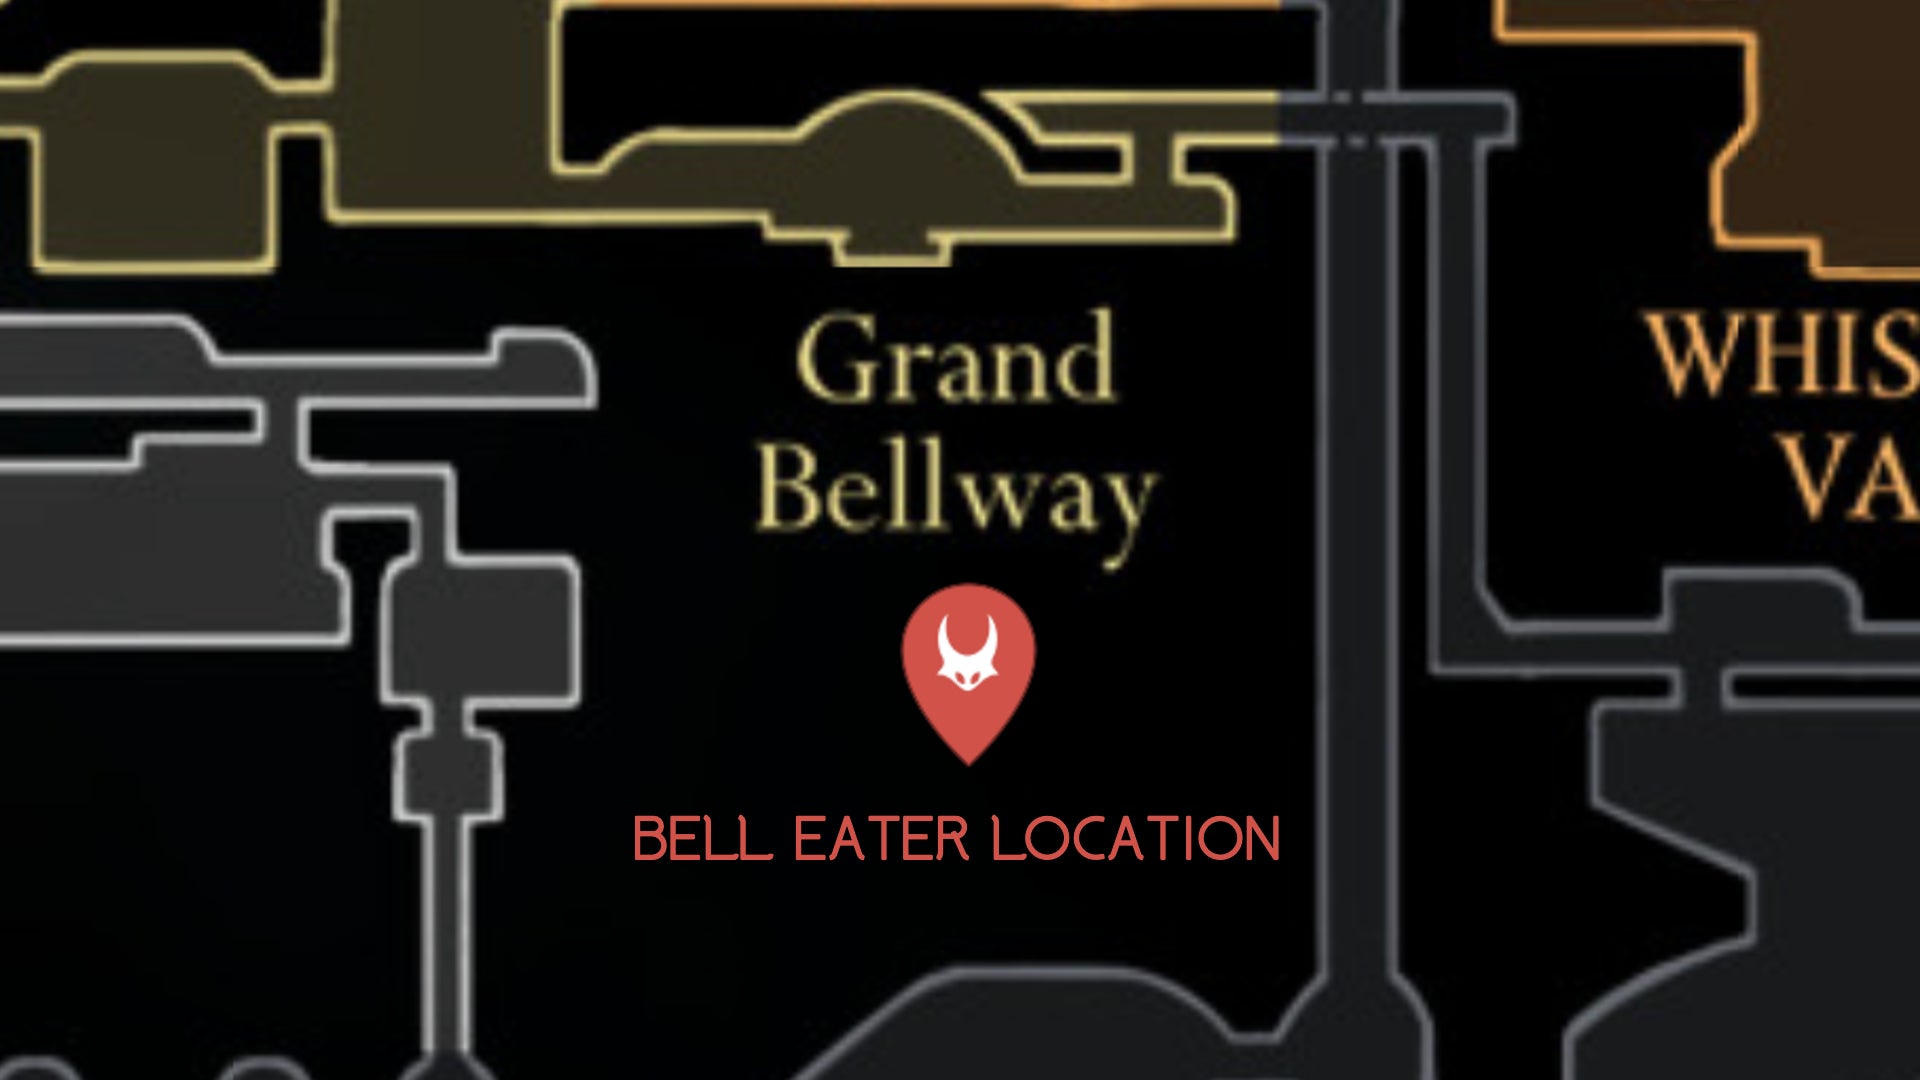
Image credit:Rock Paper Shotgun/MapGenie/Team Cherry
How to beat: Your old pal the Bell Beast has been replaced by a much nastier boss. The Bell Eater does attack in a similar fashion, making bells bounce all over the area for you to avoid, but it also uses both its front and rear end to attack you. The front will either spin around or shoot red globs at you, while the rear fires out bouncing balls of goo. Gross!
The narrow confines of this combat are unfortunate, as you can’t wall jump to avoid attacks and must rely upon double jumps and Pogo-ing. As is the case with all boss encounters in small arenas, Tools can make the environment work in your favour. Cogflies can do decent damage, and the stake form of Volt Vessels is a nice one to use whenever you see dust rumbling on the floor, indicating that the Bell Eater is about to emerge.
Moss Mother Miniboss
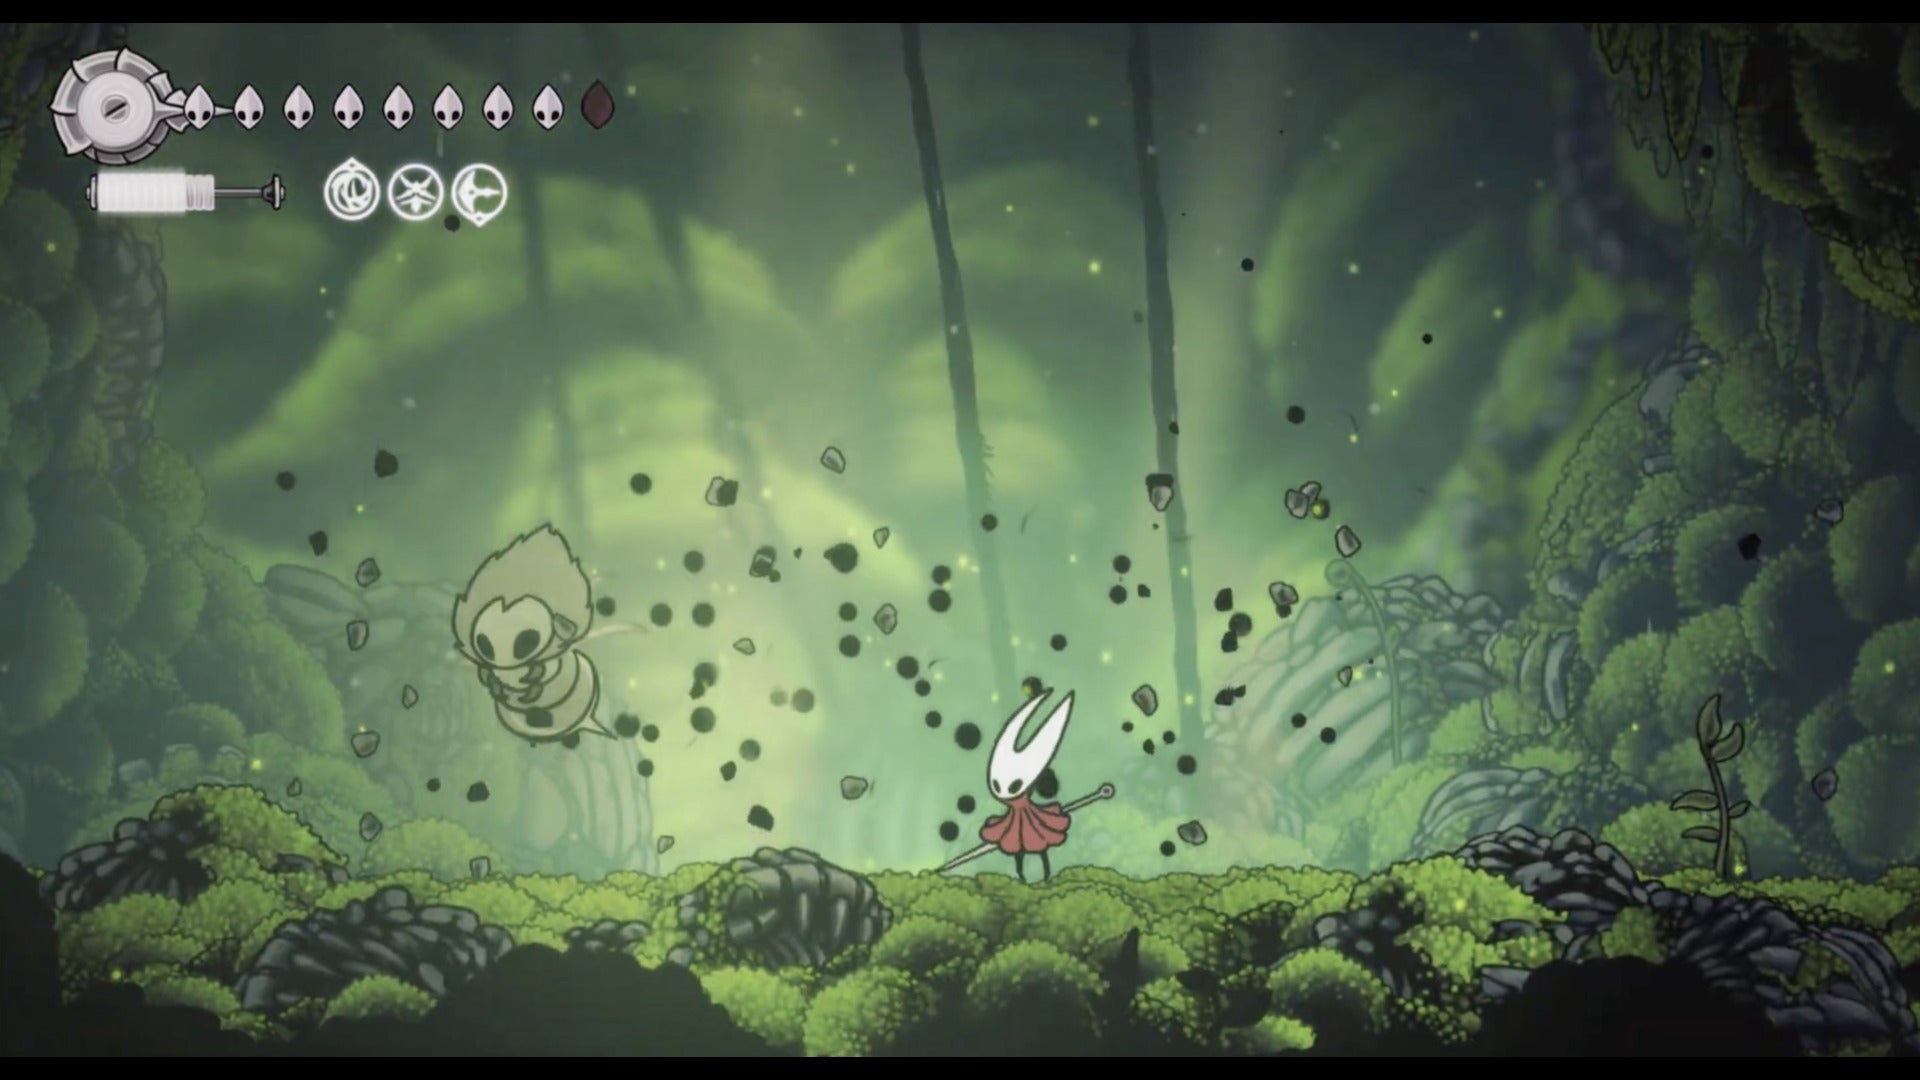
Another Moss Mother? And this one just shows up without any warning? Meh. |Image credit:Rock Paper Shotgun/Team Cherry
Location: Moss Grotto, near the bottom of the region and below where you first fought Moss Mother at the start of the game. Notably, this Moss Mother only appears in Act 3 and does so without any fanfare, almost like a regular enemy.

Image credit:Rock Paper Shotgun/MapGenie/Team Cherry
How to beat: By now, you should be used to facing Moss Mothers, so when this one pops as a miniboss/regular foe, it might be a surprise…but hopefully nothing that will destroy too many of your Masks. This Moss Mother is a Void variant, but otherwise her attacks are similar to the others. She’ll focus on slamming the ceiling to knock debris downwards and occasionally turn into a void pinwheel, but with some well-timed Nail slashes you can send her to join her sisters.
Lost Garmond
You used to be such a friendly bumbler, Garmond. What have they done to ya. |Image credit:Rock Paper Shotgun/Team Cherry
Location: The Blasted Steps, where you previously ran into Lumble the Lucky. Meeting Lost Garmond is part of the Hero’s Call Wish; see our guide for the full details on completing this Wish.

Image credit:Rock Paper Shotgun/MapGenie/Team Cherry
How to beat: Thanks to that darn Void poisoning his mind, Lost Garmond’s much more of a force to be reckoned with than the last time you dueled. He shoots horizontal projectiles that fan towards the ceiling and also has a nasty downwards jump attack. When his downwards jump hits the ground, four black globs will spray out, and these turn razor-sharp shortly afterwards.
Stay airborne to get the drop on Garmond and avoid the brunt of his moves. Alternate between Pogo-ing on his head and slashing with your Nail, always aiming in the direction where he isn’t shooting projectiles. It takes some trial and error, but if you utilise the dash attack of the Reaper Crest (which has a nice distance closing attack combined with an airborne leap) you can avoid most of the junk that Garmond tosses at you.
Crawfather
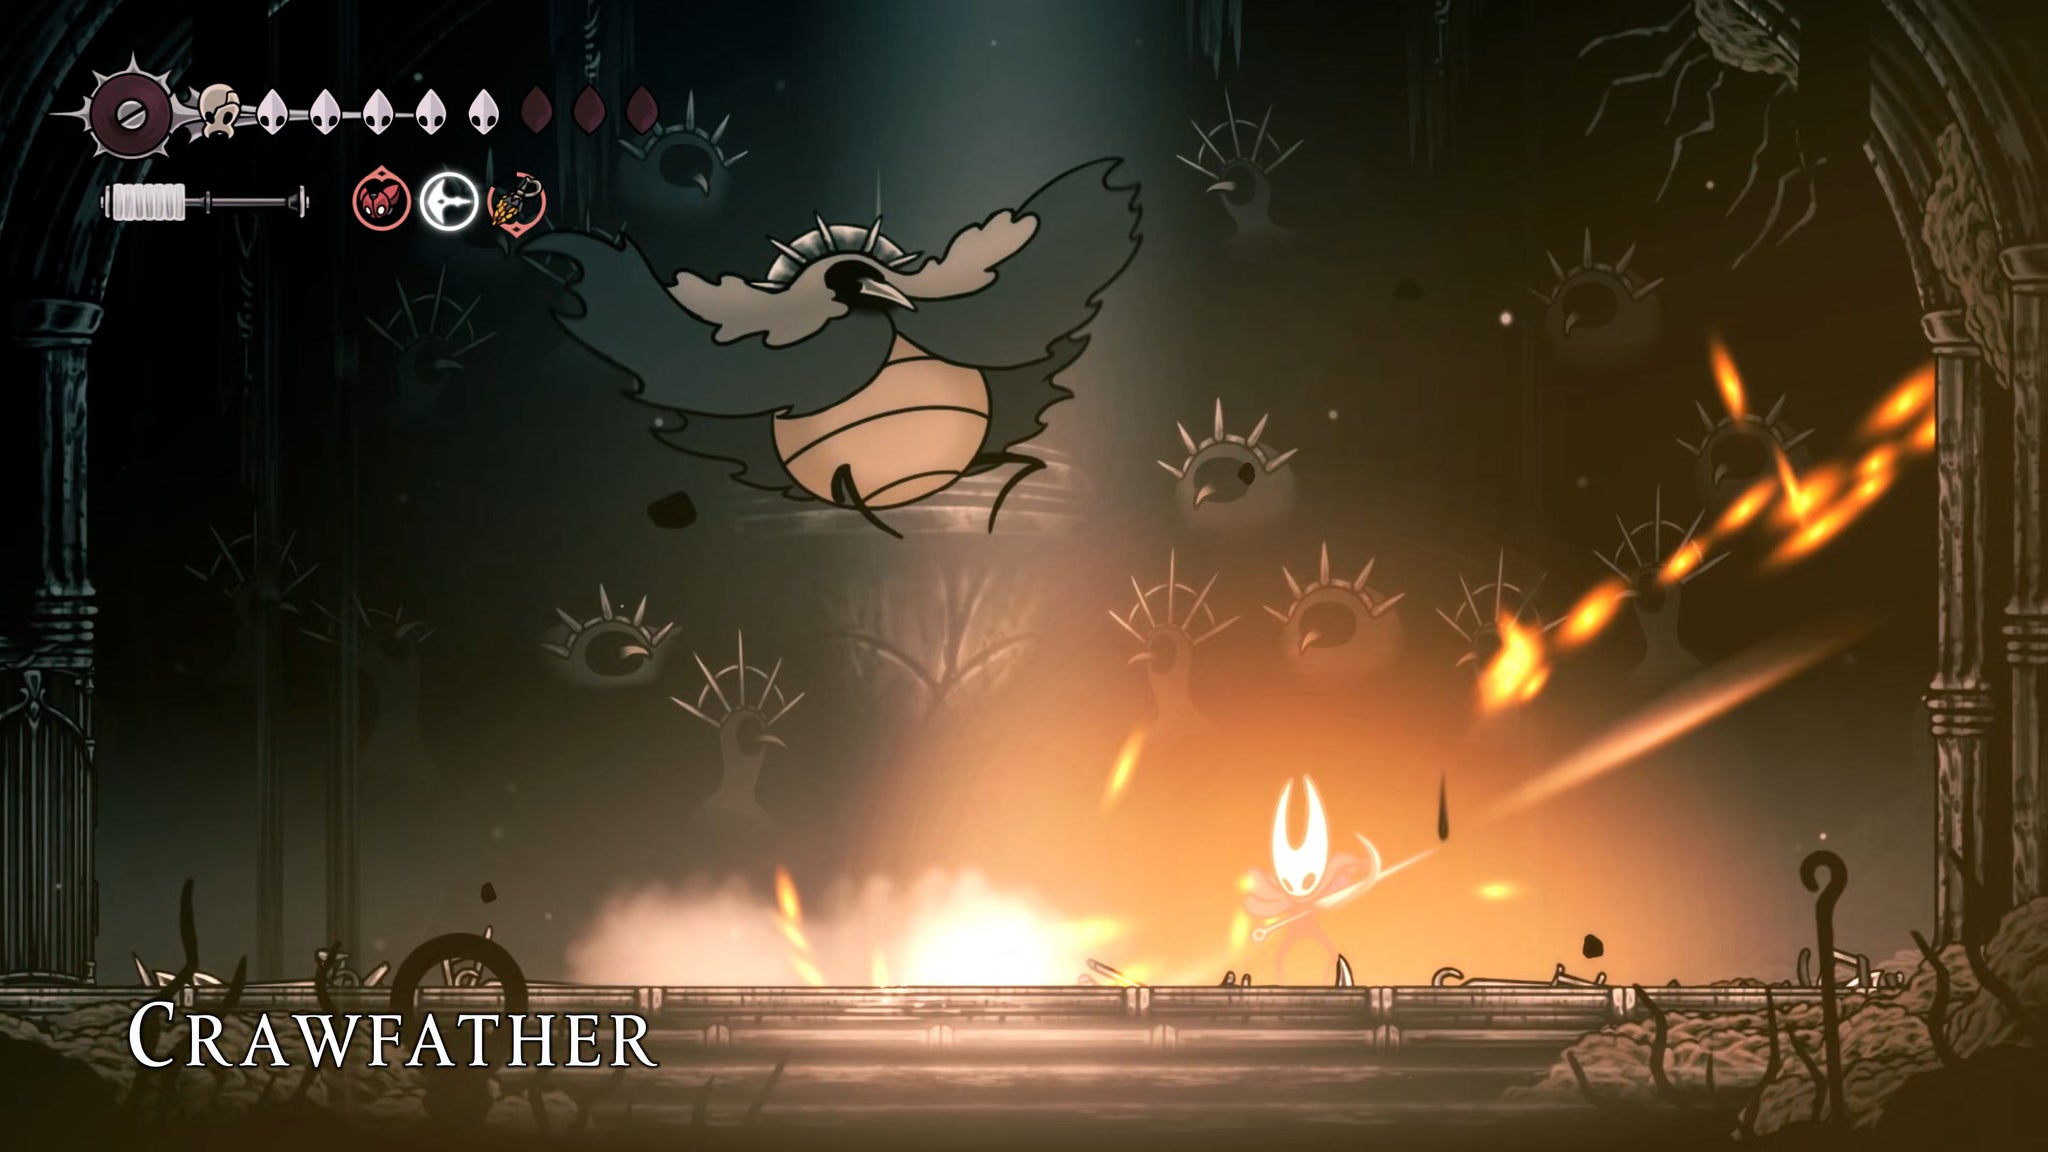
Nothing worse than a court of Craws… |Image credit:Rock Paper Shotgun/Team Cherry
Location: Greymoor; you’ll need to unlock the Craw Door in Craw Lake using the Craw Summons item. (Whew, that’s a lotta Craws.) The Craw Summons is delivered to you randomly at any point when you rest at a Bench in Act 3.
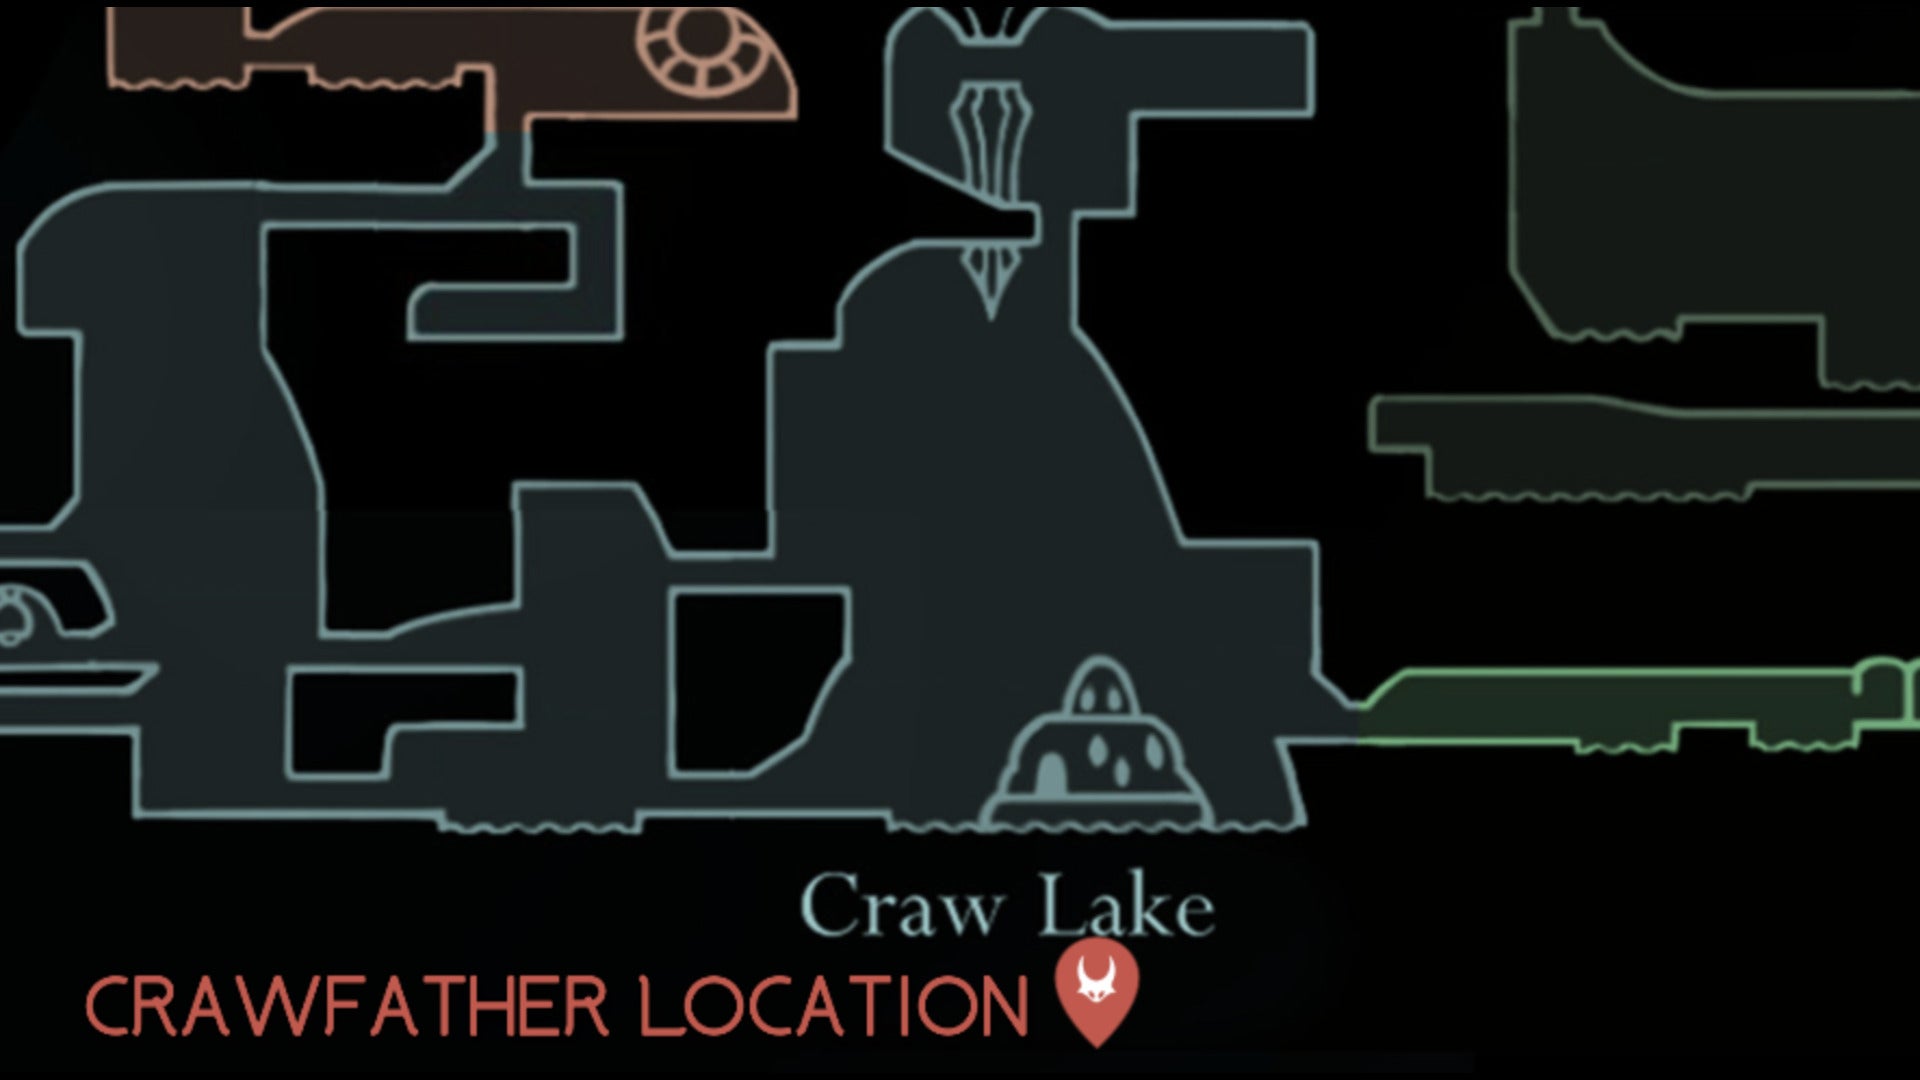
Image credit:Rock Paper Shotgun/MapGenie/Team Cherry
How to beat: The Crawfather’s another one of those bosses who comes at the end of a long gauntlet - this one featuring six waves of the Court of Craws, so half of the battle is simply staying alive until you face him. He isn’t an awful boss all things considered - watch out for his charge attack along the ground and his downward dive - but as he weakens he starts summoning minions, which can be annoying.
Abuse the Cogfly during this battle (and the waves leading up to it) and try to focus your attacks on the Crawfather rather than his goons. When his health gets low, he’ll start shooting chains that attach to all edges of the arena. It’s fairly straightforward to avoid these and get under him for several good upwards slashes as this attack hits.
Plasmified Zango
Beware those big plasma globs, but otherwise this fight’s a simple DPS check. |Image credit:Rock Paper Shotgun/Team Cherry
Location: The Wormways, in the lower leftmost room through a breakable wall. This is part of Zylotol’s Act 3 Advanced Alchemy Wish, and we have a rundown on how to explore this stretch of the Wormways and encounter Plasmified Zango here .

Image credit:Rock Paper Shotgun/MapGenie/Team Cherry
How to beat: Plasmified Zango wanders from side to side of the room, regenerates his health regularly, and shoots out globs of plasma. This isn’t a hard fight by any means, but you want to end it quickly to contend with his constantly-regenerating health. You can either pile on the DPS, unleashing as many Cogwork Wheels and Cogflies as you can, or stick him four times with the Needle Phial. Doing so cuts his max health down each time.
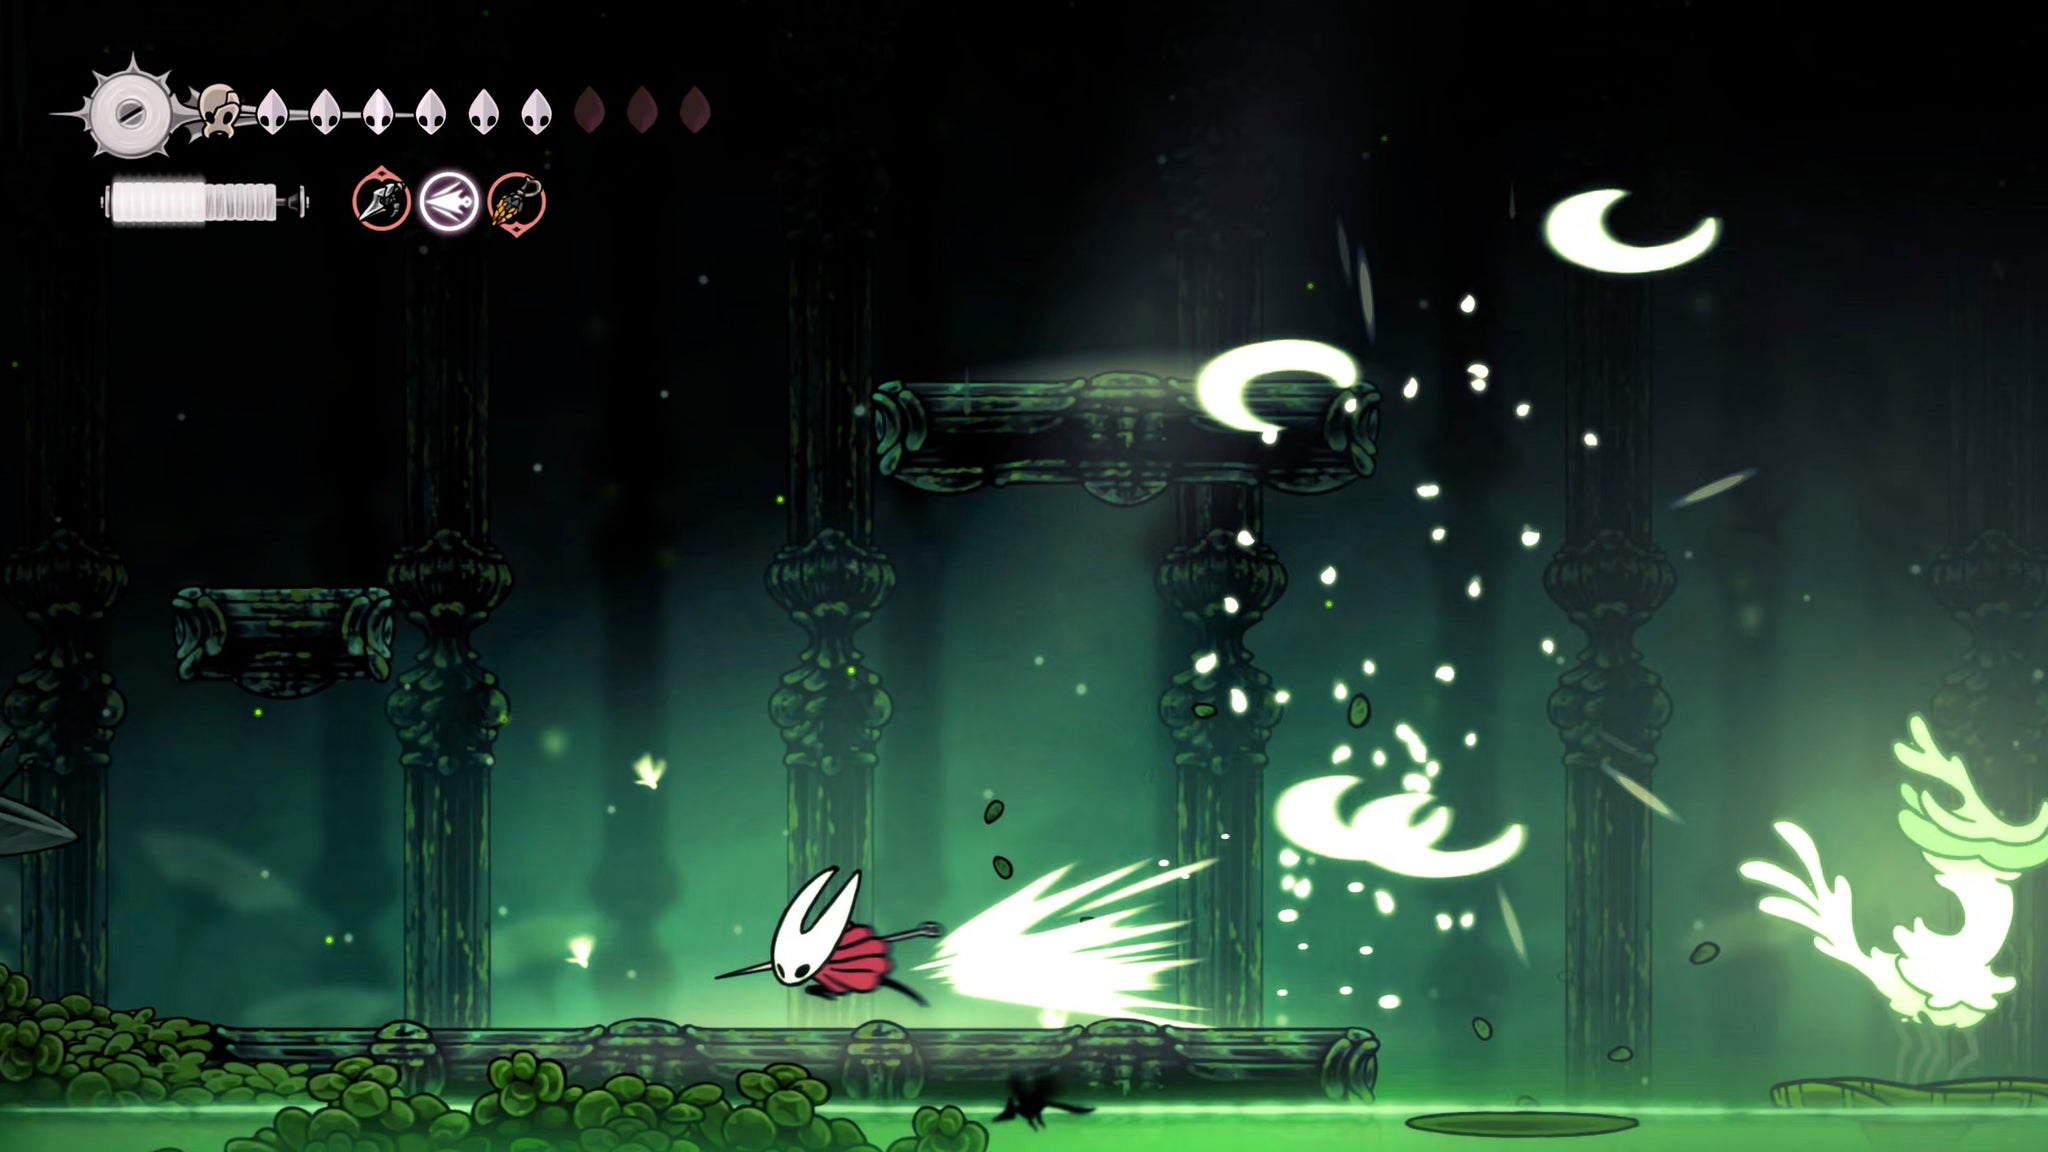
Watcher At The Edge
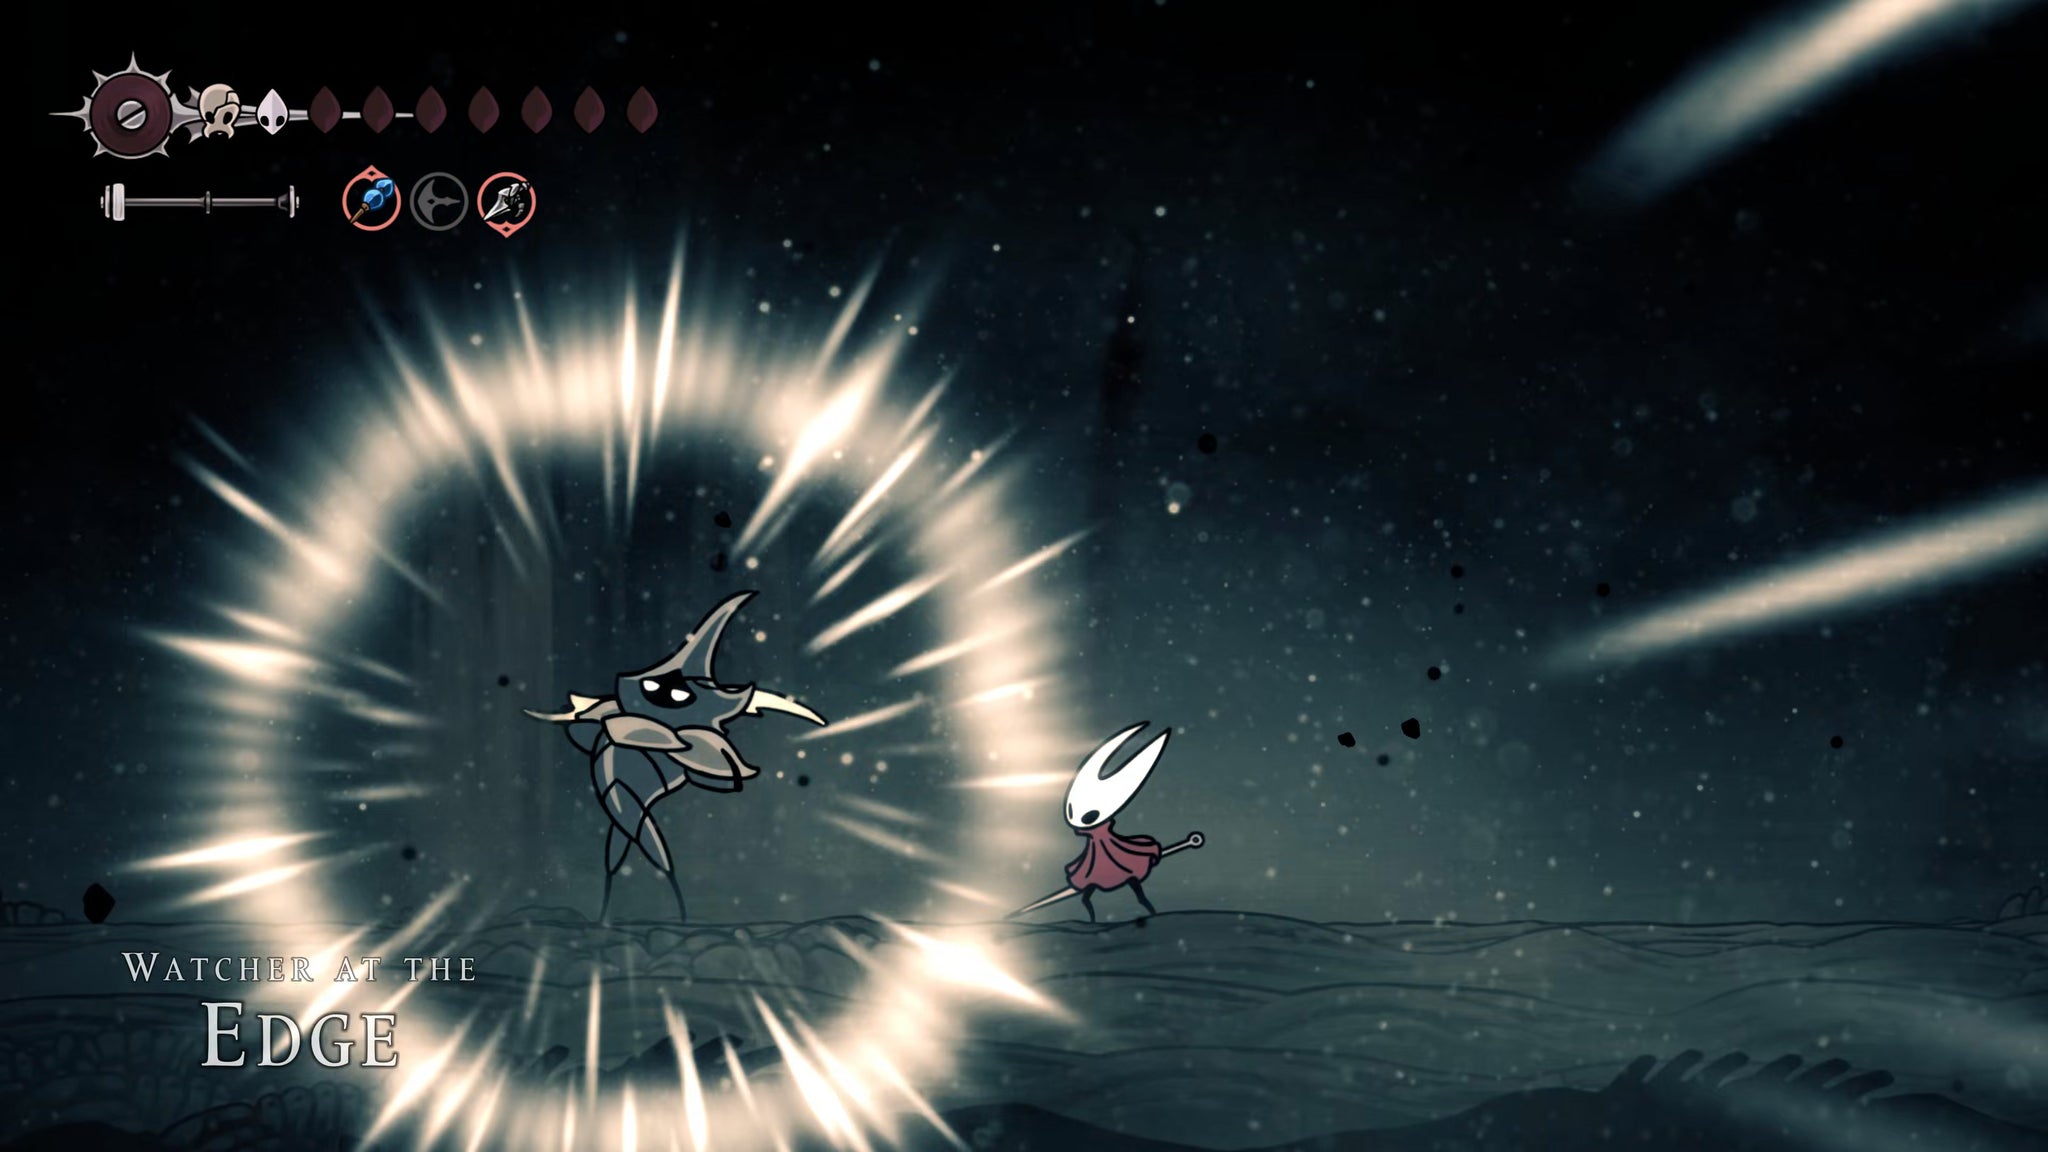
The Watcher awakens. Beware his relentless aggression. |Image credit:Rock Paper Shotgun/Team Cherry
Location: The Sands of Karak, right above the region’s entrance. You need the Silk Soar and Needolin - see our guide for the exact instructions on how to reach and activate this armoured warrior.
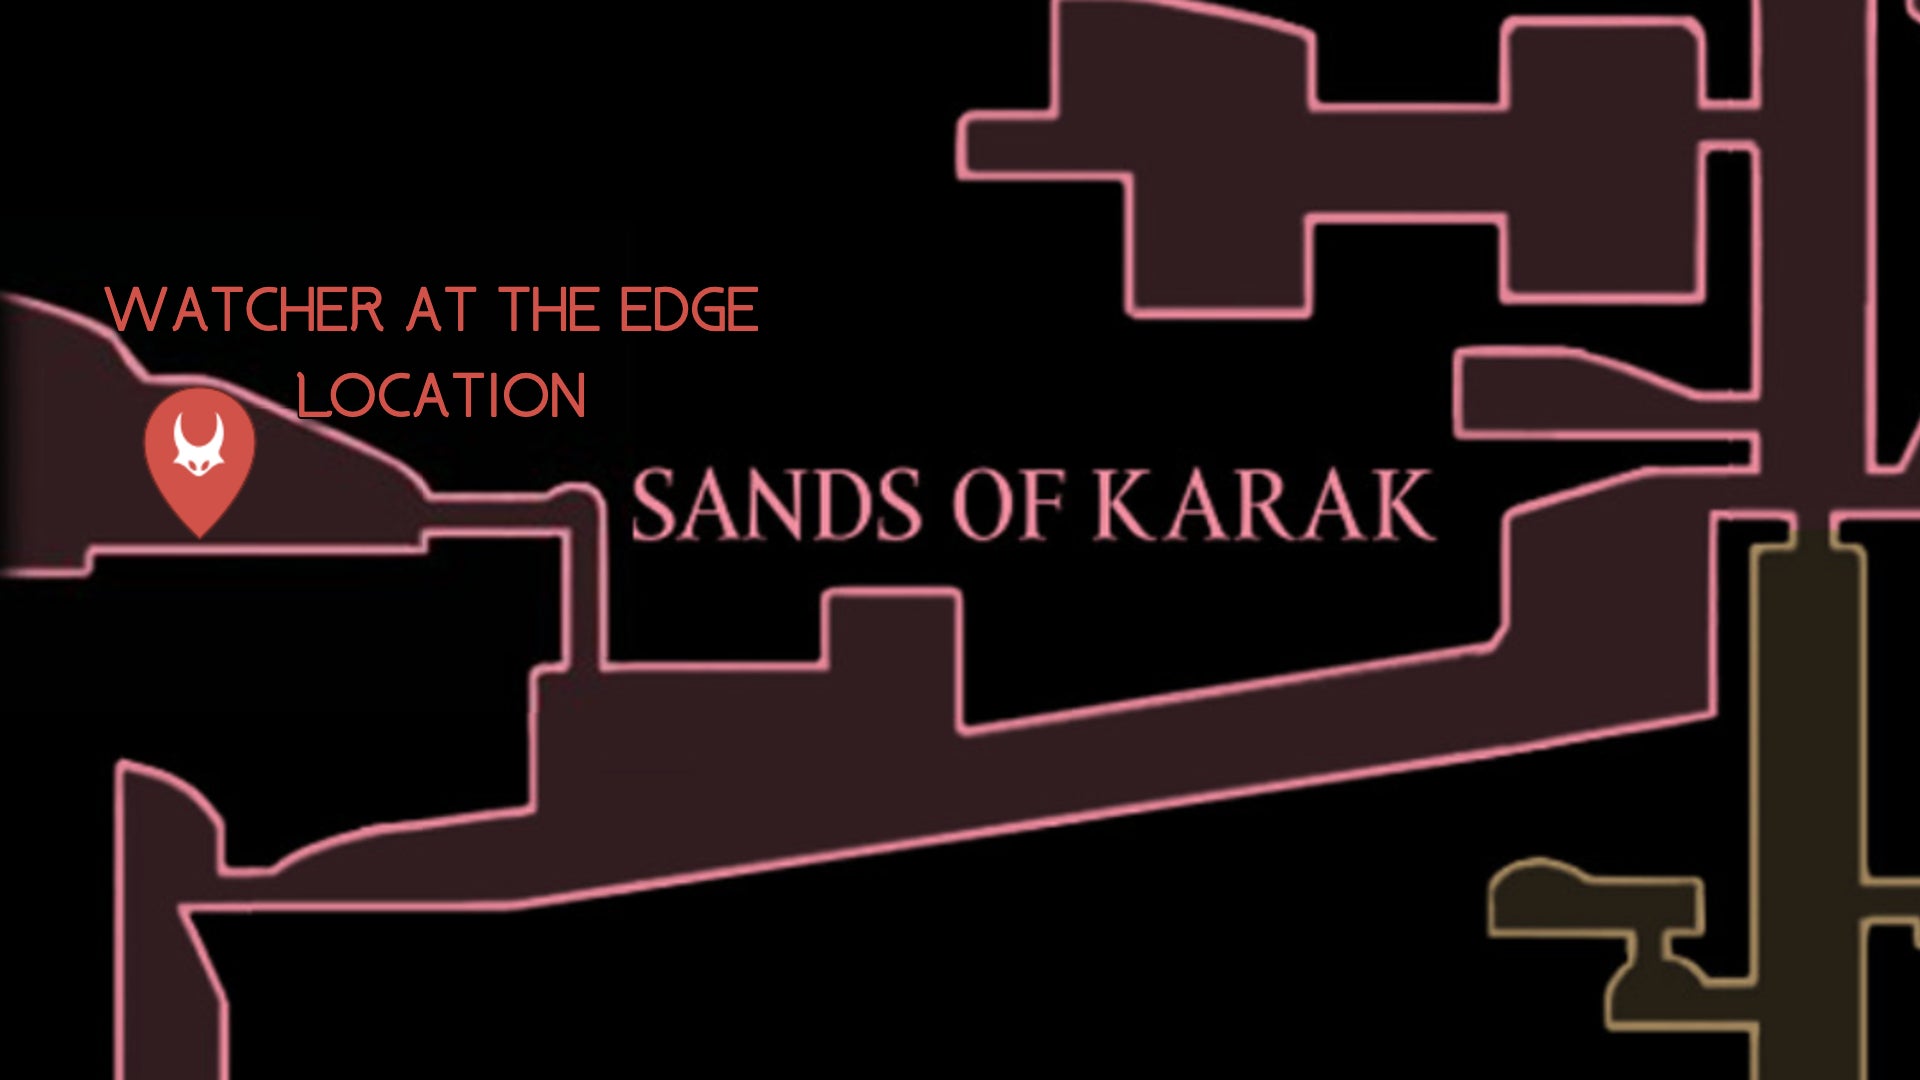
Image credit:Rock Paper Shotgun/MapGenie/Team Cherry
How to beat: The Watcher At The Edge hits very hard with big sword range, but has a simple enough attack pattern. The Watcher’s most devastating attack is a leaping sword slash which kicks up sand and then goes into a downward slash. You can either dodge away from this attack completely, or you can dash under the Watcher and through the sand to ensure that you’re not hit and have a chance to attack a few times from behind.
The Watcher’s other moves consist of a more straightforward jump attack and a few combo sword swipes that are only used on the ground. Dash around the Watcher, kite him off the edge of the platform if you can (he’ll fall, take some damage from the worms, and then respawn onto the platform) and rinse and repeat.
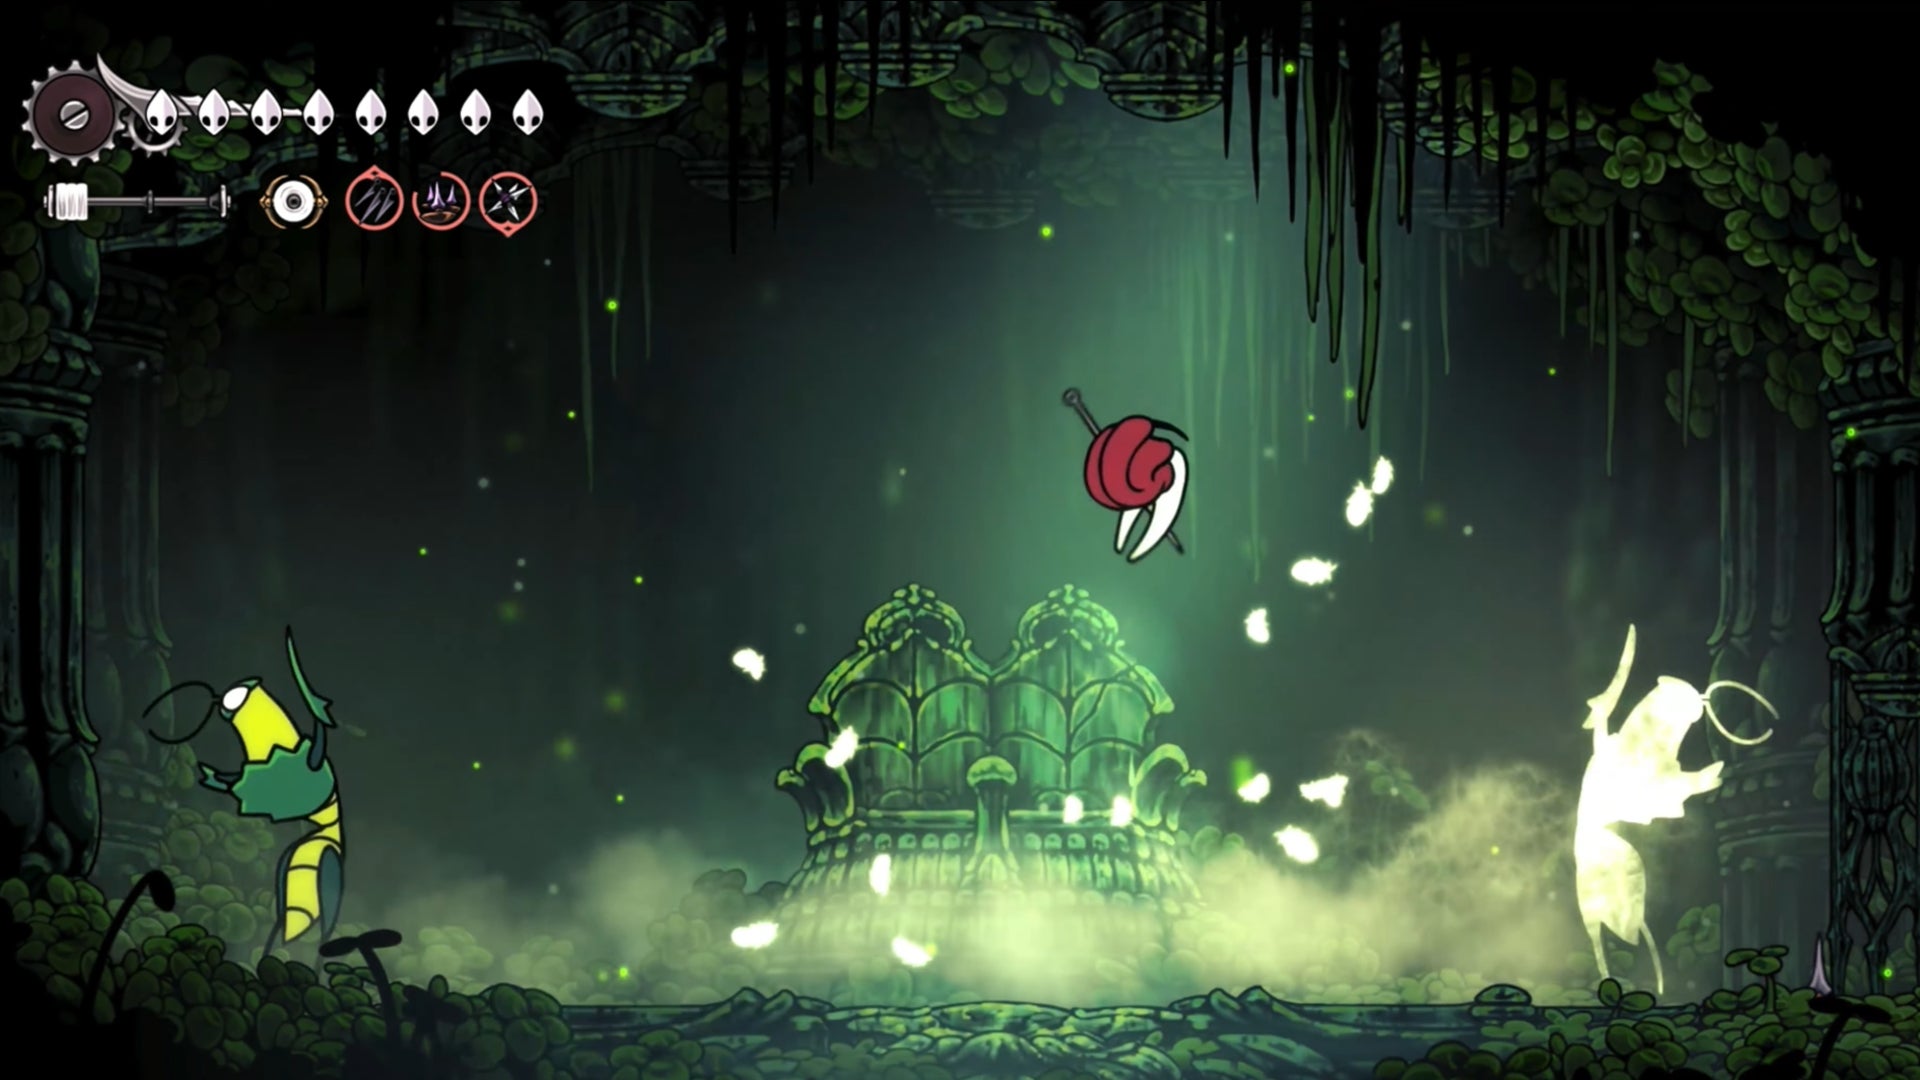
Palestag
A stag, you say? Once I get out of the way of these spinning things, it shall fall victim to my silk gun! |Image credit:Rock Paper Shotgun/Team Cherry
Location: Verdania, near the very top of Lost Verdania. You need the Elegy of the Deep to be able to enter Lost Verdania, so here’s a link to the appropriate section of our walkthrough . If you have the Elegy of the Deep, once you get to this stretch of Lost Verdania you must follow the glowing marks on the ground, which will lead you to the ethereal creature that is the Palestag.
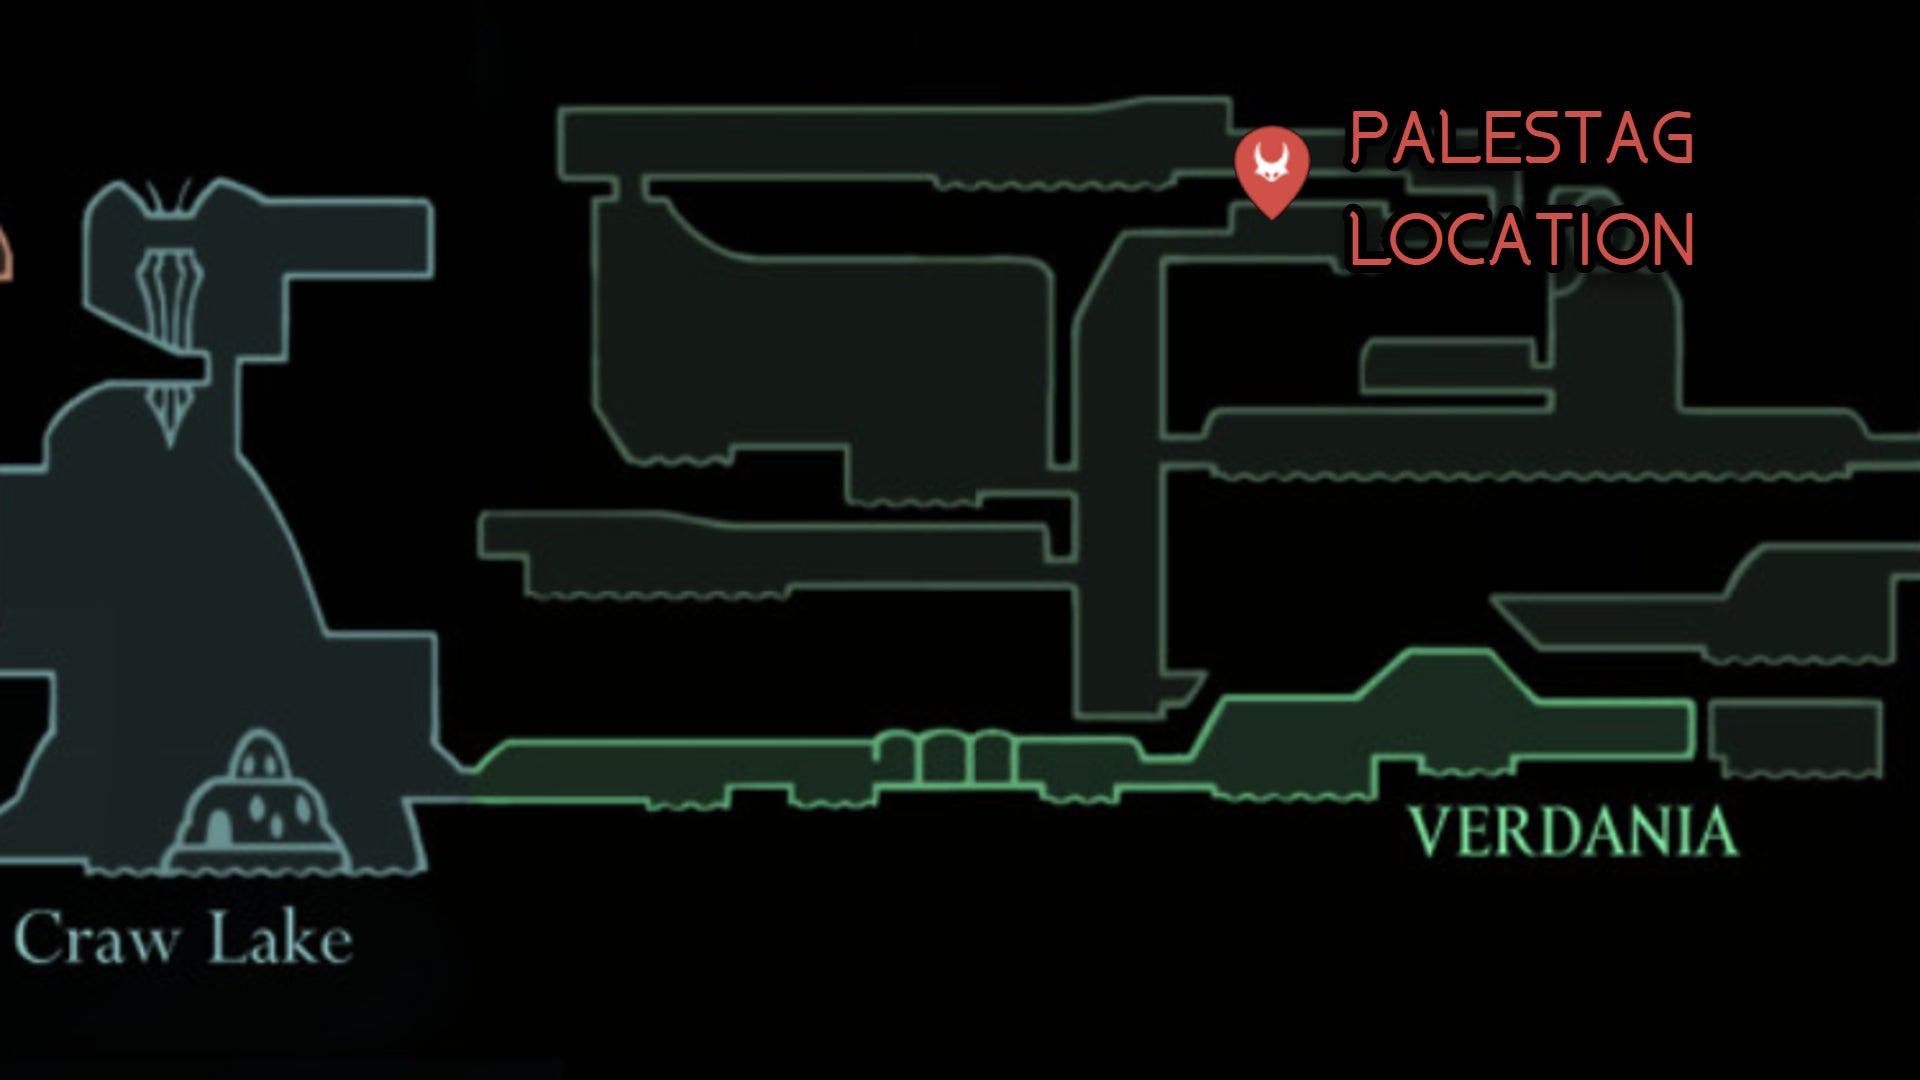
Image credit:Rock Paper Shotgun/MapGenie/Team Cherry
How to beat: The Palestag is more majestic than it is difficult. It hurls spinning projectiles of light at you and teleports away as soon as you get close. The projectiles go through platforms and are relentless, and jumping over them can get exhausting. Since melee attacks are so hard to land, your best bet is to resort to ranged weaponry to blast the Palestag from afar like a veteran hunter. The Silkshot works wonders, as does the Silkspear imbued with electricity.
Clover Dancers
Maintain attacks on the Green Prince - his dancing partner is invincible and only serves as an obstacle during this combat. |Image credit:Rock Paper Shotgun/Team Cherry
Location: Verdania, within the house of the Green Prince. This boss only becomes available after you’ve accessed Lost Verdania, as described in the Palestag entry above, and completed the Green Prince’s trials around the region. Once inside the Green Prince’s house, go right, jump up the shaft, and turn left to run into the prince again and start the combat.
How to beat: Remember the Cogwork Dancers? The Clover Dancers have a similar gimmick, but one of them is ghostly and can’t be harmed. Focus your attacks on the Green Prince and dodge the other dancer. Every now and again, both dancers will come together in the centre of the room to unleash a vortex that moves either clockwise or counterclockwise. You need to move to the other side of the room, following the vortex’s rotation, in order to avoid taking damage.
The Clover Dancers will start moving out of sync with each other in the second stage of the battle, upping the difficulty level slightly. Both will zoom across the screen leaving silk lines; avoid contact with these and stand in a place of safety. Once again, as long as you focus on the Green Prince himself and don’t let the ghost distract you, you’ll survive.
Gurr The Outcast

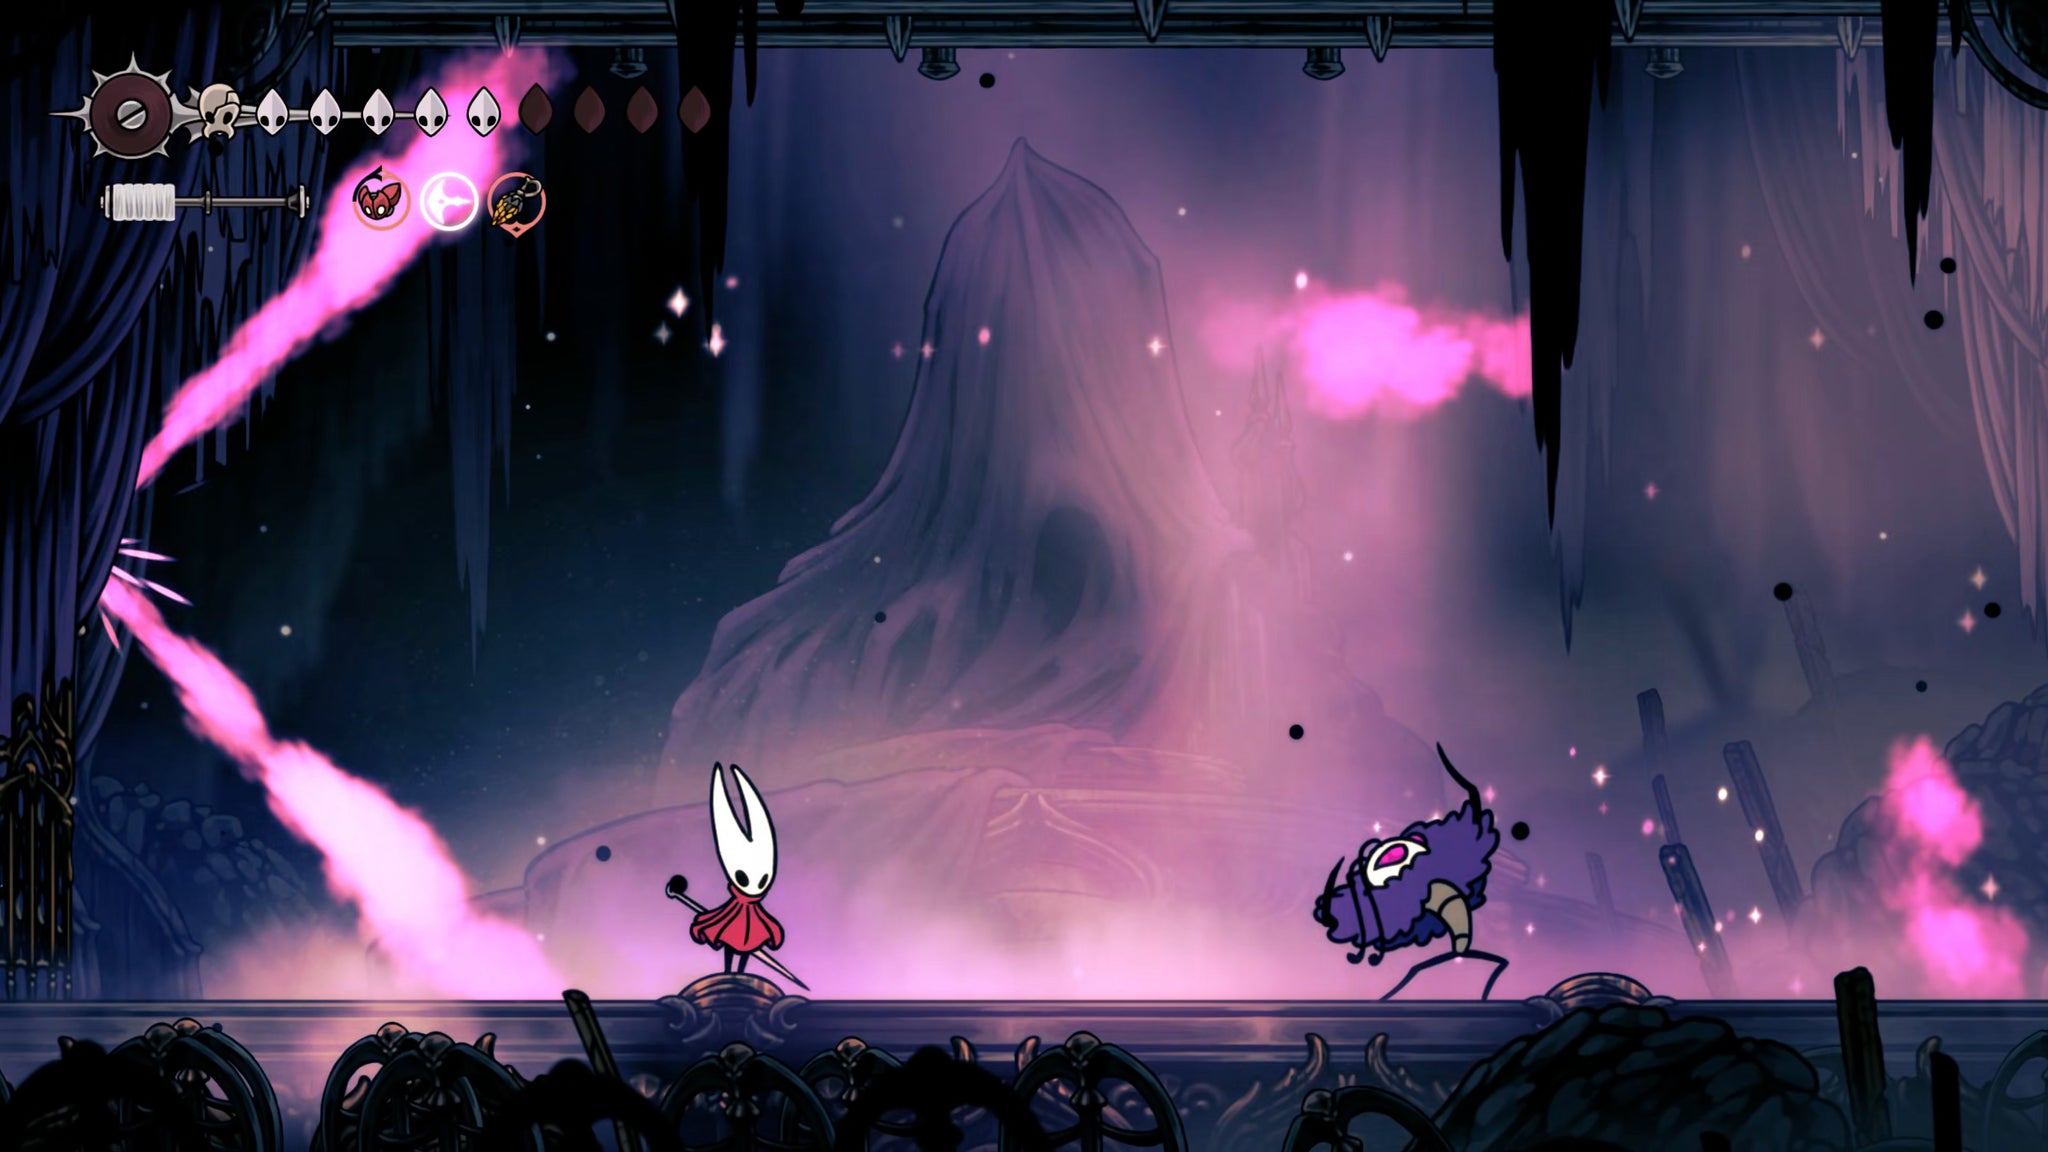
This guy sure loves his spikes. |Image credit:Rock Paper Shotgun/Team Cherry
Location: Far Fields, at the bottom of the upper section of the region. This fight is part of The Hidden Hunter Wish, which we’ve outlined in our walkthrough .
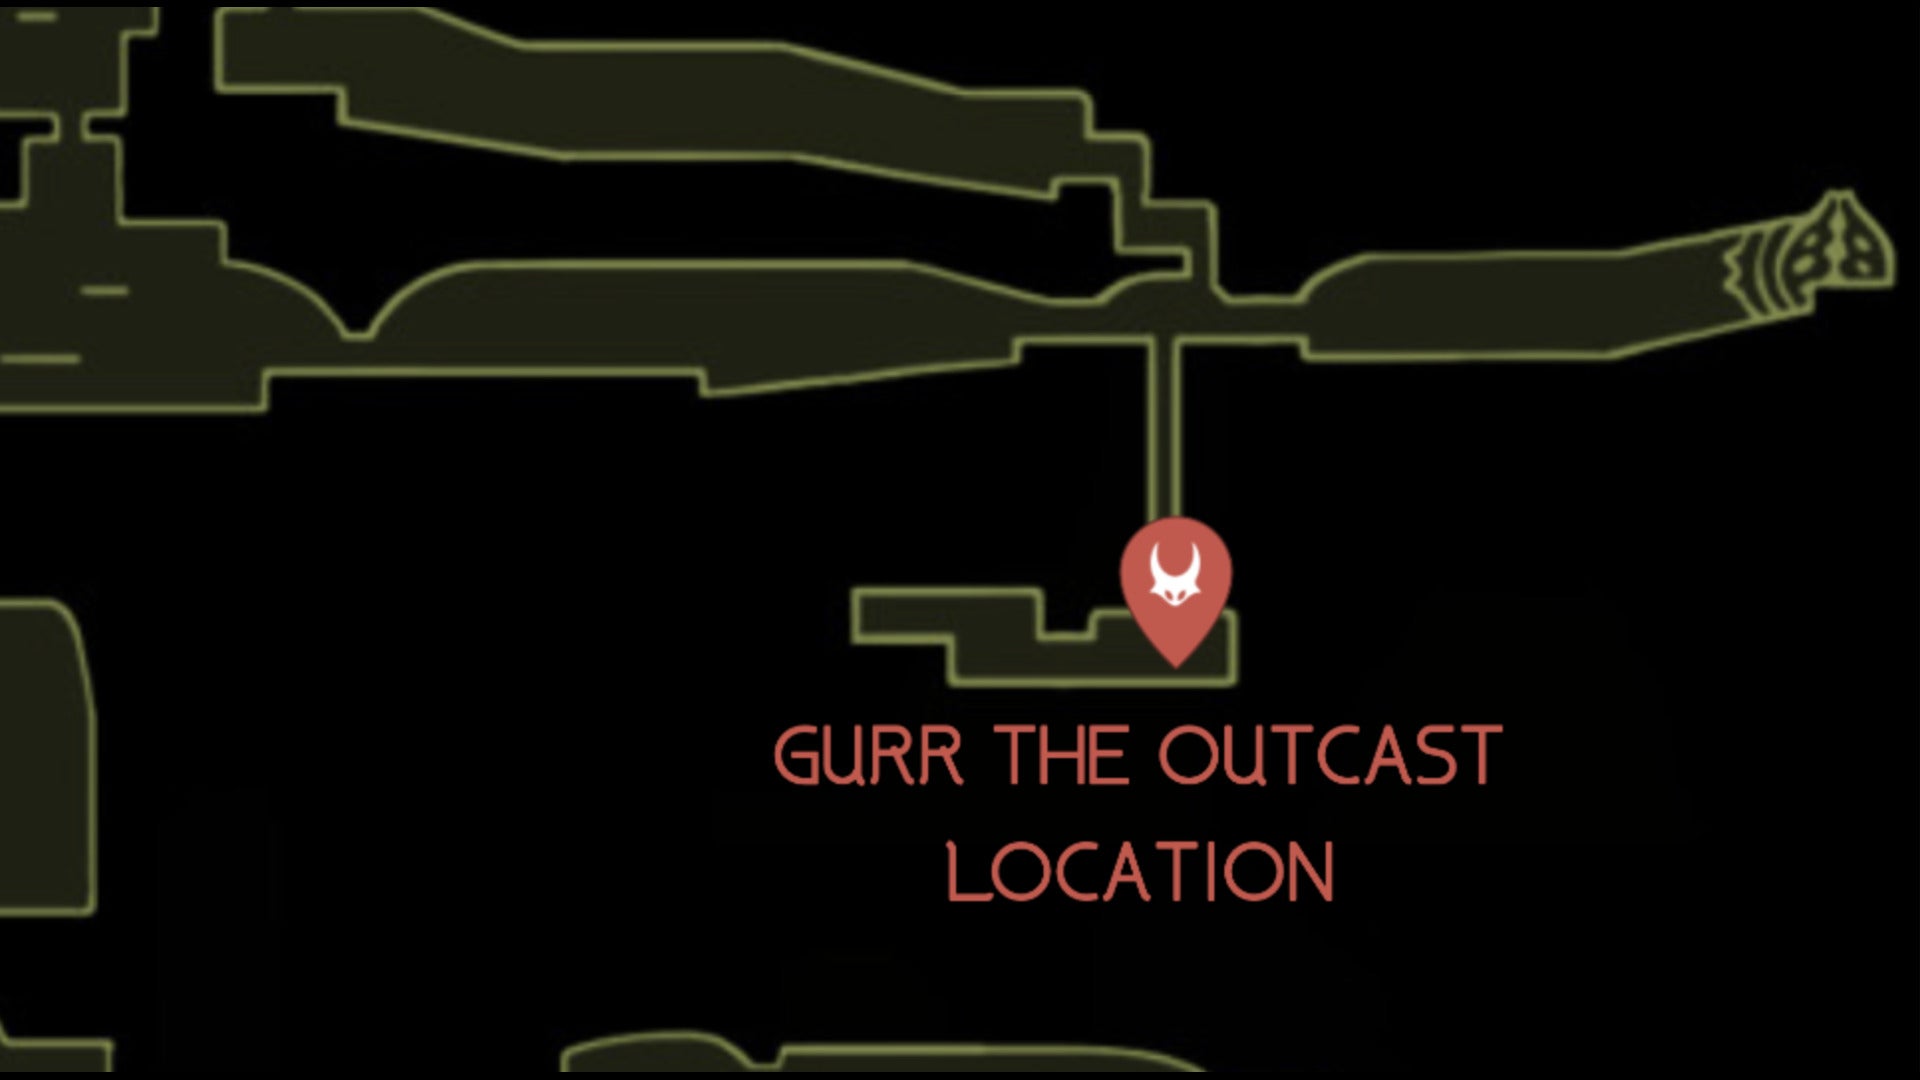
Image credit:Rock Paper Shotgun/MapGenie/Team Cherry
How to beat: Gurr likes traps, and commences this fight by ensnaring you in one. Once you’re out, his trap-laying continues with lots of airborne spikes, each of which will expand after a brief period of time. You can either avoid these spikes or destroy them to get them out of your way faster.
When he isn’t chucking spikes, Gurr slides across the floor, burrows into the ground, and jumps up. His moves are telegraphed by a smoke trail, and he isn’t tough to follow or damage along the way, but all of the spikes he litters the screen with can make this a chaotic and confining affair.
Tormented Trobbio
It’s Trobbio again! He’s more like Prince this time, all purple and stuff. |Image credit:Rock Paper Shotgun/Team Cherry
Location: The Stage in the Whispering Vaults - the same place where you defeated Trobbio. However, you can’t find Tormented Trobbio in Act 3 unless you’ve already beaten his untormented form and taken on the Pain, Anguish, and Misery quest.

Image credit:Rock Paper Shotgunn/MapGenie/Team Cherry
How to beat: Trobbio the showy bastard is back, and his gameplan is to fill the stage with more smoke and mirrors than ever before. His attacks are similar to last time, except now his whirlwinds leave behind a trail of firework explosions, and he’ll also levitate in the air at times and shoot out lines that either appear in a cross or X shape.
If you whupped Trobbio the first time around, you can do so to his emo, purple form. Tacks work well during this fight, and note that Trobbio doesn’t move while his fireworks are exploding, making those moments prime time for healing or getting in a hit or two.
Pinstress
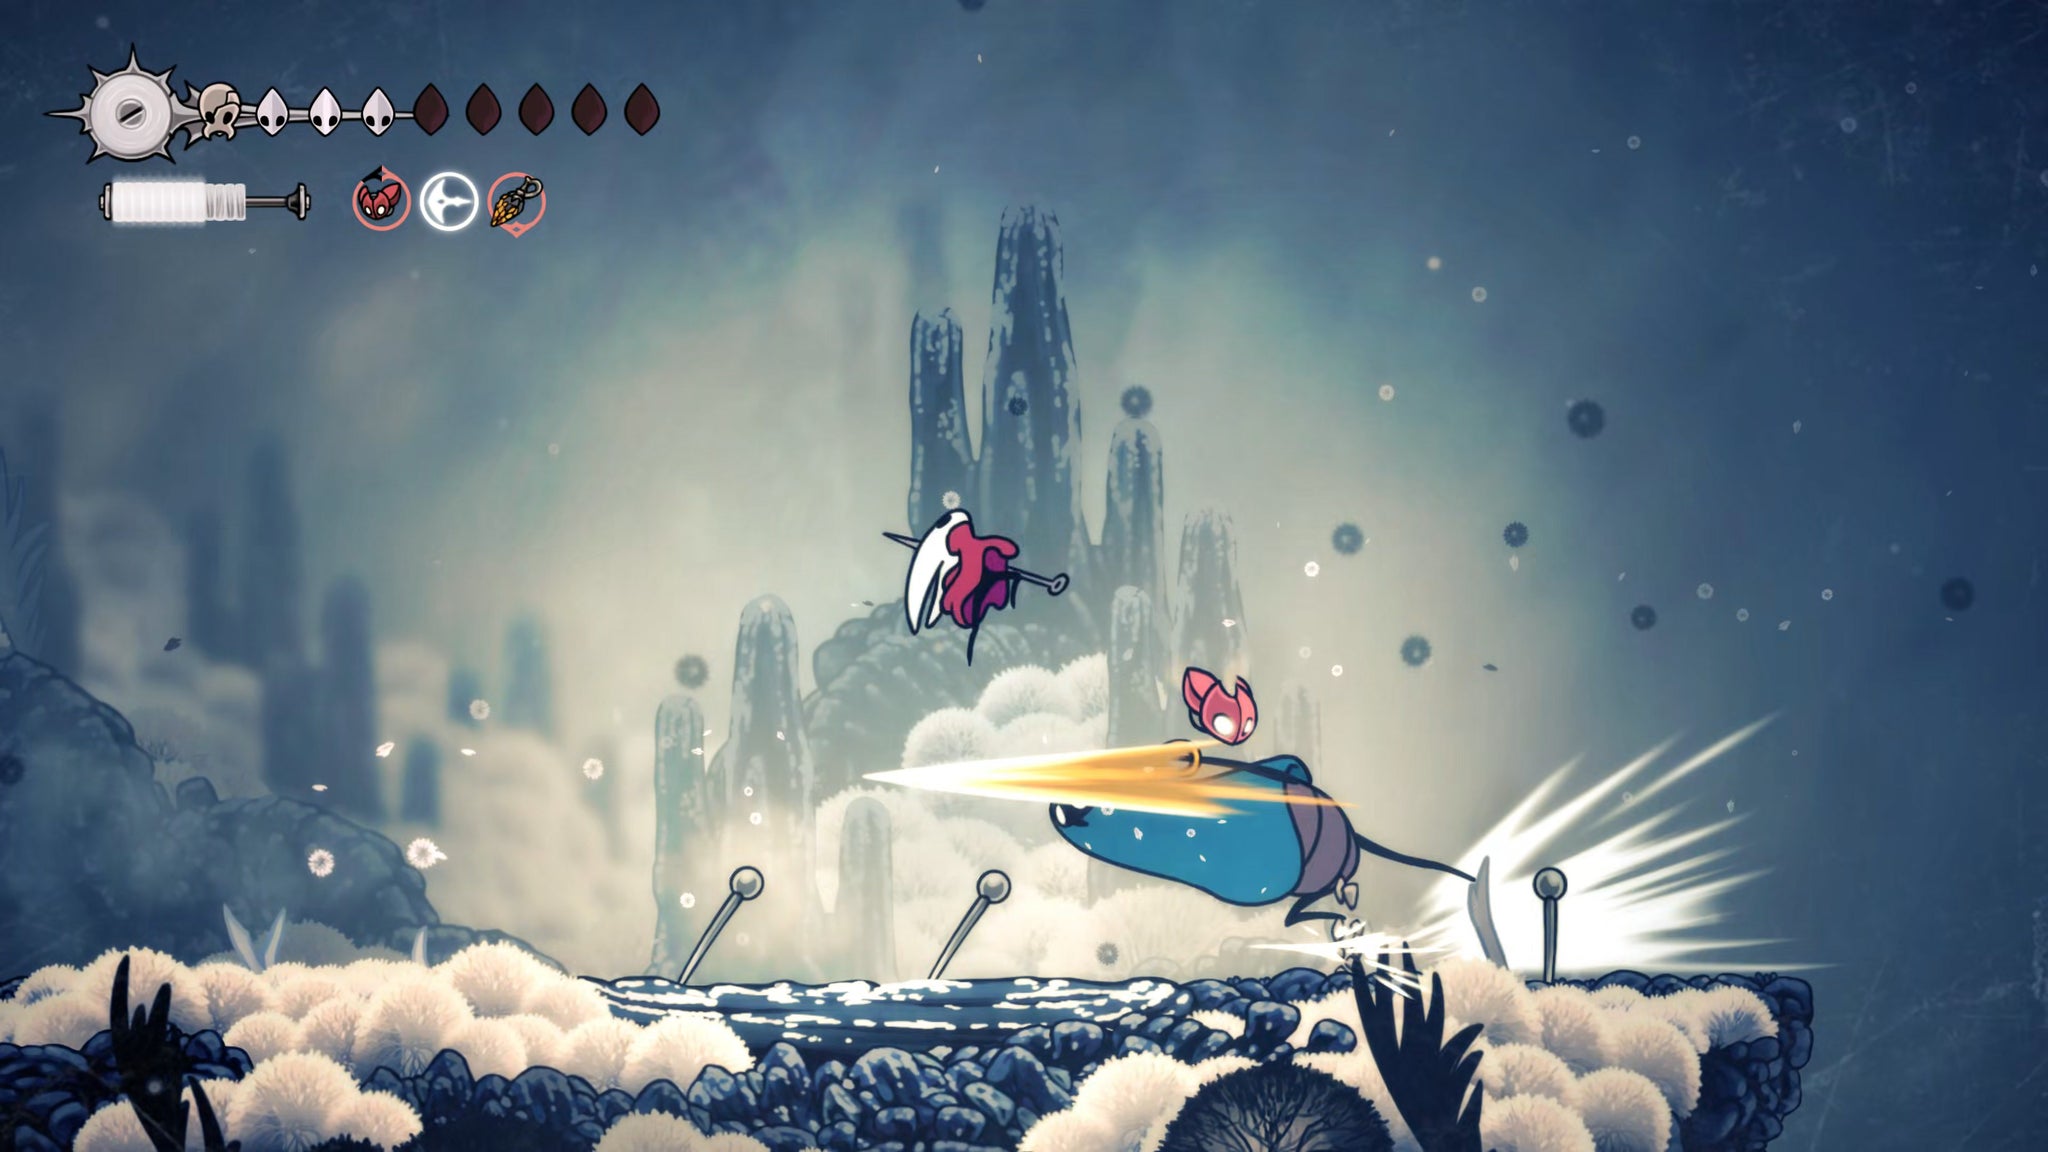
The fight against Pinstress is sort of like the Shakra duel, but a tad slower. |Image credit:Rock Paper Shotgun/Team Cherry
Location: Mount Fay, on a platform above the Bench located halfway up the region’s central vertical area. Meeting Pinstress is part of completing the Fatal Resolve Wish, which is detailed in our walkthrough .
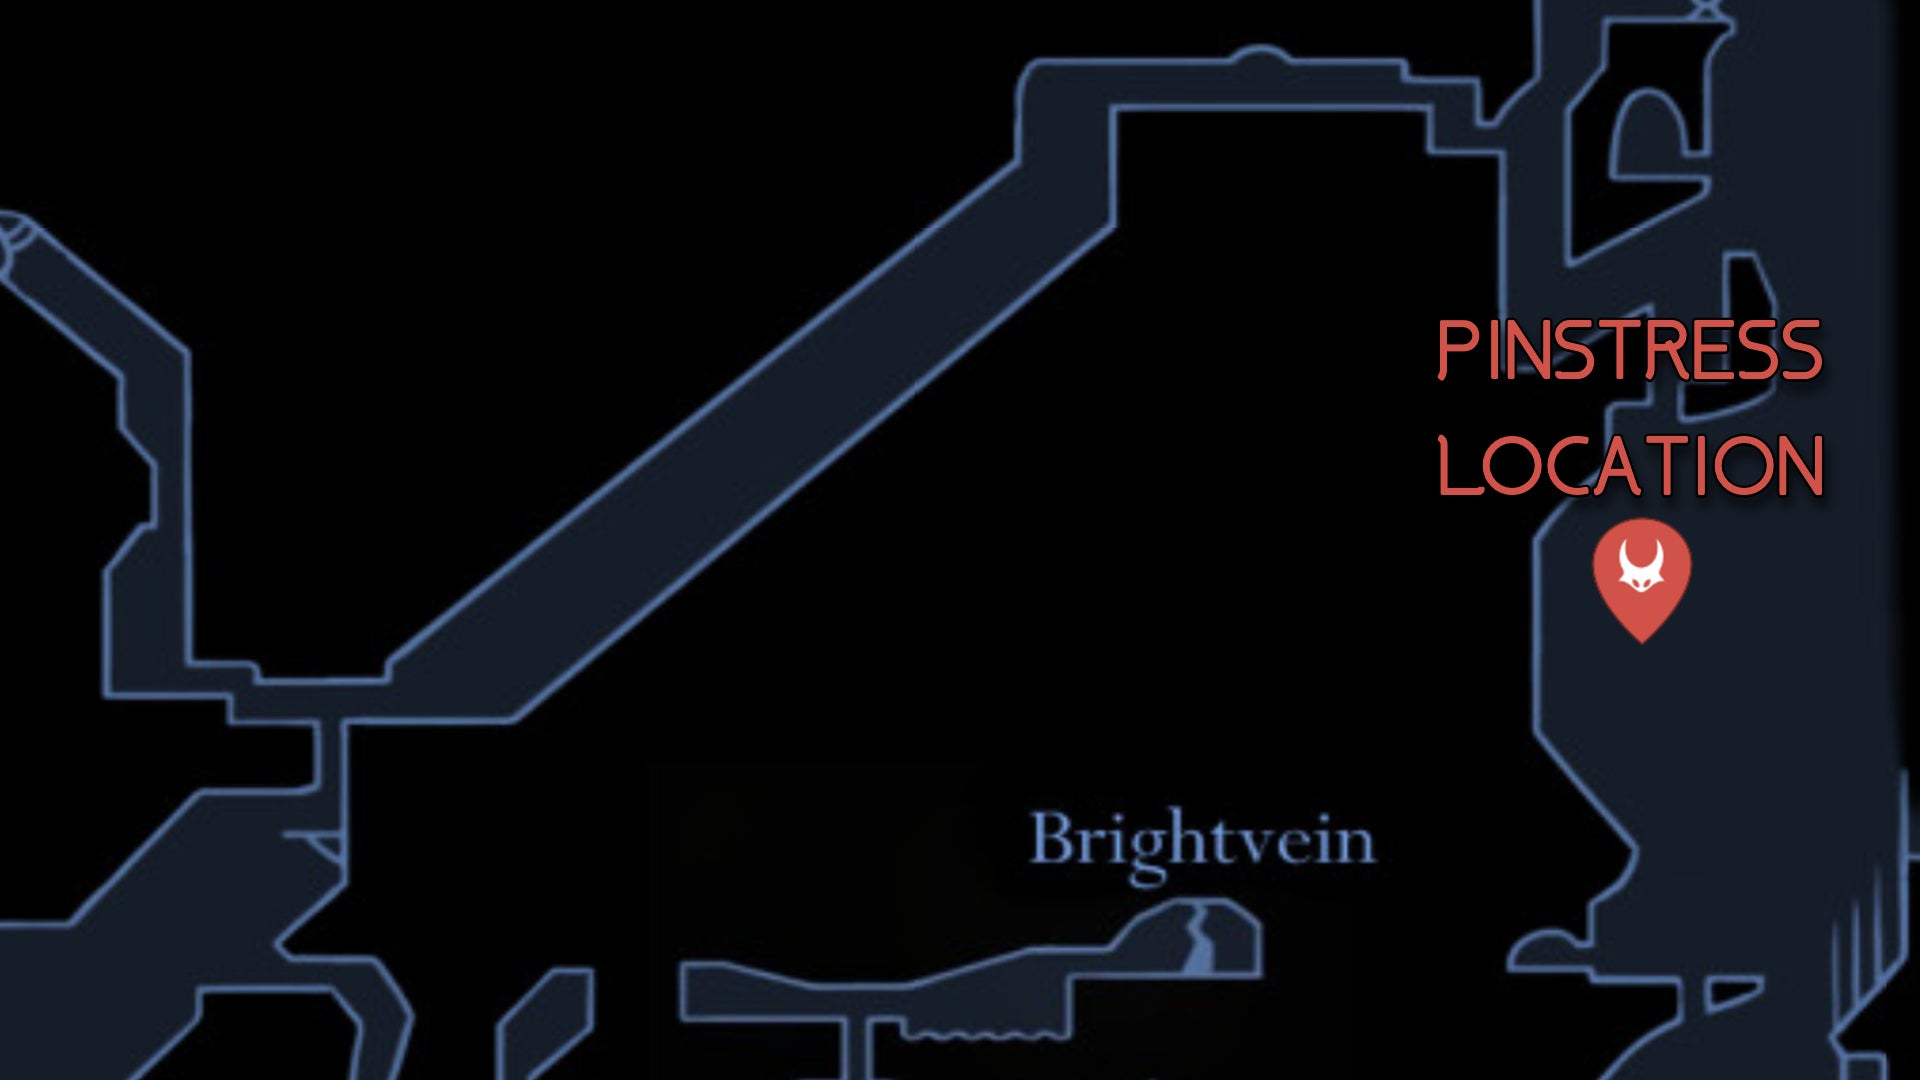
Image credit:Rock Paper Shotgun/MapGenie/Team Cherry
How to beat: Pinstress teleports around the arena and tosses slow daggers that aren’t too tough to avoid. Her trickiest attack is a leap and downwards slam; she immediately follows this with two back and forth charges across the platform. You’ll soon learn to jump above both, and in her second phase, she uses X-shaped slash attacks that hit hard but once again, are pretty easy to avoid. Overall, she’s not very hard compared to many of the other bosses in Act 3.
Shrine Guardian Seth

Beware Seth’s shield strikes and aerial attacks, though you can safely jump over him in the battle’s second phase after he uses his lunge. |Image credit:Rock Paper Shotgun/Team Cherry
Location: Shellwood, in the northernmost stretch only accessible via the Grand Gate if you use Silk Soar. (If you don’t know how to get Hornet’s final and most powerful movement ability, refer to this section of our walkthrough .)
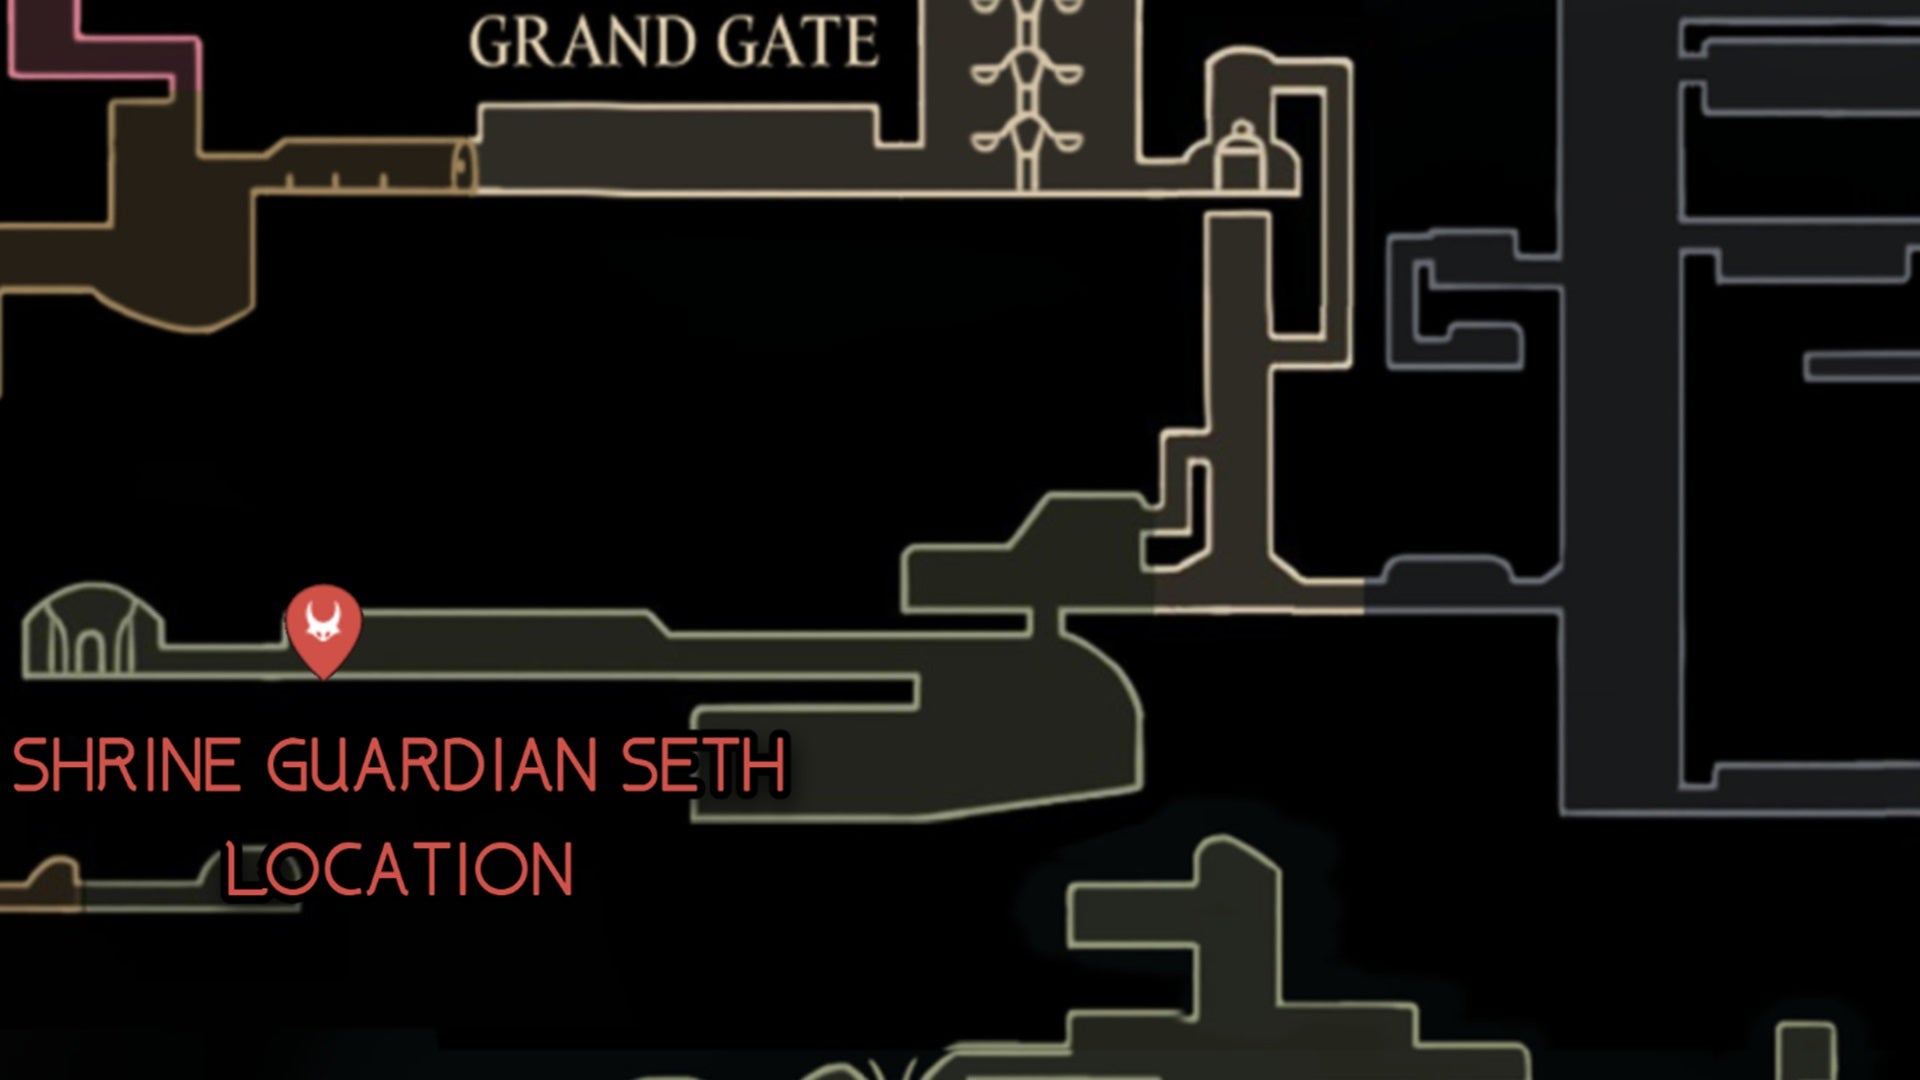
Image credit:Rock Paper Shotgun/MapGenie/Team Cherry
How to beat: Seth teleports through the air, performs slam AoE attacks, and chucks his shield like Captain America, making it bounce off the ground in degrees designed to disrupt Hornet’s aerial combat techniques. You can Pogo on his head, but half of the time he’ll block it, so you may have better luck staying on the ground during this fight. Use projectiles or Tools like the Wispfire Lantern to deal extra damage without having to move around so much.
Seth’s second phase begins with three AoE slams from the air followed by a lunge on the ground. It’s finally safe to jump over him when he lunges without fear of retribution, so grab this chance to get in a solid Pogo attack or two. Seth takes a second to recover after unleashing this attack, which should give you enough time to Bind or continue the offensive.
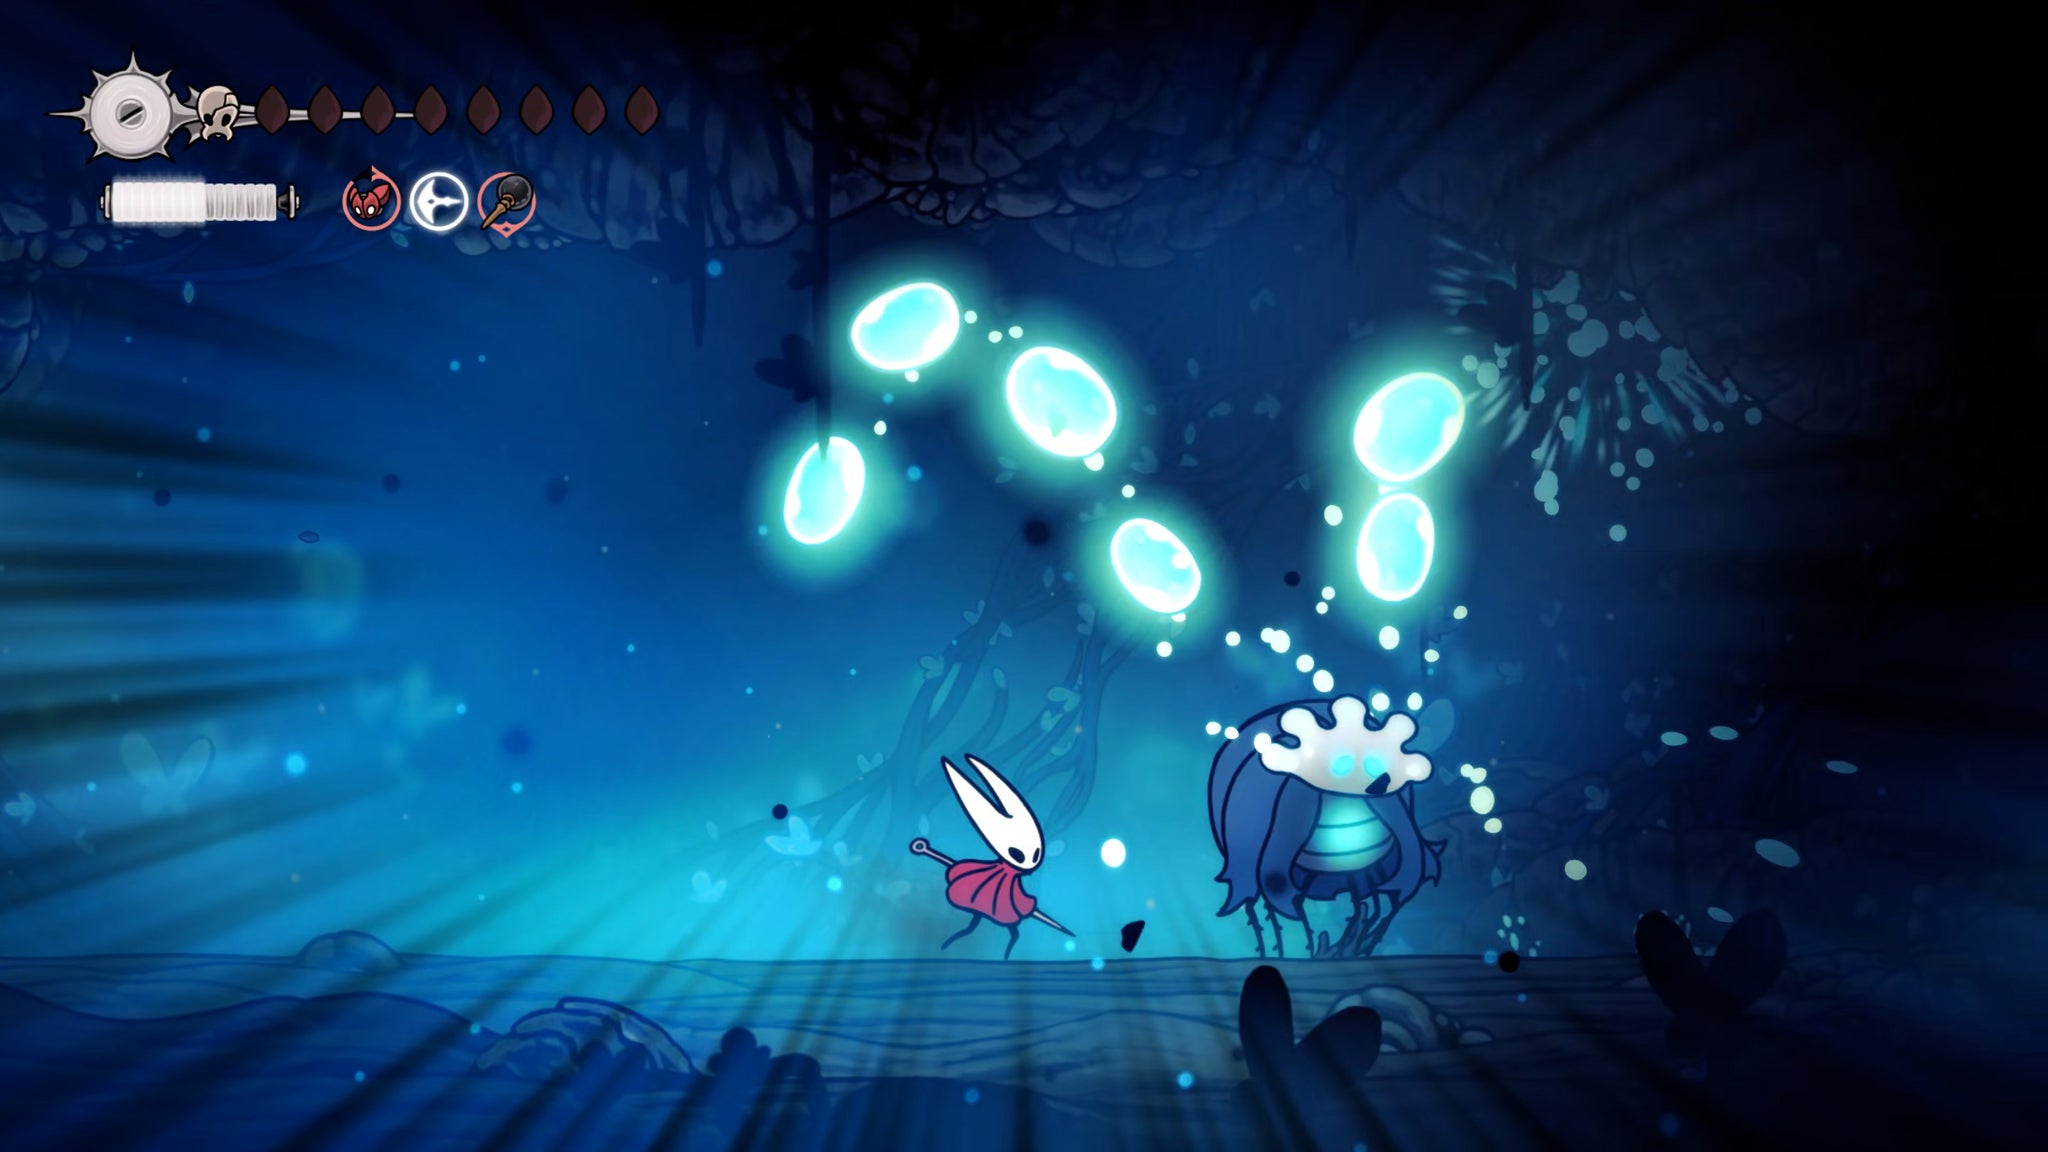
Nyleth
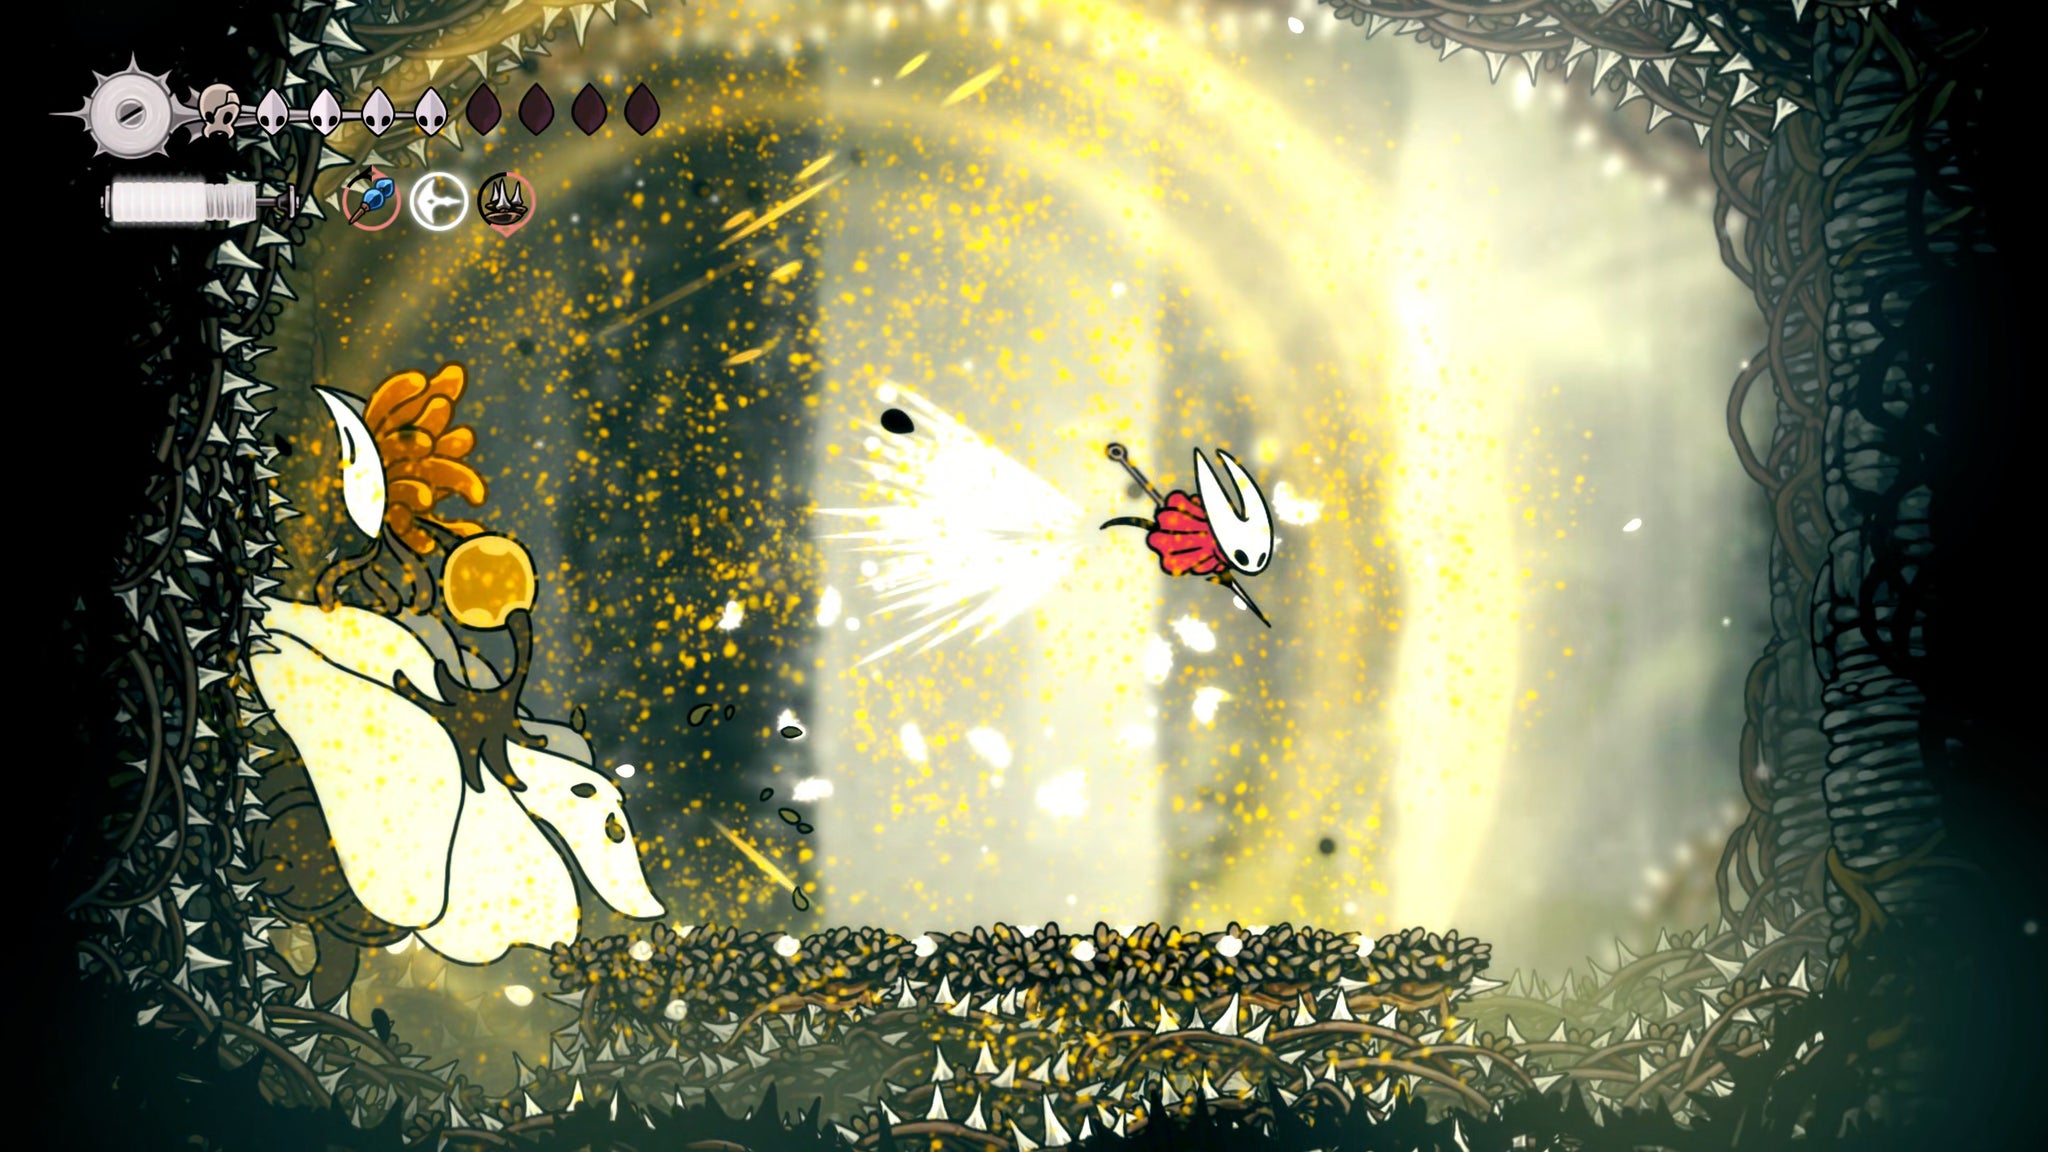
Nyleth’s pollen attack sucks. Dash and cling to the other wall to avoid damage - you’ve got to be fast, alas. |Image credit:Rock Paper Shotgun/Team Cherry
Location: Shellwood, in the shrine just beyond where you encounter Shrine Guardian Seth. Stand in front of the fountain, and use Elegy Of The Deep by playing your Needolin. Hornet awakens in the past, and to her left is a hole in the ground that leads to Nyleth.

Image credit:Rock Paper Shotgun/MapGenie/Team Cherry
How to beat: Nyleth stays attached to the walls most of the time, but occasionally launches herself from one side of the room to the other. As she does this, you can usually double jump and get a Pogo strike in. Her other main attacks include flooding the area with a huge AoE burst of pollen (which you’ll need to cling to the other side of the room to avoid), making three thorn balls bounce up from the floor, and firing out a spread of yellow globs. It’s fairly easy to avoid the yellow globs if you stand in the right spot on the platform; as you do this you should fire off Coglies or any other Tools you have for ranged damage. Don’t spam your Tools too hard, though, as you’ll need them for the second half of the fight.
Once Nyleth’s taken enough damage, she’ll make the ground fall away! This is when you want to ramp up Tool usage to the utmost while clinging to the wall or Pogo-ing off of Nyleth. The Ascendant’s Grip (which lets you wall cling indefinintely) makes this much easier, and if you have it hopefully you can just blast Nyleth with your Silkshot in a relatively easy manner. Tough stuff, but you got this.
Skarrsinger Karmelita
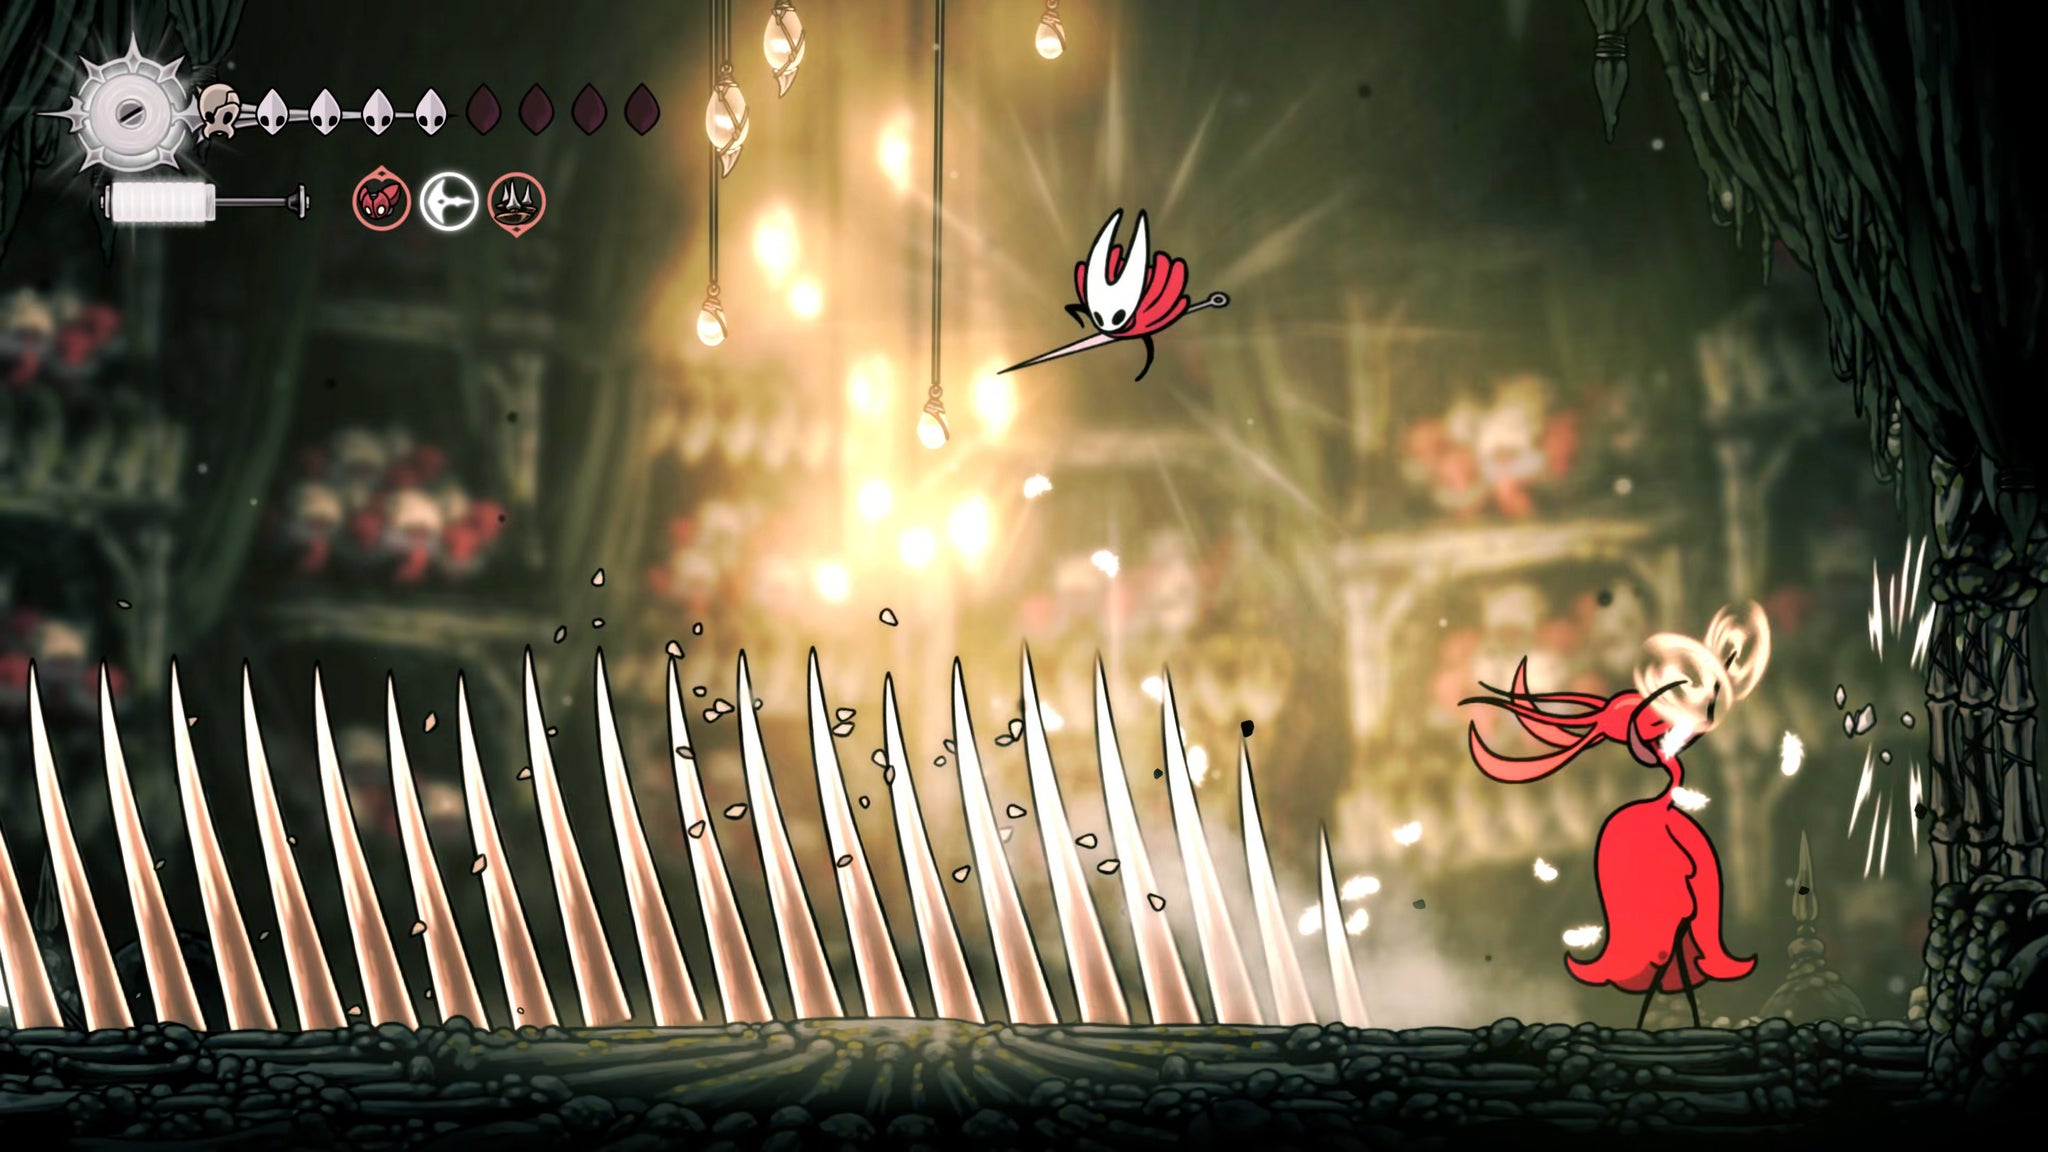
These spikes are nasty. Pogo, drift, or double jump off of the wall to where Karmelita can’t reach for a good airborne Bind. |Image credit:Rock Paper Shotgun/Team Cherry
Location: Far Fields, at the top of the area and only accessible after you get the Elegy Of The Deep and Silk Soar. There’s a statue of Skarrsinger Karmelita in Far Fields; use your Silk Soar in front of it and climb upwards until you get to the region’s northernmost Bench. From this Bench, go right and you’ll reach a room that leads to an unnamed creature that you can speak with behind curtains. Exhaust the dialogue, then use Elegy Of The Deep to enter the past.
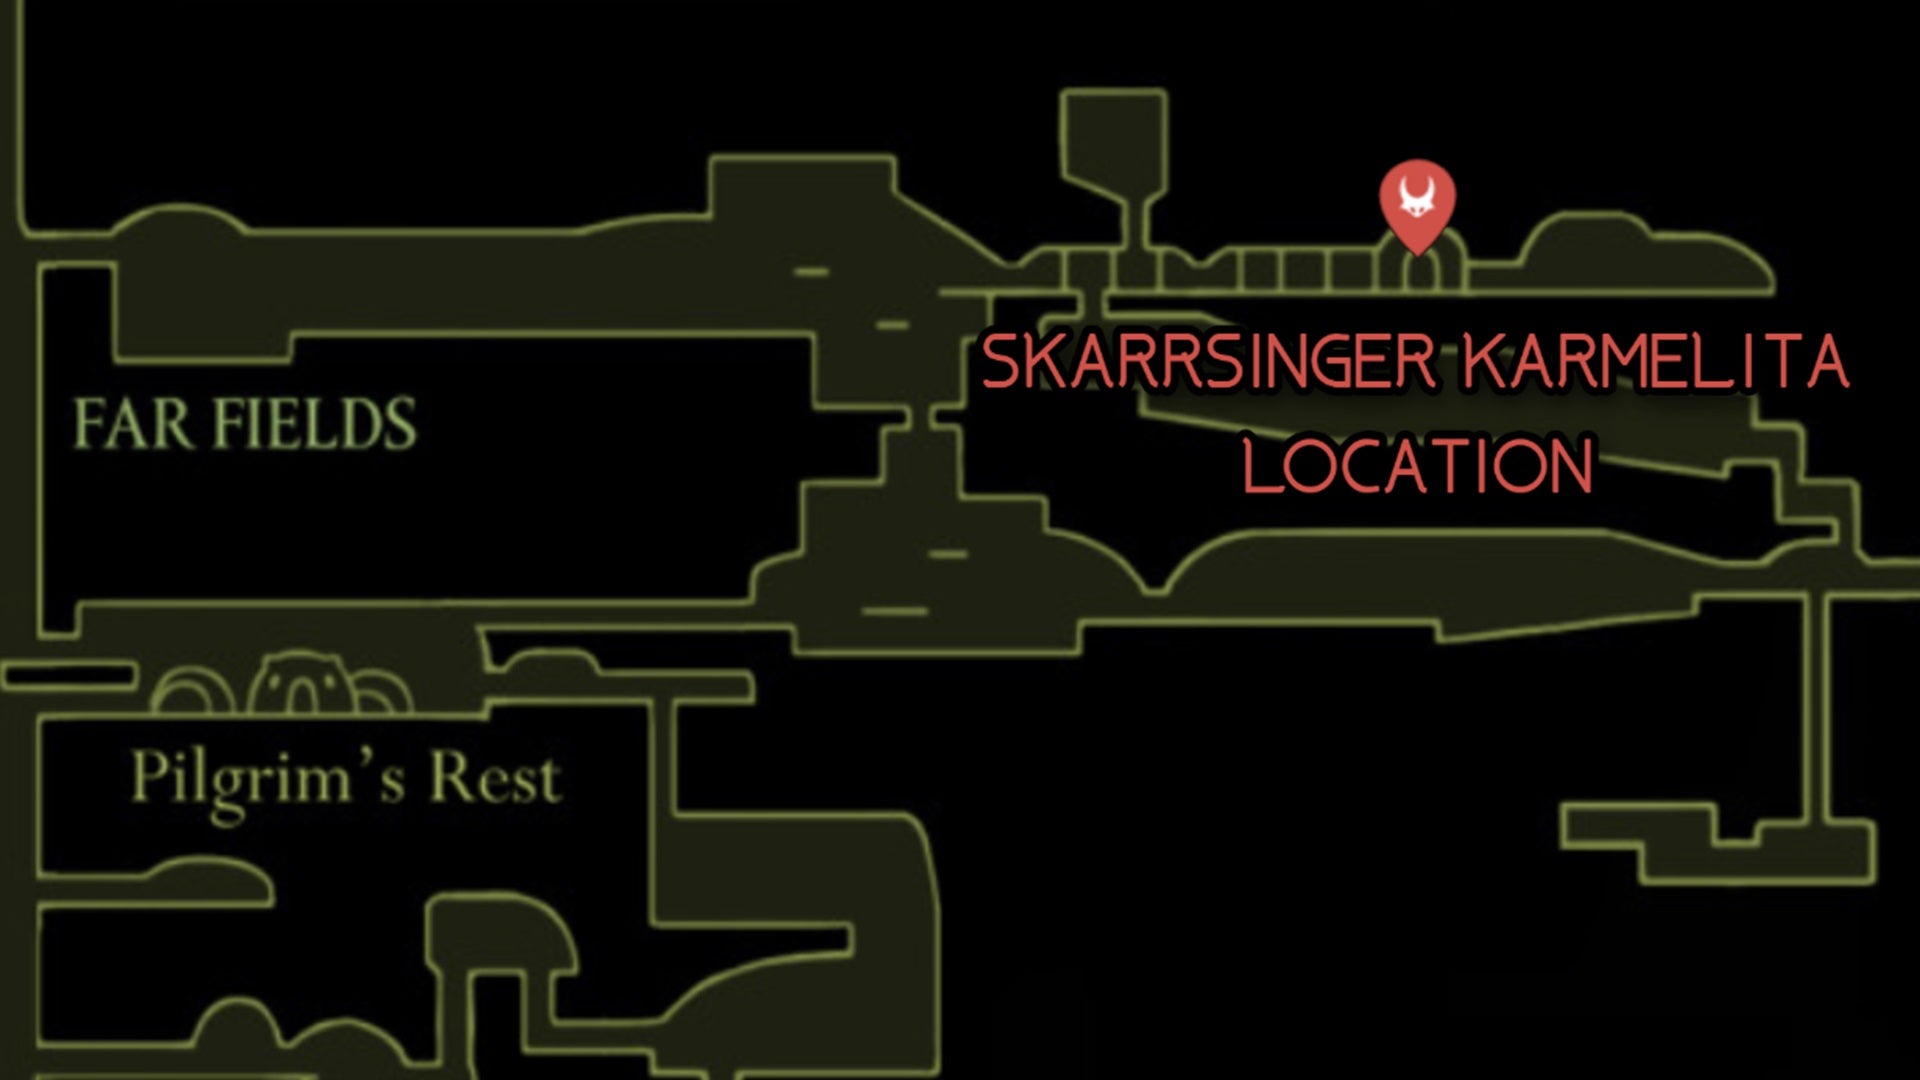
Image credit:Rock Paper Shotgun/MapGenie/Team Cherry
How to beat: Skarrsinger Karmelita first summons three waves of ants, making you feel like you’re back in Hunter’s March for a moment. The third wave is composed of two Last Claws, entirely new enemies who are a pain in the butt.
Once you’ve defeated them, the proper fight commences. Karmeltita mainly attacks by swinging a pair of chakrams and tossing them in your direction. Sometimes she’ll also somersault into the air and slam down, summoning a series of spikes that move towards you. The further the spikes are from her the higher they reach, so move in close and Pogo off of her head.
Stage two of the battle sees Karmelita amping up her floor spikes and making them travel the entire length of the room, but you can Pogo off of the spikes if your timing is on point. Alternately, use a mid-air Bind or the Drifter’s Cloak to avoid taking damage.
Once you think things are over, Karmelita gets even faster in stage three. Stay mobile, slam her with poison Cogflies or Tacks to deal good amounts of damage, and if you’re in a tough spot, double jump off of the wall to a height where Karmalita can’t reach you to heal. This is a heckuva fight that will require a good many tries, but with practice you’ll obtain a good rhythm. And hey, at least the music is grand!
Crust King Khann
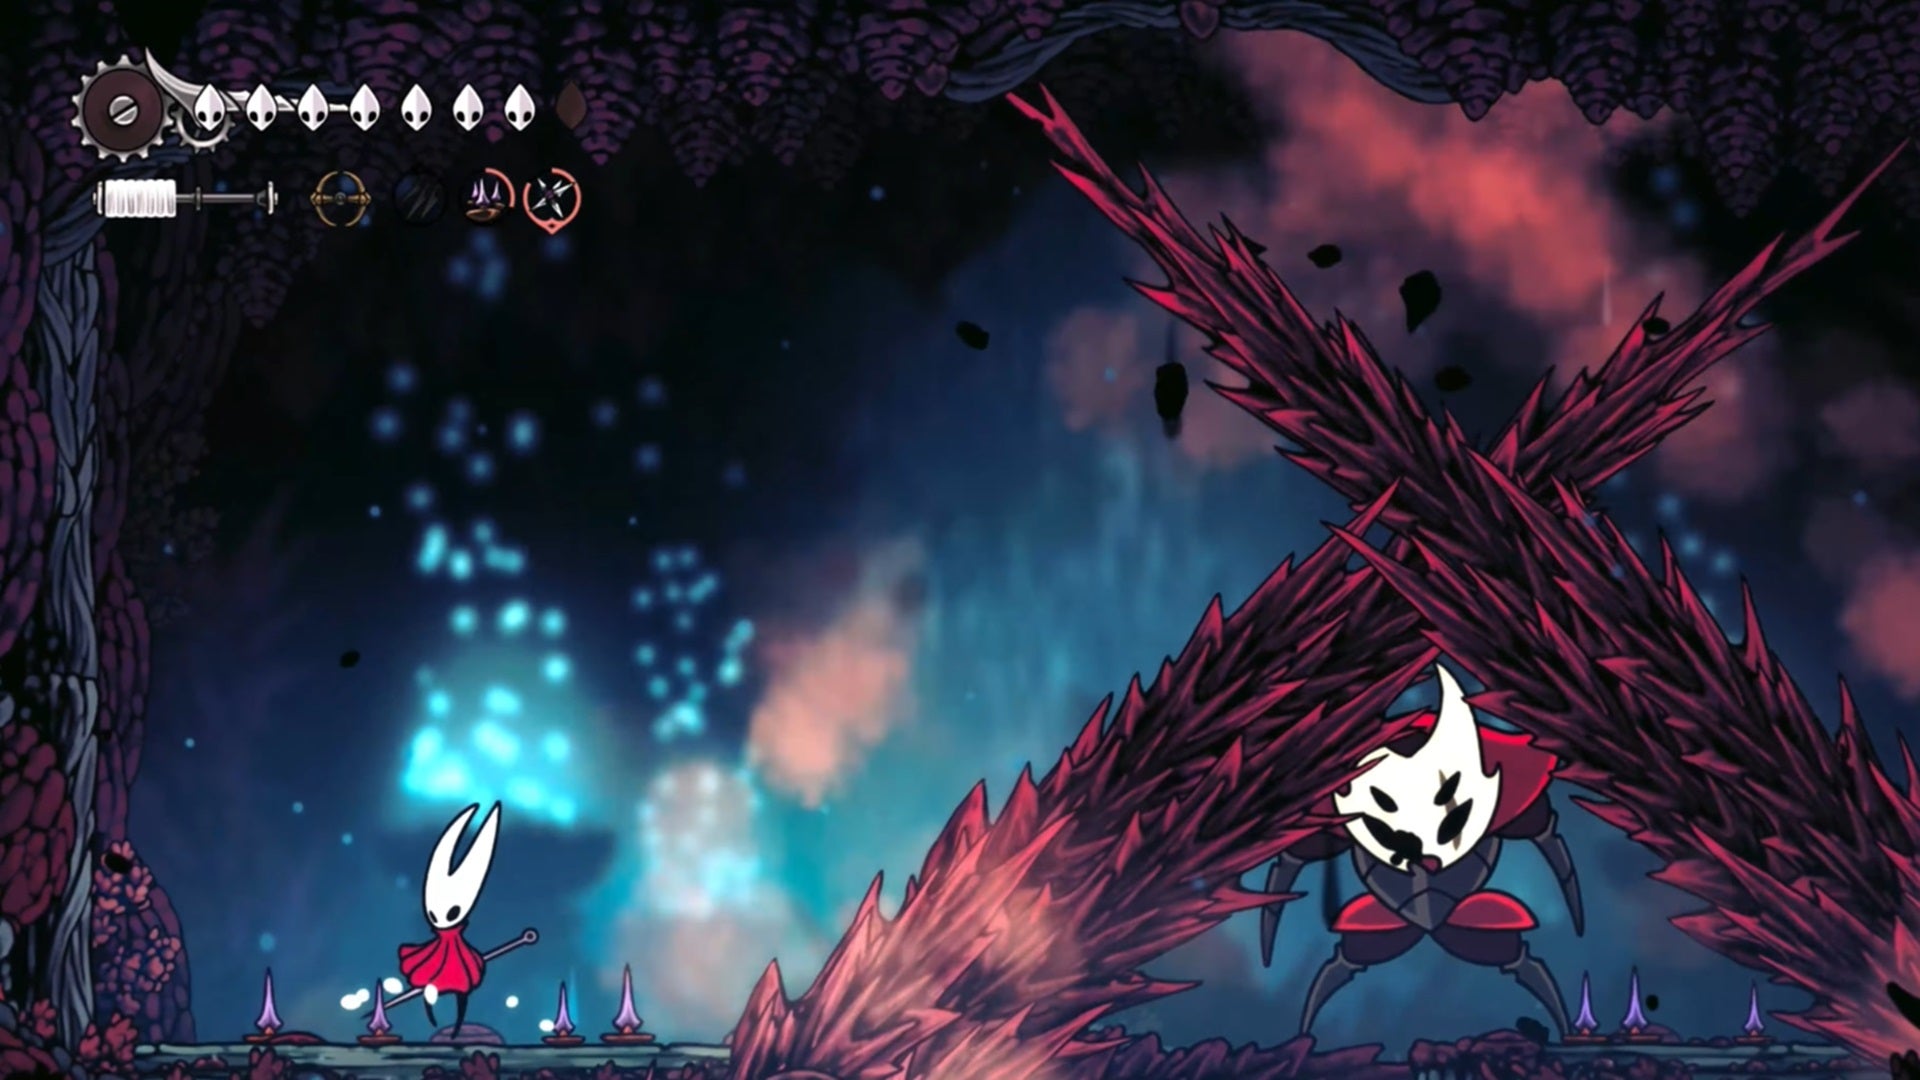
So many thorny pillars to dodge… Crust King Khann never lets up during this fight, so you shouldn’t either. |Image credit:Rock Paper Shotgun/MapGenie/Team Cherry
Location: Sands of Karak, inside Coral Tower in the top left part of the region. Getting here requires Elegy Of The Deep and surviving several waves of enemies that just won’t stop. Head over to our walkthrough on Coral Tower for the full rundown on how to survive these waves and finally meet Crust King Khann.
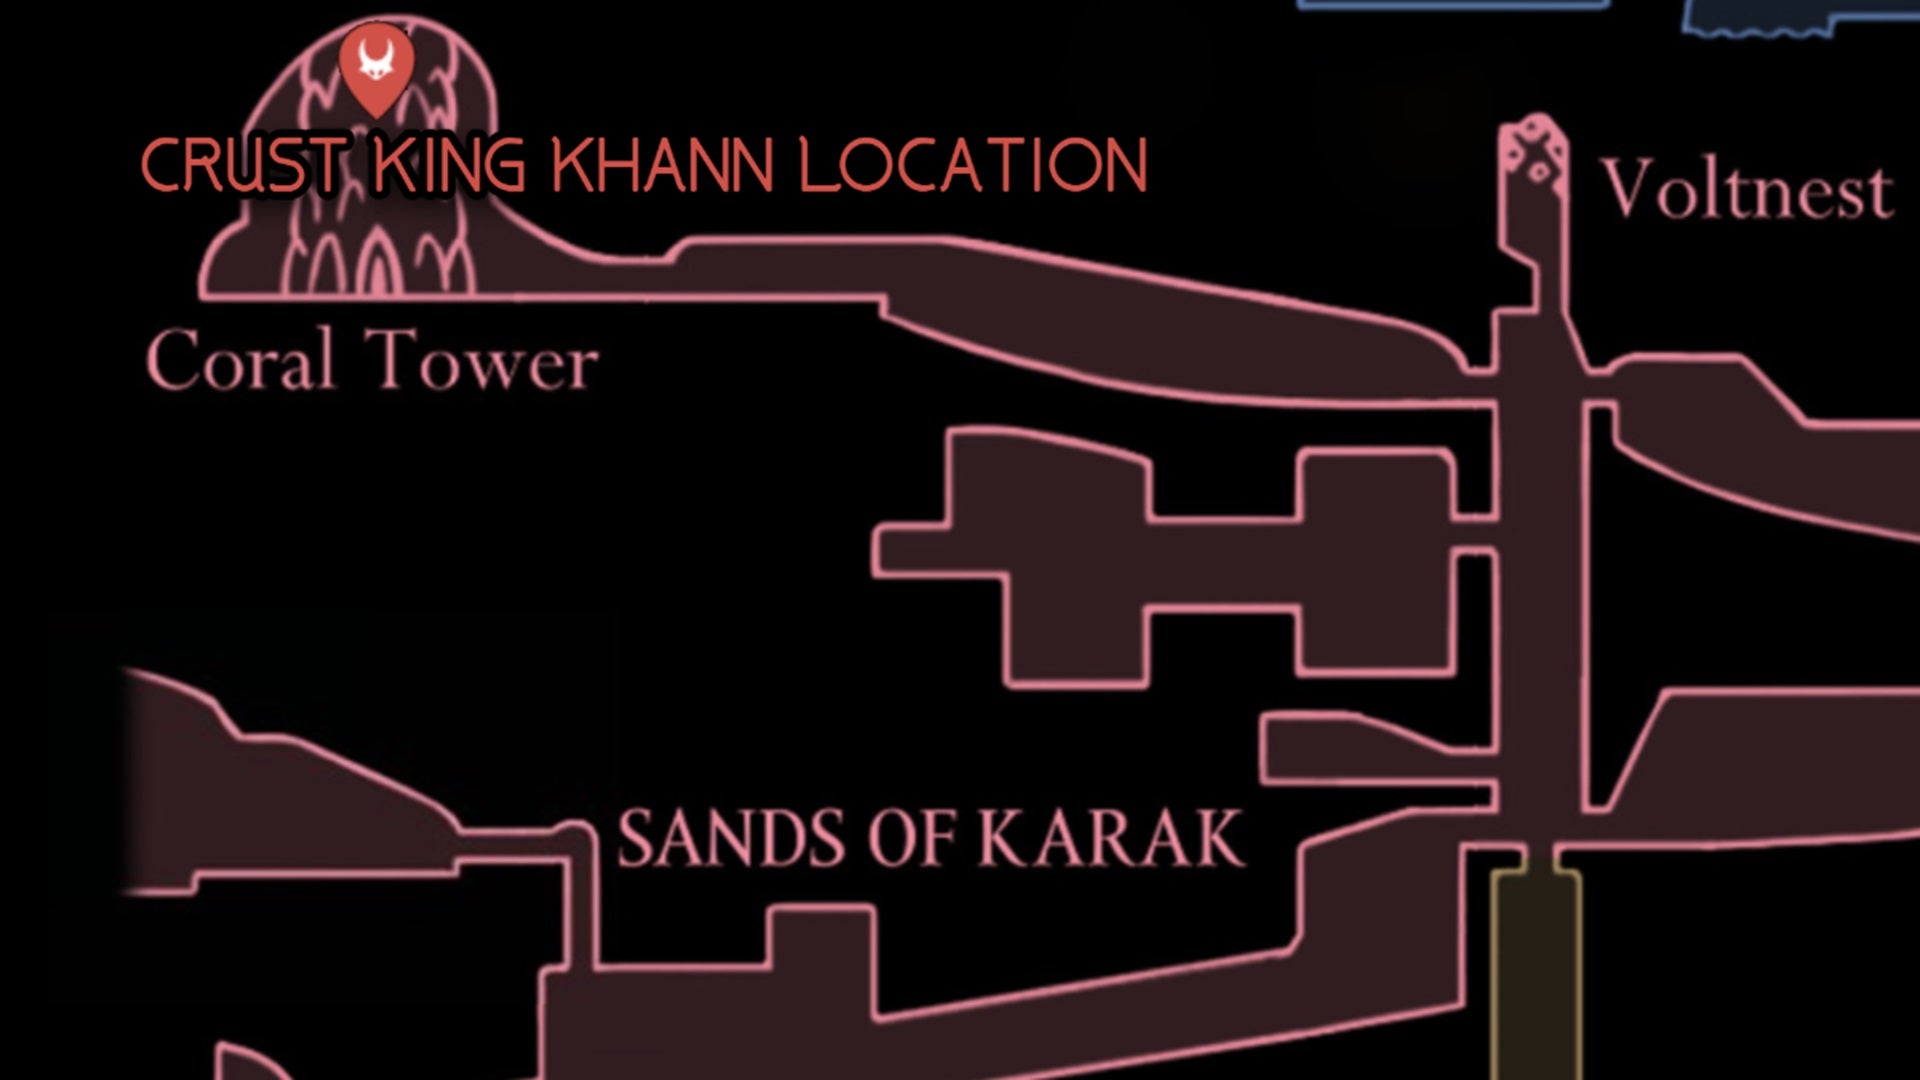
Image credit:Rock Paper Shotgun/MapGenie/Team Cherry
How to beat: Crust King Khann is one mean looking bastard, but thankfully he’s not quite as difficult as the rubbish series of gauntlets you had to survive in order to reach him. His main trick is summoning tonnes of thorny stalactites and stalagmites to pierce you. Watch for the smoke appearing on the edges of the screen to see where these will turn up, and then get out of the way.
There’s no second phase to worry about here - it’s all one long battle of dodging the terrain and trying to get your hits in. Use Tacks liberally to damage Crust King Khann as he jumps about, and pile on the pressure. He deserves it for summoning so much stuff on the screen.
Summoned Saviour
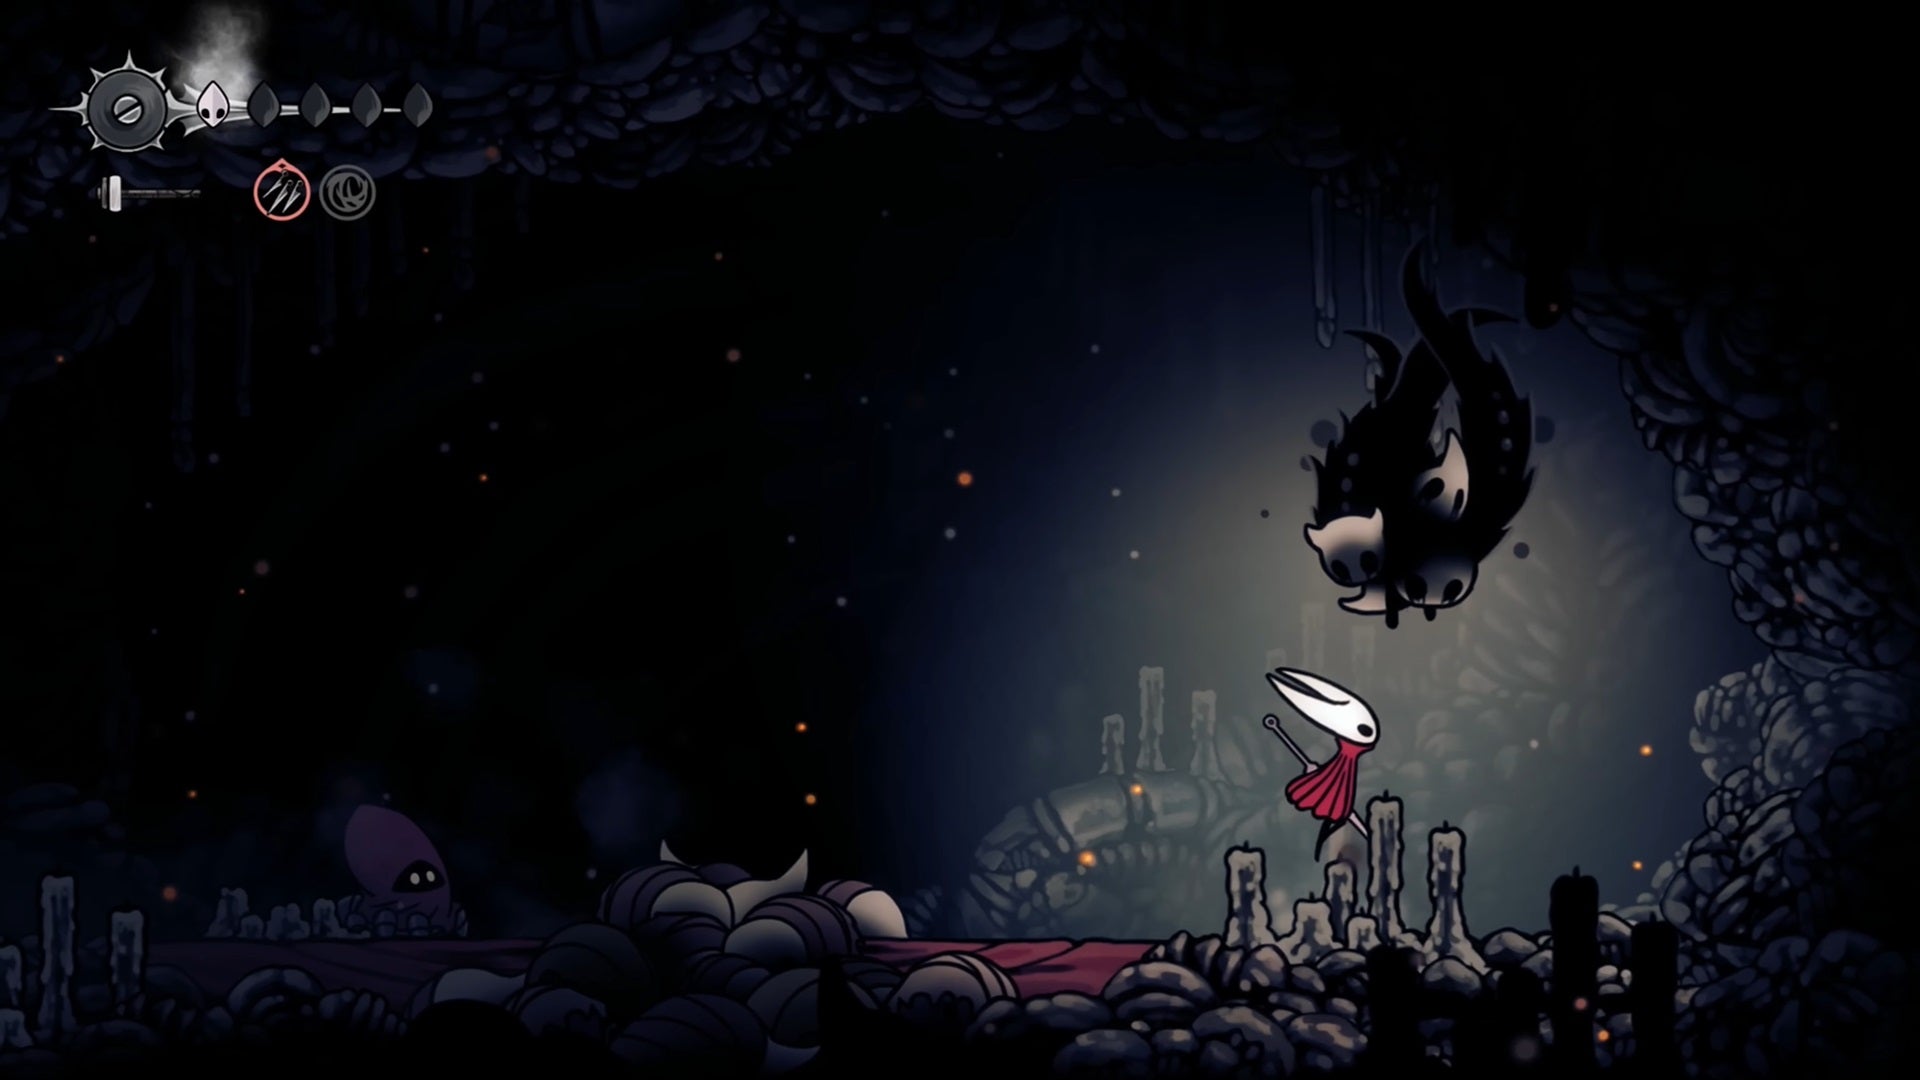
A secret boss for all of you who lust for the punishment of permadeath, how nice! |Image credit:Rock Paper Shotgun/Team Cherry
Location: Past Bonegrave, to the far west of Moss Grotto. You can only encounter Summoned Saviour on Steel Soul Mode as part of the A Vassal Lost quest. Steel Soul is Silksong’s ultra hard permadeath mode that can only be activated after beating the game once and then inputting ye olde Konami code (that’s up, down, up, down, left, right, left, right) on the game’s Extra’s page. Once you’ve accessed Steel Soul, you can start A Vassal Lost by finding Steel Seer Zi in the Blasted Steps.
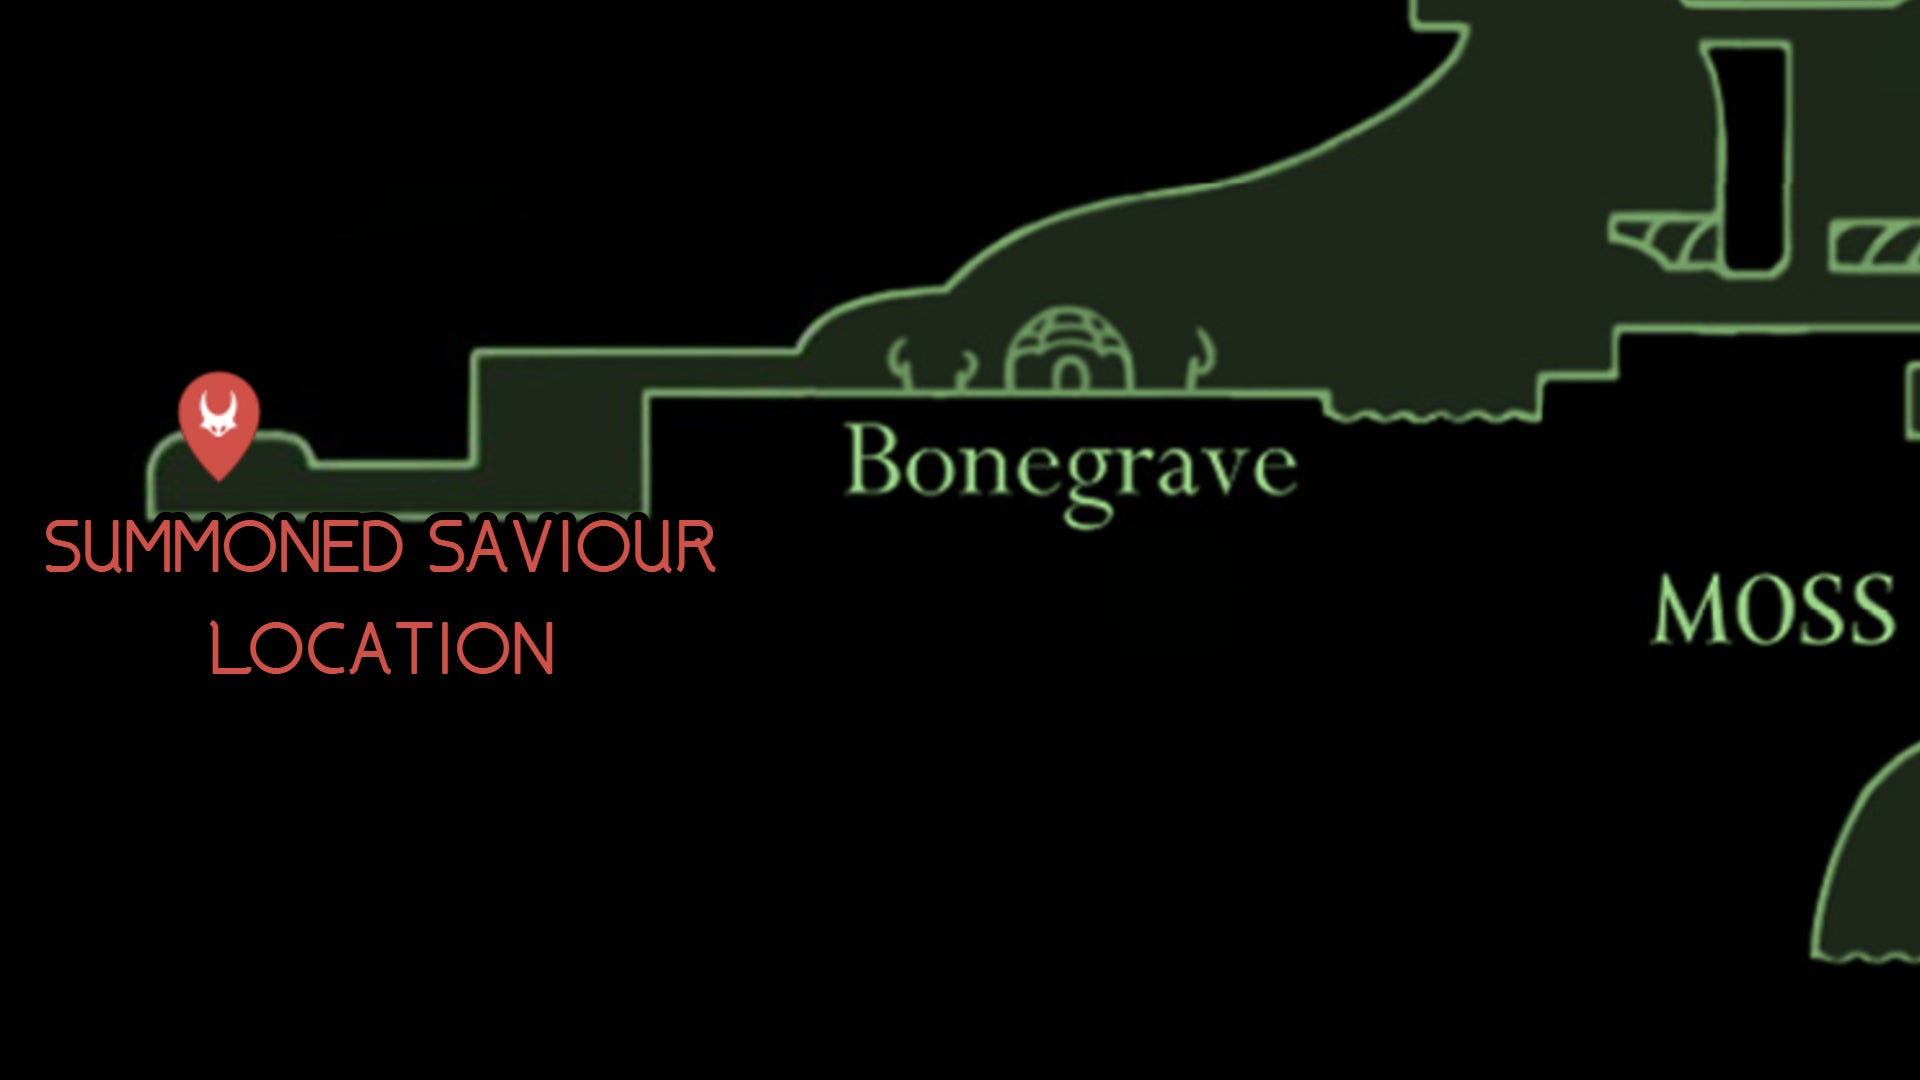
Image credit:Rock Paper Shotgun/MapGenie/Team Cherry
How to beat: If you’ve managed to make it this far in Steel Soul Mode, welcome to an extra degree of difficulty, as Summoned Saviour doesn’t give you any Silk when you attack it. The only Silk you’ll have at your disposal is whatever you’ve gathered prior to entering the boss arena, so we recommend that you conserve your Silk for heals and avoid using any Silk Skills during this combat. Instead, target Summoned Saviour with the Cogfly, the Sting Shard, and any other Tools that can cause damage from a distance. The Conchcutter is also a solid pick for richochet damage due to the confined nature of the boss room.
Summoned Saviour’s main attacks include swinging a tentacle whip, summoning spinning razor saws on the ground, turning into a razor saw mid-air, shooting tentacle projectiles, and occasionally charging at you. Dash in and out, attack Summoned Saviour from underneath, and if you don’t have appropriate Tools, consider using the Pollip Pouch to make your attacks deal some poison chip damage.
Since this is a permadeath-exclusive battle, you may want to cheese things a bit, save, and quit the game if you end up on one Mask and are teetering close to death. But then again, if your Silksong skills are potent enough to attempt Steel Soul Mode, you’ll probably be okay.
Lost Lace
One more dance with Lace awaits. |Image credit:Rock Paper Shotgun/Team Cherry
Location: Head down to the very bottom of the Abyss. Be sure you’ve got the Everbloom !
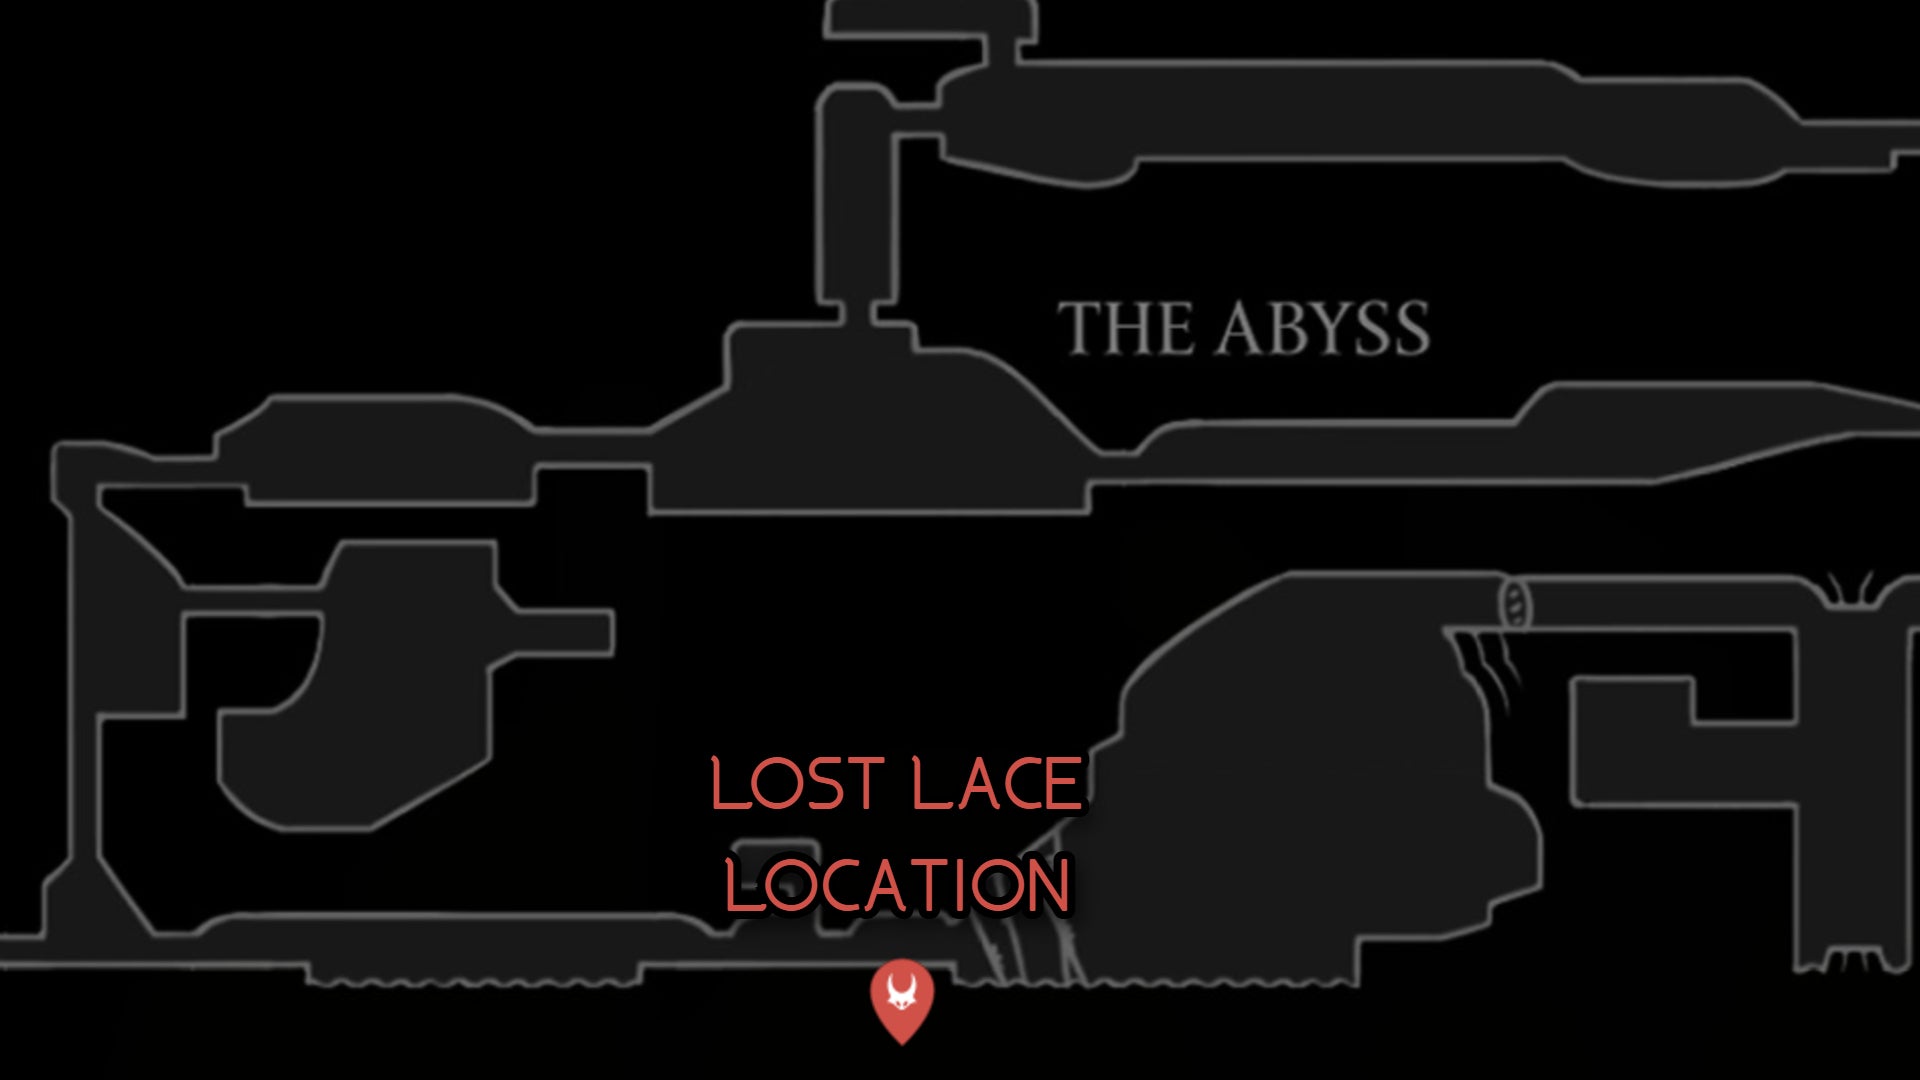
Image credit:Rock Paper Shotgun/MapGenie/Team Cherry
How to beat: The true final boss of Silksong has arrived, and it’s your old galpal Lace once again. Alas, now she’s been possessed by the Void. She retains many of the same dash and dive attacks that she’s always had, but her speed feels even more immense than usual, and now she’s got Void powers at her disposal. Beware the Void tentacles that emerge from her arm (the reach is truly huge), and you should also watch out for Lost Lace’s teleport, as she tends to move herself directly into your path while you’re dashing. Contact damage will probably result in the most deaths during this fight, and your best bet is to resort to aerial evasion instead of dashing.
There are three phases of this battle. In the second phase, Lost Lace begins summoning Void tentacles from the ground, and she’ll sometimes hop into the air and spew Void blobs that will erupt into blades when they hit the floor. Other times, she’ll summon orbs that shoot out projectiles, requiring lots of fast movement on your part.
Lost Lace’s second phase attacks are annoying but not too terrible to avoid. What you really need to watch out for is the third phase - she’ll let out a terrific shriek and cause a tidal wave of Void spikes to surge across the floor. Be sure to cling to a side of the wall when this happens or risk losing major Masks. Finally, Lost Lace will summon exploding sparkles of light around the arena - an attack you should be familiar with based on your old encounters with her. Just step outside of the glowing orbs to dodge and continue your assault.
Pull out the big guns for this fight, including all the Tools you can muster and the Crest of your choice. Lost Lace is a devastating boss, though once you get accustomed to avoiding her teleport and stay away from contact damage, the ordeal becomes much more surmountable. Best of luck - the end is finally in sight!
That finishes our list of Hollow Knight: Silksong bosses. If you’re having trouble with exploration and finding yourself lost in the expansive realm of Pharloom, then sure to check our our walkthrough for an in-depth guide on how to navigate Hornet through her journey!

Hollow Knight: Silksong
PC , Nintendo Switch
Rock Paper Shotgun is better when you sign in
Sign in and join us on our journey to discover strange and compelling PC games.

All 75 Arc Raiders Blueprints and where to get them
These areas have the highest chance of giving you Blueprints

Image credit:Rock Paper Shotgun/Embark Studios

Looking for more Arc Raiders Blueprints? It’s a special day when you find a Blueprint, as they’re among the most valuable items in Arc Raiders. If you find a Blueprint that you haven’t already found, then you must make sure you hold onto it at all costs, because Blueprints are the key to one of the most important and powerful systems of meta-progression in the game.
This guide aims to be the very best guide on Blueprints you can find, starting with a primer on what exactly they are and how they work in Arc Raiders, before delving into exactly where to get Blueprints and the very best farming spots for you to take in your search.
We’ll also go over how to get Blueprints from other unlikely activities, such as destroying Surveyors and completing specific quests. And you’ll also find the full list of all 75 Blueprints in Arc Raiders on this page (including the newest Blueprints added with the Cold Snap update , such as the Deadline Blueprint and Firework Box Blueprint), giving you all the information you need to expand your own crafting repertoire.
In this guide:
- What are Blueprints in Arc Raiders?
- Full Blueprint list: All crafting recipes
- Where to find Blueprints in Arc Raiders Blueprints obtained from quests Blueprints obtained from Trials Best Blueprint farming locations

What are Blueprints in Arc Raiders?
Blueprints in Arc Raiders are special items which, if you manage to extract with them, you can expend to permanently unlock a new crafting recipe in your Workshop. If you manage to extract from a raid with an Anvil Blueprint, for example, you can unlock the ability to craft your very own Anvil Pistol, as many times as you like (as long as you have the crafting materials).
To use a Blueprint, simply open your Inventory while in the lobby, then right-click on the Blueprint and click “Learn And Consume” . This will permanently unlock the recipe for that item in your Workshop. As of the Stella Montis update, there are allegedly 75 different Blueprints to unlock - although only 68 are confirmed to be in the game so far. You can see all the Blueprints you’ve found and unlocked by going to the Workshop menu, and hitting “R” to bring up the Blueprint screen.
It’s possible to find duplicates of past Blueprints you’ve already unlocked. If you find these, then you can either sell them, or - if you like to play with friends - you can take it into a match and gift it to your friend so they can unlock that recipe for themselves. Another option is to keep hold of them until the time comes to donate them to the Expedition.
Full Blueprint list: All crafting recipes
Below is the full list of all the Blueprints that are currently available to find in Arc Raiders, and the crafting recipe required for each item:
| Blueprint | Type | Recipe | Crafted At |
|---|---|---|---|
| Bettina | Weapon | 3x Advanced Mechanical Components 3x Heavy Gun Parts 3x Canister | Gunsmith 3 |
| Blue Light Stick | Quick Use | 3x Chemicals | Utility Station 1 |
| Aphelion | Weapon | 3x Magnetic Accelerator 3x Complex Gun Parts 1x Matriarch Reactor | Gunsmith 3 |
| Combat Mk. 3 (Flanking) | Augment | 2x Advanced Electrical Components 3x Processor | Gear Bench 3 |
| Combat Mk. 3 (Aggressive) | Augment | 2x Advanced Electrical Components 3x Processor | Gear Bench 3 |
| Complex Gun Parts | Material | 2x Light Gun Parts 2x Medium Gun Parts 2x Heavy Gun Parts | Refiner 3 |
| Fireworks Box | Quick Use | 1x Explosive Compound 3x Pop Trigger | Explosives Station 2 |
| Gas Mine | Mine | 4x Chemicals 2x Rubber Parts | Explosives Station 1 |
| Green Light Stick | Quick Use | 3x Chemicals | Utility Station 1 |
| Pulse Mine | Mine | 1x Crude Explosives 1x Wires | Explosives Station 1 |
| Seeker Grenade | Grenade | 1x Crude Explosives 2x ARC Alloy | Explosives Station 1 |
| Looting Mk. 3 (Survivor) | Augment | 2x Advanced Electrical Components 3x Processor | Gear Bench 3 |
| Angled Grip II | Mod | 2x Mechanical Components 3x Duct Tape | Gunsmith 2 |
| Angled Grip III | Mod | 2x Mod Components 5x Duct Tape | Gunsmith 3 |
| Hullcracker | Weapon | 1x Magnetic Accelerator 3x Heavy Gun Parts 1x Exodus Modules | Gunsmith 3 |
| Launcher Ammo | Ammo | 5x Metal Parts 1x Crude Explosives | Workbench 1 |
| Anvil | Weapon | 5x Mechanical Components 5x Simple Gun Parts | Gunsmith 2 |
| Anvil Splitter | Mod | 2x Mod Components 3x Processor | Gunsmith 3 |
| ??? | ??? | ??? | ??? |
| Barricade Kit | Quick Use | 1x Mechanical Components | Utility Station 2 |
| Blaze Grenade | Grenade | 1x Explosive Compound 2x Oil | Explosives Station 3 |
| Bobcat | Weapon | 3x Advanced Mechanical Components 3x Light Gun Parts | Gunsmith 3 |
| Osprey | Weapon | 2x Advanced Mechanical Components 3x Medium Gun Parts 7x Wires | Gunsmith 3 |
| Burletta | Weapon | 3x Mechanical Components 3x Simple Gun Parts | Gunsmith 1 |
| Compensator II | Mod | 2x Mechanical Components 4x Wires | Gunsmith 2 |
| Compensator III | Mod | 2x Mod Components 8x Wires | Gunsmith 3 |
| Defibrillator | Quick Use | 9x Plastic Parts 1x Moss | Medical Lab 2 |
| ??? | ??? | ??? | ??? |
| Equalizer | Weapon | 3x Magnetic Accelerator 3x Complex Gun Parts 1x Queen Reactor | Gunsmith 3 |
| Extended Barrel | Mod | 2x Mod Components 8x Wires | Gunsmith 3 |
| Extended Light Mag II | Mod | 2x Mechanical Components 3x Steel Spring | Gunsmith 2 |
| Extended Light Mag III | Mod | 2x Mod Components 5x Steel Spring | Gunsmith 3 |
| Extended Medium Mag II | Mod | 2x Mechanical Components 3x Steel Spring | Gunsmith 2 |
| Extended Medium Mag III | Mod | 2x Mod Components 5x Steel Spring | Gunsmith 3 |
| Extended Shotgun Mag II | Mod | 2x Mechanical Components 3x Steel Spring | Gunsmith 2 |
| Extended Shotgun Mag III | Mod | 2x Mod Components 5x Steel Spring | Gunsmith 3 |
| Remote Raider Flare | Quick Use | 2x Chemicals 4x Rubber Parts | Utility Station 1 |
| Heavy Gun Parts | Material | 4x Simple Gun Parts | Refiner 2 |
| Venator | Weapon | 2x Advanced Mechanical Components 3x Medium Gun Parts 5x Magnet | Gunsmith 3 |
| Il Toro | Weapon | 5x Mechanical Components 6x Simple Gun Parts | Gunsmith 1 |
| Jolt Mine | Mine | 1x Electrical Components 1x Battery | Explosives Station 2 |
| Explosive Mine | Mine | 1x Explosive Compound 1x Sensors | Explosives Station 3 |
| Jupiter | Weapon | 3x Magnetic Accelerator 3x Complex Gun Parts 1x Queen Reactor | Gunsmith 3 |
| Light Gun Parts | Material | 4x Simple Gun Parts | Refiner 2 |
| Lightweight Stock | Mod | 2x Mod Components 5x Duct Tape | Gunsmith 3 |
| Lure Grenade | Grenade | 1x Speaker Component 1x Electrical Components | Utility Station 2 |
| Medium Gun Parts | Material | 4x Simple Gun Parts | Refiner 2 |
| Torrente | Weapon | 2x Advanced Mechanical Components 3x Medium Gun Parts 6x Steel Spring | Gunsmith 3 |
| Muzzle Brake II | Mod | 2x Mechanical Components 4x Wires | Gunsmith 2 |
| Muzzle Brake III | Mod | 2x Mod Components 8x Wires | Gunsmith 3 |
| Padded Stock | Mod | 2x Mod Components 5x Duct Tape | Gunsmith 3 |
| Shotgun Choke II | Mod | 2x Mechanical Components 4x Wires | Gunsmith 2 |
| Shotgun Choke III | Mod | 2x Mod Components 8x Wires | Gunsmith 3 |
| Shotgun Silencer | Mod | 2x Mod Components 8x Wires | Gunsmith 3 |
| Showstopper | Grenade | 1x Advanced Electrical Components 1x Voltage Converter | Explosives Station 3 |
| Silencer I | Mod | 2x Mechanical Components 4x Wires | Gunsmith 2 |
| Silencer II | Mod | 2x Mod Components 8x Wires | Gunsmith 3 |
| Snap Hook | Quick Use | 2x Power Rod 3x Rope 1x Exodus Modules | Utility Station 3 |
| Stable Stock II | Mod | 2x Mechanical Components 3x Duct Tape | Gunsmith 2 |
| Stable Stock III | Mod | 2x Mod Components 5x Duct Tape | Gunsmith 3 |
| Tagging Grenade | Grenade | 1x Electrical Components 1x Sensors | Utility Station 3 |
| Tempest | Weapon | 3x Advanced Mechanical Components 3x Medium Gun Parts 3x Canister | Gunsmith 3 |
| Trigger Nade | Grenade | 2x Crude Explosives 1x Processor | Explosives Station 2 |
| Vertical Grip II | Mod | 2x Mechanical Components 3x Duct Tape | Gunsmith 2 |
| Vertical Grip III | Mod | 2x Mod Components 5x Duct Tape | Gunsmith 3 |
| Vita Shot | Quick Use | 2x Antiseptic 1x Syringe | Medical Lab 3 |
| Vita Spray | Quick Use | 3x Antiseptic 1x Canister | Medical Lab 3 |
| Vulcano | Weapon | 1x Magnetic Accelerator 3x Heavy Gun Parts 1x Exodus Modules | Gunsmith 3 |
| Wolfpack | Grenade | 2x Explosive Compound 2x Sensors | Explosives Station 3 |
| Red Light Stick | Quick Use | 3x Chemicals | Utility Station 1 |
| Smoke Grenade | Grenade | 14x Chemicals 1x Canister | Utility Station 2 |
| Deadline | Mine | 3x Explosive Compound 2x ARC Circuitry | Explosives Station 3 |
| Trailblazer | Grenade | 1x Explosive Compound 1x Synthesized Fuel | Explosives Station 3 |
| Tactical Mk. 3 (Defensive) | Augment | 2x Advanced Electrical Components 3x Processor | Gear Bench 3 |
| Tactical Mk. 3 (Healing) | Augment | 2x Advanced Electrical Components 3x Processor | Gear Bench 3 |
| Yellow Light Stick | Quick Use | 3x Chemicals | Utility Station 1 |
Note: The missing Blueprints in this list likely have not actually been added to the game at the time of writing, because none of the playerbase has managed to find any of them. As they are added to the game, I will update this page with the most relevant information so you know exactly how to get all 75 Arc Raiders Blueprints.
Where to find Blueprints in Arc Raiders
Below is a list of all containers, modifiers, and events which maximise your chances of finding Blueprints:
- Certain quests reward you with specific Blueprints .
- Completing Trials has a high chance of offering Blueprints as rewards.
- Surveyors have a decent chance of dropping Blueprints on death.
- High loot value areas tend to have a greater chance of spawning Blueprints.
- Night Raids and Storms may increase rare Blueprint spawn chances in containers.
- Containers with higher numbers of items may have a higher tendency to spawn Blueprints. As a result, Blue Gate (which has many “large” containers containing multiple items) may give you a higher chance of spawning Blueprints.
- Raider containers (Raider Caches, Weapon Boxes, Medical Bags, Grenade Tubes) have increased Blueprint drop rates. As a result, the Uncovered Caches event gives you a high chance of finding Blueprints.
- Security Lockers have a higher than average chance of containing Blueprints.
- Certain Blueprints only seem to spawn under specific circumstances: Tempest Blueprint only spawns during Night Raid events. Vulcano Blueprint only spawns during Hidden Bunker events. Jupiter and Equaliser Blueprints only spawn during Harvester events.

Raider Caches, Weapon Boxes, and other raider-oriented container types have a good chance of offering Blueprints. |Image credit:Rock Paper Shotgun/Embark Studios
Blueprints have a very low chance of spawning in any container in Arc Raiders, around 1-2% on average. However, there is a higher chance of finding Blueprints in particular container types. Specifically, you can find more Blueprints in Raider containers and security lockers.
Beyond this, if you’re looking for Blueprints you should focus on regions of the map which are marked as having particularly high-value loot. Areas such as the Control Tower in Dam Battlegrounds, the Arrival and Departure Buildings in Spaceport, and Pilgrim’s Peak in Blue Gate all have a better-than-average chance of spawning Blueprints somewhere amongst all their containers. Night Raids and Electromagnetic Storm events also increase the drop chances of certain Blueprints .
In addition to these containers, you can often loot Blueprints from destroyed Surveyors - the largest of the rolling ball ARC. Surveyors are more commonly found on the later maps - Spaceport and Blue Gate - and if one spawns in your match, you’ll likely see it by the blue laser beam that it casts into the sky while “surveying”.
Surveyors are quite well-armoured and will very speedily run away from you once it notices you, but if you can take one down then make sure you loot all its parts for a chance of obtaining certain unusual Blueprints.
Blueprints obtained from quests
One way in which you can get Blueprints is by completing certain quests for the vendors in Speranza. Some quests will reward you with a specific item Blueprint upon completion, so as long as you work through all the quests in Arc Raiders, you are guaranteed those Blueprints.
Here is the full list of all Blueprints you can get from quest rewards:
- Trigger Nade Blueprint: Rewarded after completing “Sparks Fly”.
- Lure Grenade Blueprint: Rewarded after completing “Greasing Her Palms”.
- Burletta Blueprint: Rewarded after completing “Industrial Espionage”.
- Hullcracker Blueprint (and Launcher Ammo Blueprint): Rewarded after completing “The Major’s Footlocker”.
Alas, that’s only 4 Blueprints out of a total of 75 to unlock, so for the vast majority you will need to find them yourself during a raid. If you’re intent on farming Blueprints, then it’s best to equip yourself with cheap gear in case you lose it, but don’t use a free loadout because then you won’t get a safe pocket to stash any new Blueprint you find. No pain in Arc Raiders is sharper than failing to extract with a new Blueprint you’ve been after for a dozen hours already.

One of the best ways to get Blueprints is by hitting three stars on all five Trials every week. |Image credit:Rock Paper Shotgun/Embark Studios
Blueprints obtained from Trials
One of the very best ways to get Blueprints is as rewards for completing Trials in Arc Raiders. Trials are unlocked from Level 15 onwards, and allow you to earn rewards by focusing on certain tasks over the course of several raids. For example, one Trial might task you with dealing damage to Hornets, while another might challenge you to loot Supply Drops.
Trials refresh on a weekly basis, with a new week bringing five new Trials. Each Trial can offer up to three rewards after passing certain score milestones, and it’s possible to receive very high level loot from these reward crates - including Blueprints. So if you want to unlock as many Blueprints as possible, you should make a point of completing as many Trials as possible each week.
Best Blueprint farming locations
The very best way to get Blueprints is to frequent specific areas of the maps which combine high-tier loot pools with the right types of containers to search. Here are my recommendations for where to find Blueprints on every map, so you can always keep the search going for new crafting recipes to unlock.

Image credit:Rock Paper Shotgun/Embark Studios
Dam Battlegrounds
The best places to farm Blueprints on Dam Battlegrounds are the Control Tower, Power Generation Complex, Ruby Residence, and Pale Apartments . The first two regions, despite only being marked on the map as mid-tier loot, contain a phenomenal number of containers to loot. The Control Tower can also contain a couple of high-tier Security Lockers - though of course, you’ll need to have unlocked the Security Breach skill at the end of the Survival tree.
There’s also a lot of reporting amongst the playerbase that the Residential areas in the top-left of the map - Pale Apartments and Ruby Residence - give you a comparatively strong chance of finding Blueprints. Considering their size, there’s a high density of containers to loot in both locations, and they also have the benefit of being fairly out of the way. So you’re more likely to have all the containers to yourself.
Buried City
The best Blueprint farming locations on Buried City are the Santa Maria Houses, Grandioso Apartments, Town Hall, and the various buildings of the New District . Grandioso Apartments has a lower number of containers than the rest, but a high chance of spawning weapon cases - which have good Blueprint drop rates. The others are high-tier loot areas, with plenty of lootable containers - including Security Lockers.
Spaceport
The best places to find Blueprints on Spaceport are the Arrival and Departure Buildings, as well as Control Tower A6 and the Launch Towers . All these areas are labelled as high-value loot regions, and many of them are also very handily connected to one another by the Spaceport wall, which you can use to quickly run from one area to the next. At the tops of most of these buildings you’ll find at least one Security Locker, so this is an excellent farming route for players looking to find Blueprints.
The downside to looting Blueprints on Spaceport is that all these areas are hotly contested, particularly in Duos and Squads. You’ll need to be very focused and fast in order to complete the full farming route.

Image credit:Rock Paper Shotgun/Embark Studios
Blue Gate
Blue Gate tends to have a good chance of dropping Blueprints, potentially because it generally has a high number of containers which can hold lots of items; so there’s a higher chance of a Blueprint spawning in each container. In my experience, the best Blueprint farming spots on Blue Gate are Pilgrim’s Peak, Raider’s Refuge, the Ancient Fort, and the Underground Complex beneath the Warehouse .
All of these areas contain a wealth of containers to loot. Raider’s Refuge has less to loot, but the majority of the containers in and around the Refuge are raider containers, which have a high chance of containing Blueprints - particularly during major events.
Stella Montis
On the whole, Stella Montis seems to have a very low drop rate for Blueprints (though a high chance of dropping other high-tier loot). If you do want to try farming Blueprints on this map, the best places to find Blueprints in Stella Montis are Medical Research, Assembly Workshop, and the Business Center . These areas have the highest density of containers to loot on the map.
In addition to this, the Western Tunnel has a few different Security Lockers to loot, so while there’s very little to loot elsewhere in this area of the map, it’s worth hitting those Security Lockers if you spawn there at the start of a match.
That wraps up this primer on how to get all the Blueprints in Arc Raiders as quickly as possible. With the Expedition system constantly resetting a large number of players’ Blueprints, it’s more important than ever to have the most up-to-date information on where to find all these Blueprints.
While you’re here, be sure to check out our Arc Raiders best guns tier list , as well as our primers on the best skills to unlock and all the different Field Depot locations on every map.

ARC Raiders
PS5 , Xbox Series X/S , PC
Rock Paper Shotgun is better when you sign in
Sign in and join us on our journey to discover strange and compelling PC games.
