All 12 Avowed Treasure Map locations and rewards
Here’s a detailed breakdown of all 12 Treasure Map locations in Avowed
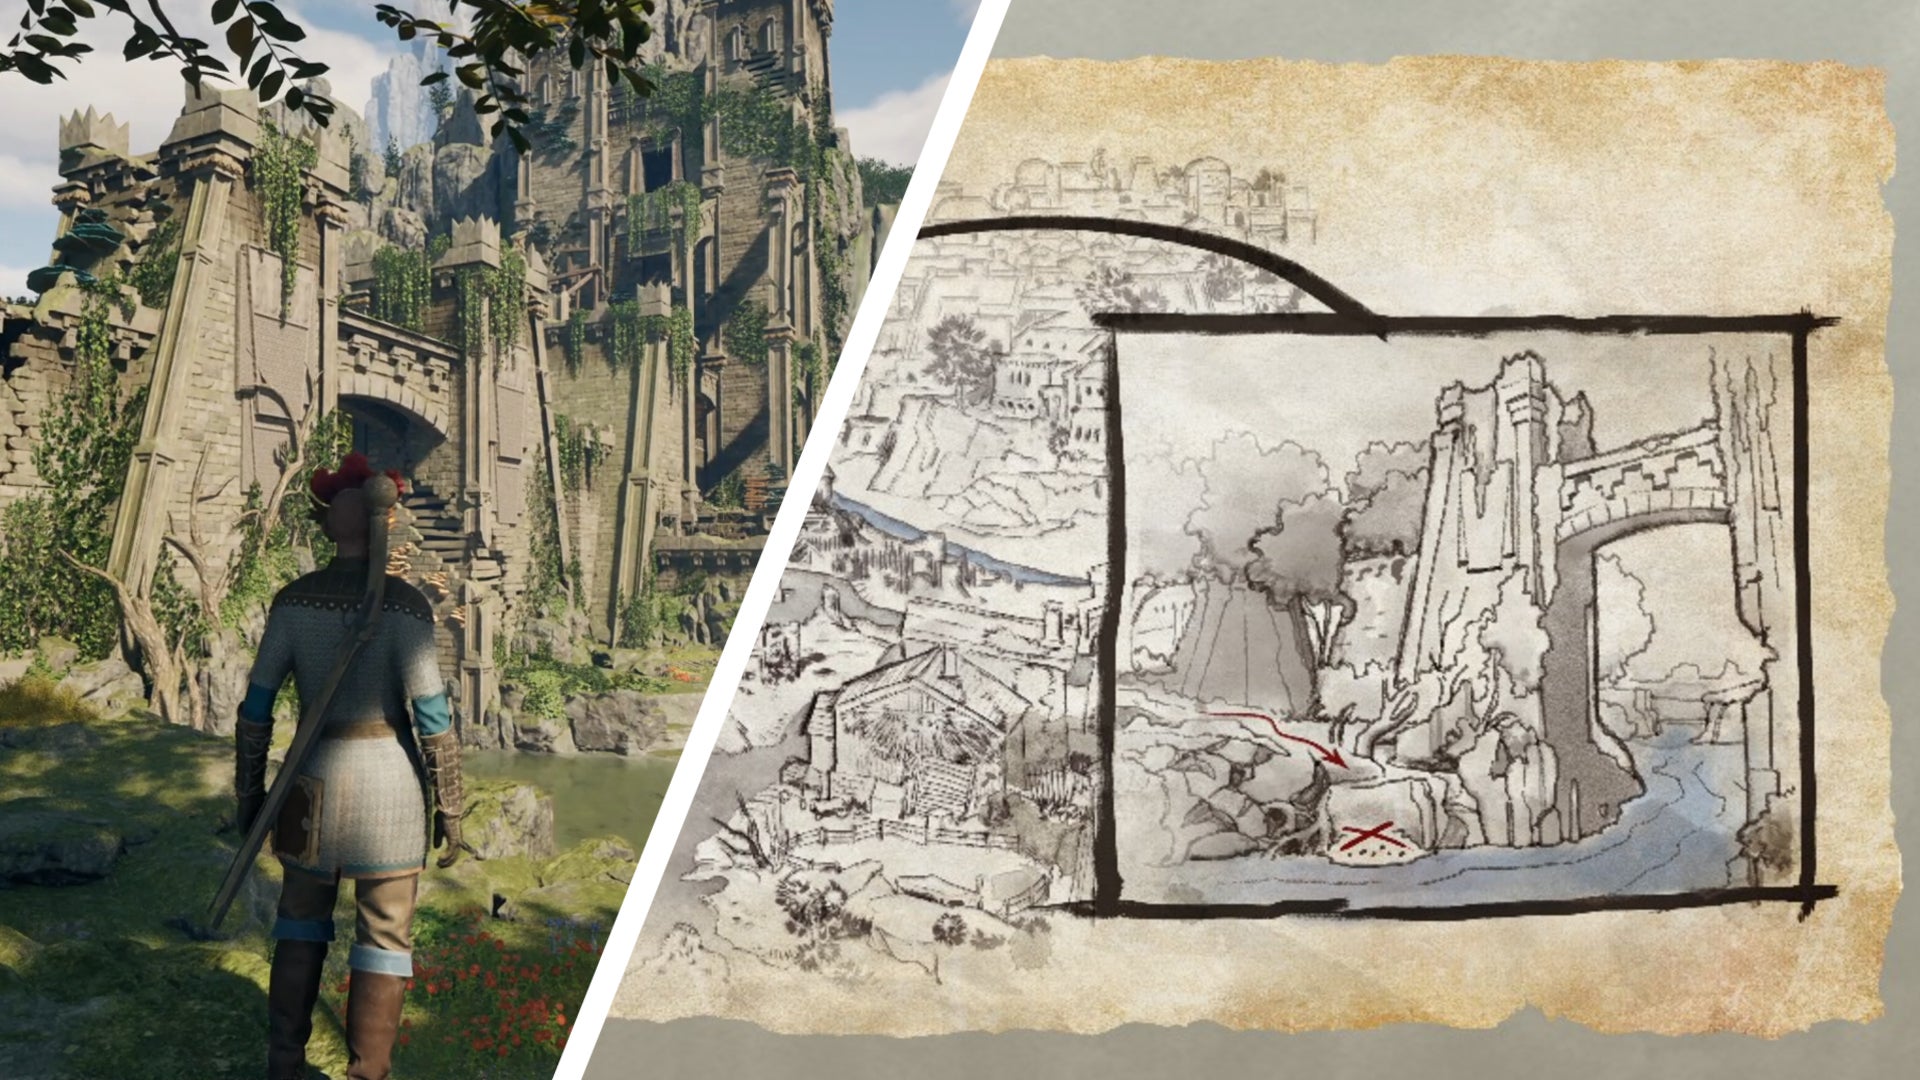
Image credit:Rock Paper Shotgun/Obsidian

Trying to find the treasures hidden within each of Avowed’s Treasure Maps? Avowed has 12 Treasure Maps hidden within its four main regions that are wonderfully unique. Instead of telling you exactly where to go via a map marker, you’ll pick up pages that show illustrated scenery. You then have to travel the world and find the exact spot that was drawn.
For anyone who delights in not being handheld, Avowed’s Treasure Maps will be great fun. All others might find them highly obfuscating, but that’s where we can provide some assistance. In this guide we’ll outline the exact location of each Treasure Map and how to find the treasures that the maps lead to . Happy hunting!
All Avowed Treasure Maps
Here are all 12 Treasure Maps scattered across Avowed’s four main regions. Click on the treasure you’re searching for to jump to that section of the guide.
Intimidating Feline Codpiece
Captain Henqua’s Spoils
Woedica’s Inheritance
Practical Pockets
Painter’s Regret
Earthly Aegis
Robe of the Arcane Cheater
Seafarer’s Boots
Dead Man’s Mail
Ancient Arrowhead
My Loyal Shield
The Blade That Hungers
To help you find them all, we’ve also included an interactive map of all the treasure map locations, from our friends at MapGenie :
Treasure Map locations
Finding these Treasure Maps is sometimes very easy, only requiring you to chat with a seller in town. But in a few instances, locating the map requires just as much searching as finding the treasure itself. Here’s a gallery with quick references for all Treasure Map locations. Check the ‘Treasure Map location’ section in each entry below for greater details.
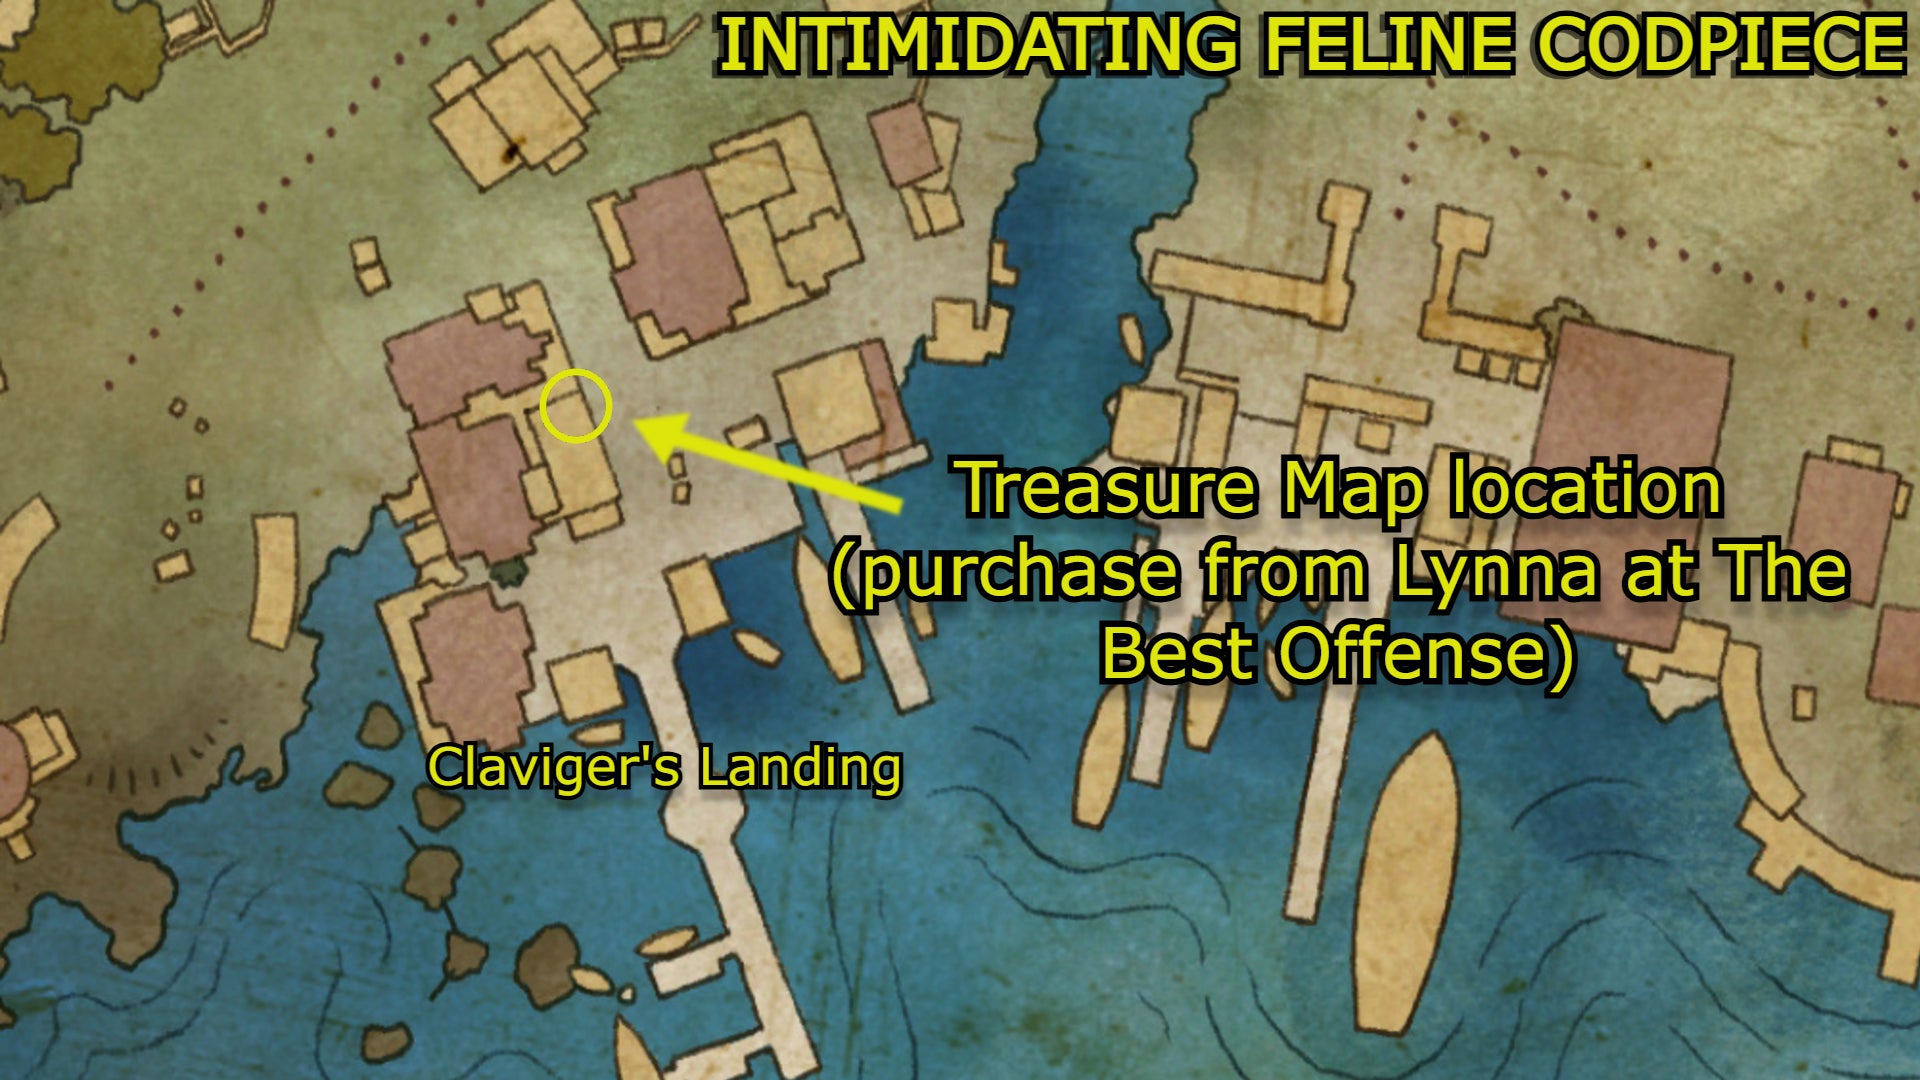
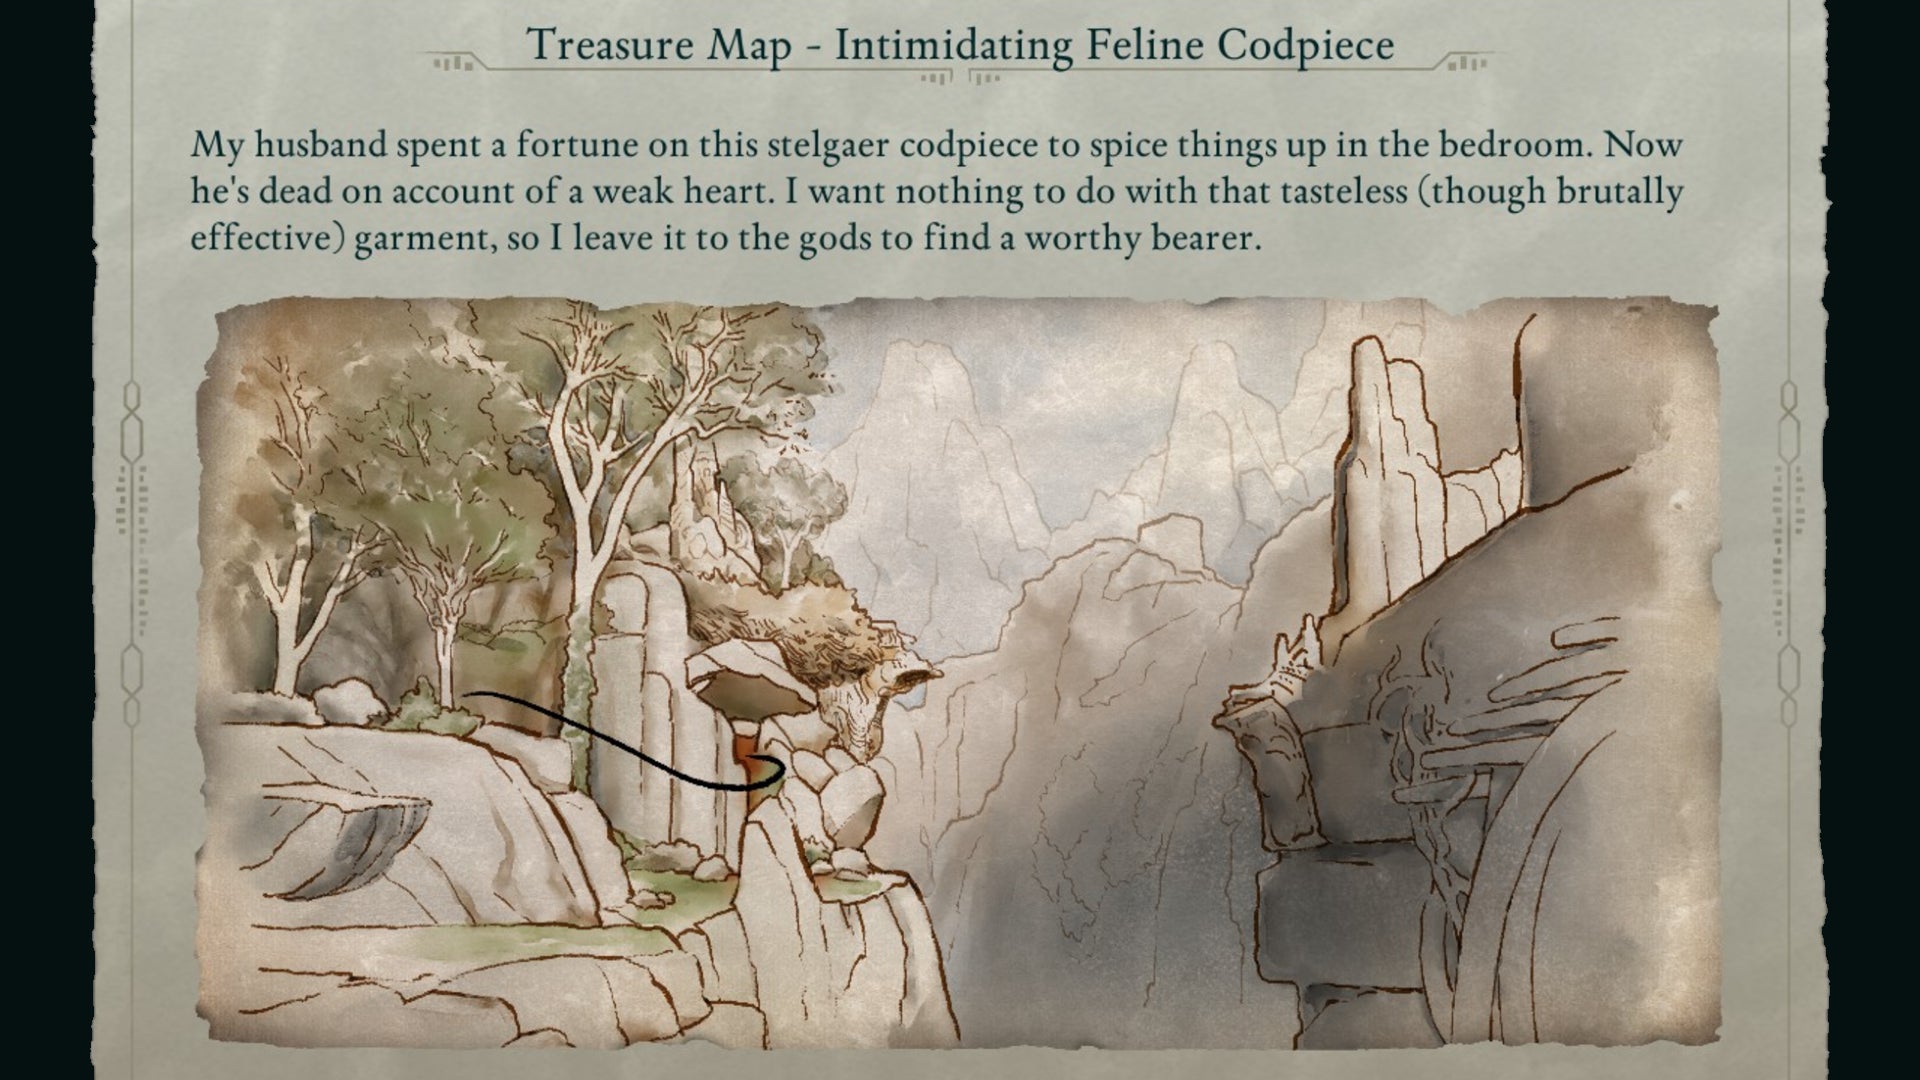
1. Dawnshore Treasure Map: Intimidating Feline Codpiece
How lovely that our first treasure hunt is for a codpiece! |Image credit:Rock Paper Shotgun/Obsidian
Treasure Map location : This map is sold by Lynna , the owner of The Best Offense in Claviger’s Landing. She’s the first armour merchant you’ll run into in Avowed.
Treasure location : Go east of Paradis and south of the Watcher’s Mirror point of interest until you come to a cliffside with a giant dinosaur-esque skeleton sticking out of it. Walk along the side of the cliff until you reach an enclave with a breakable wall; the treasure lies within a chest inside.
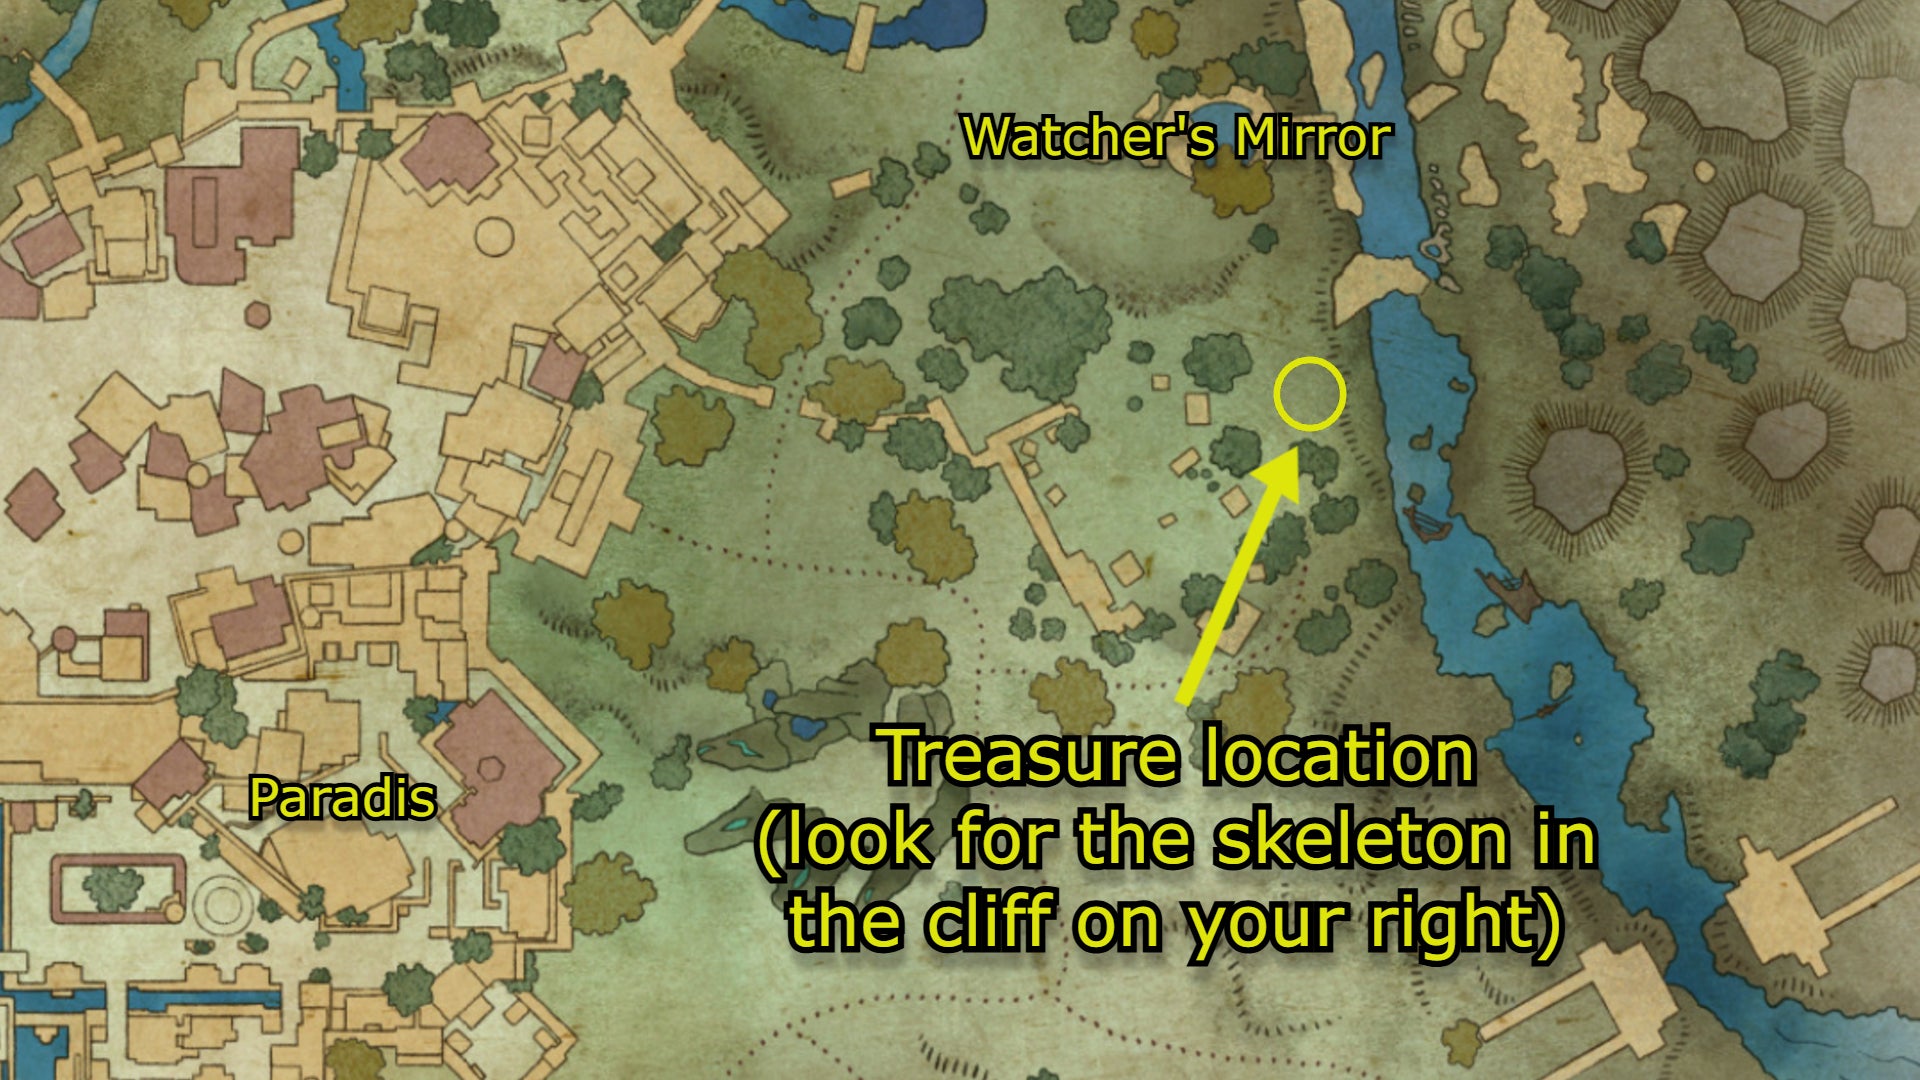
Image credit:Rock Paper Shotgun/Map Genie/Obsidian
Treasure : Stelgaer’s Pride , a unique medium armour chestpiece that lets you cast Barbaric Shout when taking damage greater than 30% of your max health and offers a boost to Stamina regeneration. This is a good armour for anyone who mostly does melee combat.

Follow the trail of the cliff until you hit a wall - no need for platforming required. Then enjoy your new intimidating codpiece. |Image credit:Rock Paper Shotgun/Obsidian
2. Dawnshore Treasure Map: Captain Henqua’s Spoils

Kai will give you a little hint for this one, telling you it’s by the Old Pargrun Wall. Thanks, Kai. |Image credit:Rock Paper Shotgun/Obsidian
Treasure Map location : Climb the Lighthouse near Claviger’s Landing. All the way at the top, you’ll find a body with the Treasure Map.
Treasure location : Head to the Old Pargrun Wall and dive into the river near the shore. If you’re facing the structure that overlooks the river, veer left underwater until you see a small cave. There’s a chest hidden there, along with the shield you’re looking for.
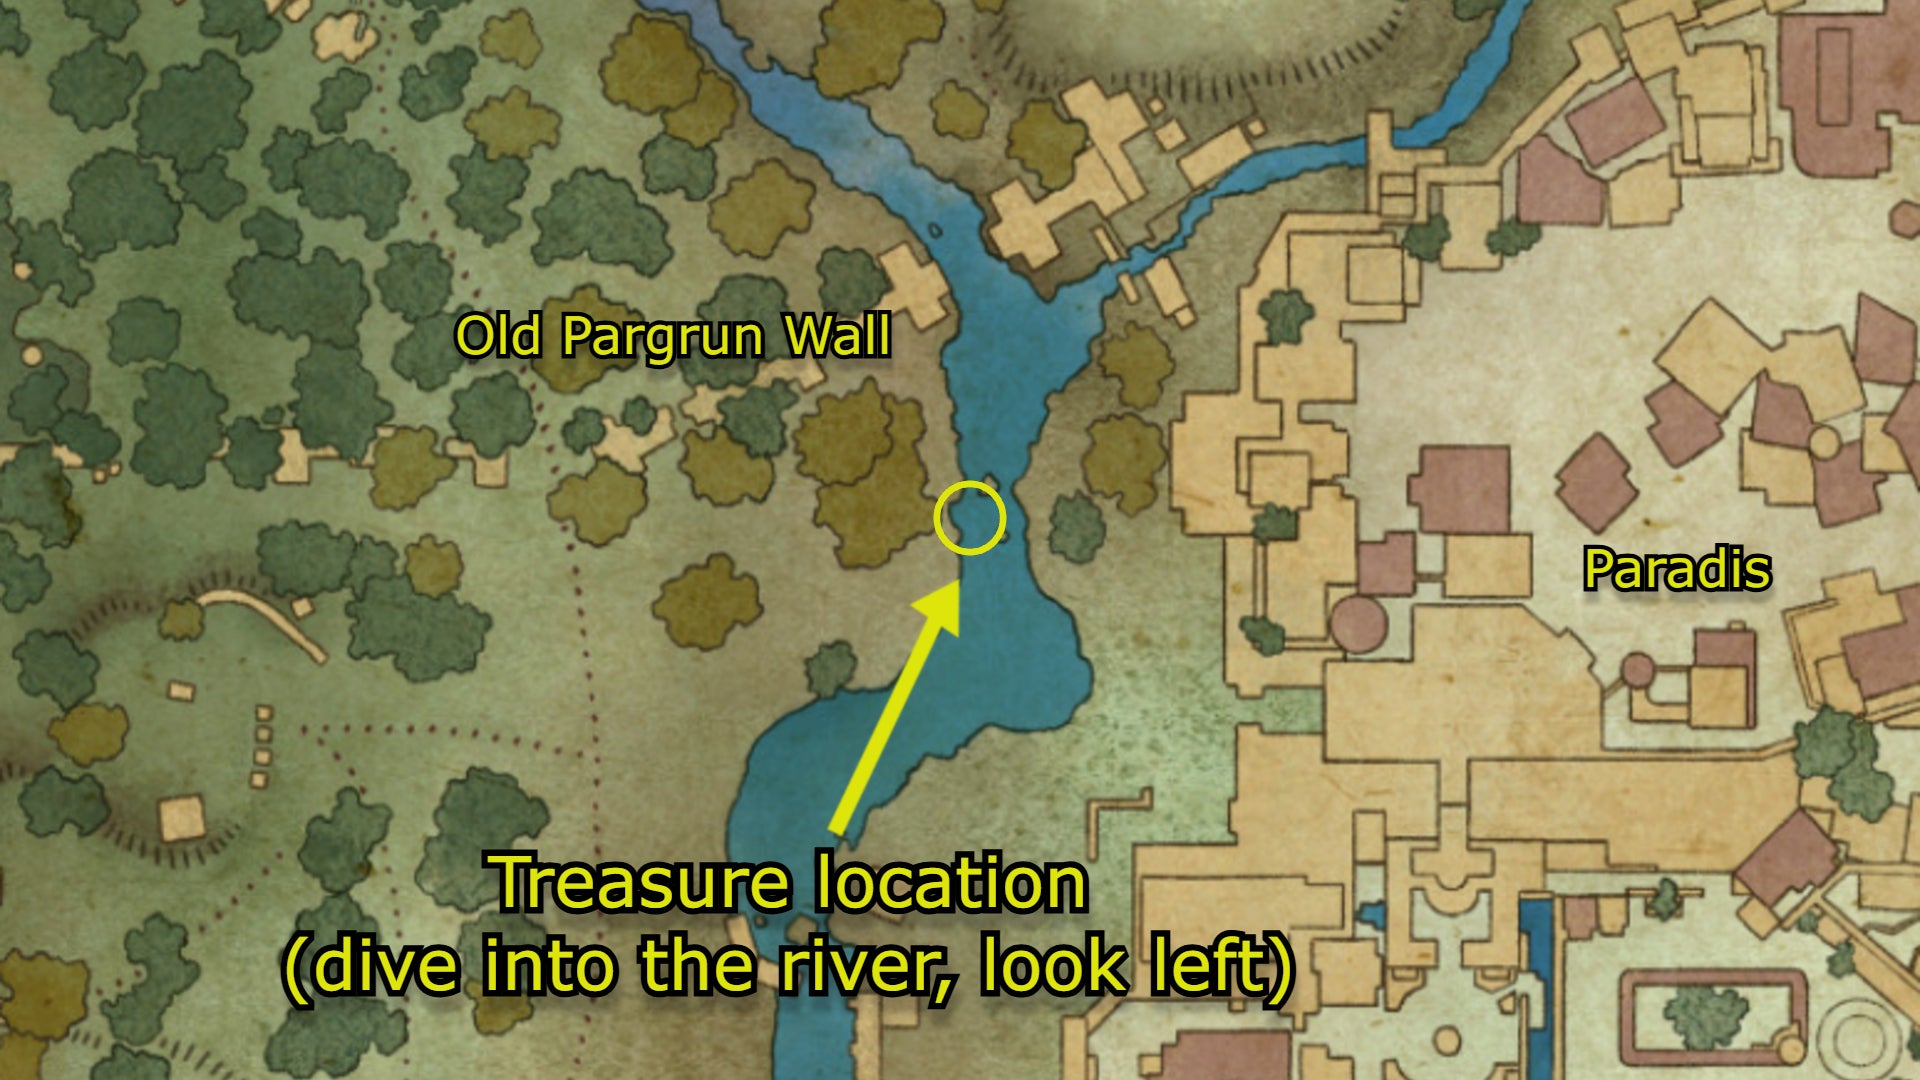
Image credit:Rock Paper Shotgun/Map Genie/Obsidian
Treasure : Wind and Wave , a unique shield that provides a boost to move speed and resistance against Frost accumulation. This is a fine starting shield for anyone investing in the Fighter’s abilities , though there are much better options later on.

Dive into the water and hug the left wall. The cave entrance is pretty small, but you’ll find it if you’re looking for it. |Image credit:Rock Paper Shotgun/Obsidian
3. Dawnshore Treasure Map: Woedica’s Inheritance
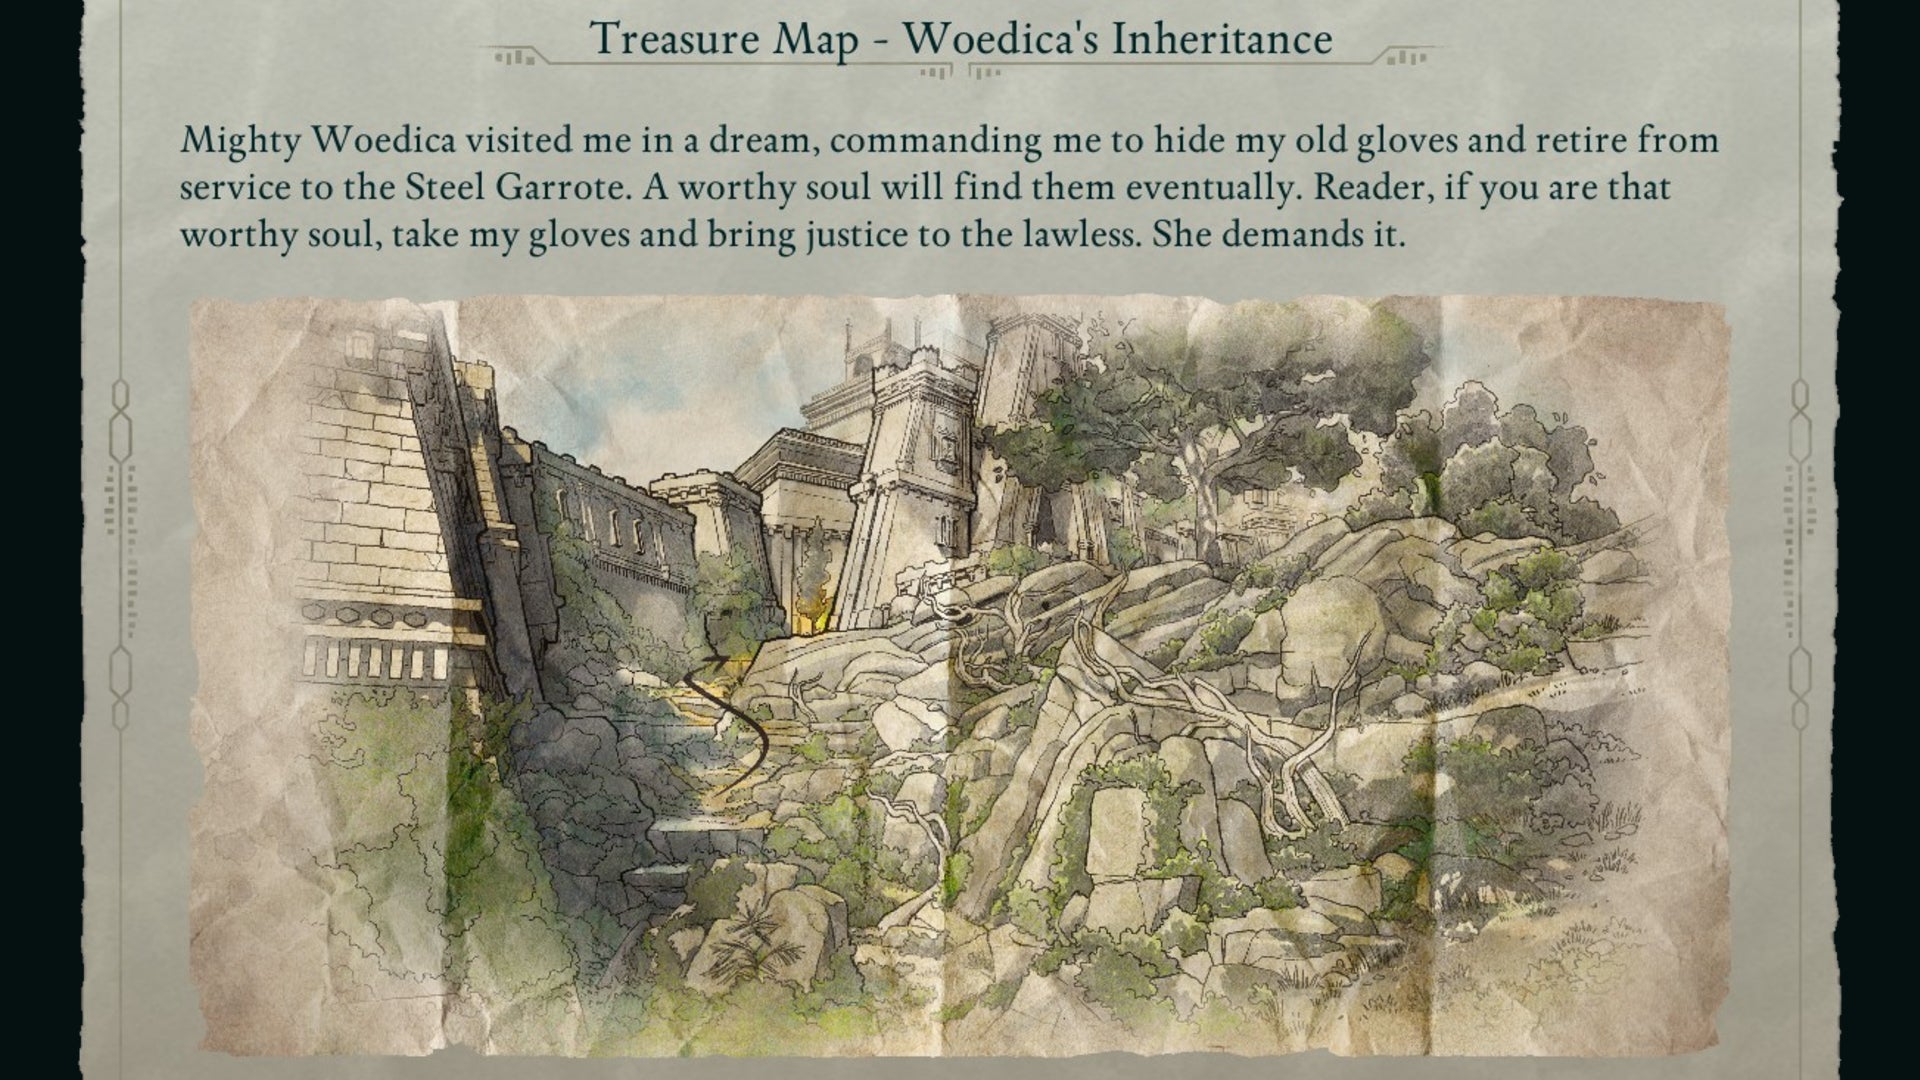
A treasure hidden so close to Paradis is a treasure we have no excuse to overlook! |Image credit:Rock Paper Shotgun/Obsidian
Treasure Map location : This map is sold by Sanza in his shop Sanza’s Emporium , located in Paradis Hightown just southeast of the High Market.
Treasure location : Head over to the outer eastern wall of Paradis until the gate lines up to the illustration on the treasure map. Go along the wall until you reach a dead end and very carefully search for a hidden switch on your right. Hit the switch and part of the wall will slide open to reveal a hidden room.
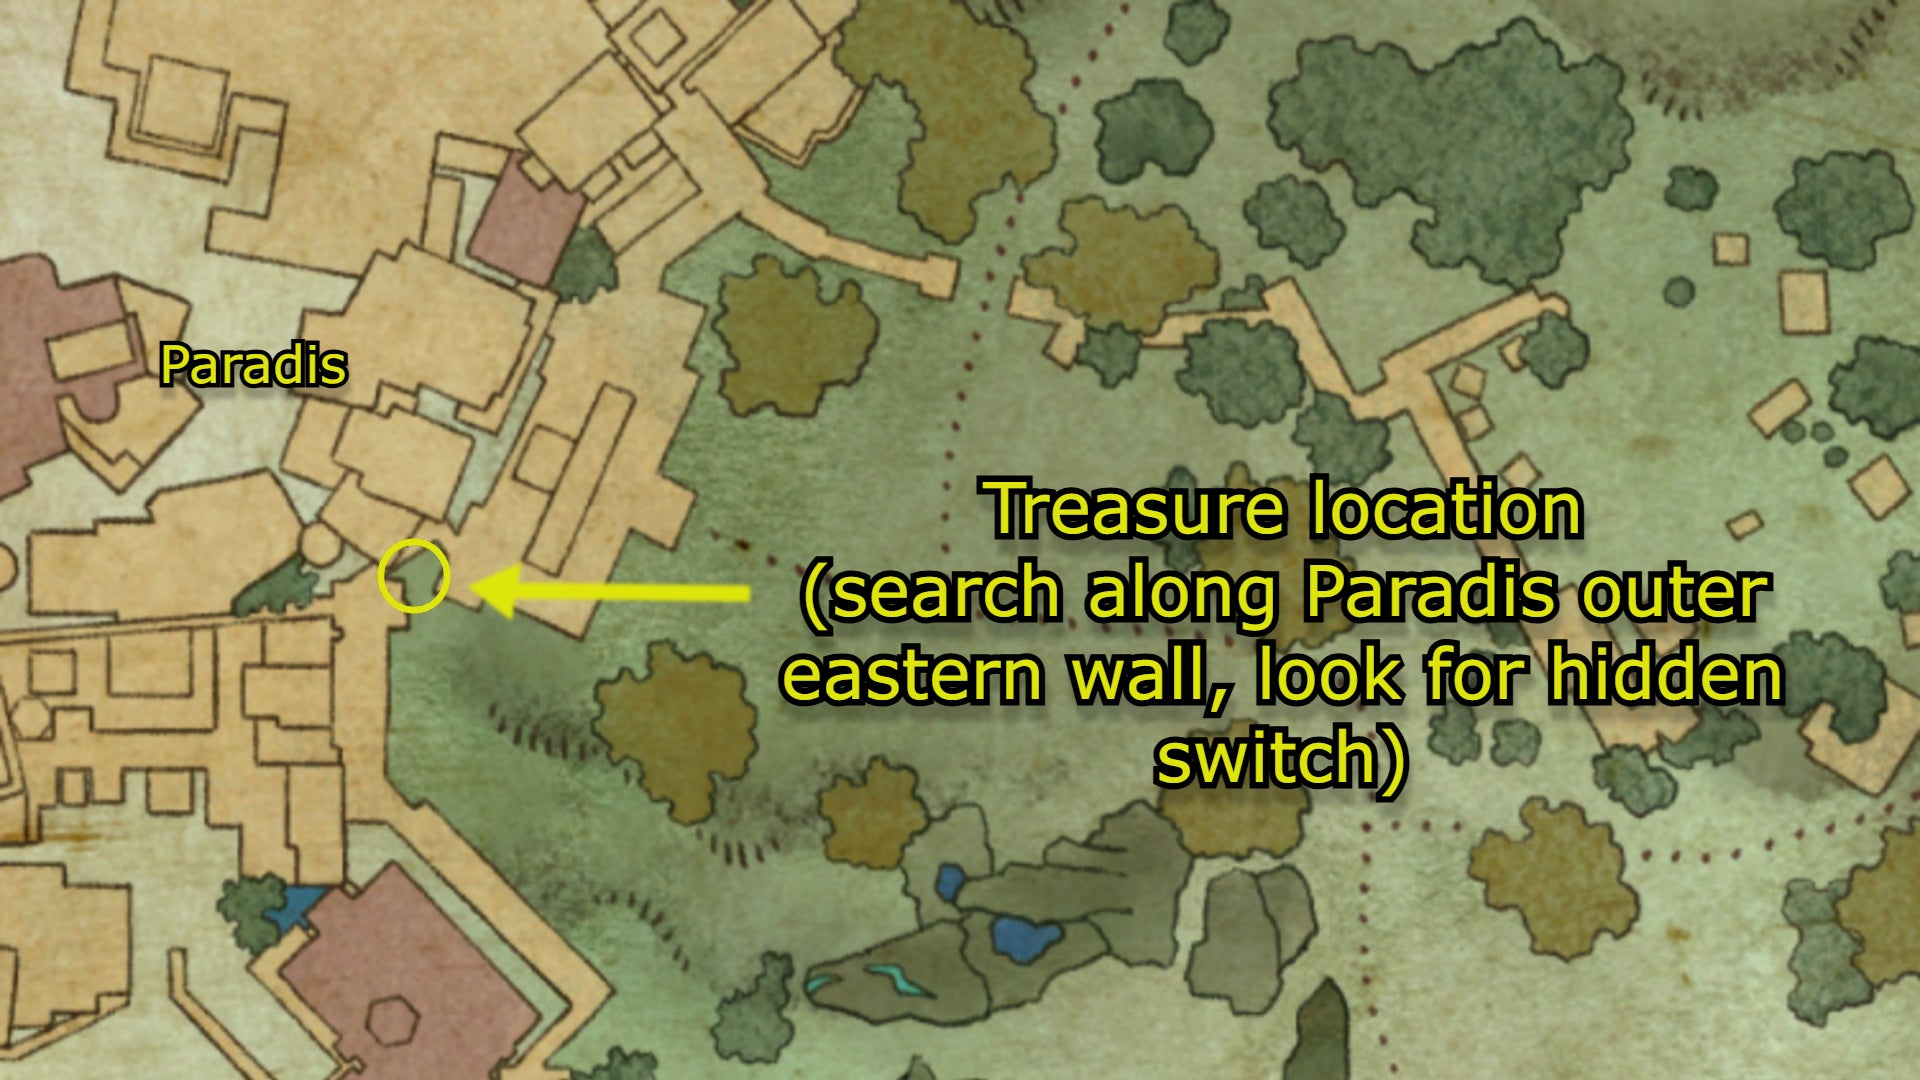
Image credit:Rock Paper Shotgun/Map Genie/Obsidian
Treasure : Gloves of the Strangler , a unique pair of gloves that increases critical hit chance and stealth attack damage. For Rangers and other characters of a sneaky persuasion, these are excellent.
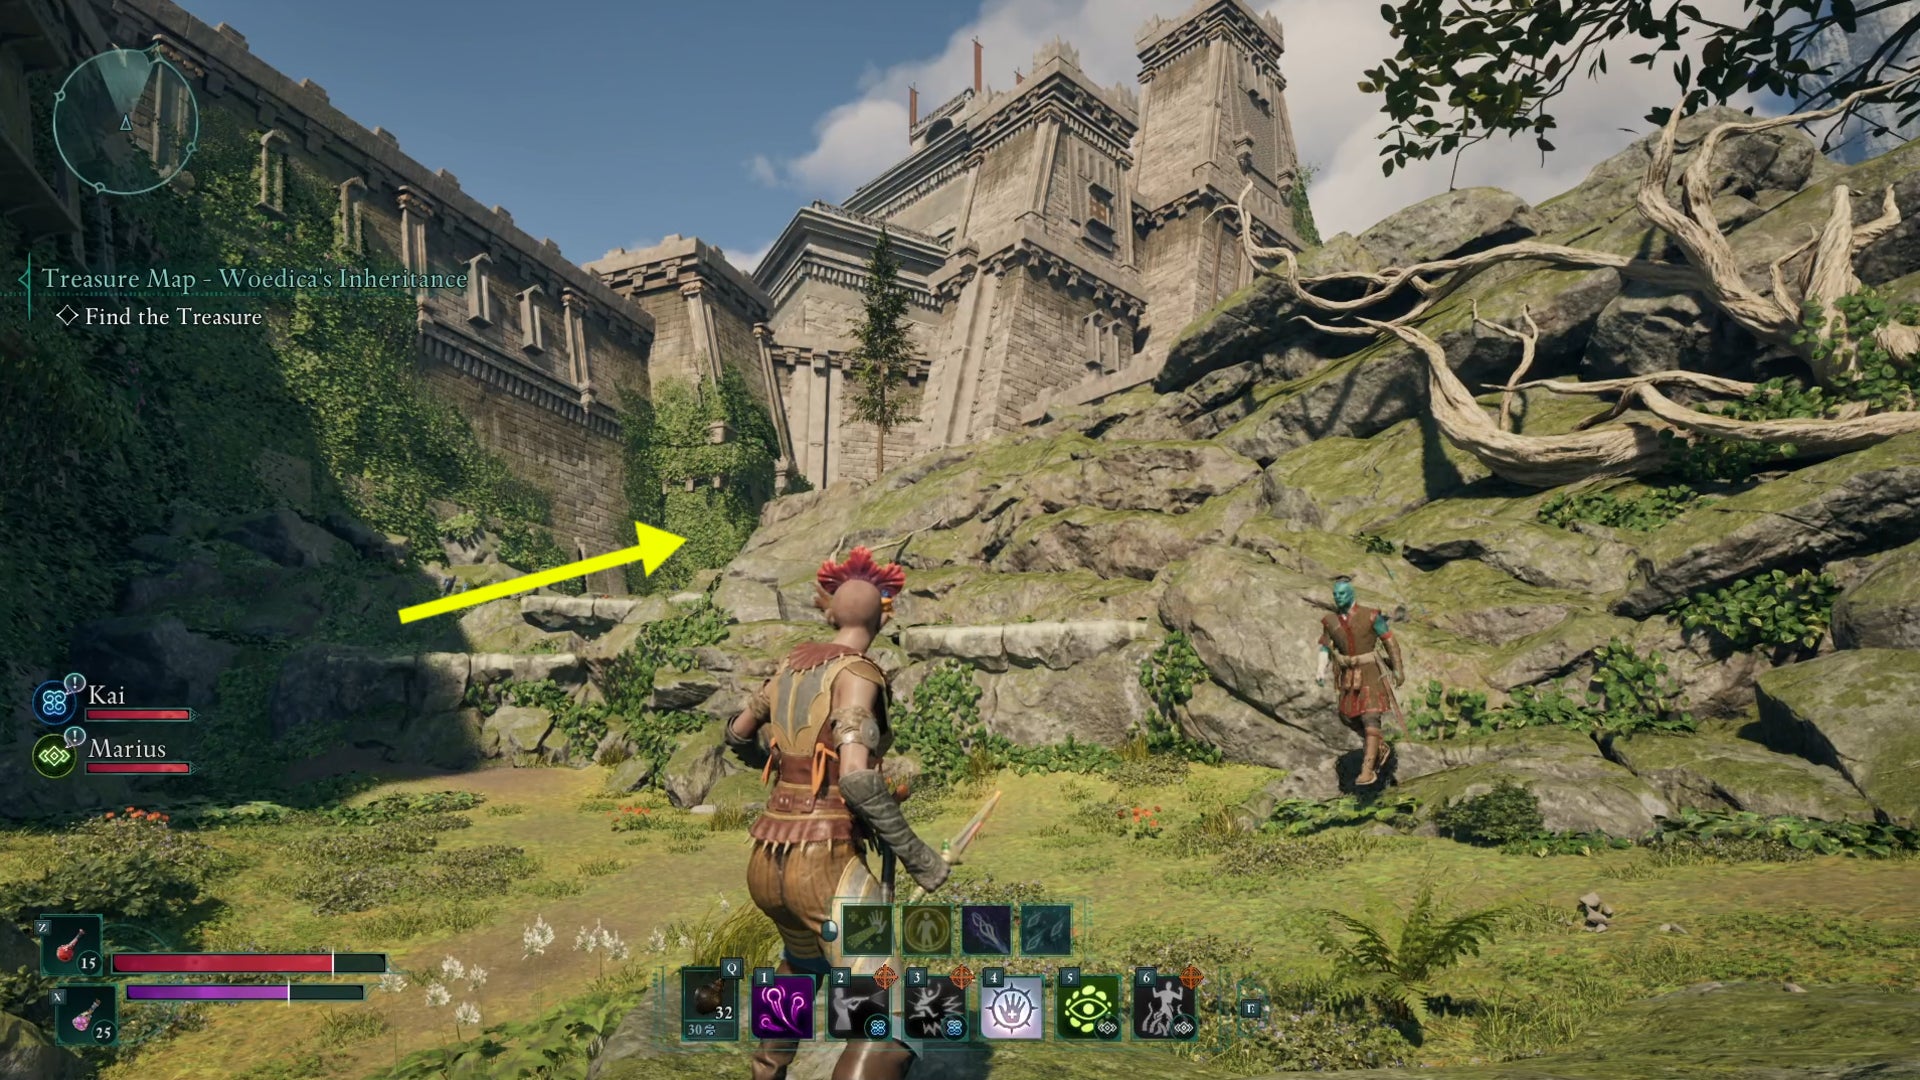
Go outside of Paradis’ eastern exit, hug the wall until you hit a corner and then look for a switch. This took me a while to find - the switch is a tiny one. |Image credit:Rock Paper Shotgun/Obsidian
4. Emerald Stair Treasure Map: Practical Pockets
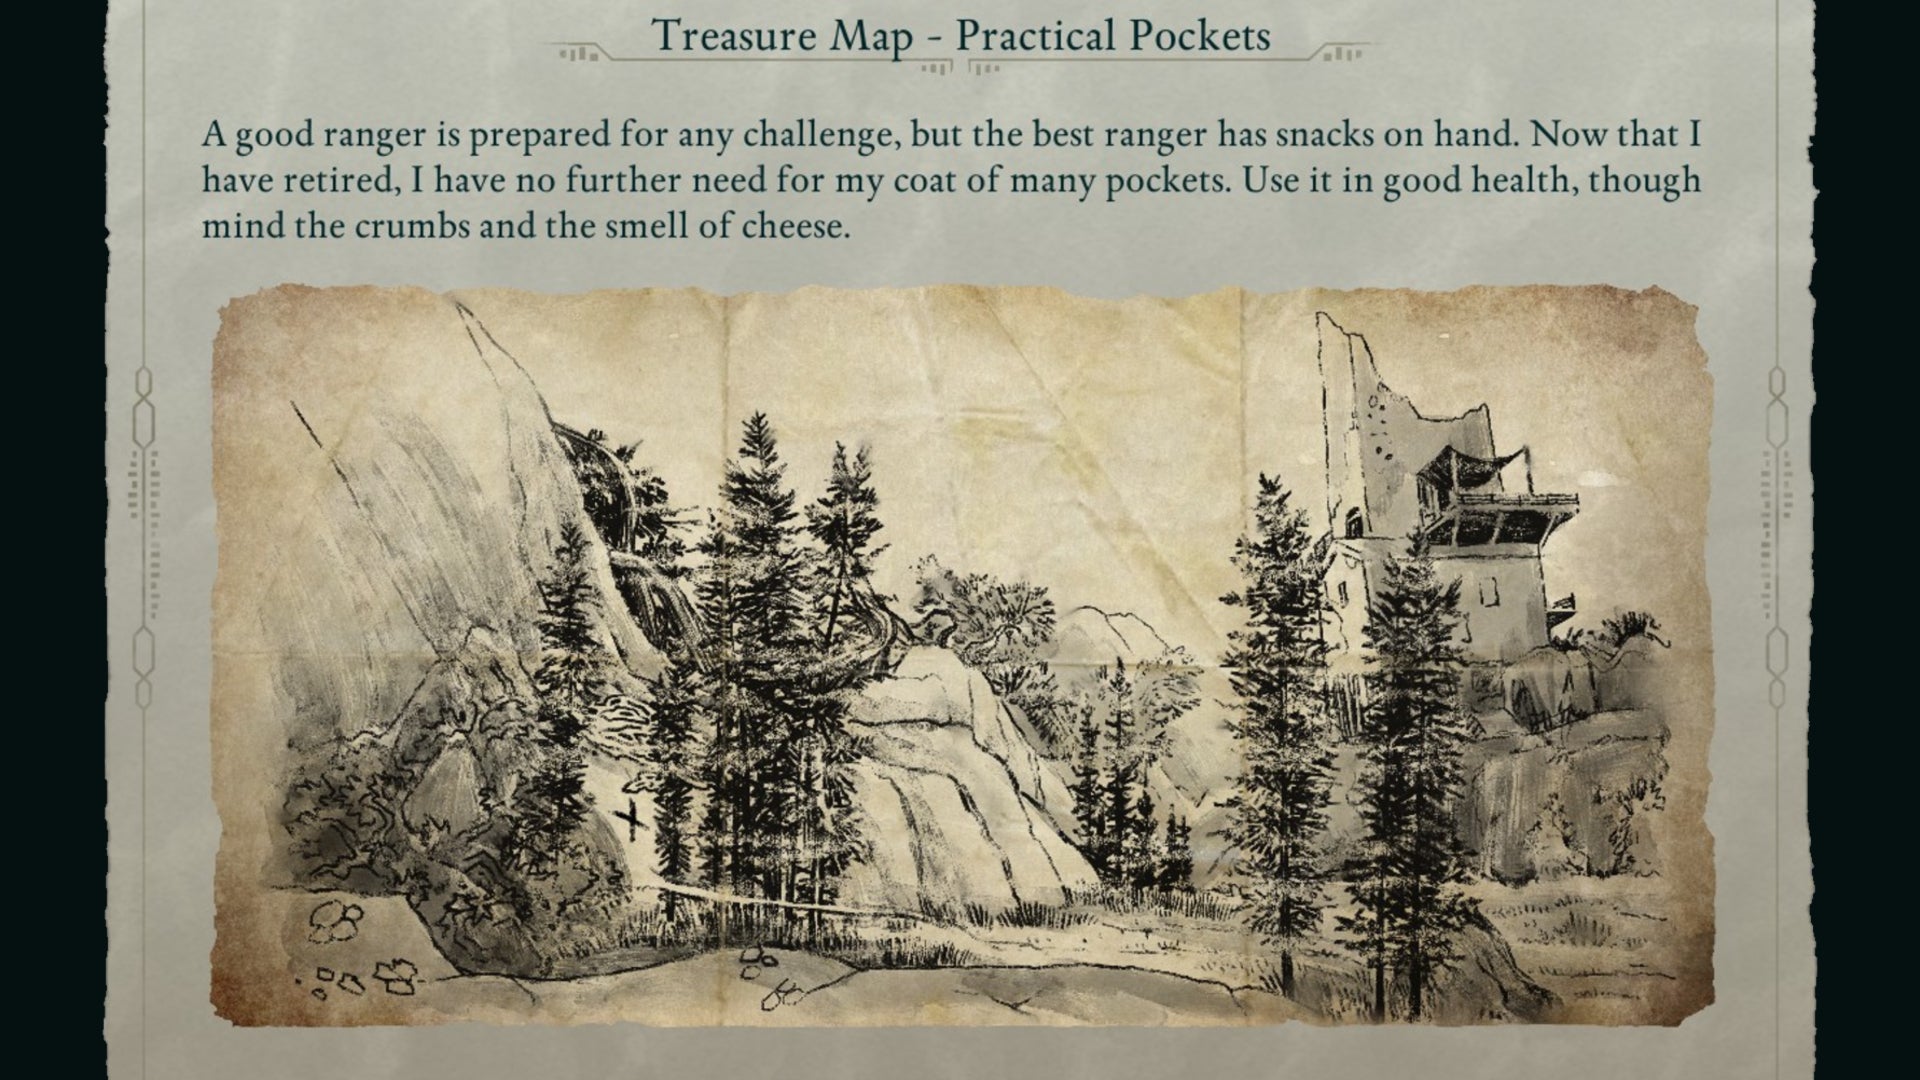
Just what every Envoy needs - armour with lots and lots of pockets. |Image credit:Rock Paper Shotgun/Obsidian
Treasure Map location : Sold by Ector Brewer in The Gifted Magpie teahouse in Fior mes Iverno.
Treasure location : Head northeast of Fior mes Iverno, southeast of Rolling Crags . Face the tower in the illustration then explore the cliffside north of the mushroom patch with the sporelings and bear. You’ll find a small undercropping of ground along the cliff face with a chest hidden there.
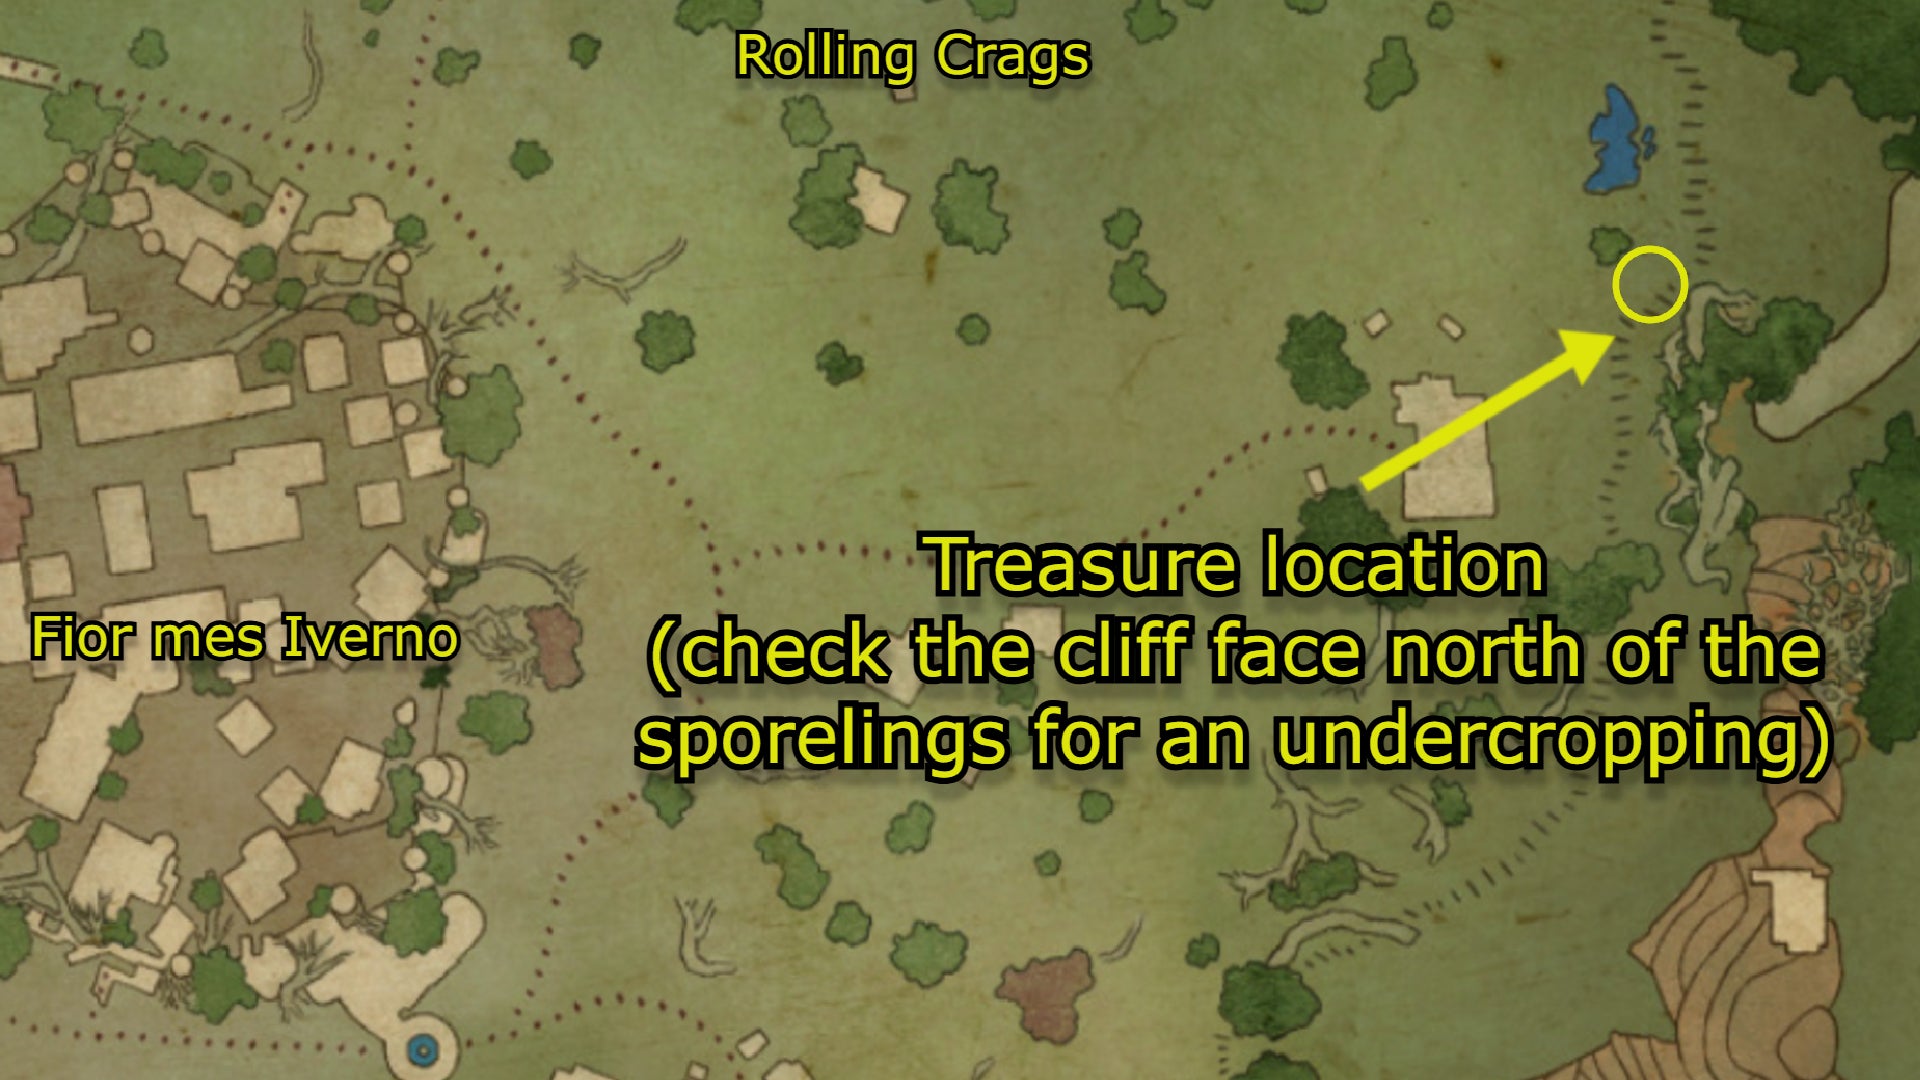
Image credit:Rock Paper Shotgun/Map Genie/Obsidian
Treasure : Hjilde’s Handy Hide , a unique light armour chestpiece that adds +40 to max health and reduces all incoming Fire, Frost, and Shock damage. A stellar coat that complements a build making use of Ranger abilities , not to mention one of the earliest Exceptional Quality armours you can get.
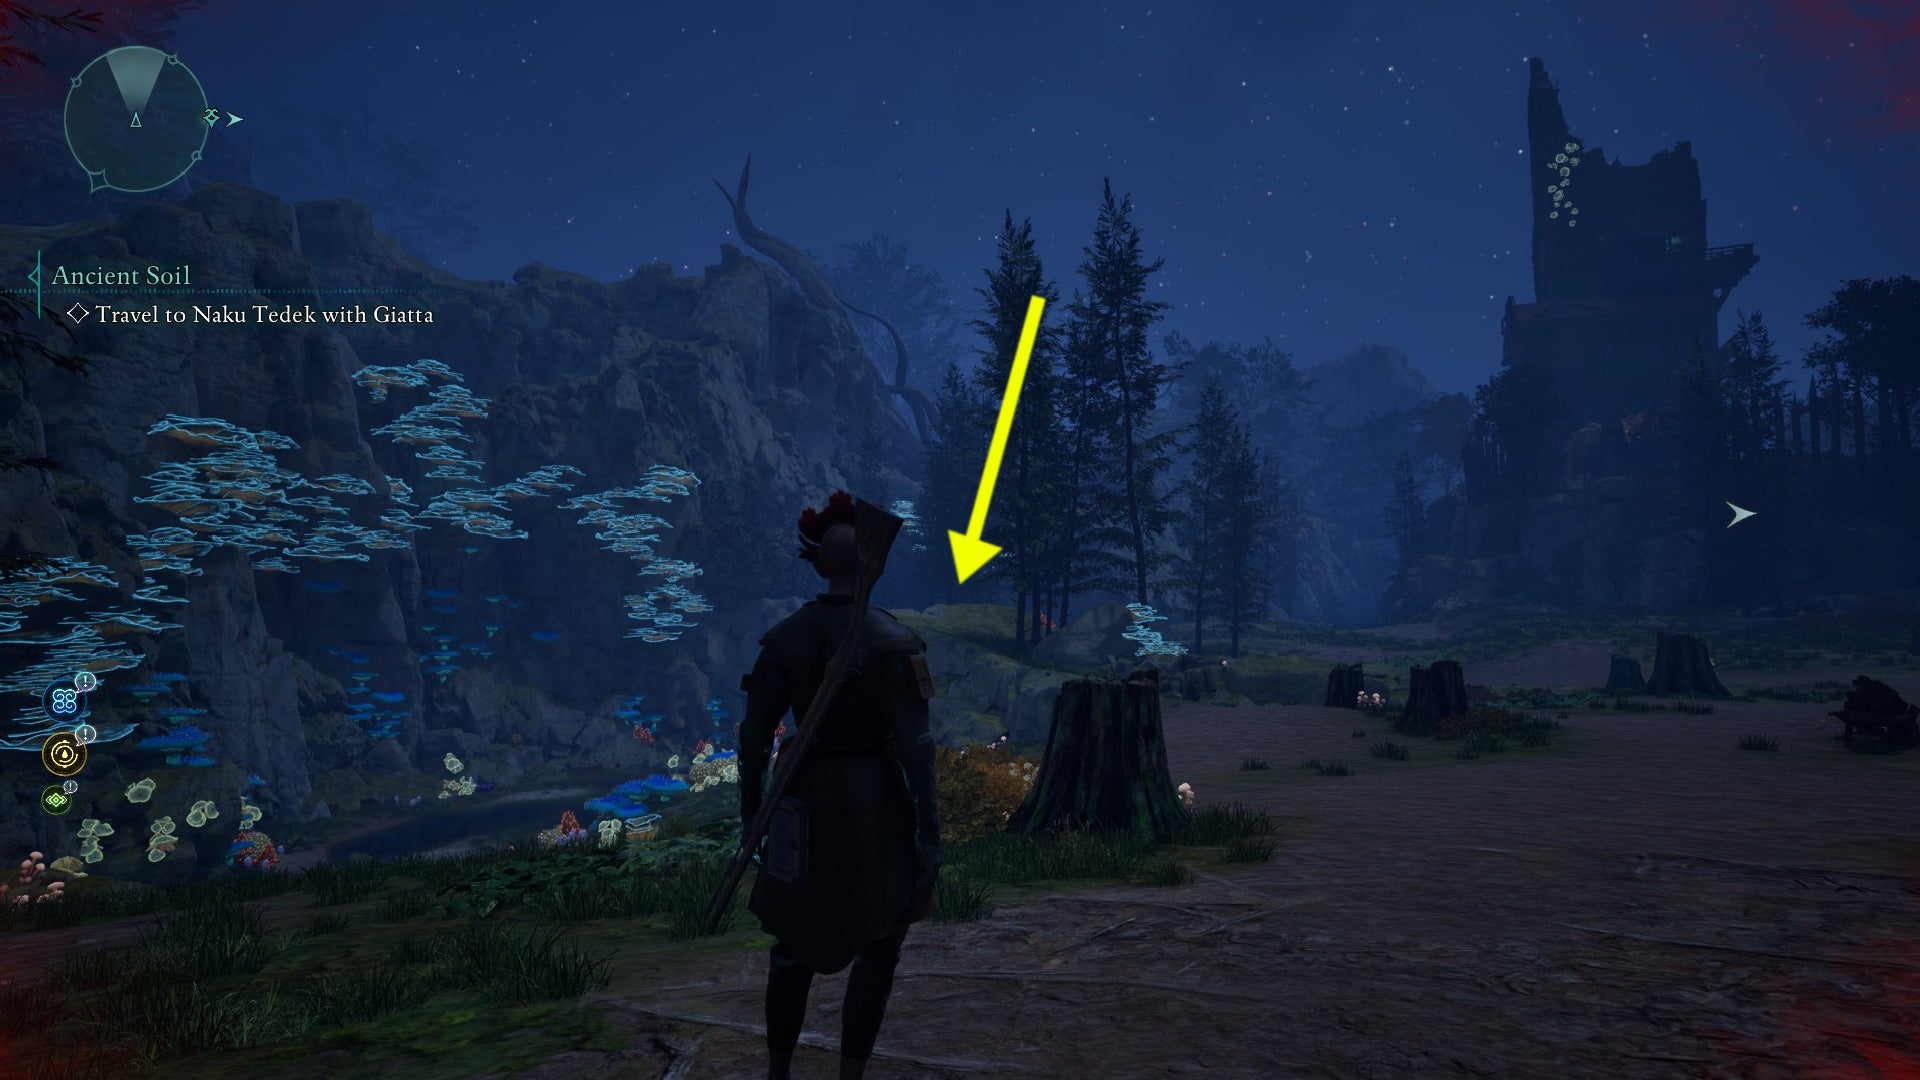
Be sure to head north of the colourful sporeling patch and hug the cliffs. This one takes some careful observing to find, but the extra health and resistance that Hjilde’s Handy Hide provides is worth the effort. |Image credit:Rock Paper Shotgun/Obsidian
5. Emerald Stair Treasure Map: Painter’s Regret

This one is cryptic and has no description, but a picture is worth a thousand words. |Image credit:Rock Paper Shotgun/Obsidian
Treasure Map location : Explore the southeast of Emerald Stair until you reach Maxim’s Claim Party Camp , which is slightly to the northeast of Elia’s Revenant Farm on your map. An empty house can be found to the north of this camp. Explore it and examine the painter’s canvas.
Treasure location : Go west of Fior mes Iverno until you come across a bridge. In the river beneath the bridge (above the Belderreno’s Lair marker on your map) is a waterfall that matches the treasure map illustration. You have two options here if you’re facing the waterfall - you can either parkour up the left stretch of rocky wall, jump over a gap and go up a slope until you reach an alcove with the treasure, or you can take the long way around via a passageway that wraps behind the waterfall.
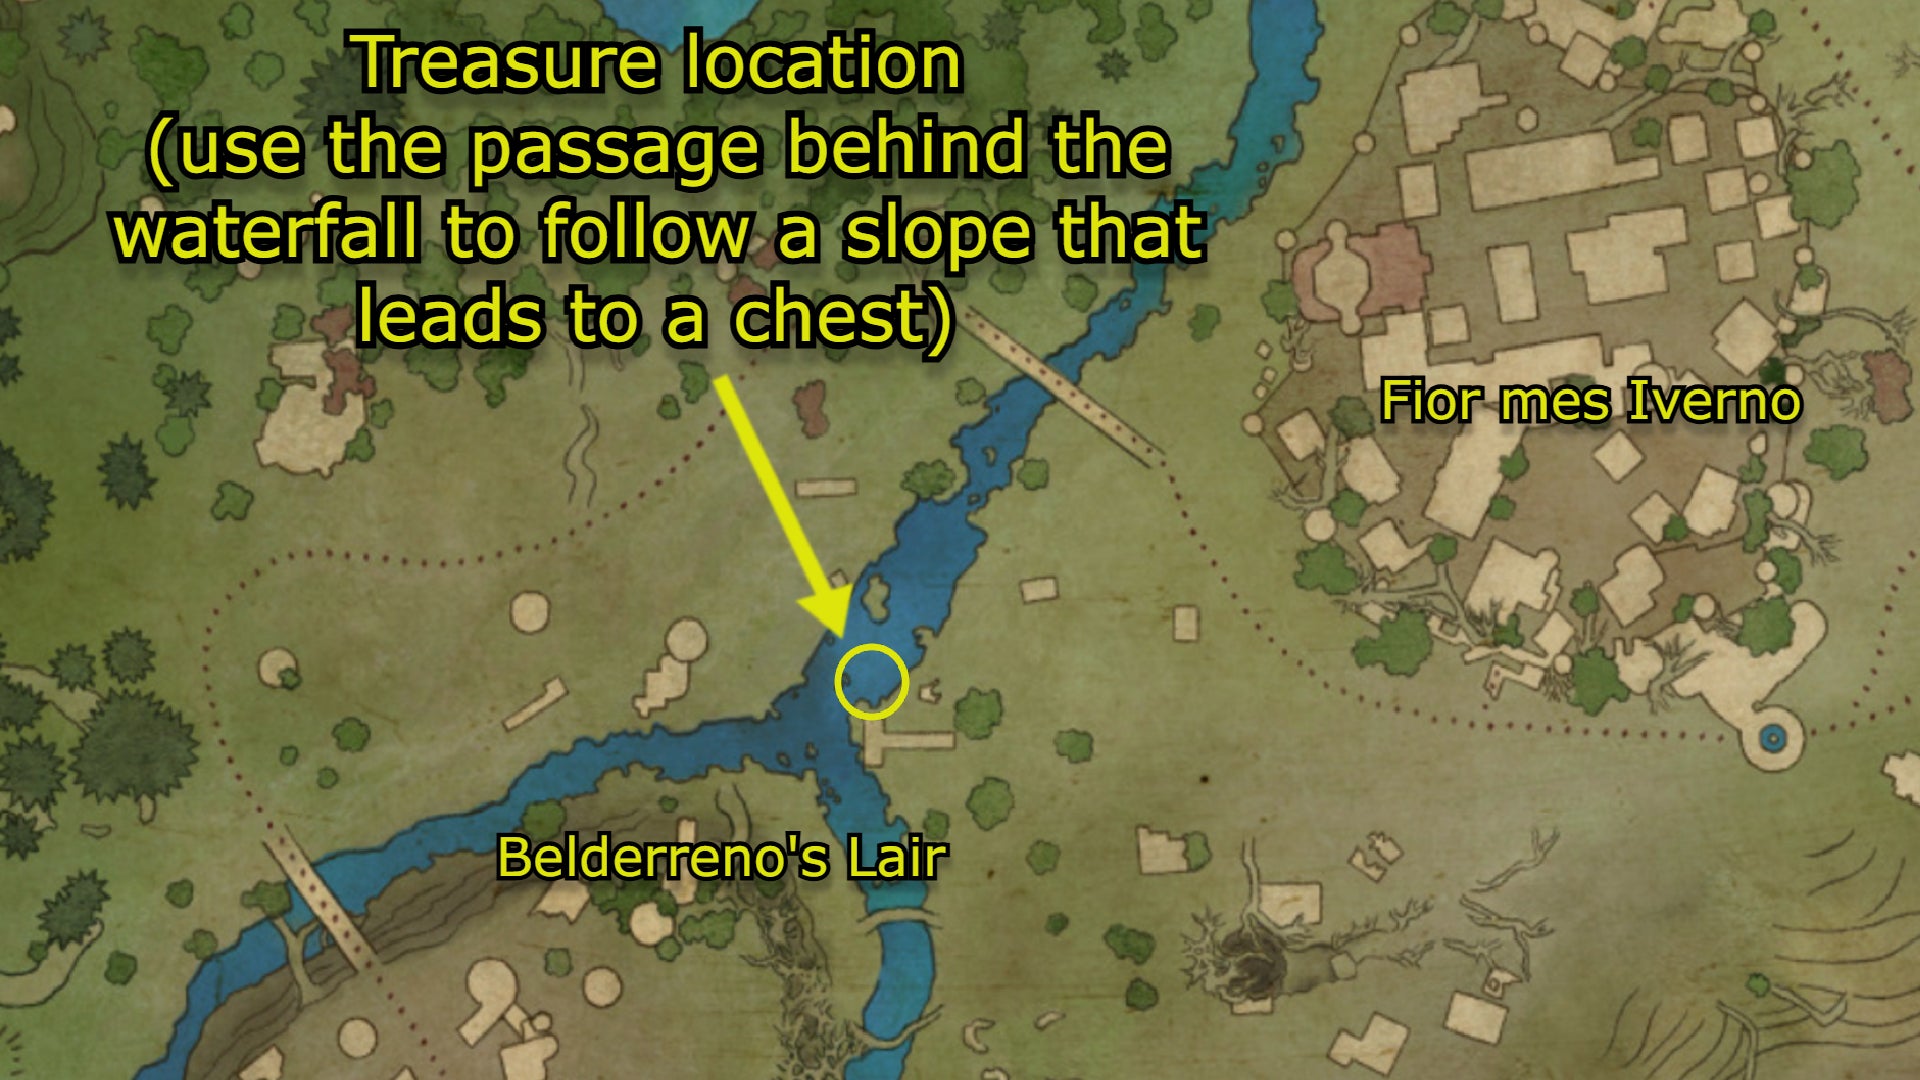
Image credit:Rock Paper Shotgun/Map Genie/Obsidian
Treasure : Painter’s Brush , a unique trinket that gives you a +5% critical hit chance. Good for anyone developing a build that relies on high damage.

Follow the arrows behind the waterfall and keep moving along the hidden passageway. Ignore the entrance you’ll probably bump into along the way that leads deeper into a cave - the treasure is located outdoors, after you emerge from the passageway, jump a gap, and go up a slope. |Image credit:Rock Paper Shotgun/Obsidian
6. Emerald Stair Treasure Map: Earthly Aegis

The Treasure Maps are getting harder. The Earthly Aegis map requires a careful eye. |Image credit:Rock Paper Shotgun/Obsidian
Treasure Map location : You’ll have to be thoroughly exploring the Naku Tedek Grounds in southern Emerald Stair in order to find this one. Climb atop the market stalls covered with tarps and orient yourself until you can see the glowing adra in the background. A giant root will be in front of you - walk across it and jump through the hole in the structure before you to find a chest with the map.
Treasure location : Go west of Tama’s Cabin, to the northeast of the Delemgan Glade text that appears on your map . You’ll see a small tower there that’s slowly being reclaimed by nature and matches the illustration on your Treasure Map.
Go around the right side of the tower, being careful not to fall down. You’ll see a bunch of roots covering an opening that leads to a chest. Look very carefully for a small switch that lets you open these roots. If you’re playing in third-person view, like I usually do, switch to first-person for this part, since it’s very hard to orient the camera in third-person view in a way that highlights the switch. Press it and the roots will go away and you can finally get your prize.
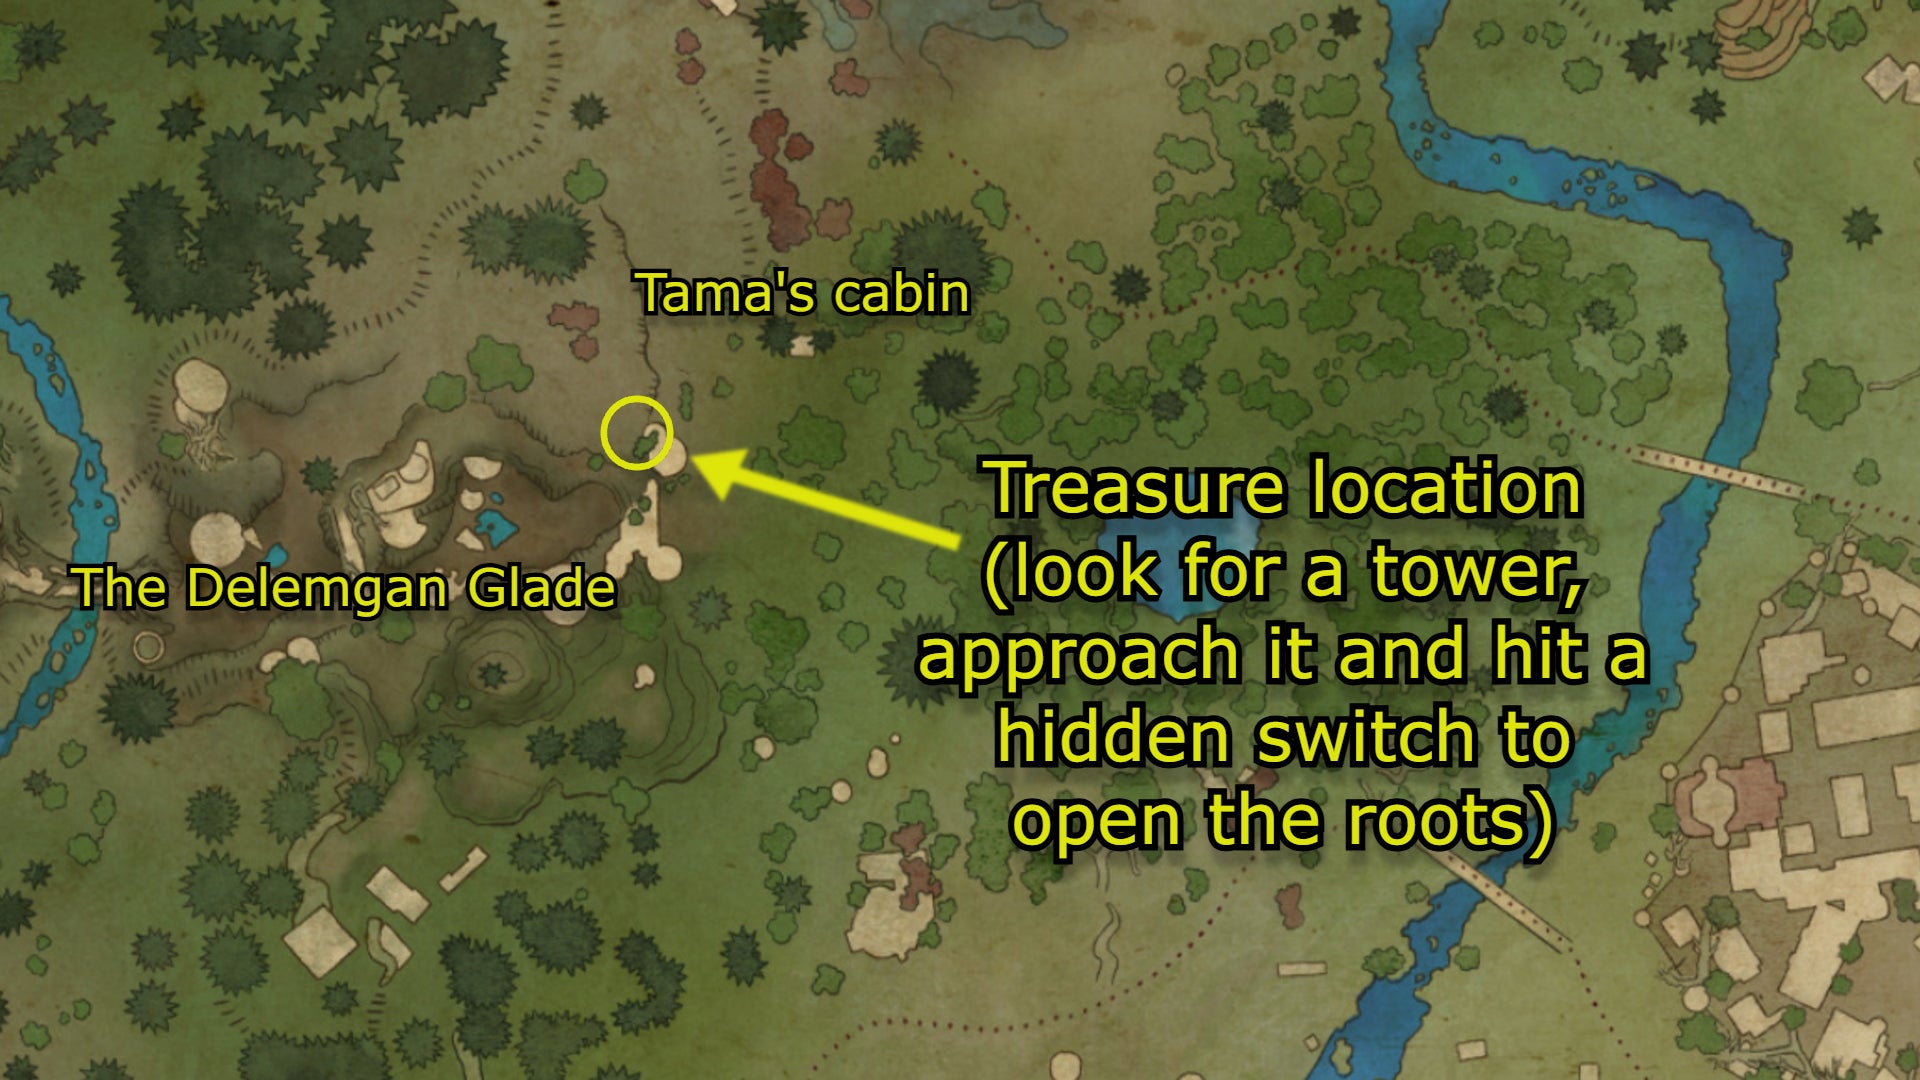
Image credit:Rock Paper Shotgun/Map Genie/Obsidian
Treasure : Nature’s Ward , a unique wooden shield that deals damage to an attacker whenever you block thanks to spikes sticking out of it. If I used shields more I’d gravitate towards this, since it looks rad and also gives you a 50% chance to remove Poison.
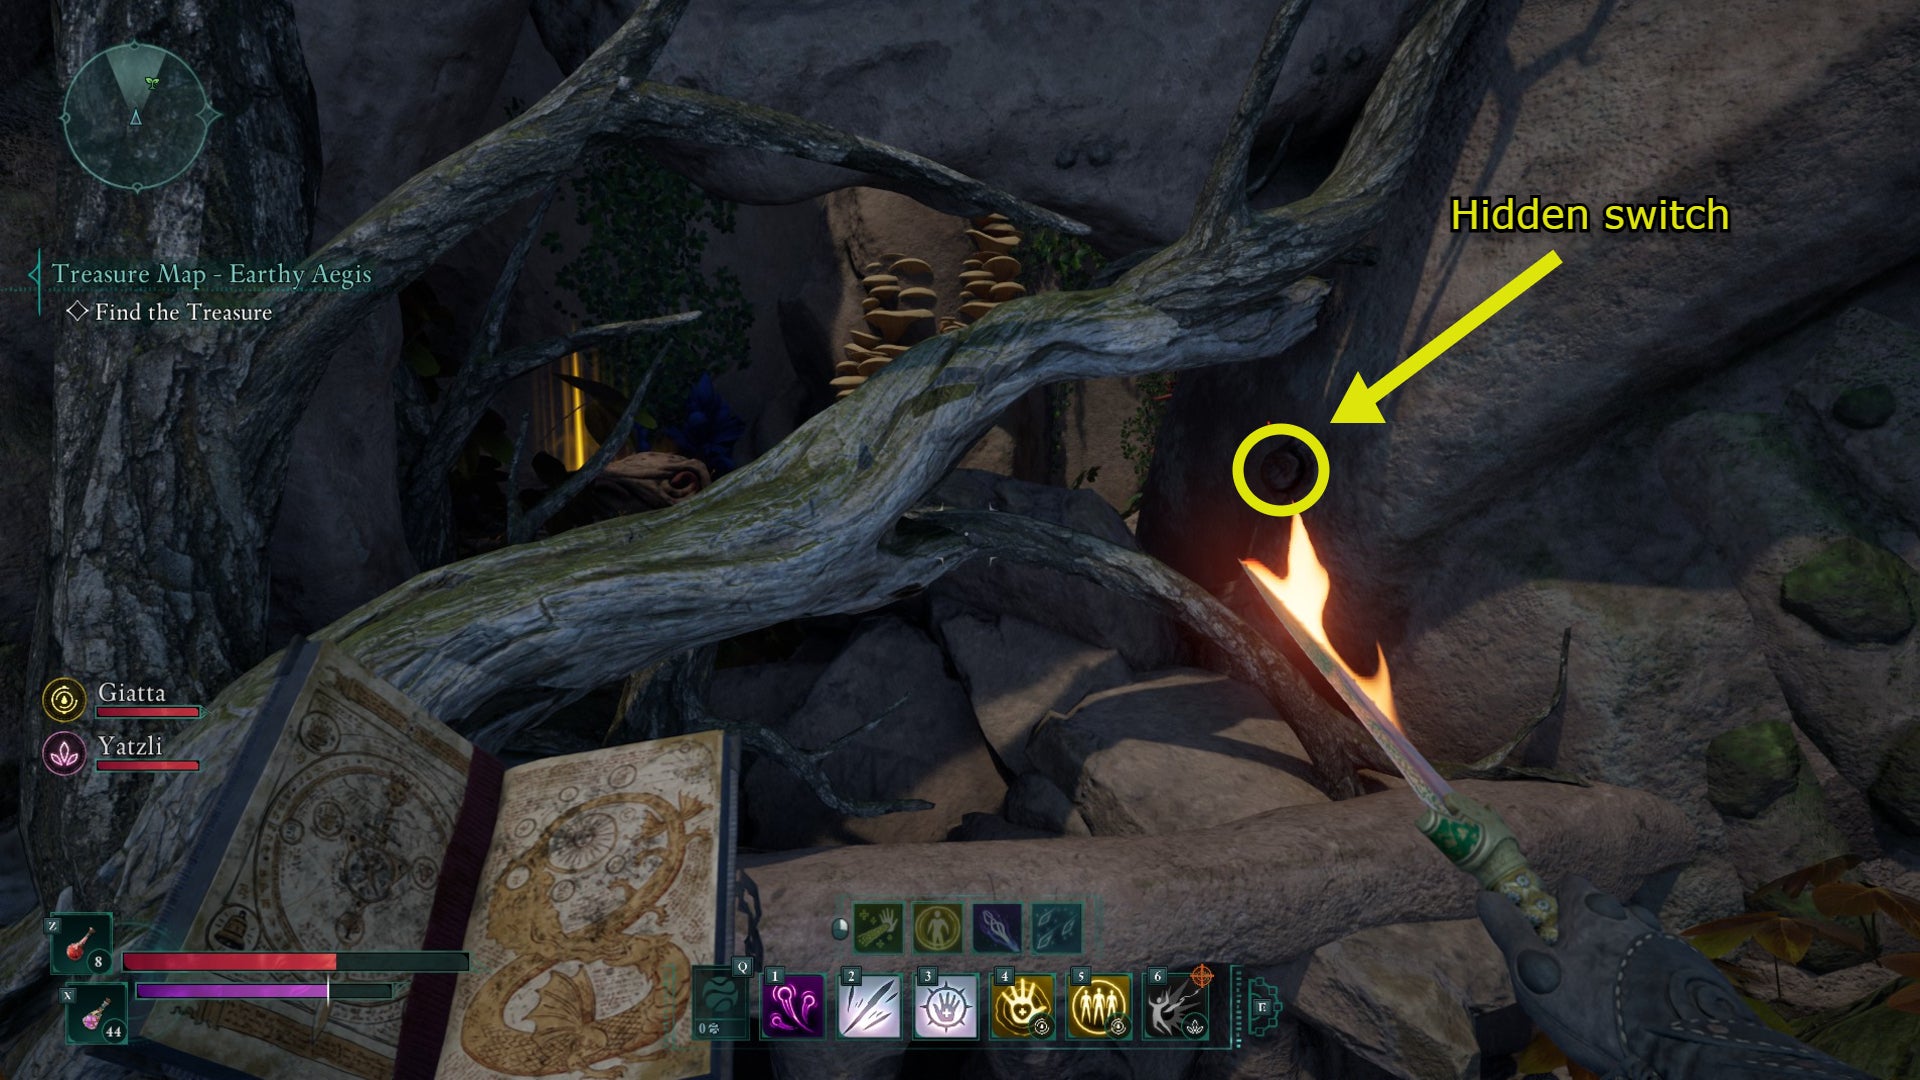
Be sure to approach the tower in first-person, as it’s almost impossible to highlight the switch needed to bypass the roots blocking the door in third-person. |Image credit:Rock Paper Shotgun/Obsidian
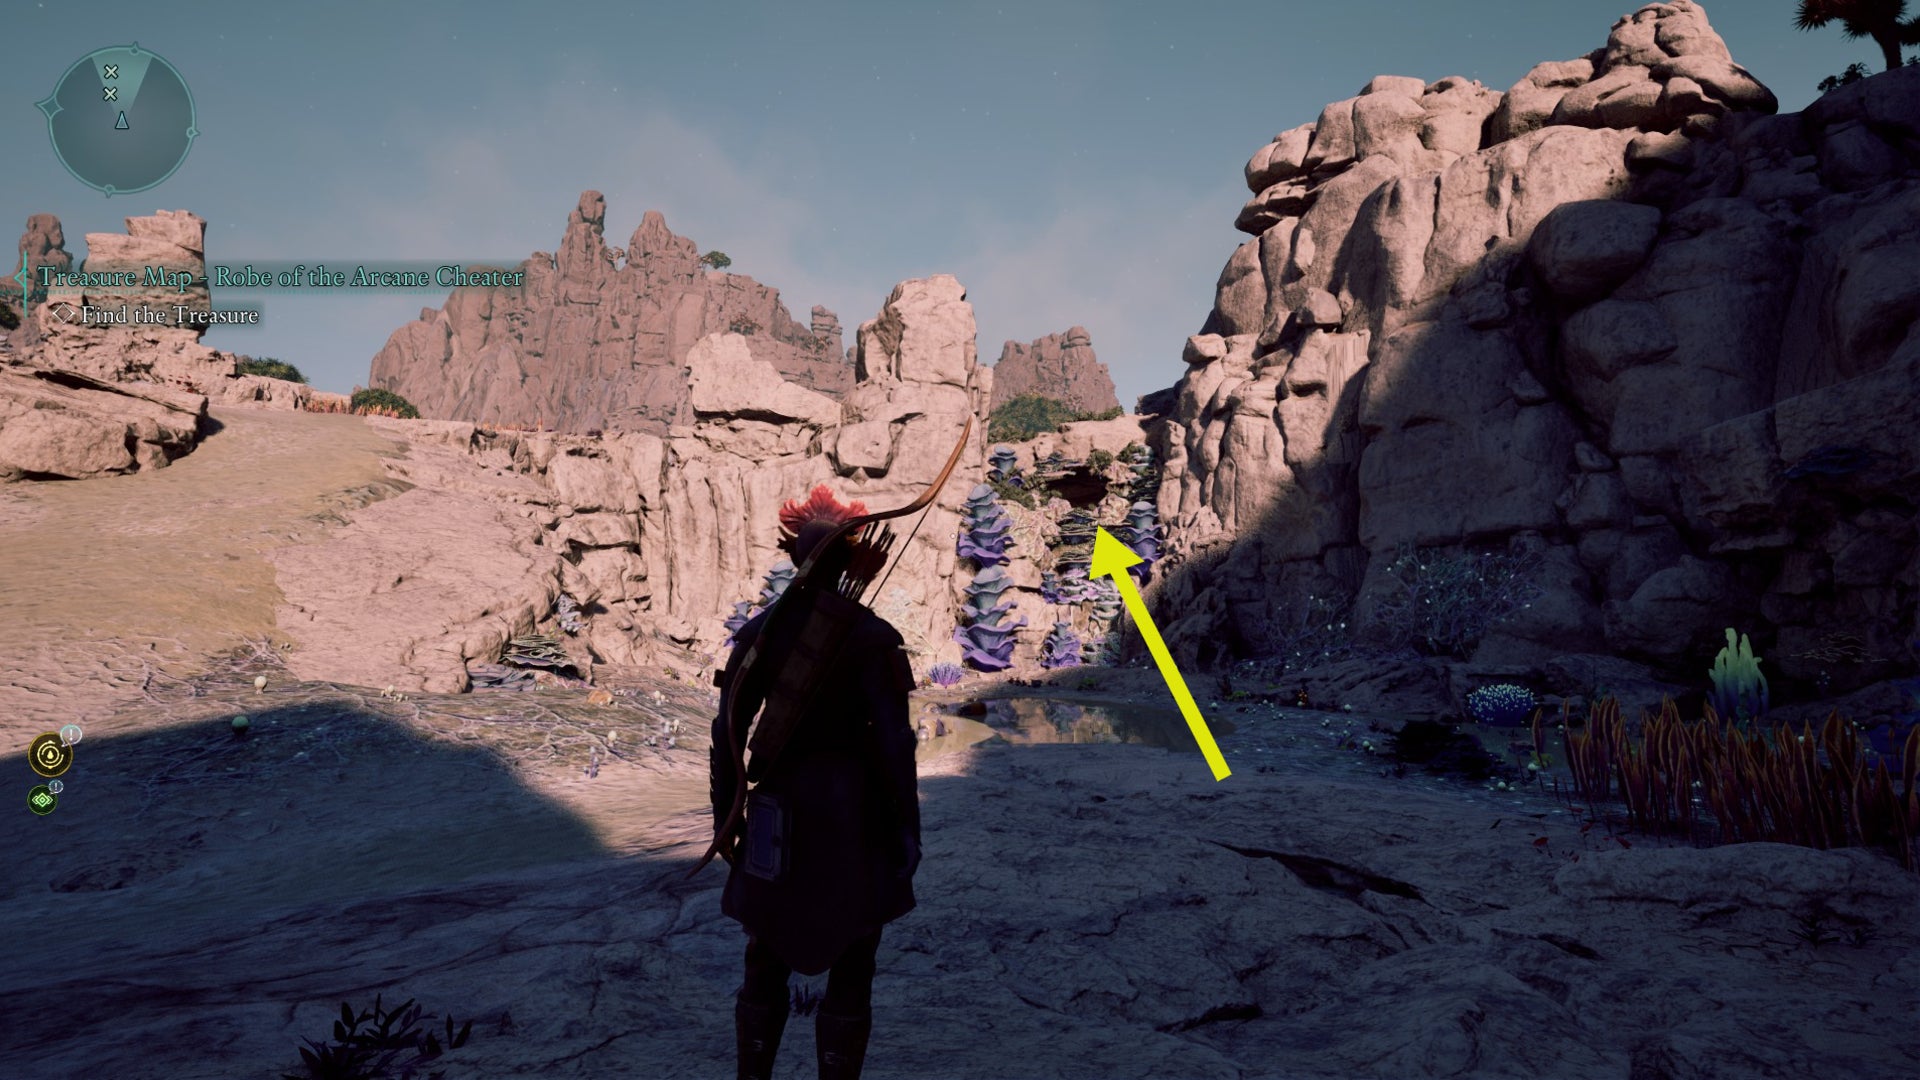
7. Shatterscarp Treasure Map: Robe of the Arcane Cheater
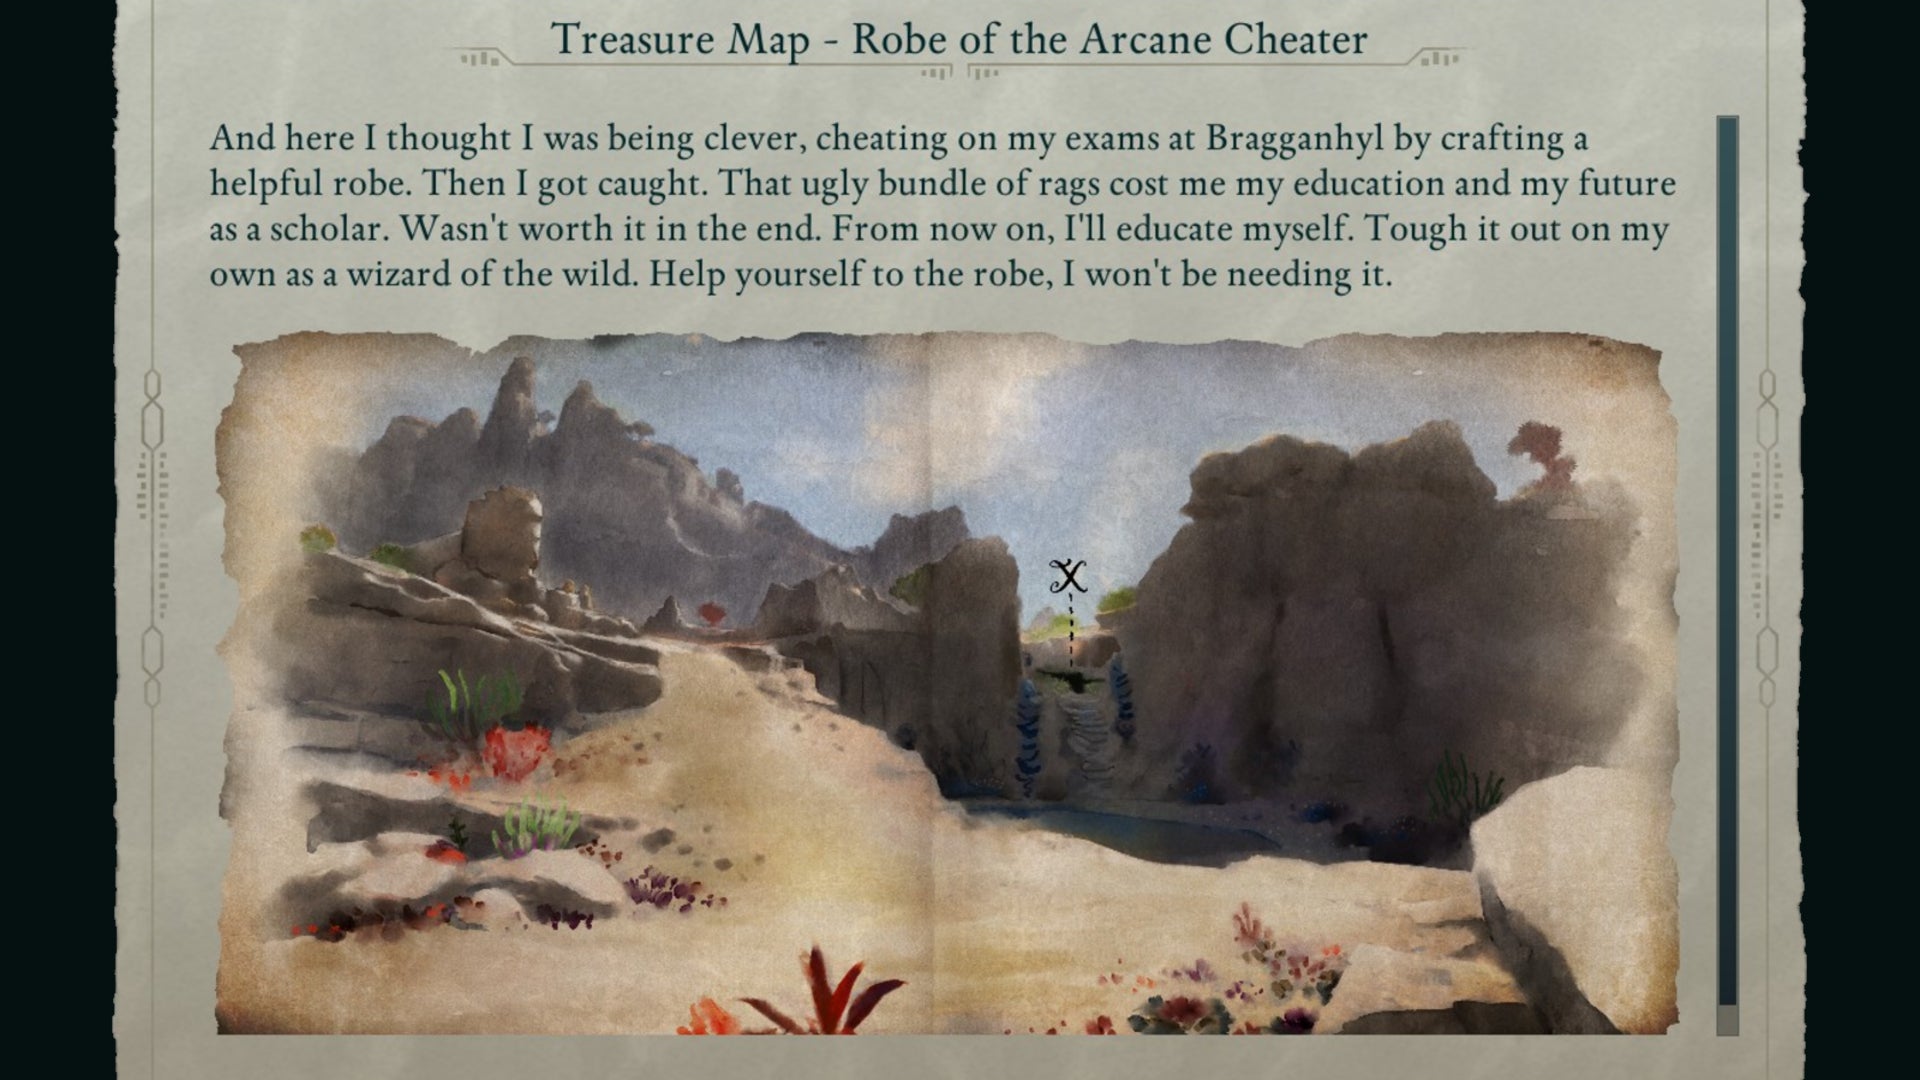
All of the lakebeds in Shatterscarp may have dried up, but some still contain hidden goodies. |Image credit:Rock Paper Shotgun/Obsidian
Treasure Map location : You’ll need to buy this map from Ihaka , a woman who appears to be a former thief or fence and runs The Thrifty Pig , an out-of-the-way shop. You can find her shop in a cave located in the northeast stretch of the Deadfall Highlands in Shatterscarp.
Treasure location : Go to the body of water under the Ancient Lakebed text on your map , northeast of Thirdborn. It’s not really a body of water any longer, as the heat in Shatterscarp has made everything dry up. But if you stand facing the rocks that are decorated by colourful foliage, you can match your position up with the map illustration. You’ll see a little opening in the wall - parkour up the rocks or jump down from the ledge above to enter a cave with a chest. (Incidentally, the Kukae Maka Bounty is also here, so if you’re doing bounties you might run into this area by accident.)
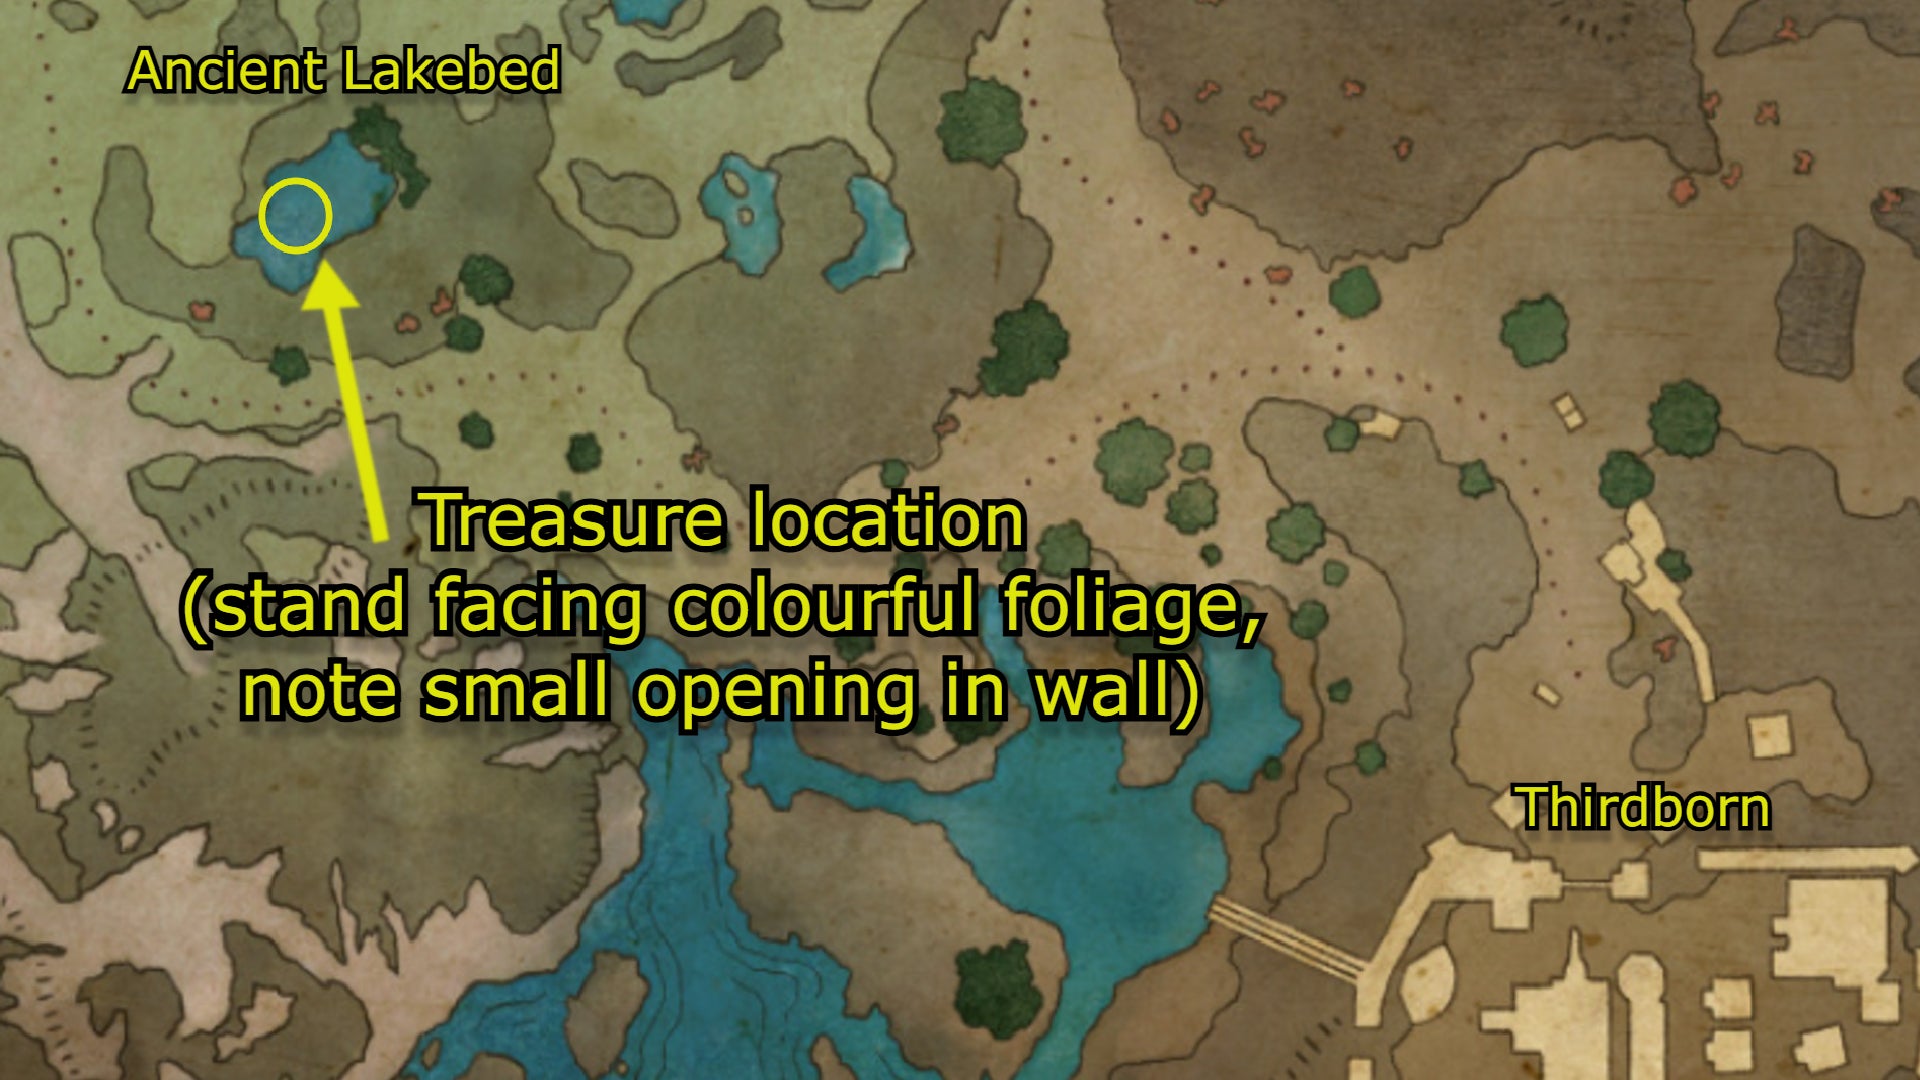
Image credit:Rock Paper Shotgun/Map Genie/Obsidian
Treasure : Robes of Surpassing Brilliance , unique light armour that gives you +15% AoE damage plus +40 max Essence. Great clothing to complement some of the skills in our best Wizard abilities guide.
Be sure to approach the tower in first-person, as it’s almost impossible to highlight the switch needed to bypass the roots blocking the door in third-person. |Image credit:Rock Paper Shotgun/Obsidian
8. Shatterscarp Treasure Map: Seafarer’s Boots
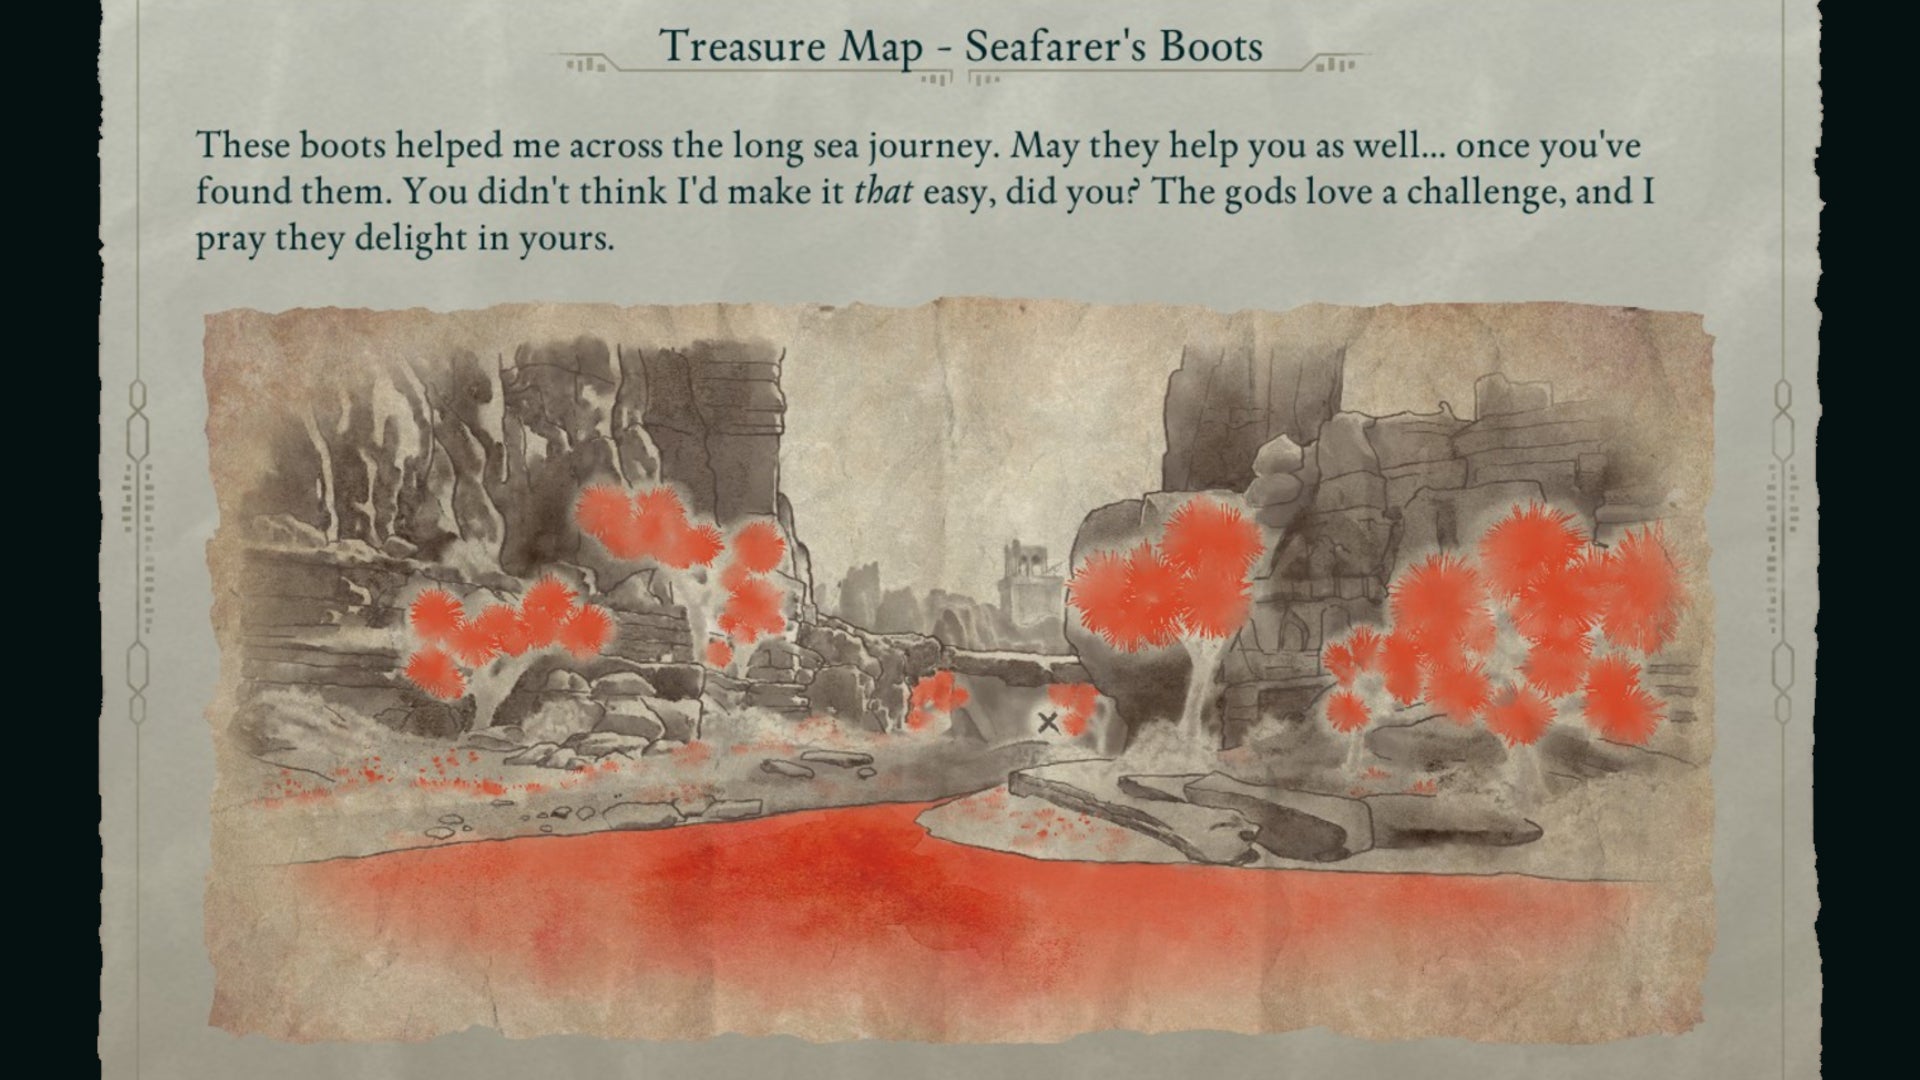
The rivers run red in Shatterscarp. And within those red rivers, boots can be found! |Image credit:Rock Paper Shotgun/Obsidian
Treasure Map location : This map can be found on a cliff to the slight northeast of the gates of Thirdborn. Keep your eyes out for an Loato , an orlan NPC looking out at the horizon and standing by a picnic blanket. Examine the blanket to pick up the map.
Treasure location : Go to the red riverbed to the northeast of the Sulfur Mines Basecamp in western Shatterscarp. Explore the stretch of river that sticks out east, and pay attention to the bridge as you orient yourself with the map’s illustration. Go under the bridge and you’ll find an alcove on your left that contains the treasure.
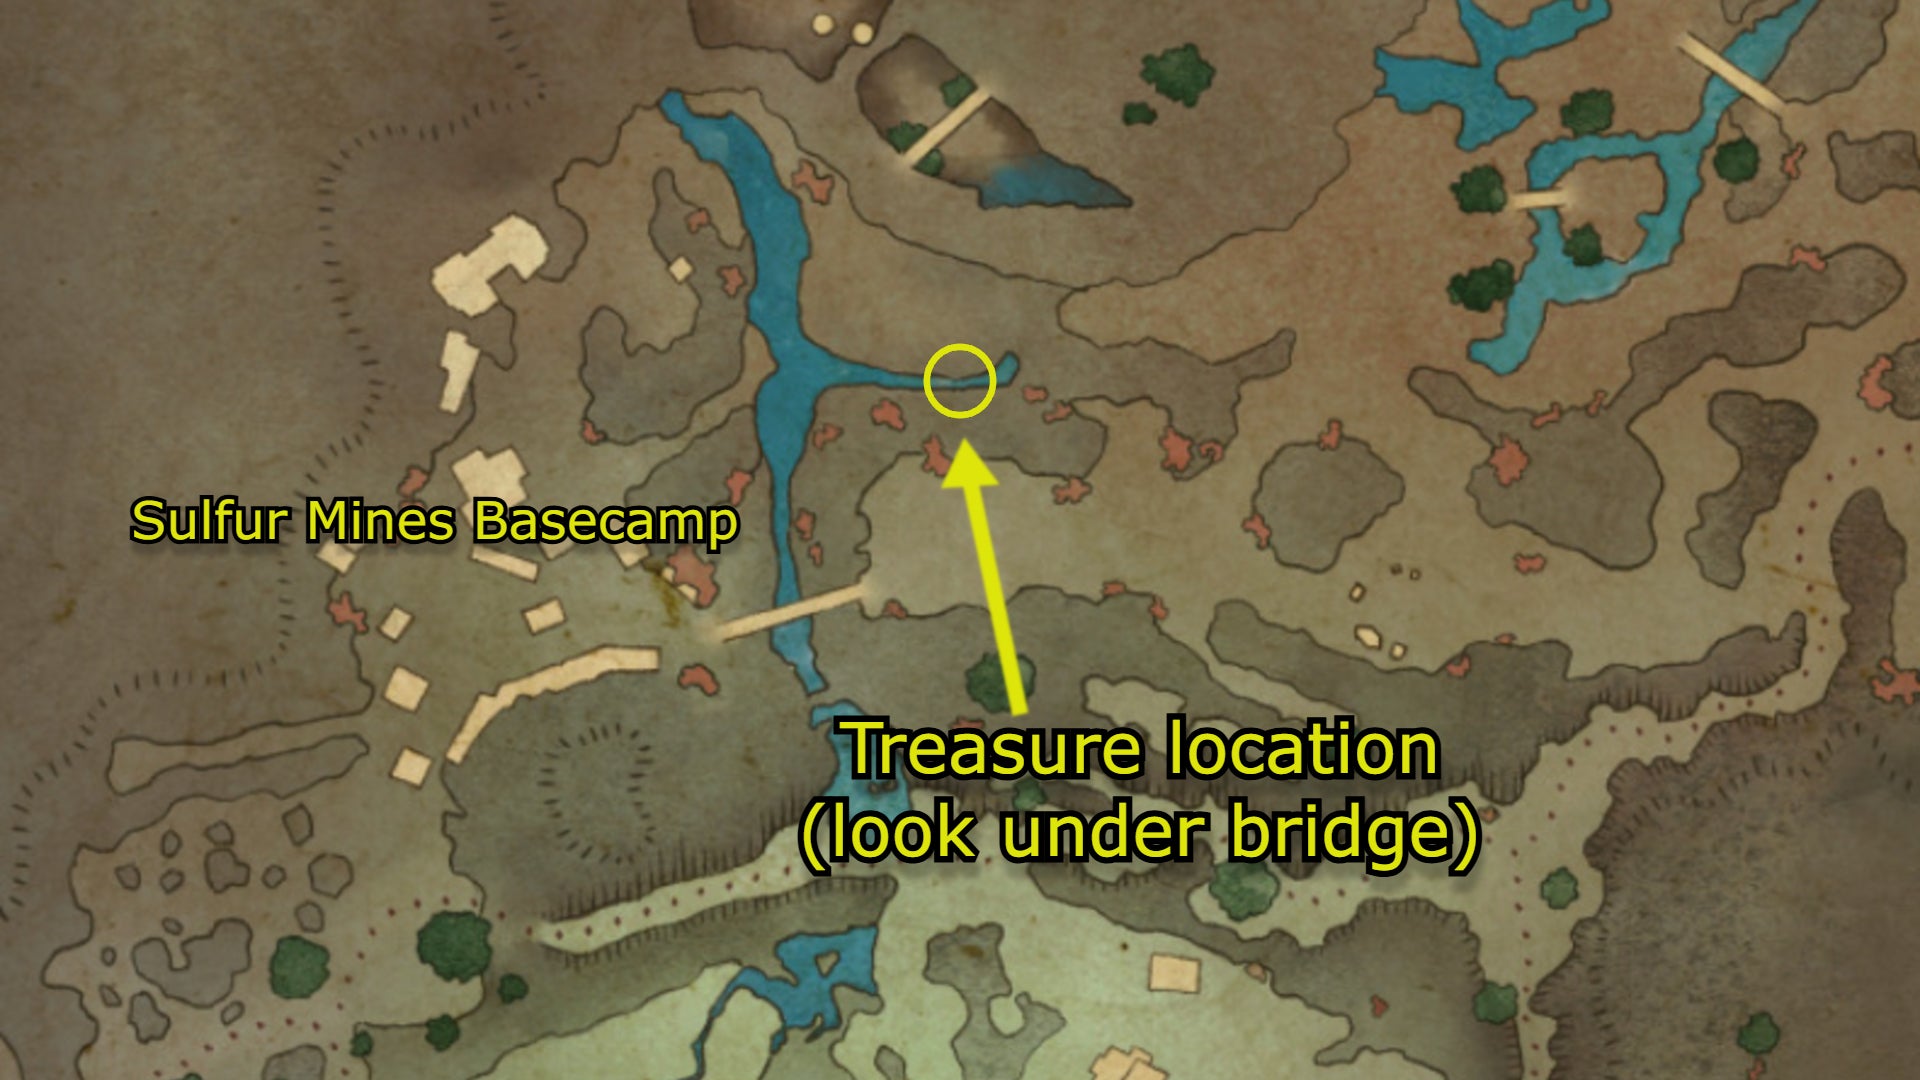
Image credit:Rock Paper Shotgun/Map Genie/Obsidian
Treasure : Wavebinder Boots , unique shoes that give you +15 maximum essence and allow for smaller hit reactions. They’re a decent bit of footwear for magic-users and non-melee characters.
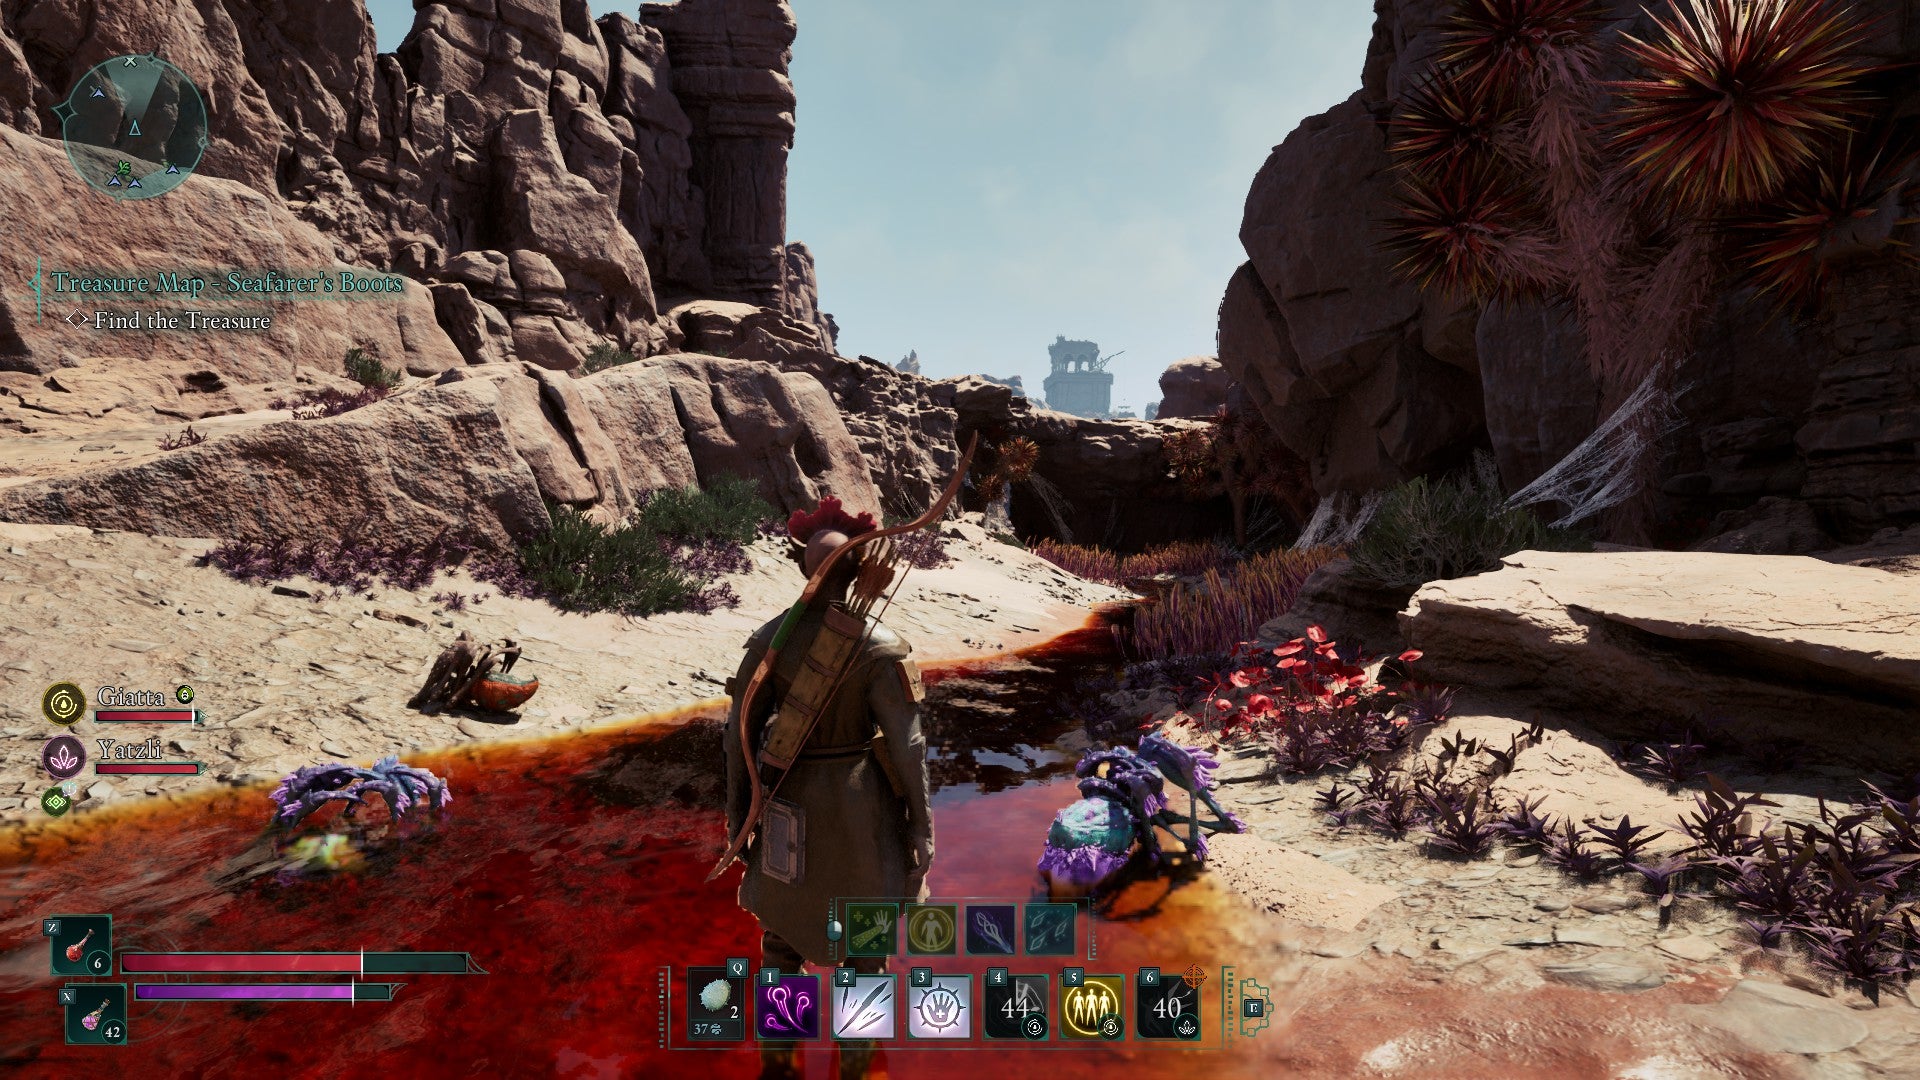
Position yourself in the riverbed until you can see the bridge drawn in the map. Then examine the area under the bridge to locate a good pair of boots that offer more magical power. |Image credit:Rock Paper Shotgun/Obsidian
9. Shatterscarp Treasure Map: Dead Man’s Mail
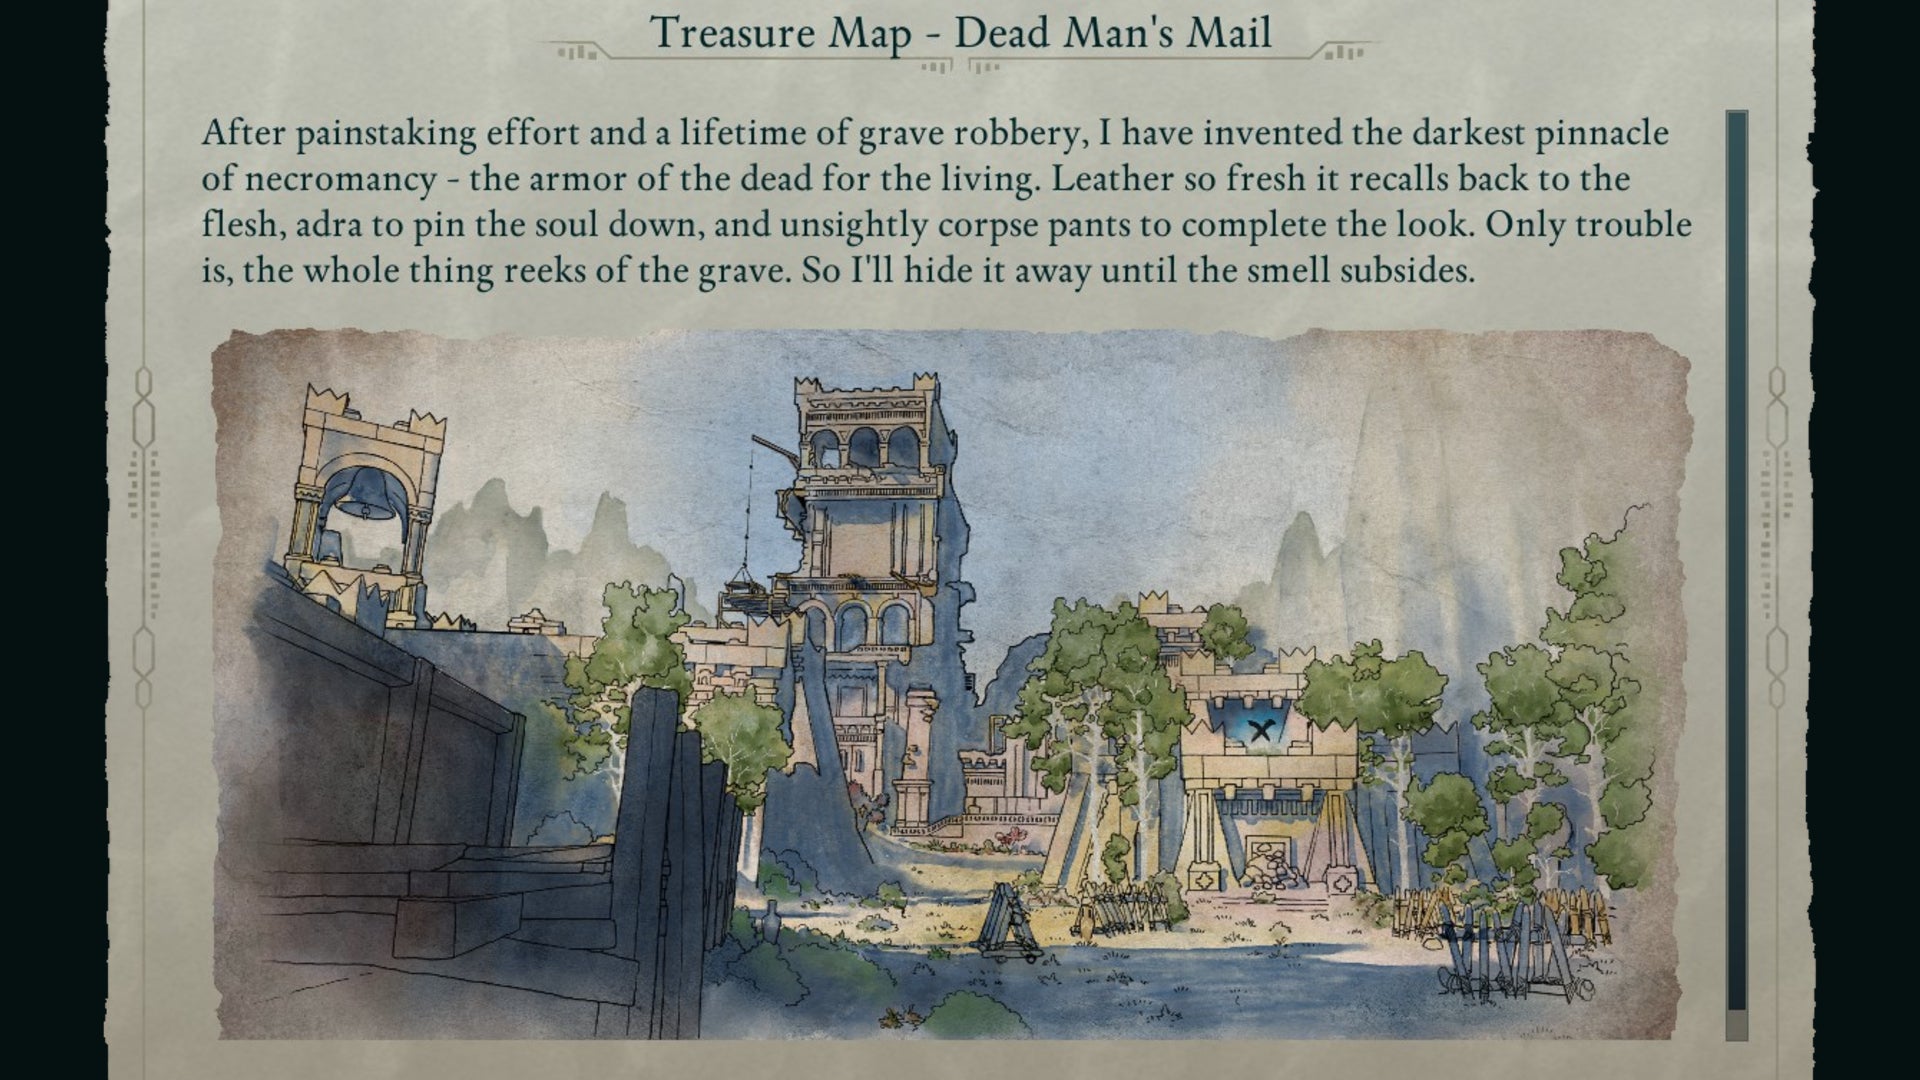
Follow the trail in these ruins, and you too can own a bizarre pair of undead pants. |Image credit:Rock Paper Shotgun/Obsidian
Treasure Map location : Go to eastern Shatterscarp until you reach the Great Sand Sea. Then, navigate directly to where the “S” of “Great Sand Sea” is written on your map . You’ll find a tent there with a skeleton; examine it to find the Treasure Map.
Treasure location : Go north of Shark’s Teeth and stand at the intersection of Shark’s Teeth, the Ruined Village, and Tago’s Tower. Keep an eye out for the hanging construction to re-create the illustration on the Treasure Map. Note the structure you need to climb into; there’s a fallen pillar nearby that heads right on up.
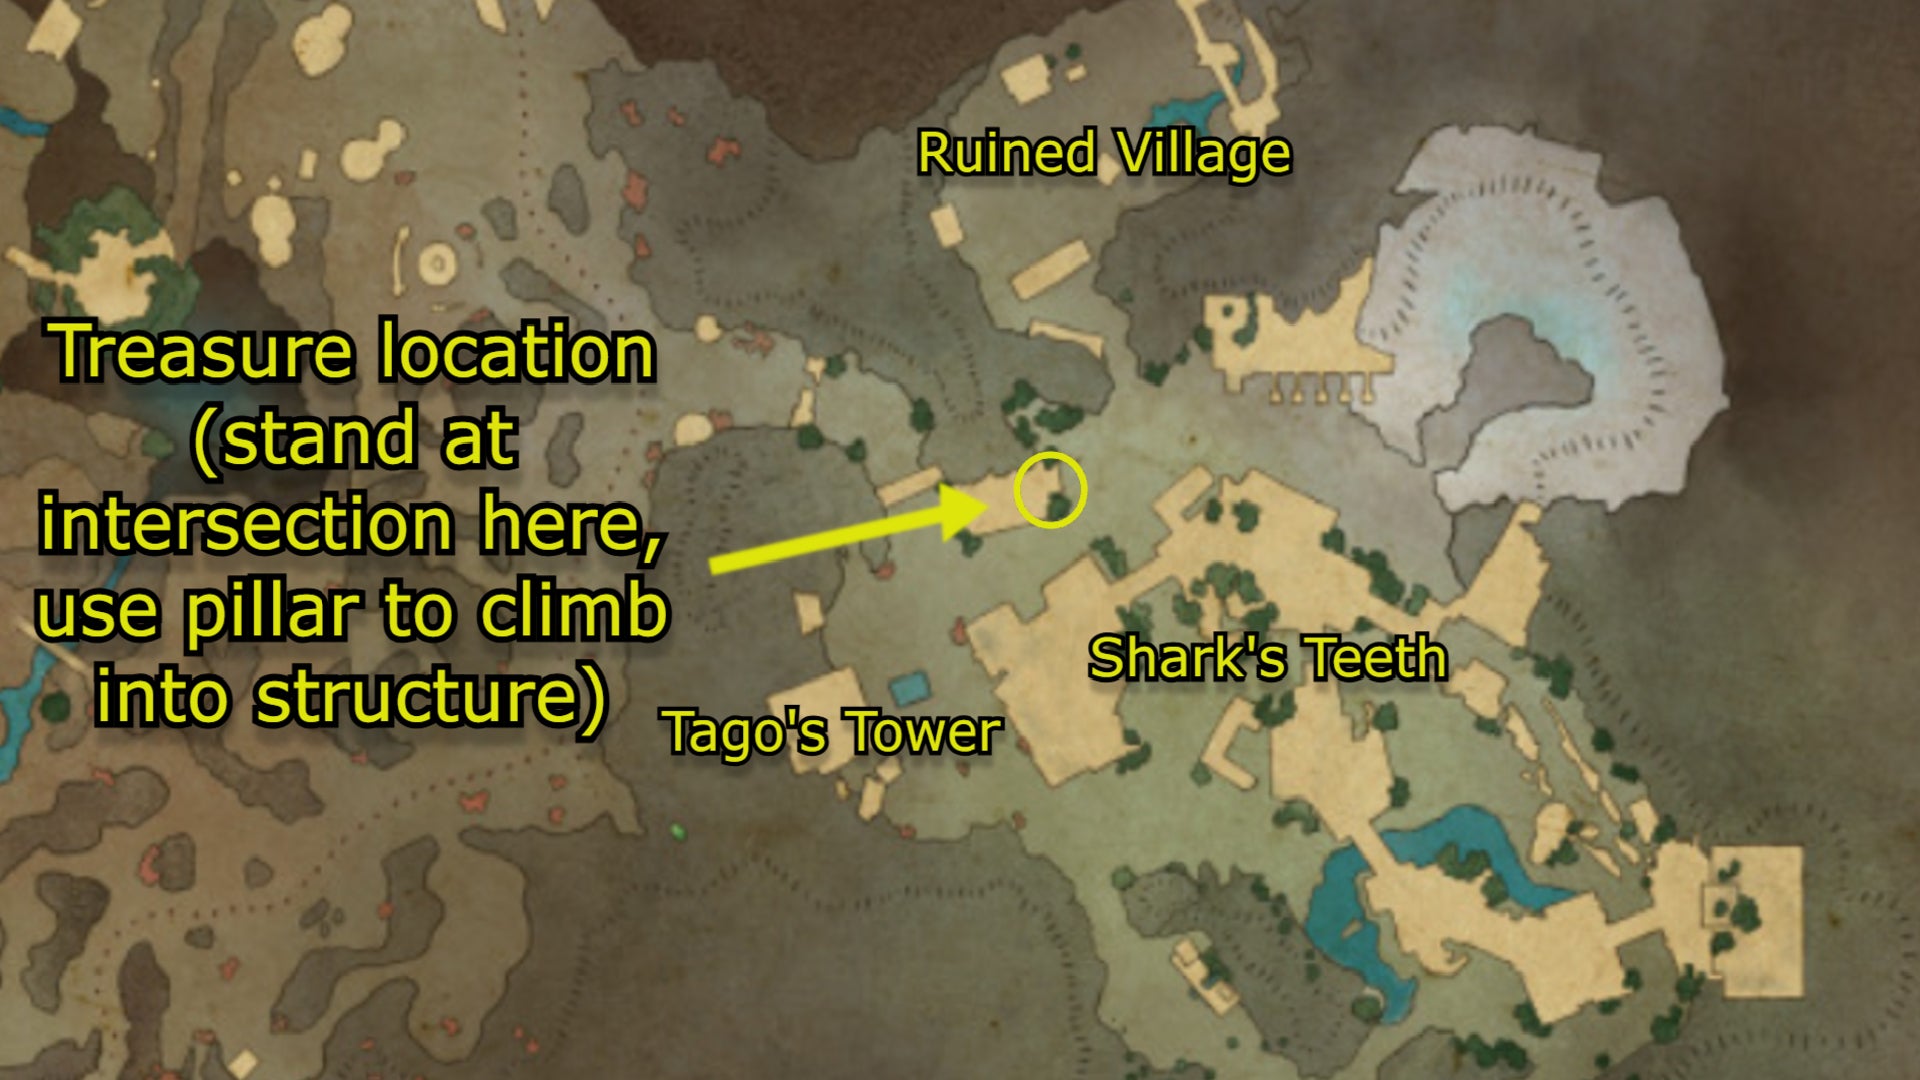
Image credit:Rock Paper Shotgun/Map Genie/Obsidian
Treasure : Necropants , unique medium armour that allow you to summon a spectre and give +30% resistance to Poison accumulation. They also remove your Envoy’s top and are baggy around the butt area. Supposedly they were made from skin. Creepy!
You’ll need to hop into the enclave highlighted here to find the treasure. Note the hanging construction scaffolding in the background; I found that useful for helping me get my bearings. |Image credit:Rock Paper Shotgun/Obsidian
10. Galawain’s Tusks Treasure Map: Ancient Arrowhead
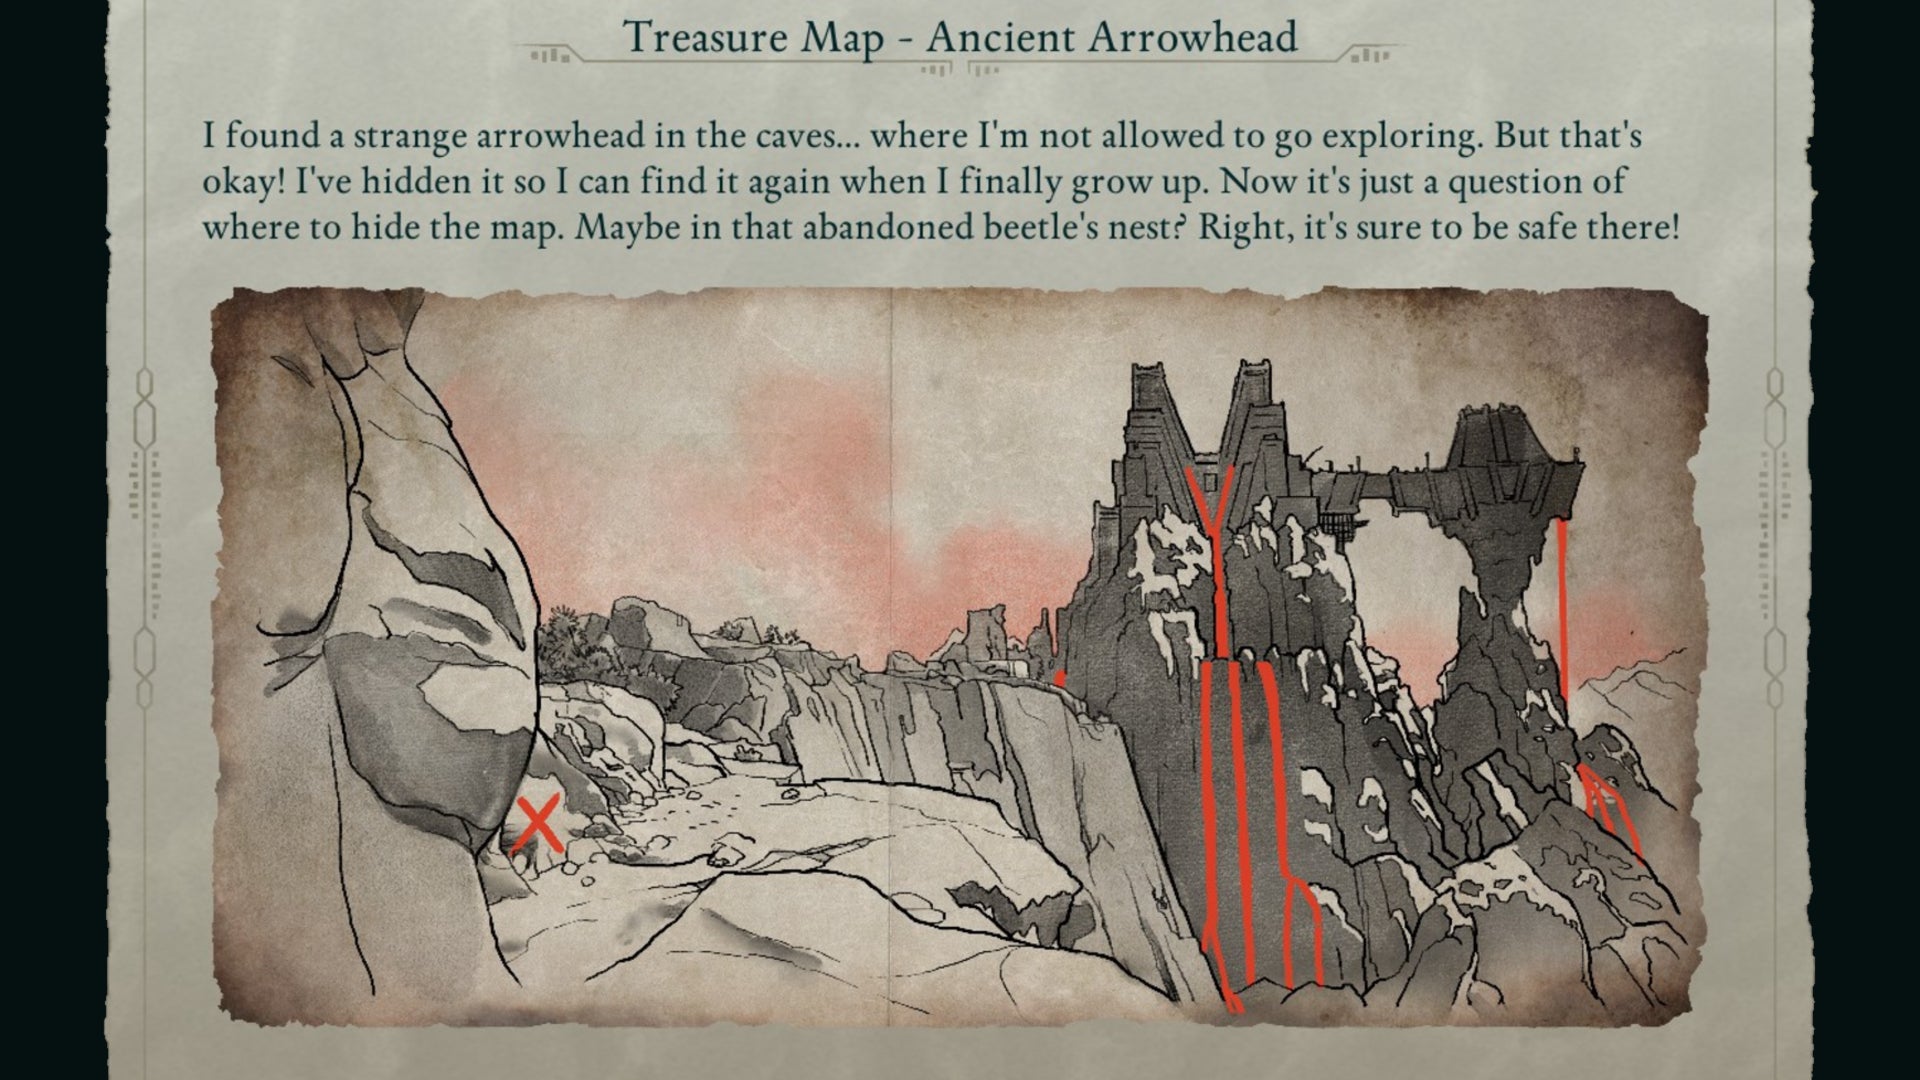
Time to find an arrowhead in the midst of all this lava. |Image credit:Rock Paper Shotgun/Obsidian
Treasure Map location : You can find this map in a cave within the Writhing Ruins, to the west of the starting area when you first enter Galawain’s Tusks. Search for an opening amongst the rocks that leads down into a cavern with a giant creature skull lying in the middle of a pool of water . You’ll know you’re in the right place when your companions comment on the awful stench, and the Treasure Map lies on a corpse nearby. This is also where the Mater Mare Bounty is, so if you’ve been meaning to kill the big beetle matriarch, you may end up here.
Treasure location : This treasure’s hidden in plain sight, albeit on a dangerous ledge overlooking a steep fall. Go east of Warden’s Rest and look at Solace Keep in the distance to match the Treasure Map’s illustration. Search along the rocky ledges beneath you while being careful not to lose your step. Your treasure lies within a chest that requires 3 Lockpicks to open.
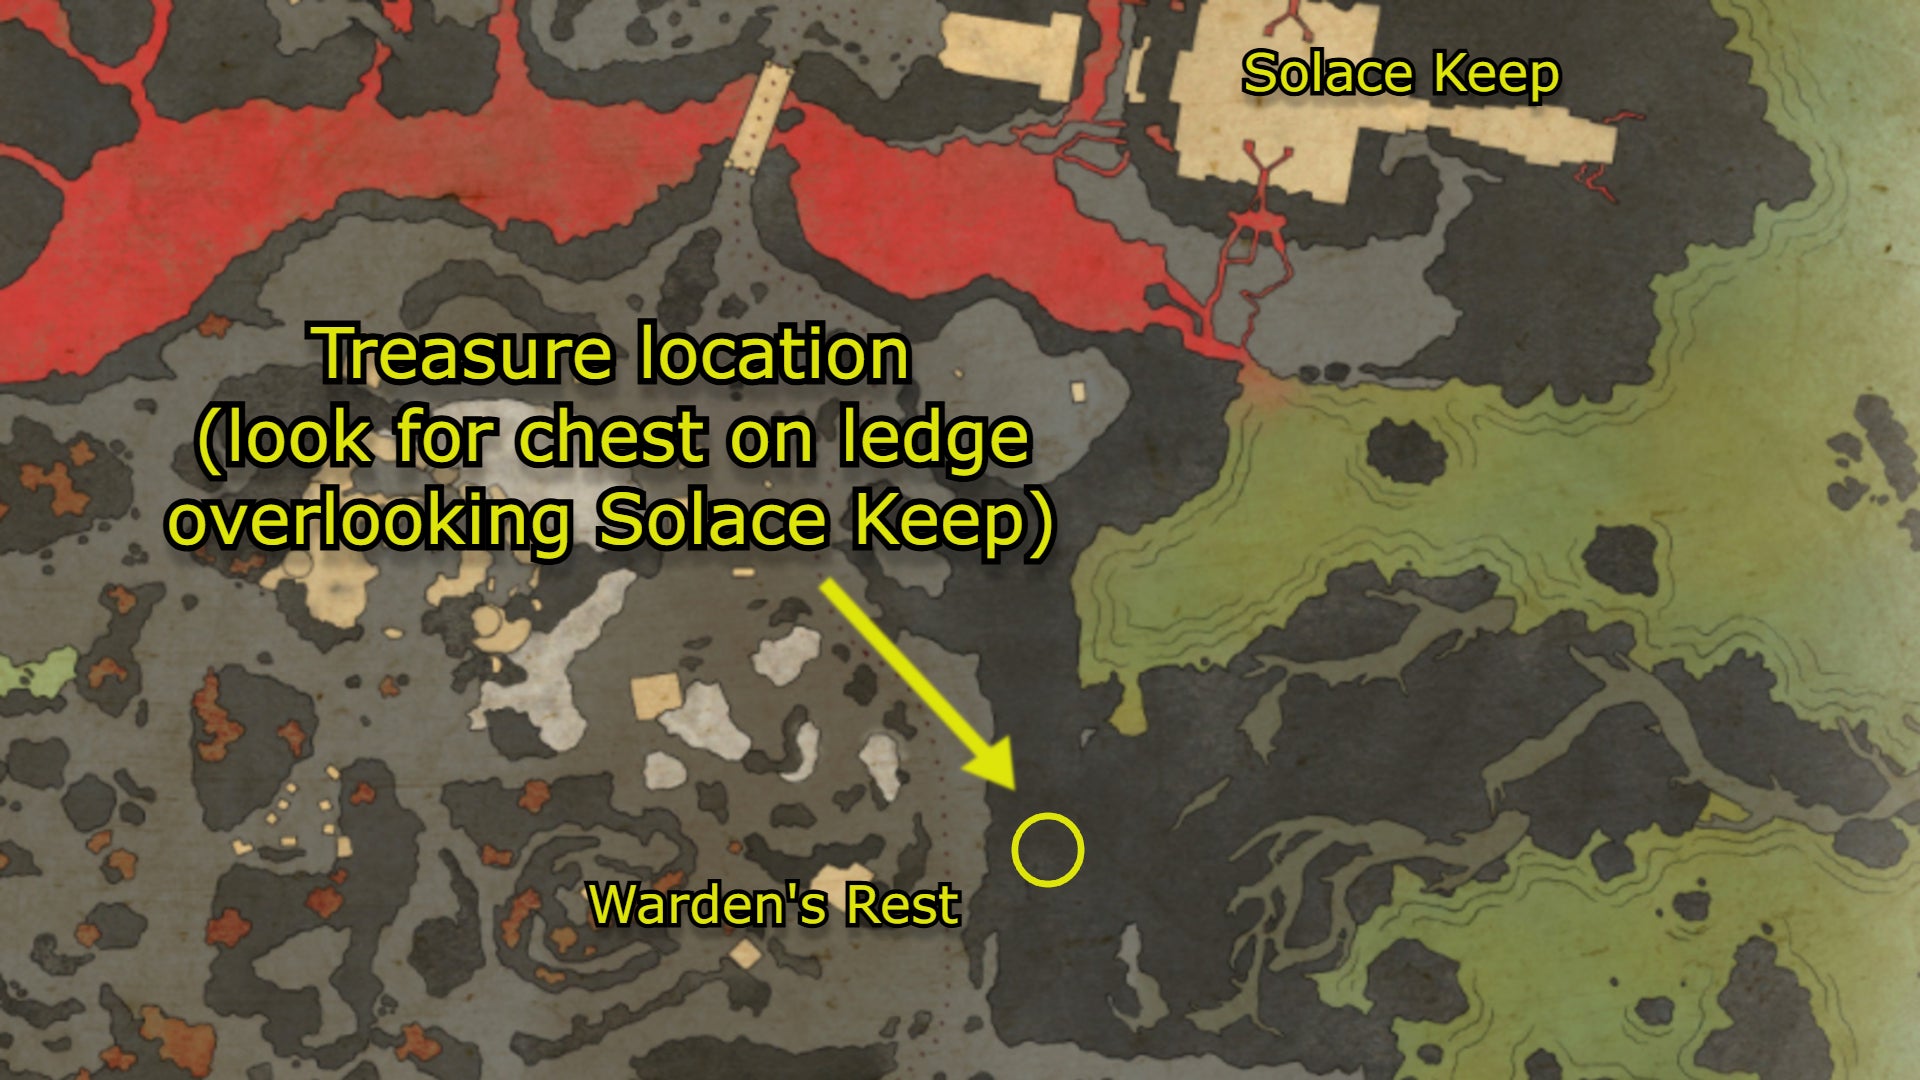
Image credit:Rock Paper Shotgun/Map Genie/Obsidian
Treasure : Scout’s Reach , a unique trinket that offers +3 to Perception. Not the most stunning treasure, but if you don’t have any other trinkets handy it’s not terrible.
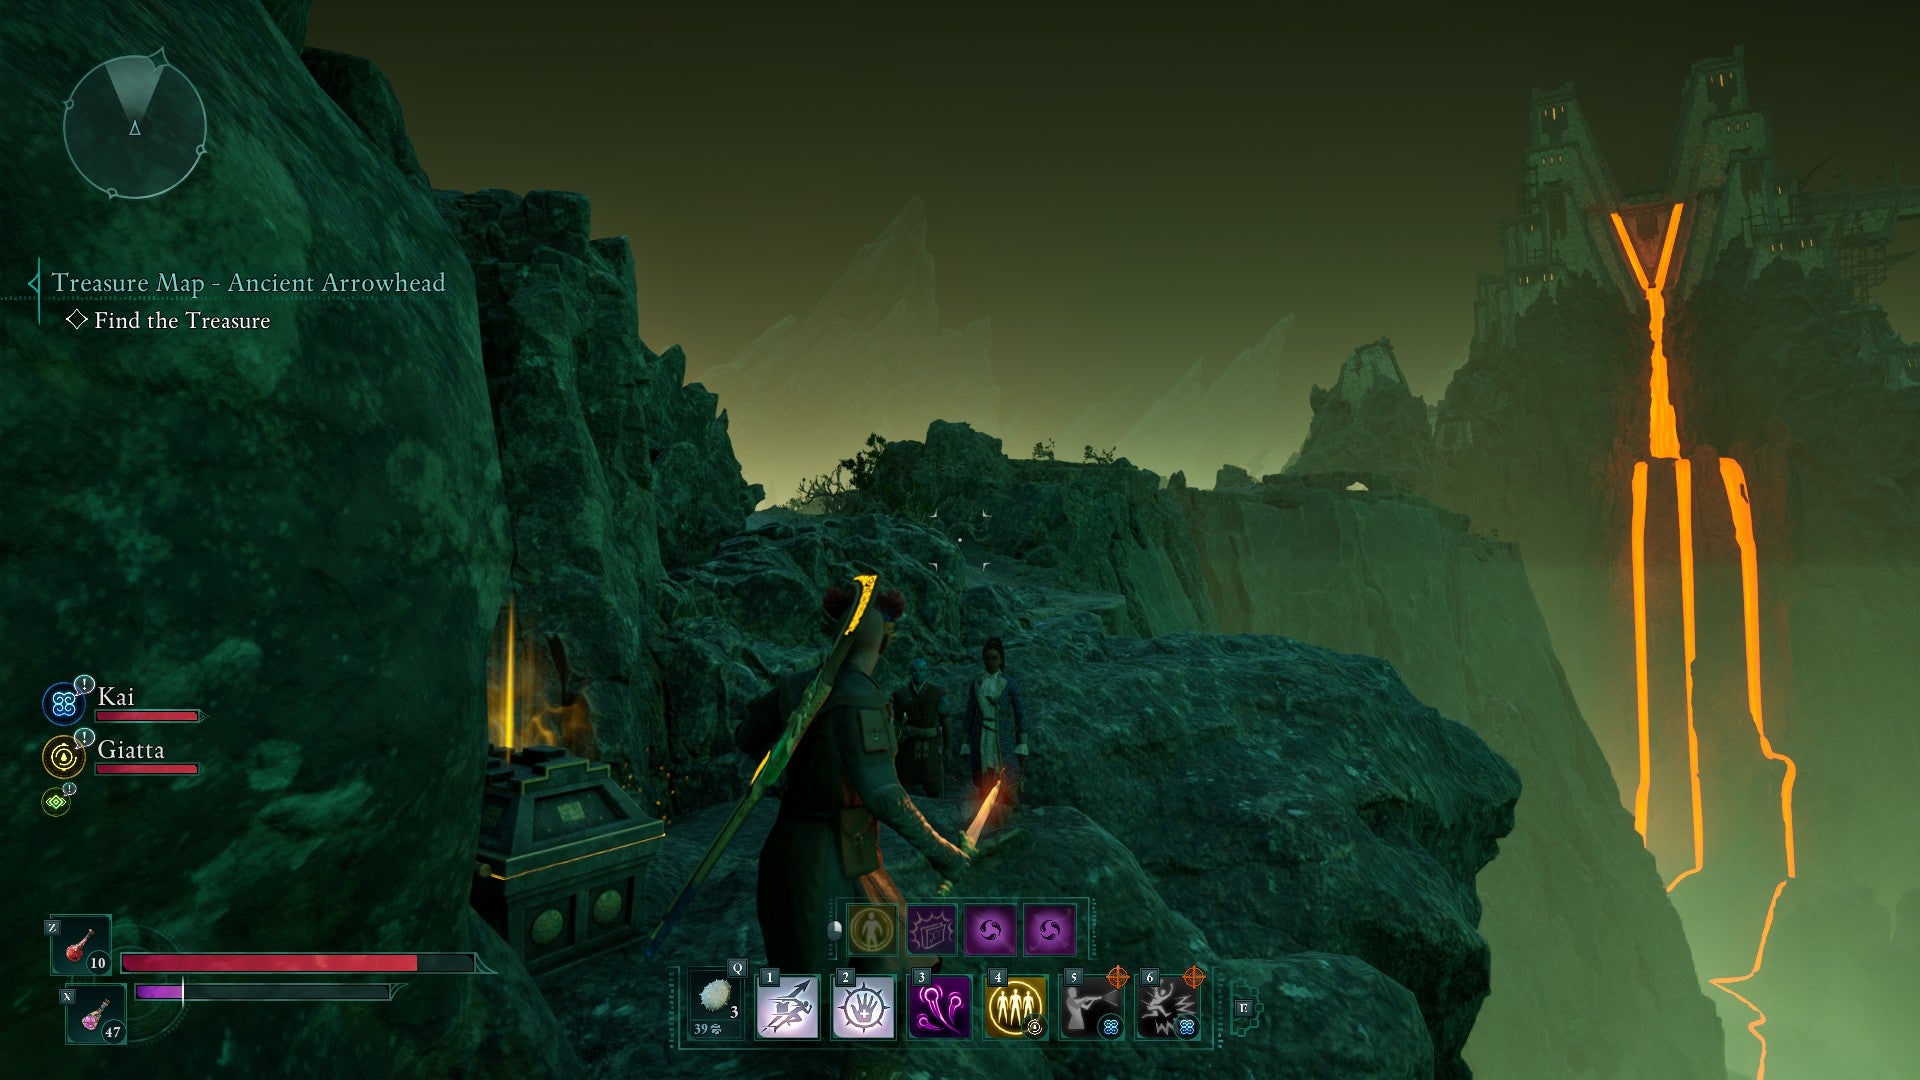
It’s entirely possible to stumble upon this chest by accident if you’re the sort of player who loves making parkour jumps along the edges of cliffs. |Image credit:Rock Paper Shotgun/Obsidian
11. Galawain’s Tusks Treasure Map: My Loyal Shield
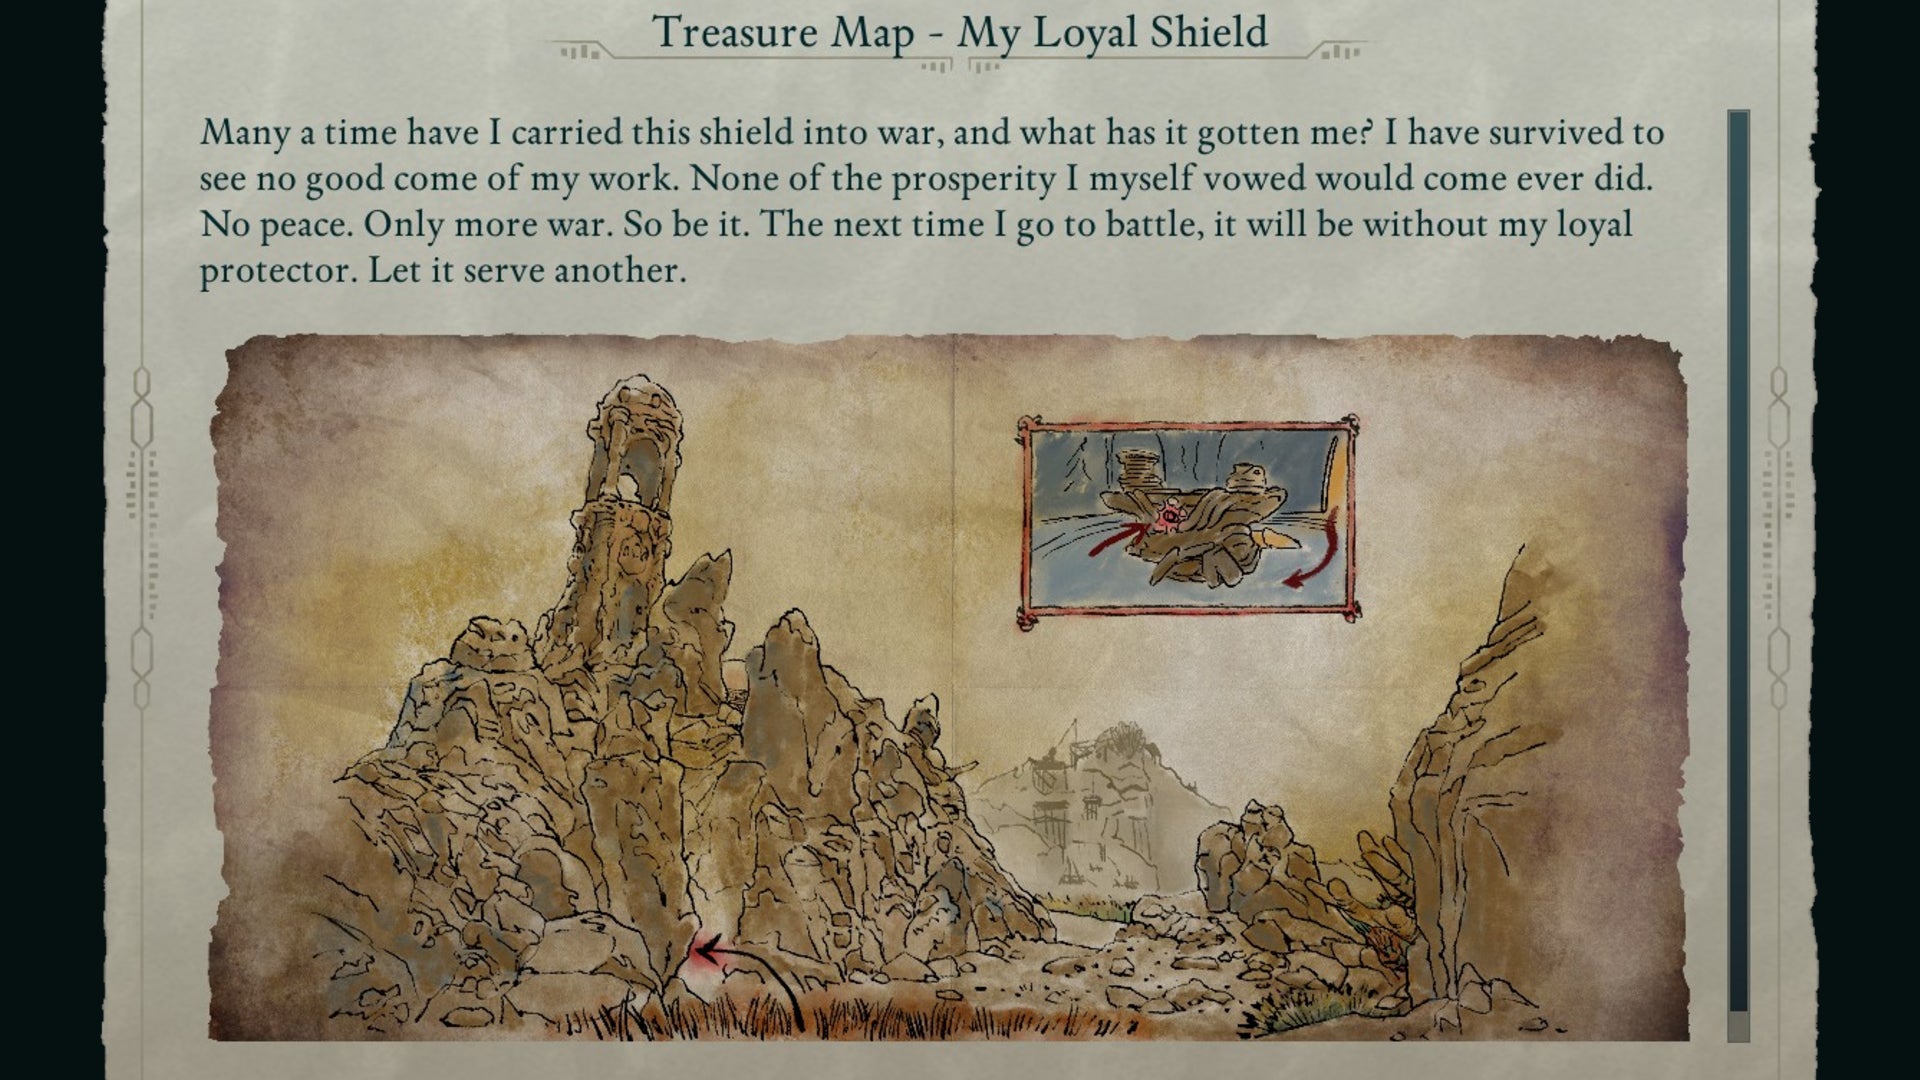
What’s up with all these folks hiding shields away in hard-to-reach parts of the world? |Image credit:Rock Paper Shotgun/Obsidian
Treasure Map location : Go to the Southern Warden Tower in southern Galawain’s Tusks, right above the Writhing Ruins. You can buy this Treasure Map from Stockkeeper Eberk , a merchant who sells various dwarven odds and ends.
Treasure location : From the Southern Warden Tower, trek northwest until you spot a tower on a rocky structure overlooking lava that has a glowing blue interior the closer you approach. Navigate your way around to the back of the tower and climb up the ledges until you get inside. Circle around the table in the centre of the room and you’ll find a secret switch. Press it (if you’re in third-person mode, switch to first-person to make things easier) and this opens up a door just outside the blue-lit central interior. The treasure lies in a chest inside.
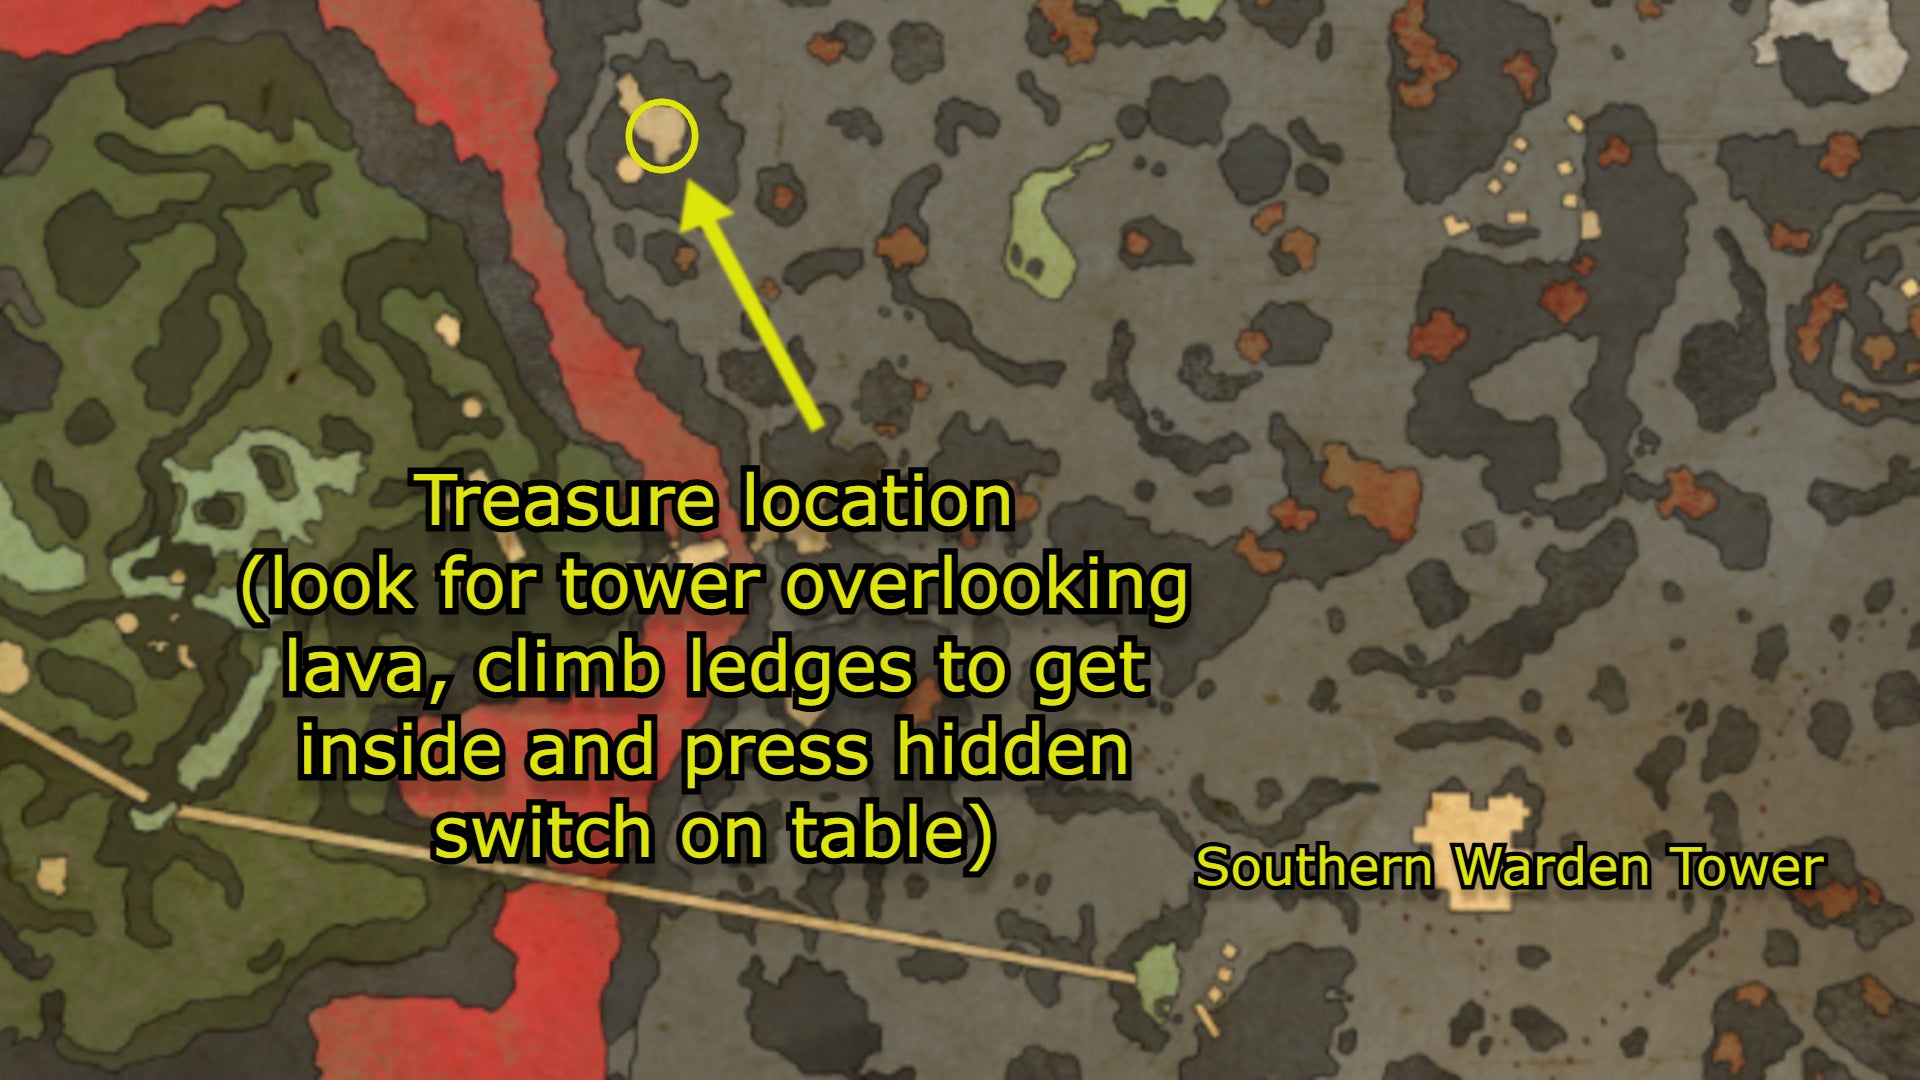
Image credit:Rock Paper Shotgun/Map Genie/Obsidian
Treasure : Time’s Tarnish , a unique shield that restores 20% of Stamina as you block and offers a 10% chance to avoid melee damage. A nice protective piece, especially in this tough endgame region.
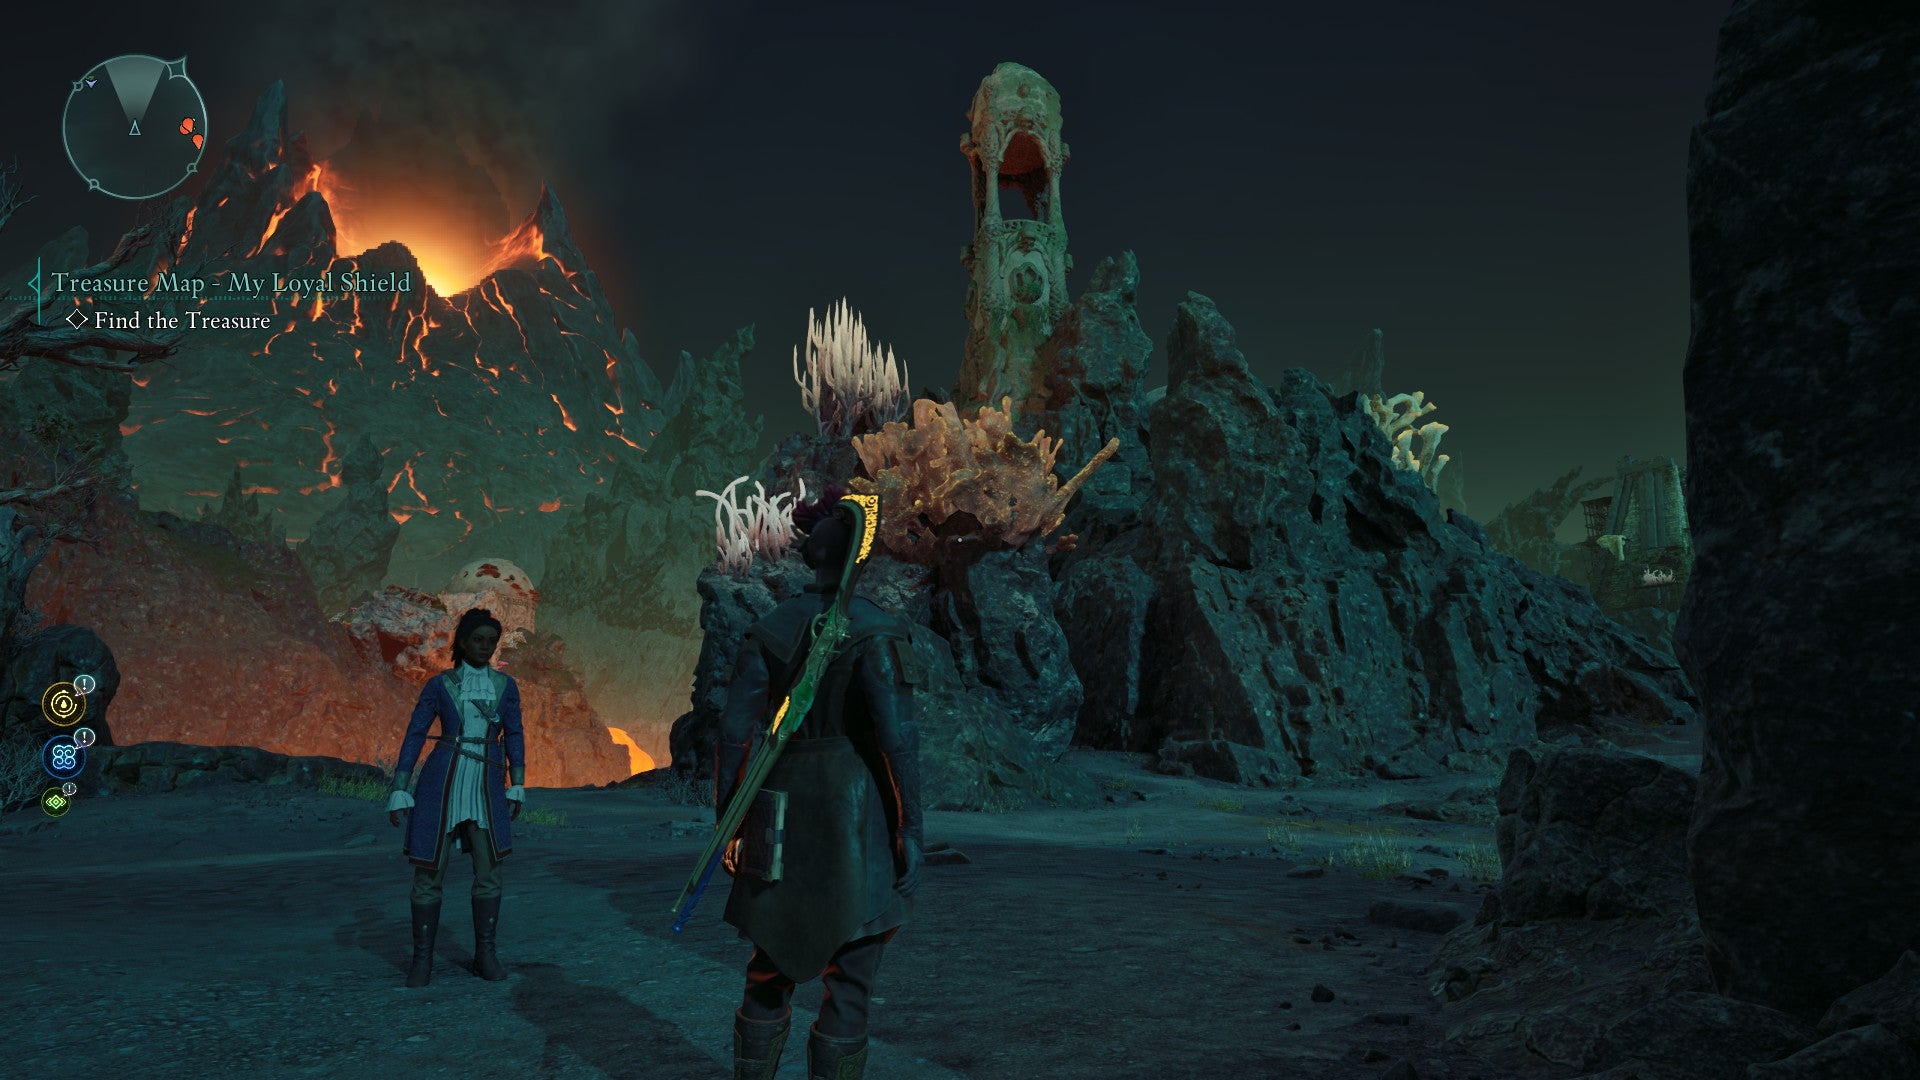
This tower stands tall over the lava in eastern Galawain’s Tusks. You’ll need to circle around and climb a bit to find the entrance. |Image credit:Rock Paper Shotgun/Obsidian
12. Galawain’s Tusks Treasure Map: The Blade That Hungers

Finally, the last of these elusive treasures awaits us. |Image credit:Rock Paper Shotgun/Obsidian
Treasure Map location : Go to the top floor of Solace Keep (take the stairs, not the lift that leads to the Council chamber) and buy the map from Bulti , one of the keep’s quartermasters.
Treasure location : Go to the far north beyond the Ash Forest and west of the Living Archives until you come across a group of spiders hanging out in the rocky cliffs that border the contours of Galawain’s Tusks. To the right of their nest you’ll spot a small crevice that you can fit through; go inside and follow the path until you reach the chest.
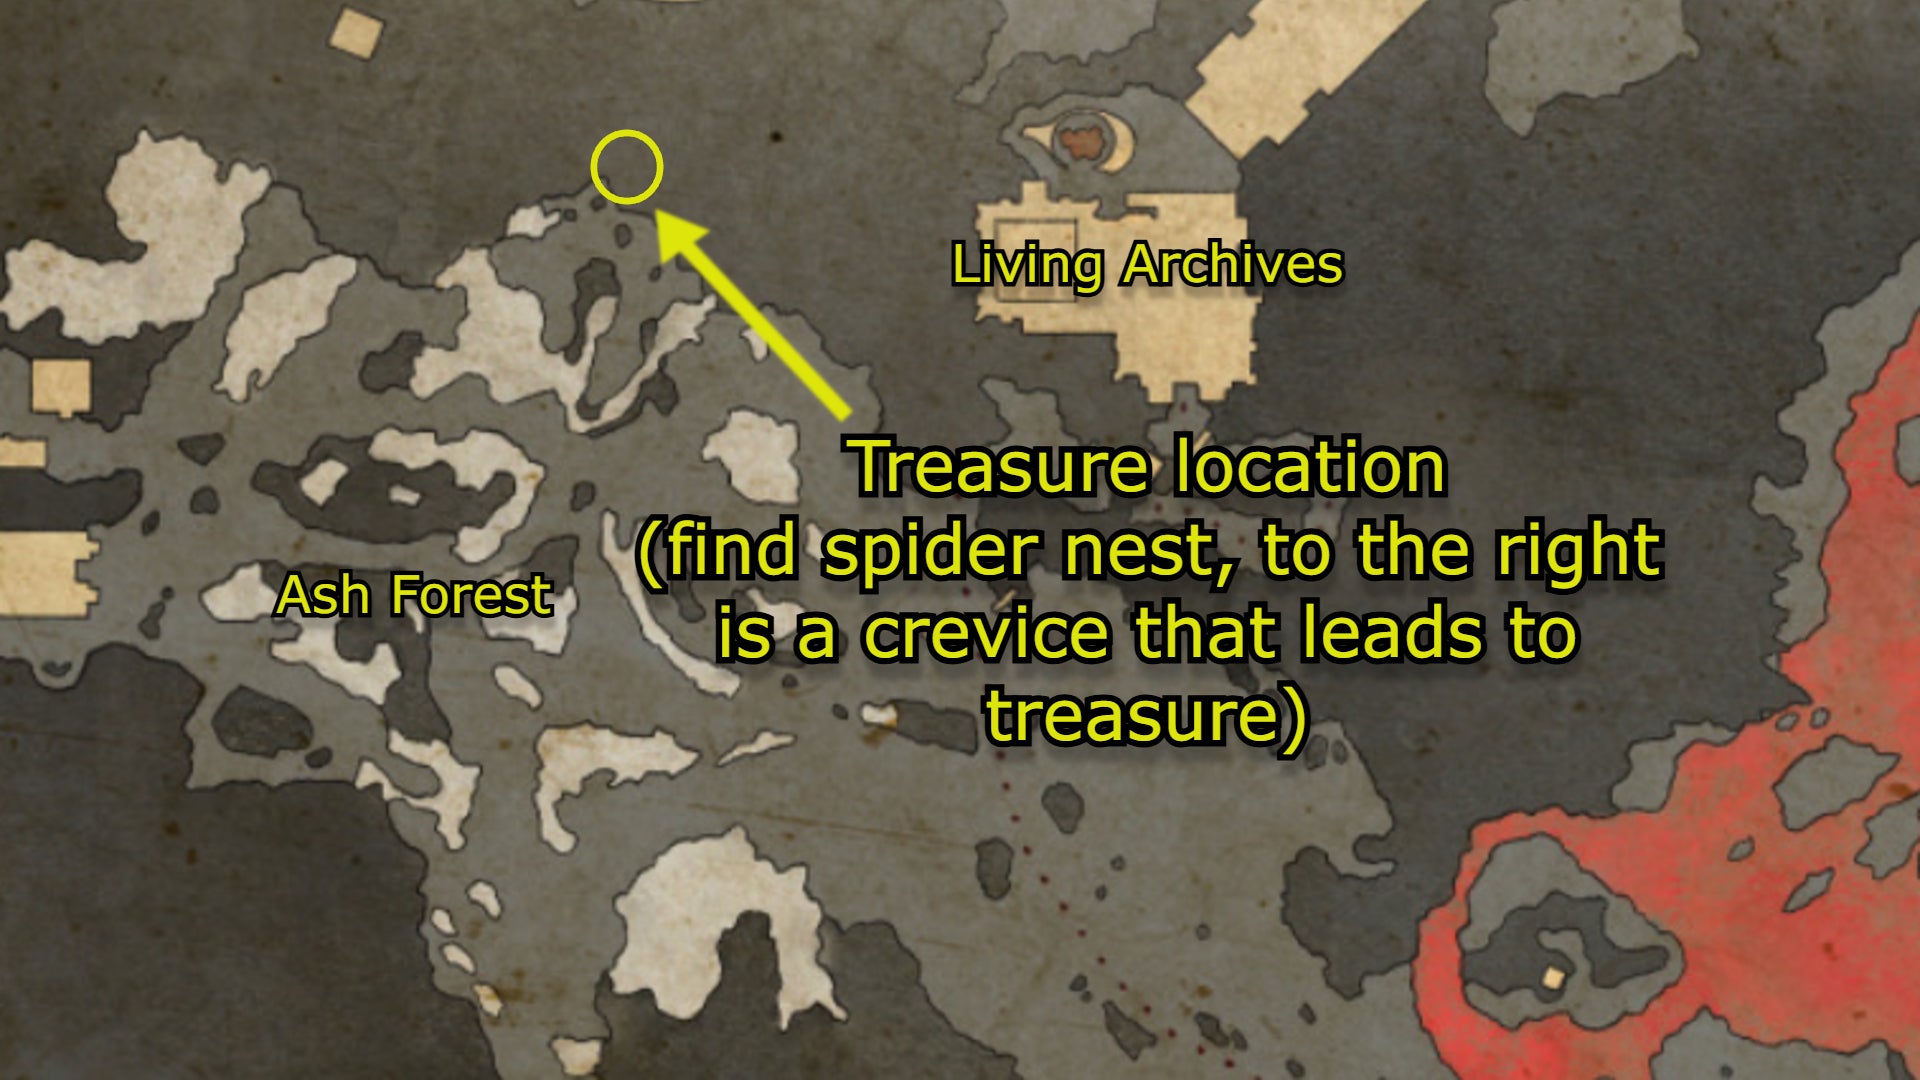
Image credit:Rock Paper Shotgun/Map Genie/Obsidian
Treasure : Umbral Needle , a unique dagger that restores 2% of the damage you deal as health and does +15% damage against enemies with full health. If you’re a dagger user, this is without a doubt one of the best knives in the game.
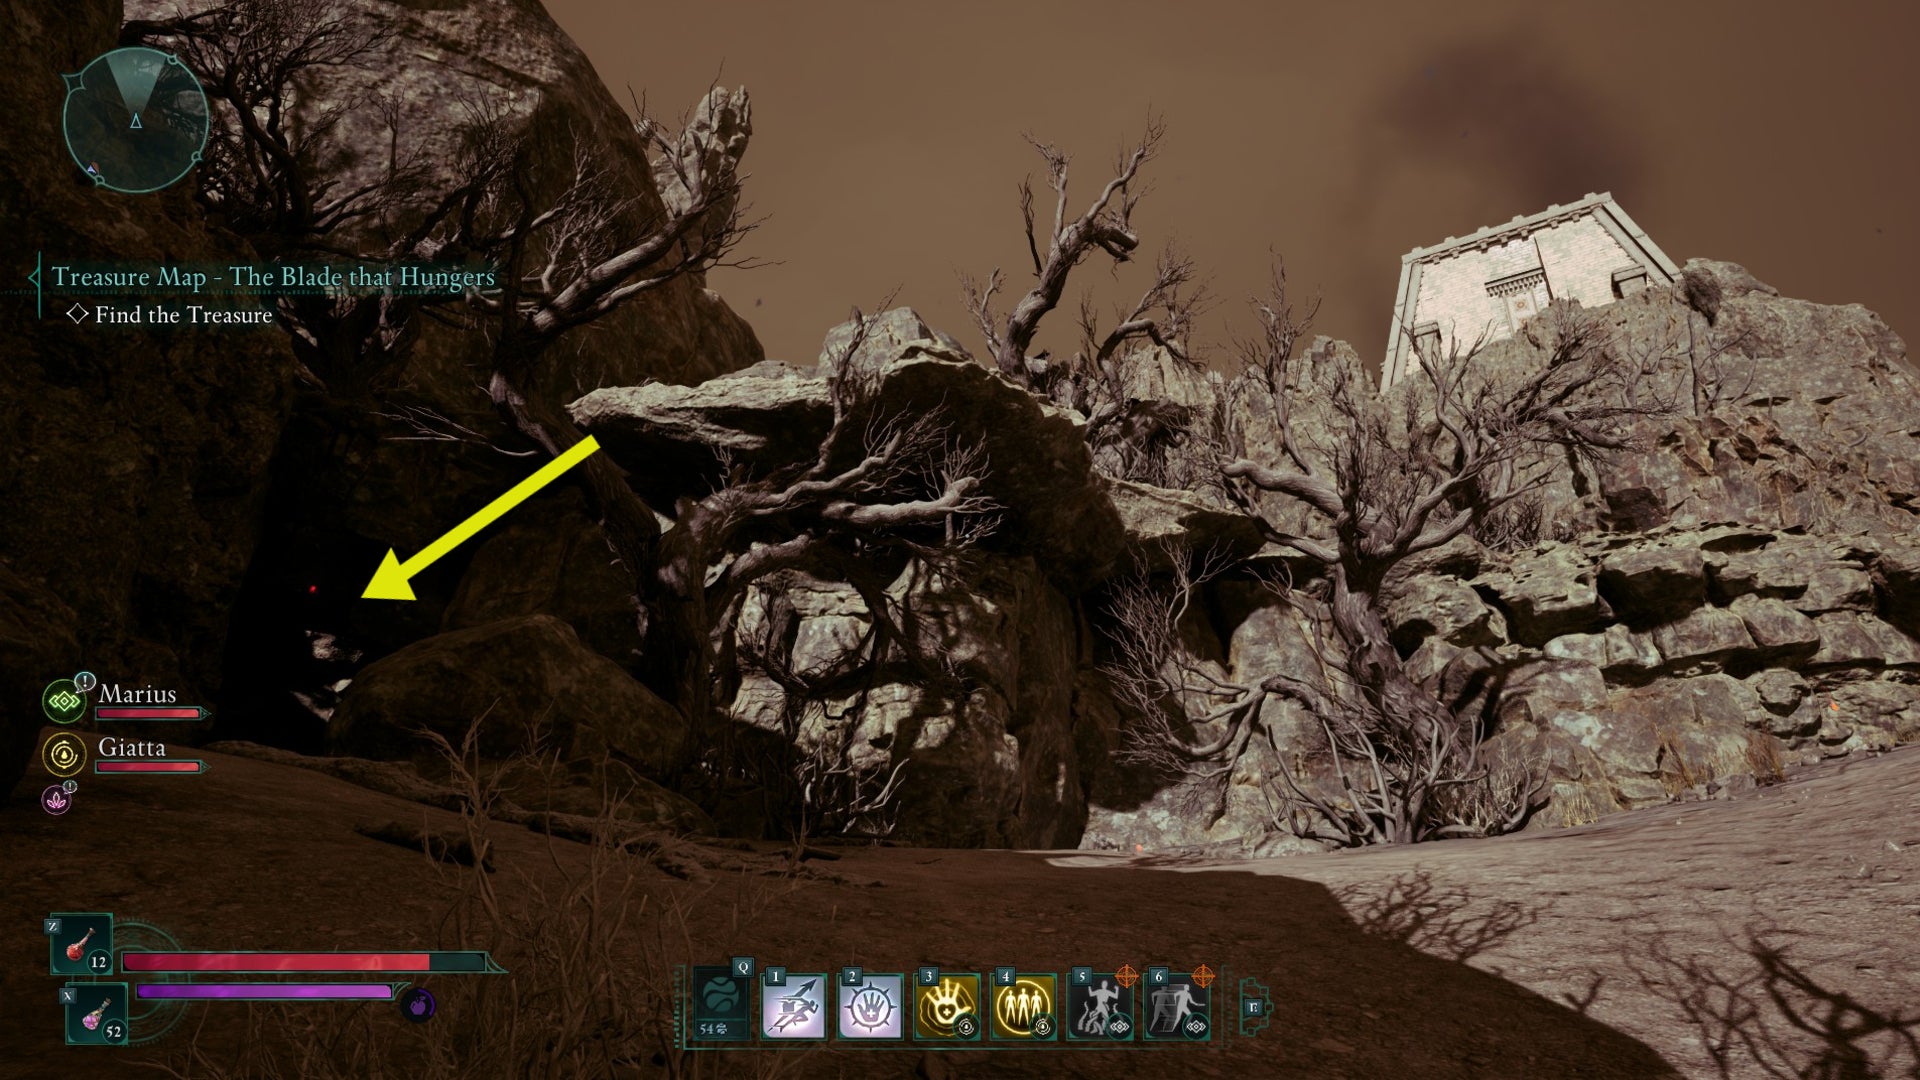
It’s hard to spot if you aren’t looking for it, but follow the arrow here to find the pathway that leads to the Umbral Needle. |Image credit:Rock Paper Shotgun/Obsidian
That finishes our guide to the many hidden Treasure Maps of Avowed! If you’d like to make yourself look pretty with all of this cool gear, our guide on how to transmogrify is worth a read. Our Avowed beginner’s guide and tips on dealing Elemental and Explosive damage will also make your journey through the Living Lands all the easier. And if you’re keen on figuring out the skillsets of your four trusty companions, be sure to read our guides on the best abilities for Kai , Marius , Giatta , and Yatzli !

Avowed
Xbox Series X/S , PC
Rock Paper Shotgun is better when you sign in
Sign in and join us on our journey to discover strange and compelling PC games.

All 75 Arc Raiders Blueprints and where to get them
These areas have the highest chance of giving you Blueprints

Image credit:Rock Paper Shotgun/Embark Studios

Looking for more Arc Raiders Blueprints? It’s a special day when you find a Blueprint, as they’re among the most valuable items in Arc Raiders. If you find a Blueprint that you haven’t already found, then you must make sure you hold onto it at all costs, because Blueprints are the key to one of the most important and powerful systems of meta-progression in the game.
This guide aims to be the very best guide on Blueprints you can find, starting with a primer on what exactly they are and how they work in Arc Raiders, before delving into exactly where to get Blueprints and the very best farming spots for you to take in your search.
We’ll also go over how to get Blueprints from other unlikely activities, such as destroying Surveyors and completing specific quests. And you’ll also find the full list of all 75 Blueprints in Arc Raiders on this page (including the newest Blueprints added with the Cold Snap update , such as the Deadline Blueprint and Firework Box Blueprint), giving you all the information you need to expand your own crafting repertoire.
In this guide:
- What are Blueprints in Arc Raiders?
- Full Blueprint list: All crafting recipes
- Where to find Blueprints in Arc Raiders Blueprints obtained from quests Blueprints obtained from Trials Best Blueprint farming locations

What are Blueprints in Arc Raiders?
Blueprints in Arc Raiders are special items which, if you manage to extract with them, you can expend to permanently unlock a new crafting recipe in your Workshop. If you manage to extract from a raid with an Anvil Blueprint, for example, you can unlock the ability to craft your very own Anvil Pistol, as many times as you like (as long as you have the crafting materials).
To use a Blueprint, simply open your Inventory while in the lobby, then right-click on the Blueprint and click “Learn And Consume” . This will permanently unlock the recipe for that item in your Workshop. As of the Stella Montis update, there are allegedly 75 different Blueprints to unlock - although only 68 are confirmed to be in the game so far. You can see all the Blueprints you’ve found and unlocked by going to the Workshop menu, and hitting “R” to bring up the Blueprint screen.
It’s possible to find duplicates of past Blueprints you’ve already unlocked. If you find these, then you can either sell them, or - if you like to play with friends - you can take it into a match and gift it to your friend so they can unlock that recipe for themselves. Another option is to keep hold of them until the time comes to donate them to the Expedition.
Full Blueprint list: All crafting recipes
Below is the full list of all the Blueprints that are currently available to find in Arc Raiders, and the crafting recipe required for each item:
| Blueprint | Type | Recipe | Crafted At |
|---|---|---|---|
| Bettina | Weapon | 3x Advanced Mechanical Components 3x Heavy Gun Parts 3x Canister | Gunsmith 3 |
| Blue Light Stick | Quick Use | 3x Chemicals | Utility Station 1 |
| Aphelion | Weapon | 3x Magnetic Accelerator 3x Complex Gun Parts 1x Matriarch Reactor | Gunsmith 3 |
| Combat Mk. 3 (Flanking) | Augment | 2x Advanced Electrical Components 3x Processor | Gear Bench 3 |
| Combat Mk. 3 (Aggressive) | Augment | 2x Advanced Electrical Components 3x Processor | Gear Bench 3 |
| Complex Gun Parts | Material | 2x Light Gun Parts 2x Medium Gun Parts 2x Heavy Gun Parts | Refiner 3 |
| Fireworks Box | Quick Use | 1x Explosive Compound 3x Pop Trigger | Explosives Station 2 |
| Gas Mine | Mine | 4x Chemicals 2x Rubber Parts | Explosives Station 1 |
| Green Light Stick | Quick Use | 3x Chemicals | Utility Station 1 |
| Pulse Mine | Mine | 1x Crude Explosives 1x Wires | Explosives Station 1 |
| Seeker Grenade | Grenade | 1x Crude Explosives 2x ARC Alloy | Explosives Station 1 |
| Looting Mk. 3 (Survivor) | Augment | 2x Advanced Electrical Components 3x Processor | Gear Bench 3 |
| Angled Grip II | Mod | 2x Mechanical Components 3x Duct Tape | Gunsmith 2 |
| Angled Grip III | Mod | 2x Mod Components 5x Duct Tape | Gunsmith 3 |
| Hullcracker | Weapon | 1x Magnetic Accelerator 3x Heavy Gun Parts 1x Exodus Modules | Gunsmith 3 |
| Launcher Ammo | Ammo | 5x Metal Parts 1x Crude Explosives | Workbench 1 |
| Anvil | Weapon | 5x Mechanical Components 5x Simple Gun Parts | Gunsmith 2 |
| Anvil Splitter | Mod | 2x Mod Components 3x Processor | Gunsmith 3 |
| ??? | ??? | ??? | ??? |
| Barricade Kit | Quick Use | 1x Mechanical Components | Utility Station 2 |
| Blaze Grenade | Grenade | 1x Explosive Compound 2x Oil | Explosives Station 3 |
| Bobcat | Weapon | 3x Advanced Mechanical Components 3x Light Gun Parts | Gunsmith 3 |
| Osprey | Weapon | 2x Advanced Mechanical Components 3x Medium Gun Parts 7x Wires | Gunsmith 3 |
| Burletta | Weapon | 3x Mechanical Components 3x Simple Gun Parts | Gunsmith 1 |
| Compensator II | Mod | 2x Mechanical Components 4x Wires | Gunsmith 2 |
| Compensator III | Mod | 2x Mod Components 8x Wires | Gunsmith 3 |
| Defibrillator | Quick Use | 9x Plastic Parts 1x Moss | Medical Lab 2 |
| ??? | ??? | ??? | ??? |
| Equalizer | Weapon | 3x Magnetic Accelerator 3x Complex Gun Parts 1x Queen Reactor | Gunsmith 3 |
| Extended Barrel | Mod | 2x Mod Components 8x Wires | Gunsmith 3 |
| Extended Light Mag II | Mod | 2x Mechanical Components 3x Steel Spring | Gunsmith 2 |
| Extended Light Mag III | Mod | 2x Mod Components 5x Steel Spring | Gunsmith 3 |
| Extended Medium Mag II | Mod | 2x Mechanical Components 3x Steel Spring | Gunsmith 2 |
| Extended Medium Mag III | Mod | 2x Mod Components 5x Steel Spring | Gunsmith 3 |
| Extended Shotgun Mag II | Mod | 2x Mechanical Components 3x Steel Spring | Gunsmith 2 |
| Extended Shotgun Mag III | Mod | 2x Mod Components 5x Steel Spring | Gunsmith 3 |
| Remote Raider Flare | Quick Use | 2x Chemicals 4x Rubber Parts | Utility Station 1 |
| Heavy Gun Parts | Material | 4x Simple Gun Parts | Refiner 2 |
| Venator | Weapon | 2x Advanced Mechanical Components 3x Medium Gun Parts 5x Magnet | Gunsmith 3 |
| Il Toro | Weapon | 5x Mechanical Components 6x Simple Gun Parts | Gunsmith 1 |
| Jolt Mine | Mine | 1x Electrical Components 1x Battery | Explosives Station 2 |
| Explosive Mine | Mine | 1x Explosive Compound 1x Sensors | Explosives Station 3 |
| Jupiter | Weapon | 3x Magnetic Accelerator 3x Complex Gun Parts 1x Queen Reactor | Gunsmith 3 |
| Light Gun Parts | Material | 4x Simple Gun Parts | Refiner 2 |
| Lightweight Stock | Mod | 2x Mod Components 5x Duct Tape | Gunsmith 3 |
| Lure Grenade | Grenade | 1x Speaker Component 1x Electrical Components | Utility Station 2 |
| Medium Gun Parts | Material | 4x Simple Gun Parts | Refiner 2 |
| Torrente | Weapon | 2x Advanced Mechanical Components 3x Medium Gun Parts 6x Steel Spring | Gunsmith 3 |
| Muzzle Brake II | Mod | 2x Mechanical Components 4x Wires | Gunsmith 2 |
| Muzzle Brake III | Mod | 2x Mod Components 8x Wires | Gunsmith 3 |
| Padded Stock | Mod | 2x Mod Components 5x Duct Tape | Gunsmith 3 |
| Shotgun Choke II | Mod | 2x Mechanical Components 4x Wires | Gunsmith 2 |
| Shotgun Choke III | Mod | 2x Mod Components 8x Wires | Gunsmith 3 |
| Shotgun Silencer | Mod | 2x Mod Components 8x Wires | Gunsmith 3 |
| Showstopper | Grenade | 1x Advanced Electrical Components 1x Voltage Converter | Explosives Station 3 |
| Silencer I | Mod | 2x Mechanical Components 4x Wires | Gunsmith 2 |
| Silencer II | Mod | 2x Mod Components 8x Wires | Gunsmith 3 |
| Snap Hook | Quick Use | 2x Power Rod 3x Rope 1x Exodus Modules | Utility Station 3 |
| Stable Stock II | Mod | 2x Mechanical Components 3x Duct Tape | Gunsmith 2 |
| Stable Stock III | Mod | 2x Mod Components 5x Duct Tape | Gunsmith 3 |
| Tagging Grenade | Grenade | 1x Electrical Components 1x Sensors | Utility Station 3 |
| Tempest | Weapon | 3x Advanced Mechanical Components 3x Medium Gun Parts 3x Canister | Gunsmith 3 |
| Trigger Nade | Grenade | 2x Crude Explosives 1x Processor | Explosives Station 2 |
| Vertical Grip II | Mod | 2x Mechanical Components 3x Duct Tape | Gunsmith 2 |
| Vertical Grip III | Mod | 2x Mod Components 5x Duct Tape | Gunsmith 3 |
| Vita Shot | Quick Use | 2x Antiseptic 1x Syringe | Medical Lab 3 |
| Vita Spray | Quick Use | 3x Antiseptic 1x Canister | Medical Lab 3 |
| Vulcano | Weapon | 1x Magnetic Accelerator 3x Heavy Gun Parts 1x Exodus Modules | Gunsmith 3 |
| Wolfpack | Grenade | 2x Explosive Compound 2x Sensors | Explosives Station 3 |
| Red Light Stick | Quick Use | 3x Chemicals | Utility Station 1 |
| Smoke Grenade | Grenade | 14x Chemicals 1x Canister | Utility Station 2 |
| Deadline | Mine | 3x Explosive Compound 2x ARC Circuitry | Explosives Station 3 |
| Trailblazer | Grenade | 1x Explosive Compound 1x Synthesized Fuel | Explosives Station 3 |
| Tactical Mk. 3 (Defensive) | Augment | 2x Advanced Electrical Components 3x Processor | Gear Bench 3 |
| Tactical Mk. 3 (Healing) | Augment | 2x Advanced Electrical Components 3x Processor | Gear Bench 3 |
| Yellow Light Stick | Quick Use | 3x Chemicals | Utility Station 1 |
Note: The missing Blueprints in this list likely have not actually been added to the game at the time of writing, because none of the playerbase has managed to find any of them. As they are added to the game, I will update this page with the most relevant information so you know exactly how to get all 75 Arc Raiders Blueprints.
Where to find Blueprints in Arc Raiders
Below is a list of all containers, modifiers, and events which maximise your chances of finding Blueprints:
- Certain quests reward you with specific Blueprints .
- Completing Trials has a high chance of offering Blueprints as rewards.
- Surveyors have a decent chance of dropping Blueprints on death.
- High loot value areas tend to have a greater chance of spawning Blueprints.
- Night Raids and Storms may increase rare Blueprint spawn chances in containers.
- Containers with higher numbers of items may have a higher tendency to spawn Blueprints. As a result, Blue Gate (which has many “large” containers containing multiple items) may give you a higher chance of spawning Blueprints.
- Raider containers (Raider Caches, Weapon Boxes, Medical Bags, Grenade Tubes) have increased Blueprint drop rates. As a result, the Uncovered Caches event gives you a high chance of finding Blueprints.
- Security Lockers have a higher than average chance of containing Blueprints.
- Certain Blueprints only seem to spawn under specific circumstances: Tempest Blueprint only spawns during Night Raid events. Vulcano Blueprint only spawns during Hidden Bunker events. Jupiter and Equaliser Blueprints only spawn during Harvester events.

Raider Caches, Weapon Boxes, and other raider-oriented container types have a good chance of offering Blueprints. |Image credit:Rock Paper Shotgun/Embark Studios
Blueprints have a very low chance of spawning in any container in Arc Raiders, around 1-2% on average. However, there is a higher chance of finding Blueprints in particular container types. Specifically, you can find more Blueprints in Raider containers and security lockers.
Beyond this, if you’re looking for Blueprints you should focus on regions of the map which are marked as having particularly high-value loot. Areas such as the Control Tower in Dam Battlegrounds, the Arrival and Departure Buildings in Spaceport, and Pilgrim’s Peak in Blue Gate all have a better-than-average chance of spawning Blueprints somewhere amongst all their containers. Night Raids and Electromagnetic Storm events also increase the drop chances of certain Blueprints .
In addition to these containers, you can often loot Blueprints from destroyed Surveyors - the largest of the rolling ball ARC. Surveyors are more commonly found on the later maps - Spaceport and Blue Gate - and if one spawns in your match, you’ll likely see it by the blue laser beam that it casts into the sky while “surveying”.
Surveyors are quite well-armoured and will very speedily run away from you once it notices you, but if you can take one down then make sure you loot all its parts for a chance of obtaining certain unusual Blueprints.
Blueprints obtained from quests
One way in which you can get Blueprints is by completing certain quests for the vendors in Speranza. Some quests will reward you with a specific item Blueprint upon completion, so as long as you work through all the quests in Arc Raiders, you are guaranteed those Blueprints.
Here is the full list of all Blueprints you can get from quest rewards:
- Trigger Nade Blueprint: Rewarded after completing “Sparks Fly”.
- Lure Grenade Blueprint: Rewarded after completing “Greasing Her Palms”.
- Burletta Blueprint: Rewarded after completing “Industrial Espionage”.
- Hullcracker Blueprint (and Launcher Ammo Blueprint): Rewarded after completing “The Major’s Footlocker”.
Alas, that’s only 4 Blueprints out of a total of 75 to unlock, so for the vast majority you will need to find them yourself during a raid. If you’re intent on farming Blueprints, then it’s best to equip yourself with cheap gear in case you lose it, but don’t use a free loadout because then you won’t get a safe pocket to stash any new Blueprint you find. No pain in Arc Raiders is sharper than failing to extract with a new Blueprint you’ve been after for a dozen hours already.

One of the best ways to get Blueprints is by hitting three stars on all five Trials every week. |Image credit:Rock Paper Shotgun/Embark Studios
Blueprints obtained from Trials
One of the very best ways to get Blueprints is as rewards for completing Trials in Arc Raiders. Trials are unlocked from Level 15 onwards, and allow you to earn rewards by focusing on certain tasks over the course of several raids. For example, one Trial might task you with dealing damage to Hornets, while another might challenge you to loot Supply Drops.
Trials refresh on a weekly basis, with a new week bringing five new Trials. Each Trial can offer up to three rewards after passing certain score milestones, and it’s possible to receive very high level loot from these reward crates - including Blueprints. So if you want to unlock as many Blueprints as possible, you should make a point of completing as many Trials as possible each week.
Best Blueprint farming locations
The very best way to get Blueprints is to frequent specific areas of the maps which combine high-tier loot pools with the right types of containers to search. Here are my recommendations for where to find Blueprints on every map, so you can always keep the search going for new crafting recipes to unlock.

Image credit:Rock Paper Shotgun/Embark Studios
Dam Battlegrounds
The best places to farm Blueprints on Dam Battlegrounds are the Control Tower, Power Generation Complex, Ruby Residence, and Pale Apartments . The first two regions, despite only being marked on the map as mid-tier loot, contain a phenomenal number of containers to loot. The Control Tower can also contain a couple of high-tier Security Lockers - though of course, you’ll need to have unlocked the Security Breach skill at the end of the Survival tree.
There’s also a lot of reporting amongst the playerbase that the Residential areas in the top-left of the map - Pale Apartments and Ruby Residence - give you a comparatively strong chance of finding Blueprints. Considering their size, there’s a high density of containers to loot in both locations, and they also have the benefit of being fairly out of the way. So you’re more likely to have all the containers to yourself.
Buried City
The best Blueprint farming locations on Buried City are the Santa Maria Houses, Grandioso Apartments, Town Hall, and the various buildings of the New District . Grandioso Apartments has a lower number of containers than the rest, but a high chance of spawning weapon cases - which have good Blueprint drop rates. The others are high-tier loot areas, with plenty of lootable containers - including Security Lockers.
Spaceport
The best places to find Blueprints on Spaceport are the Arrival and Departure Buildings, as well as Control Tower A6 and the Launch Towers . All these areas are labelled as high-value loot regions, and many of them are also very handily connected to one another by the Spaceport wall, which you can use to quickly run from one area to the next. At the tops of most of these buildings you’ll find at least one Security Locker, so this is an excellent farming route for players looking to find Blueprints.
The downside to looting Blueprints on Spaceport is that all these areas are hotly contested, particularly in Duos and Squads. You’ll need to be very focused and fast in order to complete the full farming route.

Image credit:Rock Paper Shotgun/Embark Studios
Blue Gate
Blue Gate tends to have a good chance of dropping Blueprints, potentially because it generally has a high number of containers which can hold lots of items; so there’s a higher chance of a Blueprint spawning in each container. In my experience, the best Blueprint farming spots on Blue Gate are Pilgrim’s Peak, Raider’s Refuge, the Ancient Fort, and the Underground Complex beneath the Warehouse .
All of these areas contain a wealth of containers to loot. Raider’s Refuge has less to loot, but the majority of the containers in and around the Refuge are raider containers, which have a high chance of containing Blueprints - particularly during major events.
Stella Montis
On the whole, Stella Montis seems to have a very low drop rate for Blueprints (though a high chance of dropping other high-tier loot). If you do want to try farming Blueprints on this map, the best places to find Blueprints in Stella Montis are Medical Research, Assembly Workshop, and the Business Center . These areas have the highest density of containers to loot on the map.
In addition to this, the Western Tunnel has a few different Security Lockers to loot, so while there’s very little to loot elsewhere in this area of the map, it’s worth hitting those Security Lockers if you spawn there at the start of a match.
That wraps up this primer on how to get all the Blueprints in Arc Raiders as quickly as possible. With the Expedition system constantly resetting a large number of players’ Blueprints, it’s more important than ever to have the most up-to-date information on where to find all these Blueprints.
While you’re here, be sure to check out our Arc Raiders best guns tier list , as well as our primers on the best skills to unlock and all the different Field Depot locations on every map.

ARC Raiders
PS5 , Xbox Series X/S , PC
Rock Paper Shotgun is better when you sign in
Sign in and join us on our journey to discover strange and compelling PC games.
