16 Manor Lords tips and tricks for beginners
Become the ultimate Manor Lord with our tips for beginners and advanced players alike

Image credit:Rock Paper Shotgun/Hooded Horse

Looking for some tips and tricks to help you get started in Manor Lords? It’s quite astonishing, what Slavic Magic - predominantly a one-person dev team - has done in creating Manor Lords . The newest city-builder on the block does a whole lot of things rather differently to most games in the genre, with a gridless building and roads system and the inclusion of Total War-style combat being the two features players have talked about the most ahead of release.
But as with many city-builders, it can be difficult to understand exactly what needs doing and when. There’s already a lot of content in Manor Lords , even in early access, and not much in the way of tutorials that teach you how everything actually works, or the best strategies to employ to build your settlement from nothing to greatness.
In this guide, we offer 16 (well, actually more like 40) of the best Manor Lords tips and tricks for both beginners and advanced players alike. We’ll go over everything from family management and road placement to the different seasons, trade, warfare, and much more. So let’s get started!
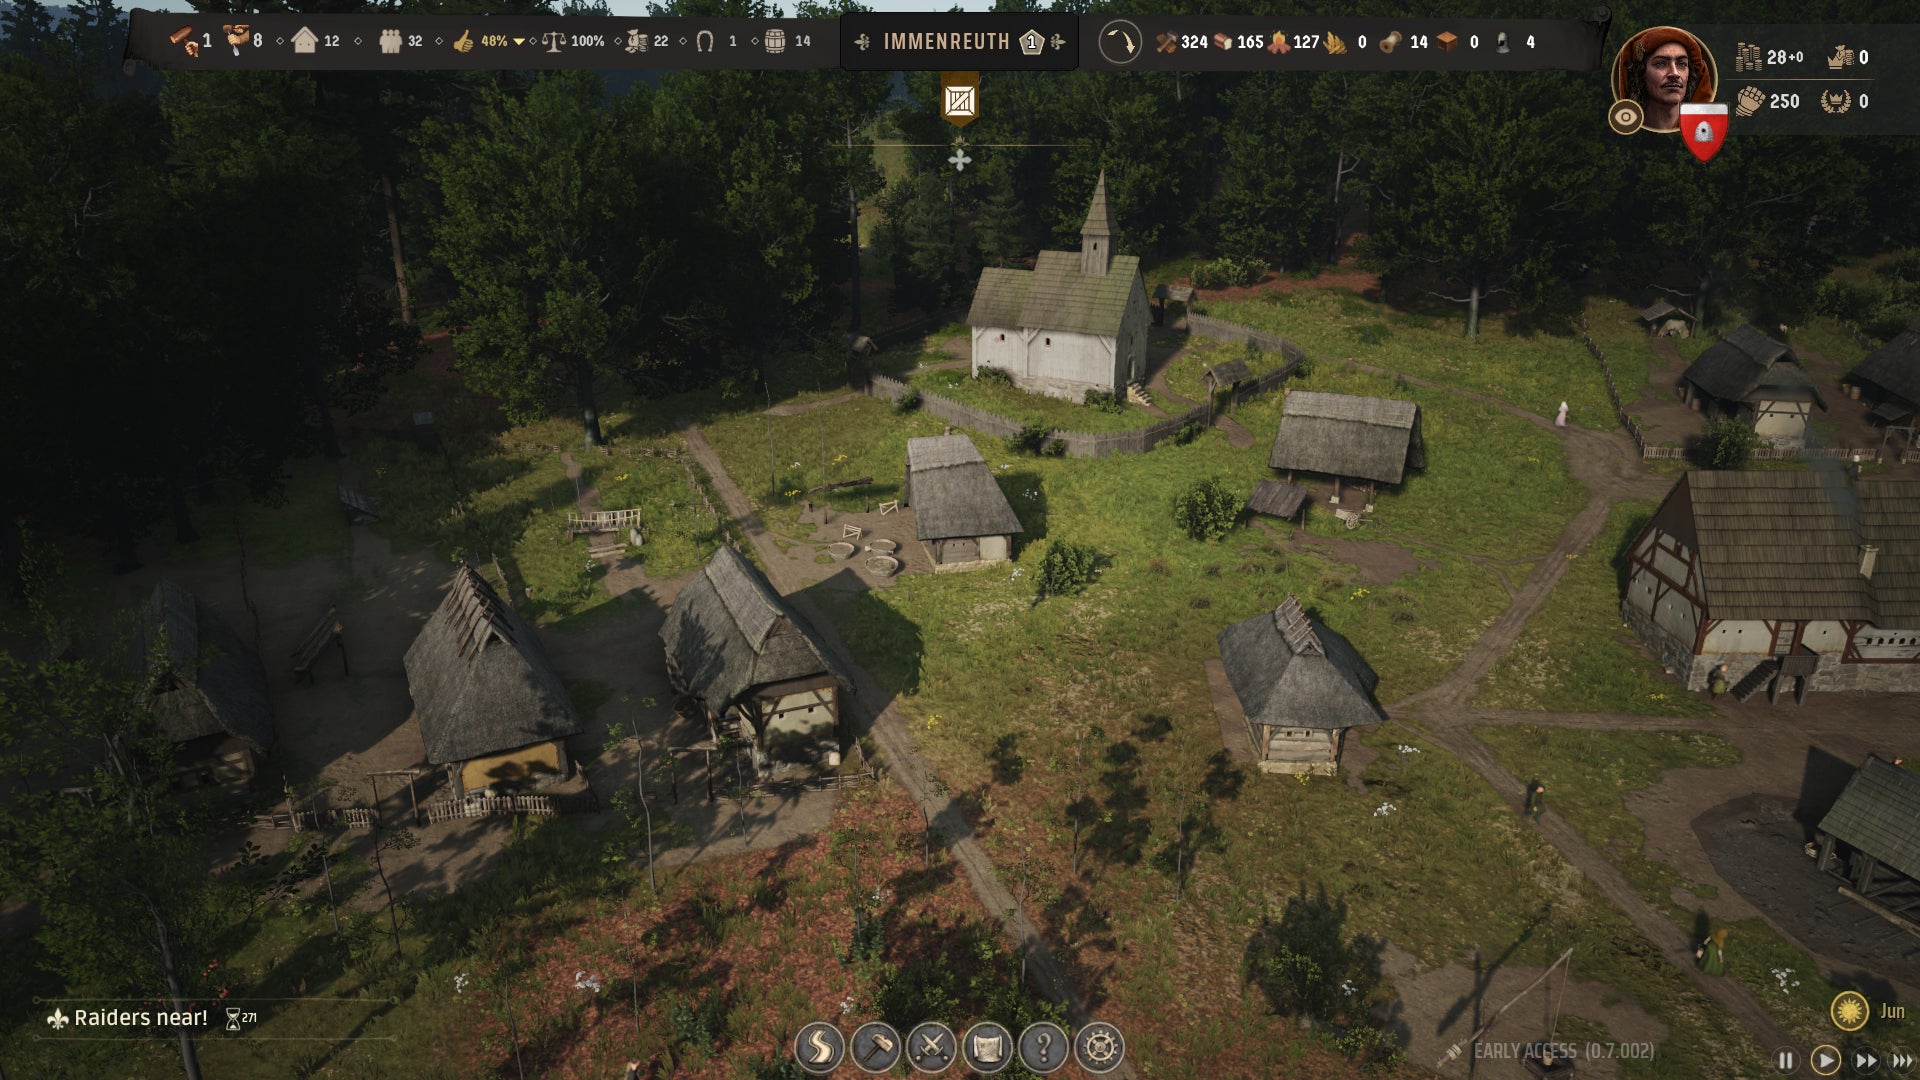
1. Hold TAB to view extra information
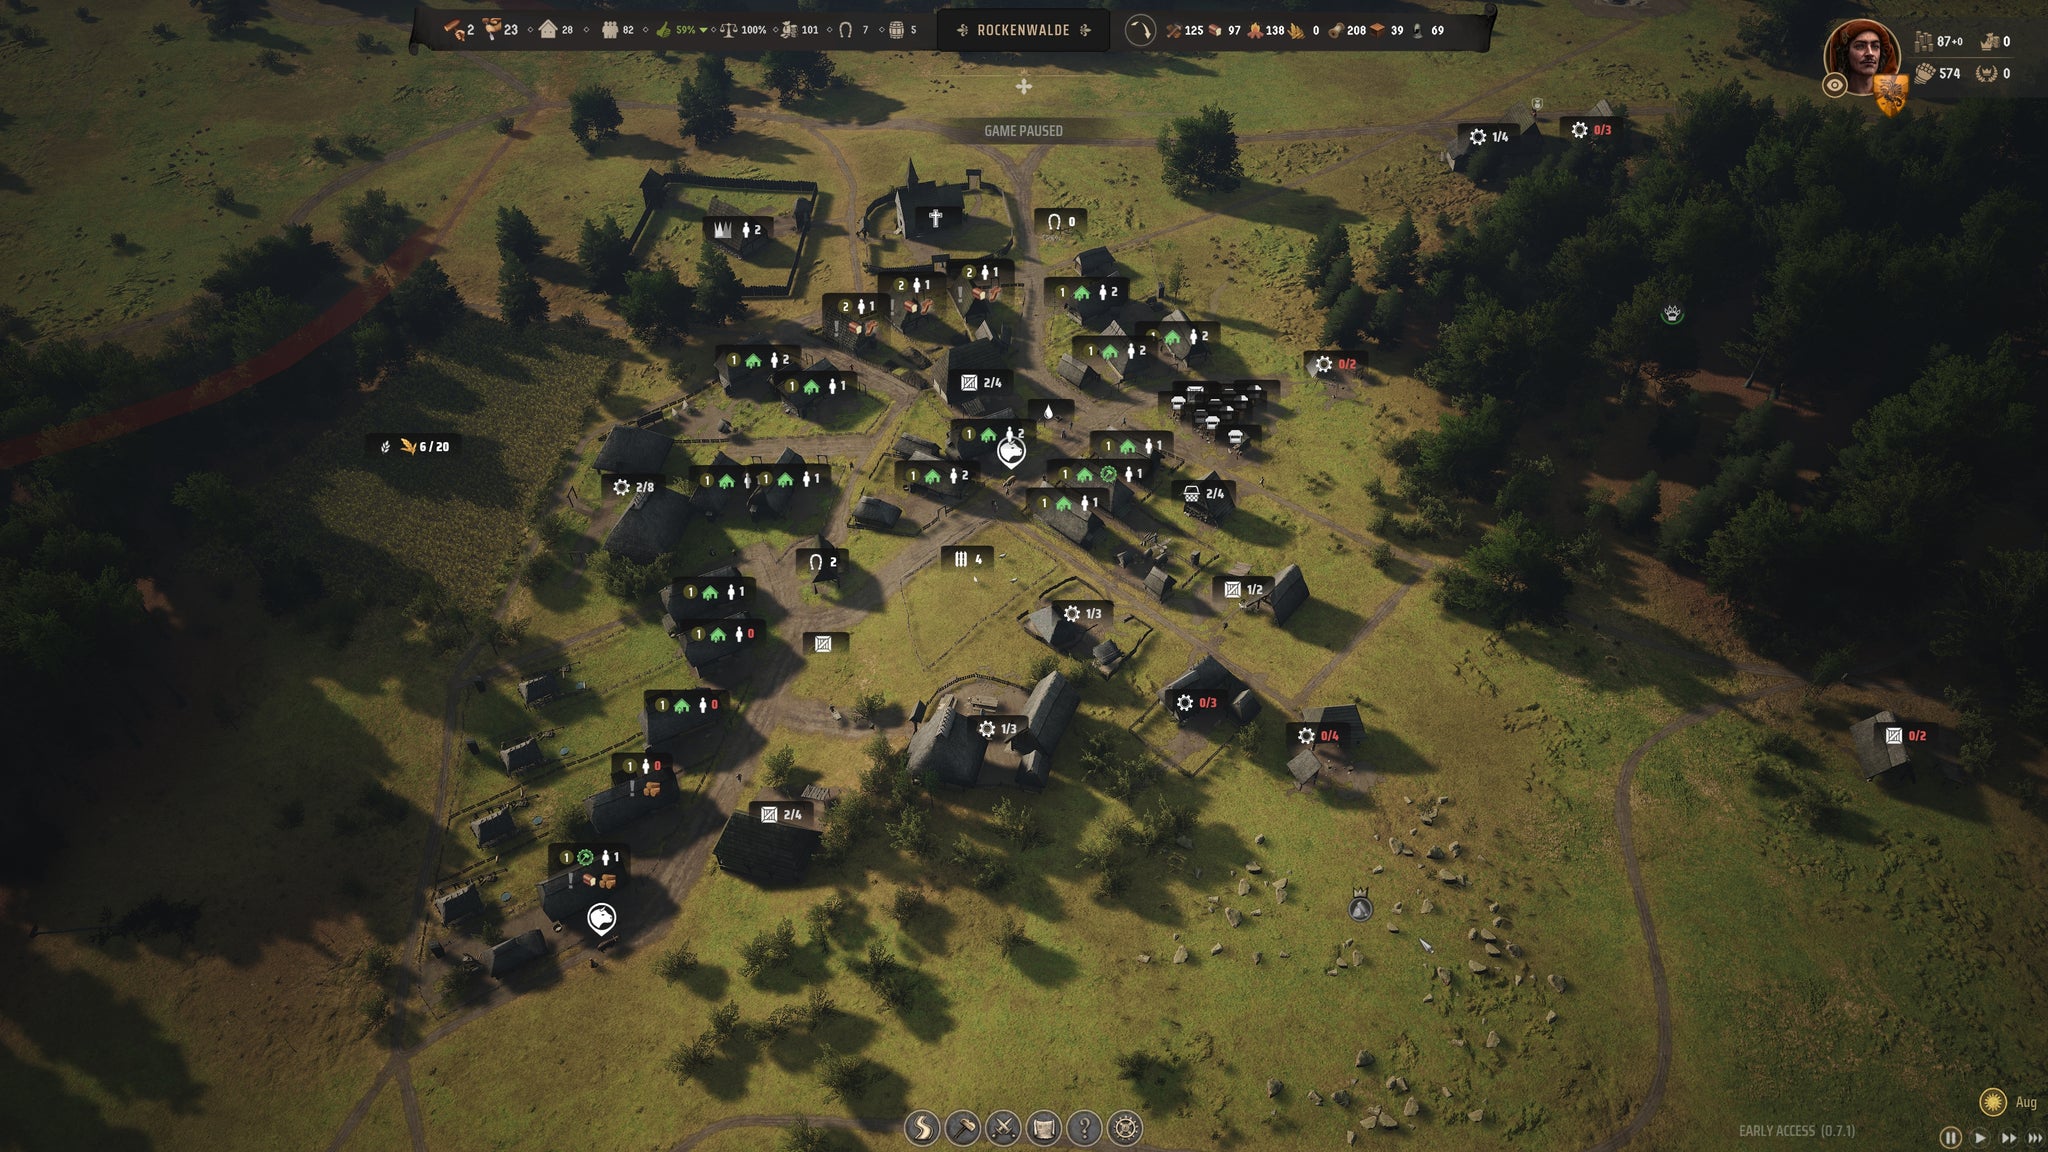
Hold TAB for extra details! |Image credit:Rock Paper Shotgun/Hooded Horse
At any point in Manor Lords, you can hold the TAB button to bring up the additional information overlay. This overlay gives you a lot of extra detail at a glance about all the buildings in your settlement, including where your families are working, the current Approval requirements of your citizens, the rate of growth of your crops, and more.
Every couple of minutes I hold TAB and scan my entire settlement to see how everything is doing. It’s a fantastic and essential feature that helps you quickly spot any potential issues with your growing town.
2. Unoccupied families will build for you

You can’t build anything without jobless families. |Image credit:Rock Paper Shotgun/Hooded Horse
The basic unit in Manor Lords is the family, and you can set families to work in different buildings by clicking on the building and using the plus (+) and minus (-) icons to assign or unassign families. But if you are in the process of building any new buildings anywhere, don’t assign all your families to work , because only unassign families will build for you.
You can check how many families are assigned or unassigned to jobs by looking at the first two numbers in the top hotbar. The first icon (next to the hammer) is the number of unassigned families who will carry out any building jobs around your settlement.
3. Store your starting supplies before it rains
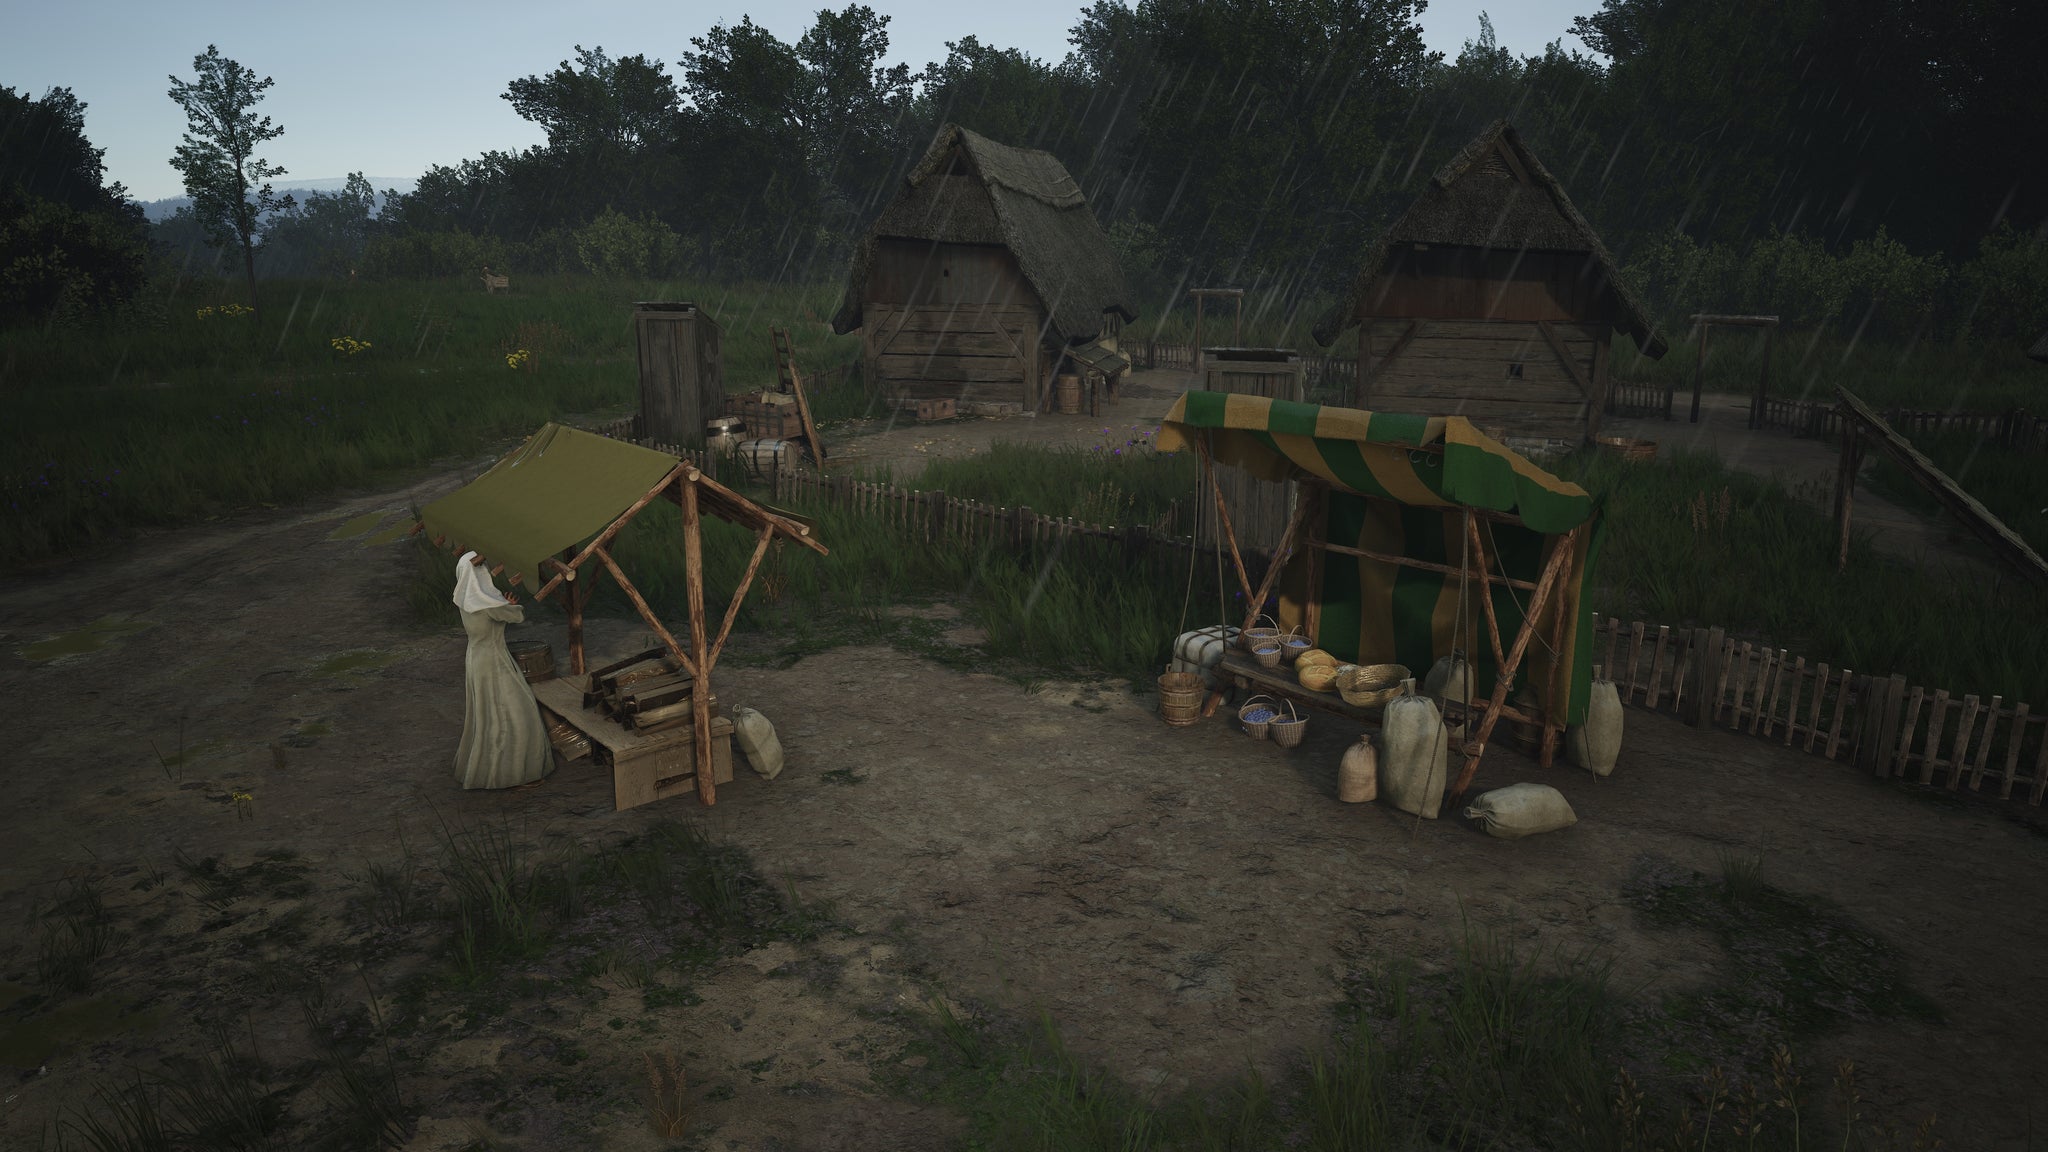
The damaging effects of weather depend on your starting settings, but you should always look to store resources early on regardless. |Image credit:Rock Paper Shotgun/Hooded Horse
Weather can be deadly in Manor Lords, and rainfall is common . When you first start a Manor Lords playthrough, you need to quickly move your starting supplies into a Storehouse and Granary so they are protected from the next rain.
If you don’t do this, then those crucial starting supplies (including your food) could be ruined within the first few days of your playthrough. Make it a priority to store resources that are out in the open as quickly as possible.
4. Take time to understand the seasons

Farming depends heavily on the seasons. |Image credit:Rock Paper Shotgun/Hooded Horse
Seasons are very important in Manor Lords. Not only will Winter prove a more difficult survival challenge thanks to double Firewood consumption and the need for Clothes to keep everyone warm, but you also need to synchronise your farming with the different seasons. You should aim to do all your harvesting and sowing during the Autumn months (September, October, November), before leaving them to grow over the Spring and Summer months.
You can hover over the current month displayed in the bottom-right corner of the screen to get a full breakdown of the different seasons and their effects on your settlement in Manor Lords.
5. Optimise road placement
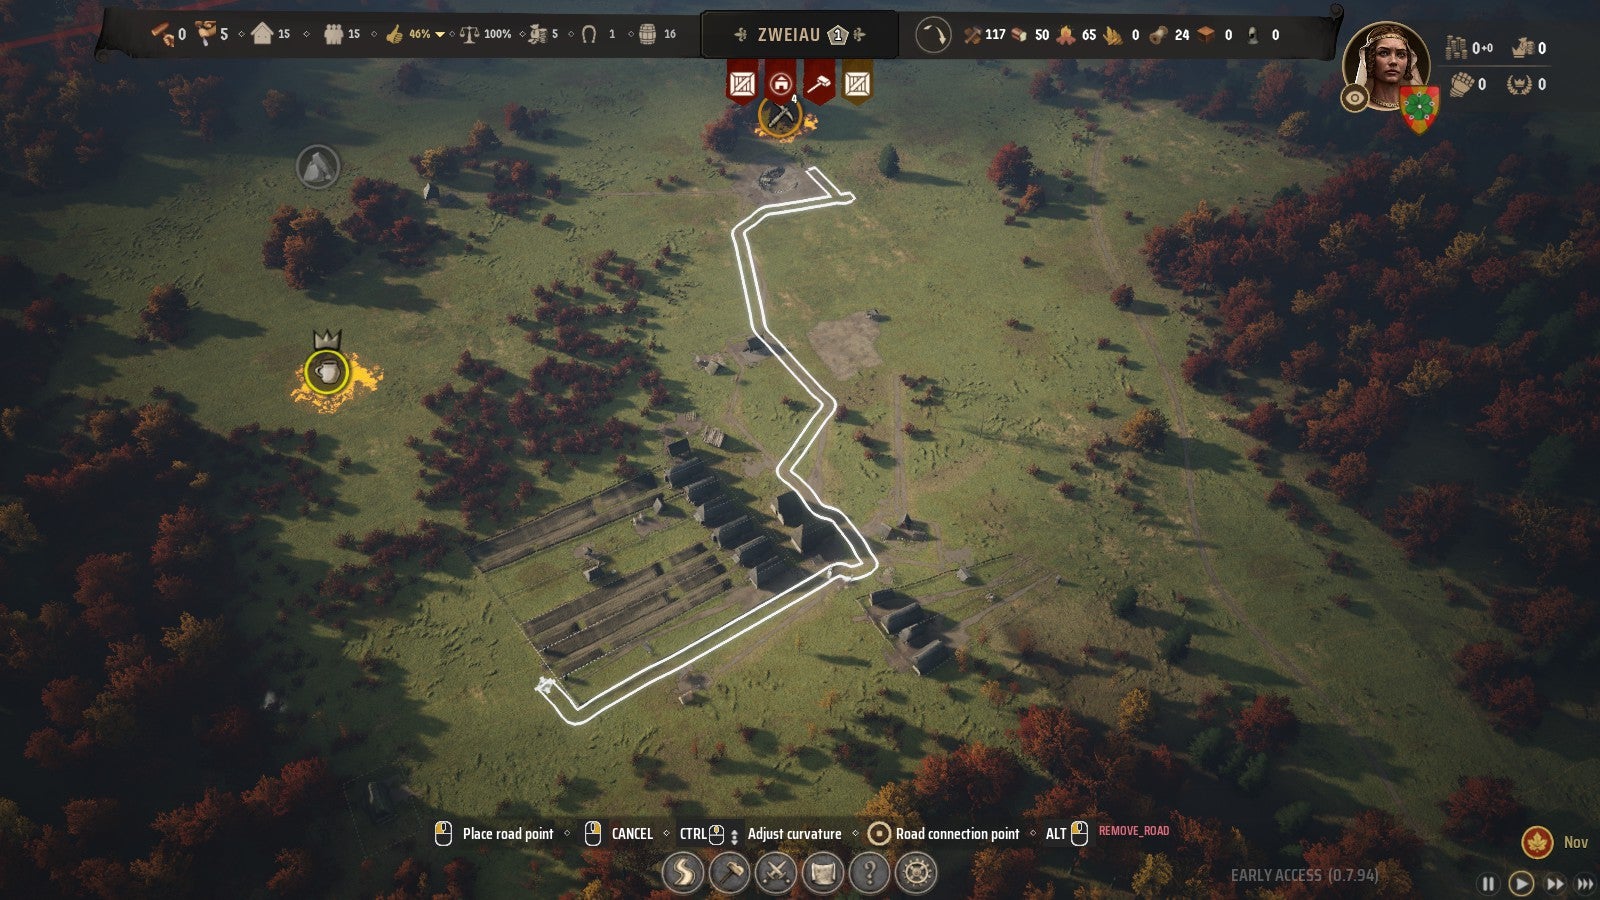
Roads are free and instantly built, so go crazy with them. |Image credit:Rock Paper Shotgun/Hooded Horse
Roads aren’t just fun to place in Manor Lords. They make movement much faster for your populace, and so it’s important when placing roads to give your citizens the shortest, quickest journey between where they are and where they’re going. For example - when beginning a new game, make a conscious decision to build a straight road from your Logging camp to the area you’re going to spend most time building, so that your families waste as little time as possible ferrying Timber to and fro.
6. Be very careful with finite resources
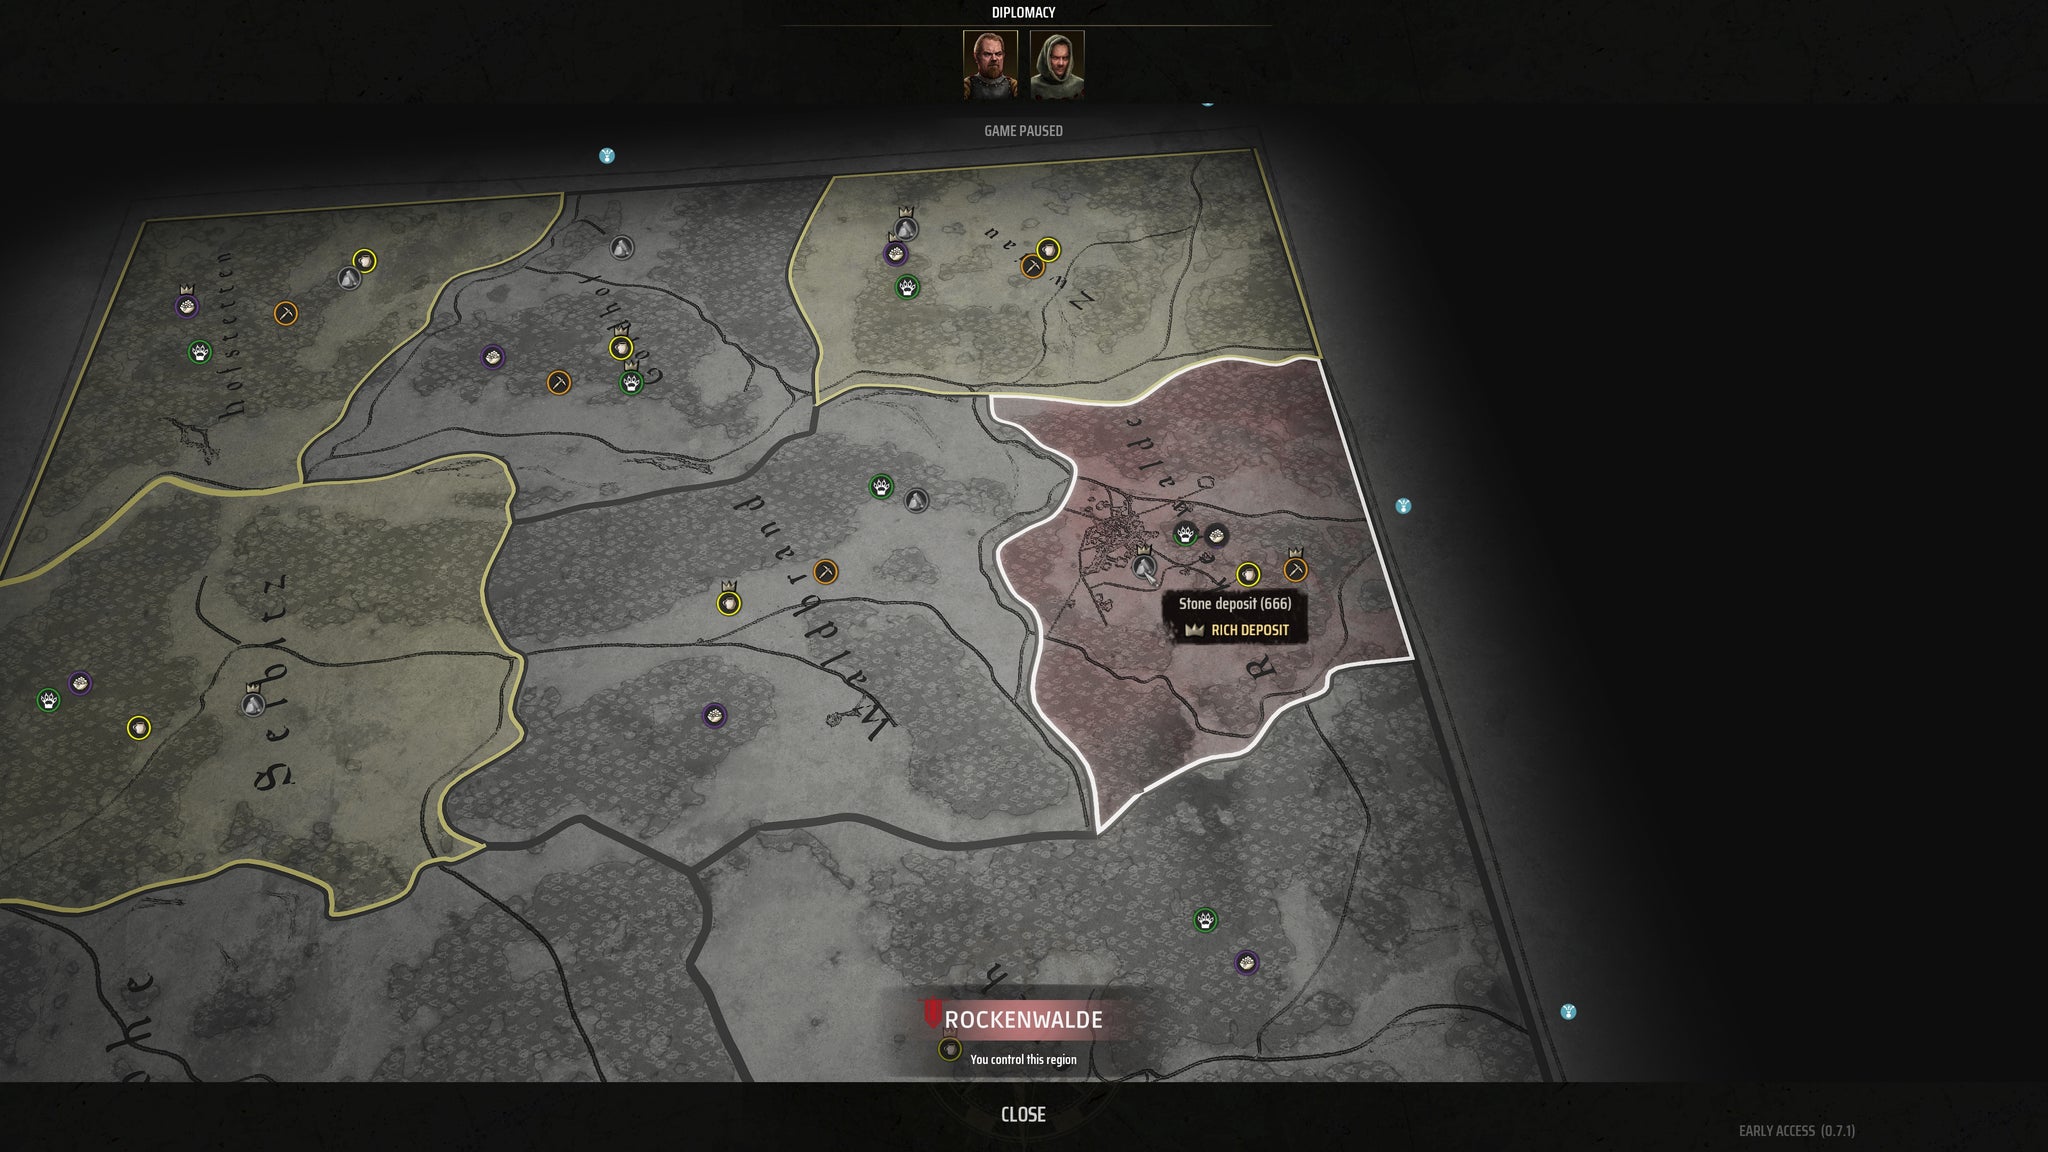
The map is full of finite resources, so be careful not to waste them. |Image credit:Rock Paper Shotgun/Hooded Horse
Manor Lords is full of finite resources. Iron and Clay deposits can disappear over time; Berries will only grow at certain times of the year; Wild Animals can be hunted to extinction; even trees and forests are limited resources on the Manor Lords map.
So for each of these resources, you should be very careful not to run yourself out of them entirely. Learn the best ways to prolong these resources. Here’s what we suggest:
- Iron and Clay Deposits: Research Deep Mining to turn Rich Deposits into infinite deposits.
- Berries: Research Forest Management to double Berry Deposit capacity.
- Wild Animals: Give your Hunting Camps a Hunting Limit so you don’t accidentally kill too many animals.
- Trees: Construct a Forester’s Hut to replenish fallen trees around your Logging Camp.
7. Work your families as efficiently as possible

Keep track of how far your families have to travel from home to work! |Image credit:Rock Paper Shotgun/Hooded Horse
Families do all the important work in Manor Lords, so to really kickstart your settlement, you should try to maximise their efficiency. This tip is actually two tips in one, but both are related and of equal importance:
Make families work close to their homes.
Click on a Burgage Plot and select the “People” tab, then click the “Show Workplace” button with the cog icon. This shows where that family is working. If they work far from home, click the button next to the cog to “Reassign family to a different workplace”. If you do this regularly, then your entire Population will become much more efficient because far less working time will be wasted on travel.
Keep changing where your families work depending on need.
If you don’t have any construction jobs, then don’t leave any families unassigned: set them to work. If your Berries are depleted for now, unassign the families at the Forager Hut. If you don’t have Ale , then there’s no need for families to work in the Tavern. Move your families around as needed to grow your settlement more quickly.
8. Create Plots with Living Space Extensions
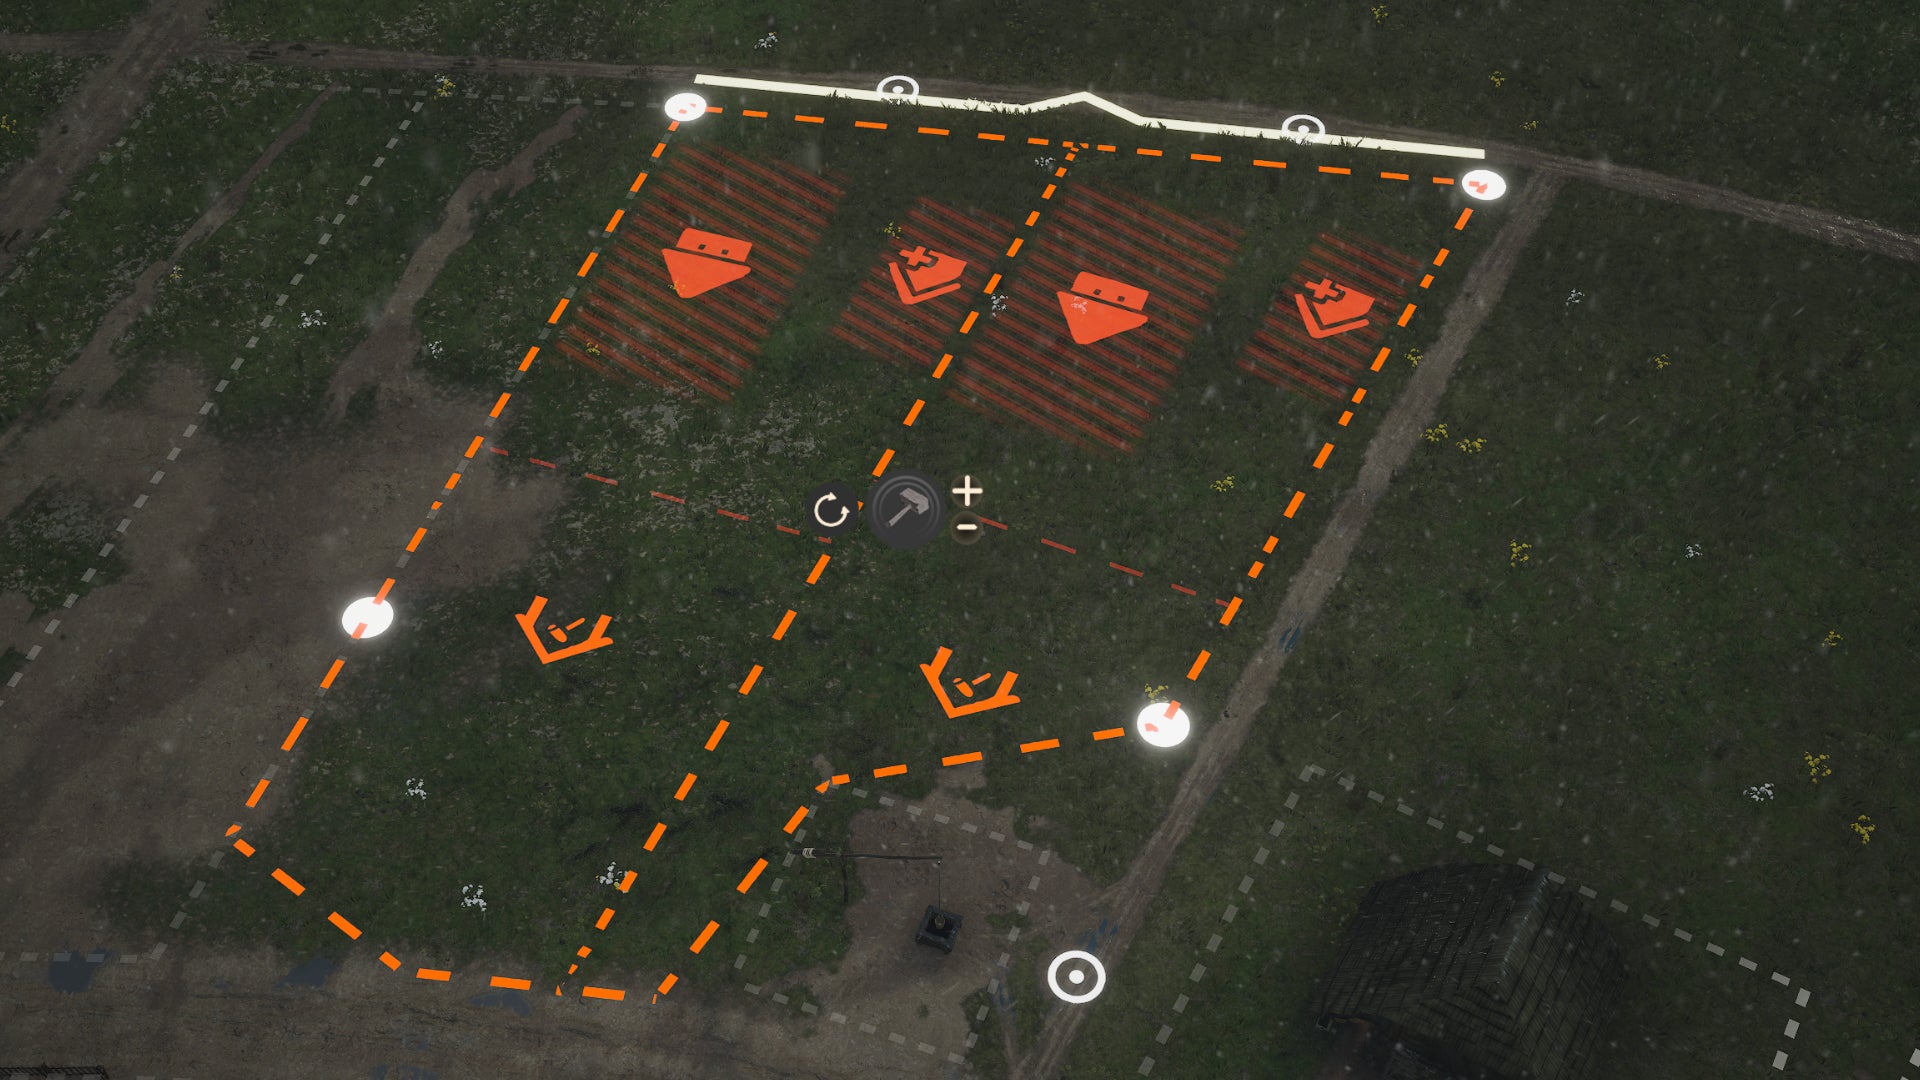
Living Space Extensions are extremely valuable parts of plot placement. |Image credit:Rock Paper Shotgun/Hooded Horse
Thanks to the flexible plot system, not all Burgage Plots are created equal. It’s a very good idea early on to place down Burgage Plots so that they have Living Space Extensions (the small house with the plus icon). You can get these Plots more easily by reducing the plot divisions before you place down a Burgage Plot.
With a Living Space Extension, you can double the capacity of a single Burgage Plot by selecting it and clicking the “Expand Living Space” button. It costs 2x Timber - the same as creating a new plot - but the benefit is that you only have to upgrade the one plot instead of two. And upgrading is expensive, so prioritising Living Space Extensions will save you lots of resources in the long run.
9. Get another Ox and Hitching Post early on
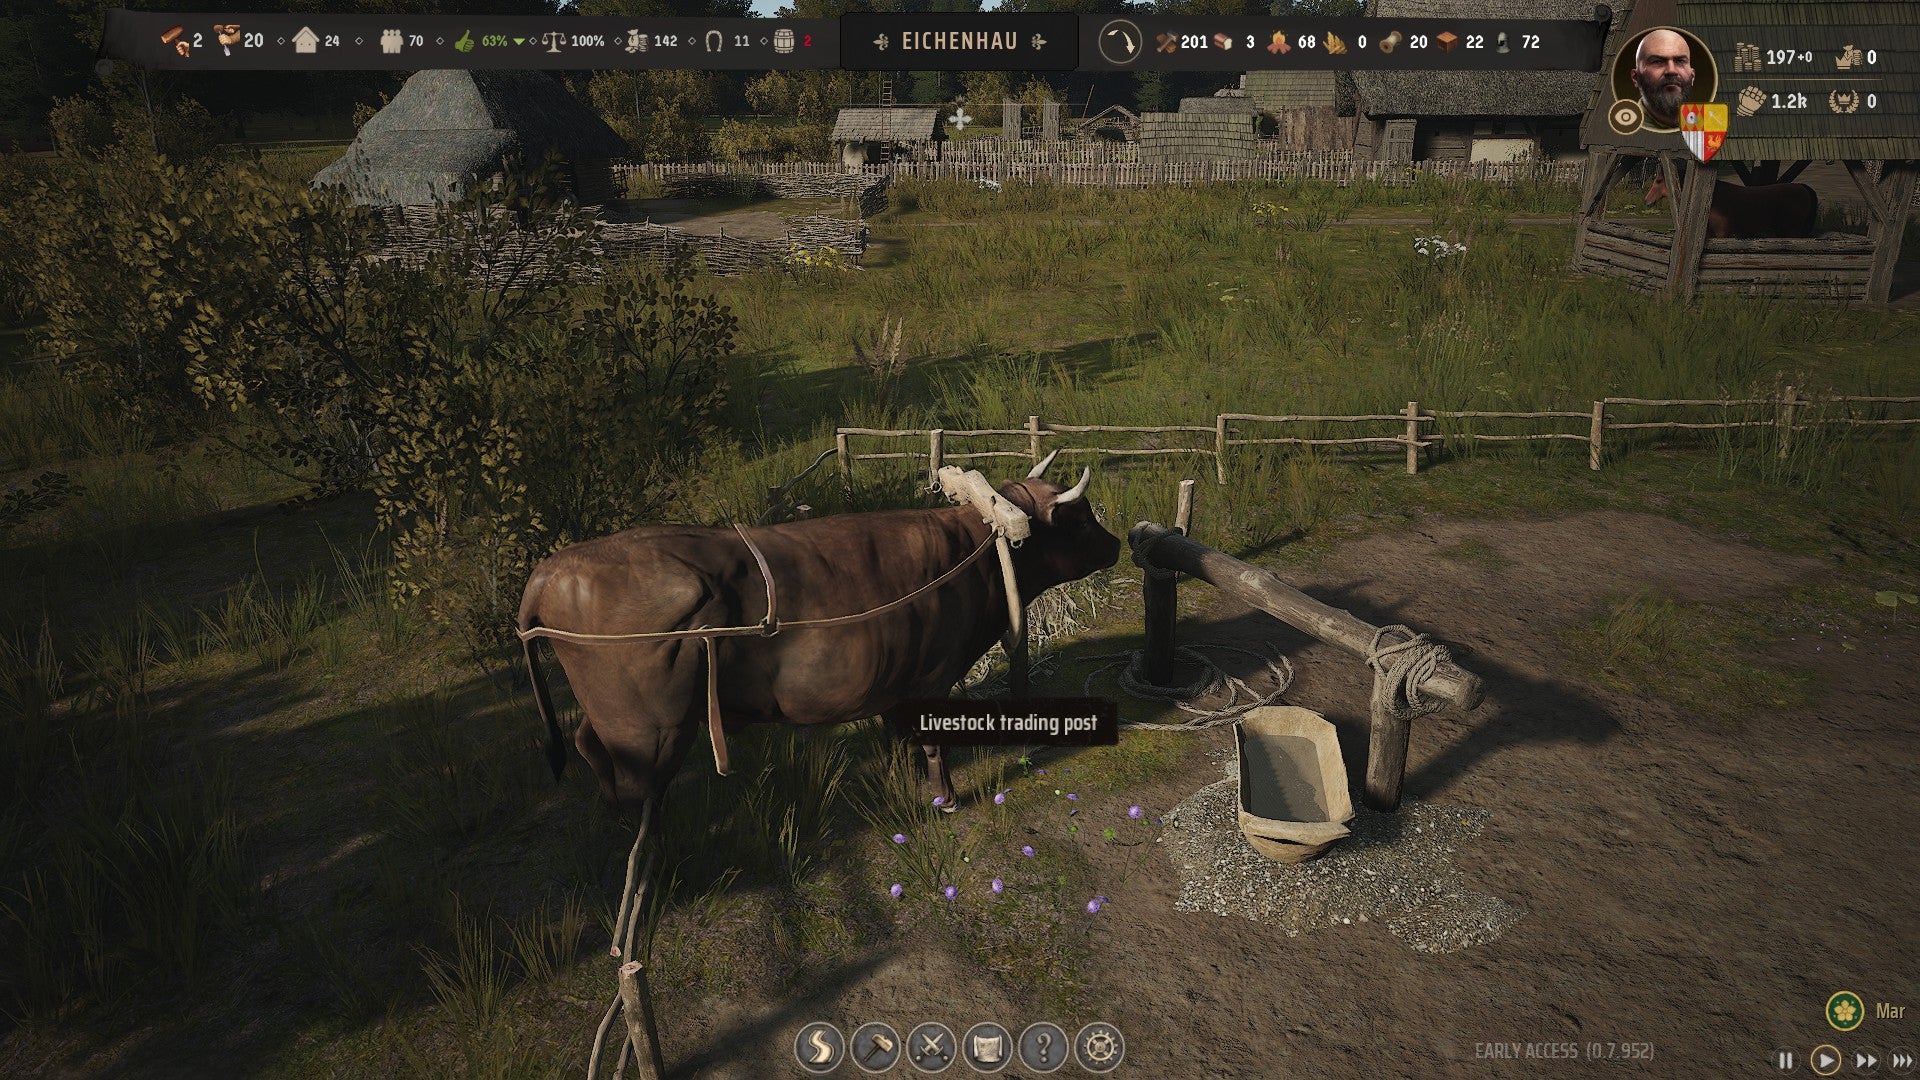
It’s never too early for another Ox. |Image credit:Slavic Magic
Likely the biggest bottleneck early on in expanding your settlement will be ferrying resources to where they’re needed. This is predominantly the job of your Oxen , but with just one Ox and one Hitching Post, you’ll never get things done in a timely manner.
Spend the 25x Regional Wealth early on to get an additional Ox, and your productivity will soar. Suddenly buildings will get built so much quicker. It’s also a very good idea later on to build additional Hitching Posts and Stables in different areas of your settlement, so that Oxen don’t spend ages travelling to where they’re needed.
10. Build multiple marketplaces across your town
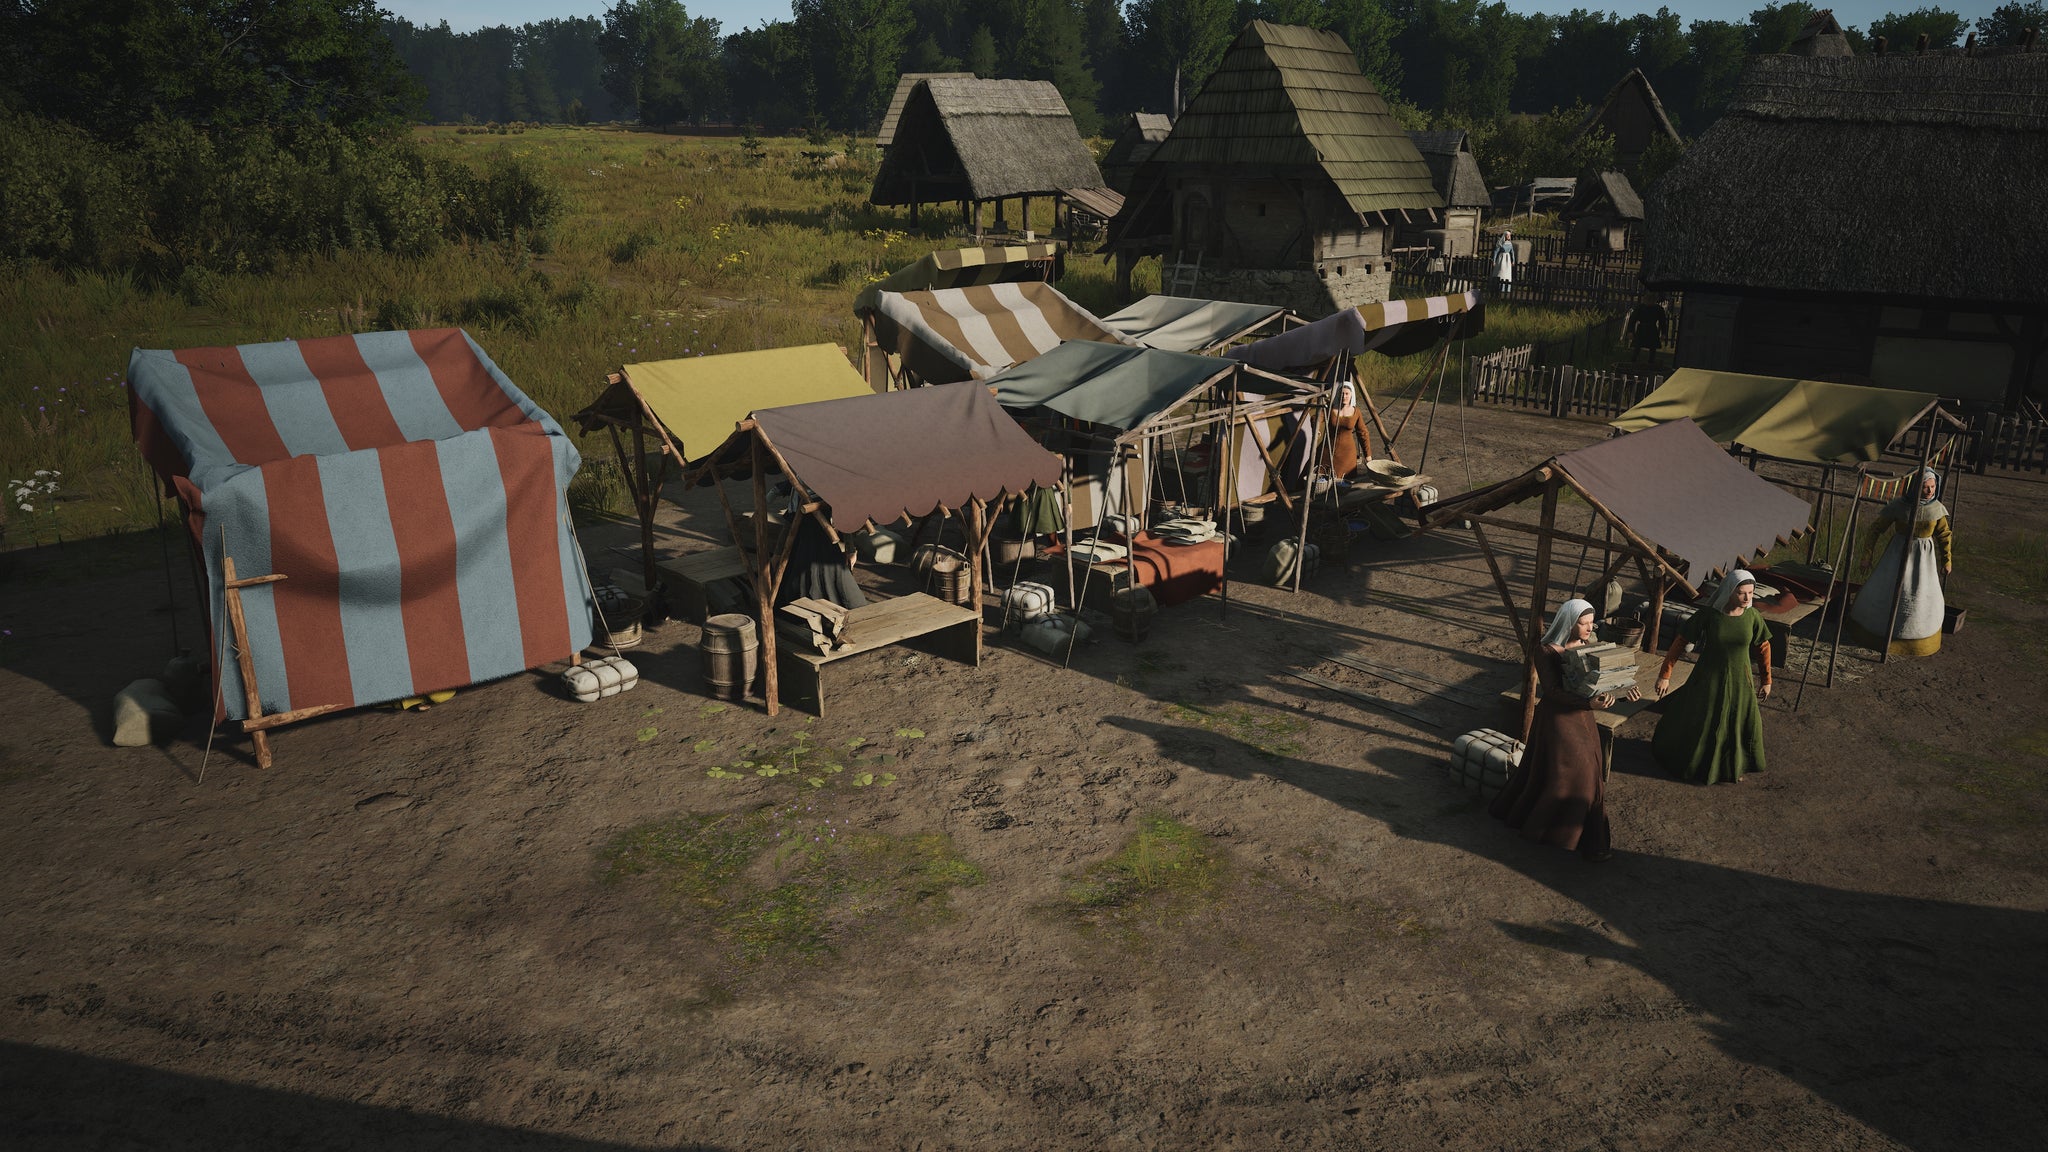
Marketplaces keep your populace happy, so make sure they’re sorted early on. |Image credit:Rock Paper Shotgun/Hooded Horse
Another efficiency tip that escapes many new players’ notice: Marketplaces are essential for the happiness of your families in Manor Lords. Families will themselves set up Market Stalls inside Marketplace areas, but they have to physically travel there in order to sell their wares. Minimise their travel time by creating multiple smaller Marketplaces throughout your settlement, so that every Burgage Plot in the vicinity is near a Marketplace.
11. Set up Trade as soon as you have goods to sell
I often start by selling Berries, because you can gather a surplus of them very quickly in the early-game. |Image credit:Rock Paper Shotgun/Hooded Horse
Learning how to trade is an enormous part of any Manor Lords player’s first playthrough. To start trading, build a Trading Post and enter the Trade tab of the building to set various resources to be imported and exported.
There’s no point in building a Trading Post before you have items to sell, but the instant it feels like you have a good surplus of any item, start exporting. You’ll need all that Regional Wealth later when it comes to purchasing weapons and armor , or settling new territories.
12. Export Warbows for big profits

Warbows are easy to make and sell for a lot of Regional Wealth. |Image credit:Rock Paper Shotgun/Hooded Horse
Once you’re past the early-game of Manor Lords, by far the best way to get oodles of Regional Wealth is by crafting and exporting Warbows . Each Warbow is made from just 1x Planks, and you can start crafting them as soon as you’ve got one or two Burgage Plots with Bowyer’s Workshops as their Backyard Extensions.
Warbows are amazingly easy to make, and each one sells in the Trading Post for 5x Regional Wealth . For reference: if you just export the 1 Plank it took to make the Warbow, you’d only gain 2x Regional Wealth. That’s a 150% markup. Business is good.
13. Start small when farming
Don’t go crazy with farm sizes, or you’ll shoot yourself in the foot. |Image credit:Rock Paper Shotgun/Hooded Horse
It may be tempting when you first start farming in Manor Lords to just place down one giant farm and say “there, that’s all my food needs for the time being sorted”. But large farms are very tricky . Everything has to be done in accordance with the seasons, so your workers have a limited amount of time to do every part of the farming process.
Therefore, it’s best to start small with your first couple of farms. Farm sizes are measured in “Morgens”, and we’d recommend your first farm stays at around 1.0-1.5 Morgens . The bigger farms can come later on.
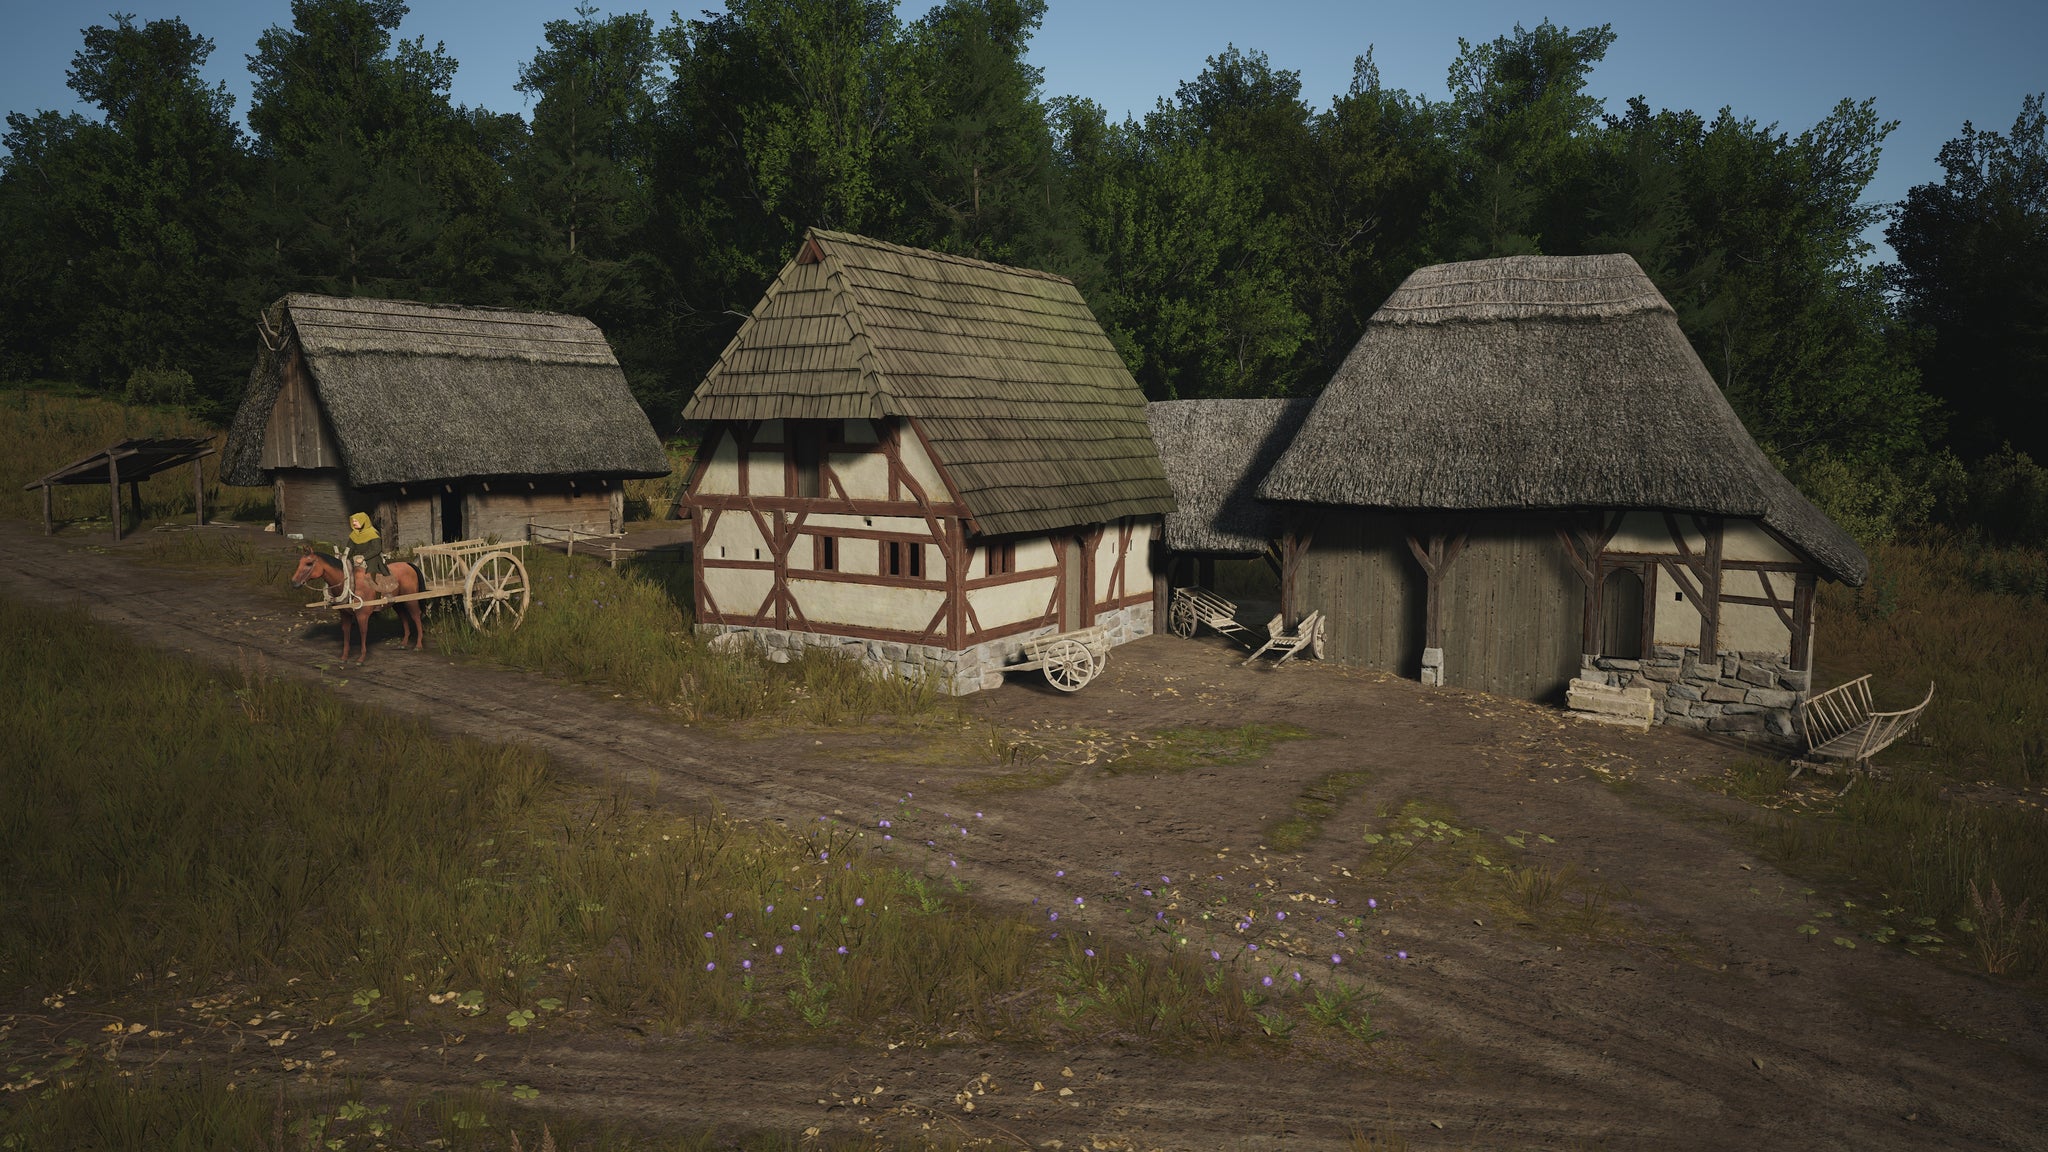
14. Don’t build more than you need
There’s little point in building something that’s just going to sit abandoned for the next hour or two. |Image credit:Rock Paper Shotgun/Hooded Horse
Have you ever stopped to ask yourself why you’re building that Malthouse before you’ve even got Barley? Or why you’ve got a Sheep Farm before you’ve imported any Sheep ? Most of the buildings in Manor Lords are available to build from the start of the game, which can trick you into thinking you should build them all as soon as possible. You don’t.
Building more than you need is a fantastic way to run yourself out of Timber and stall production of your settlement. Play it slow , and build what you need when you need it, and not before.
15. Get the right Development Points early on
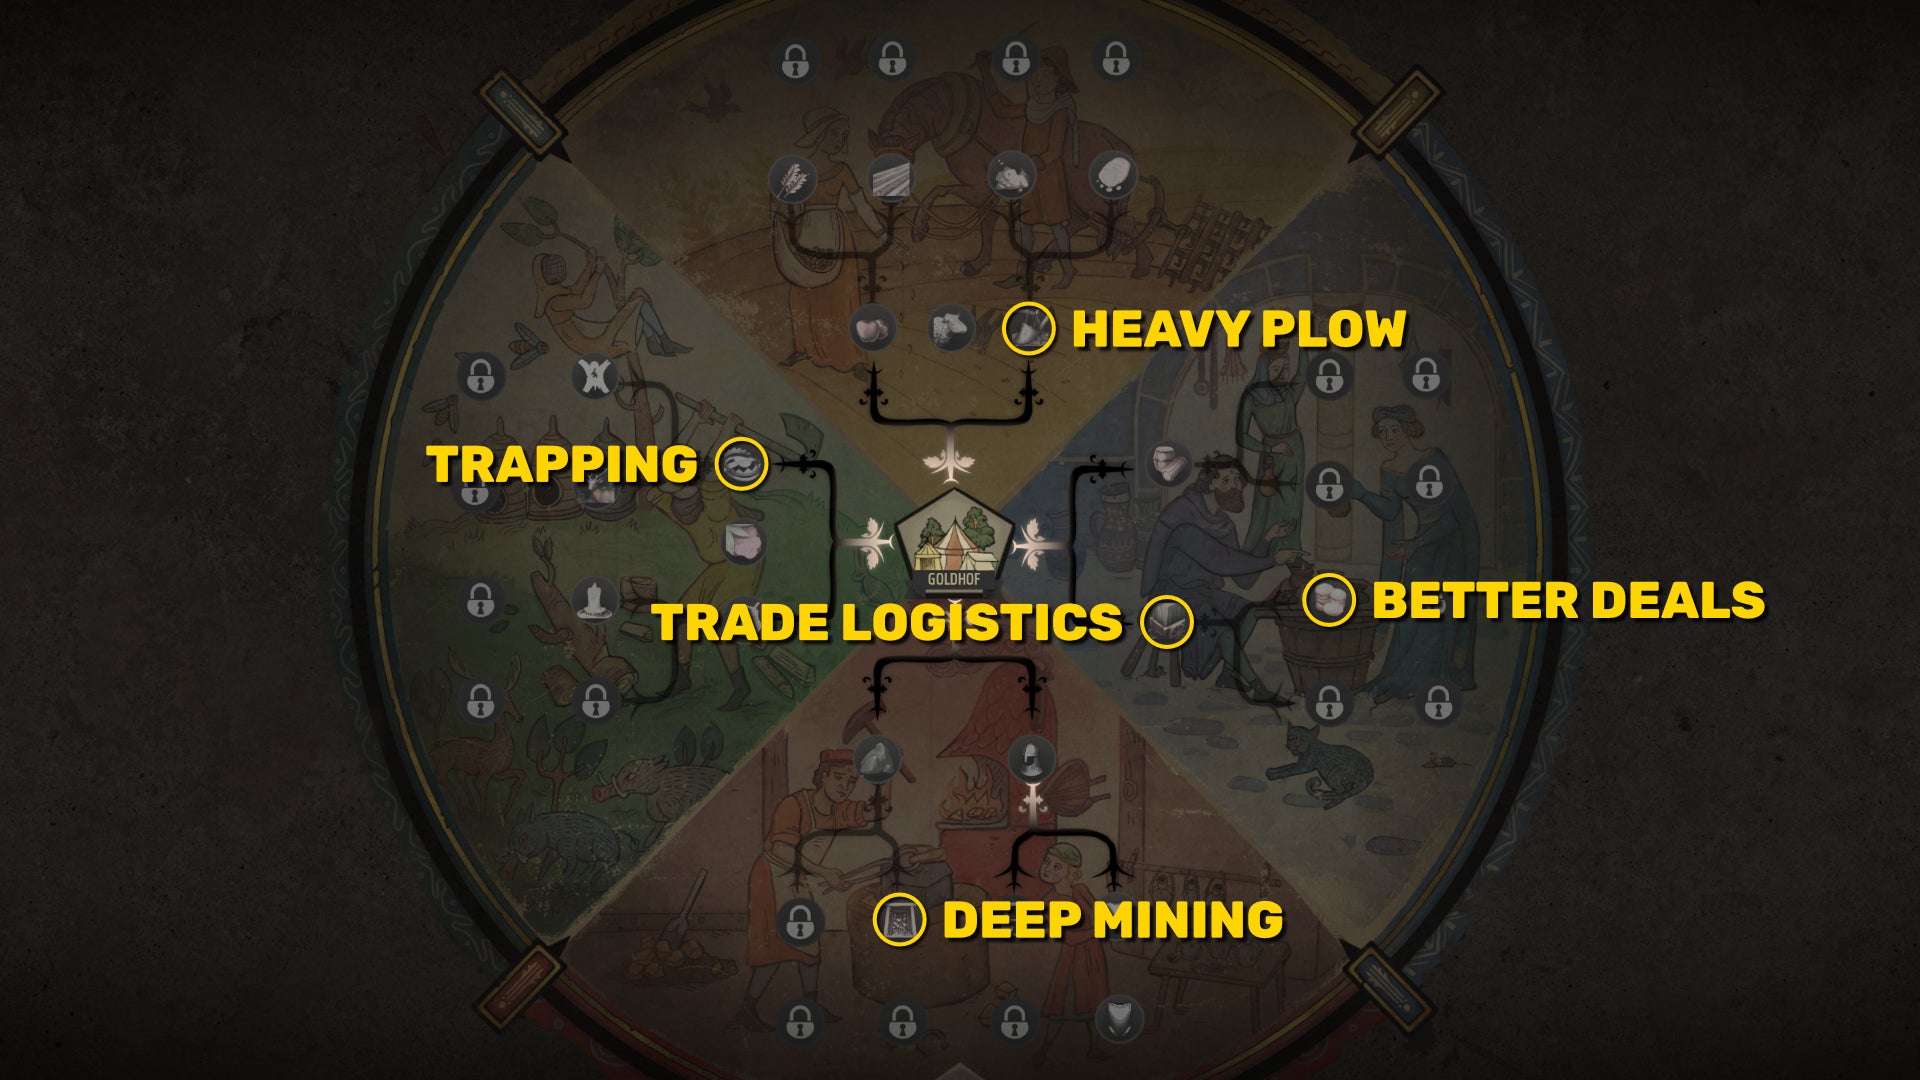
These are our recommendations for where to invest your Development Points first. |Image credit:Rock Paper Shotgun/Hooded Horse
Development Upgrades form the tech tree of Manor Lords, and some of them are very, very powerful. We go over the most important of them in our best Development Upgrades guide , so we won’t repeat ourselves here. But remember that, at least when you first start a Manor Lords game, Development Points are rare and precious, and you should invest them where they’re most needed. Having an Ox plough a farm sounds cool (and it is), but it might not be your top priority.
16. Deal with Bandits as they arrive
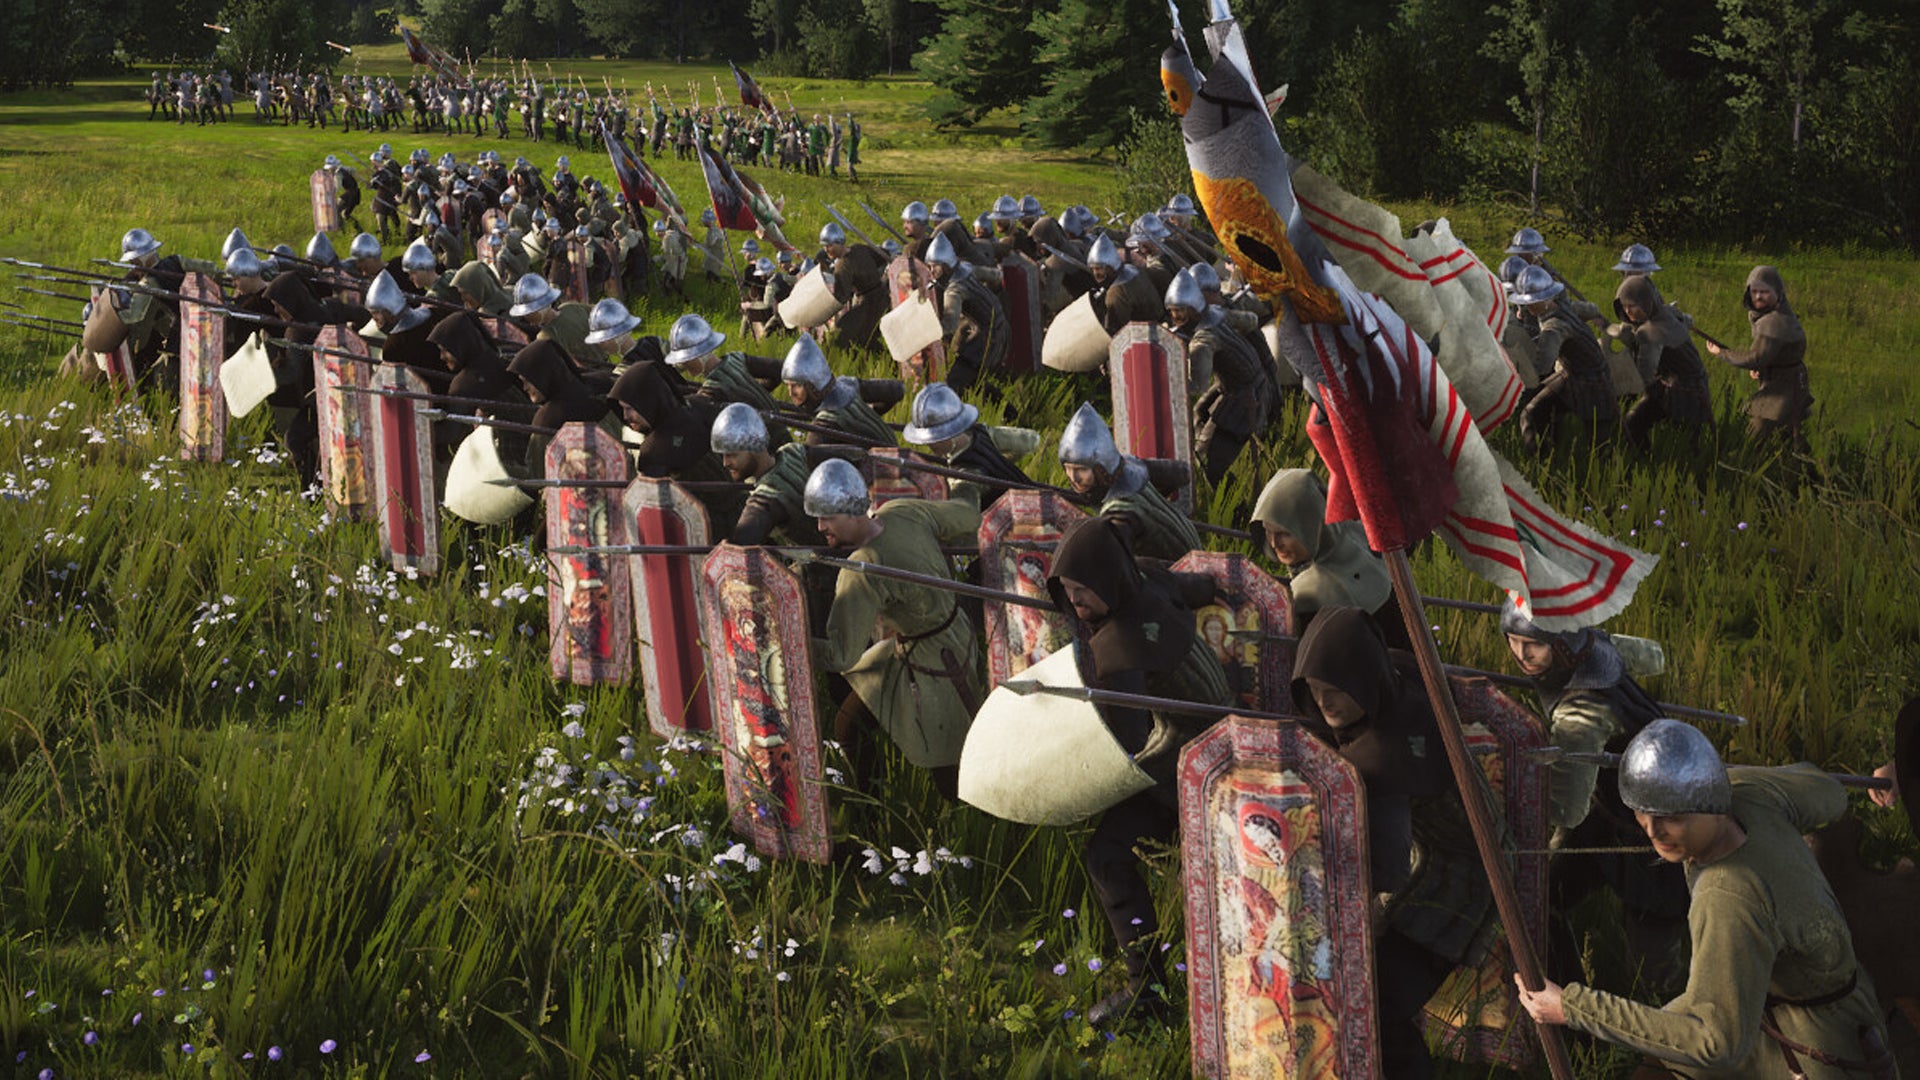
Bandits are easily dealt with by your armies; the trick is getting your army there before they wreak too much havoc. |Image credit:Hooded Horse
Your first brush with the Total War-esque combat of Manor Lords will likely come into play when Bandits first start appearing on your map. These Bandits should not be left alone to do their thing. The moment the first Bandit Camp appears nearby, you should make it your priority to import whatever equipment you need to raise an army and crush those Bandits without mercy.
Dealing with Bandits as quickly as possible is good for two reasons. First: it is the only way to prevent them from stealing your valuable resources. Banditry happens automatically ; there’s no stopping it until you destroy the Bandit Camp. And secondly, killing Bandits and plundering their camps is a great way to earn Treasury and Influence .
Bonus Manor Lords tips!
Finally, here’s a selection of more specific and advanced Manor Lords tips that we couldn’t fit into any of the sections above. How many do you know?
- Select the right starting scenario for your style of play. If you just want a relaxed city-building experience, go with “Rise To Prosperity”. For a combat-oriented challenge, pick “On The Edge”.
- Food production should always be your top priority, particularly at the start of a new game. Get multiple types of food up and running as quickly as possible, and let that guide your goals for the first few months.
- Demolishing a building refunds the full amount of resources. The only cost is in time taken to rebuild it elsewhere.
- If Wild Animals are quite far away from your starting location, you can chase them closer to your settlement by building in their habitat. Position your buildings so that the deer will run away from it and towards your base. After that you can delete the building for free.
- The Tannery is a good first Industry building to construct, because you’ll likely already have a surplus of Hides from the Wild Animals you’ve been killing (you monster). Turn the Hides into Leather at the Tannery, then sell them at a Trading Post for easy money.
- Firewood isn’t made from Timber, it’s made from the trees themselves. Build a Woodcutter’s Lodge (not a Logging Camp) near some trees and the families working there will chop trees just like with a Logging Camp, but convert the trees into Firewood instead of Timber.
- You can manually set the work area of a building (for example, tell a Logging Camp to only chop trees in a certain location). Do this using the buttons in the “Advanced” tab of the building. You can even hold CTRL and scroll your mouse wheel to increase or decrease the size of the area.
- Don’t neglect your Storehouse and Granary. Unlike with most city-builders, you actually need to assign families to these storage buildings in order for them to work. Families working there will also create Market Stalls selling key goods from those buildings.
- Upgrade your Storehouse before it overflows. A basic Storehouse only holds 250 items, while a Large Storehouse holds 2,500 items. So if you start seeing that pesky " Generic Storage Full " alert, you know what to do.
- Use the priority controls when building and farming to tell your Population the most important things to work on.
- You can click the button to the right of your settlement name at the top to switch your resources view between Surplus and Total. Hover over the button to see what this actually means.
- Try to earmark particular Burgage Plots for later Backyard Extensions. Once you upgrade a Burgage Plot to level 2, you’ll get a host of more interesting Backyard Extensions such as Blacksmiths for Tools and weapons, Cobblers for shoes, and more. But until then, don’t bother with any of the level 1 Extensions for that Burgage Plot, because you’ll just be throwing that Regional Wealth away when the time comes to tear it down and create a new Extension.
- Build a Trading Post right on the map border next to a trade area, and you’ll get to enjoy a ridiculous rate of import and export. Sneaky!
- Where possible, prioritise hiring Mercenaries over creating an army of your own. Mercenaries may cost a lot of Treasury, but your own armies cost something even dearer: your Population’s productivity, and possibly even their lives. While employed in an army, those people are literally taken away from their town, so there’ll be lots of jobs in the town going unfulfilled until they return. So if you need to take on a bunch of Raiders, then cough up the dough from your Treasury to employ Mercenaries rather than grinding your town’s productivity to a halt.
- If you run out of trees near your Logging Camp, it’s best to regrow them rather than demolishing the Logging Camp and building it elsewhere. When demolished, all the Timber will stay where it is as supplies out in the open, and there’s a chance they could be ruined by rain.
- Need lots of Influence? The fastest way is fighting, but the easiest way is by raising a Tithe. You can do this at your Manor once you’ve built one. The Tithe will convert a portion of your surplus food into Influence by sending it to the Church. It’s slow going at first, but later on when you have huge amounts of food, that will mean huge amounts of Influence.
- Control sickness with a varied diet. Multiple food sources will boost your Population’s immune system. And if they do fall ill, then you can upgrade a Forager Hut to gather Herbs with which to cure them.
- When the time comes to claim your second region of the map, look for resources that are lacking in your first region. If you don’t have a good Iron or Clay source, look for a region with one. Similarly, check out the fertility overlay to see what your first region is lacking, and which regions will make up for it.
- Click on the button in the top-right corner next to your portrait to start walking around your settlement in third-person !
- Hit CTRL+C to toggle the cinematic camera in Manor Lords, which will remove the UI and smooth camera movements. Great for screenshots and recording!

Manor Lords
PC
Rock Paper Shotgun is better when you sign in
Sign in and join us on our journey to discover strange and compelling PC games.

All 75 Arc Raiders Blueprints and where to get them
These areas have the highest chance of giving you Blueprints

Image credit:Rock Paper Shotgun/Embark Studios
Looking for more Arc Raiders Blueprints? It’s a special day when you find a Blueprint, as they’re among the most valuable items in Arc Raiders. If you find a Blueprint that you haven’t already found, then you must make sure you hold onto it at all costs, because Blueprints are the key to one of the most important and powerful systems of meta-progression in the game.
This guide aims to be the very best guide on Blueprints you can find, starting with a primer on what exactly they are and how they work in Arc Raiders, before delving into exactly where to get Blueprints and the very best farming spots for you to take in your search.
We’ll also go over how to get Blueprints from other unlikely activities, such as destroying Surveyors and completing specific quests. And you’ll also find the full list of all 75 Blueprints in Arc Raiders on this page (including the newest Blueprints added with the Cold Snap update , such as the Deadline Blueprint and Firework Box Blueprint), giving you all the information you need to expand your own crafting repertoire.
In this guide:
- What are Blueprints in Arc Raiders?
- Full Blueprint list: All crafting recipes
- Where to find Blueprints in Arc Raiders Blueprints obtained from quests Blueprints obtained from Trials Best Blueprint farming locations

What are Blueprints in Arc Raiders?
Blueprints in Arc Raiders are special items which, if you manage to extract with them, you can expend to permanently unlock a new crafting recipe in your Workshop. If you manage to extract from a raid with an Anvil Blueprint, for example, you can unlock the ability to craft your very own Anvil Pistol, as many times as you like (as long as you have the crafting materials).
To use a Blueprint, simply open your Inventory while in the lobby, then right-click on the Blueprint and click “Learn And Consume” . This will permanently unlock the recipe for that item in your Workshop. As of the Stella Montis update, there are allegedly 75 different Blueprints to unlock - although only 68 are confirmed to be in the game so far. You can see all the Blueprints you’ve found and unlocked by going to the Workshop menu, and hitting “R” to bring up the Blueprint screen.
It’s possible to find duplicates of past Blueprints you’ve already unlocked. If you find these, then you can either sell them, or - if you like to play with friends - you can take it into a match and gift it to your friend so they can unlock that recipe for themselves. Another option is to keep hold of them until the time comes to donate them to the Expedition.
Full Blueprint list: All crafting recipes
Below is the full list of all the Blueprints that are currently available to find in Arc Raiders, and the crafting recipe required for each item:
| Blueprint | Type | Recipe | Crafted At |
|---|---|---|---|
| Bettina | Weapon | 3x Advanced Mechanical Components 3x Heavy Gun Parts 3x Canister | Gunsmith 3 |
| Blue Light Stick | Quick Use | 3x Chemicals | Utility Station 1 |
| Aphelion | Weapon | 3x Magnetic Accelerator 3x Complex Gun Parts 1x Matriarch Reactor | Gunsmith 3 |
| Combat Mk. 3 (Flanking) | Augment | 2x Advanced Electrical Components 3x Processor | Gear Bench 3 |
| Combat Mk. 3 (Aggressive) | Augment | 2x Advanced Electrical Components 3x Processor | Gear Bench 3 |
| Complex Gun Parts | Material | 2x Light Gun Parts 2x Medium Gun Parts 2x Heavy Gun Parts | Refiner 3 |
| Fireworks Box | Quick Use | 1x Explosive Compound 3x Pop Trigger | Explosives Station 2 |
| Gas Mine | Mine | 4x Chemicals 2x Rubber Parts | Explosives Station 1 |
| Green Light Stick | Quick Use | 3x Chemicals | Utility Station 1 |
| Pulse Mine | Mine | 1x Crude Explosives 1x Wires | Explosives Station 1 |
| Seeker Grenade | Grenade | 1x Crude Explosives 2x ARC Alloy | Explosives Station 1 |
| Looting Mk. 3 (Survivor) | Augment | 2x Advanced Electrical Components 3x Processor | Gear Bench 3 |
| Angled Grip II | Mod | 2x Mechanical Components 3x Duct Tape | Gunsmith 2 |
| Angled Grip III | Mod | 2x Mod Components 5x Duct Tape | Gunsmith 3 |
| Hullcracker | Weapon | 1x Magnetic Accelerator 3x Heavy Gun Parts 1x Exodus Modules | Gunsmith 3 |
| Launcher Ammo | Ammo | 5x Metal Parts 1x Crude Explosives | Workbench 1 |
| Anvil | Weapon | 5x Mechanical Components 5x Simple Gun Parts | Gunsmith 2 |
| Anvil Splitter | Mod | 2x Mod Components 3x Processor | Gunsmith 3 |
| ??? | ??? | ??? | ??? |
| Barricade Kit | Quick Use | 1x Mechanical Components | Utility Station 2 |
| Blaze Grenade | Grenade | 1x Explosive Compound 2x Oil | Explosives Station 3 |
| Bobcat | Weapon | 3x Advanced Mechanical Components 3x Light Gun Parts | Gunsmith 3 |
| Osprey | Weapon | 2x Advanced Mechanical Components 3x Medium Gun Parts 7x Wires | Gunsmith 3 |
| Burletta | Weapon | 3x Mechanical Components 3x Simple Gun Parts | Gunsmith 1 |
| Compensator II | Mod | 2x Mechanical Components 4x Wires | Gunsmith 2 |
| Compensator III | Mod | 2x Mod Components 8x Wires | Gunsmith 3 |
| Defibrillator | Quick Use | 9x Plastic Parts 1x Moss | Medical Lab 2 |
| ??? | ??? | ??? | ??? |
| Equalizer | Weapon | 3x Magnetic Accelerator 3x Complex Gun Parts 1x Queen Reactor | Gunsmith 3 |
| Extended Barrel | Mod | 2x Mod Components 8x Wires | Gunsmith 3 |
| Extended Light Mag II | Mod | 2x Mechanical Components 3x Steel Spring | Gunsmith 2 |
| Extended Light Mag III | Mod | 2x Mod Components 5x Steel Spring | Gunsmith 3 |
| Extended Medium Mag II | Mod | 2x Mechanical Components 3x Steel Spring | Gunsmith 2 |
| Extended Medium Mag III | Mod | 2x Mod Components 5x Steel Spring | Gunsmith 3 |
| Extended Shotgun Mag II | Mod | 2x Mechanical Components 3x Steel Spring | Gunsmith 2 |
| Extended Shotgun Mag III | Mod | 2x Mod Components 5x Steel Spring | Gunsmith 3 |
| Remote Raider Flare | Quick Use | 2x Chemicals 4x Rubber Parts | Utility Station 1 |
| Heavy Gun Parts | Material | 4x Simple Gun Parts | Refiner 2 |
| Venator | Weapon | 2x Advanced Mechanical Components 3x Medium Gun Parts 5x Magnet | Gunsmith 3 |
| Il Toro | Weapon | 5x Mechanical Components 6x Simple Gun Parts | Gunsmith 1 |
| Jolt Mine | Mine | 1x Electrical Components 1x Battery | Explosives Station 2 |
| Explosive Mine | Mine | 1x Explosive Compound 1x Sensors | Explosives Station 3 |
| Jupiter | Weapon | 3x Magnetic Accelerator 3x Complex Gun Parts 1x Queen Reactor | Gunsmith 3 |
| Light Gun Parts | Material | 4x Simple Gun Parts | Refiner 2 |
| Lightweight Stock | Mod | 2x Mod Components 5x Duct Tape | Gunsmith 3 |
| Lure Grenade | Grenade | 1x Speaker Component 1x Electrical Components | Utility Station 2 |
| Medium Gun Parts | Material | 4x Simple Gun Parts | Refiner 2 |
| Torrente | Weapon | 2x Advanced Mechanical Components 3x Medium Gun Parts 6x Steel Spring | Gunsmith 3 |
| Muzzle Brake II | Mod | 2x Mechanical Components 4x Wires | Gunsmith 2 |
| Muzzle Brake III | Mod | 2x Mod Components 8x Wires | Gunsmith 3 |
| Padded Stock | Mod | 2x Mod Components 5x Duct Tape | Gunsmith 3 |
| Shotgun Choke II | Mod | 2x Mechanical Components 4x Wires | Gunsmith 2 |
| Shotgun Choke III | Mod | 2x Mod Components 8x Wires | Gunsmith 3 |
| Shotgun Silencer | Mod | 2x Mod Components 8x Wires | Gunsmith 3 |
| Showstopper | Grenade | 1x Advanced Electrical Components 1x Voltage Converter | Explosives Station 3 |
| Silencer I | Mod | 2x Mechanical Components 4x Wires | Gunsmith 2 |
| Silencer II | Mod | 2x Mod Components 8x Wires | Gunsmith 3 |
| Snap Hook | Quick Use | 2x Power Rod 3x Rope 1x Exodus Modules | Utility Station 3 |
| Stable Stock II | Mod | 2x Mechanical Components 3x Duct Tape | Gunsmith 2 |
| Stable Stock III | Mod | 2x Mod Components 5x Duct Tape | Gunsmith 3 |
| Tagging Grenade | Grenade | 1x Electrical Components 1x Sensors | Utility Station 3 |
| Tempest | Weapon | 3x Advanced Mechanical Components 3x Medium Gun Parts 3x Canister | Gunsmith 3 |
| Trigger Nade | Grenade | 2x Crude Explosives 1x Processor | Explosives Station 2 |
| Vertical Grip II | Mod | 2x Mechanical Components 3x Duct Tape | Gunsmith 2 |
| Vertical Grip III | Mod | 2x Mod Components 5x Duct Tape | Gunsmith 3 |
| Vita Shot | Quick Use | 2x Antiseptic 1x Syringe | Medical Lab 3 |
| Vita Spray | Quick Use | 3x Antiseptic 1x Canister | Medical Lab 3 |
| Vulcano | Weapon | 1x Magnetic Accelerator 3x Heavy Gun Parts 1x Exodus Modules | Gunsmith 3 |
| Wolfpack | Grenade | 2x Explosive Compound 2x Sensors | Explosives Station 3 |
| Red Light Stick | Quick Use | 3x Chemicals | Utility Station 1 |
| Smoke Grenade | Grenade | 14x Chemicals 1x Canister | Utility Station 2 |
| Deadline | Mine | 3x Explosive Compound 2x ARC Circuitry | Explosives Station 3 |
| Trailblazer | Grenade | 1x Explosive Compound 1x Synthesized Fuel | Explosives Station 3 |
| Tactical Mk. 3 (Defensive) | Augment | 2x Advanced Electrical Components 3x Processor | Gear Bench 3 |
| Tactical Mk. 3 (Healing) | Augment | 2x Advanced Electrical Components 3x Processor | Gear Bench 3 |
| Yellow Light Stick | Quick Use | 3x Chemicals | Utility Station 1 |
Note: The missing Blueprints in this list likely have not actually been added to the game at the time of writing, because none of the playerbase has managed to find any of them. As they are added to the game, I will update this page with the most relevant information so you know exactly how to get all 75 Arc Raiders Blueprints.
Where to find Blueprints in Arc Raiders
Below is a list of all containers, modifiers, and events which maximise your chances of finding Blueprints:
- Certain quests reward you with specific Blueprints .
- Completing Trials has a high chance of offering Blueprints as rewards.
- Surveyors have a decent chance of dropping Blueprints on death.
- High loot value areas tend to have a greater chance of spawning Blueprints.
- Night Raids and Storms may increase rare Blueprint spawn chances in containers.
- Containers with higher numbers of items may have a higher tendency to spawn Blueprints. As a result, Blue Gate (which has many “large” containers containing multiple items) may give you a higher chance of spawning Blueprints.
- Raider containers (Raider Caches, Weapon Boxes, Medical Bags, Grenade Tubes) have increased Blueprint drop rates. As a result, the Uncovered Caches event gives you a high chance of finding Blueprints.
- Security Lockers have a higher than average chance of containing Blueprints.
- Certain Blueprints only seem to spawn under specific circumstances: Tempest Blueprint only spawns during Night Raid events. Vulcano Blueprint only spawns during Hidden Bunker events. Jupiter and Equaliser Blueprints only spawn during Harvester events.

Raider Caches, Weapon Boxes, and other raider-oriented container types have a good chance of offering Blueprints. |Image credit:Rock Paper Shotgun/Embark Studios
Blueprints have a very low chance of spawning in any container in Arc Raiders, around 1-2% on average. However, there is a higher chance of finding Blueprints in particular container types. Specifically, you can find more Blueprints in Raider containers and security lockers.
Beyond this, if you’re looking for Blueprints you should focus on regions of the map which are marked as having particularly high-value loot. Areas such as the Control Tower in Dam Battlegrounds, the Arrival and Departure Buildings in Spaceport, and Pilgrim’s Peak in Blue Gate all have a better-than-average chance of spawning Blueprints somewhere amongst all their containers. Night Raids and Electromagnetic Storm events also increase the drop chances of certain Blueprints .
In addition to these containers, you can often loot Blueprints from destroyed Surveyors - the largest of the rolling ball ARC. Surveyors are more commonly found on the later maps - Spaceport and Blue Gate - and if one spawns in your match, you’ll likely see it by the blue laser beam that it casts into the sky while “surveying”.
Surveyors are quite well-armoured and will very speedily run away from you once it notices you, but if you can take one down then make sure you loot all its parts for a chance of obtaining certain unusual Blueprints.
Blueprints obtained from quests
One way in which you can get Blueprints is by completing certain quests for the vendors in Speranza. Some quests will reward you with a specific item Blueprint upon completion, so as long as you work through all the quests in Arc Raiders, you are guaranteed those Blueprints.
Here is the full list of all Blueprints you can get from quest rewards:
- Trigger Nade Blueprint: Rewarded after completing “Sparks Fly”.
- Lure Grenade Blueprint: Rewarded after completing “Greasing Her Palms”.
- Burletta Blueprint: Rewarded after completing “Industrial Espionage”.
- Hullcracker Blueprint (and Launcher Ammo Blueprint): Rewarded after completing “The Major’s Footlocker”.
Alas, that’s only 4 Blueprints out of a total of 75 to unlock, so for the vast majority you will need to find them yourself during a raid. If you’re intent on farming Blueprints, then it’s best to equip yourself with cheap gear in case you lose it, but don’t use a free loadout because then you won’t get a safe pocket to stash any new Blueprint you find. No pain in Arc Raiders is sharper than failing to extract with a new Blueprint you’ve been after for a dozen hours already.

One of the best ways to get Blueprints is by hitting three stars on all five Trials every week. |Image credit:Rock Paper Shotgun/Embark Studios
Blueprints obtained from Trials
One of the very best ways to get Blueprints is as rewards for completing Trials in Arc Raiders. Trials are unlocked from Level 15 onwards, and allow you to earn rewards by focusing on certain tasks over the course of several raids. For example, one Trial might task you with dealing damage to Hornets, while another might challenge you to loot Supply Drops.
Trials refresh on a weekly basis, with a new week bringing five new Trials. Each Trial can offer up to three rewards after passing certain score milestones, and it’s possible to receive very high level loot from these reward crates - including Blueprints. So if you want to unlock as many Blueprints as possible, you should make a point of completing as many Trials as possible each week.
Best Blueprint farming locations
The very best way to get Blueprints is to frequent specific areas of the maps which combine high-tier loot pools with the right types of containers to search. Here are my recommendations for where to find Blueprints on every map, so you can always keep the search going for new crafting recipes to unlock.

Image credit:Rock Paper Shotgun/Embark Studios
Dam Battlegrounds
The best places to farm Blueprints on Dam Battlegrounds are the Control Tower, Power Generation Complex, Ruby Residence, and Pale Apartments . The first two regions, despite only being marked on the map as mid-tier loot, contain a phenomenal number of containers to loot. The Control Tower can also contain a couple of high-tier Security Lockers - though of course, you’ll need to have unlocked the Security Breach skill at the end of the Survival tree.
There’s also a lot of reporting amongst the playerbase that the Residential areas in the top-left of the map - Pale Apartments and Ruby Residence - give you a comparatively strong chance of finding Blueprints. Considering their size, there’s a high density of containers to loot in both locations, and they also have the benefit of being fairly out of the way. So you’re more likely to have all the containers to yourself.
Buried City
The best Blueprint farming locations on Buried City are the Santa Maria Houses, Grandioso Apartments, Town Hall, and the various buildings of the New District . Grandioso Apartments has a lower number of containers than the rest, but a high chance of spawning weapon cases - which have good Blueprint drop rates. The others are high-tier loot areas, with plenty of lootable containers - including Security Lockers.
Spaceport
The best places to find Blueprints on Spaceport are the Arrival and Departure Buildings, as well as Control Tower A6 and the Launch Towers . All these areas are labelled as high-value loot regions, and many of them are also very handily connected to one another by the Spaceport wall, which you can use to quickly run from one area to the next. At the tops of most of these buildings you’ll find at least one Security Locker, so this is an excellent farming route for players looking to find Blueprints.
The downside to looting Blueprints on Spaceport is that all these areas are hotly contested, particularly in Duos and Squads. You’ll need to be very focused and fast in order to complete the full farming route.

Image credit:Rock Paper Shotgun/Embark Studios
Blue Gate
Blue Gate tends to have a good chance of dropping Blueprints, potentially because it generally has a high number of containers which can hold lots of items; so there’s a higher chance of a Blueprint spawning in each container. In my experience, the best Blueprint farming spots on Blue Gate are Pilgrim’s Peak, Raider’s Refuge, the Ancient Fort, and the Underground Complex beneath the Warehouse .
All of these areas contain a wealth of containers to loot. Raider’s Refuge has less to loot, but the majority of the containers in and around the Refuge are raider containers, which have a high chance of containing Blueprints - particularly during major events.
Stella Montis
On the whole, Stella Montis seems to have a very low drop rate for Blueprints (though a high chance of dropping other high-tier loot). If you do want to try farming Blueprints on this map, the best places to find Blueprints in Stella Montis are Medical Research, Assembly Workshop, and the Business Center . These areas have the highest density of containers to loot on the map.
In addition to this, the Western Tunnel has a few different Security Lockers to loot, so while there’s very little to loot elsewhere in this area of the map, it’s worth hitting those Security Lockers if you spawn there at the start of a match.
That wraps up this primer on how to get all the Blueprints in Arc Raiders as quickly as possible. With the Expedition system constantly resetting a large number of players’ Blueprints, it’s more important than ever to have the most up-to-date information on where to find all these Blueprints.
While you’re here, be sure to check out our Arc Raiders best guns tier list , as well as our primers on the best skills to unlock and all the different Field Depot locations on every map.

ARC Raiders
PS5 , Xbox Series X/S , PC
Rock Paper Shotgun is better when you sign in
Sign in and join us on our journey to discover strange and compelling PC games.
